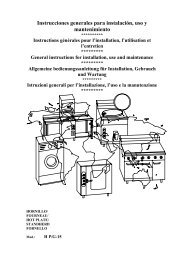
General instructions for installation, use and maintenance - fagor
General instructions for installation, use and maintenance - fagor
General instructions for installation, use and maintenance - fagor

You also want an ePaper? Increase the reach of your titles
YUMPU automatically turns print PDFs into web optimized ePapers that Google loves.
<strong>General</strong> <strong>instructions</strong> <strong>for</strong> <strong>installation</strong>, <strong>use</strong> <strong>and</strong><br />
<strong>maintenance</strong><br />
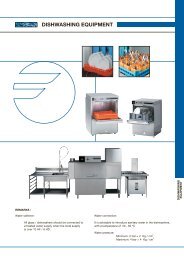
RACK MODULAR CONVEYOR DISHWASHERS /<br />
Mods.: FI - 280<br />
FI - 370<br />
FI – 460<br />
FI – 550 Z - 316102
FI – 280 D<br />
FI – 280 I<br />
1
FI – 370 D<br />
FI – 370 I<br />
2
FI – 460 D<br />
FI – 460 I<br />
3
L Largas<br />
Longs<br />
Long<br />
Langer<br />
Tendine lunghe<br />
Figs. 1<br />
FI – 550 D<br />
FI – 550 I<br />
A1: Toma de agua-Prise d’eau-Water inlet-Wasseranschluß- Presa dell’acqua<br />
D1, D2, D3: Desagüe Ø 38-Vidange Ø 38-Drainage Ø 38- Wasserauslauf Ø 38- Scarico Ø 38<br />
E: Conexión eléctrica-Raccordem. Elect.-Electrical connection- Elektrischer Anschluß- Connessione elettrica<br />
4<br />
C Cortas<br />
Courts<br />
Short<br />
Kurzer<br />
Tendine corte
Fig. 2<br />
MOD.<br />
Fig. 5<br />
Fig. 3 Fig. 4<br />
S=Llave de paso-Robinet d’arret-Stopcock-Überströmventil-Rubinetto di arresto E=Electroválvula-Electrovanne-Electrovalve-Elektroventil-Elettrovalvola<br />
B=Electrobomba-Electropompe-Electropump-Druckerhöhungspumpe-Elettropompa H=Manguera-Tuyau-Hose-Schlauch-Tubo<br />
R=Regulador de presión-Régulateur de pression-Pressure regulator F=Filtro-Filtre-Filter-Filter-Filtro<br />
Druckregler-Regolatore pressione<br />
D=Manguera desagüe-Tuyau de vidange-Drain hose-Ablaßschlauch-Tubo di scarico<br />
C=Desagüe-Vidange-Drainage-Wasserauslauf-Scarico<br />
380-415 V - 3N 220V - 3<br />
Manguera = M Fusible = F Manguera = M Fusible = F<br />
FI - 280 4x25 mm² + T 100 A 3x50 mm² + T 160 A<br />
FI – 280 + T.S. 4x35 mm² + T 125 A 3x70 mm² + T 200 A<br />
FI – 370 4x25 mm² + T 125 A 3x50 mm² + T 160 A<br />
FI – 370 + T.S. 4x35 mm² + T 125 A 3x70 mm² + T 200 A<br />
FI – 460 4x25 mm² + T 125 A 3x70 mm² + T 200 A<br />
FI – 460 + T.S. 4x35 mm² + T 160 A 3x95 mm² + T 250 A<br />
FI – 550 4x35 mm² + T 125 A 3x70 mm² + T 200 A<br />
FI – 550 + T.S. 4x50 mm² + T 160 A 3x95 mm² + T 300 A<br />
Fig. 7<br />
5<br />
380-415V.-3N 220V.-3~<br />
Fig. 6
Fig. 10<br />
Fig. 14<br />
Fig. 18<br />
Fig. 11<br />
Fig. 15<br />
Fig. 8<br />
Fig. 9<br />
Dosificador abrillantador<br />
Dosseur de tensoactif<br />
Rinse doser<br />
Klarspülmittel-dosierung<br />
Dosatore del brillantante<br />
Dosificador detergente<br />
Dosseur de détergent<br />
Detergent doser<br />
Spülmittel-dosierung<br />
Dosatore del detersivo<br />
6<br />
Fig. 12 Fig. 13<br />
Fig. 16 Fig. 17<br />
Fig. 19<br />
Micro fin recorrido<br />
Micro din de course<br />
Safety end switch<br />
Scherheits-Abschlußschalter<br />
Microinterruttore di finecorsa
Tornillo lateral<br />
Vis laterale<br />
Side bolt<br />
Seitliche Schraube<br />
Vite laterale<br />
Fig. 20<br />
Llave dinamométrica<br />
Cle dynamometrique<br />
Torque wrench<br />
Dynamometrischer Schlüssel<br />
Chiave dinamometrica<br />
Llave de uña<br />
Cle a ergot<br />
“C” Wrench<br />
Greifschlüssel<br />
Chiave fissa a “C”<br />
Fig. 22<br />
Tornillo superior<br />
Vis superieure<br />
Top bolt<br />
Obere Schraube<br />
Vite superiore<br />
7<br />
Aflojar<br />
Desserrer<br />
Loosen<br />
Lockern<br />
Allentare<br />
Fig. 23<br />
Fig. 21<br />
Apretar<br />
Serrer<br />
Tighten<br />
Anziehen<br />
Stringere<br />
Apretar<br />
Serrer<br />
Tighten<br />
Anziehen<br />
Stringere
MODEL<br />
− 1.- INSTALLATION<br />
1.1.- Installation Diagrams<br />
Ver Figs. 1.<br />
1.2.- Positioning<br />
Level <strong>and</strong> adjust the height of the appliance. (Fig. 2).<br />
1.3.- Water connection<br />
It must be carried out as shown in figures 3 <strong>and</strong> 4, with water at room temperature.<br />
Dynamic pressure required during rinsing: 2 ÷ 4 Kg/cm 2 (28÷56psi).If pressure is lower<br />
than Kg/cm 2 , install a pressure electrical pump. (Fig. 4) The appliances have a pressure<br />
regulator (R) <strong>and</strong> a manometer (M) serially tared at 2Kg/cm 2 (Fig. 3).<br />
When appliances have an energy recuperator, the pressure during rinsing will be 3 ÷ 5<br />
Kg/cm 2 (42÷70 psi).<br />
When the water hardness level is above 10ºF, a water softener should be installed.<br />
1.4.- Drainage<br />
a) Fix the draining hose (D) to drainage (C) as shown in Fig. 5.<br />
b) Position a syphon (T) tube so as to avoid nasty smells.<br />
1.5.- Technical specifications<br />
Water<br />
inlet<br />
pressure<br />
Electric Power Kw<br />
Drain hose<br />
Absorbed<br />
Supply<br />
voltage<br />
Prewash Wash 1<br />
Pre-<br />
Wash 2<br />
rinse<br />
Drum<br />
8<br />
Max.<br />
Resistance<br />
Square<br />
Basket<br />
(mm)<br />
Rinse water<br />
consumption<br />
FI - 280 - - 12 5 27 46.2 259<br />
2<br />
360 l/h<br />
FI - 370 - - 12 5 27 47.4<br />
381<br />
> 38<br />
500x500<br />
FI - 460 - - 12 5 34.5 55.9 434<br />
FI - 550 2 ÷ 4 Kg/cm<br />
(28 – 56 psi)<br />
380-415 V – 3N<br />
220 V – 3<br />
(50-60 Hz)<br />
- 6 12 5 34.5 63.1<br />
450 l/h<br />
1.6.- Electrical connection<br />
− Gain access the connection strip (E), (Fig. 1 <strong>and</strong> 6) by removing electrical panel cover<br />
(Figs. 1) Connect the hose to the strip marked with letters RSTN <strong>and</strong>/or (L1, L2, L3), as<br />
shown in Fig. 6.<br />
− Fit a general switch (I) independent of the appliance with a distance between contacts<br />
equal to or greater than 3 mm. (Fig. 7) to the mains socket, as well as a 300 mA<br />
differential switch.<br />
− The machine must be earthed.<br />
− A polychloroprene insulated cable or one made from a similar material should be <strong>use</strong>d<br />
(H05RN-F)<br />
Net<br />
Weight<br />
(Kg.)<br />
556
2.- USE<br />
1 st . FILLING. Set the selector dial (1), (Fig. 8) to the preparation position (∇) (2). The pilot<br />
light will come on (3) <strong>and</strong> the filling of the of the Boiler <strong>and</strong> the wash tank will start.<br />
Once full of water, turn the right thermostat control to 90ºC (Fig. 9).<br />
This operation will be only carried out when the appliance is installed <strong>for</strong> the first time or<br />
when the Boiler resistances are changed.<br />
FURTHER FILLINGS.Set the selector dial (1), (Fig. 8) to the preparation position (∇) (2).<br />
The pilot light will come on (3) <strong>and</strong> the filling <strong>and</strong> heating of the rinse <strong>and</strong> wash water<br />
starts. The appliance is ready when the rinse thermometer (4) displays 85÷90ºC <strong>and</strong> the<br />
wash thermometer (5) displays 55 ÷ 60ºC.<br />
Washing cycles.<br />
FI-280; FI-370; FI-460 y FI-550.<br />
Set the selector (1) to position (I) or (II) (Fig. 8).The advance starts <strong>and</strong> the pilot light<br />
comes on (6).<br />
It has 2 advance speeds:<br />
− Selector set to position (I), slow speed <strong>for</strong> a more intensive wash. (Fig.8).<br />
− Selector set to position (II), fast speed to wash less dirty crockery. (Fig.8).<br />
Washing starts when the basket is put in. Pre-rinsing <strong>and</strong> Rinsing start automatically when<br />
the basket reaches the pre-rinse area.<br />
2.1.- Washing hints<br />
− Pour the correct doses of detergent into the dispenser drawer, as indicated by the<br />
manufacturer. Use a lather-controlled detergent.<br />
− Control <strong>and</strong> maintain the rinse aid level in the tank.<br />
− To interrupt the wash <strong>and</strong> the conveying of baskets, set the selector (1) to the<br />
´0´position.<br />
Be<strong>for</strong>e washing.<br />
Ensure that:<br />
− The tub <strong>and</strong> pump suction filters are in place..<br />
− The spill doors are in place.<br />
− The curtains are placed correctly.<br />
− The doors are closed..<br />
− The detergent <strong>and</strong> rinse-aid dispensers are full.<br />
− The dimensions of the items to be washed are not greater than the dishwasher’s working<br />
dimensions.<br />
Preparing the crockery<br />
− Remove the thicker residues from the dishes be<strong>for</strong>e placing them in the baskets.<br />
− Soak the cutlery <strong>and</strong> even the plates when they are to be washed after a long period of<br />
time.<br />
− Wash glassware first (Fig.10).<br />
− Place the cups <strong>and</strong> glasses face down.<br />
− Place the dishes in the barbed racks, as shown in the figure. (Fig. 11).<br />
− Place the pieces of cutlery in the suitable receptacles, with the h<strong>and</strong>les face down<br />
(Fig.12). Place spoons, <strong>for</strong>ks <strong>and</strong> knives in the same place.<br />
− Put the special cutlery holders in the base baskets or in the baskets with 16 spaces.<br />
9
During the washing cycle.<br />
− Only <strong>use</strong> specific anti-foaming detergents <strong>for</strong> commercial dishwashers, supplied by<br />
well-respected companies.<br />
− Disconnect the apparatus if it does not work correctly or there is a fault. For any<br />
eventual repair, only <strong>use</strong> an authorised technical assistance centre <strong>and</strong> request the <strong>use</strong> of<br />
original spares.<br />
− Stop the machine periodically, remove the filters from the tub <strong>and</strong> clean the residues that<br />
are deposited on them. Do not remove the suction filters from the pump when the tub is<br />
full.<br />
− Check the level of detergent <strong>and</strong> rinse-aid in their respective containers.<br />
After the washing cycle.<br />
− Turn the switch to position “0” to turn the machine off (Fig. 8).<br />
− Open the door <strong>and</strong> secure it with the fixing stop.<br />
− Remove the spill door to empty the tub.<br />
− When the tub is empty, remove the curtains <strong>and</strong> the filters to clean them appropriately<br />
(Fig. 14 <strong>and</strong> Fig. 15).<br />
− Clean the washing <strong>and</strong> rinsing injectors.<br />
− Clean the tub appropriately with a water jet, removing all the residues that are stuck to it.<br />
− Clean the racks daily (Fig.13).<br />
− For machines with steam condenser, remove the suction filter <strong>and</strong> clean it.<br />
− Re-assemble all the devices in their correct place, keeping in mind the following:<br />
− The short side of curtains should face towards the dishes entrance.<br />
− The nozzles should be aimed towards the dishes.<br />
− Leave the doors open to avoid bad smells <strong>for</strong>ming.<br />
2.2.- Energy economizer<br />
− The machine works only when the baskets are inserted.<br />
2.3.- Dispensers<br />
− The machine is not fitted with detergent or rinse aid dispensers. These are necessary <strong>for</strong><br />
a correct final wash <strong>and</strong> rinse.<br />
− Their positioning <strong>and</strong> regulation must be done by an authorised technician.<br />
− The conections between the detergent doser, the rinse doser <strong>and</strong> the safety end switch<br />
with the binding clamp should be done as shown in picture 19.<br />
10
3.- MAINTENANCE<br />
− In appliances with no detergent dispensers, pour a dose every 10 baskets.<br />
− Control the rinse aid tank level.<br />
− Check <strong>and</strong> clean the injectors frequently.<br />
− If the appliance is not going to be <strong>use</strong>d <strong>for</strong> a long time, cover its surfaces with a coat of<br />
vaseline.<br />
− Do not <strong>use</strong> the machine to wash iron objects.<br />
− Do not <strong>use</strong> corrosive products, such as hypo-sodium chloride (bleach), hydrochloric<br />
acid, acids in general, steel wool or scrapers, <strong>for</strong> the internal <strong>and</strong> external cleaning of the<br />
machines.<br />
Prolonged dis<strong>use</strong> of the machine:<br />
If the machine is not <strong>use</strong>d <strong>for</strong> a long time it is advisable to start the machine with clean<br />
water while it is empty, to avoid unpleasant smells <strong>for</strong>ming <strong>and</strong> dirt accumulating.<br />
3.1.- Electrical <strong>and</strong> Mechanical Faults<br />
Be<strong>for</strong>e calling the Service Center, check <strong>for</strong> the following conditions:<br />
− If the machine is plugged in to the power supply.<br />
− The state of the f<strong>use</strong>s.<br />
− The voltage coincides with that of the machine.<br />
If the pre-rinse is poor, check:<br />
− The motor pump works correctly.<br />
− The nozzles are not blocked. Clean if necessary <strong>and</strong> put them back properly (Fig.16, 17).<br />
If it does not wash properly, check:<br />
− The washing arms are not blocked. Remove them as shown in figure 18, clean them if<br />
necessary <strong>and</strong> put them back.<br />
− The tray (Fig. 13) <strong>and</strong> the filter (Fig. 14 <strong>and</strong> 15) are not blocked <strong>and</strong> they are suitably<br />
fitted.<br />
If the rinse is poor, check:<br />
− The water inlet filter is not blocked. The mains water pressure is between 2 ÷ 4 Kg/cm 2<br />
(28 ÷ 56 psi).<br />
− The nozzles are not blocked. Clean if necessary <strong>and</strong> put them back properly (Fig.16, 17).<br />
− The rinse aid dose.<br />
11
INSTRUCTIONS FOR ADJUSTING THE CLUTCH OF CONVEYOR DISHWASHERS<br />
Should it be necessary to adjust the clutch, proceed as follows:<br />
Loosen the bolt on the top of the clutch with a no. 13 wrench <strong>and</strong> with a no. 4 Allen<br />
wrench, loosen the side bolt. (Fig 20, Fig. 21)<br />
With a torque wrench adjusted to 12 Nm <strong>and</strong> a “C” wrench (Fig. 22) which will hook onto<br />
one of the lateral holes of the clutch, tighten this clockwise until the torque wrench<br />
indicates that the required torque has been reached (the end of the wrench “clicks”). (Fig.<br />
23).<br />
Once this has been done, tighten the top <strong>and</strong> lateral bolts. (Fig 20, Fig. 21)<br />
Should a torque wrench not be available, tighten only with the “C” wrench <strong>and</strong> then check<br />
the tightness with the dishwasher loaded with baskets <strong>and</strong> dishes.<br />
3.2.- Optional accessories<br />
The following optional accessories can be implemented in all the appliances (depending on<br />
the model):<br />
− Drying tunnel 9,000 W.<br />
− Drying tunnel 13,500 W.<br />
− Fume condenser.<br />
− Energy recuperator.<br />
− Entry-exit tunnel, equipped with flue to be fitted to fume extractor.<br />
− Pressure electrical pump.<br />
12