Ethernet Configuration and Control, cont'd - Extron Electronics
Ethernet Configuration and Control, cont'd - Extron Electronics Ethernet Configuration and Control, cont'd - Extron Electronics
PRELIMINARY Ethernet Configuration and Control, cont’d 4-22 2. From the drop-down menus, select the time (hour, minutes, and AM or PM) at which you want executive mode enabled or disabled. 3. Select the check box(es) for the day(s) of the week you want executive mode to be turned on or off at the time you specified. 4. When finished, click Set to save your settings and close the Set Schedule For field. The settings you entered appear on the Current Schedule in the Executive Mode section. 5. Repeat steps 1 through 4 as needed to specify executive mode settings for other days. IPL T PC1 Ethernet Configuration and Control You cannot set Receptacle On and Off for the same time. Scheduling by day of the week You can also select a day of the week and schedule all power and executive mode time settings for that day at one time: 1. Click on a day of the week at the top of a column in the Receptacle 1 scheduling table. Two Set Schedule For fields open, one for Power On/ Executive Mode On and one for Power Off/Executive Mode Off. These fields contain drop-down menus for selecting on and off times, as well as check boxes for selecting the receptacle (power) and executive mode. In the illustration below, Sunday has been selected for scheduling. Schedule screen showing fields for daily receptacle scheduling
2. In either the Power ON or Power OFF section, select the hours, minutes, and AM/PM from the menus; and select the check box(es) for the items you want to schedule. 3. In the section in which you made your selections, click Set to enter your choices. The field closes. 4. If desired, repeat steps 2 and 3 in the other Set Schedule For field. If you do not want to make selections in the remaining Set Schedule For field, click Refresh to close the field. 5. Repeat steps 1 through 4 for any additional days that you want to schedule. Changing an individual setting Follow this procedure if you want to change only one setting on the scheduling table, either for powering on or off, or for executive mode. 1. In the Receptacle or Executive Mode scheduling table, click on the time displayed or the “-” symbol in the cell that you want to change, in the desired day column. A single-line Set Schedule For field appears above the Scheduling section. In the following illustration, the red circle indicates the cell that was selected: receptacle powering off, on Monday. Set Schedule For field to set powering off for a single receptacle 2. From the drop-down menus in the Set Schedule For field, select the hour, minute(s), and AM or PM for the power or executive mode setting. 3. Click Set to enter your settings. The time that you entered appears in the cell that you selected on the Scheduling table. IPL T PC1 Ethernet Configuration and Control 4-23 PRELIMINARY
- Page 1 and 2: IP Link Power Control Interface IPL
- Page 3 and 4: FCC Class A Notice This equipment h
- Page 5 and 6: Table of Contents Chapter 1 Introdu
- Page 7 and 8: Using the Command/Response Table ..
- Page 9 and 10: IPL T PC1 1 Chapter One Introductio
- Page 11 and 12: Web-based A/V asset management —
- Page 13 and 14: IPL T PC1 2 Chapter Two Installatio
- Page 15 and 16: Reduced air flow — Installation o
- Page 17 and 18: 3 COM port (RS-232) — Connect the
- Page 19 and 20: Side View Pins: 12345678 Insert Twi
- Page 21 and 22: IPL T PC1 3 Chapter Three Front Pan
- Page 23 and 24: Setting Up the System Using the Fro
- Page 25 and 26: Result — The RS-232 port is conve
- Page 27 and 28: IPL T PC1 4 Chapter Four Ethernet C
- Page 29 and 30: ARP-S command screen 6. Execute a p
- Page 31 and 32: 2. Right-click Local Area Connectio
- Page 33 and 34: 7. Set up the PC1’s IP address. S
- Page 35 and 36: Passwords must contain 4 to 12 alph
- Page 37 and 38: 2. Enter your new information in th
- Page 39 and 40: RS-232 port From the drop-boxes in
- Page 41 and 42: 3. In the Re-enter Admin Password f
- Page 43 and 44: 4. Click Save to save the informati
- Page 45 and 46: 2. Click Browse to open a Choose fi
- Page 47: “Set Schedule For” field, displ
- Page 51 and 52: Adding a directory To add a directo
- Page 53 and 54: The figure below shows the HTML cod
- Page 55 and 56: Accessing and Using Telnet (Port 23
- Page 57 and 58: Network connections 1. Check the ne
- Page 59 and 60: IPL T PC1 5 Chapter Five SIS Progr
- Page 61 and 62: The error response codes and their
- Page 63 and 64: Symbol definitions = CR/LF (carriag
- Page 65 and 66: X712 = Time in minutes (0-1440) 0 =
- Page 67 and 68: Command/response table for SIS comm
- Page 69 and 70: Command/response table for SIS comm
- Page 71 and 72: Command/response table for SIS comm
- Page 73 and 74: Command/response table for SIS comm
- Page 75 and 76: IPL T PC1 Appendix A Reference Mate
- Page 77 and 78: General Power input ...............
- Page 79 and 80: Glossary 10/100Base-T is Ethernet t
- Page 81 and 82: IP address is a unique, 32-bit, bin
- Page 83 and 84: Extron’s Warranty Extron Electron
2. In either the Power ON or Power OFF section, select the hours, minutes, <strong>and</strong><br />
AM/PM from the menus; <strong>and</strong> select the check box(es) for the items you want<br />
to schedule.<br />
3. In the section in which you made your selections, click Set to enter your<br />
choices. The field closes.<br />
4. If desired, repeat steps 2 <strong>and</strong> 3 in the other Set Schedule For field.<br />
If you do not want to make selections in the remaining Set Schedule For field,<br />
click Refresh to close the field.<br />
5. Repeat steps 1 through 4 for any additional days that you want to schedule.<br />
Changing an individual setting<br />
Follow this procedure if you want to change only one setting on the scheduling<br />
table, either for powering on or off, or for executive mode.<br />
1. In the Receptacle or Executive Mode scheduling table, click on the time<br />
displayed or the “-” symbol in the cell that you want to change, in the desired<br />
day column. A single-line Set Schedule For field appears above the<br />
Scheduling section.<br />
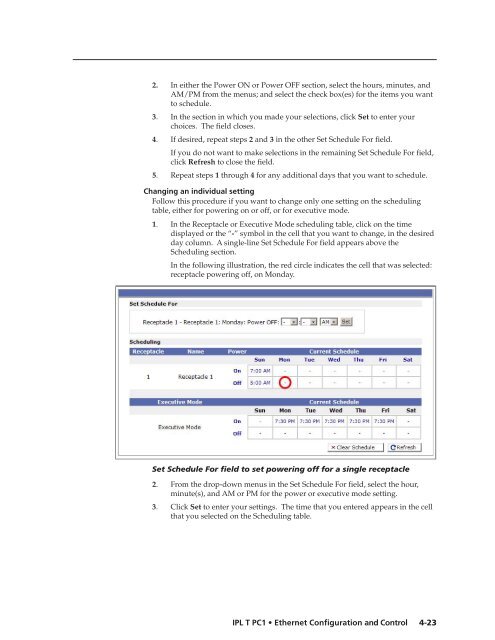
In the following illustration, the red circle indicates the cell that was selected:<br />
receptacle powering off, on Monday.<br />
Set Schedule For field to set powering off for a single receptacle<br />
2. From the drop-down menus in the Set Schedule For field, select the hour,<br />
minute(s), <strong>and</strong> AM or PM for the power or executive mode setting.<br />
3. Click Set to enter your settings. The time that you entered appears in the cell<br />
that you selected on the Scheduling table.<br />
IPL T PC1 <strong>Ethernet</strong> <strong>Configuration</strong> <strong>and</strong> <strong>Control</strong><br />
4-23<br />
PRELIMINARY


