Ethernet Configuration and Control, cont'd - Extron Electronics
Ethernet Configuration and Control, cont'd - Extron Electronics
Ethernet Configuration and Control, cont'd - Extron Electronics

You also want an ePaper? Increase the reach of your titles
YUMPU automatically turns print PDFs into web optimized ePapers that Google loves.
PRELIMINARY<br />
Installation <strong>and</strong> Rear Panel, cont’d<br />
2-8<br />
6<br />
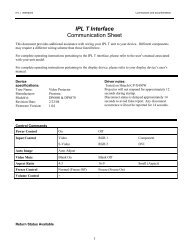
Input contact closure port — Connect a contact closure device to pins 1 (IN,<br />
for input) <strong>and</strong> 2 ( , for ground) of this shared captive screw connector to<br />
enable the PC1 to detect a closed circuit between an input <strong>and</strong> ground <strong>and</strong> to<br />
trigger an event.<br />
For example, if a button were pressed or motion were detected by a sensor,<br />
the input would short to ground, which would cause an event such as a bell<br />
ringing, a light turning on, <strong>and</strong>/or an e-mail notification that an event has<br />
occurred.<br />
Wiring the contact Input port<br />
7<br />
The IPL T PC1 contact closure Input port can be connected to any device<br />
providing a closure to ground (closed = logic 1 <strong>and</strong> open = logic 0). The<br />
contact Input is connected to 5VDC via a 1k ohm pull-up resistor <strong>and</strong> must be<br />
wired with a ground. This allows the input to be tied to a device such as a<br />
motion detector, alarm, photo eye, etc. You can define what this input will<br />
trigger via GC2.3.<br />
1. Connect one end of the input cable to a<br />
3.5 mm, 5-pole captive screw connector,<br />
wired appropriately, <strong>and</strong> plug it into pins 1<br />
<strong>and</strong> 2 of the shared input/IR port connector<br />
on the rear panel.<br />
2. Connect the other end of the input cable to<br />
the input device that will provide a<br />
triggering signal. (See the diagram at right.)<br />
Output power receptacle — Connect the power cord from an output device<br />
to this three-prong female Edison (IPL T PC1) or IEC (IPL T PC1i) power<br />
output receptacle.<br />
Connecting the Hardware<br />
Connect the cables to the rear panel as follows:<br />
1. Plug an IEC power cord into a wall outlet <strong>and</strong> into the 3-prong male power<br />
connector on the PC1 rear panel. The green Power LED lights <strong>and</strong> remain lit.<br />
2. Plug the <strong>Ethernet</strong> cable from the network into the LAN port on the rear panel.<br />
The Link LED lights green.<br />
3. Plug the power cord of the output device to be controlled into the output<br />
receptacle on the PCI rear panel.<br />
4. If desired, connect the output device to the RS-232 COM port.<br />
5. If desired, connect an IR emitter to the IR port to control an output device.<br />
6. If desired, connect a contact switch to the contact input port.<br />
IPL T PC1 Installation <strong>and</strong> Rear Panel<br />
INPUT IR<br />
IN S G<br />
Momentary<br />
Switch