Ethernet Configuration and Control, cont'd - Extron Electronics
Ethernet Configuration and Control, cont'd - Extron Electronics
Ethernet Configuration and Control, cont'd - Extron Electronics

You also want an ePaper? Increase the reach of your titles
YUMPU automatically turns print PDFs into web optimized ePapers that Google loves.
PRELIMINARY<br />
Installation <strong>and</strong> Rear Panel, cont’d<br />
2-4<br />
Under-desk mounting<br />
The PC1 can also be mounted under furniture, such as a table or podium surface,<br />
using the optional under-desk mounting kit MBU 125 (part #70-077-01).<br />
1. If rubber feet were previously installed on the bottom of the unit, remove<br />
them.<br />
2. Attach the mounting brackets to<br />
the unit with the provided<br />
machine screws.<br />
3. Insert #8 wood screws into the<br />
four pilot holes. Tighten each<br />
screw into the mounting surface<br />
until slightly less than ¼" of the<br />
screw protrudes.<br />
4. Align the mounting screws with<br />
the slots in the brackets, <strong>and</strong><br />
place the PC1 against the surface<br />
with the screws through the<br />
bracket slots.<br />
5. Slide the unit slightly forward or back, then tighten all four screws to secure it<br />
in place.<br />
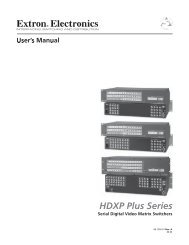
Rear Panels <strong>and</strong> Cabling<br />
1 2 3<br />
100-120VAC 50/60Hz<br />
12A MAX<br />
MAC ADDRESS<br />
POWER OUTPUT 12A MAX<br />
IPL T PC1 Installation <strong>and</strong> Rear Panel<br />
COM<br />
TX RX<br />
INPUT IR<br />
+5V<br />
IN S G<br />
7 6 5<br />
IPL T PC1 rear panel (120 VAC)<br />
1 2 3<br />
200-240VAC 50/60Hz<br />
10A MAX<br />
MAC ADDRESS<br />
POWER OUTPUT 10A MAX<br />
COM<br />
TX RX<br />
INPUT IR<br />
+5V<br />
IN S G<br />
7 6 5<br />
® US<br />
LISTED 17TT<br />
AUDIO/VIDEO<br />
APARATUS<br />
LAN<br />
® US<br />
LISTED 17TT<br />
AUDIO/VIDEO<br />
APARATUS<br />
LAN<br />
IPL T PC1i rear panel (220 VAC)<br />
1<br />
2<br />
4<br />
4<br />
Power connector — Connect a power cord from a wall outlet to this male IEC<br />
power receptacle.<br />
UID # label — Contains the unique User ID number (MAC address) of the<br />
unit (for example, 00-05-A6-00-00-01).