pdf 1 - exhibitions international
pdf 1 - exhibitions international
pdf 1 - exhibitions international

You also want an ePaper? Increase the reach of your titles
YUMPU automatically turns print PDFs into web optimized ePapers that Google loves.
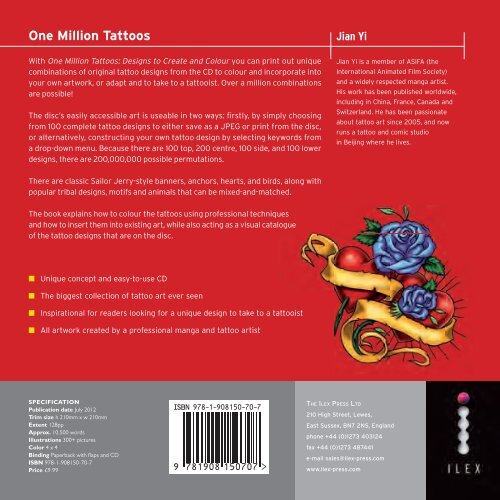
One Million Tattoos Jian Yi<br />
With One Million Tattoos: Designs to Create and Colour you can print out unique<br />
combinations of original tattoo designs from the CD to colour and incorporate into<br />
your own artwork, or adapt and to take to a tattooist. Over a million combinations<br />
are possible!<br />
The disc’s easily accessible art is useable in two ways: firstly, by simply choosing<br />
from 100 complete tattoo designs to either save as a JPEG or print from the disc,<br />
or alternatively, constructing your own tattoo design by selecting keywords from<br />
a drop-down menu. Because there are 100 top, 200 centre, 100 side, and 100 lower<br />
designs, there are 200,000,000 possible permutations.<br />
There are classic Sailor Jerry-style banners, anchors, hearts, and birds, along with<br />
popular tribal designs, motifs and animals that can be mixed-and-matched.<br />
The book explains how to colour the tattoos using professional techniques<br />
and how to insert them into existing art, while also acting as a visual catalogue<br />
of the tattoo designs that are on the disc.<br />
■ Unique concept and easy-to-use CD<br />
■ The biggest collection of tattoo art ever seen<br />
■ Inspirational for readers looking for a unique design to take to a tattooist<br />
■ All artwork created by a professional manga and tattoo artist<br />
SPECIFICATION<br />
Publication date July 2012<br />
Trim size h 210mm x w 210mm<br />
Extent 128pp<br />
Approx. 10,500 words<br />
Illustrations 300+ pictures<br />
Color 4 x 4<br />
Binding Paperback with flaps and CD<br />
ISBN 978-1-908150-70-7<br />
Price £9.99<br />
THE ILEX PRESS LTD<br />
Jian Yi is a member of ASIFA (the<br />
International Animated Film Society)<br />
and a widely respected manga artist.<br />
His work has been published worldwide,<br />
including in China, France, Canada and<br />
Switzerland. He has been passionate<br />
about tattoo art since 2005, and now<br />
runs a tattoo and comic studio<br />
in Beijing where he lives.<br />
210 High Street, Lewes,<br />
East Sussex, BN7 2NS, England<br />
phone +44 (0)1273 403124<br />
fax +44 (0)1273 487441<br />
e-mail sales@ilex-press.com<br />
www.ilex-press.com
ONE<br />
Tattoos Tattoos Tattoos Tattoos Tattoos Tattoos T attoos<br />
MILLION<br />
T TTattoos<br />
Tattoos<br />
DESIGNS<br />
JIAN YI<br />
One One Mi Million<br />
book book<br />
Tattoos,<br />
accompanies<br />
accompanies the the<br />
ISBN<br />
CD CD This This<br />
978-1-908150-70-7, published in the U.K. by ILEX. Copyright © 2010 The Ilex Press Ltd. All rights reserved. Made in China.<br />
Mi<br />
M llion Ta<br />
Ta<br />
T tt<br />
TO CREATE AND COLOUR<br />
disc. this on image any using<br />
before befo<br />
Agreement Agreement<br />
License License the the Read Read<br />
ONE MILLION<br />
Tattoos Tattoos Tattoos Tattoos Tattoos Tattoos Tattoos<br />
MILLION<br />
TTattoos<br />
Tattoos Tattoos<br />
MILLION<br />
Tattoos T<br />
ttt<br />
os, ISBN 978-1-908150-70-7,<br />
published intheU.K.byILEX.Copyright ©2010TheIlexPressLtd.Allrightsreserved.MadeinChina.<br />
t o<br />
to<br />
fo<br />
disc. this on image any using re f
Contents 6<br />
The History of Tattoo Art<br />
7 Tattoo Art Now<br />
8 USING THE BOOK AND CD<br />
9 TAKING IT FURTHER<br />
10 CREATING TATTOO DESIGNS<br />
12 PRINTING<br />
13 THINK BEFORE YOU INK<br />
14 IMPORTING IMAGES<br />
16 DIGITAL TATTOO ART<br />
18 EDITING PROGRAMS<br />
20 BASIC TOOLS<br />
22 BASIC BRUSHES<br />
24 BASIC TECHNIQUES<br />
26 CUSTOMIZING TATTOOS<br />
28 BLOCKING IN COLOR<br />
32 SHADING AND HIGHLIGHTS<br />
34 ADDING TATTOOS TO ARTWORK<br />
36 ADDING TATTOOS TO DECALS<br />
38 TATTOO DESIGNS<br />
40 TRADITIONAL<br />
52 ASIAN<br />
62 MYTHICAL<br />
72 NAUTICAL<br />
78 TRIBAL<br />
88 HORROR<br />
98 NATURE<br />
110 MIX AND MATCH<br />
126 Chinese Zodiac Characters<br />
128 License Agreement
26<br />
cUStoMiZing tattooS<br />
Customizing Tattoos<br />
You don’t have to stick to the fi ve-part template that the designs on<br />
the program follow. Using the techniques covered on pages 24–25,<br />
you can use the artwork provided with One Million Tattoos to<br />
customize your tattoo however you like. The composition of your<br />
design may depend on where you plan to position it; for example,<br />
the fi ve-part design is ideal for placing on a shoulder or the lower<br />
back, while a single side panel would look great on a forearm.<br />
Top<br />
Center<br />
Lower<br />
Sides<br />
Traditional 034<br />
Traditional 040<br />
Traditional 011<br />
Traditional 036<br />
- 0 Blank 0 -<br />
Asian 001<br />
Asian 002<br />
Asian 003<br />
Asian 004<br />
Asian 005<br />
Asian 006<br />
Asian 007<br />
Asian 008<br />
Asian 009<br />
Asian 010<br />
Horror 001<br />
Horror 002<br />
Horror 003<br />
Horror 004<br />
Horror 005<br />
Thumbnails<br />
Thumbnails<br />
Thumbnails<br />
Thumbnails<br />
A simple way to tweak your<br />
composition is to use the Blank<br />
option in the drop-down menus. You<br />
can choose which parts of template<br />
you want to leave out, for example<br />
the Side panels. You may want to<br />
leave a panel blank and include<br />
some of your own artwork instead.<br />
Alternatively, you may want to get a<br />
little more creative. By resizing, rotating,<br />
and fl ipping your panels you can end up<br />
with dramatically different designs.
Choose the elements you want to use in your tattoo design and<br />
copy them over to your image-editing program (see pages 14–15).<br />
Here, the side and top panels have been deleted, and the lower<br />
panel has been resized and moved to sit just under the central motif.<br />
Above, the side panels have been fl ipped vertically and resized. The side panels can be used as top and lower panels as well.<br />
Here they have been positioned to face each other by deleting the<br />
left piece, copying the right side, and fl ipping this horizontally.<br />
cUStoMiZing tattooS<br />
27
28<br />
Blocking in color<br />
Blocking in Color<br />
Filling in base colors is the fi rst step in every coloring process.<br />
Flat colors block out the areas of color that serve as boundaries<br />
for the more detailed coloring to follow.<br />
Remember that the more colors you use, and the greater the amount<br />
of shading and gradation, the longer the tattoo will take, and the more<br />
diffi cult it will be to apply. Simpler, bolder designs with limited numbers of<br />
colors will often work the best—sometimes fl at colors will be all you need.<br />
Creating blocks of solid color on a separate layer also allows you to easily<br />
reselect large areas of color with the Magic Wand tool—but be sure to<br />
keep a copy of your fl ats layer, even after you start shading, so that you<br />
can come back to areas of color later if you aren’t happy with them.<br />
Preparing the Artwork for Color<br />
When you have copied your tattoo to<br />
the clipboard, you should prepare it to<br />
be colored or toned. It’s important to<br />
fl atten an image and make sure that<br />
no anti-aliasing is present, as blurred<br />
lines can prove tricky during coloring.<br />
Nothing is worse than ragged<br />
graytones around all of your lines!<br />
1Choose Layers > Flatten Image from<br />
the menu. This will reduce the image<br />
to a single layer.<br />
2Choose Filter > Adjustments ><br />
Threshold. Adjust the slider until you<br />
are happy with the “boldness” of your<br />
lines. This means that any colors above a<br />
certain percentage of “darkness” will<br />
become black, and any below will be white.<br />
Unsharp Mask<br />
100%<br />
Amount: 70 %<br />
Radius: 0.9 pixels<br />
Threshold: 50 levels<br />
OK<br />
Cancel<br />
Preview<br />
As well as setting your resolution,<br />
another way to optimize your line art<br />
is to try out some of Photoshop’s Sharpen<br />
fi lters, such as the Smart Sharpen fi lter.<br />
Or in Elements, apply the Sharpen effect<br />
and adjust the Threshold.
Laying Down Flats<br />
1Most of the tattoo designs have<br />
solid black lines for easy coloring.<br />
If you wish, you can just use the Paint<br />
Bucket tool set to Contiguous to fill<br />
them. If you want a little more control,<br />
duplicate the line art to a new layer.<br />
Using the Magic Wand tool, with<br />
Contiguous unchecked, click on an<br />
area of white, then press Delete.<br />
This will select and delete anything<br />
that isn’t line art. Delete the artwork<br />
on the original line art layer, replacing<br />
it with a flood fill in a neutral color<br />
such as gray or pale yellow.<br />
2On the line art layer, use the Magic Wand tool to select an<br />
area you want to block color in. Set the tolerance to about 35,<br />
check Contiguous and uncheck Anti-alias. Press and hold the Shift<br />
key to select multiple areas (all parts of your tattoo you want in<br />
the same color, such as a flower’s petals, for instance) or press<br />
and hold the Alt key to deselect any areas you may have clicked<br />
by accident.<br />
3Now click Select > Modify ><br />
Expand, set the value to 1, and<br />
click OK. This expands the area of<br />
color out over the linework so that<br />
there are no gaps in the color when<br />
printed or viewed on screen. When<br />
you’ve finished selecting one group of<br />
areas, switch to the color layer below.<br />
4Using the Paint Bucket tool, fill the selected area with your<br />
chosen color. You can also get the same result by pressing X<br />
to switch your chosen color to the background color, and pressing<br />
Delete. It’s quicker over multiple areas.<br />
Blocking in color<br />
29
32<br />
Shading and highlightS<br />
Shading and Highlights<br />
The brushes in Photoshop make creating great airbrush and simulated<br />
natural media effects easy! Due to the possibility of using hundreds of<br />
colors, these effects are great for designs you’re intending to use on<br />
a tattoo transfer, T-shirt design, or other decal.<br />
1After blocking in base colors, duplicate the layer (Layer > Duplicate Layer).<br />
Rename the duplicate and leave its mode on Normal, then move it above your<br />
base layer. Keep the original base layer, as it will help you select areas of flat color<br />
with the Magic Wand. You will be doing all of your painting on the duplicate. Don’t<br />
use the Eraser to correct mistakes, as it will erase through to the layer below: use<br />
a brush to paint over the fault with the original color.<br />
2Select the color you want to work on,<br />
using the Magic Wand with Contiguous<br />
unchecked. Choose a color that’s a few<br />
shades darker (not a shade of gray). With<br />
the Paint Brush tool, select a soft tip and<br />
set the opacity to around 30%.
3You can paint directly onto the color<br />
within your Magic Wand selection<br />
(selecting each area of color keeps your<br />
shading inside the lines). With an opacity<br />
as low as 30%, you can build the darker<br />
color up gradually, overpainting your<br />
shading with darker shadows. If you<br />
think the shadows are not dark enough,<br />
simply choose a darker tone.<br />
6Next, add the strong highlights. Create<br />
a new layer above the color layer,<br />
name it “Highlights,” and leave the mode<br />
as Normal. Pick a hard-tipped Brush with<br />
80%–100% opacity, then paint in bright<br />
white (or very light) shades to finish toning.<br />
4Once the shadows are complete,<br />
move on to the highlights—choose<br />
a lighter color than the original and paint<br />
areas that especially catch the light.<br />
Build the highlights up gradually with<br />
a soft-tipped, low-opacity brush.<br />
5Repeat this process for the other<br />
parts of the picture. Pay attention<br />
to the material you’re painting, and how<br />
reflective or shiny it might be. Use the<br />
Hue/Saturation controls to tweak finished<br />
areas until you’re satisfied. Here’s where<br />
keeping your base colors as a separate<br />
layer comes in handy: painted colors are<br />
tough to select in their entirety with the<br />
Magic Wand. Just click back to the base<br />
layer, select the area of flat color you want<br />
to adjust, then flip back to the color layer<br />
to alter the selection as necessary.<br />
7Lastly, add<br />
any further<br />
details to complete<br />
your tattoo.<br />
Shading and highlightS<br />
33
42<br />
traditional<br />
Traditional<br />
The traditional tattoos feature motifs<br />
of hearts, skulls, daggers, crosses,<br />
and roses. Mixing Gothic skulls with<br />
delicate flower designs can create<br />
effective contrasts, while using<br />
elements from the other tattoo styles<br />
gives a contemporary feel to classic<br />
designs like the love heart.<br />
Top: Traditional 042<br />
Center: Traditional 053<br />
Lower: Traditional 042<br />
Sides: Traditional 036
Top: Traditional 031 Center: Traditional 024<br />
Lower: Traditional 018 Sides: Traditional 028<br />
Top: Traditional 017 Center: Traditional 018<br />
Lower: Traditional 002 Sides: Traditional 015<br />
Top: Traditional 037 Center: Traditional 059<br />
Lower: Traditional 037 Sides: Traditional 037<br />
Top: Traditional 003 Center: Traditional 028<br />
Lower: Traditional 002 Sides: Traditional 008<br />
traditional<br />
43


![01 -[BE/INT-2] 2 KOL +UITGEV+ - exhibitions international](https://img.yumpu.com/19621858/1/184x260/01-be-int-2-2-kol-uitgev-exhibitions-international.jpg?quality=85)