EDR810H/EDR810M EDR410H/EDR410M - EverFocus
EDR810H/EDR810M EDR410H/EDR410M - EverFocus EDR810H/EDR810M EDR410H/EDR410M - EverFocus
To edit a MOTION AREA, enter a desired channel and press SELECT. Motion must be set to “Enable” in order to edit the motion detection area. In the motion edit mode: The default motion area of each camera is entire screen which displays in light green. Press COPY to start setting an area. Use the JOG Dial to move the cursor. Press ENTER to switch between vertical and horizontal movement. Press SEARCH to end and enable the selected area, or press PAUSE to end and disable the area. To quit the motion area edit, press MENU. To test a motion area: Grids will turn into light red from light green when a motion is detected. To clear the motion entire area: Press PLAY to clear the entire motion area. If you forget the motion grid commands: Press DISPLAY to get a hint window (shows below) in motion edit mode. MENU COPY ENTER SEARCH PAUSE - EXIT - SELECT AREA - CHANGE DIR - ON AREA - OFF AREA
3.6 VIDEOLOSS Setup Menu Diagram 3.9 Diagram 3.9 is a screen shot of the VIDEOLOSS SETUP MENU. VIDEOLOSS event is caused when no video signal input is detected on a channel. Usually it happens when the camera loses power or the camera fails. In the VIDEOLOSS SETUP MENU the following fields are defined as follows: 1. VIDEOLOSS: ENABLE: Enable video loss detection. DISABLE: Disable video loss detection. 2. LOG: ON: Select ON if you wish to record Video Loss Events in the Log. OFF: Select OFF if you do not wish to record Video Loss Events in the Log. 3. DURATION: The amount of time a Video loss event will record - from 1 sec to 99 seconds. The default value is 5 seconds. To change this, simply use the Jog Dial on the DVR. 4. ALARM OUTPUT: This will transmit a signal to another device. The setting of alarms are NONE = not activated, 1 = output signal 1 transmitted. To change this, simply use the Jog Dial on the DVR.
- Page 1 and 2: Instruction Manual EDR810H/EDR810M
- Page 3: Federal Communication Commission In
- Page 6 and 7: 4.2 SCHEDULE RECORDING SETUP.......
- Page 8 and 9: Safety Warning WARNING TO REDUCE RI
- Page 10 and 11: Safety Precautions Read Instructio
- Page 12 and 13: 1.2 Specifications Video format NTS
- Page 14 and 15: 9 FULL: Press this key and channel
- Page 16 and 17: 1.4 Back Panel Connections Back pan
- Page 18 and 19: LAN 7 LAN Connector: RJ-45 network
- Page 20 and 21: 1 Channel tag: A channel tag indica
- Page 22 and 23: 3. Event The current/last event tha
- Page 24 and 25: 2.1 Basic Wiring Instructions Pleas
- Page 26 and 27: 2.2 Hard Disk Drive Installation Th
- Page 28 and 29: Unpack Everything Make sure you hav
- Page 30 and 31: Possible Installation Locations Ins
- Page 32 and 33: 3. DVR Menu Setup Assuming you have
- Page 34 and 35: 5. DAYLIGHT SAVING: This field repr
- Page 36 and 37: Alaska Standard Time subtract 9 hou
- Page 38 and 39: 4. SEQ (MAIN/CALL): Set the number
- Page 40 and 41: 7. SUMMARY: Diagram 3.5 Dial Jog to
- Page 42 and 43: 4. WATER MARK: ON: Recording is ove
- Page 44 and 45: 3. LOG: ON: Select ON if you wish t
- Page 46 and 47: 3.5 Motion Setup Menu Diagram 3.8 D
- Page 50 and 51: 5. ALARM EMAIL: Select “YES” fo
- Page 52 and 53: 2. IP Address This field shows the
- Page 54 and 55: 3.7.2 ALARM NETWORK DVR can send ou
- Page 56 and 57: 7. SENDER EMAIL ADDR Input sender
- Page 58 and 59: Shared: need shared key. WEP: uses
- Page 60 and 61: 3.7.7 DDNS In DDNS of the NETWORK S
- Page 62 and 63: 3.7.8 GPS In GPS of the NETWORK SET
- Page 64 and 65: 3. END: This field is used to set t
- Page 66 and 67: 2. THERMOMETRIC SCALE: Select CELSI
- Page 68 and 69: RS485: 5. RS485 Baud Rate: This fie
- Page 70 and 71: 4. NETWORK ALARM: YES: To enable ne
- Page 72 and 73: 3.11.3 NO HDD In NO HDD, we define:
- Page 74 and 75: 4. NETWORK ALARM: YES: To enable ne
- Page 76 and 77: 4. UPDATE SYSTEM SOFTWARE: Turn the
- Page 78 and 79: 4. Recording Overview Before contin
- Page 80 and 81: 4.3 Event Recording Setup We will d
- Page 82 and 83: Note: 1. If you only want to record
- Page 84 and 85: (3) Fast Forward/Reverse Playback P
- Page 86 and 87: 5.2 Search Playback SEARCH Press th
- Page 88 and 89: The event types and number show on
- Page 90 and 91: In the COPY MENU, we define: Diagra
- Page 92 and 93: 7. Call Overview This chapter will
- Page 94 and 95: When turning SHARPNESS OFF, the ima
- Page 96 and 97: 09 10. Networking Overview This cha
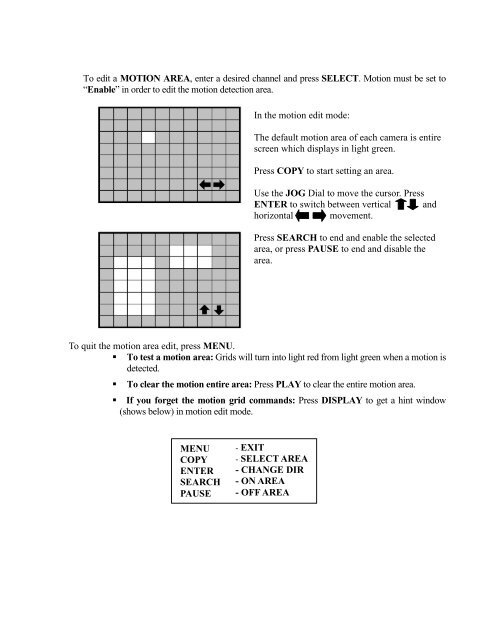
To edit a MOTION AREA, enter a desired channel and press SELECT. Motion must be set to<br />
“Enable” in order to edit the motion detection area.<br />
In the motion edit mode:<br />
The default motion area of each camera is entire<br />
screen which displays in light green.<br />
Press COPY to start setting an area.<br />
Use the JOG Dial to move the cursor. Press<br />
ENTER to switch between vertical and<br />
horizontal movement.<br />
Press SEARCH to end and enable the selected<br />
area, or press PAUSE to end and disable the<br />
area.<br />
To quit the motion area edit, press MENU.<br />
To test a motion area: Grids will turn into light red from light green when a motion is<br />
detected.<br />
To clear the motion entire area: Press PLAY to clear the entire motion area.<br />
If you forget the motion grid commands: Press DISPLAY to get a hint window<br />
(shows below) in motion edit mode.<br />
MENU<br />
COPY<br />
ENTER<br />
SEARCH<br />
PAUSE<br />
- EXIT<br />
- SELECT AREA<br />
- CHANGE DIR<br />
- ON AREA<br />
- OFF AREA


