EDR810H/EDR810M EDR410H/EDR410M - EverFocus
EDR810H/EDR810M EDR410H/EDR410M - EverFocus EDR810H/EDR810M EDR410H/EDR410M - EverFocus
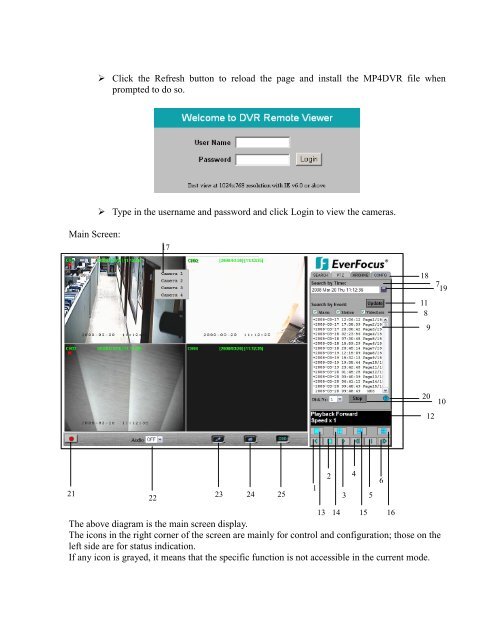
Main Screen: 21 Click the Refresh button to reload the page and install the MP4DVR file when prompted to do so. Type in the username and password and click Login to view the cameras. 22 17 23 24 25 1 13 14 15 18 11 8 9 7 19 20 10 The above diagram is the main screen display. The icons in the right corner of the screen are mainly for control and configuration; those on the left side are for status indication. If any icon is grayed, it means that the specific function is not accessible in the current mode. 2 3 4 5 6 16 12
The followings are a brief description for each of the icons. 1. REV. PLAY: Reverse Video Playback. 2. STOP: Press this key to stop Playback and return to Live mode. 3. PLAY: Normal Video Playback. 4. STEP BACKWARD: Move one frame back while paused. 5. PAUSE: To pause the Video Playback display. 6. STEP FORWARD: Move one frame forward while paused. 7. Search Section. There are two methods of searching past video: by Event and by Time. 8. Types of events to be searched: Alarm, Motion and/or Vloss. 9. All available events are shown in the list. Click the desired event to highlight it. 10. Click on “Play” to play back highlighted video event. 11. Press “Update” to refresh the event list. 12. Current connection and playback status are shown along with date and time. 13. Full screen view. 14. Quad screen view. 15. Nine split screen view (not available for 4 channel units). 16. Sixteen split screen view (reserved for 16 channel units only). 17. If you right-click on a camera screen, a drop-down list of available cameras appears. Click on the desired camera to display it in that view screen. 18. There are 4 main functions of Remote Viewer: SEARCH, PTZ, ARCHIVE and CONFIG. SEARCH section allows you to search by event or by time. PTZ section allows you to control PTZ cameras. ARCHIVE section allows you to remotely archive files or download DVRViewer. CONFIG section allows you to make system changes remotely. 19. Pick a date: Click on the blue box to open the detailed time search box.
- Page 74 and 75: 4. NETWORK ALARM: YES: To enable ne
- Page 76 and 77: 4. UPDATE SYSTEM SOFTWARE: Turn the
- Page 78 and 79: 4. Recording Overview Before contin
- Page 80 and 81: 4.3 Event Recording Setup We will d
- Page 82 and 83: Note: 1. If you only want to record
- Page 84 and 85: (3) Fast Forward/Reverse Playback P
- Page 86 and 87: 5.2 Search Playback SEARCH Press th
- Page 88 and 89: The event types and number show on
- Page 90 and 91: In the COPY MENU, we define: Diagra
- Page 92 and 93: 7. Call Overview This chapter will
- Page 94 and 95: When turning SHARPNESS OFF, the ima
- Page 96 and 97: 09 10. Networking Overview This cha
- Page 98 and 99: Note: Everfocus suggests having a m
- Page 100 and 101: 10.7 Simple One to One Connection C
- Page 105 and 106: Once you have reached this point cl
- Page 107 and 108: Now Log into the EverFocus DVR menu
- Page 109 and 110: Connection Procedure: The First st
- Page 111 and 112: 11. Linksys Port Forwarding Chapter
- Page 113 and 114: application. Enable - Click the Ena
- Page 115 and 116: 12. D-Link Port Forwarding Chapter
- Page 117 and 118: Name - Enter the name referencing t
- Page 119 and 120: 13. EverFocus DDNS Setup Note: You
- Page 121 and 122: 14. Viewing through Internet Explor
- Page 123: Click the Security tab at the top,
- Page 127 and 128: 14.1 SEARCH 14.1.1 Search by Time T
- Page 129 and 130: 14.2 PTZ control 1. Select the PTZ
- Page 131 and 132: 1) Press on the M button to change
- Page 133 and 134: III. Open the DVRViewer.exe for loa
- Page 135 and 136: 14.4 Remote Configuration Click on
- Page 137 and 138: CAMERA setup menu RECORD setup menu
- Page 139 and 140: NETWORK 1 setup menu The Network Co
- Page 141 and 142: WARNING setup menu SYSTEM setup men
- Page 143 and 144: 15.2 Remote Control Protocol A comp
- Page 145 and 146: 0x23 CH8 0x24 (reserve) 0x25 (reser
- Page 147 and 148: Appendix B: Alarm Board Configurati
- Page 149 and 150: Troubleshooting If you have difficu
Main Screen:<br />
21<br />
Click the Refresh button to reload the page and install the MP4DVR file when<br />
prompted to do so.<br />
Type in the username and password and click Login to view the cameras.<br />
22<br />
17<br />
23 24 25<br />
1<br />
13 14 15<br />
18<br />
11<br />
8<br />
9<br />
7 19<br />
20 10<br />
The above diagram is the main screen display.<br />
The icons in the right corner of the screen are mainly for control and configuration; those on the<br />
left side are for status indication.<br />
If any icon is grayed, it means that the specific function is not accessible in the current mode.<br />
2<br />
3<br />
4<br />
5<br />
6<br />
16<br />
12


