EDR810H/EDR810M EDR410H/EDR410M - EverFocus
EDR810H/EDR810M EDR410H/EDR410M - EverFocus EDR810H/EDR810M EDR410H/EDR410M - EverFocus
Press the Select button to synchronize the DVR with the DDNS server. You should see the word “Success” at the bottom of the screen. If you see “Could Not Find Server” instead, double check your network settings until you get “Success”. You should now be able to connect by typing in the host name you created. Example: http://hostname.everfocusddns.com
14. Viewing through Internet Explorer To access the DVR from a computer simply open Internet Explorer and in the address bar type: http:// (LAN address or IP address of your internet service provider) After a few seconds, you should see a screen like the one above. If you do not see a yellow bar like the one the arrow is pointing at, your security settings may be too high. If so, go to the section labeled “Enabling ActiveX Controls.” Right click on the yellow bar and select “Install ActiveX Control…” Install the MP4DVR file when prompted to do so. Chapter 14
- Page 70 and 71: 4. NETWORK ALARM: YES: To enable ne
- Page 72 and 73: 3.11.3 NO HDD In NO HDD, we define:
- Page 74 and 75: 4. NETWORK ALARM: YES: To enable ne
- Page 76 and 77: 4. UPDATE SYSTEM SOFTWARE: Turn the
- Page 78 and 79: 4. Recording Overview Before contin
- Page 80 and 81: 4.3 Event Recording Setup We will d
- Page 82 and 83: Note: 1. If you only want to record
- Page 84 and 85: (3) Fast Forward/Reverse Playback P
- Page 86 and 87: 5.2 Search Playback SEARCH Press th
- Page 88 and 89: The event types and number show on
- Page 90 and 91: In the COPY MENU, we define: Diagra
- Page 92 and 93: 7. Call Overview This chapter will
- Page 94 and 95: When turning SHARPNESS OFF, the ima
- Page 96 and 97: 09 10. Networking Overview This cha
- Page 98 and 99: Note: Everfocus suggests having a m
- Page 100 and 101: 10.7 Simple One to One Connection C
- Page 105 and 106: Once you have reached this point cl
- Page 107 and 108: Now Log into the EverFocus DVR menu
- Page 109 and 110: Connection Procedure: The First st
- Page 111 and 112: 11. Linksys Port Forwarding Chapter
- Page 113 and 114: application. Enable - Click the Ena
- Page 115 and 116: 12. D-Link Port Forwarding Chapter
- Page 117 and 118: Name - Enter the name referencing t
- Page 119: 13. EverFocus DDNS Setup Note: You
- Page 123 and 124: Click the Security tab at the top,
- Page 125 and 126: The followings are a brief descript
- Page 127 and 128: 14.1 SEARCH 14.1.1 Search by Time T
- Page 129 and 130: 14.2 PTZ control 1. Select the PTZ
- Page 131 and 132: 1) Press on the M button to change
- Page 133 and 134: III. Open the DVRViewer.exe for loa
- Page 135 and 136: 14.4 Remote Configuration Click on
- Page 137 and 138: CAMERA setup menu RECORD setup menu
- Page 139 and 140: NETWORK 1 setup menu The Network Co
- Page 141 and 142: WARNING setup menu SYSTEM setup men
- Page 143 and 144: 15.2 Remote Control Protocol A comp
- Page 145 and 146: 0x23 CH8 0x24 (reserve) 0x25 (reser
- Page 147 and 148: Appendix B: Alarm Board Configurati
- Page 149 and 150: Troubleshooting If you have difficu
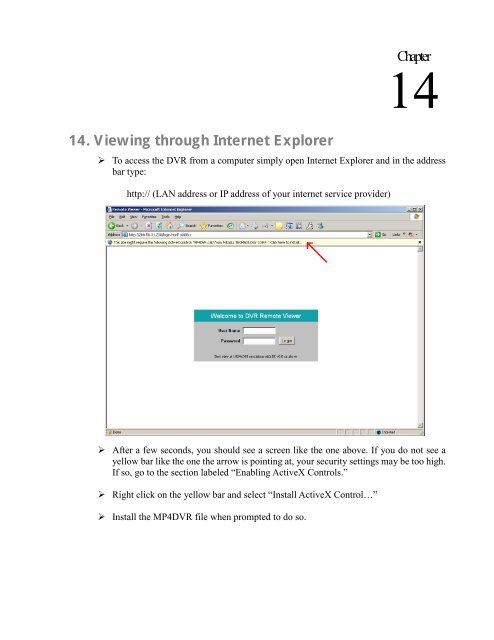
14. Viewing through Internet Explorer<br />
To access the DVR from a computer simply open Internet Explorer and in the address<br />
bar type:<br />
http:// (LAN address or IP address of your internet service provider)<br />
After a few seconds, you should see a screen like the one above. If you do not see a<br />
yellow bar like the one the arrow is pointing at, your security settings may be too high.<br />
If so, go to the section labeled “Enabling ActiveX Controls.”<br />
Right click on the yellow bar and select “Install ActiveX Control…”<br />
Install the MP4DVR file when prompted to do so.<br />
Chapter<br />
14


