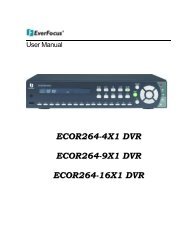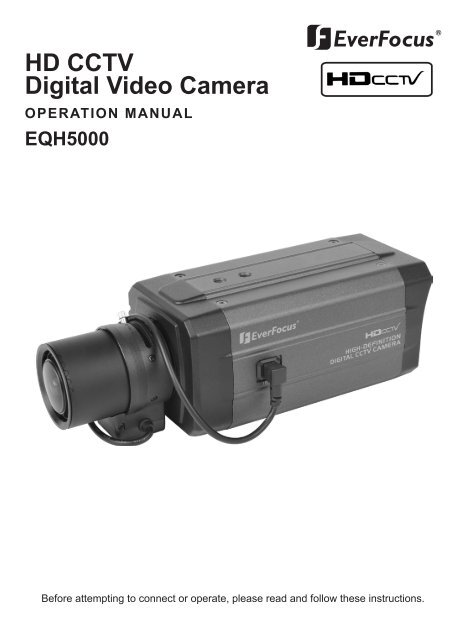
HD CCTV Digital Video Camera - Everfocus
HD CCTV Digital Video Camera - Everfocus
HD CCTV Digital Video Camera - Everfocus

You also want an ePaper? Increase the reach of your titles
YUMPU automatically turns print PDFs into web optimized ePapers that Google loves.
<strong>HD</strong> <strong>CCTV</strong><br />
<strong>Digital</strong> <strong>Video</strong> <strong>Camera</strong><br />
OPERATION MANUAL<br />
EQH5000<br />
Before attempting to connect or operate, please read and follow these instructions.
CONTENTS<br />
1. CAUTIONS<br />
2. FEATURES<br />
3. EQUIPMENT AND ACCESSORIES<br />
4. CAMERA COMPONENT DESCRIPTION<br />
5. INSTALLATION<br />
6. DIMENSIONS<br />
7. SPECIFICATIONS<br />
8. DIGITAL INPUT/OUTPUT CIRCUIT (Future use)<br />
9. OSD MANUAL<br />
3
1. CAUTIONS<br />
This device complies with Part 15 of the FCC Rules.<br />
Operation is subject to the following two conditions;<br />
1. This device may not cause harmful interference.<br />
2. This device must accept any interference received,<br />
including interference that may cause undesired operation.<br />
Note<br />
This equipment has been tested and found to comply with the limits for a Class A digital<br />
device, pursuant to part 15 of the FCC Rules. These limits are designed to provide<br />
reasonable protection against harmful interference when the equipment is operated<br />
in a commercial environment. This equipment generates, uses, and can radiate radio<br />
frequency energy and, if not installed and used in accordance with the instruction<br />
manual, may cause harmful interference to radio communications. Operation of this<br />
equipment in a residential area is likely to cause harmful interference in which case the<br />
user will be required to correct the interference at his own expense.”<br />
WARNING<br />
This is a class A product. In a domestic environment this product may cause radio<br />
interference in which case the user may be required to take adequate measures.<br />
Caution<br />
Any changes or modifications in construction of this device which are not expressly<br />
approved by the party responsible for compliance could void the user’s authority to<br />
operate the equipment.<br />
1. A regulated DC12V 1A power supply is recommended for use with this camera<br />
for the best picture and the most stable operation.<br />
An unregulated power supply can cause damage to the camera.<br />
If an unregulated power supply is used, product warranty will be Void.<br />
2. It is recommended that the camera is used with a system that has an <strong>HD</strong><strong>CCTV</strong> quality<br />
75 video impedance level.<br />
3. Do not attempt to disassemble the camera to gain access to the internal components.<br />
Refer servicing to your dealer.<br />
4. Never face the camera towards the sun or any bright or reflective light, which may<br />
cause smear on the picture and possible damage to the CCD.<br />
5. Do not remove the serial number sticker.<br />
6. Do not expose the camera to rain or other type of liquid.<br />
4
1. CAUTIONS<br />
Correct Disposal of This Product<br />
(Waste Electrical & Electronic Equipment)<br />
(Applicable in the European Union and other European countries with<br />
separate collection systems)<br />
This marking shown on the product or its literature, indicate that it should not<br />
be disposed with other household wastes at the end of its working life. To<br />
prevent possible harm to the environment or human health from uncontrolled<br />
waste disposal, please separate this from other types of wastes and recycle it<br />
responsibly to promote the sustainable reuse of material resources.<br />
This product should not be mixed with other commercial wastes purchased this<br />
product, or their local government office, for details of where and how they can<br />
take item for environmentally safe recycling.<br />
Business users should contact their supplier and check the terms and<br />
conditions of the purchase contract.<br />
Household users should contact either the retailer where they for disposal.<br />
5
2. FEATURES<br />
• High Resolution<br />
1/3˝ SONY Progressive Color CMOS Sensor,<br />
1280x720 30fps<br />
• Supports Various <strong>Digital</strong> <strong>Video</strong> Output<br />
720p 30, 720p 60<br />
720p 25, 720p 50<br />
• <strong>Video</strong> Outputs<br />
Primary <strong>HD</strong>-SDI (BNC)<br />
Test/Setup TV Out (BNC), NTSC /PAL selectable<br />
• S/N Ratio : Max 50dB<br />
• OSD menu for setup and configuration<br />
• Lens Control<br />
Manual Iris<br />
DC Iris<br />
• Provides True Day/Night Capability with Motorized IR Cut Filter<br />
• Accepts CS Mount Lenses : Adapter included for C-Mount Lens<br />
• Power Source : DC 12V<br />
6
3. EQUIPMENT AND ACCESSORIES<br />
<strong>HD</strong> <strong>CCTV</strong><br />
<strong>Digital</strong> <strong>Video</strong> <strong>Camera</strong><br />
C-MOUNT ADAPTOR RING<br />
OPERATION MANUAL<br />
TERMINAL BLOCK<br />
* NOTE<br />
PLEASE REMOVE PROTECTION FILM<br />
7
4. CAMERA COMPONENT DESCRIPTIONS<br />
• FRONT<br />
C-MOUNT<br />
ADAPTOR RING<br />
(Optional - use for C-Mount lens only)<br />
MOUNTING HOLE(1/4"-20 UNC)<br />
8<br />
MOUNTING HOLE(1/4"-20 UNC)<br />
AUTO IRIS JACK<br />
BACK FOCUS CONTROL LEVER
4. CAMERA COMPONENT DESCRIPTIONS<br />
• BACK<br />
①. MENU SET BUTTON<br />
MENU NAVIGATION BUTTONS<br />
②. UP BUTTON<br />
③. DOWN BUTTON<br />
④. LEFT BUTTON<br />
⑤. RIGHT BUTTON<br />
⑥. POWER LED<br />
⑦. SDI OUT BNC<br />
⑧. VIDEO OUT BNC<br />
① ②<br />
④<br />
③<br />
⑪<br />
⑨. MIC IN JACK(Future Feature)<br />
⑩. AUDIO OUT JACK(Future Feature)<br />
⑩<br />
⑤<br />
⑨<br />
⑪. TERMINAL (POWER, <strong>Digital</strong> Input/Output) “Note : <strong>Digital</strong> input and Output for Future use”<br />
9<br />
⑦<br />
⑥<br />
⑧
5. INSTALLATION<br />
• LENS CONNECTION<br />
Mega Pixel Lenses are sold separately. Lenses such as a DC auto iris lens,<br />
CS-Mount lens and C-Mount lens can be used ( adapter included for C-Mount Lens).<br />
NOTE<br />
• Please keep the lens clean.<br />
• Any foreign objects and Finger marks on the lens can cause<br />
inferior image quality in low light level conditions.<br />
After attaching the lens to the camera please insert the connection plug from the DC<br />
auto iris lens cable into the auto lens connector, which is located on the side of the<br />
camera<br />
*NOTE<br />
When using a CS Mount Lens, you can attach it directly to camera,<br />
If useing a C Mount lens, you must attach the ring spacer provided,<br />
otherwise it will crack the image sensor.<br />
10<br />
C-mount lens : 10mm or less<br />
CS-mount lens : 5mm or less
5. INSTALLATION<br />
Installation of C-Mount Lens<br />
Installation of CS-Mount Lens<br />
11<br />
C to CS-MOUNT ADAPTOR RING<br />
Lens<br />
Lens
5. INSTALLATION<br />
• CONNECTION<br />
BNC FEMALE<br />
VIDEO<br />
12<br />
TO <strong>HD</strong> SDI IN<br />
DC12V REGULATED<br />
POWER SUPPLY<br />
<strong>HD</strong><strong>CCTV</strong> DVR<br />
OR OTHER<br />
<strong>HD</strong><strong>CCTV</strong> SIGNAL<br />
EQUIPMENT<br />
TO VIDEO IN<br />
HANDHELD
6. DIMENSIONS<br />
Unit: mm(inch)<br />
72.58(2.86)<br />
66(2.60)<br />
C-MOUNT ADAPTOR RING<br />
(Optional use for C-Mount Lenses only)<br />
MOUNTING HOLE<br />
(1/4"-20 UNC, Depth 5)<br />
30(1.18)<br />
13<br />
145(5.71) / (C-Mount)<br />
138.55(5.45) / (CS-Mount)<br />
AUTO IRIS JACK<br />
MOUNTING HOLE
7. SPECIFICATION<br />
Image Device 1/3” SONY Mega-Pixel Color Progressive CMOS<br />
Effective Pixels 1329 (H) x 1049 (V) 30fps<br />
Unit cell size 3.63um (H) x 3.63um (V)<br />
<strong>Video</strong> output mode<br />
<strong>HD</strong><strong>CCTV</strong> : 720p 30, 720p 60, 720p 25, 720p 50<br />
TV Out : NTSC / PAL selectable<br />
H.Resolution More than 800 TV Lines<br />
Minimum illumination 1.0 Lux<br />
S/N Ratio Max 50dB<br />
Shutter speed Auto / Manual selectable<br />
Min. Exposure Time 110.86us (1/9020 sec)<br />
Flickerless Off / 60Hz(50Hz) selectable<br />
True Day/Night IR Cut /Pass Filter change<br />
White Balance ATW / Push / Manual<br />
BLC On/Off (by OSD)<br />
Lens Control Manual Iris, DC Iris<br />
OSD Menu Yes<br />
Power DC 12V<br />
Consumption Max 500mA<br />
Dimension (W x H x D) 72.5mm x 66mm x 138.5mm / 2.86inch x 2.60inch x 5.45inch<br />
Weight (g / lb) 410g / 0.90lb<br />
Lens Mount CS/C-mount<br />
Conformity CE, FCC<br />
Temperature/Humidity<br />
(non-condensing)<br />
Operation : Celsius -10~50 (Fahrenheit 14~122) / 20~80%<br />
Storage :Celsius -20~70 (Fahrenheit -4~158) / 20~95%<br />
Specifications and designs are subject to change without notice for improving the functionality of this product.<br />
14
8. DIGITAL INPUT/OUTPUT<br />
• <strong>Digital</strong> Input Port (Future Feature, Use for CDS Mode Only)<br />
MicroController<br />
CAMERA<br />
A/D Port<br />
10bit resolution,<br />
Vtop = 3.3V, Vbot = 0V<br />
R:1.5K<br />
GPIN PORT<br />
(3.3V)<br />
External CDS is only active when day and night mode is set to EXT Mode in the OSD.<br />
CDS : External device to control day and night status<br />
• <strong>Digital</strong> Output Port ( Future Feature)<br />
MicroController GPOUT PORT<br />
(3.3V)<br />
CAMERA EXTERNAL DEVICE<br />
3.3V<br />
R:270<br />
15<br />
Day and Night<br />
CDS MODE<br />
Photo<br />
Coupler<br />
R:10K<br />
DI<br />
<strong>Digital</strong> Input Port<br />
DO<br />
<strong>Digital</strong> Output Port<br />
EXTERNAL DEVICE<br />
Sensor Input<br />
(0~3.3V)<br />
<strong>Digital</strong> Output<br />
(0/3.3V)
9. OSD MANUAL<br />
• Menu structure<br />
- Main Menu<br />
- VIDEO OUT Menu<br />
VIDEO OUT<br />
LENS<br />
EXPOSURE<br />
WHITE BALANCE<br />
DAY / NIGHT<br />
IMAGE<br />
SPECIAL<br />
VIDEO OUT SDI FORMAT<br />
TV OUT FORMAT NTSC / PAL<br />
16<br />
720p 30Hz / 720p 60Hz<br />
720p 25Hz / 720p 50Hz
8. OSD MANUAL<br />
- LENS Menu<br />
LENS LENS TYPE<br />
- EXPOSURE Menu<br />
EXPOSURE BRIGHTNESS<br />
BRIGHTNESS 0 ~ 127<br />
IRIS SPD 0 ~ 112<br />
SHUTTER MODE<br />
AGC MAX<br />
BLC<br />
SHUT LEVEL(Shutter Level)<br />
17<br />
DC IRIS / MANUAL IRIS<br />
DC IRIS<br />
0 ~ 127<br />
0 ~ 150<br />
ON / OFF<br />
AUTO / MANUAL<br />
/ FLK 60Hz(FLK 50Hz)<br />
MANUAL<br />
0~215
9. OSD MANUAL<br />
- WHITE BALANCE Menu<br />
WHITE BALANCE MODE<br />
- DAY / NIGHT Menu<br />
DAY / NIGHT MODE<br />
- IMAGE Menu<br />
IMAGE SHARPNESS<br />
R GAIN 0 ~ 255<br />
B GAIN 0 ~ 255<br />
18<br />
ATW / PUSH / MANUAL<br />
DAY LEVEL 0 ~ 127<br />
NIGHT LEVEL 0 ~ 127<br />
IMAGE FLIP<br />
DNR<br />
GAMMA<br />
MANUAL<br />
COLOR / AUTO / EXT / BW<br />
AUTO / EXT<br />
0 ~ 15<br />
OFF, H FLIP, V FLIP, H/V FLIP<br />
OFF, LOW, MID, HIGH<br />
OFF, 1.0, 1.8, 2.2, 2.6
9. OSD MANUAL<br />
- SPECIAL Menu<br />
SPECIAL SYSTEM INFO<br />
USER SET<br />
COMM/GPIO SET<br />
FOCUS MODE ON / OFF<br />
LANGUAGE<br />
19<br />
SAVE USER SET<br />
LOAD USER SET<br />
CLEAR USER SET<br />
FACTORY RESET<br />
CAMERA RESET<br />
RS485 Address<br />
GP IN Status<br />
GP OUT Control<br />
0~255<br />
LOW / HIGH
9. OSD MANUAL<br />
• ICONS<br />
- : Value adjustment(use LEFT/RIGHT button).<br />
- : Select Sub Menu(use SET button).<br />
- : Execution command(use SET button).<br />
- : Return to previous menu.<br />
- : Menu OFF.<br />
- : Information.<br />
The [SETUP] menu will show up when you push the SET button.<br />
• Main Menu<br />
[ SETUP ]<br />
VIDEO OUT<br />
LENS<br />
EXPOSURE<br />
WHITE BALANCE<br />
DAY / NIGHT<br />
IMAGE<br />
SPECIAL<br />
EXIT<br />
SAVE & EXIT<br />
- VIDEO OUT : Select SDI Out format and TV Out format.<br />
- LENS : Select the IRIS TYPE and adjust IRIS control value.<br />
- EXPOSURE : Adjust Exposure control.<br />
- WHITE BALANCE : Adjust White balance control.<br />
- DAY / NIGHT : Day / Night control.<br />
- IMAGE : Apply Image processing effects.<br />
- SPECIAL : System setting, IO setting, USER SET setting<br />
- EXIT : Close OSD Menu.<br />
- SAVE & EXIT : Save and Close OSD Menu. These settings are<br />
loaded and applied automatically when the <strong>Camera</strong><br />
is power on.<br />
20<br />
720p 60Hz<br />
DC IRIS<br />
AUTO<br />
AUTO
9. OSD MANUAL<br />
• <strong>Video</strong> Out<br />
[ VIDEO OUT ]<br />
SDI FORMAT<br />
TV OUT FORMAT<br />
ESC<br />
EXIT<br />
SAVE & EXIT<br />
• LENS<br />
[ LENS ]<br />
LENS TYPE<br />
BRIGHTNESS<br />
IRIS SPD<br />
ESC<br />
EXIT<br />
SAVE & EXIT<br />
720p 60Hz<br />
NTSC<br />
DC IRIS<br />
123 1<br />
- SDI Format<br />
Select SDI output Formats – 720p 30Hz,<br />
720p 60Hz, 720p 25Hz and 720p 50Hz.<br />
- TV Out Format<br />
Select NTSC / PAL.<br />
Note : NTSC or PAL <strong>Video</strong> Format can be<br />
selected by pressing the RIGHT Button even<br />
when the OSD Menu is turned off<br />
- ESC<br />
Back to the previous.<br />
- LENS TYPE<br />
Using Left / Right button, Select DC IRIS or<br />
MANUAL IRIS.<br />
- BRIGHTNESS<br />
This menu appeared on screen when DC IRIS<br />
is selected.<br />
Using Left / Right button, adjust Brightness<br />
value.<br />
- IRIS SPD<br />
This menu appears on screen when DC IRIS<br />
is selected.<br />
Using Left / Right button, adjust Iris speed<br />
value.<br />
21
9. OSD MANUAL<br />
• EXPOSURE<br />
[ EXPOSURE ]<br />
• SHUTTER (Sub Menu)<br />
- BRIGHTNESS<br />
Same as the BRIGHTNESS value in LENS<br />
Menu. Using Left / Right button, adjust<br />
Brightness value.<br />
- SHUTTER<br />
Using Set button, go to the SHUTTER sub<br />
menu.<br />
- AGC MAX<br />
Using Left / Right button, adjust AGC Max<br />
value.<br />
- BLC<br />
Using Left / Right button, select on/off of Back-<br />
Light Compensation Control.<br />
- MODE<br />
Using Left / Right button, select Shutter Control<br />
modes – AUTO, MANUAL and FLK 60Hz<br />
(FLK 50Hz).<br />
AUTO Auto Exposure mode<br />
MANUAL Manual Exposure mode<br />
FLK 60Hz (FLK 50Hz) Flickerless mode (Default)<br />
- SHUT LEVEL (Shutter Level)<br />
This menu can be accessed when the Shutter Speed is set to MANUAL.<br />
Use the Left / Right button to adjust the shutter speed control level.<br />
Instead of using the default conventional shutter speed of 1/60,<br />
you may choose other speeds. The speeds corresponding to the value of shutter<br />
level are listed below.<br />
Shutter<br />
Speed<br />
BRIGHTNESS<br />
SHUTTER<br />
AGC MAX<br />
BLC<br />
ESC<br />
EXIT<br />
SAVE & EXIT<br />
[ SHUTTER ]<br />
MODE<br />
SHUT LEVEL<br />
ESC<br />
EXIT<br />
SAVE & EXIT<br />
123<br />
AUTO<br />
10<br />
OFF<br />
MANUAL 1<br />
1/50 1/60 1/100 1/120 1/250 1/500 1/700 1/<br />
1000<br />
22<br />
1/<br />
1600<br />
1/<br />
2500<br />
1/<br />
5000<br />
1/<br />
7000<br />
Level 178 169 142 135 105 65 46 32 20 12 6 4 3<br />
1/<br />
10000
9. OSD MANUAL<br />
• WHITE BALANCE<br />
[ WHITE BALANCE ]<br />
MODE<br />
R GAIN<br />
B GAIN<br />
ESC<br />
EXIT<br />
SAVE & EXIT<br />
MANUAL<br />
100<br />
100<br />
- MODE<br />
Using Left / Right button, select White balance modes – ATW, PUSH<br />
and MANUAL.<br />
ATW Auto Trace White Balance mode<br />
PUSH White Balance Push Lock mode (Auto White Balance Control & Lock)<br />
MANUAL Manual White Balance mode<br />
- R GAIN<br />
This menu appears on screen when MANUAL is selected.<br />
Using Left / Right button, adjust Red Gain.<br />
-B GAIN<br />
This menu appears on screen when MANUAL is selected.<br />
Using Left / Right button, adjust Blue Gain.<br />
* NOTE<br />
R GAIN and B GAIN is correlated with the G GAIN internally, so the R GAIN and B<br />
GAIN may increase or decrease with the other color gain.<br />
23
9. OSD MANUAL<br />
• Day / Night<br />
[ DAY / NIGHT ]<br />
MODE<br />
DAY LEVEL<br />
NIGHT LEVEL<br />
ESC<br />
EXIT<br />
SAVE & EXIT<br />
AUTO<br />
50<br />
100<br />
- MODE<br />
Using Left / Right button, select TDN(True Day & Night) modes – AUTO,<br />
EXT, COLOR, and BW.<br />
AUTO Controlled by AGC level in the processor. (AGC Type)<br />
EXT Controlled by signal from CDS sensor. (CDS Type)<br />
COLOR Fixed Day State. Color Image.<br />
BW Fixed Night State. BW Image.<br />
- DAY/Night Levels<br />
This menu can be displayed by selecting AUTO or EXT in the MODE Menu.<br />
The Day Level and Night Level thresholds function independently from each other.<br />
- DAY LEVEL<br />
The threshold of change from B&W Mode to Color Mode can be adjusted with values<br />
between 0 - 127. A lower value will prevent the camera from switching to Color until<br />
the scene becomes brighter.<br />
- NIGHT LEVEL<br />
The threshold of change from Color Mode to B&W Mode can be adjusted with values<br />
between 0 - 127. A higher value will prevent the camera from switching to B&W until<br />
the scene becomes darker.<br />
Note: These is a built in offset between the Day and Night Level to prevent a<br />
switching level conflict. The effective Day level can not be set lower than<br />
the Night level<br />
24
9. OSD MANUAL<br />
• IMAGE<br />
- SHARPNESS: Using Left / Right button, adjust sharpness value.<br />
- IMAGE FLIP: Using Left / Right button, select Flip modes – OFF, H FLIP, V FLIP and H/V FLIP.<br />
- DNR: Using Left / Right button, select <strong>Digital</strong> Noise Reduction Modes - OFF, LOW, MID, HIGH.<br />
- GAMMA: Using Left / Right button, adjust gamma control setting.<br />
• SPECIAL<br />
[ SPECIAL ]<br />
SYSTEM INFO<br />
USER SET<br />
COMM / GPIO SET<br />
FOCUS MODE<br />
• LANGUAGE<br />
ESC<br />
EXIT<br />
SAVE & EXIT<br />
[ SYSTEM ]<br />
• TYPE<br />
• MODULE ID<br />
• CAMERA VER<br />
• IF F/W VER<br />
ESC<br />
EXIT<br />
[ IMAGE ]<br />
SHARPNESS<br />
IMAGE FILP<br />
DNR<br />
GAMMA<br />
ESC<br />
EXIT<br />
SAVE & EXIT<br />
[X]<br />
ADDR 0<br />
OFF<br />
ENGLISH<br />
<strong>HD</strong>-SDI CAMERA<br />
00_0000<br />
02.02_0000R05<br />
01.00_1110R00<br />
- SYSTEM INFO<br />
Display <strong>Camera</strong> Version, SDI IF F/W Version &<br />
other information.<br />
25<br />
0<br />
OFF<br />
OFF<br />
1.0
9. OSD MANUAL<br />
- USER SET<br />
Using Set button, display [USER SET] sub menu.<br />
- COMM/GPIO SET<br />
Using Set button, display [COMM/GPIO SET] sub menu.<br />
- FOCUS MODE<br />
In focus mode, the iris becomes fully open, electronic shutter controls the light<br />
level, and the TV out screen zooms into the center in order to make focusing<br />
easier. When in Focus Mode, the OSD Menu is not displayed. The OSD Menu can<br />
be toggled on and off using the Left / Right button.<br />
> TV Out Image<br />
FOCUS MODE OFF FOCUS MODE ON<br />
- LANGUAGE<br />
Select OSD Language. (Only English is available, currently)<br />
• USER SET (Sub Menu)<br />
[ USER SET ]<br />
SAVE USER SET<br />
LOAD USER SET<br />
CLEAR USER SET<br />
FACTORY RESET<br />
CAMERA RESET<br />
ESC<br />
EXIT<br />
- SAVE USER SET<br />
Saves a copy of the current configuration set by the user into<br />
a separate memory area. If user set data has been saved,<br />
an [O] mark is displayed and if not, an [X] mark is displayed.<br />
[X]<br />
User Set settings can NOT be loaded automatically when<br />
the camera is powered on. They can only be loaded<br />
manually via the “LOAD USER SET” OSD choice. To make<br />
the values in a User Set become the configuration loaded<br />
when the camera is powered on, first load that User set,<br />
then choose “SAVE AND EXIT” in any of the OSD Screens;<br />
the current User Set OSD Settings will be written to the<br />
power on configuration. These steps effectively copy a User<br />
Set to the power on configuration.<br />
- LOAD USER SET<br />
Load the saved user set, and applies to <strong>Camera</strong>.<br />
- CLEAR USER SET<br />
Clear all saved user set.<br />
- FACTORY RESET<br />
Clear all setting and initialize to factory setting.<br />
Clear user set.<br />
- CAMERA RESET<br />
Reboot the <strong>Camera</strong>.<br />
26
9. OSD MANUAL<br />
• COMM/GPIO SET (Sub Menu)<br />
[ COM / GPIO SET ]<br />
RS485 Address (Future Feature)<br />
• GP IN Status<br />
GP OUT Control<br />
ESC<br />
EXIT<br />
SAVE & EXIT<br />
- RS485 Address<br />
Future Feature.<br />
LOW<br />
LOW<br />
- GP IN Status ( CDS Mode Only <strong>Digital</strong> input Future Feature)<br />
If the OSD is set to the EXT mode in the [DAY/NIGHT] menu, this port is used to<br />
connect to a photo-sensor.<br />
- GP OUT Control (Future Feature).<br />
For control of an external device by the camera.<br />
27
EverFocus Electronics Corp.<br />
Corporate Headquarters:<br />
12F, No.79 Sec. 1 Shin-Tai Wu Road,<br />
Hsi-Chih, Taipei, Taiwan<br />
TEL: +886-2-26982334<br />
FAX: +886-2-26982380<br />
www.everfocus.com.tw<br />
marketing@everfocus.com.tw<br />
U.S.A - California Office:<br />
1801 Highland Avenue Units A & B<br />
Duarte, CA 91010<br />
TEL: +1-626-844-8888<br />
FAX: +1-626-844-8838<br />
www.everfocus.com<br />
sales@everfocus.com<br />
Europe - Germany Office:<br />
Albert-Einstein-Strasse 1,<br />
D-46446 Emmerich, Germany<br />
TEL: +49-2822-93940<br />
FAX: +49-2822-939495<br />
www.everfocus.de<br />
info@everfocus.de<br />
India Office:<br />
Suite 803, Housefin Bhavan, C-21,<br />
Bandra Kurla Complex, Bandra (East),<br />
Mumbai 400051. India.<br />
TEL: +91-222-444-8791<br />
FAX: +91-222-444-8790<br />
www.everfocus.in<br />
Your EverFocus product is designed Ihr EverFocus Produkt wurde<br />
and manufactured with high quality entwickelt und hergestellt mit qualitativ<br />
materials and components which can hochwertigen Materialien und<br />
be recycled and reused.<br />
Komponenten, die recycelt und wieder<br />
This symbol means that electrical and verwendet werden können.<br />
electronic equipment, at their end-of- Dieses Symbol bedeutet, dass<br />
life, should be disposed of separately elektrische und elektronische Geräte<br />
from your household waste.<br />
am Ende ihrer Nutzungsdauer vom<br />
Please, dispose of this equipment at Hausmüll getrennt entsorgt werden<br />
your local community waste<br />
sollen.<br />
collection/recycling centre.<br />
Bitte entsorgen Sie dieses Gerät bei<br />
In the European Union there are Ihrer örtlichen kommunalen<br />
separate collection systems for used Sammelstelle oder im Recycling Centre.<br />
electrical and electronic product. Helfen Sie uns bitte, die Umwelt zu<br />
Please, help us to conserve the<br />
environment we live in!<br />
erhalten, in der wir leben!<br />
China Office:<br />
Room 609, Technology Trade Building,<br />
Shangdi Information Industry Base,<br />
Haidian District, Beijing, China 100085<br />
TEL: +86-10-62973336~39<br />
FAX: +86-10-62971423<br />
www.everfocus.com.cn<br />
marketing@everfocus.com.cn<br />
U.S.A - New York Office:<br />
415 Oser Avenue Unit S<br />
Happauge, NY 11788<br />
TEL: +1-631-436-5070<br />
FAX: +1-631-436-5027<br />
www.everfocus.com<br />
sales@everfocus.com<br />
Japan Office:<br />
5F Kinshicho city Building,<br />
2-13-4 Koto-Bashi,<br />
Sumida-Ku, Tokyo, 130-0022 Japan<br />
TEL: +81-3-5625-8188<br />
FAX: +81-3-5625-8189<br />
www.everfocus.co.jp<br />
info@everfocus.co.jp<br />
UK Office:<br />
Unit 12 Spitfire Business Park<br />
Hawker Road<br />
Croydon, CR0 4WD<br />
London: 0845 430 9999<br />
Telford: 0845 430 8888<br />
Fax: 020 8649 9907<br />
uk.support@EverFocus.com<br />
28