iPhone DVR Client User Manual
iPhone DVR Client User Manual iPhone DVR Client User Manual
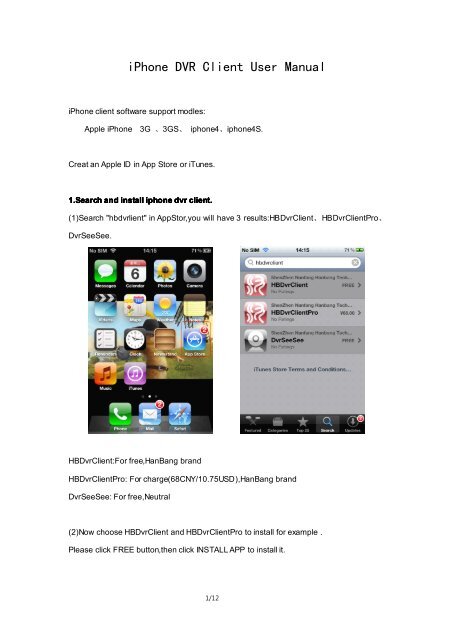
iPhone DVR Client User Manual iPhone client software support modles: Apple iPhone 3G 、3GS、 iphone4、iphone4S. Creat an Apple ID in App Store or iTunes. 1.Search and install iphone dvr client. (1)Search "hbdvrlient" in AppStor,you will have 3 results:HBDvrClient、HBDvrClientPro、 DvrSeeSee. HBDvrClient:For free,HanBang brand HBDvrClientPro: For charge(68CNY/10.75USD),HanBang brand DvrSeeSee: For free,Neutral (2)Now choose HBDvrClient and HBDvrClientPro to install for example . Please click FREE button,then click INSTALL APP to install it. 1/12
- Page 2 and 3: (3).After installed,you will found
- Page 4 and 5: User name: the user name you have s
- Page 6 and 7: (3) Press “Back”,return to Prev
- Page 8 and 9: 5. 5.Browse Browse caputure photo.
- Page 10 and 11: a) Press“Remote Play”,enter Vid
- Page 12: Press Search button. Press "Show" b
<strong>iPhone</strong> <strong>DVR</strong> <strong>Client</strong> <strong>User</strong> <strong>Manual</strong><br />
<strong>iPhone</strong> client software support modles:<br />
Apple <strong>iPhone</strong> 3G 、3GS、 iphone4、iphone4S.<br />
Creat an Apple ID in App Store or iTunes.<br />
1.Search and install iphone dvr client.<br />
(1)Search "hbdvrlient" in AppStor,you will have 3 results:HBDvr<strong>Client</strong>、HBDvr<strong>Client</strong>Pro、<br />
DvrSeeSee.<br />
HBDvr<strong>Client</strong>:For free,HanBang brand<br />
HBDvr<strong>Client</strong>Pro: For charge(68CNY/10.75USD),HanBang brand<br />
DvrSeeSee: For free,Neutral<br />
(2)Now choose HBDvr<strong>Client</strong> and HBDvr<strong>Client</strong>Pro to install for example .<br />
Please click FREE button,then click INSTALL APP to install it.<br />
1/12
(3).After installed,you will found “HBDvr<strong>Client</strong>” and "HBDvr<strong>Client</strong>Pro".<br />
2.Set iphone dvr client<br />
(1)Click HBDvr client,uou can see the HBDvr<strong>Client</strong> main menu.<br />
2/12
(2).Open HBDvr<strong>Client</strong>->Device List->Edit->Add->Device Details->OK.<br />
Input the Name, Address,Port,<strong>User</strong> name,Password,Channels.<br />
Name:dvr device name,it’s depend on you.<br />
Address:input your dvr WLAN IP address or domain Name address.<br />
Port: command port(listen port), same with the command port you have set in your <strong>DVR</strong>.<br />
platform server setting interface.<br />
★ default command port(listen port)is 8101,value range is 8000-9000.<br />
HBDvr<strong>Client</strong> V2.1.5 use HanBang Protocol instead of old Huake protocol(old<br />
command port 15966).<br />
3/12
<strong>User</strong> name: the user name you have set in your <strong>DVR</strong> .<br />
Password: same with user password you have set in your <strong>DVR</strong>.<br />
Channels:the dvr channels<br />
Press "OK " to save the settings.<br />
Press “Back” button back to Device Manage menu<br />
After save the adding content,you can check the device detail.<br />
4/12
3.Live view. view.<br />
(1)Main menu->Live view<br />
“1”:channel number<br />
“2”:Direction key of PTZ control<br />
“3”:switch to next group channel numbers<br />
“4”:Pause/Play<br />
“5”:Snapshot<br />
“6”:get alarm message<br />
“7”:Device List and choose channel<br />
“8”:About<br />
“9”:Channel Preview<br />
(2)Press “+”in split preview screen center,enter Device List.Then you can choose which<br />
channel you want to preview at this split screen.<br />
5/12
(3) Press “Back”,return to Preview interface.After all 4 channels connected,it shows as<br />
below picture.<br />
Note: You can press or to choose new channels to preview.<br />
(4)Press“PTZ”,you can enter PTZ control interface.From left to right,they are direction<br />
control keys,Zoom in/Zoom out,Focus control,Iris+/Iris-.After chosen split screen,you can<br />
control the PTZ camera.And you can double click split screen to full screen.Then control<br />
the PTZ camera.<br />
6/12
Note:<br />
1.Pls set the PTZ parameters before you control PTZ by <strong>iPhone</strong>.About PTZ<br />
setttings,please refer to <strong>DVR</strong> user mauaul in product CD.<br />
2.This version will not automatically identify <strong>DVR</strong> channel number,display channels<br />
number subject to channles number which user had set.<br />
4. 4.Device Device settings.<br />
Open Main menu->Device,you can set channel sub stream(net stream).<br />
7/12
5. 5.Browse Browse caputure photo.<br />
(1)Open Main menu->Photos,you can browse the photos which you captured by button<br />
in Live View.<br />
(2)Click one photo,you can check photo in detail.<br />
Photo button:<br />
“saveto<strong>iPhone</strong>photo”:Save the photo into <strong>iPhone</strong> Photos Libary<br />
:switch to pre photo<br />
: switch to next photo<br />
8/12
:remove current photo.Click it,it show messages:<br />
Press "OK",confirm remove;Press "Cancel",cancel remove.<br />
6. 6.Check Check <strong>iPhone</strong> dvr client software version.<br />
Open Main menu->About,you can check version as below picture:<br />
7.HBDvr<strong>Client</strong>Pro guide. guide.<br />
Compared with HBDvr<strong>Client</strong>,HBDvr<strong>Client</strong>Pro add the function:Remore Play.<br />
9/12
a) Press“Remote Play”,enter Video record check interface.<br />
"1":search date<br />
"2":search start time<br />
"3":search end time<br />
"4":select device<br />
"5":select channel<br />
"6":video record search type:All,<strong>Manual</strong>,Schedual,Motion,Alarm<br />
"7":Search record<br />
"8":search record<br />
10/12
Choose date choose time<br />
Choose device choose channel<br />
Choose record type<br />
11/12
Press Search button.<br />
Press "Show" button,switch to search interface.Press "Hide" button,swtich to video record<br />
data interface.<br />
Select one record to play.<br />
"1":play progress bar<br />
"2":Pause/Play<br />
"3":capture photo<br />
12/12


