Flexitemp Instructions - Euroheat
Flexitemp Instructions - Euroheat
Flexitemp Instructions - Euroheat

You also want an ePaper? Increase the reach of your titles
YUMPU automatically turns print PDFs into web optimized ePapers that Google loves.
Commissioning the BM <strong>Flexitemp</strong><br />
Once the installation has been completed the <strong>Flexitemp</strong> requires adjusting to correctly control the minimum<br />
oil flow rate when the <strong>Flexitemp</strong> is de-energized.<br />
The protruding control lever of the <strong>Flexitemp</strong> presses down on the valve firing rate pin. The degree to which<br />
this is pressed determines the flow rate to the burner. To correctly adjust the <strong>Flexitemp</strong> the appliance must be<br />
fully installed and normal stove commissioning completed.<br />
Two checks and possible adjustments need to be completed for correct operation.<br />
A<br />
Remove the coal effect from the appliance.<br />
Light the appliance as described in the operation<br />
instructions.<br />
Once the stove has reached operational temperature<br />
turn the main control knob to the number “1”<br />
position.<br />
The control to the <strong>Flexitemp</strong> must be calling for heat<br />
so that the <strong>Flexitemp</strong> control lever is not touching the<br />
valve firing rate pin.<br />
Observe the flame size.<br />
Remove the electrical power from the <strong>Flexitemp</strong> by<br />
switching off the connecting time clock or other control<br />
system.<br />
The <strong>Flexitemp</strong> control lever should now drop and press<br />
on to the Valve firing rate pin.<br />
The flame size should not change. If the flame reduces<br />
in size the <strong>Flexitemp</strong> control lever is pressing to greatly<br />
on the Valve firing pin.<br />
BM <strong>Flexitemp</strong>, Adjust the low position limit screw<br />
clockwise in small increments until the flame size<br />
returns to the originally observed size.<br />
B<br />
Once section “A” of <strong>Flexitemp</strong> commissioning has<br />
been completed section “B” checks that the <strong>Flexitemp</strong><br />
control lever will reduce the oil flow rate to the number<br />
“1 “ setting and not for example to the number “2” oil<br />
control setting.<br />
With the <strong>Flexitemp</strong> de-energized turn the oil control<br />
knob to the number “4” setting. The flame size should<br />
not change. If The flame size increases the <strong>Flexitemp</strong><br />
oil control lever is not pressing sufficiently on to the<br />
valve firing pin.<br />
BM <strong>Flexitemp</strong>, Turn the low position limit screw<br />
anticlockwise in small increments until the flame<br />
returns to the number “1” setting.<br />
© EUROHEAT DISTRIBUTORS (H.B.S) LTD. Nov. 2004 5 Operating <strong>Instructions</strong> Part number IN1051 Edition B<br />
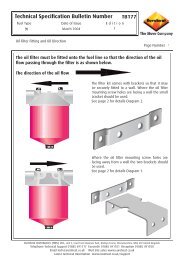
FIG82A<br />
Minimum for low fire<br />
setting<br />
E x c e p t a b l e<br />
Flame Patterns<br />
Valve Firing Rate Pin<br />
Maximum for low<br />
fire setting<br />
Unacceptable Flame Pattern<br />
Caution after adjusting wait 3-4 minutes<br />
for the flame pattern to settle before<br />
continuing commissioning.