Flexitemp Instructions - Euroheat
Flexitemp Instructions - Euroheat
Flexitemp Instructions - Euroheat

Create successful ePaper yourself
Turn your PDF publications into a flip-book with our unique Google optimized e-Paper software.
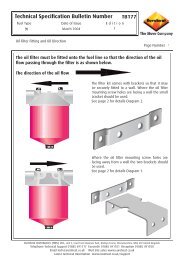
Installing the <strong>Flexitemp</strong> to BM and CI Oil Control<br />
The wiring of all electrical components fi tted to a stove should allow for the stove’s surface and radiated heat,<br />
no electrical wiring should be undertaken by anyone not suitably qualifi ed and conversant with any regulations,<br />
and necessary precautions applicable to the installation of the <strong>Flexitemp</strong> unit. All planned electrical connections<br />
should be installed prior to the attachment of the <strong>Flexitemp</strong> to the Oil Control valve.<br />
The stove must be cold and all electrical and fuel supplies should be isolated when fi tting any components to<br />
the stove.<br />
The three top-plate mounting screws which will be covered by the <strong>Flexitemp</strong> unit should be removed. The<br />
cover of the <strong>Flexitemp</strong> unit should be removed, placed over the valve so that the <strong>Flexitemp</strong> operating arm pad<br />
is concentric with the valve fi ring rate pin and the three holes in the <strong>Flexitemp</strong> body allow the top-plate screws<br />
to be refi tted, passing through, and securing the <strong>Flexitemp</strong> body. Ensure the valve control knob will not foul<br />
against the <strong>Flexitemp</strong> cover when replaced and that the auto/manual lever is set to automatic.<br />
Turn the valve to its minimum “on” position and adjust the <strong>Flexitemp</strong> low position limit screw to cause the<br />
operating arm pad to rest on, but not infl uence the valve fi ring rate pin.<br />
The <strong>Flexitemp</strong> and its control should be subjected to a full mechanical and electrical operation test.<br />
Note:<br />
See <strong>Flexitemp</strong> commissioning instructions to complete installation.<br />
CI Oil Control Valves<br />
remove low setting location<br />
clicker<br />
Valve fi ring rate pin<br />
© EUROHEAT DISTRIBUTORS (H.B.S) LTD. 2004 4<br />
Operating <strong>Instructions</strong> Part number IN1051 Edition B<br />
6<br />
OFF<br />
5<br />
Override<br />
1<br />
3<br />
Automatic<br />
Low position<br />
Limit screw