EHEST Off-airfield Landing Site Operations - Eurocopter
EHEST Off-airfield Landing Site Operations - Eurocopter
EHEST Off-airfield Landing Site Operations - Eurocopter

You also want an ePaper? Increase the reach of your titles
YUMPU automatically turns print PDFs into web optimized ePapers that Google loves.
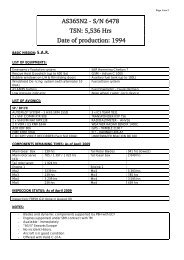
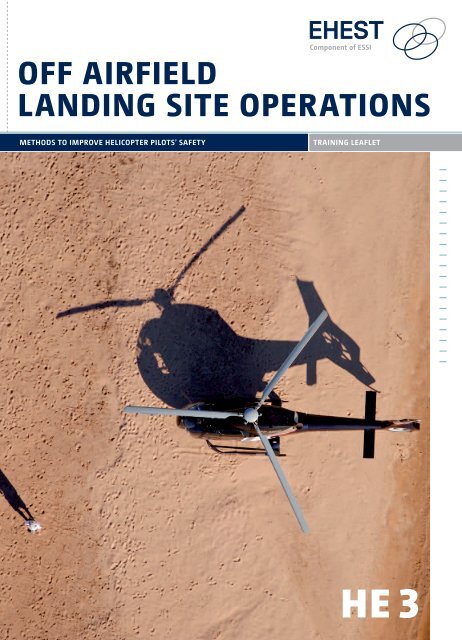
OFF AIRFIELD<br />
LANDING SITE OpERATIONS<br />
mEtHodS to improvE HElicoptEr pilotS’ SafEty<br />
training lEaflEt<br />
HE 3
4 >> <strong>Off</strong> Airfield <strong>Landing</strong> <strong>Site</strong> <strong>Operations</strong>
cONTENT<br />
Training leaflet >> 3<br />
Introduction 5<br />
1.0 Planning and Preparation 6<br />
2.0 <strong>Landing</strong> <strong>Site</strong> Identification 8<br />
3.0 <strong>Landing</strong> <strong>Site</strong> Recce 9<br />
3.1 Introduction<br />
3.2 Types of Recce<br />
3.3 The Recce<br />
3.4 The Circuit<br />
4.0 Types of Approach 16<br />
4.1 Single Angle Approach<br />
4.2 Double Angle Approach<br />
4.3 Vertical Approach<br />
5.0 Manoeuvring in the LS 18<br />
6.0 Departure 20<br />
6.1 Towering Take <strong>Off</strong><br />
6.2 Vertical Climb (to outside ground effect)<br />
7.0 Pilot Errors 22
4 >> <strong>Off</strong> Airfield <strong>Landing</strong> <strong>Site</strong> <strong>Operations</strong>
Introduction<br />
Training leaflet >> 5<br />
The helicopters ability to approach, manoeuvre, land and take-off from an off <strong>airfield</strong><br />
<strong>Landing</strong> <strong>Site</strong> (LS) or unprepared <strong>Landing</strong> <strong>Site</strong> is one of the most important aspects of<br />
helicopters operations. Pilots will want at some stage to fly passengers to various landing<br />
sites such as hotels, golf courses, sporting venues, etc. Whilst all these sites can vary in<br />
their dimensions, approaches, hazards, elevation, and location, the same basic principles<br />
should be employed. A LS that has obstructions that require a steeper than normal<br />
approach, where the manoeuvring space in the ground cushion is limited, or whenever<br />
obstructions force a steeper than normal climb-out angle is often defined as ‘Confined<br />
Area’. Although a helicopter pilot can land at a Confined Area, he still has to apply all the<br />
basic principles.<br />
<strong>Landing</strong> sites that are remote from an <strong>airfield</strong> offer various challenges to the pilot and<br />
consequently have resulted in a significant number of accidents. Unlike at an <strong>airfield</strong><br />
there is generally, little or no assistance in the assessment of wind, guidance on appropriate<br />
approach directions or information on other traffic. Hazards not normally experienced<br />
at an <strong>airfield</strong> such as wires, obstructions, uneven landing ground, trees, Foreign Object<br />
Damage, livestock and pedestrians are quite likely to be found and require a heightened<br />
degree of situational awareness by the pilot who needs to expect the unexpected!<br />
It should be noted that a ‘precautionary’ or ‘forced’ landing that is made in response to an<br />
aircraft malfunction/emergency or deteriorating weather, will invariably be an ‘off <strong>airfield</strong>’<br />
landing therefore the techniques prescribed for the recce, approach and departure should<br />
be utilised even if in an abbreviated format.
6 >> <strong>Off</strong> Airfield <strong>Landing</strong> <strong>Site</strong> <strong>Operations</strong><br />
1. pLANNING AND<br />
pREpARATION<br />
The basic principles of planning and preparation as outlined in the <strong>EHEST</strong> HE1 Safety<br />
Considerations Leaflet still apply. However landing at a site which is remote from an<br />
<strong>airfield</strong> offers the pilot extra considerations that may require additional information, some<br />
of which are highlighted below in a ‘matEd’ brief<br />
mEt ›› As the site may be remote from an <strong>airfield</strong> and associated met facilities,<br />
the pilot will be required to interpolate the information provided in the<br />
synoptic charts, TAFs, and METARs. If possible, a telephone call to speak<br />
to somebody at the LS for a local weather observation is advised.<br />
Information should be collated for both the outbound and return flight,<br />
including the anticipated dusk time - in case of a delay. It is important to<br />
carry a telephone number/’app’ for a met service so that updated<br />
weather forecasts can be collected from the LS.<br />
aircraft ›› Take off weight, C of G, and performance calculations will be required for<br />
the arrival and departure at the LS, especially if there is a difference in<br />
density altitude from the initial departure site and if passengers or cargo<br />
are being picked up or dropped off. Fuel is unlikely to be available at a<br />
remote site so a fuel diversion may be required – important if planned<br />
performance calculations require a reduced fuel load for the landing/<br />
take-off. The remainder of the aircraft documents should be checked as<br />
normal.<br />
(Note for Commercial <strong>Operations</strong> there will be extra EASA Ops/legal<br />
performance criteria to consider).<br />
atc ›› Whilst <strong>airfield</strong> information and NOTAMs for en-route/departure/diversion<br />
<strong>airfield</strong>s will be available through the normal channels, information for<br />
a remote LS may require further research, either in a LS directory or by<br />
speaking to the site operator/owner. If the LS is being used as part of an<br />
event, it is likely that there will formalised routes/procedures to follow<br />
and it may be subject to a temporary NOTAM or restrictions. Invariably a<br />
LS will require prior permission before it can be used, often in writing. Do<br />
not rely on the passengers for details as they may not be ‘aviation aware’,<br />
it is better to speak directly to the site operator to receive any last minute<br />
briefing on hazards, livestock, avoids, other activity – and possible<br />
landing fees!
Training leaflet >> 7<br />
Check to see whether the site has a radio frequency – some countries<br />
have a common radio frequency to use at unmanned site 1 . Remember<br />
if communicating with an ATC service to report when landing, if not on<br />
the radio then by telephone or overdue action could be initiated.<br />
ExErciSES ›› A flight into a LS will not only require the skills associated with<br />
confined area techniques but also those with: navigation of maps of<br />
various scales at various heights, advanced transitions, limited power,<br />
and sloping ground operations.<br />
dutiES ›› Although the flight is likely to be conducted as single pilot operation<br />
and the pilot will be conducting all the duties himself, passengers, if<br />
briefed correctly may be able to assist in lookout - especially for hazards<br />
at the LS such as wires, obstacles, FOD, livestock, people and objects<br />
likely to be affected by the helicopter down wash such as tables, chairs,<br />
sun shades, tents etc.<br />
Note:<br />
(i) Always carry a mobile telephone and a driving licence just in case a<br />
car hire is required to get home due to adverse weather or night –<br />
do not be forced into flying in adverse weather just to return home.<br />
(ii) If possible confirm with the site owner just before takeoff to update<br />
on changes, conditions, hazards livestock etc at the LS.<br />
(iii) If it is important to get to the destination always have an alternative<br />
plan in case the weather is not suitable – do not be pressurised into<br />
flying in adverse conditions or beyond your capabilities!<br />
1 e.g. in the UK a SAFETYCOM radio frequency of 135.475 is specified for use at sites where no specific radio frequency is notified
8 >> <strong>Off</strong> Airfield <strong>Landing</strong> <strong>Site</strong> <strong>Operations</strong><br />
2. LANDING SITE<br />
IDENTIFIcATION<br />
It is unlikely that the LS will be marked or obvious and consequently it may be difficult<br />
to identify from the air. Therefore it may be necessary to employ some of the following<br />
techniques to make sure you land in the right place – it should be noted that any<br />
co-ordinates given to the pilot should be double checked before use!<br />
paSSEngErS The passenger may be familiar with the destination - however be aware<br />
once in the air it is not unknown for passengers not to recognise their<br />
own homes!<br />
mapS Larger scale maps will have individual buildings and fields marked.<br />
gpS GPS can be accurate down to 100 m and so able to get you to the area<br />
but they are unlikely to identify an individual LS even with a Lat/Long<br />
reference.<br />
pHotograpHS A regularly used site may have a photograph in a brochure or an LS<br />
directory.<br />
googlE EartH A satellite generated picture has the advantage of giving a plan view<br />
from the air, but it may be outdated.<br />
lS dirEctory More commonly used sites can be found in a published LS Directory<br />
which normally has the advantage of containing aviation related advice<br />
including. LS elevation, frequencies, local hazards, avoids areas,<br />
recommend approach paths, etc.<br />
SitE oWnEr/<br />
opErator<br />
A telephone call to the site owner prior to take off who may be able to<br />
describe the LS in detail and any local avoids, hazards and livestock.<br />
However be aware they may not be ‘aviation aware’ so may not consider<br />
wires as a hazard.<br />
otHEr pilotS Speaking to a pilot who has previous been to an LS has the advantage<br />
of them being able to describe the site and the best approach and any<br />
aviation hazards.<br />
markErS An LS may have an ‘H’, helipad or a windsock indicating the location –<br />
however if temporary markers are being used ensure they are secured<br />
and not able to be blown into the disc by the aircraft downwash.
3. LANDING SITE<br />
REccE<br />
3.1 Introduction<br />
Training leaflet >> 9<br />
An airborne recce of an LS is required, even if the site has been previously used, to<br />
assess the suitability of the site for the individual pilot/aircraft capability, the given wind<br />
velocity, the best approach/departure path, and local hazards.<br />
When conducting the recce, it is necessary to minimise the noise/disturbance to<br />
the public, and also to fly at a height/speed combination that will offer the best possible<br />
chance of a successful landing in the event of engine failure. Therefore as a principle:<br />
always fly environmentally and defensively and never lower or slower than is<br />
necessary!<br />
SpEEd The recce should be flown at a nominal speed close to Vy, but not<br />
normally slower than 40Kts or VTOSS, especially when flying crosswind/<br />
downwind as this will alleviate the possibility of Loss of Tail Rotor<br />
Effectiveness (LTE), Vortex Ring and help maintain rotor energy in the<br />
event of an engine failure (see <strong>EHEST</strong> HE1 Safety Considerations Leaflet,<br />
Methods To Improve Helicopter Pilots’ Capabilities).<br />
HEigHt The recce should not be flown any lower than is necessary and ideally<br />
not less than 500ft agl or the height specified in the RFM ‘avoid curve/<br />
height velocity diagram’ in case of an engine failure and to avoid<br />
unnecessary disturbance of the local population. Whilst a recce of an LS<br />
can normally be completed from a safe height with the minimum number<br />
of circuits, in cases of difficult terrain, built up areas, or a complex<br />
landing site it may be necessary to conduct a ‘high’ followed by a ‘low’<br />
recce and possibly a dummy approach.<br />
It should be noted that an airborne recce of an LS requires a high degree of situational<br />
awareness. A number of accidents have resulted where pilots have become distracted by<br />
the increased workload associated with conducting an LS recce and allowed the airspeed<br />
to reduce and/or allowed a Rate Of Descent (ROD) to build up which has lead to VORTEX<br />
RING STATE or LTE.
10 >> <strong>Off</strong> Airfield <strong>Landing</strong> <strong>Site</strong> <strong>Operations</strong><br />
3.2 Types of Recce<br />
Several styles of recce can be utilised:<br />
orbital This is normally the easiest technique to fly. It involves flying an orbit<br />
around the landing site, usually with the landing site on the ‘pilot’s side’<br />
therefore allowing maximum visibility of the site. However it requires<br />
the pilot to identify safe precautionary landing sites as he flies the recce<br />
around the LS in case of engine failure. It can be difficult to fly accurately<br />
around a very small site or in strong wind conditions. (SEE figurE 1)<br />
flyby If it is not possible to fly an orbital recce safely all around the LS (e.g.<br />
if the terrain on one side is unsuitable for an emergency landing) it may<br />
be possible to fly past the LS over a suitable area – ideally with the LS on<br />
the pilot’s side to complete the recce elements. It may be then necessary<br />
to reposition for a second or third ‘fly by’ which can be achieved by<br />
flying the downwind elements away from the LS over terrain more<br />
suitable for an emergency landing. (SEE figurE 2)<br />
HovEr As a last resort it may be possible to bring the helicopter to an ‘out of<br />
ground effect’ high hover to recce the LS. However this technique<br />
requires training and skilful handling by the pilot as it requires an<br />
increased awareness of power margins, avoid curve/height velocity<br />
diagram, wind velocity, escape routes, prior identification of an<br />
appropriate emergency landing site in the event of an engine failure<br />
whilst in the high hover. (SEE figurE 3)<br />
final<br />
approacH<br />
3.3 The Recce<br />
An experienced pilot, or a pilot who is very familiar with a landing site<br />
(and has previously conducted a recce of the site), may be able to<br />
update his previous recce during flying a long final approach into the site.<br />
the recce should identify the following points (often referred to as the 5 S’s), in order<br />
to determine the best approach path and missed approach route:<br />
SizE Is the LS big enough for me (at my experience level) – to get this size<br />
aircraft in (aircraft dimensions) – and what type of approach shall be<br />
required to fly (e.g. a large area – single angle approach, a medium sized<br />
area – a double angle approach, or a small area – a vertical approach)<br />
and what type of taking-off I will decide to perform?
figurE 1<br />
orbital<br />
figurE 2<br />
flyby<br />
figurE 3<br />
HovEr<br />
Flight path to<br />
resposition for<br />
final approach<br />
Establish hover into wind<br />
remaining above the<br />
height / velocity curve<br />
Fly ideally<br />
at Vy and not<br />
below 500’<br />
Fly ideally<br />
at Vy and not<br />
below 500’<br />
Area not<br />
to overfly<br />
Clear area in<br />
the event of engine<br />
failure or emergency<br />
H<br />
H<br />
H<br />
Training leaflet >> 11<br />
!<br />
This technique requires<br />
training and skilful<br />
handling by the pilot<br />
and shall be used only<br />
as a last resort.
12 >> <strong>Off</strong> Airfield <strong>Landing</strong> <strong>Site</strong> <strong>Operations</strong><br />
SHapE What shape is the LS in relation to the wind velocity (w/v) or direction<br />
of approach/departure, Note: in light wind conditions it may not be<br />
necessary for the wind to dictate the direction of approach/departure and<br />
a safer approach/departure route may be identified avoiding built up<br />
areas, wooded areas. Pilots should be cautious about flying into reduced<br />
visibility caused sun glare or shadows cast in the LS.<br />
SurroundS outEr – Establishing a safe area to fly over (defensively and<br />
environmentally) whilst conducting the recce, including establishing any<br />
markers to be used for the circuit.<br />
innEr – Establish the hazards in the immediate LS area and any forward<br />
and lateral markers to be used in the LS to establish the centre of the<br />
area for the manoeuvring /landing especially if a vertical approach is to<br />
be used.<br />
SlopE Identify any perceivable slope in the LS. This is normally confirmed by<br />
coming to a slightly higher than normal hover whilst manoeuvrings in<br />
the LS. It is advisable to assume the ground is uneven and use sloping<br />
ground techniques when landing on any unprepared surface.<br />
SurfacE Identify the nature of the LS surface to ensure suitability for landing<br />
including checking sufficient aircraft ground clearance - long grass can hide<br />
obstacles such as tree stumps which are hazardous to low skidded aircraft.<br />
This is normally confirmed by coming to a slightly higher than normal<br />
hover whilst manoeuvring in the LS. Extreme caution should be used<br />
when landing on surfaces covered by loose snow or sand which normally<br />
required specialised landing techniques such as a ‘zero speed’ landing.<br />
Once a pilot is competent at conducting a LS recce it should be possible to obtain all the<br />
necessary information from a safe height in as a few orbits as possible. However for an<br />
inexperienced pilot or when faced with a more complex LS, it may be necessary to conduct<br />
a ‘high recce’ followed by a ‘low recce’.<br />
High recce<br />
1 ›› Orbit, speed Vy, at a height that would permit an autorotation to a clear area in the<br />
event of an engine failure.<br />
2 ›› Considered Size, Shape, Surrounds, w/v<br />
3 ›› Decide best approach/overshoot/climb out path.<br />
4 ›› Decide circuit direction – choose markers for low recce/circuit/approach – check for<br />
wires and cables.<br />
5 ›› Make any radio calls to ATC advising of intention to land and close any flight plans.
low recce<br />
Training leaflet >> 13<br />
1 ›› Orbit/Flyby/Hover, speed Vy, at a height that would permit an autorotation to<br />
a clear area in the event of an engine failure, normally not below 500 ft AGL and<br />
be aware of the avoid curve/height velocity diagram.<br />
2 ›› Confirm/reselect the best approach path, type of approach, overshoot path,<br />
departure path and circuit.<br />
3 ›› Look inside confined area to check Surface, Slope, Obstruction, wires, FOD, etc.<br />
4 ›› Select forward and lateral markers for a landing point in the centre of the area.<br />
5 ›› Cross check radar altimeter/map to the barometric alt to establish the LS elevation.<br />
circuit<br />
1 ›› Choose the circuit direction, sometimes it is not possible with the landing site<br />
on the ‘pilot’s side’.<br />
2 ›› Fly using markers, speed Vy and at a height that would permit an autorotation<br />
to a clear area in the event of an engine failure.<br />
3 ›› Conduct power check as appropriate to aircraft type (if not already conducted<br />
on the high/low recce) and verify the power margin available is sufficient for the<br />
appropriate approach/take off technique.<br />
4 ›› Conduct pre-landing checks.<br />
final approach/landing<br />
1 ›› Turn onto finals – maintaining initially Vy until the turn is finished beware ltE.<br />
2 ›› Monitor ROD/Speed/Power margin and – beware vortEx ring StatE.<br />
3 ›› Note escape routes, emergency landing areas, wind shear and turbulence and<br />
consider a go around using the planned overshoot path if:<br />
• any yaw deviation from selected approach heading cannot be safely corrected.<br />
• the power ‘in hand’/power margin is insufficient to safely continue the approach.<br />
• the rate of descent becomes excessive.<br />
• the closing speed becomes excessive (especially with a rear cyclic application<br />
which may indicate a downwind component).<br />
• the airspeed falls below 30kts with an excessively high rate of descent<br />
4 ›› Check again Surface, Slope, Obstruction, wires, FOD, to verify the accuracy of<br />
the information gained in the recce (some obstacles might not be visible from<br />
certain height).<br />
5 ›› Reduce groundspeed in final stages ensuring a safe clearance from obstacles.<br />
6 ›› Maintain a constant angle approach, ideally to a spot a third of the way into the<br />
confined area.<br />
7 ›› Ensure tail clearance by use of a lateral marker if required.<br />
8 ›› Establish slightly higher than normal hover whilst checking surface and slope.<br />
9 ›› Land using sloping ground technique.
14 >> <strong>Off</strong> Airfield <strong>Landing</strong> <strong>Site</strong> <strong>Operations</strong><br />
monitor ROD, speed,<br />
and power margin<br />
try to keep site<br />
on pilot’s side to<br />
get a better look<br />
base<br />
dummy approach<br />
If the recce identifies concerns with w/v, turbulence, power margins, obstacles, etc,<br />
especially when attempting to land in a smaller LS, then a Dummy Approach should be<br />
considered. For this an approach is flown to a predetermined point or height above the<br />
LS, maintaining airspeed/ translational lift, whilst monitoring the power margins, ROD,<br />
turbulence etc with the intention of overshooting to go around and re-positioning for<br />
another approach…. however also keeping open an option to continue with the landing<br />
if judged safe to do so. (Note: In certain States it is not permissible to descend below<br />
500 feet except for take-off and landing, however if the site proves unsuitable on the<br />
approach a go-around may be permissible since it was your initial intention to land).<br />
3.4 The Circuit<br />
Below is a typical example of a circuit.<br />
final approach<br />
careful what<br />
you overfly!<br />
pre-landing<br />
checks<br />
upwind<br />
monitor ROD, speed,<br />
and power margin<br />
always have an<br />
escape route<br />
downwind<br />
assess five S’s<br />
as you fly past<br />
H<br />
go-around<br />
do power check<br />
as soon as practical<br />
turning<br />
point<br />
crosswind<br />
turning<br />
point
Training leaflet >> 15
16 >> <strong>Off</strong> Airfield <strong>Landing</strong> <strong>Site</strong> <strong>Operations</strong><br />
4. TypES OF AppROAch<br />
4.1 Single Angle Approach<br />
• Maintain height until touchdown point is seen.<br />
• Hold line of sight with small collective movements.<br />
• Maintain a steady, controlled ROD with power/ speed combination to avoid<br />
Vortex Ring State and also to avoid excessive rates of descent that may require<br />
large/rapid collective inputs to arrest the ROD.<br />
• In later stages reduce speed to slow apparent ground speed.<br />
• Descend to establish a ground cushion at slightly higher than normal hover.<br />
4.2 Double Angle Approach<br />
• Initially a shallow angle may be flown to a point on the other side of the LS<br />
until the landing area is visible.<br />
• Once the touchdown point is visible the angle is steepened for final approach to<br />
hover.<br />
• Hold line of sight with small collective movements.<br />
• Maintain a steady, controlled ROD with power/speed combination to avoid<br />
Vortex Ring and also to avoid excessive rates of descent that may require large/<br />
rapid collective inputs to arrest the ROD.<br />
• In later stages reduce speed to slow apparent ground speed.<br />
• Descend to establish a ground cushion at slightly higher than normal hover.<br />
4.3 Vertical Approach<br />
• Shallow approach to a out of ground effect hover over the centre of the LS, note<br />
increased power requirement and ensure sufficient power margin for controlled<br />
descent.<br />
• Descend vertically maintaining ground position by use of lateral markers.<br />
• Maintain a steady, controlled ROD with power/ speed combination to avoid<br />
Vortex Ring and also to avoid excessive rates of descent that may require large/<br />
rapid collective inputs to arrest the ROD.<br />
• Descend to establish a ground cushion at slightly higher than normal hover
figurE 5<br />
SinglE anglE<br />
approacH<br />
figurE 6<br />
doublE anglE<br />
approacH<br />
figurE 7<br />
vErtical<br />
approacH<br />
Training leaflet >> 17
18 >> <strong>Off</strong> Airfield <strong>Landing</strong> <strong>Site</strong> <strong>Operations</strong><br />
5. MANOEuvRING IN ThE<br />
LANDING SITE<br />
Due to danger of blade strike/tail strike/FOD, manoeuvring within a LS should only be<br />
conducted when it is entirely necessary to do so. If it is necessary to manoeuvre, either<br />
to park the aircraft or reposition in preparation for a take-off, then extreme caution<br />
should be used and it may be advisable to taxi slightly higher and slower than normal<br />
keeping a good look out.<br />
When landing or taking off on an ‘unprepared site’ it is always advisable to use sloping<br />
ground techniques, especially in long grass where the surface may be obscured. When<br />
landing in long grass pilots should also be aware of the risk of causing a fire especially<br />
in dry conditions, with aircraft that have an exhaust close to ground.<br />
Be aware of possible FOD, blowing sand, straw, snow, etc. that can cause brown out or<br />
white out conditions.<br />
turn about the tail<br />
• Adopt a slightly higher than normal hover.<br />
• Maintain the tail over the same ground position.<br />
• Turn the aircraft in the direction the pilot can see (i.e., pilots side).<br />
• Look out throughout the turn for obstructions.<br />
• Monitor the blade tips and be aware of overhanging branches<br />
Sideward movement (box turn)<br />
• Adopt a slightly higher than normal hover.<br />
• Hover taxi sideward whilst maintaining heading, at least an aircraft length in<br />
the direction the pilot can see (i.e., pilots side).<br />
• Spot turn through 90 degrees so that the tail is now in the known clear area<br />
where the aircraft was positioned.<br />
• Repeat (if required) until back onto original heading.<br />
• Look out throughout the turn for obstructions.<br />
• Monitor the blade tips and be aware of overhanging branches.
figurE 8<br />
turn about<br />
tHE tail<br />
figurE 9<br />
SidEWard<br />
movEmEnt<br />
Training leaflet >> 19
20 >> <strong>Off</strong> Airfield <strong>Landing</strong> <strong>Site</strong> <strong>Operations</strong><br />
6. DEpARTuRE<br />
Prior to the departure from an LS, a thorough ‘recce’ of the landing site should<br />
be undertaken noting hazards, obstacles, wind velocity, sun position and possible safe<br />
departure routes. A power margin calculation from the RFM may be required as may<br />
a hover power check as a confirmation to establish the exact power margin available.<br />
Special attention should be paid to the re-calculation of C of G, weight and loading if<br />
passengers/cargo have been off loaded or picked up.<br />
The pilot should then establish the climb out path from the LS by asking himself<br />
‘what is the safest way out of here?<br />
considerations should include:<br />
• Obstacles in the immediate area/climb out route.<br />
• Wind velocity.<br />
• Sun position.<br />
• Power margin.<br />
• Safe emergency escape routes/landing areas.<br />
• Habitation, livestock, people, buildings in climb out path.<br />
• Any commercial operations/aircraft restrictions.<br />
Note: If the wind is light then the exit route may well be the same as the entry route!<br />
If power limited and space permits it may be advisable to back track in order to<br />
gain translational lift during the transition.<br />
Vertical climbs which necessitate prolonged periods in the height/velocity diagram<br />
should only be used as a last resort.<br />
Suggested sequence for takeoff and departure from an lS:<br />
• Pre-take-off checks.<br />
• Lookout – take-off using sloping ground techniques.<br />
• After take-off checks to include power check<br />
• Confirm or reselect take-off path.<br />
• Reposition within area if required.<br />
• Select forward and lateral markers as appropriate.<br />
• Lookout above – check for overhead obstructions.<br />
• Transition using appropriate technique.<br />
• Thorough lookout on lifting from the confined area especially for any aircraft<br />
overflying arriving/departing the LS.
6.1 Towering Take <strong>Off</strong><br />
• Position the aircraft in a low hover at the maximum possible distance from<br />
forward obstacles.<br />
• Smoothly apply power up to maximum power available and climb vertically<br />
whilst maintaining heading.<br />
• Before climb stops assess height in relation to forward obstacles and if a safe<br />
margin start a gentle transition (exchanging ground effect for translational lift).<br />
• Aim the aircraft at highest point, but do not increase acceleration towards<br />
obstacle until at least level with top of obstacle and the helicopter is still<br />
climbing.<br />
• When level with top of obstacle increase speed to best angle of climb speed to<br />
clear the obstacle.<br />
Note: If insufficient power to maintain the climb and clear the obstacles then a<br />
transition should not be attempted and the aircraft landed back inside the LS.<br />
6.2 Vertical Climb (to outside ground effect)<br />
• Establish low hover in centre of LS.<br />
• Identify forward and lateral markers to ensure no forwards/sideward/rearward<br />
movement during climb.<br />
• Smoothly apply power up to maximum power available and climb vertically<br />
whilst maintaining heading.<br />
• Note initial rate of climb decreases with height.<br />
• When clear of obstacles, maintaining a rate of climb, adopt a gentle transition<br />
forward to prevent height loss<br />
Note: If insufficient power to maintain the climb then descend vertically and land<br />
back inside the LS.<br />
Training leaflet >> 21
22 >> Helicopter airmanship<br />
SuMMARy<br />
The freedom to fly to and land at a chosen<br />
destination without the requirement for<br />
an <strong>airfield</strong> or runway utilises the unique<br />
abilities of the helicopter as they were<br />
originally designed to be used. As well as<br />
very convenient, it can be extremely<br />
challenging and rewarding to land as close<br />
as is safely possible to your destination.<br />
7. pILOT ERRORS<br />
the following are common pilot errors that have occurred at off <strong>airfield</strong> landing sites<br />
of which some have resulted in accidents:<br />
• Loss of airspeed whilst turning cross/downwind during an LS recce resulting in LTE.<br />
• Turning onto final approach too high/too fast/too close leading to an excessive<br />
ROD, with low airspeed and power applied resulting in Vortex Ring.<br />
• Incorrect wind w/v identification resulting in downwind approach with hard<br />
landings and/or excessive power demands.<br />
• Blade strike/tail strike on unseen obstacles/foreign object damage in the LS.<br />
• Persons being hit by tail/main rotor blades.<br />
• Damage to underside of aircraft due to landing on unseen obstruction.<br />
• Aircraft rolling over because sloping ground technique not used for landing/<br />
take off.<br />
However it must be remembered that<br />
there are always inherent risks associated<br />
at landing at an ‘off <strong>airfield</strong> site’ that<br />
requires a high degree of piloting skills,<br />
a thorough knowledge of the aircraft<br />
performance and a spatial awareness of<br />
the changing environment, if this ability<br />
is to be used safely.
IMpRINT<br />
acronyms<br />
atc Air Traffic Controls<br />
cat Commercial Air Transport<br />
c of g Centre of Gravity<br />
EHESt European Helicopter Safety Team<br />
fod Foreign Object Damage<br />
ltE Loss of Tail Rotor Effectiveness<br />
lS <strong>Landing</strong> <strong>Site</strong><br />
mEtar Meteorological Aviation Routine<br />
Weather Report<br />
disclaimer:<br />
The views expressed in this leaflet are the exclusive responsibility of <strong>EHEST</strong>.<br />
All information provided is of a general nature only and is not intended to address<br />
the specific circumstances of any particular individual or entity. Its only purpose<br />
is to provide guidance without affecting in any way the status of officially adopted<br />
legislative and regulatory provisions, including Acceptable Means of Compliance or<br />
Guidance Materials. It is not intended and should not be relied upon, as any form<br />
of warranty, representation, undertaking, contractual, or other commitment binding<br />
in law upon <strong>EHEST</strong> its participants or affiliate organisations. The adoption of<br />
such recommendations is subject to voluntary commitment and engages only the<br />
responsibility of those who endorse these actions.<br />
Consequently, <strong>EHEST</strong> and its participants or affiliate organisations do not express<br />
or imply any warranty or assume any liability or responsibility for the accuracy,<br />
completeness or usefulness of any information or recommendation included in this<br />
leaflet. To the extent permitted by Law, <strong>EHEST</strong> and its participants or affiliate<br />
organisations shall not be liable for any kind of damages or other claims or demands<br />
arising out of or in connection with the use, copying, or display of this leaflet.<br />
picture credits<br />
Cover: <strong>Eurocopter</strong> / Inside front cover: Vasco Morao / Page 4: Rotorflug GmbH /<br />
Page 10: AgustaWestland NV / Page 15: Aerosud Elicotteri / Page 19: <strong>Eurocopter</strong> /<br />
Page 20: AgustaWestland NV / Page 21: Thomas Zimmer / Page 22: Fotolia<br />
graphics<br />
Sarah Bowen<br />
notam Notification to Airman<br />
rEccE Reconnaissance<br />
rfm Rotorcraft Flight Manual<br />
rod Rate of Descent<br />
taf Terminal Aerodrome Forecast<br />
vtoSS take off safety speed<br />
vy Best Rate of Climb Speed<br />
W/v wind velocity<br />
contact details for enquiries:<br />
European Helicopter Safety Team<br />
E-mail: ehest@easa.europa.eu, www.easa.europa.eu/essi/ehest<br />
Training leaflet >> 23
JAN 2012<br />
EuropEan HElicoptEr SafEty tEam (EHESt)<br />
Component of ESSI<br />
European aviation Safety agency (EaSa)<br />
Safety Analysis and Research Department<br />
Ottoplatz 1, 50679 Köln, Germany<br />
mail ehest@easa.europa.eu<br />
Web www.easa.europa.eu/essi/ehest