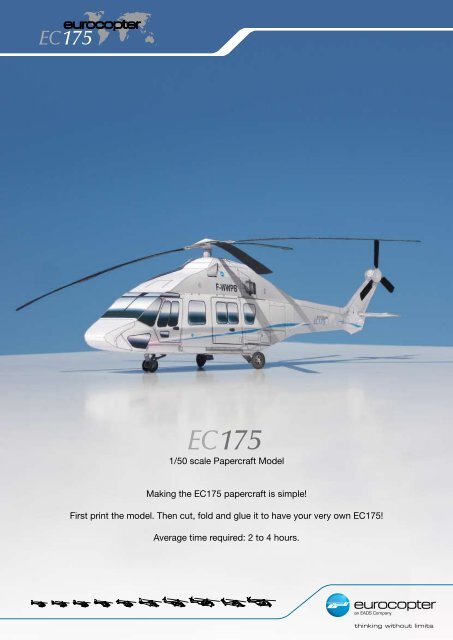
1/50 scale Papercraft Model Making the EC175 ... - Eurocopter
1/50 scale Papercraft Model Making the EC175 ... - Eurocopter 1/50 scale Papercraft Model Making the EC175 ... - Eurocopter
1/50 scale Papercraft Model Making the EC175 papercraft is simple! First print the model. Then cut, fold and glue it to have your very own EC175! Average time required: 2 to 4 hours.
- Page 2 and 3: Help Mountain Valley Use A4 Sheets
- Page 4 and 5: 11 13 16 2+6 2+4+7 2+4+7 12 14 17 2
1/<strong>50</strong> <strong>scale</strong> <strong>Papercraft</strong> <strong>Model</strong><br />
<strong>Making</strong> <strong>the</strong> <strong>EC175</strong> papercraft is simple!<br />
First print <strong>the</strong> model. Then cut, fold and glue it to have your very own <strong>EC175</strong>!<br />
Average time required: 2 to 4 hours.
Help<br />
Mountain Valley<br />
Use A4 Sheets of paper<br />
Size : 21*29.7mm)<br />
Weight : 160 to 180 grs/M2<br />
Avoid too thin, fragile,<br />
and difficult to fold paper.<br />
Ruler<br />
To be used to cut straight<br />
lines<br />
Brush<br />
To apply glue on <strong>the</strong> paper<br />
Cutter or blade<br />
Blade is prefered to make<br />
precise cuts.<br />
Stage 1<br />
Cut <strong>the</strong><br />
parts<br />
required in<br />
<strong>the</strong> step..<br />
8<br />
Stage 2<br />
Fold <strong>the</strong><br />
parts.<br />
Check<br />
mountain<br />
and valley<br />
foldings.<br />
3+5<br />
Apply glue on this area.<br />
Cut this section.<br />
Step number<br />
Picture:<br />
Final assemblies<br />
are illustrated<br />
Part numbers<br />
In black: Single<br />
parts<br />
In red: Left parts<br />
In green: Right<br />
parts<br />
White glue<br />
Preferable because it<br />
does not damage <strong>the</strong><br />
ink on <strong>the</strong> paper.<br />
Paper knife or flat object<br />
to fold <strong>the</strong> paper neatly<br />
Tweezers to handle<br />
small parts<br />
Stage 3<br />
Glue <strong>the</strong><br />
parts.<br />
The step<br />
is finished.<br />
Felt tip pens to color<br />
<strong>the</strong> thickness of paper<br />
edges and <strong>the</strong> back of<br />
<strong>the</strong> wheels and rotor.<br />
Glue a weight such as a<br />
wire, paperclip or a coin<br />
on <strong>the</strong> front edge.
1<br />
3<br />
5<br />
7<br />
8<br />
1<br />
5<br />
3+5<br />
2+3<br />
2+3<br />
2<br />
4<br />
6<br />
1+2<br />
2+3<br />
2+3+4
11<br />
13<br />
16<br />
2+6<br />
2+4+7<br />
2+4+7<br />
12<br />
14<br />
17<br />
2+7<br />
8 / 10<br />
9<br />
10<br />
18<br />
6<br />
6<br />
Glue a weight such<br />
as a wire, paperclip<br />
or a coin on <strong>the</strong><br />
front edge<br />
15<br />
2+7<br />
8 / 10
19<br />
23<br />
27<br />
3+7+14<br />
18-19-20-21-22<br />
31<br />
32<br />
8+9 / 10+11<br />
24<br />
23+24<br />
20<br />
24<br />
28<br />
4+8 / 4+10<br />
15<br />
17+18-19-20-21-22<br />
21<br />
25<br />
29<br />
6+12 / 6+13<br />
5+15<br />
1+17+23<br />
22<br />
26<br />
30<br />
14<br />
5+15+16<br />
1+17+23


