Installation and Maintenance Instructions - ETO Doors
Installation and Maintenance Instructions - ETO Doors Installation and Maintenance Instructions - ETO Doors
step four: locating the torsion spring M,safety device for spring break N and cable drums O on the spring shaft T as the picture,the spring shaft T has to be straight and level. K I O Z T Z:only locate the cable drum O between the drum bracket Z above the vertical track;tighten one side of spring onto the drum bracket as the picture showed.This is the base for the tension of the springs. M M N(optional):install the safety device for spring break N with the torsion spring,this is the base for the tension of the winding spring please check the step seven below. N T 8
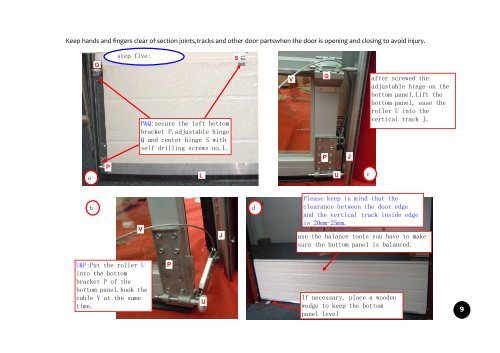
Keep hands and fingers clear of section joints,tracks and other door partswhen the door is opening and closing to avoid injury. a b Q P step five: P&Q:secure the left bottom bracket P,adjustable hinge Q and center hinge S with self drilling screws no.1. V U&P:Put the roller U into the bottom bracket P of the bottom panel.hook the cable V at the same time. P L U J S d V Q P U J use the balance tools you have to make sure the bottom panel is balanced. If necessary, place a wooden wedge to keep the bottom panel level c after screwed the adjustable hinge on the bottom panel,Lift the bottom panel, ease the roller U into the vertical track J. Please keep in mind that the clearance between the door edge and the vertical track inside edge is 20mm-25mm. 9
- Page 1 and 2: INSTALLATION GUIDE-industiral door
- Page 3 and 4: Garage door installation: NO. DESCR
- Page 5 and 6: Packing components list: torsion sp
- Page 7: I J K step two: I&J: After checked
- Page 11 and 12: make the cable V go through between
- Page 13 and 14: final checkings: a,re-adjust torsio
- Page 15: Maintaineance A, The door - clean d
Keep h<strong>and</strong>s <strong>and</strong> fingers clear of section joints,tracks <strong>and</strong> other door partswhen the door is opening <strong>and</strong> closing to avoid injury.<br />
a<br />
b<br />
Q<br />
P<br />
step five:<br />
P&Q:secure the left bottom<br />
bracket P,adjustable hinge<br />
Q <strong>and</strong> center hinge S with<br />
self drilling screws no.1.<br />
V<br />
U&P:Put the roller U<br />
into the bottom<br />
bracket P of the<br />
bottom panel.hook the<br />
cable V at the same<br />
time.<br />
P<br />
L<br />
U<br />
J<br />
S<br />
d<br />
V<br />
Q<br />
P<br />
U<br />
J<br />
use the balance tools you have to make<br />
sure the bottom panel is balanced.<br />
If necessary, place a wooden<br />
wedge to keep the bottom<br />
panel level<br />
c<br />
after screwed the<br />
adjustable hinge on the<br />
bottom panel,Lift the<br />
bottom panel, ease the<br />
roller U into the<br />
vertical track J.<br />
Please keep in mind that the<br />
clearance between the door edge<br />
<strong>and</strong> the vertical track inside edge<br />
is 20mm-25mm.<br />
9


