Installation and Maintenance Instructions - ETO Doors
Installation and Maintenance Instructions - ETO Doors Installation and Maintenance Instructions - ETO Doors
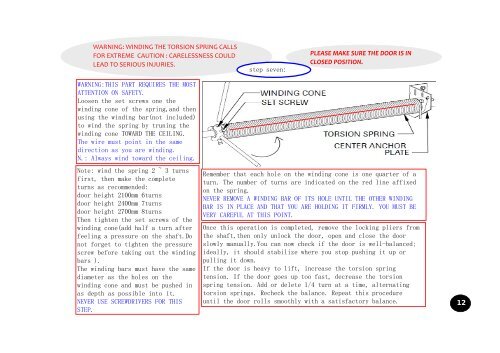
WARNING: WINDING THE TORSION SPRING CALLS FOR EXTREME CAUTION : CARELESSNESS COULD LEAD TO SERIOUS INJURIES. WARNING:THIS PART REQUIRES THE MOST ATTENTION ON SAFETY. Loosen the set screws one the winding cone of the spring,and then using the winding bar(not included) to wind the spring by truning the winding cone TOWARD THE CEILING. The wire must point in the same direction as you are winding. N.: Always wind toward the ceiling. Note: wind the spring 2 ~ 3 turns first, then make the complete turns as recommended: door height 2100mm 6turns door height 2400mm 7turns door height 2700mm 8turns Then tighten the set screws of the winding cone(add half a turn after feeling a pressure on the shaft.Do not forget to tighten the pressure screw before taking out the winding bars ). The winding bars must have the same diameter as the holes on the winding cone and must be pushed in as depth as possible into it. NEVER USE SCREWDRIVERS FOR THIS STEP. step seven: PLEASE MAKE SURE THE DOOR IS IN CLOSED POSITION. Remember that each hole on the winding cone is one quarter of a turn. The number of turns are indicated on the red line affixed on the spring. NEVER REMOVE A WINDING BAR OF ITS HOLE UNTIL THE OTHER WINDING BAR IS IN PLACE AND THAT YOU ARE HOLDING IT FIRMLY. YOU MUST BE VERY CAREFUL AT THIS POINT. Once this operation is completed, remove the locking pliers from the shaft,then only unlock the door, open and close the door slowly manually.You can now check if the door is well-balanced; ideally, it should stabilize where you stop pushing it up or pulling it down. If the door is heavy to lift, increase the torsion spring tension. If the door goes up too fast, decrease the torsion spring tension. Add or delete 1/4 turn at a time, alternating torsion springs. Recheck the balance. Repeat this procedure until the door rolls smoothly with a satisfactory balance. 12
final checkings: a,re-adjust torsion spring if necessary,always close the door and latch before adjusting. b,lubricate all moving parts. step eight: c,if door doesnot work easily,double-check the installation process especially the step ten & eleven. d, make sure spacing of track is correct and that door is not binding any place. balance the door with the level 13
- Page 1 and 2: INSTALLATION GUIDE-industiral door
- Page 3 and 4: Garage door installation: NO. DESCR
- Page 5 and 6: Packing components list: torsion sp
- Page 7 and 8: I J K step two: I&J: After checked
- Page 9 and 10: Keep hands and fingers clear of sec
- Page 11: make the cable V go through between
- Page 15: Maintaineance A, The door - clean d
WARNING: WINDING THE TORSION SPRING CALLS<br />
FOR EXTREME CAUTION : CARELESSNESS COULD<br />
LEAD TO SERIOUS INJURIES.<br />
WARNING:THIS PART REQUIRES THE MOST<br />
ATTENTION ON SAFETY.<br />
Loosen the set screws one the<br />
winding cone of the spring,<strong>and</strong> then<br />
using the winding bar(not included)<br />
to wind the spring by truning the<br />
winding cone TOWARD THE CEILING.<br />
The wire must point in the same<br />
direction as you are winding.<br />
N.: Always wind toward the ceiling.<br />
Note: wind the spring 2 ~ 3 turns<br />
first, then make the complete<br />
turns as recommended:<br />
door height 2100mm 6turns<br />
door height 2400mm 7turns<br />
door height 2700mm 8turns<br />
Then tighten the set screws of the<br />
winding cone(add half a turn after<br />
feeling a pressure on the shaft.Do<br />
not forget to tighten the pressure<br />
screw before taking out the winding<br />
bars ).<br />
The winding bars must have the same<br />
diameter as the holes on the<br />
winding cone <strong>and</strong> must be pushed in<br />
as depth as possible into it.<br />
NEVER USE SCREWDRIVERS FOR THIS<br />
STEP.<br />
step seven:<br />
PLEASE MAKE SURE THE DOOR IS IN<br />
CLOSED POSITION.<br />
Remember that each hole on the winding cone is one quarter of a<br />
turn. The number of turns are indicated on the red line affixed<br />
on the spring.<br />
NEVER REMOVE A WINDING BAR OF ITS HOLE UNTIL THE OTHER WINDING<br />
BAR IS IN PLACE AND THAT YOU ARE HOLDING IT FIRMLY. YOU MUST BE<br />
VERY CAREFUL AT THIS POINT.<br />
Once this operation is completed, remove the locking pliers from<br />
the shaft,then only unlock the door, open <strong>and</strong> close the door<br />
slowly manually.You can now check if the door is well-balanced;<br />
ideally, it should stabilize where you stop pushing it up or<br />
pulling it down.<br />
If the door is heavy to lift, increase the torsion spring<br />
tension. If the door goes up too fast, decrease the torsion<br />
spring tension. Add or delete 1/4 turn at a time, alternating<br />
torsion springs. Recheck the balance. Repeat this procedure<br />
until the door rolls smoothly with a satisfactory balance.<br />
12


