- Page 1 and 2:
Lighting Control Console Operations
- Page 3 and 4:
Table of Contents Introduction . .
- Page 5 and 6:
Selective Partial Show Opening . .
- Page 7 and 8:
Highlight/Lowlight Rem Dim. . . . .
- Page 9 and 10:
Setting Referenced Mark Flags . . .
- Page 11 and 12:
Focus Effects . . . . . . . . . . .
- Page 13 and 14:
MIDI Show Control Devices. . . . .
- Page 15 and 16:
Introduction Welcome to the Ion Ope
- Page 17 and 18:
Register Your Ion Registering your
- Page 19 and 20:
Enter Since the command line can re
- Page 21 and 22:
Live and Blind Live and Blind are m
- Page 23 and 24:
Chapter 1 System Overview Inside th
- Page 25 and 26:
Gateways Ion is part of a fully net
- Page 27 and 28: USB Ports One USB port is provided
- Page 29 and 30: Outputting DMX In order to output c
- Page 31 and 32: Chapter 2 System Installation This
- Page 33 and 34: Ion Console Client Software Eos Con
- Page 35 and 36: Chapter 3 System Basics This chapte
- Page 37 and 38: Power Power Up the Console Note: No
- Page 39 and 40: You can use the [Swap] key to chang
- Page 41 and 42: The Central Information Area (CIA)
- Page 43 and 44: Using the Browser To use the browse
- Page 45 and 46: Using Direct Selects Direct selects
- Page 47 and 48: Display Control and Navigation Open
- Page 49 and 50: Graphical User Interface (GUI) Disp
- Page 51 and 52: Text Indicators in live/blind Pleas
- Page 53 and 54: [Data] Key Pressing and holding [Da
- Page 55 and 56: Indicators in the Playback Status D
- Page 57 and 58: Using [Format] Some displays have m
- Page 59 and 60: Spreadsheet (Blind Only) Spreadshee
- Page 61 and 62: Chapter 4 Managing Show Files This
- Page 63 and 64: Select the specific show file • N
- Page 65 and 66: To open only partial components fro
- Page 67 and 68: To merge only partial components: S
- Page 69 and 70: Saving the Current Show File To sav
- Page 71 and 72: Deleting a File Ion provides you wi
- Page 73 and 74: Chapter 5 Patch The Patch is where
- Page 75 and 76: Displays To begin patching your sho
- Page 77: Create and Edit Patch Select Channe
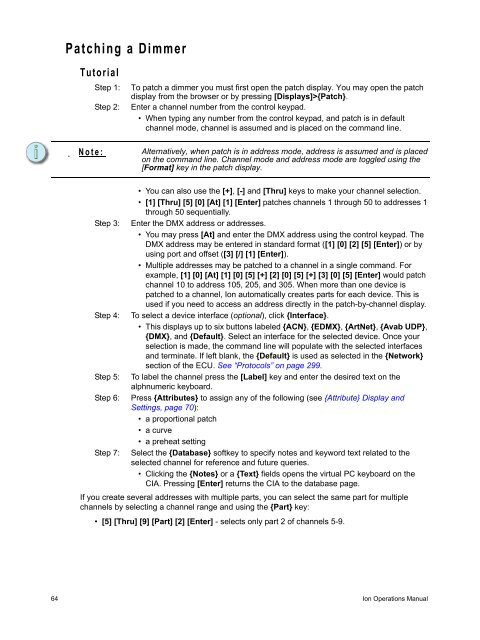
- Page 81 and 82: Step 6: To select a device interfac
- Page 83 and 84: Note: Note: Note: • {RDM Discover
- Page 85 and 86: • {Swap} - A moving light attribu
- Page 87 and 88: Patch Channels from the Encoder LCD
- Page 89 and 90: The picker displays buttons for the
- Page 91 and 92: Editing a copy of a scroll or wheel
- Page 93 and 94: To calibrate from the LCD: Step 1:
- Page 95 and 96: Fixture Creator Ion provides you wi
- Page 97 and 98: To add parameters to a new fixture:
- Page 99 and 100: To alter the Home settings for any
- Page 101 and 102: Chapter 6 Using Groups Groups are c
- Page 103 and 104: Offset You can use the {Offset} sof
- Page 105 and 106: Using Groups as a Channel Collector
- Page 107 and 108: Chapter 7 Setup This chapter descri
- Page 109 and 110: Show Settings Click {Show Settings}
- Page 111 and 112: Grandmasters, submasters, and playb
- Page 113 and 114: {ACN - MIDI Tx ID} This setting all
- Page 115 and 116: {Manual Control} This desk setting
- Page 117 and 118: {Displays} This desk setting button
- Page 119 and 120: Clicking {Identify} will display nu
- Page 121 and 122: Chapter 8 Basic Manual Control Ion
- Page 123 and 124: [Next] and [Last] The [Next] and [L
- Page 125 and 126: Manual Control of Non-intensity Par
- Page 127 and 128: Encoder LCD screen The encoder LCD
- Page 129 and 130:
Min and Max {Min} and {Max} are dis
- Page 131 and 132:
Shutter Control Pressing the [Shutt
- Page 133 and 134:
Home Ion is equipped with a [Home]
- Page 135 and 136:
Lamp Controls Lamp controls allow y
- Page 137 and 138:
Remainder Dim [Rem Dim] temporarily
- Page 139 and 140:
Highlight and Lowlight Ion can be p
- Page 141 and 142:
Channel Check Channel check allows
- Page 143 and 144:
Chapter 9 Storing and Using Presets
- Page 145 and 146:
Storing Presets using [Record Only]
- Page 147 and 148:
Editing Presets Live There are two
- Page 149 and 150:
Editing Presets in Blind All preset
- Page 151 and 152:
Chapter 10 Storing and Using Palett
- Page 153 and 154:
Storing Palettes Live Palettes may
- Page 155 and 156:
Using Filters with Palettes Filters
- Page 157 and 158:
Editing Palettes Live Note: Rerecor
- Page 159 and 160:
Editing Palettes in Spreadsheet Vie
- Page 161 and 162:
Deleting Palettes To delete color p
- Page 163 and 164:
Chapter 11 Working with a Single Cu
- Page 165 and 166:
Recording Cues in Live When using [
- Page 167 and 168:
Using Selective Store You may use t
- Page 169 and 170:
Timing Cue timing can be applied in
- Page 171 and 172:
Delay Time Delay is used to stage t
- Page 173 and 174:
Assigning Cue Attributes You can re
- Page 175 and 176:
Rate The {Rate} softkey can be used
- Page 177 and 178:
Assert Assert is a way to make a tr
- Page 179 and 180:
Modifying Cues Live Recorded cues c
- Page 181 and 182:
[Update] Update is a powerful featu
- Page 183 and 184:
Using Cue Only/Track The [Cue Only/
- Page 185 and 186:
Recording and Editing Cues from Bli
- Page 187 and 188:
Replace With {Replace With} is used
- Page 189 and 190:
Chapter 12 Using Mark {Mark} is an
- Page 191 and 192:
Referenced Marks Referenced marks a
- Page 193 and 194:
It is also possible to mark to a cu
- Page 195 and 196:
Reference Marks and Timing Movement
- Page 197 and 198:
Chapter 13 Using Filters Filters ar
- Page 199 and 200:
To apply record filters by category
- Page 201 and 202:
Chapter 14 Working with Multiple Cu
- Page 203 and 204:
Using Assert By default, channel pa
- Page 205 and 206:
Using [Go To Cue] with Multiple Cue
- Page 207 and 208:
Cue List Attributes Cue list attrib
- Page 209 and 210:
Chapter 15 Advanced Manual Control
- Page 211 and 212:
Using [Recall From] [Recall From] i
- Page 213 and 214:
Using {Make Manual} The {Make Manua
- Page 215 and 216:
Using [Undo] Undo is a method to re
- Page 217 and 218:
Chapter 16 Multipart Cues Cues can
- Page 219 and 220:
Setting Multipart Cue Attributes Cu
- Page 221 and 222:
Storing a Multipart Cue in Blind No
- Page 223 and 224:
Chapter 17 Cue Playback Ion has man
- Page 225 and 226:
Selected Cue The selected cue is al
- Page 227 and 228:
Go To Cue [Go to Cue] instructions
- Page 229 and 230:
Playback Fader Controls In Ion, man
- Page 231 and 232:
Manual Intensity Override An intens
- Page 233 and 234:
Using Stop Effect The {Stop Effect}
- Page 235 and 236:
Chapter 18 Using Park This chapter
- Page 237 and 238:
Parked Values in Live Channels and
- Page 239 and 240:
Park Values from the Park Display Y
- Page 241 and 242:
Chapter 19 Creating and Using Effec
- Page 243 and 244:
Effects Editor When viewing the eff
- Page 245 and 246:
Entry Establishes at what time and
- Page 247 and 248:
Effect Status Display To view the e
- Page 249 and 250:
Program a Step Effect Below is the
- Page 251 and 252:
Absolute Effects Absolute effects a
- Page 253 and 254:
Relative Effects A relative effect
- Page 255 and 256:
Define a Pattern Shape Shapes can b
- Page 257 and 258:
Effects on Submasters Channels runn
- Page 259 and 260:
Chapter 20 Using About [About] prov
- Page 261 and 262:
[About] When [About] is pressed, th
- Page 263 and 264:
About Channel Press [About] to put
- Page 265 and 266:
{Sensor AF} - appears when the curr
- Page 267 and 268:
About Cue The following information
- Page 269 and 270:
Chapter 21 Storing and Using Submas
- Page 271 and 272:
Submaster Displays In the display w
- Page 273 and 274:
Loading Submasters Submasters can b
- Page 275 and 276:
Using Bump Button Timing With Subma
- Page 277 and 278:
Chapter 22 Storing and Using Macros
- Page 279 and 280:
Begin writing the sequence of butto
- Page 281 and 282:
While in the macro editor display,
- Page 283 and 284:
Edit an Existing Macro When you hav
- Page 285 and 286:
Chapter 23 Storing and Using Curves
- Page 287 and 288:
Creating and Editing Curves Creatin
- Page 289 and 290:
Applying a Curve To Channels In Pat
- Page 291 and 292:
Chapter 24 Using Show Control Ion s
- Page 293 and 294:
Programming an Event List Getting s
- Page 295 and 296:
Enabling the Clocks The internal an
- Page 297 and 298:
Analog Inputs and Relay Outputs Ana
- Page 299 and 300:
Set The “Set” command allows MS
- Page 301 and 302:
Chapter 25 Multiple Users Ion can b
- Page 303 and 304:
Chapter 26 Using Partitioned Contro
- Page 305 and 306:
Creating New Partitions To create a
- Page 307 and 308:
Appendix A Eos Configuration Utilit
- Page 309 and 310:
Backup Backup mode requires a prima
- Page 311 and 312:
Keyboard Allows you to select the l
- Page 313 and 314:
Network Settings Ion Console IP Set
- Page 315 and 316:
Ion IP Settings These are the setti
- Page 317 and 318:
Backup Show Archive {Backup Show Ar
- Page 319 and 320:
Ion This screen allows you to confi
- Page 321 and 322:
Appendix B Multi-console and Synchr
- Page 323 and 324:
Change IP Address All Ion consoles
- Page 325 and 326:
Synchronized Backup Once you have c
- Page 327 and 328:
Backup Scenarios Console and consol
- Page 329 and 330:
Appendix C Remote Processor Unit (R
- Page 331 and 332:
Software Configuration Settings for
- Page 333 and 334:
Appendix D Remote Video Interface (
- Page 335 and 336:
Front Panel Removable label strip B
- Page 337 and 338:
Appendix E Remote Control Remotes O
- Page 339 and 340:
Base Station Receiver The receiver
- Page 341 and 342:
Basic Use Guidelines Keypad Functio
- Page 343 and 344:
RFR Operation Modes The Eos/Ion RFR
- Page 345 and 346:
Playback Mode Softkeys The followin
- Page 347 and 348:
Technical Specifications Handheld T
- Page 349 and 350:
Appendix F Universal Fader Wings Ov
- Page 351 and 352:
then press down gently on the right
- Page 353 and 354:
Using the Buttons Each fader is equ
- Page 355 and 356:
Index Symbols -% . . . . . . . . .
- Page 357 and 358:
in setup. . . . . . . . . . . . . .
- Page 359 and 360:
programming . . . . . . . . . . . .
- Page 361 and 362:
setting intensity with . . . . . .
- Page 363 and 364:
faders . . . . . . . . . . . . . .
- Page 365 and 366:
multipart cues. . . . . . . . . . .
- Page 367 and 368:
T large . . . . . . . . . . . . . .
- Page 370 and 371:
Corporate Headquarters 3031 Pleasa
- Page 372 and 373:
identification, copyright notices,
- Page 374 and 375:
measures in any relevant jurisdicti
- Page 376 and 377:
) use the modified Package only wit


