Pattern for Knit Baby Sweater ( UMCOR Layette Kit)
Pattern for Knit Baby Sweater ( UMCOR Layette Kit)
Pattern for Knit Baby Sweater ( UMCOR Layette Kit)
Create successful ePaper yourself
Turn your PDF publications into a flip-book with our unique Google optimized e-Paper software.
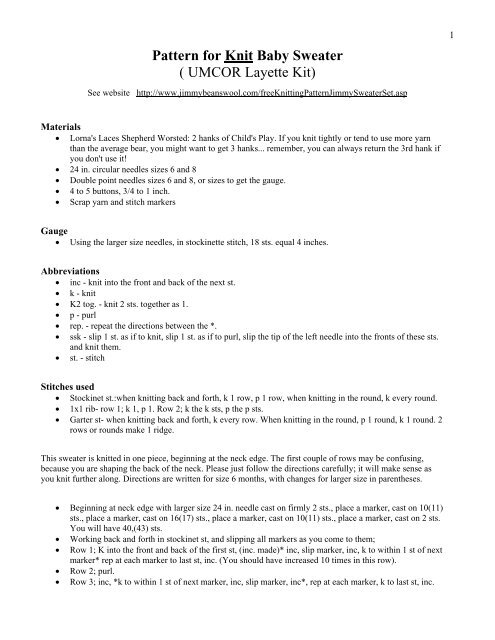
<strong>Pattern</strong> <strong>for</strong> <strong>Knit</strong> <strong>Baby</strong> <strong>Sweater</strong><br />
( <strong>UMCOR</strong> <strong>Layette</strong> <strong>Kit</strong>)<br />
See website http://www.jimmybeanswool.com/free<strong>Knit</strong>ting<strong>Pattern</strong>Jimmy<strong>Sweater</strong>Set.asp<br />
Materials<br />
• Lorna's Laces Shepherd Worsted: 2 hanks of Child's Play. If you knit tightly or tend to use more yarn<br />
than the average bear, you might want to get 3 hanks... remember, you can always return the 3rd hank if<br />
you don't use it!<br />
• 24 in. circular needles sizes 6 and 8<br />
• Double point needles sizes 6 and 8, or sizes to get the gauge.<br />
• 4 to 5 buttons, 3/4 to 1 inch.<br />
• Scrap yarn and stitch markers<br />
Gauge<br />
• Using the larger size needles, in stockinette stitch, 18 sts. equal 4 inches.<br />
Abbreviations<br />
• inc - knit into the front and back of the next st.<br />
• k - knit<br />
• K2 tog. - knit 2 sts. together as 1.<br />
• p - purl<br />
• rep. - repeat the directions between the *.<br />
• ssk - slip 1 st. as if to knit, slip 1 st. as if to purl, slip the tip of the left needle into the fronts of these sts.<br />
and knit them.<br />
• st. - stitch<br />
Stitches used<br />
• Stockinet st.:when knitting back and <strong>for</strong>th, k 1 row, p 1 row, when knitting in the round, k every round.<br />
• 1x1 rib- row 1; k 1, p 1. Row 2; k the k sts, p the p sts.<br />
• Garter st- when knitting back and <strong>for</strong>th, k every row. When knitting in the round, p 1 round, k 1 round. 2<br />
rows or rounds make 1 ridge.<br />
This sweater is knitted in one piece, beginning at the neck edge. The first couple of rows may be confusing,<br />
because you are shaping the back of the neck. Please just follow the directions carefully; it will make sense as<br />
you knit further along. Directions are written <strong>for</strong> size 6 months, with changes <strong>for</strong> larger size in parentheses.<br />
• Beginning at neck edge with larger size 24 in. needle cast on firmly 2 sts., place a marker, cast on 10(11)<br />
sts., place a marker, cast on 16(17) sts., place a marker, cast on 10(11) sts., place a marker, cast on 2 sts.<br />
You will have 40,(43) sts.<br />
• Working back and <strong>for</strong>th in stockinet st, and slipping all markers as you come to them;<br />
• Row 1; K into the front and back of the first st, (inc. made)* inc, slip marker, inc, k to within 1 st of next<br />
marker* rep at each marker to last st, inc. (You should have increased 10 times in this row).<br />
• Row 2; purl.<br />
• Row 3; inc, *k to within 1 st of next marker, inc, slip marker, inc*, rep at each marker, k to last st, inc.<br />
1
• Continue to work rows 2 and 3 until there are 22(23) sts between the back markers (these are the second<br />
and third markers that you placed). At the end of this last increase row, cast on to the right tip of the<br />
needle 3 sts.<br />
• Next row- p, and at the end of this row, cast on to the right tip of the needle 3 sts as be<strong>for</strong>e.<br />
• Next row- *k to within 1 st of marker, inc, inc*, rep at each marker, k to end of row.<br />
• Next row- p.<br />
• Continue to work the last 2 rows, increasing as established (on the k side of work, be<strong>for</strong>e and after each<br />
marker) until there are 40 (45) sts between the back markers, ending after working a p row.<br />
Divide <strong>for</strong> sleeves<br />
• k to first marker; remove it (remove all markers now, as you come to them), k 1. Now using a blunt<br />
needle and a length of scrap yarn, slip all the sts between here and the next marker onto the length of<br />
yarn to hold <strong>for</strong> the left sleeve. Cast onto the right tip of the needle 5 sts. and join to the back sts. K<br />
across the back sts to the next marker, k 1, slip all the sts between here and the next marker onto a length<br />
of yarn to hold <strong>for</strong> the right sleeve. Cast on 5 sts as be<strong>for</strong>e and join to front sts. K to end of row.<br />
• You are now working on the body sts only. Work in stockinet st until work measures 9 1/2 (10 1/2)<br />
inches, measuring from the top of the shoulder. Change to smaller 24 in circular needle and work 3/4 in.<br />
of garter stitch (k every row). Bind off loosely.<br />
Neckband<br />
• with right side of work facing you, using the smaller circular needle, beginning at right front (as worn)<br />
edge of neck, join yarn and pick up 8 sts across front,10 (11) across top of sleeve, 16 (17) sts across back<br />
neck,10 (11,12) across top of other sleeve, 8 across other front. Work 2 ridges of garter stitch, bind off.<br />
Sleeves<br />
• Slip the sleeve sts off their length of yarn onto 2 of the larger size double point needles. With right side<br />
of work facing you, using a third double point needle, join yarn to right edge of armhole and pick up 7<br />
sts across the armhole, placing a marker after 3. This is the beginning and end of the round.<br />
• K 1 round, then slip some of the sts from the needles that have lots of sts to the needle that only has 7 to<br />
make the amount of sts on each needle approx. even.<br />
• K 5 rounds.<br />
• Decrease round; k 1, ssk, k to within 2 sts of marker, k 2 tog.<br />
• K 4 (3) rounds, then do another decrease round as above.<br />
• Continue to work as established, decreasing every 5 ( 4) rounds, until sleeve measures 5 1/2 (6) ins.,<br />
measured from the armhole, or 3/4 ins less than desired length.<br />
• Decrease evenly if needed over the next round to 24 (26) sts. Change to smaller double point needles,<br />
and work 2 ridges of garter stitch. Bind off loosely.<br />
Front Bands<br />
• Left band; using the smaller circular needle, beginning at neck edge of left front, with the k side of the<br />
work facing you, pick up 3 sts <strong>for</strong> every 4 rows. Count these sts and make note. Mark buttonholes: using<br />
safety pins, mark 2 sts <strong>for</strong> each buttonhole desired, spacing them evenly, about 2 1/2 ins apart, with the<br />
first buttonhole 2 sts from upper edge. Buttonhole row; *k to marked sts, bind them off firmly* rep until<br />
all pinned sts are bound off, k to end of row. Next row; *k to bound off sts, cast on 2 sts firmly*, rep to<br />
end of band. K every row until there are 2 garter st ridges. Bind off loosely.<br />
• Right band; beginning at lower edge of right front with k side of work facing you, pick up sts as <strong>for</strong> the<br />
left band, making sure the number of sts is the same. K same as left band, making buttonholes in this<br />
band also. Sew buttons on over the holes on left band <strong>for</strong> girl, right band <strong>for</strong> a boy.<br />
2


