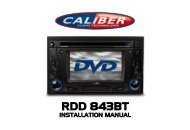
Manual English - Caliber Europe
Manual English - Caliber Europe
Manual English - Caliber Europe

You also want an ePaper? Increase the reach of your titles
YUMPU automatically turns print PDFs into web optimized ePapers that Google loves.
Contents<br />
1.Before Operation...........................................................................................3<br />
1.1 Glossary................................................................................................ 3<br />
1.2 Precautions............................................................................................3<br />
1.3 Maintenance andCleaning ofDiscs..........................................................4<br />
1.4 Battery Informationofthe RemoteControl.................................................4<br />
1.5 TheRemoteControl Description..............................................................5<br />
1.6 LocationsandNames oftheControls.......................................................6<br />
1.7 Description oftheRearCabinet...............................................................7<br />
1.8 UnitInstallation......................................................................................8<br />
2.CommonOperation........................................................................................9<br />
3.Radio Operation..........................................................................................11<br />
4.Basic Disc, USB orMMC/SDOperation..........................................................13<br />
4.1 BeginPlayback......................................................................................13<br />
4.2 Pause Playback.....................................................................................14<br />
4.3 StopPlayback.......................................................................................14<br />
4.4 Select Chapter/Track with theUP/DN orthe >>|/|
1.Before Operation<br />
1.1 Glossary<br />
PBC(playback control)<br />
Thisisasignal(menu)recorded inthe discwithSVCD orVCD2.0<br />
format usedfor theplaybackcontrol.For thediscscontaining PBC,It can<br />
playbackinteractivesoftwarewith the menudisplayed onmonitor screen.<br />
If thedisccontainsstillimages,itcanplaybackhighdefinitionstillimages.<br />
Title<br />
Generally, the titleisthe importantpartofDVD disc.for example,the<br />
theme partof movieis title 1,the partdescribed howtomake movieis title<br />
2, the cast istitle3,etc.Every titlecontains aserialnumber that is easyto<br />
lookup.<br />
Chapter<br />
Atitle can bedivided intoseveral blocks, sothat everyblockcanbeoperated<br />
asaunit, theunitiscalledachapter. The chaptercontainsatleastoneunit.<br />
Track<br />
It isthebiggestcomponent ofVCD.Generally, everysong ofkaraoke disc<br />
isatrack.<br />
1.2 Precautions<br />
Safety<br />
1.PowerSource: The unit should be connected to powersupply only of<br />
the type described in the operating instructions or as marked on the unit.<br />
2.The unit is designed fornegative terminal of the battery which is<br />
connected to the vehicle earth.Please confirm before installation.<br />
3.Do not allowthe speaker wiresto be shorted togetherwhen the unit is<br />
switched on. Otherwise it may overload or burn out the poweramplifier.<br />
4.Do not install the detachable panel before connecting all the wire.<br />
Environment<br />
1.Do not use this unit when waterand moisture is nearit.<br />
2.If moisture formsinside the Lens, it maynot operate properly.Tocorrect<br />
this problem, wait about one hourfor the moisture to evaporate.<br />
3.If the car interior is extremely hot, do not use the player until the carhas<br />
been driven for awhile to cool off the interior.
1.3 Maintenance andCleaning of Discs<br />
Disc Maintenance<br />
1.To keep the disc clean, handle<br />
the disc by its edge, donot touch the disc<br />
surface of the play side.<br />
2.Do not stick paper or tapeon thedisc. Ifthere is glue(or analog) onthe<br />
disc surface,must wipe it up before using.<br />
3.Do not expose the disc todirect sunlight, or nearby heat sources such as<br />
caliduct, or leave itin acar parked in direct sunlight where there can be a<br />
considerablerise intemperature.<br />
4.Put the disc inside disc case to keep temperature after finishing playback.<br />
Disc Cleaning<br />
1. Beforeplaying, wipethe disc withaclean lint. wipe the discoutwards from<br />
the disc center.<br />
2. Do not use petrol, thinners, commercially available cleaners or anti-static<br />
sprays for plastic LP's to wipe discs.<br />
1.4 Battery Informationof the Remote Control<br />
Fig.1 Fig.2 Fig.3<br />
ReplaceBatteryintheRemote Control:<br />
1.Before usingthe remote control for the firsttime, pull theinsulating<br />
sheetout ofthe remote controlasthedirectionindicated by the<br />
arrow.(see fig.1)<br />
2.Pressthe movableblockholdas the direction indicatedbytheAarrow<br />
(See fig.2), then pull the batteryholder out of the remote control as<br />
the direction indicated bythe Barrow(see fig.2).<br />
3.Replacethe old battery by anew batterywith (+)polarityside upward.<br />
(See fig.3).<br />
4.Insertthe battery holderto the original positioninremote control.<br />
(See fig.3).<br />
Noteabout theBatteryofthe Remote Control:<br />
1. Improper use of battery may cause overheating orexplosion.so that<br />
Result ininjuryorfire .<br />
2.Battery leakage maycause damagetothe remote control(Battery<br />
Life:6monthswithnormal use in normalroomtemperature).<br />
3.Donot short the battery.<br />
4.Donot throw the batteryinto the fire.<br />
5.Toavoidthe risk ofaccident,keepthe battery outof reach of children.<br />
A<br />
B<br />
+side up
1.5 TheRemote ControlDescription<br />
14<br />
29<br />
32<br />
9<br />
34<br />
13<br />
31<br />
30<br />
40<br />
41<br />
24<br />
28<br />
21<br />
22<br />
26<br />
25<br />
23<br />
36<br />
3<br />
PWR<br />
SEL<br />
+<br />
1<br />
-10<br />
5<br />
CLK<br />
SLOW_FWD<br />
LOC<br />
ZOOM<br />
A-B<br />
27<br />
16. SEARCHBUTTON<br />
17. RDM BUTTON<br />
18. RPT BUTTON<br />
19. SUBTITLEBUTTON<br />
20. TITLE/PBC BUTTON<br />
21. ANGLE/STBUTTON<br />
EQ<br />
MU MODE<br />
SETUP<br />
22. ZOOMBUTTON<br />
23. AUDIOBUTTON<br />
24. CLK BUTTON<br />
25. A-B BUTTON<br />
26. INT BUTTON<br />
27. EQ BUTTON<br />
28. LOC/SLOW-FWDBUTTON<br />
2<br />
+10<br />
6<br />
9/AF<br />
ST<br />
INT<br />
AUDIO<br />
35<br />
1<br />
BAND P/N<br />
4<br />
2<br />
33<br />
6<br />
8<br />
5<br />
7<br />
10<br />
11<br />
12<br />
16<br />
15<br />
18<br />
17<br />
19<br />
20<br />
39<br />
37 38<br />
0K<br />
7<br />
0/10<br />
TA<br />
TITLE/PBC<br />
MENU<br />
3 4<br />
10+<br />
/PTY<br />
SEARCH APS<br />
RPT RDM<br />
SUBTITLE<br />
PROG OSD LOUD STEP<br />
8<br />
1.P/N BUTTON<br />
2.MENU BUTTON<br />
3.POWER BUTTON<br />
4.^BUTTON<br />
5.>>|BUTTON<br />
6.>BUTTON<br />
7. |
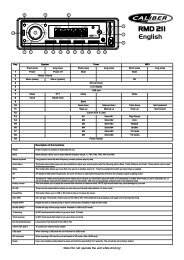
1.6 Locations and Namesof the Controls<br />
14<br />
1 6 11 17 9 8<br />
3<br />
/MU<br />
VIDEO TM<br />
2<br />
INT<br />
15 12 16<br />
24<br />
1<br />
3 RPT<br />
A<br />
P<br />
S<br />
5<br />
11<br />
The figure of thefront panel<br />
2 21 23 13<br />
The figure ofthe UnitChassis FacetAfter removingthe FrontPanel<br />
1.POWER/MUTE BUTTON<br />
2.DISC SLOT<br />
3.RELEASE BUTTON<br />
4.MODE<br />
5.TABUTTON<br />
6.SELBUTTON<br />
AND VOLKNOB<br />
7.AF BUTTON<br />
8. SMALLMONITOR<br />
9.IR REMOTE SENSOR<br />
10.BAND BUTTON<br />
11. UPAND DN BUTTONS<br />
12.APSBUTTON<br />
UP<br />
DN<br />
TA AF<br />
B<br />
N<br />
D<br />
4 RDM<br />
6<br />
+10<br />
5<br />
-10<br />
PUSHSEL<br />
_<br />
+<br />
VOL<br />
MODE<br />
3" TFT<br />
7 19 10 4 18<br />
22 20<br />
REL<br />
USB<br />
AUX<br />
13.EJECT BUTTON<br />
14.1/PLAY/PAUSE BUTTON<br />
15.2/INT BUTTON<br />
16.3/RPTBUTTON<br />
17.4/RDM BUTTON<br />
18.5/-10 BUTTON<br />
19.6/+10 BUTTON<br />
20. USBSOCKET<br />
21.RESETBUTTON<br />
22.AUX IN SOCKET<br />
23.LED INDICATOR<br />
24. SD/MMC CARDSLOT
7<br />
Reversal line White<br />
Parking Line GREEN<br />
1.7 Descriptionofthe Rear Cabinet<br />
VIDEO OUT<br />
Connecting theparking brakelineto theparkingbrake system built in thecar<br />
Parking brake<br />
YELLOW<br />
YELLOW<br />
GRAY<br />
GRAY<br />
GREY<br />
BLACK<br />
BLACK<br />
Note: 1. after connecting the Parking Line, the video on the small monitor of the front panel will be display only after braking the car.<br />
2. Use the clip end of aGround Line provided by manufacturer to connect the Fixing Screw Bolt, use another end of the Ground<br />
Line to connect the negative pole of the power source. Otherwise, the video on screen maybe flashes.<br />
Parking brake switch<br />
(insidethecar)<br />
Parking brakeline(Green)<br />
To metallicbodyorchassisof thecar<br />
The Description of the Fixed ISO Female Connector<br />
CONNECTORA<br />
1.<br />
2.<br />
3.<br />
4. Memory +12V<br />
5.Auto Antenna<br />
6.<br />
7. 12V (ToIgnition Key)<br />
8. GROUND<br />
GREEN<br />
RED R<br />
WHITE L<br />
SUBWOOFER<br />
RCA LINE OUT<br />
Fixing Screw Bolt<br />
CONNECTOR B<br />
1. Rear Right Speaker (+)<br />
2. Rear Right Speaker (-)<br />
3. Front Right Speaker (+)<br />
4. Front Right Speaker (-)<br />
5. Front Left Speaker (+)<br />
6. Front Left Speaker (-)<br />
7. Rear Left Speaker (+)<br />
8. Rear Left Speaker (-)<br />
Fixed ISOFemale Connector
1.8 UNIT INSTALLATION<br />
INSTALLATION INSTRUCTIONS<br />
METALSTRAP<br />
NOTE<br />
DASH BOARD<br />
SLIDING METALHOUSING<br />
TO DRAW THE CHASSIS OUT OFTHE<br />
SLIDING METALHOUSING,INSERT<br />
THE LEFTANDRIGHTKEYPLATES<br />
INTO THE TWOSIDES OF CHASSIS.<br />
REMOVETHE SLIDINGMETAL HOUSING<br />
Thisisan anti-theftinstallation,with<br />
the unithaving aslidingmetalsleeve.<br />
Toreduce skipping or jamming<br />
of discs, please fix themetal<br />
strap onthemetalconnectedto<br />
the chassisofthecar.<br />
REMOVETHEDECKTRANSPORT<br />
SCREWSBEFORE INSTALLING IT.<br />
UNITCHASSIS<br />
EJECT BUTTON<br />
RESET BUTTON<br />
SELECTTHE PROPER TABS<br />
OFTHE SLIDINGMETAL<br />
HOUSINGTO FIXTHE<br />
SLIDING METAL HOUSING.<br />
PLASTIC TRIMOUT<br />
FRONTPANEL
2. Common Operation<br />
1. To turn on/off theunit<br />
Underpoweroff mode,pressthePOWER buttonto turnontheunit.<br />
Underpoweronmode, pressandholdthe POWER button onthe frontpanel<br />
orbriefly pressthePOWER buttononthe remote controllertoturn off the unit.<br />
2. To select function mode<br />
Pressthe MODEbuttonto selectTUNER, DISC(After insertingadisc),USB<br />
(After inserting aUSB storage), Card(After inserting aMMCorSDcard), or<br />
AUXmode.<br />
3. To adjustsoundlevel<br />
Rotate theVOLknob onthe front panelorpressorholdthe +or-buttonon<br />
theremote controllertodirectlyadjustthe volumelevel.<br />
4. To mutesound<br />
PresstheMUTEbutton onthe remote controllertoturn on/off MUTEmode.<br />
BrieflypressingthePOWER buttononthefront panelalsocan turnon/off<br />
MUTEmode.<br />
InMUTEmode, the MUTEmode can bereleased bypressingthefollowing<br />
buttons: MUTE, VOLor+/-, SEL, MODE.<br />
5. To displayandadjusttheclocktime<br />
Pressthe CLK buttononremote controller to displayclocktime on thesmall<br />
monitorofthefront panel.<br />
Thenpressandholdthe CLK buttonto change the colorofthe hourofthe<br />
clock, thenrotate the VOLknobonthefront panelorpressthe +or-button<br />
onthe remote controllertoadjustthe hour;andthen briefly pressthe SEL<br />
button to changethecoloroftheminuteofthe clock,then rotate theVOL<br />
knobonthe front panelor pressthe +or-button onthe remote controllerto<br />
adjust theminute.<br />
6. To select apresetEQ mode<br />
Pressthe EQ buttonto selectthe preset musicequalizercurves:POP,ROCK,<br />
CLAS, FLAT .The soundeffect will bechanged.
7. To demountthefrontpanel<br />
8. To mountthe frontpanel<br />
Fig.1 Fig.2 Fig.3 Fig.4<br />
9. To turn on/off LOUDNESSmode<br />
Pressthe LOUDbuttononthe remote controllerto turn on/off LOUDNESS<br />
mode.<br />
Whenturning on LOUDNESSmode, it will enhancebasslevel immediately<br />
whenthebassisnotenough.<br />
10.To reset the unit<br />
whenthe displayis incorrect,orthe function buttonsarenot effectiveor<br />
sound isdistorted,presstheRELEASE buttonto detachthefront panel<br />
from the unit,then useasharppointto presstheRESET button,which will<br />
reset to factorydefault,andre-instate the correctfunctions.<br />
11.To adjustthe sound equalizercurves<br />
To adjustthesoundequalizercurves,brieflyandrepeatedlypresstheSEL<br />
button to selectthe soundequalizercurvesofVOL, BAS(withoutpresetEQ),<br />
TRE(without preset EQ),BAL,FAD, thenrotate theVOLknob onthe front<br />
panelorpressthe+or-buttontoadjustlevel.
3. Radio Operation<br />
1. BAND BUTTON<br />
In RADIO mode, press the BAND button on the remote controlor on the front panel to<br />
selectyour desired radio band of FM1, FM2, FM3,AM1 andAM2, and the selected band<br />
will be displayed on the small monitor of the frontpanel.<br />
2. TUNE/SEEK UP/DOWN BUTTONS<br />
In RADIO mode:<br />
1) Pressand hold the UP/DN button on the front panel or the >>|/ |>| /|
7. PTY(PROGRAMTYPE) BUTTON<br />
PressthePTYbutton shortly to selectone of thefollowing mode:<br />
PTYMUSIC group- -PTYSPEECHgroup- -PTYOFF<br />
When PTYgroupis on, pressthe VOL+ orVOL- buttonontheremote<br />
controller orrotate the VOLknob onthe frontpanelto selectoneofPTY<br />
programs: NEWSAFFAIRSINFOSPORTEDUCATE<br />
DRAMACULTURE SCIENCEVARIEDWEATHER<br />
FINANCECHILDRENSOCIALRELIGIONPHONE IN<br />
TRAVELLEISUREDOCUMENT< -->PTYNONEPOP M< --><br />
ROCK MEASYMLIGHTMCLASSICSOTHER M<br />
JAZZCOUNTRYNATIONMOLDIESFOLK M<br />
When PTYgroupison, pressing the6number buttons also canselect one of<br />
PTYprogramsasabove.<br />
AfterselectingoneofthePTY programs,it will displaySEEK PTY and<br />
automatically searchfor the stationofthePTYprogram.If thestationof<br />
thePTYprogramdoesnotexist,it will display PTY NONEandthenreturn<br />
back tothe normalstation.<br />
8. AF [ALTERNATIVE FREQUENCIES]BUTTON<br />
Whenpressing theAF buttonbriefly, theAF switchingmodeisselected and<br />
thestate oftheAF switching mode isdisplayedbyAF segment in display.<br />
Segmentoff:AFswitching modeoff.<br />
Segmenton:AF switchingmodeon,andhasRDSinformation.<br />
Segmentflashing:AF switchingmodeon,but RDSinformationisnot<br />
receivedyet.<br />
When theAF switchingmodeisselected, theradio checksthe signalstrength<br />
of the AF all thetime.Theintervalofcheckingtime ofeachAFs dependson<br />
thesignalstrengthofthecurrentstation,from afew minutefor the strong<br />
station to afew seconds for theweak station.Every time thatanewAFis<br />
strongerthan thecurrentstation, itswitchesoverto thatfrequencyfor very<br />
shorttime,andtheNEW FREQUENCYisdisplayedfor 1-2second.Because<br />
the mute time oftheAF switching orthecheckingtimeisveryshort,it is<br />
almostinaudibleincaseofnormalprogram.(WhenAF flash onLCD,it will<br />
search for thestronger RDS station.IfAF andTPflashonLCD, itcanonly<br />
searchfor thetrafficannouncementstation).<br />
In FMmode,whenAFison,SEEK,(SCAN),AUTO-MEMORY functioncan<br />
onlyreceive and save theRDS program.<br />
9. TA[TRAFFICANNOUNCEMENT] BUTTON<br />
PresstheTAbuttonshortlytoturn onTAsearchmode.<br />
When trafficannouncementistransmitted:<br />
1).Iftheunitis inDisc Play mode, itwill switchtoradio modetemporarily.<br />
2).TemporarilyswitchovertoanEON linked station when EON detectsa<br />
trafficannouncement onthatotherprogram,andTA,TPwill bedisplayed<br />
onLCD<br />
* TAinterruptionfunction:<br />
Thecurrenttraffic announcementiscancelledbypressingTAbutton<br />
shortly.<br />
* When TAison,SEEK, (SCAN),AUTO MEMORY functioncanbereceived<br />
or saved onlywhen trafficprogramidentificationcodehasbeenreceived.
4. BasicDisc,USB orMMC/SDOperation<br />
4.1 Begin playback<br />
1. Press the POWER button briefly to turn on the DVD player.<br />
After turning onthe DVD player, pleaseturnonthemonitor, andensurethat<br />
thevideooutputofthemonitoristhe videoinputfromthe DVD player<br />
connectedwith themonitor.<br />
? Common Question<br />
Q: ThereisnotanythingisdisplayedonTVscreenwhentheDVD playeris<br />
turnedon.How to solvethe problem?<br />
A: Ensure thattheTVwasset to right videoinput(notTVchannel);for<br />
example,ifyou makeVIDEO1 INPUTof TV and DVD playerconnected<br />
witheachother, thenyouneedset TV to VIDEO1.<br />
2.<br />
Press the RELEASE button to detach the front panelfrom theunit.<br />
3. Insert adiscinto the DISC SLOT(Label surfaceup), then flip up the<br />
frontpanel till hearingaclip.<br />
! NOTE<br />
1. For some discsthat areseriouslyscratched orpoormanufacturingor<br />
recording quality, itmay notplay.<br />
2. If theplayercannotread discunder normalcondition,pleasetry to<br />
eject andreloadthe discagain.<br />
3. Remark:<br />
1)InadditiontonormalCDandDVD,thisunitsupports to playCD-R,<br />
CD-R/W, DVD-Rand DVD-R/W aswell; however, dependingonthe<br />
conditionsoftherecording equipment,recording programorthedisc<br />
itself,someCD-R,CD-R/W, DVD-R orDVD-R/W may notplay.<br />
2)Whendealingwith CD-R, CD-R/W, DVD-RorDVD-R/Wrecording,<br />
too highrecording speedmayresult inpoorsignalqualityandtherefore,<br />
it is recommendable to selectasloweraspossiblerecordingspeed.
4.2 Pause Playback<br />
When playingDVD/VCD/CD/MP3/WMAdiscs,pressthe PAUSEbuttononIR<br />
remotecontrolto pausethe playback,pressthe PLAYbuttontoresumenormal<br />
playback.<br />
4.3<br />
Stop Playback<br />
When playingDVD/VCD/MP3/WMA/CDdiscs,pressthe STOPbutton once to<br />
pause theplayback,thenpress thePLAYbutton to resumethe normal playback;<br />
pressthe STOP button twiceto stopthe playback, thenpress the PLAY button<br />
tostartplayback fromthe beginningofthe firstchapter/track.<br />
4.4<br />
SelectChapter/Track withtheUP/DN orthe >>| /|>|/|>|/|
In VCD mode<br />
1. Whenstartingto turn on thePBC function, it will playfrom thebeginningof<br />
thedisctillitdisplaythe PBC menuonTV screenif the discincludethePBC<br />
menu.<br />
2. Pressthe numberbuttonstoselect yourdesiredtracktoplay.<br />
In MP3/WMAmode<br />
1. Theroot menu isdisplayed onthe monitorscreenallthetime(and theTITLE<br />
or MENU buttonisnotavailable).<br />
2. Pressthe directionbuttonsto selectyour desiredFOLDER,then pressthe<br />
OKorPLAY buttonto openthe FOLDER, andthenpressthedirectionbuttons<br />
toselect yourdesiredfile,finallypresstheOKbutton toplaythe selectedfile.<br />
In CD mode,theTITLE, PBC, MENUbuttonsaredisabled.<br />
4.7<br />
Terminate the Playback<br />
1. Pressthe RELEASE button todetachthe frontpanelfrom theunit,then press<br />
theEJECTbuttonto ejectdisc,andthenremove thediscandflip up thefront<br />
paneltillhearingaclip.<br />
2. Pressandhold thePOWER buttononthefront panelorbrieflypressthe<br />
POWER buttononthe remote controllertoturn off the DVD player.<br />
5.<br />
AdvancedDisc, USB orMMC/SD Operation<br />
5.1 Playbackwith Speed<br />
During normal playback,pressandhold theUP/DN buttononthefront panel<br />
orthe>>|/|
During slowforward, pressthePLAY buttontoresume normalplayback.<br />
Thefunction is only forvideo.<br />
5.3<br />
Playback with stillframe<br />
Ifthe unitiscurrentlyrunning DVD/VCDdisc,pressthe STEPbutton<br />
consecutivelytodisplay thestillframeforwardwith step bystep.<br />
Pressthe PLAY button toresumenormalplayback.<br />
5.4<br />
Playback Repeatedly<br />
5.4.1<br />
ONE/ALLRepeat<br />
1. In the mode ofDVD discplayback:<br />
Pressthe RPTbuttontoselectREP CHAPTER, REPTITLE,REPALL<br />
or REP OFF.<br />
2. In the mode ofVCD(PBC OFF)/CD discplayback:<br />
press theRPTbuttonto selectREPONE,REPALLorOFF.<br />
Whenitis inthe state ofPBCON, duringVCDdiscplaying, theRPT<br />
button arenot available.<br />
3. In the mode ofMP3/WMAdiscplayback:<br />
Pressthe RPTbuttontoselectREP ONE, REPDIR, REPALLorOFF.<br />
5.4.2<br />
A-B Repeat<br />
Press the A-B buttonifyou want torepeat aspecificsegmenton adisc<br />
thatyoudefine:<br />
1. Press the A-B buttonatapoint(A) where you want ittobethestartpoint<br />
ofthe repeat segment. Press the A-B button again atapoint(B)whereyou<br />
wantit to bethe terminal pointoftherepeatsegment.Thenitwill playthe<br />
segmentrepeatedly.<br />
2. TocanceltheA-B repeat modeandresumenormalplayback,pressthe<br />
buttonfor thethird time.<br />
A-B<br />
Note:<br />
DuringVCD/MP3/WMA/CD playback,pointsAandBmustbe within the<br />
sametrack.<br />
DuringDVD playback,pointsAandBcan beselectedfrom differentchapters.
5.5 Playback in Scan Mode<br />
1. When playingVCD(PBCOFF)/CD discs,presstheINTbutton to playthe<br />
previous10seconds partofeachtrackonthedisc.Press the INTbutton<br />
againto resume normalplayback.<br />
2. When playingDVD/MP3/WMAdiscs,the INTbuttonisnotavailable.<br />
5.6 Playback fromaspecifiedchapter/trackoraspecifiedtime<br />
1. When playingDVDdiscs, presstheSEARCHbutton todisplayainterface<br />
andhighlightthetitle item,then usethe numberbuttonsto input the serial<br />
numberofthetitle;usethe directionbuttonsto highlightthe chapteritem,<br />
thenusethe numberbuttonstoinputthe serialnumberofthe chapter; you<br />
canstillusethe directionbuttonsto highlightthe time item,thenusethe<br />
numberbuttonsto inputthedesired time to start playback; finally pressthe<br />
OK or PLAY buttontoplaythe selected chapterorplayfromtheselected time.<br />
2. When playingVCD/MP3/WMA/CD discs,pressthe SEARCHbutton to display<br />
ainterface andhighlightthe trackitem,thenusethe numberbuttons toinput<br />
theserialnumberofthetrack;you can stillusethe directionbuttons tohighlightthe<br />
time item,thenusethe numberbuttonsto input the desiredtimeto<br />
start playback;finallypresstheOKorPLAY button to playthe selectedtrack<br />
or play fromthe selected time.<br />
5.7PlaybackinRandom<br />
Whenplaying DVD/VCD(PBC OFF)/MP3/WMA/CDdiscs, presstheRDM<br />
button to switch betweenRANDOM (ON)/RANDOM OFF. When in RANDOM<br />
(ON) mode,itwill playinrandom.<br />
5.8<br />
Playback in DifferentAngle<br />
1. When playingVCD/MP3/WMA/CD discs,theANGLE buttonontheIR remote<br />
control isnotavailable.<br />
2. When playingDVDdiscs, presstheANGLE buttonrepeatedly onthe IR<br />
remotecontrolto viewindifferentangle.(Thisfunction is onlyforthe DVD<br />
discs withANGLE function)<br />
5.9<br />
Playback in ZoomMode<br />
In DVD/VCD mode, duringplayback,pressthe ZOOMbuttoncontinuously<br />
to enlargeacertainareaofthe imagesonthe screen with thesemultiples:
ZOOMx2,ZOOMx3,ZOOMx4,ZOOMx1/2,ZOOMx1/3,ZOOMx1/4,ZOOM OFF.<br />
Press one of the ^/v/>/PAL-->PAL-M --> PAL-N -->NTSC -->AUTO --><br />
5.13 Lookover the Playback Status<br />
1. When playingDVDdiscs, press theOSDbuttonrepeatedly on the remote<br />
controltoturnon/off theplayback status. When itison, it will displaythe<br />
informationsuch as: theserialnumberoftheplayingtitle,theserialnumber<br />
of theplaying chapter, theelapsed timeoftheplaying chapter, the remaining<br />
time oftheplayingchapter, theelapsedtimeof theplaying title,the remaining<br />
time oftheplayingtitle, etc.<br />
2. When playingVCD/CDdiscs, presstheOSDbutton repeatedly on theremote<br />
controltoturnon/off theplayback status. When itison, it will displaythe<br />
informationsuch as: the serialnumber of theplayingtrack,theelapsed time<br />
oftheplaying track,theremaining timeoftheplaying track, theelapstedtime<br />
of thedisc,theremaining time ofthedisc.<br />
3. When playingMP3/WMAdiscs,press the OSD button repeatedly on the<br />
remotecontrol to turn on/off theplayback status. When it is on,itwill<br />
displaytheinformationsuch as: theserialnumberof theplayingtrack, the<br />
elapsedtimeof theplayingtrack,the remaining timeoftheplaying track.
5.14ProgramPlayback<br />
Itallowsyou to enterthe orderin whichyouwantsome chapters/tracksin<br />
DVD/VCD/MP3/WMA/CDdiscto play.<br />
1 Duringplayback,press the PROG button toenter aprograminterfaceas<br />
follows:<br />
for DVD discs forVCD/MP3/WMA/CDdiscs<br />
PROGRAM<br />
T C T C T C T C<br />
1__:__ 5__:__ 9__:__13__:__<br />
2__:__<br />
6__:__10__:__14__:__<br />
3__:__<br />
7__:__11__:__15__:__<br />
4__:__<br />
8__:__12__:__16__:__<br />
Play Clear<br />
PROGRAM<br />
2 Use thedirectionbuttonsto move cursor onto thedesired placefor inputting<br />
the sequencenumber.<br />
3 Use thenumber buttonto inputdesiredsequence number of title/chapter/<br />
trackwith desiredsequence.<br />
4 Use thedirectionbutton tomove cursoronto Play item, then pressthe OK<br />
button to playthe programmedtitles/chapters/tracks inprogrammedorder;<br />
onlypressingthe PLAYbutton alsocanplaytheprogrammedtitles/chapters<br />
/tracksin programmed order.<br />
* To exit programplayback, firstlypress the STOPbutton,thenpress thePLAY<br />
button to entersequence playback; or pressthe PROGbuttontwiceagain.<br />
* To remove theallprogrammedsequence numbers,move thecursor onto<br />
Clearitem,thenpress the OK button.<br />
* To change theprogrammed sequence, movethe cursoronto theitemyou<br />
want to change, inputthe desired sequence number.<br />
* During VCDplayback,ifit is inPBC ON mode, atthesame timeof entering<br />
the stateofprogramplayback,it turnsoffPBC mode.<br />
5.15Playback<br />
thePicture CDinJPEGFormat<br />
1____ 5____ 9____ 13____<br />
2____<br />
6____ 10____14____<br />
3____<br />
7____ 11____15____<br />
4____<br />
8____ 12____16____<br />
Play Clear<br />
1. The root menuis displayedon themonitorwhen beginningto switch on DISC<br />
mode.Atthetime,itplays MP3/WMAfile.(the TITLEorMENUbutton is not<br />
available).<br />
Inthe root menu, the left filesort icon is for MP3/WMAfile;themiddle file sort<br />
iconis forJPEG file; the rightfile sort icon isfor VIDEOfile. If oneof these 3<br />
file sort does not exist, you can not movecursor ontothe file sort icon.<br />
2. Whendisplayingthe rootmenu,pressthe direction buttonsto select your<br />
desiredFOLDER, fileorfile sort icon,thenpress the OK or PLAYbutton to<br />
openthe FOLDER, orplay the selected file,orplayonlythis sortoffile.<br />
Whendisplaying therootmenu, youcanalso use thenumberbuttons to<br />
selectthe serial numberofthe fileandplay thefile.<br />
Whenyou select aJPEG file sort icon, press the ^or>buttonto selectthe<br />
firstJPEG file, thenpress the vbutton to selectthedesired JPEGfile, finally<br />
presstheOK orPLAY/PAUSE button todisplay theJPEGpicture infullscreen<br />
from the selected JPEG picture.
3. DuringJPEG playback, press oneof the >/:90 deg cw;orbutton to enterthe setup item. Thenpressthevor ^buttontoselecta<br />
desiredmodeofthesetupitem, finallypresstheOKbutton to confirm it.<br />
* Press the
For the DVDSystemMenu, there are6setuppages in all. They displayas follows:<br />
5.19.1 SYSTEM SETUP<br />
SYSTEMSETUP<br />
TV SYSTEM<br />
TV TYPE<br />
PASSWORD<br />
RATING<br />
DEFAULT<br />
TV SYSTEM<br />
Thisproduct supports outputofvariousTV system.<br />
If yourTV set has only NTSC orPALsystem,the screenwill blinkand become<br />
colorless whenawrong TVsystemis selected. In this case,presstheN/Pbutton<br />
to switch the right TVsystem to match the TVcolorsystem.<br />
TV TYPE<br />
The setupitem is formatchingTV screensize.<br />
4:3 PS: Choosetheitem whenconnecting aTVsetwith 4:3 screen. When playing<br />
thepictureswith16:9size,the left and right parts ofthevideowillbe cutout,<br />
and displayin fullscreen.<br />
4:3 LB: Choosethe item whenconnecting aTV setwith4:3screen. When playing<br />
the pictureswith16:9size,the top and bottom parts of theTVscreen willbe<br />
turnedinto ablack squarerespectively.<br />
16:9:Choose the itemwhen connectingaTVset with 16:9 wide screen.<br />
PASSWORD<br />
Thissetupitemis forlocking orunlocking therating level ofthe Parental Control.<br />
The defaulted stateislocked. Thedefaultedpasswordis 0000.<br />
You can set anew password that youlike: Select the PASSWORDitemandthen<br />
pressthe >button to enter it,then inputthe originalpassword0000, and then<br />
pressthe OK buttonto unlockit. Press the >buttonto enterit again, then input<br />
anewpasswordthatyoulike and then press the OKbutton tomake iteffective.<br />
Beforetheother personssee the <strong>Manual</strong>,youshould get thepasswordinmind<br />
and cut outthepartof PASSWORDin the<strong>Manual</strong>.<br />
RATING<br />
The item isforsettinganew ratinglevelof theParentalControl.<br />
1. Select the PASSWORDitemandthenpressthe>button to enter it, theninput<br />
thepassword mentioned above,and then pressthe OK buttontounlock the<br />
setting of theratinglevel ofthe Parental Control.<br />
2. Select the RATINGitemandthenpressthe>buttonto enter it, thenuse the<br />
directionbuttons toselect your desiredrating level,then pressthe OK button<br />
to confirm.<br />
3. Select the PASSWORDitemagain andthenpress the>buttonto enter it, then<br />
input thepassword, and thenpress the OKbutton to lock the new settingof<br />
therating level ofthe Parental Control.<br />
DEFAULT<br />
Thisitem is formaking all setup items changebacktooriginal status.
5.19.2 LANGUAGE SETUP<br />
LANGUAGE SETUP<br />
OSD LANGUAGE<br />
AUDIO LANG<br />
SUBTITLE LANG<br />
MENU LANG<br />
OSD LANGUAGE<br />
Thisitemisfor selectingthe languageoftheSYSTEM MENUandall operating<br />
prompt interface displayed duringplayback.<br />
AUDIOLANG<br />
Thisitemisfor selectingaaudiolanguage.<br />
SUBTITLE LANG<br />
Thisitemisfor selectingasubtitlelanguage.<br />
MENULANG<br />
Thisitemisfor selectingadiscmenulanguage.<br />
5.l9.3 AUDIO SETUP<br />
AUDIO SETUP<br />
AUDIOOUT<br />
KEY<br />
AUDIO OUT<br />
thereisonlyANALOG mode, i.e.SPDIF/OFF, notoptional.<br />
KEY<br />
Itisfor selectingyour desiredbasicmusic tone(fromlowtohigh).<br />
5.l9.4<br />
VIDEOSETUP<br />
VIDEOSETUP<br />
BRIGHTNESS<br />
CONTRAST<br />
HUE<br />
SATURATION<br />
SHARPNESS<br />
BRIGHTNESS<br />
It isfor adjusting the brightness of the videooutput.<br />
CONTRAST<br />
It isfor adjusting the contrastof the videooutput.
HUE<br />
It isforadjusting the hueofthe videooutput.<br />
SATURATION<br />
Itisforadjusting the saturationofthe video output.<br />
SHARPNESS<br />
It isforadjusting the sharpness ofthe video output.<br />
5.19.5 SPEAKER SETUP<br />
SPEAKERSETUP<br />
DOWNMIX<br />
EXITSETUP<br />
DOWNMIX<br />
Itisforselectingyour desiredsoundeffectwhenthere isnocenterspeaker<br />
andsubwoofer. There are3modes:LT/RT,STEREO,VSS.<br />
LT/RT: Whenplaying adiscwith PROLOGICDolby stereo effect, choose the<br />
item,soitwilloutputaudiosignal withvividtheatre effect.<br />
STEREO: If youchoosethe item, when outputting audiosignalwith 5.1channels,<br />
it willoutputtheleftandright channelsof signal;when outputting audio signal<br />
with 2channels,itwill outputthe common2channelsofstereosignal.<br />
VSS: If youchoose theitem, when playingadisc recorded with 5.1channels,<br />
themain channelspeakerscanoutputaudiosignalwith VSSeffect.<br />
5.l9.6 DIGITALSETUP<br />
DIGITAL SETUP<br />
OP MODE<br />
DYNAMICRANGE<br />
DUALMONO<br />
EXITSETUP<br />
OP MODE<br />
It isforselectingaudiooutputmode<br />
DYNAMIC RANGE<br />
After selecting the compressionmodeof LINEOUT, set the item,so you can<br />
adjustthe linear compressionratio. If yousetit tobeFULL,thePeak-to-Peak<br />
value ofthe audiosignalis the minimum; ifyou setitto beOFF, the Peak-to-<br />
Peak valueis the maximum.<br />
DUAL MONO<br />
Itisforselectingadesiredaudiooutputmodefor the leftand right ways of signal.<br />
Itismainlyfor Karaoke ofAc3. Thereare4modes inallas follows:<br />
STEREO, MONO L,MONO R, MIX MONO.
5.20 The Parental Control<br />
Q:After insertingDVDdiscintodisc compartment, adialogue window will appear<br />
askingfor apassword of 4digits. Why ?<br />
A:This isbecause thatthedisc movie youare playingwas rated with the Parental<br />
Control,and the current rating level of DVD playeris lower than one of current<br />
disc.You mustinput rightpassword and enteritto entryParentalControl setup<br />
menuandthen set aequalor higherrating levelthan oneofcurrent disc. So that<br />
youcan playbackthe disc.<br />
!<br />
NOTE<br />
* If youhave not changed the password,the factorypresetpasswordfor the DVD<br />
player will be empty. Sothatyou should input adesired password and input it<br />
againto verify it toenterthe Parental Controlsetup menu.<br />
* Forthe rating level setup of Parental Control of the DVDplayer, please referto<br />
the relative contentofLOCK setup menu for details.<br />
Accessories: Parental Control<br />
The ParentalControlfunctionofaDVD playercan control theplayback ofmovie<br />
rated levelinadisc.Canset the DVD player(include software playerinPC)to bea<br />
certain rating levelwithSETUPMENU on TV screen.If theratinglevel set inthe<br />
disc ishigher than one setin the DVD player, the DVDplayercan notplayback the<br />
disc. SometimestheParental Controlsequences insomediscs aredifferentfrom<br />
each other.Therating levelsetupcan be protected bythe password.Therein, if you<br />
selectUnlock item, the ParentalControl function willbe invalid,thecontent ofdisc<br />
willbeplayedtotally.<br />
The discmovie can bedesigned asthat the DVD playerwill playbackthedifferent<br />
versionofcontent ofasame movieaccording to the differentratinglevel set by<br />
ParentalControl.Dependon the DVD feature of seamlessswitching described above,<br />
thescenes thatarenotfitting for children will be cleared or replacedbythe other<br />
fittingscene automatically.<br />
All ratinglevels ofParental Control are as follows:<br />
Unlock<br />
1 KidSafe<br />
2 G<br />
3 PG<br />
4 PG 13<br />
5 PG R<br />
6 R<br />
7 NC 17<br />
8 Adult
5.21<br />
The Region Code<br />
Q: NoDVDplayback.Screen displaysREGIONERROR after inserting disc into<br />
disccompartment.Why?<br />
A: Because the DVD playeranddisc have different region codes. If theydonot<br />
match,theDVDplayer cannot play the disc.<br />
Appendix:The region code of DVD:<br />
The MotionPictureAssociation ofAmereca(MPAA) divided the world into 6<br />
regions, and namedevery region acode, namelyregion code.Theregion codes<br />
and the countries or areas represented by the regioncodes areasfollows:<br />
Region1:America,Canada, East-Pacific Inlands;<br />
Region2: Japan,West<strong>Europe</strong>,North <strong>Europe</strong>, Egypt,SouthAfrica, Middle East;<br />
Region3: South-eastAsiancountries includeTaiwan, Hong Kong,South Corea,<br />
Thailand, indonesia,etc.;<br />
Region4:Australia, New Zealand, Central SouthAmerica, South Pacific Inlands;<br />
Region5: Russia, Mongolia, Indian Peninsula,MiddleAsia, East <strong>Europe</strong>, North<br />
Corea, NorthAfrica, North-westAsia etc.;<br />
Region6: China mainland.<br />
Basically, whenaDVD moviediscfor theversionof region6was decided not to<br />
issue,we needto purchaseanotherDVDplayer that canplaythe DVDmoviedisc<br />
for theversion of non-region6. In order to view this disc, viewerwhodoes not have<br />
the non-region6DVD player facilities willhave tospend extrasumof money tobuy<br />
it.The problemscausedfromthe area code inconsistencybetween thedisc and the<br />
DVD player haspushedforthe production ofUnlock-VersionDVDplayer facilities,<br />
and someDVDdiscsets allow user to modifythe areacodesfor alimited number of<br />
times.Butnotethatonly thediscs produced by the 8biggest filmmaking companies<br />
ofAmericarestrictso, they are not oneof originalDVDformat. Thatis tosay, the<br />
DVD movie discs not producedby the 8biggestfilmmaking companiesofAmerica<br />
were not restricted by the rule of region code. Generally, they are called<br />
FreeRegionCode discsor Full Region discs.The 8biggest filmmakingcompanies<br />
ofAmericaare asfollows:<br />
1.WarnerBros;<br />
2.Colmbia;<br />
3.20thCenturyFOX;<br />
4.Paramount;<br />
5.Universal;<br />
6.UA(UnitedArtist);<br />
7.MGM(MetroDogwynMayer);<br />
8.WaltDisney
6. TheTrouble Shooting<br />
Please read the usersmanualcarefullybefore usingtheDVDplayer. If youhave anytroubles<br />
inusingthis player, tryto solve the problemsbythe suggestionsmentioned below. If you can<br />
notremove thetroubleafter using all thesuggestions,please contactthecompany orthe<br />
technicalservicecenterauthorizedbyus. Forthe sakeof yoursafety, pleasedonot openthe<br />
cover andrepair the playerby yourself,ifthat,it may cause electric shock.<br />
NO PICTURE, SOUNDAND INDICATION<br />
* Ensurethat the power switchis on.<br />
* Ensurethat the wall inlet is ok.<br />
* Ensurethat the power cord is not damagedorthefuse isnotblown.<br />
* Ensurethat the power plugis connected to the inlettightly.<br />
NO SOUND BUTPICTURE OK<br />
* Ensurethat the player saudio output has agood connection with TVsaudio input.<br />
* Check whether theaudioconnector is damaged.<br />
* Check whether you have turned downthevolume.<br />
* Ensurethat you have set therightAUDIO setup oftheplayer.<br />
* Ensurethat the audio is not under mute.<br />
NO PICTUREBUTSOUND OK<br />
* Ensurethat the player svideo outputhas agood connectionwith TVsvideo input.<br />
* Ensurethat you have turned your TVtotheAV input channel connecting to yourplayer.<br />
* Check whether thevideo connector is damaged.<br />
* Ensurethat you have set theright VIDEO settingsof theplayer.<br />
BLACKAND WHITEPICTURE OR SCREENROLLING<br />
* Ensurethat you have set theright TVSYSTEM(e.g. PAL,NTSC)setting.<br />
FLAWS OFPICTUREOR SOUND<br />
* Check whether thesettingofAUDIOisright.<br />
* Check whether thediscis scratched orstained.<br />
* Check whether theAV connectorand the outputterminal is stained.<br />
* Check whether there is condensationinsidetheLens.If so, leave the playeroff foran hour<br />
or so, thentryagain.<br />
* Check whether theinstallation angle isless than 30.<br />
DISPLAY NO DISCORBAD DISC<br />
* Ensurethat you have put the disconthe tray.<br />
* Check whether thediscis put in thereverse side.<br />
* Check whether thediscis distorted.<br />
* Check whether thediscis stainedor scratched badly.<br />
* Ensurethat the discformat is compatible to theplayer.<br />
* Ensurethat the temperature inside thecar is nottoohigh.If so, cool off untilthe ambient<br />
temperature returnstonormal.<br />
* Replace anotherdisc toinsertitinto the disccompartment.<br />
REMOTE CONTROL IS INSENSITIVE ORDOESNOTWORK<br />
* Check the batteriesof remote controlandmake sure thatthey are notflat.<br />
* Direct the remote control to theIR sensor of the player.<br />
* Check whether there are someobstacles betweentheremotecontrol and IR sensor.<br />
SOMEFUNCTION BUTTONSDONOT WORK<br />
* Turn off thepower, then turn on again.<br />
* Reset the unit to zero, thenturnon again.<br />
* Remove thefront panel from theunit,then install itagain andthen turnonagain.<br />
THERADIO DOESNOT WORK<br />
* Check whether theantenna cable is connected firmly. Or manually tune forastation.
7. Specification<br />
General Specification<br />
Power Supply Requirement..................................................DC 12V<br />
Maximum Power Output...................4 x 40W(measured at DC 14.4 V)<br />
Dimensions(w x h x d)...........................................178 x 50 x 165mm<br />
DVD Deck Specification<br />
Format.....................................DVD/VCD/JPEG/MP4/MP3/WMA/CD<br />
Video System....................NTSC/PAL/PAL-M/PAL-N/AUTO(optional)<br />
Audio System..............................................................24 bit/96KHz<br />
Loading System.......................................................... Auto Loading<br />
Mounting Angle.................................................................0 to +/-30<br />
Video Specification<br />
Video Type...................................................................16:9 and 4:3<br />
Video Output level......................................Composite:1.0 0.2Vp-p<br />
Load impedance: 75 ohms<br />
Horizontal Resolution................................................................600<br />
Audio Specification<br />
+0<br />
Audio Output(Analog audio)..........................................2.0 -1.0Vrms<br />
Frequency Response.............................20Hz ~ 20KHz(at 1KHz 0 dB)<br />
S/N Ratio(Audio)............................................. ! 90dB (at 1KHz 0 dB)<br />
Separation..............................................................................50dB<br />
Radio Specification<br />
FM Section<br />
Frequency range..............................................87.5MHz - 108.0MHz<br />
Usable sensitivity......................................................................3uV<br />
I.F Frequency....................................................................10.7MHz<br />
AM Section<br />
Frequency..........................................................522KHz - 1620KHz<br />
THIS PRODUCT INCORPORATES COPYRIGHT PROTECTION<br />
TECHNOLOGY THAT IS PROTECTED BY U.S. PATENTS AND<br />
OTHER INTELLECTUAL PROPERTY RIGHTS. USE OF THIS<br />
COPYRIGHT PROTECTION TECHNOLOGY MUST BE<br />
AUTHORIZED BY MACROVISION, AND IS INTENDED FOR<br />
HOME AND OTHER LIMITED VIEWING USES ONLY UNLESS<br />
OTHERWISE AUTHORIZED BY MACROVISION. REVERSE<br />
ENGINEERING OR DISASSEMBLY IS PROHIBITED.<br />
Manufactured under license from Dolby Laboratories.<br />
Dolby and the double-D symbol are trademarks of Dolby Laboratories.