User's manual - VTech Communications
User's manual - VTech Communications
User's manual - VTech Communications

Create successful ePaper yourself
Turn your PDF publications into a flip-book with our unique Google optimized e-Paper software.
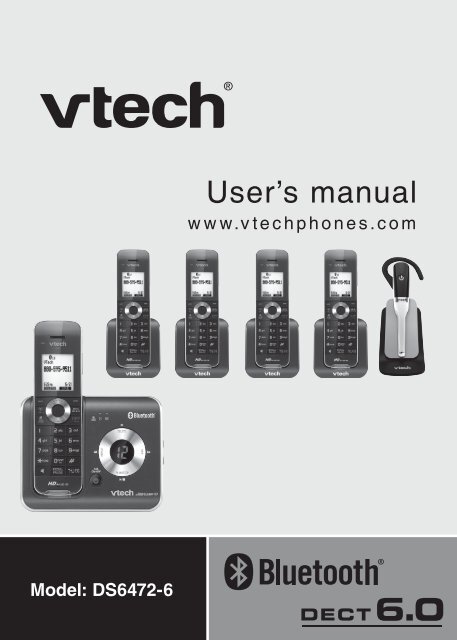
Model: DS6472-6<br />
®<br />
User’s <strong>manual</strong><br />
w w w.v t e c h p h o n e s . c o m
Congratulations<br />
on purchasing your new <strong>VTech</strong> product. Before using this telephone, please<br />
read Important safety instructions on page 121 of this <strong>manual</strong>.<br />
This <strong>manual</strong> has all the feature operations and troubleshooting necessary<br />
to install and operate your new <strong>VTech</strong> telephone. Please review this <strong>manual</strong><br />
thoroughly to ensure proper installation and operation of this innovative and<br />
feature rich <strong>VTech</strong> product. For support, shopping, and everything new at<br />
<strong>VTech</strong>, visit our website at www.vtechphones.com. In Canada, please visit<br />
www.vtechcanada.com.<br />
Compatible with<br />
Hearing Aid T-Coil<br />
TIA-1083<br />
T<br />
Telephones identified with this logo have reduced noise<br />
and interference when used with most T-coil equipped<br />
hearing aids and cochlear implants. The TIA-1083 Compliant<br />
Logo is a trademark of the Telecommunications Industry<br />
Association. Used under license.<br />
Register online to get an additional 3-month warranty!<br />
Visit www.vtechphones.com.<br />
Registration<br />
Register your product online for enhanced<br />
warranty support.<br />
Product news<br />
Learn about the latest <strong>VTech</strong> products.<br />
The Bluetooth ® word mark and logos are registered trademarks owned by<br />
Bluetooth SIG, Inc. and any use of such marks by <strong>VTech</strong> Holdings Limited<br />
is under license. <strong>VTech</strong> Holdings Limited is a member of Bluetooth SIG, Inc.<br />
Other trademarks and trade names are those of their respective owners.
Table of contents<br />
Getting started .........................1<br />
Parts checklist ............................1<br />
Installation ..................................2<br />
Telephone base and charger<br />
installation ...............................3<br />
Handset battery installation ......4<br />
Handset battery charging ...........5<br />
Headset charger installation .......6<br />
Power on the headset ................6<br />
Headset charging .......................6<br />
Earbud installation ......................7<br />
Ear hook installation ...................8<br />
Head band installation ................11<br />
Installation options .....................13<br />
Tabletop to wall mount<br />
installation ..............................13<br />
Wall mount to tabletop<br />
installation ...............................14<br />
Telephone base layout ...............15<br />
Handset layout ...........................16<br />
Headset layout ...........................19<br />
Handset main menu ...................20<br />
Bluetooth ® .................................22<br />
Introducing Bluetooth .................22<br />
Glossary of terms ......................23<br />
Bluetooth setup ..........................24<br />
Add a cell phone ........................24<br />
Add a headset ............................26<br />
Auto connection .........................27<br />
Connecting devices ....................28<br />
Review the device list .................28<br />
Connect/Disconnect an active<br />
device ......................................28<br />
Remove a device ........................29<br />
Rename a device .......................30<br />
Replace an active device ...........31<br />
Bluetooth connection from idle<br />
mode .......................................31<br />
Download directory ....................32<br />
Interruption to directory<br />
download .................................34<br />
i<br />
View the directory download<br />
information ..............................34<br />
Change PIN ................................35<br />
Telephone settings ..................36<br />
Handset settings .......................36<br />
Ringers .......................................36<br />
Ringer volume (handset) ............36<br />
Ringer volume (headset) ............36<br />
Ringer tone .................................37<br />
Set date and time .......................38<br />
Settings ......................................39<br />
LCD language ............................39<br />
Voice language ...........................39<br />
Display alerts ..............................40<br />
CID time synchronization ...........43<br />
Rename handsets ......................43<br />
Key tone .....................................44<br />
Dial mode ...................................44<br />
Voice Announce ® caller ID .........45<br />
Website.......................................46<br />
Home area code .........................46<br />
Cell area code ............................47<br />
Telephone base settings ............48<br />
Answering system settings.........48<br />
Telephone operation ................49<br />
Make, answer or end a home<br />
call ..........................................49<br />
Call waiting on the home line .....50<br />
Make, answer or end a cell<br />
call ..........................................51<br />
Call waiting on the cell line .........51<br />
Answer a cell call while on a<br />
home call .................................52<br />
Cell phone voicemail ..................52<br />
Answer a home call while on a<br />
cell call ....................................52<br />
Conference home and cell<br />
calls .........................................53<br />
Using the home and cell lines<br />
together ...................................53<br />
Handset speakerphone ..............54<br />
Volume control ...........................54
Table of contents<br />
Silence the ringer .......................54<br />
Mute ...........................................54<br />
Temporary tone dialing ...............55<br />
Hold ............................................55<br />
Handset/headset locator ............55<br />
Equalizer.....................................56<br />
Transfer a call .............................56<br />
Chain dialing...............................57<br />
Redial list ....................................58<br />
Review the redial list ..................58<br />
Dial a redial entry .......................58<br />
Save a redial entry to the<br />
directory ..................................59<br />
Delete a redial entry ...................59<br />
Multiple handset use ...............60<br />
Share an outside call ..................60<br />
Intercom .....................................60<br />
Answer an incoming call during<br />
an intercom call .......................61<br />
Transfer a call using intercom ....62<br />
Push-to-talk (PTT) ......................63<br />
PTT on/off ..................................63<br />
PTT to a single handset .............64<br />
PTT to multiple handsets ...........65<br />
Answer a PTT call ......................66<br />
Change a one-to-one PTT to<br />
intercom call ............................66<br />
End a PTT call ............................67<br />
Answer an incoming call during<br />
a PTT call ................................67<br />
Make an outgoing call during a<br />
PTT call ...................................67<br />
Directory ...................................68<br />
About the directory .....................68<br />
Create a new entry in the home<br />
directory ..................................69<br />
Review the directory...................70<br />
3-character alphabetical<br />
search .....................................70<br />
Dial a directory entry ..................71<br />
Edit a directory entry ..................71<br />
ii<br />
Edit the type of a directory<br />
entry ........................................72<br />
Delete a directory entry ..............72<br />
Remove a downloaded<br />
directory ..................................72<br />
Speed dial ..................................73<br />
Assign a speed dial slot .............73<br />
Reassign a speed dial slot .........73<br />
Dial a speed dial entry ...............73<br />
Delete a speed dial entry ...........74<br />
Caller ID .....................................75<br />
About caller ID ............................75<br />
Information about caller ID with<br />
call waiting ..............................75<br />
Caller ID history ..........................76<br />
Memory match ..........................76<br />
Review the caller ID log ............77<br />
View dialing options ...................78<br />
Dial a caller ID log entry ............78<br />
Save a caller ID log entry to the<br />
directory ..................................79<br />
Delete from the caller ID log .......80<br />
Caller ID log display screen<br />
messages ................................80<br />
Answering system settings ....81<br />
Answer on/off .............................81<br />
Announcement ...........................82<br />
Play your announcement ...........82<br />
Record your own<br />
announcement ........................82<br />
Delete your announcement ........83<br />
Answering system setup ............84<br />
Call screening ............................84<br />
Number of rings ..........................85<br />
Remote access code .................86<br />
Message alert tone.....................87<br />
Recording time ...........................87
Table of contents<br />
Answering system<br />
operation ...................................88<br />
Answering system and voicemail<br />
indicators ................................88<br />
Using the answering system and<br />
voicemail together ...................88<br />
Message capacity ......................89<br />
Voice prompts ............................89<br />
Call screening ............................89<br />
Call intercept ..............................89<br />
Temporarily turning off the<br />
message alert tone .................90<br />
Message playback .....................90<br />
Delete all old messages .............92<br />
Record and play memos ............92<br />
Message window displays..........93<br />
Remote access ..........................94<br />
Appendix ...................................95<br />
Display screen messages ..........95<br />
Handset and telephone base<br />
indicators ................................100<br />
Headset indicators .....................102<br />
Handset battery ..........................103<br />
Headset battery ..........................104<br />
Expand your telephone system ..105<br />
Add and register a handset ........105<br />
Add and register a headset ........106<br />
Deregister handsets/headsets ...107<br />
Troubleshooting ..........................108<br />
Important safety instructions ......121<br />
Precautions for users of implanted<br />
cardiac pacemakers .................122<br />
Operating range .........................122<br />
Maintenance ...............................122<br />
About cordless telephones.........123<br />
The RBRC ® seal .........................123<br />
Limited warranty .........................124<br />
FCC, ACTA and IC regulations ..126<br />
Technical specifications .............128<br />
Index ..........................................129<br />
iii
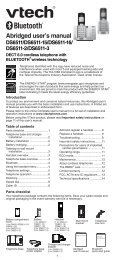
Getting started<br />
Parts checklist<br />
Your telephone contains the following items. Save your sales receipt and<br />
original packaging in the event warranty service is necessary.<br />
Quick start guide<br />
Quick start guide<br />
Cordless headset<br />
with an earbud<br />
attached<br />
Headset charger<br />
with power<br />
adapter installed<br />
Telephone base<br />
power adapter<br />
•<br />
•<br />
Bluetooth<br />
quick start guide<br />
Bluetooth<br />
quick start guide<br />
Head band<br />
Battery<br />
compartment<br />
covers (5)<br />
Handset chargers<br />
with power adapters<br />
installed (4)<br />
The headset battery is not replaceable.<br />
To purchase a replacement battery or power adapter, visit our website at<br />
www.vtechphones.com or call 1 (800) 595-9511. In Canada, go to<br />
www.vtechcanada.com or dial 1 (800) 267-7377.<br />
1<br />
User’s <strong>manual</strong><br />
User’s <strong>manual</strong><br />
Ear hooks (3)<br />
Batteries (5)<br />
Telephone base<br />
Wall mount bracket<br />
Additional<br />
earbuds (3)<br />
Ear pad<br />
Telephone<br />
line cord<br />
Handsets (5)
Getting started<br />
Installation<br />
Install the telephone base close to a telephone jack and a power outlet not<br />
connected to a wall switch. For optimum range and better reception, place<br />
the telephone base in a central and open location.<br />
When using a Bluetooth wireless technology enabled cell phone with this<br />
telephone, make sure the cell phone is within 15 feet of the telephone base to<br />
maintain a reliable connection between the cell phone and telephone base.<br />
This product may be shipped with protective stickers covering the handsets<br />
and telephone base displays. Remove them before use.<br />
Avoid placing the telephone base too close to:<br />
• Communication devices such as personal computers, computer routers,<br />
television sets, VCRs, wireless routers (wireless broadband, Wi-Fi, or<br />
802.11) or other cordless telephones.<br />
• Excessive heat sources.<br />
• Noise sources such as a window with traffic outside, motors, microwave<br />
ovens, refrigerators, or fluorescent lighting.<br />
• Excessive dust sources such as a workshop or garage.<br />
• Excessive moisture.<br />
• Extremely low temperature.<br />
•<br />
Mechanical vibration or shock such as on top of a washing machine or<br />
work bench.<br />
2
Getting started<br />
Telephone base and charger installation<br />
Install the telephone base and chargers as shown below.<br />
Make sure that the electrical outlet is not controlled by a wall switch.<br />
If you subscribe to digital subscriber line (DSL) high-speed Internet service<br />
through your telephone line, you must install a DSL filter between the<br />
telephone line cord and the telephone wall jack. The filter prevents noise and<br />
caller ID problems caused by DSL interference. Contact your DSL service<br />
provider for more information about DSL filters.<br />
Telephone<br />
base power<br />
adapter<br />
•<br />
•<br />
Telephone<br />
line cord<br />
Telephone base<br />
Electrical outlet<br />
not controlled<br />
by a wall switch<br />
Telephone<br />
wall jack<br />
A DSL filter<br />
(not included)<br />
is required<br />
if you have<br />
DSL high<br />
speed Internet<br />
service<br />
Use only the power adapters supplied with this product. To order a<br />
replacement, visit our website at www.vtechphones.com or call<br />
1 (800) 595-9511. In Canada, go to www.vtechcanada.com or dial<br />
1 (800) 267-7377.<br />
The power adapters are intended to be correctly oriented in a vertical or<br />
floor mount position. The prongs are not designed to hold the plug in place<br />
if it is plugged into a ceiling, under-the-table or cabinet outlet.<br />
3<br />
Charger<br />
Power<br />
adapter
Getting started<br />
Handset battery installation<br />
Install the battery as shown below.<br />
1. Plug the battery connector securely into the socket inside the handset<br />
battery compartment, matching the color-coded label.<br />
2. Place the battery with the label THIS SIDE UP facing up and the wires<br />
inside the battery compartment.<br />
3. Align the cover flat against the battery compartment, then slide it towards<br />
the center of the handset until it clicks into place.<br />
4. Charge the handset by placing it in the telephone base or charger. The<br />
CHARGE light is on when the handset is charging.<br />
1<br />
3<br />
•<br />
•<br />
4<br />
CHARGE light<br />
If the handset will not be used for a long time, disconnect and remove the<br />
battery to prevent possible leakage.<br />
To purchase a replacement battery, visit our website at<br />
www.vtechphones.com or call 1 (800) 595-9511. In Canada, go to<br />
www.vtechcanada.com or dial 1 (800) 267-7377.<br />
4<br />
2<br />
2
Getting started<br />
Handset battery charging<br />
Once you have installed the battery, the screen indicates the battery status<br />
(see the table below). If necessary, place the handset in the telephone base<br />
or charger to charge the battery. For best performance, keep the handset in<br />
the telephone base or charger when not in use. The battery is fully charged<br />
after 16 hours of continuous charging. See the table on page 103 for battery<br />
operating times.<br />
If the screen is blank, you need to charge the handset without interruption for<br />
at least 30 minutes to give the handset enough charge to use the telephone<br />
for a short time. When the battery is low, the handset shows Low battery<br />
along with a flashing . If you are on a call in low battery mode, the handset<br />
beeps every minute.<br />
The following table summarizes the battery charge indicators and actions<br />
to take.<br />
Battery indicators Battery status Action<br />
The screen is blank,<br />
or shows Place in<br />
charger and flashes.<br />
The screen shows<br />
Low battery and<br />
flashes.<br />
The screen shows<br />
HANDSET X.<br />
Battery has no or very<br />
little charge. The handset<br />
cannot be used.<br />
Battery has enough<br />
charge to be used for a<br />
short time.<br />
5<br />
Charge without interruption<br />
until the screen shows<br />
HANDSET X (at least<br />
30 minutes).<br />
Charge without interruption<br />
until the screen shows<br />
HANDSET X (at least<br />
30 minutes).<br />
Battery is charged. To keep the battery charged,<br />
place it in the telephone base<br />
or charger when not in use.<br />
After you install your telephone or power returns following<br />
a power outage, the handset will prompt you to set the<br />
date and time. For instructions, see Set date and time<br />
on page 38. To skip setting, press OFF/CANCEL or BACK.<br />
SET DATE<br />
09/30/09<br />
MM/DD/YY<br />
BACK SET
Getting started<br />
Headset charger installation<br />
Install the headset charger as shown below.<br />
Plug the small end of<br />
the headset charger<br />
power adapter into<br />
the power jack of the<br />
headset charger.<br />
Power on the headset<br />
6<br />
Plug the large end of the<br />
headset charger power<br />
adapter into an electrical<br />
outlet not controlled by a<br />
wall switch.<br />
Headset charger<br />
Power on the headset before use. Place the headset in the headset charger<br />
or press and hold for two seconds. The light flashes three times in blue<br />
and you hear three beeps when the headset is being powered on.<br />
If the headset will not be used for a long time, press and hold for two<br />
seconds to power off the headset. The light flashes three times in red and<br />
you hear three beeps when the headset is being powered off.<br />
Headset charging<br />
After installing the headset charger, charge the headset as shown below.<br />
The headset is fully charged after three hours of continuous charging. If the<br />
light does not turn on while charging, you need to charge the headset<br />
without interruption for at least 15 minutes to give the headset enough<br />
charge to use for a short time. For best performance, keep the headset in<br />
the headset charger when not in use. See the table on page 104 for battery<br />
operating times.<br />
1. Place the tip of<br />
the headset in the<br />
small cradle on<br />
the headset charger.<br />
The headset battery is not replaceable.<br />
2. The magnet holds<br />
the top of the<br />
headset in place.<br />
The light turns<br />
on when charging.
Getting started<br />
Earbud installation<br />
There are four earbuds provided and one of them has already been attached<br />
to the headset.<br />
To remove the earbud from the headset earpiece:<br />
Hold both sides of the earbud and then pull the earbud until it separates from<br />
the earpiece.<br />
To attach the earbud to the headset earpiece:<br />
1.<br />
2.<br />
Choose an appropriate earbud.<br />
Press the earbud towards the earpiece until it clicks into place. Move<br />
the earbud around so that the protruding bump on the earbud is pointing<br />
towards your mouth when placed on your ear. The protruding bump on the<br />
earbud holds the headset securely in your ear.<br />
Protruding<br />
bump<br />
7
Getting started<br />
Ear hook installation<br />
There are three ear hooks provided. The smallest ear hook is a flexible ear<br />
hook. If you choose to use it, adjust to suit your ear comfortably before use.<br />
To attach the ear hook to the headset:<br />
1. Remove any headset attachment (earbud excluded) connected to<br />
the headset.<br />
2. Choose an appropriate ear hook.<br />
3. Insert the ear hook [A] into the rotating clip [B] on the headset until it<br />
clicks into place.<br />
[A]<br />
[B]<br />
4. Hook the headset on your right ear. Adjust the angle of the headset until<br />
the microphone is pointing towards your mouth. Firmly grip the earpiece<br />
with one hand whenever adjusting the headset microphone up or down.<br />
8
Getting started<br />
Ear hook installation (continued)<br />
To wear the headset on your left ear:<br />
1. Hold the headset with one hand. 2. Twist the ear hook 180 degrees<br />
Lift the ear hook upward.<br />
clockwise.<br />
3. Push the ear hook downward. 4.<br />
Hook the headset on your left<br />
ear. Adjust the angle of the<br />
headset until the microphone is<br />
pointing towards your mouth.<br />
9
Getting started<br />
Ear hook installation (continued)<br />
To remove the ear hook from the headset:<br />
1.<br />
2.<br />
Hold the headset with one hand and the ear hook with your other hand.<br />
Pull the end of the ear hook up until it separates from the rotating clip on<br />
the headset.<br />
10
Getting started<br />
Head band installation<br />
To attach the head band to the headset:<br />
1.<br />
2.<br />
Remove any headset attachment connected to the headset.<br />
Attach the ear pad to the headset earpiece.<br />
3.<br />
To wear the headset on your right ear, insert the end [A] of the head band<br />
into the rotating clip [B] on the headset until it clicks into place.<br />
[A]<br />
[B]<br />
11
Getting started<br />
Head band installation (continued)<br />
4.<br />
Adjust the head band to fit your head. Adjust and rotate the angle of the<br />
headset until the microphone is pointing towards your mouth. Firmly grip<br />
the earpiece with one hand whenever adjusting the headset microphone<br />
up or down.<br />
To wear on your left ear, hold the headset on one hand and the head band with<br />
your other hand. Rotate the head band within the rotating clip on the headset.<br />
To remove the head band from the headset:<br />
1.<br />
2.<br />
Hold the headset with one hand and the head band with your other hand.<br />
Pull the end of the head band until it separates from the rotating clip on<br />
the headset.<br />
12
Getting started<br />
Installation options<br />
Your telephone base is ready for tabletop use. If you want to mount your<br />
telephone on a wall, use the provided wall mount bracket to connect with<br />
a standard dual-stud telephone wall mounting plate. If you do not have this<br />
mounting plate, you can purchase one from many hardware or consumer<br />
electronics retailers. You may need a professional to install the mounting plate.<br />
Tabletop to wall mount installation<br />
1.<br />
2.<br />
3.<br />
4.<br />
1<br />
3<br />
Plug one end of the telephone line cord into the TEL LINE jack on the<br />
bottom of the telephone base. Plug the small end of the telephone base<br />
power adapter into the POWER jack on the bottom of the telephone base.<br />
Position the lower portion grooves on the telephone base to the lower<br />
portion tabs (marked B) on the wall mount bracket. Make sure the upper<br />
portion grooves of the telephone base are above the upper portion tabs<br />
(marked A) on the wall mount bracket. Push the telephone base down<br />
until it clicks securely in place.<br />
Route the telephone line cord (or DSL filter) through the wall mount<br />
bracket hole and plug it into the telephone wall jack. Route the power cord<br />
out of the bottom of the telephone and plug it into an electrical outlet not<br />
controlled by a wall switch.<br />
Align the holes on the bracket with the standard wall plate and slide the<br />
bracket down until it locks securely. Bundle the telephone line cord and<br />
power adapter cord neatly with twist ties.<br />
2<br />
13<br />
4
Getting started<br />
Wall mount to tabletop installation<br />
1.<br />
2.<br />
3.<br />
4.<br />
If the telephone line cord and power adapter cord are bundled, untie<br />
them first.<br />
Slide the black wall mount bracket up and remove it from the wall plate.<br />
Unplug the telephone line cord (or DSL filter) from the wall. Unplug the<br />
power adapter from the power outlet.<br />
Slide the telephone base up and remove it from the wall mount bracket.<br />
See Telephone base and charger installation on page 3.<br />
14
Getting started<br />
Telephone base layout<br />
REPEAT/<br />
Press to repeat a message<br />
or press twice to play the<br />
previous message<br />
(page 90).<br />
/FIND HANDSET<br />
Press to page all system<br />
handsets and headset<br />
(page 55).<br />
/ANS ON/OFF<br />
Press to turn the answering<br />
system on or off (page 81).<br />
IN USE light<br />
On when the handset or<br />
headset is in use.<br />
Flashes when another<br />
telephone sharing the same<br />
line is in use or on hold.<br />
Flashes quickly when there<br />
is an incoming home call.<br />
Message window<br />
Shows the number of<br />
messages and other<br />
answering system<br />
information (page 93).<br />
15<br />
DELETE/X<br />
Press to delete the message<br />
currently playing (page 90).<br />
When the phone is not in<br />
use, press twice to delete all<br />
previously reviewed messages<br />
(page 92).<br />
/VOL/<br />
Press to adjust the<br />
volume during message<br />
playback (page 90).<br />
When the phone is not<br />
in use, press to adjust<br />
the telephone base<br />
ringer volume (page 48).<br />
SKIP/<br />
Press to skip to the next<br />
message (page 90).<br />
PLAY/STOP/<br />
Press to play messages<br />
(page 90).<br />
Press to stop message<br />
playback (page 90).<br />
D1/D2 lights<br />
On when the telephone<br />
base is paired and<br />
connected with a Bluetooth<br />
device.<br />
Flashes when there is an<br />
incoming cell call.<br />
Alternate when the<br />
telephone base is in<br />
discoverable mode.
Getting started<br />
Handset layout<br />
CHARGE light<br />
On when the handset is charging in the telephone base or<br />
charger.<br />
Softkeys (2)<br />
Press to select a menu item displayed above the key.<br />
While in a menu, press to select an item, or save an entry<br />
or setting.<br />
/CELL<br />
Press to make or answer a cell call (page 51).<br />
During a cell call, press to answer an incoming call when<br />
you hear a call waiting alert (page 51).<br />
Flashes quickly when there is an incoming cell call.<br />
Flashes slowly when a cell call is on hold.<br />
/HOME/FLASH<br />
Press to make or answer a home call (page 49).<br />
During a home call, press to answer an incoming call<br />
when you hear a call waiting alert (page 50).<br />
Flashes quickly when there is an incoming home call.<br />
Flashes slowly when a home call is on hold.<br />
1<br />
While reviewing a caller ID log entry, press repeatedly to<br />
add or remove 1 in front of the telephone number before<br />
dialing or saving it in the directory (page 78).<br />
Press to switch to tone dialing temporarily during a call if<br />
you have pulse service (page 55).<br />
Press to toggle the name order when saving a caller ID<br />
entry into the directory (page 79).<br />
Press to make or answer a home call using the handset<br />
speakerphone (page 49).<br />
During a call, message or announcement playback, press to<br />
switch between the speakerphone and the handset (page 54).<br />
REDIAL/PAUSE<br />
Press to review the redial list (page 58).<br />
While dialing or entering numbers into the directory,<br />
press and hold to insert a dialing pause (page 69).<br />
During an outside call, intercom call, message or<br />
announcement playback, press to change the quality of<br />
the audio to best suit your hearing (page 56).<br />
16
Getting started<br />
Handset layout (continued)<br />
VOL/ /<br />
While in a menu, press to scroll up.<br />
During a call or message playback, press to increase the<br />
listening volume (page 54 or page 91).<br />
When the handset is not in use, press to enter the<br />
directory (page 70).<br />
When entering numbers and names in the directory, press<br />
to move the cursor to the left.<br />
MUTE/DELETE<br />
While on a call, press to mute the microphone (page 54).<br />
While reviewing the caller ID log, directory or redial list, press<br />
to delete an individual entry (page 80, page 72 and page 59<br />
respectively).<br />
Press to delete digits when predialing (page 49).<br />
While entering or editing a directory entry, press to erase<br />
a digit or character.<br />
While the handset is ringing, press to silence the ringer<br />
temporarily.<br />
During message or announcement playback, press to<br />
delete a message or announcement.<br />
OFF/CANCEL<br />
During a call, press to hang up (page 49 and page 51).<br />
While the handset is ringing, press to silence the ringer<br />
temporarily (page 54).<br />
Press and hold while the telephone is not in use to erase the<br />
displayed messages (XX Missed calls and Download fail).<br />
While in a menu, press to exit without making changes or<br />
press and hold to return to idle mode.<br />
VOL/ /CID<br />
While in a menu, press to scroll down.<br />
During a call or message playback, press to decrease the<br />
listening volume (page 54 or page 91).<br />
When the handset is not in use, press to review the<br />
caller ID log (page 77).<br />
When entering numbers and names in the directory, press<br />
to move the cursor to the right.<br />
# (pound key)<br />
While reviewing a caller ID log entry or a directory entry,<br />
press repeatedly to show other dialing options<br />
(page 78 and page 71 respectively).<br />
17
Getting started<br />
Handset layout (continued)<br />
PUSH TO TALK (PTT)<br />
Press to begin a one-to-one or one-to-group<br />
broadcast (page 64 and page 65).<br />
Press and hold to begin a broadcast to a<br />
group of handsets when the handset is not in<br />
use (page 65).<br />
18
Getting started<br />
Headset layout<br />
+/-/VOLUME<br />
While on a call,<br />
press to adjust the<br />
listening volume<br />
(page 54).<br />
When the headset<br />
is not in use, press<br />
to adjust the ringer<br />
volume (page 36).<br />
(on/off)<br />
Press and hold two seconds to power on or off.<br />
Press to answer, end or join a call (pages 49, 51 and 60).<br />
On in red when charging in the headset charger.<br />
On in blue when fully charged in the headset charger.<br />
Flashes once every 10 seconds in blue when in idle mode.<br />
Flashes once every 10 seconds in red when in low battery mode.<br />
Flashes twice every three seconds in blue while on a call.<br />
Flashes quickly in blue while being paged.<br />
Flashes quickly and alternately in red and blue while being registered.<br />
Flashes four times every four seconds in blue when there is an<br />
incoming call.<br />
Rotating clip<br />
Connect the ear<br />
hook or head band.<br />
RESET inset<br />
button<br />
Insert a paper clip<br />
or similar object to<br />
reset the headset<br />
when deregistration<br />
fails (page 107).<br />
Earpiece<br />
19<br />
MUTE/FLASH<br />
While on a call, press to<br />
mute the microphone (page 54).<br />
While on a call, press and hold<br />
to answer an incoming call<br />
when you receive a call waiting<br />
alert (page 50 and page 51).<br />
When there is an incoming call,<br />
press to silence the ringer in the<br />
earpiece temporarily.<br />
Microphone
Getting started<br />
Handset main menu<br />
To enter the main menu:<br />
1.<br />
2.<br />
Press MENU when the handset is not in use.<br />
Press or to highlight a handset feature menu, then press SELECT to<br />
enter that menu.<br />
To return to the previous menu, press OFF/CANCEL.<br />
To return to idle mode, press and hold OFF/CANCEL.<br />
Play messages - play messages from<br />
the answering system.<br />
Play messages<br />
Answering sys<br />
Directory<br />
Caller ID log<br />
Intercom<br />
BACK SELECT<br />
Directory - store and search for<br />
names and numbers.<br />
Play messages<br />
Answering sys<br />
Directory<br />
Caller ID log<br />
Intercom<br />
BACK SELECT<br />
Intercom - make intercom calls to a<br />
system handset.<br />
Play messages<br />
Answering sys<br />
Directory<br />
Caller ID log<br />
Intercom<br />
BACK SELECT<br />
20<br />
Answering sys - record memos<br />
and change your answering system<br />
settings.<br />
Play messages<br />
Answering sys<br />
Directory<br />
Caller ID log<br />
Intercom<br />
BACK SELECT<br />
Caller ID log - review the caller ID<br />
history or delete all caller ID log<br />
entries.<br />
Play messages<br />
Answering sys<br />
Directory<br />
Caller ID log<br />
Intercom<br />
BACK SELECT<br />
Bluetooth - set up and manage your<br />
Bluetooth enabled devices.<br />
Answering sys<br />
Directory<br />
Caller ID log<br />
Intercom<br />
Bluetooth<br />
BACK SELECT
Getting started<br />
Handset main menu (continued)<br />
Ringers - set up ringers for the home<br />
and cell lines.<br />
Directory<br />
Caller ID log<br />
Intercom<br />
Bluetooth<br />
Ringers<br />
BACK SELECT<br />
Settings - change your telephone<br />
settings.<br />
Intercom<br />
Bluetooth<br />
Ringers<br />
Set date/time<br />
Settings<br />
BACK SELECT<br />
21<br />
Set date/time - set up the date and<br />
time of your telephone.<br />
Caller ID log<br />
Intercom<br />
Bluetooth<br />
Ringers<br />
Set date/time<br />
BACK SELECT<br />
Website - displays the <strong>VTech</strong> website<br />
address.<br />
Bluetooth<br />
Ringers<br />
Set date/time<br />
Settings<br />
Website<br />
BACK SELECT
Bluetooth<br />
Introducing Bluetooth<br />
Your new DS6472 telephone system with Bluetooth wireless technology has<br />
the following features:<br />
•<br />
•<br />
•<br />
•<br />
•<br />
Pair up to four Bluetooth enabled devices (cell phones or headsets) with<br />
the telephone base.<br />
Connect a maximum of two cell phones to make and receive cell calls.<br />
Only one cell phone can be active on a call at a time.<br />
Connect one Bluetooth enabled headset for making and receiving<br />
home calls.<br />
Conference cell and home calls.<br />
Make and receive calls using your cell phone plan while utilizing the ease<br />
and comfort of your home telephone system.<br />
IMPORTANT INFORMATION<br />
• After plugging in the telephone base, wait at least 20 seconds before<br />
connecting a Bluetooth device. The screen shows Bluetooth system busy<br />
if you try to connect too soon.<br />
• Refer to the user's <strong>manual</strong> of your Bluetooth enabled cell phone or<br />
headset for more information about how that device uses Bluetooth<br />
connectivity.<br />
• Bluetooth wireless technology operates within a short range (a maximum<br />
of approximately 30 feet) from the telephone base. Keep connected cell<br />
phones and headset within this range.<br />
• If your cell phone has poor reception in your home, the DS6472 cannot<br />
improve the reception. However, if there is a location in your house with<br />
better reception, you can leave your cell phone at that location while you<br />
use the DS6472 cell line. In order for this to work, the telephone base<br />
must be within 30 feet of the cell phone.<br />
• Charge your cell phone while it is connected to the telephone base.<br />
Your cell phone's battery will discharge faster while it is connected to the<br />
telephone base via Bluetooth wireless technology.<br />
•<br />
Monitor your cell phone's usage because minutes are deducted from your<br />
cellular plan for the duration of all cell calls.<br />
Refer to Bluetooth setup (page 24) to learn how to set up and manage your<br />
Bluetooth enabled devices. Refer to Telephone operation (page 49) on how<br />
to operate your Bluetooth devices with your new DS6472 telephone system<br />
with Bluetooth wireless technology. Refer to Troubleshooting (page 108) if<br />
you experience difficulty using the telephone system.<br />
The Bluetooth ® word mark and logos are owned by Bluetooth SIG, Inc. and<br />
any use of such marks by <strong>VTech</strong> Holdings Limited is under license.<br />
<strong>VTech</strong> Holdings Limited is a member of Bluetooth SIG, Inc. Other trademarks<br />
and trade names are those of their respective owners.<br />
22
Bluetooth<br />
Glossary of terms<br />
Below are some terms used in this user’s <strong>manual</strong> to help you become<br />
familiar with using your Bluetooth enabled devices and your new<br />
DS6472 telephone system.<br />
Active device slots - the Device list has two active slots for two cell<br />
phones, or one cell phone and one headset. When a device on the list<br />
is active, D1 or D2 displays in front of the device name. In order to use a<br />
Bluetooth device on a call, it must be in an active slot and be connected.<br />
Bluetooth cell phone - refers to a Bluetooth enabled cellular telephone.<br />
Cell line - the telephone line associated with your cell phone service. On<br />
your DS6472 handset, press /CELL to use the cell line.<br />
Connected - when you pair a Bluetooth device to the DS6472, it is placed<br />
in an active slot and automatically connected. When a device is connected,<br />
1 and/or 2 displays after on the handset and the D1 and/or D2 light on the<br />
telephone base is on. If a device loses its connection to the telephone base, it<br />
must be reconnected before you can use the device with the DS6472.<br />
Disconnected - when a device is disconnected, 1 and/or 2 displays after<br />
on the handset and the D1 and/or D2 light on the telephone base is off.<br />
Discoverable mode - before a Bluetooth enabled device can be paired, it<br />
must be set to this mode. When pairing your cell phone, the telephone base<br />
will be set to this mode. When pairing a headset, the headset must be set to<br />
this mode. Depending on the manufacturer, this mode is sometimes referred<br />
to as Find Me or Visibility.<br />
Home line - your conventional telephone land line. On your DS6472 handset,<br />
press /HOME/FLASH to use the home line.<br />
Paired devices - once Bluetooth enabled devices have been paired with the<br />
telephone base, they appear on the device list. A maximum of four devices<br />
can be paired with the telephone base.<br />
Pairing - this refers to the process of Bluetooth enabled devices registering<br />
device information with each other. The telephone base must be paired with a<br />
Bluetooth enabled cell phone or headset before the Bluetooth device can be<br />
used. Depending on the manufacturer, this is also referred to as Bonding.<br />
PIN - by default, the PIN is 0000 for the telephone base and for most<br />
Bluetooth devices. PIN information must be exchanged between<br />
Bluetooth devices before they can be used. This is also known as a<br />
Passkey or Passcode.<br />
23
Bluetooth<br />
Bluetooth setup<br />
To use a Bluetooth enabled cell phone or headset with your DS6472, you<br />
must first pair and connect your Bluetooth device(s) with the telephone base.<br />
All DS6472 handsets can be used to make or answer on the cell phone line.<br />
Bluetooth wireless technology operates within a short range (30 feet). When<br />
you pair a Bluetooth cell phone or Bluetooth headset to the telephone base,<br />
move closer to the telephone base to maintain sufficient signal strength.<br />
Add a cell phone<br />
Before you begin, make sure that you have cellular coverage and your<br />
Bluetooth enabled cell phone is not connected to any other Bluetooth<br />
devices. Refer to your cell phone user's <strong>manual</strong> to learn how to search for or<br />
add new Bluetooth devices.<br />
To pair and connect a cell phone:<br />
1.<br />
2.<br />
3.<br />
4.<br />
Press MENU on the handset when it is not in use.<br />
Press or to highlight Bluetooth, then<br />
press SELECT.<br />
Press SELECT to choose Add device, then press<br />
SELECT to choose Add cellular. The handset<br />
displays Please wait... followed by 1. If cell is<br />
connected to BT device, please disconnect it.<br />
• If there are already four paired devices on the<br />
device list, the 4th device on the device list will be<br />
automatically removed, regardless of whether the<br />
new device pairing is successful or not (page 31).<br />
• If there are already two active devices on the device<br />
list with prefix D1: or D2:, the handset shows Only<br />
2 devices can be ready for connection. You are<br />
prompted to deactivate an active device.<br />
Press NEXT. The handset displays 2. Place cell<br />
phone next to base.<br />
• All devices that are connected to the telephone<br />
base are disconnected until the pairing process<br />
is completed.<br />
24<br />
Answering sys<br />
Directory<br />
Caller ID log<br />
Intercom<br />
Bluetooth<br />
BACK SELECT<br />
BLUETOOTH<br />
Add device<br />
Device list<br />
Download dir<br />
Change PIN<br />
BACK SELECT<br />
ADD DEVICE<br />
Add cellular<br />
Add headset<br />
BACK SELECT
Bluetooth<br />
Add a cell phone (continued)<br />
5.<br />
6.<br />
7.<br />
Press NEXT to turn on the telephone base<br />
discoverable mode. The handset displays Set cell<br />
to search base: <strong>VTech</strong> DS6472 discoverable PIN:<br />
0000. Promptly turn on the Bluetooth feature of your<br />
cell phone and search for or add new devices.<br />
• Your cell phone may require a passcode. In this<br />
case, the handset displays Check cellular. ENTER<br />
PASS CODE. Enter the cell phone passcode into<br />
the handset and press SET to save.<br />
Enter the PIN of the telephone base (the default PIN<br />
is 0000) into your cell phone to continue the pairing<br />
process. The handset displays Adding Cell Phone A<br />
to device list...<br />
When a device is successfully connected, the handset<br />
displays Cell Phone A is added and connected<br />
to base. You hear a confirmation tone. The<br />
corresponding status icon ( 1 or 2) displays. The<br />
corresponding device light on the telephone base (D1<br />
or D2) turns on.<br />
If you have trouble pairing your cell phone, it may not<br />
be compatible with your DS6472. Check the Bluetooth compatibility list<br />
at www.vtechphones.com.<br />
•<br />
•<br />
•<br />
The pairing process may take up to one minute. If the pairing process fails,<br />
try again.<br />
The steps for the pairing process may vary for different cell phones. If<br />
this happens, follow the prompts on your cell phone and your DS6472 to<br />
complete the pairing process.<br />
If you put the handset back in the telephone base or charger while pairing,<br />
the pairing is canceled and the handset returns to idle mode.<br />
25<br />
Set cell to<br />
search base:<br />
<strong>VTech</strong> DS6472<br />
discoverable<br />
PIN:0000<br />
Adding<br />
Cell Phone A<br />
to device<br />
list...<br />
Cell Phone A<br />
is added<br />
and connected<br />
to base.
Bluetooth<br />
Add a headset<br />
Before you begin, make sure that your Bluetooth enabled<br />
headset is not connected to any other Bluetooth device.<br />
Refer to your headset user's <strong>manual</strong> to learn how to<br />
search for or add new Bluetooth devices.<br />
To pair and connect a headset:<br />
1.<br />
2.<br />
3.<br />
4.<br />
5.<br />
6.<br />
7.<br />
8.<br />
Press MENU on the handset when it is not in use.<br />
Press or to highlight Bluetooth, then<br />
press SELECT.<br />
Press SELECT to choose Add device.<br />
Press or to highlight Add headset, then<br />
press SELECT. The handset displays If headset is<br />
connected to cell, please disconnect it.<br />
Press NEXT.<br />
• When there is already an active headset, the<br />
handset shows Only 1 headset in device list can<br />
be ready for connection and then prompt you to<br />
replace an existing paired device (page 31).<br />
• When there are already two active devices, the<br />
handset shows Only 2 devices can be ready for<br />
connection. The telephone base will deactivate<br />
another headset from an active slot automatically.<br />
The handset displays Pls set headset to<br />
discoverable mode, then press NEXT.<br />
• All devices that are connected to the telephone<br />
base are temporarily disconnected.<br />
The handset displays Searching for Bluetooth<br />
headsets... Set your headset to discoverable mode<br />
(refer to the user’s <strong>manual</strong> of your headset).<br />
When the handset displays the found devices, press<br />
or to highlight a desired headset and then<br />
press SELECT.<br />
Enter the PIN of your headset. The PIN for most<br />
Bluetooth devices is 0000 (refer to the user’s <strong>manual</strong><br />
of your headset). Then press NEXT. The handset<br />
displays Adding Headset A to device list... when the<br />
base is connecting to your headset.<br />
26<br />
Answering sys<br />
Directory<br />
Caller ID log<br />
Intercom<br />
Bluetooth<br />
BACK SELECT<br />
ADD DEVICE<br />
Add cellular<br />
Add headset<br />
BACK SELECT<br />
If headset is<br />
connected to<br />
cell, please<br />
disconnect it.<br />
NEXT<br />
Pls set headset<br />
to discoverable<br />
mode<br />
BACK NEXT<br />
Searching for<br />
Bluetooth<br />
headsets...<br />
FOUND DEVICES<br />
Headset A<br />
Headset B<br />
BACK SELECT
Bluetooth<br />
Add a headset (continued)<br />
9.<br />
When a device is successfully connected, the handset<br />
displays Headset A is added and connected to<br />
base and the corresponding status icon ( 1 or 2).<br />
You hear a confirmation tone. The corresponding light<br />
on the telephone base (D1 or D2) turns on.<br />
If you have trouble pairing your headset, it may be not<br />
compatible with your DS6472. Check the Bluetooth<br />
compatibility list at www.vtechphones.com.<br />
•<br />
•<br />
The pairing process may take up to one minute. If the<br />
pairing process fails, try again.<br />
If you put the handset back in the telephone base or<br />
charger while pairing, the process discontinues and<br />
the handset returns to idle mode.<br />
Auto connection<br />
An active device may be disconnected from the telephone base when:<br />
• The Bluetooth feature of your connected cell phone is turned off.<br />
• The power of your device is turned off.<br />
• Your Bluetooth device is not within range of the telephone base.<br />
When the Bluetooth feature or power on the device is turned on, or it moves<br />
within range of the base, the base will try to reconnect to the Bluetooth<br />
device. If you disconnect the device through the device list, the base will not<br />
attempt to reconnect unless your device is moved out of range and back in<br />
range again.<br />
27<br />
Adding<br />
Headset A<br />
to device<br />
list...<br />
Headset A<br />
is added<br />
and connected<br />
to base.
Bluetooth<br />
Connecting devices<br />
Up to four devices can be paired to the telephone base. All paired devices are<br />
shown on the device list. To use a paired device, it must be in an active slot<br />
(D1 or D2) on the device list and connected. Only one Bluetooth cell phone or<br />
a headset can be on a call at a time.<br />
Once you have paired a device with the telephone base, you do not need<br />
to repeat the pairing procedure again unless you delete the device from the<br />
device list.<br />
Review the device list<br />
1.<br />
2.<br />
3.<br />
Press MENU on the handset when it is not in use.<br />
Press or to highlight Bluetooth, then<br />
press SELECT.<br />
Press or to highlight Device list, then<br />
press SELECT.<br />
Connect/Disconnect an active device<br />
While in the device list menu, you may connect or<br />
disconnect your devices.<br />
1.<br />
2.<br />
3.<br />
4.<br />
5.<br />
When connecting a Bluetooth device to the device list, all connected devices<br />
will be temporarily disconnected until the procedure is complete. It may take<br />
up to two minutes to reconnect.<br />
Press MENU on the handset when it is not in use.<br />
Press or to highlight Bluetooth, then<br />
press SELECT.<br />
Press or to highlight Device list, then<br />
press SELECT.<br />
Press or to highlight a device when necessary,<br />
then press OPTION.<br />
Press or to highlight Connect/Disconnect<br />
(whichever is applicable), then press<br />
SELECT to confirm. The handset displays Device<br />
connected/Device disconnected. You hear a<br />
confirmation tone.<br />
When your device is connected, you will be prompted to<br />
select Disconnect. When your device is disconnected,<br />
you will be prompted to select Connect.<br />
28<br />
Answering sys<br />
Directory<br />
Caller ID log<br />
Intercom<br />
Bluetooth<br />
BACK SELECT<br />
BLUETOOTH<br />
Add device<br />
Device list<br />
Download dir<br />
Change PIN<br />
BACK SELECT<br />
1<br />
DEVICE LIST<br />
D1:Headset A<br />
D2:Cell Phone A<br />
Cell Phone B<br />
Cell Phone C<br />
BACK OPTION<br />
1<br />
Headset A<br />
Connect<br />
Remove<br />
Rename<br />
BACK SELECT
Bluetooth<br />
Remove a device<br />
When you already have the maximum of four paired devices on the device list<br />
and you want to add another device, you must first delete a device from the<br />
device list.<br />
1.<br />
2.<br />
3.<br />
4.<br />
5.<br />
Press MENU on the handset when it is not in use.<br />
Press or to highlight Bluetooth, then<br />
press SELECT.<br />
Press or to highlight Device list, then<br />
press SELECT.<br />
Press or to highlight a desired device when<br />
necessary, then press MUTE/DELETE.<br />
- OR -<br />
• Press or to highlight a desired device when<br />
necessary, then press OPTION.<br />
• Press or to highlight Remove, then<br />
press SELECT.<br />
The handset displays Remove Headset A? Press YES<br />
to confirm. The handset displays Device removed<br />
from device list. You hear a confirmation tone.<br />
29<br />
BLUETOOTH<br />
Add device<br />
Device list<br />
Download dir<br />
Change PIN<br />
BACK SELECT<br />
1<br />
DEVICE LIST<br />
D1:Headset A<br />
D2:Cell Phone A<br />
BACK OPTION<br />
1<br />
Headset A<br />
Connect<br />
Remove<br />
Rename<br />
BACK SELECT<br />
1<br />
Remove<br />
Headset A<br />
?<br />
NO YES<br />
Device removed<br />
from<br />
device list.
Bluetooth<br />
Rename a device<br />
You can change the name of a device on the device list.<br />
1.<br />
2.<br />
3.<br />
4.<br />
5.<br />
6.<br />
7.<br />
Press MENU on the handset when it is not in use.<br />
Press or to highlight Bluetooth, then<br />
press SELECT.<br />
Press or to highlight Device list, then<br />
press SELECT.<br />
Press or to choose a desired device when<br />
necessary, then press OPTION.<br />
Press or to highlight Rename, then press<br />
SELECT. The handset displays ENTER NEW NAME.<br />
Use the dialing keys to edit the name (up to<br />
15 characters).<br />
•<br />
•<br />
•<br />
Press MUTE/DELETE to erase a character.<br />
Press and hold MUTE/DELETE to erase<br />
all characters.<br />
Press to move the cursor to the right or to<br />
the left.<br />
Press SAVE. The handset displays Device renamed.<br />
You hear a confirmation tone.<br />
30<br />
BLUETOOTH<br />
Add device<br />
Device list<br />
Download dir<br />
Change PIN<br />
BACK SELECT<br />
1<br />
DEVICE LIST<br />
D1:Headset A<br />
D2:Cell Phone A<br />
BACK OPTION<br />
1<br />
Headset A<br />
Connect<br />
Remove<br />
Rename<br />
BACK SELECT<br />
1<br />
ENTER NEW NAME<br />
Headset A -----<br />
SAVE
Bluetooth<br />
Replace an active device<br />
If you already have two active devices on the device list<br />
and you want to activate a different device, you must<br />
deactivate one of the two active devices.<br />
To replace an active device:<br />
1.<br />
2.<br />
3.<br />
4.<br />
5.<br />
6.<br />
7.<br />
Press MENU on the handset when it is not in use.<br />
Press or to highlight Bluetooth, then<br />
press SELECT.<br />
Press or to highlight Device list, then<br />
press SELECT.<br />
Press or to highlight the device you want to<br />
activate, without a prefix D1: or D2:, then<br />
press OPTION.<br />
Press or to highlight Connect, then press<br />
SELECT. The handset displays Only 2 devices can<br />
be ready for connection and then a list of devices<br />
for deactivation.<br />
Press or to highlight the device to be deactivated,<br />
then press NEXT. The handset displays<br />
Cell Phone/Headset A is deactivated and you hear a<br />
confirmation tone. The handset displays Connecting<br />
Cell Phone/Headset B to the base...<br />
Depending on your cell phone settings, you may<br />
need to press a key on your cell phone to confirm<br />
the connection. When the new device is successfully<br />
activated and connected, the handset displays<br />
Device connected. You hear a confirmation tone.<br />
Bluetooth connection from idle mode<br />
When you have active devices that are not connected,<br />
CONNECT appears on the idle handset. Press CONNECT<br />
to start connecting an active device. When there are two<br />
active devices, the handset will prompt you to choose one<br />
before connection.<br />
31<br />
BLUETOOTH<br />
Add device<br />
Device list<br />
Download dir<br />
Change PIN<br />
BACK SELECT<br />
1<br />
DEVICE LIST<br />
D1:Headset A<br />
D2:Cell Phone A<br />
Cell Phone B<br />
Cell Phone C<br />
BACK OPTION<br />
1<br />
Cell Phone B<br />
Connect<br />
Remove<br />
Rename<br />
BACK SELECT<br />
Connecting<br />
Cell Phone B<br />
to the base...<br />
1<br />
HANDSET<br />
--:-- --/--<br />
CONNECT MENU<br />
1
Bluetooth<br />
Download directory<br />
You can download up to four cell phone directories (phonebooks) to<br />
your DS6472 telephone system via Bluetooth wireless technology. Each<br />
downloaded directory can store up to 1,500 entries with up to 30 digits for<br />
each phone number and 15 characters for each name.<br />
Before downloading the directory, make sure the cell phone is paired, active<br />
and connected to the DS6472. Make sure the handset battery is charged for<br />
at least 10 minutes.<br />
Place your cell phone next to the telephone base when you download a<br />
cell phone directory to your DS6472.<br />
To download a cell phone directory:<br />
1.<br />
2.<br />
3.<br />
4.<br />
5.<br />
Press MENU on the handset when it is not in use.<br />
Press or to highlight Bluetooth, then<br />
press SELECT.<br />
Press or to highlight Download dir, then<br />
press SELECT.<br />
• If there is no cell phone paired to the system, the<br />
handset displays Device list is empty. Press OK to<br />
return to the Bluetooth menu.<br />
Press or to highlight a desired device, then<br />
press SELECT.<br />
• If the selected device is active but disconnected, the<br />
handset displays Cellular phone not connected.<br />
Press CONNECT.<br />
Press or to highlight one of the following options:<br />
• Phone memory - download all contacts stored in<br />
your phone memory.<br />
• SIM card only - download all contacts stored in<br />
your SIM card.<br />
• Phone and SIM - download all contacts stored in<br />
both your phone memory and SIM card.<br />
Press SELECT. During the download, the handset<br />
displays the progress. All other idle system handsets<br />
display Downloading dir.<br />
• Your cell phone may require a passcode. In this<br />
case, the handset displays Check cellular. ENTER<br />
PASS CODE. Enter the cell phone passcode into<br />
the handset and press SET to save.<br />
32<br />
Answering sys<br />
Directory<br />
Caller ID log<br />
Intercom<br />
Bluetooth<br />
BACK SELECT<br />
BLUETOOTH<br />
Add device<br />
Device list<br />
Download dir<br />
Change PIN<br />
BACK SELECT<br />
1<br />
DOWNLOAD DIR<br />
D1:Cell Phone A<br />
D2:Cell Phone B<br />
BACK SELECT<br />
1<br />
DOWNLOAD FROM<br />
Phone memory<br />
SIM card only<br />
Phone and SIM<br />
BACK SELECT
Bluetooth<br />
Download directory (continued)<br />
6.<br />
•<br />
•<br />
If the selected device’s directory has already been<br />
downloaded to the DS6472 before, the handset<br />
displays the last update date of your cell phone. The<br />
directory stored on the DS6472 for that cell phone<br />
will be erased and replaced with the current cell<br />
phone directory. If you have edited the downloaded<br />
entries (page 71), those changes will be lost. Press<br />
NEXT to start the download, the handset displays<br />
Erasing directory...<br />
If you already have four downloaded directories, the<br />
handset displays Memory is full. Replace existing<br />
directory? Press YES. Highlight the cell phone<br />
directory to be replaced and then press SELECT.<br />
The handset displays Replace Cell Phone A<br />
directory? Press YES to confirm.<br />
When the downloading process is complete, the<br />
handset displays Download ended XXXX entries saved. You hear a<br />
confirmation tone. Press OK to return to the download directory menu.<br />
•<br />
•<br />
•<br />
Certain cell phones do not support SIM card download. If this is the case,<br />
try transferring the contacts from your SIM card to your cell phone memory<br />
first, then download from your cell phone memory. For more information on<br />
how to transfer contacts from your SIM card to your cell phone memory, see<br />
the user’s <strong>manual</strong> of your cell phone.<br />
When downloading the directory from your Bluetooth enabled cell phone,<br />
some data may not transfer. For example, if you have home, mobile and<br />
work numbers for a particular contact, the three categories may not transfer<br />
to your DS6472.<br />
For certain cell phones, you may need to press a key on your cell phone to<br />
confirm the directory download.<br />
33<br />
1<br />
Cell Phone A<br />
Downloading<br />
entry #XXXX<br />
STOP<br />
1<br />
Download ended<br />
XXXX<br />
entries saved<br />
OK
Bluetooth<br />
Interruption to directory download<br />
When you are downloading a directory from a cell phone and the phone<br />
receives a call, the download process stops and all handsets display<br />
Download fail after the call ends. When you try to view the downloaded<br />
directory, the handset displays Last download failed: MM/DD/YY. You need<br />
to download the directory again (see page 32).<br />
When you are downloading a directory from a cell phone<br />
and the telephone base loses power, the download<br />
process stops. When the telephone base regains power,<br />
the handset only displays the Home directory. You need<br />
to download the directory again (see page 32).<br />
The download progress screen may be replaced with<br />
Cell line in use. To go back to the downloading progress<br />
screen, do steps one through four on page 32. The<br />
download process continues even if any of the following occurs:<br />
•<br />
•<br />
•<br />
You place the handset in the telephone base or charger.<br />
You access your cell phone menu features.<br />
The handset battery becomes depleted or the handset loses connection<br />
with the telephone base.<br />
View the directory download information<br />
1.<br />
2.<br />
3.<br />
4.<br />
During the download process, do not attempt to make changes to your cell<br />
phone directory.<br />
Press MENU on the handset when it is not in use.<br />
Press or to highlight Directory, then<br />
press SELECT.<br />
Press or to choose the desired downloaded<br />
directory, then press OPTION.<br />
Press or to highlight Last update, then<br />
press SELECT. Press OK to exit.<br />
34<br />
1<br />
HANDSET 1<br />
Download fail<br />
12:31PM 12/31<br />
MENU<br />
Cell Phone A<br />
Last update:<br />
12/12/09<br />
Total #0159<br />
OK
Bluetooth<br />
Change PIN<br />
You are required to enter a PIN when establishing a<br />
Bluetooth connection. The default PIN of your telephone<br />
base is 0000.<br />
To change the PIN:<br />
1.<br />
2.<br />
3.<br />
4.<br />
Press MENU on the handset when it is not in use.<br />
Press or to highlight Bluetooth, then<br />
press SELECT.<br />
Press or to highlight Change PIN, then press<br />
SELECT. The handset displays ENTER NEW PIN and<br />
the existing PIN.<br />
Use the dialing keys to enter a new four-digit code.<br />
• Press MUTE/DELETE to erase a digit.<br />
• Press and hold MUTE/DELETE to erase all digits.<br />
• Press to move the cursor to the right or to the left.<br />
5. Press SET to save. You hear a confirmation tone.<br />
35<br />
BLUETOOTH<br />
Add device<br />
Device list<br />
Download dir<br />
Change PIN<br />
BACK SELECT<br />
ENTER NEW PIN1<br />
BACK SET<br />
----
Telephone settings<br />
Handset settings<br />
Ringers<br />
In the ringers menu, you can select the ringer tones and adjust the ringer<br />
volume for incoming calls to the home and cell lines.<br />
Ringer volume (handset)<br />
You can adjust the ringer volume for the incoming home<br />
and cell calls.<br />
To adjust the handset ringer volume:<br />
1.<br />
2.<br />
3.<br />
4.<br />
5.<br />
6.<br />
Press MENU on the handset when it is not in use.<br />
Press or to highlight Ringers, then<br />
press SELECT.<br />
Press SELECT to choose Ringer volume.<br />
Press or to highlight All lines, Home, Cell-D1, or<br />
Cell-D2 then press SELECT.<br />
Press or to sample each volume level.<br />
Press SET to save. You hear a confirmation tone.<br />
- OR -<br />
Press OFF to turn off the ringer, then press SET to<br />
save. You hear a confirmation tone.<br />
•<br />
•<br />
•<br />
When the ringer volume for all are set to off, a ringer off<br />
icon appears steady. When only one or two of the<br />
ringer volume is set to off, a ringer off icon flashes.<br />
When the ringer volume is set to off, the handset<br />
displays briefly Caller ID won’t be announced if the<br />
voice announce caller ID feature is turned on<br />
(page 45).<br />
See page 48 to set the telephone base ringer volume.<br />
Ringer volume (headset)<br />
The headset does not have an external ringer. When there is<br />
an incoming call, the headset earpiece rings.<br />
To adjust the ringer volume:<br />
Press +/-/VOLUME on the side of the headset when it is not<br />
in use.<br />
36<br />
RINGERS<br />
Ringer volume<br />
Ringer tone<br />
BACK SELECT<br />
RINGER VOLUME<br />
All lines<br />
Home<br />
Cell-D1<br />
Cell-D2<br />
BACK SELECT<br />
RINGER VOLUME<br />
OFF SET
Telephone settings<br />
Ringer tone<br />
You can select the ringer tones for the incoming home and cell calls.<br />
To select a ringer tone:<br />
1.<br />
2.<br />
3.<br />
4.<br />
5.<br />
6.<br />
Press MENU on the handset when it is not in use.<br />
Press or to highlight Ringers, then<br />
press SELECT.<br />
Press or to highlight Ringer tone, then<br />
press SELECT.<br />
Press or to highlight All lines, Home, Cell-D1 or<br />
Cell-D2, then press SELECT.<br />
Press or to sample each ringer tone.<br />
Press SET to save. You hear a confirmation tone.<br />
When you turn off the ringer volume, you will not hear<br />
ringer tone samples.<br />
37<br />
RINGERS<br />
Ringer volume<br />
Ringer tone<br />
BACK SELECT<br />
RINGER TONE<br />
All lines<br />
Home<br />
Cell-D1<br />
Cell-D2<br />
BACK SELECT<br />
RINGER TONE<br />
Tone 1<br />
Tone 2<br />
Tone 3<br />
Tone 4<br />
BACK SET
Telephone settings<br />
Set date and time<br />
The answering system announces the day and time of each message prior<br />
to playing it. If you subscribe to caller ID service, the day, month and time are<br />
set automatically with each incoming call. If you do not want to set the date<br />
and time automatically with caller ID information, turn this feature off (see<br />
CID time synchronization on page 43). However, the year must be correct<br />
so that the day of the week can be calculated from the<br />
caller ID information. Before using the answering system,<br />
set the date and time as follows.<br />
To set the date and time <strong>manual</strong>ly:<br />
1. Press MENU on the handset when it is not in use.<br />
2. Press or to highlight Set date/time, then<br />
press SELECT.<br />
3. Use the dialing keys (0-9) to enter the month. For<br />
example, enter 02 for February.<br />
- OR -<br />
Press or to choose the month and then<br />
press SET.<br />
4. Repeat Step 3 to set the date and year, and then<br />
press SET.<br />
5. Repeat Step 3 to set the hour and minute, and then<br />
press SET.<br />
6. Press or to choose AM or PM, or press 2 for<br />
AM or 7 for PM. Then press SET to save. You hear a<br />
confirmation tone.<br />
If the date and time are not set, the system announces,<br />
“Time and day not set,” before each message plays.<br />
38<br />
Caller ID log<br />
Intercom<br />
Bluetooth<br />
Ringers<br />
Set date/time<br />
BACK SELECT<br />
SET DATE<br />
09/30/09<br />
MM/DD/YY<br />
BACK SET<br />
SET TIME<br />
05:41 PM<br />
BACK SET
Telephone settings<br />
Settings<br />
In the settings menu, you can modify the settings for LCD language, voice<br />
language, display alerts, CID time synchronization, handset name, key tone,<br />
dial mode and voice announce caller ID.<br />
LCD language<br />
You can select a language (English, French or Spanish) to<br />
be used in all screen displays.<br />
To select a language:<br />
1.<br />
2.<br />
3.<br />
4.<br />
Press MENU on the handset when it is not in use.<br />
Press or to highlight Settings, then<br />
press SELECT.<br />
Press SELECT to choose LCD language.<br />
Press or to choose from English, Français<br />
or Español, then press SET to save. You hear a<br />
confirmation tone.<br />
Voice language<br />
You can select a language (English or French) to be<br />
used for the answering system’s voice prompts and voice<br />
announce caller ID feature.<br />
1.<br />
2.<br />
3.<br />
4.<br />
5.<br />
Press MENU on the handset when it is not in use.<br />
Press or to highlight Settings, then<br />
press SELECT.<br />
Press or to highlight Voice language, then<br />
press SELECT.<br />
Press or to highlight Answering sys or<br />
Annc Caller ID , then press SELECT.<br />
Press or to choose from English or Français,<br />
then press SET to save. You hear a confirmation tone.<br />
39<br />
SETTINGS<br />
LCD language<br />
Voice language<br />
Display alerts<br />
CID time sync<br />
BACK SELECT<br />
LCD LANGUAGE<br />
English<br />
Fran c, ais<br />
Espanol<br />
BACK SET<br />
SETTINGS<br />
LCD language<br />
Voice language<br />
Display alerts<br />
CID time sync<br />
BACK SELECT<br />
ANS SYS LANG.<br />
English<br />
Fran c, ais<br />
BACK SET
Telephone settings<br />
Display alerts<br />
In the display alerts menu, you can change and edit the settings for display<br />
alerts on the idle screen.<br />
Missed call indicator<br />
When there are missed calls that have not been reviewed<br />
in the caller ID log, the handsets show XX Missed calls.<br />
Each time you review a caller ID log entry marked NEW,<br />
the number of missed calls decreases by one.<br />
When you have reviewed all the missed calls, the missed<br />
calls indicator disappears.<br />
If you do not want to review the missed calls one by one,<br />
you can reset the missed call indicator. All the entries are<br />
then considered old and kept in the caller ID log.<br />
To reset the missed call indicator:<br />
1.<br />
2.<br />
3.<br />
4.<br />
5.<br />
Press MENU on the handset when it is not in use.<br />
Press or to highlight Settings, then<br />
press SELECT.<br />
Press or to highlight Display alerts, then<br />
press SELECT.<br />
Press or to highlight Home line or Cell line, then<br />
press SELECT.<br />
Press SELECT to choose Missed calls. The handset<br />
displays Reset missed call indication? Press YES to<br />
confirm. You hear a confirmation tone.<br />
You can also press and hold OFF/CANCEL to erase the<br />
missed call indicator when the telephone is not in use.<br />
40<br />
HANDSET X<br />
XX Missed calls<br />
12:31PM 12/31<br />
<strong>VTech</strong><br />
MENU<br />
NEW<br />
800-595-9511<br />
12:31PM 12/31<br />
BACK DIAL<br />
SETTINGS<br />
LCD language<br />
Voice language<br />
Display alerts<br />
CID time sync<br />
BACK SELECT<br />
HOME ALERTS<br />
Missed calls<br />
Voicemail<br />
No line<br />
BACK SELECT
Telephone settings<br />
Display alerts (continued)<br />
Voicemail indicators<br />
If you subscribe to voicemail service offered by your telephone service<br />
provider, New voicemail and appear on the handsets when you have<br />
new voicemail messages. Contact your telephone service provider for more<br />
information and assistance about using your voicemail service.<br />
After you have listened to all new voicemail messages, the indicators on the<br />
handsets turn off automatically.<br />
Reset the voicemail indicators when the telephone indicates that there is<br />
new voicemail but there is none (for example, when you have accessed your<br />
voicemail while away from home). Clearing the voicemail waiting indicators<br />
only turns off the indicators; it does not delete your voicemail messages. As<br />
long as you have new voicemail messages, your telephone service provider<br />
continues to send the signal to turn on the indicators.<br />
To reset the voicemail indicators:<br />
1.<br />
2.<br />
3.<br />
4.<br />
5.<br />
6.<br />
Press MENU on the handset when it is not in use.<br />
Press or to highlight Settings, then<br />
press SELECT.<br />
Press or to highlight Display alerts, then<br />
press SELECT.<br />
Press or to highlight Home line, then<br />
press SELECT.<br />
Press or to highlight Voicemail, press SELECT.<br />
The handset displays Reset voicemail indication?<br />
Press YES to confirm. You hear a confirmation tone.<br />
41<br />
DISPLAY ALERTS<br />
Home line<br />
Cell line<br />
BACK SELECT<br />
HOME ALERTS<br />
Missed calls<br />
Voicemail<br />
No line<br />
BACK SELECT
Telephone settings<br />
Display alerts (continued)<br />
No line<br />
If there is no telephone line connected to the telephone base, the handsets show<br />
No home line. If you do not want to display the message on the handsets (for<br />
example, if you use the cell line only), you can turn off the no line alert.<br />
To turn the no line alert on or off:<br />
1.<br />
2.<br />
3.<br />
4.<br />
5.<br />
6.<br />
Press MENU on the handset when it is not in use.<br />
Press or to highlight Settings, then<br />
press SELECT.<br />
Press or to highlight Display alerts, then<br />
press SELECT.<br />
Press or to highlight Home line, then<br />
press SELECT.<br />
Press or to highlight No line, then press SELECT.<br />
Press or to choose On or Off, then press SET to<br />
save. When you choose Off, the handset displays If<br />
the line is not connected, an alert will not appear.<br />
You hear a confirmation tone.<br />
Download fail<br />
If the directory download process is interrupted, the handsets display<br />
Download fail. You can reset the download fail indication on the handset.<br />
To reset the download fail indication:<br />
1.<br />
2.<br />
3.<br />
4.<br />
5.<br />
6.<br />
Press MENU on the handset when it is not in use.<br />
Press or to highlight Settings, then<br />
press SELECT.<br />
Press or to highlight Display alerts, then<br />
press SELECT.<br />
Press or to highlight Cell line, then<br />
press SELECT.<br />
Press or to highlight Download fail, then<br />
press SELECT.<br />
The handset displays Reset download failure<br />
indication? Press YES to confirm. You hear a<br />
confirmation tone.<br />
You can also press and hold OFF/CANCEL to erase this<br />
indication when the telephone is not in use.<br />
42<br />
HOME ALERTS<br />
Missed calls<br />
Voicemail<br />
No line<br />
BACK SELECT<br />
NO LINE ALERT<br />
On<br />
Off<br />
BACK SET<br />
CELL ALERTS<br />
Missed calls<br />
Download fail<br />
BACK SELECT<br />
Reset<br />
download<br />
failure<br />
indication?<br />
YES NO
Telephone settings<br />
CID time synchronization<br />
If you subscribe to caller ID service, the date and time<br />
will be set automatically by the caller ID information. You<br />
can turn off this feature if you want to set the date and<br />
time <strong>manual</strong>ly.<br />
To change the setting:<br />
1. Press MENU on the handset when it is not<br />
in use.<br />
2. Press or to highlight Settings, then<br />
press SELECT.<br />
3. Press or to highlight CID time sync,<br />
then press SELECT.<br />
4. Press or to choose On or Off, then press<br />
SET to save. You hear a confirmation tone.<br />
Rename handsets<br />
You can create a name for each handset. The new name<br />
can be up to 11 characters.<br />
To rename a handset:<br />
1. Press MENU on the handset when it is not<br />
in use.<br />
2. Press or to highlight Settings, then<br />
press SELECT.<br />
3. Press or to highlight Rename handset,<br />
4.<br />
then press SELECT. The handset displays<br />
RENAME HANDSET.<br />
Use the dialing keys to edit the name.<br />
• Press MUTE/DELETE to erase a character.<br />
• Press and hold MUTE/DELETE to erase all<br />
characters.<br />
• Press to move the cursor to the right or<br />
5.<br />
to the left.<br />
Press SAVE. You hear a confirmation tone.<br />
43<br />
SETTINGS<br />
Voice language<br />
Display alerts<br />
CID time sync<br />
Rename handset<br />
BACK SELECT<br />
CID TIME SYNC<br />
On<br />
Off<br />
BACK SET<br />
SETTINGS<br />
Voice language<br />
Display alerts<br />
CID time sync<br />
Rename handset<br />
BACK SELECT<br />
RENAME HANDSET<br />
Room A_ _ _ _ _<br />
BACK SAVE<br />
Room A<br />
12:31PM 12/31<br />
MENU<br />
1
Telephone settings<br />
Key tone<br />
You can change the volume of the key tone or turn it off.<br />
To change the setting:<br />
1.<br />
2.<br />
3.<br />
4.<br />
Press MENU on the handset when it is not in use.<br />
Press or to highlight Settings, then<br />
press SELECT.<br />
Press or to highlight Key tone, then<br />
press SELECT.<br />
Press or to sample each volume level.<br />
Press SET to save.<br />
- OR -<br />
Press OFF to turn off the key tone, then press SET to<br />
save. You hear a confirmation tone.<br />
Dial mode<br />
The dial mode is preset to tone dialing. If you have pulse<br />
(rotary) service, you must change the dial mode to pulse<br />
dialing before using the telephone.<br />
To change the setting:<br />
1. Press MENU on the handset when it is not<br />
in use.<br />
2. Press or to highlight Settings, then<br />
press SELECT.<br />
3. Press or to highlight Dial mode, then<br />
press SELECT.<br />
4. Press or to choose Tone or Pulse, then<br />
press SET to save. You hear a confirmation tone.<br />
44<br />
SETTINGS<br />
Display alerts<br />
CID time sync<br />
Rename handset<br />
Key tone<br />
BACK SELECT<br />
KEY TONE VOLUME<br />
OFF SET<br />
SETTINGS<br />
CID time sync<br />
Rename handset<br />
Key tone<br />
Dial mode<br />
BACK SELECT<br />
Tone<br />
Pulse<br />
DIAL MODE<br />
BACK SET
Telephone settings<br />
Voice Announce ® caller ID<br />
You can set your handset and/or telephone base to<br />
announce the caller ID information for incoming calls. The<br />
voice announce caller ID setting is independent for each<br />
handset and the telephone base.<br />
To change the setting:<br />
1. Press MENU on the handset when it is not in use.<br />
2. Press or to highlight Settings, then<br />
press SELECT.<br />
3. Press or to highlight Annc Caller ID, then<br />
press SELECT.<br />
4. Press or to highlight Handset or Base, then<br />
press SELECT.<br />
5. Press or to choose On or Off, then press SET to<br />
save. You hear a confirmation tone.<br />
•<br />
•<br />
•<br />
•<br />
•<br />
•<br />
•<br />
•<br />
•<br />
•<br />
To use the voice announce caller ID feature, you must subscribe to caller ID<br />
service from your telephone service provider.<br />
Only the first four registered handsets will be able to use this feature.<br />
If the phone number of the incoming call matches the last 7 digits of a<br />
directory entry, the name will be announced as it appears in the entry.<br />
The phone number will be announced when the name is unknown, private<br />
or not provided. Only the last 11 numbers of a phone number is announced.<br />
No information will be announced if both the name and number are private,<br />
unknown or not provided.<br />
This feature is not supported with headsets.<br />
This feature does not announce information for call waiting calls.<br />
If both home and cell lines are ringing, only the caller ID information of the<br />
first ringing line will be announced.<br />
It takes at least 2 rings for the phone to receive caller ID information and<br />
announce it. If the phone is answered before the end of the second ring, it<br />
will not have time to announce the caller ID information.<br />
Pronunciation of names may vary with this feature. Not all names may be<br />
pronounced correctly.<br />
Voice Announce ® is a registered trademark of ClassCo Inc.<br />
45<br />
SETTINGS<br />
Rename handset<br />
Key tone<br />
Dial tone<br />
Annc Caller ID<br />
BACK SELECT<br />
ANNC CALLER ID<br />
On<br />
Off<br />
BACK SET
Telephone settings<br />
Website<br />
You can use this feature to view the <strong>VTech</strong> website<br />
address.<br />
1.<br />
2.<br />
3.<br />
Home area code<br />
If you dial local calls using only seven digits (area code not required), you can<br />
program your home area code so that when you receive a call within your<br />
local area, the telephone number is automatically stored without the area<br />
code in the caller ID log.<br />
When you review the directory, call log or redial list, you can press # (pound<br />
key) repeatedly to show different dialing options before dialing.<br />
To change the setting:<br />
1.<br />
2.<br />
3.<br />
4.<br />
5.<br />
6.<br />
Press MENU on the handset when it is not in use.<br />
Press or to highlight Website, then press<br />
SELECT. The handset displays the <strong>VTech</strong> website.<br />
Press OK to exit.<br />
Press MENU on the handset when it is not in use.<br />
Press or to highlight Directory, then<br />
press SELECT.<br />
Press OPTION to choose Home.<br />
Press or to highlight Home area code, then<br />
press SELECT. The handset displays Only for 7<br />
digits dialing from Caller ID log.<br />
Use the dialing keys to enter the desired home area<br />
code.<br />
•<br />
•<br />
•<br />
Press MUTE/DELETE to erase a digit.<br />
Press and hold MUTE/DELETE to erase all digits.<br />
Press to move the cursor to the right or to the left.<br />
Press SET to save. The handset displays Area code will not show in<br />
Caller ID log. You hear a confirmation tone.<br />
46<br />
Bluetooth<br />
Ringers<br />
Set date/time<br />
Settings<br />
Website<br />
BACK SELECT<br />
www.<br />
vtechphones.com<br />
800-595-9511<br />
1-800-595-9511<br />
595-9511<br />
1-595-9511<br />
HOME AREA CODE<br />
BACK SET<br />
If, in the future, your telephone service provider requires you to dial 10 digits<br />
to make a local call (area code plus telephone number), you need to delete<br />
your home area code. With the home area code displayed, press<br />
MUTE/DELETE to delete the numbers, and then press SET. The home area<br />
code is now restored to its default setting of _ _ _ (empty).<br />
OK<br />
---
Telephone settings<br />
Cell area code<br />
Most cell phone entries are stored in a 10-digit format. If<br />
all of your cell phone entries are stored this way, you do<br />
not need to program your cell area code.<br />
If your cell phone stores entries in a 7-digit format, we<br />
recommend that you program your cell area code so that<br />
your 7-digit directory entries can be dialed correctly using<br />
your home line. While reviewing an entry in the caller ID<br />
log or directory, you can press # (pound key) repeatedly to<br />
see different dialing options before you dial or store<br />
the number.<br />
To change the setting:<br />
1. Press MENU on the handset when it is not in use.<br />
2. Press or to highlight Directory, then press SELECT.<br />
3. Press or to highlight a desired downloaded directory, then<br />
press OPTION.<br />
4. Press SELECT to choose Cell area code. The handset displays Only for<br />
7 digits dialing from Caller ID log.<br />
5. Use the dialing keys to enter the desired cell area code.<br />
6.<br />
•<br />
•<br />
•<br />
Press MUTE/DELETE to erase a digit.<br />
Press and hold MUTE/DELETE to erase all digits.<br />
Press to move the cursor to the right or to the left.<br />
Press SET to save. The handset displays Area code will not show in<br />
Caller ID log. You hear a confirmation tone.<br />
47<br />
800-595-9511<br />
1-800-595-9511<br />
595-9511<br />
1-595-9511<br />
CELL AREA CODE<br />
BACK SET<br />
---
Telephone settings<br />
Telephone base settings<br />
Telephone base ringer volume<br />
Press /VOL or /VOL on the side of telephone base to adjust the ringer<br />
volume when the telephone is not in use. When you set the ringer volume to<br />
zero, the base ringer is off and the system announces, “Base ringer is off.”<br />
Press /VOL during an incoming call to mute the ringer temporarily.<br />
See page 36 to set the handset ringer volume.<br />
Answering system settings<br />
Go to Answering system settings starting on page 81 for instructions on<br />
how to use a system handset to modify the answering system settings<br />
shown below.<br />
Setting Page<br />
Answer on/off 81<br />
Announcement (play, record and delete) 82-83<br />
Call screening 84<br />
Number of rings 85<br />
Remote access code 86<br />
Message alert tone 87<br />
Recording time 87<br />
48
Telephone operation<br />
Make, answer or end a home call<br />
Using a handset:<br />
To make a home call:<br />
1. Press /HOME/FLASH or , then enter the<br />
telephone number.<br />
2. Press on the headset to join the call. Hang up<br />
the handset at any time to leave the call and the<br />
headset continues the call.<br />
To predial a home call:<br />
1. Enter the telephone number, then press<br />
/HOME/FLASH or .<br />
2. Press on the headset to join the call. Hang up<br />
the handset at any time to leave the call and the<br />
headset continues the call.<br />
To answer a home call:<br />
•<br />
•<br />
Press /HOME/FLASH or .<br />
Press on the headset.<br />
To end a home call:<br />
•<br />
•<br />
Press OFF/CANCEL or put the handset in the telephone base or charger.<br />
Press on the headset or place the headset in the headset charger.<br />
•<br />
•<br />
•<br />
The screen shows the elapsed time as you talk (in hours, minutes<br />
and seconds).<br />
When predialing (preview numbers before dialing), press MUTE/DELETE<br />
to backspace and delete; press and hold REDIAL/PAUSE to insert a dialing<br />
pause (a p appears).<br />
You cannot answer a home call using your connected cell phone.<br />
Using a Bluetooth headset:<br />
You can use a Bluetooth headset on home calls. However, you will need to stay<br />
within 30 feet from the telephone base to maintain the Bluetooth signal.<br />
To answer a home call using a Bluetooth headset:<br />
• Press the call key on your headset.<br />
To end a home call you answered from a Bluetooth headset:<br />
• Press the call key on your headset.<br />
49
Telephone operation<br />
Make, answer or end a home call (continued)<br />
To transfer a call from a handset to a Bluetooth headset:<br />
If you make or answer a home call on a handset, you can transfer the call to<br />
your Bluetooth headset. The handset remains active, but the handset earpiece<br />
and microphone are muted. If you hang up the handset, the call will end.<br />
•<br />
•<br />
Press OPTION.<br />
Press or to choose Use BT headset, then press SELECT twice.<br />
The handset briefly displays Transferring audio to Headset A when the<br />
call is successfully transferred to the Bluetooth headset.<br />
•<br />
•<br />
•<br />
To transfer a call from the headset back to the handset:<br />
• Press OPTION, then press<br />
press SELECT.<br />
or to highlight Use handset and then<br />
To end a call that started at the handset:<br />
• Press OFF/CANCEL or put the handset in the telephone base or charger.<br />
•<br />
•<br />
If you answer a call from the Bluetooth headset, that call cannot be<br />
transferred to a handset.<br />
The handset will not show Use BT headset when the Bluetooth headset is<br />
already in use, or there are no active Bluetooth headsets on the device list.<br />
You cannot use a Bluetooth headset on cell calls.<br />
If you answer a call using a Bluetooth headset, and you lose the Bluetooth<br />
connection or the battery is depleted, the call will be lost.<br />
If you are using a Bluetooth headset for a call which is transferred from a<br />
handset, and you lose the Bluetooth connection or the battery of the headset<br />
is depleted, the call will be transferred back to the originating handset.<br />
Call waiting on the home line<br />
When you subscribe to call waiting service with your telephone service<br />
provider, you hear a beep if someone calls while you are already on a call.<br />
• Press /HOME/FLASH on the handset or press and hold MUTE/FLASH<br />
for two seconds on the headset to put your current call on hold and take<br />
the new call.<br />
• Press /HOME/FLASH on the handset or press and hold MUTE/FLASH<br />
for two seconds on the headset at any time to switch back and forth<br />
between calls.<br />
50
Telephone operation<br />
Make, answer or end a cell call<br />
You can connect a maximum of two Bluetooth enabled cell phones to the<br />
telephone base, but only one cell phone can be used on a cell call at a time. All<br />
handsets can be used to make or answer calls on the cell phone line.<br />
To make a cell call:<br />
1.<br />
2.<br />
3.<br />
Press /CELL.<br />
Enter the telephone number, then press DIAL.<br />
Press on the headset to join the call. Hang up the<br />
handset at any time to leave the call and the headset<br />
continues the call.<br />
- OR -<br />
1.<br />
2.<br />
Enter the telephone number, then press /CELL.<br />
Press on the headset to join the call. Hang up the handset at any time<br />
to leave the call and the headset continues the call.<br />
If you have only one cell phone connected to the telephone base, it is<br />
automatically selected to make cell calls. If you have two cell phones<br />
connected to the telephone base, the telephone system prompts you to select<br />
a cell phone before you make a cell call.<br />
To answer a cell call:<br />
1.<br />
2.<br />
Press /CELL.<br />
Press on the headset to join the call. Hang up the handset at any time<br />
to leave the call and the headset continues the call.<br />
To end a cell call:<br />
• Press OFF/CANCEL or put the handset in the telephone base or charger.<br />
Call waiting on the cell line<br />
When you subscribe to call waiting service with your cell phone service<br />
provider, you hear a beep if someone calls while you are already on a call.<br />
• Press /CELL on the handset or press and hold MUTE/FLASH for two<br />
seconds on the headset to put your current call on hold and take the<br />
new call.<br />
• Press /CELL on the handset or press and hold MUTE/FLASH for two<br />
seconds on the headset at any time to switch back and forth between calls.<br />
- OR -<br />
•<br />
•<br />
You can also use your cell phone to answer the call. If you answer with your<br />
cell phone, it will disconnect from the telephone base.<br />
Press SWAP to switch.<br />
To switch back, press OPTION. Press or to choose Swap, and then<br />
press SELECT.<br />
51
Telephone operation<br />
Answer a cell call while on a home call<br />
When you are on a home call and you receive an incoming cell call, you<br />
hear a beep, and 1 or 2 displays on the handset you are using. The<br />
telephone base and all other handsets ring.<br />
To answer the incoming cell call:<br />
• Press /CELL on the handset. The home call is automatically placed<br />
on hold and all other handsets display Home call on hold and<br />
Cell line in use alternately.<br />
To end the cell call:<br />
• Press OFF/CANCEL on the handset. The home line is still on hold. All<br />
handsets display Home call on hold.<br />
To resume the home call on hold:<br />
• Press /HOME/FLASH on the handset.<br />
Cell phone voicemail<br />
If you have voicemail service active on your cell phone, and you do not<br />
answer the incoming cell call, the call will be answered by your cell phone’s<br />
voicemail. Contact your cell phone service provider for more information<br />
about voicemail service.<br />
Answer a home call while on a cell call<br />
If you are on a cell call and you receive an incoming home call, you will hear<br />
a beep and displays on the handset you are using. The telephone base<br />
and all other handsets will ring.<br />
To answer the incoming home call:<br />
• Press /HOME/FLASH on the handset. The cell call is automatically<br />
placed on hold and all other handsets display Cell call on hold and<br />
Home line in use alternately.<br />
To end the home call:<br />
• Press OFF/CANCEL on the handset. The cell line is still on hold. All<br />
handsets display Cell call on hold.<br />
To resume the cell call on hold:<br />
• Press /CELL on the handset.<br />
If you have turned on your answering system and you do not answer the<br />
incoming home call, the call will be answered by your answering system.<br />
52
Telephone operation<br />
Conference home and cell calls<br />
When you have calls established on the home and cell lines, you can create<br />
a 3-way conference.<br />
To conference both home and cell calls:<br />
1.<br />
2.<br />
3.<br />
Press OPTION.<br />
Press or to highlight Conference.<br />
Press SELECT. The handset displays Lines now in conference.<br />
To select an option while on a conference call:<br />
1. Press OPTION.<br />
2. Press or to highlight one of the following options:<br />
• End Home line<br />
• End Cell line<br />
• End Conference<br />
• Directory<br />
• Caller ID log<br />
3. Press SELECT.<br />
To end a conference call:<br />
• Press OFF/CANCEL or put the handset back in the telephone base<br />
or charger.<br />
- OR -<br />
• Press OPTION, then press or to highlight End Conference. Press<br />
SELECT to end the conference.<br />
Using the home and cell lines together<br />
• You can be on two different calls using the cell line and home line at the<br />
same time using two handsets.<br />
• You cannot be on a call using the cell line and a Bluetooth headset via the<br />
home line at the same time. These are both Bluetooth devices and only<br />
one can be used at a time.<br />
•<br />
If you are on a call using the cell line, you cannot join the call using your<br />
paired cell phone. However, you can join the call using another handset.<br />
Your cell phone is being used for the phone call so only features that are<br />
normally available during a call can be used.<br />
53
Telephone operation<br />
Handset speakerphone<br />
During a call, press to switch between speakerphone and normal<br />
handset use.<br />
Volume control<br />
During a call, press VOL/ / or VOL/ /CID on the handset, or +/-/VOLUME<br />
on the side of the headset to adjust the listening volume. You hear an<br />
in-ear beep while adjusting. If you turn off the key tone, the in-ear beep will<br />
not be heard.<br />
If this is a cell call and the volume is too loud or quiet, try changing the<br />
volume on your cell phone. On some cell phones, changing the volume on<br />
the cell phone effects your cell call volume on the DS6472 handset.<br />
Silence the ringer<br />
When the telephone is ringing, you can temporarily silence the ringer of<br />
the handset or headset without disconnecting the call. The next call rings<br />
normally at the preset volume.<br />
To silence the handset ringer:<br />
• Press SILENCE, OFF/CANCEL or MUTE/DELETE on the handset and<br />
Ringer muted appears.<br />
To silence the headset ringer:<br />
• Press MUTE/FLASH on the headset.<br />
To silence the telephone base ringer:<br />
Press /VOL during an incoming call to mute the ringer temporarily.<br />
Mute<br />
The mute function turns off the microphone. You can hear the caller, but the<br />
caller cannot hear you.<br />
On a handset:<br />
• During a call, press MUTE/DELETE to turn off the microphone. The<br />
handset shows Microphone off briefly and MUTE appears until the mute<br />
function is turned off.<br />
•<br />
Press MUTE/DELETE again to resume the conversation. The handset<br />
briefly shows Microphone on.<br />
On a headset:<br />
• During a call, press MUTE/FLASH. The headset announces, “Mute on.” The<br />
headset beeps every 30 seconds until the mute function is turned off.<br />
•<br />
Press MUTE/FLASH again to resume the conversation. The headset<br />
announces, “Mute off.”<br />
54
Telephone operation<br />
Temporary tone dialing<br />
If you have pulse (rotary) service only, you can switch from pulse to touch-tone<br />
dialing temporarily during a call. This is useful if you need to send touch-tone<br />
signals to access your telephone banking or long distance services.<br />
During a call:<br />
1.<br />
2.<br />
3.<br />
Press .<br />
Use the dialing keys to enter the relevant number. The telephone sends<br />
touch-tone signals.<br />
The telephone automatically returns to pulse dialing mode after you end<br />
the call.<br />
Hold<br />
You can place a home or cell call on hold. You will hear an alert tone if you<br />
have not taken the call off of hold after 14 minutes. You will hear another<br />
alert tone 30 seconds later. At 15 minutes on hold, the call on hold<br />
automatically disconnects.<br />
To place a home call on hold:<br />
• Press HOLD. Home call on hold appears and /HOME/FLASH flashes.<br />
To resume a home call on hold:<br />
• Press /HOME/FLASH.<br />
To place a cell call on hold:<br />
• Press HOLD. Cell call on hold appears and /CELL flashes.<br />
To resume a cell call on hold:<br />
• Press /CELL.<br />
Handset/headset locator<br />
This feature helps you find misplaced handsets and headset.<br />
To start paging:<br />
• Press /FIND HANDSET on the telephone<br />
base when it is not in use. All idle handsets<br />
and headset ring; the handsets display<br />
** Paging ** and the light on the headset<br />
flashes in blue.<br />
To end paging:<br />
• Press /FIND HANDSET on the telephone base.<br />
- OR -<br />
•<br />
Press /HOME/FLASH, /CELL, , PUSH TO TALK, REDIAL/PAUSE,<br />
or any dialing key (0-9, # or<br />
the headset.<br />
) on the handset, or press on<br />
55
Telephone operation<br />
Equalizer<br />
The equalizer feature on the handset enables you to change the quality of the<br />
handset audio to best suit your hearing. While on a call, an intercom, a PTT<br />
session, or listening to a message or announcement, press to select<br />
the equalizer setting Treble 1, Treble 2, Bass or Natural (the default setting)<br />
for the handset. You hear an in-ear beep while adjusting. If you turn off the<br />
key tone, the in-ear beep will not be heard. The current setting is shown on<br />
the handset for two seconds.<br />
•<br />
•<br />
•<br />
The equalizer feature does not apply to the speakerphone on the telephone<br />
base or the connected Bluetooth headset.<br />
If you switch the call between the handset and the speakerphone by<br />
pressing , the audio setting remains unchanged.<br />
The current equalizer setting remains unchanged until a new setting<br />
is selected.<br />
Transfer a call<br />
While on an outside call, you can transfer the call from one handset to another.<br />
1. Press OPTION, then press SELECT to highlight Transfer.<br />
• If you have two handsets, your handset displays Transferring call<br />
to HANDSET X. The destination handset rings and displays Home<br />
Transfer from other handset.<br />
• If you have three or more handsets, your handset displays TRANSFER<br />
TO: and a list of registered handsets. Press or to highlight a<br />
2.<br />
destination handset and then press SELECT. Your handset displays<br />
Transferring call to HANDSET X, or Transferring call to all...<br />
when you choose All handsets. The destination handset rings and<br />
displays Home Transfer from HANDSET X or Home Transfer from<br />
HANDSET X to all.<br />
Your handset displays Call transferred when the other handset picks up<br />
the call. You hear a confirmation tone.<br />
•<br />
If the destination handset does not answer within 30 seconds, the<br />
originating handset displays No response to transfer and rings. If the<br />
originating handset does not answer the call on hold within 30 seconds, the<br />
call will end automatically.<br />
56
Telephone operation<br />
Chain dialing<br />
Use this feature to initiate a dialing sequence from numbers stored in the<br />
directory, caller ID log or redial while you are on a call.<br />
Chain dialing can be useful if you wish to access other numbers (such as<br />
bank account numbers or access codes) from the directory, caller ID log or<br />
redial list.<br />
To access a number in the directory while on a call:<br />
1.<br />
2.<br />
3.<br />
4.<br />
5.<br />
Press OPTION.<br />
Press or to highlight Directory, then press SELECT.<br />
Press or to highlight a desired directory, then press REVIEW.<br />
Press or to scroll to the desired entry, or perform an alphabetical<br />
search (page 70).<br />
Press DIAL to dial the displayed number.<br />
To access a number in the caller ID log while on a call:<br />
1.<br />
2.<br />
3.<br />
4.<br />
5.<br />
Press OPTION.<br />
Press or to highlight Caller ID log, then press SELECT.<br />
Press or to highlight a desired directory, then press REVIEW.<br />
Press or to scroll to the desired entry.<br />
Press DIAL to dial the displayed number.<br />
To access the redial list while on a call:<br />
1.<br />
2.<br />
Press REDIAL/PAUSE.<br />
Press , or REDIAL/PAUSE repeatedly until the desired number<br />
displays, then press DIAL to dial the displayed number.<br />
•<br />
•<br />
•<br />
•<br />
You cannot edit a directory entry while on a call. For more details about the<br />
directory, see page 68.<br />
You cannot copy a caller ID log entry into the directory while on a call. For<br />
more details about caller ID log, see page 76.<br />
You can only view the numbers in the directory, caller ID log or redial while<br />
on a call and cannot erase any entries.<br />
While on a call, press OFF/CANCEL to exit the directory, caller ID log or<br />
redial list.<br />
57
Telephone operation<br />
Redial list<br />
The redial list stores up to 10 of the most recently dialed numbers on<br />
each handset.<br />
When there are already 10 entries, the oldest entry is deleted to make<br />
room for the new entry. Entries are shown in reverse chronological order.<br />
Review the redial list<br />
1.<br />
2.<br />
Press REDIAL/PAUSE when the handset is not<br />
in use.<br />
Press , or REDIAL/PAUSE to browse. You hear<br />
a double beep when you reach the beginning or<br />
end of the redial list.<br />
Dial a redial entry<br />
1.<br />
2.<br />
3.<br />
Press REDIAL/PAUSE when the handset is not in use.<br />
Press , or REDIAL/PAUSE to browse until the desired<br />
number displays.<br />
Press /HOME/FLASH or to use the home line.<br />
- OR -<br />
Press /CELL to use the cell line.<br />
58
Telephone operation<br />
Save a redial entry to the directory<br />
1.<br />
2.<br />
3.<br />
4.<br />
Press REDIAL/PAUSE when the handset is not in use.<br />
Press , or REDIAL/PAUSE to select the desired number.<br />
Press SAVE.<br />
The handset displays EDIT NUMBER. Use the dialing keys to edit the<br />
number, if necessary.<br />
•<br />
•<br />
•<br />
•<br />
Press MUTE/DELETE to erase a digit.<br />
Press and hold MUTE/DELETE to erase all digits.<br />
Press to move the cursor to the right or to the left.<br />
Press and hold REDIAL/PAUSE to insert a dialing pause (a p appears).<br />
5. Press NEXT.<br />
6. Press or to highlight one of the following types:<br />
• Home<br />
• Cell<br />
• Work<br />
• Other<br />
7. Press NEXT. The handset displays ENTER NAME. Use the dialing keys<br />
to enter a name.<br />
• Press MUTE/DELETE to erase a character.<br />
• Press and hold MUTE/DELETE to erase all characters.<br />
• Press to move the cursor to the right or to the left.<br />
8. Press SAVE and then Saved displays. You hear a confirmation tone.<br />
Delete a redial entry<br />
1.<br />
2.<br />
3.<br />
Press REDIAL/PAUSE when the handset is not in use.<br />
Press , or REDIAL/PAUSE to select the desired number.<br />
Press MUTE/DELETE to delete the displayed number. You hear a<br />
confirmation tone.<br />
59
Multiple handset use<br />
Share an outside call<br />
You can use up to four system handsets on an outside call at a time.<br />
While on a call:<br />
• Press /HOME/FLASH or on another handset, or on the headset to<br />
join the call.<br />
- OR -<br />
• Press OPTION during an intercom call, then press<br />
Share call. Press SELECT.<br />
or to highlight<br />
Intercom<br />
Use the intercom feature for conversations between two system handsets, or<br />
a handset and a headset. Only one intercom call can be established at a time.<br />
To initiate an intercom call:<br />
1.<br />
2.<br />
Press MENU on the handset when it is not in use.<br />
Press or to highlight Intercom, then<br />
press SELECT.<br />
• If you have two handsets, your handset displays<br />
Calling other handset. The destination handset<br />
rings and displays Other handset is calling.<br />
• If you have one handset and one headset, your<br />
handset displays Calling HEADSET.<br />
• If you have three or more handsets and/or headsets,<br />
your handset displays INTERCOM and a list of<br />
registered handsets.<br />
◊ Press or to highlight a destination<br />
handset or headset and then press SELECT.<br />
Your handset displays Calling HANDSET X,<br />
Calling HEADSET X or Calling all handsets<br />
when you choose All handsets.<br />
- OR -<br />
◊ Use the dialing keys to enter a destination handset number (1-9 for<br />
handsets 1-9, and 0 for handset 10, and 1 for handset<br />
11, and 2 for handset 12, and # for all handsets, # and 1<br />
for headset 1 or # and 2 for headset 2).<br />
The destination handset rings and displays HANDSET X is calling,<br />
or HANDSET X is calling all when you choose all handsets, or the<br />
headset earpiece rings and the light flashes in blue.<br />
60<br />
Play messages<br />
Answering sys<br />
Directory<br />
Caller ID log<br />
Intercom<br />
BACK SELECT<br />
INTERCOM<br />
HANDSET A 2<br />
HANDSET B 3<br />
HANDSET C 4<br />
All handsets<br />
BACK SELECT
Multiple handset use<br />
Intercom (continued)<br />
To answer an intercom call at the destination handset:<br />
• Press /HOME/FLASH or . Both handsets show Intercom.<br />
• Press on the headset. The originating handset displays Intercom.<br />
To silence an intercom call:<br />
• Press OFF/CANCEL, MUTE/DELETE or SILENCE on the destination<br />
handset. Its screen displays Ringer muted for a few seconds.<br />
To end an intercom call:<br />
• Press OFF/CANCEL, END or place either handset back in the telephone<br />
base or charger. Both handsets display Intercom ended.<br />
• Press or place the headset in the headset charger. The originating<br />
handset displays Intercom ended.<br />
•<br />
•<br />
•<br />
You can cancel the intercom call before it is answered by pressing<br />
OFF/CANCEL or END on your handset.<br />
If you are calling all devices, the quickest device will answer the<br />
intercom call.<br />
If the destination handset does not answer the intercom call within<br />
100 seconds, is in the directory or caller ID log, or is out of range, the<br />
originating handset displays No answer. Try again. and returns to<br />
idle mode.<br />
Answer an incoming call during an intercom call<br />
When you receive an incoming home call during an intercom call, there is<br />
an alert tone and Home Incoming call and then the caller ID display on<br />
screens. The telephone base and all other handsets and headset ring.<br />
• Press /HOME/FLASH on the handset or press and hold MUTE/DELETE<br />
for two seconds on the headset to answer the home call. The intercom call<br />
ends automatically.<br />
• Press OFF/CANCEL on the handset or press on the headset to end<br />
the intercom call without answering the incoming call. The telephone<br />
continues to ring.<br />
When you receive an incoming cell call during an intercom call, there is an<br />
alert tone and Cell Incoming call and then the caller ID display on screens.<br />
The telephone base and all other handsets ring.<br />
• Press /CELL on the handset or press and hold MUTE/DELETE for<br />
two seconds on the headset to answer the cell call. The intercom call<br />
ends automatically.<br />
• Press OFF/CANCEL on the handset or press on the headset to end<br />
the intercom call without answering the incoming call. The telephone<br />
continues to ring.<br />
61
Multiple handset use<br />
Transfer a call using intercom<br />
You can use the intercom feature to transfer an outside<br />
call to other system handsets or headset.<br />
1.<br />
2.<br />
3.<br />
4.<br />
When on an outside call, press OPTION.<br />
Press or to highlight Intercom, then press<br />
SELECT. The call is automatically put on hold.<br />
• If you have one handset and one headset, your<br />
handset displays Calling HEADSET.<br />
• If you have two handsets, your handset displays<br />
Calling other handset. The destination handset<br />
rings and displays Other handset is calling.<br />
• If you have three or more handsets, your handset<br />
displays INTERCOM and a list of registered handsets.<br />
◊<br />
◊<br />
Press or to highlight a destination handset<br />
and then press SELECT. Your handset displays<br />
Calling HANDSET X, Calling HEADSET X, or Calling all handsets<br />
when you choose All handsets.<br />
- OR -<br />
Use the dialing keys to enter a destination handset number (1-9 for<br />
handsets 1-9, and 0 for handset 10, and 1 for handset 11,<br />
and 2 for handset 12, and # for all handsets, # and 1 for<br />
headset 1 or # and 2 for headset 2).<br />
When the destination handset answers the intercom call, both handsets<br />
show Intercom.<br />
From this intercom call, you have the following options:<br />
• You can transfer the call. Press OPTION and then press SELECT to<br />
choose Transfer. Your handset shows Call transferred. The other<br />
handset automatically connects to the outside call.<br />
• You can let the other handset join you on the outside call in a three-way<br />
conversation. Press OPTION. Press<br />
your handset, then press SELECT.<br />
or to highlight Share call on<br />
• Either person can press the appropriate line key ( /HOME/FLASH<br />
or /CELL) on the handset to take the held outside call, or press<br />
OFF/CANCEL or END to end the intercom call (the outside call will<br />
automatically go off hold on the handset that did not hang up).<br />
•<br />
•<br />
If you want to cancel an intercom call and reconnect to the outside call<br />
before the destination handset answers, press OFF/CANCEL or END on the<br />
originating handset.<br />
If the destination handset does not answer the intercom call within 100<br />
seconds, is in the directory or caller ID log, or is out of range, the originating<br />
handset displays No answer. Try again. and returns to the outside call.<br />
62<br />
Directory<br />
Caller ID log<br />
Intercom<br />
Bluetooth<br />
Ringers<br />
BACK SELECT<br />
INTERCOM<br />
HANDSET A 2<br />
HANDSET B 3<br />
HANDSET C 4<br />
All handsets<br />
BACK SELECT
Multiple handset use<br />
Push-to-talk (PTT)<br />
You can directly broadcast messages from one handset to the<br />
speakerphone of one or a group of handsets. Press and hold<br />
PUSH TO TALK to begin two-way communication . If only one<br />
handset is available or registered, the handset screen shows<br />
PTT requires two handsets when you press PUSH TO TALK.<br />
• Only one handset can talk at a time. To do so,<br />
press and hold PUSH TO TALK while you are speaking.<br />
• You must release PUSH TO TALK, so the other person<br />
can respond.<br />
• Only one PTT session can be active at a time.<br />
• While PTT is in use between handsets, other handsets<br />
cannot use the intercom feature.<br />
• If you attempt to place a PTT call to another handset that<br />
is on an outside call or intercom call, or accessing the<br />
answering system, your handset displays Not available at<br />
this time.<br />
PTT on/off<br />
You can turn PTT on or off on each handset.<br />
To turn PTT on or off:<br />
1. Press PUSH TO TALK when the handset is not in use.<br />
The PUSH TO TALK menu displays.<br />
2. Press or to highlight PTT On/Off, then<br />
press SELECT.<br />
3. Press or to choose On or Off, then press<br />
SELECT to save. You hear a confirmation tone.<br />
When PTT is turned off, the handset shows<br />
No Incoming PTT while the phone is not in use.<br />
63<br />
PUSH TO TALK<br />
HANDSET A 2<br />
HANDSET B 3<br />
All handsets<br />
PTT On/Off<br />
BACK SELECT<br />
INCOMING PTT<br />
On<br />
Off<br />
BACK SELECT
Multiple handset use<br />
PTT to a single handset<br />
1. You have two ways to begin a PTT call:<br />
• If you have two handsets, press and hold PUSH TO TALK when<br />
handset is not in use.<br />
• If you have three or more handsets, press PUSH TO TALK when the<br />
handset is not in use. Then use the dialing keys to enter a handset<br />
number (1-9 for handsets 1-9, and 0 for handset 10, and<br />
1 for handset 11 or and 2 for handset 12), or press or to<br />
2.<br />
scroll to the desired handset then press SELECT. Press SELECT or<br />
PUSH TO TALK to create the push-to-talk session.<br />
Your handset displays Connecting to HANDSET X... for a few seconds.<br />
When the connection is made, both your and the destination handsets<br />
display Press and hold [PTT] to talk and beep once.<br />
Press and hold PUSH TO TALK on your handset. A chirp indicates your<br />
microphone is on. Speak towards the handset. Your voice is broadcast<br />
to the destination handset. While you are speaking, the handset displays<br />
PTT To HANDSET X (X represents the destination handset number).<br />
3. Release PUSH TO TALK after speaking. All handsets beep once again.<br />
After the handsets beep, you can press and hold PUSH TO TALK to<br />
continue speaking or the destination handsets can respond (see<br />
Answer a PTT call on page 66).<br />
4. Press OFF/CANCEL or END to end the PTT call. The handset displays<br />
Push to talk Ended for a few seconds.<br />
- OR -<br />
Place the handset in the telephone base or charger to end the PTT call.<br />
After PUSH TO TALK is released, the PTT call remains open for a short<br />
time. If no one presses PUSH TO TALK within 10 seconds, the PTT call<br />
ends automatically.<br />
64
Multiple handset use<br />
PTT to multiple handsets<br />
When there are multiple handsets registered to the telephone system, PTT<br />
supports one-to-group calls. PTT supports a maximum of one-to-four calls<br />
when one to five handsets are registered, and a maximum of one-to-three<br />
calls when six or more handsets are registered. The first four registered<br />
handsets will be able to use this feature. Other handsets can only use PTT<br />
for one-to-one calls.<br />
1. To begin a PTT call to multiple handsets:<br />
2.<br />
3.<br />
4.<br />
•<br />
•<br />
Press and hold PUSH TO TALK when the handset is not in use.<br />
If you have three or more handsets, press PUSH TO TALK when the<br />
handset is not in use. Press and #, or press or to highlight<br />
All handsets then press SELECT or PUSH TO TALK.<br />
Your handset displays Connecting to all handsets... for a few seconds.<br />
When the connection is made, both your and the destination handsets<br />
display Press and hold [PTT] to talk and beep once.<br />
Press and hold PUSH TO TALK on your handset. A chirp indicates your<br />
microphone is on. Speak towards the handset. Your voice is broadcast to<br />
the destination handset.<br />
While you are speaking, the handset displays PTT To handset: X<br />
(X represents the destination handset; a maximum of four handset<br />
numbers appear).<br />
Release PUSH TO TALK after speaking. All eligible handsets beep<br />
once again. After the handsets beep, you can press and hold<br />
PUSH TO TALK to continue speaking or the destination handsets can<br />
respond (see Answer a PTT call on page 66).<br />
Press OFF/CANCEL or END to end the PTT call. The handset displays<br />
Push to talk Ended for a few seconds.<br />
- OR -<br />
Place the handset in the telephone base or charger to end the PTT call.<br />
After PUSH TO TALK is released, the PTT call remains open for a short time.<br />
If no one presses PUSH TO TALK within 10 seconds, the PTT call<br />
ends automatically.<br />
65
Multiple handset use<br />
Answer a PTT call<br />
You can respond to a PTT call whenever the speakerphone light is off, as<br />
described below.<br />
1. When your handset receives a PTT call, the handset beeps and displays<br />
Press and hold [PTT] to talk.<br />
2. When the other party is speaking, your speakerphone light is on, and your<br />
handset displays PTT From HANDSET X To handset: Y (X represents<br />
the originating handset and Y represents the destination handset; a<br />
maximum of four handset numbers appear).<br />
3. When your speakerphone light is off and the handset displays Press and<br />
hold [PTT] to talk, press and hold PUSH TO TALK on your handset.<br />
When you hear a chirp, speak towards the handset.<br />
• While you are speaking, your handset displays PTT To HANDSET X<br />
(X represents the handset numbers of one or more destination<br />
handsets; a maximum of four handset numbers appear).<br />
• Your voice is broadcast to all destination handsets.<br />
After speaking, release PUSH TO TALK. Your handset will beep. After the beep,<br />
if your speakerphone light is off, you can press and hold PUSH TO TALK to<br />
speak again or the destination handset can respond.<br />
Change a one-to-one PTT to intercom call<br />
You can convert a one-to-one PTT session to an intercom call.<br />
1. When your handset displays Press and hold [PTT] to talk, press<br />
INTCOM. Your handset displays Switch to Intercom? Press SELECT<br />
to confirm.<br />
• If you have two handsets, your handset displays Calling other handset.<br />
The destination handset temporarily displays Push to talk Ended and<br />
then Other handset is calling.<br />
• If you have three or more handsets, your handset displays Calling<br />
HANDSET Y (Y represents the destination handset). The destination<br />
handset temporarily displays Push to talk Ended and then Handset X<br />
is calling (X represents the originating handset).<br />
2. On the destination handset, press /HOME/FLASH or to answer the<br />
3.<br />
intercom call. Both handsets now display Intercom.<br />
To end the intercom call, press OFF/CANCEL, END, or place the handset in<br />
the telephone base or charger. Both handsets display Intercom ended.<br />
66
Multiple handset use<br />
End a PTT call<br />
•<br />
•<br />
For a one-to-one PTT call, both the originating and destination handsets<br />
can end the PTT call.<br />
For a PTT call to multiple handsets, the originating handset can end the<br />
PTT call. If any one of the destination handsets leaves the PTT call, the<br />
call continues until all participants or the initiator hangs up.<br />
To end or leave a PTT call:<br />
Press OFF/CANCEL, END, or place the handset in the telephone base or<br />
charger. The handset displays Push to talk Ended.<br />
After PUSH TO TALK is released, the PTT call remains open for a short time.<br />
If no one presses PUSH TO TALK within 10 seconds, the PTT call<br />
ends automatically.<br />
Answer an incoming call during a PTT call<br />
When you receive an incoming outside call during a PTT session, there is an<br />
alert tone. The PTT screen and the caller ID information display alternately.<br />
• During a one-to-one PTT, press /HOME/FLASH or /CELL on the<br />
originating or destination handset. The PTT call ends automatically and<br />
the outside call is answered.<br />
• During a PTT call to multiple handsets, press /HOME/FLASH or /CELL<br />
on the originating handset. The PTT call ends automatically and the<br />
outside call is answered.<br />
• During a PTT call to multiple handsets, press /HOME/FLASH or /CELL<br />
•<br />
on any one of the destination handsets and that handset answers the<br />
outside call. The PTT call continues for the rest of the PTT participants.<br />
To leave the PTT call without answering the incoming call, press<br />
OFF/CANCEL. The telephone continues to ring.<br />
Make an outgoing call during a PTT call<br />
• During a one-to-one PTT call, press /HOME/FLASH or /CELL to get a<br />
•<br />
dial tone. The PTT call ends automatically.<br />
During a PTT call to multiple handsets, press /HOME/FLASH or /CELL<br />
on the originating handset. The PTT call ends automatically and you get a<br />
dial tone.<br />
• During a PTT call to multiple handsets, press /HOME/FLASH or /CELL<br />
on any one of the destination handsets and that handset gets a dial tone.<br />
The PTT call continues for the rest of the PTT participants.<br />
67
Directory<br />
About the directory<br />
Your phone directory consists of a home directory and up to four directories<br />
downloaded from cell phones. The home directory stores up to 200 entries<br />
with up to 30 digits for each phone number and 15 characters for each name.<br />
Each downloaded directory stores up to 1,500 entries with up to 30 digits for<br />
each phone number and 15 characters for each name.<br />
• Directory entries are stored at the telephone base and shared by all<br />
system handsets. Any changes made on one handset apply to all.<br />
• Only one handset can review the directory at a time. If another handset<br />
tries to enter the directory, it shows Not available at this time.<br />
• When you access the directory with no records, the handset shows<br />
Directory empty.<br />
• When the directory is full and you try to save an entry, the handset shows<br />
Directory full.<br />
•<br />
When you try to save a number already stored in the directory, the<br />
handset shows Already saved.<br />
All of the instructions on pages 69-74 for the directories apply to the home<br />
directory and all downloaded directories. Creating a new entry on page 69<br />
only applies to the home directory.<br />
You cannot create new entries in your downloaded directories from the<br />
DS6472 handset. Entries must be downloaded from your cell phone<br />
(see Download directory on page 32).<br />
68
Directory<br />
Create a new entry in the home directory<br />
1.<br />
2.<br />
3.<br />
4.<br />
5.<br />
Press MENU on the handset when it is not in use.<br />
Press or to highlight Directory, then press SELECT.<br />
Press OPTION to select Home.<br />
Press or to highlight Add contact, then press SELECT. The<br />
handset displays ENTER NUMBER.<br />
Use the dialing keys to enter a telephone number (up to 30 digits).<br />
• Press MUTE/DELETE to erase a digit.<br />
• Press and hold MUTE/DELETE to erase all digits.<br />
• Press to move the cursor to the right or to the left.<br />
• Press and hold REDIAL/PAUSE to insert a dialing pause (a p appears).<br />
- OR -<br />
Copy a number from the redial list.<br />
i. Press REDIAL/PAUSE and then<br />
to the desired number.<br />
, or REDIAL/PAUSE to browse<br />
ii. Press INSERT to copy the displayed number.<br />
6. Press NEXT.<br />
7. Press or to highlight one of the following types:<br />
• Home<br />
• Cell<br />
• Work<br />
• Other<br />
8. Press NEXT. The handset displays ENTER NAME.<br />
9. Use the dialing keys to enter the name (up to 15 characters). Additional<br />
key presses show other characters of that particular key. Press the key<br />
repeatedly until the desired character appears. The first character and the<br />
character after a space are automatically capitalized.<br />
• Press MUTE/DELETE to erase a character.<br />
• Press and hold MUTE/DELETE to erase all characters.<br />
• Press to move the cursor to the right or to the left.<br />
10. Press SAVE and then the handset shows Saved. You hear a<br />
confirmation tone.<br />
You cannot create new entries in your downloaded directories from your<br />
DS6472 handsets. Entries must be downloaded from your cell phone<br />
(see Download directory on page 32).<br />
69
Directory<br />
Review the directory<br />
Entries are sorted alphabetically.<br />
To review the directory:<br />
1. Press VOL/ / when the handset is not in use.<br />
2. Press or to choose a directory, then press REVIEW.<br />
3. Press or to browse.<br />
- OR -<br />
1. Press MENU on the handset when it is not in use.<br />
2. Press or to highlight Directory, then press SELECT.<br />
3. Press or to choose a directory, then press REVIEW.<br />
4. Press or to browse.<br />
- OR -<br />
1. Press OPTION while on a call.<br />
2. Press or to highlight Directory, then press SELECT.<br />
3. Press or to choose a directory, then press REVIEW.<br />
4. Press or to browse.<br />
3-character alphabetical search<br />
You can use the enhanced 3-character search to find your contacts<br />
quickly and efficiently.<br />
To start a search:<br />
1.<br />
2.<br />
When the desired entry displays, press # (pound key) repeatedly to show<br />
different dialing options.<br />
Follow the steps in Review the directory above to enter the directory.<br />
When an entry appears, use the dialing keys to enter the letters<br />
associated with the name. You can enter up to three letters for the search.<br />
If there is no name matching the letters entered, the next closest match in<br />
alphabetical order appears. If necessary, use or to browse.<br />
The cursor automatically moves to the next position in two seconds after<br />
you enter a letter. If you do not enter another letter within two seconds, the<br />
handset starts searching.<br />
70
Directory<br />
Dial a directory entry<br />
You can dial a directory entry on either a home or cell line.<br />
To dial a directory entry:<br />
1. Search for the desired entry in the directory (see Review the directory or<br />
3-character alphabetical search on page 70).<br />
2. When the desired entry appears, press # (pound key)<br />
repeatedly to show different dialing options.<br />
800-595-9511<br />
1-800-595-9511<br />
3. When the displayed number is in the correct format,<br />
press /HOME/FLASH or to use the home line, or<br />
/CELL to use the cell line.<br />
595-9511<br />
1-595-9511<br />
Edit a directory entry<br />
You may edit any directory entry. However, be aware that if you download<br />
from a cell phone again, the directory will be erased and replaced with the<br />
current cell phone directory. If you have edited the downloaded entries on the<br />
DS6472, those changes will be lost.<br />
1. Search for the desired entry in the directory (see Review the directory or<br />
3-character alphabetical search on page 70).<br />
2. When the desired entry appears, press EDIT. The handset shows<br />
EDIT NUMBER.<br />
3. Use the dialing keys to edit the number.<br />
• Press MUTE/DELETE to erase a digit.<br />
• Press and hold MUTE/DELETE to erase all digits.<br />
• Press to move the cursor to the right or to the left.<br />
• Press and hold REDIAL/PAUSE to insert a dialing pause (a p appears).<br />
4. Press NEXT.<br />
5. Press or to highlight one of the following types:<br />
• Home<br />
• Cell<br />
• Work<br />
• Other<br />
6. Press NEXT. The handset displays EDIT NAME.<br />
7. Use the dialing keys to edit the name.<br />
• Press MUTE/DELETE to erase a character.<br />
• Press and hold MUTE/DELETE to erase all characters.<br />
• Press to move the cursor to the right or to the left.<br />
8. Press SAVE and then the handset shows Saved.<br />
71
Directory<br />
Edit the type of a directory entry<br />
If you only want to edit the type of a directory entry:<br />
1. Search for the desired entry in the directory (see Review the directory or<br />
3-character alphabetical search on page 70).<br />
2. When the desired entry appears, press LABEL. Enter the corresponding<br />
shortcut keys shown in the below table.<br />
Type: Press:<br />
Home 1<br />
Cell 2<br />
Work 3<br />
Other 4<br />
- OR -<br />
Press CLEAR to erase the assigned label.<br />
Delete a directory entry<br />
Once a directory entry is deleted, it cannot be retrieved.<br />
To delete an entry:<br />
1. Search for the desired entry in the directory (see Review the directory or<br />
3-character alphabetical search on page 70).<br />
2. When the desired entry appears, press MUTE/DELETE. The handset<br />
displays Delete contact? and the name of the entry. Press YES<br />
to confirm.<br />
3. The handset displays Contact deleted and then the next alphabetical<br />
entry in the directory. You hear a confirmation tone.<br />
Remove a downloaded directory<br />
1.<br />
2.<br />
3.<br />
4.<br />
Search for a desired downloaded directory in the directory menu (see<br />
Review the directory on page 70).<br />
When the desired downloaded directory is chosen, press OPTION, then<br />
press or to highlight Remove dir.<br />
Press SELECT. The handset displays Directory CELL PHONE A will be<br />
erased. Press YES to confirm.<br />
The handset displays Erasing directory... and then Directory removed.<br />
You hear a confirmation tone.<br />
72
Directory<br />
Speed dial<br />
You can copy 10 of your directory entries to the speed dial slots (0-9). The<br />
speed dial entries are shared by all handsets.<br />
Assign a speed dial slot<br />
1.<br />
2.<br />
3.<br />
4.<br />
5.<br />
6.<br />
Press MENU on handset when it is not in use.<br />
Press or to highlight Directory, then press SELECT.<br />
Press or to highlight Speed dial, then press REVIEW.<br />
Press or to highlight an empty slot, then press ASSIGN.<br />
Press or to highlight the desired directory, then press REVIEW.<br />
Search for the desired entry in the directory (see Review the directory or<br />
3-character alphabetical search on page 70). When the desired entry<br />
appears, press ASSIGN. You hear a confirmation tone.<br />
Reassign a speed dial slot<br />
1.<br />
2.<br />
3.<br />
4.<br />
5.<br />
6.<br />
7.<br />
Press MENU on handset when it is not in use.<br />
Press or to highlight Directory, then press SELECT.<br />
Press or to highlight Speed dial, then press REVIEW.<br />
Press or to highlight the desired slot.<br />
Press ASSIGN. The handset displays the directory at the current<br />
assigned entry.<br />
Search for the desired entry in the directory (see Review the directory or<br />
3-character alphabetical search on page 70). When the desired entry<br />
appears, press ASSIGN.<br />
The handset displays Entry B replaces Entry A Accept? Press YES to<br />
confirm. You hear a confirmation tone.<br />
Dial a speed dial entry<br />
1.<br />
2.<br />
Press and hold a desired speed dial slot (0-9).<br />
Press /HOME/FLASH or to use the home line, or /CELL to use the<br />
cell line.<br />
73
Directory<br />
Delete a speed dial entry<br />
1.<br />
2.<br />
3.<br />
4.<br />
5.<br />
Press MENU on handset when it is not in use.<br />
Press or to highlight Directory, then press SELECT.<br />
Press or to highlight Speed dial, then press REVIEW.<br />
Press or to highlight an assigned slot, then press MUTE/DELETE.<br />
The handset displays Delete Entry A Speed dial assignment?<br />
Press YES to confirm. You hear a confirmation tone.<br />
Deleting speed dial entries does not affect the directory entries.<br />
74
Caller ID<br />
About caller ID<br />
This product supports caller ID services provided by most telephone service<br />
providers. Depending on your service subscription, you may see the caller’s<br />
number, or the caller’s name and number from the telephone service provider after<br />
the first or second ring. Caller ID from the home line allows you to see the name,<br />
number, date and time of the incoming calls. The caller ID may appear differently<br />
if the caller is matched to a directory entry (see Memory match on page 76).<br />
Information about caller ID with call waiting<br />
Caller ID with call waiting lets you see the name and telephone number of the<br />
caller before answering the telephone, even while on another call.<br />
It may be necessary to change your telephone service to use this feature.<br />
Contact your telephone service provider and cell phone service provider if:<br />
•<br />
•<br />
•<br />
You have both caller ID and call waiting, but as separate services (you<br />
may need to combine these services).<br />
You have only caller ID service, or only call waiting service.<br />
You do not subscribe to any caller ID or call waiting services.<br />
There are fees for caller ID services. In addition, services may not be<br />
available in all areas.<br />
This product can provide information only if both you and the caller are in<br />
areas offering caller ID service and if both telephone service providers use<br />
compatible equipment. The time and date are sent by your telephone service<br />
provider along with the call information.<br />
You can use this product with regular caller ID service, or you can use this<br />
product’s other features without subscribing to either caller ID or combined<br />
caller ID with call waiting service.<br />
75
Caller ID<br />
Caller ID history<br />
If you subscribe to caller ID service provided by your telephone service<br />
provider and/or cell phone service provider, information about each caller<br />
appears after the first or second ring. If you answer a call before the caller<br />
information appears on the screen, it will not be saved in the caller ID log.<br />
•<br />
•<br />
•<br />
•<br />
•<br />
•<br />
•<br />
•<br />
The home line and each cell phone paired to the DS6472 have their own<br />
caller ID log.<br />
The caller ID log stores up to 50 entries. Each entry has up to 15 digits<br />
for the phone number and 15 characters for the name. If the name has<br />
more than 15 characters, only the first 15 characters are shown and<br />
saved in the caller ID log. If the phone number has more than 15 digits,<br />
only the last 15 digits are shown and saved in the caller ID log.<br />
You can review, redial, and copy an entry into the directory.<br />
Entries are in reverse chronological order.<br />
When the caller ID log is full, the oldest entry is deleted to make room for<br />
new incoming call information.<br />
XX Missed calls shows when there are new caller ID log entries that<br />
have not been reviewed.<br />
Caller ID log empty shows when you access the caller ID log with<br />
no records.<br />
Only one handset can review the caller ID log at a time. If a handset<br />
tries to enter the caller ID log while another handset is already in it,<br />
Not available at this time appears.<br />
The caller ID information may not be available for every incoming call. The<br />
callers may intentionally block their names and/or telephone numbers.<br />
Memory match<br />
If the last seven digits of the incoming telephone number is an exact match<br />
with a telephone number in your directory, the name that appears on the<br />
screen matches the corresponding name in your directory.<br />
For example, if Elizabeth Jones calls, her name appears as Liz if this is how<br />
you entered it into your directory.<br />
The number you see on your caller ID is in the format sent by the telephone<br />
service provider. It usually delivers 10-digit telephone numbers (area code<br />
plus telephone number). If the last seven digits of the incoming telephone<br />
number does not match a number in your directory, the name appears as it is<br />
delivered by the telephone service provider.<br />
76
Caller ID<br />
Review the caller ID log<br />
1.<br />
2.<br />
Press VOL/ /CID when the handset is not in use.<br />
Press or to highlight the desired line (home or cell), then<br />
press REVIEW.<br />
Press or to browse.<br />
3.<br />
- OR -<br />
1. Press MENU on the handset when it is not in use, or press OPTION<br />
while on a call.<br />
2. Press or to highlight Caller ID log, then press SELECT.<br />
3. Press or to highlight the desired line (home or cell), then<br />
press REVIEW.<br />
4. Press or to browse.<br />
•<br />
•<br />
The name and telephone number (if available), date and time of all<br />
incoming calls are shown.<br />
You hear a double beep when you reach the beginning or end of the<br />
caller ID log.<br />
77
Caller ID<br />
View dialing options<br />
Although the caller ID log entries received have 10 digits (the area code plus<br />
the seven-digit number), in some areas, you may need to dial only the seven<br />
digits, or 1 plus the seven digits, or 1 plus the area code plus the seven digits.<br />
You can change the number of digits that you dial from the caller ID log or<br />
store to the directory.<br />
While reviewing the caller ID log, press<br />
# (pound key) repeatedly to display different<br />
dialing options for local and long distance<br />
numbers before dialing or saving the<br />
telephone number in the directory.<br />
Press 1 repeatedly if you need to add or<br />
remove 1 in front of the telephone number<br />
before dialing or saving it in the directory.<br />
When the number is displayed in the correct<br />
format for dialing, press /HOME/FLASH,<br />
or /CELL to dial.<br />
Dial a caller ID log entry<br />
1.<br />
2.<br />
Search for the desired entry in the caller ID log (see Review the<br />
caller ID log on page 77).<br />
When the desired entry appears and is in the correct format for dialing,<br />
press /HOME/FLASH or to use the home line, or /CELL to use the<br />
cell line.<br />
78<br />
Press #<br />
Press 1<br />
Press 1<br />
800-595-9511<br />
1-800-595-9511<br />
595-9511<br />
1-595-9511<br />
1-800-595-9511<br />
800-595-9511<br />
1-595-9511<br />
595-9511
Caller ID<br />
Save a caller ID log entry to the directory<br />
Caller ID log entries can only be saved to the Home directory.<br />
1. Select a desired entry in the caller ID log (see Review the caller ID log<br />
on page 77).<br />
2. When the desired entry appears, press # (pound key) repeatedly to show<br />
different dialing options.<br />
3. When the number is in the correct format, press SAVE. The handset<br />
shows EDIT NUMBER.<br />
4. Use the dialing keys to edit the number.<br />
• Press MUTE/DELETE to erase a digit.<br />
• Press and hold MUTE/DELETE to erase all digits.<br />
• Press to move the cursor to the right or to the left.<br />
• Press and hold REDIAL/PAUSE to insert a dialing pause (a p appears).<br />
5. Press NEXT.<br />
6. Press or to highlight one of the following types:<br />
• Home<br />
• Cell<br />
• Work<br />
• Other<br />
7. Press NEXT. The handset displays EDIT NAME.<br />
8. Use the dialing keys to edit the name.<br />
• Press MUTE/DELETE to erase a character.<br />
• Press and hold MUTE/DELETE to erase all characters.<br />
• Press to move the cursor to the right or to the left.<br />
• Press to toggle the name order. For example, Mike Smith<br />
becomes Smith Mike when you press .<br />
9. Press SAVE and then the handset shows Saved. You hear a<br />
confirmation tone.<br />
•<br />
•<br />
If the name received from the telephone service provider is all in capital<br />
letters, the first letter of every word remains a capital letter. However, the<br />
next letter after the prefix “Mac”, “Mc”, or “O’”, is kept as a capital letter. For<br />
example, the “D” in “MacDonald” is kept as a capital letter.<br />
When you try to save a caller ID entry without any caller ID information, the<br />
handset displays Unable to save.<br />
79
Caller ID<br />
Delete from the caller ID log<br />
To delete a single entry:<br />
1. Select a desired entry in the caller ID log (see Review the caller ID log<br />
on page 77).<br />
2. When the desired entry appears, press MUTE/DELETE. The handset<br />
shows the previous caller ID log entry. You hear a confirmation tone.<br />
To delete all entries:<br />
1.<br />
2.<br />
1.<br />
2.<br />
3.<br />
Press VOL/ /CID when the handset is not in use.<br />
Press ERASE. If you choose the home caller ID log, the handset displays<br />
Delete all Home Calls? If you choose a cell phone caller ID log, the<br />
handset displays Delete all Cell phone A calls? Press YES to confirm.<br />
You hear a confirmation tone.<br />
- OR -<br />
Press MENU on the handset when it is not in use.<br />
Press or to highlight Caller ID log, then press SELECT.<br />
Press ERASE. If you choose the home caller ID log, the handset displays<br />
Delete all Home Calls? If you choose a cell phone caller ID log, the<br />
handset displays Delete all Cell phone A calls? Press YES to confirm.<br />
You hear a confirmation tone.<br />
Caller ID log display screen messages<br />
There are occasions that other information are shown instead of caller ID<br />
information.<br />
Displays: When:<br />
Private name<br />
Private number<br />
Private caller<br />
Unknown name<br />
Unknown number<br />
Unknown caller<br />
Long distance or<br />
L (before the caller’s number)<br />
The caller is blocking the name.<br />
The caller is blocking the telephone number.<br />
The caller is blocking the name and number.<br />
This caller’s name is unavailable.<br />
This caller’s number is unavailable.<br />
No information is available about this caller.<br />
It is a long distance call.<br />
80
Answering system settings<br />
Answer on/off<br />
If you turn the answering system on, it answers calls and records messages<br />
only on the home line. If your paired cell phone has voicemail, callers can leave<br />
messages with that voicemail service.<br />
If your answering system is turned off and you change any of its settings, the<br />
answering system automatically turns on again and the handset displays<br />
Calls will be answered.<br />
When the answering system is turned on, the<br />
/ANS ON/OFF light on the telephone base is on<br />
and the handsets display ANS ON.<br />
To turn the answering system on or off:<br />
Using the telephone base:<br />
• Press /ANS ON/OFF to turn the answering<br />
system on or off. When the answering system is<br />
turned on, it announces, “Calls will be answered.” When the answering<br />
system is turned off, it announces, “Calls will not be answered.”<br />
•<br />
•<br />
•<br />
If there is no remaining recording time, the answering system announces,<br />
“Memory is full. Calls will not be answered,” and cannot be turned on.<br />
If the total recording time is less than three minutes, the answering system<br />
announces, “Less than three minutes to record.”<br />
If the answering system is off, you may press<br />
/ANS ON to turn it on when there is an incoming<br />
call. The answering system answers the call<br />
immediately if there is remaining recording time.<br />
Using a handset:<br />
1. Press MENU on the handset when it is not in use.<br />
2. Press or to highlight Answering sys, then<br />
press SELECT.<br />
3. Press or to highlight Answer ON/OFF, then<br />
press SELECT.<br />
4. Press or to choose On or Off, then press SET to<br />
save. You hear a confirmation tone.<br />
81<br />
Play messages<br />
Answering sys<br />
Directory<br />
Caller ID log<br />
Intercom<br />
BACK SELECT<br />
ANSWERING SYS<br />
Announcement<br />
Delete all old<br />
Record memo<br />
Answer ON/OFF<br />
BACK SELECT<br />
ANSWER ON/OFF<br />
On<br />
Off<br />
BACK SET
Answering system settings<br />
Announcement<br />
The telephone is preset with a greeting that answers calls with “Hello, please<br />
leave a message after the tone.” You can use this preset announcement, or<br />
replace it with your own.<br />
Play your announcement<br />
1.<br />
2.<br />
3.<br />
4.<br />
Press MENU on the handset when it is not in use.<br />
Press or to highlight Answering sys, then<br />
press SELECT.<br />
Press SELECT to choose Announcement.<br />
The handset displays ANNOUNCEMENT, press PLAY.<br />
Record your own announcement<br />
1.<br />
2.<br />
3.<br />
4.<br />
5.<br />
6.<br />
7.<br />
Press MENU on the handset when it is not in use.<br />
Press or to choose Answering sys, then<br />
press SELECT.<br />
Press SELECT to choose Announcement.<br />
The handset displays ANNOUNCEMENT,<br />
press RECORD.<br />
The handset announces, “Record after the tone. Press<br />
STOP when you are done.” After the tone, speak<br />
towards the handset microphone.<br />
Press STOP when you finish recording.<br />
The handset automatically plays back the newly<br />
recorded announcement. Press STOP to stop the<br />
playback at any time. After the announcement<br />
playback, press PLAY to replay the recorded<br />
announcement, or RECORD to record again if desired.<br />
•<br />
•<br />
Your announcement can be up to 90 seconds<br />
in length.<br />
Announcements shorter than two seconds will not<br />
be recorded.<br />
82<br />
ANSWERING SYS<br />
Announcement<br />
Delete all old<br />
Record memo<br />
Answer ON/OFF<br />
BACK SELECT<br />
ANNOUNCEMENT<br />
PLAY RECORD<br />
Recording<br />
announcement...<br />
STOP<br />
Announcement<br />
playback<br />
DELETE STOP
Answering system settings<br />
Delete your announcement<br />
1.<br />
2.<br />
3.<br />
4.<br />
5.<br />
Press MENU on the handset when it is not in use.<br />
Press or to choose Answering sys, then<br />
press SELECT.<br />
Press SELECT to choose Announcement.<br />
The handset displays ANNOUNCEMENT, press PLAY<br />
to play the announcement.<br />
While the announcement is playing, press DELETE<br />
to delete your own recorded announcement. The<br />
handset displays Reset Announcement to default?<br />
Press YES to confirm. You hear a confirmation tone.<br />
When your announcement is deleted, calls are answered<br />
with the default announcement.<br />
83<br />
Announcement<br />
playback<br />
DELETE STOP<br />
Reset<br />
Announcement<br />
to default?<br />
YES NO
Answering system settings<br />
Answering system setup<br />
In the answering system setup menu, you can change the settings for call<br />
screening, number of rings, remote access code, message alert tone and<br />
recording time.<br />
Call screening<br />
Use this feature to choose whether incoming messages<br />
are broadcast from the telephone base speaker when<br />
they are being recorded. While monitoring an incoming<br />
message, you can press /HOME/FLASH or on the<br />
handset to answer the call.<br />
To change the setting:<br />
1.<br />
2.<br />
3.<br />
4.<br />
5.<br />
Press MENU on the handset when it is not in use.<br />
Press or to highlight Answering sys, then<br />
press SELECT.<br />
Press or to highlight Ans sys setup, then<br />
press SELECT.<br />
Press SELECT to choose Call screening.<br />
Press or to choose On or Off, then press<br />
SET to save. You hear a confirmation tone.<br />
84<br />
ANSWERING SYS<br />
Delete all old<br />
Record memo<br />
Answer ON/OFF<br />
Ans sys setup<br />
BACK SELECT<br />
ANS SYS SETUP<br />
Call screening<br />
# of rings<br />
Remote code<br />
Msg alert tone<br />
BACK SELECT<br />
CALL SCREENING<br />
On<br />
Off<br />
BACK SET
Answering system settings<br />
Number of rings<br />
When the answering system is turned on, it answers all<br />
incoming home calls after the number of rings set. You<br />
can choose from two, three, four, five or six rings; or toll<br />
saver. With toll saver selected, the answering system<br />
answers after two rings when you have new messages,<br />
and after four rings when you have no new messages.<br />
This enables you to check for new messages and avoid<br />
paying unnecessary long distance charges if you are<br />
calling from outside of your local area. The default number<br />
of rings is four.<br />
To change the setting:<br />
1. Press MENU on the handset when it is not in use.<br />
2. Press or to highlight Answering sys, then<br />
press SELECT.<br />
3. Press or to highlight Ans sys setup, then<br />
press SELECT.<br />
4. Press or to highlight # of rings, then<br />
press SELECT.<br />
5. Press or to choose from 6, 5, 4, 3, 2 or Toll saver,<br />
then press SET to save. You hear a confirmation tone.<br />
85<br />
ANS SYS SETUP<br />
Call screening<br />
# of rings<br />
Remote code<br />
Msg alert tone<br />
BACK SELECT<br />
6<br />
5<br />
4<br />
3<br />
# OF RINGS<br />
BACK SET<br />
If you set the number of rings that the answering system answers calls as<br />
3 rings, the answering system may not have enough time to announce the<br />
caller’s full information.
Answering system settings<br />
Remote access code<br />
A two-digit security code is required to access the<br />
answering system remotely from any touch tone<br />
telephone. The preset code is 19. You can change the<br />
code to any number from 00 to 99.<br />
To change the setting:<br />
1. Press MENU on the handset when it is not in use.<br />
2. Press or to highlight Answering sys, then<br />
press SELECT.<br />
3. Press or to highlight Ans sys setup, then<br />
press SELECT.<br />
4. Press or to highlight Remote code, then<br />
press SELECT.<br />
5. Use the dialing keys (0-9) to enter a two-digit number,<br />
then press SET to save. You hear a confirmation tone.<br />
•<br />
•<br />
•<br />
Press MUTE/DELETE to erase a digit.<br />
Press and hold MUTE/DELETE to erase all digits.<br />
Press to move the cursor to the right or to the left.<br />
86<br />
ANS SYS SETUP<br />
Call screening<br />
# of rings<br />
Remote code<br />
Msg alert tone<br />
BACK SELECT<br />
REMOTE CODE<br />
BACK SET<br />
19
Answering system settings<br />
Message alert tone<br />
When the answering system is turned on, the telephone<br />
beeps every 10 seconds to alert you of new messages.<br />
The tone stops when all new messages have been<br />
reviewed. The message alert tone is preset to off.<br />
To change the setting:<br />
1. Press MENU on the handset when it is not in use.<br />
2. Press or to highlight Answering sys, then<br />
press SELECT.<br />
3. Press or to highlight Ans sys setup, then<br />
press SELECT.<br />
4. Press or to highlight Msg alert tone, then<br />
press SELECT.<br />
5. Press or to choose from On or Off, then press<br />
SET to save. You hear a confirmation tone.<br />
You cannot set the message alert tone when another handset or the<br />
telephone base is accessing the answering system.<br />
Recording time<br />
You can set the recording time limit for each incoming<br />
message. The default setting is three minutes.<br />
To change the setting:<br />
1. Press MENU on the handset when it is not in use.<br />
2. Press or to highlight Answering sys, then<br />
press SELECT.<br />
3. Press or to highlight Ans sys setup, then<br />
press SELECT.<br />
4. Press or to highlight Recording time, then<br />
press SELECT.<br />
5. Press or to choose from 3 minutes, 2 minutes,<br />
or 1 minute, then press SET to save. You hear a<br />
confirmation tone.<br />
87<br />
ANS SYS SETUP<br />
Call screening<br />
# of rings<br />
Remote code<br />
Msg alert tone<br />
BACK SELECT<br />
MSG ALERT TONE<br />
On<br />
Off<br />
BACK SET<br />
ANS SYS SETUP<br />
# of rings<br />
Remote code<br />
Msg alert tone<br />
Recording time<br />
BACK SELECT<br />
RECORDING TIME<br />
3 minutes<br />
2 minutes<br />
1 minute<br />
BACK SET
Answering system operation<br />
Answering system and voicemail indicators<br />
Your telephone has separate indicators for two different<br />
types of voice messages: those left on its built-in<br />
answering system and those left at your service provider’s<br />
voicemail (fees may apply). Your telephone’s built-in<br />
answering system messages and voicemail messages are<br />
separate. Each alerts you to new messages differently.<br />
• If and XX New messages display on the<br />
MENU<br />
handsets and the message window on<br />
the telephone base flashes, there are new<br />
messages in the built-in answering system,<br />
press PLAY/STOP/ on the telephone base.<br />
To listen to messages with a handset, see<br />
To play messages with a handset on page 91.<br />
• If and New voicemail display on the<br />
handsets, your telephone service provider is<br />
indicating that it has new voicemail for you. To<br />
listen to your voicemail, you typically dial an<br />
access number provided by your telephone<br />
service provider, followed by a security code or PIN.<br />
Some service providers bundle or combine multiple services like voicemail<br />
and call waiting, so you may not be aware that you have voicemail. To check<br />
what services you have and how to access them, contact your telephone<br />
service provider.<br />
To use your voicemail service rather than your answering system, turn off<br />
your answering system. To use your answering system rather than your<br />
voicemail service, contact your telephone service provider to deactivate your<br />
voicemail service.<br />
Using the answering system and voicemail together<br />
You can use your telephone answering system and voicemail together by<br />
setting your built-in answering system to answer before voicemail answers.<br />
To learn how to program your voicemail settings, contact your telephone<br />
service provider. If you are on a call, or if the answering system is busy<br />
recording a message and you receive another call, the second caller can<br />
leave a voicemail message.<br />
Set your answering system to answer calls at least two rings earlier than your<br />
voicemail is set to answer. For example, if your voicemail answers after six<br />
rings, set your answering system to answer after four rings. Some voicemail<br />
providers may program the delay before answering calls in seconds instead<br />
of rings. In this case, allow six seconds per ring when determining the<br />
appropriate setting.<br />
88<br />
ANS<br />
O N<br />
HANDSET X<br />
1 New message<br />
12:31PM 12/31
Answering system operation<br />
Message capacity<br />
The answering system can record and store up to 99 messages. Each<br />
message can be up to three minutes depending on the message length<br />
set (see Recording time on page 87). The total storage capacity for the<br />
announcement, messages and memos is approximately 11 minutes. The<br />
actual recording time depends on individual message characteristics.<br />
Messages remain available for replay until you delete them.<br />
Voice prompts<br />
The system provides voice prompts to guide you through the setup<br />
procedures at the telephone base, message playback, remote access and<br />
recording outgoing announcements.<br />
Call screening<br />
Call screening at the telephone base:<br />
If the answering system and call screening are on (see Call screening on<br />
page 84), the announcement and the incoming message broadcast at the<br />
telephone base while the call is answered by the answering system.<br />
Options while a message is being recorded:<br />
•<br />
•<br />
•<br />
Press /VOL or /VOL on the telephone base to adjust the call<br />
screening volume.<br />
Press PLAY/STOP/ to temporarily silence the call screening.<br />
Press PLAY/STOP/ to temporarily turn on or off call screening.<br />
Call screening at the handset:<br />
If the answering system is on and your answering system is recording a<br />
message, press SCREEN to screen the call on your handset and the screen<br />
displays the caller ID information. If you do not subscribe to caller ID service,<br />
the handset shows Incoming call.<br />
The call screening setting does not affect the call screening on the handset.<br />
Call intercept<br />
If you want to talk to the person whose message is being recorded, press<br />
/HOME/FLASH or on the handset.<br />
89
Answering system operation<br />
Temporarily turning off the message alert tone<br />
If the message alert tone is turned on, the telephone base beeps every 10<br />
seconds when there are new or missed messages. Pressing any telephone<br />
base key (except /FIND HANDSET) temporarily silences the message<br />
alert tone.<br />
If you press DELETE/X when in idle mode to temporarily turn off the<br />
message alert tone, there is a voice prompt directing you to press DELETE/X<br />
again to delete all old messages. The message alert tone is temporarily off.<br />
Only press DELETE/X a second time if you wish to erase all old messages in<br />
your answering system.<br />
The message alert tone resumes when you receive a new message.<br />
Message playback<br />
On the telephone base, if you have new messages, the<br />
telephone plays only the new messages (oldest first). If<br />
there are no new messages, the telephone plays back all<br />
messages (oldest first).<br />
On the handset, if you have both new and old messages,<br />
you can play either new or old messages. The caller ID<br />
information displays on the handset screen when you play<br />
messages and you can call back the caller.<br />
When playback begins, the handset displays the message<br />
status, caller ID information, and time and date of the<br />
message recorded. You hear the total number of messages<br />
followed by the day and time of the message. After the last<br />
message, the telephone announces, “End of messages,”<br />
and the handset displays End of messages.<br />
To play messages with the telephone base:<br />
1. Press PLAY/STOP/ to listen to messages.<br />
Options during playback:<br />
•<br />
•<br />
•<br />
•<br />
•<br />
Press /VOL or /VOL to adjust the speaker volume.<br />
Press SKIP/ to skip to the next message.<br />
Press REPEAT/ to repeat the message currently playing. Press<br />
REPEAT/ twice to listen to the previous message.<br />
Press DELETE/X to delete the current message. The system<br />
advances to the next message.<br />
Press PLAY/STOP/ to stop.<br />
90<br />
You have:<br />
3 Old messages<br />
BACK SKIP<br />
OLD MSG #1/3<br />
ANDERSON ALLEN<br />
11:49 10/29<br />
[2]-Call info<br />
REPEAT SKIP
Answering system operation<br />
Message playback (continued)<br />
To play messages with a handset:<br />
1. Press MENU to show the menu when the handset is not in use.<br />
2. Press SELECT to choose Play messages. If you have either new or old<br />
messages, the messages play automatically. If you have both new and old<br />
messages:<br />
To play new messages, press SELECT to select Play new msgs.<br />
To play old messages, press /VOL or /VOL to highlight<br />
Play old msgs, then press SELECT.<br />
When the handset is playing a message, its screen shows the caller’s name<br />
or number. If the caller’s information is unavailable, the handset shows<br />
No caller info.<br />
Options during playback:<br />
•<br />
•<br />
•<br />
•<br />
•<br />
•<br />
•<br />
•<br />
•<br />
•<br />
•<br />
•<br />
Press VOL/ / or VOL/ /CID to adjust the speaker volume.<br />
Press to play the messages through the handset earpiece.<br />
Press SKIP to skip the message summary or to the next message.<br />
Press REPEAT to repeat the message currently playing.<br />
Press REPEAT twice to playback the previous message.<br />
Press OFF/CANCEL to stop.<br />
Press MUTE/DELETE to delete the current message. The handset<br />
displays Message deleted briefly and the system advances to the<br />
next message.<br />
Press to adjust the handset message playback audio quality.<br />
Press 2 to pause the playback and show the caller ID information. Press<br />
/HOME/FLASH, DIAL or to use the home line, or press<br />
/CELL to use the cell line to call back the caller.<br />
Press OFF/CANCEL or BACK to resume the playback. If you do not<br />
call back within 10 seconds, message playback resumes.<br />
Press /HOME/FLASH or /CELL to pause the message playback. The<br />
handset displays Call back? with the caller ID information. Press YES to<br />
call back the caller, or NO to resume the message playback.<br />
•<br />
•<br />
When the answering system has less than three minutes of recording time<br />
left, it announces, “Less than three minutes to record.” and the handset<br />
displays Rec mem low.<br />
When the telephone is not in use, if F and the number of messages are<br />
flashing alternately in the message window, or the handset displays<br />
Rec mem full, the memory is full. Delete some messages to make room<br />
for more.<br />
91
Answering system operation<br />
Delete all old messages<br />
Using the telephone base:<br />
Press DELETE/X when the phone is not in use. The telephone announces,<br />
“To delete all old messages, press DELETE again.” Press DELETE/X<br />
again. All previously heard messages are erased and the telephone<br />
announces, “All old messages deleted.”<br />
Using a handset:<br />
1. Press MENU on the handset when it is not in use.<br />
2. Press or to highlight Answering sys, then press SELECT.<br />
3. Press or to highlight Delete all old, then press SELECT.<br />
4. The handset displays Delete all old messages? Press YES to confirm.<br />
5. The handset displays Deleting... and then All old messages deleted!<br />
You hear a confirmation tone.<br />
You can only delete old messages, which are messages you have played.<br />
Record and play memos<br />
Memos are your own recorded messages used as reminders for yourself<br />
or others using the same answering system. You can record your own<br />
memos using a system handset. Play and delete them the same way as<br />
incoming messages.<br />
To record a memo:<br />
1. Press MENU on the handset when it is not in use.<br />
2. Press or to highlight Answering sys, then press SELECT.<br />
3. Press or to highlight Record memo, then press SELECT.<br />
4. The system announces, “Record after the tone. Press STOP when you are<br />
done.” After the tone, speak towards the microphone.<br />
5. Press STOP when you finish recording. The handset announces,<br />
“Recorded,” and then returns to the previous menu.<br />
•<br />
•<br />
•<br />
The system announces “Memory is full.” Memory full displays if you record<br />
a memo when the memory is full.<br />
Each memo can be up to four minutes in length.<br />
Memos shorter than two seconds are not recorded.<br />
92
Answering system operation<br />
Message window displays<br />
Window display Description<br />
0<br />
0 (flashing)<br />
1-99<br />
0-99 (flashing)<br />
1-99 & F (alternating)<br />
1-8<br />
0-6<br />
- -<br />
No messages.<br />
The time and date need to be set.<br />
Total number of old messages and memos recorded.<br />
The message number currently playing.<br />
When time and date are not set, it flashes 0, the total<br />
number of new messages recorded, or total number of<br />
old messages recorded.<br />
The telephone base may have lost and regained power.<br />
The clock needs to be set.<br />
The answering system memory is full with total number of<br />
messages recorded.<br />
The telephone base speaker volume level while adjusting.<br />
The telephone base ringer level while adjusting.<br />
The system is answering a call, or recording a memo<br />
or announcement.<br />
The telephone is being accessed remotely.<br />
The answering system is being programmed.<br />
93
Answering system operation<br />
Remote access<br />
A two-digit security code is required to access the answering system<br />
remotely from any touch-tone telephone. The preset code is 19. See<br />
Remote access code on page 86 to change it.<br />
1.<br />
2.<br />
3.<br />
4.<br />
Dial your telephone number from any touch-tone telephone.<br />
When the system plays the announcement, enter the two-digit<br />
security code.<br />
You can also enter one of the following remote commands.<br />
Hang up or press 8 to end the call.<br />
•<br />
•<br />
•<br />
•<br />
Command Function<br />
1 Play all messages.<br />
2 Play only new messages.<br />
3 Delete the current message (during playback).<br />
33 Delete all old messages.<br />
4 Repeat the current message (during playback).<br />
44 Play the previous message.<br />
5 Stop.<br />
*5 Hear a list of remote commands.<br />
6 Skip to the next message (during playback).<br />
*7 Record a new announcement.<br />
8 Hang up the call<br />
0 Turn the answering system on or off.<br />
If you do not press any keys after you enter the remote access code, all new<br />
messages play. If there are no new messages, all old messages play.<br />
Once the new messages have played, the telephone announces the help<br />
menu options. If you do not press any key within 20 seconds, the remote<br />
access call automatically disconnects.<br />
When the answering system is turned off, the telephone answers after 10<br />
rings, and announces, “Please enter your remote access code.”<br />
When the memory is full, the answering system answers incoming calls<br />
after 10 rings and announces, “Memory is full. Enter the remote access code.”<br />
94
Appendix<br />
Display screen messages<br />
Add device failed<br />
Already saved<br />
Area code will not show<br />
in Caller ID log<br />
Bluetooth headset in use.<br />
Cellular not available.<br />
Bluetooth system busy<br />
Caller ID log empty<br />
Caller ID won’t be<br />
announced.<br />
Calling all handsets<br />
(for models with more than two handsets)<br />
Calling HANDSET X<br />
(for models with more than two handsets)<br />
Calling other handset<br />
(for models with two handsets)<br />
Call transferred<br />
Calls will be answered<br />
Calls will not be<br />
answered. Memory full<br />
Cell<br />
Cell call on hold<br />
Cell line in use<br />
Cellular phone not<br />
connected<br />
Connecting...<br />
The Bluetooth device failed to pair to the<br />
telephone base.<br />
The telephone number entered is already<br />
stored in the directory.<br />
The home area code you saved will not be<br />
shown in caller ID log.<br />
You are trying to make a cell call while the<br />
Bluetooth headset is in use.<br />
You are trying to make a cell call or access<br />
the Bluetooth menu when the Bluetooth link is<br />
already being used.<br />
There are no caller ID log entries.<br />
The ringer volume on the handset is turned off<br />
so no caller ID information will be announced for<br />
incoming calls.<br />
You are calling all other handsets.<br />
You are calling another handset.<br />
You have successfully transferred an outside<br />
call to another handset.<br />
You have changed an answering system<br />
setting while the answering system is off. The<br />
answering system turns on automatically to<br />
answer calls.<br />
You have changed an answering system<br />
setting while the answering system is off.<br />
The answering system turns on automatically<br />
but it will not answer calls due to lack of<br />
memory space.<br />
The cell line is in use.<br />
A call on the cell line has been put on hold.<br />
Another system handset is using the cell line.<br />
There is no cell phone connected when you try<br />
to make a call on the cell line.<br />
Connection is establishing between the<br />
telephone base and the Bluetooth device.<br />
95
Appendix<br />
Display screen messages (continued)<br />
Connection failed<br />
Connecting to all<br />
handsets...<br />
Cell Phone A is added and<br />
connected to base.<br />
Device list is empty<br />
Device disconnected<br />
Device renamed<br />
Directory empty<br />
Directory full<br />
Download fail<br />
Downloading dir<br />
Ended<br />
End of messages<br />
Handset X is calling<br />
(for models with more than two handsets)<br />
Other handset is calling<br />
(for models with two handsets)<br />
Handset X is calling all<br />
Headset X is deactivated<br />
Headset not connected!<br />
Home<br />
Home call on hold<br />
Home & cell calls on hold<br />
Home & cell lines in use<br />
Home line in use<br />
Unsuccessful connection between a Bluetooth<br />
device and the telephone base.<br />
You are trying to start a PTT session to all<br />
other handsets.<br />
The Bluetooth device is successfully added<br />
and connected to the telephone base.<br />
There are no Bluetooth devices paired to the<br />
telephone base.<br />
A Bluetooth device is disconnected.<br />
A Bluetooth device is renamed.<br />
There are no directory entries.<br />
The directory is full.<br />
The telephone system failed to download the<br />
directory from a cell phone.<br />
The telephone system is downloading the<br />
directory from a cell phone.<br />
You have just ended a call.<br />
You have listened to all messages in the<br />
answering system.<br />
Another system handset is calling.<br />
One of the system handset is calling all others.<br />
The headset is deactivated from the active slot.<br />
The Bluetooth headset is not connected to the<br />
telephone base.<br />
The home line is in use.<br />
A call on the home line has been put on hold.<br />
Calls on the home and cell lines have been put<br />
on hold.<br />
Calls on the home and cell lines are in use<br />
while all other handsets are in idle mode.<br />
Another system handset or another telephone<br />
on the same home line is in use.<br />
96
Appendix<br />
Display screen messages (continued)<br />
Home Transfer from<br />
HANDSET X<br />
(for models with more than two handsets)<br />
Home Transfer from other<br />
handset<br />
(for models with two handsets)<br />
Home Transfer from<br />
HANDSET X to all<br />
Home Transfer from other<br />
handset<br />
Incoming call<br />
Incorrect PIN<br />
Intercom<br />
Intercom ended<br />
Key tone off<br />
One handset is receiving an outside call<br />
transferred from another handset.<br />
All handsets are receiving an outside call<br />
transferred from another handset.<br />
All handsets are receiving an outside call<br />
transferred from another handset.<br />
There is an incoming call.<br />
The PIN number for adding a Bluetooth device<br />
is incorrect.<br />
The handset is on an intercom call.<br />
You have just ended an intercom call.<br />
The key tone volume is set as off.<br />
Less than 3 min to record The answering system memory is low.<br />
Low battery<br />
Message deleted<br />
Memory full<br />
Microphone on<br />
Microphone off<br />
New voicemail<br />
No answer. Try again.<br />
No cellular is ready for<br />
connection.<br />
No Incoming PTT<br />
No entries found. Try<br />
downloading from SIM only<br />
The battery needs to be recharged.<br />
The message is deleted.<br />
The memory for recording messages and<br />
memos is full.<br />
The mute feature is turned off and the person<br />
on the other end can hear you.<br />
You have turned off the handset microphone.<br />
The other party cannot hear you but you can<br />
hear the other party.<br />
There are new voicemail messages from your<br />
telephone service provider for the home line.<br />
You tried to make an intercom call, but the<br />
handset you are calling is is busy or out<br />
of range.<br />
There are no cell phones in an active slot to<br />
connect with the telephone base.<br />
The incoming PTT function is disabled. The<br />
handset will not receive PTT calls.<br />
There are no entries found when you download<br />
a cell phone directory from the cell memory.<br />
97
Appendix<br />
Display screen messages (continued)<br />
No entries found. Try<br />
downloading from Phone<br />
only<br />
No headset found<br />
No home line<br />
No signal. Call ended.<br />
There are no entries found when you<br />
download a cell phone directory from your<br />
SIM card.<br />
There are no entries found in either the cell<br />
or SIM card when you download a cell phone<br />
directory from both memories.<br />
No Bluetooth headset can be found.<br />
There is no telephone line connected.<br />
Communication between the handset and<br />
telephone base is lost during a call.<br />
Not available at this time One handset is already viewing the caller<br />
ID log, directory or answering system, and<br />
another handset attempts to review it.<br />
Out of range OR No power<br />
at base<br />
Only 1 headset in device<br />
list can be ready<br />
for connection.<br />
Only 2 devices can be<br />
ready for connection<br />
Only for 7 digits dialing<br />
from Caller ID log<br />
** Paging **<br />
Place in charger<br />
Please use cell to<br />
connect to base.<br />
Please use headset to<br />
connect to base.<br />
PTT From HANDSET X To<br />
HANDSET Y<br />
PTT To HANDSET X<br />
One handset attempts to place a PTT<br />
call to another handset which is on an<br />
outside or intercom call, or accessing the<br />
answering system.<br />
The handset has lost communication with the<br />
telephone base.<br />
There is no power connected to the<br />
telephone base.<br />
One headset is already connected to the<br />
telephone base.<br />
There are already two Bluetooth devices active<br />
or connected.<br />
The area code will be removed from caller ID<br />
entries to allow seven digit local dialing.<br />
The system handset is being paged.<br />
The battery is very low. The handset should<br />
be placed in the telephone base or charger<br />
to recharge.<br />
You need to use your cell phone to establish a<br />
connection to the telephone base.<br />
You need to use your headset to establish a<br />
connection to the telephone base.<br />
One handset has started a PTT session to<br />
another handset.<br />
You have started the PTT process.<br />
98
Appendix<br />
Display screen messages (continued)<br />
Push to talk Ended<br />
Put handset on BASE to<br />
register<br />
Rec mem full<br />
Rec mem low<br />
Redial empty<br />
Registration failed<br />
Ringer muted<br />
Saved<br />
Transferring call to<br />
HANDSET X<br />
Transferring call to all<br />
(for models with more than two handsets)<br />
Transferring to other<br />
handset<br />
(for models with two handsets)<br />
Unable to save<br />
XX Missed calls<br />
XX New messages<br />
The PTT session is ended.<br />
Your handset is not registered to the<br />
telephone base.<br />
The answering system has no recording<br />
time left.<br />
The answering system has less than 3 minutes<br />
to record.<br />
There are no entries in the redial list.<br />
You failed to register a handset to the<br />
telephone base.<br />
The ringer is muted temporarily during an<br />
incoming call or intercom call.<br />
Your selection has been saved.<br />
One handset is transferring an outside call to<br />
another handset.<br />
You tried to save a caller ID entry with no caller<br />
ID information.<br />
There are missed calls that have not been<br />
reviewed in your caller ID log.<br />
There are new messages recorded in the<br />
answering system.<br />
99
Appendix<br />
Handset and telephone base indicators<br />
Handset lights<br />
/CELL<br />
/HOME/FLASH<br />
On when the handset speakerphone is in use.<br />
Flashes quickly when there is an incoming cell call.<br />
Flashes slowly when the cell line is on hold.<br />
Flashes quickly when there is an incoming home call.<br />
Flashes slowly when the home line is on hold.<br />
CHARGE On when the handset is charging in the telephone base<br />
or charger.<br />
Telephone base lights<br />
/ANS ON/OFF<br />
On when the answering system is turned on.<br />
D1/D2 On when a Bluetooth device is connected to the base.<br />
Flashes alternately while pairing a Bluetooth device.<br />
Flashes quickly when there is an incoming cell call.<br />
IN USE On when the telephone line is in use or on hold.<br />
On when the answering system is answering a call.<br />
On when you are registering a handset.<br />
Flashes quickly when there is an incoming call.<br />
Flashes when another telephone sharing the same line is<br />
in use.<br />
100
Appendix<br />
Handset icons<br />
1<br />
2<br />
1 2<br />
1 2<br />
1<br />
2<br />
ANS<br />
O N<br />
NEW<br />
MUTE<br />
Home line - on steadily when the home line is in use or<br />
there is an incoming home call.<br />
CeLL line - on steadily when the cell line is in use or there<br />
is an incoming cell call.<br />
Bluetooth connected devices - indicates that there are<br />
Bluetooth connected devices on the device list.<br />
Bluetooth disconnected devices - indicates that there are<br />
Bluetooth disconnected devices on the device list.<br />
Wireless Bluetooth headset - on steadily when a wireless<br />
Bluetooth headset is in use on the home line.<br />
Speakerphone - the speakerphone is in use.<br />
Ringer off - on steadily when all the ringers of Home,<br />
Cellular 1 and Cellular 2 are turned off. Flashes when only<br />
one or two of the ringers are turned off.<br />
New voicemail - indicates you have new voicemail<br />
messages from the telephone service provider for the home<br />
line.<br />
New answering system message - indicates you have<br />
new answering system messages.<br />
Battery status - animates when the battery is charging.<br />
Becomes solid when the battery is fully charged.<br />
Battery status - flashes when the battery is low and needs<br />
charging.<br />
Answering system on - indicates that the answering<br />
system is turned on to answer incoming home calls.<br />
New caller ID log - indicates that the missed call is new.<br />
mute - the microphone is muted.<br />
101
Appendix<br />
Headset indicators<br />
Headset alert tones<br />
One beep Headset key tone.<br />
One beep every 30 seconds Muted headset microphone alert tone.<br />
Two quick beeps Error alert tone.<br />
The volume reaches its minimum or<br />
maximum setting.<br />
Two rapid beeps every 20 seconds Low battery warning.<br />
Three rapid beeps The headset is being powered on or off.<br />
Three rapid beeps every 20 seconds Out of range while the headset is on a call.<br />
A non-registered headset with a charged<br />
battery.<br />
Ringer tone Incoming call alert tone.<br />
Headset lights<br />
Red On when the headset is charging in the telephone base.<br />
Flashes once every 10 seconds to indicate the battery is low.<br />
Flashes three times when the headset is being powered off.<br />
Blue On when the headset is fully charged in the telephone base.<br />
Flashes once every 10 seconds when the charged headset is in<br />
idle mode.<br />
Flashes twice every three seconds when the headset is in use.<br />
Flashes three times when the headset is being powered on.<br />
Flashes four times every four seconds when there is an incoming call.<br />
Flashes quickly in blue while being paged.<br />
Red and blue Flashes quickly and alternately when the headset is trying to register<br />
to a telephone base.<br />
Flashes slowly and alternately when the headset is not registered.<br />
Off The headset battery is depleted.<br />
The headset has been powered off.<br />
102
Appendix<br />
Handset battery<br />
It takes up to 16 hours for the battery to be fully charged. When it is fully charged, you<br />
can expect the following performance:<br />
operation operating time<br />
While in handset use (talking*) Up to seven hours<br />
While in speakerphone mode (talking*) Up to five hours<br />
While not in use (standby**) Up to seven days<br />
*Operating times vary depending on your actual use and the age of the battery.<br />
**Handset is not charging or in use.<br />
The battery needs charging when:<br />
•<br />
•<br />
•<br />
•<br />
•<br />
A new battery is installed in the handset.<br />
The handset beeps every minute while on a call.<br />
The handset beeps and Low battery displays on the handset.<br />
Place in charger displays on the handset.<br />
A battery is properly installed but the screen is blank.<br />
CAUTIoN:<br />
To reduce the risk of fire or injury, read and follow these instructions:<br />
•<br />
•<br />
•<br />
•<br />
•<br />
•<br />
•<br />
Use only the battery(ies) provided or equivalent. To order a replacement, visit our<br />
website at www.vtechphones.com or call 1 (800) 595-9511. In Canada, go to<br />
www.vtechcanada.com or dial 1 (800) 267-7377.<br />
Do not dispose of the battery(ies) in a fire. Check with local waste management<br />
codes for special disposal instructions.<br />
Do not open or mutilate the battery(ies). Released electrolyte is corrosive and may<br />
cause burns or injury to the eyes or skin. The electrolyte may be toxic if swallowed.<br />
Exercise care in handling batteries in order not to create a short circuit with<br />
conductive materials.<br />
Charge the battery(ies) provided with or identified for use with this product only in<br />
accordance with the instructions and limitations specified in this <strong>manual</strong>.<br />
Observe proper polarity orientation between the battery and metallic contacts.<br />
To prevent fire or shock hazard, do not expose this product to water or any type<br />
of moisture.<br />
103
Appendix<br />
Headset battery<br />
It takes up to three hours for the battery to be fully charged. When it is fully charged,<br />
you can expect the following performance:<br />
operation operating time<br />
While in use (talking*) Up to nine hours<br />
While not in use (standby**) Up to ninety hours<br />
*Operating times vary depending on your actual use and the age of the battery.<br />
**Headset is not charging or in use.<br />
The battery needs charging when:<br />
•<br />
•<br />
•<br />
The headset beeps twice every 20 seconds.<br />
The light is off when in idle mode.<br />
The light flashes every 10 seconds in red.<br />
Conserve battery life:<br />
•<br />
•<br />
The headset battery is not replaceable.<br />
If the headset will not be used for a long period of time, press and hold on the<br />
headset for two seconds to power off the headset and conserve the headset<br />
battery life. The light flashes three times in red when the headset is being<br />
powered off.<br />
CAUTIoN:<br />
To prevent fire or shock hazard, do not expose this product to water or any type<br />
of moisture.<br />
104
Appendix<br />
expand your telephone system<br />
The handsets provided with your telephone system are already registered.<br />
Additional handsets registered to the telephone system are assigned<br />
in sequential order. For instance, if you already have HANDSeT 1 and<br />
HANDSeT 2, the new registered handset is assigned HANDSeT 3. This<br />
telephone system accommodates up to 12 handsets.<br />
Add and register a handset<br />
You can add new handsets (DS6401, purchased separately) to your<br />
telephone system, but each handset must be registered with the telephone<br />
base before use. When first purchased, each expansion handset shows<br />
Put handset on BASe to register after a battery is installed. You may<br />
need to charge the handset before registering it to the telephone base. For<br />
more details on battery charging, see the table on page 5.<br />
To register a handset:<br />
1. Make sure the handset is out of the telephone<br />
base or handset charger and shows Put handset<br />
on BASe to register. Place the handset you wish<br />
to register in the telephone base.<br />
2. The handset displays Registering handset...<br />
and the red IN USe light on the telephone base<br />
turns on. It takes about 90 seconds to complete<br />
the registration process. The handset displays<br />
HANDSeT X Registered (X represents the<br />
registered handset number). The IN USe light<br />
on the telephone base turns off and you hear<br />
a confirmation tone from the handset when<br />
registration completes.<br />
If registration fails, the system will automatically try to<br />
register again. If registration fails after the third try, the<br />
handset displays Registration failed then Put handset<br />
on BASe to register and the telephone base beeps.<br />
This may take up to five minutes to occur.<br />
To reset the handset, remove it from the telephone<br />
base. When the handset displays Put handset on<br />
BASe to register, try the registration process again.<br />
•<br />
You cannot register a handset if any other system<br />
handset is in use.<br />
105
Appendix<br />
Add and register a headset<br />
This telephone system accommodates up to two cordless headsets. You<br />
can buy an additional cordless headset (IS6100, purchased separately) for<br />
the telephone base. You can register a maximum of two headsets to the<br />
telephone base. The telephone base recognizes and counts a headset the<br />
same as a handset. The headset must be registered with the telephone base<br />
before use. You may need to charge the headset before registering it to the<br />
telephone base. For more details on battery charging, see page 6.<br />
To register a headset:<br />
1. Place the non-registered headset in the headset charger and allow it to<br />
charge for at least 15 minutes before beginning registration. Remove the<br />
headset from the headset charger. The light on the headset flashes<br />
slowly and alternately in red and blue.<br />
2. On the telephone base, press and hold /FIND HANDSeT for about four<br />
seconds until the red IN USe light turns on.<br />
3. Immediately place the headset in the headset charger. It takes about<br />
60 seconds to complete the registration. The red IN USe light on the<br />
telephone base turns off. The light on the headset turns red when<br />
it is registered but not fully charged, or turns blue if it is registered and<br />
fully charged.<br />
If the registration process is successful, you hear a dial tone when you press<br />
on the headset. If the registration fails, you hear “Not registered ” through<br />
the headset earpiece when you press on the headset. The light on the<br />
headset flashes slowly and alternately in red and blue. To reset the headset,<br />
remove it from the headset charger and then place it back into its charger. Try<br />
the registration process again.<br />
•<br />
•<br />
You cannot register a headset if any other system handset or headset is<br />
in use.<br />
The headset must be deregistered before registering it to another<br />
telephone system.<br />
106
Appendix<br />
Deregister handsets/headsets<br />
If you want to replace a handset or headset, or reassign the designated<br />
handset number of a registered handset, you must deregister all handsets<br />
and headsets that are registered to the telephone base. Then register each<br />
handset and/or headset you wish to use individually.<br />
To make deregistration easier, read all of the instructions on this page before<br />
you begin.<br />
To deregister all handsets:<br />
1.<br />
2.<br />
3.<br />
4.<br />
Make sure that all handsets are out of the<br />
telephone base and handset chargers before<br />
you begin deregistration.<br />
Press and hold /FIND HANDSeT on the<br />
telephone base for about 10 seconds until the<br />
IN USe light flashes.<br />
Quickly press /FIND HANDSeT again. You<br />
must press /FIND HANDSeT while the IN USe<br />
light is still flashing. The IN USe light flashes for about five seconds. If the<br />
light stops flashing, start again with Step 1 above.<br />
All system handsets show Put handset on BASe to register and all<br />
headset lights flash slowly and alternately in red and blue. You hear<br />
a confirmation tone when deregistration completes. The deregistration<br />
process takes about 10 seconds to complete.<br />
If the deregistration process is successful, you hear “Not registered” through<br />
the headset earpiece when you press on the headset. If deregistration fails,<br />
you may need to reset the telephone and try again.<br />
To reset:<br />
1. Press and hold oFF/CANCeL or place the handset back in the<br />
telephone base.<br />
2. Pick up the registered headset and press the ReSeT inset button with a<br />
paper clip or similar object.<br />
- oR -<br />
• Unplug the power from the telephone base, then plug it back in.<br />
•<br />
•<br />
You cannot deregister the handsets and headsets if any system handset or<br />
headset is in use.<br />
Even if the battery is depleted, you can still deregister the handsets by<br />
following the steps above.<br />
107
Appendix<br />
Troubleshooting<br />
If you have difficulty with your telephone or headset, please try the<br />
suggestions below. For customer service, visit our website at<br />
www.vtechphones.com or call 1 (800) 595-9511. In Canada, go to<br />
www.vtechcanada.com or dial 1 (800) 267-7377.<br />
I cannot add my cell phone to the telephone base.<br />
•<br />
•<br />
•<br />
•<br />
•<br />
•<br />
•<br />
Make sure you have cellular coverage.<br />
Make sure your cell phone is compatible with your DS6472. Check the Bluetooth<br />
compatibility list at www.vtechphones.com.<br />
Make sure the Bluetooth function of your cell phone is turned on. See the user’s<br />
<strong>manual</strong> of your cell phone for more information.<br />
Remove <strong>VTech</strong> DS6472 from your cell phone’s handsfree device history list (see<br />
the user’s <strong>manual</strong> of your cell phone for more information).<br />
Carefully follow the pairing instructions on page 24 and make sure that your cell<br />
phone is not connected to any other Bluetooth device.<br />
Turn off your cell phone, then turn it on again.<br />
Reset the telephone base. Unplug the unit’s electrical power. Wait for<br />
approximately 15 seconds, then plug it back in. Repeat the above suggestions.<br />
I cannot add my Bluetooth headset to the telephone base.<br />
• Make sure that your Bluetooth headset is in discoverable mode when pairing with<br />
the telephone base. See the user’s <strong>manual</strong> of your headset for more information<br />
on how to set your headset to discoverable mode.<br />
• Carefully follow the pairing instructions on page 26 and make sure that your<br />
headset is not connected to any other Bluetooth device.<br />
• Reset the telephone base. Unplug the unit’s electrical power. Wait for<br />
approximately 15 seconds, then plug it back in. Repeat the above suggestions.<br />
I cannot connect my cell phone with the telephone base.<br />
• Make sure that the Bluetooth function of your cell phone is turned on. See the<br />
user’s <strong>manual</strong> of your cell phone for more information.<br />
• Make sure that your Bluetooth cell phone is not connected to any other<br />
Bluetooth device.<br />
• Turn off your cell phone, then turn it on again.<br />
• Make sure that your cell phone is connected and active on the device list.<br />
• For some cell phones, you must authorize <strong>VTech</strong> DS6472 device in your cell<br />
phone’s Bluetooth feature. See the user’s <strong>manual</strong> of your cell phone for<br />
more information.<br />
• Manually connect your cell phone to <strong>VTech</strong> DS6472. Refer to the user’s <strong>manual</strong> of<br />
your cell phone for more information.<br />
I cannot connect my Bluetooth headset with the telephone base.<br />
• Make sure that your Bluetooth headset is not connected to any other<br />
Bluetooth device.<br />
• Make sure that your Bluetooth headset is connected and active on the device list.<br />
108
Appendix<br />
Troubleshooting<br />
I cannot put my Bluetooth headset in discoverable mode.<br />
• Refer to the user’s <strong>manual</strong> of your Bluetooth headset for information on how to set<br />
your headset to discoverable mode.<br />
• Make sure that the Bluetooth headset is not connected to any other Bluetooth<br />
device in order to successfully pair and connect to the telephone base.<br />
• Carefully follow the pairing process on page 26.<br />
• Reset the telephone base. Unplug the unit’s electrical power. Wait for<br />
approximately 15 seconds, then plug it back in. Repeat the above suggestions.<br />
I cannot find <strong>VTech</strong> DS6472 on my cell phone.<br />
• Make sure that the telephone base is in discoverable mode. Carefully follow the<br />
setup instructions on page 24.<br />
• Make sure that you <strong>manual</strong>ly set your cell phone to search for devices.<br />
• Remove <strong>VTech</strong> DS6472 from your cell phone’s handsfree device history list (see<br />
the user’s <strong>manual</strong> of your cell phone).<br />
• Turn off your cell phone, then turn it on again.<br />
• Reset the telephone base. Unplug the unit’s electrical power. Wait for<br />
approximately 15 seconds, then plug it back in. Repeat the above suggestions.<br />
I don’t know how to search for or add new devices on my cell phone.<br />
• Most cell phones have the Bluetooth feature in the connection or setup menus.<br />
Please refer to the user’s <strong>manual</strong> of your cell phone.<br />
• In general, press the menu key on your cell phone, then look for the Bluetooth<br />
menu in the settings or connection menu. In the Bluetooth menu, select the option<br />
to search for or add new devices.<br />
my cell phone disconnects with the telephone base.<br />
•<br />
•<br />
Turn off your cell phone, then turn it on again.<br />
Make sure that you are not using your cell phone when on a cell call.<br />
My cell phone is connected to the telephone base, but I cannot make a<br />
cell call.<br />
• Make sure that your cell phone is not in use when you are trying to make a<br />
cell call.<br />
• For some smartphones, make sure that the cellular function is turned on.<br />
Bluetooth system busy appears on the display.<br />
•<br />
•<br />
•<br />
Make sure that your cell phone is not in use when connected and active on the<br />
device list.<br />
Make sure that your Bluetooth cell phone or headset is not connected to any other<br />
Bluetooth device.<br />
DS6472 can only use one Bluetooth device at a time.<br />
109
Appendix<br />
Troubleshooting<br />
The PIN on the telephone base does not work.<br />
•<br />
•<br />
The default PIN is 0000.<br />
If you have changed the PIN, it will appear on the handset in the<br />
pairing process.<br />
I cannot hear any audio on my telephone system when on a cell call.<br />
• Reset the telephone base. Unplug the unit’s electrical power. Wait for<br />
approximately 15 seconds, then plug it back in.<br />
• Turn off your cell phone, then turn it on again.<br />
I cannot download contacts from my cell phone to the DS6472.<br />
•<br />
•<br />
•<br />
Make sure that your cell phone is paired and connected to the base.<br />
Make sure you place your cell phone next to the base while downloading.<br />
If your cell phone does not support the download, you can send the directory from<br />
your cell phone. The system can receive the directory automatically.<br />
I see duplicate entries in my downloaded directory<br />
• If you see duplicate directory entries, you can delete them <strong>manual</strong>ly. Another<br />
option is to download again either your SIM card or phone memory, but not both.<br />
Some of my cell phone contacts were not imported to the DS6472.<br />
• Make sure to try transferring the contacts from your SIM card to your phone<br />
memory first, then download from your phone memory. If that doesn’t work,<br />
try transferring the contacts from your phone memory to your SIM card, then<br />
download from your SIM card. For more information on how to transfer contacts<br />
between your SIM card and your phone memory, refer to the user’s <strong>manual</strong> of your<br />
cell phone.<br />
Can the DS6472 help the poor cell phone reception in my house?<br />
• If your cell phone has poor reception in your home, the DS6472 cannot improve<br />
the reception. However, if there is a location in your house with better reception,<br />
you can leave your cell phone at that location while you use DS6472 cell line. In<br />
order for this to work, the telephone base must be within 30 feet of the cell phone.<br />
The listening volume of my cell call is too loud or quiet.<br />
• During a cell call, if the listening volume is to too loud or quiet, try changing the<br />
volume on your cell phone. On some cell phones, changing the volume on the cell<br />
phone effects your cell call volume on the DS6472 handset.<br />
110
Appendix<br />
Troubleshooting<br />
my telephone does not work at all.<br />
• Make sure the battery is installed and charged correctly (page 4). For optimum<br />
daily performance, return the handset to the telephone base or charger after use.<br />
• Make sure the power adapter is securely plugged into an outlet not controlled by a<br />
wall switch.<br />
• Make sure the telephone line cord is plugged firmly into the telephone base and<br />
the telephone wall jack.<br />
• Unplug the electrical power to the telephone base. Wait for approximately 15<br />
seconds, then plug it back in. Allow up to one minute for the cordless handset and<br />
telephone base to synchronize.<br />
• Charge the battery in the handset for up to 16 hours.<br />
• If the battery is completely depleted, charge it for at least 30 minutes before<br />
use (page 5).<br />
• Remove and install the battery again. If that still does not work, it may be necessary<br />
to purchase a new battery.<br />
• Disconnect the telephone base from the telephone wall jack and plug in a working<br />
telephone. If the other telephone does not work, the problem is probably in the<br />
wiring or telephone service. Call the telephone service provider.<br />
Low battery shows on screen.<br />
•<br />
•<br />
•<br />
Place the handset in the telephone base or charger for recharging.<br />
Remove and install the battery again and use it until fully depleted, then recharge<br />
the handset in the telephone base or charger for up to 16 hours.<br />
If the above measures do not correct the problem, replace the battery.<br />
The battery does not charge in the handset or the handset battery does<br />
not accept charge.<br />
• Make sure the handset is placed in the telephone base or charger correctly. The<br />
CHARGe light on the handset should be on.<br />
• Remove and install the battery again, then charge for up to 16 hours.<br />
• If the handset is in the telephone base or charger but the CHARGe light on the<br />
handset is not on, refer to The CHARGe light is off below.<br />
• If the battery is completely depleted, charge it for at least 30 minutes before<br />
use (page 5).<br />
• Purchase a new battery.<br />
The CHARGe light is off.<br />
• Clean the charging contacts on the handset, telephone base and charger each<br />
month with a pencil eraser or a dry non-abrasive fabric.<br />
• Make sure the power adapter and telephone line cord are plugged in correctly<br />
and securely.<br />
• Unplug the power adapter. Wait for 15 seconds before plugging it back in. Allow up<br />
to one minute for the handset and telephone base to reset.<br />
111
Appendix<br />
Troubleshooting<br />
There is no dial tone.<br />
•<br />
•<br />
•<br />
•<br />
Try all the above suggestions.<br />
Move the handset closer to the telephone base. It may be out of range.<br />
The telephone line cord may be defective. Install a new telephone line cord.<br />
Disconnect the telephone base from the telephone wall jack and connect a<br />
different telephone. If there is no dial tone on this telephone either, the problem is<br />
in your wiring or telephone service. Contact your telephone service provider.<br />
The telephone does not ring when there is an incoming call.<br />
• Make sure the handset ringer volume is not set to off (page 36) and the telephone<br />
base ringer volume is not set to off (page 48).<br />
• Make sure the telephone line cord and power adapter are plugged in properly<br />
(page 3).<br />
• The handset may be too far from the telephone base. Move it closer to the<br />
telephone base.<br />
• There may be too many extension phones on the telephone line to allow all of them<br />
to ring simultaneously. Unplug some of them.<br />
• If other telephones in your home are having the same problem, the problem is in<br />
the wiring or telephone service. Contact your telephone service provider (charges<br />
may apply).<br />
• Other electronic products such as HAM radios and other DECT phones can cause<br />
interference with your cordless phone. Try installing your phone as far away as<br />
possible from these types of electronic devices.<br />
• Test a working telephone at the telephone wall jack. If another telephone has the<br />
same problem, the problem is in the telephone wall jack. Contact your telephone<br />
service provider (charges may apply).<br />
• The telephone line cord may be defective. Install a new telephone line cord.<br />
• Remove and install the battery again and then place the handset in the telephone<br />
base or charger.<br />
• Wait for the handset to synchronize with the telephone base. Allow up to one<br />
minute for this to take place.<br />
I cannot dial out.<br />
•<br />
•<br />
•<br />
•<br />
Try all the above suggestions.<br />
Make sure there is a dial tone before dialing. It is normal if the handset takes a<br />
second or two to synchronize with the telephone before producing a dial tone. Wait<br />
an extra second before dialing.<br />
If other telephones in your home are having the same problem, the problem is in<br />
the wiring or telephone service. Contact your telephone service provider (charges<br />
may apply).<br />
Eliminate any background noise. Mute the cordless handset before dialing, or dial<br />
from another room in your home with less background noise.<br />
112
Appendix<br />
Troubleshooting<br />
my handset beeps and is not performing normally.<br />
• Make sure the power cord is securely plugged into the telephone base. Plug<br />
the telephone base into a different working electrical outlet not controlled by a<br />
wall switch.<br />
• Move the handset closer to the telephone base. It may be out of range.<br />
• Reset the telephone base by unplugging the electrical power to the base. Wait<br />
for 15 seconds and plug it back in again. Allow up to one minute for the cordless<br />
handset and the telephone base to synchronize.<br />
• Other electronic products such as HAM radios and other DECT phones can cause<br />
interference with your cordless phone. Try installing your phone as far away as<br />
possible from these types of electronic devices.<br />
There is interference during a telephone conversation.<br />
my calls fade out when I am using the cordless handset/headset.<br />
• The handset or headset may be out of range. Move it closer to the telephone base.<br />
• If you subscribe to high-speed Internet service (DSL - digital subscriber line)<br />
through your telephone line, you must install a DSL filter between the telephone<br />
line cord and the telephone wall jack. The filter prevents noise and caller ID<br />
problems caused by DSL interference. Please contact your DSL service provider<br />
for more information about DSL filters.<br />
• Appliances or other cordless telephones plugged into the same circuit as the<br />
telephone base can cause interference. Try moving the appliance or telephone<br />
base to another outlet.<br />
• Other electronic products such as HAM radios and other DECT phones can cause<br />
interference with your cordless phone. Try installing your phone as far away as<br />
possible from these types of electronic devices.<br />
• If your telephone is plugged in with a modem or a surge protector, plug the<br />
telephone (or modem/surge protector) into a different location. If this doesn’t solve<br />
the problem, relocate your telephone or modem farther apart from each other, or<br />
use a different surge protector.<br />
• The location of your telephone base can impact the performance of your cordless<br />
phone or headset. For better reception, install the telephone base in a centralized<br />
location within your home or office, away from walls or other obstructions. In many<br />
environments, elevating the telephone base improves overall performance.<br />
• Disconnect the telephone base from the telephone wall jack and plug in a corded<br />
telephone. If calls are still not clear, the problem is probably in the wiring or<br />
telephone service. Contact your telephone service provider (charges may apply).<br />
• If other telephones in your home are having the same problem, the problem<br />
is in the wiring or telephone service. Contact your telephone service provider<br />
(charges may apply).<br />
I hear other calls when using the cordless handset/headset.<br />
•<br />
Disconnect the telephone base from the telephone wall jack. Plug in a different<br />
telephone. If you still hear other calls, the problem is probably in the wiring or<br />
telephone service. Call your telephone service provider.<br />
113
Appendix<br />
Troubleshooting<br />
I hear noise on the cordless handset and the keys do not work.<br />
• Make sure the telephone line cord is plugged in securely.<br />
Registration failed appears on the handset.<br />
• Only one handset can be registered at a time. If you have multiple handsets to<br />
register, please follow the instructions on page 105 for the first handset. Once a<br />
handset has been successfully registered, repeat the steps for each handset that<br />
needs to be registered.<br />
• Make sure that the telephone base, handsets and headsets are in idle mode when<br />
registering a handset.<br />
• Follow the steps on page 120 for the common cure for electronic equipment, then<br />
try again to register a handset.<br />
• If you have already registered the maximum numbers of handsets and/or<br />
headsets, you need to follow the deregistration instructions before registering a<br />
handset. Refer to expand your telephone system on page 105 and Deregister<br />
handsets/headsets on page 107.<br />
my headset does not work at all.<br />
• Make sure the telephone line cord is plugged firmly into the telephone base and the<br />
telephone wall jack.<br />
• Charge the headset in the headset charger for up to three hours.<br />
• Unplug the electrical power to the telephone base. Wait for approximately 15<br />
seconds, then plug it back in. Allow up to one minute for the cordless headset and<br />
telephone base to synchronize.<br />
• Other electronic products such as HAM radios and other DECT phones can cause<br />
interference with your cordless phone. Try installing your phone as far away as<br />
possible from these types of electronic devices.<br />
• If the headset battery is completely depleted, it may take up to 15 minutes to charge<br />
the headset before the headset has enough charge to use for a short time.<br />
• The headset battery may be defective. Contact our customer service for assistance.<br />
I cannot dial out from my cordless headset.<br />
• You must use a telephone on the same line to dial out. Once you have dialed<br />
the number, you can press on the headset to take the call. After the headset is<br />
activated, you can hang up the handset from which you dialed from.<br />
• If other telephones in your home are having the same problem, the problem is in<br />
your wiring or telephone service. Contact your telephone service provider (charges<br />
may apply).<br />
The blue or red light keeps flashing on the headset key.<br />
•<br />
Different flashing patterns of the red and/or blue lights indicate different conditions<br />
of the headset. See Headset indicators on page 102.<br />
114
Appendix<br />
Troubleshooting<br />
The headset does not charge in the headset charger.<br />
• Make sure the headset charger adapter is securely plugged into an electrical<br />
outlet (page 3). For optimum daily performance, return the headset to the headset<br />
charger after use.<br />
• Make sure the cordless headset is placed in the headset charger correctly. The<br />
headset light should be on.<br />
• Unplug the power adapter and then plug it back, then charge for up to three hours.<br />
• If the cordless headset is in the headset charger and the headset light is not on,<br />
refer to The light on the headset is off while charging below.<br />
• If the battery is completely depleted, it may take up to 15 minutes to charge the<br />
headset before it has enough charge to be used for a short time. For optimum daily<br />
performance, return the cordless headset to the headset charger when not in use.<br />
• The headset battery may be defective. Contact our customer service for<br />
assistance.<br />
The light on the headset is off while charging.<br />
• Make sure the power adapter is correctly and securely plugged in the electrical<br />
outlet.<br />
• Make sure the headset is sitting properly in the headset charger to charge.<br />
• Clean the charging contacts on the headset and headset charger each month with<br />
a pencil eraser or a dry non-abrasive fabric.<br />
• Unplug the power adapter. Wait for 15 seconds before plugging it back in.<br />
my cordless headset is not performing normally.<br />
• Make sure the power cord is correctly and securely plugged into the telephone base.<br />
Plug the telephone base into a different working electrical outlet not controlled by a<br />
wall switch.<br />
• Move the cordless headset closer to the telephone base. It may be out of range.<br />
• Other electronic products such as HAM radios and other DECT phones can cause<br />
interference with your cordless phone. Try installing your phone as far away as<br />
possible from these types of electronic devices.<br />
•<br />
If your have tried the above suggestions and the headset is still not performing<br />
normally, press the ReSeT inset button with a paper clip or similar object once to<br />
restart the headset.<br />
115
Appendix<br />
Troubleshooting<br />
I cannot hear any ring tone from the cordless headset when there is an<br />
incoming call.<br />
•<br />
•<br />
•<br />
•<br />
•<br />
•<br />
•<br />
•<br />
•<br />
•<br />
The headset does not have an external ringer. The ring tone can only be heard<br />
through the headset earpiece.<br />
Make sure the headset ringer volume is not set to the lowest level (page 36).<br />
If you have pressed mUTe/FLASH on the cordless headset when it is ringing, it<br />
mutes the ring tone of the headset. The ring tone resumes on the next call.<br />
The headset may be too far from the telephone base. Move it closer to the<br />
telephone base.<br />
You may have too many extension phones on the telephone line to allow all of them<br />
to ring simultaneously. Unplug some of them.<br />
The layout of your home or office may be limiting the operating range. Try moving<br />
the telephone base to another location, preferably on a higher location.<br />
If other telephones in your home are having the same problem, the problem is in<br />
the wiring or telephone service. Contact your telephone service provider.<br />
Other electronic products such as HAM radios and other DECT phones can cause<br />
interference with your cordless phone. Try installing your phone as far away as<br />
possible from these types of electronic devices.<br />
Test a working telephone at the telephone wall jack. If another telephone has the<br />
same problem, there may be problem with the telephone wall jack. Contact your<br />
telephone service provider.<br />
The telephone line cord may be defective. Install a new telephone line cord.<br />
I cannot register a cordless headset.<br />
•<br />
•<br />
•<br />
•<br />
Only two headsets can be registered to this telephone system (page 106).<br />
If you have already registered the maximum numbers of handsets and/or headsets,<br />
you need to follow the deregistration instructions before registering a headset.<br />
Refer to expand your telephone system on page 105 and Deregister handsets/<br />
headsets on page 107.<br />
Make sure that all registered handsets, headsets and the telephone base are in idle<br />
mode when registering a headset.<br />
Follow the steps in Common cure for electronic equipment (page 120), then try<br />
again to register a headset.<br />
116
Appendix<br />
Troubleshooting<br />
my caller ID features are not working properly.<br />
• Caller ID is a subscription service. You must subscribe to this service from your<br />
telephone service provider for this feature to work on your telephone.<br />
• The caller may not be calling from an area which supports caller ID.<br />
• Both your and the caller’s telephone service providers must use equipment<br />
compatible with the caller ID service.<br />
• The caller ID information shows after the first or second ring.<br />
• If you subscribe to high-speed Internet service (DSL - digital subscriber line)<br />
through your telephone line, you must install a DSL filter between the telephone<br />
line cord and the telephone wall jack. The filter prevents noise and caller ID<br />
problems caused by DSL interference. Contact your DSL service provider for more<br />
information about DSL filters.<br />
The telephone does not receive caller ID or the telephone does not<br />
show caller ID during call waiting.<br />
• Make sure you subscribe to caller ID with call waiting features provided by your<br />
telephone service provider.<br />
• The caller may not be calling from an area which supports caller ID.<br />
• Both your and the caller’s telephone service providers must use equipment<br />
compatible with caller ID service.<br />
• If you subscribe to high-speed Internet service (DSL - digital subscriber line)<br />
through your telephone line, you must install a DSL filter between the telephone<br />
line cord and the telephone wall jack. The filter prevents noise and caller ID<br />
problems caused by DSL interference. Contact your DSL service provider for more<br />
information about DSL filters.<br />
Caller ID entries do not match the numbers I need to dial.<br />
• Caller ID service delivers 10 digits (the area code plus the seven-digits number).<br />
If you need to dial something other 10 digits, see page 78 for instructions on<br />
changing the number.<br />
• If you dial seven digits for local calls, you may want to use the home area code<br />
feature (page 46).<br />
out of range oR No power at base shows on the handset.<br />
•<br />
•<br />
•<br />
•<br />
The handset may be out of range. Move it closer to the telephone base.<br />
Make sure the power cord is securely plugged into the telephone base. Use a<br />
working electrical outlet not controlled by a wall switch.<br />
Reset your telephone by unplugging the power adapter from the telephone base.<br />
Disconnect the battery from the cordless handset. Wait for 15 seconds, then plug in<br />
the power adapter and reinstall the battery. Place the handset in the telephone base<br />
and allow up to one minute for the handset and telephone base to synchronize.<br />
Other electronic products such as HAM radios and other DECT phones can cause<br />
interference with your cordless phone. Try installing your phone as far away as<br />
possible from these types of electronic devices.<br />
117
Appendix<br />
Troubleshooting<br />
•<br />
and New voicemail appear on the handsets and I don’t know why.<br />
Your telephone has voicemail indication that is separate from the built-in<br />
answering system. If and New voicemail appear on the handsets, your<br />
telephone has received a signal from your telephone service provider that you<br />
have a voicemail message waiting for you to retrieve from your telephone service<br />
provider. Contact your telephone service provider for more information on how to<br />
access your voicemail.<br />
I cannot retrieve my voicemail messages.<br />
• Your telephone has both a built-in answering system and voicemail indication.<br />
They are independent features and each alerts you to new messages differently<br />
(page 88). If you subscribe to voicemail service from your telephone service<br />
provider, contact your telephone service provider for more information on how to<br />
access your voicemail.<br />
The answering system does not answer after the correct number<br />
of rings.<br />
• Make sure the answering system is on. When the answering system is on,<br />
ANS oN should be shown on the handset and /ANS oN/oFF light on the<br />
telephone base should be on.<br />
• If toll saver is selected, the number of rings changes to two when there are new<br />
messages waiting (page 85).<br />
• If the memory is full or if the answering system is off, the answering system<br />
answers after 10 rings.<br />
• In some cases, the answering system is affected by the ringing system used by the<br />
telephone service provider.<br />
• If you subscribe to voicemail service, change the number of rings so that your<br />
answering system answers before your voicemail answers (page 85). To determine<br />
how many rings activate your voicemail, contact your telephone service provider.<br />
• If there is a fax machine connected to the same telephone line, try disconnecting<br />
the fax machine. If that solves the problem, consult your fax machine<br />
documentation for information on compatibility with answering systems.<br />
The outgoing announcement is not clear.<br />
• When recording the announcement, make sure you speak in a normal tone of<br />
voice towards the microphone of the handset.<br />
• Make sure there is no background noise when recording.<br />
The messages on the answering system are very difficult to hear.<br />
•<br />
Press /VoL on the side of telephone base or VoL/ / on the handset to<br />
increase the speaker volume.<br />
118
Appendix<br />
Troubleshooting<br />
The answering system does not record messages.<br />
•<br />
•<br />
•<br />
•<br />
Make sure the answering system is on.<br />
When the answering machine memory is full, it does not record new messages<br />
until some old messages are deleted.<br />
If you subscribe to voicemail service, change the number of rings so that your<br />
answering system answers before your voicemail answers (page 85).<br />
To determine how many rings activate your voicemail, contact your telephone<br />
service provider.<br />
If there is a fax machine connected to the same telephone line, try disconnecting<br />
the fax machine. If that solves the problem, consult your fax machine<br />
documentation for information on compatibility with answering systems.<br />
The messages on the answering system are incomplete.<br />
• If a caller leaves a very long message, part of it may be lost when the answering<br />
system disconnects the call after three minutes or the recording time set.<br />
• If the memory on the answering system becomes full during a message, the<br />
answering system stops recording and disconnects the call.<br />
• If the caller’s voice is very soft, the answering system may stop recording and<br />
disconnect the call.<br />
The answering system does not respond to remote commands.<br />
•<br />
•<br />
•<br />
•<br />
Make sure your remote access code is correct (page 86).<br />
Make sure you are calling from a touch-tone telephone. When dialing a number,<br />
there should be tones. If there are clicks, then it is not a touch-tone telephone and<br />
cannot activate the answering system.<br />
The answering system may not detect the remote access code when your<br />
announcement is playing. Wait until the announcement is over before entering<br />
the code.<br />
There may be interference on the telephone line you are using. Press the dialing<br />
keys firmly when dialing.<br />
I subscribe to a nontraditional telephone service that uses my<br />
computer to establish connections, and my telephone doesn’t work.<br />
• Make sure your computer is powered on.<br />
• Make sure your Internet connection is working properly.<br />
• Make sure that the software is installed and running for your nontraditional<br />
telephone service.<br />
• Make sure to plug your USB telephone adapter into a dedicated USB port on<br />
your computer. Do not plug into a multiple port USB hub (USB splitter) that is<br />
not powered.<br />
• In a few rare instances, the USB port on your computer may not have enough<br />
power. In these instances, try using a USB hub with its own external power supply.<br />
• If you are using a firewall, it may prevent access to your nontraditional telephone<br />
service. Contact your service provider for more information.<br />
119
Appendix<br />
Troubleshooting<br />
Common cure for electronic equipment.<br />
• If the telephone is not responding normally, put the cordless handset in the<br />
telephone base. If it does not fix the problem, try the following (in the order listed):<br />
1. Disconnect the power to the telephone base.<br />
2. Disconnect the battery on the cordless handset.<br />
3. Wait a few minutes before connecting power to the telephone base.<br />
4. Install the battery again and place the cordless handset in the telephone base.<br />
5. Wait for the cordless handset to synchronize with the telephone base. Allow<br />
up to one minute for this to take place.<br />
120
Appendix<br />
Important safety instructions<br />
When using your telephone equipment, basic safety precautions should always be followed to<br />
reduce the risk of fire, electric shock and injury, including the following:<br />
1.<br />
2.<br />
3.<br />
4.<br />
5.<br />
6.<br />
7.<br />
8.<br />
9.<br />
10.<br />
11.<br />
12.<br />
Read and understand all instructions.<br />
Follow all warnings and instructions marked on the product.<br />
Unplug this product from the wall outlet before cleaning. Do not use liquid or aerosol cleaners.<br />
Use a dry non-abrasive cloth for cleaning.<br />
Do not use this product near water such as near a bath tub, wash bowl, kitchen sink, laundry<br />
tub or swimming pool, or in a wet basement or shower.<br />
Do not place this product on an unstable table, shelf, stand or other unstable surfaces.<br />
Slots and openings in the back or bottom of the telephone base and handset are provided for<br />
ventilation. To protect them from overheating, these openings must not be blocked by placing<br />
the product on a soft surface such as a bed, sofa or rug. This product should never be placed<br />
near or over a radiator or heat register. This product should not be placed in any area where<br />
proper ventilation is not provided.<br />
This product should be operated only from the type of power source indicated on the marking<br />
label. If you are not sure of the type of power supply in your home or office, consult your<br />
dealer or local power company.<br />
Do not allow anything to rest on the power cord. Do not install this product where the cord<br />
may be walked on.<br />
Never push objects of any kind into this product through the slots in the telephone base or<br />
handset because they may touch dangerous voltage points or create a short circuit. Never<br />
spill liquid of any kind on the product.<br />
To reduce the risk of electric shock, do not disassemble this product, but take it to an<br />
authorized service facility. Opening or removing parts of the telephone base or handset other<br />
than specified access doors may expose you to dangerous voltages or other risks. Incorrect<br />
reassembling can cause electric shock when the product is subsequently used.<br />
Do not overload wall outlets and extension cords.<br />
Unplug this product from the wall outlet and refer servicing to an authorized service facility<br />
under the following conditions:<br />
A.<br />
B.<br />
C.<br />
D.<br />
E.<br />
F.<br />
13.<br />
14.<br />
15.<br />
16.<br />
When the power supply cord or plug is damaged or frayed.<br />
If liquid has been spilled onto the product.<br />
If the product has been exposed to rain or water.<br />
If the product does not operate normally by following the operating instructions. Adjust only<br />
those controls that are covered by the operation instructions. Improper adjustment of other<br />
controls may result in damage and often requires extensive work by an authorized technician<br />
to restore the product to normal operation.<br />
If the product has been dropped and the telephone base and/or handset has been damaged.<br />
If the product exhibits a distinct change in performance.<br />
Avoid using a telephone (other than cordless) during an electrical storm. There is a remote<br />
risk of electric shock from lightning.<br />
Do not use the telephone to report a gas leak in the vicinity of the leak. Under certain<br />
circumstances, a spark may be created when the adapter is plugged into the power outlet,<br />
or when the handset is replaced in its cradle. This is a common event associated with the<br />
closing of any electrical circuit. The user should not plug the phone into a power outlet, and<br />
should not put a charged handset into the cradle, if the phone is located in an environment<br />
containing concentrations of flammable or flame-supporting gases, unless there is<br />
adequate ventilation. A spark in such an environment could create a fire or explosion. Such<br />
environments might include: medical use of oxygen without adequate ventilation; industrial<br />
gases (cleaning solvents; gasoline vapors; etc.); a leak of natural gas; etc.<br />
Only put the handset of your telephone next to your ear when it is in normal talk mode.<br />
The power adapters are intended to be correctly oriented in a vertical or floor mount position.<br />
The prongs are not designed to hold the plug in place if it is plugged into a ceiling, under-thetable<br />
or cabinet outlet.<br />
SAVe THeSe INSTRUCTIoNS<br />
121
Appendix<br />
Precautions for users of implanted cardiac pacemakers<br />
Cardiac pacemakers (applies only to digital cordless telephones):<br />
Wireless Technology Research, LLC (WTR), an independent research entity, led a<br />
multidisciplinary evaluation of the interference between portable wireless telephones and<br />
implanted cardiac pacemakers. Supported by the U.S. Food and Drug Administration, WTR<br />
recommends to physicians that:<br />
Pacemaker patients:<br />
•<br />
•<br />
Should keep wireless telephones at least six inches from the pacemaker.<br />
Should NOT place wireless telephones directly over the pacemaker, such as in a breast pocket,<br />
when it is turned ON.<br />
•<br />
Should use the wireless telephone at the ear opposite the pacemaker.<br />
WTR’s evaluation did not identify any risk to bystanders with pacemakers from other persons<br />
using wireless telephones.<br />
operating range<br />
This cordless telephone operates with the maximum power allowed by the Federal<br />
<strong>Communications</strong> Commission (FCC). Even so, this handset and telephone base can communicate<br />
over only a certain distance - which can vary with the locations of the telephone base and<br />
handset, the weather, and the layout of your home or office.<br />
When the handset is out of range, the handset displays out of range oR No power at base.<br />
If there is a call while the handset is out of range, it might not ring, or if it does ring, the call might<br />
not connect well when you press /Home/FLASH. Move closer to the telephone base, then press<br />
/Home/FLASH to answer the call.<br />
If the handset moves out of range during a telephone conversation, there might be interference.<br />
To improve reception, move closer to the telephone base.<br />
maintenance<br />
Taking care of your telephone<br />
Your cordless telephone contains sophisticated electronic parts, so it must be treated with care.<br />
Avoid rough treatment<br />
Place the handset down gently. Save the original packing materials to protect your telephone if<br />
you ever need to ship it.<br />
Avoid water<br />
Your telephone can be damaged if it gets wet. Do not use the handset outdoors in the rain, or<br />
handle it with wet hands. Do not install the telephone base near a sink, bathtub or shower.<br />
electrical storms<br />
Electrical storms can sometimes cause power surges harmful to electronic equipment. For your<br />
own safety, take caution when using electrical appliances during storms.<br />
Cleaning your telephone<br />
Your telephone has a durable plastic casing that should retain its luster for many years. Clean<br />
it only with a soft cloth slightly dampened with water or mild soap. Do not use excess water or<br />
cleaning solvents of any kind.<br />
Remember that electrical appliances can cause serious injury if used when you are wet or<br />
standing in the water. If the telephone base should fall into the water, DO NOT RETRIEVE IT<br />
UNTIL YOU UNPLUG THE POWER CORD AND TELEPHONE LINE CORD FROM THE WALL.<br />
Then remove the telephone by the unplugged cords.<br />
122
Appendix<br />
About cordless telephones<br />
•<br />
•<br />
•<br />
•<br />
•<br />
Privacy: The same features that make a cordless telephone convenient create some<br />
limitations. Telephone calls are transmitted between the telephone base and the cordless<br />
handset by radio waves, so there is a possibility that the cordless telephone conversations<br />
could be intercepted by radio receiving equipment within range of the cordless handset. For<br />
this reason, you should not think of cordless telephone conversations as being as private as<br />
those on corded telephones.<br />
Electrical power: The telephone base of this cordless telephone must be connected to a<br />
working electrical outlet. The electrical outlet should not be controlled by a wall switch. Calls<br />
cannot be made from the cordless handset if the telephone base is unplugged, switched off,<br />
or if the electrical power is interrupted.<br />
Potential TV interference: Some cordless telephones operate at frequencies that may cause<br />
interference to televisions and VCRs. To minimize or prevent such interference, do not place<br />
the telephone base of the cordless telephone near or on top of a TV or VCR. If interference is<br />
experienced, moving the cordless telephone farther away from the TV or VCR often reduces<br />
or eliminates the interference.<br />
Rechargeable batteries: Exercise care in handling batteries in order not to create a short<br />
circuit with conducting material such as rings, bracelets and keys. The battery or conductor<br />
may overheat and cause harm. Observe proper polarity between the battery and the<br />
battery charger.<br />
Nickel-metal hydride rechargeable batteries: Dispose of these batteries in a safe manner. Do<br />
not burn or puncture the battery. Like other batteries of this type, if burned or punctured, they<br />
could release caustic material which could cause injury.<br />
The RBRC ® seal<br />
The RBRC ® seal on the nickel-metal hydride battery indicates that <strong>VTech</strong><br />
<strong>Communications</strong>, Inc. is voluntarily participating in an industry program to collect<br />
and recycle these batteries at the end of their useful lives, when taken out of service<br />
within the United States and Canada.<br />
The RBRC ® program provides a convenient alternative to placing used nickel-metal<br />
hydride batteries into the trash or municipal waste, which may be illegal in your area.<br />
<strong>VTech</strong>’s participation in RBRC ® makes it easy for you to drop off the spent battery<br />
at local retailers participating in the RBRC ® program or at authorized <strong>VTech</strong> product<br />
service centers. Please call 1-800-8-BATTeRY Tm for information on Ni-MH battery<br />
recycling and disposal bans/restrictions in your area. <strong>VTech</strong>’s involvement in this<br />
program is part of its commitment to protecting our environment and conserving<br />
natural resources.<br />
RBRC ® is a registered trademark of Rechargeable Battery Recycling<br />
Corporation.<br />
The RBRC ® seal on the lithium-ion battery indicates that <strong>VTech</strong><br />
<strong>Communications</strong>, Inc. is voluntarily participating in an industry program to<br />
collect and recycle these batteries at the end of their useful lives, when taken<br />
out of service within the United States and Canada.<br />
The RBRC ® program provides a convenient alternative to placing used lithiumion<br />
batteries into the trash or municipal waste, which may be illegal in your area.<br />
<strong>VTech</strong>’s participation in RBRC ® makes it easy for you to drop off the spent<br />
battery at local retailers participating in the RBRC ® program or at authorized<br />
<strong>VTech</strong> product service centers. Please call 1 (800) 8 BATTeRY Tm for<br />
information on Li-ion battery recycling and disposal bans/restrictions in<br />
your area. <strong>VTech</strong>’s involvement in this program is part of its commitment to<br />
protecting our environment and conserving natural resources.<br />
RBRC ® is a registered trademark of Rechargeable Battery Recycling<br />
Corporation.<br />
123
Appendix<br />
Limited warranty<br />
What does this limited warranty cover?<br />
The manufacturer of this <strong>VTech</strong> Product warrants to the holder of a valid proof of purchase<br />
(“Consumer” or “you”) that the Product and all accessories provided in the sales package<br />
(“Product”) are free from defects in material and workmanship, pursuant to the following terms<br />
and conditions, when installed and used normally and in accordance with the Product operating<br />
instructions. This limited warranty extends only to the Consumer for Products purchased and used<br />
in the United States of America and Canada.<br />
What will <strong>VTech</strong> do if the Product is not free from defects in materials and workmanship<br />
during the limited warranty period (“materially Defective Product”)?<br />
During the limited warranty period, <strong>VTech</strong>’s authorized service representative will repair or replace<br />
at <strong>VTech</strong>’s option, without charge, a Materially Defective Product. If we repair the Product, we may<br />
use new or refurbished replacement parts. If we choose to replace the Product, we may replace<br />
it with a new or refurbished Product of the same or similar design. We will retain defective parts,<br />
modules, or equipment. Repair or replacement of the Product, at <strong>VTech</strong>’s option, is your exclusive<br />
remedy. <strong>VTech</strong> will return the repaired or replacement Products to you in working condition. You<br />
should expect the repair or replacement to take approximately 30 days.<br />
How long is the limited warranty period?<br />
The limited warranty period for the Product extends for ONE (1) YEAR from the date of purchase.<br />
If <strong>VTech</strong> repairs or replaces a Materially Defective Product under the terms of this limited warranty,<br />
this limited warranty also applies to repaired or replacement Product for a period of either (a) 90<br />
days from the date the repaired or replacement Product is shipped to you or (b) the time remaining<br />
on the original one-year warranty; whichever is longer.<br />
What is not covered by this limited warranty?<br />
This limited warranty does not cover:<br />
1.<br />
2.<br />
3.<br />
4.<br />
5.<br />
6.<br />
7.<br />
8.<br />
Product that has been subjected to misuse, accident, shipping or other physical damage,<br />
improper installation, abnormal operation or handling, neglect, inundation, fire, water or other<br />
liquid intrusion; or<br />
Product that has been damaged due to repair, alteration or modification by anyone other than<br />
an authorized service representative of <strong>VTech</strong>; or<br />
Product to the extent that the problem experienced is caused by signal conditions, network<br />
reliability, or cable or antenna systems; or<br />
Product to the extent that the problem is caused by use with non-<strong>VTech</strong> accessories; or<br />
Product whose warranty/quality stickers, product serial number plates or electronic serial<br />
numbers have been removed, altered or rendered illegible; or<br />
Product purchased, used, serviced, or shipped for repair from outside the United States of<br />
America or Canada, or used for commercial or institutional purposes (including but not limited<br />
to Products used for rental purposes); or<br />
Product returned without a valid proof of purchase (see item 2 on the next page); or<br />
Charges for installation or set up, adjustment of customer controls, and installation or repair of<br />
systems outside the unit.<br />
124
Appendix<br />
Limited warranty (continued)<br />
How do you get warranty service?<br />
To obtain warranty service, please visit our website at www.vtechphones.com or call 1 (800)<br />
595-9511. In Canada, go to www.vtechcanada.com or dial 1 (800) 267-7377. NOTE: Before calling<br />
for service, please review the user’s <strong>manual</strong> - a check of the Product’s controls and features may<br />
save you a service call.<br />
Except as provided by applicable law, you assume the risk of loss or damage during transit and<br />
transportation and are responsible for delivery or handling charges incurred in the transport of<br />
the Product(s) to the service location. <strong>VTech</strong> will return repaired or replaced Product under this<br />
limited warranty. Transportation, delivery or handling charges are prepaid. <strong>VTech</strong> assumes no<br />
risk for damage or loss of the Product in transit. If the Product failure is not covered by this limited<br />
warranty, or proof of purchase does not meet the terms of this limited warranty, <strong>VTech</strong> will notify<br />
you and will request that you authorize the cost of repair prior to any further repair activity. You<br />
must pay for the cost of repair and return shipping costs for the repair of Products that are not<br />
covered by this limited warranty.<br />
What must you return with the Product to get warranty service?<br />
1.<br />
2.<br />
3.<br />
Return the entire original package and contents including the Product to the <strong>VTech</strong> service<br />
location along with a description of the malfunction or difficulty; and<br />
Include a “valid proof of purchase” (sales receipt) identifying the Product purchased (Product<br />
model) and the date of purchase or receipt; and<br />
Provide your name, complete and correct mailing address, and telephone number.<br />
other limitations<br />
This limited warranty is the complete and exclusive agreement between you and <strong>VTech</strong>. It<br />
supersedes all other written or oral communications related to this Product. <strong>VTech</strong> provides no other<br />
warranties for this Product. The limited warranty exclusively describes all of <strong>VTech</strong>’s responsibilities<br />
regarding the Product. There are no other express warranties. No one is authorized to make<br />
modifications to this limited warranty and you should not rely on any such modification.<br />
State/Provincial Law Rights: This limited warranty gives you specific legal rights, and you may also<br />
have other rights, which vary from state to state or province to province.<br />
Limitations: Implied warranties, including those of fitness for a particular purpose and<br />
merchantability (an unwritten warranty that the Product is fit for ordinary use) are limited to one<br />
year from the date of purchase. Some states/provinces do not allow limitations on how long an<br />
implied warranty lasts, so the above limitation may not apply to you. In no event shall <strong>VTech</strong> be<br />
liable for any indirect, special, incidental, consequential, or similar damages (including, but not<br />
limited to lost profits or revenue, inability to use the Product or other associated equipment, the<br />
cost of substitute equipment, and claims by third parties) resulting from the use of this Product.<br />
Some states/provinces do not allow the exclusion or limitation of incidental or consequential<br />
damages, so the above limitation or exclusion may not apply to you.<br />
Please retain your original sales receipt as proof of purchase.<br />
125
Appendix<br />
FCC, ACTA and IC regulations<br />
FCC Part 15<br />
This equipment has been tested and found to comply with the requirements for a Class B<br />
digital device under Part 15 of the Federal <strong>Communications</strong> Commission (FCC) rules. These<br />
requirements are intended to provide reasonable protection against harmful interference in a<br />
residential installation. This equipment generates, uses and can radiate radio frequency energy<br />
and, if not installed and used in accordance with the instructions, may cause harmful interference<br />
to radio communications. However, there is no guarantee that interference will not occur in a<br />
particular installation. If this equipment does cause harmful interference to radio or television<br />
reception, which can be determined by turning the equipment off and on, the user is encouraged<br />
to try to correct the interference by one or more of the following measures:<br />
•<br />
•<br />
•<br />
•<br />
Reorient or relocate the receiving antenna.<br />
Increase the separation between the equipment and receiver.<br />
Connect the equipment into an outlet on a circuit different from that to which the receiver<br />
is connected.<br />
Consult the dealer or an experienced radio/TV technician for help.<br />
Changes or modifications to this equipment not expressly approved by the party responsible for<br />
compliance could void the user’s authority to operate the equipment.<br />
This device complies with Part 15 of the FCC rules. Operation is subject to the following two<br />
conditions: (1) this device may not cause harmful interference, and (2) this device must accept<br />
any interference received, including interference that may cause undesired operation. Privacy of<br />
communications may not be ensured when using this telephone.<br />
To ensure safety of users, the FCC has established criteria for the amount of radio frequency<br />
energy that can be safely absorbed by a user or bystander according to the intended usage<br />
of the product. This product has been tested and found to comply with the FCC criteria. The<br />
handset may be safely held against the ear of the user. The telephone base shall be installed<br />
and used such that parts of the user’s body other than the hands are maintained at a distance of<br />
approximately 20 cm (8 inches) or more.<br />
This Class B digital apparatus complies with Canadian ICES-003.<br />
FCC Part 68 and ACTA<br />
This equipment complies with Part 68 of the FCC rules and with technical requirements adopted by<br />
the Administrative Council for Terminal Attachments (ACTA). The label on the back or bottom of this<br />
equipment contains, among other things, a product identifier in the format US:AAAEQ##TXXXX.<br />
This identifier must be provided to your telephone service provider upon request.<br />
The plug and jack used to connect this equipment to premises wiring and the telephone network<br />
must comply with applicable Part 68 rules and technical requirements adopted by ACTA. A<br />
compliant telephone cord and modular plug is provided with this product. It is designed to be<br />
connected to a compatible modular jack that is also compliant. An RJ11 jack should normally be<br />
used for connecting to a single line and an RJ14 jack for two lines. See the installation instructions<br />
in the user’s <strong>manual</strong>.<br />
The Ringer Equivalence Number (REN) is used to determine how many devices you may connect<br />
to your telephone line and still have them ring when you are called. The REN for this product is<br />
encoded as the 6th and 7th characters following the US: in the product identifier (e.g., if ## is 03,<br />
the REN is 0.3). In most, but not all areas, the sum of all RENs should be five (5.0) or less. For<br />
more information, please contact your telephone service provider.<br />
This equipment may not be used with Party Lines. If you have specially wired alarm dialing<br />
equipment connected to your telephone line, ensure the connection of this equipment does not<br />
disable your alarm equipment. If you have questions about what will disable alarm equipment,<br />
consult your telephone service provider or a qualified installer.<br />
126
Appendix<br />
FCC, ACTA and IC regulations (continued)<br />
If this equipment is malfunctioning, it must be unplugged from the modular jack until the problem has<br />
been corrected. Repairs to this telephone equipment can only be made by the manufacturer or its<br />
authorized agents. For repair procedures, follow the instructions outlined under the Limited warranty.<br />
If this equipment is causing harm to the telephone network, the telephone service provider may<br />
temporarily discontinue your telephone service. The telephone service provider is required to<br />
notify you before interrupting service. If advance notice is not practical, you will be notified as soon<br />
as possible. You will be given the opportunity to correct the problem and the telephone service<br />
provider is required to inform you of your right to file a complaint with the FCC. Your telephone<br />
service provider may make changes in its facilities, equipment, operation, or procedures that could<br />
affect the proper functioning of this product. The telephone service provider is required to notify<br />
you if such changes are planned.<br />
If this product is equipped with a corded or cordless handset, it is hearing aid compatible.<br />
If this product has memory dialing locations, you may choose to store emergency telephone numbers<br />
(e.g., police, fire, medical) in these locations. If you do store or test emergency numbers, please:<br />
Remain on the line and briefly explain the reason for the call before hanging up.<br />
Perform such activities in off-peak hours, such as early morning or late evening.<br />
Industry Canada<br />
Operation is subject to the following two conditions: (1) this device may not cause harmful<br />
interference, and (2) this device must accept any interference, including interference that may<br />
cause undesired operation.<br />
The term ‘’IC:‘’ before the certification/registration number only signifies that the Industry Canada<br />
technical specifications were met.<br />
The Ringer Equivalence Number (REN) for this terminal equipment is 0.1. The REN is an<br />
indication of the maximum number of devices allowed to be connected to a telephone interface.<br />
The termination on an interface may consist of any combination of devices subject only to the<br />
requirement that the sum of the RENs of all the devices does not exceed five.<br />
This product meets the applicable Industry Canada technical specifications.<br />
127
Appendix<br />
Technical specifications<br />
Frequency control Crystal controlled PLL synthesizer<br />
Transmit frequency Handset: 1921.536-1928.448 MHz<br />
Channels 5<br />
Nominal effective<br />
range<br />
Telephone base: 1921.536-1928.448 MHz<br />
Headset: 1921.536-1928.448 MHz<br />
Maximum power allowed by FCC and IC. Actual operating<br />
range may vary according to environmental conditions at the<br />
time of use.<br />
Power requirements Handset: 2.4V Ni-MH battery<br />
Telephone base: 6V DC @ 400mA<br />
Handset charger: 6V AC @300mA<br />
Headset charger: 6V DC @ 400mA<br />
Memory Handset directory: 200 memory locations;<br />
up to 30 digits and 15 characters<br />
Four download directories: 1,500 memory locations (each);<br />
up to 30 digits and 15 characters<br />
Handset caller ID log: 50 memory locations;<br />
up to 15 digits and 15 characters<br />
128
Index<br />
A<br />
Add a cell phone 24<br />
Add a handset 105<br />
Add a headset 26, 106<br />
Alphabetical search 70<br />
Announcement 82<br />
Answer a cell call 51<br />
Answer a cell call while on a home<br />
call 52<br />
Answer a home call 49<br />
Answer a home call while on a cell<br />
call 52<br />
Answer an incoming call during<br />
a PTT call 67<br />
Answering a PTT call 66<br />
Answering system and voicemail 88<br />
Answering system setup 84<br />
Answer on/off 81<br />
Assign a speed dial slot 73<br />
B<br />
Battery 4, 5, 103, 104<br />
Bluetooth connection from Idle mode 31<br />
Bluetooth glossary 23<br />
Bluetooth headset 26, 49<br />
Bluetooth setup 24<br />
C<br />
Caller ID 75<br />
Caller ID announce 45<br />
Caller ID history 76<br />
Caller ID log 76<br />
Call screening 84, 89<br />
Call waiting on the cell line 51<br />
Call waiting on the home line 50<br />
Cell area code 47<br />
Cell call 51<br />
Cell phone - download directory 32<br />
Cell phone voicemail 52<br />
Chain dialing 57<br />
Change a one-to-one PTT to<br />
intercom 66<br />
Change PIN 35<br />
Charging 5, 6<br />
CID time synchronization 43<br />
129<br />
Conference home and cell calls 53<br />
Connect an active device 28<br />
Create a new directory entry 69<br />
D<br />
Date 38<br />
Delete a directory entry 72<br />
Delete a redial entry 59<br />
Delete a speed dial entry 74<br />
Delete from the caller ID log 80<br />
Delete messages 90, 91, 92<br />
Delete the announcement 83<br />
Deregister handsets/headsets 107<br />
Devices connection 28<br />
Dial a caller ID log entry 78<br />
Dial a directory entry 71<br />
Dial a redial entry 58<br />
Dial a speed dial entry 73<br />
Dialing options 78<br />
Dial mode 44<br />
Directory 32, 68<br />
Disconnect an active device 28<br />
Display alerts 40<br />
Display screen messages 95<br />
Download directory 32<br />
Download fail 42<br />
DSL filter 3<br />
e<br />
Earbud installation 7<br />
Ear hook installation 8, 9, 10<br />
Edit a directory entry 71<br />
Edit the type of a directory entry 72<br />
End a cell call 51<br />
End a home call 49<br />
End a PTT call 67<br />
Equalizer 56<br />
Expand your telephone system 105<br />
F<br />
FCC, ACTA and IC regulations 126<br />
Find handset 55<br />
Flash 50, 51
Index<br />
G<br />
Glossary 23<br />
H<br />
Handset icons 101<br />
Handset layout 16<br />
Handset lights 100<br />
Handset locator 55<br />
Handset main menu 20<br />
Handset ringer volume 36<br />
Handset speakerphone 54<br />
Head band installation 11, 12<br />
Headset charger installation 6<br />
Headset charging 6<br />
Headset layout 19<br />
Headset listening volume 54<br />
Headset ringer volume 36<br />
Hold 55<br />
Hold a call and intercom 62<br />
Home area code 46<br />
I<br />
Icons 100, 101<br />
Indicators 100, 102<br />
Installation 2, 3, 4, 6, 7, 8, 11, 13, 14<br />
Intercom 60<br />
Interruption to directory download 34<br />
K<br />
Key tone 44<br />
L<br />
Language 39<br />
LCD language 39<br />
Lights 100, 102<br />
Limited warranty 124<br />
m<br />
Maintenance 122<br />
Make a call using speed dial 73<br />
Make a cell call 51<br />
Make a home call 49<br />
Make an outgoing call during a PTT<br />
call 67<br />
Memory match 76<br />
Memos 92<br />
130<br />
Message alert tone 87<br />
Message capacity 89<br />
Message playback 90, 91<br />
Message window displays 93<br />
Missed calls 40<br />
Mute 54<br />
N<br />
No home line 42<br />
Number of rings 85<br />
o<br />
Operating range 122<br />
P<br />
Paging 55<br />
Pair and connect a Bluetooth headset 26<br />
Pair and connect a cell phone 24<br />
Parts checklist 1<br />
Play memos 92<br />
Play messages 90, 91<br />
Play the announcement 82<br />
Power off the headset 6<br />
Power on the headset 6<br />
Predial a home call 49<br />
PTT 63<br />
PTT on/off 63<br />
PTT to a single handset 64<br />
PTT to multiple handsets 65<br />
Pulse dialing 44, 55<br />
Push-to-talk 63<br />
R<br />
Reassign a speed dial slot 73<br />
Record an announcement 82<br />
Recording time setting 87<br />
Record memos 92<br />
Redial list 58<br />
Register a handset 105<br />
Register a headset 106<br />
Remote access 94<br />
Remote access code 86<br />
Remove a device 29<br />
Remove a downloaded directory 72<br />
Rename a device 30<br />
Repeat messages 90, 91
Index<br />
Replace a handset 107<br />
Replace a headset 107<br />
Replace an active device 31<br />
Reset download fail indication 42<br />
Reset the missed call indicator 40<br />
Reset the voicemail indicators 41<br />
Review the caller ID log 77<br />
Review the directory 70<br />
Review the redial list 58<br />
Ringer mute 54<br />
Ringer tone 37<br />
Ringer volume 36, 48<br />
S<br />
Safety instructions 121<br />
Save a caller ID log entry to the<br />
directory 79<br />
Save a redial entry to the directory 59<br />
Search for a contact 70<br />
Set date/time 38<br />
Share an outside call 60<br />
Silence the ringer 54<br />
Skip messages 90, 91<br />
Speakerphone 54<br />
Speed dial 73<br />
Stop messages 90, 91<br />
Swap 51<br />
T<br />
Technical specifications 128<br />
Telephone base installation 3<br />
Telephone base lights 100<br />
Telephone base ringer volume 48<br />
Temporary tone dialing 55<br />
Time 38<br />
Transfer a call 56, 62<br />
Transfer a call from a handset to a<br />
headset 50<br />
Troubleshooting 108<br />
Turn on or off the answering system 81<br />
131<br />
U<br />
Using a Bluetooth headset 49<br />
V<br />
View directory download information 34<br />
Voice announce caller ID 45<br />
Voice language 39<br />
Voicemail 41, 52, 88<br />
Voicemail indicators 41<br />
Volume 36, 44, 48, 54, 90, 91<br />
W<br />
Wall mounting 13<br />
Warranty 124<br />
Website 46
The Bluetooth ® word mark and logos are owned by Bluetooth SIG, Inc.<br />
and any use of such marks by <strong>VTech</strong> Holdings Limited is under license.<br />
<strong>VTech</strong> Holdings Limited is a member of Bluetooth SIG, Inc.<br />
Other trademarks and trade names are those of their respective owners.<br />
VTECH TELECOMMUNICATIONS LTD.<br />
A member of THE VTECH GROUP OF COMPANIES.<br />
Distributed in the U.S.A. by <strong>VTech</strong> <strong>Communications</strong>, Inc., Beaverton, Oregon 97008.<br />
Distributed in Canada by <strong>VTech</strong> Technologies Canada Ltd., Richmond, B.C. V6W 1L5.<br />
<strong>VTech</strong> is the registered trademark of <strong>VTech</strong> Holdings Limited.<br />
Copyright © 2012 for VTECH TELECOMMUNICATIONS LTD.<br />
All rights reserved. Printed in China.<br />
91-004923-020-100