211i Operating Manual FabricatOr® - Victor Technologies - Europe
211i Operating Manual FabricatOr® - Victor Technologies - Europe
211i Operating Manual FabricatOr® - Victor Technologies - Europe

You also want an ePaper? Increase the reach of your titles
YUMPU automatically turns print PDFs into web optimized ePapers that Google loves.
BASIC WELDING FABRICATOR <strong>211i</strong><br />
C. Vertical Welds<br />
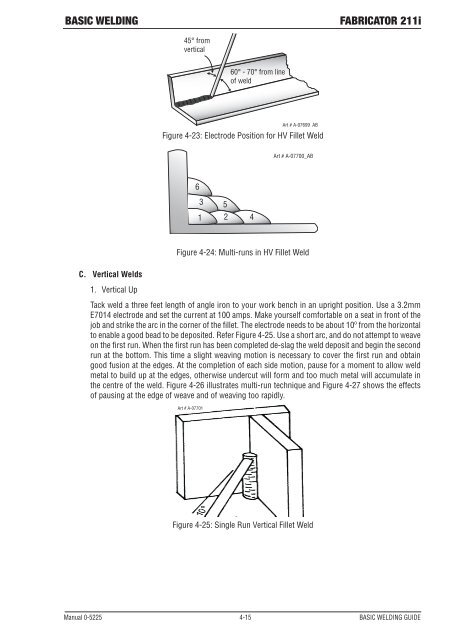
1. Vertical Up<br />
45° from<br />
vertical<br />
60° - 70° from line<br />
of weld<br />
Art # A-07699_AB<br />
Figure 4-23: Electrode Position for HV Fillet Weld<br />
6<br />
3<br />
1<br />
5<br />
2<br />
Art # A-07700_AB<br />
Figure 4-24: Multi-runs in HV Fillet Weld<br />
<strong>Manual</strong> 0-5225 4-15 BASIC WELDING GUIDE<br />
4<br />
Tack weld a three feet length of angle iron to your work bench in an upright position. Use a 3.2mm<br />
E7014 electrode and set the current at 100 amps. Make yourself comfortable on a seat in front of the<br />
job and strike the arc in the corner of the fillet. The electrode needs to be about 10º from the horizontal<br />
to enable a good bead to be deposited. Refer Figure 4-25. Use a short arc, and do not attempt to weave<br />
on the first run. When the first run has been completed de-slag the weld deposit and begin the second<br />
run at the bottom. This time a slight weaving motion is necessary to cover the first run and obtain<br />
good fusion at the edges. At the completion of each side motion, pause for a moment to allow weld<br />
metal to build up at the edges, otherwise undercut will form and too much metal will accumulate in<br />
the centre of the weld. Figure 4-26 illustrates multi-run technique and Figure 4-27 shows the effects<br />
of pausing at the edge of weave and of weaving too rapidly.<br />
Art # A-07701<br />
Figure 4-25: Single Run Vertical Fillet Weld