211i Operating Manual FabricatOr® - Victor Technologies - Europe
211i Operating Manual FabricatOr® - Victor Technologies - Europe
211i Operating Manual FabricatOr® - Victor Technologies - Europe

Create successful ePaper yourself
Turn your PDF publications into a flip-book with our unique Google optimized e-Paper software.
BASIC WELDING FABRICATOR <strong>211i</strong><br />
The Welder<br />
Place yourself in a comfortable position before beginning to weld. Get a seat of suitable height and do as<br />
much work as possible sitting down. Don't hold your body tense. A taut attitude of mind and a tensed body<br />
will soon make you feel tired. Relax and you will find that the job becomes much easier. You can add much to<br />
your peace of mind by wearing a leather apron and gauntlets. You won't be worrying then about being burnt<br />
or sparks setting alight to your clothes.<br />
Place the work so that the direction of welding is across, rather than to or from, your body. The electrode<br />
holder lead should be clear of any obstruction so that you can move your arm freely along as the electrode<br />
burns down. If the lead is slung over your shoulder, it allows greater freedom of movement and takes a lot of<br />
weight off your hand. Be sure the insulation on your cable and electrode holder is not faulty, otherwise you<br />
are risking an electric shock.<br />
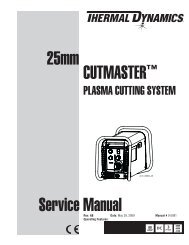
Striking the Arc<br />
Practice this on a piece of scrap plate before going on to more exacting work. You may at first experience<br />
difficulty due to the tip of the electrode "sticking" to the work piece. This is caused by making too heavy a<br />
contact with the work and failing to withdraw the electrode quickly enough. A low amperage will accentuate it.<br />
This freezing-on of the tip may be overcome by scratching the electrode along the plate surface in the same<br />
way as a match is struck. As soon as the arc is established, maintain a 1.6mm to 3.2mm gap between the<br />
burning electrode end and the parent metal. Draw the electrode slowly along as it melts down.<br />
Another difficulty you may meet is the tendency, after the arc is struck, to withdraw the electrode so far that<br />
the arc is broken again. A little practice will soon remedy both of these faults.<br />
20°<br />
Arc Length<br />
Art # A-07696_AB<br />
1.6 mm (1/16”)<br />
Figure 4-20: Striking an Arc<br />
The securing of an arc length necessary to produce a neat weld soon becomes almost automatic. You will<br />
find that a long arc produces more heat. A very long arc produces a crackling or spluttering noise and the<br />
weld metal comes across in large, irregular blobs. The weld bead is flattened and spatter increases. A short<br />
arc is essential if a high quality weld is to be obtained although if it is too short there is the danger of it being<br />
blanketed by slag and the electrode tip being solidified in. If this should happen, give the electrode a quick<br />
twist back over the weld to detach it. Contact or "touch-weld" electrodes such as E7014 do not stick in this<br />
way, and make welding much easier.<br />
Rate of Travel<br />
After the arc is struck, your next concern is to maintain it, and this requires moving the electrode tip towards<br />
the molten pool at the same rate as it is melting away. At the same time, the electrode has to move along the<br />
plate to form a bead. The electrode is directed at the weld pool at about 20º from the vertical. The rate of travel<br />
has to be adjusted so that a well-formed bead is produced.<br />
If the travel is too fast, the bead will be narrow and strung out and may even be broken up into individual<br />
globules. If the travel is too slow, the weld metal piles up and the bead will be too large.<br />
<strong>Manual</strong> 0-5225 4-13 BASIC WELDING GUIDE