

CutMaster True Service Manual - Victor Technologies - Europe
CutMaster True Service Manual - Victor Technologies - Europe
CutMaster True Service Manual - Victor Technologies - Europe

You also want an ePaper? Increase the reach of your titles
YUMPU automatically turns print PDFs into web optimized ePapers that Google loves.
CUTMASTER 25mm<br />
5T.02 Inspection and Replacement<br />
of Consumable Torch Parts<br />
WARNINGS<br />
Disconnect primary power to the system before<br />
disassembling the torch or torch leads.<br />
DO NOT touch any internal torch parts while the<br />
AC indicator light of the Power Supply is ON.<br />
Remove the consumable torch parts as follows:<br />
NOTE<br />
The shield cup holds the tip and starter cartridge<br />
in place. Position the torch with the shield cup<br />
facing upward to prevent these parts from falling<br />
out when the cup is removed.<br />
1. Unscrew and remove the shield cup from the<br />
torch.<br />
NOTE<br />
Slag built up on the shield cup that cannot be removed<br />
may effect the performance of the system.<br />
2. Inspect the cup for damage. Wipe it clean or<br />
replace if damaged.<br />
Art # A-08067<br />
Shield Cups<br />
3. On torches with a shield cup body and a shield<br />
cap or deflector, ensure that the cap or deflector is<br />
threaded snugly against the shield cup body. In<br />
shielded drag cutting operations (only), there may<br />
be an O-ring between the shield cup body and<br />
drag shield cap. Do not lubricate the O-ring.<br />
Shield<br />
Cup Body<br />
O-Ring No. 8-3488<br />
Art # A-03878<br />
Drag Shield Cap<br />
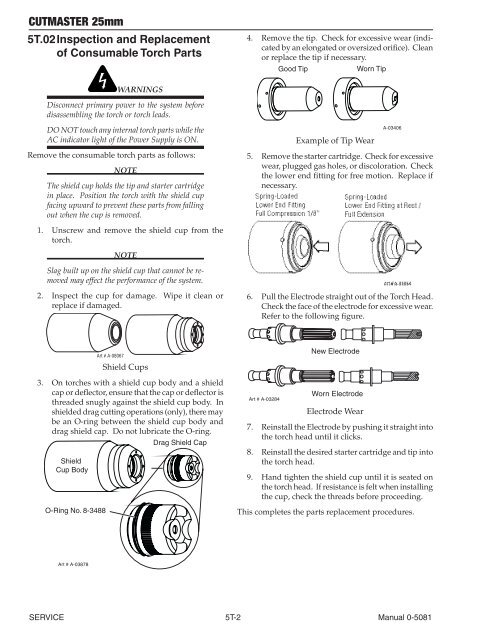
4. Remove the tip. Check for excessive wear (indicated<br />
by an elongated or oversized orifice). Clean<br />
or replace the tip if necessary.<br />
Good Tip Worn Tip<br />
Example of Tip Wear<br />
SERVICE 5T-2 <strong>Manual</strong> 0-5081<br />
A-03406<br />
5. Remove the starter cartridge. Check for excessive<br />
wear, plugged gas holes, or discoloration. Check<br />
the lower end fitting for free motion. Replace if<br />
necessary.<br />
6. Pull the Electrode straight out of the Torch Head.<br />
Check the face of the electrode for excessive wear.<br />
Refer to the following figure.<br />
Art # A-03284<br />
New Electrode<br />
Worn Electrode<br />
Electrode Wear<br />
7. Reinstall the Electrode by pushing it straight into<br />
the torch head until it clicks.<br />
8. Reinstall the desired starter cartridge and tip into<br />
the torch head.<br />
9. Hand tighten the shield cup until it is seated on<br />
the torch head. If resistance is felt when installing<br />
the cup, check the threads before proceeding.<br />
This completes the parts replacement procedures.


