

CutMaster True Service Manual - Victor Technologies - Europe
CutMaster True Service Manual - Victor Technologies - Europe
CutMaster True Service Manual - Victor Technologies - Europe

You also want an ePaper? Increase the reach of your titles
YUMPU automatically turns print PDFs into web optimized ePapers that Google loves.
CUTMASTER 25mm<br />
the internal hex fitting and turning it counter<br />
clock-wise (left). Numbers 4 and 5 in the previous<br />
illustration.<br />
6. Disconnect the input line from the filter element<br />
assembly.<br />
7. Remove the filter element assembly through the<br />
rear opening.<br />
NOTE<br />
If replacing or cleaning just the filter element refer<br />
to the following illustration for disassembly.<br />
Filter Element<br />
Art # A-07990<br />
8. Install the new or cleaned assembly by reversing<br />
these procedures.<br />
9. Turn on the air supply and check for leaks before<br />
reinstalling the cover.<br />
10.. Reinstall the power supply cover<br />
C. Optional Single-Stage Filter Element<br />
Replacement<br />
These instructions apply to power supplies where the<br />
optional Single-Stage Filter has been installed.<br />
The Power Supply shuts down automatically when<br />
the Filter Element becomes completely saturated. The<br />
Filter Element can be removed from its housing, dried,<br />
and reused. Allow 24 hours for Element to dry. Refer<br />
to Section 6, Parts List, for replacement filter element<br />
catalog number.<br />
1. Remove power from power supply.<br />
2. Shut off air supply and bleed down system before<br />
disassembling Filter to change Filter Element.<br />
3. Disconnect gas supply hose.<br />
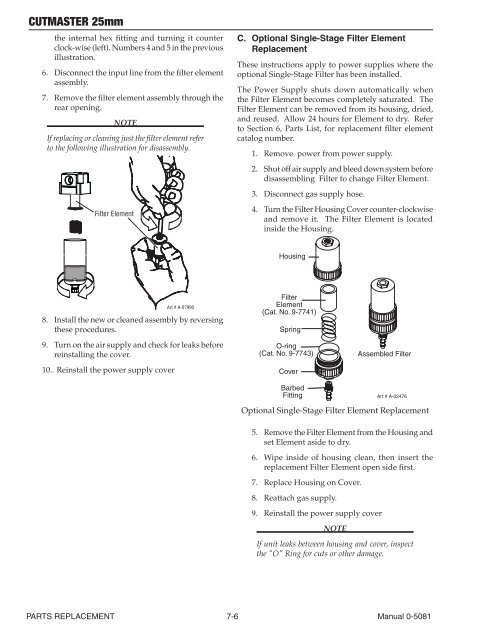
4. Turn the Filter Housing Cover counter-clockwise<br />
and remove it. The Filter Element is located<br />
inside the Housing.<br />
Housing<br />
Filter<br />
Element<br />
(Cat. No. 9-7741)<br />
Spring<br />
O-ring<br />
(Cat. No. 9-7743)<br />
Art # A-02476<br />
PARTS REPLACEMENT 7-6 <strong>Manual</strong> 0-5081<br />
Cover<br />
Barbed<br />
Fitting<br />
Assembled Filter<br />
Optional Single-Stage Filter Element Replacement<br />
5. Remove the Filter Element from the Housing and<br />
set Element aside to dry.<br />
6. Wipe inside of housing clean, then insert the<br />
replacement Filter Element open side first.<br />
7. Replace Housing on Cover.<br />
8. Reattach gas supply.<br />
9. Reinstall the power supply cover<br />
NOTE<br />
If unit leaks between housing and cover, inspect<br />
the "O" Ring for cuts or other damage.


