Installation Instructions - F062/04 - 56FA Series Flush ... - Clipsal
Installation Instructions - F062/04 - 56FA Series Flush ... - Clipsal
Installation Instructions - F062/04 - 56FA Series Flush ... - Clipsal

Create successful ePaper yourself
Turn your PDF publications into a flip-book with our unique Google optimized e-Paper software.
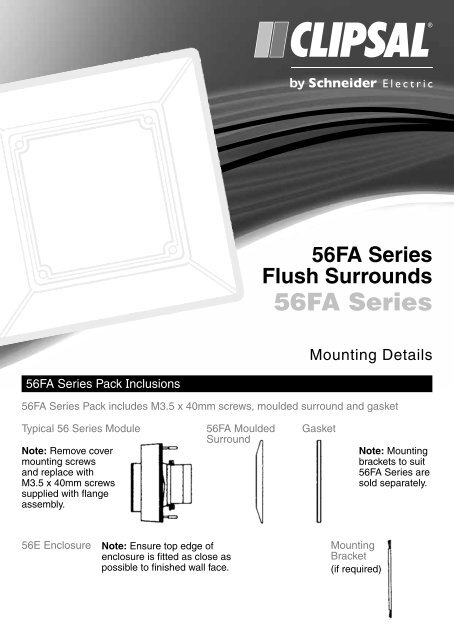
<strong>56FA</strong> <strong>Series</strong> Pack Inclusions<br />
<strong>56FA</strong> <strong>Series</strong><br />
<strong>Flush</strong> Surrounds<br />
<strong>56FA</strong> <strong>Series</strong><br />
Mounting Details<br />
<strong>56FA</strong> <strong>Series</strong> Pack includes M3.5 x 40mm screws, moulded surround and gasket<br />
Typical 56 <strong>Series</strong> Module<br />
Note: Remove cover<br />
mounting screws<br />
and replace with<br />
M3.5 x 40mm screws<br />
supplied with flange<br />
assembly.<br />
56E Enclosure<br />
Note: Ensure top edge of<br />
enclosure is fitted as close as<br />
possible to finished wall face.<br />
<strong>56FA</strong> Moulded<br />
Surround<br />
Gasket<br />
Note: Mounting<br />
brackets to suit<br />
<strong>56FA</strong> <strong>Series</strong> are<br />
sold separately.<br />
Mounting<br />
Bracket<br />
(if required)
Poured Concrete Walls (Enclosure Mounting)<br />
Position enclosure at correct height on formwork. Pour concrete over<br />
the enclosure.<br />
Note: To prevent conduit entry obstructions, appropriately seal<br />
conduit prior to pouring concrete.<br />
Adhere gasket to flange and mount 56 <strong>Series</strong> Modules to enclosure<br />
through flange when concrete is fully cured.<br />
Solid and Cavity Brick Walls (Bracket Mounting)<br />
Prepare wall by cutting hole 90 x 90mm for <strong>56FA</strong>1, 90 x 190mm<br />
for <strong>56FA</strong>2, 90 x 285mm for <strong>56FA</strong>3 and 190mm2 for <strong>56FA</strong>4.<br />
Mount bracket to exterior wall using any suitable fixing device i.e.<br />
thrubolts, fibre plugs, etc.<br />
Remove adhesive backing sheet from gasket and adhere to inner<br />
surface of flange. Mount modules to bracket through flange.<br />
Note: 1. For soft or porous brickwork we suggest adhesive<br />
anchored fixing.<br />
2. When mounting to brick ensure all mortar joints are<br />
sealed with suitable caulking compound.<br />
Panel Type Walls (Bracket Mounting)<br />
Prepare wall by cutting hole as described above for solid and<br />
cavity brick walls. Mount bracket to wall using suitable hollow wall<br />
anchors. Adhere gasket to flange and mount modules through<br />
flange to bracket.<br />
Note: If possible mount bracket to building frame i.e. wooden<br />
noggins and studs with suitable wood screws.<br />
<strong>Clipsal</strong> Australia Pty Ltd<br />
A member of Schneider Electric<br />
Contact us: clipsal.com/feedback<br />
National Customer Care Enquiries:<br />
Tel 1300 2025 25 Fax 1300 2025 56<br />
clipsal.com<br />
<strong>Clipsal</strong> Australia Pty Ltd reserves the right to change specifications, modify designs and discontinue items<br />
without incurring obligation and whilst every effort is made to ensure that descriptions, specifications and other<br />
information in this catalogue are correct, no warranty is given in respect thereof and the company shall not be<br />
liable for any error therein.<br />
© <strong>Clipsal</strong> Australia Pty Ltd. The identified trademarks and copyrights are the property of<br />
<strong>Clipsal</strong> Australia Pty Ltd unless otherwise noted.<br />
<strong>F062</strong>/<strong>04</strong> CLIPCOM 19602 June 2010