
Create successful ePaper yourself
Turn your PDF publications into a flip-book with our unique Google optimized e-Paper software.
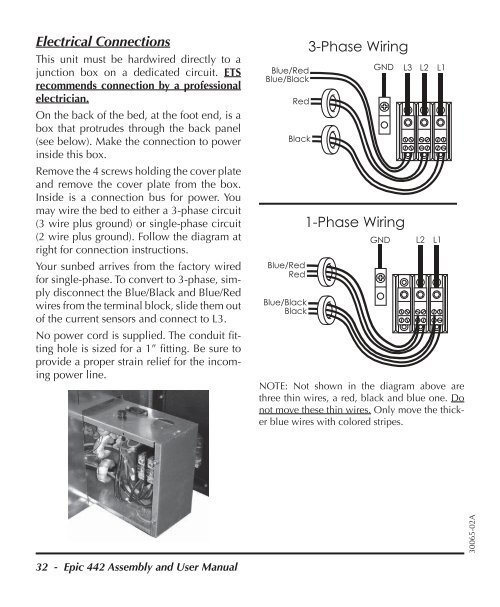
Electrical Connections<br />
This unit must be hardwired directly to a<br />
junction box on a dedicated circuit. ETS<br />
re<strong>com</strong>mends connection by a professional<br />
electrician.<br />
On the back of the <strong>bed</strong>, at the foot end, is a<br />
box that protrudes through the back panel<br />
(see below). Make the connection to power<br />
inside this box.<br />
Remove the 4 screws holding the cover plate<br />
and remove the cover plate from the box.<br />
Inside is a connection bus for power. You<br />
may wire the <strong>bed</strong> to either a 3-phase circuit<br />
(3 wire plus ground) or single-phase circuit<br />
(2 wire plus ground). Follow the diagram at<br />
right for connection instructions.<br />
Your sun<strong>bed</strong> arrives from the factory wired<br />
for single-phase. To convert to 3-phase, simply<br />
disconnect the Blue/Black and Blue/Red<br />
wires from the terminal block, slide them out<br />
of the current sensors and connect to L3.<br />
No power cord is supplied. The conduit fi tting<br />
hole is sized for a 1” fi tting. Be sure to<br />
provide a proper strain relief for the in<strong>com</strong>ing<br />
power line.<br />
32 - Epic 442 Assembly and User Manual<br />
NOTE: Not shown in the diagram above are<br />
three thin wires, a red, black and blue one. Do<br />
not move these thin wires. Only move the thicker<br />
blue wires with colored stripes.<br />
30065-02A