30197-01a PS26CP-DTT 10 xsp:PS26CP-DTT.qxd - Tanning Bed ...
30197-01a PS26CP-DTT 10 xsp:PS26CP-DTT.qxd - Tanning Bed ...
30197-01a PS26CP-DTT 10 xsp:PS26CP-DTT.qxd - Tanning Bed ...

Create successful ePaper yourself
Turn your PDF publications into a flip-book with our unique Google optimized e-Paper software.
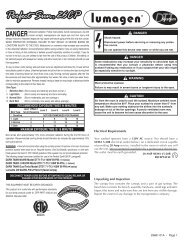
DANGER<br />
Ultraviolet radiation. Follow instructions. Avoid overexposure. As with<br />
natural sunlight, overexposure can cause eye and skin injury and<br />
allergic reactions. Repeated exposure may cause premature aging of the skin and skin cancer.<br />
WEAR PROTECTIVE EYEWEAR; FAILURE TO MAY RESULT IN SEVERE BURNS OR<br />
LONGTERM INJURY TO THE EYES. Medications or cosmetics may increase your sensitivity<br />
to the ultraviolet radiation. Consult physician before using sunlamp if you are using medications<br />
or have a history of skin problems or believe yourself especially sensitive to sunlight. If you do<br />
not tan in the sun, you are unlikely to tan from the use of this product. Children, the elderly, or<br />
fair skinned people who always burn easily and either never tan or tan minimally should not use<br />
this equipment.<br />
To use, lie down under canopy and pull down as far as adjustment will allow. Do not use without<br />
clear plastic panels in place. Untanned persons should not tan on consecutive days during their<br />
first week of tanning. Never tan more than once a day. <strong>Tanning</strong> normally appears after the first<br />
few sessions and maximizes after approximately four weeks. Tan once or twice per week thereafter<br />
to maintain appearance. Persons already having a base tan may begin at advanced levels<br />
corresponding to the extent of their base tan.<br />
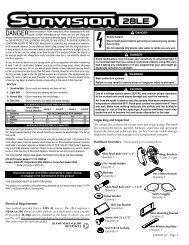
Skin Type:<br />
I Sensitive Skin (Burns easily and severely and does not tan.)<br />
II Light Skin (Burns easily and severely and tans minimally.)<br />
III Normal Skin (Burns moderately and tans average.)<br />
IV Dark Skin (Burns minimally, tans easily and above average.)<br />
RECOMMENDED EXPOSURE TIMES IN MINUTES<br />
Level 1/Week 1 Level 2 Level 3 Level 4 Level 5<br />
Skin Type: 1st-3rd Sessions<br />
I Sensitive NOT RECOMMENDED FOR TANNING<br />
II Light 3 6 9 12 15<br />
III Normal 4 7 11 15 15<br />
IV Dark 5 9 13 15 15<br />
MAXIMUM EXPOSURE TIME IS 15 MINUTES<br />
New lamps emit approximately <strong>10</strong>% more ultraviolet radiation during the first 50 hours of<br />
operation. Recommended tanning times should therefore be reduced by approximately <strong>10</strong>%<br />
during that period.<br />
WARNING: Read all instructions before using this sunlamp product. All persons in the room should wear<br />
protective eyewear when lamps are on. Required eyewear: Ultra SunGlobes®, special-eyez, or other darktinted<br />
eyewear that meet 21 CFR <strong>10</strong>40.20 guidelines. Other eyewear may not provide adequate protection.<br />
The following lamps have been certified for use in the Perfect Sun® 26CP Lumagen®:<br />
DARK TAN® II Wolff® Model DTII 71-T12 <strong>10</strong>0W BI-PIN ( below)<br />
XS-Power Wolff® Model XSP71-T12-<strong>10</strong>0W BI PIN ( below)<br />
DARK TAN® Wolff® Model DT71-T12-<strong>10</strong>0W BI-PIN ( below)<br />
DARK TAN® Dual Twist Model DTDT 71-T12-<strong>10</strong>0W BI-PIN ( below)<br />
XS-Power Dual Twister Voltarc® Model XSPDT71-T12-<strong>10</strong>0W BI PIN ( below)<br />
XS-Power 2 Tone Twist Model XSP2T 71-T12-<strong>10</strong>0W BI-PIN ( below)<br />
Lumalite C® Wolff® P/N 27743-01 (facial lamps)<br />
DISCONNECT POWER CORD BEFORE ATTEMPTING TO CLEAN, RELAMP, OR<br />
ENGAGE IN THE MAINTENANCE OF THIS PRODUCT.<br />
THIS EQUIPMENT MUST BE EARTH GROUNDED.<br />
This product is in conformity with performance standards for sun lamp products under 21 CFR<br />
PART <strong>10</strong>40.20 and ANSI/UL Standard 482.<br />
88465<br />
DANGER<br />
Shock hazard.<br />
Disconnect power before servicing or removing any protective<br />
covers.<br />
Do not operate this device near water or while you are wet.<br />
Unpacking and Inspection<br />
DANGER<br />
Some medications may increase your sensitivity to ultraviolet light. It<br />
is recommended that you consult a physician before using this<br />
sunbed if taking any medication or if you suspect that your skin might<br />
be especially sensitive to sunlight.<br />
WARNING<br />
Wear protective eyewear.<br />
Failure to may result in severe burns or longterm injury to the eyes.<br />
CAUTION<br />
Air from the room is used to cool the sunbed. Maximum ambient room<br />
temperature should be 80°F. Place your sunbed no closer than 6” from<br />
any wall. Make sure nothing obstructs the airflow into the sunbed’s<br />
endcaps or out of the fan openings. A poorly ventilated room may<br />
cause the unit to become hot and cause discomfort to the user.<br />
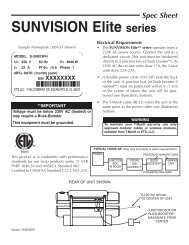
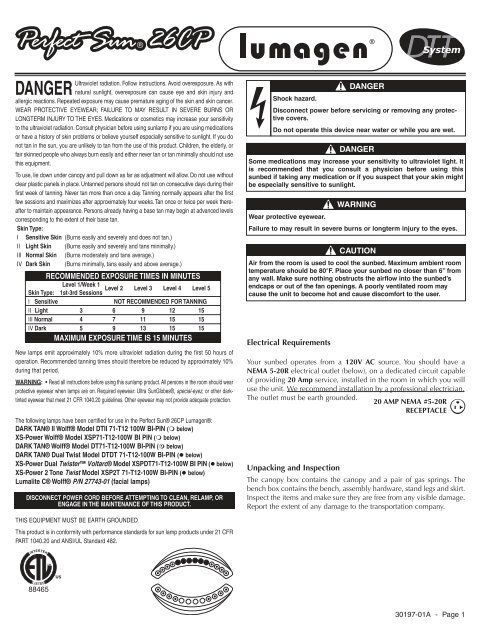
Electrical Requirements<br />
Your sunbed operates from a 120V AC source. You should have a<br />
NEMA 5-20R electrical outlet (below), on a dedicated circuit capable<br />
of providing 20 Amp service, installed in the room in which you will<br />
use the unit. We recommend installation by a professional electrician.<br />
The outlet must be earth grounded.<br />
20 AMP NEMA #5-20R<br />
RECEPTACLE<br />
The canopy box contains the canopy and a pair of gas springs. The<br />
bench box contains the bench, assembly hardware, stand legs and skirt.<br />
Inspect the items and make sure they are free from any visible damage.<br />
Report the extent of any damage to the transportation company.<br />
<strong>30197</strong>-01A - Page 1
Hardware Inventory (These items, Velcro® and a small pillow)<br />
Allen-head Bolt 5/16” x 1”<br />
Quantity 2<br />
5/16” Metal Washer<br />
Quantity 2<br />
Bushing<br />
Quantity 2<br />
Page 2 - <strong>30197</strong>-01A<br />
Allen-head Bolt 5/16” x 1 1/2”<br />
Quantity 2<br />
Nylon Washer<br />
Quantity 2<br />
Star Lock Washer<br />
Quantity 8<br />
#<strong>10</strong>-32 x 1/2” Screw<br />
Quantity 8<br />
Skirt Retaining Bracket<br />
Quantity 2<br />
Hinge Brackets<br />
(1) left, (1) right<br />
Hex (Allen) Wrench<br />
Quantity 1<br />
Safety Goggles<br />
Quantity 1<br />
Skirt Mounting Bracket<br />
Quantity 1-left, 1-right<br />
4<br />
Attach the side skirts to the mounting<br />
brackets with two #<strong>10</strong>-32 x 1/2” screws<br />
and star lock washers from inside the<br />
skirt and into the brackets. The rounded<br />
part of the side skirts points toward the<br />
front of the bed.<br />
Assembly Procedures<br />
1<br />
Lay the bench upside down on the<br />
floor. Locate the two stand legs.<br />
2<br />
SKIRT MOUNTING HOLES<br />
Remove the six 5/16” x 1” bolts and<br />
5/16” washers installed in the bench.<br />
Attach the stand legs, with the four small<br />
skirt mounting holes toward the back, by<br />
installing the center bolt first. You may<br />
have to gently push the sides of the legs<br />
in to align holes. Tighten with the Allen<br />
wrench.<br />
3<br />
While the bench is upside-down attach the triangular<br />
skirt mounting brackets. Locate the two<br />
brackets and attach them as shown with two #<strong>10</strong>-<br />
32 x 1/2” screws and star lock washers. Make sure<br />
the threaded inserts point toward the stand legs<br />
and the wide end is toward what will be the floor.<br />
(ELECTRICAL CONNECTOR<br />
INDICATES BACK OF BENCH)
5<br />
The front skirt panel is held in place by adhesive backed<br />
Velcro® strips. Clean each place the adhesive will touch<br />
with rubbing alcohol (see right). Peel off the backing paper<br />
from the two large pieces and adhere them to the stand legs.<br />
Stick a long, narrow strip on each side of the side skirts in<br />
the indentation. The last piece attaches the tab on the top of<br />
the front skirt to the bottom of the bench cover.<br />
6<br />
Peel the remaining backing paper from the<br />
Velcro strips and press the front skirt in place.<br />
FRONT SKIRT<br />
RETAINING BRACKET<br />
8<br />
Turn bench over. Install hinge brackets to ends of bench such<br />
that the short boss engages the stud above the bolt hole, and<br />
the long boss engages the hole below the bolt hole. Secure<br />
using 5/16” x 1” Allen-head bolts and 5/16” metal washers.<br />
Tighten bolt snug, then an additional half turn.<br />
SHORT BOLT<br />
STUD<br />
LEG<br />
VELCRO STRIPS<br />
SIDE SKIRT<br />
VELCRO STRIP<br />
7<br />
Using the front leg mounting bolt, secure<br />
the L-shaped Skirt Retaining Bracket so it<br />
clamps the front and side skirt to the<br />
bench cover. Place the retainer bracket<br />
so the tab holds the front skirt as shown.<br />
Repeat for the other side.<br />
9<br />
Place the bushings<br />
into hinge brackets.<br />
<strong>30197</strong>-01A - Page 3
11<br />
Insert 5/16” x 1 1/2” bolts with nylon<br />
washers into both hinge brackets.<br />
Tighten bolts into the endcap threaded<br />
inserts until snug, then an additional<br />
half turn. Do not overtighten to avoid<br />
damaging threaded inserts.<br />
Page 4 - <strong>30197</strong>-01A<br />
12<br />
The gas springs have a locking<br />
mechanism. Follow the directions<br />
below for the type you received.<br />
Type 1<br />
Pry back the<br />
locking clip<br />
with a flat<br />
screwdriver.<br />
Type 2<br />
Remove locking<br />
clip to install or<br />
remove gas spring.<br />
<strong>10</strong><br />
Lift the canopy and hold it<br />
between the hinge brackets.<br />
15<br />
Connect the canopy to<br />
bench power cord to the<br />
bench receptacle. Align the<br />
terminals and firmly push<br />
on until seated then tighten<br />
the threaded locking ring.<br />
PIVOT STUD<br />
13<br />
With a helper holding the canopy open,<br />
align ends of gas spring ball joints with<br />
pivot studs and push into place. Be sure<br />
rod end is down as shown. DO NOT lower<br />
canopy until both gas springs are engaged!<br />
THREADED<br />
LOCKING RING<br />
CANOPY TO BENCH<br />
POWER CORD<br />
CAUTION<br />
Failure to engage locking clips may<br />
result in the ball joints working loose,<br />
allowing the canopy to fall, which may<br />
result in damage to the unit and injury.<br />
RECEPTACLE<br />
ON BENCH<br />
14<br />
Lift and lower canopy a few<br />
times to lubricate gas springs<br />
for optimum performance.<br />
16<br />
Plug the three-prong 120V AC<br />
power cord into a dedicated outlet<br />
(see Electrical Requirements).
Using Your Sunbed<br />
Before using your sunbed, please note the following:<br />
Your skin should be free of cosmetics, tanning oils, or other body<br />
lotions prior to tanning except for those specifically made for use<br />
with tanning devices. However, do not remove natural body oils by<br />
bathing or showering immediately before tanning.<br />
Keep treated hair from contacting sunbed surfaces. Many hair products<br />
can damage the sunbed acrylic. Wear a shower cap or towel if<br />
you use gels, mousses, sprays, or other hair products.<br />
Your sunbed is designed for individual use. Always wear the safety<br />
goggles supplied with your sunbed or another approved pair of goggles,<br />
as defined under 21 CFR <strong>10</strong>40.20. Regular sunglasses do not<br />
provide adequate protection from ultraviolet light.<br />
Exposure Times<br />
Follow the guidelines for skin type and exposure times as shown in the<br />
table below. Untanned persons should not tan on consecutive days<br />
during their first week of tanning. Never tan more than once a day.<br />
<strong>Tanning</strong> normally appears after the first few sessions and maximizes<br />
after approximately four weeks. Tan once or twice per week thereafter<br />
to maintain appearance. Persons already having a base tan may begin<br />
at advanced levels corresponding to the extent of their base tan.<br />
Skin Type:<br />
I Sensitive Skin (Burns easily and severely and does not tan.)<br />
II Light Skin (Burns easily and severely and tans minimally.)<br />
III Normal Skin (Burns moderately and tans average.)<br />
IV Dark Skin (Burns minimally, tans easily and above average.)<br />
RECOMMENDED EXPOSURE TIMES IN MINUTES<br />
Level 1/Week 1 Level 2 Level 3 Level 4 Level 5<br />
Skin Type: 1st-3rd Sessions<br />
I Sensitive NOT RECOMMENDED FOR TANNING<br />
II Light 3 6 9 12 15<br />
III Normal 4 7 11 15 15<br />
IV Dark 5 9 13 15 15<br />
MAXIMUM EXPOSURE TIME IS 15 MINUTES<br />
Operation<br />
This sunbed is equipped with a control key lock on the timer bezel,<br />
allowing you to monitor usage by children and/or others. To activate,<br />
insert the key into the lock and turn, horizontal to lock and vertical to<br />
unlock. You may remove the key in either position.<br />
A Timer display - Displays remaining time.<br />
B Timer button - Turns bed on. Timer display<br />
shows remaining time. If a lesser<br />
time is desired, press timer button<br />
until desired time is displayed.<br />
C Stop button - Interrupts tanning session.<br />
D Face button - Turns Lumagen® facial lamps on and off.<br />
<strong>Tanning</strong> with or without Lumagen®<br />
1 Press the timer button (B) to begin a tanning session. The timer display<br />
(A) displays the remaining time. All lamps will turn on and the<br />
timer will begin to count down from the maximum tanning session<br />
time of 15 minutes. If a tanning time less than the displayed time is<br />
desired, repeatedly press the timer button (B) to decrease the<br />
remaining time. Simply press the face button (D) to turn Lumagen<br />
off if desired.<br />
2 Lift the canopy, lie down on the bench (face up), lower the canopy<br />
as close to your body as possible.<br />
3 When the timer reaches “0” the tanning lamps turn off. If Lumagen<br />
was active, they will remain on for an additional 5 minutes, for a<br />
total of 20 minutes. If you want to stop your session before time<br />
expires, press the stop button (C).<br />
4 Raise the canopy by using the outer edge of the canopy, do not<br />
push up on the acrylic shield as it may crack. The cooling fans run<br />
for three minutes after the lamps shut off to aid in cooling the<br />
sunbed.<br />
Lumagen® only<br />
1 Press the face button (D) to begin a Lumagen session. The timer display<br />
(A) displays the remaining time. Only the Lumagen lamps will<br />
turn on and the timer will begin to count down from the maximum<br />
Lumagen session time of 20 minutes.<br />
2 Lift the canopy, lie down on the bench (face up), lower the canopy<br />
as close to your body as possible.<br />
3 When the timer reaches “0” the lamps turn off. If you want to stop<br />
your session before time expires, press the stop button (C).<br />
4 Raise the canopy by using the outer edge of the canopy, do not<br />
push up on the acrylic shield as it may crack. The cooling fans run<br />
for three minutes after the lamps shut off to aid in cooling the<br />
sunbed.<br />
A<br />
B<br />
C<br />
D<br />
<strong>30197</strong>-01A - Page 5
Care and Maintenance<br />
Cleaning After Use<br />
Clean and disinfect your tanning bed’s bench and canopy after each<br />
use. Use a non-abrasive disinfectant cleaner that does not contain<br />
ammonia or ammonia derivatives. Ammonia may damage the acrylic<br />
shield. Spray the acrylic lightly with disinfectant and wipe dry with a<br />
clean soft cloth.<br />
Thorough Periodic Cleaning<br />
The cooling fans draw air through the bed and will cause a dust<br />
buildup on the lamps and reflectors. When a dust buildup is observed,<br />
it is necessary to thoroughly clean the inside of the bench and canopy.<br />
1 Remove the acrylic shields and lamps.<br />
2 With a soft cloth, wipe the entire length of each lamp.<br />
3 Clean both sides of the acrylic shields with a non-ammonia disinfectant<br />
cleaner.<br />
4 Wipe the reflectors with a clean damp cloth.<br />
5 Re-install the lamps and acrylic shields.<br />
Mechanical Inspection<br />
Inspect the unit’s mechanical integrity every 400-500 hours of use.<br />
Inspect the unit’s fasteners verifying that all are firmly in place.<br />
Pay particular attention to the hinge bolts.<br />
Inspect gas springs for signs of wear. Replace gas springs that will<br />
not hold the canopy in the full open position when raised.<br />
Inspect the AC power cord and its connections.<br />
Inspect the acrylic. Replace if broken, cracked or badly scratched.<br />
Hour Counter<br />
This sunbed incorporates an ingenious hour counter function into the<br />
timing circuitry. It allows the operator of the unit to monitor the hours<br />
of use of the lamps, making it easy to determine when to change them.<br />
You may also decide to use this function to monitor other time based<br />
maintenance tasks.<br />
To determine how many hours the unit has been in service (since the<br />
last reset of the hour counter memory), first make sure the timer display<br />
shows “0”. Then simply hold the stop button for three seconds.<br />
The display will show two pairs of numbers which indicate the number<br />
of hours of service, then return to “0”. (example: Display shows 08<br />
then 54. This equals 854 hours.) NOTE: If the unit is connected to a T-<br />
Max® remote device, it may briefly lose communication with the<br />
remote. This is normal.<br />
To erase the indicated hours, disconnect power from the sunbed. Press<br />
and hold the green timer button as you reconnect power. Release the<br />
button after a few seconds.<br />
Page 6 - <strong>30197</strong>-01A<br />
Removing/Replacing Acrylic Shields<br />
The acrylic shields are secured in place by hinged profiles which run<br />
the length of the bed, both front and back. Simply pry up on the inside<br />
edge of the profile until it releases its latching action (see figure<br />
below). Continue to pry up the profile across its entire length until it<br />
swings back freely. Repeat for the other profile. The long edges of the<br />
acrylic shield are now exposed. Standing in front of the sunbed, grasp<br />
the long exposed edge of the acrylic and carefully slide it toward you<br />
until it is removed.<br />
After changing the lamps, replace the acrylic shields by reversing the<br />
above directions. Close the hinged profile by pushing it back into<br />
place until it snaps tight.<br />
CAUTION<br />
Be careful. The edges of the<br />
acrylic shield may be sharp.<br />
PROFILE<br />
Start pulling from the<br />
middle of the profile!<br />
Removing/Replacing Lamps<br />
To be assured of maximum tanning effectiveness, change lamps after<br />
approximately 800-<strong>10</strong>00 hours of use. <strong>Tanning</strong> will continue after this<br />
time but at a slower rate. To ensure trouble-free operation of your<br />
sunbed, replace the lamp starters whenever the lamps are replaced. We<br />
recommend using the lamps specified below. Use of uncertified lamps<br />
is a violation of Federal regulations and will void your warranty.<br />
1 Grasp a lamp at one end and at the middle, then turn the lamp a<br />
quarter turn. The lamp may then be gently removed from its holder.<br />
2 To reinstall lamp, insert pins on the ends of the lamp into the slots<br />
on top of the lamp holder and turn the lamp a quarter turn.<br />
The following lamps have been certified for use in the 26CP:<br />
DARK TAN® II Wolff® Model DTII 71-T12 <strong>10</strong>0W BI-PIN ( below)<br />
XS-Power Wolff® Model XSP71-T12-<strong>10</strong>0W BI PIN ( below)<br />
DARK TAN® Wolff® Model DT71-T12-<strong>10</strong>0W BI-PIN ( below)<br />
DARK TAN® Dual Twist Model DTDT 71-T12-<strong>10</strong>0W BI-PIN ( below)<br />
XS-Power Dual Twister Voltarc®<br />
Model XSPDT71-T12-<strong>10</strong>0W BI PIN ( below)<br />
XS-Power 2 Tone Twist Model XSP2T 71-T12-<strong>10</strong>0W BI-PIN ( below)<br />
Lumalite C® Wolff® P/N 27743-01 (facial lamps)
Problem<br />
Troubleshooting<br />
Solution<br />
Sunbed not tanning<br />
1. Clean sunbed, see Thorough Periodic Cleaning.<br />
2. Replace lamps if lamp hours are greater than 800hrs.<br />
3. Replace acrylic.<br />
Lamps fail to light and timer display is blank<br />
1. Check source of AC power. Reset circuit breaker or replace<br />
fuse if necessary.<br />
2. Make sure the unit is plugged into outlet.<br />
3. Make sure canopy to bench cord is properly connected.<br />
4. Make sure Control Lock is in the vertical position.<br />
One or more lamps fail to light<br />
1. Check that lamp is installed correctly.<br />
2. Switch unlit lamp with a lamp that lights. If the new lamp<br />
lights and the old lamp still does not, replace old lamp.<br />
The canopy will not stay up<br />
NOTE: Gas springs are manufactured to hold the canopy in its<br />
fully open position as well as allow it to rest fully closed. If<br />
left open for an extended period of time some creep down<br />
may occur. This is considered normal. Keep the unit closed<br />
when not in use. If the canopy will not stay fully open when<br />
raised...<br />
1. Raise and lower the canopy a few times to lubricate gas<br />
spring internal seals.<br />
2. Replace gas springs.<br />
Sunbed does not stay lit<br />
Check source of AC power. Reset circuit breaker or<br />
replace fuse if necessary.<br />
If you did not find the solution to your problem above, contact your<br />
place of purchase for additional assistance<br />
<strong>30197</strong>-01A - Page 7
Page 8 - <strong>30197</strong>-01A<br />
Perfect Sun® 18 MONTH WARRANTY<br />
Perfect Sun® warrants your tanning unit to be free of structural defects in material and workmanship,<br />
under normal use, for its lifetime. Perfect Sun® will, at its discretion, repair any<br />
structural defect which materially affects the performance of the tanning unit, or replace the<br />
tanning unit.<br />
For eighteen (18) months following the shipping date of your tanning unit, Perfect Sun® will<br />
provide replacements for parts that prove to be defective in material or workmanship.<br />
Fluorescent lamps, and lamp starters are warranted against manufacturer’s defects for a period<br />
of ninety (90) days following the shipping date of your tanning unit. Acrylics will be warranted<br />
against manufacturer’s defects for a period of 1 year (prorated).<br />
Labor costs associated with repair or replacement work covered by this warranty will be<br />
reimbursed for repair or replacement work required to be performed for a period of six (6)<br />
months following the shipping date of your tanning unit. All such warranty service must be<br />
performed by an authorized Perfect Sun® service person. All labor charges must be authorized<br />
by Perfect Sun® prior to the start of repairs and must not exceed the established rates<br />
and time allotment policies established by Perfect Sun®. If your tanning unit must be<br />
returned for service, all freight charges shall be at your expense.<br />
Normal wear and tear, damage from misuse or abuse, damage incurred in transit or damages<br />
resulting from unauthorized repairs or modifications are not covered by this warranty.<br />
Warranty coverage does not include cosmetic abnormalities such as scratches, nicks, dents, or<br />
other cosmetic changes that do not materially interfere with the function of the tanning unit.<br />
THIS STANDARD 18 MONTH WARRANTY IS EXPRESSLY MADE IN LIEU OF ANY<br />
OTHER WARRANTIES, EXPRESS OR IMPLIED, INCLUDING ANY IMPLIED WAR-<br />
RANTIES OF MERCHANTABILITY AND FITNESS FOR A PARTICULAR PURPOSE,<br />
WHICH ARE HEREBY DISCLAIMED. No one has the authority to change or modify this<br />
Standard 18 Month Warranty in any respect. To obtain service under this Standard 18 Month<br />
Warranty, contact Perfect Sun® at 1-800-361-5170 or visit www.PerfectSun<strong>DTT</strong>.com to<br />
fill out an online warranty request form.<br />
IN NO EVENT SHALL YOUR DISTRIBUTOR OR THE MANUFACTURER BE LIABLE<br />
AT LAW OR IN EQUITY FOR ANY LOSS, LIABILITY, DAMAGE OR EXPENSE IN AN<br />
AMOUNT IN EXCESS OF THE PURCHASE PRICE RECEIVED, OR FOR LOSS OF USE<br />
OR PROFITS, LOSS OF TIME, INCONVENIENCE, RENTAL OR SUBSTITUTE PROD-<br />
UCTS, LOSS OF BUSINESS, LOSS OF INCOME, OR ANY OTHER INCIDENTAL,<br />
INDIRECT, SPECIAL OR CONSEQUENTIAL DAMAGES. Some states do not allow the<br />
exclusion or limitation of incidental or consequential damages, and the above limitation or<br />
exclusion will not apply to residents of some states. This Standard 18 Month Warranty gives<br />
you specific, legal rights and you may have other rights which may vary from state to state.<br />
Contact Perfect Sun® for the authorized Service Center nearest you. This warranty is serial<br />
number specific and only applies to tanning units purchased through an authorized Perfect<br />
Sun® Dealer. This warranty is extended to the individual or legal entity whose name appears<br />
on the original sales document and may not be transferred to any other individual or legal<br />
entity. This warranty is void if the tanning unit is modified in any manner from its original<br />
design.<br />
To file a Warranty Claim, please follow these steps:<br />
1. Locate the silver serial number label, located on the back of the unit<br />
near the power cord on the canopy. Identify the serial number and<br />
model number of the unit.<br />
2. Proof of purchase must be provided before any claim will be considered.<br />
3. Contact Perfect Sun® at 1-800-361-5170 or visit<br />
www.PerfectSun<strong>DTT</strong>.com to fill out an online warranty form.<br />
4. If it is determined that a defective part needs to be replaced, Perfect<br />
Sun® will arrange for the pick-up or shipment of the replacement part.<br />
Record this information for ease of service:<br />
Date of purchase:<br />
Bench serial number:<br />
Canopy serial number:<br />
Proudly manufactured in the U.S.A.