S7-1200 Programmable controller
S7-1200 Programmable controller
S7-1200 Programmable controller

Create successful ePaper yourself
Turn your PDF publications into a flip-book with our unique Google optimized e-Paper software.
<strong>S7</strong>-<strong>1200</strong> <strong>Programmable</strong> <strong>controller</strong><br />
SIMATIC<br />
<strong>S7</strong><br />
<strong>S7</strong>-<strong>1200</strong> <strong>Programmable</strong> <strong>controller</strong><br />
System Manual<br />
04/2012<br />
A5E02486680-06<br />
___________________<br />
Preface<br />
___________________ 1<br />
Product overview<br />
STEP 7 programming<br />
___________________ 2<br />
software<br />
___________________ 3<br />
Installation<br />
___________________ 4<br />
PLC concepts<br />
___________________ 5<br />
Device configuration<br />
___________________ 6<br />
Programming concepts<br />
___________________ 7<br />
Basic instructions<br />
___________________ 8<br />
Extended instructions<br />
___________________ 9<br />
Technology instructions<br />
___________________ 10<br />
Communication<br />
___________________ 11<br />
Web server<br />
___________________ 12<br />
Communication processor<br />
Teleservice communication<br />
___________________ 13<br />
(SMTP email)<br />
___________________ 14<br />
Online and diagnostic tools<br />
___________________ A<br />
Technical specifications<br />
___________________ B<br />
Calculating a power budget<br />
___________________ C<br />
Order numbers
Legal information<br />
Legal information<br />
Warning notice system<br />
This manual contains notices you have to observe in order to ensure your personal safety, as well as to prevent<br />
damage to property. The notices referring to your personal safety are highlighted in the manual by a safety alert<br />
symbol, notices referring only to property damage have no safety alert symbol. These notices shown below are<br />
graded according to the degree of danger.<br />
DANGER<br />
indicates that death or severe personal injury will result if proper precautions are not taken.<br />
WARNING<br />
indicates that death or severe personal injury may result if proper precautions are not taken.<br />
CAUTION<br />
with a safety alert symbol, indicates that minor personal injury can result if proper precautions are not taken.<br />
CAUTION<br />
without a safety alert symbol, indicates that property damage can result if proper precautions are not taken.<br />
NOTICE<br />
indicates that an unintended result or situation can occur if the relevant information is not taken into account.<br />
If more than one degree of danger is present, the warning notice representing the highest degree of danger will<br />
be used. A notice warning of injury to persons with a safety alert symbol may also include a warning relating to<br />
property damage.<br />
Qualified Personnel<br />
The product/system described in this documentation may be operated only by personnel qualified for the specific<br />
task in accordance with the relevant documentation, in particular its warning notices and safety instructions.<br />
Qualified personnel are those who, based on their training and experience, are capable of identifying risks and<br />
avoiding potential hazards when working with these products/systems.<br />
Proper use of Siemens products<br />
Note the following:<br />
WARNING<br />
Siemens products may only be used for the applications described in the catalog and in the relevant technical<br />
documentation. If products and components from other manufacturers are used, these must be recommended<br />
or approved by Siemens. Proper transport, storage, installation, assembly, commissioning, operation and<br />
maintenance are required to ensure that the products operate safely and without any problems. The permissible<br />
ambient conditions must be complied with. The information in the relevant documentation must be observed.<br />
Trademarks<br />
All names identified by ® are registered trademarks of Siemens AG. The remaining trademarks in this publication<br />
may be trademarks whose use by third parties for their own purposes could violate the rights of the owner.<br />
Disclaimer of Liability<br />
We have reviewed the contents of this publication to ensure consistency with the hardware and software<br />
described. Since variance cannot be precluded entirely, we cannot guarantee full consistency. However, the<br />
information in this publication is reviewed regularly and any necessary corrections are included in subsequent<br />
editions.<br />
Siemens AG<br />
Industry Sector<br />
Postfach 48 48<br />
90026 NÜRNBERG<br />
GERMANY<br />
Order number: 6E<strong>S7</strong>298-8FA30-8BH0<br />
Ⓟ 05/2012 Technical data subject to change<br />
Copyright © Siemens AG 2012.<br />
All rights reserved
Preface<br />
Purpose of the manual<br />
The <strong>S7</strong>-<strong>1200</strong> series is a line of programmable logic <strong>controller</strong>s (PLCs) that can control a<br />
variety of automation applications. Compact design, low cost, and a powerful instruction set<br />
make the <strong>S7</strong>-<strong>1200</strong> a perfect solution for controlling a wide variety of applications. The <strong>S7</strong>-<br />
<strong>1200</strong> models and the Windows-based programming tool give you the flexibility you need to<br />
solve your automation problems.<br />
This manual provides information about installing and programming the <strong>S7</strong>-<strong>1200</strong> PLCs and<br />
is designed for engineers, programmers, installers, and electricians who have a general<br />
knowledge of programmable logic <strong>controller</strong>s.<br />
Required basic knowledge<br />
To understand this manual, it is necessary to have a general knowledge of automation and<br />
programmable logic <strong>controller</strong>s.<br />
Scope of the manual<br />
This manual describes the following products:<br />
● STEP 7 V11 Basic and Professional<br />
● <strong>S7</strong>-<strong>1200</strong> CPU firmware release V3.0<br />
For a complete list of the <strong>S7</strong>-<strong>1200</strong> products described in this manual, refer to the technical<br />
specifications (Page 699).<br />
Certification, CE label, C-Tick, and other standards<br />
Refer to the technical specifications (Page 699) for more information.<br />
Service and support<br />
In addition to our documentation, we offer our technical expertise on the Internet on the<br />
customer support web site (http://www.siemens.com/automation/).<br />
Contact your Siemens distributor or sales office for assistance in answering any technical<br />
questions, for training, or for ordering <strong>S7</strong> products. Because your sales representatives are<br />
technically trained and have the most specific knowledge about your operations, process<br />
and industry, as well as about the individual Siemens products that you are using, they can<br />
provide the fastest and most efficient answers to any problems you might encounter.<br />
<strong>S7</strong>-<strong>1200</strong> <strong>Programmable</strong> <strong>controller</strong><br />
System Manual, 04/2012, A5E02486680-06 3
Preface<br />
Documentation and information<br />
<strong>S7</strong>-<strong>1200</strong> and STEP 7 provide a variety of documentation and other resources for finding the<br />
technical information that you require.<br />
● The <strong>S7</strong>-<strong>1200</strong> system manual provides specific information about the operation,<br />
programming and the specifications for the complete <strong>S7</strong>-<strong>1200</strong> product family. In addition<br />
to the system manual, the <strong>S7</strong>-<strong>1200</strong> Easy Book provides a more general overview to the<br />
capabilities of the <strong>S7</strong>-<strong>1200</strong> family.<br />
Both the system manual and the Easy Book are available as electronic (PDF) and printed<br />
manuals. The electronic manuals can be downloaded from the customer support web site<br />
and can also be found on the companion disk that ships with every <strong>S7</strong>-<strong>1200</strong> CPU.<br />
● The online information system of STEP 7 provides immediate access to the conceptual<br />
information and specific instructions that describe the operation and functionality of the<br />
programming package and basic operation of SIMATIC CPUs.<br />
● My Documentation Manager accesses the electronic (PDF) versions of the SIMATIC<br />
documentation set, including the system manual, the Easy Book and the information<br />
system of STEP 7. With My Documentation Manager, you can drag and drop topics from<br />
various documents to create your own custom manual.<br />
The customer support entry portal (http://support.automation.siemens.com) provides a<br />
link to My Documentation Manager under mySupport.<br />
● The customer support web site also provides podcasts, FAQs, and other helpful<br />
documents for <strong>S7</strong>-<strong>1200</strong> and STEP 7. The podcasts utilize short educational video<br />
presentations that focus on specific features or scenarios in order to demonstrate the<br />
interactions, convenience and efficiency provided by STEP 7. Visit the following web sites<br />
to access the collection of podcasts:<br />
– STEP 7 Basic web page (http://www.automation.siemens.com/mcms/simatic<strong>controller</strong>-software/en/step7/step7-basic/Pages/Default.aspx)<br />
– STEP 7 Professional web page (http://www.automation.siemens.com/mcms/simatic<strong>controller</strong>-software/en/step7/step7-professional/Pages/Default.aspx)<br />
● You can also follow or join product discussions on the Service & Support technical forum<br />
(https://www.automation.siemens.com/WW/forum/guests/Conferences.aspx?Language=e<br />
n&siteid=csius&treeLang=en&groupid=4000002&extranet=standard&viewreg=WW&nodei<br />
d0=34612486). These forums allow you to interact with various product experts.<br />
– Forum for <strong>S7</strong>-<strong>1200</strong><br />
(https://www.automation.siemens.com/WW/forum/guests/Conference.aspx?SortField=<br />
LastPostDate&SortOrder=Descending&ForumID=258&Language=en&onlyInternet=Fa<br />
lse)<br />
– Forum for STEP 7 Basic<br />
(https://www.automation.siemens.com/WW/forum/guests/Conference.aspx?SortField=<br />
LastPostDate&SortOrder=Descending&ForumID=265&Language=en&onlyInternet=Fa<br />
lse)<br />
<strong>S7</strong>-<strong>1200</strong> <strong>Programmable</strong> <strong>controller</strong><br />
4 System Manual, 04/2012, A5E02486680-06
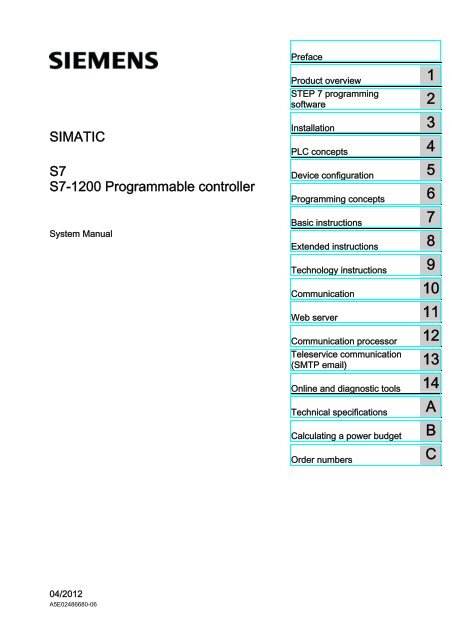
Table of contents<br />
1<br />
Preface ...................................................................................................................................................... 3<br />
Product overview ..................................................................................................................................... 19<br />
1.1 Introducing the <strong>S7</strong>-<strong>1200</strong> PLC.......................................................................................................19<br />
1.2 Expansion capability of the CPU..................................................................................................22<br />
1.3 <strong>S7</strong>-<strong>1200</strong> modules.........................................................................................................................24<br />
1.4 New features................................................................................................................................25<br />
1.5 Basic HMI panels .........................................................................................................................26<br />
2 STEP 7 programming software................................................................................................................ 29<br />
2.1 System requirements ...................................................................................................................29<br />
2.2 Different views to make the work easier ......................................................................................30<br />
2.3 Easy-to-use tools .........................................................................................................................31<br />
2.3.1 Inserting instructions into your user program...............................................................................31<br />
2.3.2 Accessing instructions from the "Favorites" toolbar.....................................................................32<br />
2.3.3 Creating a complex equation with a simple instruction................................................................33<br />
2.3.4 Adding inputs or outputs to a LAD or FBD instruction .................................................................35<br />
2.3.5 Expandable instructions...............................................................................................................35<br />
2.3.6 Selecting a version for an instruction...........................................................................................36<br />
2.3.7 Modifying the appearance and configuration of STEP 7 .............................................................36<br />
2.3.8 Dragging and dropping between editors......................................................................................37<br />
2.3.9 Changing the operating mode of the CPU...................................................................................37<br />
2.3.10 Changing the call type for a DB ...................................................................................................39<br />
2.3.11 Temporarily disconnecting devices from a network.....................................................................40<br />
2.3.12 Virtual unplugging of devices from the configuration...................................................................41<br />
3 Installation ............................................................................................................................................... 43<br />
3.1 Guidelines for installing <strong>S7</strong>-<strong>1200</strong> devices....................................................................................43<br />
3.2 Power budget...............................................................................................................................44<br />
3.3 Installation and removal procedures............................................................................................46<br />
3.3.1 Mounting dimensions for the <strong>S7</strong>-<strong>1200</strong> devices............................................................................46<br />
3.3.2 Installing and removing the CPU .................................................................................................49<br />
3.3.3 Installing and removing an SB, CB or BB ....................................................................................51<br />
3.3.4 Installing and removing an SM.....................................................................................................52<br />
3.3.5 Installing and removing a CM or CP ............................................................................................53<br />
3.3.6 Removing and reinstalling the <strong>S7</strong>-<strong>1200</strong> terminal block connector...............................................55<br />
3.3.7 Installing and removing the expansion cable...............................................................................56<br />
3.3.8 TS (teleservice) adapter...............................................................................................................57<br />
3.3.8.1 Connecting the TeleService Adapter ...........................................................................................57<br />
3.3.8.2 Installing the SIM card .................................................................................................................58<br />
3.3.8.3 Installing the TS adapter unit .......................................................................................................59<br />
3.3.8.4 Installing the TS adapter on a wall...............................................................................................60<br />
<strong>S7</strong>-<strong>1200</strong> <strong>Programmable</strong> <strong>controller</strong><br />
System Manual, 04/2012, A5E02486680-06 5
Table of contents<br />
3.4 Wiring guidelines......................................................................................................................... 61<br />
4 PLC concepts .......................................................................................................................................... 67<br />
4.1 Execution of the user program.................................................................................................... 67<br />
4.1.1 Operating modes of the CPU...................................................................................................... 69<br />
4.1.2 Processing the scan cycle in RUN mode.................................................................................... 72<br />
4.1.3 Organization blocks (OBs) .......................................................................................................... 73<br />
4.1.4 Event execution priorities and queuing ....................................................................................... 75<br />
4.1.5 Monitoring the cycle time ............................................................................................................ 80<br />
4.1.6 CPU memory............................................................................................................................... 82<br />
4.1.6.1 System and clock memory.......................................................................................................... 84<br />
4.1.7 Diagnostics buffer ....................................................................................................................... 86<br />
4.1.8 Time of day clock ........................................................................................................................ 86<br />
4.1.9 Configuring the outputs on a RUN-to-STOP transition ............................................................... 87<br />
4.2 Data storage, memory areas, I/O and addressing...................................................................... 87<br />
4.2.1 Accessing the data of the <strong>S7</strong>-<strong>1200</strong> ............................................................................................. 87<br />
4.3 Processing of analog values ....................................................................................................... 92<br />
4.4 Data types ................................................................................................................................... 93<br />
4.4.1 Bool, Byte, Word, and DWord data types ................................................................................... 94<br />
4.4.2 Integer data types ....................................................................................................................... 95<br />
4.4.3 Floating-point real data types...................................................................................................... 95<br />
4.4.4 Time and Date data types........................................................................................................... 96<br />
4.4.5 Character and String data types ................................................................................................. 97<br />
4.4.6 Array data type............................................................................................................................ 99<br />
4.4.7 Data structure data type............................................................................................................ 100<br />
4.4.8 PLC data type ........................................................................................................................... 100<br />
4.4.9 Pointer data types ..................................................................................................................... 101<br />
4.4.9.1 "Pointer" pointer data type ........................................................................................................ 101<br />
4.4.9.2 "Any" pointer data type.............................................................................................................. 102<br />
4.4.9.3 "Variant" pointer data type ........................................................................................................ 103<br />
4.4.10 Accessing a "slice" of a tagged data type ................................................................................. 104<br />
4.4.11 Accessing a tag with an AT overlay .......................................................................................... 105<br />
4.5 Using a memory card ................................................................................................................ 107<br />
4.5.1 Inserting a memory card in the CPU......................................................................................... 108<br />
4.5.2 Configuring the startup parameter of the CPU before copying the project to the memory<br />
card ........................................................................................................................................... 110<br />
4.5.3 Transfer card............................................................................................................................. 110<br />
4.5.4 Program card ............................................................................................................................ 112<br />
4.5.5 Firmware update ....................................................................................................................... 115<br />
4.6 Recovery from a lost password................................................................................................. 118<br />
5 Device configuration .............................................................................................................................. 119<br />
5.1 Inserting a CPU......................................................................................................................... 120<br />
5.2 Detecting the configuration for an unspecified CPU ................................................................. 121<br />
5.3 Adding modules to the configuration......................................................................................... 122<br />
5.4 Configuring the operation of the CPU ....................................................................................... 123<br />
5.5 Configuring the parameters of the modules.............................................................................. 125<br />
<strong>S7</strong>-<strong>1200</strong> <strong>Programmable</strong> <strong>controller</strong><br />
6 System Manual, 04/2012, A5E02486680-06
Table of contents<br />
5.6 Configuring the CPU for communication ...................................................................................126<br />
5.6.1 Creating a network connection ..................................................................................................126<br />
5.6.2 Configuring the Local/Partner connection path..........................................................................127<br />
5.6.3 Parameters for the PROFINET connection ...............................................................................129<br />
5.6.4 Assigning Internet Protocol (IP) addresses ...............................................................................132<br />
5.6.4.1 Assigning IP addresses to programming and network devices.................................................132<br />
5.6.4.2 Checking the IP address of your programming device..............................................................134<br />
5.6.4.3 Assigning an IP address to a CPU online..................................................................................134<br />
5.6.4.4 Configuring an IP address for a CPU in your project.................................................................136<br />
5.6.5 Testing the PROFINET network ................................................................................................139<br />
5.6.6 Locating the Ethernet (MAC) address on the CPU....................................................................140<br />
5.6.7 Configuring Network Time Protocol synchronization.................................................................141<br />
5.6.8 PROFINET device start-up time, naming, and address assignment.........................................142<br />
6 Programming concepts.......................................................................................................................... 145<br />
6.1 Guidelines for designing a PLC system.....................................................................................145<br />
6.2 Structuring your user program ...................................................................................................146<br />
6.3 Using blocks to structure your program .....................................................................................148<br />
6.3.1 Organization block (OB).............................................................................................................148<br />
6.3.2 Function (FC) .............................................................................................................................150<br />
6.3.3 Function block (FB)....................................................................................................................150<br />
6.3.4 Data block (DB)..........................................................................................................................151<br />
6.4 Understanding data consistency................................................................................................153<br />
6.5 Programming language..............................................................................................................154<br />
6.5.1 Ladder logic (LAD) .....................................................................................................................155<br />
6.5.2 Function Block Diagram (FBD) ..................................................................................................156<br />
6.5.3 SCL ............................................................................................................................................156<br />
6.5.4 EN and ENO for LAD, FBD and SCL.........................................................................................163<br />
6.6 Protection...................................................................................................................................164<br />
6.6.1 Access protection for the CPU...................................................................................................164<br />
6.6.2 Know-how protection .................................................................................................................165<br />
6.6.3 Copy protection..........................................................................................................................166<br />
6.7 Downloading the elements of your program ..............................................................................168<br />
6.8 Uploading from the CPU ............................................................................................................168<br />
6.8.1 Copying elements of the project ................................................................................................168<br />
6.8.2 Using the compare function .......................................................................................................170<br />
6.9 Debugging and testing the program ..........................................................................................170<br />
6.9.1 Monitor and modify data in the CPU..........................................................................................170<br />
6.9.2 Watch tables and force tables....................................................................................................170<br />
6.9.3 Cross reference to show usage .................................................................................................171<br />
6.9.4 Call structure to examine the calling hierarchy..........................................................................172<br />
7 Basic instructions................................................................................................................................... 175<br />
7.1 Bit logic.......................................................................................................................................175<br />
7.1.1 Bit logic contacts and coils.........................................................................................................175<br />
7.1.2 Set and reset instructions ..........................................................................................................178<br />
7.1.3 Positive and negative edge instructions ....................................................................................180<br />
7.2 Timers ........................................................................................................................................182<br />
<strong>S7</strong>-<strong>1200</strong> <strong>Programmable</strong> <strong>controller</strong><br />
System Manual, 04/2012, A5E02486680-06 7
Table of contents<br />
7.3 Counters.................................................................................................................................... 190<br />
7.4 Compare.................................................................................................................................... 196<br />
7.4.1 Compare.................................................................................................................................... 196<br />
7.4.2 In-range and Out-of-range instructions ..................................................................................... 197<br />
7.4.3 OK and Not OK instructions...................................................................................................... 197<br />
7.5 Math .......................................................................................................................................... 198<br />
7.5.1 Calculate instruction.................................................................................................................. 198<br />
7.5.2 Add, subtract, multiply and divide instructions.......................................................................... 199<br />
7.5.3 Modulo instruction ..................................................................................................................... 200<br />
7.5.4 Negation instruction .................................................................................................................. 201<br />
7.5.5 Increment and decrement instructions...................................................................................... 202<br />
7.5.6 Absolute value instruction ......................................................................................................... 202<br />
7.5.7 Minimum and Maximum instructions......................................................................................... 203<br />
7.5.8 Limit instruction ......................................................................................................................... 204<br />
7.5.9 Floating-point math instructions ................................................................................................ 205<br />
7.6 Move.......................................................................................................................................... 207<br />
7.6.1 Move and block move instructions............................................................................................ 207<br />
7.6.2 FieldRead and FieldWrite instructions ...................................................................................... 209<br />
7.6.3 Fill instructions .......................................................................................................................... 211<br />
7.6.4 Swap instruction........................................................................................................................ 212<br />
7.7 Convert...................................................................................................................................... 213<br />
7.7.1 CONV instruction ...................................................................................................................... 213<br />
7.7.2 Conversion instructions for SCL ............................................................................................... 214<br />
7.7.3 Round and truncate instructions ............................................................................................... 217<br />
7.7.4 Ceiling and floor instructions..................................................................................................... 218<br />
7.7.5 Scale and normalize instructions .............................................................................................. 219<br />
7.8 Program control......................................................................................................................... 222<br />
7.8.1 Overview of SCL program control statements .......................................................................... 222<br />
7.8.2 IF-THEN statement ................................................................................................................... 223<br />
7.8.3 CASE statement........................................................................................................................ 224<br />
7.8.4 FOR statement.......................................................................................................................... 225<br />
7.8.5 WHILE-DO statement ............................................................................................................... 226<br />
7.8.6 REPEAT-UNTIL statement ....................................................................................................... 227<br />
7.8.7 CONTINUE statement............................................................................................................... 227<br />
7.8.8 EXIT statement ......................................................................................................................... 228<br />
7.8.9 GOTO statement....................................................................................................................... 229<br />
7.8.10 RETURN statement .................................................................................................................. 229<br />
7.8.11 Jump and label instructions....................................................................................................... 230<br />
7.8.12 JMP_LIST instruction ................................................................................................................ 230<br />
7.8.13 SWITCH instruction................................................................................................................... 231<br />
7.8.14 RET execution control instruction ............................................................................................. 233<br />
7.8.15 Re-trigger scan cycle watchdog instruction .............................................................................. 234<br />
7.8.16 Stop scan cycle instruction........................................................................................................ 235<br />
7.8.17 Get Error instructions ................................................................................................................ 235<br />
7.9 Word logic operations ............................................................................................................... 239<br />
7.9.1 AND, OR, and XOR instructions ............................................................................................... 239<br />
7.9.2 Invert instruction........................................................................................................................ 240<br />
7.9.3 Encode and decode instructions............................................................................................... 240<br />
7.9.4 Select, Multiplex, and Demultiplex instructions......................................................................... 242<br />
<strong>S7</strong>-<strong>1200</strong> <strong>Programmable</strong> <strong>controller</strong><br />
8 System Manual, 04/2012, A5E02486680-06
Table of contents<br />
7.10 Shift and Rotate .........................................................................................................................244<br />
7.10.1 Shift instructions.........................................................................................................................244<br />
7.10.2 Rotate instructions .....................................................................................................................245<br />
8 Extended instructions ............................................................................................................................ 247<br />
8.1 Date and time-of-day .................................................................................................................247<br />
8.1.1 Date and time instructions .........................................................................................................247<br />
8.1.2 Set and read system clock.........................................................................................................249<br />
8.1.3 Run-time meter instruction.........................................................................................................251<br />
8.1.4 SET_TIMEZONE instruction ......................................................................................................252<br />
8.2 String and character...................................................................................................................254<br />
8.2.1 String data overview ..................................................................................................................254<br />
8.2.2 S_MOVE instruction...................................................................................................................254<br />
8.2.3 String conversion instructions....................................................................................................255<br />
8.2.3.1 String to value and value to string conversions .........................................................................255<br />
8.2.3.2 String-to-characters and characters-to-string conversions........................................................263<br />
8.2.3.3 ASCII to Hex and Hex to ASCII conversions.............................................................................265<br />
8.2.4 String operation instructions ......................................................................................................267<br />
8.2.4.1 LEN ............................................................................................................................................267<br />
8.2.4.2 CONCAT....................................................................................................................................268<br />
8.2.4.3 LEFT, RIGHT, and MID .............................................................................................................269<br />
8.2.4.4 DELETE .....................................................................................................................................270<br />
8.2.4.5 INSERT ......................................................................................................................................271<br />
8.2.4.6 REPLACE ..................................................................................................................................272<br />
8.2.4.7 FIND...........................................................................................................................................273<br />
8.3 Distributed I/O (PROFINET, PROFIBUS, or AS-i).....................................................................274<br />
8.3.1 Distributed I/O Instructions.........................................................................................................274<br />
8.3.2 RDREC and WRREC.................................................................................................................275<br />
8.3.3 RALRM.......................................................................................................................................278<br />
8.3.4 STATUS parameter for RDREC, WRREC, and RALRM...........................................................280<br />
8.3.5 DPRD_DAT and DPWR_DAT....................................................................................................284<br />
8.3.6 DPNRM_DG...............................................................................................................................286<br />
8.4 Interrupts....................................................................................................................................288<br />
8.4.1 Attach and detach instructions...................................................................................................288<br />
8.4.2 Cyclic interrupts..........................................................................................................................291<br />
8.4.2.1 SET_CINT (Set cyclic interrupt).................................................................................................291<br />
8.4.2.2 QRY_CINT (Query cyclic interrupt)............................................................................................293<br />
8.4.3 Time delay interrupts .................................................................................................................294<br />
8.4.4 Asynchronous event interrupts ..................................................................................................296<br />
8.5 Diagnostics (PROFINET or PROFIBUS) ...................................................................................297<br />
8.5.1 Diagnostic instructions ...............................................................................................................297<br />
8.5.2 Diagnostic events for distributed I/O..........................................................................................297<br />
8.5.3 LED instruction...........................................................................................................................298<br />
8.5.4 DeviceStates instruction ............................................................................................................299<br />
8.5.5 ModuleStates instruction............................................................................................................301<br />
8.5.6 GET_DIAG instruction................................................................................................................302<br />
8.6 Pulse ..........................................................................................................................................309<br />
8.6.1 CTRL_PWM instruction..............................................................................................................309<br />
8.6.2 Operation of the pulse outputs...................................................................................................311<br />
8.6.3 Configuring a pulse channel for PWM .......................................................................................312<br />
<strong>S7</strong>-<strong>1200</strong> <strong>Programmable</strong> <strong>controller</strong><br />
System Manual, 04/2012, A5E02486680-06 9
Table of contents<br />
8.7 Data logging .............................................................................................................................. 313<br />
8.7.1 Data log record structure........................................................................................................... 314<br />
8.7.2 Program instructions that control Data logs.............................................................................. 315<br />
8.7.2.1 DataLogCreate.......................................................................................................................... 315<br />
8.7.2.2 DataLogOpen............................................................................................................................ 318<br />
8.7.2.3 DataLogClose ........................................................................................................................... 319<br />
8.7.2.4 DataLogWrite ............................................................................................................................ 320<br />
8.7.2.5 DataLogNewFile........................................................................................................................ 322<br />
8.7.3 Working with data logs .............................................................................................................. 324<br />
8.7.4 Limits to the size of data log files .............................................................................................. 325<br />
8.7.5 Data log example program........................................................................................................ 327<br />
8.8 Data block control ..................................................................................................................... 332<br />
8.8.1 READ_DBL, WRIT_DBL (Read from or write to a DB in load memory) ................................... 332<br />
8.9 Common error codes for the "Extended" instructions............................................................... 335<br />
9 Technology instructions ......................................................................................................................... 337<br />
9.1 High-speed counter................................................................................................................... 337<br />
9.1.1 Operation of the high-speed counter ........................................................................................ 339<br />
9.1.2 Configuration of the HSC .......................................................................................................... 345<br />
9.2 PID control................................................................................................................................. 346<br />
9.2.1 Inserting the PID instruction and technological object .............................................................. 348<br />
9.2.2 PID_Compact instruction........................................................................................................... 350<br />
9.2.3 PID_Compact instruction ErrorBit parameters.......................................................................... 354<br />
9.2.4 PID_3STEP instruction.............................................................................................................. 355<br />
9.2.5 PID_3STEP instruction ErrorBit parameters............................................................................. 362<br />
9.2.6 Configuring the PID <strong>controller</strong>................................................................................................... 363<br />
9.2.7 Commissioning the PID <strong>controller</strong>............................................................................................. 365<br />
9.3 Motion control............................................................................................................................ 366<br />
9.3.1 Configuring the axis .................................................................................................................. 370<br />
9.3.2 Configuring the TO_CommandTable_PTO ............................................................................... 372<br />
9.3.3 Motion control instructions ........................................................................................................ 375<br />
9.3.3.1 MC_Power instruction ............................................................................................................... 375<br />
9.3.3.2 MC_Reset instruction ................................................................................................................ 378<br />
9.3.3.3 MC_Home instruction................................................................................................................ 379<br />
9.3.3.4 MC_Halt instruction ................................................................................................................... 381<br />
9.3.3.5 MC_MoveAbsolute instruction .................................................................................................. 383<br />
9.3.3.6 MC_MoveRelative instruction.................................................................................................... 385<br />
9.3.3.7 MC_MoveVelocity instruction.................................................................................................... 387<br />
9.3.3.8 MC_MoveJog instruction........................................................................................................... 390<br />
9.3.3.9 MC_CommandTable instruction................................................................................................ 392<br />
9.3.3.10 MC_ChangeDynamic ................................................................................................................ 394<br />
9.3.4 Operation of motion control for <strong>S7</strong>-<strong>1200</strong>................................................................................... 396<br />
9.3.4.1 CPU outputs used for motion control ........................................................................................ 396<br />
9.3.4.2 Hardware and software limit switches for motion control.......................................................... 397<br />
9.3.4.3 Homing...................................................................................................................................... 401<br />
9.3.4.4 Jerk limit .................................................................................................................................... 406<br />
9.3.5 Commissioning.......................................................................................................................... 407<br />
9.3.6 Monitoring active commands .................................................................................................... 410<br />
9.3.6.1 Monitoring MC instructions with a "Done" output parameter .................................................... 410<br />
9.3.6.2 Monitoring the MC_Velocity instruction..................................................................................... 414<br />
<strong>S7</strong>-<strong>1200</strong> <strong>Programmable</strong> <strong>controller</strong><br />
10 System Manual, 04/2012, A5E02486680-06
Table of contents<br />
9.3.6.3 Monitoring the MC_MoveJog instruction....................................................................................418<br />
10 Communication...................................................................................................................................... 423<br />
10.1 Number of asynchronous communication connections supported ............................................424<br />
10.2 PROFINET.................................................................................................................................425<br />
10.2.1 Local/Partner connection ...........................................................................................................425<br />
10.2.2 Open user communication.........................................................................................................427<br />
10.2.2.1 Connection IDs for the PROFINET instructions.........................................................................427<br />
10.2.2.2 Protocols ....................................................................................................................................430<br />
10.2.2.3 Ad hoc mode..............................................................................................................................431<br />
10.2.2.4 TCP and ISO on TCP ................................................................................................................431<br />
10.2.2.5 UDP............................................................................................................................................446<br />
10.2.2.6 T_CONFIG .................................................................................................................................451<br />
10.2.2.7 Common parameters for instructions.........................................................................................458<br />
10.2.3 Communication with a programming device..............................................................................460<br />
10.2.3.1 Establishing the hardware communications connection............................................................460<br />
10.2.3.2 Configuring the devices .............................................................................................................461<br />
10.2.3.3 Assigning Internet Protocol (IP) addresses ...............................................................................462<br />
10.2.3.4 Testing your PROFINET network ..............................................................................................462<br />
10.2.4 HMI-to-PLC communication.......................................................................................................462<br />
10.2.4.1 Configuring logical network connections between two devices.................................................463<br />
10.2.5 PLC-to-PLC communication ......................................................................................................464<br />
10.2.5.1 Configuring logical network connections between two devices.................................................465<br />
10.2.5.2 Configuring the Local/Partner connection path between two devices.......................................465<br />
10.2.5.3 Configuring transmit (send) and receive parameters.................................................................465<br />
10.2.6 Configuring a CPU and PROFINET IO device ..........................................................................468<br />
10.2.7 Diagnostics.................................................................................................................................471<br />
10.2.8 Distributed I/O Instructions.........................................................................................................472<br />
10.2.9 Diagnostic instructions ...............................................................................................................472<br />
10.2.10 Diagnostic events for distributed I/O..........................................................................................472<br />
10.3 PROFIBUS.................................................................................................................................472<br />
10.3.1 Communications modules PROFIBUS ......................................................................................474<br />
10.3.1.1 Connecting to PROFIBUS .........................................................................................................474<br />
10.3.1.2 Communications services of the PROFIBUS CMs....................................................................474<br />
10.3.1.3 Other properties of the PROFIBUS CMs ...................................................................................476<br />
10.3.1.4 Configuration examples for PROFIBUS ....................................................................................477<br />
10.3.2 Configuring a DP master and slave device................................................................................478<br />
10.3.2.1 Adding the CM 1243-5 (DP master) module and a DP slave ....................................................478<br />
10.3.2.2 Configuring logical network connections between two PROFIBUS devices .............................478<br />
10.3.2.3 Assigning PROFIBUS addresses to the CM 1243-5 module and DP slave..............................479<br />
10.3.3 Distributed I/O Instructions.........................................................................................................480<br />
10.3.4 Diagnostic instructions ...............................................................................................................480<br />
10.3.5 Diagnostic events for distributed................................................................................................481<br />
10.4 AS-i ............................................................................................................................................481<br />
10.4.1 Configuring an AS-i master and slave device............................................................................481<br />
10.4.1.1 Adding the AS-i master CM 1243-2 and AS-i slave...................................................................482<br />
10.4.1.2 Configuring logical network connections between two AS-i devices.........................................482<br />
10.4.1.3 Configuring the properties of the AS-i master CM1243-2..........................................................483<br />
10.4.1.4 Assigning an AS-i address to an AS-i slave ..............................................................................483<br />
10.4.2 Exchanging data between the user program and AS-i slaves...................................................484<br />
10.4.2.1 STEP 7 basic configuration........................................................................................................484<br />
<strong>S7</strong>-<strong>1200</strong> <strong>Programmable</strong> <strong>controller</strong><br />
System Manual, 04/2012, A5E02486680-06 11
Table of contents<br />
10.4.2.2 Configuring slaves with STEP 7................................................................................................ 486<br />
10.4.3 Distributed I/O Instructions........................................................................................................ 488<br />
10.4.4 Working with AS-i online tools................................................................................................... 488<br />
10.5 <strong>S7</strong> communication..................................................................................................................... 489<br />
10.5.1 GET and PUT instructions ........................................................................................................ 489<br />
10.5.2 Creating an <strong>S7</strong> connection........................................................................................................ 493<br />
10.5.3 Configuring the Local/Partner connection path between two devices ...................................... 493<br />
10.5.4 GET/PUT connection parameter assignment ........................................................................... 494<br />
10.5.4.1 Connection parameters............................................................................................................. 494<br />
10.5.4.2 Configuring a CPU-to-CPU <strong>S7</strong> connection ............................................................................... 497<br />
11 Web server ............................................................................................................................................ 503<br />
11.1 Enabling the Web server........................................................................................................... 504<br />
11.2 Standard web pages ................................................................................................................. 505<br />
11.2.1 Accessing the standard Web pages from the PC ..................................................................... 505<br />
11.2.2 Layout of the standard Web pages ........................................................................................... 506<br />
11.2.3 Introduction ............................................................................................................................... 508<br />
11.2.4 Start........................................................................................................................................... 509<br />
11.2.5 Identification .............................................................................................................................. 510<br />
11.2.6 Diagnostic Buffer....................................................................................................................... 510<br />
11.2.7 Module Information ................................................................................................................... 511<br />
11.2.8 Communication ......................................................................................................................... 513<br />
11.2.9 Variable Status.......................................................................................................................... 515<br />
11.2.10 Data Logs.................................................................................................................................. 516<br />
11.2.11 Update Firmware....................................................................................................................... 519<br />
11.3 User-defined web pages ........................................................................................................... 521<br />
11.3.1 Creating HTML pages ............................................................................................................... 521<br />
11.3.2 AWP commands supported by the <strong>S7</strong>-<strong>1200</strong> Web server ......................................................... 522<br />
11.3.2.1 Reading variables ..................................................................................................................... 523<br />
11.3.2.2 Writing variables........................................................................................................................ 524<br />
11.3.2.3 Reading special variables ......................................................................................................... 526<br />
11.3.2.4 Writing special variables ........................................................................................................... 527<br />
11.3.2.5 Using an alias for a variable reference ..................................................................................... 529<br />
11.3.2.6 Defining enum types ................................................................................................................. 529<br />
11.3.2.7 Referencing CPU variables with an enum type ........................................................................ 530<br />
11.3.2.8 Creating fragments.................................................................................................................... 532<br />
11.3.2.9 Importing fragments .................................................................................................................. 533<br />
11.3.2.10 Combining definitions........................................................................................................... 533<br />
11.3.2.11 Handling tag names that contain special characters ........................................................... 534<br />
11.3.3 Configuring use of user-defined Web pages............................................................................. 535<br />
11.3.4 Programming the WWW instruction for user-defined web pages............................................. 537<br />
11.3.5 Downloading the program blocks to the CPU........................................................................... 538<br />
11.3.6 Accessing the user-defined web pages from the PC................................................................ 539<br />
11.3.7 Constraints specific to user-defined Web pages ...................................................................... 539<br />
11.3.8 Example of a user-defined web page ....................................................................................... 540<br />
11.3.8.1 Web page for monitoring and controlling a wind turbine........................................................... 540<br />
11.3.8.2 Reading and displaying <strong>controller</strong> data..................................................................................... 542<br />
11.3.8.3 Using an enum type .................................................................................................................. 543<br />
11.3.8.4 Writing user input to the <strong>controller</strong> ............................................................................................ 544<br />
11.3.8.5 Writing a special variable .......................................................................................................... 545<br />
11.3.8.6 Reference: HTML listing of remote wind turbine monitor Web page ........................................ 545<br />
<strong>S7</strong>-<strong>1200</strong> <strong>Programmable</strong> <strong>controller</strong><br />
12 System Manual, 04/2012, A5E02486680-06
Table of contents<br />
11.3.8.7 Configuration in STEP 7 of the example Web page ..................................................................549<br />
11.3.9 Setting up user-defined Web pages in multiple languages .......................................................551<br />
11.3.9.1 Creating the folder structure ......................................................................................................551<br />
11.3.9.2 Programming the language switch.............................................................................................552<br />
11.3.9.3 Configuring STEP 7 to use a multi-language page structure ....................................................554<br />
11.3.10 Advanced user-defined Web page control.................................................................................555<br />
11.4 Constraints.................................................................................................................................558<br />
11.4.1 Features restricted when JavaScript is disabled .......................................................................558<br />
11.4.2 Features restricted when cookies are not allowed.....................................................................560<br />
11.4.3 Importing the Siemens security certificate .................................................................................560<br />
11.4.4 Importing CSV format data logs to non-USA/UK versions of Microsoft Excel...........................561<br />
12 Communication processor ..................................................................................................................... 563<br />
12.1 Using the serial communication interfaces ................................................................................563<br />
12.2 Biasing and terminating an RS485 network connector..............................................................564<br />
12.3 Point-to-Point (PtP) communication...........................................................................................565<br />
12.3.1 Point-to-Point instructions ..........................................................................................................566<br />
12.3.1.1 Common parameters for Point-to-Point instructions..................................................................566<br />
12.3.1.2 PORT_CFG instruction ..............................................................................................................568<br />
12.3.1.3 SEND_CFG instruction ..............................................................................................................569<br />
12.3.1.4 RCV_CFG instruction.................................................................................................................571<br />
12.3.1.5 SEND_PTP instruction...............................................................................................................575<br />
12.3.1.6 RCV_PTP instruction .................................................................................................................578<br />
12.3.1.7 RCV_RST instruction .................................................................................................................580<br />
12.3.1.8 SGN_GET instruction.................................................................................................................581<br />
12.3.1.9 SGN_SET instruction .................................................................................................................582<br />
12.3.2 Configuring the communication ports ........................................................................................583<br />
12.3.2.1 Managing flow control ................................................................................................................585<br />
12.3.3 Configuring the transmit (send) and receive parameters ..........................................................586<br />
12.3.3.1 Configuring transmit (send) parameters ....................................................................................586<br />
12.3.3.2 Configuring receive parameters.................................................................................................587<br />
12.3.4 Programming the PtP communications .....................................................................................594<br />
12.3.4.1 Polling architecture ....................................................................................................................595<br />
12.3.5 Example: Point-to-Point communication....................................................................................596<br />
12.3.5.1 Configuring the communication module ....................................................................................597<br />
12.3.5.2 Configuring the RS422 and RS485 ...........................................................................................599<br />
12.3.5.3 Programming the STEP 7 program ...........................................................................................602<br />
12.3.5.4 Configuring the terminal emulator..............................................................................................603<br />
12.3.5.5 Running the example program...................................................................................................604<br />
12.4 Universal serial interface (USS) communication .......................................................................604<br />
12.4.1 Requirements for using the USS protocol .................................................................................605<br />
12.4.2 USS_DRV instruction.................................................................................................................608<br />
12.4.3 USS_PORT instruction ..............................................................................................................610<br />
12.4.4 USS_RPM instruction ................................................................................................................611<br />
12.4.5 USS_WPM instruction................................................................................................................612<br />
12.4.6 USS status codes ......................................................................................................................614<br />
12.4.7 General drive setup information.................................................................................................616<br />
12.5 Modbus communication .............................................................................................................619<br />
12.5.1 Overview of Modbus RTU and TCP communication .................................................................619<br />
12.5.2 Modbus TCP ..............................................................................................................................622<br />
<strong>S7</strong>-<strong>1200</strong> <strong>Programmable</strong> <strong>controller</strong><br />
System Manual, 04/2012, A5E02486680-06 13
Table of contents<br />
12.5.2.1 MB_CLIENT (Modbus TCP)...................................................................................................... 622<br />
12.5.2.2 MB_SERVER (Modbus TCP).................................................................................................... 628<br />
12.5.2.3 MB_SERVER example: Multiple TCP connections .................................................................. 633<br />
12.5.2.4 MB_CLIENT example 1: Multiple requests with common TCP connection .............................. 634<br />
12.5.2.5 MB_CLIENT example 2: Multiple requests with different TCP connections ............................. 635<br />
12.5.2.6 MB_CLIENT example 3: Output image write request ............................................................... 636<br />
12.5.2.7 MB_CLIENT example 4: Coordinating multiple requests.......................................................... 636<br />
12.5.3 Modbus RTU ............................................................................................................................. 637<br />
12.5.3.1 MB_COMM_LOAD .................................................................................................................... 638<br />
12.5.3.2 MB_MASTER ............................................................................................................................ 641<br />
12.5.3.3 MB_SLAVE ............................................................................................................................... 647<br />
12.5.3.4 Modbus RTU master example program.................................................................................... 653<br />
12.5.3.5 Modbus RTU slave example program ...................................................................................... 654<br />
12.6 Telecontrol and TeleService with the CP 1242-7...................................................................... 655<br />
12.6.1 Connection to a GSM network .................................................................................................. 655<br />
12.6.2 Applications of the CP 1242-7 .................................................................................................. 657<br />
12.6.3 Other properties of the CP ........................................................................................................ 658<br />
12.6.4 Accessories............................................................................................................................... 659<br />
12.6.5 Configuration examples for telecontrol ..................................................................................... 660<br />
13 Teleservice communication (SMTP email)............................................................................................. 665<br />
13.1 TM_Mail transfer email instruction ............................................................................................ 665<br />
14 Online and diagnostic tools.................................................................................................................... 673<br />
14.1 Status LEDs .............................................................................................................................. 673<br />
14.2 Going online and connecting to a CPU..................................................................................... 675<br />
14.3 Assigning a name to a PROFINET IO device online ................................................................ 676<br />
14.4 Setting the IP address and time of day ..................................................................................... 678<br />
14.5 Resetting to factory settings...................................................................................................... 678<br />
14.6 CPU operator panel for the online CPU.................................................................................... 679<br />
14.7 Monitoring the cycle time and memory usage .......................................................................... 680<br />
14.8 Displaying diagnostic events in the CPU .................................................................................. 680<br />
14.9 Comparing offline and online CPUs.......................................................................................... 681<br />
14.10 Monitoring and modifying values in the CPU............................................................................ 682<br />
14.10.1 Going online to monitor the values in the CPU......................................................................... 683<br />
14.10.2 Displaying status in the program editor..................................................................................... 684<br />
14.10.3 Capturing the online values of a DB to reset the start values................................................... 684<br />
14.10.4 Using a watch table to monitor and modify values in the CPU................................................. 685<br />
14.10.4.1 Using a trigger when monitoring or modifying PLC tags ..................................................... 686<br />
14.10.4.2 Enabling outputs in STOP mode.......................................................................................... 687<br />
14.10.5 Forcing values in the CPU ........................................................................................................ 688<br />
14.10.5.1 Using the force table ............................................................................................................ 688<br />
14.10.5.2 Operation of the Force function ........................................................................................... 689<br />
14.11 Downloading in RUN mode....................................................................................................... 690<br />
14.11.1 Prerequisites for "Download in RUN mode".............................................................................. 691<br />
14.11.2 Changing your program in RUN mode...................................................................................... 692<br />
14.11.3 Downloading selected blocks.................................................................................................... 693<br />
<strong>S7</strong>-<strong>1200</strong> <strong>Programmable</strong> <strong>controller</strong><br />
14 System Manual, 04/2012, A5E02486680-06
Table of contents<br />
A<br />
14.11.4 Downloading a single selected block with a compile error in another block..............................694<br />
14.11.5 System reaction if the download process fails...........................................................................695<br />
14.11.6 Downloading the program in RUN mode ...................................................................................696<br />
Technical specifications......................................................................................................................... 699<br />
A.1 General Technical Specifications ..............................................................................................699<br />
A.2 CPU 1211C................................................................................................................................705<br />
A.2.1 General specifications and features ..........................................................................................705<br />
A.2.2 Timers, counters and code blocks supported by CPU 1211C...................................................707<br />
A.2.3 Digital inputs and outputs...........................................................................................................709<br />
A.2.4 Analog inputs .............................................................................................................................710<br />
A.2.4.1 Step response of the built-in analog inputs of the CPU.............................................................711<br />
A.2.4.2 Sample time for the built-in analog ports of the CPU ................................................................711<br />
A.2.5 CPU 1211C Wiring diagrams.....................................................................................................712<br />
A.3 CPU 1212C................................................................................................................................715<br />
A.3.1 General specifications and features ..........................................................................................715<br />
A.3.2 Timers, counters and code blocks supported by CPU 1212C...................................................716<br />
A.3.3 Digital inputs and outputs...........................................................................................................718<br />
A.3.4 Analog inputs .............................................................................................................................720<br />
A.3.4.1 Step response of the built-in analog inputs of the CPU.............................................................720<br />
A.3.4.2 Sample time for the built-in analog ports of the CPU ................................................................721<br />
A.3.5 CPU 1212C Wiring diagrams.....................................................................................................721<br />
A.4 CPU 1214C................................................................................................................................724<br />
A.4.1 General specifications and features ..........................................................................................724<br />
A.4.2 Timers, counters and code blocks supported by CPU 1214C...................................................725<br />
A.4.3 Digital inputs and outputs...........................................................................................................727<br />
A.4.4 Analog inputs .............................................................................................................................729<br />
A.4.4.1 Step response of the built-in analog inputs of the CPU.............................................................730<br />
A.4.4.2 Sample time for the built-in analog ports of the CPU ................................................................730<br />
A.4.5 CPU 1214C Wiring Diagrams ....................................................................................................731<br />
A.5 CPU 1215C................................................................................................................................734<br />
A.5.1 General specifications and features ..........................................................................................734<br />
A.5.2 Timers, counters and code blocks supported by CPU 1215C...................................................735<br />
A.5.3 Digital inputs and outputs...........................................................................................................737<br />
A.5.4 Analog inputs and outputs .........................................................................................................739<br />
A.5.4.1 Analog input specifications ........................................................................................................739<br />
A.5.4.2 Step response of built-in analog inputs of the CPU...................................................................740<br />
A.5.4.3 Sample time for the built-in analog ports of the CPU ................................................................740<br />
A.5.4.4 Analog output specifications ......................................................................................................740<br />
A.5.5 CPU 1215C Wiring Diagrams ....................................................................................................741<br />
A.6 Digital signal modules (SMs) .....................................................................................................745<br />
A.6.1 SM 1221 digital input specifications...........................................................................................745<br />
A.6.2 SM 1222 8-Point Digital Output Specifications..........................................................................747<br />
A.6.3 SM 1222 16-Point Digital Output Specifications........................................................................749<br />
A.6.4 SM 1223 Digital Input/Output VDC Specifications.....................................................................753<br />
A.6.5 SM 1223 Digital Input/Output AC Specifications .......................................................................757<br />
A.7 Analog signal modules (SMs) ....................................................................................................760<br />
A.7.1 SM 1231 analog input module specifications ............................................................................760<br />
A.7.2 SM 1232 analog output module specifications ..........................................................................764<br />
<strong>S7</strong>-<strong>1200</strong> <strong>Programmable</strong> <strong>controller</strong><br />
System Manual, 04/2012, A5E02486680-06 15
Table of contents<br />
A.7.3 SM 1234 analog input/output module specifications ................................................................ 766<br />
A.7.4 Step response of the analog inputs .......................................................................................... 769<br />
A.7.5 Sample time and update times for the analog inputs................................................................ 769<br />
A.7.6 Measurement ranges of the analog inputs for voltage.............................................................. 770<br />
A.7.7 Measurement ranges of the analog inputs for current .............................................................. 770<br />
A.7.8 Output (AQ) measurement ranges for voltage and current (SB and SM)................................. 771<br />
A.8 Thermocouple and RTD signal modules (SMs)........................................................................ 772<br />
A.8.1 SM 1231 Thermocouple............................................................................................................ 772<br />
A.8.1.1 Basic operation for a thermocouple .......................................................................................... 775<br />
A.8.1.2 Selection tables for the SM 1231 thermocouple ....................................................................... 776<br />
A.8.2 SM 1231 RTD ........................................................................................................................... 778<br />
A.8.2.1 Selection tables for the SM 1231 RTD...................................................................................... 781<br />
A.9 Digital signal boards (SBs)........................................................................................................ 784<br />
A.9.1 SB 1221 200 kHz digital input specifications ............................................................................ 784<br />
A.9.2 SB 1222 200 kHz digital output specifications.......................................................................... 786<br />
A.9.3 SB 1223 200 kHz digital input / output specifications ............................................................... 789<br />
A.9.4 SB 1223 2 X 24 VDC input / 2 X 24 VDC output specifications................................................ 792<br />
A.10 Analog signal boards (SBs)....................................................................................................... 794<br />
A.10.1 SB 1231 1 analog input specifications ...................................................................................... 794<br />
A.10.2 SB 1232 1 analog output specifications.................................................................................... 796<br />
A.10.3 Measurement ranges for analog inputs and outputs ................................................................ 798<br />
A.10.3.1 Step response of the analog inputs .......................................................................................... 798<br />
A.10.3.2 Sample time and update times for the analog inputs................................................................ 799<br />
A.10.3.3 Measurement ranges of the analog inputs for voltage.............................................................. 799<br />
A.10.3.4 Measurement ranges of the analog inputs for current .............................................................. 800<br />
A.10.3.5 Output (AQ) measurement ranges for voltage and current (SB and SM)................................. 800<br />
A.10.4 Thermocouple SBs.................................................................................................................... 801<br />
A.10.4.1 SB 1231 1 analog thermocouple input specifications ............................................................... 801<br />
A.10.4.2 Basic operation for a thermocouple .......................................................................................... 803<br />
A.10.5 RTD SBs ................................................................................................................................... 805<br />
A.10.5.1 SB 1231 1 analog RTD input specifications.............................................................................. 805<br />
A.10.5.2 Selection tables for the SB 1231 RTD ...................................................................................... 808<br />
A.11 BB 1297 Battery Board ............................................................................................................. 810<br />
A.12 Communication interfaces......................................................................................................... 812<br />
A.12.1 PROFIBUS................................................................................................................................ 812<br />
A.12.1.1 CM 1242-5................................................................................................................................. 812<br />
A.12.1.2 CM 1243-5................................................................................................................................. 813<br />
A.12.2 GPRS ........................................................................................................................................ 815<br />
A.12.2.1 CP 1242-7 ................................................................................................................................. 815<br />
A.12.3 CM 1243-2 AS-i Master............................................................................................................. 818<br />
A.12.3.1 Technical data for the AS-i master CM 1243-2......................................................................... 818<br />
A.12.3.2 Electrical connections of the AS-i master CM 1243-2 .............................................................. 819<br />
A.12.4 RS232, RS422, and RS485 ...................................................................................................... 821<br />
A.12.4.1 CB 1241 RS485 Specifications................................................................................................. 821<br />
A.12.4.2 CM 1241 RS232 Specifications ................................................................................................ 823<br />
A.12.4.3 CM 1241 RS422/485 Specifications ......................................................................................... 824<br />
A.13 TeleService (TS Adapter and TS Adapter modular) ................................................................. 826<br />
A.14 SIMATIC memory cards............................................................................................................ 826<br />
<strong>S7</strong>-<strong>1200</strong> <strong>Programmable</strong> <strong>controller</strong><br />
16 System Manual, 04/2012, A5E02486680-06
Table of contents<br />
A.15 Input simulators..........................................................................................................................826<br />
A.16 I/O expansion cable ...................................................................................................................827<br />
A.17 Companion products..................................................................................................................828<br />
A.17.1 PM 1207 power module .............................................................................................................828<br />
A.17.2 CSM 1277 compact switch module ...........................................................................................828<br />
B Calculating a power budget ................................................................................................................... 829<br />
C Order numbers ...................................................................................................................................... 833<br />
C.1 CPU modules.............................................................................................................................833<br />
C.2 Signal modules (SMs), signal boards (SBs) and battery boards (BB).......................................833<br />
C.3 Communication ..........................................................................................................................834<br />
C.4 Other modules............................................................................................................................835<br />
C.5 Memory cards ............................................................................................................................836<br />
C.6 Basic HMI devices .....................................................................................................................836<br />
C.7 Spare parts and other hardware ................................................................................................836<br />
C.8 Programming software...............................................................................................................837<br />
C.9 Documentation...........................................................................................................................837<br />
Index...................................................................................................................................................... 839<br />
<strong>S7</strong>-<strong>1200</strong> <strong>Programmable</strong> <strong>controller</strong><br />
System Manual, 04/2012, A5E02486680-06 17
Table of contents<br />
<strong>S7</strong>-<strong>1200</strong> <strong>Programmable</strong> <strong>controller</strong><br />
18 System Manual, 04/2012, A5E02486680-06
Product overview 1<br />
1.1 Introducing the <strong>S7</strong>-<strong>1200</strong> PLC<br />
The <strong>S7</strong>-<strong>1200</strong> <strong>controller</strong> provides the flexibility and power to control a wide variety of devices<br />
in support of your automation needs. The compact design, flexible configuration, and<br />
powerful instruction set combine to make the <strong>S7</strong>-<strong>1200</strong> a perfect solution for controlling a<br />
wide variety of applications.<br />
The CPU combines a microprocessor, an integrated power supply, input and output circuits,<br />
built-in PROFINET, high-speed motion control I/O, and on-board analog inputs in a compact<br />
housing to create a powerful <strong>controller</strong>. After you download your program, the CPU contains<br />
the logic required to monitor and control the devices in your application. The CPU monitors<br />
the inputs and changes the outputs according to the logic of your user program, which can<br />
include Boolean logic, counting, timing, complex math operations, and communications with<br />
other intelligent devices.<br />
The CPU provides a PROFINET port for communication over a PROFINET network.<br />
Additional modules are available for communicating over PROFIBUS, GPRS, RS485 or<br />
RS232 networks.<br />
<br />
<br />
<br />
① Power connector<br />
② Memory card slot under top door<br />
③ Removable user wiring connectors<br />
(behind the doors)<br />
④ Status LEDs for the on-board I/O<br />
⑤ PROFINET connector (on the bottom of<br />
the CPU)<br />
<strong>S7</strong>-<strong>1200</strong> <strong>Programmable</strong> <strong>controller</strong><br />
System Manual, 04/2012, A5E02486680-06 19<br />
<br />
<br />
Several security features help protect access to both the CPU and the control program:<br />
● Every CPU provides password protection (Page 164) that allows you to configure access<br />
to the CPU functions.<br />
● You can use "know-how protection" (Page 165) to hide the code within a specific block.<br />
● You can use copy protection (Page 166) to bind your program to a specific memory card<br />
or CPU.
Product overview<br />
1.1 Introducing the <strong>S7</strong>-<strong>1200</strong> PLC<br />
Table 1- 1 Comparing the CPU models<br />
Feature CPU 1211C CPU 1212C CPU 1214C CPU 1215C<br />
Physical size (mm) 90 x 100 x 75 90 x 100 x 75 110 x 100 x 75 130 x 100 x 75<br />
User memory Work 30 Kbytes 50 Kbytes 75 Kbytes 100 Kbytes<br />
Load 1 Mbyte 1 Mbyte 4 Mbytes 4 Mbytes<br />
Retentive 10 Kbytes 10 Kbytes 10 Kbytes 10 Kbytes<br />
Local on-board Digital 6 inputs/4 outputs 8 inputs/6 outputs 14 inputs/10 outputs 14 inputs/10 outputs<br />
I/O<br />
Analog 2 inputs 2 inputs 2 inputs 2 inputs / 2 outputs<br />
Process image Inputs (I) 1024 bytes 1024 bytes 1024 bytes 1024 bytes<br />
size<br />
Outputs (Q) 1024 bytes 1024 bytes 1024 bytes 1024 bytes<br />
Bit memory (M) 4096 bytes 4096 bytes 8192 bytes 8192 bytes<br />
Signal module (SM) expansion None 2 8 8<br />
Signal board (SB), Battery board<br />
(BB), or communication board (CB)<br />
1 1 1 1<br />
Communication module (CM)<br />
(left-side expansion)<br />
3 3 3 3<br />
High-speed Total 3 built-in I/O, 5 4 built-in I/O, 6 6 6<br />
counters<br />
with SB<br />
with SB<br />
Single phase 3 at 100 kHz 3 at 100 kHz 3 at 100 kHz 3 at 100 kHz<br />
SB: 2 at 30 kHz 1 at 30 kHz<br />
SB: 2 at 30 kHz<br />
3 at 30 kHz 3 at 30 kHz<br />
Quadrature phase 3 at 80 kHz 3 at 80 kHz 3 at 80 kHz 3 at 80 kHz<br />
SB: 2 at 20 kHz 1 at 20 kHz<br />
SB: 2 at 20 kHz<br />
3 at 20 kHz 3 at 20 kHz<br />
Pulse outputs1 4 4 4 4<br />
Memory card SIMATIC Memory card (optional)<br />
Real time clock retention time 20 days, typ. / 12 day min. at 40 degrees C (maintenance-free Super Capicator)<br />
PROFINET 1 Ethernet communication port 2 Ethernet<br />
communication ports<br />
Real math execution speed 2.3 μs/instruction<br />
Boolean execution speed 0.08 μs/instruction<br />
1 For CPU models with relay outputs, you must install a digital signal board (SB) to use the pulse outputs.<br />
Each CPU provides dedicated HMI connections to support up to 3 HMI devices. The total<br />
number of HMI is affected by the types of HMI panels in your configuration. For example,<br />
you could have up to three SIMATIC Basic panels connected to your CPU, or you could<br />
have up to two SIMATIC Comfort panels with one additional Basic panel.<br />
The different CPU models provide a diversity of features and capabilities that help you create<br />
effective solutions for your varied applications. For detailed information about a specific<br />
CPU, see the technical specifications (Page 699).<br />
<strong>S7</strong>-<strong>1200</strong> <strong>Programmable</strong> <strong>controller</strong><br />
20 System Manual, 04/2012, A5E02486680-06
Table 1- 2 Blocks, timers and counters supported by <strong>S7</strong>-<strong>1200</strong><br />
Product overview<br />
1.1 Introducing the <strong>S7</strong>-<strong>1200</strong> PLC<br />
Element Description<br />
Blocks<br />
Type OB, FB, FC, DB<br />
Size 30 Kbytes (CPU 1211C)<br />
50 Kbytes (CPU 1212C)<br />
64 Kbytes (CPU 1214C and CPU 1215C)<br />
Quantity Up to 1024 blocks total (OBs + FBs + FCs + DBs)<br />
Address range for FBs, FCs,<br />
and DBs<br />
1 to 65535 (such as FB 1 to FB 65535)<br />
Nesting depth 16 from the program cycle or start up OB; 4 from the time delay<br />
interrupt, time-of-day interrupt, cyclic interrupt, hardware interrupt,<br />
time error interrupt, or diagnostic error interrupt OB<br />
Monitoring Status of 2 code blocks can be monitored simultaneously<br />
Program cycle Multiple: OB 1, OB 200 to OB 65535<br />
Startup Multiple: OB 100, OB 200 to OB 65535<br />
Time-delay interrupts and<br />
cyclic interrupts<br />
41 OBs<br />
(1 per event): OB 200 to OB 65535<br />
Hardware interrupts (edges<br />
and HSC)<br />
50 (1 per event): OB 200 to OB 65535<br />
Time error interrupts 1: OB 80<br />
Diagnostic error interrupts 1: OB 82<br />
Timers<br />
Type IEC<br />
Quantity Limited only by memory size<br />
Storage Structure in DB, 16 bytes per timer<br />
Counters<br />
Type IEC<br />
Quantity Limited only by memory size<br />
Storage Structure in DB, size dependent upon count type<br />
SInt, USInt: 3 bytes<br />
Int, UInt: 6 bytes<br />
DInt, UDInt: 12 bytes<br />
1 Time-delay and cyclic interrupts use the same resources in the CPU. You can have only a total of 4 of these interrupts<br />
(time-delay plus cyclic interrupts). You cannot have 4 time-delay interrupts and 4 cyclic interrupts.<br />
<strong>S7</strong>-<strong>1200</strong> <strong>Programmable</strong> <strong>controller</strong><br />
System Manual, 04/2012, A5E02486680-06 21
Product overview<br />
1.2 Expansion capability of the CPU<br />
1.2 Expansion capability of the CPU<br />
The <strong>S7</strong>-<strong>1200</strong> family provides a variety of modules and plug-in boards for expanding the<br />
capabilities of the CPU with additional I/O or other communication protocols. For detailed<br />
information about a specific module, see the technical specifications (Page 699).<br />
<br />
<br />
<strong>S7</strong>-<strong>1200</strong> <strong>Programmable</strong> <strong>controller</strong><br />
22 System Manual, 04/2012, A5E02486680-06<br />
<br />
<br />
① Communication module (CM), communcation processor (CP), or TS Adapter<br />
② CPU<br />
③ Signal board (SB), communication board (CB), or Battery Board (BB)<br />
④ Signal module (SM)<br />
Table 1- 3 Digital signal modules and signal boards<br />
Type Input only Output only Combination In/Out<br />
③ digital SB 4 x 24VDC In,<br />
200 kHz<br />
4 x 5VDC In,<br />
200 kHz<br />
④ digital SM<br />
4 x 24VDC Out,<br />
200 kHz<br />
4 x 5VDC Out,<br />
200 kHz<br />
8 x 24VDC In 8 x 24VDC Out<br />
8 x Relay Out<br />
8 x Relay Out<br />
(Changeover)<br />
16 x 24VDC In 16 x 24VDC Out<br />
16 x Relay Out<br />
2 x 24VDC In / 2 x 24VDC Out<br />
2 x 24VDC In / 2 x 24VDC Out,<br />
200 kHz<br />
2 x 5VDC In / 2 x 5VDC Out,<br />
200 kHz<br />
8 x 24VDC In / 8 x 24VDC Out<br />
8 x 24VDC In / 8 x Relay Out<br />
8 x 120/230VAC In / 8 x Relay Out<br />
16 x 24VDC In / 16 x 24VDC Out<br />
16 x 24VDC In / 16 x Relay Out
Table 1- 4 Analog signal modules and signal boards<br />
Product overview<br />
1.2 Expansion capability of the CPU<br />
Type Input only Output only Combination In/Out<br />
③ analog SB 1 x 12 bit Analog In<br />
1 x Analog Out -<br />
1 x 16 bit RTD<br />
1 x 16 bit Thermocouple<br />
④ analog SM 4 x Analog In<br />
2 x Analog Out<br />
4 x Analog In / 2 x Analog Out<br />
4 x Analog In x 16 bit 4 x Analog Out<br />
8 x Analog In<br />
Thermocouple:<br />
– 4 x 16 bit TC<br />
– 8 x 16 bit TC<br />
RTD:<br />
– 4 x 16 bit RTD<br />
– 8 x 16 bit RTD<br />
Table 1- 5 Communication interfaces<br />
Module Type Description<br />
① Communication module (CM)<br />
RS232 Full-duplex<br />
RS422/485 Full-duplex (RS422)<br />
Half-duplex (RS485)<br />
PROFIBUS Master DPV1<br />
PROFIBUS Slave DPV1<br />
AS-i Master (CM 1243-2) AS-Interface<br />
① Communication processor (CP) Modem connectivity GPRS<br />
① Communication board (CB) RS485 Half-duplex<br />
TS Adapter IE Basic1 ① TeleService<br />
Connection to CPU<br />
TS Adapter GSM GSM/GPRS<br />
TS Adapter Modem Modem<br />
TS Adapter ISDN ISDN<br />
TS Adapter RS232 RS232<br />
1 The TS Adapter allows you to connect various communication interfaces to the PROFINET port of the CPU. You install<br />
the TS Adapter on the left side of the CPU and connect the TS Adapter modular (up to 3) onto the TS Adapter.<br />
Table 1- 6 Other boards<br />
Module Description<br />
③ Battery board<br />
Plugs into expansion board interface on front of CPU. Provides long term<br />
backup of realtime clock<br />
<strong>S7</strong>-<strong>1200</strong> <strong>Programmable</strong> <strong>controller</strong><br />
System Manual, 04/2012, A5E02486680-06 23
Product overview<br />
1.3 <strong>S7</strong>-<strong>1200</strong> modules<br />
1.3 <strong>S7</strong>-<strong>1200</strong> modules<br />
Table 1- 7 <strong>S7</strong>-<strong>1200</strong> expansion modules<br />
Type of module Description<br />
The CPU supports one plug-in<br />
expansion board:<br />
<br />
A signal board (SB) provides<br />
additional I/O for your CPU.<br />
The SB connects on the front of<br />
the CPU.<br />
<br />
A communication board (CB)<br />
allows you to add another<br />
communication port to your<br />
CPU.<br />
A battery board (BB) allows you<br />
to provide long term backup of<br />
the realtime clock.<br />
Signal modules (SMs) add<br />
additional functionality to the CPU.<br />
SMs connect to the right side of the<br />
CPU.<br />
Digital I/O<br />
Analog I/O<br />
RTD and thermocouple<br />
Communication modules (CMs)<br />
and communications processors<br />
(CPs) add communication options<br />
to the CPU, such as for<br />
PROFIBUS or RS232 / RS485<br />
connectivity (for PtP, Modbus or<br />
USS), or the AS-i master. A CP<br />
provides capabilities for other types<br />
of communication, such as to<br />
connect the CPU over a GPRS<br />
network.<br />
The CPU supports up to 3 CMs<br />
or CPs<br />
Each CM or CP connects to the<br />
left side of the CPU (or to the<br />
left side of another CM or CP)<br />
<br />
<br />
① Status LEDs on<br />
the SB<br />
② Removable user<br />
wiring connector<br />
① Status LEDs<br />
② Bus connector<br />
③ Removable user<br />
wiring connector<br />
<strong>S7</strong>-<strong>1200</strong> <strong>Programmable</strong> <strong>controller</strong><br />
24 System Manual, 04/2012, A5E02486680-06<br />
<br />
<br />
<br />
① Status LEDs<br />
② Communication<br />
connector
1.4 New features<br />
Product overview<br />
1.4 New features<br />
The following features are new in this release:<br />
● A standard Web server page for performing a CPU firmware update (Page 519)<br />
● The ability to use three PROFIBUS DP CM 1243-5 master modules or three AS-i CM<br />
1243-2 master modules<br />
Note<br />
To use three AS-i modules as masters, you must update the firmware of the AS-i<br />
modules.<br />
New modules for the <strong>S7</strong>-<strong>1200</strong><br />
A variety of new modules expand the power of the <strong>S7</strong>-<strong>1200</strong> CPU and provide the flexibility to<br />
meet your automation needs:<br />
● New and improved CPUs:<br />
– New CPU 1215C DC/DC/DC, CPU 1215C DC/DC/Relay, and CPU 1215C<br />
AC/DC/Relay offer 100 Kbytes of work memory, dual Ethernet, and analog outputs.<br />
– New and improved CPU 1211Cs, CPU 1212Cs, and CPU 1214Cs have faster<br />
processing time, the possibility of 4 PTOs (the CPU 1211C requires a signal board),<br />
increased retentive memory (10 Kbytes), and increased time-of-day hold up time (20<br />
days).<br />
● New I/O signal module: SM 1231 AI 4 x 16 bit provides higher sample rate and increased<br />
number of bits.<br />
● New battery board (BB 1297) offers long term backup of the realtime clock. The BB 1297<br />
is pluggable in the signal board slot of the <strong>S7</strong>-<strong>1200</strong> CPU (firmware 3.0 and later<br />
versions).<br />
To use the new modules you must use STEP 7 V11 SP2 Update 3 or later (Basic or<br />
Professional) and you must download the hardware support package (HSP) for new modules<br />
from the STEP 7 Options > Support Packages menu command. Follow the instructions for<br />
adding modules to the hardware catalog for STEP 7 (TIA Portal) from the Siemens Service<br />
and Support Site (http://support.automation.siemens.com).<br />
<strong>S7</strong>-<strong>1200</strong> <strong>Programmable</strong> <strong>controller</strong><br />
System Manual, 04/2012, A5E02486680-06 25
Product overview<br />
1.5 Basic HMI panels<br />
1.5 Basic HMI panels<br />
Because visualization is becoming a standard component for most machine designs, the<br />
SIMATIC HMI Basic Panels provide touch-screen devices for basic operator control and<br />
monitoring tasks. All panels have a protection rating for IP65 and have CE, UL, cULus, and<br />
NEMA 4x certification.<br />
Basic HMI Panel Description Technical data<br />
3.6" membrane keyboard with 10 freely 250 tags<br />
configurable tactile keys<br />
50 process screens<br />
Mono (STN, black/white)<br />
200 alarms<br />
KP 300 Basic PN<br />
87 mm x 31 mm (3.6")<br />
25 curves<br />
<br />
<br />
Backlight color programmed (white,<br />
green, yellow or red)<br />
Resolution: 240 x 80<br />
<br />
<br />
40 KB recipe memory<br />
5 recipes, 20 data records, 20 entries<br />
KTP 400 Basic PN<br />
KTP 600 Basic PN<br />
4" touch screen with 4 tactile keys<br />
Mono (STN, gray scale)<br />
76.79 mm x 57.59 mm (3.8")<br />
Portrait or landscape<br />
Resolution: 320 x 240<br />
6" touch screen with 6 tactile keys<br />
Color (TFT, 256 colors) or Mono<br />
(STN, gray scales)<br />
115.2 mm x 86.4 mm (5.7")<br />
Portrait or landscape<br />
Resolution: 320 x 240<br />
250 tags<br />
50 process screens<br />
200 alarms<br />
25 curves<br />
40 KB recipe memory<br />
5 recipes, 20 data records, 20 entries<br />
500 tags<br />
50 process screens<br />
200 alarms<br />
25 curves<br />
40 KB recipe memory<br />
5 recipes, 20 data records, 20 entries<br />
<strong>S7</strong>-<strong>1200</strong> <strong>Programmable</strong> <strong>controller</strong><br />
26 System Manual, 04/2012, A5E02486680-06
Product overview<br />
1.5 Basic HMI panels<br />
Basic HMI Panel Description Technical data<br />
10" touch screen with 8 tactile keys 500 tags<br />
Color (TFT, 256 colors)<br />
50 process screens<br />
211.2 mm x 158.4 mm (10.4") 200 alarms<br />
Resolution: 640 x 480<br />
25 curves<br />
40 KB recipe memory<br />
5 recipes, 20 data records, 20 entries<br />
KTP 1000 Basic PN<br />
TP 1500 Basic PN<br />
15" touch screen<br />
Color (TFT, 256 colors)<br />
304.1 mm x 228.1 mm (15.1")<br />
Resolution: 1024 x 768<br />
500 tags<br />
50 process screens<br />
200 alarms<br />
25 curves<br />
40 KB recipe memory (integrated<br />
flash)<br />
5 recipes, 20 data records, 20 entries<br />
<strong>S7</strong>-<strong>1200</strong> <strong>Programmable</strong> <strong>controller</strong><br />
System Manual, 04/2012, A5E02486680-06 27
Product overview<br />
1.5 Basic HMI panels<br />
<strong>S7</strong>-<strong>1200</strong> <strong>Programmable</strong> <strong>controller</strong><br />
28 System Manual, 04/2012, A5E02486680-06
STEP 7 programming software 2<br />
STEP 7 provides a user-friendly environment to develop, edit, and monitor the logic needed<br />
to control your application, including the tools for managing and configuring all of the devices<br />
in your project, such as <strong>controller</strong>s and HMI devices. To help you find the information you<br />
need, STEP 7 provides an extensive online help system.<br />
STEP 7 provides standard programming languages for convenience and efficiency in<br />
developing the control program for your application.<br />
● LAD (ladder logic) is a graphical programming language. The representation is based on<br />
circuit diagrams (Page 155).<br />
● FBD (Function Block Diagram) is a programming language that is based on the graphical<br />
logic symbols used in Boolean algebra (Page 156).<br />
● SCL (structured control language) is a text-based, high-level programming language.<br />
When you create a code block, you select the programming language to be used by that<br />
block. Your user program can utilize code blocks created in any or all of the programming<br />
languages.<br />
Note<br />
STEP 7 is the programming and configuration software component of the TIA Portal. The<br />
TIA Portal, in addition to STEP 7, also includes WinCC for designing and executing runtime<br />
process visualization, and includes online help for WinCC as well as STEP 7.<br />
2.1 System requirements<br />
To install the STEP 7 software on a PC running Windows XP or Windows 7 operating<br />
system, you must log in with Administrator privileges.<br />
Table 2- 1 System requirements<br />
Hardware/software Requirements<br />
Processor type Pentium M, 1.6 GHz or similar<br />
RAM 1 GB<br />
Available hard disk space 2 GB on system drive C:\<br />
Operating systems Windows XP Professional SP3<br />
Windows 2003 Server R2 StdE SP2<br />
Windows 7 Home Premium (STEP 7 Basic only, not<br />
supported for STEP 7 Professional)<br />
Windows 7 (Professional, Enterprise, Ultimate)<br />
Windows 2008 Server StdE R2<br />
<strong>S7</strong>-<strong>1200</strong> <strong>Programmable</strong> <strong>controller</strong><br />
System Manual, 04/2012, A5E02486680-06 29
STEP 7 programming software<br />
2.2 Different views to make the work easier<br />
Hardware/software Requirements<br />
Graphics card 32 MB RAM<br />
24-bit color depth<br />
Screen resolution 1024 x 768<br />
Network 20 Mbit/s Ethernet or faster<br />
Optical drive DVD-ROM<br />
2.2 Different views to make the work easier<br />
STEP 7 provides a user-friendly environment to develop <strong>controller</strong> logic, configure HMI<br />
visualization, and setup network communication. To help increase your productivity, STEP 7<br />
provides two different views of the project: a task-oriented set of portals that are organized<br />
on the functionality of the tools (Portal view), or a project-oriented view of the elements within<br />
the project (Project view). Choose which view helps you work most efficiently. With a single<br />
click, you can toggle between the Portal view and the Project view.<br />
<br />
<br />
<br />
<br />
<br />
<br />
<br />
<br />
Portal view<br />
① Portals for the different tasks<br />
② Tasks for the selected portal<br />
③ Selection panel for the selected<br />
action<br />
④ Changes to the Project view<br />
Project view<br />
① Menus and toolbar<br />
② Project navigator<br />
③ Work area<br />
④ Task cards<br />
⑤ Inspector window<br />
⑥ Changes to the Portal view<br />
⑦ Editor bar<br />
<strong>S7</strong>-<strong>1200</strong> <strong>Programmable</strong> <strong>controller</strong><br />
30 System Manual, 04/2012, A5E02486680-06<br />
<br />
With all of these components in one place, you have easy access to every aspect of your<br />
project. For example, the inspector window shows the properties and information for the<br />
object that you have selected in the work area. As you select different objects, the inspector<br />
window displays the properties that you can configure. The inspector window includes tabs<br />
that allow you to see diagnostic information and other messages.
STEP 7 programming software<br />
2.3 Easy-to-use tools<br />
By showing all of the editors that are open, the editor bar helps you work more quickly and<br />
efficiently. To toggle between the open editors, simply click the different editor. You can also<br />
arrange two editors to appear together, arranged either vertically or horizontally. This feature<br />
allows you to drag and drop between editors.<br />
2.3 Easy-to-use tools<br />
2.3.1 Inserting instructions into your user program<br />
STEP 7 provides task cards that contain the instructions for your<br />
program. The instructions are grouped according to function.<br />
To create your program, you drag instructions from the task card<br />
onto a network.<br />
<strong>S7</strong>-<strong>1200</strong> <strong>Programmable</strong> <strong>controller</strong><br />
System Manual, 04/2012, A5E02486680-06 31
STEP 7 programming software<br />
2.3 Easy-to-use tools<br />
2.3.2 Accessing instructions from the "Favorites" toolbar<br />
STEP 7 provides a "Favorites" toolbar to give you quick access to the instructions that you<br />
frequently use. Simply click the icon for the instruction to insert it into your network!<br />
(For the "Favorites" in the instruction tree, doubleclick<br />
the icon.)<br />
You can easily customize the<br />
"Favorites" by adding new<br />
instructions.<br />
Simply drag and drop an<br />
instruction to the "Favorites".<br />
The instruction is now just a click<br />
away!<br />
<strong>S7</strong>-<strong>1200</strong> <strong>Programmable</strong> <strong>controller</strong><br />
32 System Manual, 04/2012, A5E02486680-06
2.3.3 Creating a complex equation with a simple instruction<br />
STEP 7 programming software<br />
2.3 Easy-to-use tools<br />
The Calculate instruction lets you create a math function that operates on multiple input<br />
parameters to produce the result, according to the equation that you define.<br />
In the Basic instruction tree, expand the Math functions folder.<br />
Double-click the Calculate instruction to insert the instruction<br />
into your user program.<br />
The unconfigured Calculate<br />
instruction provides two input<br />
parameters and an output<br />
parameter.<br />
Click the "???" and select the data types for the input and output<br />
parameters. (The input and output parameters must all be the same<br />
data type.)<br />
For this example, select the "Real" data type.<br />
Click the "Edit equation" icon to enter the equation.<br />
<strong>S7</strong>-<strong>1200</strong> <strong>Programmable</strong> <strong>controller</strong><br />
System Manual, 04/2012, A5E02486680-06 33
STEP 7 programming software<br />
2.3 Easy-to-use tools<br />
For this example, enter the following equation for scaling a raw analog value. (The "In" and<br />
"Out" designations correspond to the parameters of the Calculate instruction.)<br />
Out value = ((Out high - Out low) / (In high - In low)) * (In value - In low) + Out low<br />
Out = ((in4 - in5) / (in2 - in3)) * (in1 - in3) + in5<br />
Where: Out value (Out) Scaled output value<br />
In value (in1) Analog input value<br />
In high (in2) Upper limit for the scaled input value<br />
In low (in3) Lower limit for the scaled input value<br />
Out high (in4) Upper limit for the scaled output value<br />
Out low (in5) Lower limit for the scaled ouput value<br />
In the "Edit Calculate" box, enter the equation with the parameter names:<br />
OUT = ((in4 - in5) / (in2 - in3)) * (in1 - in3) + in5<br />
When you click "OK", the Calculate<br />
instruction creates the inputs<br />
required for the instruction.<br />
Enter the tag names for the values<br />
that correspond to the parameters.<br />
<strong>S7</strong>-<strong>1200</strong> <strong>Programmable</strong> <strong>controller</strong><br />
34 System Manual, 04/2012, A5E02486680-06
2.3.4 Adding inputs or outputs to a LAD or FBD instruction<br />
STEP 7 programming software<br />
2.3 Easy-to-use tools<br />
Some of the instructions allow you to create additional inputs or outputs.<br />
● To add an input or output, click the "Create" icon or right-click on an input stub for one of<br />
the existing IN or OUT parameters and select the "Insert input" command.<br />
● To remove an input or output, right-click on the stub for one of the existing IN or OUT<br />
parameters (when there are more than the original two inputs) and select the "Delete"<br />
command.<br />
2.3.5 Expandable instructions<br />
Some of the more complex instructions are expandable, displaying only the key inputs and<br />
outputs. To display the inputs and outputs, click the arrow at the bottom of the instruction.<br />
<strong>S7</strong>-<strong>1200</strong> <strong>Programmable</strong> <strong>controller</strong><br />
System Manual, 04/2012, A5E02486680-06 35
STEP 7 programming software<br />
2.3 Easy-to-use tools<br />
2.3.6 Selecting a version for an instruction<br />
The development and release cycles for certain sets of instructions (such as Modbus, PID<br />
and motion) have created multiple released versions for these instructions. To help ensure<br />
compatibility and migration with older projects, STEP 7 allows you to choose which version<br />
of instruction to insert into your user program.<br />
Click the icon on the instruction tree task card to enable the<br />
headers and columns of the instruction tree.<br />
To change the version of the instruction, select the<br />
appropriate version from the drop-down list.<br />
2.3.7 Modifying the appearance and configuration of STEP 7<br />
You can select a variety of settings,<br />
such as the appearance of the<br />
interface, language, or the folder for<br />
saving your work.<br />
Select the "Settings" command from<br />
the "Options" menu to change these<br />
settings.<br />
<strong>S7</strong>-<strong>1200</strong> <strong>Programmable</strong> <strong>controller</strong><br />
36 System Manual, 04/2012, A5E02486680-06
2.3.8 Dragging and dropping between editors<br />
To display two editors at one time, use the<br />
"Split editor" menu commands or buttons in<br />
the toolbar.<br />
STEP 7 programming software<br />
2.3 Easy-to-use tools<br />
To help you perform tasks quickly and easily,<br />
STEP 7 allows you to drag and drop elements<br />
from one editor to another. For example, you<br />
can drag an input from the CPU to the address<br />
of an instruction in your user program.<br />
You must zoom in at least 200% to select the<br />
inputs or outputs of the CPU.<br />
Notice that the tag names are displayed not<br />
only in the PLC tag table, but also are<br />
displayed on the CPU.<br />
To toggle between the editors that have been opened, click the icons in the editor bar.<br />
2.3.9 Changing the operating mode of the CPU<br />
Refer to<br />
The CPU does not have a physical switch for changing the operating mode (STOP or RUN).<br />
Use the "Start CPU" and "Stop CPU" toolbar buttons to change the operating<br />
mode of the CPU.<br />
When you configure the CPU in the device configuration, you configure the start-up behavior<br />
in the properties of the CPU.<br />
<strong>S7</strong>-<strong>1200</strong> <strong>Programmable</strong> <strong>controller</strong><br />
System Manual, 04/2012, A5E02486680-06 37
STEP 7 programming software<br />
2.3 Easy-to-use tools<br />
The "Online and diagnostics" portal also provides an operator panel for changing the<br />
operating mode of the online CPU. To use the CPU operator panel, you must be connected<br />
online to the CPU. The "Online tools" task card displays an operator panel that shows the<br />
operating mode of the online CPU. The operator panel also allows you to change the<br />
operating mode of the online CPU.<br />
Use the button on the operator panel to change the operating mode<br />
(STOP or RUN). The operator panel also provides an MRES button for<br />
resetting the memory.<br />
The color of the RUN/STOP indicator shows the current operating mode of the CPU. Yellow<br />
indicates STOP mode, and green indicates RUN mode.<br />
Refer to Operating Modes of the CPU in the <strong>S7</strong>-<strong>1200</strong> System Manual (Page 69) for<br />
configuring the default operating mode on power up.<br />
<strong>S7</strong>-<strong>1200</strong> <strong>Programmable</strong> <strong>controller</strong><br />
38 System Manual, 04/2012, A5E02486680-06
2.3.10 Changing the call type for a DB<br />
STEP 7 programming software<br />
2.3 Easy-to-use tools<br />
STEP 7 allows you to easily create or change the<br />
association of a DB for an instruction or an FB that is in<br />
an FB.<br />
You can switch the association between different DBs.<br />
You can switch the association between a singleinstance<br />
DB and a multi-instance DB.<br />
You can create an instance DB (if an instance DB is<br />
missing or not available).<br />
You can access the "Change call type" command either<br />
by right-clicking the instruction or FB in the program<br />
editor or by selecting the "Block call" command from the<br />
"Options" menu.<br />
The "Call options" dialog allows<br />
you to select a single-instance<br />
or multi-instance DB. You can<br />
also select specific DBs from a<br />
drop-down list of available DBs.<br />
<strong>S7</strong>-<strong>1200</strong> <strong>Programmable</strong> <strong>controller</strong><br />
System Manual, 04/2012, A5E02486680-06 39
STEP 7 programming software<br />
2.3 Easy-to-use tools<br />
2.3.11 Temporarily disconnecting devices from a network<br />
You can disconnect individual network devices from the subnet. Because the configuration of<br />
the device is not removed from the project, you can easily restore the connection to the<br />
device.<br />
Right-click the interface port of the network<br />
device and select the "Disconnect from<br />
subnet" command from the context menu.<br />
STEP 7 reconfigures the network connections, but does not remove the disconnected device<br />
from the project. While the network connection is deleted, the interface addresses are not<br />
changed.<br />
When you download the new network connections, the CPU must be set to STOP mode.<br />
To reconnect the device, simply create a new network connection to the port of the device.<br />
<strong>S7</strong>-<strong>1200</strong> <strong>Programmable</strong> <strong>controller</strong><br />
40 System Manual, 04/2012, A5E02486680-06
2.3.12 Virtual unplugging of devices from the configuration<br />
STEP 7 programming software<br />
2.3 Easy-to-use tools<br />
STEP 7 provides a storage area for<br />
"unplugged" modules. You can drag a<br />
module from the rack to save the<br />
configuration of that module. These<br />
unplugged modules are saved with your<br />
project, allowing you to reinsert the<br />
module in the future without having to<br />
reconfigure the parameters.<br />
One use of this feature is for temporary<br />
maintenance. Consider a scenario where<br />
you might be waiting for a replacement<br />
module and plan to temporarily use a<br />
different module as a short-term<br />
replacement. You could drag the<br />
configured module from the rack to the<br />
"Unplugged modules" and then insert the<br />
temporary module.<br />
<strong>S7</strong>-<strong>1200</strong> <strong>Programmable</strong> <strong>controller</strong><br />
System Manual, 04/2012, A5E02486680-06 41
STEP 7 programming software<br />
2.3 Easy-to-use tools<br />
<strong>S7</strong>-<strong>1200</strong> <strong>Programmable</strong> <strong>controller</strong><br />
42 System Manual, 04/2012, A5E02486680-06
Installation 3<br />
3.1 Guidelines for installing <strong>S7</strong>-<strong>1200</strong> devices<br />
The <strong>S7</strong>-<strong>1200</strong> equipment is designed to be easy to install. You can install an <strong>S7</strong>-<strong>1200</strong> either<br />
on a panel or on a standard rail, and you can orient the <strong>S7</strong>-<strong>1200</strong> either horizontally or<br />
vertically. The small size of the <strong>S7</strong>-<strong>1200</strong> allows you to make efficient use of space.<br />
WARNING<br />
The SIMATIC <strong>S7</strong>-<strong>1200</strong> PLCs are Open Type Controllers. It is required that you install the<br />
<strong>S7</strong>-<strong>1200</strong> in a housing, cabinet, or electric control room. Entry to the housing, cabinet, or<br />
electric control room should be limited to authorized personnel.<br />
Failure to follow these installation requirements could result in death, severe personal injury<br />
and/or property damage.<br />
Always follow these requirements when installing <strong>S7</strong>-<strong>1200</strong> PLCs.<br />
Separate the <strong>S7</strong>-<strong>1200</strong> devices from heat, high voltage, and electrical noise<br />
As a general rule for laying out the devices of your system, always separate the devices that<br />
generate high voltage and high electrical noise from the low-voltage, logic-type devices such<br />
as the <strong>S7</strong>-<strong>1200</strong>.<br />
When configuring the layout of the <strong>S7</strong>-<strong>1200</strong> inside your panel, consider the heat-generating<br />
devices and locate the electronic-type devices in the cooler areas of your cabinet. Reducing<br />
the exposure to a high-temperature environment will extend the operating life of any<br />
electronic device.<br />
Consider also the routing of the wiring for the devices in the panel. Avoid placing low-voltage<br />
signal wires and communications cables in the same tray with AC power wiring and highenergy,<br />
rapidly-switched DC wiring.<br />
Provide adequate clearance for cooling and wiring<br />
<strong>S7</strong>-<strong>1200</strong> devices are designed for natural convection cooling. For proper cooling, you must<br />
provide a clearance of at least 25 mm above and below the devices. Also, allow at least 25<br />
mm of depth between the front of the modules and the inside of the enclosure.<br />
CAUTION<br />
For vertical mounting, the maximum allowable ambient temperature is reduced by 10<br />
degrees C. Orient a vertically mounted <strong>S7</strong>-<strong>1200</strong> system as shown in the following figure.<br />
<strong>S7</strong>-<strong>1200</strong> <strong>Programmable</strong> <strong>controller</strong><br />
System Manual, 04/2012, A5E02486680-06 43
Installation<br />
3.2 Power budget<br />
When planning your layout for the <strong>S7</strong>-<strong>1200</strong> system, allow enough clearance for the wiring<br />
and communications cable connections.<br />
<br />
<br />
<br />
<br />
<br />
<br />
3.2 Power budget<br />
<strong>S7</strong>-<strong>1200</strong> <strong>Programmable</strong> <strong>controller</strong><br />
44 System Manual, 04/2012, A5E02486680-06<br />
<br />
<br />
<br />
① Side view ③ Vertical installation<br />
② Horizontal installation ④ Clearance area<br />
Your CPU has an internal power supply that provides power for the CPU, the signal<br />
modules, signal board and communication modules and for other 24 VDC user power<br />
requirements.<br />
Refer to the technical specifications (Page 699) for information about the 5 VDC logic budget<br />
supplied by your CPU and the 5 VDC power requirements of the signal modules, signal<br />
boards, and communication modules. Refer to the "Calculating a power budget" (Page 829)<br />
to determine how much power (or current) the CPU can provide for your configuration.<br />
The CPU provides a 24 VDC sensor supply that can supply 24 VDC for input points, for relay<br />
coil power on the signal modules, or for other requirements. If your 24 VDC power<br />
requirements exceed the budget of the sensor supply, then you must add an external<br />
24 VDC power supply to your system. Refer to the technical specifications (Page 699) for the<br />
24 VDC sensor supply power budget for your particular CPU.<br />
Note<br />
The CM 1243-5 (PROFIBUS master module) requires power from the 24 VDC sensor supply<br />
of the CPU.
Installation<br />
3.2 Power budget<br />
If you require an external 24 VDC power supply, ensure that the power supply is not<br />
connected in parallel with the sensor supply of the CPU. For improved electrical noise<br />
protection, it is recommended that the commons (M) of the different power supplies be<br />
connected.<br />
WARNING<br />
Connecting an external 24 VDC power supply in parallel with the 24 VDC sensor supply<br />
can result in a conflict between the two supplies as each seeks to establish its own<br />
preferred output voltage level.<br />
The result of this conflict can be shortened lifetime or immediate failure of one or both<br />
power supplies, with consequent unpredictable operation of the PLC system. Unpredictable<br />
operation could result in death, severe personal injury and/or property damage.<br />
The DC sensor supply and any external power supply should provide power to different<br />
points.<br />
Some of the 24 VDC power input ports in the <strong>S7</strong>-<strong>1200</strong> system are interconnected, with a<br />
common logic circuit connecting multiple M terminals. For example, the following circuits are<br />
interconnected when designated as "not isolated" in the data sheets: the 24 VDC power<br />
supply of the CPU, the power input for the relay coil of an SM, or the power supply for a nonisolated<br />
analog input. All non-isolated M terminals must connect to the same external<br />
reference potential.<br />
WARNING<br />
Connecting non-isolated M terminals to different reference potentials will cause unintended<br />
current flows that may cause damage or unpredictable operation in the PLC and any<br />
connected equipment.<br />
Failure to comply with these guidelines could cause damage or unpredictable operation<br />
which could result in death or severe personal injury and/or property damage.<br />
Always ensure that all non-isolated M terminals in an <strong>S7</strong>-<strong>1200</strong> system are connected to the<br />
same reference potential.<br />
<strong>S7</strong>-<strong>1200</strong> <strong>Programmable</strong> <strong>controller</strong><br />
System Manual, 04/2012, A5E02486680-06 45
Installation<br />
3.3 Installation and removal procedures<br />
3.3 Installation and removal procedures<br />
3.3.1 Mounting dimensions for the <strong>S7</strong>-<strong>1200</strong> devices<br />
<br />
<br />
<br />
<br />
<br />
<br />
<br />
<br />
Table 3- 1 Mounting dimensions (mm)<br />
<br />
<br />
<br />
<br />
<br />
<strong>S7</strong>-<strong>1200</strong> Devices Width A (mm) Width B (mm) Width C (mm)<br />
CPU<br />
<strong>S7</strong>-<strong>1200</strong> <strong>Programmable</strong> <strong>controller</strong><br />
46 System Manual, 04/2012, A5E02486680-06<br />
<br />
CPU 1211C and CPU 1212C 90 45 --<br />
CPU 1214C 110 55 --
Installation<br />
3.3 Installation and removal procedures<br />
<strong>S7</strong>-<strong>1200</strong> Devices Width A (mm) Width B (mm) Width C (mm)<br />
CPU 1215C 130 65 (top) Bottom:<br />
C1: 32.5<br />
C2: 65<br />
C3: 32.5<br />
Signal modules Digital 8 and 16 point<br />
Analog 2, 4, and 8 point<br />
Thermocouple 4 and 8 point<br />
RTD 4 point<br />
45 22.5 --<br />
Digital DQ 8 x Relay (Changeover) 70 22.5 --<br />
Analog 16 point<br />
RTD 8 point<br />
70 35 --<br />
Communication CM 1241 RS232, and<br />
30 15 --<br />
interfaces<br />
CM 1241 RS422/485<br />
CM 1243-5 PROFIBUS master and<br />
CM 1242-5 PROFIBUS slave<br />
CM 1242-2 AS-i Master<br />
CP 1242-7 GPRS<br />
TS AdapterIE Basic 60 1 15 --<br />
1 Because you must install a TS Adapter modular with the TS Adapter, the total width ("width A") is 60 mm.<br />
Each CPU, SM, CM, and CP supports mounting on either a DIN rail or on a panel. Use the<br />
DIN rail clips on the module to secure the device on the rail. These clips also snap into an<br />
extended position to provide screw mounting positions to mount the unit directly on a panel.<br />
The interior dimension of the hole for the DIN clips on the device is 4.3 mm.<br />
A 25 mm thermal zone must be provided above and below the unit for free air circulation.<br />
Installing and removing the <strong>S7</strong>-<strong>1200</strong> devices<br />
The CPU can be easily installed on a standard DIN rail or on a panel. DIN rail clips are<br />
provided to secure the device on the DIN rail. The clips also snap into an extended position<br />
to provide a screw mounting position for panel-mounting the unit.<br />
1<br />
<strong>S7</strong>-<strong>1200</strong> <strong>Programmable</strong> <strong>controller</strong><br />
System Manual, 04/2012, A5E02486680-06 47<br />
12<br />
① DIN rail installation ③ Panel installation<br />
② DIN rail clip in latched position ④ Clip in extended position for panel mounting<br />
13<br />
4
Installation<br />
3.3 Installation and removal procedures<br />
Before you install or remove any electrical device, ensure that the power to that equipment<br />
has been turned off. Also, ensure that the power to any related equipment has been turned<br />
off.<br />
WARNING<br />
Installation or removal of <strong>S7</strong>-<strong>1200</strong> or related equipment with the power applied could cause<br />
electric shock or unexpected operation of equipment.<br />
Failure to disable all power to the <strong>S7</strong>-<strong>1200</strong> and related equipment during installation or<br />
removal procedures could result in death, severe personal injury and/or property damage<br />
due to electric shock or unexpected equipment operation.<br />
Always follow appropriate safety precautions and ensure that power to the <strong>S7</strong>-<strong>1200</strong> is<br />
disabled before attempting to install or remove <strong>S7</strong>-<strong>1200</strong> CPUs or related equipment.<br />
Always ensure that whenever you replace or install an <strong>S7</strong>-<strong>1200</strong> device you use the correct<br />
module or equivalent device.<br />
WARNING<br />
Incorrect installation of an <strong>S7</strong>-<strong>1200</strong> module may cause the program in the <strong>S7</strong>-<strong>1200</strong> to<br />
function unpredictably.<br />
Failure to replace an <strong>S7</strong>-<strong>1200</strong> device with the same model, orientation, or order could result<br />
in death, severe personal injury and/or property damage due to unexpected equipment<br />
operation.<br />
Replace an <strong>S7</strong>-<strong>1200</strong> device with the same model, and be sure to orient and position it<br />
correctly.<br />
WARNING<br />
Do not disconnect equipment when a flammable or combustible atmosphere is present.<br />
Disconnection of equipment when a flammable or combustible atmosphere is present may<br />
cause a fire or explosion which could result in death, serious injury and/or property<br />
damage.<br />
CAUTION<br />
Electrostatic discharge can damage the device or the receptacle on the CPU.<br />
Make contact with a grounded conductive pad and/or wear a grounded wrist strap<br />
whenever you handle the device.<br />
<strong>S7</strong>-<strong>1200</strong> <strong>Programmable</strong> <strong>controller</strong><br />
48 System Manual, 04/2012, A5E02486680-06
3.3.2 Installing and removing the CPU<br />
You can install the CPU on a panel or on a DIN rail.<br />
Installation<br />
3.3 Installation and removal procedures<br />
Note<br />
Attach any communication modules to the CPU and install the assembly as a unit. Install<br />
signal modules separately after the CPU has been installed.<br />
Consider the following when installing the units on the DIN rail or on a panel:<br />
● For DIN rail mounting, make sure the upper DIN rail clip is in the latched (inner) position<br />
and that the lower DIN rail clip is in the extended position for the CPU and attached CMs.<br />
● After installing the devices on the DIN rail, move the lower DIN rail clips to the latched<br />
position to lock the devices on the DIN rail.<br />
● For panel mounting, make sure the DIN rail clips are pushed to the extended position.<br />
To install the CPU on a panel, follow these steps:<br />
1. Locate, drill, and tap the mounting holes (M4), using the dimensions shown in table,<br />
Mounting dimensions (mm) (Page 46).<br />
2. Ensure that the CPU and all <strong>S7</strong>-<strong>1200</strong> equipment are disconnected from electrical power.<br />
3. Extend the mounting clips from the module. Make sure the DIN rail clips on the top and<br />
bottom of the CPU are in the extended position.<br />
4. Secure the module to the panel, using a Pan Head M4 screw with spring and flat washer.<br />
Do not use a flat head screw.<br />
Note<br />
The type of screw will be determined by the material upon which it is mounted. You<br />
should apply appropriate torque until the spring washer becomes flat. Avoid applying<br />
excessive torque to the mounting screws. Do not use a flat head screw.<br />
Note<br />
If your system is subject to a high vibration environment, or is mounted vertically, panel<br />
mounting the <strong>S7</strong>-<strong>1200</strong> will provide a greater level of protection.<br />
<strong>S7</strong>-<strong>1200</strong> <strong>Programmable</strong> <strong>controller</strong><br />
System Manual, 04/2012, A5E02486680-06 49
Installation<br />
3.3 Installation and removal procedures<br />
Table 3- 2 Installing the CPU on a DIN rail<br />
Task Procedure<br />
Table 3- 3 Removing the CPU from a DIN rail<br />
Task Procedure<br />
1. Install the DIN rail. Secure the rail to the mounting panel every 75 mm.<br />
2. Ensure that the CPU and all <strong>S7</strong>-<strong>1200</strong> equipment are disconnected from electrical<br />
power.<br />
3. Hook the CPU over the top of the DIN rail.<br />
4. Pull out the DIN rail clip on the bottom of the CPU to allow the CPU to fit over the<br />
rail.<br />
5. Rotate the CPU down into position on the rail.<br />
6. Push in the clips to latch the CPU to the rail.<br />
1. Ensure that the CPU and all <strong>S7</strong>-<strong>1200</strong> equipment are<br />
disconnected from electrical power.<br />
2. Disconnect the I/O connectors, wiring, and cables from<br />
the CPU (Page 55).<br />
3. Remove the CPU and any attached communication<br />
modules as a unit. All signal modules should remain<br />
installed.<br />
4. If an SM is connected to the CPU, retract the bus<br />
connector:<br />
– Place a screwdriver beside the tab on the top of the<br />
signal module.<br />
– Press down to disengage the connector from the<br />
CPU.<br />
– Slide the tab fully to the right.<br />
5. Remove the CPU:<br />
– Pull out the DIN rail clip to release the CPU from the<br />
rail.<br />
– Rotate the CPU up and off the rail, and remove the<br />
CPU from the system.<br />
<strong>S7</strong>-<strong>1200</strong> <strong>Programmable</strong> <strong>controller</strong><br />
50 System Manual, 04/2012, A5E02486680-06
3.3.3 Installing and removing an SB, CB or BB<br />
Table 3- 4 Installing an SB, CB, or BB 1297<br />
Installation<br />
3.3 Installation and removal procedures<br />
Task Procedure<br />
1. Ensure that the CPU and all <strong>S7</strong>-<strong>1200</strong> equipment are disconnected<br />
from electrical power.<br />
2. Remove the top and bottom terminal block covers from the CPU.<br />
3. Place a screwdriver into the slot on top of the CPU at the rear of the<br />
cover.<br />
4. Gently pry the cover up and remove it from the CPU.<br />
5. Place the module straight down into its mounting position in the top<br />
of the CPU.<br />
6. Firmly press the module into position until it snaps into place.<br />
7. Replace the terminal block covers.<br />
Table 3- 5 Removing an SB, CB or BB 1297<br />
Task Procedure<br />
1. Ensure that the CPU and all <strong>S7</strong>-<strong>1200</strong> equipment are disconnected<br />
from electrical power.<br />
2. Remove the top and bottom terminal block covers from the CPU.<br />
3. Place a screwdriver into the slot on top of the module.<br />
4. Gently pry the module up to disengage it from the CPU.<br />
5. Remove the module straight up from its mounting position in the top<br />
of the CPU.<br />
6. Replace the cover onto the CPU.<br />
7. Replace the terminal block covers.<br />
Installing or replacing the battery in the BB 1297 battery board<br />
The BB 1297 requires battery type CR1025. The battery is not included with the BB 1297<br />
and must be purchased by the user. To install or replace the battery, follow these steps:<br />
1. In the BB 1297, install a new battery with the positive side of the battery on top, and the<br />
negative side next to the printed wiring board.<br />
<strong>S7</strong>-<strong>1200</strong> <strong>Programmable</strong> <strong>controller</strong><br />
System Manual, 04/2012, A5E02486680-06 51
Installation<br />
3.3 Installation and removal procedures<br />
2. The BB 1297 is ready to be installed in the CPU. Follow the installation directions above<br />
to install the BB 1297.<br />
To replace the battery in the BB 1297:<br />
1. Remove the BB 1297 from the CPU following the removal directions above.<br />
2. Carefully remove the old battery using a small screwdriver. Push the battery out from<br />
under the clip.<br />
3. Install a new CR1025 replacement battery with the positive side of the battery on top and<br />
the negative side next to the printed wiring board.<br />
4. Re-install the BB 1297 battery board following the installation directions above.<br />
3.3.4 Installing and removing an SM<br />
Table 3- 6 Installing an SM<br />
Task Procedure<br />
Install your SM after installing the CPU.<br />
1. Ensure that the CPU and all <strong>S7</strong>-<strong>1200</strong> equipment are<br />
disconnected from electrical power.<br />
2. Remove the cover for the connector from the right side of the<br />
CPU.<br />
3. Insert a screwdriver into the slot above the cover.<br />
4. Gently pry the cover out at its top and remove the cover.<br />
Retain the cover for reuse.<br />
Connect the SM to the CPU:<br />
1. Position the SM beside the CPU.<br />
2. Hook the SM over the top of the DIN rail.<br />
3. Pull out the bottom DIN rail clip to allow the SM to fit over the<br />
rail.<br />
4. Rotate the SM down into position beside the CPU and push<br />
the bottom clip in to latch the SM onto the rail.<br />
Extending the bus connector makes both mechanical and electrical connections for<br />
the SM.<br />
1. Place a screwdriver beside the tab on the top of the SM.<br />
2. Slide the tab fully to the left to extend the bus connector into the CPU.<br />
Follow the same procedure to install a signal module to a signal module.<br />
<strong>S7</strong>-<strong>1200</strong> <strong>Programmable</strong> <strong>controller</strong><br />
52 System Manual, 04/2012, A5E02486680-06
Table 3- 7 Removing an SM<br />
Installation<br />
3.3 Installation and removal procedures<br />
Task Procedure<br />
You can remove any SM without removing the CPU or other SMs in place.<br />
1. Ensure that the CPU and all <strong>S7</strong>-<strong>1200</strong> equipment are disconnected from<br />
electrical power.<br />
2. Remove the I/O connectors and wiring from the SM (Page 55).<br />
3. Retract the bus connector.<br />
– Place a screwdriver beside the tab on the top of the SM.<br />
– Press down to disengage the connector from the CPU.<br />
– Slide the tab fully to the right.<br />
If there is another SM to the right, repeat this procedure for that SM.<br />
3.3.5 Installing and removing a CM or CP<br />
Table 3- 8 Installing a CM or CP<br />
Remove the SM:<br />
1. Pull out the bottom DIN rail clip to release the SM from the rail.<br />
2. Rotate the SM up and off the rail. Remove the SM from the system.<br />
3. If required, cover the bus connector on the CPU to avoid contamination.<br />
Follow the same procedure to remove a signal module from a signal module.<br />
Attach any communication modules to the CPU and install the assembly as a unit, as shown<br />
in Installing and removing the CPU (Page 49).<br />
Task Procedure<br />
1. Ensure that the CPU and all <strong>S7</strong>-<strong>1200</strong> equipment are<br />
disconnected from electrical power.<br />
2. Attach the CM to the CPU before installing the assembly<br />
as a unit to the DIN rail or panel.<br />
3. Remove the bus cover from the left side of the CPU:<br />
– Insert a screwdriver into the slot above the bus cover.<br />
– Gently pry out the cover at its top.<br />
4. Remove the bus cover. Retain the cover for reuse.<br />
5. Connect the CM or CP to the CPU:<br />
– Align the bus connector and the posts of the CM with<br />
the holes of the CPU<br />
– Firmly press the units together until the posts snap into<br />
place.<br />
6. Install the CPU and CP on a DIN rail or panel.<br />
<strong>S7</strong>-<strong>1200</strong> <strong>Programmable</strong> <strong>controller</strong><br />
System Manual, 04/2012, A5E02486680-06 53
Installation<br />
3.3 Installation and removal procedures<br />
Table 3- 9 Removing a CM or CP<br />
Task Procedure<br />
CAUTION<br />
Remove the CPU and CM as a unit from the DIN rail or panel.<br />
1. Ensure that the CPU and all <strong>S7</strong>-<strong>1200</strong> equipment are disconnected from electrical<br />
power.<br />
2. Remove the I/O connectors and all wiring and cables from the CPU and CMs.<br />
3. For DIN rail mounting, move the lower DIN rail clips on the CPU and CMs to the<br />
extended position.<br />
4. Remove the CPU and CMs from the DIN rail or panel.<br />
5. Grasp the CPU and CMs firmly and pull apart.<br />
Do not use a tool to separate the modules because this will damage the units.<br />
<strong>S7</strong>-<strong>1200</strong> <strong>Programmable</strong> <strong>controller</strong><br />
54 System Manual, 04/2012, A5E02486680-06
Installation<br />
3.3 Installation and removal procedures<br />
3.3.6 Removing and reinstalling the <strong>S7</strong>-<strong>1200</strong> terminal block connector<br />
Table 3- 10 Removing the connector<br />
The CPU, SB and SM modules provide removable connectors to make connecting the wiring<br />
easy.<br />
Task Procedure<br />
Prepare the system for terminal block connector removal by removing the power from the<br />
CPU and opening the cover above the connector.<br />
1. Ensure that the CPU and all <strong>S7</strong>-<strong>1200</strong> equipment are disconnected from electrical power.<br />
2. Inspect the top of the connector and locate the slot for the tip of the screwdriver.<br />
3. Insert a screwdriver into the slot.<br />
4. Gently pry the top of the connector away from the CPU. The connector will release with a<br />
snap.<br />
5. Grasp the connector and remove it from the CPU.<br />
Table 3- 11 Installing the connector<br />
Task Procedure<br />
Prepare the components for terminal block installation by removing power from the CPU and<br />
opening the cover for connector.<br />
1. Ensure that the CPU and all <strong>S7</strong>-<strong>1200</strong> equipment are disconnected from electrical power.<br />
2. Align the connector with the pins on the unit.<br />
3. Align the wiring edge of the connector inside the rim of the connector base.<br />
4. Press firmly down and rotate the connector until it snaps into place.<br />
Check carefully to ensure that the connector is properly aligned and fully engaged.<br />
<strong>S7</strong>-<strong>1200</strong> <strong>Programmable</strong> <strong>controller</strong><br />
System Manual, 04/2012, A5E02486680-06 55
Installation<br />
3.3 Installation and removal procedures<br />
3.3.7 Installing and removing the expansion cable<br />
The <strong>S7</strong>-<strong>1200</strong> expansion cable provides additional flexibility in configuring the layout of your<br />
<strong>S7</strong>-<strong>1200</strong> system. Only one expansion cable is allowed per CPU system. You install the<br />
expansion cable either between the CPU and the first SM, or between any two SMs.<br />
Table 3- 12 Installing and removing the male connector of the expansion cable<br />
Task Procedure<br />
Table 3- 13 Installing the female connector of the expansion cable<br />
To install the male connector:<br />
1. Ensure that the CPU and all <strong>S7</strong>-<strong>1200</strong> equipment are disconnected<br />
from electrical power.<br />
2. Push the connector into the bus connector on the right side of the<br />
signal module or CPU.<br />
To remove the male connector:<br />
1. Ensure that the CPU and all <strong>S7</strong>-<strong>1200</strong> equipment are disconnected<br />
from electrical power.<br />
2. Pull out the male connector to release it from the signal module or<br />
CPU.<br />
Task Procedure<br />
1. Ensure that the CPU and all <strong>S7</strong>-<strong>1200</strong> equipment<br />
are disconnected from electrical power.<br />
2. Place the female connector to the bus connector on<br />
the left side of the signal module.<br />
3. Slip the hook extension of the female connector<br />
into the housing at the bus connector and press<br />
down slightly to engage the hook.<br />
4. Lock the connector into place:<br />
– Place a screwdriver beside the tab on the top of<br />
the signal module.<br />
– Slide the tab fully to the left.<br />
To engage the connector, you must slide the connector<br />
tab all the way to the left. The connector tab must be<br />
locked into place.<br />
<strong>S7</strong>-<strong>1200</strong> <strong>Programmable</strong> <strong>controller</strong><br />
56 System Manual, 04/2012, A5E02486680-06
Table 3- 14 Removing the female connector of the expansion cable<br />
Installation<br />
3.3 Installation and removal procedures<br />
Task Procedure<br />
1. Ensure that the CPU and all <strong>S7</strong>-<strong>1200</strong> equipment are<br />
disconnected from electrical power.<br />
2. Unlock the connector:<br />
– Place a screwdriver beside the tab on the top of<br />
the signal module.<br />
– Press down slightly and slide the tab fully to the<br />
right.<br />
3. Lift the connector up slightly to disengage the hook<br />
extension.<br />
4. Remove the female connector.<br />
3.3.8 TS (teleservice) adapter<br />
3.3.8.1 Connecting the TeleService Adapter<br />
Before installing the TS (Teleservice) Adapter IE Basic, you must first connect the<br />
TS Adapter and a TS module.<br />
Available TS modules:<br />
● TS module RS232<br />
● TS module Modem<br />
● TS module GSM<br />
● TS module ISDN<br />
<strong>S7</strong>-<strong>1200</strong> <strong>Programmable</strong> <strong>controller</strong><br />
System Manual, 04/2012, A5E02486680-06 57
Installation<br />
3.3 Installation and removal procedures<br />
CAUTION<br />
The TS module can be damaged if you touch the contacts of the plug connector ④of the<br />
TS module. Follow ESD guidelines in order to avoid damaging the TS module through<br />
electrostatic discharge. Before connecting a TS module and TS Adapter, make sure that<br />
both are in an idle state.<br />
1<br />
3<br />
4<br />
3<br />
2<br />
6<br />
5<br />
① TS module ④ Plug connector from the TS module<br />
② TS Adapter ⑤ Cannot be opened<br />
③ Elements ⑥ Ethernet port<br />
CAUTION<br />
Before connecting a TS module and TS adapter basic unit, ensure that the contact pins ④<br />
are not bent. When connecting, ensure that the male connector and guide elements are<br />
positioned correctly.<br />
Only connect a TS module into the TS adapter. Do not force a connection of the TS adapter<br />
to a different device, such as an <strong>S7</strong>-<strong>1200</strong> CPU. Do not change the mechanical construction<br />
of the connector, and do not remove or damage the guide elements.<br />
3.3.8.2 Installing the SIM card<br />
Locate the SIM card slot on the underside of the TS module GSM.<br />
NOTICE<br />
The SIM card may only be removed or inserted if the TS module GSM is de-energized.<br />
<strong>S7</strong>-<strong>1200</strong> <strong>Programmable</strong> <strong>controller</strong><br />
58 System Manual, 04/2012, A5E02486680-06
Table 3- 15 Installing the SIM card<br />
Procedure Task<br />
Use a sharp object to press<br />
the eject button of the SIM<br />
card tray (in the direction of<br />
the arrow) and remove the<br />
SIM card tray.<br />
Place the SIM card in the SIM<br />
card tray as shown and put<br />
the SIM card tray back into its<br />
slot.<br />
1<br />
Installation<br />
3.3 Installation and removal procedures<br />
<strong>S7</strong>-<strong>1200</strong> <strong>Programmable</strong> <strong>controller</strong><br />
System Manual, 04/2012, A5E02486680-06 59<br />
2<br />
3<br />
①<br />
②<br />
③<br />
TS Module GSM<br />
SIM card<br />
SIM card tray<br />
Note<br />
Ensure that the SIM card tray is correctly oriented in the card tray. Otherwise, the SIM card<br />
will not make connection with the module, and the eject button may not remove the card tray.<br />
3.3.8.3 Installing the TS adapter unit<br />
Prerequisites: You must have connected the TS Adapter and a TS module together, and the<br />
DIN rail must have been installed.<br />
Note<br />
If you install the TS unit vertically or in high-vibration environment, the TS module can<br />
become disconnected from the TS Adapter. Use an end bracket 8WA1 808 on the DIN rail to<br />
ensure that the modules remain connected.
Installation<br />
3.3 Installation and removal procedures<br />
Table 3- 16 Installing and removing the TS Adapter<br />
Task Procedure<br />
<br />
<br />
WARNING<br />
Installation:<br />
1. Hook the TS Adapter with attached TS module ① on the DIN rail ②.<br />
2. Rotate the unit back until it engages.<br />
3. Push in the DIN rail clip on each module to attach the each module to<br />
the rail.<br />
Removal:<br />
1. Remove the analog cable and Ethernet cable from the underside of<br />
the TS Adapter.<br />
2. Remove power from the TS Adapter.<br />
3. Use a screwdriver to disengage the rail clips on both modules.<br />
4. Rotate the unit upwards to remove the unit from the DIN rail.<br />
Before you remove power from the unit, disconnect the grounding of the TS Adapter by<br />
removing the analog cable and Ethernet cable.<br />
3.3.8.4 Installing the TS adapter on a wall<br />
Prerequisites: You must have connected the TS Adapter and TS module.<br />
1. Move the attachment slider ① to the backside of the TS Adapter and TS module in the<br />
direction of the arrow until it engages.<br />
2. Screw the TS Adapter and TS module to the position marked with ② to the designated<br />
assembly wall.<br />
<strong>S7</strong>-<strong>1200</strong> <strong>Programmable</strong> <strong>controller</strong><br />
60 System Manual, 04/2012, A5E02486680-06
Installation<br />
3.4 Wiring guidelines<br />
The following illustration shows the TS Adapter from behind, with the attachment sliders ①<br />
in both positions:<br />
1<br />
1<br />
① Attachment slider<br />
② Drill holes for wall mounting<br />
3.4 Wiring guidelines<br />
Prerequisites<br />
<strong>S7</strong>-<strong>1200</strong> <strong>Programmable</strong> <strong>controller</strong><br />
System Manual, 04/2012, A5E02486680-06 61<br />
2<br />
2<br />
<br />
<br />
<br />
Proper grounding and wiring of all electrical equipment is important to help ensure the<br />
optimum operation of your system and to provide additional electrical noise protection for<br />
your application and the <strong>S7</strong>-<strong>1200</strong>. Refer to the technical specifications (Page 699) for the<br />
<strong>S7</strong>-<strong>1200</strong> wiring diagrams.<br />
Before you ground or install wiring to any electrical device, ensure that the power to that<br />
equipment has been turned off. Also, ensure that the power to any related equipment has<br />
been turned off.
Installation<br />
3.4 Wiring guidelines<br />
Ensure that you follow all applicable electrical codes when wiring the <strong>S7</strong>-<strong>1200</strong> and related<br />
equipment. Install and operate all equipment according to all applicable national and local<br />
standards. Contact your local authorities to determine which codes and standards apply to<br />
your specific case.<br />
WARNING<br />
Installation or wiring the <strong>S7</strong>-<strong>1200</strong> or related equipment with power applied could cause<br />
electric shock or unexpected operation of equipment. Failure to disable all power to the <strong>S7</strong>-<br />
<strong>1200</strong> and related equipment during installation or removal procedures could result in death,<br />
severe personal injury, and/or damage due to electric shock or unexpected equipment<br />
operation.<br />
Always follow appropriate safety precautions and ensure that power to the <strong>S7</strong>-<strong>1200</strong> is<br />
disabled before attempting to install or remove the <strong>S7</strong>-<strong>1200</strong> or related equipment.<br />
Always take safety into consideration as you design the grounding and wiring of your <strong>S7</strong>-<br />
<strong>1200</strong> system. Electronic control devices, such as the <strong>S7</strong>-<strong>1200</strong>, can fail and can cause<br />
unexpected operation of the equipment that is being controlled or monitored. For this reason,<br />
you should implement safeguards that are independent of the <strong>S7</strong>-<strong>1200</strong> to protect against<br />
possible personal injury or equipment damage.<br />
WARNING<br />
Control devices can fail in an unsafe condition, resulting in unexpected operation of<br />
controlled equipment. Such unexpected operations could result in death, severe personal<br />
injury and/or property damage.<br />
Use an emergency stop function, electromechanical overrides, or other redundant<br />
safeguards that are independent of the <strong>S7</strong>-<strong>1200</strong>.<br />
Guidelines for isolation<br />
<strong>S7</strong>-<strong>1200</strong> AC power supply boundaries and I/O boundaries to AC circuits have been designed<br />
and approved to provide safe separation between AC line voltages and low voltage circuits.<br />
These boundaries include double or reinforced insulation, or basic plus supplementary<br />
insulation, according to various standards. Components which cross these boundaries such<br />
as optical couplers, capacitors, transformers, and relays have been approved as providing<br />
safe separation. Isolation boundaries which meet these requirements have been identified in<br />
<strong>S7</strong>-<strong>1200</strong> product data sheets as having 1500 VAC or greater isolation. This designation is<br />
based on a routine factory test of (2Ue + 1000 VAC) or equivalent according to approved<br />
methods. <strong>S7</strong>-<strong>1200</strong> safe separation boundaries have been type tested to 4242 VDC.<br />
The sensor supply output, communications circuits, and internal logic circuits of an <strong>S7</strong>-<strong>1200</strong><br />
with included AC power supply are sourced as SELV (safety extra-low voltage) according to<br />
EN 61131-2.<br />
<strong>S7</strong>-<strong>1200</strong> <strong>Programmable</strong> <strong>controller</strong><br />
62 System Manual, 04/2012, A5E02486680-06
Installation<br />
3.4 Wiring guidelines<br />
To maintain the safe character of the <strong>S7</strong>-<strong>1200</strong> low voltage circuits, external connections to<br />
communications ports, analog circuits, and all 24 V nominal power supply and I/O circuits<br />
must be powered from approved sources that meet the requirements of SELV, PELV, Class<br />
2, Limited Voltage, or Limited Power according to various standards.<br />
WARNING<br />
Use of non-isolated or single insulation supplies to supply low voltage circuits from an AC<br />
line can result in hazardous voltages appearing on circuits that are expected to be touch<br />
safe, such as communications circuits and low voltage sensor wiring.<br />
Such unexpected high voltages could cause electric shock resulting in death, severe<br />
personal injury and/or property damage.<br />
Only use high voltage to low voltage power converters that are approved as sources of<br />
touch safe, limited voltage circuits.<br />
Guidelines for grounding the <strong>S7</strong>-<strong>1200</strong><br />
The best way to ground your application is to ensure that all the common and ground<br />
connections of your <strong>S7</strong>-<strong>1200</strong> and related equipment are grounded to a single point. This<br />
single point should be connected directly to the earth ground for your system.<br />
All ground wires should be as short as possible and should use a large wire size, such as 2<br />
mm2 (14 AWG).<br />
When locating grounds, consider safety-grounding requirements and the proper operation of<br />
protective interrupting devices.<br />
Guidelines for wiring the <strong>S7</strong>-<strong>1200</strong><br />
When designing the wiring for your <strong>S7</strong>-<strong>1200</strong>, provide a single disconnect switch that<br />
simultaneously removes power from the <strong>S7</strong>-<strong>1200</strong> CPU power supply, from all input circuits,<br />
and from all output circuits. Provide over-current protection, such as a fuse or circuit breaker,<br />
to limit fault currents on supply wiring. Consider providing additional protection by placing a<br />
fuse or other current limit in each output circuit.<br />
Install appropriate surge suppression devices for any wiring that could be subject to lightning<br />
surges.<br />
Avoid placing low-voltage signal wires and communications cables in the same wire tray with<br />
AC wires and high-energy, rapidly switched DC wires. Always route wires in pairs, with the<br />
neutral or common wire paired with the hot or signal-carrying wire.<br />
Use the shortest wire possible and ensure that the wire is sized properly to carry the required<br />
current. The CPU and SM connector accepts wire sizes from 2 mm2 to 0.3 mm2 (14 AWG to<br />
22 AWG). The SB connector accepts wire sizes from 1.3 mm2 to 0.3 mm2 (16 AWG to 22<br />
AWG). Use shielded wires for optimum protection against electrical noise. Typically,<br />
grounding the shield at the <strong>S7</strong>-<strong>1200</strong> gives the best results.<br />
When wiring input circuits that are powered by an external power supply, include an<br />
overcurrent protection device in that circuit. External protection is not necessary for circuits<br />
that are powered by the 24 VDC sensor supply from the <strong>S7</strong>-<strong>1200</strong> because the sensor supply<br />
is already current-limited.<br />
<strong>S7</strong>-<strong>1200</strong> <strong>Programmable</strong> <strong>controller</strong><br />
System Manual, 04/2012, A5E02486680-06 63
Installation<br />
3.4 Wiring guidelines<br />
All <strong>S7</strong>-<strong>1200</strong> modules have removable connectors for user wiring. To prevent loose<br />
connections, ensure that the connector is seated securely and that the wire is installed<br />
securely into the connector. To avoid damaging the connector, be careful that you do not<br />
over-tighten the screws. The maximum torque for the CPU and SM connector screw is 0.56<br />
N-m (5 inch-pounds). The maximum torque for the SB connector screw is 0.33 N-m (3 inchpounds).<br />
To help prevent unwanted current flows in your installation, the <strong>S7</strong>-<strong>1200</strong> provides isolation<br />
boundaries at certain points. When you plan the wiring for your system, you should consider<br />
these isolation boundaries. Refer to the technical specifications for the amount of isolation<br />
provided and the location of the isolation boundaries. Do not depend on isolation boundaries<br />
rated less than 1500 VAC as safety boundaries.<br />
Guidelines for lamp loads<br />
Lamp loads are damaging to relay contacts because of the high turn-on surge current. This<br />
surge current will nominally be 10 to 15 times the steady state current for a Tungsten lamp.<br />
A replaceable interposing relay or surge limiter is recommended for lamp loads that will be<br />
switched a large number of times during the lifetime of the application.<br />
Guidelines for inductive loads<br />
You should equip inductive loads with suppression circuits to limit voltage rise when the<br />
control output turns off. Suppression circuits protect your outputs from premature failure due<br />
to the high voltages associated with turning off inductive loads. In addition, suppression<br />
circuits limit the electrical noise generated when switching inductive loads. Placing an<br />
external suppression circuit so that it is electrically across the load, and physically located<br />
near the load is most effective in reducing electrical noise.<br />
<strong>S7</strong>-<strong>1200</strong> DC outputs include internal suppression circuits that are adequate for the inductive<br />
loads in most applications. Since <strong>S7</strong>-<strong>1200</strong> relay output contacts can be used to switch either<br />
a DC or an AC load, internal protection is not provided.<br />
Note<br />
The effectiveness of a given suppression circuit depends on the application, and you must<br />
verify it for your particular use. Always ensure that all components used in your suppression<br />
circuit are rated for use in the application.<br />
<strong>S7</strong>-<strong>1200</strong> <strong>Programmable</strong> <strong>controller</strong><br />
64 System Manual, 04/2012, A5E02486680-06
Typical suppressor circuit for DC or relay outputs that switch DC inductive loads<br />
<br />
<br />
A B<br />
① 1N4001 diode or equivalent<br />
② 8.2 V Zener (DC outputs),<br />
36 V Zener (Relay outputs)<br />
③ Output point<br />
Typical suppressor circuit for relay outputs that switch AC inductive loads<br />
<br />
<br />
MOV<br />
① 0.1 μ F<br />
② 100 to 120 Ω<br />
③ Output point<br />
<br />
Installation<br />
3.4 Wiring guidelines<br />
In most applications, the addition of a diode (A)<br />
across a DC inductive load is suitable, but if your<br />
application requires faster turn-off times, then the<br />
addition of a Zener diode (B) is recommended. Be<br />
sure to size your Zener diode properly for the amount<br />
of current in your output circuit.<br />
When you use a relay output to switch 115 V/230<br />
VAC loads, place the appropriately rated resistorcapacitor-metal<br />
oxide varistor (MOV) circuit across<br />
the AC load. Ensure that the working voltage of the<br />
MOV is at least 20% greater than the nominal line<br />
voltage.<br />
<strong>S7</strong>-<strong>1200</strong> <strong>Programmable</strong> <strong>controller</strong><br />
System Manual, 04/2012, A5E02486680-06 65
Installation<br />
3.4 Wiring guidelines<br />
<strong>S7</strong>-<strong>1200</strong> <strong>Programmable</strong> <strong>controller</strong><br />
66 System Manual, 04/2012, A5E02486680-06
PLC concepts 4<br />
4.1 Execution of the user program<br />
The CPU supports the following types of code blocks that allow you to create an efficient<br />
structure for your user program:<br />
● Organization blocks (OBs) define the structure of the program. Some OBs have<br />
predefined behavior and start events, but you can also create OBs with custom start<br />
events. Valid OB number ranges are shown in Event execution priorities and queuing<br />
(Page 75).<br />
● Functions (FCs) and function blocks (FBs) contain the program code that corresponds to<br />
specific tasks or combinations of parameters. Each FC or FB provides a set of input and<br />
output parameters for sharing data with the calling block. An FB also uses an associated<br />
data block (called an instance DB) to maintain state of values between execution that can<br />
be used by other blocks in the program. Valid FC and FB numbers range from 1 to<br />
65535.<br />
● Data blocks (DBs) store data that can be used by the program blocks. Valid DB numbers<br />
range from 1 to 65535.<br />
Execution of the user program begins with one or more optional start-up organization blocks<br />
(OBs) which are executed once upon entering RUN mode, followed by one or more program<br />
cycle OBs which are executed cyclically. An OB can also be associated with an interrupt<br />
event, which can be either a standard event or an error event, and executes whenever the<br />
corresponding standard or error event occurs.<br />
A function (FC) or a function block (FB) is a block of program code that can be called from<br />
an OB or from another FC or FB, down to the following nesting depths:<br />
● 16 from the program cycle or startup OB<br />
● 4 from time delay interrupt, cyclic interrupt, time of day interrupt, hardware interrupt, time<br />
error interrupt, or diagnostic error interrupt OB<br />
FCs are not associated with any particular data block (DB), while FBs are tied directly to a<br />
DB and use the DB for passing parameters and storing interim values and results.<br />
The size of the user program, data, and configuration is limited by the available load memory<br />
and work memory in the CPU. There is no specific limit to the number of each individual OB,<br />
FC, FB and DB block. However, the total number of blocks is limited to 1024.<br />
Each cycle includes writing the outputs, reading the inputs, executing the user program<br />
instructions, and performing background processing. The cycle is referred to as a scan cycle<br />
or scan.<br />
The modules (SM, SB, BB, CB, CM or CP) are detected and logged in only upon power-up.<br />
<strong>S7</strong>-<strong>1200</strong> <strong>Programmable</strong> <strong>controller</strong><br />
System Manual, 04/2012, A5E02486680-06 67
PLC concepts<br />
4.1 Execution of the user program<br />
● Inserting or removing a module in the central rack under power (hot) is not supported.<br />
Never insert or remove a module from the central rack when the CPU has power..<br />
WARNING<br />
Insertion or removal of a module (SM, SB, BB, CD, CM or CP) from the central rack<br />
when the CPU has power could cause unpredictable behavior, resulting in damage to<br />
equipment and/or injury to personnel.<br />
Always ensure that power is removed from the CPU and central rack before inserting or<br />
removing a module from the central rack.<br />
● You can insert or remove a SIMATIC memory card while the CPU is under power.<br />
However, inserting or removing a memory card when the CPU is in RUN mode causes<br />
the CPU to go to STOP mode.<br />
CAUTION<br />
Insertion or removal of a memory card when the CPU is in RUN mode causes the CPU<br />
to go to STOP, which might result in in damage to the equipment or the process being<br />
controlled.<br />
Whenever you insert or remove a memory card, the CPU immediately goes to STOP<br />
mode. Before inserting or removing a memory card, always ensure that the CPU is not<br />
actively controlling a machine or process. Always install an emergency stop circuit for<br />
your application or process.<br />
● If you insert or remove a module in a distributed I/O rack (PROFINET or PROFIBUS)<br />
when the CPU is in RUN mode, the CPU generates an entry in the diagnostics buffer and<br />
stays in RUN mode.<br />
Under the default configuration, all local digital and analog I/O points are updated<br />
synchronously with the scan cycle using an internal memory area called the process image.<br />
The process image contains a snapshot of the physical inputs and outputs (the physical I/O<br />
points on the CPU, signal board, and signal modules).<br />
The CPU performs the following tasks:<br />
● The CPU writes the outputs from the process image output area to the physical outputs.<br />
● The CPU reads the physical inputs just prior to the execution of the user program and<br />
stores the input values in the process image input area. This ensures that these values<br />
remain consistent throughout the execution of the user instructions.<br />
● The CPU executes the logic of the user instructions and updates the output values in the<br />
process image output area instead of writing to the actual physical outputs.<br />
This process provides consistent logic through the execution of the user instructions for a<br />
given cycle and prevents the flickering of physical output points that might change state<br />
multiple times in the process image output area.<br />
<strong>S7</strong>-<strong>1200</strong> <strong>Programmable</strong> <strong>controller</strong><br />
68 System Manual, 04/2012, A5E02486680-06
PLC concepts<br />
4.1 Execution of the user program<br />
You can specify whether digital and analog I/O points are to be automatically updated and<br />
stored in the process image. If you insert a module in the device view, its data is located in<br />
the process image of the CPU (default). The CPU handles the data exchange between the<br />
module and the process image area automatically during the update of the process image.<br />
To remove digital or analog points from the process-image automatic update, select the<br />
appropriate device in Device configuration, view the Properties tab, expand if necessary to<br />
locate the desired I/O points, and then select "IO addresses/HW identifier". Then change the<br />
entry for "Process image:" from "Cyclic PI" to "---". To add the points back to the processimage<br />
automatic update, change this selection back to "Cyclic PI".<br />
You can immediately read physical input values and immediately write physical output<br />
values when an instruction executes. An immediate read accesses the current state of the<br />
physical input and does not update the process image input area, regardless of whether the<br />
point is configured to be stored in the process image. An immediate write to the physical<br />
output updates both the process image output area (if the point is configured to be stored in<br />
the process image) and the physical output point. Append the suffix ":P" to the I/O address if<br />
you want the program to immediately access I/O data directly from the physical point instead<br />
of using the process image.<br />
The CPU supports distributed I/O for both PROFINET and PROFIBUS networks (Page 423).<br />
4.1.1 Operating modes of the CPU<br />
The CPU has three modes of operation: STOP mode, STARTUP mode, and RUN mode.<br />
Status LEDs on the front of the CPU indicate the current mode of operation.<br />
● In STOP mode, the CPU is not executing the program. You can download a project.<br />
● In STARTUP mode, the startup OBs (if present) are executed once. Interrupt events are<br />
not processed during the startup mode.<br />
● In RUN mode, the program cycle OBs are executed repeatedly. Interrupt events can<br />
occur and be processed at any point within the RUN mode. Some parts of a project can<br />
be downloaded in RUN mode (Page 690).<br />
The CPU supports a warm restart for entering the RUN mode. Warm restart does not include<br />
a memory reset. All non-retentive system and user data are initialized at warm restart.<br />
Retentive user data is retained.<br />
<strong>S7</strong>-<strong>1200</strong> <strong>Programmable</strong> <strong>controller</strong><br />
System Manual, 04/2012, A5E02486680-06 69
PLC concepts<br />
4.1 Execution of the user program<br />
A memory reset clears all work memory, clears retentive and non-retentive memory areas,<br />
and copies load memory to work memory. A memory reset does not clear the diagnostics<br />
buffer or the permanently saved values of the IP address.<br />
Note<br />
When you download one or more DBs from STEP 7 V11 to an <strong>S7</strong>-<strong>1200</strong> V2 CPU, the<br />
retentive and non-retentive values of those DBs are set to their start values. The next<br />
transition to RUN performs a warm restart, setting all non-retentive data to their start values<br />
and setting all retentive data to their retained values.<br />
When you download project elements (such as device configuration, code blocks or DBs)<br />
from STEP 7 V10.5 to any <strong>S7</strong>-<strong>1200</strong> CPU or from STEP 7 V11 to an <strong>S7</strong>-<strong>1200</strong> V1 CPU (or a<br />
V2 CPU that has been configured as a V1 CPU), the next transition to RUN mode resets all<br />
of the DBs in the project to their start values.<br />
You can configure the "startup after POWER ON" setting of the CPU. This configuration item<br />
appears under the "Device configuration" for the CPU under "Startup". When power is<br />
applied, the CPU performs a sequence of power-up diagnostic checks and system<br />
initialization. During system initialization the CPU deletes all non-retentive bit memory and<br />
resets all non-retentive DB contents to the initial values from load memory. The CPU retains<br />
retentive bit memory and retentive DB contents and then enters the appropriate operating<br />
mode. Certain detected errors prevent the CPU from entering the RUN mode. The CPU<br />
supports the following configuration choices:<br />
● No restart (stay in STOP mode)<br />
● Warm restart - RUN<br />
● Warm restart - mode prior to POWER OFF<br />
CAUTION<br />
The CPU can enter STOP mode due to repairable faults, such as failure of a<br />
replaceable signal module, or temporary faults, such as power line disturbance or erratic<br />
power up event.<br />
If the CPU has been configured to "Warm restart mode prior to POWER OFF", it will not<br />
return to RUN mode when the fault is repaired or removed until it receives a new<br />
command from STEP 7 to go to RUN. Without a new command, the STOP mode is<br />
retained as the mode prior to POWER OFF.<br />
CPUs that are intended to operate independently of a STEP 7 connection should<br />
typically be configured to "Warm restart - RUN" so that the CPU can be returned to RUN<br />
mode by a power cycle following the removal of fault conditions.<br />
<strong>S7</strong>-<strong>1200</strong> <strong>Programmable</strong> <strong>controller</strong><br />
70 System Manual, 04/2012, A5E02486680-06
STARTUP processing<br />
PLC concepts<br />
4.1 Execution of the user program<br />
You can change the current operating mode using the "STOP" or "RUN" commands from the<br />
online tools of the programming software. You can also include a STP instruction in your<br />
program to change the CPU to STOP mode. This allows you to stop the execution of your<br />
program based on the program logic.<br />
● In STOP mode, the CPU handles any communication requests (as appropriate) and<br />
performs self-diagnostics. The CPU does not execute the user program, and the<br />
automatic updates of the process image do not occur.<br />
You can download your project only when the CPU is in STOP mode.<br />
● In STARTUP and RUN modes, the CPU performs the tasks shown in the following figure.<br />
<br />
<br />
<br />
STARTUP RUN<br />
A Clears the I (image) memory area ① Writes Q memory to the physical outputs<br />
B Initializes the outputs with either the ② Copies the state of the physical inputs to I<br />
last value or the substitute value<br />
memory<br />
C Executes the startup OBs ③ Executes the program cycle OBs<br />
D Copies the state of the physical inputs<br />
to I memory<br />
④ Performs self-test diagnostics<br />
E Stores any interrupt events into the ⑤ Processes interrupts and communications<br />
queue to be processed after entering<br />
RUN mode<br />
during any part of the scan cycle<br />
F Enables the writing of Q memory to the<br />
physical outputs<br />
Whenever the operating mode changes from STOP to RUN, the CPU clears the process<br />
image inputs, initializes the process image outputs and processes the startup OBs. Any read<br />
accesses to the process-image inputs by instructions in the startup OBs read zero rather<br />
than the current physical input value. Therefore, to read the current state of a physical input<br />
during the startup mode, you must perform an immediate read. The startup OBs and any<br />
associated FCs and FBs are executed next. If more than one startup OB exists, each is<br />
executed in order according to the OB number, with the lowest OB number executing first.<br />
<strong>S7</strong>-<strong>1200</strong> <strong>Programmable</strong> <strong>controller</strong><br />
System Manual, 04/2012, A5E02486680-06 71
PLC concepts<br />
4.1 Execution of the user program<br />
See also<br />
Each startup OB includes startup information that helps you determine the validity of<br />
retentive data and the time-of-day clock. You can program instructions inside the startup<br />
OBs to examine these startup values and to take appropriate action. The following startup<br />
locations are supported by the Startup OBs:<br />
Table 4- 1 Startup locations supported by the startup OB<br />
Input Data Type Description<br />
LostRetentive Bool This bit is true if the retentive data storage areas have been lost<br />
LostRTC Bool This bit is true if the time-of-day clock (Real time Clock) has been lost<br />
The CPU also performs the following tasks during the startup processing.<br />
● Interrupts are queued but not processed during the startup phase<br />
● No cycle time monitoring is performed during the startup phase<br />
● Configuration changes to HSC (high-speed counter), PWM (pulse-width modulation), and<br />
PtP (point-to-point communication) modules can be made in startup<br />
● Actual operation of HSC, PWM and point-to-point communication modules only occurs in<br />
RUN<br />
After the execution of the startup OBs finishes, the CPU goes to RUN mode and processes<br />
the control tasks in a continuous scan cycle.<br />
Stop scan cycle instruction (Page 235)<br />
CPU operator panel for the online CPU (Page 679)<br />
4.1.2 Processing the scan cycle in RUN mode<br />
For each scan cycle, the CPU writes the outputs, reads the inputs, executes the user<br />
program, updates communication modules, and responds to user interrupt events and<br />
communication requests. Communication requests are handled periodically throughout the<br />
scan.<br />
These actions (except for user interrupt events) are serviced regularly and in sequential<br />
order. User interrupt events which are enabled are serviced according to priority in the order<br />
in which they occur.<br />
<strong>S7</strong>-<strong>1200</strong> <strong>Programmable</strong> <strong>controller</strong><br />
72 System Manual, 04/2012, A5E02486680-06
PLC concepts<br />
4.1 Execution of the user program<br />
The system guarantees that the scan cycle will be completed in a time period called the<br />
maximum cycle time; otherwise a time error event is generated.<br />
● Each scan cycle begins by retrieving the current values of the digital and analog outputs<br />
from the process image and then writing them to the physical outputs of the CPU, SB,<br />
and SM modules configured for automatic I/O update (default configuration). When a<br />
physical output is accessed by an instruction, both the output process image and the<br />
physical output itself are updated.<br />
● The scan cycle continues by reading the current values of the digital and analog inputs<br />
from the CPU, SB, and SMs configured for automatic I/O update (default configuration),<br />
and then writing these values to the process image. When a physical input is accessed<br />
by an instruction, the value of the physical input is accessed by the instruction, but the<br />
input process image is not updated.<br />
● After reading the inputs, the user program is executed from the first instruction through<br />
the end instruction. This includes all the program cycle OBs plus all their associated FCs<br />
and FBs. The program cycle OBs are executed in order according to the OB number with<br />
the lowest OB number executing first.<br />
Communications processing occurs periodically throughout the scan, possibly interrupting<br />
user program execution.<br />
Self-diagnostic checks include periodic checks of the system and the I/O module status<br />
checks.<br />
Interrupts can occur during any part of the scan cycle, and are event-driven. When an event<br />
occurs, the CPU interrupts the scan cycle and calls the OB that was configured to process<br />
that event. After the OB finishes processing the event, the CPU resumes execution of the<br />
user program at the point of interruption.<br />
4.1.3 Organization blocks (OBs)<br />
OBs control the execution of the user program. Each OB must have a unique OB number.<br />
The default OB numbers are reserved below 200. Other OBs must be numbered 200 or<br />
greater.<br />
Specific events in the CPU trigger the execution of an organization block. OBs cannot call<br />
each other or be called from an FC or FB. Only a start event, such as a diagnostic interrupt<br />
or a time interval, can start the execution of an OB. The CPU handles OBs according to their<br />
respective priority classes, with higher priority OBs executed before lower priority OBs. The<br />
lowest priority class is 1 (for the main program cycle), and the highest priority class is 26 (for<br />
the time-error interrupts).<br />
<strong>S7</strong>-<strong>1200</strong> <strong>Programmable</strong> <strong>controller</strong><br />
System Manual, 04/2012, A5E02486680-06 73
PLC concepts<br />
4.1 Execution of the user program<br />
OBs control the following operations:<br />
● Program cycle OBs execute cyclically while the CPU is in RUN mode. The main block of<br />
the program is a program cycle OB. This is where you place the instructions that control<br />
your program and where you call additional user blocks. Multiple program cycle OBs are<br />
allowed and are executed in numerical order. OB 1 is the default. Other program cycle<br />
OBs must be identified as OB 200 or greater.<br />
● Startup OBs execute one time when the operating mode of the CPU changes from STOP<br />
to RUN, including powering up in the RUN mode and in commanded STOP-to-RUN<br />
transitions. After completion, the main "Program cycle" OB will begin executing. Multiple<br />
startup OBs are allowed. OB 100 is the default. Others must be OB 200 or greater.<br />
● Cyclic interrupt OBs execute at a specified interval. A cyclic interrupt OB will interrupt<br />
cyclic program execution at user defined intervals, such as every 2 seconds. You can<br />
configure up to a total of 4 for both the time-delay and cyclic events at any given time,<br />
with one OB allowed for each configured time-delay and cyclic event. The OB must be<br />
OB 200 or greater.<br />
● Hardware interrupt OBs execute when the relevant hardware event occurs, including<br />
rising and falling edges on built-in digital inputs and HSC events. A hardware interrupt OB<br />
will interrupt normal cyclic program execution in reaction to a signal from a hardware<br />
event. You define the events in the properties of the hardware configuration. One OB is<br />
allowed for each configured hardware event. The OB must be OB 200 or greater.<br />
● A time error interrupt OB executes when either the maximum cycle time is exceeded or a<br />
time error event occurs. The OB for processing the time error interrupt is OB 80. If<br />
triggered, it executes, interrupting normal cyclic program execution or any other event<br />
OB. The events that trigger the time error interrupt and the reaction of the CPU to those<br />
events are described below:<br />
– Exceeding the maximum cycle time: You configure the maximum cycle time in the<br />
properties of the CPU. If OB 80 does not exist, the reaction of the CPU for exceeding<br />
the maximum time is to change to STOP.<br />
– Time errors: If OB 80 does not exist, the reaction of the CPU is to stay in RUN. Time<br />
errors occur if the time of day event is missed or repeated, the queue overflows, or an<br />
event OB (time delay event, time of day event, or cyclic interrupt) starts before the<br />
CPU finishes the execution of the first.<br />
The occurrence of either of these events generates a diagnostic buffer entry describing<br />
the event. The diagnostic buffer entry is generated regardless of the existence of OB 80.<br />
● Diagnostic error interrupt OBs execute when a diagnostic error is detected and reported.<br />
A diagnostic OB interrupts the normal cyclic program execution if a diagnostics-capable<br />
module recognizes an error (if the diagnostic error interrupt has been enabled for the<br />
module). OB 82 is the only OB number supported for the diagnostic error event. You can<br />
include an STP instruction (put CPU in STOP mode) inside your OB 82 if you desire your<br />
CPU to enter STOP mode upon receiving this type of error. If there is no diagnostic OB in<br />
the program, the CPU ignores the error (stays in RUN).<br />
<strong>S7</strong>-<strong>1200</strong> <strong>Programmable</strong> <strong>controller</strong><br />
74 System Manual, 04/2012, A5E02486680-06
4.1.4 Event execution priorities and queuing<br />
PLC concepts<br />
4.1 Execution of the user program<br />
The CPU processing is controlled by events. An event triggers an interrupt OB to be<br />
executed. You can specify the interrupt OB for an event during the creation of the block,<br />
during the device configuration, or with an ATTACH or DETACH instruction. Some events<br />
happen on a regular basis like the program cycle or cyclic events. Other events happen only<br />
a single time, like the startup event and time delay events. Some events happen when there<br />
is a change triggered by the hardware, such as an edge event on an input point or a high<br />
speed counter event. There are also events like the diagnostic error and time error event<br />
which only happen when there is an error. The event priorities and queues are used to<br />
determine the processing order for the event interrupt OBs.<br />
The program cycle event happens once during each program cycle (or scan). During the<br />
program cycle, the CPU writes the outputs, reads the inputs and executes program cycle<br />
OBs. The program cycle event is required and is always enabled. You may have no program<br />
cycle OBs, or you may have multiple OBs selected for the program cycle event. After the<br />
program cycle event is triggered, the lowest numbered program cycle OB (usually OB 1) is<br />
executed. The other program cycle OBs are executed sequentially (in numerical order) within<br />
the program cycle.<br />
The cyclic interrupt events allow you to configure the execution of an interrupt OB at a<br />
configured scan time. The initial scan time is configured when the OB is created and<br />
selected to be a cyclic interrupt OB. A cyclic event will interrupt the program cycle and<br />
execute the cyclic interrupt OB (the cyclic event is at a higher priority class than the program<br />
cycle event).<br />
Only one cyclic interrupt OB can be attached to a cyclic event.<br />
Each cyclic event can be assigned a phase shift so that the execution of cyclic interrupts with<br />
the same scan time can be offset from one another by the phase shift amount. The default<br />
phase shift is 0. To change the initial phase shift, or to change the initial scan time for a<br />
cyclic event, right click on the cyclic interrupt OB in the project tree, click "Properties", then<br />
click "Cyclic interrupt", and enter the new initial values. You can also query and change the<br />
scan time and the phase shift from your program using the Query cyclic interrupt<br />
(QRY_CINT) and Set cyclic interrupt (SET_CINT) instructions. Scan time and phase shift<br />
values set by the SET_CINT instruction do not persist through a power cycle or a transition<br />
to STOP mode; scan time and phase shift values will return to the initial values following a<br />
power cycle or a transition to STOP. The CPU supports a total of four cyclic and time-delay<br />
interrupt events.<br />
The startup event happens one time on a STOP to RUN transition and causes the startup<br />
OBs to be executed. Multiple OBs can be selected for the startup event. The startup OBs are<br />
executed in numerical order.<br />
The time delay interrupt events allow you to configure the execution of an interrupt OB after<br />
a specified delay time has expired. The delay time is specified with the SRT_DINT<br />
instruction. The time delay events will interrupt the program cycle to execute the time delay<br />
interrupt OB. Only one time delay interrupt OB can be attached to a time delay event. The<br />
CPU supports four time delay events.<br />
The hardware interrupt events are triggered by a change in the hardware, such as a rising or<br />
falling edge on an input point, or a HSC (High Speed Counter) event. There can be one<br />
interrupt OB selected for each hardware interrupt event. The hardware events are enabled in<br />
Device configuration. The OBs are specified for the event in the Device configuration or with<br />
an ATTACH instruction in the user program. The CPU supports several hardware interrupt<br />
events. The exact events are based on the CPU model and the number of input points.<br />
<strong>S7</strong>-<strong>1200</strong> <strong>Programmable</strong> <strong>controller</strong><br />
System Manual, 04/2012, A5E02486680-06 75
PLC concepts<br />
4.1 Execution of the user program<br />
The time and diagnostic error interrupt events are triggered when the CPU detects an error.<br />
These events are at a higher priority class that the other interrupt events and can interrupt<br />
the execution of the time delay, cyclic and hardware interrupt events. One interrupt OB can<br />
be specified for each of the time error and diagnostic error interrupt events.<br />
Understanding event execution priorities and queuing<br />
Table 4- 2 OB events<br />
The number of pending (queued) events from a single source is limited, using a different<br />
queue for each event type. Upon reaching the limit of pending events for a given event type,<br />
the next event is lost. Refer to the following section on "Understanding time error events" for<br />
more information regarding queue overflows.<br />
Each CPU event has an associated priority. You cannot change the priority of an OB. In<br />
general, events are serviced in order of priority (highest priority first). Events of the same<br />
priority are serviced on a "first-come, first-served" basis.<br />
Event OB number Quantity allowed Start event OB priority<br />
Program cycle OB 1, OB 200 to 1 program cycle event Startup OB ends<br />
1<br />
OB 65535<br />
Multiple OBs allowed Last program cycle OB ends<br />
Startup OB 100, OB 200 to 1 startup event 1, 2<br />
STOP-to-RUN transition 1<br />
OB 65535<br />
Multiple OBs allowed<br />
Time OB 200 to OB 65535 Up to 4 time events Time-delay OB event is scheduled 3<br />
3<br />
1 OB per event Cyclic OB event is scheduled 7<br />
Process OB 200 to OB 65535 Up to 50 process events Edges:<br />
5<br />
Rising edge events: 16 max.<br />
Falling edge events: 16 max.<br />
4<br />
1 OB per event<br />
For HSC:<br />
CV=PV: 6 max.<br />
Direction changed: 6 max.<br />
External reset: 6 max.<br />
<strong>S7</strong>-<strong>1200</strong> <strong>Programmable</strong> <strong>controller</strong><br />
76 System Manual, 04/2012, A5E02486680-06<br />
6
PLC concepts<br />
4.1 Execution of the user program<br />
Event OB number Quantity allowed Start event OB priority<br />
Diagnostic error OB 82 1 event (only if OB 82 was<br />
loaded)<br />
Module transmits an error 9<br />
Time error OB 80 1 event (only if OB 80 was<br />
loaded) 5<br />
Maximum cycle time was<br />
26<br />
exceeded<br />
A second time interrupt (cyclic or<br />
time-delay) started before the<br />
CPU had finished execution of<br />
the first interrupt<br />
1 The startup event and the program cycle event will never occur at the same time because the startup event will run to<br />
completion before the program cycle event will be started (controlled by the operating system).<br />
2 Only the diagnostic error event (OB 82) interrupts the startup event. All other events are queued to be processed after<br />
the startup event has finished.<br />
3 The CPU provides a total of 4 time events that are shared by the time-delay OBs and the cyclic OBs. The number of<br />
time-delay and cyclic OBs in your user program cannot exceed 4.<br />
4 You can have more than 50 process events if you use the DETACH and ATTACH instructions.<br />
5 You can configure the CPU to stay in RUN if the maximum scan cycle time was exceeded or you can use the<br />
RE_TRIGR instruction to reset the cycle time. However, the CPU goes to STOP mode the second time that the<br />
maximum scan cycle time was exceeded in one scan cycle.<br />
Interrupt latency<br />
Understanding time error events<br />
After the execution of an OB with a priority of 2 to 25 has started, processing of that OB<br />
cannot be interrupted by the occurrence of another event, except for by OB 80 (time-error<br />
event, which has a priority of 26). All other events are queued for later processing, allowing<br />
the current OB to finish.<br />
The interrupt event latency (the time from notification of the CPU that an event has occurred<br />
until the CPU begins execution of the first instruction in the OB that services the event) is<br />
approximately 175 µsec, provided that a program cycle OB is the only event service routine<br />
active at the time of the interrupt event.<br />
The occurrence of any of several different time error conditions results in a time error event.<br />
The following time errors are supported:<br />
● Maximum cycle time exceeded<br />
● Requested OB cannot be started<br />
● Queue overflow occurred<br />
The maximum cycle time exceeded condition results if the program cycle does not complete<br />
within the specified maximum scan cycle time. See the section on "Monitoring the cycle time<br />
in the <strong>S7</strong>-<strong>1200</strong> System Manual" (Page 80) for more information regarding the maximum<br />
cycle time condition, how to configure the maximum scan cycle time, and how to reset the<br />
cycle timer.<br />
<strong>S7</strong>-<strong>1200</strong> <strong>Programmable</strong> <strong>controller</strong><br />
System Manual, 04/2012, A5E02486680-06 77
PLC concepts<br />
4.1 Execution of the user program<br />
The requested OB cannot be started condition results if an OB is requested by a cyclic<br />
interrupt, a time-delay interrupt, or a time-of-day interrupt, but the requested OB is already<br />
being executed.<br />
The queue overflow occurred condition results if the interrupts are occurring faster than they<br />
can be processed. The number of pending (queued) events is limited using a different queue<br />
for each event type. If an event occurs when the corresponding queue is full, a time error<br />
event is generated.<br />
All time error events trigger the execution of OB 80 if it exists. If an OB 80 is not included in<br />
the user program, then the device configuration of the CPU determines the CPU reaction to<br />
the time error:<br />
● The default configuration for time errors, such as starting a second cyclic interrupt before<br />
the CPU has finished the execution of the first, is for the CPU to stay in RUN.<br />
● The default configuration for exceeding the maximum time is for the CPU to change to<br />
STOP.<br />
You can use the RE_TRIGR instruction to reset the maximum cycle time. However, if two<br />
"maximum cycle time exceeded" conditions occur within the same program cycle without<br />
resetting the cycle timer, then the CPU transitions to STOP, regardless of whether OB 80<br />
exists. See the section on "Monitoring the cycle time in the <strong>S7</strong>-<strong>1200</strong> System Manual"<br />
(Page 80).<br />
OB 80 includes startup information that helps you determine which event and OB generated<br />
the time error. You can program instructions inside OB 80 to examine these startup values<br />
and to take appropriate action.<br />
Table 4- 3 Startup information for OB 80<br />
Input Data type Description<br />
fault_id BYTE 16#01 - maximum cycle time exceeded<br />
16#02 - requested OB cannot be started<br />
16#07 and 16#09 - queue overflow occurred<br />
csg_OBnr OB_ANY Number of the OB which was being executed when the error<br />
occurred<br />
csg_prio UINT Priority of the OB causing the error<br />
No time error interrupt OB 80 is present when you create a new project. If desired, you add a<br />
time error interrupt OB 80 to your project by double-clicking "Add new block" under "Program<br />
blocks" in the tree, then choose "Organization block", and then "Time error interrupt".<br />
Understanding diagnostic error events<br />
Analog (local), PROFINET, and PROFIBUS devices are capable of detecting and reporting<br />
diagnostic errors. The occurrence or removal of any of several different diagnostic error<br />
conditions results in a diagnostic error event. The following diagnostic errors are supported:<br />
● No user power<br />
● High limit exceeded<br />
● Low limit exceeded<br />
<strong>S7</strong>-<strong>1200</strong> <strong>Programmable</strong> <strong>controller</strong><br />
78 System Manual, 04/2012, A5E02486680-06
PLC concepts<br />
4.1 Execution of the user program<br />
● Wire break<br />
● Short circuit<br />
Diagnostic error events trigger the execution of OB 82 if it exists. If OB 82 does not exist,<br />
then the CPU ignores the error. No diagnostic error interrupt OB 82 is present when you<br />
create a new project. If desired, you add a diagnostic error interrupt OB 82 to your project by<br />
double-clicking "Add new block" under "Program blocks" in the tree, then choose<br />
"Organization block", and then "Diagnostic error interrupt".<br />
Note<br />
Diagnostic errors for multi-channel local analog devices (I/O, RTD, and Thermocouple)<br />
The OB 82 diagnostic error interrupt can report only one channel's diagnostic error at a time.<br />
If two channels of a multi-channel device have an error, then the second error only triggers<br />
OB 82 under the following conditions: the first channel error clears, the execution of OB 82<br />
triggered by the first error is complete, and the second error still exists.<br />
OB 82 includes startup information that helps you determine whether the event is due to the<br />
occurrence or removal of an error, and the device and channel which reported the error. You<br />
can program instructions inside OB 82 to examine these startup values and to take<br />
appropriate action.<br />
Table 4- 4 Startup information for OB 82<br />
Input Data type Description<br />
IOstate WORD IO state of the device:<br />
Bit 0 = 1 if the configuration is correct, and = 0 if the configuration is<br />
no longer correct.<br />
Bit 4 = 1 if an error is present (such as a wire break). (Bit 4 = 0 if<br />
there is no error.)<br />
Bit 5 = 1 if the configuration is not correct, and = 0 if the configuration<br />
is correct again.<br />
Bit 6 = 1 if an I/O access error has occurred. Refer to laddr for the<br />
hardware identifier of the I/O with the access error. (Bit 6 = 0 if there<br />
is no error.)<br />
laddr HW_ANY Hardware identifier of the device or functional unit that reported the<br />
error1 channel UINT Channel number<br />
multierror BOOL TRUE if more than one error is present<br />
1 The laddr input contains the hardware identifier of the device or functional unit which returned the error. The hardware<br />
identifier is assigned automatically when components are inserted in the device or network view and appears in the<br />
Constants tab of PLC tags. A name is also assigned automatically for the hardware identifier. These entries in the<br />
Constants tab of the PLC tags cannot be changed.<br />
<strong>S7</strong>-<strong>1200</strong> <strong>Programmable</strong> <strong>controller</strong><br />
System Manual, 04/2012, A5E02486680-06 79
PLC concepts<br />
4.1 Execution of the user program<br />
4.1.5 Monitoring the cycle time<br />
The cycle time is the time that the CPU operating system requires to execute the cyclic<br />
phase of the RUN mode. The CPU provides two methods of monitoring the cycle time:<br />
● Maximum scan cycle time<br />
● Fixed minimum scan cycle time<br />
Scan cycle monitoring begins after the startup event is complete. Configuration for this<br />
feature appears under the "Device Configuration" for the CPU under "Cycle time".<br />
The CPU always monitors the scan cycle and reacts if the maximum scan cycle time is<br />
exceeded. If the configured maximum scan cycle time is exceeded, an error is generated<br />
and is handled one of two ways:<br />
● If the user program does not include an OB 80, then the CPU generates an error and<br />
goes to STOP. (You can change the configuration of the CPU to ignore this time error<br />
and stay in RUN. The default configuration is for the CPU to go to STOP.)<br />
● If the user program includes an OB 80, then the CPU executes OB 80<br />
The RE_TRIGR instruction (Re-trigger cycle time monitoring) allows you to reset the timer<br />
that measures the cycle time. However, this instruction only functions if executed in a<br />
program cycle OB; the RE_TRIGR instruction is ignored if executed in OB 80. If the<br />
maximum scan cycle time is exceeded twice within the same program cycle with no<br />
RE_TRIGR instruction execution between the two, then the CPU transitions to STOP<br />
immediately. The use of repeated executions of the RE_TRIGR instruction can create an<br />
endless loop or a very long scan.<br />
Typically, the scan cycle executes as fast as it can be executed and the next scan cycle<br />
begins as soon as the current one completes. Depending upon the user program and<br />
communication tasks, the time period for a scan cycle can vary from scan to scan. To<br />
eliminate this variation, the CPU supports an optional fixed minimum scan cycle time (also<br />
called fixed scan cycle). When this optional feature is enabled and a fixed minimum scan<br />
cycle time is provided in ms, the CPU will maintain the minimum cycle time within ±1 ms for<br />
the completion of each CPU scan.<br />
In the event that the CPU completes the normal scan cycle in less time than the specified<br />
minimum cycle time, the CPU spends the additional time of the scan cycle performing<br />
runtime diagnostics and/or processing communication requests. In this way the CPU always<br />
takes a fixed amount of time to complete a scan cycle.<br />
In the event that the CPU does not complete the scan cycle in the specified minimum cycle<br />
time, the CPU completes the scan normally (including communication processing) and does<br />
not create any system reaction as a result of exceeding the minimum scan time. The<br />
following table defines the ranges and defaults for the cycle time monitoring functions.<br />
<strong>S7</strong>-<strong>1200</strong> <strong>Programmable</strong> <strong>controller</strong><br />
80 System Manual, 04/2012, A5E02486680-06
Table 4- 5 Range for the cycle time<br />
PLC concepts<br />
4.1 Execution of the user program<br />
Cycle time Range (ms) Default<br />
Maximum scan cycle time1 1 to 6000 150 ms<br />
Fixed minimum scan cycle time2 1 to maximum scan cycle time Disabled<br />
1 The maximum scan cycle time is always enabled. Configure a cycle time between 1 ms to 6000 ms. The default is 150<br />
ms.<br />
2 The fixed minimum scan cycle time is optional, and is disabled by default. If required, configure a cycle time between 1<br />
ms and the maximum scan cycle time.<br />
Configuring the cycle time and communication load<br />
You use the CPU properties in the Device configuration to configure the following<br />
parameters:<br />
● Cycle time: You can enter a maximum scan cycle time. You can also enter a fixed<br />
minimum scan cycle time.<br />
● Communications load: You can configure a percentage of the time to be dedicated for<br />
communication tasks.<br />
For more information about the scan cycle, see "Monitoring the cycle time". (Page 80)<br />
<strong>S7</strong>-<strong>1200</strong> <strong>Programmable</strong> <strong>controller</strong><br />
System Manual, 04/2012, A5E02486680-06 81
PLC concepts<br />
4.1 Execution of the user program<br />
4.1.6 CPU memory<br />
Memory management<br />
The CPU provides the following memory areas to store the user program, data, and<br />
configuration:<br />
● Load memory is non-volatile storage for the user program, data and configuration. When<br />
a project is downloaded to the CPU, it is first stored in the Load memory area. This area<br />
is located either in a memory card (if present) or in the CPU. This non-volatile memory<br />
area is maintained through a power loss. The memory card supports a larger storage<br />
space than that built-in to the CPU.<br />
● Work memory is volatile storage for some elements of the user project while executing<br />
the user program. The CPU copies some elements of the project from load memory into<br />
work memory. This volatile area is lost when power is removed, and is restored by the<br />
CPU when power is restored.<br />
● Retentive memory is non-volatile storage for a limited quantity of work memory values.<br />
The retentive memory area is used to store the values of selected user memory locations<br />
during power loss. When a power down or power loss occurs, the CPU restores these<br />
retentive values upon power up.<br />
To display the memory usage for the current project, right-click the CPU (or one of its blocks)<br />
and select "Resources" from the context. To display the memory usage for the current CPU,<br />
double-click "Online and diagnostics", expand "Diagnostics", and select "Memory".<br />
<strong>S7</strong>-<strong>1200</strong> <strong>Programmable</strong> <strong>controller</strong><br />
82 System Manual, 04/2012, A5E02486680-06
PLC concepts<br />
4.1 Execution of the user program<br />
Retentive memory<br />
Data loss after power failure can be avoided by marking certain data as retentive. The<br />
following data can be configured to be retentive:<br />
● Bit memory(M): You can define the precise width of the memory for bit memory in the<br />
PLC tag table or in the assignment list. Retentive bit memory always starts at MB0 and<br />
runs consecutively up through a specified number of bytes. Specify this value from the<br />
PLC tag table or in the assignment list by clicking the "Retain" toolbar icon. Enter the<br />
number of M bytes to retain starting at MB0.<br />
● Tags of a function block (FB): If an FB was created with "Optimzed" selected, then the<br />
interface editor for this FB includes a "Retain" column. In this column, you can select<br />
either "Retentive", "Non-retentive", or "Set in IDB" individually for each tag. An instance<br />
DB that was created when this FB is placed in the program editor shows this retain<br />
column as well. You can only change the retentive state of a tag from within the instance<br />
DB interface editor if you selected "Set in IDB" (Set in instance data block) in the Retain<br />
selection for the tag in the optimized FB.<br />
If an FB was created with "Standard - compatible with <strong>S7</strong>-300/400" selected, then the<br />
interface editor for this FB does not include a "Retain" column. An instance DB created<br />
when this FB is inserted in the program editor shows a "Retain" column which is available<br />
for edit. In this case, selecting the "Retain" option for any tag results in all tags being<br />
selected. Similarly, deselecting the option for any tag results in all tags being deselected.<br />
For an FB that was configured to be "Standard - compatible with <strong>S7</strong>-300/400", you can<br />
change the retentive state from within the instance DB editor, but all tags are set to the<br />
same retentive state together.<br />
After you create the FB, you cannot change the option for "Standard - compatible with<br />
<strong>S7</strong>-300/400". You can only select this option when you create the FB. To determine<br />
whether an existing FB was configured for "Optimized" or "Standard - compatible with <strong>S7</strong>-<br />
300/400", right-click the FB in the Project tree, select "Properties", and then select<br />
"Attributes". The check box "Optimized block access" when selected shows you whether<br />
a block is optimized. Otherwise, it is standard and compatible with <strong>S7</strong>-300/400 CPUs.<br />
● Tags of a global data block: The behavior of a global DB with regard to retentive state<br />
assignment is similar to that of an FB. Depending on the block access setting you can<br />
define the retentive state either for individual tags or for all tags of a global data block.<br />
– If you select "Optimized" when you create the DB, you can set the retentive state for<br />
each individual tag.<br />
– If you select "Standard - compatible with <strong>S7</strong>-300/400" when you create the DB, the<br />
retentive-state setting applies to all tags of the DB; either all tags are retentive or no<br />
tag is retentive.<br />
A total of 10240 bytes of data can be retentive. To see how much is available, from the PLC<br />
tag table or the assignment list, click on the "Retain" toolbar icon. Although this is where the<br />
retentive range is specified for M memory, the second row indicates the total remaining<br />
memory available for M and DB combined. Note that for this value to be accurate, you must<br />
compile all data blocks with retentive tags.<br />
<strong>S7</strong>-<strong>1200</strong> <strong>Programmable</strong> <strong>controller</strong><br />
System Manual, 04/2012, A5E02486680-06 83
PLC concepts<br />
4.1 Execution of the user program<br />
4.1.6.1 System and clock memory<br />
You use the CPU properties to enable bytes for "system memory" and "clock memory". Your<br />
program logic can reference the individual bits of these functions by their tag names.<br />
● You can assign one byte in M memory for system memory. The byte of system memory<br />
provides the following four bits that can be referenced by your user program by the<br />
following tag names:<br />
– First cycle: (Tag name "FirstScan") bit is set to1 for the duration of the first scan after<br />
the startup OB finishes. (After the execution of the first scan, the "first scan" bit is set<br />
to 0.)<br />
– Diagnostics status changed (Tag name: "DiagStatusUpdate") is set to 1 for one scan<br />
after the CPU logs a diagnostic event. Because the CPU does not set the "diagnostic<br />
graph changed" bit until the end of the first execution of the program cycle OBs, your<br />
user program cannot detect if there has been a diagnostic change either during the<br />
execution of the startup OBs or the first execution of the program cycle OBs.<br />
– Always 1 (high): (Tag name "AlwaysTRUE") bit is always set to 1.<br />
– Always 0 (low): (Tag name "AlwaysFALSE") bit is always set to 0.<br />
● You can assign one byte in M memory for clock memory. Each bit of the byte configured<br />
as clock memory generates a square wave pulse. The byte of clock memory provides 8<br />
different frequencies, from 0.5 Hz (slow) to 10 Hz (fast). You can use these bits as control<br />
bits, especially when combined with edge instructions, to trigger actions in the user<br />
program on a cyclic basis.<br />
The CPU initializes these bytes on the transition from STOP mode to STARTUP mode. The<br />
bits of the clock memory change synchronously to the CPU clock throughout the STARTUP<br />
and RUN modes.<br />
CAUTION<br />
Overwriting the system memory or clock memory bits can corrupt the data in these<br />
functions and cause your user program to operate incorrectly, which can cause damage to<br />
equipment and injury to personnel.<br />
Because both the clock memory and system memory are unreserved in M memory,<br />
instructions or communications can write to these locations and corrupt the data.<br />
Avoid writing data to these locations to ensure the proper operation of these functions, and<br />
always implement an emergency stop circuit for your process or machine.<br />
<strong>S7</strong>-<strong>1200</strong> <strong>Programmable</strong> <strong>controller</strong><br />
84 System Manual, 04/2012, A5E02486680-06
Table 4- 6 System memory<br />
PLC concepts<br />
4.1 Execution of the user program<br />
System memory configures a byte with bits that turn on (value = 1) for a specific event.<br />
7 6 5 4 3 2 1 0<br />
Reserved<br />
Always off Always on Diagnostic status First scan indicator<br />
Value 0<br />
Value 0 Value 1<br />
indicator<br />
1: First scan after<br />
1: Change<br />
startup<br />
0: No change 0: Not first scan<br />
Table 4- 7 Clock memory<br />
Clock memory configures a byte that cycles the individual bits on and off at fixed intervals.<br />
Each clock bit generates a square wave pulse on the corresponding M memory bit. These<br />
bits can be used as control bits, especially when combined with edge instructions, to trigger<br />
actions in the user code on a cyclic basis.<br />
Bit number<br />
Tag name<br />
7 6 5 4 3 2 1 0<br />
Period (s) 2.0 1.6 1.0 0.8 0.5 0.4 0.2 0.1<br />
Frequency (Hz) 0.5 0.625 1 1.25 2 2.5 5 10<br />
Because clock memory runs asynchronously to the CPU cycle, the status of the clock memory can change several times<br />
during a long cycle.<br />
<strong>S7</strong>-<strong>1200</strong> <strong>Programmable</strong> <strong>controller</strong><br />
System Manual, 04/2012, A5E02486680-06 85
PLC concepts<br />
4.1 Execution of the user program<br />
4.1.7 Diagnostics buffer<br />
4.1.8 Time of day clock<br />
The CPU supports a diagnostics buffer which contains an entry for each diagnostic event.<br />
Each entry includes a date and time the event occurred, an event category, and an event<br />
description. The entries are displayed in chronological order with the most recent event at<br />
the top. Up to 50 most recent events are available in this log. When the log is full, a new<br />
event replaces the oldest event in the log. When power is lost, the events are saved.<br />
The following types of events are recorded in the diagnostics buffer:<br />
● Each system diagnostic event; for example, CPU errors and module errors<br />
● Each state change of the CPU (each power up, each transition to STOP, each transition<br />
to RUN)<br />
To access the diagnostics buffer (Page 680), you must be online. From the "Online &<br />
diagnostics" view, locate the diagnostics buffer under "Diagnostics > Diagnostics buffer".<br />
The CPU supports a time-of-day clock. A super-capacitor supplies the energy required to<br />
keep the clock running during times when the CPU is powered down. The super-capacitor<br />
charges while the CPU has power. After the CPU has been powered up at least 24 hours,<br />
then the super-capacitor has sufficient charge to keep the clock running for typically 20 days.<br />
STEP 7 sets the time-of-day clock to system time, which has a default value out of the box or<br />
following a factory rest. To utilize the time-of-day clock, you must set it. Timestamps such as<br />
those for diagnostic buffer entries, data log files, and data log entries are based on the<br />
system time. You set the time of day from the "Set time of day" function (Page 678) in the<br />
"Online & diagnostics" view of the online CPU. STEP 7 then calculates the system time from<br />
the time you set plus or minus the Windows operating system offset from UTC (Coordinated<br />
Universal Time). Setting the time of day to the current local time produces a system time of<br />
UTC if your Windows operating system settings for time zone and daylight savings time<br />
correspond to your locale.<br />
STEP 7 includes instructions (Page 249) to read and write the system time (RD_SYS_T and<br />
WR_SYS_T), to read the local time (RD_LOC_T), and to set the time zone<br />
(SET_TIMEZONE). The RD_LOC_T instruction calculates local time using the time zone and<br />
daylight saving time offsets that you set in the "Time of day" configuration in the general<br />
properties of the CPU (Page 123). These settings enable you to set your time zone for local<br />
time, optionally enable daylight saving time, and specify the start and end dates and times<br />
for daylight saving time. You can also use the SET_TIMEZONE instructions to configure<br />
these settings.<br />
<strong>S7</strong>-<strong>1200</strong> <strong>Programmable</strong> <strong>controller</strong><br />
86 System Manual, 04/2012, A5E02486680-06
4.1.9 Configuring the outputs on a RUN-to-STOP transition<br />
PLC concepts<br />
4.2 Data storage, memory areas, I/O and addressing<br />
You can configure the behavior of the digital and analog outputs when the CPU is in STOP<br />
mode. For any output of a CPU, SB or SM, you can set the outputs to either freeze the value<br />
or use a substitute value:<br />
● Substituting a specified output value (default): You enter a substitute value for each<br />
output (channel) of that CPU, SB, or SM device.<br />
The default substitute value for digital output channels is OFF, and the default substitute<br />
value for analog output channels is 0.<br />
● Freezing the outputs to remain in last state: The outputs retain their current value at the<br />
time of the transition from RUN to STOP. After power up, the outputs are set to the<br />
default substitute value.<br />
You configure the behavior of the outputs in Device Configuration. Select the individual<br />
devices and use the "Properties" tab to configure the outputs for each device.<br />
When the CPU changes from RUN to STOP, the CPU retains the process image and writes<br />
the appropriate values for both the digital and analog outputs, based upon the configuration.<br />
4.2 Data storage, memory areas, I/O and addressing<br />
4.2.1 Accessing the data of the <strong>S7</strong>-<strong>1200</strong><br />
STEP 7 facilitates symbolic programming. You create symbolic names or "tags" for the<br />
addresses of the data, whether as PLC tags relating to memory addresses and I/O points or<br />
as local variables used within a code block. To use these tags in your user program, simply<br />
enter the tag name for the instruction parameter.<br />
For a better understanding of how the CPU structures and addresses the memory areas, the<br />
following paragraphs explain the "absolute" addressing that is referenced by the PLC tags.<br />
The CPU provides several options for storing data during the execution of the user program:<br />
● Global memory: The CPU provides a variety of specialized memory areas, including<br />
inputs (I), outputs (Q) and bit memory (M). This memory is accessible by all code blocks<br />
without restriction<br />
● PLC tag table: You can enter symbolic names in the STEP 7 PLC tag table for specific<br />
memory locations. These tags are global to the STEP 7 program and allow programming<br />
with names that are meaningful for your application.<br />
● Data block (DB): You can include DBs in your user program to store data for the code<br />
blocks. The data stored persists when the execution of the associated code block comes<br />
to an end. A "global" DB stores data that can be used by all code blocks, while an<br />
instance DB stores data for a specific FB and is structured by the parameters for the FB.<br />
● Temp memory: Whenever a code block is called, the operating system of the CPU<br />
allocates the temporary, or local, memory (L) to be used during the execution of the<br />
block. When the execution of the code block finishes, the CPU reallocates the local<br />
memory for the execution of other code blocks.<br />
<strong>S7</strong>-<strong>1200</strong> <strong>Programmable</strong> <strong>controller</strong><br />
System Manual, 04/2012, A5E02486680-06 87
PLC concepts<br />
4.2 Data storage, memory areas, I/O and addressing<br />
Table 4- 8 Memory areas<br />
Each different memory location has a unique address. Your user program uses these<br />
addresses to access the information in the memory location. References to the input (I) or<br />
output (Q) memory areas, such as I0.3 or Q1.7, access the process image. To immediately<br />
access the physical input or output, append the reference with ":P" (such as I0.3:P, Q1.7:P,<br />
or "Stop:P").<br />
Memory area Description Force Retentive<br />
I<br />
Copied from physical inputs at the beginning of the scan No No<br />
Process image input<br />
cycle<br />
I_:P 1<br />
Immediate read of the physical input points on the CPU, Yes No<br />
(Physical input)<br />
SB, and SM<br />
Q<br />
Copied to physical outputs at the beginning of the scan No No<br />
Process image output<br />
cycle<br />
Q_:P 1<br />
Immediate write to the physical output points on the<br />
Yes No<br />
(Physical output)<br />
CPU, SB, and SM<br />
M<br />
Control and data memory No Yes<br />
Bit memory<br />
(optional)<br />
L<br />
Temp memory<br />
Temporary data for a block local to that block No No<br />
DB<br />
Data memory and also parameter memory for FBs No Yes<br />
Data block<br />
(optional)<br />
1 To immediately access (read or write) the physical inputs and physical outputs, append a ":P" to the address or tag<br />
(such as I0.3:P, Q1.7:P, or "Stop:P").<br />
Each different memory location has a unique address. Your user program uses these<br />
addresses to access the information in the memory location. The absolute address consists<br />
of the following elements:<br />
● Memory area identifier (such as I, Q, or M)<br />
● Size of the data to be accessed ("B' for Byte, "W" for Word, or "D" for DWord)<br />
● Starting address of the data (such as byte 3 or word 3)<br />
When accessing a bit in the address for a Boolean value, you do not enter a mnemonic for<br />
the size. You enter only the memory area, the byte location, and the bit location for the data<br />
(such as I0.0, Q0.1, or M3.4).<br />
<strong>S7</strong>-<strong>1200</strong> <strong>Programmable</strong> <strong>controller</strong><br />
88 System Manual, 04/2012, A5E02486680-06
PLC concepts<br />
4.2 Data storage, memory areas, I/O and addressing<br />
A Memory area identifier E Bytes of the memory area<br />
B Byte address: byte 3 F Bits of the selected byte<br />
C Separator ("byte.bit")<br />
D Bit location of the byte (bit 4 of 8)<br />
In the example, the memory area and byte address (M = bit memory area, and 3 = Byte 3)<br />
are followed by a period (".") to separate the bit address (bit 4).<br />
Accessing the data in the memory areas of the CPU<br />
STEP 7 facilitates symbolic programming. Typically, tags are created either in PLC tags, a<br />
data block, or in the interface at the top of an OB, FC, or FB. These tags include a name,<br />
data type, offset, and comment. Additionally, in a data block, a start value can be specified.<br />
You can use these tags when programming by entering the tag name at the instruction<br />
parameter. Optionally you can enter the absolute operand (memory area, size and offset) at<br />
the instruction parameter. The examples in the following sections show how to enter<br />
absolute operands. The % character is inserted automatically in front of the absolute<br />
operand by the program editor. You can toggle the view in the program editor to one of<br />
these: symbolic, symbolic and absolute, or absolute.<br />
I (process image input): The CPU samples the peripheral (physical) input points just prior to<br />
the cyclic OB execution of each scan cycle and writes these values to the input process<br />
image. You can access the input process image as bits, bytes, words, or double words. Both<br />
read and write access is permitted, but typically, process image inputs are only read.<br />
Table 4- 9 Absolute addressing for I memory<br />
Bit I[byte address].[bit address] I0.1<br />
Byte, Word, or Double Word I[size][starting byte address] IB4, IW5, or ID12<br />
By appending a ":P" to the address, you can immediately read the digital and analog inputs<br />
of the CPU, SB or SM. The difference between an access using I_:P instead of I is that the<br />
data comes directly from the points being accessed rather than from the input process<br />
image. This I_:P access is referred to as an "immediate read" access because the data is<br />
retrieved immediately from the source instead of from a copy that was made the last time the<br />
input process image was updated.<br />
Because the physical input points receive their values directly from the field devices<br />
connected to these points, writing to these points is prohibited. That is, I_:P accesses are<br />
read-only, as opposed to I accesses which can be read or write.<br />
<strong>S7</strong>-<strong>1200</strong> <strong>Programmable</strong> <strong>controller</strong><br />
System Manual, 04/2012, A5E02486680-06 89
PLC concepts<br />
4.2 Data storage, memory areas, I/O and addressing<br />
I_:P accesses are also restricted to the size of inputs supported by a single CPU, SB, or SM,<br />
rounded up to the nearest byte. For example, if the inputs of a 2 DI / 2 DQ SB are configured<br />
to start at I4.0, then the input points can be accessed as I4.0:P and I4.1:P or as IB4:P.<br />
Accesses to I4.2:P through I4.7:P are not rejected, but make no sense since these points are<br />
not used. Accesses to IW4:P and ID4:P are prohibited since they exceed the byte offset<br />
associated with the SB.<br />
Accesses using I_:P do not affect the corresponding value stored in the input process image.<br />
Table 4- 10 Absolute addressing for I memory (immediate)<br />
Bit I[byte address].[bit address]:P I0.1:P<br />
Byte, Word, or Double word I[size][starting byte address]:P IB4:P, IW5:P, or ID12:P<br />
Q (process image output): The CPU copies the values stored in the output process image to<br />
the physical output points. You can access the output process image in bits, bytes, words, or<br />
double words. Both read and write access is permitted for process image outputs.<br />
Table 4- 11 Absolute addressing for Q memory<br />
Bit Q[byte address].[bit address] Q1.1<br />
Byte, Word, or Double word Q[size][starting byte address] QB5, QW10, QD40<br />
By appending a ":P" to the address, you can immediately write to the physical digital and<br />
analog outputs of the CPU, SB or SM. The difference between an access using Q_:P instead<br />
of Q is that the data goes directly to the points being accessed in addition to the output<br />
process image (writes to both places). This Q_:P access is sometimes referred to as an<br />
"immediate write" access because the data is sent immediately to the target point; the target<br />
point does not have to wait for the next update from the output process image.<br />
Because the physical output points directly control field devices that are connected to these<br />
points, reading from these points is prohibited. That is, Q_:P accesses are write-only, as<br />
opposed to Q accesses which can be read or write.<br />
Q_:P accesses are also restricted to the size of outputs supported by a single CPU, SB, or<br />
SM, rounded up to the nearest byte. For example, if the outputs of a 2 DI / 2 DQ SB are<br />
configured to start at Q4.0, then the output points can be accessed as Q4.0:P and Q4.1:P or<br />
as QB4:P. Accesses to Q4.2:P through Q4.7:P are not rejected, but make no sense since<br />
these points are not used. Accesses to QW4:P and QD4:P are prohibited since they exceed<br />
the byte offset associated with the SB.<br />
Accesses using Q_:P affect both the physical output as well as the corresponding value<br />
stored in the output process image.<br />
Table 4- 12 Absolute addressing for Q memory (immediate)<br />
Bit Q[byte address].[bit address]:P Q1.1:P<br />
Byte, Word, or Double word Q[size][starting byte address]:P QB5:P, QW10:P or QD40:P<br />
M (bit memory area): Use the bit memory area (M memory) for both control relays and data<br />
to store the intermediate status of an operation or other control information. You can access<br />
the bit memory area in bits, bytes, words, or double words. Both read and write access is<br />
permitted for M memory.<br />
<strong>S7</strong>-<strong>1200</strong> <strong>Programmable</strong> <strong>controller</strong><br />
90 System Manual, 04/2012, A5E02486680-06
Table 4- 13 Absolute addressing for M memory<br />
PLC concepts<br />
4.2 Data storage, memory areas, I/O and addressing<br />
Bit M[byte address].[bit address] M26.7<br />
Byte, Word, or Double Word M[size][starting byte address] MB20, MW30, MD50<br />
Temp (temporary memory): The CPU allocates the temp memory on an as-needed basis.<br />
The CPU allocates the temp memory for the code block at the time when the code block is<br />
started (for an OB) or is called (for an FC or FB). The allocation of temp memory for a code<br />
block might reuse the same temp memory locations previously used by a different OB, FC or<br />
FB. The CPU does not initialize the temp memory at the time of allocation and therefore the<br />
temp memory might contain any value.<br />
Temp memory is similar to M memory with one major exception: M memory has a "global"<br />
scope, and temp memory has a "local" scope:<br />
● M memory: Any OB, FC, or FB can access the data in M memory, meaning that the data<br />
is available globally for all of the elements of the user program.<br />
● Temp memory: Access to the data in temp memory is restricted to the OB, FC, or FB that<br />
created or declared the temp memory location. Temp memory locations remain local and<br />
are not shared by different code blocks, even when the code block calls another code<br />
block. For example: When an OB calls an FC, the FC cannot access the temp memory of<br />
the OB that called it.<br />
The CPU provides temp (local) memory for each of the three OB priority groups:<br />
● 16 Kbytes for startup and program cycle, including associated FBs and FCs<br />
● 4 Kbytes for standard interrupt events including FBs and FCs<br />
● 4 Kbytes for error interrupt events including FBs and FCs<br />
You access temp memory by symbolic addressing only.<br />
DB (data block): Use the DB memory for storing various types of data, including intermediate<br />
status of an operation or other control information parameters for FBs, and data structures<br />
required for many instructions such as timers and counters. You can access data block<br />
memory in bits, bytes, words, or double words. Both read and write access is permitted for<br />
read/write data blocks. Only read access is permitted for read-only data blocks.<br />
Table 4- 14 Absolute addressing for DB memory<br />
Bit DB[data block number].DBX[byte<br />
address].[bit address]<br />
Byte, Word, or Double<br />
Word<br />
DB[data block number].DB [size][starting<br />
byte address]<br />
DB1.DBX2.3<br />
DB1.DBB4, DB10.DBW2,<br />
DB20.DBD8<br />
Note<br />
When you specify an absolute address, STEP 7 precedes this address with a "%" character<br />
to indicate that it is an absolute address. While programming, you can enter an absolute<br />
address either with or without the "%" character (for example %I0.0 or I.0). If omitted,<br />
STEP 7 supplies the "%" character.<br />
<strong>S7</strong>-<strong>1200</strong> <strong>Programmable</strong> <strong>controller</strong><br />
System Manual, 04/2012, A5E02486680-06 91
PLC concepts<br />
4.3 Processing of analog values<br />
Configuring the I/O in the CPU and I/O modules<br />
When you add a CPU and I/O modules to your<br />
configuration screen, I and Q addresses are<br />
automatically assigned. You can change the<br />
default addressing by selecting the address field in<br />
the configuration screen and typing new numbers.<br />
Digital inputs and outputs are assigned in<br />
groups of 8 points (1 byte), whether the module<br />
uses all the points or not.<br />
Analog inputs and outputs are assigned in<br />
groups of 2 points (4 bytes).<br />
The figure shows an example of a CPU 1214C with two SMs and one SB. In this example,<br />
you could change the address of the DI8 module to 2 instead of 8. The tool will assist you by<br />
changing address ranges that are the wrong size or conflict with other addresses.<br />
4.3 Processing of analog values<br />
Analog signal modules provide input signals or expect output values that represent either a<br />
voltage range or a current range. These ranges are ±10V, ±5V, ±2.5V, or 0 - 20mA. The<br />
values returned by the modules are integer values where 0 to 27648 represents the rated<br />
range for current, and -27648 to 27648 for voltage. Anything outside the range represents<br />
either an overflow or underflow. See the tables for analog input representation (Page 770)<br />
and analog output representation (Page 771) for details.<br />
In your control program, you probably need to use these values in engineering units, for<br />
example to represent a volume, temperature, weight or other quantitative value. To do this<br />
for an analog input, you must first normalize the analog value to a real (floating point) value<br />
from 0.0 to 1.0. Then you must scale it to the minimum and maximum values of the<br />
engineering units that it represents. For values that are in engineering units that you need to<br />
convert to an analog output value, you first normalize the value in engineering units to a<br />
value between 0.0 and 1.0, and then scale it between 0 and 27648 or -27648 to 27648,<br />
depending on the range of the analog module. STEP 7 provides the NORM_X and SCALE_X<br />
instructions (Page 219) for this purpose. You can also use the CALCULATE instruction<br />
(Page 198) to scale the analog values (Page 33).<br />
<strong>S7</strong>-<strong>1200</strong> <strong>Programmable</strong> <strong>controller</strong><br />
92 System Manual, 04/2012, A5E02486680-06
4.4 Data types<br />
PLC concepts<br />
4.4 Data types<br />
Data types are used to specify both the size of a data element as well as how the data are to<br />
be interpreted. Each instruction parameter supports at least one data type, and some<br />
parameters support multiple data types. Hold the cursor over the parameter field of an<br />
instruction to see which data types are supported for a given parameter.<br />
A formal parameter is the identifier on an instruction that marks the location of data to be<br />
used by that instruction (example: the IN1 input of an ADD instruction). An actual parameter<br />
is the memory location (preceded by a "%" character) or constant containing the data to be<br />
used by the instruction (example %MD400 "Number_of_Widgets"). The data type of the<br />
actual parameter specified by you must match one of the supported data types of the formal<br />
parameter specified by the instruction.<br />
When specifying an actual parameter, you must specify either a tag (symbol) or an absolute<br />
(direct) memory address. Tags associate a symbolic name (tag name) with a data type,<br />
memory area, memory offset, and comment, and can be created either in the PLC tags<br />
editor or in the Interface editor for a block (OB, FC, FB and DB). If you enter an absolute<br />
address that has no associated tag, you must use an appropriate size that matches a<br />
supported data type, and a default tag will be created upon entry.<br />
All data types except String are available in the PLC tags editor and the block Interface<br />
editors. String is available only in the block Interface editors. You can also enter a constant<br />
value for many of the input parameters.<br />
● Bit and Bit sequences (Page 94): Bool (Boolean or bit value), Byte (8-bit byte value),<br />
Word (16-bit value), DWord (32-bit double-word value)<br />
● Integer (Page 95)<br />
– USInt (unsigned 8-bit integer), SInt (signed 8-bit integer),<br />
– UInt (unsigned 16-bit integer), Int (signed 16-bit integer)<br />
– UDInt (unsigned 32-bit integer), DInt (signed 32-bit integer)<br />
● Floating-point Real (Page 95): Real (32-bit Real or floating-point value), LReal (64-bit<br />
Real or floating-point value)<br />
● Time and Date (Page 96): Time (32-bit IEC time value), Date (16-bit date value), TOD<br />
(32-bit time-off-day value), DT (64-bit date-and-time value)<br />
● Character and String (Page 97): Char (8-bit single character), String (variable-length<br />
string of up to 254 characters)<br />
● Array (Page 99)<br />
● Data structure (Page 100): Struct<br />
● PLC Data type (Page 100)<br />
● Pointers (Page 101): Pointer, Any, Variant<br />
Although not available as data types, the following BCD numeric format is supported by the<br />
conversion instructions.<br />
<strong>S7</strong>-<strong>1200</strong> <strong>Programmable</strong> <strong>controller</strong><br />
System Manual, 04/2012, A5E02486680-06 93
PLC concepts<br />
4.4 Data types<br />
Table 4- 15 Size and range of the BCD format<br />
Format Size (bits) Numeric Range Constant Entry Examples<br />
BCD16 16 -999 to 999 123, -123<br />
BCD32 32 -9999999 to 9999999 1234567, -1234567<br />
4.4.1 Bool, Byte, Word, and DWord data types<br />
Table 4- 16 Bit and bit sequence data types<br />
Data<br />
type<br />
Bool 1<br />
Byte 8<br />
Bit<br />
size<br />
Word 16<br />
DWord 32<br />
Number<br />
type<br />
Number<br />
range<br />
Constant<br />
examples<br />
Boolean FALSE or TRUE TRUE, 1,<br />
Binary 0 or 1 0, 2#0<br />
Octal 8#0 or 8#1 8#1<br />
Hexadecimal 16#0 or 16#1 16#1<br />
Binary 2#0 to 2#11111111 2#00001111<br />
Unsigned integer 0 to 255 15<br />
Octal 8#0 to 8#377 8#17<br />
Hexadecimal B#16#0 to B#16#FF B#16#F, 16#F<br />
Binary 2#0 to 2#1111111111111111 2#1111000011110000<br />
Unsigned integer 0 to 65535 61680<br />
Octal 8#0 to 8#177777 8#170360<br />
Hexadecimal W#16#0 to W#16#FFFF,<br />
16#0 to 16#FFFF<br />
W#16#F0F0, 16#F0F0<br />
Binary 2#0 to<br />
2#111100001111111100<br />
2#111111111111111111111111<br />
11111111<br />
001111<br />
Unsigned integer 0 to 4294967295 15793935<br />
Octal 8#0 to 8#37777777777 8#74177417<br />
Hexadecimal DW#16#0000_0000 to<br />
DW#16#F0FF0F,<br />
DW#16#FFFF_FFFF,<br />
16#0000_0000 to<br />
16#FFFF_FFFF<br />
16#F0FF0F<br />
Address<br />
examples<br />
I1.0<br />
Q0.1<br />
M50.7<br />
DB1.DBX2.3<br />
Tag_name<br />
IB2<br />
MB10<br />
DB1.DBB4<br />
Tag_name<br />
MW10<br />
DB1.DBW2<br />
Tag_name<br />
MD10<br />
DB1.DBD8<br />
Tag_name<br />
<strong>S7</strong>-<strong>1200</strong> <strong>Programmable</strong> <strong>controller</strong><br />
94 System Manual, 04/2012, A5E02486680-06
4.4.2 Integer data types<br />
Table 4- 17 Integer data types (U = unsigned, S = short, D= double)<br />
Data type Bit size Number Range Constant examples Address<br />
examples<br />
USInt 8 0 to 255 78, 2#01001110<br />
MB0, DB1.DBB4,<br />
SInt 8 -128 to 127 +50, 16#50<br />
Tag_name<br />
UInt 16 0 to 65,535 65295, 0<br />
MW2, DB1.DBW2,<br />
Int 16 -32,768 to 32,767 30000, +30000<br />
Tag_name<br />
UDInt 32 0 to 4,294,967,295 4042322160<br />
MD6, DB1.DBD8,<br />
DInt 32 -2,147,483,648 to<br />
2,147,483,647<br />
-2131754992<br />
Tag_name<br />
4.4.3 Floating-point real data types<br />
PLC concepts<br />
4.4 Data types<br />
Real (or floating-point) numbers are represented as 32-bit single-precision numbers (Real),<br />
or 64-bit double-precision numbers (LReal) as described in the ANSI/IEEE 754-1985<br />
standard. Single-precision floating-point numbers are accurate up to 6 significant digits and<br />
double-precision floating point numbers are accurate up to 15 significant digits. You can<br />
specify a maximum of 6 significant digits (Real) or 15 (LReal) when entering a floating-point<br />
constant to maintain precision.<br />
Table 4- 18 Floating-point real data types (L=Long)<br />
Data type Bit size Number range Constant Examples Address examples<br />
Real 32 -3.402823e+38 to -1.175 495e-38,<br />
±0,<br />
+1.175 495e-38 to +3.402823e+38<br />
LReal 64 -1.7976931348623158e+308 to<br />
-2.2250738585072014e-308,<br />
±0,<br />
+2.2250738585072014e-308 to<br />
+1.7976931348623158e+308<br />
123.456, -3.4, 1.0e-5 MD100, DB1.DBD8,<br />
Tag_name<br />
12345.123456789e40,<br />
1.2E+40<br />
DB_name.var_name<br />
Rules:<br />
No direct addressing<br />
support<br />
Can be assigned in an<br />
OB, FB, or FC block<br />
interface table<br />
Calculations that involve a long series of values including very large and very small numbers<br />
can produce inaccurate results. This can occur if the numbers differ by 10 to the power of x,<br />
where x > 6 (Real), or 15 (LReal). For example (Real): 100 000 000 + 1 = 100 000 000.<br />
<strong>S7</strong>-<strong>1200</strong> <strong>Programmable</strong> <strong>controller</strong><br />
System Manual, 04/2012, A5E02486680-06 95
PLC concepts<br />
4.4 Data types<br />
4.4.4 Time and Date data types<br />
Table 4- 19 Time and date data types<br />
Data type Size Range Constant Entry Examples<br />
Time 32 bits T#-24d_20h_31m_23s_648ms to<br />
T#24d_20h_31m_23s_647ms<br />
Stored as: -2,147,483,648 ms to +2,147,483,647<br />
ms<br />
T#5m_30s<br />
T#1d_2h_15m_30s_45ms<br />
TIME#10d20h30m20s630ms<br />
500h10000ms<br />
10d20h30m20s630ms<br />
Date 16 bits D#1990-1-1 to D#2168-12-31 D#2009-12-31<br />
DATE#2009-12-31<br />
2009-12-31<br />
Time_of_Day 32 bits TOD#0:0:0.0 to TOD#23:59:59.999 TOD#10:20:30.400<br />
TIME_OF_DAY#10:20:30.400<br />
23:10:1<br />
DTL<br />
12 bytes Min.: DTL#1970-01-01-00:00:00.0<br />
DTL#2008-12-16-20:30:20.250<br />
(Date and Time<br />
Long)<br />
Max.: DTL#2554-12-31-23:59:59.999 999 999<br />
Time<br />
Date<br />
TOD<br />
TIME data is stored as a signed double integer interpreted as milliseconds. The editor format<br />
can use information for day (d), hours (h), minutes (m), seconds (s) and milliseconds (ms).<br />
It is not necessary to specify all units of time. For example T#5h10s and 500h are valid.<br />
The combined value of all specified unit values cannot exceed the upper or lower limits in<br />
milliseconds for the Time data type (-2,147,483,648 ms to +2,147,483,647 ms).<br />
DATE data is stored as an unsigned integer value which is interpreted as the number of days<br />
added to the base date 01/01/1990, to obtain the specified date. The editor format must<br />
specify a year, month and day.<br />
TOD (TIME_OF_DAY) data is stored as an unsigned double integer which is interpreted as<br />
the number of milliseconds since midnight for the specified time of day (Midnight = 0 ms).<br />
The hour (24hr/day), minute, and second must be specified. The fractional second<br />
specification is optional.<br />
<strong>S7</strong>-<strong>1200</strong> <strong>Programmable</strong> <strong>controller</strong><br />
96 System Manual, 04/2012, A5E02486680-06
DTL<br />
Table 4- 20 Size and range for DTL<br />
PLC concepts<br />
4.4 Data types<br />
DTL (Date and Time Long) data type uses a12 byte structure that saves information on date<br />
and time. You can define DTL data in either the Temp memory of a block or in a DB. A value<br />
for all components must be entered in the "Start value" column of the DB editor.<br />
Length<br />
(bytes)<br />
Format Value range Example of value input<br />
12 Clock and calendar<br />
Min.: DTL#1970-01-01-00:00:00.0 DTL#2008-12-16-20:30:20.250<br />
Year-Month-Day:Hour:Minute:<br />
Second.Nanoseconds<br />
Max.: DTL#2554-12-31-23:59:59.999<br />
999 999<br />
Each component of the DTL contains a different data type and range of values. The data<br />
type of a specified value must match the data type of the corresponding components.<br />
Table 4- 21 Elements of the DTL structure<br />
Byte Component Data type Value range<br />
0<br />
1<br />
Year UINT 1970 to 2554<br />
2 Month USINT 1 to 12<br />
3 Day USINT 1 to 31<br />
4 Weekday 1 USINT 1(Sunday) to 7(Saturday) 1<br />
5 Hour USINT 0 to 23<br />
6 Minute USINT 0 to 59<br />
7 Second USINT 0 to 59<br />
8<br />
9<br />
10<br />
11<br />
Nanoseconds UDINT 0 to 999 999 999<br />
1 The weekday is not considered in the value entry.<br />
4.4.5 Character and String data types<br />
Table 4- 22 Character and String data types<br />
Data type Size Range Constant Entry Examples<br />
Char 8 bits ASCII character codes: 16#00 to 16#FF 'A', 't', '@'<br />
String n+ 2 bytes n = (0 to 254 character bytes) 'ABC'<br />
<strong>S7</strong>-<strong>1200</strong> <strong>Programmable</strong> <strong>controller</strong><br />
System Manual, 04/2012, A5E02486680-06 97
PLC concepts<br />
4.4 Data types<br />
Char<br />
String<br />
Char data occupies one byte in memory and stores a single character coded in ASCII<br />
format. The editor syntax uses a single quote character before and after the ASCII character.<br />
Visible characters and control characters can be used. A table of valid control characters is<br />
shown in the description of the String data type.<br />
The CPU supports the String data type for storing a sequence of single-byte characters. The<br />
String data type contains a total character count (number of characters in the string) and the<br />
current character count. The String type provides up to 256 bytes for storing the maximum<br />
total character count (1 byte), the current character count (1 byte), and up to 254 characters,<br />
with each character stored in 1 byte.<br />
You can use literal strings (constants) for instruction parameters of type IN using single<br />
quotes. For example, ‘ABC’ is a three-character string that could be used as input for<br />
parameter IN of the S_CONV instruction. You can also create string variables by selecting<br />
data type "String" in the block interface editors for OB, FC, FB, and DB. You cannot create a<br />
string in the PLC tags editor.<br />
You can specify the maximum string size in bytes by entering square brackets after the<br />
keyword "String" (once the data type "String" is selected from a data type drop-list). For<br />
example, "MyString String[10]" would specify a 10-byte maximum size for MyString. If you do<br />
not include the square brackets with a maximum size, then 254 is assumed.<br />
The following example defines a String with maximum character count of 10 and current<br />
character count of 3. This means the String currently contains 3 one-byte characters, but<br />
could be expanded to contain up to 10 one-byte characters.<br />
Table 4- 23 Example of a String data type<br />
Total Character<br />
Count<br />
Current Character<br />
Count<br />
Character 1 Character 2 Character 3 ... Character 10<br />
10 3 'C' (16#43) 'A' (16#41) 'T' (16#54) ... -<br />
Byte 0 Byte 1 Byte 2 Byte 3 Byte 4 ... Byte 11<br />
ASCII control characters can be used in Char and String data. The following table shows<br />
examples of control character syntax.<br />
Table 4- 24 Valid ASCII control characters<br />
Control characters ASCII Hex value Control function Examples<br />
$L or $l 0A Line feed '$LText', '$0AText'<br />
$N or $n 0A and 0D Line break<br />
The new line shows two characters in the<br />
string.<br />
'$NText', '$0A$0DText'<br />
$P or $p 0C Form feed '$PText', '$0CText'<br />
$R or $r 0D Carriage return (CR) '$RText','$0DText'<br />
$T or $t 09 Tab '$TText', '$09Text'<br />
<strong>S7</strong>-<strong>1200</strong> <strong>Programmable</strong> <strong>controller</strong><br />
98 System Manual, 04/2012, A5E02486680-06
PLC concepts<br />
4.4 Data types<br />
Control characters ASCII Hex value Control function Examples<br />
$$ 24 Dollar sign '100$$', '100$24'<br />
$' 27 Single quote '$'Text$'','$27Text$27'<br />
4.4.6 Array data type<br />
Arrays<br />
Table 4- 25 ARRAY data type rules<br />
You can create an array that contains multiple elements of the same data type. Arrays can<br />
be created in the block interface editors for OB, FC, FB, and DB. You cannot create an array<br />
in the PLC tags editor.<br />
To create an array from the block interface editor, name the array and choose data type<br />
"Array [lo .. hi] of type", then edit "lo", "hi", and "type" as follows:<br />
● lo - the starting (lowest) index for your array<br />
● hi - the ending (highest) index for your array<br />
● type - one of the data types, such as BOOL, SINT, UDINT<br />
Data Type Array syntax<br />
ARRAY Name [index1_min..index1_max, index2_min..index2_max] of <br />
All array elements must be the same data type.<br />
The index can be negative, but the lower limit must be less than or equal to the upper limit.<br />
Arrays can have one to six dimensions.<br />
Multi-dimensional index min..max declarations are separated by comma characters.<br />
Nested arrays, or arrays of arrays, are not allowed.<br />
The memory size of an array = (size of one element * total number of elements in array)<br />
Array index Valid index data types Array index rules<br />
Constant or<br />
variable<br />
USInt, SInt, UInt, Int, UDInt,<br />
DInt<br />
Value limits: -32768 to +32767<br />
Valid: Mixed constants and variables<br />
Valid: Constant expressions<br />
Not valid: Variable expressions<br />
<strong>S7</strong>-<strong>1200</strong> <strong>Programmable</strong> <strong>controller</strong><br />
System Manual, 04/2012, A5E02486680-06 99
PLC concepts<br />
4.4 Data types<br />
Example: array<br />
declarations<br />
Example: array<br />
addresses<br />
4.4.7 Data structure data type<br />
4.4.8 PLC data type<br />
ARRAY[1..20] of REAL One dimension, 20 elements<br />
ARRAY[-5..5] of INT One dimension, 11 elements<br />
ARRAY[1..2, 3..4] of CHAR Two dimensions, 4 elements<br />
ARRAY1[0] ARRAY1 element 0<br />
ARRAY2[1,2] ARRAY2 element [1,2]<br />
ARRAY3[i,j] If i =3 and j=4, then ARRAY3 element<br />
[3, 4] is addressed<br />
You can use the data type "Struct" to define a structure of data consisting of other data<br />
types. The struct data type can be used to handle a group of related process data as a single<br />
data unit. A Struct data type is named and the internal data structure declared in the data<br />
block editor or a block interface editor.<br />
Arrays and structures can also be assembled into a larger structure. A structure can be<br />
nested up to eight levels deep. For example, you can create a structure of structures that<br />
contain arrays.<br />
A Struct variable begins at an even-byte address and uses the memory to the next word<br />
boundary.<br />
The PLC data type editor lets you define data structures that you can use multiple times in<br />
your program. You create a PLC data type by opening the "PLC data types" branch of the<br />
project tree and double-clicking the "Add new data type" item. On the newly created PLC<br />
data type item, use two single-clicks to rename the default name and double-click to open<br />
the PLC data type editor.<br />
You create a custom PLC data type structure using the same editing methods that are used<br />
in the data block editor. Add new rows for any data types that are necessary to create the<br />
data structure that you want.<br />
If a new PLC data type is created, then the new PLC type name will appear in the data type<br />
selector drop drop-lists in the DB editor and code block interface editor.<br />
Potential uses of PLC data types:<br />
● PLC data types can be used directly as a data type in a code block interface or in data<br />
blocks.<br />
● PLC data types can be used as a template for the creation of multiple global data blocks<br />
that use the same data structure.<br />
For example, a PLC data type could be a recipe for mixing colors. You can then assign this<br />
PLC data type to multiple data blocks. Each data block can then have the variables adjusted<br />
to create a specific color.<br />
<strong>S7</strong>-<strong>1200</strong> <strong>Programmable</strong> <strong>controller</strong><br />
100 System Manual, 04/2012, A5E02486680-06
4.4.9 Pointer data types<br />
PLC concepts<br />
4.4 Data types<br />
The pointer data types (Pointer, Any, and Variant) can be used in the block interface tables<br />
for FB and FC code blocks. You can select a pointer data type from the block interface data<br />
type drop-lists.<br />
The Variant data type is also used for instruction parameters.<br />
4.4.9.1 "Pointer" pointer data type<br />
The data type Pointer points to a particular variable. It occupies 6 bytes (48 bits) in memory<br />
and can include the following information:<br />
● DB number or 0 if the data is not stored in a DB<br />
● Storage area in the CPU<br />
● Variable address<br />
<br />
<br />
<br />
<br />
<br />
<br />
<br />
<br />
<br />
<br />
<br />
<br />
<br />
<br />
<strong>S7</strong>-<strong>1200</strong> <strong>Programmable</strong> <strong>controller</strong><br />
System Manual, 04/2012, A5E02486680-06 101<br />
<br />
<br />
<br />
Depending on the instruction, you can declare the following three types of pointers:<br />
● Area-internal pointer: contains data on the address of a variable<br />
● Area-crossing pointer: contains data on the memory area and the address of a variable<br />
● DB-pointer: contains a data block number and the address of a variable<br />
Table 4- 26 Pointer types:<br />
Type Format Example entry<br />
Area-internal pointer P#Byte.Bit P#20.0<br />
Area-crossing pointer P#Memory_area_Byte.Bit P#M20.0<br />
DB-pointer P#Data_block.Data_element P#DB10.DBX20.0<br />
You can enter a parameter of type Pointer without the prefix (P #). Your entry will be<br />
automatically converted to the pointer format.
PLC concepts<br />
4.4 Data types<br />
Table 4- 27 Memory area encoding in the Pointer data:<br />
Hexadecimal code Data type Description<br />
b#16#81 I Input memory area<br />
b#16#82 Q Output memory area<br />
b#16#83 M Marker memory area<br />
b#16#84 DBX Data block<br />
b#16#85 DIX Instance data block<br />
b#16#86 L Local data<br />
b#16#87 V Previous local data<br />
4.4.9.2 "Any" pointer data type<br />
The pointer data type ANY ("Any") points to the beginning of a data area and specifies its<br />
length. The ANY pointer uses 10 bytes in memory and can include the following information:<br />
● Data type: Data type of the data elements<br />
● Repeat factor: Number of data elements<br />
● DB Number: Data block in which data elements are stored<br />
● Storage area: Memory area of the CPU, in which the data elements are stored<br />
● Start address: "Byte.Bit" starting address of the data<br />
The following image shows the structure of the ANY pointer:<br />
<br />
<br />
<br />
<br />
<br />
<br />
<br />
<br />
<br />
<br />
<br />
<br />
<br />
<br />
<br />
<br />
<strong>S7</strong>-<strong>1200</strong> <strong>Programmable</strong> <strong>controller</strong><br />
102 System Manual, 04/2012, A5E02486680-06<br />
<br />
<br />
<br />
<br />
<br />
A pointer can not detect ANY structures. It can only be assigned to local variables.<br />
Table 4- 28 Format and examples of the ANY pointer:<br />
Format Entry example Description<br />
P#Data_block.Memory_area<br />
Data_address Type Number<br />
P#Memory_area Data_address<br />
P#DB 11.DBX 20.0 INT 10 10 words in global DB 11<br />
starting from DBB 20.0<br />
P#M 20.0 BYTE 10 10 bytes starting from MB 20.0<br />
Type Number P#I 1.0 BOOL 1 Input I1.0
Table 4- 29 Data type encoding in the ANY pointer<br />
PLC concepts<br />
4.4 Data types<br />
Hexadecimal code Data type Description<br />
b#16#00 Null Null pointer<br />
b#16#01 Bool Bits<br />
b#16#02 Byte Bytes, 8 Bits<br />
b#16#03 Char 8-bit character<br />
b#16#04 Word 16-bit-word<br />
b#16#05 Int 16-bit-integer<br />
b#16#37 SInt 8-bit-integer<br />
b#16#35 UInt 16-bit unsigned integer<br />
b#16#34 USInt 8-bit unsigned integer<br />
b#16#06 DWord 32-bit double word<br />
b#16#07 DInt 32-bit double integer<br />
b#16#36 UDInt 32-bit-unsigned double integer<br />
b#16#08 Real 32-Bit floating point<br />
b#16#0B Time Time<br />
b#16#13 String Character string<br />
Table 4- 30 Memory area encoding in the ANY pointer:<br />
Hexadecimal code Memory area Description<br />
b#16#81 I Input memory area<br />
b#16#82 Q Output memory area<br />
b#16#83 M Marker memory area<br />
b#16#84 DBX Data block<br />
b#16#85 DIX Instance data block<br />
b#16#86 L Local data<br />
b#16#87 V Previous local data<br />
4.4.9.3 "Variant" pointer data type<br />
The data type Variant is can point to variables of different data types or parameters. The<br />
Variant pointer can point to structures and individual structural components. The Variant<br />
pointer does not occupy any space in memory.<br />
Table 4- 31 Properties of the Variant pointer<br />
Length<br />
(Byte)<br />
0<br />
Representation Format Example entry<br />
Symbolic<br />
Absolute<br />
Operand MyTag<br />
DB_name.Struct_name.element_name MyDB.Struct1.pressure1<br />
Operand %MW10<br />
DB_number.Operand Type Length P#DB10.DBX10.0 INT 12<br />
<strong>S7</strong>-<strong>1200</strong> <strong>Programmable</strong> <strong>controller</strong><br />
System Manual, 04/2012, A5E02486680-06 103
PLC concepts<br />
4.4 Data types<br />
4.4.10 Accessing a "slice" of a tagged data type<br />
PLC tags and data block tags can be accessed at the bit, byte, or word level depending on<br />
their size. The syntax for accessing such a data slice is as follows:<br />
● "".xn (bit access)<br />
● "".bn (byte access)<br />
● "".wn (word access)<br />
● ""..xn (bit access)<br />
● ""..bn (byte access)<br />
● ""..wn (word access)<br />
A double word-sized tag can be accessed by bits 0 - 31, bytes 0 - 3, or word 0 - 1. A wordsized<br />
tag can be accessed by bits 0 - 15, bytes 0 - 2, or word 0. A byte-sized tag can be<br />
accessed by bits 0 - 8, or byte 0. Bit, byte, and word slices can be used anywhere that bits,<br />
bytes, or words are expected operands.<br />
Note<br />
Valid data types that can be accessed by slice are Byte, Char, Conn_Any, Date, DInt,<br />
DWord, Event_Any, Event_Att, Hw_Any, Hw_Device, HW_Interface, Hw_Io, Hw_Pwm,<br />
Hw_SubModule, Int, OB_Any, OB_Att, OB_Cyclic, OB_Delay, OB_WHINT, OB_PCYCLE,<br />
OB_STARTUP, OB_TIMEERROR, OB_Tod, Port, Rtm, SInt, Time, Time_Of_Day, UDInt,<br />
UInt, USInt, and Word. PLC Tags of type Real can be accessed by slice, but data block tags<br />
of type Real cannot.<br />
<strong>S7</strong>-<strong>1200</strong> <strong>Programmable</strong> <strong>controller</strong><br />
104 System Manual, 04/2012, A5E02486680-06
Examples<br />
Bit access<br />
Byte access<br />
Word access<br />
See also<br />
PLC concepts<br />
4.4 Data types<br />
In the PLC tag table, "DW" is a declared tag of type DWORD. The examples show bit, byte,<br />
and word slice access:<br />
SCL (Page 156)<br />
LAD FBD SCL<br />
IF "DW".x11 THEN<br />
...<br />
END_IF;<br />
4.4.11 Accessing a tag with an AT overlay<br />
Declaration<br />
IF "DW".b2 = "DW".b3<br />
THEN<br />
...<br />
END_IF;<br />
out:= "DW".w0 AND<br />
"DW".w1;<br />
The AT tag overlay allows you to access an already-declared tag of a standard access block<br />
with an overlaid declaration of a different data type. You can, for example, address the<br />
individual bits of a tag of a Byte, Word, or DWord data type with an Array of Bool.<br />
To overlay a parameter, declare an additional parameter directly after the parameter that is<br />
to be overlaid and select the data type "AT". The editor creates the overlay, and you can<br />
then choose the data type, struct, or array that you wish to use for the overlay.<br />
<strong>S7</strong>-<strong>1200</strong> <strong>Programmable</strong> <strong>controller</strong><br />
System Manual, 04/2012, A5E02486680-06 105
PLC concepts<br />
4.4 Data types<br />
Example<br />
This example shows the input parameters of a standard-access FB. The byte tag B1 is<br />
overlaid with an array of Booleans:<br />
Table 4- 32 Overlay of a byte with a Boolean array<br />
7 6 5 4 3 2 1 0<br />
AT[0] AT[1] AT[2] AT[3] AT[4] AT[5] AT[6] AT[7]<br />
Another example is a DWord tag overlaid with a Struct:<br />
The overlay types can be addressed directly in the program logic:<br />
LAD FBD SCL<br />
IF #AT[1] THEN<br />
...<br />
END_IF;<br />
Rules<br />
IF (#DW1_Struct.S1 =<br />
W#16#000C) THEN<br />
...<br />
END_IF;<br />
out1 := #DW1_Struct.S2;<br />
● Overlaying of tags is only possible in FB and FC blocks with standard access.<br />
● You can overlay parameters for all block types and all declaration sections.<br />
<strong>S7</strong>-<strong>1200</strong> <strong>Programmable</strong> <strong>controller</strong><br />
106 System Manual, 04/2012, A5E02486680-06
See also<br />
PLC concepts<br />
4.5 Using a memory card<br />
● An overlaid parameter can be used like any other block parameter.<br />
● You cannot overlay parameters of type VARIANT.<br />
● The size of the overlaying parameter must be less than or equal to the size of the overlaid<br />
parameter.<br />
● The overlaying variable must be declared immediately after the variable that it overlays<br />
and identified with the keyword "AT".<br />
SCL (Page 156)<br />
4.5 Using a memory card<br />
NOTICE<br />
The CPU supports only the pre-formatted SIMATIC memory card (Page 826).<br />
Before you copy any program to the formatted memory card, delete any previously saved<br />
program from the memory card.<br />
Use the memory card either as a transfer card or as a program card. Any program that you<br />
copy to the memory card contains all of the code blocks and data blocks, any technology<br />
objects, and the device configuration. A copied program does not contain force values.<br />
● Use a transfer card (Page 110) to copy a program to the internal load memory of the CPU<br />
without using STEP 7. After you insert the transfer card, the CPU first erases the user<br />
program and any force values from the internal load memory, and then copies the<br />
program from the transfer card to the internal load memory. When the transfer process is<br />
complete, you must remove the transfer card.<br />
You can use an empty transfer card to access a password-protected CPU when the<br />
password has been lost or forgotten (Page 118). Inserting the empty transfer card deletes<br />
the password-protected program in the internal load memory of the CPU. You can then<br />
download a new program to the CPU.<br />
● Use a program card (Page 112) as external load memory for the CPU. Inserting a<br />
program card in the CPU erases all of the CPU internal load memory (the user program<br />
and any force values). The CPU then executes the program in external load memory (the<br />
program card). Downloading to a CPU that has a program card updates only the external<br />
load memory (the program card).<br />
Because the internal load memory of the CPU was erased when you inserted the<br />
program card, the program card must remain in the CPU. If you remove the program<br />
card, the CPU goes to STOP mode. (The error LED flashes to indicate that program card<br />
has been removed.)<br />
<strong>S7</strong>-<strong>1200</strong> <strong>Programmable</strong> <strong>controller</strong><br />
System Manual, 04/2012, A5E02486680-06 107
PLC concepts<br />
4.5 Using a memory card<br />
The copied program on a memory card includes the code blocks, the data blocks, the<br />
technology objects, and the device configuration. The memory card does not contain any<br />
force values. The force values are not part of the program, but are stored in the load<br />
memory, whether the internal load memory of the CPU, or the external load memory (a<br />
program card). If a program card is inserted in the CPU, STEP 7 then applies the force<br />
values only to the external load memory on the program card.<br />
You also use a memory card when downloading firmware updates (Page 115).<br />
4.5.1 Inserting a memory card in the CPU<br />
CAUTION<br />
Electrostatic discharge can damage the memory card or the receptacle on the CPU.<br />
Make contact with a grounded conductive pad and/or wear a grounded wrist strap when<br />
you handle the memory card. Store the memory card in a conductive container.<br />
CAUTION<br />
Check that the memory card is not write-protected. Slide the protection<br />
switch away from the "Lock" position.<br />
If you insert a memory card (whether configured as a program or transfer card) into a<br />
running CPU, the CPU goes immediately to STOP mode, which might result in damage to<br />
the equipment or to the process being controlled. Before inserting or removing a memory<br />
card, always ensure that the CPU is not actively controlling a machine or process. Always<br />
install an emergency stop circuit for your application or process.<br />
Note<br />
If you insert a memory card with the CPU in STOP mode, the diagnostic buffer displays a<br />
message that the memory card evaluation has been initiated. The CPU will evaluate the<br />
memory card the next time you either change the CPU to RUN mode, reset the CPU<br />
memory with an MRES, or power-cycle the CPU.<br />
<strong>S7</strong>-<strong>1200</strong> <strong>Programmable</strong> <strong>controller</strong><br />
108 System Manual, 04/2012, A5E02486680-06
PLC concepts<br />
4.5 Using a memory card<br />
To insert a memory card, open the top<br />
CPU door and insert the memory card in<br />
the slot. A push-push type connector<br />
allows for easy insertion and removal.<br />
The memory card is keyed for proper<br />
installation.<br />
<strong>S7</strong>-<strong>1200</strong> <strong>Programmable</strong> <strong>controller</strong><br />
System Manual, 04/2012, A5E02486680-06 109
PLC concepts<br />
4.5 Using a memory card<br />
4.5.2 Configuring the startup parameter of the CPU before copying the project to the<br />
memory card<br />
4.5.3 Transfer card<br />
When you copy a program to a transfer card or a program card, the program includes the<br />
startup parameter for the CPU. Before copying the program to the memory card, always<br />
ensure that you have configured the operating mode for the CPU following a power-cycle.<br />
Select whether the CPU starts in STOP mode, RUN mode, or in the previous mode (prior to<br />
the power cycle).<br />
CAUTION<br />
Creating a transfer card<br />
Electrostatic discharge can damage the memory card or the receptacle on the CPU.<br />
Make contact with a grounded conductive pad and/or wear a grounded wrist strap<br />
whenever you handle the memory card. Store the memory card in a conductive container.<br />
Always remember to configure the startup parameter of the CPU (Page 110) before copying<br />
a program to the transfer card. To create a transfer card, follow these steps:<br />
1. Insert a blank SIMATIC memory card into an SD card reader/writer attached to your<br />
computer.<br />
If you are reusing a SIMATIC memory card that contains a user program or a firmware<br />
update, you must delete the program files before reusing the card. Use Windows Explorer<br />
to display the contents of the memory card and delete the "<strong>S7</strong>_JOB.<strong>S7</strong>S" file and also<br />
delete any existing "Data Logs" folders and directory folder (such as "SIMATIC.<strong>S7</strong>S" or<br />
"FWUPDATE.<strong>S7</strong>S").<br />
2. In the Project tree (Project view), expand the "SIMATIC Card Reader" folder and select<br />
your card reader.<br />
3. Display the "Memory card" dialog by right-clicking the drive letter corresponding to the<br />
memory card in the card reader and selecting "Properties" from the context menu.<br />
<strong>S7</strong>-<strong>1200</strong> <strong>Programmable</strong> <strong>controller</strong><br />
110 System Manual, 04/2012, A5E02486680-06
Using a transfer card<br />
PLC concepts<br />
4.5 Using a memory card<br />
4. In the "Memory card" dialog, select "Transfer" from the "Card type" drop-down menu.<br />
At this point, STEP 7 creates the empty transfer card. If you are creating an empty<br />
transfer card, such as to recover from a lost CPU password (Page 118), remove the<br />
transfer card from the card reader.<br />
5. Add the program by selecting the CPU device (such as PLC_1 [CPU 1214 DC/DC/DC]) in<br />
the Project tree and dragging the CPU device to the memory card. (Another method is to<br />
copy the CPU device and paste it to the memory card.) Copying the CPU device to the<br />
memory card opens the "Load preview" dialog.<br />
6. In the "Load preview" dialog, click the "Load" button to copy the CPU device to the<br />
memory card.<br />
7. When the dialog displays a message that the CPU device (program) has been loaded<br />
without errors, click the "Finish" button.<br />
WARNING<br />
Verify that the CPU is not actively running a process before inserting the memory card.<br />
Inserting a memory card will cause the CPU to go to STOP mode, which could affect the<br />
operation of an online process or machine. Unexpected operation of a process or machine<br />
could result in death or injury to personnel and/or property damage.<br />
Before inserting a memory card, always ensure that the CPU is offline and in a safe state.<br />
To transfer the program to a CPU, follow these steps:<br />
1. Insert the transfer card into the CPU (Page 108). If the CPU is in RUN, the CPU will go to<br />
STOP mode. The maintenance (MAINT) LED flashes to indicate that the memory card<br />
needs to be evaluated.<br />
2. Power-cycle the CPU to evaluate the memory card. Alternative methods for rebooting the<br />
CPU are to perform either a STOP-to-RUN transition or a memory reset (MRES) from<br />
STEP 7.<br />
<strong>S7</strong>-<strong>1200</strong> <strong>Programmable</strong> <strong>controller</strong><br />
System Manual, 04/2012, A5E02486680-06 111
PLC concepts<br />
4.5 Using a memory card<br />
4.5.4 Program card<br />
3. After the rebooting and evaluating the memory card, the CPU copies the program to the<br />
internal load memory of the CPU.<br />
The RUN/STOP LED alternately flashes green and yellow to indicate that the program is<br />
being copied. When the RUN/STOP LED turns on (solid yellow) and the MAINT LED<br />
flashes, the copy process has finished. You can then remove the memory card.<br />
4. Reboot the CPU (either by restoring power or by the alternative methods for rebooting) to<br />
evaluate the new program that was transferred to internal load memory.<br />
The CPU then goes to the start-up mode (RUN or STOP) that you configured for the project.<br />
Note<br />
You must remove the transfer card before setting the CPU to RUN mode.<br />
CAUTION<br />
Electrostatic discharge can damage the memory card or the receptacle on the CPU.<br />
Make contact with a grounded conductive pad and/or wear a grounded wrist strap when<br />
you handle the memory card. Store the memory card in a conductive container.<br />
Check that the memory card is not write-protected. Slide the protection<br />
switch away from the "Lock" position.<br />
Before you copy any program elements to the program card, delete any<br />
previously saved programs from the memory card.<br />
<strong>S7</strong>-<strong>1200</strong> <strong>Programmable</strong> <strong>controller</strong><br />
112 System Manual, 04/2012, A5E02486680-06
PLC concepts<br />
4.5 Using a memory card<br />
Creating a program card<br />
When used as a program card, the memory card is the external load memory of the CPU. If<br />
you remove the program card, the internal load memory of the CPU is empty.<br />
Note<br />
If you insert a blank memory card into the CPU and perform a memory card evaluation by<br />
either power cycling the CPU, performing a STOP to RUN transition, or performing a<br />
memory reset (MRES), the program and force values in internal load memory of the CPU are<br />
copied to the memory card. (The memory card is now a program card.) After the copy has<br />
been completed, the program in internal load memory of the CPU is then erased. The CPU<br />
then goes to the configured startup mode (RUN or STOP).<br />
Always remember to configure the startup parameter of the CPU (Page 110) before copying<br />
a project to the program card. To create a program card, follow these steps:<br />
1. Insert a blank SIMATIC memory card into an SD card reader/writer attached to your<br />
computer.<br />
If you are reusing a SIMATIC memory card that contains a user program or a firmware<br />
update, you must delete the program files before reusing the card. Use Windows Explorer<br />
to display the contents of the memory card and delete the "<strong>S7</strong>_JOB.<strong>S7</strong>S" file and also<br />
delete any existing "Data Logs" folders and any directory folder (such as "SIMATIC.<strong>S7</strong>S"<br />
or "FWUPDATE.<strong>S7</strong>S").<br />
2. In the Project tree (Project view), expand the "SIMATIC Card Reader" folder and select<br />
your card reader.<br />
3. Display the "Memory card" dialog by right-clicking the drive letter corresponding to the<br />
memory card in the card reader and selecting "Properties" from the context menu.<br />
4. In the "Memory card" dialog, select "Program" from the drop-down menu.<br />
5. Add the program by selecting the CPU device (such as PLC_1 [CPU 1214 DC/DC/DC]) in<br />
the Project tree and dragging the CPU device to the memory card. (Another method is to<br />
copy the CPU device and paste it to the memory card.) Copying the CPU device to the<br />
memory card opens the "Load preview" dialog.<br />
<strong>S7</strong>-<strong>1200</strong> <strong>Programmable</strong> <strong>controller</strong><br />
System Manual, 04/2012, A5E02486680-06 113
PLC concepts<br />
4.5 Using a memory card<br />
6. In the "Load preview" dialog, click the "Load" button to copy the CPU device to the<br />
memory card.<br />
7. When the dialog displays a message that the CPU device (program) has been loaded<br />
without errors, click the "Finish" button.<br />
Using a program card as the load memory for your CPU<br />
WARNING<br />
Verify that the CPU is not actively running a process before inserting the memory card.<br />
Inserting a memory card will cause the CPU to go to STOP mode, which could affect the<br />
operation of an online process or machine. Unexpected operation of a process or machine<br />
could result in death or injury to personnel and/or property damage.<br />
Before inserting a memory card, always ensure that the CPU is offline and in a safe state.<br />
To use a program card with your CPU, follow these steps:<br />
1. Insert the program card into the CPU. If the CPU is in RUN mode, the CPU goes to STOP<br />
mode. The maintenance (MAINT) LED flashes to indicate that the memory card needs to<br />
be evaluated.<br />
2. Power-cycle the CPU to evaluate the memory card. Alternative methods for rebooting the<br />
CPU are to perform either a STOP-to-RUN transition or a memory reset (MRES) from<br />
STEP 7.<br />
3. After the CPU reboots and evaluates the program card, the CPU erases the internal load<br />
memory of the CPU.<br />
The CPU then goes to the start-up mode (RUN or STOP) that you configured for the CPU.<br />
The program card must remain in the CPU. Removing the program card leaves the CPU with<br />
no program in internal load memory.<br />
WARNING<br />
If you remove the program card, the CPU loses its external load memory and generates an<br />
error. The CPU goes to STOP mode and flashes the error LED.<br />
Control devices can fail in an unsafe condition, resulting in unexpected operation of<br />
controlled equipment. Such unexpected operations could result in death or serious injury to<br />
personnel, and/or damage to equipment.<br />
<strong>S7</strong>-<strong>1200</strong> <strong>Programmable</strong> <strong>controller</strong><br />
114 System Manual, 04/2012, A5E02486680-06
4.5.5 Firmware update<br />
CAUTION<br />
PLC concepts<br />
4.5 Using a memory card<br />
Electrostatic discharge can damage the memory card or the receptacle on the CPU.<br />
Make contact with a grounded conductive pad and/or wear a grounded wrist strap<br />
whenever you handle the memory card. Store the memory card in a conductive container.<br />
You use a memory card when downloading firmware updates from customer support<br />
(http://www.siemens.com/automation/). From this Web site, navigate to Automation<br />
Technology > Automation Systems > SIMATIC Industrial Automation Systems > PLC ><br />
Modular <strong>controller</strong>s SIMATIC <strong>S7</strong> > SIMATIC <strong>S7</strong>-<strong>1200</strong>. From there continue navigating to the<br />
specific type of module that you need to update. Under "Support", click the link for "Software<br />
Downloads" to proceed.<br />
Alternatively, you can access the <strong>S7</strong>-<strong>1200</strong> downloads Web page<br />
(http://support.automation.siemens.com/WW/view/en/34612486/133100) directly.<br />
Note<br />
You cannot update an <strong>S7</strong>-<strong>1200</strong> CPU V2.2 or earlier to <strong>S7</strong>-<strong>1200</strong> V3.0 by firmware update.<br />
CAUTION<br />
Do not use the Windows formatter utility or any other formatting utility to reformat the<br />
memory card.<br />
If a Siemens memory card is reformatted using the Microsoft Windows formatter utility, then<br />
the memory card will no longer be usable by a <strong>S7</strong>-<strong>1200</strong> CPU.<br />
<strong>S7</strong>-<strong>1200</strong> <strong>Programmable</strong> <strong>controller</strong><br />
System Manual, 04/2012, A5E02486680-06 115
PLC concepts<br />
4.5 Using a memory card<br />
To download the firmware update to your memory card, follow these steps:<br />
1. Insert a blank SIMATIC MC 24 MB memory card into an SD card reader/writer attached<br />
to your computer.<br />
You can reuse a SIMATIC memory card that contains a user program or another firmware<br />
update, but you must delete some of the files on the memory card.<br />
CAUTION<br />
Do NOT delete the hidden files "__LOG__" and "crdinfo.bin" from the memory card.<br />
The "__LOG__" and "crdinfo.bin" files are required for the memory card. If you delete<br />
these files, you cannot use the memory card with the CPU.<br />
To reuse a memory card, you must delete the "<strong>S7</strong>_JOB.<strong>S7</strong>S" file and any existing "Data<br />
Logs" folders or any folder (such as "SIMATIC.<strong>S7</strong>S" or "FWUPDATE.<strong>S7</strong>S") before<br />
downloading the firmware update. However, do not delete the files "__LOG__" and<br />
"crdinfo.bin". (These files are typically hidden and are required.) Use Windows Explorer to<br />
display the contents of the memory card and to delete the file and folders.<br />
2. Select the self-extracting file (.exe) for the firmware update that corresponds to your<br />
module, and download it to your computer. Double-click the update file, set the file<br />
destination path to be the root directory of the SIMATIC memory card, and start the<br />
extraction process. After the extraction is complete, the root directory (folder) of the<br />
memory card will contain a "FWUPDATE.<strong>S7</strong>S" directory and the "<strong>S7</strong>_JOB.<strong>S7</strong>S" file.<br />
<strong>S7</strong>-<strong>1200</strong> <strong>Programmable</strong> <strong>controller</strong><br />
116 System Manual, 04/2012, A5E02486680-06
To install the firmware update, follow these steps:<br />
PLC concepts<br />
4.5 Using a memory card<br />
WARNING<br />
Verify that the CPU is not actively running a process before installing the firmware update.<br />
Installing the firmware update will cause the CPU to go to STOP mode, which could affect<br />
the operation of an online process or machine. Unexpected operation of a process or<br />
machine could result in death or injury to personnel and/or property damage.<br />
Before inserting the memory card, always ensure that the CPU is offline and in a safe state.<br />
1. Insert the memory card into the CPU. If the CPU is in RUN mode, the CPU then goes to<br />
STOP mode. The maintenance (MAINT) LED flashes to indicate that the memory card<br />
needs to be evaluated.<br />
2. Power-cycle the CPU to start the firmware update. Alternative methods for rebooting the<br />
CPU are to perform either a STOP-to-RUN transition or a memory reset (MRES) from<br />
STEP 7.<br />
NOTICE<br />
To complete the firmware upgrade for the module, you must ensure that the external 24<br />
VDC power to the module remains on.<br />
After the CPU reboots, the firmware update starts. The RUN/STOP LED alternately<br />
flashes green and yellow to indicate that the update is being copied. When the<br />
RUN/STOP LED turns on (solid yellow) and the MAINT LED flashes, the copy process<br />
has finished. You must then remove the memory card.<br />
3. After removing the memory card, reboot the CPU again (either by restoring power or by<br />
the alternative methods for rebooting) to load the new firmware.<br />
The user program and hardware configuration are not affected by the firmware update.<br />
When the CPU is powered up, the CPU enters the configured start-up state. (If the startup<br />
mode for your CPU was configured to "Warm restart - mode before POWER OFF", the CPU<br />
will be in STOP mode because the last state of the CPU was STOP.)<br />
Note<br />
Updating multiple modules connected to CPU<br />
If your hardware configuration contains multiple modules that correspond to a single<br />
firmware update file on the memory card, the CPU applies the updates to all applicable<br />
modules (CM, SM, SB) in configuration order, that is, by increasing order of the module<br />
position in Device Configuration in STEP 7.<br />
If you have downloaded multiple firmware updates to the memory card for multiple modules,<br />
the CPU applies the updates in the order in which you downloaded them to the memory<br />
card.<br />
<strong>S7</strong>-<strong>1200</strong> <strong>Programmable</strong> <strong>controller</strong><br />
System Manual, 04/2012, A5E02486680-06 117
PLC concepts<br />
4.6 Recovery from a lost password<br />
4.6 Recovery from a lost password<br />
If you have lost the password for a password-protected CPU, use an empty transfer card to<br />
delete the password-protected program. The empty transfer card erases the internal load<br />
memory of the CPU. You can then download a new user program from STEP 7 to the CPU.<br />
For information about the creation and use of an empty transfer card, see the section of<br />
transfer cards (Page 110).<br />
WARNING<br />
If you insert a transfer card in a running CPU, the CPU goes to STOP. Control devices can<br />
fail in an unsafe condition, resulting in unexpected operation of controlled equipment. Such<br />
unexpected operations could result in death or serious injury to personnel, and/or damage<br />
to equipment.<br />
You must remove the transfer card before setting the CPU to RUN mode.<br />
<strong>S7</strong>-<strong>1200</strong> <strong>Programmable</strong> <strong>controller</strong><br />
118 System Manual, 04/2012, A5E02486680-06
Device configuration 5<br />
You create the device configuration for your PLC by adding a CPU and additional modules to<br />
your project.<br />
<br />
<br />
<br />
<br />
① Communication module (CM) or communication processor (CP): Up to 3, inserted in slots 101,<br />
102, and 103<br />
② CPU: Slot 1<br />
③ Ethernet port of CPU<br />
④ Signal board (SB), communication board (CB) or battery board (BB): up to 1, inserted in the<br />
CPU<br />
⑤ Signal module (SM) for digital or analog I/O: up to 8, inserted in slots 2 through 9<br />
<strong>S7</strong>-<strong>1200</strong> <strong>Programmable</strong> <strong>controller</strong><br />
System Manual, 04/2012, A5E02486680-06 119<br />
<br />
(CPU 1214C and CPU 1215C allow 8, CPU 1212C allows 2, CPU 1211C does not allow any)<br />
To create the device configuration,<br />
add a device to your project.<br />
In the Portal view, select<br />
"Devices & Networks" and click<br />
"Add new device".<br />
In the Project view, under the<br />
project name, double-click "Add<br />
new device".
Device configuration<br />
5.1 Inserting a CPU<br />
5.1 Inserting a CPU<br />
You create your device configuration by inserting a CPU into your project. Be sure you insert<br />
the correct model and firmware version from the list. Selecting the CPU from the "Add new<br />
device" dialog creates the rack and CPU.<br />
"Add new device" dialog<br />
Device view of the hardware<br />
configuration<br />
Selecting the CPU in the Device<br />
view displays the CPU<br />
properties in the inspector<br />
window.<br />
Note<br />
The CPU does not have a pre-configured IP address. You must manually assign an IP<br />
address for the CPU during the device configuration. If your CPU is connected to a router on<br />
the network, you also enter the IP address for a router.<br />
<strong>S7</strong>-<strong>1200</strong> <strong>Programmable</strong> <strong>controller</strong><br />
120 System Manual, 04/2012, A5E02486680-06
Device configuration<br />
5.2 Detecting the configuration for an unspecified CPU<br />
5.2 Detecting the configuration for an unspecified CPU<br />
If you are connected to a CPU, you can upload the<br />
configuration of that CPU, including any modules, to your<br />
project. Simply create a new project and select the "unspecified<br />
CPU" instead of selecting a specific CPU. (You can also skip<br />
the device configuration entirely by selecting the "Create a PLC<br />
program" from the "First steps". STEP 7 then automatically<br />
creates an unspecified CPU.)<br />
From the program editor, you select the "Hardware detection"<br />
command from the "Online" menu.<br />
From the device configuration editor, you select the option for detecting the configuration of<br />
the connected device.<br />
After you select the CPU from the online dialog and click the Load button, STEP 7 uploads<br />
the hardware configuration from the CPU, including any modules (SM, SB, or CM). You can<br />
then configure the parameters for the CPU and the modules.<br />
<strong>S7</strong>-<strong>1200</strong> <strong>Programmable</strong> <strong>controller</strong><br />
System Manual, 04/2012, A5E02486680-06 121
Device configuration<br />
5.3 Adding modules to the configuration<br />
5.3 Adding modules to the configuration<br />
Use the hardware catalog to add modules to the CPU:<br />
● Signal module (SM) provides additional digital or analog I/O points. These modules are<br />
connected to the right side of the CPU.<br />
● Signal board (SB) provides just a few additional I/O points for the CPU. The SB is<br />
installed on the front of the CPU.<br />
● Battery Board 1297 (BB) provides long-term backup of the realtime clock. The BB is<br />
installed on the front of the CPU.<br />
● Communication board (CB) provides an additional communication port (such as RS485).<br />
The CB is installed on the front of the CPU.<br />
● Communication module (CM) and communication processor (CP) provide an additional<br />
communication port, such as for PROFIBUS or GPRS. These modules are connected to<br />
the left side of the CPU.<br />
To insert a module into the device configuration, select the module in the hardware catalog<br />
and either double-click or drag the module to the highlighted slot. You must add the modules<br />
to the device configuration and download the hardware configuration to the CPU for the<br />
modules to be functional.<br />
Table 5- 1 Adding a module to the device configuration<br />
Module<br />
SM<br />
Select the module Insert the module Result<br />
SB, BB or<br />
CB<br />
CM or CP<br />
<strong>S7</strong>-<strong>1200</strong> <strong>Programmable</strong> <strong>controller</strong><br />
122 System Manual, 04/2012, A5E02486680-06
5.4 Configuring the operation of the CPU<br />
Table 5- 2 CPU properties<br />
Device configuration<br />
5.4 Configuring the operation of the CPU<br />
To configure the operational parameters for the CPU, select the CPU in the Device view<br />
(blue outline around whole CPU), and use the "Properties" tab of the inspector window.<br />
To configure input filter times, select "Digital<br />
Inputs". The default filter time for the digital<br />
inputs is 6.4 ms.<br />
Each input point has a single filter<br />
configuration that applies to all uses: process<br />
inputs, interrupts, pulse catch, and HSC<br />
inputs.<br />
Note<br />
If an HSC is not configured to use a point, the filter setting chosen in this screen applies. If<br />
an HSC is configured to use an input point, the filter setting for that point is automatically set<br />
at 800 ns and is not affected by the configuration on this screen.<br />
WARNING<br />
If the filter time for a digital input channel is changed from a previous setting, a new "0"<br />
level input value may need to be presented for up to 20.0 ms accumulated duration before<br />
the filter becomes fully responsive to new inputs. During this time, short "0" pulse events of<br />
duration less than 20.0 ms may not be detected or counted.<br />
This changing of filter times can result in unexpected machine or process operation, which<br />
may cause death or serious injury to personnel, and/or damage to equipment.<br />
To ensure that a new filter time goes immediately into effect, a power cycle of the CPU<br />
must be applied.<br />
Property Description<br />
PROFINET interface Sets the IP address for the CPU and time synchronization<br />
DI, DO, and AI Configures the behavior of the local (on-board) digital and analog I/O (for example, digital<br />
input filter times and digital output reaction to a CPU stop).<br />
High-speed counters Enables and configures the high-speed counters (HSC) and the pulse generators used for<br />
(Page 337) and pulse pulse-train operations (PTO) and pulse-width modulation (PWM)<br />
generators (Page 311) When you configure the outputs of the CPU or signal board as pulse generators (for use with<br />
the PWM or motion control instructions), the corresponding output addresses (Q0.0, Q0.1,<br />
Q4.0, and Q4.1) are removed from the Q memory and cannot be used for other purposes in<br />
your user program. If your user program writes a value to an output used as a pulse<br />
generator, the CPU does not write that value to the physical output.<br />
<strong>S7</strong>-<strong>1200</strong> <strong>Programmable</strong> <strong>controller</strong><br />
System Manual, 04/2012, A5E02486680-06 123
Device configuration<br />
5.4 Configuring the operation of the CPU<br />
Property Description<br />
Startup (Page 69)<br />
Startup after POWER ON: Selects the behavior of the CPU following an off-to-on transition,<br />
such as to start in STOP mode or to go to RUN mode after a warm restart<br />
Supported hardware compatibility: Configures the substitution strategy for all system<br />
components (SM, SB, CM, CP and CPU):<br />
Allow acceptable substitute<br />
Allow any substitute (default)<br />
Each module internally contains substitution compatibility requirements based on the<br />
number of I/O, electrical compatibility, and other corresponding points of comparison. For<br />
example, a 16-channel SM could be an acceptable substitute for an 8-channel SM, but an 8channel<br />
SM could not be an acceptable substitute for a 16-channel SM. If you select "Allow<br />
acceptable substitute", STEP 7 enforces the substitution rules; otherwise, STEP 7 allows<br />
any substitution.<br />
Parameter assignment time for distributed I/O: Configures a maximum amount of time<br />
(default: 60000 ms) for the distributed I/O to be brought online. (The CMs and CPs receive<br />
power and communication parameters from the CPU during startup. This assignment time<br />
allows time for the I/O connected to the CM or CP be brought online.)<br />
The CPU goes to RUN as soon as the distributed I/O is online, regardless of the assignment<br />
time. If the distributed I/O has not been brought online within this time, the CPU still goes to<br />
RUN--without the distributed I/O.<br />
Note: If your configuration uses a CM 1243-5 (PROFIBUS master), do not set this parameter<br />
below 15 seconds (15000 ms) to ensure that the module to be brought online.<br />
Cycle (Page 80) Defines a maximum cycle time or a fixed minimum cycle time<br />
Communication load Allocates a percentage of the CPU time to be dedicated to communication tasks<br />
System and clock memory<br />
(Page 84)<br />
Enables a byte for "system memory" functions and enables a byte for "clock memory"<br />
functions (where each bit toggles on and off at a predefined frequency).<br />
Web server (Page 503) Enables and configures the Web server feature.<br />
Time of day Selects the time zone and configures daylight saving time<br />
Protection (Page 164) Sets the read/write protection and password for accessing the CPU<br />
Connection resources Provides a summary of the communication connections that are available for the CPU and<br />
(Page 424)<br />
the number of connections that have been configured.<br />
Overview of addresses Provides a summary of the I/O addresses that have been configured for the CPU.<br />
<strong>S7</strong>-<strong>1200</strong> <strong>Programmable</strong> <strong>controller</strong><br />
124 System Manual, 04/2012, A5E02486680-06
5.5 Configuring the parameters of the modules<br />
Device configuration<br />
5.5 Configuring the parameters of the modules<br />
To configure the operational parameters for the modules, select the module in the Device<br />
view and use the "Properties" tab of the inspector window to configure the parameters for the<br />
module.<br />
Configuring a signal module (SM) or a signal board (SB)<br />
● Digital I/O: Inputs can be configured for rising-edge detection or falling-edge detection<br />
(associating each with an event and hardware interrupt) and also for "pulse catch" (to<br />
stay on after a momentary pulse) through the next update of the input process image.<br />
Outputs can use a freeze or substitute value.<br />
● Analog I/O: For individual inputs, configure parameters, such as measurement type<br />
(voltage or current), range and smoothing, and to enable underflow or overflow<br />
diagnostics. Analog outputs provide parameters such as output type (voltage or current)<br />
and for diagnostics, such as short-circuit (for voltage outputs) or upper/lower limit<br />
diagnostics. You do not configure ranges of analog inputs and outputs in engineering<br />
units on the Properties dialog. You must handle this in your program logic as described in<br />
the topic "Processing of analog values (Page 92)".<br />
● I/O diagnostic addresses: Configures the start address for the set of inputs and outputs of<br />
the module<br />
Configuring a communication interface (CM, CP or CB)<br />
Depending on the type of communication interface, you configure the parameters for the<br />
network.<br />
<strong>S7</strong>-<strong>1200</strong> <strong>Programmable</strong> <strong>controller</strong><br />
System Manual, 04/2012, A5E02486680-06 125
Device configuration<br />
5.6 Configuring the CPU for communication<br />
5.6 Configuring the CPU for communication<br />
5.6.1 Creating a network connection<br />
Use the "Network view" of Device configuration to create the network connections between<br />
the devices in your project. After creating the network connection, use the "Properties" tab of<br />
the inspector window to configure the parameters of the network.<br />
Table 5- 3 Creating a network connection<br />
Action Result<br />
Select "Network view" to display the<br />
devices to be connected.<br />
Select the port on one device and<br />
drag the connection to the port on<br />
the second device.<br />
Release the mouse button to create<br />
the network connection.<br />
<strong>S7</strong>-<strong>1200</strong> <strong>Programmable</strong> <strong>controller</strong><br />
126 System Manual, 04/2012, A5E02486680-06
5.6.2 Configuring the Local/Partner connection path<br />
Device configuration<br />
5.6 Configuring the CPU for communication<br />
The inspector window displays the properties of the connection whenever you have selected<br />
any part of the instruction. Specify the communication parameters in the "Configuration" tab<br />
of the "Properties" for the communication instruction.<br />
Table 5- 4 Configuring the connection path (using the properties of the instruction)<br />
TCP, ISO-on-TCP, and UDP Connection properties<br />
For the TCP, ISO-on-TCP, and UDP Ethernet<br />
protocols, use the "Properties" of the instruction<br />
(TSEND_C, TRCV_C, or TCON) to configure the<br />
"Local/Partner" connections.<br />
The illustration shows the "Connection<br />
properties" of the "Configuration tab" for an ISOon-TCP<br />
connection.<br />
Note<br />
When you configure the connection properties for one CPU, STEP 7 allows you either to<br />
select a specific connection DB in the partner CPU (if one exists), or to create the connection<br />
DB for the partner CPU. The partner CPU must already have been created for the project<br />
and cannot be an "unspecified" CPU.<br />
You must still insert a TSEND_C, TRCV_C or TCON instruction into the user program of the<br />
partner CPU. When you insert the instruction, select the connection DB that was created by<br />
the configuration.<br />
<strong>S7</strong>-<strong>1200</strong> <strong>Programmable</strong> <strong>controller</strong><br />
System Manual, 04/2012, A5E02486680-06 127
Device configuration<br />
5.6 Configuring the CPU for communication<br />
Table 5- 5 Configuring the connection path for <strong>S7</strong> communication (Device configuration)<br />
<strong>S7</strong> communication (GET and PUT) Connection properties<br />
For <strong>S7</strong> communication, use the "Devices &<br />
networks" editor of the network to configure the<br />
Local/Partner connections. You can click the<br />
"Highlighted: Connection" button to access the<br />
"Properties".<br />
The "General" tab provides several properties:<br />
"General" (shown)<br />
"Local ID"<br />
"Special connection properties"<br />
"Address details" (shown)<br />
Refer to "Protocols" (Page 430) in the "PROFINET" section or to "Creating an <strong>S7</strong><br />
connection" (Page 493) in the "<strong>S7</strong> communication" section for more information and a list of<br />
available communication instructions.<br />
Table 5- 6 Parameters for the multiple CPU connection<br />
Parameter Definition<br />
Address Assigned IP addresses<br />
General End point Name assigned to the partner (receiving) CPU<br />
Interface Name assigned to the interfaces<br />
Subnet Name assigned to the subnets<br />
Interface type <strong>S7</strong> communication only: Type of interface<br />
Connection type Type of Ethernet protocol<br />
Connection ID ID number<br />
Connection data Local and Partner CPU data storage location<br />
Establish active<br />
connection<br />
Radio button to select Local or Partner CPU as the active connection<br />
Address End point <strong>S7</strong> communication only: Name assigned to the partner (receiving) CPU<br />
details Rack/slot <strong>S7</strong> communication only: Rack and slot location<br />
Connection resource <strong>S7</strong> communication only: Component of the TSAP used when configuring an<br />
<strong>S7</strong> connection with an <strong>S7</strong>-300 or <strong>S7</strong>-400 CPU<br />
Port (decimal): TCP and UPD: Partner CPU port in decimal format<br />
<strong>S7</strong>-<strong>1200</strong> <strong>Programmable</strong> <strong>controller</strong><br />
128 System Manual, 04/2012, A5E02486680-06
Device configuration<br />
5.6 Configuring the CPU for communication<br />
Parameter Definition<br />
TSAP 1 and Subnet ID: ISO on TCP (RFC 1006) and <strong>S7</strong> communication: Local and partner CPU<br />
TSAPs in ASCII and hexadecimal formats<br />
1 When configuring a connection with an <strong>S7</strong>-<strong>1200</strong> CPU for ISO-on-TCP, use only ASCII characters in the TSAP extension<br />
for the passive communication partners.<br />
Transport Service Access Points (TSAPs)<br />
Using TSAPs, ISO on TCP protocol and <strong>S7</strong> communication allows multiple connections to a<br />
single IP address (up to 64K connections). TSAPs uniquely identify these communication<br />
end point connections to an IP address.<br />
In the "Address Details" section of the Connection Parameters dialog, you define the TSAPs<br />
to be used. The TSAP of a connection in the CPU is entered in the "Local TSAP" field. The<br />
TSAP assigned for the connection in your partner CPU is entered under the "Partner TSAP"<br />
field.<br />
Port Numbers<br />
With TCP and UDP protocols, the connection parameter configuration of the Local (active)<br />
connection CPU must specify the remote IP address and port number of the Partner<br />
(passive) connection CPU.<br />
In the "Address Details" section of the Connection Parameters dialog, you define the ports to<br />
be used. The port of a connection in the CPU is entered in the "Local Port" field. The port<br />
assigned for the connection in your partner CPU is entered under the "Partner Port" field.<br />
5.6.3 Parameters for the PROFINET connection<br />
The TSEND_C, TRCV_C and TCON instructions require that connection-related parameters<br />
be specified in order to connect to the partner device. These parameters are specified by the<br />
TCON_Param structure for the TCP, ISO-on-TCP and UDP protocols. Typically, you use the<br />
"Configuration" tab of the "Properties" of the instruction to specify these parameters. If the<br />
"Configuration" tab is not accessible, then you must specify the TCON_Param structure<br />
programmatically.<br />
Table 5- 7 Structure of the connection description (TCON_Param)<br />
Byte Parameter and data type Description<br />
0 … 1 block_length UInt Length: 64 bytes (fixed)<br />
2 … 3 id CONN_OUC Reference to this connection: Range of values: 1 (default) to 4095.<br />
(Word)<br />
Specify the value of this parameter for the TSEND_C, TRCV_C or<br />
TCON instruction under ID.<br />
4 connection_type USInt Connection type:<br />
17: TCP (default)<br />
18: ISO-on-TCP<br />
19: UDP<br />
<strong>S7</strong>-<strong>1200</strong> <strong>Programmable</strong> <strong>controller</strong><br />
System Manual, 04/2012, A5E02486680-06 129
Device configuration<br />
5.6 Configuring the CPU for communication<br />
Byte Parameter and data type Description<br />
5 active_est Bool ID for the type of connection:<br />
TCP and ISO-on-TCP:<br />
– FALSE: Passive connection<br />
– TRUE: Active connection (default)<br />
UDP: FALSE<br />
6 local_device_id USInt ID for the local PROFINET or Industrial Ethernet interface:<br />
1 (default)<br />
7 local_tsap_id_len USInt Length of parameter local_tsap_id used, in bytes; possible values:<br />
TCP: 0 (active, default) or 2 (passive)<br />
ISO-on-TCP: 2 to 16<br />
UDP: 2<br />
8 rem_subnet_id_len USInt This parameter is not used.<br />
9 rem_staddr_len USInt Length of address of partner end point, in bytes:<br />
0: unspecified (parameter rem_staddr is irrelevant)<br />
4 (default): Valid IP address in parameter rem_staddr (only for<br />
TCP and ISO-on-TCP)<br />
10 rem_tsap_id_len USInt Length of parameter rem_tsap_id used, in bytes; possible values:<br />
TCP: 0 (passive) or 2 (active, default)<br />
ISO-on-TCP: 2 to 16<br />
UDP: 0<br />
11 next_staddr_len USInt This parameter is not used.<br />
12 … 27 local_tsap_id Array [1..16] of Local address component of connection:<br />
Byte<br />
TCP and ISO-on-TCP: local port no. (possible values: 1 to<br />
49151; recommended values: 2000...5000):<br />
– local_tsap_id[1] = high byte of port number in hexadecimal<br />
notation;<br />
– local_tsap_id[2] = low byte of port number in hexadecimal<br />
notation;<br />
– local_tsap_id[3-16] = irrelevant<br />
ISO-on-TCP: local TSAP-ID:<br />
– local_tsap_id[1] = B#16#E0;<br />
– local_tsap_id[2] = rack and slot of local end points (bits 0 to<br />
4: slot number, bits 5 to 7: rack number);<br />
– local_tsap_id[3-16] = TSAP extension, optional<br />
UDP: This parameter is not used.<br />
28 … 33 rem_subnet_id Array [1..6] of<br />
USInt<br />
Note: Make sure that every value of local_tsap_id is unique within<br />
the CPU.<br />
This parameter is not used.<br />
<strong>S7</strong>-<strong>1200</strong> <strong>Programmable</strong> <strong>controller</strong><br />
130 System Manual, 04/2012, A5E02486680-06
Byte Parameter and data type Description<br />
34 … 39 rem_staddr Array [1..6] of<br />
USInt<br />
40 … 55 rem_tsap_id Array [1..16] of<br />
Byte<br />
56 … 61 next_staddr Array [1..6] of<br />
Byte<br />
This parameter is not used.<br />
62 … 63 spare Word Reserved: W#16#0000<br />
See also<br />
Configuring the Local/Partner connection path (Page 127)<br />
Device configuration<br />
5.6 Configuring the CPU for communication<br />
TCP and ISO-on-TCP only: IP address of the partner end point.<br />
(Not relevant for passive connections.) For example, IP address<br />
192.168.002.003 is stored in the following elements of the array:<br />
rem_staddr[1] = 192<br />
rem_staddr[2] = 168<br />
rem_staddr[3] = 002<br />
rem_staddr[4] = 003<br />
rem_staddr[5-6]= irrelevant<br />
Partner address component of connection<br />
TCP: partner port number. Range: 1 to 49151; Recommended<br />
values: 2000 to 5000):<br />
– rem_tsap_id[1] = high byte of the port number in<br />
hexadecimal notation<br />
– rem_tsap_id[2] = low byte of the port number in<br />
hexadecimal notation;<br />
– rem_tsap_id[3-16] = irrelevant<br />
ISO-on-TCP: partner TSAP-ID:<br />
– rem_tsap_id[1] = B#16#E0<br />
– rem_tsap_id[2] = rack and slot of partner end point (bits 0 to<br />
4: Slot number, bits 5 to 7: rack number)<br />
– rem_tsap_id[3-16] = TSAP extension, optional<br />
UDP: This parameter is not used.<br />
<strong>S7</strong>-<strong>1200</strong> <strong>Programmable</strong> <strong>controller</strong><br />
System Manual, 04/2012, A5E02486680-06 131
Device configuration<br />
5.6 Configuring the CPU for communication<br />
5.6.4 Assigning Internet Protocol (IP) addresses<br />
5.6.4.1 Assigning IP addresses to programming and network devices<br />
If your programming device is using an on-board adapter card connected to your plant LAN<br />
(and possibly the world-wide web), the IP Address Network ID and subnet mask of your CPU<br />
and the programming device's on-board adapter card must be exactly the same. The<br />
Network ID is the first part of the IP address (first three octets) (for example, 211.154.184.16)<br />
that determines what IP network you are on. The subnet mask normally has a value of<br />
255.255.255.0; however, since your computer is on a plant LAN, the subnet mask may have<br />
various values (for example, 255.255.254.0) in order to set up unique subnets. The subnet<br />
mask, when combined with the device IP address in a mathematical AND operation, defines<br />
the boundaries of an IP subnet.<br />
Note<br />
In a world-wide web scenario, where your programming devices, network devices, and IP<br />
routers will communicate with the world, unique IP addresses must be assigned to avoid<br />
conflict with other network users. Contact your company IT department personnel, who are<br />
familiar with your plant networks, for assignment of your IP addresses.<br />
If your programming device is using an Ethernet-to-USB adapter card connected to an<br />
isolated network, the IP Address Network ID and subnet mask of your CPU and the<br />
programming device's Ethernet-to-USB adapter card must be exactly the same. The Network<br />
ID is the first part of the IP address (first three octets) (for example, 211.154.184.16) that<br />
determines what IP network you are on. The subnet mask normally has a value of<br />
255.255.255.0. The subnet mask, when combined with the device IP address in a<br />
mathematical AND operation, defines the boundaries of an IP subnet.<br />
Note<br />
An Ethernet-to-USB adapter card is useful when you do not want your CPU on your<br />
company LAN. During initial testing or commissioning tests, this arrangement is particularly<br />
useful.<br />
<strong>S7</strong>-<strong>1200</strong> <strong>Programmable</strong> <strong>controller</strong><br />
132 System Manual, 04/2012, A5E02486680-06
Table 5- 8 Assigning Ethernet addresses<br />
Programming Device<br />
Adapter Card<br />
On-board adapter<br />
card<br />
Ethernet-to-USB<br />
adapter card<br />
Network Type Internet Protocol (IP) Address Subnet Mask<br />
Connected to<br />
your plant LAN<br />
(and possibly<br />
the world-wide<br />
web)<br />
Connected to an<br />
isolated network<br />
Network ID of your CPU and the<br />
programming device's on-board<br />
adapter card must be exactly the<br />
same.<br />
The Network ID is the first part of the<br />
IP address (first three octets) (for<br />
example, 211.154.184.16) that<br />
determines what IP network you are<br />
on.)<br />
Network ID of your CPU and the<br />
programming device's Ethernet-to-<br />
USB adapter card must be exactly<br />
the same.<br />
The Network ID is the first part of the<br />
IP address (first three octets) (for<br />
example, 211.154.184.16) that<br />
determines what IP network you are<br />
on.)<br />
Device configuration<br />
5.6 Configuring the CPU for communication<br />
The subnet mask of your CPU and the<br />
on-board adapter card must be exactly<br />
the same.<br />
The subnet mask normally has a value of<br />
255.255.255.0; however, since your<br />
computer is on a plant LAN, the subnet<br />
mask may have various values (for<br />
example, 255.255.254.0) in order to set<br />
up unique subnets. The subnet mask,<br />
when combined with the device IP<br />
address in a mathematical AND<br />
operation, defines the boundaries of an<br />
IP subnet.<br />
The subnet mask of your CPU and the<br />
Ethernet-to-USB adapter card must be<br />
exactly the same.<br />
The subnet mask normally has a value of<br />
255.255.255.0. The subnet mask, when<br />
combined with the device IP address in a<br />
mathematical AND operation, defines the<br />
boundaries of an IP subnet.<br />
Assigning or checking the IP address of your programming device using "My Network Places" (on<br />
your desktop)<br />
You can assign or check your programming device's IP address with the following menu<br />
selections:<br />
● (Right-click) "My Network Places"<br />
● "Properties"<br />
● (Right-click) "Local Area Connection"<br />
● "Properties"<br />
In the "Local Area Connection Properties" dialog, in the "This connection uses the following<br />
items:" field, scroll down to "Internet Protocol (TCP/IP)". Click "Internet Protocol (TCP/IP)",<br />
and click the "Properties" button. Select "Obtain an IP address automatically (DHCP)" or<br />
"Use the following IP address" (to enter a static IP address).<br />
Note<br />
Dynamic Host Configuration Protocol (DHCP) automatically assigns an IP address to your<br />
programming device upon power up from the DHCP server.<br />
<strong>S7</strong>-<strong>1200</strong> <strong>Programmable</strong> <strong>controller</strong><br />
System Manual, 04/2012, A5E02486680-06 133
Device configuration<br />
5.6 Configuring the CPU for communication<br />
5.6.4.2 Checking the IP address of your programming device<br />
You can check the MAC and IP addresses of your programming device with the following<br />
menu selections:<br />
1. In the "Project tree", expand "Online access".<br />
2. Right-click the required network, and select "Properties".<br />
3. In the network dialog, expand "Configurations", and select "Industrial Ethernet".<br />
The MAC and IP addresses of the programming device are displayed.<br />
5.6.4.3 Assigning an IP address to a CPU online<br />
You can assign an IP address to a network device online. This is particularly useful in an<br />
initial device configuration.<br />
1. In the "Project tree," verify that<br />
no IP address is assigned to the<br />
CPU, with the following menu<br />
selections:<br />
"Online access"<br />
<br />
"Update accessible devices"<br />
2. Under the required accessible<br />
device, double-click "Online &<br />
diagnostics".<br />
NOTE: If a MAC address is<br />
shown instead of an IP<br />
address, then no IP<br />
address has been<br />
assigned.<br />
<strong>S7</strong>-<strong>1200</strong> <strong>Programmable</strong> <strong>controller</strong><br />
134 System Manual, 04/2012, A5E02486680-06
3. In the "Online & diagnostics"<br />
dialog, make the following menu<br />
selections:<br />
"Functions"<br />
"Assign IP address"<br />
4. In the "IP address" field, enter<br />
your new IP address, and click<br />
the "Assign IP address" button.<br />
5. In the "Project tree," verify that<br />
your new IP address has been<br />
assigned to the CPU, with the<br />
following menu selections:<br />
"Online access"<br />
<br />
"Update accessible devices"<br />
Device configuration<br />
5.6 Configuring the CPU for communication<br />
<strong>S7</strong>-<strong>1200</strong> <strong>Programmable</strong> <strong>controller</strong><br />
System Manual, 04/2012, A5E02486680-06 135
Device configuration<br />
5.6 Configuring the CPU for communication<br />
5.6.4.4 Configuring an IP address for a CPU in your project<br />
Configuring the PROFINET interface<br />
To configure parameters for the PROFINET interface, select the green PROFINET box on<br />
the CPU. The "Properties" tab in the inspector window displays the PROFINET port.<br />
① PROFINET port<br />
Configuring the IP address<br />
Ethernet (MAC) address: In a PROFINET network, each device is assigned a Media Access<br />
Control address (MAC address) by the manufacturer for identification. A MAC address<br />
consists of six groups of two hexadecimal digits, separated by hyphens (-) or colons (:), in<br />
transmission order, (for example, 01-23-45-67-89-AB or 01:23:45:67:89:AB).<br />
IP address: Each device must also have an Internet Protocol (IP) address. This address<br />
allows the device to deliver data on a more complex, routed network.<br />
Each IP address is divided into four 8-bit segments and is expressed in a dotted, decimal<br />
format (for example, 211.154.184.16). The first part of the IP address is used for the Network<br />
ID (What network are you on?), and the second part of the address is for the Host ID (unique<br />
for each device on the network). An IP address of 192.168.x.y is a standard designation<br />
recognized as part of a private network that is not routed on the Internet.<br />
Subnet mask: A subnet is a logical grouping of connected network devices. Nodes on a<br />
subnet tend to be located in close physical proximity to each other on a Local Area Network<br />
(LAN). A mask (known as the subnet mask or network mask) defines the boundaries of an IP<br />
subnet.<br />
A subnet mask of 255.255.255.0 is generally suitable for a small local network. This means<br />
that all IP addresses on this network should have the same first 3 octets, and the various<br />
devices on this network are identified by the last octet (8-bit field). An example of this is to<br />
assign a subnet mask of 255.255.255.0 and an IP addresses of 192.168.2.0 through<br />
192.168.2.255 to the devices on a small local network.<br />
The only connection between different subnets is via a router. If subnets are used, an IP<br />
router must be employed.<br />
IP router: Routers are the link between LANs. Using a router, a computer in a LAN can send<br />
messages to any other networks, which might have other LANs behind them. If the<br />
destination of the data is not within the LAN, the router forwards the data to another network<br />
or group of networks where it can be delivered to its destination.<br />
<strong>S7</strong>-<strong>1200</strong> <strong>Programmable</strong> <strong>controller</strong><br />
136 System Manual, 04/2012, A5E02486680-06
Routers rely on IP addresses to deliver and receive data packets.<br />
Table 5- 9 Parameters for the IP address<br />
Device configuration<br />
5.6 Configuring the CPU for communication<br />
IP addresses properties: In<br />
the Properties window,<br />
select the "Ethernet<br />
addresses" configuration<br />
entry. STEP 7 displays the<br />
Ethernet address<br />
configuration dialog, which<br />
associates the software<br />
project with the IP address<br />
of the CPU that will receive<br />
that project.<br />
Parameter Description<br />
Subnet Name of the Subnet to which the device is connected. Click the "Add new subnet" button to create a<br />
new subnet. "Not connected" is the default. Two connection types are possible:<br />
IP protocol<br />
The "Not connected" default provides a local connection.<br />
A subnet is required when your network has two or more devices.<br />
IP address Assigned IP address for the CPU<br />
Subnet mask Assigned subnet mask<br />
Use IP router Click the checkbox to indicate the use of an IP router<br />
Router address Assigned IP address for the router, if applicable<br />
Note<br />
All IP addresses are configured when you download the project. If the CPU does not have a<br />
pre-configured IP address, you must associate the project with the MAC address of the<br />
target device. If your CPU is connected to a router on a network, you must also enter the IP<br />
address of the router.<br />
The "Set IP address using a different method" radio button allows you to change the IP<br />
address online or by using the "T_CONFIG" instruction after the program is downloaded.<br />
This IP address assignment method is for the CPU only.<br />
<strong>S7</strong>-<strong>1200</strong> <strong>Programmable</strong> <strong>controller</strong><br />
System Manual, 04/2012, A5E02486680-06 137
Device configuration<br />
5.6 Configuring the CPU for communication<br />
See also<br />
WARNING<br />
After downloading a hardware configuration with the "Set IP address using a different<br />
method" option enabled, it is not possible to transition the CPU operating mode from RUN<br />
to STOP or from STOP to RUN.<br />
User equipment will keep running under these conditions and may result in unexpected<br />
machine or process operations, which could cause death, severe personal injury, or<br />
property damage if proper precautions are not taken.<br />
Ensure that your CPU IP address(es) are set before using the CPU in an actual automation<br />
environment. This can be done by using your STEP 7 programming package, the <strong>S7</strong>-<strong>1200</strong><br />
Tool, or an attached HMI device in conjunction with the T_CONFIG instruction.<br />
WARNING<br />
When changing the IP address of a CPU online or from the user program, it is possible to<br />
create a condition in which the PROFINET network may stop.<br />
If the IP address of a CPU is changed to an IP address outside the subnet, the PROFINET<br />
network will lose communication, and all data exchange will stop. User equipment may be<br />
configured to keep running under these conditions. Loss of PROFINET communication may<br />
result in unexpected machine or process operations, causing death, severe personal injury,<br />
or property damage if proper precautions are not taken.<br />
If an IP address must be changed manually, ensure that the new IP address lies within the<br />
subnet.<br />
T_CONFIG (Page 451)<br />
<strong>S7</strong>-<strong>1200</strong> <strong>Programmable</strong> <strong>controller</strong><br />
138 System Manual, 04/2012, A5E02486680-06
5.6.5 Testing the PROFINET network<br />
Device configuration<br />
5.6 Configuring the CPU for communication<br />
After completing the configuration, download the project (Page 168) to the CPU. All IP<br />
addresses are configured when you download the project.<br />
Assigning an IP address to a device online<br />
The <strong>S7</strong>-<strong>1200</strong> CPU does not have a pre-configured IP address. You must manually assign an<br />
IP address for the CPU:<br />
● To assign an IP address to a device online, refer to "Device configuration: Assigning an<br />
IP address to a CPU online" (Page 134) for this step-by-step procedure.<br />
● To assign an IP address in your project, you must configure the IP address in the Device<br />
configuration, save the configuration, and download it to the PLC. Refer to "Device<br />
configuration: Configuring an IP address for a CPU in your project" (Page 136) for more<br />
information.<br />
<strong>S7</strong>-<strong>1200</strong> <strong>Programmable</strong> <strong>controller</strong><br />
System Manual, 04/2012, A5E02486680-06 139
Device configuration<br />
5.6 Configuring the CPU for communication<br />
Using the "Extended download to device" dialog to test for connected network devices<br />
The <strong>S7</strong>-<strong>1200</strong> CPU "Download to device" function and its "Extended download to device"<br />
dialog can show all accessible network devices and whether or not unique IP addresses<br />
have been assigned to all devices. To display all accessible and available devices with their<br />
assigned MAC or IP addresses, check the "Show all accessible devices" checkbox.<br />
If the required network device is not in this list, communications to that device have been<br />
interrupted for some reason. The device and network must be investigated for hardware<br />
and/or configuration errors.<br />
5.6.6 Locating the Ethernet (MAC) address on the CPU<br />
In PROFINET networking, a Media Access Control address (MAC address) is an identifier<br />
assigned to the network interface by the manufacturer for identification. A MAC address<br />
usually encodes the manufacturer's registered identification number.<br />
The standard (IEEE 802.3) format for printing MAC addresses in human-friendly form is six<br />
groups of two hexadecimal digits, separated by hyphens (-) or colons (:), in transmission<br />
order, (for example, 01-23-45-67-89-ab or 01:23:45:67:89:ab).<br />
Note<br />
Each CPU is loaded at the factory with a permanent, unique MAC address. You cannot<br />
change the MAC address of a CPU.<br />
The MAC address is printed on the front, lower-left corner of the CPU. Note that you have to<br />
lift the lower door to see the MAC address information.<br />
<strong>S7</strong>-<strong>1200</strong> <strong>Programmable</strong> <strong>controller</strong><br />
140 System Manual, 04/2012, A5E02486680-06
Device configuration<br />
5.6 Configuring the CPU for communication<br />
① MAC address<br />
Initially, the CPU has no IP address, only a factory-installed MAC address. PROFINET<br />
communications requires that all devices be assigned a unique IP address.<br />
5.6.7 Configuring Network Time Protocol synchronization<br />
Use the CPU "Download to<br />
device" function and the<br />
"Extended download to device"<br />
dialog to show all accessible<br />
network devices and ensure that<br />
unique IP addresses have been<br />
assigned to all devices. This<br />
dialog displays all accessible and<br />
available devices with their<br />
assigned MAC or IP addresses.<br />
MAC addresses are all-important<br />
in identifying devices that are<br />
missing the required unique IP<br />
address.<br />
The Network Time Protocol (NTP) is widely used to synchronize the clocks of computer<br />
systems to Internet time servers. In NTP mode, the CP sends time-of-day queries at regular<br />
intervals (in the client mode) to the NTP server in the subnet (LAN). Based on the replies<br />
from the server, the most reliable and most accurate time is calculated and the time of day<br />
on the station is synchronized.<br />
The advantage of this mode is that it allows the time to be synchronized across subnets.<br />
The IP addresses of up to four NTP servers need to be configured. The update interval<br />
defines the interval between the time queries (in seconds). The value of the interval ranges<br />
between 10 seconds and one day.<br />
<strong>S7</strong>-<strong>1200</strong> <strong>Programmable</strong> <strong>controller</strong><br />
System Manual, 04/2012, A5E02486680-06 141
Device configuration<br />
5.6 Configuring the CPU for communication<br />
In NTP mode, it is generally UTC (Universal Time Coordinated) that is transferred; this<br />
corresponds to GMT (Greenwich Mean Time).<br />
In the Properties window, select the "Time synchronization" configuration entry. STEP 7<br />
displays the Time synchronization configuration dialog:<br />
Note<br />
All IP addresses are configured when you download the project.<br />
Table 5- 10 Parameters for time synchronization<br />
Parameter Definition<br />
Enable time-of-day<br />
synchronization using Network<br />
Time Protocol (NTP) servers<br />
Click the checkbox to enable time-of-day synchronization using<br />
NTP servers.<br />
Server 1 Assigned IP Address for network time server 1<br />
Server 2 Assigned IP Address for network time server 2<br />
Server 3 Assigned IP Address for network time server 3<br />
Server 4 Assigned IP Address for network time server 4<br />
Time synchronization interval Interval value (sec)<br />
5.6.8 PROFINET device start-up time, naming, and address assignment<br />
PROFINET IO can extend the start-up time for your system (configurable time-out figure).<br />
More devices and slow devices impact the amount of time it takes to switch to RUN.<br />
You can have the following maximum numbers of PROFINET IO devices on your <strong>S7</strong>-<strong>1200</strong><br />
PROFINET network:<br />
● In V3.0, you can have a maximum of 16 IO devices.<br />
● In V2.2, you can have a maximum of 8 IO devices.<br />
Each station (or IO device) starts up independently on start-up, and this affects the overall<br />
CPU start-up time. If you set the configurable time-out too low, there may not be a sufficient<br />
overall CPU start-up time for all stations to complete start-up. If this situation occurs, false<br />
station errors will result.<br />
<strong>S7</strong>-<strong>1200</strong> <strong>Programmable</strong> <strong>controller</strong><br />
142 System Manual, 04/2012, A5E02486680-06
Device configuration<br />
5.6 Configuring the CPU for communication<br />
In the CPU Properties under "Startup", you can find the "Parameter assignment time for<br />
distributed I/O" (time-out). The default configurable time-out is 60,000 ms (1 minute); the<br />
user can configure this time.<br />
PROFINET device naming and addressing in STEP 7<br />
All PROFINET devices must have a Device Name and an IP Address. Use STEP 7 to define<br />
the Device Names and to configure the IP addresses. Device names are downloaded to the<br />
IO devices using PROFINET DCP (Discovery and Configuration Protocol).<br />
PROFINET address assignment at system start-up<br />
The <strong>controller</strong> broadcasts the names of the devices to the network, and the devices respond<br />
with their MAC addresses. The <strong>controller</strong> then assigns an IP address to the device using<br />
PROFINET DCP protocol:<br />
● If the MAC address has a configured IP address, then the station performs start-up.<br />
● If the MAC address does not have a configured IP address, STEP 7 assigns the address<br />
that is configured in the project, and the station then performs start-up.<br />
● If there is a problem with this process, a station error occurs and no start-up takes place.<br />
This situation causes the configurable time-out value to be exceeded.<br />
<strong>S7</strong>-<strong>1200</strong> <strong>Programmable</strong> <strong>controller</strong><br />
System Manual, 04/2012, A5E02486680-06 143
Device configuration<br />
5.6 Configuring the CPU for communication<br />
<strong>S7</strong>-<strong>1200</strong> <strong>Programmable</strong> <strong>controller</strong><br />
144 System Manual, 04/2012, A5E02486680-06
Programming concepts 6<br />
6.1 Guidelines for designing a PLC system<br />
When designing a PLC system, you can choose from a variety of methods and criteria. The<br />
following general guidelines can apply to many design projects. Of course, you must follow<br />
the directives of your own company's procedures and the accepted practices of your own<br />
training and location.<br />
Table 6- 1 Guidelines for designing a PLC system<br />
Recommended steps Tasks<br />
Partition your process<br />
or machine<br />
Create the functional<br />
specifications<br />
Design the safety<br />
circuits<br />
Divide your process or machine into sections that have a level of independence from each other.<br />
These partitions determine the boundaries between <strong>controller</strong>s and influence the functional<br />
description specifications and the assignment of resources.<br />
Write the descriptions of operation for each section of the process or machine, such as the I/O<br />
points, the functional description of the operation, the states that must be achieved before<br />
allowing action for each actuator (such as a solenoid, a motor, or a drive), a description of the<br />
operator interface, and any interfaces with other sections of the process or machine.<br />
Identify any equipment that might require hard-wired logic for safety. Remember that control<br />
devices can fail in an unsafe manner, which can produce unexpected startup or change in the<br />
operation of machinery. Where unexpected or incorrect operation of the machinery could result in<br />
physical injury to people or significant property damage, consider the implementation of<br />
electromechanical overrides (which operate independently of the PLC) to prevent unsafe<br />
operations. The following tasks should be included in the design of safety circuits:<br />
Identify any improper or unexpected operation of actuators that could be hazardous.<br />
Identify the conditions that would assure the operation is not hazardous, and determine how<br />
to detect these conditions independently of the PLC.<br />
Identify how the PLC affects the process when power is applied and removed, and also<br />
identify how and when errors are detected. Use this information only for designing the normal<br />
and expected abnormal operation. You should not rely on this "best case" scenario for safety<br />
purposes.<br />
Design the manual or electromechanical safety overrides that block the hazardous operation<br />
independent of the PLC.<br />
Provide the appropriate status information from the independent circuits to the PLC so that<br />
the program and any operator interfaces have necessary information.<br />
Identify any other safety-related requirements for safe operation of the process.<br />
Plan system security Determine what level of protection (Page 164) you require for access to your process. You can<br />
password-protect CPUs and program blocks from unauthorized access.<br />
<strong>S7</strong>-<strong>1200</strong> <strong>Programmable</strong> <strong>controller</strong><br />
System Manual, 04/2012, A5E02486680-06 145
Programming concepts<br />
6.2 Structuring your user program<br />
Recommended steps Tasks<br />
Specify the operator<br />
stations<br />
Create the<br />
configuration drawings<br />
Create a list of<br />
symbolic names<br />
Based on the requirements of the functional specifications, create the following drawings of the<br />
operator stations:<br />
Overview drawing that shows the location of each operator station in relation to the process<br />
or machine.<br />
Mechanical layout drawing of the devices for the operator station, such as display, switches,<br />
and lights.<br />
Electrical drawings with the associated I/O of the PLC and signal modules.<br />
Based on the requirements of the functional specification, create configuration drawings of the<br />
control equipment:<br />
Overview drawing that shows the location of each PLC in relation to the process or machine.<br />
Mechanical layout drawing of each PLC and any I/O modules, including any cabinets and<br />
other equipment.<br />
Electrical drawings for each PLC and any I/O modules, including the device model numbers,<br />
communications addresses, and I/O addresses.<br />
Create a list of symbolic names for the absolute addresses. Include not only the physical I/O<br />
signals, but also the other elements (such as tag names) to be used in your program.<br />
6.2 Structuring your user program<br />
When you create a user program for the automation tasks, you insert the instructions for the<br />
program into code blocks:<br />
● An organization block (OB) responds to a specific event in the CPU and can interrupt the<br />
execution of the user program. The default for the cyclic execution of the user program<br />
(OB 1) provides the base structure for your user program and is the only code block<br />
required for a user program. If you include other OBs in your program, these OBs<br />
interrupt the execution of OB 1. The other OBs perform specific functions, such as for<br />
startup tasks, for handling interrupts and errors, or for executing specific program code at<br />
specific time intervals.<br />
● A function block (FB) is a subroutine that is executed when called from another code<br />
block (OB, FB, or FC). The calling block passes parameters to the FB and also identifies<br />
a specific data block (DB) that stores the data for the specific call or instance of that FB.<br />
Changing the instance DB allows a generic FB to control the operation of a set of<br />
devices. For example, one FB can control several pumps or valves, with different<br />
instance DBs containing the specific operational parameters for each pump or valve.<br />
● A function (FC) is a subroutine that is executed when called from another code block<br />
(OB, FB, or FC). The FC does not have an associated instance DB. The calling block<br />
passes parameters to the FC. The output values from the FC must be written to a<br />
memory address or to a global DB.<br />
<strong>S7</strong>-<strong>1200</strong> <strong>Programmable</strong> <strong>controller</strong><br />
146 System Manual, 04/2012, A5E02486680-06
Programming concepts<br />
6.2 Structuring your user program<br />
Choosing the type of structure for your user program<br />
Based on the requirements of your application, you can choose either a linear structure or a<br />
modular structure for creating your user program:<br />
● A linear program executes all of the instructions for your automation tasks in sequence,<br />
one after the other. Typically, the linear program puts all of the program instructions into<br />
the OB for the cyclic execution of the program (OB 1).<br />
● A modular program calls specific code blocks that perform specific tasks. To create a<br />
modular structure, you divide the complex automation task into smaller subordinate tasks<br />
that correspond to the technological functions of the process. Each code block provides<br />
the program segment for each subordinate task. You structure your program by calling<br />
one of the code blocks from another block.<br />
Linear structure: Modular structure:<br />
<br />
<strong>S7</strong>-<strong>1200</strong> <strong>Programmable</strong> <strong>controller</strong><br />
System Manual, 04/2012, A5E02486680-06 147<br />
<br />
By creating generic code blocks that can be reused within the user program, you can simplify<br />
the design and implementation of the user program. Using generic code blocks has a<br />
number of benefits:<br />
● You can create reusable blocks of code for standard tasks, such as for controlling a pump<br />
or a motor. You can also store these generic code blocks in a library that can be used by<br />
different applications or solutions.<br />
● When you structure the user program into modular components that relate to functional<br />
tasks, the design of your program can be easier to understand and to manage. The<br />
modular components not only help to standardize the program design, but can also help<br />
to make updating or modifying the program code quicker and easier.<br />
● Creating modular components simplifies the debugging of your program. By structuring<br />
the complete program as a set of modular program segments, you can test the<br />
functionality of each code block as it is developed.<br />
● Creating modular components that relate to specific technological functions can help to<br />
simplify and reduce the time involved with commissioning the completed application.
Programming concepts<br />
6.3 Using blocks to structure your program<br />
6.3 Using blocks to structure your program<br />
By designing FBs and FCs to perform generic tasks, you create modular code blocks. You<br />
then structure your program by having other code blocks call these reusable modules. The<br />
calling block passes device-specific parameters to the called block.<br />
When a code block calls another code block, the CPU executes the program code in the<br />
called block. After execution of the called block is complete, the CPU resumes the execution<br />
of the calling block. Processing continues with execution of the instruction that follows after<br />
the block call.<br />
<br />
<br />
<br />
<br />
<br />
<br />
<br />
<br />
A Calling block<br />
B Called (or interrupting) block<br />
① Program execution<br />
② Instruction or event that initiates the execution of<br />
another block<br />
③ Program execution<br />
④ Block end (returns to calling block)<br />
You can nest the block calls for a more modular structure. In the following example, the<br />
nesting depth is 4: the program cycle OB plus 3 layers of calls to code blocks.<br />
<br />
<br />
<br />
<br />
<br />
<br />
<br />
6.3.1 Organization block (OB)<br />
<br />
<br />
① Start of cycle<br />
② Nesting depth<br />
<strong>S7</strong>-<strong>1200</strong> <strong>Programmable</strong> <strong>controller</strong><br />
148 System Manual, 04/2012, A5E02486680-06<br />
<br />
Organization blocks provide structure for your program. They serve as the interface between<br />
the operating system and the user program. OBs are event driven. An event, such as a<br />
diagnostic interrupt or a time interval, will cause the CPU to execute an OB. Some OBs have<br />
predefined start events and behavior.
Programming concepts<br />
6.3 Using blocks to structure your program<br />
The program cycle OB contains your main program. You can include more than one program<br />
cycle OB in your user program. During RUN mode, the program cycle OBs execute at the<br />
lowest priority level and can be interrupted by all other types of program processing. The<br />
startup OB does not interrupt the program cycle OB because the CPU executes the startup<br />
OB before going to RUN mode.<br />
After finishing the processing of the program cycle OBs, the CPU immediately executes the<br />
program cycle OBs again. This cyclic processing is the "normal" type of processing used for<br />
programmable logic <strong>controller</strong>s. For many applications, the entire user program is located in<br />
a single program cycle OB.<br />
You can create other OBs to perform specific functions, such as for handling interrupts and<br />
errors, or for executing specific program code at specific time intervals. These OBs interrupt<br />
the execution of the program cycle OBs.<br />
Use the "Add new block" dialog to create new OBs in your user program.<br />
Interrupt handling is always eventdriven.<br />
When such an event occurs,<br />
the CPU interrupts the execution of<br />
the user program and calls the OB<br />
that was configured to handle that<br />
event. After finishing the execution<br />
of the interrupting OB, the CPU<br />
resumes the execution of the user<br />
program at the point of interruption.<br />
The CPU determines the order for handling interrupt events by a priority assigned to each<br />
OB. Each event has a particular servicing priority. The respective priority level within a<br />
priority class determines the order in which the OBs are executed. Several interrupt events<br />
can be combined into priority classes. For more information, refer to the PLC concepts<br />
chapter section on execution of the user program (Page 67).<br />
Creating an additional OB within a class of OB<br />
You can create multiple OBs for your user program, even for the program cycle and startup<br />
OB classes. Use the "Add new block" dialog to create an OB. Enter the name for your OB<br />
and enter an OB number 200 or greater.<br />
If you create multiple program cycle OBs for your user program, the CPU executes each<br />
program cycle OB in numerical sequence, starting with the program cycle OB with the lowest<br />
number (such as OB 1). For example: after first program cycle OB (such as OB1) finishes,<br />
the CPU executes the next higher program cycle OB (such as OB 200).<br />
<strong>S7</strong>-<strong>1200</strong> <strong>Programmable</strong> <strong>controller</strong><br />
System Manual, 04/2012, A5E02486680-06 149
Programming concepts<br />
6.3 Using blocks to structure your program<br />
Configuring the operation of an OB<br />
6.3.2 Function (FC)<br />
You can modify the operational<br />
parameters for an OB. For example, you<br />
can configure the time parameter for a<br />
time-delay OB or for a cyclic OB.<br />
A function (FC) is a code block that typically performs a specific operation on a set of input<br />
values. The FC stores the results of this operation in memory locations. For example, use<br />
FCs to perform standard and reusable operations (such as for mathematical calculations) or<br />
technological functions (such as for individual controls using bit logic operations). An FC can<br />
also be called several times at different points in a program. This reuse simplifies the<br />
programming of frequently recurring tasks.<br />
An FC does not have an associated instance data block (DB). The FC uses the local data<br />
stack for the temporary data used to calculate the operation. The temporary data is not<br />
saved. To store data permanently, assign the output value to a global memory location, such<br />
as M memory or to a global DB.<br />
6.3.3 Function block (FB)<br />
A function block (FB) is a code block that uses an instance data block for its parameters and<br />
static data. FBs have variable memory that is located in a data block (DB), or "instance" DB.<br />
The instance DB provides a block of memory that is associated with that instance (or call) of<br />
the FB and stores data after the FB finishes. You can associate different instance DBs with<br />
different calls of the FB. The instance DBs allow you to use one generic FB to control<br />
multiple devices. You structure your program by having one code block make a call to an FB<br />
and an instance DB. The CPU then executes the program code in that FB, and stores the<br />
block parameters and the static local data in the instance DB. When the execution of the FB<br />
finishes, the CPU returns to the code block that called the FB. The instance DB retains the<br />
values for that instance of the FB. These values are available to subsequent calls to the<br />
function block either in the same scan cycle or other scan cycles.<br />
Reusable code blocks with associated memory<br />
You typically use an FB to control the operation for tasks or devices that do not finish their<br />
operation within one scan cycle. To store the operating parameters so that they can be<br />
quickly accessed from one scan to the next, each FB in your user program has one or more<br />
instance DBs. When you call an FB, you also specify an instance DB that contains the block<br />
parameters and the static local data for that call or "instance" of the FB. The instance DB<br />
maintains these values after the FB finishes execution.<br />
<strong>S7</strong>-<strong>1200</strong> <strong>Programmable</strong> <strong>controller</strong><br />
150 System Manual, 04/2012, A5E02486680-06
Programming concepts<br />
6.3 Using blocks to structure your program<br />
By designing the FB for generic control tasks, you can reuse the FB for multiple devices by<br />
selecting different instance DBs for different calls of the FB.<br />
An FB stores the Input, Output, and InOut, and Static parameters in an instance DB.<br />
Assigning the start value in the instance DB<br />
The instance DB stores both a default value and a start value for each parameter. The start<br />
value provides the value to be used when the FB is executed. The start value can then be<br />
modified during the execution of your user program.<br />
The FB interface also provides a "Default value" column that allows you to assign a new start<br />
value for the parameter as you are writing the program code. This default value in the FB is<br />
then transferred to the start value in the associated instance DB. If you do not assign a new<br />
start value for a parameter in the FB interface, the default value from instance DB is copied<br />
to start value.<br />
Using a single FB with DBs<br />
The following figure shows an OB that calls one FB three times, using a different data block<br />
for each call. This structure allows one generic FB to control several similar devices, such as<br />
motors, by assigning a different instance data block for each call for the different devices.<br />
Each instance DB stores the data (such as speed, ramp-up time, and total operating time)<br />
for an individual device.<br />
<br />
<br />
<br />
<br />
<br />
<br />
<br />
<br />
In this example, FB 22 controls three separate devices, with DB 201 storing the operational<br />
data for the first device, DB 202 storing the operational data for the second device, and DB<br />
203 storing the operational data for the third device.<br />
6.3.4 Data block (DB)<br />
You create data blocks (DB) in your user program to store data for the code blocks. All of the<br />
program blocks in the user program can access the data in a global DB, but an instance DB<br />
stores data for a specific function block (FB).<br />
<strong>S7</strong>-<strong>1200</strong> <strong>Programmable</strong> <strong>controller</strong><br />
System Manual, 04/2012, A5E02486680-06 151
Programming concepts<br />
6.3 Using blocks to structure your program<br />
The data stored in a DB is not deleted when the execution of the associated code block<br />
comes to an end. There are two types of DBs:<br />
● A global DB stores data for the code blocks in your program. Any OB, FB, or FC can<br />
access the data in a global DB.<br />
● An instance DB stores the data for a specific FB. The structure of the data in an instance<br />
DB reflects the parameters (Input, Output, and InOut) and the static data for the FB. (The<br />
Temp memory for the FB is not stored in the instance DB.)<br />
Note<br />
Although the instance DB reflects the data for a specific FB, any code block can access<br />
the data in an instance DB.<br />
You can configure a DB as being read-only:<br />
1. Right-click the DB in the project navigator and select "Properties" from the context menu.<br />
2. In the "Properties" dialog, select "Attributes".<br />
3. Select the "Data block write-protected in the device" option and click "OK".<br />
<strong>S7</strong>-<strong>1200</strong> <strong>Programmable</strong> <strong>controller</strong><br />
152 System Manual, 04/2012, A5E02486680-06
Creating reusable code blocks<br />
6.4 Understanding data consistency<br />
Programming concepts<br />
6.4 Understanding data consistency<br />
Use the "Add new block" dialog<br />
under "Program blocks" in the<br />
Project navigator to create OBs,<br />
FBs, FCs, and global DBs.<br />
When you create a code block, you<br />
select the programming language<br />
for the block. You do not select a<br />
language for a DB because it only<br />
stores data.<br />
The CPU maintains the data consistency for all of the elementary data types (such as Words<br />
or DWords) and all of the system-defined structures (for example, IEC_TIMERS or DTL).<br />
The reading or writing of the value cannot be interrupted. (For example, the CPU protects<br />
the access to a DWord value until the four bytes of the DWord have been read or written.) To<br />
ensure that the program cycle OBs and the interrupt OBs cannot write to the same memory<br />
location at the same time, the CPU does not execute an interrupt OB until the read or write<br />
operation in the program cycle OB has been completed.<br />
If your user program shares multiple values in memory between a program cycle OB and an<br />
interrupt OB, your user program must also ensure that these values are modified or read<br />
consistently. You can use the DIS_AIRT (disable alarm interrupt) and EN_AIRT (enable<br />
alarm interrupt) instructions in your program cycle OB to protect any access to the shared<br />
values.<br />
● Insert a DIS_AIRT instruction in the code block to ensure that an interrupt OB cannot be<br />
executed during the read or write operation.<br />
● Insert the instructions that read or write the values that could be altered by an interrupt<br />
OB.<br />
● Insert an EN_AIRT instruction at the end of the sequence to cancel the DIS_AIRT and<br />
allow the execution of the interrupt OB.<br />
<strong>S7</strong>-<strong>1200</strong> <strong>Programmable</strong> <strong>controller</strong><br />
System Manual, 04/2012, A5E02486680-06 153
Programming concepts<br />
6.5 Programming language<br />
A communication request from an HMI device or another CPU can also interrupt execution of<br />
the program cycle OB. The communication requests can also cause issues with data<br />
consistency. The CPU ensures that the elementary data types are always read and written<br />
consistently by the user program instructions. Because the user program is interrupted<br />
periodically by communications, it is not possible to guarantee that multiple values in the<br />
CPU will all be updated at the same time by the HMI. For example, the values displayed on a<br />
given HMI screen could be from different scan cycles of the CPU.<br />
The PtP (Point-to-Point) instructions, PROFINET instructions (such as TSEND_C and<br />
TRCV_C), PROFINET Distributed I/O instructions , and PROFIBUS Distributed I/O<br />
Instructions (Page 274) transfer buffers of data that could be interrupted. Ensure the data<br />
consistency for the buffers of data by avoiding any read or write operation to the buffers in<br />
both the program cycle OB and an interrupt OB. If it is necessary to modify the buffer values<br />
for these instructions in an interrupt OB, use a DIS_AIRT instruction to delay any interruption<br />
(an interrupt OB or a communication interrupt from an HMI or another CPU) until an<br />
EN_AIRT instruction is executed.<br />
Note<br />
The use of the DIS_AIRT instruction delays the processing of interrupt OBs until the<br />
EN_AIRT instruction is executed, affecting the interrupt latency (time from an event to the<br />
time when the interrupt OB is executed) of your user program.<br />
6.5 Programming language<br />
STEP 7 provides the following standard programming languages for <strong>S7</strong>-<strong>1200</strong>:<br />
● LAD (ladder logic) is a graphical programming language. The representation is based on<br />
circuit diagrams (Page 155).<br />
● FBD (Function Block Diagram) is a programming language that is based on the graphical<br />
logic symbols used in Boolean algebra (Page 156).<br />
● SCL (structured control language) is a text-based, high-level programming language<br />
(Page 156).<br />
When you create a code block, you select the programming language to be used by that<br />
block.<br />
Your user program can utilize code blocks created in any or all of the programming<br />
languages.<br />
<strong>S7</strong>-<strong>1200</strong> <strong>Programmable</strong> <strong>controller</strong><br />
154 System Manual, 04/2012, A5E02486680-06
6.5.1 Ladder logic (LAD)<br />
Programming concepts<br />
6.5 Programming language<br />
The elements of a circuit diagram, such as normally closed and normally open contacts, and<br />
coils are linked to form networks.<br />
To create the logic for complex operations, you can insert branches to create the logic for<br />
parallel circuits. Parallel branches are opened downwards or are connected directly to the<br />
power rail. You terminate the branches upwards.<br />
LAD provides "box" instructions for a variety of functions, such as math, timer, counter, and<br />
move.<br />
STEP 7 does not limit the number of instructions (rows and columns) in a LAD network.<br />
Note<br />
Every LAD network must terminate with a coil or a box instruction.<br />
Consider the following rules when creating a LAD network:<br />
● You cannot create a branch that could result in a power flow in the reverse direction.<br />
<br />
<br />
<br />
<br />
<br />
● You cannot create a branch that would cause a short circuit.<br />
<br />
<br />
<br />
<strong>S7</strong>-<strong>1200</strong> <strong>Programmable</strong> <strong>controller</strong><br />
System Manual, 04/2012, A5E02486680-06 155
Programming concepts<br />
6.5 Programming language<br />
6.5.2 Function Block Diagram (FBD)<br />
6.5.3 SCL<br />
Like LAD, FBD is also a graphical programming language. The representation of the logic is<br />
based on the graphical logic symbols used in Boolean algebra.<br />
To create the logic for complex operations,<br />
insert parallel branches between the boxes.<br />
Mathematical functions and other complex functions can be represented directly in<br />
conjunction with the logic boxes.<br />
STEP 7 does not limit the number of instructions (rows and columns) in an FBD network.<br />
Structured Control Language (SCL) is a high-level, PASCAL-based programming language<br />
for the SIMATIC <strong>S7</strong> CPUs. SCL supports the block structure of STEP 7 (Page 148). You can<br />
also include program blocks written in SCL with program blocks written in LAD and FBD.<br />
SCL instructions use standard programming operators, such as for assignment (:=),<br />
mathematical functions (+ for addition, - for subtraction, * for multiplication, and / for division).<br />
SCL also uses standard PASCAL program control operations, such as IF-THEN-ELSE,<br />
CASE, REPEAT-UNTIL, GOTO and RETURN. You can use any PASCAL reference for<br />
syntactical elements of the SCL programming language. Many of the other instructions for<br />
SCL, such as timers and counters, match the LAD and FBD instructions. For more<br />
information about specific instructions, refer to the specific instructions in the chapters for<br />
Basic instructions (Page 175) and Extended instructions (Page 247).<br />
You can designate any type of block (OB, FB, or FC) to use the SCL programming language<br />
at the time you create the block. STEP 7 provides an SCL program editor that includes the<br />
following elements:<br />
● Interface section for defining the parameters of the code block<br />
● Code section for the program code<br />
● Instruction tree that contains the SCL instructions supported by the CPU<br />
You enter the SCL code for your instruction directly in the code section. For more complex<br />
instructions, simply drag the SCL instructions from the instruction tree and drop them into<br />
your program. You can also use any text editor to create an SCL program and then import<br />
that file into STEP 7.<br />
<strong>S7</strong>-<strong>1200</strong> <strong>Programmable</strong> <strong>controller</strong><br />
156 System Manual, 04/2012, A5E02486680-06
Constructing an SCL expression<br />
Programming concepts<br />
6.5 Programming language<br />
In the section of the SCL code block you can declare the following types of parameters:<br />
● Input, Output, InOut, and Ret_Val: These parameters define the input tags, output tags,<br />
and return value for the code block. The tag name that you enter here is used locally<br />
during the execution of the code block. You typically would not use the global tag name in<br />
the tag table.<br />
● Static (FBs only; the illustration above is for an FC): Static tags are used for storage of<br />
static intermediate results in the instance data block. Static data is retained until<br />
overwritten, which may be after several cycles. The names of the blocks, which are called<br />
in this code block as multi-instance, are also stored in the static local data.<br />
● Temp: These parameters are the temporary tags that are used during the execution of<br />
the code block.<br />
If you call the SCL code block from another code block, the parameters of the SCL code<br />
block appear as inputs or outputs.<br />
In this example, the tags for "Start" and "On" (from the project tag table) correspond to<br />
"StartStopSwitch" and "RunYesNo" in the declaration table of the SCL program.<br />
An SCL expression is a formula for calculating a value. The expression consists of operands<br />
and operators (such as *, /, + or -). The operands can be tags, constants, or expressions.<br />
<strong>S7</strong>-<strong>1200</strong> <strong>Programmable</strong> <strong>controller</strong><br />
System Manual, 04/2012, A5E02486680-06 157
Programming concepts<br />
6.5 Programming language<br />
Table 6- 2 Operators in SCL<br />
The evaluation of the expression occurs in a certain order, which is defined by the following<br />
factors:<br />
● Every operator has a pre-defined priority, with the highest-priority operation performed<br />
first.<br />
● For operators with equal priority, the operators are processed in a left-to-right sequence.<br />
● You use parentheses to designate a series of operators to be evaluated together.<br />
The result of an expression can be used either for assigning a value to a tag used by your<br />
program, as a condition to be used by a control statement, or as parameters for another SCL<br />
instruction or for calling a code block.<br />
Type Operation Operator Priority<br />
Parentheses (Expression) ( , ) 1<br />
Math<br />
Power ** 2<br />
Sign (unary plus) + 3<br />
Sign (unary minus) - 3<br />
Multiplication * 4<br />
Division / 4<br />
Modulo MOD 4<br />
Addition + 5<br />
Subtraction - 5<br />
Comparison<br />
Less than < 6<br />
Less than or equal to 6<br />
Greater than or equal to >= 6<br />
Equal to = 7<br />
Not equal to 7<br />
Bit logic<br />
Negation (unary) NOT 3<br />
AND logic operation AND or & 8<br />
Exclusive OR logic operation XOR 9<br />
OR logic operation OR 10<br />
Assignment Assignment := 11<br />
As a high-level programming language, SCL uses standard statements for basic tasks:<br />
● Assignment statement: :=<br />
● Mathematical functions: +, -, *, and /<br />
● Addressing of global variables (tags): "" (Tag name or data block name<br />
enclosed in double quotes)<br />
● Addressing of local variables: # (Variable name preceded by "#" symbol)<br />
<strong>S7</strong>-<strong>1200</strong> <strong>Programmable</strong> <strong>controller</strong><br />
158 System Manual, 04/2012, A5E02486680-06
Control statements<br />
The following examples show different expressions for different uses.<br />
Programming concepts<br />
6.5 Programming language<br />
"C" := #A+#B; Assigns the sum of two local variables to a tag<br />
"Data_block_1".Tag := #A; Assignment to a data block tag<br />
IF #A > #B THEN "C" := #A; Condition for the IF-THEN statement<br />
"C" := SQRT (SQR (#A) + SQR (#B)); Parameters for the SQRT instruction<br />
Arithmetic operators can process various numeric data types. The data type of the result is<br />
determined by the data type of the most-significant operands. For example, a multiplication<br />
operation that uses an INT operand and a REAL operand yields a REAL value for the result.<br />
A control statement is a specialized type of SCL expression that performs the following<br />
tasks:<br />
● Program branching<br />
● Repeating sections of the SCL program code<br />
● Jumping to other parts of the SCL program<br />
● Conditional execution<br />
The SCL control statements include IF-THEN, CASE-OF, FOR-TO-DO, WHILE-DO,<br />
REPEAT-UNTIL, CONTINUE, GOTO, and RETURN.<br />
A single statement typically occupies one line of code. You can enter multiple statements on<br />
one line, or you can break a statement into several lines of code to make the code easier to<br />
read. Separators (such as tabs, line breaks and extra spaces) are ignored during the syntax<br />
check. An END statement terminates the control statement.<br />
The following examples show a FOR-TO-DO control statement. (Both forms of coding are<br />
syntactically valid.)<br />
FOR x := 0 TO max DO sum := sum + value(x); END_FOR;<br />
FOR x := 0 TO max DO<br />
sum := sum + value(x);<br />
END_FOR;<br />
A control statement can also be provided with a label. A label is set off by a colon at the<br />
beginning of the statement:<br />
Label: ;<br />
The STEP 7 online help provides a complete SCL programming language reference.<br />
<strong>S7</strong>-<strong>1200</strong> <strong>Programmable</strong> <strong>controller</strong><br />
System Manual, 04/2012, A5E02486680-06 159
Programming concepts<br />
6.5 Programming language<br />
Conditions<br />
Addressing<br />
A condition is a comparison expression or a logical expression whose result is of type BOOL<br />
(with the value of either TRUE or FALSE). The following example shows conditions of<br />
various types.<br />
#Temperature > 50<br />
Relational expression<br />
#Counter
PEEK(area:=_in_,<br />
dbNumber:=_in_,<br />
byteOffset:=_in_);<br />
PEEK_WORD(area:=_in_,<br />
dbNumber:=_in_,<br />
byteOffset:=_in_);<br />
PEEK_DWORD(area:=_in_,<br />
dbNumber:=_in_,<br />
byteOffset:=_in_);<br />
PEEK_BOOL(area:=_in_,<br />
dbNumber:=_in_,<br />
byteOffset:=_in_,<br />
bitOffset:=_in_);<br />
POKE(area:=_in_,<br />
dbNumber:=_in_,<br />
byteOffset:=_in_,<br />
value:=_in_);<br />
Programming concepts<br />
6.5 Programming language<br />
Reads the byte referenced by byteOffset of<br />
the referenced data block, I/O or memory<br />
area.<br />
Example referencing data block:<br />
%MB100 := PEEK(area:=16#84,<br />
dbNumber:=1, byteOffset:=#i);<br />
Example referencing IB3 input:<br />
%MB100 := PEEK(area:=16#81,<br />
dbNumber:=0, byteOffset:=#i); // when<br />
#i = 3<br />
Reads the word referenced by byteOffset of<br />
the referenced data block, I/O or memory<br />
area.<br />
Example:<br />
%MW200 := PEEK_WORD(area:=16#84,<br />
dbNumber:=1, byteOffset:=#i);<br />
Reads the double word referenced by<br />
byteOffset of the referenced data block, I/O or<br />
memory area.<br />
Example:<br />
%MD300 := PEEK_DWORD(area:=16#84,<br />
dbNumber:=1, byteOffset:=#i);<br />
Reads a Boolean referenced by the bitOffset<br />
and byteOffset of the referenced data block,<br />
I/O or memory area<br />
Example:<br />
%MB100.0 := PEEK_BOOL(area:=16#84,<br />
dbNumber:=1, byteOffset:=#ii,<br />
bitOffset:=#j);<br />
Writes the value (Byte, Word, or DWord) to<br />
the referenced byteOffset of the referenced<br />
data block, I/O or memory area<br />
Example referencing data block:<br />
POKE(area:=16#84, dbNumber:=2,<br />
byteOffset:=3, value:="Tag_1");<br />
Example referencing QB3 output:<br />
POKE(area:=16#82, dbNumber:=0,<br />
byteOffset:=3, value:="Tag_1");<br />
<strong>S7</strong>-<strong>1200</strong> <strong>Programmable</strong> <strong>controller</strong><br />
System Manual, 04/2012, A5E02486680-06 161
Programming concepts<br />
6.5 Programming language<br />
POKE_BOOL(area:=_in_,<br />
dbNumber:=_in_,<br />
byteOffset:=_in_,<br />
bitOffset:=_in_,<br />
value:=_in_);<br />
POKE_BLK(area_src:=_in_,<br />
dbNumber_src:=_in_,<br />
byteOffset_src:=_in_,<br />
area_dest:=_in_,<br />
dbNumber_dest:=_in_,<br />
byteOffset_dest:=_in_,<br />
count:=_in_);<br />
Writes the Boolean value to the referenced<br />
bitOffset and byteOffset of the referenced<br />
data block, I/O or memory area<br />
Example:<br />
POKE_BOOL(area:=16#84, dbNumber:=2,<br />
byteOffset:=3, bitOffset:=5,<br />
value:=0);<br />
Writes "count" number of bytes starting at the<br />
referenced byte Offset of the referenced<br />
source data block, I/O or memory area to the<br />
referenced byteOffset of the referenced<br />
destination data block, I/O or memory area<br />
Example:<br />
POKE_BLK(area_src:=16#84,<br />
dbNumber_src:=#src_db,<br />
byteOffset_src:=#src_byte,<br />
area_dest:=16#84,<br />
dbNumber_dest:=#src_db,<br />
byteOffset_dest:=#src_byte,<br />
count:=10);<br />
For PEEK and POKE instructions, the following values for the "area", "area_src" and<br />
"area_dest" parameters are applicable. For areas other than data blocks, the dbNumber<br />
parameter must be 0.<br />
16#81 I<br />
16#82 Q<br />
16#83 M<br />
16#84 DB<br />
Calling other code blocks from your SCL program<br />
To call another code block in your user program, simply enter the name (or absolute<br />
address) of the FB or FC with the parameters. For an FB, you must provide the instance DB<br />
to be called with the FB.<br />
(Parameter list) Call as a single instance<br />
(Parameter list) Call as multi-instance<br />
"MyDB"(MyInput:=10, MyInOut:="Tag1");<br />
(Parameter list) Standard call<br />
:= (Parameter list) Call in an expression<br />
"MyFC"(MyInput:=10, MyInOut:="Tag1");<br />
<strong>S7</strong>-<strong>1200</strong> <strong>Programmable</strong> <strong>controller</strong><br />
162 System Manual, 04/2012, A5E02486680-06
Programming concepts<br />
6.5 Programming language<br />
You can also drag blocks from the navigation tree to the SCL program editor, and complete<br />
the parameter assignment.<br />
6.5.4 EN and ENO for LAD, FBD and SCL<br />
Determining "power flow" (EN and ENO) for an instruction<br />
Certain instructions (such as the Math and the Move instructions) provide parameters for EN<br />
and ENO. These parameters relate to power flow in LAD or FBD and determine whether the<br />
instruction is executed during that scan. SCL also allows you to set the ENO parameter for a<br />
code block.<br />
● EN (Enable In) is a Boolean input. Power flow (EN = 1) must be present at this input for<br />
the box instruction to be executed. If the EN input of a LAD box is connected directly to<br />
the left power rail, the instruction will always be executed.<br />
● ENO (Enable Out) is a Boolean output. If the box has power flow at the EN input and the<br />
box executes its function without error, then the ENO output passes power flow<br />
(ENO = 1) to the next element. If an error is detected in the execution of the box<br />
instruction, then power flow is terminated (ENO = 0) at the box instruction that generated<br />
the error.<br />
Table 6- 3 Operands for EN and ENO<br />
Program editor Inputs/outputs Operands Data type<br />
LAD EN, ENO Power flow Bool<br />
FBD<br />
EN I, I:P, Q, M, DB, Temp, Power Flow Bool<br />
ENO Power Flow Bool<br />
EN1 SCL<br />
TRUE, FALSE Bool<br />
ENO2 TRUE, FALSE Bool<br />
1 The use of EN is only available for FBs.<br />
2. The use of ENO with the SCL code block is optional. You must configure the SCL compiler to set ENO when the code<br />
block finishes.<br />
Configuring SCL to set ENO<br />
To configure the SCL compiler for setting ENO, follow these steps:<br />
1. Select the "Settings" command from the "Options" menu.<br />
2. Expand the "PLC programming" properties and select "SCL (Structured Control<br />
Language)".<br />
3. Select the "Set ENO automatically" option.<br />
<strong>S7</strong>-<strong>1200</strong> <strong>Programmable</strong> <strong>controller</strong><br />
System Manual, 04/2012, A5E02486680-06 163
Programming concepts<br />
6.6 Protection<br />
Effect of Ret_Val or Status parameters on ENO<br />
See also<br />
6.6 Protection<br />
Some instructions, such as the communication instructions or the string conversion<br />
instructions, provide an output parameter that contains information about the processing of<br />
the instruction. For example, some instructions provide a Ret_Val (return value) parameter,<br />
which is typically an Int data type that contains status information in a range from -32768 to<br />
+32767. Other instructions provide a Status parameter, which is typically a Word data type<br />
that stores status information in a range of hexadecimal values from 16#0000 to 16#FFFF.<br />
The numerical value stored in a Ret_Val or a Status parameter determines the state of ENO<br />
for that instruction.<br />
● Ret_Val: A value from 0 to 32767 typically sets ENO = 1 (or TRUE). A value from -32768<br />
to -1 typically sets ENO = 0 (or FALSE). To evaluate Ret_Val, change the representation<br />
to hexadecimal.<br />
● Status: A value from 16#0000 16#7FFF typically sets ENO = 1 (or TRUE). A value from<br />
16#8000 to 16#FFFF typically sets ENO = 0 (or FALSE).<br />
Instructions that take more than one scan to execute often provide a Busy parameter (Bool)<br />
to signal that the instruction is active but has not completed execution. These instructions<br />
often also provide a Done parameter (Bool) and an Error parameter (Bool). Done signals that<br />
the instruction was completed without error, and Error signals that the instruction was<br />
completed with an error condition.<br />
● When Busy = 1 (or TRUE), ENO = 1 (or TRUE).<br />
● When Done = 1 (or TRUE), ENO = 1 (or TRUE).<br />
● When Error = 1 (or TRUE), ENO = 0 (or FALSE).<br />
OK and Not OK instructions (Page 197)<br />
6.6.1 Access protection for the CPU<br />
The CPU provides three levels of security for restricting access to specific functions. When<br />
you configure the security level and password for a CPU, you limit the functions and memory<br />
areas that can be accessed without entering a password.<br />
The password is case-sensitive.<br />
<strong>S7</strong>-<strong>1200</strong> <strong>Programmable</strong> <strong>controller</strong><br />
164 System Manual, 04/2012, A5E02486680-06
To configure the password,<br />
follow these steps:<br />
1. In the "Device configuration",<br />
select the CPU.<br />
2. In the inspector window,<br />
select the "Properties" tab.<br />
3. Select the "Protection"<br />
property to select the<br />
protection level and to enter a<br />
password.<br />
Programming concepts<br />
6.6 Protection<br />
Each level allows certain functions to be accessible without a password. The default<br />
condition for the CPU is to have no restriction and no password-protection. To restrict access<br />
to a CPU, you configure the properties of the CPU and enter the password.<br />
Entering the password over a network does not compromise the password protection for the<br />
CPU. Password protection does not apply to the execution of user program instructions<br />
including communication functions. Entering the correct password provides access to all of<br />
the functions.<br />
PLC-to-PLC communications (using communication instructions in the code blocks) are not<br />
restricted by the security level in the CPU. HMI functionality is also not restricted.<br />
Table 6- 4 Security levels for the CPU<br />
Security level Access restrictions<br />
No protection Allows full access without password-protection.<br />
Write protection Allows HMI access and all forms of PLC-to-PLC communications without password-protection.<br />
Password is required for modifying (writing to) the CPU and for changing the CPU mode<br />
(RUN/STOP).<br />
Read/write protection Allows HMI access and all forms of PLC-to-PLC communications without password-protection.<br />
Password is required for reading the data in the CPU, for modifying (writing to) the CPU, and for<br />
changing the CPU mode (RUN/STOP).<br />
6.6.2 Know-how protection<br />
Know-how protection allows you to prevent one or more code blocks (OB, FB, FC, or DB) in<br />
your program from unauthorized access. You create a password to limit access to the code<br />
block. The password-protection prevents unauthorized reading or modification of the code<br />
block. Without the password, you can read only the following information about the code<br />
block:<br />
● Block title, block comment, and block properties<br />
● Transfer parameters (IN, OUT, IN_OUT, Return)<br />
● Call structure of the program<br />
● Global tags in the cross references (without information on the point of use), but local<br />
tags are hidden<br />
<strong>S7</strong>-<strong>1200</strong> <strong>Programmable</strong> <strong>controller</strong><br />
System Manual, 04/2012, A5E02486680-06 165
Programming concepts<br />
6.6 Protection<br />
6.6.3 Copy protection<br />
When you configure a block for "know-how" protection, the code within the block cannot be<br />
accessed except after entering the password.<br />
Use the "Properties" task card of the code block to configure the know-how protection for<br />
that block. After opening the code block, select "Protection" from Properties.<br />
1. In the Properties for the code block, click<br />
the "Protection" button to display the<br />
"Know-how protection" dialog.<br />
2. Click the "Define" button to enter the<br />
password.<br />
After entering and confirming the password,<br />
click "OK".<br />
An additional security feature allows you to bind the program or code blocks for use with a<br />
specific memory card or CPU. This feature is especially useful for protecting your intellectual<br />
property. When you bind a program or block to a specific device, you restrict the program or<br />
code block for use only with a specific memory card or CPU. This feature allows you to<br />
distribute a program or code block electronically (such as over the Internet or through email)<br />
or by sending a memory cartridge.<br />
<strong>S7</strong>-<strong>1200</strong> <strong>Programmable</strong> <strong>controller</strong><br />
166 System Manual, 04/2012, A5E02486680-06
Programming concepts<br />
6.6 Protection<br />
Use the "Properties" task card of the code block to bind the block to a specific CPU or<br />
memory card.<br />
1. After opening the code block, select "Protection".<br />
2. From the drop-down list under "Copy protection" task, select the option to bind the code<br />
block either to a memory card or to a specific CPU.<br />
3. Select the type of copy protection and enter the serial number for the memory card or<br />
CPU.<br />
Note<br />
The serial number is case-sensitive.<br />
<strong>S7</strong>-<strong>1200</strong> <strong>Programmable</strong> <strong>controller</strong><br />
System Manual, 04/2012, A5E02486680-06 167
Programming concepts<br />
6.7 Downloading the elements of your program<br />
6.7 Downloading the elements of your program<br />
You can download the elements of your project from the programming device to the CPU.<br />
When you download a project, the CPU stores the user program (OBs, FCs, FBs and DBs)<br />
in permanent memory.<br />
You can download your project from the programming device to your CPU from any of the<br />
following locations:<br />
● "Project tree": Right-click the program element, and then click the context-sensitive<br />
"Download" selection.<br />
● "Online" menu: Click the "Download to device" selection.<br />
● Toolbar: Click the "Download to device" icon.<br />
6.8 Uploading from the CPU<br />
6.8.1 Copying elements of the project<br />
You can also copy the program blocks from an online CPU or a memory card attached to<br />
your programming device.<br />
<strong>S7</strong>-<strong>1200</strong> <strong>Programmable</strong> <strong>controller</strong><br />
168 System Manual, 04/2012, A5E02486680-06
Prepare the offline project for the copied program blocks:<br />
1. Add a CPU device that matches the online CPU.<br />
2. Expand the CPU node once so that the "Program<br />
blocks" folder is visible.<br />
To upload the program blocks from the online CPU to the<br />
offline project, follow these steps:<br />
1. Click the "Program blocks" folder in the offline project.<br />
2. Click the "Go online" button.<br />
3. Click the "Upload" button.<br />
4. Confirm your decision from the Upload dialog<br />
(Page 675).<br />
As an alternative to the previous method, follow these<br />
steps:<br />
1. From the project navigator, expand the node for<br />
"Online access" to select the program blocks in the<br />
online CPU:<br />
2. Expand the node for the network, and double click<br />
"Update accessible devices".<br />
3. Expand the node for the CPU.<br />
4. Drag the "Program blocks" folder from the online CPU<br />
and drop the folder into the "Program blocks" folder of<br />
your offline project.<br />
5. In the "Upload preview" dialog, select the box for<br />
"Continue", and then click the "Upload from device"<br />
button.<br />
When the upload is complete, all of the program blocks,<br />
technology blocks, and tags will be displayed in the offline<br />
area.<br />
Programming concepts<br />
6.8 Uploading from the CPU<br />
Note<br />
You can copy the program blocks from the online CPU to an existing program. The<br />
"Program-blocks" folder of the offline project does not have to be empty. However, the<br />
existing program will be deleted and replaced by the user program from the online CPU.<br />
<strong>S7</strong>-<strong>1200</strong> <strong>Programmable</strong> <strong>controller</strong><br />
System Manual, 04/2012, A5E02486680-06 169
Programming concepts<br />
6.9 Debugging and testing the program<br />
6.8.2 Using the compare function<br />
You can use the "Compare" editor (Page 681) in STEP 7 to find differences between the<br />
online and offline projects. You might find this useful prior to uploading from the CPU.<br />
6.9 Debugging and testing the program<br />
6.9.1 Monitor and modify data in the CPU<br />
As shown in the following table, you can monitor and modify values in the online CPU.<br />
Table 6- 5 Monitoring and modifying data with STEP 7<br />
Editor Monitor Modify Force<br />
Watch table Yes Yes No<br />
Force table Yes No Yes<br />
Program editor Yes Yes No<br />
Tag table Yes No No<br />
DB editor Yes No No<br />
Monitoring with a<br />
watch table<br />
Monitoring with the LAD editor<br />
Refer to the "Online and diagnostics" chapter for more information about monitoring and<br />
modifying data in the CPU (Page 682).<br />
6.9.2 Watch tables and force tables<br />
You use "watch tables" for monitoring and modifying the values of a user program being<br />
executed by the online CPU. You can create and save different watch tables in your project<br />
to support a variety of test environments. This allows you to reproduce tests during<br />
commissioning or for service and maintenance purposes.<br />
<strong>S7</strong>-<strong>1200</strong> <strong>Programmable</strong> <strong>controller</strong><br />
170 System Manual, 04/2012, A5E02486680-06
Programming concepts<br />
6.9 Debugging and testing the program<br />
With a watch table, you can monitor and interact with the CPU as it executes the user<br />
program. You can display or change values not only for the tags of the code blocks and data<br />
blocks, but also for the memory areas of the CPU, including the inputs and outputs (I and Q),<br />
peripheral inputs (I:P), bit memory (M), and data blocks (DB).<br />
With the watch table, you can enable the physical outputs (Q:P) of a CPU in STOP mode.<br />
For example, you can assign specific values to the outputs when testing the wiring for the<br />
CPU.<br />
STEP 7 also provides a force table for "forcing" a tag to a specific value. For more<br />
information about forcing, see the section on forcing values in the CPU (Page 689) in the<br />
"Online and Diagnostics" chapter.<br />
Note<br />
The force values are stored in the CPU and not in the watch table.<br />
You cannot force an input (or "I" address). However, you can force a peripheral input. To<br />
force a peripheral input, append a ":P" to the address (for example: "On:P").<br />
6.9.3 Cross reference to show usage<br />
The Inspector window displays cross-reference information about how a selected object is<br />
used throughout the complete project, such as the user program, the CPU and any HMI<br />
devices. The "Cross-reference" tab displays the instances where a selected object is being<br />
used and the other objects using it. The Inspector window also includes blocks which are<br />
only available online in the cross-references. To display the cross-references, select the<br />
"Show cross-references" command. (In the Project view, find the cross references in the<br />
"Tools" menu.)<br />
Note<br />
You do not have to close the editor to see the cross-reference information.<br />
You can sort the entries in the cross-reference. The cross-reference list provides an<br />
overview of the use of memory addresses and tags within the user program.<br />
● When creating and changing a program, you retain an overview of the operands, tags<br />
and block calls you have used.<br />
● From the cross-references, you can jump directly to the point of use of operands and<br />
tags.<br />
● During a program test or when troubleshooting, you are notified about which memory<br />
location is being processed by which command in which block, which tag is being used in<br />
which screen, and which block is called by which other block.<br />
<strong>S7</strong>-<strong>1200</strong> <strong>Programmable</strong> <strong>controller</strong><br />
System Manual, 04/2012, A5E02486680-06 171
Programming concepts<br />
6.9 Debugging and testing the program<br />
Table 6- 6 Elements of the cross reference<br />
Column Description<br />
Object Name of the object that uses the lower-level objects or that is being used by the<br />
lower-level objects<br />
Quantity Number of uses<br />
Location Each location of use, for example, network<br />
Property Special properties of referenced objects, for example, the tag names in multi-instance<br />
declarations<br />
as Shows additional information about the object, such as whether an instance DB is<br />
used as template or as a multiple instance<br />
Access Type of access, whether access to the operand is read access (R) and/or write<br />
access (W)<br />
Address Address of the operand<br />
Type Information on the type and language used to create the object<br />
Path Path of object in project tree<br />
6.9.4 Call structure to examine the calling hierarchy<br />
The call structure describes the call hierarchy of the block within your user program. It<br />
provides an overview of the blocks used, calls to other blocks, the relationships between<br />
blocks, the data requirements for each block, and the status of the blocks. You can open the<br />
program editor and edit blocks from the call structure.<br />
Displaying the call structure provides you with a list of the blocks used in the user program.<br />
STEP 7 highlights the first level of the call structure and displays any blocks that are not<br />
called by any other block in the program. The first level of the call structure displays the OBs<br />
and any FCs, FBs, and DBs that are not called by an OB. If a code block calls another block,<br />
the called block is shown as an indentation under the calling block. The call structure only<br />
displays those blocks that are called by a code block.<br />
You can selectively display only the blocks causing conflicts within the call structure. The<br />
following conditions cause conflicts:<br />
● Blocks that execute any calls with older or newer code time stamps<br />
● Blocks that call a block with modified interface<br />
● Blocks that use a tag with modified address and/or data type<br />
● Blocks that are called neither directly nor indirectly by an OB<br />
● Blocks that call a non-existent or missing block<br />
You can group several block calls and data blocks as a group. You use a drop-down list to<br />
see the links to the various call locations.<br />
<strong>S7</strong>-<strong>1200</strong> <strong>Programmable</strong> <strong>controller</strong><br />
172 System Manual, 04/2012, A5E02486680-06
Programming concepts<br />
6.9 Debugging and testing the program<br />
You can also perform a consistency check to show time stamp conflicts. Changing the time<br />
stamp of a block during or after the program is generated can lead to time stamp conflicts,<br />
which in turn cause inconsistencies among the blocks that are calling and being called.<br />
● Most time stamp and interface conflicts can be corrected by recompiling the code blocks.<br />
● If compilation fails to clear up inconsistencies, use the link in the "Details" column to go to<br />
the source of the problem in the program editor. You can then manually eliminate any<br />
inconsistencies.<br />
● Any blocks marked in red must be recompiled.<br />
<strong>S7</strong>-<strong>1200</strong> <strong>Programmable</strong> <strong>controller</strong><br />
System Manual, 04/2012, A5E02486680-06 173
Programming concepts<br />
6.9 Debugging and testing the program<br />
<strong>S7</strong>-<strong>1200</strong> <strong>Programmable</strong> <strong>controller</strong><br />
174 System Manual, 04/2012, A5E02486680-06
Basic instructions 7<br />
7.1 Bit logic<br />
7.1.1 Bit logic contacts and coils<br />
LAD contacts<br />
LAD and FBD are very effective for handling Boolean logic. While SCL is especially effective<br />
for complex mathematical computation and for project control structures, you can use SCL<br />
for Boolean logic.<br />
Table 7- 1 Normally open and normally closed contacts<br />
LAD SCL Description<br />
IF in THEN<br />
Statement;<br />
ELSE<br />
Statement;<br />
END_IF;<br />
IF NOT (in) THEN<br />
Statement;<br />
ELSE<br />
Statement;<br />
END_IF;<br />
Table 7- 2 Data types for the parameters<br />
Normally open and normally closed contacts: You can connect contacts<br />
to other contacts and create your own combination logic. If the input bit<br />
you specify uses memory identifier I (input) or Q (output), then the bit<br />
value is read from the process-image register. The physical contact<br />
signals in your control process are wired to I terminals on the PLC. The<br />
CPU scans the wired input signals and continuously updates the<br />
corresponding state values in the process-image input register.<br />
You can specify an immediate read of a physical input using ":P"<br />
following the I offset (example: "%I3.4:P"). For an immediate read, the bit<br />
data values are read directly from the physical input instead of the<br />
process image. An immediate read does not update the process image.<br />
Parameter Data type Description<br />
IN Bool Assigned bit<br />
● The Normally Open contact is closed (ON) when the assigned bit value is equal to 1.<br />
● The Normally Closed contact is closed (ON) when the assigned bit value is equal to 0.<br />
● Contacts connected in series create AND logic networks.<br />
● Contacts connected in parallel create OR logic networks.<br />
<strong>S7</strong>-<strong>1200</strong> <strong>Programmable</strong> <strong>controller</strong><br />
System Manual, 04/2012, A5E02486680-06 175
Basic instructions<br />
7.1 Bit logic<br />
FBD AND, OR, and XOR boxes<br />
Table 7- 3 AND, OR, and XOR boxes<br />
In FBD programming, LAD contact networks are transformed into AND (&), OR (>=1), and<br />
exclusive OR (x) box networks where you can specify bit values for the box inputs and<br />
outputs. You may also connect to other logic boxes and create your own logic combinations.<br />
After the box is placed in your network, you can drag the "Insert input" tool from the<br />
"Favorites" toolbar or instruction tree and then drop it onto the input side of the box to add<br />
more inputs. You can also right-click on the box input connector and select "Insert input".<br />
Box inputs and outputs can be connected to another logic box, or you can enter a bit<br />
address or bit symbol name for an unconnected input. When the box instruction is executed,<br />
the current input states are applied to the binary box logic and, if true, the box output will be<br />
true.<br />
FBD SCL1 Description<br />
out := in1 AND<br />
in2;<br />
All inputs of an AND box must be TRUE for the output to be TRUE.<br />
out := in1 OR<br />
in2;<br />
out := in1 XOR<br />
in2;<br />
Any input of an OR box must be TRUE for the output to be TRUE.<br />
An odd number of the inputs of an XOR box must be TRUE for the output<br />
to be TRUE.<br />
1 For SCL: You must assign the result of the operation to a variable to be used for another statement.<br />
Table 7- 4 Data types for the parameters<br />
Parameter Data type Description<br />
IN1, IN2 Bool Input bit<br />
<strong>S7</strong>-<strong>1200</strong> <strong>Programmable</strong> <strong>controller</strong><br />
176 System Manual, 04/2012, A5E02486680-06
NOT logic inverter<br />
Table 7- 5 NOT Logic inverter<br />
Basic instructions<br />
7.1 Bit logic<br />
LAD FBD SCL Description<br />
NOT For FBD programming, you can drag the "Negate binary input" tool<br />
from the "Favorites" toolbar or instruction tree and then drop it on an<br />
input or output to create a logic inverter on that box connector.<br />
The LAD NOT contact inverts the logical state of power flow input.<br />
If there is no power flow into the NOT contact, then there is power<br />
flow out.<br />
If there is power flow into the NOT contact, then there is no power<br />
flow out.<br />
Output coil and assignment box<br />
The coil output instruction writes a value for an output bit. If the output bit you specify uses<br />
memory identifier Q, then the CPU turns the output bit in the process-image register on or<br />
off, setting the specified bit equal to power flow status. The output signals for your control<br />
actuators are wired to the Q terminals of the CPU. In RUN mode, the CPU system<br />
continuously scans your input signals, processes the input states according to your program<br />
logic, and then reacts by setting new output state values in the process-image output<br />
register. After each program execution cycle, the CPU system transfers the new output state<br />
reaction stored in the process-image register to the wired output terminals.<br />
Table 7- 6 Output coil (LAD) and output assignment box (FBD)<br />
LAD FBD SCL Description<br />
Table 7- 7 Data types for the parameters<br />
out := ;<br />
out := NOT<br />
;<br />
Parameter Data type Description<br />
OUT Bool Assigned bit<br />
In FBD programming, LAD coils are transformed into<br />
assignment (= and /=) boxes where you specify a bit<br />
address for the box output. Box inputs and outputs can be<br />
connected to other box logic or you can enter a bit<br />
address.<br />
You can specify an immediate write of a physical output<br />
using ":P" following the Q offset (example: "%Q3.4:P").<br />
For an immediate write, the bit data values are written to<br />
the process image output and directly to physical output.<br />
<strong>S7</strong>-<strong>1200</strong> <strong>Programmable</strong> <strong>controller</strong><br />
System Manual, 04/2012, A5E02486680-06 177
Basic instructions<br />
7.1 Bit logic<br />
● If there is power flow through an output coil or an FBD "=" box is enabled, then the output<br />
bit is set to 1.<br />
● If there is no power flow through an output coil or an FBD "=" assignment box is not<br />
enabled, then the output bit is set to 0.<br />
● If there is power flow through an inverted output coil or an FBD "/=" box is enabled, then<br />
the output bit is set to 0.<br />
● If there is no power flow through an inverted output coil or an FBD "/=" box is not enabled,<br />
then the output bit is set to 1.<br />
7.1.2 Set and reset instructions<br />
Set and Reset 1 bit<br />
Table 7- 8 S and R instructions<br />
LAD FBD SCL Description<br />
Not available When S (Set) is activated, then the data value at the OUT<br />
address is set to 1. When S is not activated, OUT is not<br />
changed.<br />
Not available When R (Reset) is activated, then the data value at the OUT<br />
address is set to 0. When R is not activated, OUT is not<br />
changed.<br />
1 For LAD and FBD: These instructions can be placed anywhere in the network.<br />
2 For SCL: You must write code to replicate this function within your application.<br />
Table 7- 9 Data types for the parameters<br />
Parameter Data type Description<br />
IN (or connect to contact/gate logic) Bool Bit location to be monitored<br />
OUT Bool Bit location to be set or reset<br />
<strong>S7</strong>-<strong>1200</strong> <strong>Programmable</strong> <strong>controller</strong><br />
178 System Manual, 04/2012, A5E02486680-06
Set and Reset Bit Field<br />
Table 7- 10 SET_BF and RESET_BF instructions<br />
Basic instructions<br />
7.1 Bit logic<br />
LAD1 FBD SCL Description<br />
Not available When SET_BF is activated, a data value of 1 is assigned to "n"<br />
bits starting at address OUT. When SET_BF is not activated,<br />
OUT is not changed.<br />
Not available RESET_BF writes a data value of 0 to "n" bits starting at<br />
address OUT. When RESET_BF is not activated, OUT is not<br />
changed.<br />
1 For LAD and FBD: These instructions must be the right-most instruction in a branch.<br />
2 For SCL: You must write code to replicate this function within your application.<br />
Table 7- 11 Data types for the parameters<br />
Parameter Data type Description<br />
OUT Bool Starting element of a bit field to be set or reset (Example:<br />
#MyArray[3])<br />
n Constant (UInt) Number of bits to write<br />
Set-dominant and Reset-dominant bit latches<br />
Table 7- 12 RS and SR instructions<br />
LAD / FBD SCL Description<br />
Not available RS is a set dominant latch where the set dominates. If the set (S1) and reset (R)<br />
signals are both true, the output address OUT will be 1.<br />
Not available SR is a reset dominant latch where the reset dominates. If the set (S) and reset<br />
(R1) signals are both true, the output address OUT will be 0.<br />
1 For LAD and FBD: These instructions must be the right-most instruction in a branch.<br />
2 For SCL: You must write code to replicate this function within your application.<br />
<strong>S7</strong>-<strong>1200</strong> <strong>Programmable</strong> <strong>controller</strong><br />
System Manual, 04/2012, A5E02486680-06 179
Basic instructions<br />
7.1 Bit logic<br />
Table 7- 13 Data types for the parameters<br />
Parameter Data type Description<br />
S, S1 Bool Set input; 1 indicates dominance<br />
R, R1 Bool Reset input; 1 indicates dominance<br />
OUT Bool Assigned bit output "OUT"<br />
Q Bool Follows state of "OUT" bit<br />
The OUT parameter specifies the bit address that is set or reset. The optional OUT output Q<br />
reflects the signal state of the "OUT" address.<br />
Instruction S1 R "OUT" bit<br />
RS 0 0 Previous state<br />
0 1 0<br />
1 0 1<br />
1 1 1<br />
S R1<br />
SR 0 0 Previous state<br />
0 1 0<br />
1 0 1<br />
1 1 0<br />
7.1.3 Positive and negative edge instructions<br />
Table 7- 14 Positive and negative transition detection<br />
LAD FBD SCL Description<br />
Not available LAD: The state of this contact is TRUE when a positive transition (OFFto-ON)<br />
is detected on the assigned "IN" bit. The contact logic state is<br />
then combined with the power flow in state to set the power flow out<br />
state. The P contact can be located anywhere in the network except the<br />
end of a branch.<br />
FBD: The output logic state is TRUE when a positive transition (OFFto-ON)<br />
is detected on the assigned input bit. The P box can only be<br />
located at the beginning of a branch.<br />
Not available LAD: The state of this contact is TRUE when a negative transition (ONto-OFF)<br />
is detected on the assigned input bit. The contact logic state is<br />
then combined with the power flow in state to set the power flow out<br />
state. The N contact can be located anywhere in the network except<br />
the end of a branch.<br />
FBD: The output logic state is TRUE when a negative transition (ON-to-<br />
OFF) is detected on the assigned input bit. The N box can only be<br />
located at the beginning of a branch.<br />
<strong>S7</strong>-<strong>1200</strong> <strong>Programmable</strong> <strong>controller</strong><br />
180 System Manual, 04/2012, A5E02486680-06
Basic instructions<br />
7.1 Bit logic<br />
LAD FBD SCL Description<br />
Not available LAD: The assigned bit "OUT" is TRUE when a positive transition (OFFto-ON)<br />
is detected on the power flow entering the coil. The power flow<br />
in state always passes through the coil as the power flow out state. The<br />
P coil can be located anywhere in the network.<br />
FBD: The assigned bit "OUT" is TRUE when a positive transition (OFFto-ON)<br />
is detected on the logic state at the box input connection or on<br />
the input bit assignment if the box is located at the start of a branch.<br />
The input logic state always passes through the box as the output logic<br />
state. The P= box can be located anywhere in the branch.<br />
Not available LAD: The assigned bit "OUT" is TRUE when a negative transition (ONto-OFF)<br />
is detected on the power flow entering the coil. The power flow<br />
in state always passes through the coil as the power flow out state. The<br />
N coil can be located anywhere in the network.<br />
FBD: The assigned bit "OUT" is TRUE when a negative transition (ONto-OFF)<br />
is detected on the logic state at the box input connection or on<br />
the input bit assignment if the box is located at the start of a branch.<br />
The input logic state always passes through the box as the output logic<br />
state. The N= box can be located anywhere in the branch.<br />
1 For SCL: You must write code to replicate this function within your application.<br />
Table 7- 15 P_TRIG and N_TRIG instructions<br />
LAD / FBD SCL Description<br />
Not available The Q output power flow or logic state is TRUE when a positive transition<br />
(OFF-to-ON) is detected on the CLK input state (FBD) or CLK power flow<br />
in (LAD).<br />
In LAD, the P_TRIG instruction cannot be located at the beginning or end<br />
of a network. In FBD, the P_TRIG instruction can be located anywhere<br />
except the end of a branch.<br />
Not available The Q output power flow or logic state is TRUE when a negative transition<br />
(ON-to-OFF) is detected on the CLK input state (FBD) or CLK power flow<br />
in (LAD).<br />
In LAD, the N_TRIG instruction cannot be located at the beginning or end<br />
of a network. In FBD, the N_TRIG instruction can be located anywhere<br />
except the end of a branch.<br />
1 For SCL: You must write code to replicate this function within your application.<br />
Table 7- 16 Data types for the parameters (P and N contacts/coils, P=, N=, P_TRIG and N_TRIG)<br />
Parameter Data type Description<br />
M_BIT Bool Memory bit in which the previous state of the input is saved<br />
IN Bool Input bit whose transition edge is to be detected<br />
OUT Bool Output bit which indicates a transition edge was detected<br />
CLK Bool Power flow or input bit whose transition edge is to be detected<br />
Q Bool Output which indicates an edge was detected<br />
<strong>S7</strong>-<strong>1200</strong> <strong>Programmable</strong> <strong>controller</strong><br />
System Manual, 04/2012, A5E02486680-06 181
Basic instructions<br />
7.2 Timers<br />
7.2 Timers<br />
Table 7- 17 Timer instructions<br />
All edge instructions use a memory bit (M_BIT) to store the previous state of the input signal<br />
being monitored. An edge is detected by comparing the state of the input with the state of<br />
the memory bit. If the states indicate a change of the input in the direction of interest, then an<br />
edge is reported by writing the output TRUE. Otherwise, the output is written FALSE.<br />
Note<br />
Edge instructions evaluate the input and memory-bit values each time they are executed,<br />
including the first execution. You must account for the initial states of the input and memory<br />
bit in your program design either to allow or to avoid edge detection on the first scan.<br />
Because the memory bit must be maintained from one execution to the next, you should use<br />
a unique bit for each edge instruction, and you should not use this bit any other place in your<br />
program. You should also avoid temporary memory and memory that can be affected by<br />
other system functions, such as an I/O update. Use only M, global DB, or Static memory (in<br />
an instance DB) for M_BIT memory assignments.<br />
You use the timer instructions to create programmed time delays. The number of timers that<br />
you can use in your user program is limited only by the amount of memory in the CPU. Each<br />
timer uses a 16 byte IEC_Timer data type DB structure to store timer data that is specified at<br />
the top of the box or coil instruction. STEP 7 automatically creates the DB when you insert<br />
the instruction.<br />
LAD / FBD boxes LAD coils SCL Description<br />
"IEC_Timer_0_DB".TP(<br />
IN:=_bool_in_,<br />
PT:=_time_in_,<br />
Q=>_bool_out_,<br />
ET=>_time_out_);<br />
"IEC_Timer_0_DB".TON (<br />
IN:=_bool_in_,<br />
PT:=_time_in_,<br />
Q=>_bool_out_,<br />
ET=>_time_out_);<br />
"IEC_Timer_0_DB".TOF (<br />
IN:=_bool_in_,<br />
PT:=_time_in_,<br />
Q=>_bool_out_,<br />
ET=>_time_out_);<br />
The TP timer generates a pulse with a preset<br />
width time.<br />
The TON timer sets output Q to ON after a preset<br />
time delay.<br />
The TOF timer resets output Q to OFF after a<br />
preset time delay.<br />
<strong>S7</strong>-<strong>1200</strong> <strong>Programmable</strong> <strong>controller</strong><br />
182 System Manual, 04/2012, A5E02486680-06
LAD / FBD boxes LAD coils SCL Description<br />
FBD only:<br />
FBD only:<br />
"IEC_Timer_0_DB".TONR (<br />
IN:=_bool_in_,<br />
R:=_bool_in_<br />
PT:=_time_in_,<br />
Q=>_bool_out_,<br />
ET=>_time_out_);<br />
Basic instructions<br />
7.2 Timers<br />
The TONR timer sets output Q to ON after a<br />
preset time delay. Elapsed time is accumulated<br />
over multiple timing periods until the R input is<br />
used to reset the elapsed time.<br />
(No SCL equivalent) The PT (Preset timer) coil loads a new PRESET<br />
time value in the specified IEC_Timer.<br />
(No SCL equivalent) The RT (Reset timer) coil resets the specified<br />
IEC_Timer.<br />
1 STEP 7 automatically creates the DB when you insert the instruction.<br />
2 In the SCL examples, "IEC_Timer_0_DB" is the name of the instance DB.<br />
Table 7- 18 Data types for the parameters<br />
Parameter Data type Description<br />
Box: IN<br />
Coil: Power flow<br />
Bool TP, TON, and TONR:<br />
Box: 0=Disable timer, 1=Enable timer<br />
Coil: No power flow=Disable timer, Power flow=Enable timer<br />
TOF:<br />
Box: 0=Enable timer, 1=Disable timer<br />
Coil: No power flow=Enable timer, Power flow=Disable timer<br />
R Bool TONR box only:<br />
0=No reset<br />
1= Reset elapsed time and Q bit to 0<br />
Box: PT<br />
Coil: "PRESET_Tag"<br />
Time Timer box or coil: Preset time input<br />
Box: Q<br />
Coil: DBdata.Q<br />
Box: ET<br />
Coil: DBdata.ET<br />
Bool Timer box: Q box output or Q bit in the timer DB data<br />
Timer coil: you can only address the Q bit in the timer DB data<br />
Time Timer box: ET (elapsed time) box output or ET time value in the timer DB<br />
data<br />
Timer coil: you can only address the ET time value in the timer DB data.<br />
<strong>S7</strong>-<strong>1200</strong> <strong>Programmable</strong> <strong>controller</strong><br />
System Manual, 04/2012, A5E02486680-06 183
Basic instructions<br />
7.2 Timers<br />
Table 7- 19 Effect of value changes in the PT and IN parameters<br />
Timer Changes in the PT and IN box parameters and the corresponding coil parameters<br />
TP Changing PT has no effect while the timer runs.<br />
Changing IN has no effect while the timer runs.<br />
TON Changing PT has no effect while the timer runs.<br />
Changing IN to FALSE, while the timer runs, resets and stops the timer.<br />
TOF Changing PT has no effect while the timer runs.<br />
Changing IN to TRUE, while the timer runs, resets and stops the timer.<br />
TONR Changing PT has no effect while the timer runs, but has an effect when the timer resumes.<br />
Changing IN to FALSE, while the timer runs, stops the timer but does not reset the timer. Changing<br />
IN back to TRUE will cause the timer to start timing from the accumulated time value.<br />
PT (preset time) and ET (elapsed time) values are stored in the specified IEC_TIMER DB<br />
data as signed double integers that represent milliseconds of time. TIME data uses the T#<br />
identifier and can be entered as a simple time unit (T#200ms or 200) and as compound time<br />
units like T#2s_200ms.<br />
Table 7- 20 Size and range of the TIME data type<br />
Data type Size Valid number ranges 1<br />
TIME 32 bits, stored<br />
as DInt data<br />
T#-24d_20h_31m_23s_648ms to T#24d_20h_31m_23s_647ms<br />
Stored as -2,147,483,648 ms to +2,147,483,647 ms<br />
1 The negative range of the TIME data type shown above cannot be used with the timer instructions. Negative PT (preset<br />
time) values are set to zero when the timer instruction is executed. ET (elapsed time) is always a positive value.<br />
Timer coil example<br />
The -(TP)-, -(TON)-, -(TOF)-, and -(TONR)- timer coils must be the last instruction in a LAD<br />
network. As shown in the timer example, a contact instruction in a subsequent network<br />
evaluates the Q bit in a timer coil's IEC_Timer DB data. Likewise, you must address the<br />
ELAPSED element in the IEC_timer DB data if you want to use the elapsed time value in<br />
your program.<br />
The pulse timer is started on a 0 to 1 transition of the Tag_Input bit value. The timer runs for<br />
the time specified by Tag_Time time value.<br />
As long as the timer runs, the state of DB1.MyIEC_Timer.Q=1 and the Tag_Output value=1.<br />
When the Tag_Time value has elapsed, then DB1.MyIEC_Timer.Q=0 and the Tag_Output<br />
value=0.<br />
<strong>S7</strong>-<strong>1200</strong> <strong>Programmable</strong> <strong>controller</strong><br />
184 System Manual, 04/2012, A5E02486680-06
Basic instructions<br />
7.2 Timers<br />
Reset timer -(RT)- and Preset timer -(PT)- coils<br />
These coil instructions can be used with box or coil timers and can be placed in a mid-line<br />
position. The coil output power flow status is always the same as the coil input status. When<br />
the -(RT)- coil is activated, the ELAPSED time element of the specified IEC_Timer DB data<br />
is reset to 0. When the -(PT)- coil is activated, the PRESET time element of the specified<br />
IEC_Timer DB data is reset to 0.<br />
Operation of the timers<br />
Table 7- 21 Types of IEC timers<br />
Note<br />
When you place timer instructions in an FB, you can select the "Multi-instance data block"<br />
option. The timer structure names can be different with separate data structures, but the<br />
timer data is contained in a single data block and does not require a separate data block for<br />
each timer. This reduces the processing time and data storage necessary for handling the<br />
timers. There is no interaction between the timer data structures in the shared multi-instance<br />
DB.<br />
Timer Timing diagram<br />
TP: Pulse timer<br />
<br />
The TP timer generates a pulse with a preset width<br />
time.<br />
TON: ON-delay timer<br />
The TON timer sets output Q to ON after a preset time<br />
delay.<br />
<br />
<br />
<br />
<br />
<br />
<br />
<br />
<br />
<strong>S7</strong>-<strong>1200</strong> <strong>Programmable</strong> <strong>controller</strong><br />
System Manual, 04/2012, A5E02486680-06 185
Basic instructions<br />
7.2 Timers<br />
Timer Timing diagram<br />
TOF: OFF-delay timer<br />
The TOF timer resets output Q to OFF after a preset<br />
time delay.<br />
TONR: ON-delay Retentive timer<br />
The TONR timer sets output Q to ON after a preset time<br />
delay. Elapsed time is accumulated over multiple timing<br />
periods until the R input is used to reset the elapsed<br />
time.<br />
<br />
<br />
<br />
<br />
<br />
<br />
<br />
<strong>S7</strong>-<strong>1200</strong> <strong>Programmable</strong> <strong>controller</strong><br />
186 System Manual, 04/2012, A5E02486680-06<br />
<br />
<br />
Note<br />
In the CPU, no dedicated resource is allocated to any specific timer instruction. Instead,<br />
each timer utilizes its own timer structure in DB memory and a continuously-running internal<br />
CPU timer to perform timing.<br />
When a timer is started due to an edge change on the input of a TP, TON, TOF, or TONR<br />
instruction, the value of the continuously-running internal CPU timer is copied into the<br />
START member of the DB structure allocated for this timer instruction. This start value<br />
remains unchanged while the timer continues to run, and is used later each time the timer is<br />
updated. Each time the timer is started, a new start value is loaded into the timer structure<br />
from the internal CPU timer.<br />
When a timer is updated, the start value described above is subtracted from the current<br />
value of the internal CPU timer to determine the elapsed time. The elapsed time is then<br />
compared with the preset to determine the state of the timer Q bit. The ELAPSED and Q<br />
members are then updated in the DB structure allocated for this timer. Note that the elapsed<br />
time is clamped at the preset value (the timer does not continue to accumulate elapsed time<br />
after the preset is reached).
Basic instructions<br />
A timer update is performed when and only when:<br />
● A timer instruction (TP, TON, TOF, or TONR) is executed<br />
● The "ELAPSED" member of the timer structure in DB is referenced directly by an<br />
instruction<br />
● The "Q" member of the timer structure in DB is referenced directly by an instruction<br />
7.2 Timers<br />
Timer programming<br />
The following consequences of timer operation should be considered when planning and<br />
creating your user program:<br />
● You can have multiple updates of a timer in the same scan. The timer is updated each<br />
time the timer instruction (TP, TON, TOF, TONR) is executed and each time the<br />
ELAPSED or Q member of the timer structure is used as a parameter of another<br />
executed instruction. This is an advantage if you want the latest time data (essentially an<br />
immediate read of the timer). However, if you desire to have consistent values throughout<br />
a program scan, then place your timer instruction prior to all other instructions that need<br />
these values, and use tags from the Q and ET outputs of the timer instruction instead of<br />
the ELAPSED and Q members of the timer DB structure.<br />
● You can have scans during which no update of a timer occurs. It is possible to start your<br />
timer in a function, and then cease to call that function again for one or more scans. If no<br />
other instructions are executed which reference the ELAPSED or Q members of the timer<br />
structure, then the timer will not be updated. A new update will not occur until either the<br />
timer instruction is executed again or some other instruction is executed using ELAPSED<br />
or Q from the timer structure as a parameter.<br />
● Although not typical, you can assign the same DB timer structure to multiple timer<br />
instructions. In general, to avoid unexpected interaction, you should only use one timer<br />
instruction (TP, TON, TOF, TONR) per DB timer structure.<br />
● Self-resetting timers are useful to trigger actions that need to occur periodically. Typically,<br />
self-resetting timers are created by placing a normally-closed contact which references<br />
the timer bit in front of the timer instruction. This timer network is typically located above<br />
one or more dependent networks that use the timer bit to trigger actions. When the timer<br />
expires (elapsed time reaches preset value), the timer bit is ON for one scan, allowing the<br />
dependent network logic controlled by the timer bit to execute. Upon the next execution of<br />
the timer network, the normally closed contact is OFF, thus resetting the timer and<br />
clearing the timer bit. The next scan, the normally closed contact is ON, thus restarting<br />
the timer. When creating self-resetting timers such as this, do not use the "Q" member of<br />
the timer DB structure as the parameter for the normally-closed contact in front of the<br />
timer instruction. Instead, use the tag connected to the "Q" output of the timer instruction<br />
for this purpose. The reason to avoid accessing the Q member of the timer DB structure<br />
is because this causes an update to the timer and if the timer is updated due to the<br />
normally closed contact, then the contact will reset the timer instruction immediately. The<br />
Q output of the timer instruction will not be ON for the one scan and the dependent<br />
networks will not execute.<br />
<strong>S7</strong>-<strong>1200</strong> <strong>Programmable</strong> <strong>controller</strong><br />
System Manual, 04/2012, A5E02486680-06 187
Basic instructions<br />
7.2 Timers<br />
Time data retention after a RUN-STOP-RUN transition or a CPU power cycle<br />
If a run mode session is ended with stop mode or a CPU power cycle and a new run mode<br />
session is started, then the timer data stored in the previous run mode session is lost, unless<br />
the timer data structure is specified as retentive (TP, TON, TOF, and TONR timers).<br />
When you accept the defaults in the call options dialog after you place a timer instruction in<br />
the program editor, you are automatically assigned an instance DB which cannot be made<br />
retentive. To make your timer data retentive, you must either use a global DB or a Multiinstance<br />
DB.<br />
Assign a global DB to store timer data as retentive data<br />
This option works regardless of where the timer is placed (OB, FC, or FB).<br />
1. Create a global DB:<br />
– Double-click "Add new block" from the Project tree<br />
– Click the data block (DB) icon<br />
– For the Type, choose global DB<br />
– If you want to be able to select individual data elements in this DB as retentive, be<br />
sure the DB type "Optimized" box is checked. The other DB type option "Standard -<br />
compatible with <strong>S7</strong>-300/400" only allows setting all DB data elements retentive or<br />
none retentive.<br />
– Click OK<br />
2. Add timer structure(s) to the DB:<br />
– In the new global DB, add a new static tag using data type IEC_Timer.<br />
– In the "Retain" column, check the box so that this structure will be retentive.<br />
– Repeat this process to create structures for all the timers that you want to store in this<br />
DB. You can either place each timer structure in a unique global DB, or you can place<br />
multiple timer structures into the same global DB. You can also place other static tags<br />
besides timers in this global DB. Placing multiple timer structures into the same global<br />
DB allows you to reduce your overall number of blocks.<br />
– Rename the timer structures if desired.<br />
3. Open the program block for editing where you want to place a retentive timer (OB, FC, or<br />
FB).<br />
4. Place the timer instruction at the desired location.<br />
5. When the call options dialog appears, click the cancel button.<br />
6. On the top of the new timer instruction, type the name (do not use the helper to browse)<br />
of the global DB and timer structure that you created above (example:<br />
"Data_block_3.Static_1").<br />
<strong>S7</strong>-<strong>1200</strong> <strong>Programmable</strong> <strong>controller</strong><br />
188 System Manual, 04/2012, A5E02486680-06
Basic instructions<br />
7.2 Timers<br />
Assign a multi-instance DB to store timer data as retentive data<br />
This option only works if you place the timer in an FB.<br />
This option depends upon whether the FB was created with "Optimized" block access<br />
(allows symbolic access only). Once the FB has been created, you cannot change the<br />
checkbox for "Optimized"; it must be chosen correctly when the FB is created, on the first<br />
screen after selecting "Add new block" from the tree. To verify how the access attribute is<br />
configured for an existing FB, right-click on the FB in the Project tree, choose properties, and<br />
then choose attributes.<br />
If the FB was created with the "Optimized" box checked (allows symbolic access only):<br />
1. Open the FB for edit.<br />
2. Place the timer instruction at the desired location in the FB.<br />
3. When the Call options dialog appears, click on the Multi instance icon. The Multi Instance<br />
option is only available if the instruction is being placed into an FB.<br />
4. In the Call options dialog, rename the timer if desired.<br />
5. Click OK. The timer instruction appears in the editor, and the IEC_TIMER structure<br />
appears in the FB Interface under Static.<br />
6. If necessary, open the FB interface editor (may have to click on the small arrow to<br />
expand the view).<br />
7. Under Static, locate the timer structure that was just created for you.<br />
8. In the Retain column for this timer structure, change the selection to "Retain". Whenever<br />
this FB is called later from another program block, an instance DB will be created with this<br />
interface definition which contains the timer structure marked as retentive.<br />
If the FB was created with the "Standard - compatible with <strong>S7</strong>-300/400" box checked (allows<br />
symbolic and direct access):<br />
1. Open the FB for edit.<br />
2. Place the timer instruction at the desired location in the FB.<br />
3. When the Call options dialog appears, click on the multi instance icon. The multi instance<br />
option is only available if the instruction is being placed into an FB.<br />
4. In the Call options dialog, rename the timer if desired.<br />
5. Click OK. The timer instruction appears in the editor, and the IEC_TIMER structure<br />
appears in the FB Interface under Static.<br />
6. Open the block that will use this FB.<br />
7. Place this FB at the desired location. Doing so results in the creation of an instance data<br />
block for this FB.<br />
8. Open the instance data block created when you placed the FB in the editor.<br />
9. Under Static, locate the timer structure of interest. In the Retain column for this timer<br />
structure, check the box to make this structure retentive.<br />
<strong>S7</strong>-<strong>1200</strong> <strong>Programmable</strong> <strong>controller</strong><br />
System Manual, 04/2012, A5E02486680-06 189
Basic instructions<br />
7.3 Counters<br />
7.3 Counters<br />
Table 7- 22 Counter instructions<br />
LAD / FBD SCL Description<br />
"IEC_Counter_0_DB".CTU(<br />
CU:=_bool_in,<br />
R:=_bool_in,<br />
PV:=_int_in,<br />
Q=>_bool_out,<br />
CV=>_int_out);<br />
"IEC_Counter_0_DB".CTD(<br />
CD:=_bool_in,<br />
LD:=_bool_in,<br />
PV:=_int_in,<br />
Q=>_bool_out,<br />
CV=>_int_out);<br />
"IEC_Counter_0_DB".CTUD(<br />
CU:=_bool_in,<br />
CD:=_bool_in,<br />
R:=_bool_in,<br />
LD:=_bool_in,<br />
PV:=_int_in,<br />
QU=>_bool_out,<br />
QD=>_bool_out,<br />
CV=>_int_out);<br />
Use the counter instructions to count internal program events and<br />
external process events. Each counter uses a structure stored in a<br />
data block to maintain counter data. You assign the data block when<br />
the counter instruction is placed in the editor.<br />
CTU is a count-up counter<br />
CTD is a count-down counter<br />
CTUD is a count-up-and-down counter<br />
1 For LAD and FBD: Select the count value data type from the drop-down list below the instruction name.<br />
2 STEP 7 automatically creates the DB when you insert the instruction.<br />
3 In the SCL examples, "IEC_Counter_0_DB" is the name of the instance DB.<br />
Table 7- 23 Data types for the parameters<br />
Parameter Data type1 Description<br />
CU, CD Bool Count up or count down, by one count<br />
R (CTU, CTUD) Bool Reset count value to zero<br />
LD (CTD, CTUD) Bool Load control for preset value<br />
PV SInt, Int, DInt, USInt, UInt, UDInt Preset count value<br />
Q, QU Bool True if CV >= PV<br />
QD Bool True if CV
Operation of the counters<br />
Basic instructions<br />
7.3 Counters<br />
The number of counters that you can use in your user program is limited only by the amount<br />
of memory in the CPU. Counters use the following amount of memory:<br />
● For SInt or USInt data types, the counter instruction uses 3 bytes.<br />
● For Int or UInt data types, the counter instruction uses 6 bytes.<br />
● For DInt or UDInt data types, the counter instruction uses 12 bytes.<br />
These instructions use software counters whose maximum counting rate is limited by the<br />
execution rate of the OB in which they are placed. The OB that the instructions are placed in<br />
must be executed often enough to detect all transitions of the CU or CD inputs. For faster<br />
counting operations, see the CTRL_HSC instruction (Page 337).<br />
Note<br />
When you place counter instructions in an FB, you can select the multi-instance DB option,<br />
the counter structure names can be different with separate data structures, but the counter<br />
data is contained in a single DB and does not require a separate DB for each counter. This<br />
reduces the processing time and data storage necessary for the counters. There is no<br />
interaction between the counter data structures in the shared multi-instance DB.<br />
Table 7- 24 Operation of the CTU counter<br />
Counter<br />
The CTU counter counts up by 1 when the value of parameter CU<br />
Operation<br />
changes from 0 to 1. The CTU timing diagram shows the operation for<br />
an unsigned integer count value (where PV = 3).<br />
<br />
If the value of parameter CV (current count value) is greater than or<br />
equal to the value of parameter PV (preset count value), then the<br />
counter output parameter Q = 1.<br />
<br />
If the value of the reset parameter R changes from 0 to 1, then the<br />
<br />
current count value is reset to 0.<br />
<br />
<strong>S7</strong>-<strong>1200</strong> <strong>Programmable</strong> <strong>controller</strong><br />
System Manual, 04/2012, A5E02486680-06 191
Basic instructions<br />
7.3 Counters<br />
Table 7- 25 Operation of the CTD counter<br />
Counter Operation<br />
The CTD counter counts down by 1 when the value of<br />
parameter CD changes from 0 to 1. The CTD timing diagram<br />
shows the operation for an unsigned integer count value<br />
(where PV = 3).<br />
If the value of parameter CV (current count value) is equal<br />
to or less than 0, the counter output parameter Q = 1.<br />
If the value of parameter LOAD changes from 0 to 1, the<br />
value at parameter PV (preset value) is loaded to the<br />
counter as the new CV (current count value).<br />
Table 7- 26 Operation of the CTUD counter<br />
Counter Operation<br />
The CTUD counter counts up or<br />
down by 1 on the 0 to 1<br />
<br />
transition of the count up (CU) or<br />
count down (CD) inputs. The <br />
CTUD timing diagram shows the<br />
operation for an unsigned<br />
integer count value (where PV = <br />
4).<br />
If the value of parameter CV<br />
is equal to or greater than the<br />
value of parameter PV, then<br />
the counter output parameter<br />
QU = 1.<br />
If the value of parameter CV<br />
is less than or equal to zero,<br />
then the counter output<br />
parameter QD = 1.<br />
If the value of parameter<br />
LOAD changes from 0 to 1,<br />
then the value at parameter<br />
PV is loaded to the counter<br />
as the new CV.<br />
If the value of the reset<br />
parameter R is changes from<br />
0 to 1, the current count<br />
value is reset to 0.<br />
<br />
<br />
<br />
<br />
<strong>S7</strong>-<strong>1200</strong> <strong>Programmable</strong> <strong>controller</strong><br />
192 System Manual, 04/2012, A5E02486680-06<br />
<br />
<br />
<br />
<br />
<br />
<br />
<br />
<br />
<br />
<br />
<br />
<br />
<br />
<br />
<br />
<br />
Counter data retention after a RUN-STOP-RUN transition or a CPU power cycle<br />
If a run mode session is ended with stop mode or a CPU power cycle and a new run mode<br />
session is started, then the counter data stored in the previous run mode session is lost,<br />
unless the counter data structure is specified as retentive (CTU, CTD, and CTUD counters).
Basic instructions<br />
7.3 Counters<br />
When you accept the defaults in the call options dialog after you place a counter instruction<br />
in the program editor, you are automatically assigned an instance DB which cannot be made<br />
retentive. To make your counter data retentive, you must either use a global DB or a Multiinstance<br />
DB.<br />
Assign a global DB to store counter data as retentive data<br />
This option works regardless of where the counter is placed (OB, FC, or FB).<br />
1. Create a global DB:<br />
– Double-click "Add new block" from the Project tree<br />
– Click the data block (DB) icon<br />
– For the Type, choose global DB<br />
– If you want to be able to select individual items in this DB as retentive, be sure the<br />
symbolic-access-only box is checked.<br />
– Click OK<br />
2. Add counter structure(s) to the DB:<br />
– In the new global DB, add a new static tag using one of the counter data types. Be<br />
sure to consider the Type you want to use for your Preset and Count values.<br />
Counter Data Type Corresponding Type for the Preset and Count<br />
Values<br />
IEC_Counter INT<br />
IEC_SCounter SINT<br />
IEC_DCounter DINT<br />
IEC_UCounter UINT<br />
IEC_USCounter USINT<br />
IEC_UDCounter UDINT<br />
1. In the "Retain" column, check the box so that this structure will be retentive.<br />
– Repeat this process to create structures for all the counters that you want to store in<br />
this DB. You can either place each counter structure in a unique global DB, or you can<br />
place multiple counter structures into the same global DB. You can also place other<br />
static tags besides counters in this global DB. Placing multiple counter structures into<br />
the same global DB allows you to reduce your overall number of blocks.<br />
– Rename the counter structures if desired.<br />
2. Open the program block for editing where you want to place a retentive counter (OB, FC,<br />
or FB).<br />
3. Place the counter instruction at the desired location.<br />
<strong>S7</strong>-<strong>1200</strong> <strong>Programmable</strong> <strong>controller</strong><br />
System Manual, 04/2012, A5E02486680-06 193
Basic instructions<br />
7.3 Counters<br />
4. When the call options dialog appears, click the cancel button. You should now see a new<br />
counter instruction which has "???" both just above and just below the instruction name.<br />
5. On the top of the new counter instruction, type the name (do not use the helper to<br />
browse) of the global DB and counter structure that you created above (example:<br />
"Data_block_3.Static_1"). This causes the corresponding preset and count value type to<br />
be filled in (example: UInt for an IEC_UCounter structure).<br />
Assign a multi-instance DB to store counter data as retentive data<br />
This option only works if you place the counter in an FB.<br />
This option depends upon whether the FB was created as symbolic access only. Once the<br />
FB has been created, you cannot change the checkbox for "Symbolic access only"; it must<br />
be chosen correctly when the FB is created, on the first screen after selecting "Add new<br />
block" from the tree. To see how this box is configured for an existing FB, right-click on the<br />
FB in the Project tree, choose properties, and then choose attributes.<br />
If the FB was created with the "Symbolic access only" box checked:<br />
1. Open the FB for edit.<br />
2. Place the counter instruction at the desired location in the FB.<br />
3. When the Call options dialog appears, click on the Multi instance icon. The Multi Instance<br />
option is only available if the instruction is being placed into an FB.<br />
4. In the Call options dialog, rename the counter if desired.<br />
5. Click OK. The counter instruction appears in the editor with type INT for the preset and<br />
count values, and the IEC_COUNTER structure appears in the FB Interface under Static.<br />
6. If desired, change the type in the counter instruction from INT to one of the other types.<br />
The counter structure will change correspondingly.<br />
Type shown in counter instruction (for preset<br />
and count values)<br />
Corresponding structure Type shown in FB<br />
interface<br />
INT IEC_Counter<br />
SINT IEC_SCounter<br />
DINT IEC_DCounter<br />
UINT IEC_UCounter<br />
USINT IEC_USCounter<br />
UDINT IEC_UDCounter<br />
1. If necessary, open the FB interface editor (may have to click on the small arrow to<br />
expand the view).<br />
2. Under Static, locate the counter structure that was just created for you.<br />
3. In the Retain column for this counter structure, change the selection to "Retain".<br />
Whenever this FB is called later from another program block, an instance DB will be<br />
created with this interface definition which contains the counter structure marked as<br />
retentive.<br />
<strong>S7</strong>-<strong>1200</strong> <strong>Programmable</strong> <strong>controller</strong><br />
194 System Manual, 04/2012, A5E02486680-06
Basic instructions<br />
7.3 Counters<br />
If the FB was created with the "Symbolic access only" box not checked:<br />
1. Open the FB for edit.<br />
2. Place the counter instruction at the desired location in the FB.<br />
3. When the Call options dialog appears, click on the multi instance icon. The multi instance<br />
option is only available if the instruction is being placed into an FB.<br />
4. In the Call options dialog, rename the counter if desired.<br />
5. Click OK. The counter instruction appears in the editor with type INT for the preset and<br />
count value, and the IEC_COUNTER structure appears in the FB Interface under Static.<br />
6. If desired, change the type in the counter instruction from INT to one of the other types.<br />
The counter structure will change correspondingly.<br />
Type shown in counter instruction (for preset<br />
and count values)<br />
Corresponding structure Type shown in FB<br />
interface<br />
INT IEC_Counter<br />
SINT IEC_SCounter<br />
DINT IEC_DCounter<br />
UINT IEC_UCounter<br />
USINT IEC_USCounter<br />
UDINT IEC_UDCounter<br />
1. Open the block that will use this FB.<br />
2. Place this FB at the desired location. Doing so results in the creation of an instance data<br />
block for this FB.<br />
3. Open the instance data block created when you placed the FB in the editor.<br />
4. Under Static, locate the counter structure of interest. In the Retain column for this counter<br />
structure, check the box to make this structure retentive.<br />
<strong>S7</strong>-<strong>1200</strong> <strong>Programmable</strong> <strong>controller</strong><br />
System Manual, 04/2012, A5E02486680-06 195
Basic instructions<br />
7.4 Compare<br />
7.4 Compare<br />
7.4.1 Compare<br />
Table 7- 27 Compare instructions<br />
LAD FBD SCL Description<br />
out := in1 = in2;<br />
or<br />
IF in1 = in2<br />
THEN out := 1;<br />
ELSE out := 0;<br />
END_IF;<br />
Compares two values of the same data type. When the<br />
LAD contact comparison is TRUE, then the contact is<br />
activated. When the FBD box comparison is TRUE,<br />
then the box output is TRUE.<br />
1 For LAD and FBD: Click the instruction name (such as "==") to change the comparison type from the drop-down list.<br />
Click the "???" and select data type from the drop-down list.<br />
Table 7- 28 Data types for the parameters<br />
Parameter Data type Description<br />
IN1, IN2 SInt, Int, DInt, USInt, UInt, UDInt, Real, LReal, String, Char,<br />
Time, DTL, Constant<br />
Values to compare<br />
Table 7- 29 Comparison descriptions<br />
Relation type The comparison is true if ...<br />
= IN1 is equal to IN2<br />
IN1 is not equal to IN2<br />
>= IN1 is greater than or equal to IN2<br />
IN1 is greater than IN2<br />
< IN1 is less than IN2<br />
<strong>S7</strong>-<strong>1200</strong> <strong>Programmable</strong> <strong>controller</strong><br />
196 System Manual, 04/2012, A5E02486680-06
7.4.2 In-range and Out-of-range instructions<br />
Table 7- 30 In Range and Out of Range instructions<br />
Basic instructions<br />
7.4 Compare<br />
LAD / FBD SCL Description<br />
out := IN_RANGE(min, val, Tests whether an input value is in or out of a specified value range.<br />
max);<br />
If the comparison is TRUE, then the box output is TRUE.<br />
out := OUT_RANGE(min, val,<br />
max);<br />
1 For LAD and FBD: Click the "???" and select the data type from the drop-down list.<br />
Table 7- 31 Data types for the parameters<br />
Parameter Data type1 Description<br />
MIN, VAL, MAX SInt, Int, DInt, USInt, UInt, UDInt, Real, LReal, Constant Comparator inputs<br />
1 The input parameters MIN, VAL, and MAX must be the same data type.<br />
● The IN_RANGE comparison is true if: MIN
Basic instructions<br />
7.5 Math<br />
Table 7- 33 Data types for the parameter<br />
Parameter Data type Description<br />
IN Real, LReal Input data<br />
Table 7- 34 Operation<br />
Instruction The Real number test is TRUE if:<br />
OK The input value is a valid real number 1<br />
NOT_OK The input value is not a valid real number 1<br />
1 A Real or LReal value is invalid if it is +/- INF (infinity), NaN (Not a Number), or if it is a denormalized value. A<br />
denormalized value is a number very close to zero. The CPU substitutes a zero for a denormalized value in calculations.<br />
See also<br />
7.5 Math<br />
EN and ENO for LAD, FBD and SCL (Page 163)<br />
7.5.1 Calculate instruction<br />
Table 7- 35 CALCULATE instruction<br />
LAD / FBD SCL Description<br />
Use the<br />
standard SCL<br />
math<br />
expressions to<br />
create the<br />
equation.<br />
Table 7- 36 Data types for the parameters<br />
The CALCULATE instruction lets you create a math function that<br />
operates on inputs (IN1, IN2, .. INn) and produces the result at OUT,<br />
according to the equation that you define.<br />
Select a data type first. All inputs and the output must be the same<br />
data type.<br />
To add another input, click the icon at the last input.<br />
Parameter Data type1 IN1, IN2, ..INn SInt, Int, DInt, USInt, UInt, UDInt, Real, LReal, Byte, Word, DWord<br />
OUT SInt, Int, DInt, USInt, UInt, UDInt, Real, LReal, Byte, Word, DWord<br />
1 The IN and OUT parameters must be the same data type (with implicit conversions of the input parameters). For<br />
example: A SINT value for an input would be converted to an INT or a REAL value if OUT is an INT or REAL<br />
<strong>S7</strong>-<strong>1200</strong> <strong>Programmable</strong> <strong>controller</strong><br />
198 System Manual, 04/2012, A5E02486680-06
Basic instructions<br />
7.5 Math<br />
Click the calculator icon to open the dialog and define your math function. You enter your<br />
equation as inputs (such as IN1 and IN2) and operations. When you click "OK" to save the<br />
function, the dialog automatically creates the inputs for the CALCULATE instruction.<br />
An example and a list of possible math operations you can include is shown at the bottom of<br />
the editor.<br />
Note<br />
You also must create an input for any constants in your function. The constant value would<br />
then be entered in the associated input for the CALCULATE instruction.<br />
By entering constants as inputs, you can copy the CALCULATE instruction to other locations<br />
in your user program without having to change the function. You then can change the values<br />
or tags of the inputs for the instruction without modifying the function.<br />
When CALCULATE is executed and all the individual operations in the calculation complete<br />
successfully, then the ENO = 1. Otherwise, ENO = 0.<br />
7.5.2 Add, subtract, multiply and divide instructions<br />
Table 7- 37 Add, subtract, multiply and divide instructions<br />
LAD / FBD SCL Description<br />
out := in1 + in2; ADD: Addition (IN1 + IN2 = OUT)<br />
out := in1 - in2;<br />
out := in1 * in2;<br />
SUB: Subtraction (IN1 - IN2 = OUT)<br />
out := in1 / in2; MUL: Multiplication (IN1 * IN2 = OUT)<br />
DIV: Division (IN1 / IN2 = OUT)<br />
An Integer division operation truncates the fractional part of the quotient<br />
to produce an integer output.<br />
1 For LAD and FBD: Click the "???" and select a data type from the drop-down menu.<br />
<strong>S7</strong>-<strong>1200</strong> <strong>Programmable</strong> <strong>controller</strong><br />
System Manual, 04/2012, A5E02486680-06 199
Basic instructions<br />
7.5 Math<br />
Table 7- 38 Data types for the parameters (LAD and FBD)<br />
Parameter Data type 1 Description<br />
IN1, IN2 SInt, Int, DInt, USInt, UInt, UDInt, Real, LReal, Constant Math operation inputs<br />
OUT SInt, Int, DInt, USInt, UInt, UDInt, Real, LReal Math operation output<br />
1 Parameters IN1, IN2, and OUTmust be the same data type.<br />
Table 7- 39 ENO status<br />
ENO Description<br />
1 No error<br />
To add an ADD or MUL input, click the "Create" icon or right-click on an input<br />
stub for one of the existing IN parameters and select the "Insert input" command.<br />
To remove an input, right-click on an input stub for one of the existing IN parameters (when<br />
there are more than the original two inputs) and select the "Delete" command.<br />
When enabled (EN = 1), the math instruction performs the specified operation on the input<br />
values (IN1 and IN2) and stores the result in the memory address specified by the output<br />
parameter (OUT). After the successful completion of the operation, the instruction sets ENO<br />
= 1.<br />
0 The Math operation result value would be outside the valid number range of the data type selected. The<br />
least significant part of the result that fits in the destination size is returned.<br />
0 Division by 0 (IN2 = 0): The result is undefined and zero is returned.<br />
0 Real/LReal: If one of the input values is NaN (not a number) then NaN is returned.<br />
0 ADD Real/LReal: If both IN values are INF with different signs, this is an illegal operation and NaN is<br />
returned.<br />
0 SUB Real/LReal: If both IN values are INF with the same sign, this is an illegal operation and NaN is<br />
returned.<br />
0 MUL Real/LReal: If one IN value is zero and the other is INF, this is an illegal operation and NaN is<br />
returned.<br />
0 DIV Real/LReal: If both IN values are zero or INF, this is an illegal operation and NaN is returned.<br />
7.5.3 Modulo instruction<br />
Table 7- 40 MOD instruction<br />
LAD / FBD SCL Description<br />
out := in1 MOD in2; You can use the MOD instruction to return the remainder of an integer<br />
division operation. The value at the IN1 input is divided by the value at<br />
the IN2 input and the remainder is returned at the OUT output.<br />
1 For LAD and FBD: Click the "???" and select a data type from the drop-down menu.<br />
<strong>S7</strong>-<strong>1200</strong> <strong>Programmable</strong> <strong>controller</strong><br />
200 System Manual, 04/2012, A5E02486680-06
Table 7- 41 Data types for parameters<br />
Parameter Data type1 Description<br />
IN1 and IN2 SInt, Int, DInt, USInt, UInt, UDInt, Constant Modulo inputs<br />
OUT SInt, Int, DInt, USInt, UInt, UDInt Modulo output<br />
1 The IN1, IN2, and OUTparameters must be the same data type.<br />
Table 7- 42 ENO values<br />
ENO Description<br />
1 No error<br />
0 Value IN2 = 0, OUT is assigned the value zero<br />
7.5.4 Negation instruction<br />
Table 7- 43 NEG instruction<br />
Basic instructions<br />
7.5 Math<br />
LAD / FBD SCL Description<br />
-(in); The NEG instruction inverts the arithmetic sign of the value at parameter IN and stores<br />
the result in parameter OUT.<br />
1 For LAD and FBD: Click the "???" and select a data type from the drop-down menu.<br />
Table 7- 44 Data types for parameters<br />
Parameter Data type1 Description<br />
IN SInt, Int, DInt, Real, LReal, Constant Math operation input<br />
OUT SInt, Int, DInt, Real, LReal Math operation output<br />
1 The IN and OUT parameters must be the same data type.<br />
Table 7- 45 ENO status<br />
ENO Description<br />
1 No error<br />
0 The resulting value is outside the valid number range of the selected data type.<br />
Example for SInt: NEG (-128) results in +128 which exceeds the data type maximum.<br />
<strong>S7</strong>-<strong>1200</strong> <strong>Programmable</strong> <strong>controller</strong><br />
System Manual, 04/2012, A5E02486680-06 201
Basic instructions<br />
7.5 Math<br />
7.5.5 Increment and decrement instructions<br />
Table 7- 46 INC and DEC instructions<br />
LAD / FBD SCL Description<br />
in_out := in_out + 1; Increments a signed or unsigned integer number value:<br />
IN_OUT value +1 = IN_OUT value<br />
in_out := in_out - 1; Decrements a signed or unsigned integer number value:<br />
IN_OUT value - 1 = IN_OUT value<br />
1 For LAD and FBD: Click the "???" and select a data type from the drop-down menu.<br />
Table 7- 47 Data types for parameters<br />
Parameter Data type Description<br />
IN/OUT SInt, Int, DInt, USInt, UInt, UDInt Math operation input and output<br />
Table 7- 48 ENO status<br />
ENO Description<br />
1 No error<br />
0 The resulting value is outside the valid number range of the selected data type.<br />
Example for SInt: INC (+127) results in +128, which exceeds the data type maximum.<br />
7.5.6 Absolute value instruction<br />
Table 7- 49 ABS instruction<br />
LAD / FBD SCL Description<br />
out := ABS(in); Calculates the absolute value of a signed integer or real number at parameter<br />
IN and stores the result in parameter OUT.<br />
1 For LAD and FBD: Click the "???" and select a data type from the drop-down menu.<br />
<strong>S7</strong>-<strong>1200</strong> <strong>Programmable</strong> <strong>controller</strong><br />
202 System Manual, 04/2012, A5E02486680-06
Table 7- 50 Data types for parameters<br />
Parameter Data type1 Description<br />
IN SInt, Int, DInt, Real, LReal Math operation input<br />
OUT SInt, Int, DInt, Real, LReal Math operation output<br />
1 The IN and OUT parameters must be the same data type.<br />
Table 7- 51 ENO status<br />
ENO Description<br />
1 No error<br />
0 The math operation result value is outside the valid number range of the selected data type.<br />
Example for SInt: ABS (-128) results in +128 which exceeds the data type maximum.<br />
7.5.7 Minimum and Maximum instructions<br />
Table 7- 52 MIN and MAX instructions<br />
LAD / FBD SCL Description<br />
out:= MIN(<br />
in1:=_variant_in_,<br />
in2:=_variant_in_<br />
[,...in32]);<br />
out:= MAX(<br />
in1:=_variant_in_,<br />
in2:=_variant_in_<br />
[,...in32]);<br />
1 For LAD and FBD: Click the "???" and select a data type from the drop-down menu.<br />
Table 7- 53 Data types for the parameters<br />
Basic instructions<br />
7.5 Math<br />
The MIN instruction compares the value of two parameters IN1<br />
and IN2 and assigns the minimum (lesser) value to parameter<br />
OUT.<br />
The MAX instruction compares the value of two parameters IN1<br />
and IN2 and assigns the maximum (greater) value to parameter<br />
OUT.<br />
Parameter Data type1 Description<br />
IN1, IN2<br />
[...IN32]<br />
SInt, Int, DInt, USInt, UInt, UDInt, Real, LReal, Constant Math operation inputs (up to 32 inputs)<br />
OUT SInt, Int, DInt, USInt, UInt, UDInt, Real, LReal Math operation output<br />
1 The IN1, IN2, and OUT parameters must be the same data type.<br />
<strong>S7</strong>-<strong>1200</strong> <strong>Programmable</strong> <strong>controller</strong><br />
System Manual, 04/2012, A5E02486680-06 203
Basic instructions<br />
7.5 Math<br />
Table 7- 54 ENO status<br />
ENO Description<br />
1 No error<br />
To add an input, click the "Create" icon or right-click on an input stub for one of<br />
the existing IN parameters and select the "Insert input" command.<br />
To remove an input, right-click on an input stub for one of the existing IN parameters (when<br />
there are more than the original two inputs) and select the "Delete" command.<br />
0 For Real data type only:<br />
One or more inputs is not a real number (NaN).<br />
The resulting OUT is +/- INF (infinity).<br />
7.5.8 Limit instruction<br />
Table 7- 55 LIMIT instruction<br />
LAD / FBD SCL Description<br />
LIMIT(MN:=_variant_in_,<br />
IN:=_variant_in_,<br />
MX:=_variant_in_,<br />
OUT:=_variant_out_);<br />
1 For LAD and FBD: Click the "???" and select a data type from the drop-down menu.<br />
Table 7- 56 Data types for the parameters<br />
The Limit instruction tests if the value of parameter IN is inside the<br />
value range specified by parameters MIN and MAX and if not,<br />
clamps the value at MIN or MAX.<br />
Parameter Data type1 Description<br />
MN, IN, and MX SInt, Int, DInt, USInt, UInt, UDInt, Real, LReal, Constant Math operation inputs<br />
OUT SInt, Int, DInt, USInt, UInt, UDInt, Real, LReal Math operation output<br />
1 The MN, IN, MX, and OUTparameters must be the same data type.<br />
If the value of parameter IN is within the specified range, then the value of IN is stored in<br />
parameter OUT. If the value of parameter IN is outside of the specified range, then the OUT<br />
value is the value of parameter MIN (if the IN value is less than the MIN value) or the value<br />
of parameter MAX (if the IN value is greater than the MAX value).<br />
<strong>S7</strong>-<strong>1200</strong> <strong>Programmable</strong> <strong>controller</strong><br />
204 System Manual, 04/2012, A5E02486680-06
Table 7- 57 ENO status<br />
Basic instructions<br />
ENO Description<br />
1 No error<br />
0 Real: If one or more of the values for MIN, IN and MAX is NaN (Not a Number), then NaN is returned.<br />
0 If MIN is greater than MAX, the value IN is assigned to OUT.<br />
SCL examples:<br />
● MyVal := LIMIT(MN:=10,IN:=53, MX:=40); //Result: MyVal = 40<br />
● MyVal := LIMIT(MN:=10,IN:=37, MX:=40); //Result: MyVal = 37<br />
● MyVal := LIMIT(MN:=10,IN:=8, MX:=40); //Result: MyVal = 10<br />
7.5.9 Floating-point math instructions<br />
7.5 Math<br />
You use the floating point instructions to program mathematical operations using a Real or<br />
LReal data type:<br />
● SQR: Square (IN 2 = OUT)<br />
● SQRT: Square root (√IN = OUT)<br />
● LN: Natural logarithm (LN(IN) = OUT)<br />
● EXP: Natural exponential (e IN =OUT), where base e = 2.71828182845904523536<br />
● EXPT: General exponential (IN1 IN2 = OUT)<br />
EXPT parameters IN1 and OUT are always the same data type, for which you must<br />
select Real or LReal. You can select the data type for the exponent parameter IN2 from<br />
among many data types.<br />
● FRAC: Fraction (fractional part of floating point number IN = OUT)<br />
● SIN: Sine (sin(IN radians) = OUT)<br />
ASIN: Inverse sine (arcsine(IN) = OUT radians), where the sin(OUT radians) = IN<br />
● COS: Cosine (cos(IN radians) = OUT)<br />
ACOS: Inverse cosine (arccos(IN) = OUT radians), where the cos(OUT radians) = IN<br />
● TAN: Tangent (tan(IN radians) = OUT)<br />
ATAN: Inverse tangent (arctan(IN) = OUT radians), where the tan(OUT radians) = IN<br />
<strong>S7</strong>-<strong>1200</strong> <strong>Programmable</strong> <strong>controller</strong><br />
System Manual, 04/2012, A5E02486680-06 205
Basic instructions<br />
7.5 Math<br />
Table 7- 58 Examples of floating-point math instructions<br />
LAD / FBD SCL Description<br />
out := SQR(in);<br />
Square: IN<br />
or<br />
out := in * in;<br />
2 = OUT<br />
For example: If IN = 9, then OUT = 81.<br />
out := in1 ** in2; General exponential: IN1 IN2 = OUT<br />
For example: If IN1 = 3 and IN2 = 2, then OUT = 9.<br />
1 For LAD and FBD: Click the "???" (by the instruction name) and select a data type from the drop-down menu.<br />
2 For SCL: You can also use the basic SCL math operators to create the mathematical expressions.<br />
Table 7- 59 Data types for parameters<br />
Parameter Data type Description<br />
IN, IN1 Real, LReal, Constant Inputs<br />
IN2 SInt, Int, DInt, USInt, UInt,UDInt, Real, LReal, Constant EXPT exponent input<br />
OUT Real, LReal Outputs<br />
Table 7- 60 ENO status<br />
ENO Instruction Condition Result (OUT)<br />
1 All No error Valid result<br />
0 SQR<br />
Result exceeds valid Real/LReal range +INF<br />
IN is +/- NaN (not a number) +NaN<br />
SQRT<br />
IN is negative -NaN<br />
IN is +/- INF (infinity) or +/- NaN +/- INF or +/- NaN<br />
LN<br />
IN is 0.0, negative, -INF, or -NaN -NaN<br />
IN is +INF or +NaN +INF or +NaN<br />
EXP<br />
Result exceeds valid Real/LReal range +INF<br />
IN is +/- NaN +/- NaN<br />
SIN, COS, TAN IN is +/- INF or +/- NaN +/- INF or +/- NaN<br />
ASIN, ACOS<br />
IN is outside valid range of -1.0 to +1.0 +NaN<br />
IN is +/- NaN +/- NaN<br />
ATAN IN is +/- NaN +/- NaN<br />
FRAC IN is +/- INF or +/- NaN +NaN<br />
EXPT<br />
IN1 is +INF and IN2 is not -INF +INF<br />
IN1 is negative or -INF +NaN if IN2 is Real/LReal,<br />
-INF otherwise<br />
IN1 or IN2 is +/- NaN +NaN<br />
<strong>S7</strong>-<strong>1200</strong> <strong>Programmable</strong> <strong>controller</strong><br />
206 System Manual, 04/2012, A5E02486680-06
ENO Instruction Condition Result (OUT)<br />
IN1 is 0.0 and IN2 is Real/LReal (only) +NaN<br />
7.6 Move<br />
7.6.1 Move and block move instructions<br />
Basic instructions<br />
7.6 Move<br />
Use the Move instructions to copy data elements to a new memory address and convert<br />
from one data type to another. The source data is not changed by the move process.<br />
● The MOVE instruction copies a single data element from the source address specified by<br />
the IN parameter to the destination addresses specified by the OUT parameter.<br />
● The MOVE_BLK and UMOVE_BLK instructions have an additional COUNT parameter.<br />
The COUNT specifies how many data elements are copied. The number of bytes per<br />
element copied depends on the data type assigned to the IN and OUT parameter tag<br />
names in the PLC tag table.<br />
Table 7- 61 MOVE, MOVE_BLK and UMOVE_BLK instructions<br />
LAD / FBD SCL Description<br />
out1 := in; Copies a data element stored at a specified address to a new address<br />
or multiple addresses. 1<br />
MOVE_BLK(<br />
in:=_variant_in,<br />
count:=_uint_in,<br />
out=>_variant_out);<br />
UMOVE_BLK(<br />
in:=_variant_in,<br />
count:=_uint_in,<br />
out=>_variant_out);<br />
Interruptible move that copies a block of data elements to a new<br />
address.<br />
Uninterruptible move that copies a block of data elements to a new<br />
address.<br />
1 MOVE instruction: To add another output in LAD or FBD, click the "Create" icon by the output parameter. For SCL, use<br />
multiple assignment statements. You might also use one of the loop constructions.<br />
Table 7- 62 Data types for the MOVE instruction<br />
Parameter Data type Description<br />
IN SInt, Int, DInt, USInt, UInt, UDInt, Real, LReal, Byte, Word,<br />
DWord, Char, Array, Struct, DTL, Time<br />
Source address<br />
OUT SInt, Int, DInt, USInt, UInt, UDInt, Real, LReal, Byte, Word,<br />
DWord, Char, Array, Struct, DTL, Time<br />
Destination address<br />
<strong>S7</strong>-<strong>1200</strong> <strong>Programmable</strong> <strong>controller</strong><br />
System Manual, 04/2012, A5E02486680-06 207
Basic instructions<br />
7.6 Move<br />
To add MOVE outputs, click the "Create" icon or right-click on an output stub for<br />
one of the existing OUT parameters and select the "Insert output" command.<br />
To remove an output, right-click on an output stub for one of the existing OUT parameters<br />
(when there are more than the original two outputs) and select the "Delete" command.<br />
Table 7- 63 Data types for the MOVE_BLK and UMOVE_BLK instructions<br />
Parameter Data type Description<br />
IN SInt, Int, DInt, USInt, UInt, UDInt, Real, LReal Byte,<br />
Word, DWord<br />
Source start address<br />
COUNT UInt Number of data elements to copy<br />
OUT SInt, Int, DInt, USInt, UInt, UDInt, Real, LReal, Byte,<br />
Word, DWord<br />
Destination start address<br />
Note<br />
Rules for data copy operations<br />
To copy the Bool data type, use SET_BF, RESET_BF, R, S, or output coil (LAD)<br />
(Page 178)<br />
To copy a single elementary data type, use MOVE<br />
To copy an array of an elementary data type, use MOVE_BLK or UMOVE_BLK<br />
To copy a structure, use MOVE<br />
To copy a string, use S_MOVE (Page 254)<br />
To copy a single character in a string, use MOVE<br />
The MOVE_BLK and UMOVE_BLK instructions cannot be used to copy arrays or<br />
structures to the I, Q, or M memory areas.<br />
MOVE_BLK and UMOVE_BLK instructions differ in how interrupts are handled:<br />
● Interrupt events are queued and processed during MOVE_BLK execution. Use the<br />
MOVE_BLK instruction when the data at the move destination address is not used within<br />
an interrupt OB subprogram or, if used, the destination data does not have to be<br />
consistent. If a MOVE_BLK operation is interrupted, then the last data element moved is<br />
complete and consistent at the destination address. The MOVE_BLK operation is<br />
resumed after the interrupt OB execution is complete.<br />
● Interrupt events are queued but not processed until UMOVE_BLK execution is complete.<br />
Use the UMOVE_BLK instruction when the move operation must be completed and the<br />
destination data consistent, before the execution of an interrupt OB subprogram. For<br />
more information, see the section on data consistency (Page 153).<br />
ENO is always true following execution of the MOVE instruction.<br />
<strong>S7</strong>-<strong>1200</strong> <strong>Programmable</strong> <strong>controller</strong><br />
208 System Manual, 04/2012, A5E02486680-06
Table 7- 64 ENO status<br />
ENO Condition Result<br />
1 No error All COUNT elements were<br />
successfully copied.<br />
0 Either the source (IN) range or the destination<br />
(OUT) range exceeds the available memory<br />
area.<br />
7.6.2 FieldRead and FieldWrite instructions<br />
Basic instructions<br />
7.6 Move<br />
Elements that fit are copied. No partial<br />
elements are copied.<br />
Note<br />
STEP 7 V10.5 did not support a variable reference as an array index or multi-dimensional<br />
arrays. The FieldRead and FieldWrite instructions were used to provide variable array index<br />
operations for a one-dimensional array. STEP 7 V11 does support a variable as an array<br />
index and multi-dimensional arrays. FieldRead and FieldWrite are included in STEP 7 V11<br />
for backward compatibility with programs that have used these instructions.<br />
Table 7- 65 FieldRead and FieldWrite instructions<br />
LAD / FBD SCL Description<br />
value :=<br />
member[index];<br />
member[index]<br />
:= value;<br />
1 For LAD and FBD: Click the "???" and select a data type from the drop-down menu.<br />
FieldRead reads the array element with the index value INDEX<br />
from the array whose first element in specified by the MEMBER<br />
parameter. The value of the array element is transferred to the<br />
location specified at the VALUE parameter.<br />
WriteField transfers the value at the location specified by the<br />
VALUE parameter to the array whose first element is specified by<br />
the MEMBER parameter. The value is transferred to the array<br />
element whose array index is specified by the INDEX parameter.<br />
<strong>S7</strong>-<strong>1200</strong> <strong>Programmable</strong> <strong>controller</strong><br />
System Manual, 04/2012, A5E02486680-06 209
Basic instructions<br />
7.6 Move<br />
Table 7- 66 Data types for parameters<br />
Parameter and type Data type Description<br />
Index Input DInt The index number of the array element to be<br />
read or written to<br />
Member 1 Input Array element types:<br />
Bool, Byte, Word, DWord, Char, SInt, Int,<br />
Dint, USInt, UInt, UDInt, Real, LReal<br />
Value 1 Out Bool, Byte, Word, DWord, Char, SInt, Int,<br />
Dint, USInt, UInt, UDInt, Real, LReal<br />
Location of the first element in a onedimension<br />
array defined in a global data block<br />
or block interface.<br />
For example: If the array index is specified as<br />
[-2..4], then the index of the first element is -2<br />
and not 0.<br />
Location to which the specified array element<br />
is copied (FieldRead)<br />
Location of the value that is copied to the<br />
specified array element (FieldWrite)<br />
1 The data type of the array element specified by the MEMBER parameter and the VALUE parameter must have the<br />
same data type.<br />
Accessing data by array indexing<br />
The enable output ENO = 0, if one of the following conditions applies:<br />
● The EN input has signal state "0"<br />
● The array element specified at the INDEX parameter is not defined in the array<br />
referenced at MEMBER parameter<br />
● Errors such as an overflow occur during processing<br />
To access elements of an array with a variable, simply use the variable as an array index in<br />
your program logic. For example, the network below sets an output based on the Boolean<br />
value of an array of Booleans in "Data_block_1" referenced by the PLC tag "Index".<br />
The logic with the variable array index is equivalent to the former method using the<br />
FieldRead instruction:<br />
FieldWrite and FieldRead instructions can be replaced with variable array indexing logic.<br />
<strong>S7</strong>-<strong>1200</strong> <strong>Programmable</strong> <strong>controller</strong><br />
210 System Manual, 04/2012, A5E02486680-06
7.6.3 Fill instructions<br />
Basic instructions<br />
SCL has no FieldRead or FieldWrite instructions, but supports indirect addressing of an<br />
array with a variable:<br />
#Tag_1 := "Data_block_1".Bool_Array[#Index];<br />
Table 7- 67 FILL_BLK and UFILL_BLK instructions<br />
LAD / FBD SCL Description<br />
FILL_BLK(<br />
in:=_variant_in,<br />
count:=int,<br />
out=>_variant_out);<br />
UFILL_BLK(<br />
in:=_variant_in,<br />
count:=int<br />
out=>_variant_out);<br />
Table 7- 68 Data types for parameters<br />
Interruptible fill instruction: Fills an address range with copies of a<br />
specified data element<br />
7.6 Move<br />
Uninterruptible fill instruction: Fills an address range with copies of a<br />
specified data element<br />
Parameter Data type Description<br />
IN SInt, Int, DIntT, USInt, UInt, UDInt, Real, LReal, Byte, Word,<br />
DWord<br />
Data source address<br />
COUNT USInt, UInt Number of data elements to copy<br />
OUT SInt, Int, DIntT, USInt, UInt, UDInt, Real, LReal, Byte, Word,<br />
DWord<br />
Data destination address<br />
Note<br />
Rules for data fill operations<br />
To fill with the BOOL data type, use SET_BF, RESET_BF, R, S, or output coil (LAD)<br />
To fill with a single elementary data type, use MOVE<br />
To fill an array with an elementary data type, use FILL_BLK or UFILL_BLK<br />
To fill a single character in a string, use MOVE<br />
The FILL_BLK and UFILL_BLK instructions cannot be used to fill arrays in the I, Q, or M<br />
memory areas.<br />
The FILL_BLK and UFILL_BLK instructions copy the source data element IN to the<br />
destination where the initial address is specified by the parameter OUT. The copy process<br />
repeats and a block of adjacent addresses is filled until the number of copies is equal to the<br />
COUNT parameter.<br />
<strong>S7</strong>-<strong>1200</strong> <strong>Programmable</strong> <strong>controller</strong><br />
System Manual, 04/2012, A5E02486680-06 211
Basic instructions<br />
7.6 Move<br />
FILL_BLK and UFILL_BLK instructions differ in how interrupts are handled:<br />
● Interrupt events are queued and processed during FILL_BLK execution. Use the<br />
FILL_BLK instruction when the data at the move destination address is not used within an<br />
interrupt OB subprogram or, if used, the destination data does not have to be consistent.<br />
● Interrupt events are queued but not processed until UFILL_BLK execution is complete.<br />
Use the UFILL_BLK instruction when the move operation must be completed and the<br />
destination data consistent, before the execution of an interrupt OB subprogram.<br />
Table 7- 69 ENO status<br />
7.6.4 Swap instruction<br />
Table 7- 70 SWAP instruction<br />
ENO Condition Result<br />
1 No error The IN element was successfully copied to<br />
all COUNT destinations.<br />
0 The destination (OUT) range exceeds<br />
the available memory area<br />
LAD / FBD SCL Description<br />
Elements that fit are copied. No partial<br />
elements are copied.<br />
out := SWAP(in); Reverses the byte order for two-byte and four-byte data elements. No change<br />
is made to the bit order within each byte. ENO is always TRUE following<br />
execution of the SWAP instruction.<br />
1 For LAD and FBD: Click the "???" and select a data type from the drop-down menu.<br />
Table 7- 71 Data types for the parameters<br />
Parameter Data type Description<br />
IN Word, DWord Ordered data bytes IN<br />
OUT Word, DWord Reverse ordered data bytes OUT<br />
Example 1 Parameter IN = MB0<br />
(before execution)<br />
Parameter OUT = MB4,<br />
(after execution)<br />
Address MB0 MB1 MB4 MB5<br />
W#16#1234 12 34<br />
34 12<br />
WORD MSB LSB<br />
MSB LSB<br />
<strong>S7</strong>-<strong>1200</strong> <strong>Programmable</strong> <strong>controller</strong><br />
212 System Manual, 04/2012, A5E02486680-06
7.7 Convert<br />
Example 2 Parameter IN = MB0<br />
(before execution)<br />
Parameter OUT = MB4,<br />
(after execution)<br />
Basic instructions<br />
7.7 Convert<br />
Address MB0 MB1 MB2 MB3 MB4 MB5 MB6 MB7<br />
DW#16#<br />
12345678<br />
12 34 56 78 78 56 34 12<br />
DWORD MSB<br />
LSB MSB<br />
LSB<br />
7.7.1 CONV instruction<br />
Table 7- 72 Convert (CONV) instruction<br />
LAD / FBD SCL Description<br />
out := _TO_(in); Converts a data element from one<br />
data type to another data type.<br />
1 For LAD and FBD: Click the "???" and select the data types from the drop-down menu.<br />
2 For SCL: Construct the conversion instruction by identifying the data type for the input parameter (in) and output<br />
parameter (out). For example, DWORD_TO_REAL converts a DWord value to a Real value.<br />
Table 7- 73 Data types for the parameters<br />
Parameter Data type Description<br />
IN Bit string1 , SInt, USInt, Int, UInt, DInt, UDInt, Real, LReal,<br />
BCD16, BCD32<br />
Input value<br />
OUT Bit string1 , SInt, USInt, Int, UInt, DInt, UDInt, Real, LReal,<br />
BCD16, BCE32<br />
Input value converted to a new data type<br />
1 The instruction does not allow you to select Bit strings (Byte, Word, DWord). To enter an operand of data type Byte,<br />
Word, or DWord for a parameter of the instruction, select an unsigned integer with the same bit length. For example,<br />
select USInt for a Byte, UInt for a Word, or UDInt for a DWord.<br />
After you select the (convert from) data type, a list of possible conversions is shown in the<br />
(convert to) dropdown list. Conversions from and to BCD16 are restricted to the Int data<br />
type. Conversions from and to BCD32 are restricted to the DInt data type.<br />
<strong>S7</strong>-<strong>1200</strong> <strong>Programmable</strong> <strong>controller</strong><br />
System Manual, 04/2012, A5E02486680-06 213
Basic instructions<br />
7.7 Convert<br />
Table 7- 74 ENO status<br />
ENO Description Result OUT<br />
1 No error Valid result<br />
0 IN is +/- INF or +/- NaN +/- INF or +/- NaN<br />
0 Result exceeds valid range for OUT data type OUT is set to the least-significant bytes of IN<br />
7.7.2 Conversion instructions for SCL<br />
Conversion instructions for SCL<br />
Table 7- 75 Conversion from a Bool, Byte, Word, or DWord<br />
Data type Instruction Result<br />
Bool<br />
Byte<br />
Word<br />
DWord<br />
BOOL_TO_BYTE, BOOL_TO_WORD,<br />
BOOL_TO_DWORD, BOOL_TO_INT,<br />
BOOL_TO_DINT<br />
The value is transferred to the least significant bit of the<br />
target data type.<br />
BYTE_TO_BOOL The lowest bit is transferred into the destination data<br />
type.<br />
BYTE_TO_WORD, BYTE_TO_DWORD The value is transferred to the low byte of the target data<br />
type.<br />
BYTE_TO_SINT, BYTE_TO_USINT The value is transferred to the target data type.<br />
BYTE_TO_INT, BYTE_TO_UINT,<br />
BYTE_TO_DINT, BYTE_TO_UDINT<br />
The value is transferred to the least significant byte of the<br />
target data type.<br />
WORD_TO_BOOL The lowest bit is transferred into the destination data<br />
type.<br />
WORD_TO_BYTE The low byte of the source value is transferred to the<br />
target data type<br />
WORD _TO_DWORD The value is transferred to the low byte of the target data<br />
type.<br />
WORD _TO_SINT, WORD _TO_USINT The low byte of the source value is transferred to the<br />
target data type.<br />
WORD _TO_INT, WORD _TO_UINT The value is transferred to the target data type.<br />
WORD _TO_DINT, WORD _TO_UDINT The value is transferred to the low byte of the target data<br />
type.<br />
DWORD_TO_BOOL The lowest bit is transferred into the destination data<br />
type.<br />
DWORD_TO_BYTE, DWORD_TO_WORD,<br />
DWORD_TO_SINT, DWORD_TO_USINT,<br />
DWORD_TO_INT, DWORD_TO_UINT<br />
DWORD_TO_DINT, DWORD_TO_UDINT,<br />
DWORD_TO_REAL<br />
The low byte of the source value is transferred to the<br />
target data type.<br />
The value is transferred to the target data type.<br />
<strong>S7</strong>-<strong>1200</strong> <strong>Programmable</strong> <strong>controller</strong><br />
214 System Manual, 04/2012, A5E02486680-06
Table 7- 76 Conversion from a short integer (SInt or USInt)<br />
Basic instructions<br />
7.7 Convert<br />
Data type Instruction Result<br />
SInt<br />
SINT_TO_BOOL The lowest bit is transferred into the destination data<br />
type.<br />
SINT_TO_BYTE The value is transferred to the target data type<br />
SINT_TO_WORD, SINT_TO_DWORD, The value is transferred to the low byte of the target data<br />
SINT_TO_INT, SINT_TO_DINT<br />
type.<br />
SINT_TO_USINT, SINT_TO_UINT,<br />
SINT_TO_UDINT, SINT_TO_REAL,<br />
SINT_TO_LREAL, SINT_TO_CHAR,<br />
SINT_TO_STRING<br />
The value is converted.<br />
USInt<br />
USINT_TO_BOOL The lowest bit is transferred into the destination data<br />
type.<br />
USINT_TO_BYTE The value is transferred to the target data type<br />
USINT_TO_WORD, USINT_TO_DWORD, The value is transferred to the low byte of the target data<br />
USINT_TO_INT, USINT_TO_UINT,<br />
USINT_TO_DINT, USINT_TO_UDINT<br />
type.<br />
USINT_TO_SINT, USINT_TO_REAL,<br />
USINT_TO_LREAL, USINT_TO_CHAR,<br />
USINT_TO_STRING<br />
The value is converted.<br />
Table 7- 77 Conversion from an integer (Int or UInt)<br />
Data type instruction Result<br />
Int<br />
INT_TO_BOOL The lowest bit is transferred into the destination data<br />
type.<br />
INT_TO_BYTE, INT_TO_DWORD,<br />
INT_TO_SINT, INT_TO_USINT,<br />
INT_TO_UINT, INT_TO_UDINT,<br />
INT_TO_REAL, INT_TO_LREAL,<br />
INT_TO_CHAR, INT_TO_STRING<br />
The value is converted.<br />
INT_TO_WORD The value is transferred to the target data type.<br />
INT_TO_DINT The value is transferred to the low byte of the target data<br />
type.<br />
UInt<br />
UINT_TO_BOOL The lowest bit is transferred into the destination data<br />
type.<br />
UINT_TO_BYTE, UINT_TO_SINT,<br />
UINT_TO_USINT, UINT_TO_INT,<br />
UINT_TO_REAL, UINT_TO_LREAL,<br />
UINT_TO_CHAR, UINT_TO_STRING<br />
The value is converted.<br />
UINT_TO_WORD, UINT_TO_DATE The value is transferred to the target data type.<br />
UINT_TO_DWORD, UINT_TO_DINT, The value is transferred to the low byte of the target data<br />
UINT_TO_UDINT<br />
type.<br />
<strong>S7</strong>-<strong>1200</strong> <strong>Programmable</strong> <strong>controller</strong><br />
System Manual, 04/2012, A5E02486680-06 215
Basic instructions<br />
7.7 Convert<br />
Table 7- 78 Conversion from a double integer (Dint or UDInt)<br />
Data type Instruction Result<br />
DInt<br />
DINT_TO_BOOL The lowest bit is transferred into the<br />
destination data type.<br />
DINT_TO_BYTE, DINT_TO_WORD, DINT_TO_SINT,<br />
DINT_TO_USINT, DINT_TO_INT, DINT_TO_UINT,<br />
DINT_TO_UDINT, DINT_TO_REAL, DINT_TO_LREAL,<br />
DINT_TO_CHAR, DINT_TO_STRING<br />
The value is converted.<br />
DINT_TO_DWORD, DINT_TO_TIME The value is transferred to the target<br />
data type.<br />
UDInt<br />
UDINT_TO_BOOL The lowest bit is transferred into the<br />
destination data type.<br />
UDINT_TO_BYTE, UDINT_TO_WORD, UDINT_TO_SINT,<br />
UDINT_TO_USINT, UDINT_TO_INT, UDINT_TO_UINT,<br />
UDINT_TO_DINT, UDINT_TO_REAL, UDINT_TO_LREAL,<br />
UDINT_TO_CHAR, UDINT_TO_STRING<br />
The value is converted.<br />
UDINT_TO_DWORD, UDINT_TO_TOD The value is transferred to the target<br />
data type.<br />
Table 7- 79 Conversion from a Real number (Real or LReal)<br />
Data type Instruction Result<br />
Real<br />
REAL_TO_DWORD, REAL_TO_LREAL The value is transferred to the target<br />
data type.<br />
REAL_TO_SINT, REAL_TO_USINT, REAL_TO_INT,<br />
REAL_TO_UINT, REAL_TO_DINT, REAL_TO_UDINT,<br />
REAL_TO_STRING<br />
The value is converted.<br />
LReal<br />
LREAL_TO_SINT, LREAL_TO_USINT, LREAL_TO_INT,<br />
LREAL_TO_UINT, LREAL_TO_DINT, LREAL_TO_UDINT,<br />
LREAL_TO_REAL, LREAL_TO_STRING<br />
The value is converted.<br />
Table 7- 80 Conversion from Time, DTL, TOD or Date<br />
Data type Instruction Result<br />
Time TIME_TO_DINT The value is transferred to the target data type.<br />
DTL DTL_TO_DATE, DTL_TO_TOD The value is converted.<br />
TOD TOD_TO_UDINT The value is converted.<br />
Date DATE_TO_UINT The value is converted.<br />
<strong>S7</strong>-<strong>1200</strong> <strong>Programmable</strong> <strong>controller</strong><br />
216 System Manual, 04/2012, A5E02486680-06
Table 7- 81 Conversion from a Char or String<br />
Basic instructions<br />
7.7 Convert<br />
Data type Instruction Result<br />
Char<br />
CHAR_TO_SINT, CHAR_TO_USINT,<br />
CHAR_TO_INT, CHAR_TO_UINT,<br />
CHAR_TO_DINT, CHAR_TO_UDINT<br />
The value is converted.<br />
CHAR_TO_STRING The value is transferred to the first character of<br />
the string.<br />
String<br />
STRING_TO_SINT, STRING_TO_USINT,<br />
STRING_TO_INT, STRING_TO_UINT,<br />
STRING_TO_DINT, STRING_TO_UDINT,<br />
STRING_TO_REAL, STRING_TO_LREAL<br />
The value is converted.<br />
STRING_TO_CHAR The first character of the string is copied to the<br />
Char.<br />
7.7.3 Round and truncate instructions<br />
Table 7- 82 ROUND and TRUNC instructions<br />
LAD / FBD SCL Description<br />
out := ROUND (in); Converts a real number to an integer. The default data type is DINT. When<br />
the output is a valid data type other than DINT, it must be declared<br />
explicitly; for example, ROUND_REAL or ROUND_LREAL.<br />
The real number fraction is rounded to the nearest integer value (IEEE -<br />
round to nearest). If the number is exactly one-half the span between two<br />
integers (for example, 10.5), then the number is rounded to the even<br />
integer. For example:<br />
ROUND (10.5) = 10<br />
ROUND (11.5) = 12<br />
out := TRUNC(in); TRUNC converts a real number to an integer. The fractional part of the real<br />
number is truncated to zero (IEEE - round to zero).<br />
1 For LAD and FBD: Click the "???" (by the instruction name) and select a data type from the drop-down menu.<br />
Table 7- 83 Data types for the parameters<br />
Parameter Data type Description<br />
IN Real, LReal Floating point input<br />
OUT SInt, Int, DInt, USInt, UInt, UDInt, Real, LReal Rounded or truncated output<br />
<strong>S7</strong>-<strong>1200</strong> <strong>Programmable</strong> <strong>controller</strong><br />
System Manual, 04/2012, A5E02486680-06 217
Basic instructions<br />
7.7 Convert<br />
Table 7- 84 ENO status<br />
ENO Description Result OUT<br />
1 No error Valid result<br />
0 IN is +/- INF or +/- NaN +/- INF or +/- NaN<br />
7.7.4 Ceiling and floor instructions<br />
Table 7- 85 CEIL and FLOOR instructions<br />
LAD / FBD SCL Description<br />
out := CEIL(in); Converts a real number (Real or LReal) to the closest integer<br />
greater than or equal to the selected real number (IEEE "round<br />
to +infinity").<br />
out := FLOOR(in); Converts a real number (Real or LReal) to the closest integer<br />
smaller than or equal to the selected real number (IEEE "round<br />
to -infinity").<br />
1 For LAD and FBD: Click the "???" (by the instruction name) and select a data type from the drop-down menu.<br />
Table 7- 86 Data types for the parameters<br />
Parameter Data type Description<br />
IN Real, LReal Floating point input<br />
OUT SInt, Int, DInt, USInt, UInt, UDInt, Real, LReal Converted output<br />
Table 7- 87 ENO status<br />
ENO Description Result OUT<br />
1 No error Valid result<br />
0 IN is +/- INF or +/- NaN +/- INF or +/- NaN<br />
<strong>S7</strong>-<strong>1200</strong> <strong>Programmable</strong> <strong>controller</strong><br />
218 System Manual, 04/2012, A5E02486680-06
7.7.5 Scale and normalize instructions<br />
Table 7- 88 SCALE_X and NORM_X instructions<br />
LAD / FBD SCL Description<br />
out :=SCALE_X(min:=_in_,<br />
value:=_in_,<br />
max:=_in_);<br />
out :=NORM_X(min:=_in_,<br />
value:=_in_,<br />
max:=_in_);<br />
1 For LAD and FBD: Click the "???" and select a data type from the drop-down menu.<br />
Table 7- 89 Data types for the parameters<br />
Basic instructions<br />
7.7 Convert<br />
Scales the normalized real parameter VALUE<br />
where ( 0.0
Basic instructions<br />
7.7 Convert<br />
Table 7- 90 ENO status<br />
Note<br />
SCALE_X parameter VALUE should be restricted to ( 0.0
Basic instructions<br />
7.7 Convert<br />
To transform the analog value to the corresponding engineering units, normalize the input to<br />
a value between 0.0 and 1.0, and then scale it between -30.0 and 70.0. The resulting value<br />
is the temperature represented by the analog input in degrees C:<br />
Note that if the analog input was from an analog signal module or signal board using voltage,<br />
the MIN value for the NORM_X instruction would be -27648 instead of 0.<br />
Example (LAD): normalizing and scaling an analog output value<br />
An analog output to be set in an analog signal module or signal board using output in current<br />
must be in the range 0 to 27648 for valid values. Suppose an analog output represents a<br />
temperature setting where the 0 value of the analog input represents -30.0 degrees C and<br />
27648 represents 70.0 degrees C. To convert a temperature value in memory that is<br />
between -30.0 and 70.0 to a value for the analog output in the range 0 to 27648, you must<br />
normalize the value in engineering units to a value between 0.0 and 1.0, and then scale it to<br />
the range of the analog output, 0 to 27648:<br />
Note that if the analog output was for an analog signal module or signal board using voltage,<br />
the MIN value for the SCALE_X instruction would be -27648 instead of 0.<br />
Additional information on analog input representations (Page 770) and analog output<br />
representations (Page 771) in both voltage and current can be found in the Technical<br />
Specifications.<br />
<strong>S7</strong>-<strong>1200</strong> <strong>Programmable</strong> <strong>controller</strong><br />
System Manual, 04/2012, A5E02486680-06 221
Basic instructions<br />
7.8 Program control<br />
7.8 Program control<br />
7.8.1 Overview of SCL program control statements<br />
Structured Control Language (SCL) provides three types of program control statements for<br />
structuring your user program:<br />
● Selective statements: A selective statement enables you to direct program execution into<br />
alternative sequences of statements.<br />
● Loops: You can control loop execution using iteration statements. An iteration statement<br />
specifies which parts of a program should be iterated depending on certain conditions.<br />
● Program jumps: A program jump means an immediate jump to a specified jump<br />
destination and therefore to a different statement within the same block.<br />
These program control statements use the syntax of the PASCAL programming language.<br />
Table 7- 91 Types of SCL program control statements<br />
Program control statement Description<br />
Selective<br />
IF-THEN statement Enables you to direct program execution into one of two alternative<br />
(Page 223)<br />
branches, depending on a condition being TRUE or FALSE<br />
CASE statement Enables the selective execution into 1 of n alternative branches, based<br />
(Page 224)<br />
on the value of a variable<br />
Loop<br />
FOR statement<br />
Repeats a sequence of statements for as long as the control variable<br />
(Page 225)<br />
remains within the specified value range<br />
WHILE-DO statement Repeats a sequence of statements while an execution condition<br />
(Page 226)<br />
continues to be satisfied<br />
REPEAT-UNTIL<br />
statement (Page 227)<br />
Repeats a sequence of statements until a terminate condition is met<br />
Program jump CONTINUE statement<br />
(Page 227)<br />
Stops the execution of the current loop iteration<br />
EXIT statement<br />
Exits a loop at any point regardless of whether the terminate condition<br />
(Page 228)<br />
is satisfied or not<br />
GOTO statement<br />
(Page 229)<br />
Causes the program to jump immediately to a specified label<br />
IF-THEN statement Causes the program to exit the block currently being executed and to<br />
(Page 223)<br />
return to the calling block<br />
See also<br />
RETURN statement (Page 229)<br />
<strong>S7</strong>-<strong>1200</strong> <strong>Programmable</strong> <strong>controller</strong><br />
222 System Manual, 04/2012, A5E02486680-06
7.8.2 IF-THEN statement<br />
Basic instructions<br />
7.8 Program control<br />
The IF-THEN statement is a conditional statement that controls program flow by executing a<br />
group of statements, based on the evaluation of a Bool value of a logical expression. You<br />
can also use brackets to nest or structure the execution of multiple IF-THEN statements.<br />
Table 7- 92 Elements of the IF-THEN statement<br />
SCL Description<br />
IF "condition" THEN<br />
statement_A;<br />
statement_B;<br />
statement_C;<br />
;<br />
[ELSIF "condition-n" THEN<br />
statement_N;<br />
;]<br />
[ELSE<br />
statement_X;<br />
;]<br />
If "condition" is TRUE or 1, then execute the following statements until<br />
encountering the END_IF statement.<br />
If "condition" is FALSE or 0, then skip to END_IF statement (unless the<br />
program includes optional ELSIF or ELSE statements).<br />
The optional ELSEIF1 statement provides additional conditions to be<br />
evaluated. For example: If "condition" in the IF-THEN statement is FALSE,<br />
then the program evaluates "condition-n". If "condition-n" is TRUE, then<br />
execute "statement_N".<br />
The optional ELSE statement provides statements to be executed when the<br />
"condition" of the IF-THEN statement is FALSE.<br />
END_IF; The END_IF statement terminates the IF-THEN instruction.<br />
1 You can include multiple ELSIF statements within one IF-THEN statement.<br />
Table 7- 93 Variables for the IF-THEN statement<br />
Variables Description<br />
"condition" Required. The logical expression is either TRUE (1) or FALSE (0).<br />
"statement_A" Optional. One or more statements to be executed when "condition" is TRUE.<br />
"condition-n" Optional. The logical expression to be evaluated by the optional ELSIF statement.<br />
"statement_N" Optional. One or more statements to be executed when "condition-n" of the ELSIF statement is<br />
TRUE.<br />
"statement_X" Optional. One or more statements to be executed when "condition" of the IF-THEN statement<br />
is FALSE.<br />
An IF statement is executed according to the following rules:<br />
● The first sequence of statements whose logical expression = TRUE is executed. The<br />
remaining sequences of statements are not executed.<br />
● If no Boolean expression = TRUE, the sequence of statements introduced by ELSE is<br />
executed (or no sequence of statements if the ELSE branch does not exist).<br />
● Any number of ELSIF statements can exist.<br />
Note<br />
Using one or more ELSIF branches has the advantage that the logical expressions<br />
following a valid expression are no longer evaluated in contrast to a sequence of IF<br />
statements. The runtime of a program can therefore be reduced.<br />
<strong>S7</strong>-<strong>1200</strong> <strong>Programmable</strong> <strong>controller</strong><br />
System Manual, 04/2012, A5E02486680-06 223
Basic instructions<br />
7.8 Program control<br />
7.8.3 CASE statement<br />
Table 7- 94 Elements of the CASE statement<br />
SCL Description<br />
CASE "Test_Value" OF<br />
"ValueList": Statement[; Statement, ...]<br />
"ValueList": Statement[; Statement, ...]<br />
[ELSE<br />
Else-statement[; Else-statement, ...]]<br />
END_CASE;<br />
Table 7- 95 Parameters<br />
The CASE statement executes one of several<br />
groups of statements, depending on the value<br />
of an expression.<br />
Parameter Description<br />
"Test_Value" Required. Any numeric expression of data type Int<br />
"ValueList" Required. A single value or a comma-separated list of values or ranges of values. (Use two<br />
periods to define a range of values: 2..8) The following example illustrates the different<br />
variants of the value list:<br />
1: Statement_A;<br />
2, 4: Statement _B;<br />
3, 5..7,9: Statement _C;<br />
Statement Required. One or more statements that are executed when "Test_Value" matches any value<br />
in the value list<br />
Else-statement Optional. One or more statements that are executed if no match with a value of the<br />
"ValueList" stated matches<br />
The CASE statement is executed according to the following rules:<br />
● The selection expression must return a value of the type Int.<br />
● When a CASE statement is processed, the program checks whether the value of the<br />
selection expression is contained within a specified list of values. If a match is found, the<br />
statement component assigned to the list is executed.<br />
● If no match is found, the program section following ELSE is executed or no statement is<br />
executed if the ELSE branch does not exist.<br />
CASE statements can be nested. Each nested case statement must have an associated<br />
END_CASE statement.<br />
CASE var1 OF<br />
1 : var2 := "A";<br />
2 : var2 := "B";<br />
ELSE<br />
CASE var3 OF<br />
65..90: var2 := "UpperCase";<br />
97..122: var2 := "LowerCase";<br />
ELSE<br />
var2:= "SpecialCharacter";<br />
<strong>S7</strong>-<strong>1200</strong> <strong>Programmable</strong> <strong>controller</strong><br />
224 System Manual, 04/2012, A5E02486680-06
END_CASE;<br />
END_CASE;<br />
7.8.4 FOR statement<br />
Table 7- 96 Elements of the FOR statement<br />
SCL Description<br />
FOR "control_variable" := "begin" TO "end"<br />
[BY "increment"] DO<br />
statement;<br />
;<br />
END_FOR;<br />
Table 7- 97 Parameters<br />
Basic instructions<br />
7.8 Program control<br />
A FOR statement is used to repeat a sequence of<br />
statements as long as a control variable is within<br />
the specified range of values. The definition of a<br />
loop with FOR includes the specification of an<br />
initial and an end value. Both values must be the<br />
same type as the control variable.<br />
Parameter Description<br />
"control_variable" Required. An integer (Int or DInt) that serves as a loop counter<br />
"begin" Required. Simple expression that specifies the initial value of the control variables<br />
"end" Required. Simple expression that determines the final value of the control variables<br />
"increment" Optional. Amount by which a "control variable" is changed after each loop. The "increment"<br />
has the same data type as "control variable". If the "increment" value is not specified, then<br />
the value of the run tags will be increased by 1 after each loop. You cannot change<br />
"increment" during the execution of the FOR statement.<br />
The FOR statement executes as follows:<br />
● At the start of the loop, the control variable is set to the initial value (initial assignment)<br />
and each time the loop iterates, it is incremented by the specified increment (positive<br />
increment) or decremented (negative increment) until the final value is reached.<br />
● Following each run through of the loop, the condition is checked (final value reached) to<br />
establish whether or not it is satisfied. If the condition is satisfied, the sequence of<br />
statements is executed, otherwise the loop and with it the sequence of statements is<br />
skipped.<br />
Rules for formulating FOR statements:<br />
● The control variable may only be of the data type Int or DInt.<br />
● You can omit the statement BY [increment]. If no increment is specified, it is automatically<br />
assumed to be +1.<br />
To end the loop regardless of the state of the "condition" expression, use the EXIT statement<br />
(Page 228). The EXIT statement executes the statement immediately following the<br />
END_FOR statement.<br />
Use the CONTINUE statement (Page 227) to skip the subsequent statements of a FOR loop<br />
and to continue the loop with the examination of whether the condition is met for termination.<br />
<strong>S7</strong>-<strong>1200</strong> <strong>Programmable</strong> <strong>controller</strong><br />
System Manual, 04/2012, A5E02486680-06 225
Basic instructions<br />
7.8 Program control<br />
7.8.5 WHILE-DO statement<br />
Table 7- 98 WHILE statement<br />
SCL Description<br />
WHILE "condition" DO<br />
Statement;<br />
Statement;<br />
...;<br />
END_WHILE;<br />
Table 7- 99 Parameters<br />
The WHILE statement performs a series of statements until a given condition is<br />
TRUE.<br />
You can nest WHILE loops. The END_WHILE statement refers to the last executed<br />
WHILE instruction.<br />
Parameter Description<br />
"condition" Required. A logical expression that evaluates to TRUE or FALSE. (A "null" condition is<br />
interpreted as FALSE.)<br />
Statement Optional. One or more statements that are executed until the condition evaluates to TRUE.<br />
Note<br />
The WHILE statement evaluates the state of "condition" before executing any of the<br />
statements. To execute the statements at least one time regardless of the state of<br />
"condition", use the REPEAT statement.<br />
The WHILE statement executes according to the following rules:<br />
● Prior to each iteration of the loop body, the execution condition is evaluated.<br />
● The loop body following DO iterates as long as the execution condition has the value<br />
TRUE.<br />
● Once the value FALSE occurs, the loop is skipped and the statement following the loop is<br />
executed.<br />
To end the loop regardless of the state of the "condition" expression, use the EXIT statement<br />
(Page 228). The EXIT statement executes the statement immediately following the<br />
END_WHILE statement<br />
Use the CONTINUE statement to skip the subsequent statements of a WHILE loop and to<br />
continue the loop with the examination of whether the condition is met for termination.<br />
<strong>S7</strong>-<strong>1200</strong> <strong>Programmable</strong> <strong>controller</strong><br />
226 System Manual, 04/2012, A5E02486680-06
7.8.6 REPEAT-UNTIL statement<br />
Table 7- 100 REPEAT instruction<br />
SCL Description<br />
REPEAT<br />
Statement;<br />
;<br />
UNTIL "condition"<br />
END_REPEAT;<br />
Table 7- 101 Parameters<br />
Basic instructions<br />
7.8 Program control<br />
The REPEAT statement executes a group of statements until a given condition is<br />
TRUE.<br />
You can nest REPEAT loops. The END_REPEAT statement always refers to the last<br />
executed Repeat instruction.<br />
Parameter Description<br />
Statement Optional. One or more statements that are executed until the condition is TRUE.<br />
"condition" Required. One or more expressions of the two following ways: A numeric expression or string<br />
expression that evaluates to TRUE or FALSE. A "null" condition is interpreted as FALSE.<br />
Note<br />
Before evaluating the state of "condition", the REPEAT statement executes the statements<br />
during the first iteration of the loop (even if "condition" is FALSE). To review the state of<br />
"condition" before executing the statements, use the WHILE statement.<br />
To end the loop regardless of the state of the "condition" expression, use the EXIT statement<br />
(Page 228). The EXIT statement executes the statement immediately following the<br />
END_REPEAT statement<br />
Use the CONTINUE statement (Page 227) to skip the subsequent statements of a REPEAT<br />
loop and to continue the loop with the examination of whether the condition is met for<br />
termination.<br />
7.8.7 CONTINUE statement<br />
Table 7- 102 CONTINUE statement<br />
SCL Description<br />
CONTINUE<br />
Statement;<br />
;<br />
The CONTINUE statement skips the subsequent statements of a program loop (FOR,<br />
WHILE, REPEAT) and continues the loop with the examination of whether the condition is<br />
met for termination. If this is not the case, the loop continues.<br />
<strong>S7</strong>-<strong>1200</strong> <strong>Programmable</strong> <strong>controller</strong><br />
System Manual, 04/2012, A5E02486680-06 227
Basic instructions<br />
7.8 Program control<br />
7.8.8 EXIT statement<br />
Table 7- 103 EXIT instruction<br />
The CONTINUE statement executes according to the following rules:<br />
● This statement immediately terminates execution of a loop body.<br />
● Depending on whether the condition for repeating the loop is satisfied or not the body is<br />
executed again or the iteration statement is exited and the statement immediately<br />
following is executed.<br />
● In a FOR statement, the control variable is incremented by the specified increment<br />
immediately after a CONTINUE statement.<br />
Use the CONTINUE statement only within a loop. In nested loops CONTINUE always refers<br />
to the loop that includes it immediately. CONTINUE is typically used in conjunction with an IF<br />
statement.<br />
If the loop is to exit regardless of the termination test, use the EXIT statement.<br />
The following example shows the use of the CONTINUE statement to avoid a division-by-0<br />
error when calculating the percentage of a value:<br />
FOR x = 0 TO 10 DO<br />
IF value[i] = 0 THEN CONTINUE; END_IF;<br />
p := part / value[i] * 100;<br />
s := INT_TO_STRING(p);<br />
percent=CONCAT(IN1:=s, IN2:="%");<br />
END_FOR;<br />
SCL Description<br />
EXIT; An EXIT statement is used to exit a loop (FOR, WHILE or REPEAT) at any point, regardless of whether<br />
the terminate condition is satisfied.<br />
The EXIT statement executes according to the following rules:<br />
● This statement causes the repetition statement immediately surrounding the exit<br />
statement to be exited immediately.<br />
● Execution of the program is continued after the end of the loop (for example after<br />
END_FOR).<br />
Use the EXIT statement within a loop. In nested loops, the EXIT statement returns the<br />
processing to the next higher nesting level.<br />
FOR i = 0 TO 10 DO<br />
CASE value[i, 0] OF<br />
1..10: value [i, 1]:="A";<br />
11..40: value [i, 1]:="B";<br />
41..100: value [i, 1]:="C";<br />
ELSE<br />
EXIT;<br />
END_CASE;<br />
END_FOR;<br />
<strong>S7</strong>-<strong>1200</strong> <strong>Programmable</strong> <strong>controller</strong><br />
228 System Manual, 04/2012, A5E02486680-06
7.8.9 GOTO statement<br />
Table 7- 104 GOTO statement<br />
SCL Description<br />
GOTO JumpLabel;<br />
Statement;<br />
... ;<br />
JumpLabel: Statement;<br />
Basic instructions<br />
7.8 Program control<br />
The GOTO statement skips over statements by jumping to a label in the same<br />
block.<br />
The jump label ("JumpLabel") and the GOTO statement must be in the same block.<br />
The name of a jump label can only be assigned once within a block. Each jump<br />
label can be the target of several GOTO statements.<br />
It is not possible to jump to a loop section (FOR, WHILE or REPEAT). It is possible to jump<br />
from within a loop.<br />
In the following example: Depending on the value of the "Tag_value" operand, the execution<br />
of the program resumes at the point defined by the corresponding jump label. If "Tag_value"<br />
equals 2, the program execution resumes at the jump label "MyLabel2" and skips<br />
"MyLabel1".<br />
CASE "Tag_value" OF<br />
1 : GOTO MyLabel1;<br />
2 : GOTO MyLabel2;<br />
ELSE GOTO MyLabel3;<br />
END_CASE;<br />
MyLabel1: "Tag_1" := 1;<br />
MyLabel2: "Tag_2" := 1;<br />
MyLabel3: "Tag_4" := 1;<br />
7.8.10 RETURN statement<br />
Table 7- 105 RETURN instruction<br />
SCL Description<br />
RETURN; The Return instruction exits the code block being executed without conditions. Program<br />
execution returns to the calling block or to the operating system (when exiting an OB).<br />
Example of a RETURN instruction:<br />
IF "Error" 0 THEN<br />
RETURN;<br />
END_IF;<br />
Note<br />
After executing the last instruction, the code block automatically returns to the calling block.<br />
Do not insert a RETURN instruction at the end of the code block.<br />
<strong>S7</strong>-<strong>1200</strong> <strong>Programmable</strong> <strong>controller</strong><br />
System Manual, 04/2012, A5E02486680-06 229
Basic instructions<br />
7.8 Program control<br />
7.8.11 Jump and label instructions<br />
Table 7- 106 JMP, JMPN, and LABEL instruction<br />
LAD FBD SCL Description<br />
See the GOTO (Page 229)<br />
statement.<br />
If there is power flow to a JMP coil (LAD), or if the<br />
JMP box input is true (FBD), then program execution<br />
continues with the first instruction following the<br />
specified label.<br />
If there is no power flow to a JMPN coil (LAD), or if<br />
the JMPN box input is false (FBD), then program<br />
execution continues with the first instruction following<br />
the specified label.<br />
Destination label for a JMP or JMPN jump instruction.<br />
1 You create your label names by typing in the LABEL instruction directly. Use the parameter helper icon to select the<br />
available label names for the JMP and JMPN label name field. You can also type a label name directly into the JMP or<br />
JMPN instruction.<br />
Table 7- 107 Data types for the parameters<br />
Parameter Data type Description<br />
Label_name Label identifier Identifier for Jump instructions and the corresponding jump<br />
destination program label<br />
● Each label must be unique within a code block.<br />
● You can jump within a code block, but you cannot jump from one code block to another<br />
code block.<br />
● You can jump forward or backward.<br />
● You can jump to the same label from more than one place in the same code block.<br />
7.8.12 JMP_LIST instruction<br />
Table 7- 108 JMP_LIST instruction<br />
LAD / FBD , SCL Description<br />
CASE k OF<br />
0: GOTO dest0;<br />
1: GOTO dest1;<br />
2: GOTO dest2;<br />
[n: GOTO destn;]<br />
END_CASE;<br />
The JMP_LIST instruction acts as a program jump distributor to control<br />
the execution of program sections. Depending on the value of the K<br />
input, a jump occurs to the corresponding program label. Program<br />
execution continues with the program instructions that follow the<br />
destination jump label. If the value of the K input exceeds the number of<br />
labels - 1, then no jump occurs and processing continues with the next<br />
program network.<br />
<strong>S7</strong>-<strong>1200</strong> <strong>Programmable</strong> <strong>controller</strong><br />
230 System Manual, 04/2012, A5E02486680-06
Table 7- 109 Data types for parameters<br />
Basic instructions<br />
7.8 Program control<br />
Parameter Data type Description<br />
K UInt Jump distributor control value<br />
DEST0, DEST1, .., Program Labels Jump destination labels corresponding to specific K parameter values:<br />
DESTn.<br />
If the value of K equals 0, then a jump occurs to the program label<br />
assigned to the DEST0 output. If the value of K equals 1, then a jump<br />
occurs to the program label assigned to the DEST1 output, and so on. If<br />
the value of the K input exceeds the (number of labels - 1), then no jump<br />
occurs and processing continues with the next program network.<br />
For LAD and FBD: The JMP_LIST box is first placed in your program, there are two jump<br />
label outputs. You can add or delete jump destinations.<br />
Click the create icon inside the box (on the left of the last DEST parameter)<br />
to add new outputs for jump labels.<br />
7.8.13 SWITCH instruction<br />
Table 7- 110 SWITCH instruction<br />
Right-click on an output stub and select the "Insert output" command.<br />
Right-click on an output stub and select the "Delete" command.<br />
LAD / FBD SCL Description<br />
Not available The SWITCH instruction acts as a program jump distributor to<br />
control the execution of program sections. Depending on the<br />
result of comparisons between the value of the K input and the<br />
values assigned to the specified comparison inputs, a jump occurs<br />
to the program label that corresponds to the first comparison test<br />
that is true. If none of the comparisons is true, then a jump to the<br />
label assigned to ELSE occurs. Program execution continues with<br />
the program instructions that follow the destination jump label.<br />
1 For LAD and FBD: Click below the box name and select a data type from the drop-down menu.<br />
2 For SCL: Use an IF-THEN set of comparisons.<br />
<strong>S7</strong>-<strong>1200</strong> <strong>Programmable</strong> <strong>controller</strong><br />
System Manual, 04/2012, A5E02486680-06 231
Basic instructions<br />
7.8 Program control<br />
Table 7- 111 Data types for parameters<br />
Parameter Data type 1 Description<br />
K SInt, Int, DInt, USInt, UInt, UDInt, Real,<br />
LReal, Byte, Word, DWord, Time,<br />
TOD, Date<br />
==, , = SInt, Int, DInt, USInt, UInt, UDInt, Real,<br />
LReal, Byte, Word, DWord, Time,<br />
TOD, Date<br />
DEST0, DEST1, ..,<br />
DESTn. ELSE<br />
Common comparison value input<br />
Separate comparison value inputs for specific comparison<br />
types<br />
Program Labels Jump destination labels corresponding to specific<br />
comparisons:<br />
The comparison input below and next to the K input is<br />
processed first and causes a jump to the label assigned to<br />
DEST0, if the comparison between the K value and this<br />
input is true. The next comparison test uses the next input<br />
below and causes a jump to the label assigned to DEST1, if<br />
the comparison is true, The remaining comparisons are<br />
processed similarly and if none of the comparisons are true,<br />
then a jump to the label assigned to the ELSE output<br />
occurs.<br />
1 The K input and comparison inputs (==, , =) must be the same data type.<br />
Adding inputs, deleting inputs, and specifying comparison types<br />
When the LAD or FBD SWITCH box is first placed in your program there are two comparison<br />
inputs. You can assign comparison types and add inputs/jump destinations, as shown below.<br />
Click a comparison operator inside the box and select a new operator<br />
from the drop-down list.<br />
Click the create icon inside the box (to the left of the last DEST<br />
parameter) to add new comparison-destination parameters.<br />
Right-click on an input stub and select the "Insert input" command.<br />
Right-click on an input stub and select the "Delete" command.<br />
Table 7- 112 SWITCH box data type selection and allowed comparison operations<br />
Data type Comparison Operator syntax<br />
Byte, Word, DWord<br />
Equal ==<br />
Not equal <br />
<strong>S7</strong>-<strong>1200</strong> <strong>Programmable</strong> <strong>controller</strong><br />
232 System Manual, 04/2012, A5E02486680-06
SWITCH box placement rules<br />
Data type Comparison Operator syntax<br />
SInt, Int, DInt, USInt, UInt, Equal ==<br />
UDInt, Real, LReal, Time, TOD,<br />
Date<br />
Not equal<br />
Greater than or equal<br />
<br />
>=<br />
Less than or equal <br />
Less than <<br />
● No LAD/FBD instruction connection in front of the compare input is allowed.<br />
Basic instructions<br />
7.8 Program control<br />
● There is no ENO output, so only one SWITCH instruction is allowed in a network and the<br />
SWITCH instruction must be the last operation in a network.<br />
7.8.14 RET execution control instruction<br />
The optional RET instruction is used to terminate the execution of the current block. If and<br />
only if there is power flow to the RET coil (LAD) or if the RET box input is true (FBD), then<br />
program execution of the current block will end at that point and instructions beyond the RET<br />
instruction will not be executed. If the current block is an OB, the "Return_Value" parameter<br />
is ignored. If the current block is a FC or FB, the value of the "Return_Value " parameter is<br />
passed back to the calling routine as the ENO value of the called box.<br />
You are not required to use a RET instruction as the last instruction in a block; this is done<br />
automatically for you. You can have multiple RET instructions within a single block.<br />
For SCL, see the RETURN (Page 229) statement.<br />
Table 7- 113 Return_Value (RET) execution control instruction<br />
LAD FBD SCL Description<br />
RETURN; Terminates the execution of the current block<br />
Table 7- 114 Data types for the parameters<br />
Parameter Data type Description<br />
Return_Value Bool The "Return_value" parameter of the RET instruction is assigned to the ENO output<br />
of the block call box in the calling block.<br />
<strong>S7</strong>-<strong>1200</strong> <strong>Programmable</strong> <strong>controller</strong><br />
System Manual, 04/2012, A5E02486680-06 233
Basic instructions<br />
7.8 Program control<br />
Sample steps for using the RET instruction inside an FC code block:<br />
1. Create a new project and add an FC:<br />
2. Edit the FC:<br />
– Add instructions from the instruction tree.<br />
– Add a RET instruction, including one of the following for the "Return_Value"<br />
parameter:<br />
TRUE, FALSE, or a memory location that specifies the required return value.<br />
– Add more instructions.<br />
3. Call the FC from MAIN [OB1].<br />
The EN input on the FC box in the MAIN code block must be true to begin execution of the<br />
FC.<br />
The value specified by the RET instruction in the FC will be present on the ENO output of the<br />
FC box in the MAIN code block following execution of the FC for which power flow to the<br />
RET instruction is true.<br />
7.8.15 Re-trigger scan cycle watchdog instruction<br />
Table 7- 115 RE_TRIGR instruction<br />
LAD / FBD SCL Description<br />
RE_TRIGR(); RE_TRIGR (Re-trigger scan time watchdog) is used to extend the maximum<br />
time allowed before the scan cycle watchdog timer generates an error.<br />
Use the RE_TRIGR instruction to restart the scan cycle monitoring timer during a single scan<br />
cycle. This has the effect of extending the allowed maximum scan cycle time by one<br />
maximum cycle time period, from the last execution of the RE_TRIGR function.<br />
Note<br />
Prior to <strong>S7</strong>-<strong>1200</strong> CPU firmware version 2.2, RE_TRIGR was restricted to execution from a<br />
program cycle OB and could be used to extend the PLC scan time indefinitely. ENO =<br />
FALSE and the watchdog timer is not reset when RE_TRIGR was executed from a start up<br />
OB, an interrupt OB, or an error OB.<br />
For firmware version 2.2 and later, RE_TRIGR can be executed from any OB (including start<br />
up, interrupt, and error OBs). However, the PLC scan can only be extended by a maximum<br />
of 10x the configured maximum cycle time.<br />
<strong>S7</strong>-<strong>1200</strong> <strong>Programmable</strong> <strong>controller</strong><br />
234 System Manual, 04/2012, A5E02486680-06
Basic instructions<br />
7.8 Program control<br />
Setting the PLC maximum cycle time<br />
Configure the value for maximum scan cycle time in the Device configuration for "Cycle<br />
time".<br />
Table 7- 116 Cycle time values<br />
Cycle time monitor Minimum value Maximum value Default value<br />
Maximum cycle time 1 ms 6000 ms 150 ms<br />
Watchdog timeout<br />
If the maximum scan cycle timer expires before the scan cycle has been completed, an error<br />
is generated. If an error handling code block OB 80 is included in the user program, the CPU<br />
executes OB 80 where you may add program logic to create a special reaction. If OB 80 is<br />
not included, the first timeout condition is ignored and the CPU goes to STOP.<br />
If a second maximum scan time timeout occurs in the same program scan (2 times the<br />
maximum cycle time value), an error is triggered that causes the CPU to transition to STOP<br />
mode.<br />
In STOP mode, your program execution stops while CPU system communications and<br />
system diagnostics continue.<br />
7.8.16 Stop scan cycle instruction<br />
Table 7- 117 STP instruction<br />
LAD / FBD SCL Description<br />
STP(); STP (Stop scan cycle) puts the CPU in STOP mode. When the CPU is in<br />
STOP mode, the execution of your program and physical updates from the<br />
process image are stopped.<br />
For more information see: Configuring the outputs on a RUN-to-STOP transition (Page 87).<br />
If EN = TRUE, then the CPU goes to STOP mode, the program execution stops, and the<br />
ENO state is meaningless. Otherwise, EN = ENO = 0.<br />
7.8.17 Get Error instructions<br />
The get error instructions provide information about program block execution errors. If you<br />
add a GetError or GetErrorID instruction to your code block, you can handle program errors<br />
within your program block.<br />
<strong>S7</strong>-<strong>1200</strong> <strong>Programmable</strong> <strong>controller</strong><br />
System Manual, 04/2012, A5E02486680-06 235
Basic instructions<br />
7.8 Program control<br />
GetError<br />
Table 7- 118 GetError instruction<br />
LAD / FBD SCL Description<br />
GET_ERROR(_o<br />
ut_);<br />
Table 7- 119 Data types for the parameters<br />
Indicates that a local program block execution error has occurred and fills a<br />
predefined error data structure with detailed error information.<br />
Parameter Data type Description<br />
ERROR ErrorStruct Error data structure: You can rename the structure, but not the members within the<br />
structure.<br />
Table 7- 120 Elements of the ErrorStruct data structure<br />
Structure components Data type Description<br />
ERROR_ID Word Error ID<br />
FLAGS Byte Shows if an error occurred during a block call.<br />
16#01: Error during a block call.<br />
16#00: No error during a block call.<br />
REACTION Byte Default reaction:<br />
0: Ignore (write error),<br />
1: Continue with substitute value "0" (read error),<br />
2: Skip instruction (system error)<br />
CODE_ADDRESS CREF Information about the address and type of block<br />
BLOCK_TYPE Byte Type of block where the error occurred:<br />
1: OB<br />
2: FC<br />
3: FB<br />
CB_NUMBER UInt Number of the code block<br />
OFFSET UDInt Reference to the internal memory<br />
MODE Byte<br />
Access mode: Depending on the type of access, the following<br />
information can be output:<br />
Mode<br />
0<br />
(A) (B) (C) (D) (E)<br />
1 Offset<br />
2 Area<br />
3 Location Scope Number<br />
4 Area Offset<br />
5 Area DB no. Offset<br />
<strong>S7</strong>-<strong>1200</strong> <strong>Programmable</strong> <strong>controller</strong><br />
236 System Manual, 04/2012, A5E02486680-06
Basic instructions<br />
7.8 Program control<br />
Structure components Data type Description<br />
6 PtrNo.<br />
/Acc<br />
Area DB no. Offset<br />
7 PtrNo. / Slot No. / Area DB no. Offset<br />
Acc Scope<br />
OPERAND_NUMBER UInt Operand number of the machine command<br />
POINTER_NUMBER_<br />
LOCATION<br />
UInt (A) Internal pointer<br />
SLOT_NUMBER_SCOPE UInt (B) Storage area in internal memory<br />
DATA_ADDRESS NREF Information about the address of an operand<br />
AREA Byte (C) Memory area:<br />
GetErrorID<br />
L: 16#40 – 4E, 86, 87, 8E, 8F, C0 – CE<br />
I: 16#81<br />
Q: 16#82<br />
M: 16#83<br />
DB: 16#84, 85, 8A, 8B<br />
DB_NUMBER UInt (D) Number of the data block<br />
OFFSET UDInt (E) Relative address of the operand<br />
Table 7- 121 GetErrorID instruction<br />
LAD / FBD SCL Description<br />
GET_ERR_ID()<br />
;<br />
Table 7- 122 Data types for the parameters<br />
Indicates that a program block execution error has occurred and reports the ID<br />
(identifier code) of the error.<br />
Parameter Data type Description<br />
ID Word Error identifier values for the ErrorStruct ERROR_ID member<br />
Table 7- 123 Error_ID values<br />
ERROR_ID<br />
Hexadecimal<br />
ERROR_ID<br />
Decimal<br />
Program block execution error<br />
0 0 No error<br />
2503 9475 Uninitialized pointer error<br />
2522 9506 Operand out of range read error<br />
2523 9507 Operand out of range write error<br />
2524 9508 Invalid area read error<br />
<strong>S7</strong>-<strong>1200</strong> <strong>Programmable</strong> <strong>controller</strong><br />
System Manual, 04/2012, A5E02486680-06 237
Basic instructions<br />
7.8 Program control<br />
ERROR_ID<br />
Hexadecimal<br />
ERROR_ID<br />
Decimal<br />
Program block execution error<br />
2525 9509 Invalid area write error<br />
2528 9512 Data alignment read error (incorrect bit alignment)<br />
2529 9513 Data alignment write error (incorrect bit alignment)<br />
2530 9520 DB write protected<br />
253A 9530 Global DB does not exist<br />
253C 9532 Wrong version or FC does not exist<br />
253D 9533 Instruction does not exist<br />
253E 9534 Wrong version or FB does not exist<br />
253F 9535 Instruction does not exist<br />
2575 9589 Program nesting depth error<br />
2576 9590 Local data allocation error<br />
2942 10562 Physical input point does not exist<br />
2943 10563 Physical output point does not exist<br />
Operation<br />
By default, the CPU responds to a block execution error by logging an error in the<br />
diagnostics buffer. However, if you place one or more GetError or GetErrorID instructions<br />
within a code block, this block is now set to handle errors within the block. In this case, the<br />
CPU does not log an error in the diagnostics buffer. Instead, the error information is reported<br />
in the output of the GetError or GetErrorID instruction. You can read the detailed error<br />
information with the GetError instruction, or read just the error identifier with GetErrorID<br />
instruction. Normally the first error is the most important, with the following errors only<br />
consequences of the first error.<br />
The first execution of a GetError or GetErrorID instruction within a block returns the first error<br />
detected during block execution. This error could have occurred anywhere between the start<br />
of the block and the execution of either GetError or GetErrorID. Subsequent executions of<br />
either GetError or GetErrorID return the first error since the previous execution of GetError or<br />
GetErrorID. The history of errors is not saved, and execution of either instruction will re-arm<br />
the PLC system to catch the next error.<br />
The ErrorStruct data type used by the GetError instruction can be added in the data block<br />
editor and block interface editors, so your program logic can access these values. Select<br />
ErrorStruct from the data type drop-down list to add this structure. You can create multiple<br />
ErrorStruct elements by using unique names. The members of an ErrorStruct cannot be<br />
renamed.<br />
Error condition indicated by ENO<br />
If EN = TRUE and GetError or GetErrorID executes, then:<br />
● ENO = TRUE indicates a code block execution error occurred and error data is present<br />
● ENO = FALSE indicates no code block execution error occurred<br />
You can connect error reaction program logic to ENO which activates after an error occurs. If<br />
an error exists, then the output parameter stores the error data where your program has<br />
access to it.<br />
<strong>S7</strong>-<strong>1200</strong> <strong>Programmable</strong> <strong>controller</strong><br />
238 System Manual, 04/2012, A5E02486680-06
Basic instructions<br />
7.9 Word logic operations<br />
GetError and GetErrorID can be used to send error information from the currently executing<br />
block (called block) to a calling block. Place the instruction in the last network of the called<br />
block program to report the final execution status of the called block.<br />
7.9 Word logic operations<br />
7.9.1 AND, OR, and XOR instructions<br />
Table 7- 124 AND, OR, and XOR instruction<br />
LAD / FBD SCL Description<br />
out := in1 AND in2; AND: Logical AND<br />
out := in1 OR in2; OR: Logical OR<br />
out := in1 XOR in2; XOR: Logical exclusive OR<br />
1 For LAD and FBD: Click the "???" and select a data type from the drop-down menu.<br />
To add an input, click the "Create" icon or right-click on an input stub for one of the<br />
existing IN parameters and select the "Insert input" command.<br />
To remove an input, right-click on an input stub for one of the existing IN parameters (when<br />
there are more than the original two inputs) and select the "Delete" command.<br />
Table 7- 125 Data types for the parameters<br />
Parameter Data type Description<br />
IN1, IN2 Byte, Word, DWord Logical inputs<br />
OUT Byte, Word, DWord Logical output<br />
1 The data type selection sets parameters IN1, IN2, and OUT to the same data type.<br />
The corresponding bit values of IN1 and IN2 are combined to produce a binary logic result at<br />
parameter OUT. ENO is always TRUE following the execution of these instructions.<br />
<strong>S7</strong>-<strong>1200</strong> <strong>Programmable</strong> <strong>controller</strong><br />
System Manual, 04/2012, A5E02486680-06 239
Basic instructions<br />
7.9 Word logic operations<br />
7.9.2 Invert instruction<br />
Table 7- 126 INV instruction<br />
LAD / FBD SCL Description<br />
Not available Calculates the binary one's complement of the parameter IN. The one's<br />
complement is formed by inverting each bit value of the IN parameter<br />
(changing each 0 to 1 and each 1 to 0). ENO is always TRUE following<br />
the execution of this instruction.<br />
1 For LAD and FBD: Click the "???" and select a data type from the drop-down menu.<br />
Table 7- 127 Data types for the parameters<br />
Parameter Data type Description<br />
IN SInt, Int, DInt, USInt, UInt, UDInt, Byte, Word, DWord Data element to invert<br />
OUT SInt, Int, DInt, USInt, UInt, UDInt, Byte, Word, DWord Inverted output<br />
7.9.3 Encode and decode instructions<br />
Table 7- 128 ENCO and DECO instruction<br />
LAD / FBD SCL Description<br />
out := ENCO(_in_); Encodes a bit pattern to a binary number<br />
The ENCO instruction converts parameter IN to the binary number<br />
corresponding to the bit position of the least-significant set bit of<br />
parameter IN and returns the result to parameter OUT. If<br />
parameter IN is either 0000 0001 or 0000 0000, then a value of 0<br />
is returned to parameter OUT. If the parameter IN value is 0000<br />
0000, then ENO is set to FALSE.<br />
out := DECO(_in_); Decodes a binary number to a bit pattern<br />
1 For LAD and FBD: Click the "???" and select a data type from the drop-down menu.<br />
The DECO instruction decodes a binary number from parameter<br />
IN, by setting the corresponding bit position in parameter OUT to<br />
a 1 (all other bits are set to 0). ENO is always TRUE following<br />
execution of the DECO instruction.<br />
Note: The default data type for the DECO instruction is DWORD.<br />
In SCL, change the instruction name to DECO_BYTE or<br />
DECO_WORD to decode a byte or word value, and assign to a<br />
byte or word tag or address.<br />
<strong>S7</strong>-<strong>1200</strong> <strong>Programmable</strong> <strong>controller</strong><br />
240 System Manual, 04/2012, A5E02486680-06
Table 7- 129 Data types for the parameters<br />
Parameter Data type Description<br />
IN ENCO: Byte, Word, DWord<br />
ENCO: Bit pattern to encode<br />
DECO: UInt<br />
DECO: Value to decode<br />
OUT ENCO: Int<br />
ENCO: Encoded value<br />
DECO: Byte, Word, DWord<br />
DECO: Decoded bit pattern<br />
Table 7- 130 OUT parameter for ENCO<br />
ENO Condition Result (OUT)<br />
1 No error Valid bit number<br />
0 IN is zero OUT is set to zero<br />
Table 7- 131 Examples<br />
Basic instructions<br />
7.9 Word logic operations<br />
The DECO parameter OUT data type selection of a Byte, Word, or DWord restricts the<br />
useful range of parameter IN. If the value of parameter IN exceeds the useful range, then a<br />
modulo operation is performed to extract the least significant bits shown below.<br />
DECO parameter IN range:<br />
● 3 bits (values 0-7) IN are used to set 1 bit position in a Byte OUT<br />
● 4-bits (values 0-15) IN are used to set 1 bit position in a Word OUT<br />
● 5 bits (values 0-31) IN are used to set 1 bit position in a DWord OUT<br />
DECO IN value DECO OUT value ( Decode single bit position)<br />
Byte OUT<br />
Min. IN 0 00000001<br />
8 bits Max. IN 7 10000000<br />
Word OUT Min. IN 0 0000000000000001<br />
16 bits Max. IN 15 1000000000000000<br />
DWord OUT Min. IN 0 00000000000000000000000000000001<br />
32 bits Max. IN 31 10000000000000000000000000000000<br />
<strong>S7</strong>-<strong>1200</strong> <strong>Programmable</strong> <strong>controller</strong><br />
System Manual, 04/2012, A5E02486680-06 241
Basic instructions<br />
7.9 Word logic operations<br />
7.9.4 Select, Multiplex, and Demultiplex instructions<br />
Table 7- 132 SEL (select) instruction<br />
LAD / FBD SCL Description<br />
out := SEL(<br />
g:=_bool_in,<br />
in0:-_variant_in,<br />
in1:=_variant_in);<br />
1 For LAD and FBD: Click the "???" and select a data type from the drop-down menu.<br />
Table 7- 133 Data types for the SEL instruction<br />
SEL assigns one of two input values to parameter OUT, depending<br />
on the parameter G value.<br />
Parameter Data type 1 Description<br />
G Bool 0 selects IN0<br />
1 selects IN1<br />
IN0, IN1 SInt, Int, DInt, USInt, UInt, UDInt, Real, LReal, Byte, Word, DWord,<br />
Time, Char<br />
OUT SInt, Int, DInt, USInt, UInt, UDInt, Real, LReal, Byte, Word, DWord,<br />
Time, Char<br />
1 Input variables and the output variable must be of the same data type.<br />
Table 7- 134 MUX (multiplex) instruction<br />
<strong>S7</strong>-<strong>1200</strong> <strong>Programmable</strong> <strong>controller</strong><br />
242 System Manual, 04/2012, A5E02486680-06<br />
Inputs<br />
Output<br />
Condition codes: ENO is always TRUE following execution of the SEL instruction.<br />
LAD / FBD SCL Description<br />
out := MUX(<br />
k:=_unit_in,<br />
in1:=variant_in,<br />
in2:=variant_in,<br />
[...in32:=variant_in,]<br />
inelse:=variant_in);<br />
1 For LAD and FBD: Click the "???" and select a data type from the drop-down menu.<br />
MUX copies one of many input values to parameter OUT, depending<br />
on the parameter K value. If the parameter K value exceeds (INn - 1),<br />
then the parameter ELSE value is copied to parameter OUT.<br />
To add an input, click the "Create" icon or right-click on an input stub for one of<br />
the existing IN parameters and select the "Insert input" command.<br />
To remove an input, right-click on an input stub for one of the existing IN parameters (when<br />
there are more than the original two inputs) and select the "Delete" command.
Table 7- 135 Data types for the MUX instruction<br />
Parameter Data type Description<br />
K UInt 0 selects IN1<br />
1 selects IN2<br />
n selects INn<br />
IN0, IN1, .. INn SInt, Int, DInt, USInt, UInt, UDInt, Real, LReal, Byte, Word, DWord,<br />
Time, Char<br />
ELSE SInt, Int, DInt, USInt, UInt, UDInt, Real, LReal, Byte, Word, DWord,<br />
Time, Char<br />
OUT SInt, Int, DInt, USInt, UInt, UDInt, Real, LReal, Byte, Word, DWord,<br />
Time, Char<br />
1 Input variables and the output variable must be of the same data type.<br />
Table 7- 136 DEMUX (Demultiplex) instruction<br />
LAD / FBD SCL Description<br />
DEMUX(<br />
k:=_unit_in,<br />
in:=variant_in,<br />
out1:=variant_in,<br />
out2:=variant_in,<br />
[...out32:=variant_in,]<br />
outelse:=variant_in);<br />
1 For LAD and FBD: Click the "???" and select a data type from the drop-down menu.<br />
Basic instructions<br />
7.9 Word logic operations<br />
<strong>S7</strong>-<strong>1200</strong> <strong>Programmable</strong> <strong>controller</strong><br />
System Manual, 04/2012, A5E02486680-06 243<br />
Inputs<br />
Input substitute value (optional)<br />
Output<br />
DEMUX copies the value of the location assigned to parameter IN to<br />
one of many outputs. The value of the K parameter selects which<br />
output selected as the destination of the IN value. If the value of K is<br />
greater than the number (OUTn - 1) then the IN value is copied to<br />
location assigned to the ELSE parameter.<br />
To add an output, click the create icon or right-click on an output stub for one of the existing<br />
OUT parameters and select the "Insert output" command. To remove an output, right-click<br />
on an output stub for one of the existing OUT parameters (when there are more than the<br />
original two outputs) and select the "Delete" command.<br />
To add an output, click the "Create" icon or right-click on an output stub for one<br />
of the existing OUT parameters and select the "Insert output" command.<br />
To remove an output, right-click on an output stub for one of the existing OUT parameters<br />
(when there are more than the original two outputs) and select the "Delete" command.
Basic instructions<br />
7.10 Shift and Rotate<br />
Table 7- 137 Data types for the DEMUX instruction<br />
Parameter Data type 1 Description<br />
K UInt Selector value:<br />
IN SInt, Int, DInt, USInt, UInt, UDInt, Real, LReal, Byte, Word, DWord,<br />
Time, Char<br />
OUT0, OUT1, ..<br />
OUTn<br />
SInt, Int, DInt, USInt, UInt, UDInt, Real, LReal, Byte, Word, DWord,<br />
Time, Char<br />
ELSE SInt, Int, DInt, USInt, UInt, UDInt, Real, LReal, Byte, Word, DWord,<br />
Time, Char<br />
1 The input variable and the output variables must be of the same data type.<br />
Table 7- 138 ENO status for the MUX and DEMUX instructions<br />
0 selects OUT1<br />
1 selects OUT2<br />
n selects OUTn<br />
<strong>S7</strong>-<strong>1200</strong> <strong>Programmable</strong> <strong>controller</strong><br />
244 System Manual, 04/2012, A5E02486680-06<br />
Input<br />
Outputs<br />
Substitute output when K is<br />
greater than (OUTn - 1)<br />
ENO Condition Result OUT<br />
1 No error MUX: Selected IN value is copied to OUT<br />
DEMUX: IN value is copied to selected OUT<br />
0 MUX: K is greater than the number of inputs -1 No ELSE provided: OUT is unchanged,<br />
ELSE provided, ELSE value assigned to OUT<br />
DEMUX: K is greater than the number of outputs -1 No ELSE provided: outputs are unchanged,<br />
ELSE provided, IN value copied to ELSE<br />
7.10 Shift and Rotate<br />
7.10.1 Shift instructions<br />
Table 7- 139 SHR and SHL instructions<br />
LAD / FBD SCL Description<br />
out := SHR(<br />
in:=_variant_in_,<br />
n:=_uint_in);<br />
out := SHL(<br />
in:=_variant_in_,<br />
n:=_uint_in);<br />
Use the shift instructions (SHL and SHR) to shift the bit pattern of<br />
parameter IN. The result is assigned to parameter OUT.<br />
Parameter N specifies the number of bit positions shifted:<br />
SHR: Shift bit pattern right<br />
SHL: Shift bit pattern left<br />
1 For LAD and FBD: Click the "???" and select the data types from the drop-down menu.
Table 7- 140 Data types for the parameters<br />
Parameter Data type Description<br />
IN Byte, Word, DWord Bit pattern to shift<br />
N UInt Number of bit positions to shift<br />
OUT Byte, Word, DWord Bit pattern after shift operation<br />
Basic instructions<br />
7.10 Shift and Rotate<br />
● For N=0, no shift occurs. The IN value is assigned to OUT.<br />
● Zeros are shifted into the bit positions emptied by the shift operation.<br />
● If the number of positions to shift (N) exceeds the number of bits in the target value (8 for<br />
Byte, 16 for Word, 32 for DWord), then all original bit values will be shifted out and<br />
replaced with zeros (zero is assigned to OUT).<br />
● ENO is always TRUE for the shift operations.<br />
Table 7- 141 SHL example for Word data<br />
Shift the bits of a Word to the left by inserting zeroes from the right (N = 1)<br />
IN 1110 0010 1010 1101 OUT value before first shift: 1110 0010 1010 1101<br />
After first shift left: 1100 0101 0101 1010<br />
After second shift left: 1000 1010 1011 0100<br />
After third shift left: 0001 0101 0110 1000<br />
7.10.2 Rotate instructions<br />
Table 7- 142 ROR and ROL instructions<br />
LAD / FBD SCL Description<br />
out := ROL(<br />
in:=_variant_in_,<br />
n:=_uint_in);<br />
out := ROR(<br />
in:=_variant_in_,<br />
n:=_uint_in);<br />
Use the rotate instructions (ROR and ROL) to rotate the bit pattern of<br />
parameter IN. The result is assigned to parameter OUT. Parameter N<br />
defines the number of bit positions rotated.<br />
ROR: Rotate bit pattern right<br />
ROL: Rotate bit pattern left<br />
1 For LAD and FBD: Click the "???" and select the data types from the drop-down menu.<br />
<strong>S7</strong>-<strong>1200</strong> <strong>Programmable</strong> <strong>controller</strong><br />
System Manual, 04/2012, A5E02486680-06 245
Basic instructions<br />
7.10 Shift and Rotate<br />
Table 7- 143 Data types for the parameters<br />
Parameter Data type Description<br />
IN Byte, Word, DWord Bit pattern to rotate<br />
N UInt Number of bit positions to rotate<br />
OUT Byte, Word, DWord Bit pattern after rotate operation<br />
● For N=0, no rotate occurs. The IN value is assigned to OUT.<br />
● Bit data rotated out one side of the target value is rotated into the other side of the target<br />
value, so no original bit values are lost.<br />
● If the number of bit positions to rotate (N) exceeds the number of bits in the target value<br />
(8 for Byte, 16 for Word, 32 for DWord), then the rotation is still performed.<br />
● ENO is always TRUE following execution of the rotate instructions.<br />
Table 7- 144 ROR example for Word data<br />
Rotate bits out the right -side into the left -side (N = 1)<br />
IN 0100 0000 0000 0001 OUT value before first rotate: 0100 0000 0000 0001<br />
After first rotate right: 1010 0000 0000 0000<br />
After second rotate right: 0101 0000 0000 0000<br />
<strong>S7</strong>-<strong>1200</strong> <strong>Programmable</strong> <strong>controller</strong><br />
246 System Manual, 04/2012, A5E02486680-06
Extended instructions 8<br />
8.1 Date and time-of-day<br />
8.1.1 Date and time instructions<br />
Use the date and time instructions to program calendar and time calculations.<br />
● T_CONV converts the data type of a time value: (Time to DInt) or (DInt to Time)<br />
● T_ADD adds Time and DTL values: (Time + Time = Time) or (DTL + Time = DTL)<br />
● T_SUB subtracts Time and DTL values: (Time - Time = Time) or (DTL - Time = DTL)<br />
● T_DIFF provides the difference between two DTL values as a Time value: DTL - DTL =<br />
Time<br />
● T_COMBINE combines a Date value and a Time_and_Date value to create a DTL value<br />
For information about the structure of the DTL and Time data, refer to the section on the<br />
Time and Date data types (Page 96).<br />
Table 8- 1 T_CONV (Time Convert) instruction<br />
LAD / FBD SCL Description<br />
out := T_CONV(<br />
in:=_variant_in);<br />
T_CONV converts a Time data type to a DInt data type, or the reverse<br />
conversion from DInt data type to Time data type.<br />
1 For LAD and FBD: Click the "???" and select the data types from the drop-down menu.<br />
Table 8- 2 Data types for the T_CONV parameters<br />
Parameter and type Data type Description<br />
IN IN DInt, Time Input Time value or DInt value<br />
OUT OUT DInt, Time Converted DInt value or Time value<br />
<strong>S7</strong>-<strong>1200</strong> <strong>Programmable</strong> <strong>controller</strong><br />
System Manual, 04/2012, A5E02486680-06 247
Extended instructions<br />
8.1 Date and time-of-day<br />
Table 8- 3 T_ADD (Time Add) and T_SUB (Time Subtract) instructions<br />
LAD / FBD SCL Description<br />
out := T_ADD(<br />
in1:=_variant_in,<br />
in2:=_time_in);<br />
out := T_SUB(<br />
in1:=_variant_in,<br />
in2:=_time_in);<br />
T_ADD adds the input IN1 value (DTL or Time data types) with the input<br />
IN2 Time value. Parameter OUT provides the DTL or Time value result.<br />
Two data type operations are possible:<br />
Time + Time = Time<br />
DTL + Time = DTL<br />
T_SUB subtracts the IN2 Time value from IN1 (DTL or Time value).<br />
Parameter OUT provides the difference value as a DTL or Time data<br />
type. Two data type operations are possible:<br />
Time - Time = Time<br />
DTL - Time = DTL<br />
1 For LAD and FBD: Click the "???" and select the data types from the drop-down menu.<br />
Table 8- 4 Data types for the T_ADD and T_SUB parameters<br />
Parameter and type Data type Description<br />
IN11 IN DTL, Time DTL or Time value<br />
IN2 IN Time Time value to add or subtract<br />
OUT OUT DTL, Time DTL or Time sum or difference<br />
1 Select the IN1 data type from the drop-down list available below the instruction name. The IN1 data type selection also<br />
sets the data type of parameter OUT.<br />
Table 8- 5 T_DIFF (Time Difference) instruction<br />
LAD / FBD SCL Description<br />
out := T_DIFF(<br />
in1:=_DTL_in,<br />
in2:=_DTL_in);<br />
Table 8- 6 Data types for the T_DIFF parameters<br />
T_DIFF subtracts the DTL value (IN2) from the DTL value (IN1).<br />
Parameter OUT provides the difference value as a Time data type.<br />
DTL - DTL = Time<br />
Parameter and type Data type Description<br />
IN1 IN DTL DTL value<br />
IN2 IN DTL DTL value to subtract<br />
OUT OUT Time Time difference<br />
<strong>S7</strong>-<strong>1200</strong> <strong>Programmable</strong> <strong>controller</strong><br />
248 System Manual, 04/2012, A5E02486680-06
Extended instructions<br />
8.1 Date and time-of-day<br />
Condition codes: ENO = 1 means no error occurred. ENO = 0 and parameter OUT = 0<br />
errors:<br />
● Invalid DTL value<br />
● Invalid Time value<br />
Table 8- 7 T_COMBINE (combine time values) instruction<br />
LAD / FBD SCL Description<br />
out := CONCAT_DATE_TOD(<br />
In1 := _date_in,<br />
In2 := _tod_in);<br />
T_COMBINE combines a Date value and a<br />
Time_of_Day value to create a DTL value.<br />
1 Note that the T_COMBINEinstruction in the Extended Instructions equates to the CONCAT_DATE_TODfunction in SCL.<br />
Table 8- 8 Data types for the T_COMBINE parameters<br />
Parameter and type Data type Description<br />
IN1 IN Date Date value to be combined must be between DATE#1990-<br />
01-01 and DATE#2089-12-31<br />
IN2 IN Time_of_Day Time_of_Day values to be combined<br />
OUT OUT DTL DTL value<br />
8.1.2 Set and read system clock<br />
Table 8- 9 System time instructions<br />
Use the clock instructions to set and read the CPU system clock. The data type DTL<br />
(Page 96) is used to provide date and time values.<br />
LAD / FBD SCL Description<br />
ret_val := WR_SYS_T(<br />
in:=_DTL_in_);<br />
ret_val := RD_SYS_T(<br />
out=>_DTL_out);<br />
ret_val := RD_LOC_T(<br />
out=>_DTL_out);<br />
WR_SYS_T (Write System Time) sets the CPU time of day clock with a<br />
DTL value at parameter IN. This time value does not include local time<br />
zone or daylight saving time offsets.<br />
RD_SYS_T (Read System Time) reads the current system time from<br />
the CPU. This time value does not include local time zone or daylight<br />
saving time offsets.<br />
RD_LOC_T (Read Local Time) provides the current local time of the<br />
CPU as a DTL data type. This time value reflects the local time zone<br />
adjusted appropriately for daylight saving time (if configured).<br />
<strong>S7</strong>-<strong>1200</strong> <strong>Programmable</strong> <strong>controller</strong><br />
System Manual, 04/2012, A5E02486680-06 249
Extended instructions<br />
8.1 Date and time-of-day<br />
Table 8- 10 Data types for the parameters<br />
Parameter and type Data type Description<br />
IN IN DTL Time of day to set in the CPU system clock<br />
RET_VAL OUT Int Execution condition code<br />
OUT OUT DTL RD_SYS_T: Current CPU system time<br />
Table 8- 11 Condition codes<br />
RD_LOC_T: Current local time. including any adjustment for<br />
daylight saving time, if configured<br />
● The local time is calculated by using the time zone and daylight saving time offsets that<br />
you set in the device configuration general tab "Time of day" parameters.<br />
● Time zone configuration is an offset to UTC or GMT time.<br />
● Daylight saving time configuration specifies the month, week, day, and hour when<br />
daylight saving time begins.<br />
● Standard time configuration also specifies the month, week, day, and hour when standard<br />
time begins.<br />
● The time zone offset is always applied to the system time value. The daylight saving time<br />
offset is only applied when daylight saving time is in effect.<br />
Note<br />
Daylight saving and standard start time configuration<br />
The "Time of day" properties for "Start for daylight saving time" of the CPU device<br />
configuration must be your local time.<br />
Condition codes: ENO = 1 means no error occurred. ENO = 0 means an execution error<br />
occurred, and a condition code is provided at the RET_VAL output.<br />
RET_VAL (W#16#....) Description<br />
0000 The current local time is in standard time.<br />
0001 Daylight saving time has been configured, and the current local time is in daylight saving<br />
time.<br />
8080 Local time not available<br />
8081 Illegal year value<br />
8082 Illegal month value<br />
8083 Illegal day value<br />
8084 Illegal hour value<br />
8085 Illegal minute value<br />
8086 Illegal second value<br />
8087 Illegal nanosecond value<br />
80B0 The real-time clock has failed.<br />
<strong>S7</strong>-<strong>1200</strong> <strong>Programmable</strong> <strong>controller</strong><br />
250 System Manual, 04/2012, A5E02486680-06
8.1.3 Run-time meter instruction<br />
Table 8- 12 RTM instruction<br />
LAD / FBD SCL Description<br />
RTM(NR:=_uint_in_,<br />
MODE:=_byte_in_,<br />
PV:=_dint_in_,<br />
CQ=>_bool_out_,<br />
CV=>_dint_out_);<br />
Table 8- 13 Data types for the parameters<br />
Extended instructions<br />
8.1 Date and time-of-day<br />
The RTM (Run Time Meter) instruction can set, start, stop, and<br />
read the run-time hour meters in the CPU.<br />
Parameter and type Data type Description<br />
NR IN UInt Run-time meter number: (possible values: 0..9)<br />
MODE IN Byte RTM Execution mode number:<br />
0 = Fetch values (the status is then written to CQ and the<br />
current value to CV)<br />
1 = Start (at the last counter value)<br />
2 = Stop<br />
4 = Set (to the value specified in PV)<br />
5 = Set (to the value specified in PV) and then start<br />
6 = Set (to the value specified in PV) and then stop<br />
7 = Save all RTM values in the CPU to the MC (Memory<br />
Card)<br />
PV IN DInt Preset hours value for the specified run-time meter<br />
RET_VAL OUT Int Function result / error message<br />
CQ OUT Bool Run-time meter status (1 = running)<br />
CV OUT DInt Current run-time hours value for the specified meter<br />
The CPU operates up to 10 run-time hour meters to track the run-time hours of critical<br />
control subsystems. You must start the individual hour meters with one RTM execution for<br />
each timer. All run-time hour meters are stopped when the CPU makes a run-to-stop<br />
transition. You can also stop individual timers with RTM execution mode 2.<br />
When a CPU makes a stop-to-run transition, you must restart the hour timers with one RTM<br />
execution for each timer that is started. After a run-time meter value is greater than<br />
2147483647 hours, counting stops and the "Overflow" error is sent. You must execute the<br />
RTM instruction once for each timer to reset or modify the timer.<br />
A CPU power failure or power cycle causes a power-down process that saves the current<br />
run-time meter values in retentive memory. Upon CPU power-up, the stored run-time meter<br />
values are reloaded to the timers and the previous run-time hour totals are not lost. The runtime<br />
meters must be restarted to accumulate additional run-time.<br />
<strong>S7</strong>-<strong>1200</strong> <strong>Programmable</strong> <strong>controller</strong><br />
System Manual, 04/2012, A5E02486680-06 251
Extended instructions<br />
8.1 Date and time-of-day<br />
Table 8- 14 Condition codes<br />
Your program can also use RTM execution mode 7 to save the run-time meter values in a<br />
memory card. The states of all timers at the instant RTM mode 7 is executed are stored in<br />
the memory card. These stored values can become incorrect over time as the hour timers<br />
are started and stopped during a program run session. You must periodically update the<br />
memory card values to capture important run-time events. The advantage that you get from<br />
storing the RTM values in the memory card is that you can insert the memory card in a<br />
substitute CPU where your program and saved RTM values will be available. If you did not<br />
save the RTM values in the memory card, then the timer values would be lost (in a substitute<br />
CPU).<br />
Note<br />
Avoid excessive program calls for memory card write operations<br />
Minimize flash memory card write operations to extend the life of the memory card.<br />
RET_VAL (W#16#....) Description<br />
0 No error<br />
8080 Incorrect run-time meter number<br />
8081 A negative value was passed to the parameter PV<br />
8082 Overflow of the operating hours counter<br />
8091 The input parameter MODE contains an illegal value.<br />
80B1 Value cannot be saved to MC (MODE=7)<br />
8.1.4 SET_TIMEZONE instruction<br />
Table 8- 15 SET_TIMEZONE instruction<br />
LAD / FBD SCL Description<br />
"SET_TIMEZONE_DB"(<br />
REQ:=_bool_in,<br />
Timezone:=_struct_in,<br />
DONE=>_bool_out_,<br />
BUSY=>_bool_out_,<br />
ERROR=>_bool_out_,<br />
STATUS=>_word_out_);<br />
1 In the SCL example, "SET_TIMEZONE_DB" is the name of the instance DB.<br />
Sets the local time zone and daylight<br />
saving parameters that are used to<br />
transform the CPU system time to local<br />
time.<br />
<strong>S7</strong>-<strong>1200</strong> <strong>Programmable</strong> <strong>controller</strong><br />
252 System Manual, 04/2012, A5E02486680-06
Table 8- 16 Data types for the parameters<br />
Extended instructions<br />
8.1 Date and time-of-day<br />
Parameter and type Data type Description<br />
REQ IN Bool REQ=1: execute function<br />
Timezone IN TimeTransformationRule Rules for the transformation from system time to<br />
local time<br />
DONE OUT Bool Function complete<br />
BUSY OUT Bool Function busy<br />
ERROR OUT Bool Error detected<br />
STATUS OUT Word Function result / error message<br />
To manually configure the time zone parameters for the CPU, use the "Time of day"<br />
properties of the "General" tab of the device configuration.<br />
Use the SET_TIMEZONE instruction to set the local time configuration programmatically.<br />
The parameters of the "TimeTransformationRule" structure specify the local time zone and<br />
timing for automatic switching between standard time and daylight saving time.<br />
Table 8- 17 "TimeTransformationRule" structure<br />
Parameter Data type Description<br />
Bias Int Time difference between UTC and local time [min]<br />
DaylightBias Int Time difference between winter and summer time [min]<br />
DaylightStartMonth USInt Month of daylight saving time<br />
DaylightStartWeek USInt Week of daylight saving time:<br />
1 = First occurrence of the weekday in the month<br />
...<br />
5 = Last occurrence of the weekday of the month<br />
DaylightStartWeekday USInt Weekday of daylight saving time:<br />
1 = Sunday<br />
...<br />
7 = Saturday<br />
DaylightStartHour USInt Hour of daylight saving time<br />
StandardStartMonth USInt Month of switching to winter time<br />
StandardStartWeek USInt Week of the changeover to winter time:<br />
1 = First occurrence of the weekday in the month<br />
...<br />
5 = last occurrence of the weekday of the month<br />
StandardStartWeekday USInt Weekday of winter time:<br />
1 = Sunday<br />
...<br />
7 = Saturday<br />
StandardStartHour USInt Hour of the winter time<br />
Time Zone Name STRING [80] Name of the zone:<br />
(GMT +01:00) Amsterdam, Berlin, Bern, Rome, Stockholm, Vienna<br />
<strong>S7</strong>-<strong>1200</strong> <strong>Programmable</strong> <strong>controller</strong><br />
System Manual, 04/2012, A5E02486680-06 253
Extended instructions<br />
8.2 String and character<br />
8.2 String and character<br />
8.2.1 String data overview<br />
String data type<br />
Initialize your String data<br />
Valid String data<br />
String data is stored as a 2-byte header followed by up to 254 character bytes of ASCII<br />
character codes. A String header contains two lengths. The first byte is the maximum length<br />
that is given in square brackets when you initialize a string, or 254 by default. The second<br />
header byte is the current length that is the number of valid characters in the string. The<br />
current length must be smaller than or equal to the maximum length. The number of stored<br />
bytes occupied by the String format is 2 bytes greater than the maximum length.<br />
String input and output data must be initialized as valid strings in memory, before execution<br />
of any string instructions.<br />
A valid string has a maximum length that must be greater than zero but less than 255. The<br />
current length must be less than or equal to the maximum length.<br />
Strings cannot be assigned to I or Q memory areas.<br />
For more information see: Format of the String data type (Page 97).<br />
8.2.2 S_MOVE instruction<br />
Table 8- 18 String move instruction<br />
LAD / FBD SCL Description<br />
out := in; Copy the source IN string to the OUT location. S_MOVE execution does not affect<br />
the contents of the source string.<br />
Table 8- 19 Data types for the parameters<br />
Parameter Data type Description<br />
IN String Source string<br />
OUT String Target address<br />
If the actual length of the string at the input IN exceeds the maximum length of a string<br />
stored at output OUT, then the part of the IN string which can fit in the OUT string is copied.<br />
<strong>S7</strong>-<strong>1200</strong> <strong>Programmable</strong> <strong>controller</strong><br />
254 System Manual, 04/2012, A5E02486680-06
8.2.3 String conversion instructions<br />
Extended instructions<br />
8.2 String and character<br />
8.2.3.1 String to value and value to string conversions<br />
You can convert number character strings to number values or number values to number<br />
character strings with these instructions:<br />
● S_CONV converts (number string to a number value) or (number value to a number<br />
string)<br />
● STRG_VAL converts a number string to a number value with format options<br />
● VAL_STRG converts a number value to a number string with format options<br />
S_CONV (String to value conversions)<br />
Table 8- 20 String conversion instruction<br />
LAD / FBD SCL Description<br />
out :=<br />
_TO_(in);<br />
Converts a character string to the corresponding value, or a value<br />
to the corresponding character string. The S_CONV instruction<br />
has no output formatting options. This makes the S_CONV<br />
instruction simpler, but less flexible than the STRG_VAL and<br />
VAL_STRG instructions.<br />
1 For LAD / FBD: Click the "???" and select the data type from the drop-down list.<br />
2 For SCL: Select S_CONV from the Extended Instructions, and answer the prompts for the data types for the conversion.<br />
STEP 7 then provides the appropriate conversion instruction.<br />
Table 8- 21 Data types (string to value)<br />
Parameter and type Data type Description<br />
IN IN String Input character string<br />
OUT OUT String, Char, SInt, Int, DInt, USInt, UInt, UDInt, Real, LReal Output number value<br />
Conversion of the string parameter IN starts at the first character and continues until the end<br />
of the string, or until the first character is encountered that is not "0" through "9", "+", "-", or<br />
".". The result value is provided at the location specified in parameter OUT. If the output<br />
number value does not fit in the range of the OUT data type, then parameter OUT is set to 0<br />
and ENO is set to FALSE. Otherwise, parameter OUT contains a valid result and ENO is set<br />
to TRUE.<br />
Input String format rules:<br />
● If a decimal point is used in the IN string, you must use the "." character.<br />
● Comma characters "," used as a thousands separator to the left of the decimal point are<br />
allowed and ignored.<br />
● Leading spaces are ignored.<br />
<strong>S7</strong>-<strong>1200</strong> <strong>Programmable</strong> <strong>controller</strong><br />
System Manual, 04/2012, A5E02486680-06 255
Extended instructions<br />
8.2 String and character<br />
S_CONV (Value to string conversions)<br />
Table 8- 22 Data types (value to string)<br />
Parameter and type Data type Description<br />
IN IN String, Char, SInt, Int, DInt, USInt, UInt, UDInt, Real, LReal Input number value<br />
OUT OUT String Output character string<br />
An integer, unsigned integer, or floating point value IN is converted to the corresponding<br />
character string at OUT. The parameter OUT must reference a valid string before the<br />
conversion is executed. A valid string consists of a maximum string length in the first byte,<br />
the current string length in the second byte, and the current string characters in the next<br />
bytes. The converted string replaces characters in the OUT string starting at the first<br />
character and adjusts the current length byte of the OUT string. The maximum length byte of<br />
the OUT string is not changed.<br />
How many characters are replaced depends on the parameter IN data type and number<br />
value. The number of characters replaced must fit within the parameter OUT string length.<br />
The maximum string length (first byte) of the OUT string should be greater than or equal to<br />
the maximum expected number of converted characters. The following table shows the<br />
maximum possible string lengths required for each supported data type.<br />
Table 8- 23 Maximum string lengths for each data type<br />
IN data type Maximum number of converted<br />
characters in OUT string<br />
USInt 3 255 5<br />
SInt 4 -128 6<br />
UInt 5 65535 7<br />
Int 6 -32768 8<br />
UDInt 10 4294967295 12<br />
DInt 11 -2147483648 13<br />
Example Total string length including maximum and<br />
current length bytes<br />
Output String format rules:<br />
● Values written to parameter OUT do not use a leading "+" sign.<br />
● Fixed-point representation is used (no exponential notation).<br />
● The period character "." is used to represent the decimal point when parameter IN is the<br />
Real data type.<br />
<strong>S7</strong>-<strong>1200</strong> <strong>Programmable</strong> <strong>controller</strong><br />
256 System Manual, 04/2012, A5E02486680-06
STRG_VAL instruction<br />
Table 8- 24 String-to-value instruction<br />
LAD / FBD SCL Description<br />
"STRG_VAL"(<br />
in:=_string_in,<br />
format:=_word_in,<br />
p:=uint_in,<br />
out=>_variant_out);<br />
1 For LAD / FBD: Click the "???" and select the data type from the drop-down list.<br />
Table 8- 25 Data types for the STRG_VAL instruction<br />
Extended instructions<br />
8.2 String and character<br />
Converts a number character string to the corresponding<br />
integer or floating point representation.<br />
Parameter and type Data type Description<br />
IN IN String The ASCII character string to convert<br />
FORMAT IN Word Output format options<br />
P IN UInt, Byte, USInt IN: Index to the first character to be converted<br />
(first character = 1)<br />
OUT OUT SInt, Int, DInt, USInt, UInt, UDInt,<br />
Real, LReal<br />
Converted number value<br />
Conversion begins in the string IN at character offset P and continues until the end of the<br />
string, or until the first character is encountered that is not "+", "-", ".", ",", "e", "E", or "0" to<br />
"9". The result is placed at the location specified in parameter OUT.<br />
String data must be initialized before execution as a valid string in memory.<br />
The FORMAT parameter for the STRG_VAL instruction is defined below. The unused bit<br />
positions must be set to zero.<br />
Table 8- 26 Format of the STRG_VAL instruction<br />
Bit<br />
16<br />
Bit 8 Bit 7 Bit 0<br />
0 0 0 0 0 0 0 0 0 0 0 0 0 0 f r<br />
f = Notation format 1= Exponential notation<br />
0 = Fixed point notation<br />
r = Decimal point format 1 = "," (comma character)<br />
0 = "." (period character)<br />
<strong>S7</strong>-<strong>1200</strong> <strong>Programmable</strong> <strong>controller</strong><br />
System Manual, 04/2012, A5E02486680-06 257
Extended instructions<br />
8.2 String and character<br />
Table 8- 27 Values of the FORMAT parameter<br />
FORMAT (W#16#) Notation format Decimal point representation<br />
0000 (default) Fixed point<br />
"."<br />
0001<br />
0002 Exponential<br />
"."<br />
0003<br />
VAL_STRG instruction<br />
Table 8- 28 Value-to-string operation<br />
0004 to FFFF Illegal values<br />
Rules for STRG_VAL conversion:<br />
● If the period character "." is used for the decimal point, then commas "," to the left of the<br />
decimal point are interpreted as thousands separator characters. The comma characters<br />
are allowed and ignored.<br />
● If the comma character "," is used for the decimal point, then periods "." to the left of the<br />
decimal point are interpreted as thousands separator characters. These period<br />
characters are allowed and ignored.<br />
● Leading spaces are ignored.<br />
LAD / FBD SCL Description<br />
"VAL_STRG"(<br />
in:=_variant_in,<br />
size:=_usint_in,<br />
prec:=_usint_in,<br />
format:=_word_in,<br />
p:=uint_in,<br />
out=>_string_out);<br />
1 For LAD / FBD: Click the "???" and select the data type from the drop-down list.<br />
Table 8- 29 Data types for the VAL_STRG instruction<br />
<strong>S7</strong>-<strong>1200</strong> <strong>Programmable</strong> <strong>controller</strong><br />
258 System Manual, 04/2012, A5E02486680-06<br />
","<br />
","<br />
Converts an integer, unsigned integer, or floating point<br />
value to the corresponding character string<br />
representation.<br />
Parameter and type Data type Description<br />
IN IN SInt, Int, DInt, USInt, UInt,<br />
UDInt, Real, LReal<br />
Value to convert<br />
SIZE IN USInt Number of characters to be written to the OUT string<br />
PREC IN USInt The precision or size of the fractional portion. This does<br />
not include the decimal point.<br />
FORMAT IN Word Output format options<br />
P IN UInt, Byte, USInt IN: Index to the first OUT string character to be replaced<br />
(first character = 1)<br />
OUT OUT String The converted string
Extended instructions<br />
8.2 String and character<br />
The value represented by parameter IN is converted to a string referenced by parameter<br />
OUT. The parameter OUT must be a valid string before the conversion is executed.<br />
The converted string will replace characters in the OUT string starting at character offset<br />
count P to the number of characters specified by parameter SIZE. The number of characters<br />
in SIZE must fit within the OUT string length, counting from character position P. This<br />
instruction is useful for embedding number characters into a text string. For example, you<br />
can put the numbers "120" into the string "Pump pressure = 120 psi".<br />
Parameter PREC specifies the precision or number of digits for the fractional part of the<br />
string. If the parameter IN value is an integer, then PREC specifies the location of the<br />
decimal point. For example, if the data value is 123 and PREC = 1, then the result is "12.3".<br />
The maximum supported precision for the Real data type is 7 digits.<br />
If parameter P is greater than the current size of the OUT string, then spaces are added, up<br />
to position P, and the result is appended to the end of the string. The conversion ends if the<br />
maximum OUT string length is reached.<br />
The FORMAT parameter for the VAL_STRG instruction is defined below. The unused bit<br />
positions must be set to zero.<br />
Table 8- 30 Format of the VAL_STRG instruction<br />
Bit<br />
16<br />
Bit 8 Bit 7 Bit 0<br />
0 0 0 0 0 0 0 0 0 0 0 0 0 s f r<br />
s = Number sign character 1= use sign character "+" and "-"<br />
0 = use sign character "-" only<br />
f = Notation format 1= Exponential notation<br />
0 = Fixed point notation<br />
r = Decimal point format 1 = "," (comma character)<br />
0 = "." (period character)<br />
Table 8- 31 Values of the FORMAT parameter<br />
FORMAT (WORD) Number sign character Notation format Decimal point representation<br />
W#16#0000 "-" only<br />
Fixed point<br />
"."<br />
W#16#0001<br />
","<br />
W#16#0002 Exponential<br />
"."<br />
W#16#0003<br />
","<br />
W#16#0004 "+" and "-"<br />
Fixed Point<br />
"."<br />
W#16#0005<br />
","<br />
W#16#0006 Exponential<br />
"."<br />
W#16#0007<br />
","<br />
W#16#0008 to W#16#FFFF Illegal values<br />
<strong>S7</strong>-<strong>1200</strong> <strong>Programmable</strong> <strong>controller</strong><br />
System Manual, 04/2012, A5E02486680-06 259
Extended instructions<br />
8.2 String and character<br />
Conditions reported by ENO<br />
Table 8- 32 ENO status<br />
Parameter OUT string format rules:<br />
● Leading space characters are added to the leftmost part of the string when the converted<br />
string is smaller than the specified size.<br />
● When the FORMAT parameter sign bit is FALSE, unsigned and signed integer data type<br />
values are written to the output buffer without the leading "+" sign. The "-" sign is used if<br />
required.<br />
'.'<br />
● When the sign bit is TRUE, unsigned and signed integer data type values are written to<br />
the output buffer always with a leading sign character.<br />
'.'<br />
● When the FORMAT is set to exponential notation, Real data type values are written to the<br />
output buffer as:<br />
'.' 'E' <br />
● When the FORMAT is set to fixed point notation, integer, unsigned integer, and real data<br />
type values are written to the output buffer as:<br />
'.'<br />
● Leading zeros to the left of the decimal point (except the digit adjacent to the decimal<br />
point) are suppressed.<br />
● Values to the right of the decimal point are rounded to fit in the number of digits to the<br />
right of the decimal point specified by the PREC parameter.<br />
● The size of the output string must be a minimum of three bytes more than the number of<br />
digits to the right of the decimal point.<br />
● Values are right-justified in the output string.<br />
When an error is encountered during the conversion operation, the following results will be<br />
returned:<br />
● ENO is set to 0.<br />
● OUT is set to 0, or as shown in the examples for string to value conversion.<br />
● OUT is unchanged, or as shown in the examples when OUT is a string.<br />
ENO Description<br />
1 No error<br />
0 Illegal or invalid parameter; for example, an access to a DB that does not exist<br />
0 Illegal string where the maximum length of the string is 0 or 255<br />
0 Illegal string where the current length is greater than the maximum length<br />
0 The converted number value is too large for the specified OUT data type.<br />
0 The OUT parameter maximum string size must be large enough to accept the number of characters<br />
specified by parameter SIZE, starting at the character position parameter P.<br />
<strong>S7</strong>-<strong>1200</strong> <strong>Programmable</strong> <strong>controller</strong><br />
260 System Manual, 04/2012, A5E02486680-06
ENO Description<br />
0 Illegal P value where P=0 or P is greater than the current string length<br />
0 Parameter SIZE must be greater than parameter PREC.<br />
Table 8- 33 Examples of S_CONV string to value conversion<br />
Extended instructions<br />
8.2 String and character<br />
IN string OUT data type OUT value ENO<br />
"123" Int or DInt 123 TRUE<br />
"-00456" Int or DInt -456 TRUE<br />
"123.45" Int or DInt 123 TRUE<br />
"+2345" Int or DInt 2345 TRUE<br />
"00123AB" Int or DInt 123 TRUE<br />
"123" Real 123.0 TRUE<br />
"123.45" Real 123.45 TRUE<br />
"1.23e-4" Real 1.23 TRUE<br />
"1.23E-4" Real 1.23 TRUE<br />
"12,345.67" Real 12345.67 TRUE<br />
"3.4e39" Real 3.4 TRUE<br />
"-3.4e39" Real -3.4 TRUE<br />
"1.17549e-38" Real 1.17549 TRUE<br />
"12345" SInt 0 FALSE<br />
"A123" N/A 0 FALSE<br />
"" N/A 0 FALSE<br />
"++123" N/A 0 FALSE<br />
"+-123" N/A 0 FALSE<br />
Table 8- 34 Examples of S_CONV value to string conversion<br />
Data type IN value OUT string ENO<br />
UInt 123 "123" TRUE<br />
UInt 0 "0" TRUE<br />
UDInt 12345678 "12345678" TRUE<br />
Real -INF "INF" FALSE<br />
Real +INF "INF" FALSE<br />
Real NaN "NaN" FALSE<br />
Table 8- 35 Examples of STRG_VAL conversion<br />
IN string FORMAT<br />
(W#16#....)<br />
OUT data type OUT value ENO<br />
"123" 0000 Int or DInt 123 TRUE<br />
"-00456" 0000 Int or DInt -456 TRUE<br />
<strong>S7</strong>-<strong>1200</strong> <strong>Programmable</strong> <strong>controller</strong><br />
System Manual, 04/2012, A5E02486680-06 261
Extended instructions<br />
8.2 String and character<br />
IN string FORMAT<br />
(W#16#....)<br />
OUT data type OUT value ENO<br />
"123.45" 0000 Int or DInt 123 TRUE<br />
"+2345" 0000 Int or DInt 2345 TRUE<br />
"00123AB" 0000 Int or DInt 123 TRUE<br />
"123" 0000 Real 123.0 TRUE<br />
"-00456" 0001 Real -456.0 TRUE<br />
"+00456" 0001 Real 456.0 TRUE<br />
"123.45" 0000 Real 123.45 TRUE<br />
"123.45" 0001 Real 12345.0 TRUE<br />
"123,45" 0000 Real 12345.0 TRUE<br />
"123,45" 0001 Real 123.45 TRUE<br />
".00123AB" 0001 Real 123.0 TRUE<br />
"1.23e-4" 0000 Real 1.23 TRUE<br />
"1.23E-4" 0000 Real 1.23 TRUE<br />
"1.23E-4" 0002 Real 1.23E-4 TRUE<br />
"12,345.67" 0000 Real 12345.67 TRUE<br />
"12,345.67" 0001 Real 12.345 TRUE<br />
"3.4e39" 0002 Real +INF TRUE<br />
"-3.4e39" 0002 Real -INF TRUE<br />
"1.1754943e-38"<br />
(and smaller)<br />
0002 Real 0.0 TRUE<br />
"12345" N/A SInt 0 FALSE<br />
"A123" N/A N/A 0 FALSE<br />
"" N/A N/A 0 FALSE<br />
"++123" N/A N/A 0 FALSE<br />
"+-123" N/A N/A 0 FALSE<br />
The following examples of VAL_STRG conversions are based on an OUT string initialized as<br />
follows:<br />
"Current Temp = xxxxxxxxxx C"<br />
where the "x" character represents space characters allocated for the converted value.<br />
<strong>S7</strong>-<strong>1200</strong> <strong>Programmable</strong> <strong>controller</strong><br />
262 System Manual, 04/2012, A5E02486680-06
Table 8- 36 Examples of VAL_STRG conversion<br />
Extended instructions<br />
8.2 String and character<br />
Data type IN value P SIZE FORMAT<br />
(W#16#....)<br />
PREC OUT string ENO<br />
UInt 123 16 10 0000 0 Current Temp =<br />
xxxxxxx123 C<br />
TRUE<br />
UInt 0 16 10 0000 2 Current Temp =<br />
xxxxxx0.00 C<br />
TRUE<br />
UDInt 12345678 16 10 0000 3 Current Temp =<br />
x12345.678 C<br />
TRUE<br />
UDInt 12345678 16 10 0001 3 Current Temp =<br />
x12345,678 C<br />
TRUE<br />
Int 123 16 10 0004 0 Current Temp =<br />
xxxxxx+123 C<br />
TRUE<br />
Int -123 16 10 0004 0 Current Temp =<br />
xxxxxx-123 C<br />
TRUE<br />
Real -0.00123 16 10 0004 4 Current Temp = xxx-<br />
0.0012 C<br />
TRUE<br />
Real -0.00123 16 10 0006 4 Current Temp = -<br />
1.2300E-3 C<br />
TRUE<br />
Real -INF 16 10 N/A 4 Current Temp =<br />
xxxxxx-INF C<br />
FALSE<br />
Real +INF 16 10 N/A 4 Current Temp =<br />
xxxxxx+INF C<br />
FALSE<br />
Real NaN 16 10 N/A 4 Current Temp =<br />
xxxxxxxNaN C<br />
FALSE<br />
UDInt 12345678 16 6 N/A 3 Current Temp =<br />
xxxxxxxxxx C<br />
FALSE<br />
8.2.3.2 String-to-characters and characters-to-string conversions<br />
Chars_TO_Strg copies an array of ASCII character bytes into a character string.<br />
Strg_TO_Chars copies an ASCII character string into an array of character bytes.<br />
Note<br />
Only the zero based array types (Array [0..n] of Char) or (Array [0..n] of Byte) are allowed as<br />
the input parameter Chars for the Chars_TO_Strg instruction, or as the IN_OUT parameter<br />
Chars for the Strg_TO_Chars instruction.<br />
Table 8- 37 Chars_TO_Strg instruction<br />
LAD / FBD SCL Description<br />
Chars_TO_Strg(<br />
All or part of an array of characters is copied to a string.<br />
Chars:=_variant_in_,<br />
pChars:=_dint_in_,<br />
The output string must be declared before Chars_TO_Strg is<br />
executed. The string is then overwritten by the Chars_TO_Strg<br />
Cnt:=_uint_in_, operation.<br />
Strg=>_string_out_); Strings of all supported maximum lengths (1..254) may be used.<br />
The string maximum length value is not changed by<br />
Chars_TO_Strg operation. Copying from array to string stops<br />
when the maximum string length is reached.<br />
A nul character '$00' or 16#00 value in the character array works<br />
as a delimiter and ends copying of characters into the string.<br />
<strong>S7</strong>-<strong>1200</strong> <strong>Programmable</strong> <strong>controller</strong><br />
System Manual, 04/2012, A5E02486680-06 263
Extended instructions<br />
8.2 String and character<br />
Table 8- 38 Data types for the parameters (Chars_TO_Strg)<br />
Parameter and type Data type Description<br />
Chars IN Variant The Chars parameter is a pointer to zero based array [0..n] of<br />
characters to be converted into a string. The array can be<br />
declared in a DB or as local variables in the block interface.<br />
Example: "DB1".MyArray points to MyArray [0..10] of Char<br />
element values in DB1.<br />
pChars IN Dint Element number for the first character in the array to copy.<br />
Array element [0] is the default value.<br />
Cnt IN UInt Count of characters to copy: 0 means all<br />
Strg OUT String Target string<br />
Table 8- 39 Strg_TO_Chars instruction<br />
LAD / FBD SCL Description<br />
Strg_TO_Chars(<br />
Strg:=_string_in_,<br />
pChars:=_dint_in_,<br />
Cnt=>_uint_out_,<br />
Chars:=_variant_inout_);<br />
Table 8- 40 Data types for the parameters (Strg_TO_Chars)<br />
The complete input string Strg is copied to an array of<br />
characters at IN_OUT parameter Chars.<br />
The operation overwrites bytes starting at array element<br />
number specified by the pChars parameter.<br />
Strings of all supported max lengths (1..254) may be used.<br />
An end delimiter is not written; this is your responsibility. To<br />
set an end delimiter just after the last written array<br />
character, use the next array element number [pChars+Cnt].<br />
Parameter and type Data type Description<br />
Strg IN String Source string<br />
pChars IN DInt Array element number for the first string character written to<br />
the target array<br />
Chars IN_OUT Variant The Chars parameter is a pointer to zero based array [0..n] of<br />
characters copied from the input string. The array can be<br />
declared in a DB or as local variables in the block interface.<br />
Example: "DB1".MyArray points to MyArray [0..10] of Char<br />
element values in DB1.<br />
Cnt OUT UInt Count of characters copied<br />
Table 8- 41 ENO status<br />
ENO Description<br />
1 No error<br />
0 Chars_TO_Strg: Attempt to copy more character bytes to the output string than allowed by the maximum<br />
length byte in the string declaration<br />
<strong>S7</strong>-<strong>1200</strong> <strong>Programmable</strong> <strong>controller</strong><br />
264 System Manual, 04/2012, A5E02486680-06
Extended instructions<br />
8.2 String and character<br />
ENO Description<br />
0 Chars_TO_Strg: The nul character (16#00) value was found in the input character byte array.<br />
0 Strg_TO_Chars: Attempt to copy more character bytes to the output array than are allowed by the element<br />
number limit<br />
8.2.3.3 ASCII to Hex and Hex to ASCII conversions<br />
Table 8- 42 ATH instruction<br />
Use the ATH (ASCII to hexadecimal) and HTA (hexadecimal to ASCII) instructions for<br />
conversions between ASCII character bytes (characters 0 to 9 and uppercase A to F only)<br />
and the corresponding 4-bit hexadecimal nibbles.<br />
LAD / FBD SCL Description<br />
ret_val := ATH(<br />
in:=_variant_in_,<br />
n:=_int_in_,<br />
out=>_variant_out_);<br />
Converts ASCII characters into packed hexadecimal digits.<br />
Table 8- 43 Data types for the ATH instruction<br />
Parameter type Data Type Description<br />
IN IN Variant Pointer to ASCII character byte array<br />
N IN UInt Number of ASCII character bytes to convert<br />
RET_VAL OUT Word Execution condition code<br />
OUT OUT Variant Pointer to the converted hexadecimal byte array<br />
Conversion begins at the location specified by parameter IN and continues for N bytes. The<br />
result is placed at the location specified by OUT. Only valid ASCII characters 0 to 9 and<br />
uppercase A to F can be converted. Any other character will be converted to zero.<br />
8-bit ASCII coded characters are converted to 4-bit hexadecimal nibbles. Two ASCII<br />
characters can be stored in a single byte.<br />
The IN and OUT parameters specify byte arrays and not hexadecimal String data. ASCII<br />
characters are converted and placed in the hexadecimal output in the same order as they<br />
are read. If there are an odd number of ASCII characters, then zeros are put in the rightmost<br />
nibble of the last converted hexadecimal digit.<br />
Table 8- 44 Examples of ASCII-to-hexadecimal (ATH) conversion<br />
IN character bytes N OUT value ENO<br />
'0123' 4 W#16#0123 TRUE<br />
'123AFx1a23' 10 16#123AF01023 FALSE<br />
'a23' 3 W#16#A230 TRUE<br />
<strong>S7</strong>-<strong>1200</strong> <strong>Programmable</strong> <strong>controller</strong><br />
System Manual, 04/2012, A5E02486680-06 265
Extended instructions<br />
8.2 String and character<br />
Table 8- 45 HTA instruction<br />
LAD / FBD SCL Description<br />
ret_val := HTA(<br />
in:=_variant_in_,<br />
n:=_uint_in_,<br />
out=>_variant_out_);<br />
Table 8- 46 Data types for the HTA instruction<br />
Converts packed hexadecimal digits to their corresponding ASCII<br />
character bytes.<br />
Parameter and type Data Type Description<br />
IN IN Variant Pointer to input byte array<br />
N IN UInt Number of bytes to convert (each input byte has two 4-bit nibbles and<br />
produces 2N ASCII characters)<br />
RET_VAL OUT Word Execution condition code<br />
OUT OUT Variant Pointer to ASCII character byte array<br />
Conversion begins at the location specified by parameter IN and continues for N bytes. Each<br />
4-bit nibble converts to a single 8-bit ASCII character and produces 2N ASCII character<br />
bytes of output. All 2N bytes of the output are written as ASCII characters 0 to 9 through<br />
uppercase A to F. The parameter OUT specifies a byte array and not a string.<br />
Each nibble of the hexadecimal byte is converted into a character in the same order as they<br />
are read in (left-most nibble of a hexadecimal digit is converted first, followed by the rightmost<br />
nibble of that same byte).<br />
Table 8- 47 Examples of hexadecimal -to- ASCII (HTA) conversion<br />
IN value N OUT character bytes ENO (ENO always TRUE after HTA execution)<br />
W#16#0123 2 '0123' TRUE<br />
DW#16#123AF012 4 '123AF012' TRUE<br />
Table 8- 48 ATH and HTA condition codes<br />
RET_VAL<br />
(W#16#....)<br />
Description ENO<br />
0000 No error TRUE<br />
0007 Invalid ATH input character: A character was found that was not an ASCII character 0-<br />
9, lowercase a-f, or uppercase A-F<br />
FALSE<br />
8101 Illegal or invalid input pointer, for example, an access to a DB that does not exist. FALSE<br />
8120 Input string is an invalid format, i.e., max= 0, max=255, current>max, or grant length in<br />
pointer < max<br />
FALSE<br />
8182 Input buffer is too small for N FALSE<br />
8151 Data type not allowed for input buffer FALSE<br />
8301 Illegal or invalid output pointer, for example, an access to a DB that does not exist. FALSE<br />
<strong>S7</strong>-<strong>1200</strong> <strong>Programmable</strong> <strong>controller</strong><br />
266 System Manual, 04/2012, A5E02486680-06
Extended instructions<br />
8.2 String and character<br />
RET_VAL<br />
(W#16#....)<br />
Description ENO<br />
8320 Output string is an invalid format, i.e., max= 0, max=255, current>max, or grant length<br />
in pointer < max<br />
FALSE<br />
8382 Output buffer is too small for N FALSE<br />
8351 Data type not allowed for output buffer FALSE<br />
8.2.4 String operation instructions<br />
8.2.4.1 LEN<br />
Table 8- 49 Length instruction<br />
Your control program can use the following string and character instructions to create<br />
messages for operator display and process logs.<br />
LAD / FBD SCL Description<br />
out := LEN(in); LEN (length) provides the current length of the string IN at output OUT. An<br />
empty string has a length of zero.<br />
Table 8- 50 Data types for the parameters<br />
Parameter and type Data type Description<br />
IN IN String Input string<br />
OUT OUT Int, DInt, Real, LReal Number of valid characters of IN string<br />
Table 8- 51 ENO status<br />
ENO Condition OUT<br />
1 No invalid string condition Valid string length<br />
0 Current length of IN exceeds maximum length of IN<br />
Maximum length of IN does not fit within allocated memory range<br />
Maximum length of IN is 255 (illegal length)<br />
Current length is set to 0<br />
<strong>S7</strong>-<strong>1200</strong> <strong>Programmable</strong> <strong>controller</strong><br />
System Manual, 04/2012, A5E02486680-06 267
Extended instructions<br />
8.2 String and character<br />
8.2.4.2 CONCAT<br />
Table 8- 52 Concatenate strings instruction<br />
LAD / FBD SCL Description<br />
out := CONCAT(in1, in2); CONCAT (concatenate strings) joins string parameters IN1 and<br />
IN2 to form one string provided at OUT. After concatenation,<br />
String IN1 is the left part and String IN2 is the right part of the<br />
combined string.<br />
Table 8- 53 Data types for the parameters<br />
Parameter and type Data type Description<br />
IN1 IN String Input string 1<br />
IN2 IN String Input string 2<br />
OUT OUT String Combined string (string 1 + string 2)<br />
Table 8- 54 ENO status<br />
ENO Condition OUT<br />
1 No errors detected Valid characters<br />
0 Resulting string after concatenation is larger than maximum length of OUT Resulting string characters are<br />
string<br />
copied until the maximum length<br />
of the OUT is reached<br />
Current length of IN1 exceeds maximum length of IN1, current length of<br />
IN2 exceeds maximum length of IN2, or current length of OUT exceeds<br />
maximum length of OUT (invalid string)<br />
Maximum length of IN1, IN2 or OUT does not fit within allocated memory<br />
range<br />
Maximum length of IN1 or IN2 is 255, or the maximum length of OUT is 0<br />
or 255<br />
Current length is set to 0<br />
<strong>S7</strong>-<strong>1200</strong> <strong>Programmable</strong> <strong>controller</strong><br />
268 System Manual, 04/2012, A5E02486680-06
8.2.4.3 LEFT, RIGHT, and MID<br />
Table 8- 55 Left, right and middle substring operations<br />
Extended instructions<br />
8.2 String and character<br />
LAD / FBD SCL Description<br />
out := LEFT(in, L); LEFT (Left substring) provides a substring made of the first L<br />
characters of string parameter IN.<br />
If L is greater than the current length of the IN string, then the entire<br />
IN string is returned in OUT.<br />
If an empty string is the input, then an empty string is returned in<br />
OUT.<br />
out := MID(in, L, p); MID (Middle substring) provides the middle part of a string. The middle<br />
substring is L characters long and starts at character position P<br />
(inclusive).<br />
If the sum of L and P exceeds the current length of the string<br />
parameter IN, then a substring is returned that starts at character<br />
position P and continues to the end of the IN string.<br />
out := RIGHT(in, L); RIGHT (Right substring) provides the last L characters of a string.<br />
Table 8- 56 Data types for the parameters<br />
If L is greater than the current length of the IN string, then the entire<br />
IN string is returned in parameter OUT.<br />
If an empty string is the input, then an empty string is returned in<br />
OUT.<br />
Parameter and type Data type Description<br />
IN IN String Input string<br />
L IN Int Length of the substring to be created:<br />
LEFT uses the left-most characters number of characters in the<br />
string<br />
RIGHT uses the right-most number of characters in the string<br />
MID uses the number of characters starting at position P within<br />
the string<br />
P IN Int MID only: Position of first substring character to be copied<br />
P= 1, for the initial character position of the IN string<br />
OUT OUT String Output string<br />
<strong>S7</strong>-<strong>1200</strong> <strong>Programmable</strong> <strong>controller</strong><br />
System Manual, 04/2012, A5E02486680-06 269
Extended instructions<br />
8.2 String and character<br />
Table 8- 57 ENO status<br />
ENO Condition OUT<br />
1 No errors detected Valid characters<br />
0 L or P is less than or equal to 0<br />
Current length is set to 0<br />
P is greater than maximum length of IN<br />
Current length of IN exceeds maximum length of IN, or current length<br />
of OUT exceeds maximum length of OUT<br />
Maximum length of IN or OUT does not fit within allocated memory<br />
Maximum length of IN or OUT is 0 or 255<br />
Substring length (L) to be copied is larger than maximum length of OUT<br />
string.<br />
MID only: L or P is less than or equal to 0<br />
MID only: P is greater than maximum length of IN<br />
Current length of IN1 exceeds maximum length of IN1, or current length of<br />
IN2 exceeds maximum length of IN2 (invalid string)<br />
Maximum length of IN1, IN2 or OUT does not fit within allocated memory<br />
range<br />
Maximum length of IN1, IN2 or OUT is 0 or 255 (illegal length)<br />
8.2.4.4 DELETE<br />
Table 8- 58 Delete substring instruction<br />
Characters are copied until the<br />
maximum length of OUT is<br />
reached<br />
Current length is set to 0<br />
Current length is set to 0<br />
LAD / FBD SCL Description<br />
out := DELETE(in, L, p); Deletes L characters from string IN. Character deletion starts at<br />
character position P (inclusive), and the remaining substring is<br />
provided at parameter OUT.<br />
If L is equal to zero, then the input string is returned in OUT.<br />
If the sum of L and P is greater than the length of the input<br />
string, then the string is deleted to the end.<br />
Table 8- 59 Data types for the parameters<br />
Parameter and type Data type Description<br />
IN IN String Input string<br />
L IN Int Number of characters to be deleted<br />
P IN Int Position of the first character to be deleted: The first character of<br />
the IN string is position number 1<br />
OUT OUT String Output string<br />
<strong>S7</strong>-<strong>1200</strong> <strong>Programmable</strong> <strong>controller</strong><br />
270 System Manual, 04/2012, A5E02486680-06
Table 8- 60 ENO status<br />
Extended instructions<br />
8.2 String and character<br />
ENO Condition OUT<br />
1 No errors detected Valid characters<br />
0 P is greater than current length of IN IN is copied to OUT with no<br />
characters deleted<br />
Resulting string after characters are deleted is larger than maximum length Resulting string characters are<br />
of OUT string<br />
copied until the maximum length<br />
of OUT is reached<br />
L is less than 0, or P is less than or equal to 0<br />
Current length of IN exceeds maximum length of IN, or current length of<br />
OUT exceeds maximum length of OUT<br />
Maximum length of IN or OUT does not fit within allocated memory<br />
Maximum length of IN or OUT is 0 or 255<br />
Current length is set to 0<br />
8.2.4.5 INSERT<br />
Table 8- 61 Insert substring instruction<br />
LAD / FBD SCL Description<br />
out := INSERT(in1, in2, p); Inserts string IN2 into string IN1. Insertion begins after the<br />
character at position P.<br />
Table 8- 62 Data types for the parameters<br />
Parameter and type Data type Description<br />
IN1 IN String Input string 1<br />
IN2 IN String Input string 2<br />
P IN Int Last character position in string IN1 before the insertion point for<br />
string IN2<br />
The first character of string IN1 is position number 1.<br />
OUT OUT String Result string<br />
Table 8- 63 ENO status<br />
ENO Condition OUT<br />
1 No errors detected Valid characters<br />
0 P is greater than length of IN1 IN2 is concatenated with IN1<br />
immediately following the last IN1<br />
character<br />
P is less than 0 Current length is set to 0<br />
<strong>S7</strong>-<strong>1200</strong> <strong>Programmable</strong> <strong>controller</strong><br />
System Manual, 04/2012, A5E02486680-06 271
Extended instructions<br />
8.2 String and character<br />
ENO Condition OUT<br />
Resulting string after insertion is larger than maximum length of<br />
OUT string<br />
Current length of IN1 exceeds maximum length of IN1, current<br />
length of IN2 exceeds maximum length of IN2, or current length of<br />
OUT exceeds maximum length of OUT (invalid string)<br />
Maximum length of IN1, IN2 or OUT does not fit within allocated<br />
memory range<br />
Maximum length of IN1 or IN2 is 255, or maximum length of OUT is<br />
0 or 255<br />
8.2.4.6 REPLACE<br />
Table 8- 64 Replace substring instruction<br />
LAD / FBD SCL Description<br />
out := REPLACE(<br />
in1:=_string_in_,<br />
in2:=_string_in_,<br />
L:=_int_in_,<br />
p:=_int_in);<br />
Table 8- 65 Data types for the parameters<br />
Resulting string characters are copied<br />
until the maximum length of OUT is<br />
reached<br />
Current length is set to 0<br />
Replaces L characters in the string parameter IN1. Replacement<br />
starts at string IN1 character position P (inclusive), with<br />
replacement characters coming from the string parameter IN2.<br />
Parameter and type Data type Description<br />
IN1 IN String Input string<br />
IN2 IN String String of replacement characters<br />
L IN Int Number of characters to replace<br />
P IN Int Position of first character to be replaced<br />
OUT OUT String Result string<br />
If parameter L is equal to zero, then the string IN2 is inserted at position P of string IN1<br />
without deleting any characters from string IN1.<br />
If P is equal to one, then the first L characters of string IN1 are replaced with string IN2<br />
characters.<br />
<strong>S7</strong>-<strong>1200</strong> <strong>Programmable</strong> <strong>controller</strong><br />
272 System Manual, 04/2012, A5E02486680-06
Table 8- 66 ENO status<br />
Extended instructions<br />
8.2 String and character<br />
ENO Condition OUT<br />
1 No errors detected Valid characters<br />
0 P is greater than length of IN1 IN2 is concatenated with IN1<br />
immediately following the last IN1<br />
character<br />
P points within IN1, but fewer than L characters remain in IN1 IN2 replaces the end characters of IN1<br />
beginning at position P<br />
Resulting string after replacement is larger than maximum length of Resulting string characters are copied<br />
OUT string<br />
until the maximum length of OUT is<br />
reached<br />
Maximum length of IN1 is 0 IN2 characters are copied to OUT<br />
L is less than 0, or P is less than or equal to 0<br />
Current length of IN1 exceeds maximum length of IN1, current<br />
length of IN2 exceeds maximum length of IN2, or current length of<br />
OUT exceeds maximum length of OUT<br />
Maximum length of IN1, IN2 or OUT does not fit within allocated<br />
memory range<br />
Maximum length of IN1 or IN2 is 255, or maximum length of OUT is<br />
0 or 255<br />
Current length is set to 0<br />
8.2.4.7 FIND<br />
Table 8- 67 Find substring instruction<br />
LAD / FBD SCL Description<br />
out := FIND(<br />
in1:=_string_in_,<br />
in2:=_string_in);<br />
Table 8- 68 Data types for the parameters<br />
Provides the character position of the substring specified by IN2 within<br />
the string IN1. The search starts on the left. The character position of<br />
the first occurrence of IN2 string is returned at OUT. If the string IN2 is<br />
not found in the string IN1, then zero is returned.<br />
Parameter and type Data type Description<br />
IN1 IN String Search inside this string<br />
IN2 IN String Search for this string<br />
OUT OUT Int Character position in string IN1 of the first search match<br />
<strong>S7</strong>-<strong>1200</strong> <strong>Programmable</strong> <strong>controller</strong><br />
System Manual, 04/2012, A5E02486680-06 273
Extended instructions<br />
8.3 Distributed I/O (PROFINET, PROFIBUS, or AS-i)<br />
Table 8- 69 ENO status<br />
ENO Condition OUT<br />
1 No errors detected Valid character position<br />
0<br />
IN2 is larger than IN1<br />
Current length of IN1 exceeds maximum length of IN1, or current length<br />
of IN2 exceeds maximum length of IN2 (invalid string)<br />
Maximum length of IN1 or IN2 does not fit within allocated memory<br />
range<br />
Maximum length of IN1 or IN2 is 255<br />
8.3 Distributed I/O (PROFINET, PROFIBUS, or AS-i)<br />
8.3.1 Distributed I/O Instructions<br />
Character position is set to 0<br />
The following Distributed I/O instructions can be used with PROFINET, PROFIBUS, or AS-i:<br />
● RDREC instruction (Page 275): You can read a data record with the number INDEX from<br />
a module or device.<br />
● WRREC instruction (Page 275): You can transfer a data record with the number INDEX<br />
to a module or device defined by ID.<br />
● RALRM instruction (Page 278): You can receive an interrupt with all corresponding<br />
information from a module or device and supply this information to its output parameters.<br />
● DPRD_DAT instruction (Page 284): You must read consistent data areas greater than<br />
64 bytes from a module or device with the DPRD_DAT instruction.<br />
● DPWR_DAT instruction (Page 284): You must write consistent data areas greater than<br />
64 bytes to a module or device with the DPWR_DAT instruction.<br />
The DPNRM_DG instruction (Page 286) can only be used with PROFIBUS. You can read<br />
the current diagnostic data of a DP slave in the format specified by EN 50 170 Volume 2,<br />
PROFIBUS.<br />
<strong>S7</strong>-<strong>1200</strong> <strong>Programmable</strong> <strong>controller</strong><br />
274 System Manual, 04/2012, A5E02486680-06
8.3.2 RDREC and WRREC<br />
Extended instructions<br />
8.3 Distributed I/O (PROFINET, PROFIBUS, or AS-i)<br />
You can use the RDREC (Read record) and WRREC (Write record) instructions with<br />
PROFINET, PROFIBUS, and AS-i.<br />
Table 8- 70 RDREC and WRREC instructions<br />
LAD / FBD SCL Description<br />
"RDREC_DB"(<br />
req:=_bool_in_,<br />
ID:=_word_in_,<br />
index:=_dint_in_,<br />
mlen:=_uint_in_,<br />
valid=>_bool_out_,<br />
busy=>_bool_out_,<br />
error=>_bool_out_,<br />
status=>_dword_out_,<br />
len=>_uint_out_,<br />
record:=_variant_inout_);<br />
"WRREC_DB"(<br />
req:=_bool_in_,<br />
ID:=_word_in_,<br />
index:=_dint_in_,<br />
len:=_uint_in_,<br />
done=>_bool_out_,<br />
busy=>_bool_out_,<br />
error=>_bool_out_,<br />
status=>_dword_out_,<br />
record:=_variant_inout_);<br />
1 STEP 7 automatically creates the DB when you insert the instruction.<br />
2 In the SCL examples, "RDREC_DB" and "WRREC_DB" are the names of the instance DBs.<br />
Use the RDREC instruction to read a data<br />
record with the number INDEX from the<br />
component addressed by the ID, such as<br />
a central rack or a distributed component<br />
(PROFIBUS DP or PROFINET IO).<br />
Assign the maximum number of bytes to<br />
read in MLEN. The selected length of the<br />
target area RECORD should have at<br />
least the length of MLEN bytes.<br />
Use the WRREC instruction to transfer a<br />
data RECORD with the record number<br />
INDEX to a DP slave/PROFINET IO<br />
device component addressed by ID, such<br />
as a module in the central rack or a<br />
distributed component (PROFIBUS DP or<br />
PROFINET IO).<br />
Assign the byte length of the data record<br />
to be transmitted. The selected length of<br />
the source area RECORD should,<br />
therefore, have at least the length of LEN<br />
bytes.<br />
<strong>S7</strong>-<strong>1200</strong> <strong>Programmable</strong> <strong>controller</strong><br />
System Manual, 04/2012, A5E02486680-06 275
Extended instructions<br />
8.3 Distributed I/O (PROFINET, PROFIBUS, or AS-i)<br />
Table 8- 71 RDREC and WRREC data types for the parameters<br />
Parameter and type Data type Description<br />
REQ IN Bool REQ = 1: Transfer data record<br />
ID IN HW_IO (Word) Logical address of the DP slave/PROFINET IO component<br />
(module or submodule):<br />
For an output module, bit 15 must be set (for example, for<br />
address 5: ID:= DW#16#8005).<br />
For a combination module, the smaller of the two addresses<br />
should be specified.<br />
Note: The device ID can be determined in one of two ways:<br />
By making the following "Network view" selections:<br />
– Device (gray box)<br />
– "Properties" of the device<br />
– "Hardware identifier"<br />
Note: Not all devices display their Hardware identifiers,<br />
however.<br />
By making the following "Project tree" menu selections:<br />
– PLC tags<br />
– Default tag table<br />
– System constants tab<br />
INDEX IN Byte, Word, USInt,<br />
UInt, SInt, Int, DInt<br />
All configured device Hardware identifiers are displayed.<br />
Data record number<br />
MLEN IN Byte, USInt, UInt Maximum length in bytes of the data record information to be<br />
fetched (RDREC)<br />
VALID OUT Bool New data record was received and valid (RDREC). The VALID<br />
bit is TRUE for one scan, after the last request was completed<br />
with no error.<br />
DONE OUT Bool Data record was transferred (WRREC). The DONE bit is TRUE<br />
for one scan, after the last request was completed with no error.<br />
BUSY OUT Bool BUSY = 1: The read (RDREC) or write (WRREC) process is<br />
not yet terminated.<br />
BUSY = 0: Data record transmission is completed.<br />
ERROR OUT Bool ERROR = 1: A read (RDREC) or write (WRREC) error has<br />
occurred. The ERROR bit is TRUE for one scan, after the last<br />
request was terminated with an error. The error code value at<br />
the STATUS parameter is valid only during the single scan<br />
where ERROR = TRUE.<br />
STATUS OUT DWord Block status or error information<br />
LEN OUT (RDREC)<br />
IN (WRREC)<br />
UInt Length of the fetched data record information (RDREC)<br />
Maximum byte length of the data record to be transferred<br />
(WRREC)<br />
RECORD IN_OUT Variant Target area for the fetched data record (RDREC)<br />
Data record (WRREC)<br />
<strong>S7</strong>-<strong>1200</strong> <strong>Programmable</strong> <strong>controller</strong><br />
276 System Manual, 04/2012, A5E02486680-06
Extended instructions<br />
8.3 Distributed I/O (PROFINET, PROFIBUS, or AS-i)<br />
The RDREC and WRREC instructions operate asynchronously, that is, processing covers<br />
multiple instruction calls. Start the job by calling RDREC or WRREC with REQ = 1.<br />
The job status is displayed via output parameter BUSY and the two central bytes of output<br />
parameter STATUS. The transfer of the data record is complete when the output parameter<br />
BUSY has the value FALSE<br />
TRUE (only for one scan) on the output parameter VALID (RDREC) or DONE (WRREC)<br />
verifies that the data record has been successfully transferred into the target area RECORD<br />
(RDREC) or to the target device (WRREC). In the case of the RDREC, the output parameter<br />
LEN contains the length of the fetched data in bytes.<br />
The output parameter ERROR (only for one scan when ERROR = TRUE) indicates that a<br />
data record transmission error has occurred. In this case, the output parameter STATUS<br />
(only for the one scan when ERROR = TRUE) contains the error information.<br />
Data records are defined by the hardware device manufacturer. Refer to the hardware<br />
manufacturer's device documentation for details about a data record.<br />
Note<br />
If a DPV1 slave is configured via GSD file (GSD rev. 3 and higher) and the DP interface of<br />
the DP master is set to "<strong>S7</strong> compatible", then you may not read any data records from the<br />
I/O modules in the user program with "RDREC" or write to the I/O modules with "WRREC".<br />
In this case, the DP master addresses the wrong slot (configured slot + 3).<br />
Remedy: set the interface of the DP master to "DPV1".<br />
Note<br />
The interfaces of the "RDREC" and "WRREC" instructions are identical to the "RDREC" and<br />
"WRREC" FBs defined in "PROFIBUS Guideline PROFIBUS Communication and Proxy<br />
Function Blocks according to IEC 61131-3".<br />
Note<br />
If you use "RDREC" or "WRREC" to read or write a data record for PROFINET IO, then<br />
negative values in the INDEX, MLEN, and LEN parameters will be interpreted as an<br />
unsigned 16-bit integer.<br />
<strong>S7</strong>-<strong>1200</strong> <strong>Programmable</strong> <strong>controller</strong><br />
System Manual, 04/2012, A5E02486680-06 277
Extended instructions<br />
8.3 Distributed I/O (PROFINET, PROFIBUS, or AS-i)<br />
8.3.3 RALRM<br />
Table 8- 72 RALRM instruction<br />
You can use the RALRM (Read alarm) instruction with PROFINET and PROFIBUS.<br />
LAD / FBD SCL Description<br />
"RALRM_DB"(<br />
mode:=_int_in_,<br />
f_ID:=_word_in_,<br />
mlen:=_uint_in_,<br />
new=>_bool_out_,<br />
status=>_dword_out_,<br />
ID=>_word_out_,<br />
len=>_uint_out_,<br />
tinfo:=_variant_inout_,<br />
ainfo:=_variant_inout_);<br />
1 STEP 7 automatically creates the DB when you insert the instruction.<br />
2 In the SCL example, "RALRM_DB" is the name of the instance DB.<br />
Table 8- 73 Data types for the parameters<br />
Use the RALRM (read alarm) instruction to read diagnostic<br />
interrupt information from PROFIBUS or PROFINET I/O<br />
modules/devices.<br />
The information in the output parameters contains the start<br />
information of the called OB as well as information of the<br />
interrupt source.<br />
Call RALRM in an interrupt OB to return information regarding<br />
the event(s) that caused the interrupt. In the <strong>S7</strong>-<strong>1200</strong>, only<br />
diagnostic interrupts (OB82) are supported.<br />
Parameter and type Data type Description<br />
MODE IN Byte, USInt, SInt, Int Operating mode<br />
F_ID IN HW_IO (Word) Logical start address of the component (module) from which interrupts<br />
are to be received<br />
Note: The device ID can be determined in one of two ways:<br />
By making the following "Network view" selections:<br />
– Device (gray box)<br />
– "Properties" of the device<br />
– "Hardware identifier"<br />
Note: Not all devices display their Hardware identifiers.<br />
By making the following "Project tree" menu selections:<br />
– PLC tags<br />
– Default tag table<br />
– System constants tab<br />
– All configured device Hardware identifiers are displayed.<br />
MLEN IN Byte, USInt, UInt Maximum length in bytes of the data interrupt information to be<br />
received. MLEN of 0 will allow receipt of as much data interrupt<br />
information as is available in the AINFO Target Area.<br />
NEW OUT Bool A new interrupt was received.<br />
STATUS OUT DWord Status of the RALRM instruction. Refer to "STATUS parameter for<br />
RDREC, WRREC, and RALRM" (Page 280) for more information.<br />
ID OUT HW_IO (Word) Hardware identifier of the I/O module that caused the diagnostic<br />
interrupt<br />
Note: Refer to the F_ID parameter for an explanation of how to<br />
determine the device ID.<br />
<strong>S7</strong>-<strong>1200</strong> <strong>Programmable</strong> <strong>controller</strong><br />
278 System Manual, 04/2012, A5E02486680-06
Extended instructions<br />
8.3 Distributed I/O (PROFINET, PROFIBUS, or AS-i)<br />
Parameter and type Data type Description<br />
LEN OUT DWord, UInt, UDInt,<br />
DInt, Real, LReal<br />
Length of the received AINFO interrupt information<br />
TINFO IN_OUT Variant Task information: Target range for OB start and management<br />
information. The TINFO length is always 32 bytes.<br />
AINFO IN_OUT Variant Interrupt information: Target area for header information and additional<br />
interrupt information. For AINFO, provide a length of at least the MLEN<br />
bytes, if MLEN is greater than 0. The AINFO length is variable.<br />
Calling RALRM<br />
Note<br />
If you call "RALRM" in an OB whose start event is not an I/O interrupt, the instruction will<br />
provide correspondingly reduced information in its outputs.<br />
Make sure to use different instance DBs when you call "RALRM" in different OBs. If you<br />
evaluate data resulting from a "RALRM" call outside of the associated interrupt OB, you<br />
should use a separate instance DB per OB start event.<br />
Note<br />
The interface of the "RALRM" instruction is identical to the "RALRM" FB defined in<br />
"PROFIBUS Guideline PROFIBUS Communication and Proxy Function Blocks according to<br />
IEC 61131-3".<br />
You can call the RALRM instruction in three different operating modes (MODE).<br />
Table 8- 74 RALRM instruction operating modes<br />
MODE Description<br />
0 ID contains the hardware identifier of the I/O module that triggered the interrupt.<br />
Output parameter NEW is set to TRUE.<br />
LEN produces an output of 0.<br />
AINFO and TINFO are not updated with any information.<br />
1 ID contains the hardware identifier of the I/O module that triggered the interrupt.<br />
Output parameter NEW is set to TRUE.<br />
LEN produces an output of the amount in bytes of AINFO data that is returned.<br />
AINFO and TINFO are updated with interrupt-related information.<br />
2 If the hardware identifier assigned to input parameter F_ID has triggered the interrupt then:<br />
ID contains the hardware identifier of the I/O module that triggered the interrupt. Should be the same<br />
as the value at F_ID.<br />
Output parameter NEW is set to TRUE.<br />
LEN produces an output of the amount in bytes of AINFO data that is returned.<br />
AINFO and TINFO are updated with interrupt-related information.<br />
<strong>S7</strong>-<strong>1200</strong> <strong>Programmable</strong> <strong>controller</strong><br />
System Manual, 04/2012, A5E02486680-06 279
Extended instructions<br />
8.3 Distributed I/O (PROFINET, PROFIBUS, or AS-i)<br />
Note<br />
If you assign a destination area for TINFO or AINFO that is too short, RALRM cannot return<br />
the full information.<br />
MLEN can limit the amount of AINFO data that is returned.<br />
Refer to the AINFO parameters and TINFO parameters of the online information system of<br />
STEP 7 for information on how to interpret the TINFO and AINFO data.<br />
8.3.4 STATUS parameter for RDREC, WRREC, and RALRM<br />
Table 8- 75 STATUS output array<br />
The output parameter STATUS contains error information that is interpreted as ARRAY[1...4]<br />
OF BYTE, with the following structure:<br />
Array element Name Description<br />
STATUS[1] Function_Num B#16#00, if no error<br />
Function ID from DPV1-PDU: If an error occurs, B#16#80 is OR'ed (for read<br />
data record: B#16#DE; for write data record: B#16#DF). If no DPV1 protocol<br />
element is used, then B#16#C0 will be output.<br />
STATUS[2] Error_Decode Location of the error ID<br />
STATUS[3] Error_Code_1 Error ID<br />
STATUS[4] Error_Code_2 Manufacturer-specific error ID expansion<br />
Table 8- 76 STATUS[2] values<br />
Error_decode<br />
(B#16#....)<br />
Source Description<br />
00 to 7F CPU No error or no warning<br />
80 DPV1 Error according to IEC 61158-6<br />
81 to 8F CPU B#16#8x shows an error in the "xth" call parameter of the instruction.<br />
FE, FF DP Profile Profile-specific error<br />
Table 8- 77 STATUS[3] values<br />
Error_decode<br />
(B#16#....)<br />
Error_code_1<br />
(B#16#....)<br />
Explanation (DVP1) Description<br />
00 00 No error, no warning<br />
70<br />
00 Reserved, reject Initial call; no active data record transfer<br />
01 Reserved, reject Initial call; data record transfer has started<br />
<strong>S7</strong>-<strong>1200</strong> <strong>Programmable</strong> <strong>controller</strong><br />
280 System Manual, 04/2012, A5E02486680-06
Error_decode<br />
(B#16#....)<br />
80<br />
Extended instructions<br />
8.3 Distributed I/O (PROFINET, PROFIBUS, or AS-i)<br />
Error_code_1<br />
(B#16#....)<br />
Explanation (DVP1) Description<br />
02 Reserved, reject Intermediate call; data record transfer already active<br />
90 Reserved, pass Invalid logical start address<br />
92 Reserved, pass Illegal type for Variant pointer<br />
93 Reserved, pass The DP component addressed via ID or F_ID is not<br />
configured.<br />
96 The "RALRM (Page 278)" cannot supply the OB start<br />
information, management information, header<br />
information, or additional interrupt information.<br />
For OBs 4x, 55, 56, 57, 82, and 83, you can use the<br />
"DPNRM_DG (Page 286)" instruction to read the current<br />
diagnostics message frame of the relevant DP slave<br />
asynchronously (address information from OB start<br />
information).<br />
A0 Read error Negative acknowledgement while reading from the<br />
module<br />
A1 Write error Negative acknowledgement while writing to the module<br />
A2 Module failure DP protocol error at layer 2 (for example, slave failure or<br />
bus problems)<br />
A3 Reserved, pass PROFIBUS DP: DP protocol error with Direct-Data-<br />
Link-Mapper or User-Interface/User<br />
PROFINET IO: General CM error<br />
A4 Reserved, pass Communication on the communication bus disrupted<br />
A5 Reserved, pass -<br />
A7 Reserved, pass DP slave or modules is occupied (temporary error).<br />
A8 Version conflict DP slave or module reports non-compatible versions.<br />
A9 Feature not supported Feature not supported by DP slave or module<br />
AA to AF User specific DP slave or module reports a manufacturer-specific error<br />
in its application. Please check the documentation from<br />
the manufacturer of the DP slave or module.<br />
B0 Invalid index Data record not known in module; illegal data record<br />
number ≥ 256<br />
B1 Write length error The length information in the RECORD parameter is<br />
incorrect.<br />
With "RALRM": Length error in AINFO<br />
Note: Refer to the online information system of<br />
STEP 7 for immediate access to information on how<br />
to interpret the "AINFO" returned buffers.<br />
With "RDREC (Page 275)" and "WRREC<br />
(Page 275)": Length error in "MLEN"<br />
B2 Invalid slot The configured slot is not occupied.<br />
B3 Type conflict Actual module type does not match specified module<br />
type.<br />
B4 Invalid area DP slave or module reports access to an invalid area.<br />
B5 Status conflict DP slave or module not ready<br />
B6 Access denied DP slave or module denies access.<br />
<strong>S7</strong>-<strong>1200</strong> <strong>Programmable</strong> <strong>controller</strong><br />
System Manual, 04/2012, A5E02486680-06 281
Extended instructions<br />
8.3 Distributed I/O (PROFINET, PROFIBUS, or AS-i)<br />
Error_decode<br />
(B#16#....)<br />
Error_code_1<br />
(B#16#....)<br />
Explanation (DVP1) Description<br />
B7 Invalid range DP slave or module reports an invalid range for a<br />
parameter or value.<br />
B8 Invalid parameter DP slave or module reports an invalid parameter.<br />
B9 Invalid type DP slave or module reports an invalid type:<br />
With "RDREC (Page 275)": Buffer too small (subsets<br />
cannot be read)<br />
With "WRREC (Page 275)": Buffer too small (subsets<br />
cannot be written)<br />
BA to BF User specific DP slave or module reports a manufacturer-specific error<br />
when accessing. Please check the documentation from<br />
the manufacturer of the DP slave or module.<br />
C0 Read constraint conflict With "WRREC (Page 275)": The data can only be<br />
written when the CPU is in STOP mode.<br />
Note: This means that data cannot be written by the<br />
user program. You can only write the data online with<br />
a PG/PC.<br />
With "RDREC (Page 275)": The module routes the<br />
data record, but either no data is present or the data<br />
can only be read when the CPU is in STOP mode.<br />
Note: If data can only be read when the CPU is in<br />
STOP mode, no evaluation by the user program is<br />
possible. In this case, you can only read the data<br />
online with a PG/PC.<br />
C1 Write constraint conflict The data of the previous write request to the module for<br />
the same data record has not yet been processed by the<br />
module.<br />
C2 Resource busy The module is currently processing the maximum<br />
possible number of jobs for a CPU.<br />
C3 Resource unavailable The required operating resources are currently occupied.<br />
C4 Internal temporary error. Job could not be carried out.<br />
Repeat the job. If this error occurs often, check your<br />
installation for sources of electrical interference.<br />
C5 DP slave or module not available<br />
C6 Data record transfer was cancelled due to priority class<br />
cancellation.<br />
C7 Job aborted due to warm or cold restart on the DP<br />
master.<br />
C8 to CF DP slave or module reports a manufacturer-specific<br />
resource error. Please check the documentation from the<br />
manufacturer of the DP slave or module.<br />
Dx User specific DP Slave specific. Refer to the description of the DP<br />
Slave.<br />
81<br />
00 to FF Error in the initial call parameter (with "RALRM<br />
(Page 278)": MODE)<br />
00 Illegal operating mode<br />
82 00 to FF Error in the second call parameter<br />
<strong>S7</strong>-<strong>1200</strong> <strong>Programmable</strong> <strong>controller</strong><br />
282 System Manual, 04/2012, A5E02486680-06
Error_decode<br />
(B#16#....)<br />
88<br />
89<br />
Extended instructions<br />
8.3 Distributed I/O (PROFINET, PROFIBUS, or AS-i)<br />
Error_code_1<br />
(B#16#....)<br />
Explanation (DVP1) Description<br />
00 to FF Error in the eighth call parameter (with "RALRM<br />
(Page 278)": TINFO)<br />
Note: Refer to the online information system of STEP 7<br />
for immediate access to information on how to interpret<br />
the "TINFO" returned buffers.<br />
01 Wrong syntax ID<br />
23 Quantity structure exceeded or destination area too small<br />
24 Wrong range ID<br />
32 DB/DI number out of user range<br />
3A DB/DI number is NULL for area ID DB/DI, or specified<br />
DB/DI does not exist.<br />
00 to FF Error in the ninth call parameter (with "RALRM<br />
(Page 278)": AINFO)<br />
Note: Refer to the online information system of STEP 7<br />
for immediate access to information on how to interpret<br />
the "AINFO" returned buffers.<br />
01 Wrong syntax ID<br />
23 Quantity structure exceeded or destination area too small<br />
24 Wrong range ID<br />
32 DB/DI number out of user range<br />
3A DB/DI number is NULL for area ID DB/DI, or specified<br />
DB/DI does not exist.<br />
8A 00 to FF Error in the 10th call parameter<br />
8F 00 to FF Error in the 15th call parameter<br />
FE, FF 00 to FF Profile-specific error<br />
Array element STATUS[4]<br />
With DPV1 errors, the DP Master passes on STATUS[4] to the CPU and to the instruction.<br />
Without a DPV1 error, this value is set to 0, with the following exceptions for the RDREC:<br />
● STATUS[4] contains the target area length from RECORD, if MLEN > the destination<br />
area length from RECORD.<br />
● STATUS[4]=MLEN, if the actual data record length < MLEN < the destination area length<br />
from RECORD.<br />
● STATUS[4]=0, if STATUS[4] > 255; would have to be set<br />
In PROFINET IO, STATUS[4] has the value 0.<br />
<strong>S7</strong>-<strong>1200</strong> <strong>Programmable</strong> <strong>controller</strong><br />
System Manual, 04/2012, A5E02486680-06 283
Extended instructions<br />
8.3 Distributed I/O (PROFINET, PROFIBUS, or AS-i)<br />
8.3.5 DPRD_DAT and DPWR_DAT<br />
You can use the DPRD_DAT (Read consistent data) and DPWR_DAT (Write consistent<br />
data) instructions with PROFINET and PROFIBUS.<br />
Table 8- 78 DPRD_DAT and DPWR_DAT instructions<br />
LAD / FBD SCL Description<br />
ret_val := DPRD_DAT(<br />
laddr:=_word_in_,<br />
record=>_variant_out_);<br />
ret_val := DPWR_DAT(<br />
laddr:=_word_in_,<br />
record:=_variant_in_);<br />
Use the DPRD_DAT instruction to read the consistent<br />
data of a DP standard slave/PROFINET IO device. If no<br />
errors occur during the data transfer, the data read is<br />
entered into the target area set up by the RECORD<br />
parameter. The target area must have the same length as<br />
you configured with STEP 7 for the selected module.<br />
When you call the DPRD_DAT instruction, you can only<br />
access the data of one module / DP identification under<br />
the configured start address.<br />
Use the DPWR_DAT instruction to transfer the data in<br />
RECORD consistently to the addressed DP standard<br />
slave/PROFINET IO device. The source area must have<br />
the same length as you configured with STEP 7 for the<br />
selected module.<br />
The CPU supports up to 64 bytes of consistent data. For consistent data areas greater than<br />
64 bytes, the DPRD_DAT and DPWR_DAT instructions must be used. If required, these<br />
instructions can be used for data areas of 1 byte or greater. If access is rejected, error code<br />
W#16#8090 will result.<br />
Note<br />
If you are using the DPRD_DAT and DPWR_DAT instructions with consistent data, you must<br />
remove this consistent data from the process-image automatic update. Refer to "PLC<br />
concepts: Execution of the user program" (Page 67) for more information.<br />
Table 8- 79 Data types for the parameters<br />
Parameter and type Data type Description<br />
LADDR IN HW_IO (Word) Configured start address from the "I" area of the module from which<br />
the data will be read (DPRD_DAT)<br />
Configured start address from the process image output area of the<br />
module to which the data will be written (DPWR_DAT)<br />
RECORD OUT Variant<br />
Addresses have to be entered in hexadecimal format (for example, an<br />
input or output address of 100 means: LADDR:=W#16#64).<br />
Destination area for the user data that were read (DPRD_DAT) or source<br />
area for the user data to be written (DPWR_DAT). This must be exactly<br />
as large as you configured for the selected module with STEP 7. Only the<br />
data type Byte is permitted.<br />
RET_VAL OUT Int If an error occurs while the function is active, the return value contains an<br />
error code.<br />
<strong>S7</strong>-<strong>1200</strong> <strong>Programmable</strong> <strong>controller</strong><br />
284 System Manual, 04/2012, A5E02486680-06
Extended instructions<br />
8.3 Distributed I/O (PROFINET, PROFIBUS, or AS-i)<br />
DPRD_DAT operations<br />
The destination area must have the same length as configured for the selected module with<br />
STEP 7. If no error occurs during the data transfer, the data that have been read are entered<br />
into the destination area identified by RECORD.<br />
If you read from a DP standard slave with a modular design or with several DP identifiers,<br />
you can only access the data of one module/DP identifier for each DPRD_DAT instruction<br />
call, specifying the configured start address.<br />
DPWR_DAT operations<br />
You transfer the data in RECORD consistently to the addressed DP standard<br />
slave/PROFINET IO. The data is transferred synchronously, that is, the write process is<br />
completed when the instruction is completed.<br />
The source area must have the same length as you configured for the selected module with<br />
STEP 7.<br />
If the DP standard slave has a modular design, you can only access one module of the DP<br />
slave.<br />
Table 8- 80 DPRD_DAT and DPWR_DAT error codes<br />
Error code Description<br />
0000 No error occurred<br />
808x System error with external DP interface module<br />
8090 One of the following cases apply:<br />
You have not configured a module for the specified logical base address.<br />
You have ignored the restriction concerning the length of consistent data.<br />
You have not entered the start address in the LADDR parameter in hexadecimal format.<br />
8092 A type other than Byte is specified in the Any reference.<br />
8093 No DP module/PROFINET IO device from which you can read (DPRD_DAT) or to which you can<br />
write (DPWR_DAT) consistent data exists at the logical address specified in LADDR.<br />
80A0 Access error detected while the I/O devices were being accessed (DPRD_DAT).<br />
80A1 Access error detected while the I/O devices were being accessed (DPWR_DAT).<br />
80B0 Slave failure on external DP interface module<br />
80B1 The length of the specified destination (DPRD_DAT) or source (DPWR_DAT) area is not identical to<br />
the user data length configured with STEP 7 Basic.<br />
80B2, 80B3, 80C2,<br />
80Fx<br />
System error with external DP interface module (DPRD_DAT) and (DPWR_DAT)<br />
87xy, 808x System error with external DP interface module (DPRD_DAT)<br />
85xy System error with external DP interface module (DPWR_DAT)<br />
80C0 The data have not yet been read by the module (DPRD_DAT).<br />
80C1 The data of the previous write job on the module have not yet been processed by the module<br />
(DPWR_DAT).<br />
8xyy1 General error information<br />
<strong>S7</strong>-<strong>1200</strong> <strong>Programmable</strong> <strong>controller</strong><br />
System Manual, 04/2012, A5E02486680-06 285
Extended instructions<br />
8.3 Distributed I/O (PROFINET, PROFIBUS, or AS-i)<br />
8.3.6 DPNRM_DG<br />
Table 8- 81 DPNRM_DG instruction<br />
Refer to "Extended instructions, Distributed I/O: Error information for RDREC, WRREC, and<br />
RALRM" (Page 280) for more information on general error codes.<br />
Note<br />
If you access DPV1 slaves, error information from these slaves can be forwarded from the<br />
DP master to the instruction.<br />
You can use the DPNRM_DG (Read diagnostic data) instruction with PROFIBUS.<br />
LAD / FBD SCL Description<br />
ret_val := DPNRM_DG(<br />
req:=_bool_in_,<br />
laddr:=_word_in_,<br />
record=>_variant_out_,<br />
busy=>_bool_out_);<br />
Table 8- 82 DPNRM_DG instruction data types for the parameters<br />
Use the DPNRM_DG instruction to read the current diagnostic data of<br />
a DP slave in the format specified by EN 50 170 Volume 2,<br />
PROFIBUS. The data that has been read is entered in the destination<br />
area indicated by RECORD following error-free data transfer.<br />
Parameter and type Data type Description<br />
REQ IN Bool REQ=1: Read request<br />
LADDR IN HW_DPSLAVE Configured diagnostic address of the DP slave: Must be the address of<br />
the station and not for the I/O device. Select the station (and not the<br />
image of the device) in the "Network" view of the "Device configuration"<br />
to determine the diagnostic address.<br />
Enter the addresses in hexadecimal format. For example, diagnostic<br />
address 1022 means LADDR:=W#16#3FE.<br />
RET_VAL OUT Int If an error occurs while the function is active, the return value contains<br />
an error code. If no error occurs, the length of the data actually<br />
transferred is entered in RET_VAL.<br />
RECORD OUT Variant Destination area for the diagnostic data that were read. Only the Byte<br />
data type is permitted. The minimum length of the data record to be<br />
read or the destination area is 6. The maximum length of the data<br />
record to be sent is 240.<br />
Standard slaves can provide more than 240 bytes of diagnostic data up<br />
to a maximum of 244 bytes. In this case, the first 240 bytes are<br />
transferred to the destination area, and the overflow bit is set in the<br />
data.<br />
BUSY OUT Bool BUSY=1: The read job is not yet completed<br />
You start the read job by assigning 1 to the input parameter REQ in the DPNRM_DG<br />
instruction call. The read job is executed asynchronously, in other words, it requires several<br />
DPNRM_DG instruction calls. The status of the job is indicated by the output parameters<br />
RET_VAL and BUSY.<br />
<strong>S7</strong>-<strong>1200</strong> <strong>Programmable</strong> <strong>controller</strong><br />
286 System Manual, 04/2012, A5E02486680-06
Table 8- 83 Slave diagnostic data structure<br />
Byte Description<br />
0 Station status 1<br />
1 Station status 2<br />
2 Station status 3<br />
3 Master station number<br />
4 Vendor ID (high byte)<br />
5 Vendor ID (low byte)<br />
6 ... Additional slave-specific diagnostic information<br />
Table 8- 84 DPNRM_DG instruction error codes<br />
Extended instructions<br />
8.3 Distributed I/O (PROFINET, PROFIBUS, or AS-i)<br />
Error code Description Restriction<br />
0000 No error -<br />
7000 First call with REQ=0: No data transfer active; BUSY has the value 0. -<br />
7001 First call with REQ =1: No data transfer active; BUSY has the value 1. Distributed I/Os<br />
7002 Interim call (REQ irrelevant): Data transfer already active; BUSY has the<br />
value 1.<br />
Distributed I/Os<br />
8090 Specified logical base address invalid: There is no base address. -<br />
8092 The type specified in the Any reference is not Byte. -<br />
8093 This instruction is not permitted for the module specified by LADDR<br />
(<strong>S7</strong>-DP modules for <strong>S7</strong>-<strong>1200</strong> are permitted).<br />
-<br />
LADDR specifies the I/O device instead of specifying the station. Select<br />
the station (and not the image of the device) in the "Network" view of<br />
the "Device configuration" to determine the diagnostic address for<br />
LADDR.<br />
80A2 DP protocol error at layer 2 (for example, slave failure or bus problems)<br />
For ET200S, data record cannot be read in DPV0 mode.<br />
Distributed I/Os<br />
80A3 DP protocol error with user interface/user Distributed I/Os<br />
80A4 Communication problem on the communication bus The error occurs between the<br />
CPU and the external DP<br />
interface module.<br />
80B0 The instruction is not possible for module type.<br />
-<br />
The module does not recognize the data record.<br />
Data record number 241 is not permitted.<br />
80B1 The length specified in the RECORD parameter is incorrect. Specified length > record<br />
length<br />
80B2 The configured slot is not occupied. -<br />
80B3 Actual module type does not match the required module type. -<br />
80C0 There is no diagnostic information. -<br />
80C1 The data of the previous write job for the same data record on the module<br />
have not yet been processed by the module.<br />
-<br />
<strong>S7</strong>-<strong>1200</strong> <strong>Programmable</strong> <strong>controller</strong><br />
System Manual, 04/2012, A5E02486680-06 287
Extended instructions<br />
8.4 Interrupts<br />
Error code Description Restriction<br />
80C2 The module is currently processing the maximum possible number of jobs<br />
for a CPU.<br />
80C3 The required resources (memory, etc.) are currently occupied. -<br />
80C4 Internal temporary error. The job could not be processed.<br />
Repeat the job. If this error occurs frequently, check your system for<br />
electrical disturbance sources.<br />
80C5 Distributed I/Os not available Distributed I/Os<br />
80C6 Data record transfer was stopped due to a priority class abort (restart or<br />
background)<br />
8xyy 1 General error codes<br />
8.4 Interrupts<br />
<strong>S7</strong>-<strong>1200</strong> <strong>Programmable</strong> <strong>controller</strong><br />
288 System Manual, 04/2012, A5E02486680-06<br />
-<br />
-<br />
Distributed I/Os<br />
Refer to "Extended instructions, Distributed I/O: Error information for RDREC, WRREC, and<br />
RALRM" (Page 280) for more information on general error codes.<br />
8.4.1 Attach and detach instructions<br />
You can activate and deactivate interrupt event-driven subprograms with the ATTACH and<br />
DETACH instructions.<br />
Table 8- 85 ATTACH and DETACH instructions<br />
LAD / FBD SCL Description<br />
ret_val := ATTACH(<br />
ob_nr:=_int_in_,<br />
event:=_event_att_in_,<br />
add:=_bool_in_);<br />
ret_val := DETACH(<br />
ob_nr:=_int_in_,<br />
event:=_event_att_ in);<br />
ATTACH enables interrupt OB subprogram<br />
execution for a hardware interrupt event.<br />
DETACH disables interrupt OB subprogram<br />
execution for a hardware interrupt event.
Table 8- 86 Data types for the parameters<br />
Extended instructions<br />
8.4 Interrupts<br />
Parameter and type Data type Description<br />
OB_NR IN OB_ATT Organization block identifier: Select from the available hardware<br />
interrupt OBs that were created using the "Add new block" feature.<br />
Double-click on the parameter field, then click on the helper icon to<br />
see the available OBs.<br />
EVENT IN EVENT_ATT Event identifier: Select from the available hardware interrupt events<br />
that were enabled in PLC device configuration for digital inputs or<br />
high-speed counters. Double-click on the parameter field, then click<br />
on the helper icon to see the available events.<br />
ADD<br />
(ATTACH only)<br />
IN Bool ADD = 0 (default): This event replaces all previous event<br />
attachments for this OB.<br />
ADD = 1: This event is added to previous event attachments for<br />
this OB.<br />
RET_VAL OUT Int Execution condition code<br />
Hardware interrupt events<br />
The following hardware interrupt events are supported by the CPU:<br />
● Rising edge events (all built-in CPU digital inputs and SB digital inputs)<br />
– A rising edge occurs when the digital input transitions from OFF to ON as a response<br />
to a change in the signal from a field device connected to the input.<br />
● Falling edge events (all built-in CPU digital inputs and SB digital inputs)<br />
– A falling edge occurs when the digital input transitions from ON to OFF.<br />
● High-speed counter (HSC) current value = reference value (CV = RV) events (HSC 1<br />
through 6)<br />
– A CV = RV interrupt for a HSC is generated when the current count transitions from an<br />
adjacent value to the value that exactly matches a reference value that was previously<br />
established.<br />
● HSC direction changed events (HSC 1 through 6)<br />
– A direction changed event occurs when the HSC is detected to change from<br />
increasing to decreasing, or from decreasing to increasing.<br />
● HSC external reset events (HSC 1 through 6)<br />
– Certain HSC modes allow the assignment of a digital input as an external reset that is<br />
used to reset the HSC count value to zero. An external reset event occurs for such a<br />
HSC, when this input transitions from OFF to ON.<br />
Enabling hardware interrupt events in the device configuration<br />
Hardware interrupts must be enabled during the device configuration. You must check the<br />
enable-event box in the device configuration for a digital input channel or a HSC, if you want<br />
to attach this event during configuration or run time.<br />
<strong>S7</strong>-<strong>1200</strong> <strong>Programmable</strong> <strong>controller</strong><br />
System Manual, 04/2012, A5E02486680-06 289
Extended instructions<br />
8.4 Interrupts<br />
Check box options within the PLC device configuration:<br />
● Digital input<br />
– Enable rising edge detection<br />
– Enable falling edge detection<br />
● High-speed counter (HSC)<br />
– Enable this high-speed counter for use<br />
– Generate interrupt for counter value equals reference value count<br />
– Generate interrupt for external reset event<br />
– Generate interrupt for direction change event<br />
Adding new hardware interrupt OB code blocks to your program<br />
By default, no OB is attached to an event when the event is first enabled. This is indicated by<br />
the "HW interrupt:" device configuration "" label. Only hardware-interrupt<br />
OBs can be attached to a hardware interrupt event. All existing hardware-interrupt OBs<br />
appear in the "HW interrupt:" drop-down list. If no OB is listed, then you must create an OB<br />
of type "Hardware interrupt" as follows. Under the project tree "Program blocks" branch:<br />
1. Double-click "Add new block", select "Organization block (OB)" and choose "Hardware<br />
interrupt".<br />
OB_NR parameter<br />
EVENT parameter<br />
General operation<br />
2. Optionally, you can rename the OB, select the programming language (LAD or FBD), and<br />
select the block number (switch to manual and choose a different block number than that<br />
suggested).<br />
3. Edit the OB and add the programmed reaction that you want to execute when the event<br />
occurs. You can call FCs and FBs from this OB, to a nesting depth of four.<br />
All existing hardware-interrupt OB names appear in the device configuration "HW interrupt:"<br />
drop-down list and in the ATTACH / DETACH parameter OB_NR drop-list.<br />
When a hardware interrupt event is enabled, a unique default event name is assigned to this<br />
particular event. You can change this event name by editing the "Event name:" edit box, but<br />
it must be a unique name. These event names become tag names in the "Constants" tag<br />
table, and appear on the EVENT parameter drop-down list for the ATTACH and DETACH<br />
instruction boxes. The value of the tag is an internal number used to identify the event.<br />
Each hardware event can be attached to a hardware-interrupt OB which will be queued for<br />
execution when the hardware interrupt event occurs. The OB-event attachment can occur at<br />
configuration time or at run time.<br />
<strong>S7</strong>-<strong>1200</strong> <strong>Programmable</strong> <strong>controller</strong><br />
290 System Manual, 04/2012, A5E02486680-06
Extended instructions<br />
8.4 Interrupts<br />
You have the option to attach or detach an OB to an enabled event at configuration time. To<br />
attach an OB to an event at configuration time, you must use the "HW interrupt:" drop-down<br />
list (click on the down arrow on the right) and select an OB from the list of available<br />
hardware-interrupt OBs. Select the appropriate OB name from this list, or select "" to remove the attachment.<br />
You can also attach or detach an enabled hardware interrupt event during run time. Use the<br />
ATTACH or DETACH program instructions during run time (multiple times if you wish) to<br />
attach or detach an enabled interrupt event to the appropriate OB. If no OB is currently<br />
attached (either from a "" selection in device configuration, or as a result of<br />
executing a DETACH instruction), the enabled hardware interrupt event is ignored.<br />
DETACH operation<br />
Use the DETACH instruction to detach either a particular event or all events from a particular<br />
OB. If an EVENT is specified, then only this one event is detached from the specified<br />
OB_NR; any other events currently attached to this OB_NR will remain attached. If no<br />
EVENT is specified, then all events currently attached to OB_NR will be detached.<br />
Condition codes<br />
Table 8- 87 Condition codes<br />
8.4.2 Cyclic interrupts<br />
RET_VAL (W#16#....) ENO Description<br />
0000 1 No error<br />
0001 1 Nothing to Detach (DETACH only)<br />
8090 0 OB does not exist<br />
8091 0 OB is wrong type<br />
8093 0 Event does not exist<br />
8.4.2.1 SET_CINT (Set cyclic interrupt)<br />
Table 8- 88 SET_CINT (Set cyclic interrupt instruction)<br />
LAD / FBD SCL Description<br />
ret_val := SET_CINT(<br />
ob_nr:=_int_in_,<br />
cycle:=_udint_in_,<br />
phase:=_udint_in_);<br />
Set the specified interrupt OB to begin cyclic execution<br />
that interrupts the program scan.<br />
<strong>S7</strong>-<strong>1200</strong> <strong>Programmable</strong> <strong>controller</strong><br />
System Manual, 04/2012, A5E02486680-06 291
Extended instructions<br />
8.4 Interrupts<br />
Table 8- 89 Data types for the parameters<br />
Parameter and type Data type Description<br />
OB_NR IN OB_CYCLIC OB number (accepts symbolic name)<br />
CYCLE IN UDInt Time interval, in microseconds<br />
PHASE IN UDInt Phase shift, in microseconds<br />
RET_VAL OUT Int Execution condition code<br />
Time parameter examples:<br />
● If the CYCLE time = 100 us, then the interrupt OB referenced by OB_NR interrupts the<br />
cyclic program scan every 100 us. The interrupt OB executes and then returns execution<br />
control to the program scan, at the point of interruption.<br />
● If the CYCLE time = 0, then the interrupt event is deactivated and the interrupt OB is not<br />
executed.<br />
● The PHASE (phase shift) time is a specified delay time that occurs before the CYCLE<br />
time interval begins. You can use the phase shift to control the execution timing of lower<br />
priority OBs.<br />
If lower and higher priority OBs are called in the same time interval, the lower priority OB is<br />
only called after the higher priority OB has finished processing. The execution start time for<br />
the low priority OB can shift depending on the processing time of higher priority OBs.<br />
<br />
<br />
<br />
<br />
<br />
<br />
<br />
<br />
If you want to start the execution of a lower priority OB on a fixed time cycle, then phase shift<br />
time should be greater then the processing time of higher priority OBs.<br />
<br />
<br />
<br />
<br />
<br />
<br />
<br />
<br />
<br />
<strong>S7</strong>-<strong>1200</strong> <strong>Programmable</strong> <strong>controller</strong><br />
292 System Manual, 04/2012, A5E02486680-06
Table 8- 90 Condition codes<br />
RET_VAL (W#16#....) Description<br />
0000 No error<br />
8090 OB does not exist or is of wrong type<br />
8091 Invalid cycle time<br />
8092 Invalid phase shift time<br />
80B2 OB has no attached event<br />
8.4.2.2 QRY_CINT (Query cyclic interrupt)<br />
Table 8- 91 QRY_CINT (Query cyclic interrupt)<br />
LAD / FBD SCL Description<br />
Table 8- 92 Data types for the parameters<br />
ret_val := QRY_CINT(<br />
ob_nr:=_int_in_,<br />
cycle=>_udint_out_,<br />
phase=>_udint_out__,<br />
status=>_word_out_);<br />
Extended instructions<br />
8.4 Interrupts<br />
Get parameter and execution status from a cyclic<br />
interrupt OB. The values that are returned existed<br />
at the time QRY_CINT was executed.<br />
Parameter and type Data type Description<br />
OB_NR IN OB_CYCLIC OB number (accepts symbolic name like OB_MyOBName)<br />
RET_VAL OUT Int Execution condition code<br />
CYCLE OUT UDInt Time interval, in microseconds<br />
PHASE OUT UDInt Phase shift, in microseconds<br />
STATUS OUT Word Cyclic interrupt status code:<br />
Bits 0 to 4, see the STATUS table below<br />
Other bits, always 0<br />
Table 8- 93 STATUS parameter<br />
Bit Value Description<br />
0 0 During CPU RUN<br />
1 During startup<br />
1 0 The interrupt is enabled.<br />
1 Interrupt is disabled via the DIS_IRT instruction.<br />
2 0 The interrupt is not active or has elapsed.<br />
1 The interrupt is active.<br />
4 0 The OB identified by OB_NR does not exist.<br />
1 The OB identified by OB_NR exists.<br />
<strong>S7</strong>-<strong>1200</strong> <strong>Programmable</strong> <strong>controller</strong><br />
System Manual, 04/2012, A5E02486680-06 293
Extended instructions<br />
8.4 Interrupts<br />
Bit Value Description<br />
Other Bits Always 0<br />
If an error occurs, RET_VAL displays the appropriate error code and the parameter STATUS<br />
= 0.<br />
Table 8- 94 RET_VAL parameter<br />
RET_VAL (W#16#....) Description<br />
0000 No error<br />
8090 OB does not exist or is of wrong type.<br />
80B2 OB has no attached event.<br />
8.4.3 Time delay interrupts<br />
You can start and cancel time delay interrupt processing with the SRT_DINT and CAN_DINT<br />
instructions, or query the interrupt status with the QRY_DINT instruction. Each time delay<br />
interrupt is a one-time event that occurs after the specified delay time. If the time delay event<br />
is cancelled before the time delay expires, the program interrupt does not occur.<br />
Table 8- 95 SRT_DINT, CAN_DINT, and QRY_DINT instructions<br />
LAD / FBD SCL Description<br />
Table 8- 96 Data types for the parameters<br />
ret_val := SRT_DINT(<br />
ob_nr:=_int_in_,<br />
dtime:=_time_in_,<br />
sign:=_word_in_);<br />
ret_val := CAN_DINT(<br />
ob_nr:=_int_in_);<br />
ret_val := QRY_DINT(<br />
ob_nr:=_int_in_,<br />
status=>_word_out_);<br />
SRT_DINT starts a time delay interrupt that<br />
executes an OB when the delay time specified by<br />
parameter DTIME has elapsed.<br />
CAN_DINT cancels a time delay interrupt that has<br />
already started. The time delay interrupt OB is not<br />
executed in this case.<br />
QRY_DINT queries the status of the time delay<br />
interrupt specified by the OB_NR parameter.<br />
Parameter and type Data type Description<br />
OB_NR IN OB_DELAY Organization block (OB) to be started after a time-delay: Select from<br />
the available time-delay interrupt OBs that were created using the "Add<br />
new block" project tree feature. Double-click on the parameter field,<br />
then click on the helper icon to see the available OBs.<br />
DTIME 1 IN Time Time delay value (1 to 60000 ms)<br />
<strong>S7</strong>-<strong>1200</strong> <strong>Programmable</strong> <strong>controller</strong><br />
294 System Manual, 04/2012, A5E02486680-06
Extended instructions<br />
8.4 Interrupts<br />
Parameter and type Data type Description<br />
SIGN 1 IN Word Not used by the <strong>S7</strong>-<strong>1200</strong>: Any value is accepted. A value must be<br />
assigned to prevent errors.<br />
RET_VAL OUT Int Execution condition code<br />
STATUS OUT Word QRY_DINT instruction: Status of the specified time-delay interrupt OB,<br />
see the table below<br />
1 Only for SRT_DINT<br />
Operation<br />
The SRT_DINT instruction specifies a time delay, starts the internal time delay timer, and<br />
associates a time delay interrupt OB subprogram with the time delay timeout event. When<br />
the specified time delay has elapsed, a program interrupt is generated that triggers the<br />
execution of the associated time delay interrupt OB. You can cancel an in-process time<br />
delay interrupt before the specified time delay occurs by executing the CAN_DINT<br />
instruction. The total number of active time delay and cyclic interrupt events must not exceed<br />
four.<br />
Adding time delay interrupt OB subprograms to your project<br />
Only time delay interrupt OBs can be assigned to the SRT_DINT and CAN_DINT<br />
instructions. No time delay interrupt OB exists in a new project. You must add time delay<br />
interrupt OBs to your project. To create a time-delay interrupt OB, follow these steps:<br />
1. Double-click the "Add new block" item in the "Program blocks" branch of the project tree,<br />
select "Organization block (OB)", and choose "Time delay interrupt".<br />
2. You have the option to rename the OB, select the programming language, or select the<br />
block number. Switch to manual numbering if you want to assign a different block number<br />
than the number that was assigned automatically.<br />
QRY_DINT parameter STATUS<br />
3. Edit the time delay interrupt OB subprogram and create programmed reaction that you<br />
want to execute when the time delay timeout event occurs. You can call other FC and FB<br />
code blocks from the time delay interrupt OB, with a maximum nesting depth of four.<br />
4. The newly assigned time delay interrupt OB names will be available when you edit the<br />
OB_NR parameter of the SRT_DINT and CAN_DINT instructions.<br />
Table 8- 97 If there is an error (REL_VAL 0), then STATUS = 0.<br />
Bit Value Description<br />
0 0 In RUN<br />
1 In startup<br />
1 0 The interrupt is enabled.<br />
1 The interrupt is disabled.<br />
2 0 The interrupt is not active or has elapsed.<br />
1 The interrupt is active.<br />
<strong>S7</strong>-<strong>1200</strong> <strong>Programmable</strong> <strong>controller</strong><br />
System Manual, 04/2012, A5E02486680-06 295
Extended instructions<br />
8.4 Interrupts<br />
Condition codes<br />
Bit Value Description<br />
4<br />
0 An OB with an OB number given in OB_NR does not exist.<br />
1 An OB with an OB number given in OB_NR exists.<br />
Other bits Always 0<br />
Table 8- 98 Condition codes for SRT_DINT, CAN_DINT, and QRY_DINT<br />
RET_VAL (W#16#...) Description<br />
0000 No error occurred<br />
8090 Incorrect parameter OB_NR<br />
8091 Incorrect parameter DTIME<br />
80A0 Time delay interrupt has not started.<br />
8.4.4 Asynchronous event interrupts<br />
Use the DIS_AIRT and EN_AIRT instructions to disable and enable alarm interrupt<br />
processing.<br />
Table 8- 99 DIS_AIRT and EN_AIRT instructions<br />
LAD / FBD SCL Description<br />
DIS_AIRT(); DIS_AIRT delays the processing of new interrupt events. You can execute<br />
DIS_AIRT more than once in an OB.<br />
EN_AIRT(); EN_AIRT enables the processing of interrupt events that you previously disabled<br />
with the DIS_AIRT instruction. Each DIS_AIRT execution must be cancelled by an<br />
EN_AIRT execution.<br />
The EN_AIRT executions must occur within the same OB, or any FC or FB called<br />
from the same OB, before interrupts are enabled again for this OB.<br />
WARNING<br />
If the filter time for a digital input channel is changed from a previous setting, a new "0"<br />
level input value may need to be presented for up to 20.0 ms accumulated duration before<br />
the filter becomes fully responsive to new inputs. During this time, short "0" pulse events of<br />
duration less than 20.0 ms may not be detected or counted.<br />
This changing of filter times can result in unexpected machine or process operation, which<br />
may cause death or serious injury to personnel, and/or damage to equipment.<br />
To ensure that a new filter time goes immediately into effect, a power cycle of the CPU<br />
must be applied.<br />
<strong>S7</strong>-<strong>1200</strong> <strong>Programmable</strong> <strong>controller</strong><br />
296 System Manual, 04/2012, A5E02486680-06
Table 8- 100 Data types for the parameters<br />
Extended instructions<br />
8.5 Diagnostics (PROFINET or PROFIBUS)<br />
Parameter and type Data type Description<br />
RET_VAL OUT Int Number of delays = number of DIS_AIRT executions in the queue.<br />
The DIS_AIRT executions are counted by the operating system. Each of these remains in<br />
effect until it is cancelled again specifically by an EN_AIRT instruction, or until the current OB<br />
has been completely processed. For example: if you disabled interrupts five times with five<br />
DIS_AIRT executions, you must cancel these with five EN_AIRT executions before interrupts<br />
become enabled again.<br />
After the interrupt events are enabled again, the interrupts that occurred while DIS_AIRT was<br />
in effect are processed, or the interrupts are processed as soon as the current OB has been<br />
executed.<br />
Parameter RET_VAL indicates the number of times that interrupt processing was disabled,<br />
which is the number of queued DIS_AIRT executions. Interrupt processing is only enabled<br />
again when parameter RET_VAL = 0.<br />
8.5 Diagnostics (PROFINET or PROFIBUS)<br />
8.5.1 Diagnostic instructions<br />
The following diagnostic instructions can be used with either PROFINET or PROFIBUS:<br />
● GET_DIAG instruction (Page 302): You can read the diagnostic information from a<br />
specified device.<br />
● DeviceStates instruction (Page 299): You can retrieve the operational states for a<br />
distributed I/O device within an I/O subsystem.<br />
● ModuleStates instruction (Page 301): You can retrieve the operational states for the<br />
modules in a distributed I/O device.<br />
● LED instruction (Page 298): You can read the state of the LEDs for a distributed I/O<br />
device.<br />
8.5.2 Diagnostic events for distributed I/O<br />
Note<br />
With a PROFIBUS IO system, after a download or power cycle, the CPU will go to RUN<br />
mode unless the hardware compatibility is set to allow acceptable substitute modules<br />
(Page 123) and one or more modules is missing or is not an acceptable substitute for the<br />
configured module.<br />
<strong>S7</strong>-<strong>1200</strong> <strong>Programmable</strong> <strong>controller</strong><br />
System Manual, 04/2012, A5E02486680-06 297
Extended instructions<br />
8.5 Diagnostics (PROFINET or PROFIBUS)<br />
As shown in the following table, the CPU supports diagnostics that can be configured for the<br />
components of the distributed I/O system. Each of these errors generates a log entry in the<br />
diagnostic buffer.<br />
Table 8- 101 Handling of diagnostic events for PROFINET and PROFIBUS<br />
Type of error Diagnostic information for<br />
the station?<br />
Entry in the diagnostic<br />
buffer?<br />
CPU operating mode<br />
Diagnostic error Yes Yes Stays in RUN mode<br />
Rack or station failure Yes Yes Stays in RUN mode<br />
I/O access error 1 No Yes Stays in RUN mode<br />
Peripheral access error 2 No Yes Stays in RUN mode<br />
Pull / plug event Yes Yes Stays in RUN mode<br />
1 I/O access error example cause: A module that has been removed.<br />
2 Peripheral access error example cause: Acyclic communication to a submodule that is not communicating.<br />
8.5.3 LED instruction<br />
Table 8- 102 LED instruction<br />
Use the GET_DIAG instruction (Page 302) for each station to obtain the diagnostic<br />
information. This will allow you to programmatically handle the errors encountered on the<br />
device and if desired take the CPU to STOP mode. This method requires you to specify the<br />
hardware device from which to read the status information.<br />
The GET_DIAG instruction uses the "L address" (LADDR) of the station to obtain the health<br />
of the entire station. This L Address can be found within the Network Configuration view and<br />
by selecting the entire station rack (entire gray area), the L Address is shown in the<br />
Properties Tab of the station. You can find the LADDR for each individual module either in<br />
the properties for the module (in the device configuration) or in the default tag table for the<br />
CPU.<br />
LAD / FBD SCL Description<br />
ret_val := LED(<br />
laddr:=_word_in_,<br />
LED:=_uint_in_);<br />
Table 8- 103 Data types for the parameters<br />
Use the LED instruction to read the state of the LEDs on a CPU or<br />
interface. The specified LED state is returned by the RET_VAL<br />
output.<br />
Parameter and type Data type Description<br />
LADDR IN HW_IO Identification number of the CPU or interface1 LED IN UInt<br />
LED identifier number<br />
1 RUN/STOP Color 1 = green, color 2 = yellow<br />
2 Error Color 1 = red<br />
<strong>S7</strong>-<strong>1200</strong> <strong>Programmable</strong> <strong>controller</strong><br />
298 System Manual, 04/2012, A5E02486680-06
Parameter and type Data type Description<br />
3 Maintenance Color 1 = yellow<br />
4 Redundancy Not applicable<br />
5 Link Color 1 = green<br />
6 Tx/Rx Color 1 = yellow<br />
RET_VAL OUT Int Status of the LED<br />
Extended instructions<br />
8.5 Diagnostics (PROFINET or PROFIBUS)<br />
1 For example, you can select the CPU (such as "PLC_1") or the PROFINET interface from the drop-down list of the<br />
parameter.<br />
Table 8- 104 Status of RET_VAL<br />
RET_VAL (W#16#...) Description<br />
0 to 9 LED state 0 LED does not exist<br />
1 Off<br />
2 Color 1 On (solid)<br />
3 Color 2 On (Solid)<br />
4 Color 1 flashing at 2 Hz<br />
5 Color 2 flashing 2 Hz<br />
6 Color 1 & 2 flashing alternatively at 2 Hz<br />
7 Color 1 on (Tx/Rx)<br />
8 Color 2 on (Tx/Rx)<br />
9 State of the LED is not available<br />
8091 Device identified by LADDR does not exist<br />
8092 Device identified by LADDR does not support LEDs<br />
8093 LED identifier not defined<br />
80Bx CPU identified by LADDR does not support the LED instruction<br />
8.5.4 DeviceStates instruction<br />
Table 8- 105 DeviceStates instruction<br />
LAD / FBD SCL Description<br />
ret_val := DeviceStates(<br />
laddr:=hw_io_in_,<br />
mode:=_uint_in_,<br />
state:=_variant_inout_);<br />
DeviceStates retrieves the I/O device operational<br />
states of an I/O subsystem. After execution, the<br />
STATE parameter contains the error state of each<br />
I/O device in a bit list (for the assigned LADDR and<br />
MODE). This information corresponds with the<br />
device status seen in the STEP 7 diagnostics view.<br />
<strong>S7</strong>-<strong>1200</strong> <strong>Programmable</strong> <strong>controller</strong><br />
System Manual, 04/2012, A5E02486680-06 299
Extended instructions<br />
8.5 Diagnostics (PROFINET or PROFIBUS)<br />
Table 8- 106 Data types for the parameters<br />
Parameter and type Data type Description<br />
LADDR IN HW_IOSYSTEM Logical address: (Identifier for the I/O system)<br />
MODE IN UInt Status type:<br />
1: Configuration of device is active or not yet complete.<br />
2: Device defective<br />
3: Device disabled<br />
4: Device exists<br />
RET_VAL OUT Int Execution condition code<br />
STATE 1 InOut Variant Buffer that receives the error status of each device: The data type<br />
that you choose for the STATE parameter can be any bit type<br />
(Bool, Byte, Word, or DWord) or an array of a bit type<br />
Summary bit: Bit 0 =1, if one of the state bits of the I/O devices<br />
is 1<br />
State bit: State of I/O device with station number n according to<br />
the selected MODE. For example, MODE = 2 and bit 3 = 1<br />
means station 3 is faulty.<br />
1 For PROFIBUS-DP, the length of the status information is 128 bits. For PROFINET I/O, the length is 1024 bits.<br />
Table 8- 107 Condition codes<br />
RET_VAL (W#16#...) Description<br />
0 No error<br />
After execution, the STATE parameter contains the error state of each I/O device as a bit list<br />
(for the assigned LADDR and MODE).<br />
8091 LADDR does not exist.<br />
8092 LADDR does not address an I/O system.<br />
8093 Invalid data type assigned for STATE parameter: Valid data types are (Bool, Byte, Word, or<br />
Dword), or an array of (Bools, Bytes, Words, or Dwords)<br />
80Bx DeviceStates instruction not supported by the CPU for this LADDR.<br />
8452 The complete state data is too large for the assigned STATE parameter. The STATE buffer<br />
contains a partial result.<br />
<strong>S7</strong>-<strong>1200</strong> <strong>Programmable</strong> <strong>controller</strong><br />
300 System Manual, 04/2012, A5E02486680-06
8.5.5 ModuleStates instruction<br />
Table 8- 108 ModuleStates instruction<br />
LAD / FBD SCL Description<br />
Table 8- 109 Data types for the parameters<br />
ret_val := ModuleStates(<br />
laddr:=_word_in_,<br />
mode:=_uint_in,<br />
state:=_variant_inout);<br />
Extended instructions<br />
8.5 Diagnostics (PROFINET or PROFIBUS)<br />
ModuleStates retrieves the operational states<br />
of I/O modules. After execution, the STATE<br />
parameter contains the error state of each I/O<br />
module in a bit list (for the assigned LADDR<br />
and MODE). This information corresponds<br />
with the module status seen in the STEP 7<br />
diagnostics view.<br />
Parameter and type Data type Description<br />
LADDR IN HW_DEVICE Logical address (Identifier for the I/O modules)<br />
MODE IN UInt Status type:<br />
1: Configuration of module is active or not yet complete.<br />
2: Module defective<br />
3: Module disabled<br />
4: Module exists<br />
RET_VAL OUT Int Status (condition code)<br />
STATE1 InOut Variant Buffer that receives the error status of each module: The data type<br />
you use for the STATE parameter can be any bit type (Bool, Byte,<br />
Word, or DWord) or an array of a bit type.<br />
Summary bit: Bit 0 =1, if one of the state bits of the I/O module<br />
is 1<br />
State bit: State of I/O module with slot number n according to<br />
the selected MODE. For example, MODE = 2 and bit 3 = 1<br />
means station 3 is faulty.<br />
1 A maximum of 128 bits can be assigned. The number of bits required is dependent on your I/O module usage.<br />
Table 8- 110 Condition codes<br />
RET_VAL ( W#16#...) Description<br />
0 No error<br />
8091 Module identified by LADDR does not exist.<br />
8092 Module identified by LADDR does not address an I/O device.<br />
8093 Invalid data type for STATE parameter: Valid data types are (Bool, Byte, Word, or Dword), or<br />
an array of (Bools, Bytes, Words, or Dwords).<br />
<strong>S7</strong>-<strong>1200</strong> <strong>Programmable</strong> <strong>controller</strong><br />
System Manual, 04/2012, A5E02486680-06 301
Extended instructions<br />
8.5 Diagnostics (PROFINET or PROFIBUS)<br />
RET_VAL ( W#16#...) Description<br />
80Bx ModuleStates instruction not supported by this CPU for this LADDR.<br />
8452 The complete state data is too large for the assigned STATE parameter. The STATE buffer<br />
contains a partial result.<br />
8.5.6 GET_DIAG instruction<br />
Description<br />
Table 8- 111 GET_DIAG instruction<br />
You can use the "GET_DIAG" instruction to read out the diagnostic information of a<br />
hardware object. The hardware object is selected with the LADDR parameter. With the<br />
MODE parameter, you select which diagnostic information is to be read out.<br />
LAD / FBD SCL Description<br />
Parameters<br />
ret_val := GET_DIAG(<br />
mode:=_uint_in_,<br />
laddr:=_word_in_,<br />
cnt_diag=>_uint_out_,<br />
diag:=_variant_inout_,<br />
detail:=_variant_inout_);<br />
Reads the diagnostic information from a<br />
specified hardware device.<br />
The following table shows the parameters of the "GET_DIAG" instruction:<br />
Table 8- 112 Data types for the parameters<br />
Parameter and type Data type Description<br />
MODE IN UInt Use the MODE parameter to select which diagnostic data is to be<br />
output.<br />
LADDR IN HW_ANY (Word) Hardware ID of the device<br />
RET_VAL OUT Int Status of the instruction<br />
CNT_DIAG OUT UInt Number of output diagnostic details<br />
DIAG InOut Variant Pointer to data area for storage of diagnostic information of the<br />
selected mode<br />
DETAILS InOut Variant Pointer to data area for storage of diagnostic details in accordance<br />
with the selected mode<br />
<strong>S7</strong>-<strong>1200</strong> <strong>Programmable</strong> <strong>controller</strong><br />
302 System Manual, 04/2012, A5E02486680-06
Extended instructions<br />
8.5 Diagnostics (PROFINET or PROFIBUS)<br />
MODE parameter<br />
Depending on the value at the MODE parameter, different diagnostics data is output at the<br />
DIAG, CNT_DIAG and DETAILS output parameters:<br />
Table 8- 113 MODE parameter<br />
MODE Description DIAG CNT_DIAG DETAILS<br />
0 Output of all supported Bit string of the supported 0 -<br />
diagnostic information for a modes as DWord, where Bit<br />
module as DWord, where Bit X=1 indicates that mode X<br />
X=1 indicates that mode X is<br />
supported.<br />
is supported.<br />
1 Output of the inherent status Diagnostics status: Output 0 -<br />
of the addressed hardware in accordance with the DIS<br />
object.<br />
structure. (Note: Refer to<br />
the "DIS structure"<br />
information below and<br />
GET_DIAG instruction<br />
example at the end of the<br />
section.)<br />
2 Output of the status of all Output of diagnostics data 0 Module status<br />
subordinate modules of the in accordance with the DNN<br />
information in<br />
addressed hardware object. structure. (Note: Refer to<br />
accordance with the<br />
the "DNN structure"<br />
DiagnosticsDetails<br />
information below and<br />
GET_DIAG instruction<br />
example at the end of the<br />
section.)<br />
structure.<br />
DIS structure<br />
With the MODE parameter = 1, the diagnostics information is output in accordance with the<br />
DIS structure. The following table shows the meaning of the individual parameter values:<br />
Table 8- 114 Structure of the Diagnostic Information Source (DIS)<br />
Parameter Data type Value Description<br />
MaintenanceState DWord Enum<br />
0 No maintenance required<br />
1 The module or device is disabled.<br />
2 -<br />
3 -<br />
4 -<br />
5 Maintenance required<br />
6 Maintenance demanded<br />
7 Error<br />
8 Status unknown / error in subordinate module<br />
9 -<br />
10 Inputs/outputs are not available.<br />
<strong>S7</strong>-<strong>1200</strong> <strong>Programmable</strong> <strong>controller</strong><br />
System Manual, 04/2012, A5E02486680-06 303
Extended instructions<br />
8.5 Diagnostics (PROFINET or PROFIBUS)<br />
Parameter Data type Value Description<br />
Componentstate DWord Bit array Status of the module sub-modules:<br />
Detail<br />
Bit 0 to 15: Status message of the module<br />
OwnState Uint16<br />
IO State Uint16<br />
0 to 2<br />
(enum)<br />
Bit 16 to 31: Status message of the CPU<br />
Additional information:<br />
Bit 0: No additional information<br />
Bit 1: Transfer not permitted<br />
3 Bit 3 = 1: At least one channel supports qualifiers for diagnostics.<br />
4 Bit 4 = 1: Maintenance required for at least one channel or one<br />
component<br />
5 Bit 5 = 1: Maintenance demanded for at least one channel or one<br />
component<br />
6 Bit 6 = 1: Error in at least one channel or one component<br />
7 to 10 -<br />
11 to 14 Bit 11 = 1: PNIO - sub-module correct<br />
Bit 12 = 1: PNIO - replacement module<br />
Bit 13 = 1: PNIO - incorrect module<br />
Bit 14 = 1: PNIO - module disconnected<br />
15 -<br />
16 to 31 Status information for modules generated by the CPU:<br />
Bit 16 = 1: Module disabled<br />
Bit 17 = 1: CiR operation active<br />
Bit 18 = 1: Input not available<br />
Bit 19 = 1: Output not available<br />
Bit 20 = 1: Overflow diagnostics buffer<br />
Bit 21 = 1: Diagnostics not available<br />
Bit 22 - 31: Reserved (always 0)<br />
Enum The value of the OwnState parameter describes the maintenance<br />
status of the module.<br />
0 No fault<br />
1 The module or device is disabled.<br />
2 Maintenance required<br />
3 Maintenance demanded<br />
4 Error<br />
5 The module or the device cannot be reached from the CPU (valid for<br />
modules and devices below a CPU).<br />
6 Inputs/outputs are not available.<br />
7 -<br />
Bit array I/O status of the module<br />
0 Bit 0 = 1: No maintenance required<br />
1 Bit 1 = 1: The module or device is disabled.<br />
2 Bit 2 = 1: Maintenance required<br />
3 Bit 3 = 1: Maintenance demanded<br />
4 Bit 4 = 1: Error<br />
<strong>S7</strong>-<strong>1200</strong> <strong>Programmable</strong> <strong>controller</strong><br />
304 System Manual, 04/2012, A5E02486680-06
Extended instructions<br />
8.5 Diagnostics (PROFINET or PROFIBUS)<br />
Parameter Data type Value Description<br />
5 Bit 5 = 1: The module or the device cannot be reached from the CPU<br />
(valid for modules and devices below a CPU).<br />
6 Inputs/outputs are not available.<br />
7 Qualifier; bit 7 = 1, if bit 0, 2, or 3 are set<br />
8 to 15 Reserved (always = 0)<br />
OperatingState UInt16 Enum<br />
0 -<br />
1 In STOP / firmware update<br />
2 In STOP / reset memory<br />
3 In STOP / self start<br />
4 In STOP<br />
5 Memory reset<br />
6 In START<br />
7 In RUN<br />
8 -<br />
9 In HOLD<br />
10 -<br />
11 -<br />
12 Module defective<br />
13 -<br />
14 No power<br />
15 CiR<br />
16 In STOP / without DIS<br />
17<br />
18<br />
19<br />
20<br />
In<br />
DiagnosticsDetail structure<br />
With the MODE parameter = 2, the diagnostics information details are output in accordance<br />
with the DiagnosticsDetail structure. The following table shows the meaning of the individual<br />
parameter values:<br />
Table 8- 115 Structure of the DiagnosticsDetail<br />
Parameter Data type Description<br />
ChannelNumber UInt Channel number<br />
Properties Word<br />
ALID UInt Identification ID of alarm<br />
Qualifier DWord Qualifier of diagnostic data<br />
ErrorType UDInt Channel error type<br />
ExtErrorType UDInt Extended channel error type<br />
<strong>S7</strong>-<strong>1200</strong> <strong>Programmable</strong> <strong>controller</strong><br />
System Manual, 04/2012, A5E02486680-06 305
Extended instructions<br />
8.5 Diagnostics (PROFINET or PROFIBUS)<br />
Parameter Data type Description<br />
AddValue_1 UInt Additional value<br />
AddValue_2 UInt Additional value<br />
AddValue_3 UInt Additional value<br />
AddValue_4 UInt Additional value<br />
DNN structure<br />
With the MODE parameter = 2, the diagnostics information details are output in accordance<br />
with the DNN structure. The following table shows the meaning of the individual parameter<br />
values:<br />
Table 8- 116 Structure of the Diagnostic Navigation Node (DNN)<br />
Parameter Data type Value Description<br />
SubordinateState UINT Enum Status of the subordinate module (See parameter OwnState of<br />
the DIS structure.)<br />
SubordinateIOState WORD Bitarray Status of the inputs and outputs of the subordinate module (See<br />
parameter IO State of the DIS structure.)<br />
DNNmode WORD Bitarray Bit 0 = 0: Diagnostics enabled<br />
RET_VAL parameter<br />
Table 8- 117 Error codes of the RET_VAL parameter<br />
Bit 0 = 1: Diagnostics disabled<br />
Bit 1 to 15: Reserved<br />
Error code<br />
(W#16#...)<br />
Description<br />
0 No error<br />
n The data area in the DETAILS parameter is too small. Not all details of the diagnostic data can be<br />
output.<br />
8080 Value in the MODE parameter is not supported.<br />
8081 Type in the DIAG parameter is not supported with the selected mode (parameter MODE).<br />
8082 Type in the DETAILS parameter is not supported with the selected mode (parameter MODE).<br />
8090 LADDR does not exist.<br />
8091 The selected channel in the CHANNEL parameter does not exist.<br />
80C1 Insufficient resources for parallel execution<br />
<strong>S7</strong>-<strong>1200</strong> <strong>Programmable</strong> <strong>controller</strong><br />
306 System Manual, 04/2012, A5E02486680-06
Example<br />
Extended instructions<br />
8.5 Diagnostics (PROFINET or PROFIBUS)<br />
The following ladder logic network and DB show how to use the three modes with the three<br />
structures:<br />
● DIS<br />
● DiagnosticsDetail<br />
● DNN<br />
<strong>S7</strong>-<strong>1200</strong> <strong>Programmable</strong> <strong>controller</strong><br />
System Manual, 04/2012, A5E02486680-06 307
Extended instructions<br />
8.5 Diagnostics (PROFINET or PROFIBUS)<br />
① DNN<br />
② DIS<br />
③ DiagnosticsDetail<br />
1<br />
3<br />
Note<br />
In the DB, you must manually type in the data type to access each of the three structures;<br />
there is no dropdown list selection. Type in the data types exactly as shown below:<br />
DNN<br />
DIS<br />
DiagnosticsDetail<br />
<strong>S7</strong>-<strong>1200</strong> <strong>Programmable</strong> <strong>controller</strong><br />
308 System Manual, 04/2012, A5E02486680-06<br />
2
8.6 Pulse<br />
8.6.1 CTRL_PWM instruction<br />
Table 8- 118 CTRL_PWM (Pulse Width Modulation) instruction<br />
LAD / FBD SCL Description<br />
"CTRL_PWM_DB"(<br />
PWM:=_word_in_,<br />
enable:=_bool_in_,<br />
busy=>_bool_out_,<br />
status=>_word_out_);<br />
1 STEP 7 automatically creates the DB when you insert the instruction.<br />
2 In the SCL example, "CTRL_PWM_DB" is the name of the instance DB.<br />
CTRL_HSC<br />
Table 8- 119 Data types for the parameters<br />
Parameter and type Data type Description<br />
PWM IN HW_PWM<br />
(Word)<br />
Extended instructions<br />
8.6 Pulse<br />
Provides a fixed cycle time output with a variable duty<br />
cycle. The PWM output runs continuously after being<br />
started at the specified frequency (cycle time). The<br />
pulse width is varied as required to affect the desired<br />
control.<br />
PWM identifier: Names of enabled pulse generators will become tags in<br />
the "constant" tag table, and will be available for use as the PWM<br />
parameter. (Default value: 0)<br />
ENABLE IN Bool 1=start pulse generator<br />
0 = stop pulse generator<br />
BUSY OUT Bool Function busy (Default value: 0)<br />
STATUS OUT Word Execution condition code (Default value: 0)<br />
The CTRL_PWM instruction stores the parameter information in the DB. The data block<br />
parameters are not separately changed by the user, but are controlled by the CTRL_PWM<br />
instruction.<br />
Specify the enabled pulse generator to use, by using its tag name for the PWM parameter.<br />
When the EN input is TRUE, the PWM_CTRL instruction starts or stops the identified PWM<br />
based on the value at the ENABLE input. Pulse width is specified by the value in the<br />
associated Q word output address.<br />
Because the CPU processes the request when the CTRL_PWM instruction is executed,<br />
parameter BUSY will always report FALSE. If an error is detected, then ENO is set to<br />
FALSE, and parameter STATUS contains a condition code.<br />
<strong>S7</strong>-<strong>1200</strong> <strong>Programmable</strong> <strong>controller</strong><br />
System Manual, 04/2012, A5E02486680-06 309
Extended instructions<br />
8.6 Pulse<br />
The pulse width will be set to the initial value configured in device configuration when the<br />
CPU first enters RUN mode. You write values to the Q-word location specified in device<br />
configuration ("Output addresses" / "Start address:") as needed to change the pulse width.<br />
You use an instruction such as a move, convert, math, or PID box to write the desired pulse<br />
width to the appropriate Q word. You must use the valid range for the Q-word value (percent,<br />
thousandths, ten-thousandths, or <strong>S7</strong> analog format).<br />
Note<br />
Digital I/O points assigned to PWM and PTO cannot be forced<br />
The digital I/O points used by the pulse-width modulation (PWM) and pulse-train output<br />
(PTO) devices are assigned during device configuration. When digital I/O point addresses<br />
are assigned to these devices, the values of the assigned I/O point addresses cannot be<br />
modified by the Watch table force function.<br />
Table 8- 120 Value of the STATUS parameter<br />
STATUS Description<br />
0 No error<br />
80A1 PWM identifier does not address a valid PWM.<br />
Table 8- 121 Common condition codes<br />
Condition code1 Description<br />
8022 Area too small for input<br />
8023 Area too small for output<br />
8024 Illegal input area<br />
8025 Illegal output area<br />
8028 Illegal input bit assignment<br />
8029 Illegal output bit assignment<br />
8030 Output area is a read-only DB.<br />
803A DB does not exist.<br />
1 If one of these errors occurs when a code block is executed, the CPU goes to STOP mode unless you use the GetError<br />
or GetErrorID instructions within that code block to create a programmed reaction to the error.<br />
<strong>S7</strong>-<strong>1200</strong> <strong>Programmable</strong> <strong>controller</strong><br />
310 System Manual, 04/2012, A5E02486680-06
8.6.2 Operation of the pulse outputs<br />
<br />
<br />
① Cycle time<br />
② Pulse width<br />
Extended instructions<br />
8.6 Pulse<br />
Pulse width can be expressed as hundredths of the<br />
cycle time (0 to 100), as thousandths (0 to 1000), as<br />
ten thousandths (0 to 10000), or as <strong>S7</strong> analog format.<br />
The pulse width can vary from 0 (no pulse, always off)<br />
to full scale (no pulse, always on).<br />
Since the PWM output can be varied from 0 to full scale, it provides a digital output that in<br />
many ways is the same as an analog output. For example, the PWM output can be used to<br />
control the speed of a motor from stop to full speed, or it can be used to control position of a<br />
valve from closed to fully opened.<br />
Two pulse generators are available for controlling high-speed pulse output functions: PWM<br />
and Pulse train output (PTO). PTO is used by the motion control instructions. You can assign<br />
each pulse generator to either PWM or PTO, but not both at the same time.<br />
The two pulse generators are mapped to specific digital outputs as shown in the following<br />
table. You can use onboard CPU outputs, or you can use the optional signal board outputs.<br />
The output point numbers are shown in the following table (assuming the default output<br />
configuration). If you have changed the output point numbering, then the output point<br />
numbers will be those you assigned. Regardless, PTO1/PWM1 uses the first two digital<br />
outputs, and PTO2/PWM2 uses the next two digital outputs, either on the CPU or on the<br />
attached signal board. Note that PWM requires only one output, while PTO can optionally<br />
use two outputs per channel. If an output is not required for a pulse function, it is available<br />
for other uses.<br />
NOTICE<br />
Pulse-train outputs cannot be used by other instructions in the user program<br />
When you configure the outputs of the CPU or signal board as pulse generators (for use<br />
with the PWM or motion control instructions), the corresponding outputs addresses (Q0.0,<br />
Q0.1, Q4.0, and Q4.1) are removed from the Q memory and cannot be used for other<br />
purposes in your user program. If your user program writes a value to an output used as a<br />
pulse generator, the CPU does not write that value to the physical output.<br />
Table 8- 122 Default output assignments for the pulse generators<br />
PTO 0<br />
PWM 0<br />
PTO 1<br />
Description Pulse Direction<br />
Built-in I/O Q0.0 Q0.1<br />
SB I/O Q4.0 Q4.1<br />
Built-in outputs Q0.0 -<br />
SB outputs Q4.0 -<br />
<strong>S7</strong>-<strong>1200</strong> <strong>Programmable</strong> <strong>controller</strong><br />
System Manual, 04/2012, A5E02486680-06 311
Extended instructions<br />
8.6 Pulse<br />
PWM 1<br />
PTO 2<br />
PWM 2<br />
PTO 3<br />
PWM 3<br />
Description Pulse Direction<br />
Built-in I/O Q0.2 Q0.3<br />
SB I/O Q4.2 Q4.3<br />
Built-in outputs Q0.2 -<br />
SB outputs Q4.2 -<br />
Built-in I/O Q0.4 1 Q0.5 1<br />
SB I/O Q4.0 Q4.1<br />
Built-in outputs Q0.4 1 -<br />
SB outputs Q4.1 -<br />
Built-in I/O Q0.6 2 Q0.7 2<br />
SB I/O Q4.2 Q4.3<br />
Built-in outputs Q0.6 2 -<br />
SB outputs Q4.3 -<br />
1 The CPU 1211C does not have outputs Q0.4, Q0.5, Q0.6, or Q0.7. Therefore, these outputs<br />
cannot be used in the CPU 1211C.<br />
2 The CPU 1212C does not have outputs Q0.6 or Q0.7. Therefore, these outputs cannot be used in<br />
the CPU 1212C.<br />
3 This table applies to the CPU 1211C, CPU 1212C, CPU 1214C, and CPU 1215C PTO/PWM<br />
functions.<br />
8.6.3 Configuring a pulse channel for PWM<br />
To prepare for PWM operation, first configure a pulse channel in the device configuration by<br />
selecting the CPU, then Pulse Generator (PTO/PWM), and choose either PWM1 or PWM2.<br />
Enable the pulse generator (check box). If a pulse generator is enabled, a unique default<br />
name is assigned to this particular pulse generator. You can change this name by editing it<br />
in the "Name:" edit box, but it must be a unique name. Names of enabled pulse generators<br />
will become tags in the "constant" tag table, and will be available for use as the PWM<br />
parameter of the CTRL_PWM instruction.<br />
NOTICE<br />
The maximum pulse frequency of the pulse output generators for the digital output is<br />
100 KHz (for the CPU), 20 KHz (for a SB), or 200 KHz (for a high-speed SB). However,<br />
STEP 7 does not alert you when you configure an axis that with a maximum speed or<br />
frequency that exceeds this hardware limitation. This could cause problems with your<br />
application, so always ensure that you do not exceed the maximum pulse frequency of the<br />
hardware.<br />
<strong>S7</strong>-<strong>1200</strong> <strong>Programmable</strong> <strong>controller</strong><br />
312 System Manual, 04/2012, A5E02486680-06
8.7 Data logging<br />
Extended instructions<br />
8.7 Data logging<br />
You have the option to rename the pulse generator, add a comment, and assign parameters<br />
as follows:<br />
● Pulse generator used as follows: PWM or PTO (choose PWM)<br />
● Output source: onboard CPU or SB<br />
● Time base: milliseconds or microseconds<br />
● Pulse width format:<br />
– Hundredths (0 to 100)<br />
– Thousandths (0 to 1000)<br />
– Ten-thousandths (0 to 10000)<br />
– <strong>S7</strong> analog format (0 to 27648)<br />
● Cycle time: Enter your cycle time value. This value can only be changed in Device<br />
configuration.<br />
● Initial pulse width: Enter your initial pulse width value. The pulse width value can be<br />
changed during runtime.<br />
Enter the start address to configure the output addresses. Enter the Q word address where<br />
you want to locate the pulse width value.<br />
NOTICE<br />
Pulse-train outputs cannot be used by other instructions in the user program<br />
When you configure the outputs of the CPU or signal board as pulse generators (for use<br />
with the PWM or motion control instructions), the corresponding outputs addresses (Q0.0,<br />
Q0.1, Q4.0, and Q4.1) are removed from the Q memory and cannot be used for other<br />
purposes in your user program. If your user program writes a value to an output used as a<br />
pulse generator, the CPU does not write that value to the physical output.<br />
The default location is QW1000 for PWM1, and QW1002 for PWM2. The value at this<br />
location controls the width of the pulse and is initialized to the "Initial pulse width:" value<br />
specified above each time the CPU transitions from STOP to RUN mode. You change this<br />
Q-word value during run time to cause a change in the pulse width.<br />
Your control program can use the Data log instructions to store run-time data values in<br />
persistent log files. The data log files are stored in flash memory (CPU or memory card). Log<br />
file data is stored in standard CSV (Comma Separated Value) format. The data records are<br />
organized as a circular log file of a pre-determined size.<br />
The Data log instructions are used in your program to create, open, write a record, and close<br />
the log files. You decide which program values will be logged by creating a data buffer that<br />
defines a single log record. Your data buffer is used as temporary storage for a new log<br />
record. New current values must be programmatically moved into the buffer during run-time.<br />
When all of the current data values are updated, you can execute the DataLogWrite<br />
instruction to transfer data from the buffer to a data log record.<br />
<strong>S7</strong>-<strong>1200</strong> <strong>Programmable</strong> <strong>controller</strong><br />
System Manual, 04/2012, A5E02486680-06 313
Extended instructions<br />
8.7 Data logging<br />
Use the built-in PLC Web server to manage your data log files. Download recent records, all<br />
records, clear records, or delete log files with the "Data Logs" standard web page. After a<br />
data log file is transferred to your PC, then you can analyze the data with standard<br />
spreadsheet tools like Excel.<br />
8.7.1 Data log record structure<br />
The DATA and HEADER parameters of the DataLogCreate instruction assign the data type<br />
and the column header description of all data elements in a log record.<br />
DATA parameter for the DataLogCreate instruction<br />
The DATA parameter points to memory used as a temporary buffer for a new log record and<br />
must be assigned to an M or DB location.<br />
You can assign an entire DB (derived from a PLC data type that you assign when the DB is<br />
created) or part of a DB (the specified DB element can be any data type, data type structure,<br />
PLC data type, or data array).<br />
Structure data types are limited to a single nesting level. The total number of data elements<br />
declared should correspond to the number of columns specified in the header parameter.<br />
The maximum number of data elements you can assign is 253 (with a timestamp) or 255<br />
(without a timestamp). This restriction keeps your record inside the 256 column limit of an<br />
Excel sheet.<br />
The DATA parameter can assign either retentive or non-retentive data elements in a<br />
"Standard" (compatible with <strong>S7</strong>-300/400) or "Optimized" DB type.<br />
In order to write a Data log record you must first load the temporary DATA record with new<br />
process values and then execute the DataLogWrite instruction that saves new record values<br />
in the Datalog file.<br />
HEADER parameter for the DataLogCreate instruction<br />
The HEADER parameter points to column header names for the top row of the data matrix<br />
encoded in the CSV file. HEADER data must be located in DB or M memory and the<br />
characters must follow standard CSV format rules with commas separating each column<br />
name. The data type may be a string, byte array, or character array. Character/byte arrays<br />
allow increased size, where strings are limited to a maximum of 255 bytes. The HEADER<br />
parameter is optional. If the HEADER is not assigned, then no header row is created in the<br />
Data log file.<br />
<strong>S7</strong>-<strong>1200</strong> <strong>Programmable</strong> <strong>controller</strong><br />
314 System Manual, 04/2012, A5E02486680-06
8.7.2 Program instructions that control Data logs<br />
8.7.2.1 DataLogCreate<br />
Table 8- 123 DataLogCreate instruction<br />
LAD/FBD SCL Description<br />
"DataLogCreate_DB"(<br />
req:=_bool_in_,<br />
records:=_udint_in_,<br />
format:=_uint_in_,<br />
timestamp:=_uint_in_,<br />
done=>_bool_out_,<br />
busy=>_bool_out_,<br />
error=>_bool_out_,<br />
status=>_word_out_,<br />
name:=_string_inout_,<br />
ID:=_dword_inout_,<br />
header:=_variant_inout_,<br />
data:=_variant_inout_);<br />
1 In the SCL example, "DataLogCreate_DB" is the name of the instance DB.<br />
Table 8- 124 Data types for the parameters<br />
Extended instructions<br />
8.7 Data logging<br />
Creates and initializes a data log file. The<br />
file is created in the PLC \DataLogs<br />
directory, named by the NAME<br />
parameter, and implicitly opened for write<br />
operations. You can use the Data log<br />
instructions to programmatically store<br />
run-time process data in flash memory of<br />
the CPU.<br />
STEP 7 automatically creates the<br />
associated instance DB when you insert<br />
the instruction.<br />
Parameter and type Data type Description<br />
REQ IN Bool A low to high (positive edge) signal starts the operation. (Default value:<br />
False)<br />
RECORDS IN UDint The maximum number of data records the circular data log can contain<br />
before overwriting the oldest entry:<br />
The header record is not included. Sufficient available PLC load memory<br />
must exist in order to successfully create the data log. (Default value - 1)<br />
FORMAT IN UInt Data log format:<br />
0 - Internal format (not supported)<br />
1 - Comma separated values "csv-eng" (Default value)<br />
TIMESTAMP IN UInt Data time stamp format: Column headers for date and time fields are not<br />
required. The time stamp uses the system time (Coordinated Universal Time<br />
- UTC) and not the local time.<br />
0 - No time stamp<br />
1 - Date and time stamp (Default value)<br />
NAME IN Variant Data log name: You provide the name. This variant only supports a String<br />
data type and can only be located in local, DB, or M memory. (Default value:<br />
' ')<br />
The string reference is also used as the name of the data log file. The name<br />
characters must follow the Windows file system naming restrictions.<br />
Characters \ / : * ? " < > | and the space character are not allowed.<br />
<strong>S7</strong>-<strong>1200</strong> <strong>Programmable</strong> <strong>controller</strong><br />
System Manual, 04/2012, A5E02486680-06 315
Extended instructions<br />
8.7 Data logging<br />
Parameter and type Data type Description<br />
ID In/Out DWord Data log numeric identifier: You store this generated value for use with other<br />
Data log instructions. The ID parameter is only used as an output with the<br />
DataLogCreate instruction. (Default value: 0)<br />
Symbolic name access for this parameter is not allowed.<br />
HEADER In/Out Variant Pointer to data log column header names for the top row of the data matrix<br />
encoded in the CSV file. (Default value: null).<br />
HEADER data must be located in DB or M memory.<br />
The characters must follow standard CSV format rules with commas<br />
separating each column name. The data type may be a string, byte array, or<br />
character array. Character/byte arrays allow increased size, where strings<br />
are limited to a maximum of 255 bytes.<br />
The HEADER parameter is optional. If the HEADER is not parameterized,<br />
then no header row is created in the Data log file.<br />
DATA In/Out Variant Pointer to the record data structure, user defined type (UDT), or array.<br />
Record data must be located in DB or M memory.<br />
The DATA parameter specifies the individual data elements (columns) of a<br />
data log record and their data type. Structure data types are limited to a<br />
single nesting level. The number of data elements declared should<br />
correspond to the number of columns specified in the header parameter.<br />
The maximum number of data elements you can assign is 253 (with a<br />
timestamp) or 255 (without a timestamp). This restriction keeps your record<br />
inside the 256 column limit of a Excel sheet.<br />
DONE OUT Bool The DONE bit is TRUE for one scan, after the last request was completed<br />
with no error. (Default value: False)<br />
BUSY OUT Bool 0 - No operation in progress<br />
1 - Operation on progress<br />
ERROR OUT Bool The ERROR bit is TRUE for one scan, after the last request was terminated<br />
with an error. The error code value at the STATUS parameter is valid only<br />
during the single scan where ERROR = TRUE.<br />
STATUS OUT Word Execution condition code (Default value: 0)<br />
A data log file is created with a pre-determined fixed sized based on the RECORDS and<br />
DATA parameters. The data records are organized as a circular log file. New records are<br />
appended to the data log file, until the maximum number of records that is specified by the<br />
RECORDS parameter is stored. The next record written will overwrite the oldest record.<br />
Another record write operation will overwrite the next oldest data record and so on.<br />
Note<br />
If you want to prevent overwriting any data records, then you can use the DataLogNewFile<br />
instruction to create a new data log based on the current data log, after the current data log<br />
has stored the maximum number of records. New data records are stored in the new data<br />
log file. The old data log file and record data remain in flash memory.<br />
<strong>S7</strong>-<strong>1200</strong> <strong>Programmable</strong> <strong>controller</strong><br />
316 System Manual, 04/2012, A5E02486680-06
Extended instructions<br />
8.7 Data logging<br />
Memory resource usage:<br />
● The data logs consume only load memory.<br />
● There is no set limit for the total number of data logs. The size of all data logs combined<br />
is limited by the available resources of load memory. Only eight data logs may be open at<br />
one time.<br />
● The maximum possible number for the RECORDS parameter is the limit for an UDint<br />
number (4,294,967,295). The actual limit for the RECORD parameter depends on the<br />
size of a single record, the size of other data logs, and the available resources of load<br />
memory. In addition, Excel limits the number of rows allowed in an Excel sheet.<br />
Table 8- 125 Values of ERROR and STATUS<br />
Note<br />
A DataLogCreate operation extends over many program scan cycles. The actual time<br />
required for the log file creation depends on the record structure and number of records.<br />
Your program logic must monitor and catch the DataLogCreate DONE bit's transition to<br />
the TRUE state, before the new data log can be used for other data log operations.<br />
ERROR STATUS (W#16#....) Description<br />
0 0000 No error<br />
0 7000 Call with no REQ edge: BUSY = 0, DONE = 0<br />
0 7001 First call with REQ edge (working): BUSY = 1, DONE = 0<br />
0 7002 Nth call (working): BUSY = 1, DONE = 0<br />
1 8070 All internal instance memory is in use.<br />
1 807F Internal error<br />
1 8090 Invalid file name<br />
1 8091 Name parameter is not a String reference.<br />
1 8093 Data log already exists.<br />
1 8097 Requested file length exceeds file system maximum.<br />
1 80B3 Insufficient load memory available.<br />
1 80B4 MC (Memory Cartridge) is write protected.<br />
1 80C1 Too many open files: No more than eight opened data log files are allowed.<br />
1 8253 Invalid record count<br />
1 8353 Invalid format selection<br />
1 8453 Invalid timestamp selection<br />
1 8B24 Invalid HEADER area assignment: For example, pointing to local memory<br />
1 8B51 Invalid HEADER parameter data type<br />
1 8B52 Too many HEADER parameter data elements<br />
1 8C24 Invalid DATA area assignment: For example, pointing to local memory<br />
1 8C51 Invalid DATA parameter data type<br />
1 8C52 Too many DATA parameter data elements<br />
<strong>S7</strong>-<strong>1200</strong> <strong>Programmable</strong> <strong>controller</strong><br />
System Manual, 04/2012, A5E02486680-06 317
Extended instructions<br />
8.7 Data logging<br />
8.7.2.2 DataLogOpen<br />
Table 8- 126 DataLogOpen instruction<br />
LAD / FBD SCL Description<br />
"DataLogOpen_DB"(<br />
req:=_bool_in_,<br />
mode:=_uint_in_,<br />
done=>_bool_out_,<br />
busy=>_bool_out_,<br />
error=>_bool_out_,<br />
status=>_word_out_,<br />
name:=_string_inout_,<br />
ID:=_dword_inout_);<br />
2 In the SCL example, "DataLogOpen_DB" is the name of the instance DB.<br />
Table 8- 127 Data types for the parameters<br />
Opens a pre-existing data log file. A data log must be<br />
opened before you can write new records to the log. Data<br />
logs can be opened and closed individually. A maximum<br />
of eight data logs can be open at the same time.<br />
STEP 7 automatically creates the associated instance DB<br />
when you insert the instruction.<br />
Parameter and type Data type Description<br />
REQ IN Bool A low to high (positive edge) signal starts the operation. (Default value:<br />
False)<br />
MODE IN UInt Operation mode:<br />
0 - Append to existing data (Default value)<br />
1 - Clear all existing records<br />
NAME IN Variant Name of an existing data log: This variant only supports a String data type<br />
and can only be located in local, DB, or M memory. (Default value: ' ')<br />
ID In/Out DWord Numeric identifier of a data log. (Default value: 0)<br />
Note: Symbolic name access for this parameter is not allowed.<br />
DONE OUT Bool The DONE bit is TRUE for one scan, after the last request was completed<br />
with no error. (Default value: False)<br />
BUSY OUT Bool 0 - No operation in progress<br />
1 - Operation on progress<br />
ERROR OUT Bool The ERROR bit is TRUE for one scan, after the last request was<br />
terminated with an error. The error code value at the STATUS parameter<br />
is valid only during the single scan where ERROR = TRUE.<br />
STATUS OUT Word Execution condition code (Default value: 0)<br />
You can provide either the NAME or an ID (ID parameter as an input) of a pre-existing data<br />
log. If you provide both parameters and a valid ID does correspond to the NAME data log,<br />
then the ID is used, and the NAME ignored.<br />
<strong>S7</strong>-<strong>1200</strong> <strong>Programmable</strong> <strong>controller</strong><br />
318 System Manual, 04/2012, A5E02486680-06
Extended instructions<br />
8.7 Data logging<br />
The NAME must be the name of a data log created by the DataLogCreate instruction. If only<br />
the NAME is provided and the NAME specifies a valid data log, then the corresponding ID<br />
will be returned (ID parameter as an output).<br />
Note<br />
General usage of data log files<br />
Data log files are automatically opened after the DataLogCreate and DataLogNewFile<br />
operations.<br />
Data log files are automatically closed after a PLC run to stop transition or a PLC power<br />
cycle.<br />
A Data log file must be open before a new DataLogWrite operation is possible.<br />
A maximum of eight data log files may be open at one time. More than eight data log files<br />
may exist, but some of them must be closed so no more than eight are open.<br />
Table 8- 128 Values of ERROR and STATUS<br />
ERROR STATUS (W#16#) Description<br />
0 0000 No error<br />
0 0002 Warning: Data log file already open by this application program<br />
0 7000 Call with no REQ edge: BUSY = 0, DONE = 0<br />
0 7001 First call with REQ edge (working): BUSY = 1, DONE = 0<br />
0 7002 Nth call (working): BUSY = 1, DONE = 0<br />
1 8070 All internal instance memory is in use.<br />
1 8090 Data log definition is inconsistent with existing data log file.<br />
1 8091 Name parameter is not a String reference.<br />
1 8092 Data log does not exist.<br />
1 80C0 Data log file is locked.<br />
1 80C1 Too many open files: No more than eight opened data log files are allowed.<br />
8.7.2.3 DataLogClose<br />
Table 8- 129 DataLogClose instruction<br />
LAD / FBD SCL Description<br />
"DataLogClose_DB"(<br />
req:=_bool_in_,<br />
done=>_bool_out_,<br />
busy=>_bool_out_,<br />
error=>_bool_out_,<br />
status=>_word_out_,<br />
ID:=_dword_inout_);<br />
2 In the SCL example, "DataLogClose_DB" is the name of the instance DB.<br />
Closes an open data log file. DataLogWrite operations to<br />
a closed data log result in an error. No write operations<br />
are allowed to this data log until another DataLogOpen<br />
operation is performed.<br />
A transition to STOP mode will close all open data log<br />
files.<br />
STEP 7 automatically creates the associated instance<br />
DB when you insert the instruction.<br />
<strong>S7</strong>-<strong>1200</strong> <strong>Programmable</strong> <strong>controller</strong><br />
System Manual, 04/2012, A5E02486680-06 319
Extended instructions<br />
8.7 Data logging<br />
Table 8- 130 Data types for the parameters<br />
Parameter and type Data type Description<br />
REQ IN Bool A low to high (positive edge) signal starts the operation. (Default value: False)<br />
ID In/Out DWord Numeric identifier of a data log. Only used as an input for the DataLogClose<br />
instruction. (Default value: 0)<br />
Note: Symbolic name access for this parameter is not allowed.<br />
DONE OUT Bool The DONE bit is TRUE for one scan after the last request was completed with<br />
no error.<br />
BUSY OUT Bool 0 - No operation in progress<br />
1- Operation on progress<br />
ERROR OUT Bool The ERROR bit is TRUE for one scan, after the last request was terminated<br />
with an error. The error code value at the STATUS parameter is valid only<br />
during the single scan where ERROR = TRUE.<br />
STATUS OUT Word Execution condition code (Default value: 0)<br />
Table 8- 131 Values of ERROR and STATUS<br />
ERROR STATUS (W#16#) Description<br />
0 0000 No error<br />
0 0001 Data log not open<br />
0 7000 Call with no REQ edge: BUSY = 0, DONE = 0<br />
0 7001 First call with REQ edge (working): BUSY = 1, DONE = 0<br />
0 7002 Nth call (working): BUSY = 1, DONE = 0<br />
1 8092 Data log does not exist.<br />
8.7.2.4 DataLogWrite<br />
Table 8- 132 DataLogWrite instruction<br />
LAD / FBD SCL Description<br />
"DataLogWrite_DB"(<br />
req:=_bool_in_,<br />
done=>_bool_out_,<br />
busy=>_bool_out_,<br />
error=>_bool_out_,<br />
status=>_word_out_,<br />
ID:=_dword_inout_);<br />
2 In the SCL example, "DataLogWrite_DB" is the name of the instance DB.<br />
Writes a data record into the specified data log. The preexisting<br />
target data log must be open before a<br />
DataLogWrite operation is allowed.<br />
STEP 7 automatically creates the associated instance DB<br />
when you insert the instruction.<br />
<strong>S7</strong>-<strong>1200</strong> <strong>Programmable</strong> <strong>controller</strong><br />
320 System Manual, 04/2012, A5E02486680-06
Table 8- 133 Data types for the parameters<br />
Extended instructions<br />
8.7 Data logging<br />
Parameter and type Data type Description<br />
REQ IN Bool A low to high (positive edge) signal starts the operation. (Default value: False)<br />
ID In/Out DWord Numeric data log identifier. Only used as an input for the DataLogWrite<br />
instruction. (Default value: 0)<br />
Note: Symbolic name access for this parameter is not allowed.<br />
DONE OUT Bool The DONE bit is TRUE for one scan, after the last request was completed with<br />
no error.<br />
BUSY OUT Bool 0 - No operation in progress<br />
1 - Operation on progress<br />
ERROR OUT Bool The ERROR bit is TRUE for one scan, after the last request was terminated<br />
with an error. The error code value at the STATUS parameter is valid only<br />
during the single scan where ERROR = TRUE.<br />
STATUS OUT Word Execution condition code (Default value: 0)<br />
The memory address and data structure of the record buffer is configured by the DATA<br />
parameter of a DataLogCreate instruction. You must programmatically load the record buffer<br />
with current run-time process values and then execute the DataLogWrite instruction to move<br />
new record data from the buffer to the data log.<br />
The ID parameter identifies a data log and data record configuration. The ID number is<br />
generated when a data log is created.<br />
If there are empty records in the circular data log file, then the next available empty record<br />
will be written. If all records are full, then the oldest record will be overwritten.<br />
CAUTION<br />
Potential for data log data loss during a CPU power failure<br />
If there is a power failure during an incomplete DataLogWrite operation, then the data<br />
record being transferred to the data log could be lost.<br />
Table 8- 134 Values of ERROR and STATUS<br />
ERROR STATUS (W#16#) Description<br />
0 0000 No error<br />
0 0001 Indicates that the data log is full: Each data log is created with a specified<br />
maximum number of records. The last record of the maximum number has been<br />
written. The next write operation will overwrite the oldest record.<br />
0 7000 Call with no REQ edge: BUSY = 0, DONE = 0<br />
0 7001 First call with REQ edge (working): BUSY = 1, DONE = 0<br />
0 7002 Nth call (working): BUSY = 1, DONE = 0<br />
1 8070 All internal instance memory is in use.<br />
1 8092 Data log does not exist.<br />
1 80B0 Data log file is not open (for explicit open mode only).<br />
<strong>S7</strong>-<strong>1200</strong> <strong>Programmable</strong> <strong>controller</strong><br />
System Manual, 04/2012, A5E02486680-06 321
Extended instructions<br />
8.7 Data logging<br />
8.7.2.5 DataLogNewFile<br />
Table 8- 135 DataLogNewFile instruction<br />
LAD / FBD SCL Description<br />
"DataLogNewFile_DB"(<br />
req:=_bool_in_,<br />
records=:_udint_in_,<br />
done=>_bool_out_,<br />
busy=>_bool_out_,<br />
error=>_bool_out_,<br />
status=>_word_out_,<br />
name=:_DataLog_out_,<br />
ID:=_dword_inout_);<br />
2 In the SCL example, "DataLogNewFile_DB" is the name of the instance DB.<br />
Table 8- 136 Data types for the parameters<br />
Allows your program to create a new data<br />
log file based upon an existing data log file.<br />
STEP 7 automatically creates the associated<br />
instance DB when you insert the instruction.<br />
Parameter and type Data type Description<br />
REQ IN Bool A low to high (positive edge) signal starts the operation. (Default value:<br />
False)<br />
RECORDS IN UDInt The maximum number of data records the circular data log can contain<br />
before overwriting the oldest entry. (Default value: 1)<br />
The header record is not included. Sufficient available CPU load memory<br />
must exist in order to successfully create the data log.<br />
NAME IN Variant Data log name: You provide the name. This variant only supports a String<br />
data type and can only be located in local, DB, or M memory. (Default value:<br />
' ')<br />
The string reference is also used as the name of the data log file. The name<br />
characters must follow the Windows file system naming restrictions.<br />
Characters \ / : * ? " < > | and the space character are not allowed.)<br />
ID In/Out DWord Numeric data log identifier(Default value: 0):<br />
At execution, the ID input identifies a valid data log. The new data log<br />
configuration is copied from this data log.<br />
After execution, the ID parameter becomes an output that returns the ID<br />
of the newly created data log file.<br />
DONE OUT Bool<br />
Note: Symbolic name access for this parameter is not allowed.<br />
The DONE bit is TRUE for one scan, after the last request was completed<br />
with no error.<br />
BUSY OUT Bool 0 - No operation in progress<br />
1 - Operation on progress<br />
ERROR OUT Bool The ERROR bit is TRUE for one scan, after the last request was terminated<br />
with an error. The error code value at the STATUS parameter is valid only<br />
during the single scan where ERROR = TRUE.<br />
STATUS OUT Word Execution condition code (Default value: 0)<br />
<strong>S7</strong>-<strong>1200</strong> <strong>Programmable</strong> <strong>controller</strong><br />
322 System Manual, 04/2012, A5E02486680-06
Extended instructions<br />
8.7 Data logging<br />
You can execute the DataLogNewFile instruction when a data log becomes full or is deemed<br />
completed and you do not want to lose any data that is stored in the data log. A new empty<br />
data log file can be created based on the structure of the full Data log file. The header record<br />
will be duplicated from the original data log with the original data log properties (DATA record<br />
buffer, data format, and timestamp settings). The original Data log file is implicitly closed and<br />
the new Data log file is implicitly opened.<br />
DataLogWrite parameter trigger: Your program must monitor the ERROR and STATUS<br />
parameters of each DataLogWrite operation. When the final record is written and a data log<br />
is full, the DataLogWrite ERROR bit = 1 and the DataLogWrite STATUS word = 1. These<br />
ERROR and STATUS values are valid for one scan only, so your monitoring logic must use<br />
ERROR = 1 as a time gate to capture the STATUS value and then test for STATUS = 1 (the<br />
data log is full).<br />
DataLogNewFile operation: When your program logic gets the data log is full signal, this<br />
state is used to activate a DataLogNewFile operation. You must execute DataLogNewFile<br />
with the ID of an existing (usually full) and open data log, but a new unique NAME<br />
parameter. After the DataLogNewFile operation is done, a new data log ID value is returned<br />
(as an output parameter) that corresponds to the new data log name. The new data log file is<br />
implicitly opened and is ready to store new records. New DataLogWrite operations that are<br />
directed to the new data log file, must use the ID value returned by the DataLogNewFile<br />
operation.<br />
Note<br />
A DataLogNewFile operation extends over many program scan cycles. The actual time<br />
required for the log file creation depends on the record structure and number of records.<br />
Your program logic must monitor and catch the DataLogNewFile DONE bit's transition to the<br />
TRUE state, before the new data log can be used for other data log operations.<br />
Table 8- 137 Values of ERROR and STATUS<br />
ERROR STATUS (W#16#) Description<br />
0 0000 No error<br />
0 7000 Call with no REQ edge: BUSY = 0, DONE = 0<br />
0 7001 First call with REQ edge (working): BUSY = 1, DONE = 0<br />
0 7002 Nth call (working): BUSY = 1, DONE = 0<br />
1 8070 All internal instance memory is in use.<br />
1 8090 Invalid file name<br />
1 8091 Name parameter is not a String reference.<br />
1 8092 Data log does not exist.<br />
1 8093 Data log already exists.<br />
1 8097 Requested file length exceeds file system maximum.<br />
1 80B3 Insufficient load memory available.<br />
1 80B4 MC is write protected.<br />
1 80C1 Too many open files.<br />
<strong>S7</strong>-<strong>1200</strong> <strong>Programmable</strong> <strong>controller</strong><br />
System Manual, 04/2012, A5E02486680-06 323
Extended instructions<br />
8.7 Data logging<br />
8.7.3 Working with data logs<br />
The data log files are stored as comma separated value format (*.csv) in persistent flash<br />
memory. You can view the data logs by using the PLC Web server feature or by removing<br />
the PLC memory card and inserting it in a standard PC card reader.<br />
Viewing data logs with the PLC Web server feature<br />
If the PLC PROFINET port and a PC are connected to a network, then you can use a PC<br />
web browser like Microsoft Internet Explorer or Mozilla Firefox to access the built-in PLC<br />
Web server. The PLC may be in run mode or stop mode when you operate the PLC Web<br />
server. If the PLC is in run mode, then your control program continues to execute while the<br />
PLC Web server is transferring log data through the network.<br />
Web server access:<br />
1. Enable the Web server in the Device Configuration for the target CPU (Page 504).<br />
2. Connect your PC to the PLC through the PROFINET network (Page 505).<br />
3. Log in to the built-in Web server (Page 506).<br />
4. Download the recent records, all records, clear records, or delete log files with the "Data<br />
Log" standard web page (Page 516).<br />
5. After a copy of a data log file is downloaded to your PC, you can open the .csv file with a<br />
spreadsheet application like Excel.<br />
Viewing data logs on a PLC memory card<br />
If the <strong>S7</strong>-<strong>1200</strong> CPU has a "Program" type <strong>S7</strong>-<strong>1200</strong> memory card inserted, then you can<br />
remove the memory card and insert the card into a standard SD (Secure Digital) or MMC<br />
(MultiMediaCard) card slot on a PC or PG. The PLC is in stop mode when the memory card<br />
is removed and your control program is not executed.<br />
Use the Windows file explorer and navigate to the \DataLog directory on the memory card.<br />
All your \*.csv data log files are located in this directory.<br />
Make a copy of the data log files and put the copies on a local drive of your PC. Then, you<br />
can use Excel to open a local copy of a *.csv file and not the original file that is stored on the<br />
memory card.<br />
CAUTION<br />
You can copy, but do not modify or delete data log files on a <strong>S7</strong>-<strong>1200</strong> memory card using a<br />
PC card reader<br />
The standard Web server data log page is the recommended tool for viewing, downloading<br />
(copying), clearing (delete the data), and deleting data log files. The Web server manages<br />
the memory card files for you and helps prevent accidental modification or deletion of data.<br />
Direct browsing of the memory card file system by the Windows Explorer has the risk that<br />
you can accidentally delete/modify data log or other system files which may corrupt a file or<br />
make the memory card unusable.<br />
<strong>S7</strong>-<strong>1200</strong> <strong>Programmable</strong> <strong>controller</strong><br />
324 System Manual, 04/2012, A5E02486680-06
Extended instructions<br />
8.7 Data logging<br />
Viewing data logs from a Web browser<br />
Even if you do not use the Web server feature, you can view data logs directly from a Web<br />
browser such as Internet Explorer or Mozilla Firefox. Simply enter the following text into the<br />
address bar of your browser using the IP address of your CPU and the actual name of the<br />
data log file you provided in STEP 7 instead of "MyDataLog":<br />
http://192.168.0.1/DataLog.html?FileName=MyDataLog.csv<br />
The fixed addresses of data log files also make it possible to access them through third party<br />
file collection tools.<br />
8.7.4 Limits to the size of data log files<br />
Data log files share PLC load memory space with the program, program data, configuration<br />
data, user-defined web pages, and PLC system data. A large program using internal load<br />
memory requires a large amount of load memory and there may be insufficient free space for<br />
data log files. In this case, you can use a "Program card" to increase the size of load<br />
memory. <strong>S7</strong>-<strong>1200</strong> CPUs can use either internal or external load memory, but not both at<br />
once.<br />
Refer to the memory card chapter for details about how to create a "Program" card<br />
(Page 112).<br />
Maximum size rule for one Data log file<br />
The maximum size of one Data log file may not exceed 25% of the load memory size<br />
(internal or external). If your application requires more Data log entries, then use the<br />
"DataLogNewFile" instruction to create a new file when all records in the first file are filled.<br />
See the table below for the maximum sizes of one Data log file.<br />
Table 8- 138 Load memory size and maximum size for one Data log file<br />
Data area CPU 1211C CPU 1212C CPU 1214C CPU 1215C Data storage<br />
Internal load memory<br />
flash memory<br />
External load memory<br />
Optional "Program card"<br />
flash memory cards<br />
1 MB<br />
(250 KB max.<br />
for one Data<br />
log file)<br />
1 MB<br />
(250 KB max.<br />
for one Data<br />
log file)<br />
Determine the size of load memory free space<br />
4 MB<br />
(500 KB max.<br />
for one Data log<br />
file)<br />
2 MB, 12 MB or 24 MB depending on the SD card size<br />
(500 KB max. for one Data log file using a 2 MB card)<br />
(6 MB max. for one Data log file using a 24 MB card)<br />
4 MB<br />
(500 KB max. for<br />
one Data log file)<br />
1. Establish an online connection between STEP 7 and the target <strong>S7</strong>-<strong>1200</strong> PLC.<br />
2. Download the program to which you want to add data log operations.<br />
User program and<br />
program data,<br />
configuration data,<br />
Data logs, userdefined<br />
web pages,<br />
and PLC system<br />
data<br />
3. Create any optional user-defined web pages that you need. (The standard web pages<br />
that give you access to data logs are stored in PLC firmware and do not use load<br />
memory).<br />
<strong>S7</strong>-<strong>1200</strong> <strong>Programmable</strong> <strong>controller</strong><br />
System Manual, 04/2012, A5E02486680-06 325
Extended instructions<br />
8.7 Data logging<br />
4. Use the Online and diagnostic tools to get the load memory size and percentage of free<br />
load memory space (Page 680).<br />
5. Multiply the load memory size by the percentage that is free to obtain the current load<br />
memory free space.<br />
Maximum size rule for all data logs combined<br />
The amount of load memory free space varies during normal operations as the operating<br />
system uses and releases memory. You should limit the combined size of all data log files to<br />
one half of the available free space.<br />
Calculate the memory requirement for a single data log record<br />
Log data is stored as character bytes in the CSV (comma separated values) file format. The<br />
following table shows the number of bytes that are required to store each data type.<br />
Table 8- 139 CSV file data sizes<br />
Data type Number of bytes (data bytes plus separator comma byte)<br />
Bool 2<br />
Byte 5<br />
Word 7<br />
DWord 12<br />
Char 4<br />
String Example 1: MyString[10]<br />
The maximum string size is assigned as 10 characters.<br />
Text characters + automatic padding with blank characters = 10 bytes<br />
Opening and closing double quote + comma characters = 3 bytes<br />
10 + 3 = 13 total bytes<br />
Example 2: Mystring2<br />
If no size is assigned with square brackets, then 254 bytes is allocated by<br />
default.<br />
Text characters + automatic padding with blank characters = 254 bytes<br />
Opening and closing double quote + comma characters = 3 bytes<br />
254 + 3 = 257 total bytes<br />
USInt 5<br />
UInt 7<br />
UDInt 12<br />
SInt 5<br />
Int 7<br />
DInt 12<br />
Real 16<br />
LReal 25<br />
Time 15<br />
DTL 24<br />
<strong>S7</strong>-<strong>1200</strong> <strong>Programmable</strong> <strong>controller</strong><br />
326 System Manual, 04/2012, A5E02486680-06
Extended instructions<br />
8.7 Data logging<br />
The DataLogCreate DATA parameter points to a structure that specifies the number of data<br />
fields and the data type of each data field for one data log record. The table above gives the<br />
bytes required in the CSV file for each data type. Multiply the number of occurrences of a<br />
given data type by the number of bytes it requires. Do this for each data type in the record<br />
and sum the number of bytes to get the total size of the data record. Add one byte for the<br />
end of line character.<br />
Size of a data log record = summation of bytes required for all data fields + 1 (the end of line<br />
character).<br />
Calculate the memory requirement for an entire data log file<br />
The RECORDS parameter of the DataLogCreate instruction sets the maximum number of<br />
records in a data log file. When the data log file is created the maximum memory size is<br />
allocated.<br />
Size of data log file = (number of bytes in one record) x (number of records).<br />
8.7.5 Data log example program<br />
This Data log example program does not show all the program logic necessary to get sample<br />
values from a dynamic process, but does show the key operations of the Data log<br />
instructions. The structure and number of log files that you use depends on your process<br />
control requirements.<br />
Note<br />
General usage of Data log files<br />
Data log files are automatically opened after the DataLogCreate and DataLogNew File<br />
operations.<br />
Data log files are automatically closed after a PLC run to stop transition or a PLC power<br />
cycle.<br />
A Data log file must be open before a DataLogWrite operation is possible.<br />
A maximum of eight data log files may be open at one time. More than eight data log files<br />
may exist, but some of them must be closed so no more than eight are open.<br />
<strong>S7</strong>-<strong>1200</strong> <strong>Programmable</strong> <strong>controller</strong><br />
System Manual, 04/2012, A5E02486680-06 327
Extended instructions<br />
8.7 Data logging<br />
Example Data log program<br />
Example data log names, header text, and the MyData structure are created in a data block.<br />
The three MyData variables temporarily store new sample values. The process sample<br />
values at these DB locations are transferred to a data log file by executing the DataLogWrite<br />
instruction.<br />
Network 1 REQ rising edge starts the data log creation process.<br />
Network 2 Capture the DONE output from DataLogCreate because it is only valid for one<br />
scan.<br />
<strong>S7</strong>-<strong>1200</strong> <strong>Programmable</strong> <strong>controller</strong><br />
328 System Manual, 04/2012, A5E02486680-06
Extended instructions<br />
8.7 Data logging<br />
Network 3 A positive edge signal triggers when to store new process values in the MyData<br />
structure.<br />
Network 4 The EN input state is based upon when the DataLogCreate operation is complete.<br />
A create operation extends over many scan cycles and must be complete before executing a<br />
write operation. The positive edge signal on the REQ input is the event that triggers an<br />
enabled write operation.<br />
Network 5 Close the data log once the last record has been written. After executing the<br />
DataLogWrite operation that writes the last record, the log file full status is signaled when<br />
DataLogWrite STATUS output = 1.<br />
<strong>S7</strong>-<strong>1200</strong> <strong>Programmable</strong> <strong>controller</strong><br />
System Manual, 04/2012, A5E02486680-06 329
Extended instructions<br />
8.7 Data logging<br />
Network 6 A positive signal edge DataLogOpen REQ input simulates the user pushing a<br />
button on an HMI that opens a data log file. If you open a Data log file that has all records<br />
filled with process data, then the next DataLogWrite operation will overwrite the oldest<br />
record. You may want to preserve the old Data log and instead create a new data log, as<br />
shown in network 7.<br />
Network 7 The ID parameter is an IN/OUT type. First, you supply the ID value of the existing<br />
Data log whose structure you want to copy. After the DataLogNewFile operation is complete,<br />
a new and unique ID value for the new Data log is written back to the ID reference location.<br />
The required DONE bit = TRUE capture is not shown, refer to networks 1, 2, and 4 for an<br />
example of DONE bit logic.<br />
<strong>S7</strong>-<strong>1200</strong> <strong>Programmable</strong> <strong>controller</strong><br />
330 System Manual, 04/2012, A5E02486680-06
Data log files created by the example program viewed with the <strong>S7</strong>-<strong>1200</strong> CPU Webserver<br />
Table 8- 140 Downloaded .csv file examples viewed with Excel<br />
Two records written in a five record<br />
maximum file<br />
Five records in a Data log file with a five<br />
record maximum<br />
After one additional record is written to the<br />
file above which is full, the sixth write<br />
operation overwrites the oldest record one<br />
with record six. Another write operation<br />
will overwrite record two with record<br />
seven and so on.<br />
Extended instructions<br />
8.7 Data logging<br />
<strong>S7</strong>-<strong>1200</strong> <strong>Programmable</strong> <strong>controller</strong><br />
System Manual, 04/2012, A5E02486680-06 331
Extended instructions<br />
8.8 Data block control<br />
8.8 Data block control<br />
8.8.1 READ_DBL, WRIT_DBL (Read from or write to a DB in load memory)<br />
Table 8- 141 READ_DBL and WRIT_DBL instructions<br />
LAD / FBD Description<br />
Table 8- 142 Data types for the parameters<br />
READ_DBL(<br />
req:=_bool_in_,<br />
srcblk:=_variant_in_,<br />
busy=>_bool_out_,<br />
dstblk=>_variant_out_);<br />
WRIT_DBL(<br />
req:=_bool_in_,<br />
srcblk:=_variant_in_,<br />
busy=>_bool_out_,<br />
dstblk=>_variant_out_);<br />
Copies DB start values or part of the<br />
values, from load memory to a target<br />
DB in the work memory.<br />
The content of load memory is not<br />
changed during the copy process.<br />
Copies DB current values or part of the<br />
values from work memory to a target<br />
DB in load memory.<br />
The content of work memory is not<br />
changed during the copy process.<br />
Parameter and type Data type Description<br />
REQ IN BOOL A high signal starts the operation, if BUSY = 0.<br />
SRCBLK IN VARIANT READ_DBL: Pointer to the source data block in load memory<br />
WRIT_DBL: Pointer to the source data block in work memory<br />
RET_VAL OUT INT Execution condition code<br />
BUSY OUT BOOL BUSY = 1 signals that the reading/writing process is not complete.<br />
DSTBLK OUT VARIANT READ_DBL: Pointer to the destination data block in work memory<br />
WRIT_DBL: Pointer to the destination data block in load memory<br />
<strong>S7</strong>-<strong>1200</strong> <strong>Programmable</strong> <strong>controller</strong><br />
332 System Manual, 04/2012, A5E02486680-06
Extended instructions<br />
8.8 Data block control<br />
Typically, a DB is stored in both load memory (flash) and work memory (RAM). The start<br />
values (initial values) are always stored in load memory, and the current values are always<br />
stored in work memory. READ_DBL can be used to copy a set of start values from load<br />
memory to the current values of a DB in work memory that is referenced by your program.<br />
You can use WRIT_DBL to update the start values stored in internal load memory or<br />
memory card from current values in work memory.<br />
Note<br />
Avoid excessive WRIT_DBL flash memory write operations<br />
The WRIT_DBL instruction performs write operations in flash memory (internal load memory<br />
or memory card). WRIT_DBL should be used for infrequent updates like a production<br />
process changes.<br />
The data blocks used by READ_DBL and WRIT_DBL must have been previously created by<br />
STEP 7 before you can use these instructions. If the source DB is created as a "standard"<br />
type then the destination DB must also be the "standard" type. If the source data block is<br />
created as an "optimized" type then the destination data block must also be the "optimized"<br />
type.<br />
If the DBs are standard, then you can specify either a tag name or a P# value. The P# value<br />
allows you to specify and copy any number of elements of the specified size (Byte, Word, or<br />
DWord). Thus, you can copy part or all of a DB. If the DBs are optimized, you can only<br />
specify a tag name; you cannot use the P# operator. If you specify a tag name for either<br />
standard or optimized DBs (or for other work-memory types), then whatever is referenced by<br />
this tag name is copied. This could be a user-defined type, an array, or a basic element.<br />
Type Struct can only be used by these instructions if the DB is standard, not optimized. You<br />
must use a user-defined type (UDT) if it is a structure in optimized memory. Only a userdefined<br />
type ensures that the "data types" are exactly the same for both the source and<br />
destination structures.<br />
Note<br />
Using a structure (data type Struct) in an "optimized" DB<br />
When using a Struct data type with "optimzed" DBs, you must first create a user-defined<br />
data type (UDT) for the Struct. You then configure both the source and destination DBs with<br />
the UDT. The UDT ensures that the data types within the Struct remain consistent for both<br />
DBs.<br />
For "standard" DBs, you use the Struct without creating a UDT.<br />
READ_DBL and WRIT_DBL execute asynchronously to the cyclic program scan. The<br />
processing extends over multiple READ_DBL and WRIT_DBL calls. You start the DB<br />
transfer job by calling with REQ = 1 and then monitor the BUSY and RET_VAL outputs to<br />
determine when the data transfer is complete and correct.<br />
To ensure data consistency, do not modify the destination area during the processing of<br />
READ_DBL or the source area during the processing of WRIT_DBL (that is, as long as the<br />
BUSY parameter is TRUE).<br />
<strong>S7</strong>-<strong>1200</strong> <strong>Programmable</strong> <strong>controller</strong><br />
System Manual, 04/2012, A5E02486680-06 333
Extended instructions<br />
8.8 Data block control<br />
SRCBLK and DSTBLK parameter restrictions:<br />
● A data block must have been previously created before it can be referenced.<br />
● The length of a VARIANT pointer of type BOOL must be divisible by 8.<br />
● The length of a VARIANT pointer of type STRING must be the same in the source and<br />
destination pointers.<br />
Recipes and machine setup information<br />
Table 8- 143 Condition codes<br />
You can use the READ_DBL and WRIT_DBL instructions to manage recipes or machine<br />
setup information. This essentially becomes another method of achieving retentive data for<br />
values that do not change often, although you would want to limit the number of writes to<br />
prevent wearing out the flash prematurely. This effectively allows you to increase the amount<br />
of retentive memory beyond that supported for the normal power-down retentive data, at<br />
least for values that do not change often. You could save recipe information or machinesetup<br />
information from work memory to load memory using the WRIT_DBL instruction, and<br />
you could retrieve such information from load memory into work memory using the<br />
READ_DBL instruction.<br />
RET_VAL<br />
(W#16#...)<br />
Description<br />
0000 No error<br />
0081 Warning: that the source area is smaller than the destination area. The source data is copied<br />
completely with the extra bytes in the destination area unchanged.<br />
7000 Call with REQ = 0: BUSY = 0<br />
7001 First call with REQ = 1 (working): BUSY = 1<br />
7002 Nth call (working): BUSY = 1<br />
8051 Data block type error<br />
8081 The source area is larger than the destination area. The destination area is completely filled and the<br />
remaining bytes of the source are ignored.<br />
8251 Source data block type error<br />
82B1 Missing source data block<br />
82C0 The source DB is being edited by another statement or a communication function.<br />
8551 Destination data block type error<br />
85B1 Missing destination data block<br />
85C0 The destination DB is being edited by another statement or a communication function.<br />
80C3 More than 50 READ_DBL or 50 WRIT_DBL statements are currently queued for execution.<br />
<strong>S7</strong>-<strong>1200</strong> <strong>Programmable</strong> <strong>controller</strong><br />
334 System Manual, 04/2012, A5E02486680-06
Extended instructions<br />
8.9 Common error codes for the "Extended" instructions<br />
8.9 Common error codes for the "Extended" instructions<br />
Table 8- 144 Common condition codes for the extended instructions<br />
Condition code (W#16#....) 1 Description<br />
8022 Area too small for input<br />
8023 Area too small for output<br />
8024 Illegal input area<br />
8025 Illegal output area<br />
8028 Illegal input bit assignment<br />
8029 Illegal output bit assignment<br />
8030 Output area is a read-only DB.<br />
803A DB does not exist.<br />
1 If one of these errors occurs when a code block is executed the the CPU goes to STOP mode, unless you use the<br />
GetError or GetErrorID instructions within that code block and create a programmed reaction to the error.<br />
<strong>S7</strong>-<strong>1200</strong> <strong>Programmable</strong> <strong>controller</strong><br />
System Manual, 04/2012, A5E02486680-06 335
Extended instructions<br />
8.9 Common error codes for the "Extended" instructions<br />
<strong>S7</strong>-<strong>1200</strong> <strong>Programmable</strong> <strong>controller</strong><br />
336 System Manual, 04/2012, A5E02486680-06
Technology instructions 9<br />
9.1 High-speed counter<br />
Table 9- 1 CTRL_HSC instruction<br />
LAD / FBD SCL Description<br />
"CTRL_HSC_0_DB" (<br />
hsc:=_hw_hsc_in_,<br />
dir:=_bool_in_,<br />
cv:=_bool_in_,<br />
rv:=_bool_in_,<br />
period:=_bool_in_,<br />
new_dir:=_int_in_,<br />
new_cv:=_int_in_,<br />
new_rv:=_dint_in_,<br />
new_period:=_int_in_,<br />
busy:=_bool_out_,<br />
status:=_word_out_);<br />
1 STEP 7 automatically creates the DB when you insert the instruction.<br />
2 In the SCL example, "CTRL_HSC_0_DB" is the name of the instance DB.<br />
Table 9- 2 Data types for the parameters<br />
Each CTRL_HSC instruction uses a structure stored in<br />
a DB to maintain data. You assign the DB when the<br />
CTRL_HSC instruction is placed in the editor.<br />
Parameter and type Data type Description<br />
HSC IN HW_HSC HSC identifier<br />
DIR1, 2 IN Bool 1 = Request new direction<br />
CV1 IN Bool 1 = Request to set new counter value<br />
RV1 IN Bool 1= Request to set new reference value<br />
PERIOD1 IN Bool 1 = Request to set new period value<br />
(only for frequency measurement mode)<br />
NEW_DIR IN Int New direction: 1= forward, -1= backward<br />
NEW_CV IN DInt New counter value<br />
NEW_RV IN DInt New reference value<br />
NEW_PERIOD IN Int New period value in seconds: 0.01, 0.1, or 1<br />
(only for frequency measurement mode)<br />
BUSY3 OUT Bool Function is busy<br />
STATUS OUT Word Execution condition code<br />
1 If an update of a parameter value is not requested, then the corresponding input values are ignored.<br />
2 The DIR parameter is only valid if the configured counting direction is set to "User program (internal direction control)".<br />
You determine how to use this parameter in the HSC device configuration.<br />
3 For an HSC on the CPU or on the SB, the BUSY parameter always has a value of 0.<br />
<strong>S7</strong>-<strong>1200</strong> <strong>Programmable</strong> <strong>controller</strong><br />
System Manual, 04/2012, A5E02486680-06 337
Technology instructions<br />
9.1 High-speed counter<br />
You configure the parameters for each HSC in the device configuration for the CPU:<br />
counting mode, I/O connections, interrupt assignment, and operation as a high-speed<br />
counter or as a device to measure pulse frequency.<br />
Some of the parameters for the HSC can be modified by your user program to provide<br />
program control of the counting process:<br />
● Set the counting direction to a NEW_DIR value<br />
● Set the current count value to a NEW_CV value<br />
● Set the reference value to a NEW_RV value<br />
● Set the period value (for frequency measurement mode) to a NEW_PERIOD value<br />
If the following Boolean flag values are set to 1 when the CTRL_HSC instruction is executed,<br />
the corresponding NEW_xxx value is loaded to the counter. Multiple requests (more than<br />
one flag is set at the same time) are processed in a single execution of the CTRL_HSC<br />
instruction.<br />
● DIR = 1 is a request to load a NEW_DIR value, 0 = no change<br />
● CV = 1 is a request to load a NEW_CV value, 0 = no change<br />
● RV = 1 is a request to load a NEW_RV value, 0 = no change<br />
● PERIOD = 1 is a request to load a NEW_PERIOD value, 0 = no change<br />
The CTRL_HSC instruction is typically placed in a hardware interrupt OB that is executed<br />
when the counter hardware interrupt event is triggered. For example, if a CV=RV event<br />
triggers the counter interrupt, then a hardware interrupt OB code block executes the<br />
CTRL_HSC instruction and can change the reference value by loading a NEW_RV value.<br />
The current count value is not available in the CTRL_HSC parameters. The process image<br />
address that stores the current count value is assigned during the hardware configuration of<br />
the high-speed counter. You may use program logic to directly read the count value. The<br />
value returned to your program will be a correct count for the instant in which the counter<br />
was read. The counter will continue to count high-speed events. Therefore, the actual count<br />
value could change before your program completes a process using an old count value.<br />
Condition codes: In the case of an error, ENO is set to 0, and the STATUS output contains a<br />
condition code.<br />
Table 9- 3 STATUS values (W#16#)<br />
STATUS Description<br />
0 No error<br />
80A1 HSC identifier does not address a HSC<br />
80B1 Illegal value in NEW_DIR<br />
80B2 Illegal value in NEW_CV<br />
80B3 Illegal value in NEW_RV<br />
80B4 Illegal value in NEW_PERIOD<br />
80C0 Multiple access to the high-speed counter<br />
80D0 High-speed counter (HSC) not enabled in CPU hardware configuration<br />
<strong>S7</strong>-<strong>1200</strong> <strong>Programmable</strong> <strong>controller</strong><br />
338 System Manual, 04/2012, A5E02486680-06
9.1.1 Operation of the high-speed counter<br />
Technology instructions<br />
9.1 High-speed counter<br />
The high-speed counter (HSC) counts events that occur faster than the OB execution rate. If<br />
the events to be counted occur within the execution rate of the OB, you can use CTU, CTD,<br />
or CTUD counter instructions. If the events occur faster than the OB execution rate, then use<br />
the HSC. The CTRL_HSC instruction allows your user program to programmatically change<br />
some of the HSC parameters.<br />
For example: You can use the HSC as an input for an incremental shaft encoder. The shaft<br />
encoder provides a specified number of counts per revolution and a reset pulse that occurs<br />
once per revolution. The clock(s) and the reset pulse from the shaft encoder provide the<br />
inputs to the HSC.<br />
The HSC is loaded with the first of several presets, and the outputs are activated for the time<br />
period where the current count is less than the current preset. The HSC provides an interrupt<br />
when the current count is equal to preset, when reset occurs, and also when there is a<br />
direction change.<br />
As each current-count-value-equals-preset-value interrupt event occurs, a new preset is<br />
loaded and the next state for the outputs is set. When the reset interrupt event occurs, the<br />
first preset and the first output states are set, and the cycle is repeated.<br />
Since the interrupts occur at a much lower rate than the counting rate of the HSC, precise<br />
control of high-speed operations can be implemented with relatively minor impact to the scan<br />
cycle of the CPU. The method of interrupt attachment allows each load of a new preset to be<br />
performed in a separate interrupt routine for easy state control. (Alternatively, all interrupt<br />
events can be processed in a single interrupt routine.)<br />
Table 9- 4 Maximum frequency (KHz)<br />
HSC Single phase Two phase and AB quadrature<br />
HSC1 CPU 100 KHz 80 KHz<br />
High-speed SB 200 KHz 160 KHz<br />
SB 30 KHz 20 KHz<br />
HSC2 CPU 100 KHz 80 KHz<br />
High-speed SB 200 KHz 160 KHz<br />
SB 30 KHz 20 KHz<br />
HSC3 CPU 100 KHz 80 KHz<br />
HSC4 CPU 30 KHz 20 KHz<br />
HSC5 CPU 30 KHz 20 KHz<br />
High-speed SB 200 KHz 160 KHz<br />
SB 30 KHz 20 KHz<br />
HSC6 CPU 30 KHz 20 KHz<br />
High-speed SB 200 KHz 160 KHz<br />
SB 30 KHz 20 KHz<br />
<strong>S7</strong>-<strong>1200</strong> <strong>Programmable</strong> <strong>controller</strong><br />
System Manual, 04/2012, A5E02486680-06 339
Technology instructions<br />
9.1 High-speed counter<br />
Selecting the functionality for the HSC<br />
Table 9- 5 Counting modes for HSC<br />
All HSCs function the same way for the same counter mode of operation. There are four<br />
basic types of HSC:<br />
● Single-phase counter with internal direction control<br />
● Single-phase counter with external direction control<br />
● Two-phase counter with 2 clock inputs<br />
● A/B phase quadrature counter<br />
You can use each HSC type with or without a reset input. When you activate the reset input<br />
(with some restrictions, see the following table), the current value is cleared and held clear<br />
until you deactivate the reset input.<br />
● Frequency function: Some HSC modes allow the HSC to be configured (Type of<br />
counting) to report the frequency instead of a current count of pulses. Three different<br />
frequency measuring periods are available: 0.01, 0.1, or 1.0 seconds.<br />
The frequency measuring period determines how often the HSC calculates and reports a<br />
new frequency value. The reported frequency is an average value determined by the total<br />
number of counts in the last measuring period. If the frequency is rapidly changing, the<br />
reported value will be an intermediate between the highest and lowest frequency<br />
occurring during the measuring period. The frequency is always reported in Hertz (pulses<br />
per second) regardless of the frequency-measuring-period setting.<br />
● Counter modes and inputs: The following table shows the inputs used for the clock,<br />
direction control, and reset functions associated with the HSC.<br />
The same input cannot be used for two different functions, but any input not being used<br />
by the present mode of its HSC can be used for another purpose. For example, if HSC1<br />
is in a mode that uses built-in inputs but does not use the external reset (I0.3), then I0.3<br />
can be used for edge interrupts or for HSC2.<br />
Type Input 1 Input 2 Input 3 Function<br />
Single-phase counter with internal Clock (Optional: - Count or frequency<br />
direction control<br />
direction) Reset Count<br />
Single-phase counter with external Clock Direction - Count or frequency<br />
direction control<br />
Reset Count<br />
Two-phase counter with 2 clock Clock up Clock down - Count or frequency<br />
inputs<br />
Reset Count<br />
A/B-phase quadrature counter Phase A Phase B - Count or frequency<br />
Reset1 Count<br />
1 For an encoder: Phase Z, Home<br />
<strong>S7</strong>-<strong>1200</strong> <strong>Programmable</strong> <strong>controller</strong><br />
340 System Manual, 04/2012, A5E02486680-06
Input addresses for the HSC<br />
Technology instructions<br />
9.1 High-speed counter<br />
Note<br />
The digital I/O points used by high-speed counter devices are assigned during device<br />
configuration. When digital I/O point addresses are assigned to these devices, the values of<br />
the assigned I/O point addresses cannot be modified by the force function in a watch table.<br />
When you configure the CPU, you have the option to enable and configure each HSC. The<br />
CPU automatically assigns the input addresses for each HSC according to its configuration.<br />
(Some of the HSCs allow you to select whether to use either the on-board inputs of the CPU<br />
or the inputs of an SB.)<br />
NOTICE<br />
As shown in the following tables, the default assignments for the optional signals for the<br />
different HSCs overlap. For example, the optional external reset for HSC 1 uses the same<br />
input as one of the inputs for HSC 2.<br />
Always ensure that you have configured your HSCs so that any one input is not being used<br />
by two HSCs.<br />
The following table shows the HSC input assignments for both the on-board I/O of the CPU<br />
1211C and an SB. (If the SB has only 2 inputs, only 4.0 and 4.1 inputs are available.)<br />
● For single-phase: C is the Clock input, [d] is the optional direction input, and [R] is an<br />
optional external reset input. (Reset is available only for "Counting" mode.)<br />
● For two-phase: CU is the Clock Up input, CD is the Clock Down input, and [R] is an<br />
optional external reset input. (Reset is available only for "Counting" mode.)<br />
● For AB-phase quadrature: A is the Clock A input, B is the Clock B input, and [R] is an<br />
optional external reset input. (Reset is available only for "Counting" mode.)<br />
Table 9- 6 HSC input assignments for CPU 1211C<br />
HSC<br />
HSC 1 1<br />
HSC 2 1<br />
HSC 3<br />
HSC 5 2<br />
CPU on-board input (0.x) SB input (default 4.x) 3<br />
0 1 2 3 4 5 0 1 2 3<br />
1-phase C [d] [R] C [d] [R]<br />
2-phase CU CD [R] CU CD [R]<br />
AB-phase A B [R] A B [R]<br />
1-phase [R] C [d] [R] C [d]<br />
2-phase [R] CU CD [R] CU CD<br />
AB-phase [R] A B [R] A B<br />
1-phase C [d]<br />
2-phase CU CD<br />
AB-phase A B<br />
1-phase C [d] [R]<br />
2-phase CU CD [R]<br />
AB-phase A B [R]<br />
<strong>S7</strong>-<strong>1200</strong> <strong>Programmable</strong> <strong>controller</strong><br />
System Manual, 04/2012, A5E02486680-06 341
Technology instructions<br />
9.1 High-speed counter<br />
HSC<br />
HSC 6 2<br />
CPU on-board input (0.x) SB input (default 4.x) 3<br />
0 1 2 3 4 5 0 1 2 3<br />
1-phase [R] C [d]<br />
2-phase [R] CU CD<br />
AB-phase [R] A B<br />
1 HSC 1 and HSC 2 can be configured for either the on-board inputs or for an SB.<br />
2 HSC 5 and HSC 6 are available only with an SB. HSC 6 is available only with a 4-input SB.<br />
3 An SB with only 2 digital inputs provides only the 4.0 and 4.1 inputs.<br />
The following table shows the HSC input assignments for both the on-board I/O of the CPU<br />
1212C and an SB. (If the SB has only 2 inputs, only 4.0 and 4.1 inputs are available.)<br />
● For single-phase: C is the Clock input, [d] is the optional direction input, and [R] is an<br />
optional external reset input. (Reset is available only for "Counting" mode.)<br />
● For two-phase: CU is the Clock Up input, CD is the Clock Down input, and [R] is an<br />
optional external reset input. (Reset is available only for "Counting" mode.)<br />
● For AB-phase quadrature: A is the Clock A input, B is the Clock B input, and [R] is an<br />
optional external reset input. (Reset is available only for "Counting" mode.)<br />
Table 9- 7 HSC input assignments for CPU 1212C<br />
HSC<br />
HSC 1 1<br />
HSC 2 1<br />
HSC 3<br />
HSC 4<br />
HSC 5 2<br />
HSC 6 2<br />
CPU on-board input (0.x) SB input (4.x) 3<br />
0 1 2 3 4 5 6 7 0 1 2 3<br />
1-phase C [d] [R] C [d] [R]<br />
2-phase CU CD [R] CU CD [R]<br />
AB-phase A B [R] A B [R]<br />
1-phase [R] C [d] [R] C [d]<br />
2-phase [R] CU CD [R] CU CD<br />
AB-phase [R] A B [R] A B<br />
1-phase C [d] [R]<br />
2-phase CU CD [R]<br />
AB-phase A B [R]<br />
1-phase [R] C [d]<br />
2-phase [R] CU CD<br />
AB-phase [R] A B<br />
1-phase C [d] [R]<br />
2-phase CU CD [R]<br />
AB-phase A B [R]<br />
1-phase [R] C [d]<br />
2-phase [R] CU CD<br />
AB-phase [R] A B<br />
1 HSC 1 and HSC 2 can be configured for either the on-board inputs or for an SB.<br />
2 HSC 5 and HSC 6 are available only with an SB. HSC 6 is available only with a 4-input SB.<br />
3 An SB with only 2 digital inputs provides only the 4.0 and 4.1 inputs.<br />
<strong>S7</strong>-<strong>1200</strong> <strong>Programmable</strong> <strong>controller</strong><br />
342 System Manual, 04/2012, A5E02486680-06
Technology instructions<br />
9.1 High-speed counter<br />
The following two tables show the HSC input assignments for the on-board I/O of the CPU<br />
1214C and for an optional SB, if installed.<br />
● For single-phase: C is the Clock input, [d] is the optional direction input, and [R] is an<br />
optional external reset input. (Reset is available only for "Counting" mode.)<br />
● For two-phase: CU is the Clock Up input, CD is the Clock Down input, and [R] is an<br />
optional external reset input. (Reset is available only for "Counting" mode.)<br />
● For AB-phase quadrature: A is the Clock A input, B is the Clock B input, and [R] is an<br />
optional external reset input. (Reset is available only for "Counting" mode.)<br />
Table 9- 8 HSC input assignments for CPU 1214C and CPU 1215C (on-board inputs only)<br />
HSC<br />
HSC 1 1<br />
HSC 2 1<br />
HSC 3<br />
HSC 4<br />
HSC 5 1<br />
HSC 6 1<br />
Digital input 0 (default: 0.x) Digital input 1 (default: 1.x)<br />
0 1 2 3 4 5 6 7 0 1 2 3 4 5<br />
1-phase C [d] [R]<br />
2-phase CU CD [R]<br />
AB-phase A B [R]<br />
1-phase [R] C [d]<br />
2-phase [R] CU CD<br />
AB-phase [R] A B<br />
1-phase C [d] [R]<br />
2-phase CU CD [R]<br />
AB-phase A B [R]<br />
1-phase [R] C [d]<br />
2-phase [R] CU CD<br />
AB-phase [R] A B<br />
1-phase C [d] [R]<br />
2-phase CU CD [R]<br />
AB-phase A B [R]<br />
1-phase C [d] [R]<br />
2-phase CU CD [R]<br />
AB-phase A B [R]<br />
1 HSC 1, HSC 2, HSC 5 and HSC 6 can be configured for either the on-board inputs or for an SB.<br />
Table 9- 9 HSC input assignments for SBs<br />
HSC 1<br />
HSC 1<br />
HSC 2<br />
SB inputs (default: 4.x) 2<br />
0 1 2 3<br />
1-phase C [d] [R]<br />
2-phase CU CD [R]<br />
AB-phase A B [R]<br />
1-phase [R] C [d]<br />
2-phase [R] CU CD<br />
AB-phase [R] A B<br />
<strong>S7</strong>-<strong>1200</strong> <strong>Programmable</strong> <strong>controller</strong><br />
System Manual, 04/2012, A5E02486680-06 343
Technology instructions<br />
9.1 High-speed counter<br />
HSC 1<br />
HSC 5<br />
HSC 6<br />
SB inputs (default: 4.x) 2<br />
0 1 2 3<br />
1-phase C [d] [R]<br />
2-phase CU CD [R]<br />
AB-phase A B [R]<br />
1-phase [R] C [d]<br />
2-phase [R] CU CD<br />
AB-phase [R] A B<br />
1 For CPU 1214C: HSC 1, HSC 2, HSC 5 and HSC 6 can be configured for either the on-board<br />
inputs or for an SB.<br />
2 An SB with only 2 digital inputs provides only the 4.0 and 4.1 inputs.<br />
Accessing the current value for the HSC<br />
Note<br />
When you enable a pulse generator for use as a PTO, a corresponding HSC is assigned to<br />
this PTO. HSC1 is assigned for PTO1, and HSC2 is assigned for PTO2. The assigned HSC<br />
belongs completely to the PTO channel, and the ordinary output of the HSC is disabled. The<br />
HSC value is only used for the internal functionality. You cannot monitor the current value<br />
(for example, in ID1000) when pulses are occurring.<br />
The CPU stores the current value of each HSC in an input (I) address. The following table<br />
shows the default addresses assigned to the current value for each HSC. You can change<br />
the I address for the current value by modifying the properties of the CPU in the Device<br />
Configuration.<br />
Table 9- 10 Current value of the HSC<br />
HSC Data type Default address<br />
HSC1 DInt ID1000<br />
HSC2 DInt ID1004<br />
HSC3 DInt ID1008<br />
HSC4 DInt ID1012<br />
HSC5 DInt ID1016<br />
HSC6 DInt ID1020<br />
<strong>S7</strong>-<strong>1200</strong> <strong>Programmable</strong> <strong>controller</strong><br />
344 System Manual, 04/2012, A5E02486680-06
9.1.2 Configuration of the HSC<br />
Technology instructions<br />
9.1 High-speed counter<br />
The CPU allows you to configure up to 6 high-speed<br />
counters. You edit the "Properties" of the CPU to<br />
configure the parameters of each individual HSC.<br />
Use the CTRL_HSC instruction in your user program to<br />
control the operation of the HSC.<br />
Enable the specific HSC by selecting the "Enable" option<br />
for that HSC.<br />
Note<br />
When you enable the high speed counter and select input points for it, the input filter settings<br />
for these points are configured to 800 ns. Each input point has a single filter configuration<br />
that applies to all uses: process inputs, interrupts, pulse catch, and HSC inputs.<br />
WARNING<br />
If the filter time for a digital input channel is changed from a previous setting, a new "0"<br />
level input value may need to be presented for up to 20.0 ms accumulated duration before<br />
the filter becomes fully responsive to new inputs. During this time, short "0" pulse events of<br />
duration less than 20.0 ms may not be detected or counted.<br />
This changing of filter times can result in unexpected machine or process operation, which<br />
may cause death or serious injury to personnel, and/or damage to equipment.<br />
To ensure that a new filter time goes immediately into effect, a power cycle of the CPU<br />
must be applied.<br />
<strong>S7</strong>-<strong>1200</strong> <strong>Programmable</strong> <strong>controller</strong><br />
System Manual, 04/2012, A5E02486680-06 345
Technology instructions<br />
9.2 PID control<br />
9.2 PID control<br />
After enabling the HSC, configure the other parameters, such as counter function, initial<br />
values, reset options and interrupt events.<br />
For information about configuring the HSC, refer to the section on configuring the CPU<br />
(Page 123).<br />
STEP 7 provides the following PID instructions for the <strong>S7</strong>-<strong>1200</strong> CPU:<br />
● The PID_Compact instruction is used to control technical processes with continuous<br />
input- and output variables.<br />
● The PID_3Step instruction is used to control motor-actuated devices, such as valves that<br />
require discrete signals for open- and close actuation.<br />
Note<br />
Changes that you make to the PID configuration and download in RUN mode do not take<br />
effect until the CPU transitions from STOP to RUN mode.<br />
Both PID instructions (PID_3Step and PID_Compact) can calculate the P-, I-, and Dcomponents<br />
during startup (if configured for "pretuning"). You can also configure the<br />
instruction for "fine tuning" to allow you to optimize the parameters. You do not need to<br />
manually determine the parameters.<br />
Note<br />
Execute the PID instruction at constant intervals of the sampling time (preferably in a cyclic<br />
OB).<br />
Because the PID loop needs a certain time to respond to changes of the control value, do<br />
not calculate the output value in every cycle. Do not execute the PID instruction in the main<br />
program cycle OB (such as OB 1).<br />
The sampling time of the PID algorithm represents the time between two calculations of the<br />
output value (control value). The output value is calculated during self-tuning and rounded to<br />
a multiple of the cycle time. All other functions of PID instruction are executed at every call.<br />
<strong>S7</strong>-<strong>1200</strong> <strong>Programmable</strong> <strong>controller</strong><br />
346 System Manual, 04/2012, A5E02486680-06
PID algorithm<br />
Technology instructions<br />
9.2 PID control<br />
The PID (Proportional/Integral/Derivative) <strong>controller</strong> measures the time interval between two<br />
calls and then evaluates the results for monitoring the sampling time. A mean value of the<br />
sampling time is generated at each mode changeover and during initial startup. This value is<br />
used as reference for the monitoring function and is used for calculation. Monitoring includes<br />
the current measuring time between two calls and the mean value of the defined <strong>controller</strong><br />
sampling time.<br />
The output value for the PID <strong>controller</strong> consists of three components:<br />
● P (proportional): When calculated with the "P" component, the output value is proportional<br />
to the difference between the setpoint and the process value (input value).<br />
● I (integral): When calculated with the "I" component, the output value increases in<br />
proportion to the duration of the difference between the setpoint and the process value<br />
(input value) to finally correct the difference.<br />
● D (derivative): When calculated with the "D" component, the output value increases as a<br />
function of the increasing rate of change of the difference between the setpoint and the<br />
process value (input value). The output value is corrected to the setpoint as quickly as<br />
possible.<br />
The PID <strong>controller</strong> uses the following formula to calculate the output value for the<br />
PID_Compact instruction.<br />
1<br />
T · s D<br />
y = K (w - x) + (c · w - x)<br />
p [(b · w - x) +<br />
T · s<br />
a · T · s + 1<br />
I D<br />
y Output value x Process value<br />
w Setpoint value s Laplace operator<br />
Kp Proportional gain<br />
a Derivative delay coefficient<br />
(P component)<br />
(D component)<br />
T1 Integral action time<br />
b Proportional action weighting<br />
(I component)<br />
(P component)<br />
TD Derivative action time<br />
c Derivative action weighting<br />
(D component)<br />
(D component)<br />
The PID <strong>controller</strong> uses the following formula to calculate the output value for the PID_3Step<br />
instruction.<br />
1<br />
T · s D<br />
Δ y = K · s · (w - x) + (c · w - x)<br />
p [(b · w - x) +<br />
T · s<br />
a · T · s + 1<br />
I D<br />
y Output value x Process value<br />
w Setpoint value s Laplace operator<br />
Kp Proportional gain<br />
a Derivative delay coefficient<br />
(P component)<br />
(D component)<br />
T1 Integral action time<br />
b Proportional action weighting<br />
(I component)<br />
(P component)<br />
TD Derivative action time<br />
c Derivative action weighting<br />
(D component)<br />
(D component)<br />
<strong>S7</strong>-<strong>1200</strong> <strong>Programmable</strong> <strong>controller</strong><br />
System Manual, 04/2012, A5E02486680-06 347<br />
]<br />
]
Technology instructions<br />
9.2 PID control<br />
9.2.1 Inserting the PID instruction and technological object<br />
STEP 7 provides two instructions for PID control:<br />
● The PID_Compact instruction and its associated technological object provide a universal<br />
PID <strong>controller</strong> with tuning. The technological object contains all of the settings for the<br />
control loop.<br />
● The PID_3Step instruction and its associated technological object provide a PID<br />
<strong>controller</strong> with specific settings for motor-activated valves. The technological object<br />
contains all of the settings for the control loop. The PID_3Step <strong>controller</strong> provides two<br />
additional Boolean outputs.<br />
After creating the technological object, you must configure the parameters (Page 363). You<br />
also adjust the autotuning parameters ("pretuning" during startup or manual "fine tuning") to<br />
commission the operation of the PID <strong>controller</strong> (Page 365).<br />
Table 9- 11 Inserting the PID instruction and the technological object<br />
When you insert a PID instruction into your user program,<br />
STEP 7 automatically creates a technology object and an<br />
instance DB for the instruction. The instance DB contains<br />
all of the parameters that are used by the PID instruction.<br />
Each PID instruction must have its own unique instance<br />
DB to operate properly.<br />
After inserting the PID instruction and creating the<br />
technological object and instance DB, you configure the<br />
parameters for the technological object (Page 363).<br />
<strong>S7</strong>-<strong>1200</strong> <strong>Programmable</strong> <strong>controller</strong><br />
348 System Manual, 04/2012, A5E02486680-06
Table 9- 12 (Optional) Creating a technological object from the project navigator<br />
You can also create technological objects for your<br />
project before inserting the PID instruction. By<br />
creating the technological object before inserting a<br />
PID instruction into your user program, you can<br />
then select the technological object when you insert<br />
the PID instruction.<br />
To create a technological object, double-click the<br />
"Add new object" icon in the project navigator.<br />
Click the "Control" icon and select the technological<br />
object for the type of PID <strong>controller</strong> (PID_Compact<br />
or PID_3Step). You can create an optional name<br />
for the technological object.<br />
Click "OK" to create the technological object.<br />
Technology instructions<br />
9.2 PID control<br />
<strong>S7</strong>-<strong>1200</strong> <strong>Programmable</strong> <strong>controller</strong><br />
System Manual, 04/2012, A5E02486680-06 349
Technology instructions<br />
9.2 PID control<br />
9.2.2 PID_Compact instruction<br />
The PID <strong>controller</strong> uses the following formula to calculate the output value for the<br />
PID_Compact instruction.<br />
1<br />
T · s D<br />
y = K (w - x) + (c · w - x)<br />
p [(b · w - x) +<br />
T · s<br />
a · T · s + 1<br />
I D<br />
y Output value x Process value<br />
w Setpoint value s Laplace operator<br />
Kp Proportional gain<br />
(P component)<br />
T1 Integral action time<br />
(I component)<br />
TD Derivative action time<br />
(D component)<br />
Table 9- 13 PID_Compact instruction<br />
<strong>S7</strong>-<strong>1200</strong> <strong>Programmable</strong> <strong>controller</strong><br />
350 System Manual, 04/2012, A5E02486680-06<br />
]<br />
a Derivative delay coefficient<br />
(D component)<br />
b Proportional action weighting<br />
(P component)<br />
c Derivative action weighting<br />
(D component)<br />
LAD / FBD SCL Description<br />
"PID_Compact_1"(<br />
Setpoint:=_real_in_,<br />
Input:=_real_in_,<br />
Input_PER:=_word_in_,<br />
ManualEnable:=_bool_in_,<br />
ManualValue:=_real_in_,<br />
Reset:=_bool_in_,<br />
ScaledInput=>_real_out_,<br />
Output=>_real_out_,<br />
Output_PER=>_word_out_,<br />
Output_PWM=>_bool_out_,<br />
SetpointLimit_H=>_bool_out_,<br />
SetpointLimit_L=>_bool_out_,<br />
InputWarning_H=>_bool_out_,<br />
InputWarning_L=>_bool_out_,<br />
State=>_int_out_,<br />
Error=>_dword_out_);<br />
PID_Compact provides a PID <strong>controller</strong> with<br />
self-tuning for automatic and manual mode.<br />
PID_Compact is a PIDT1 <strong>controller</strong> with<br />
anti-windup and weighting of the P- and D-<br />
component.<br />
1 STEP 7 automatically creates the technological object and instance DB when you insert the instruction. The instance<br />
DB contains the parameters of the technological object.<br />
2 In the SCL example, "PID_Compact_1" is the name of the instance DB.
Table 9- 14 Data types for the parameters<br />
Technology instructions<br />
9.2 PID control<br />
Parameter and type Data type Description<br />
Setpoint IN Real Setpoint of the PID <strong>controller</strong> in automatic mode. Default value: 0.0<br />
Input IN Real Process value. Default value: 0.0<br />
You must also set sPid_Cmpt.b_Input_PER_On = FALSE.<br />
Input_PER IN Word Analog process value (optional). Default value: W#16#0<br />
You must also set sPid_Cmpt.b_Input_PER_On = TRUE.<br />
ManualEnable IN Bool Enables or disables the manual operation mode. Default value: FALSE:<br />
PID_Compact V1.0 and V1.2: When the CPU transitions to RUN, if<br />
the ManualEnable = TRUE, PID_Compact starts in manual mode. It<br />
is not necessary for a FALSE to TRUE transition to place the<br />
PID_Compact into manual mode.<br />
PID_Compact V1.1: When the CPU transitions to RUN and the<br />
ManualEnable = TRUE, the PID Compact starts in the last state. A<br />
transition from TRUE to FALSE to TRUE is required to place the<br />
PID_Compact in manual mode.<br />
ManualValue IN Real Process value for manual operation. Default value: 0.0<br />
Reset IN Bool The Reset parameter restarts the <strong>controller</strong>. Default value: FALSE<br />
See the "Response to Reset" section below for PID_Compact V1.1 and<br />
V1.0 Reset response diagrams.<br />
ScaledInput OUT Real Scaled process value. Default value: 0.0<br />
Output1 OUT Real Output value. Default value: 0.0<br />
Output_PER1 OUT Word Analog output value. Default value: W#16#0<br />
Output_PWM1 OUT Bool Output value for pulse width modulation. Default value: FALSE<br />
SetpointLimit_H OUT Bool Setpoint high limit. Default value: FALSE<br />
If SetpointLimit_H = TRUE, the absolute upper limit of the setpoint is<br />
reached. Default value: FALSE<br />
SetpointLimit_L OUT Bool Setpoint low limit. Default value: FALSE<br />
If SetpointLimit_L = TRUE, the absolute lower limit of the setpoint is<br />
reached. Default value: FALSE<br />
InputWarning_H OUT Bool If InputWarning_H = TRUE, the process value reached or exceeded the<br />
upper warning limit. Default value: FALSE<br />
InputWarning_L OUT Bool If InputWarning_L = TRUE, the process value reached the lower<br />
warning limit. Default value: FALSE<br />
State OUT Int Current operating mode of the PID <strong>controller</strong>. Default value: 0<br />
Use sRet.i_Mode to change the mode.<br />
State = 0: Inactive<br />
State = 1: Pretuning<br />
State = 2: Manual fine tuning<br />
State = 3: Automatic mode<br />
State = 4: Manual mode<br />
ErrorBits OUT DWord The PID_Compact instruction ErrorBits parameters table (Page 354)<br />
defines the error messages. Default value: DW#16#0000 (no error)<br />
1 The outputs of the Output, Output_PER, and Output_PWM parameters can be used in parallel.<br />
<strong>S7</strong>-<strong>1200</strong> <strong>Programmable</strong> <strong>controller</strong><br />
System Manual, 04/2012, A5E02486680-06 351
Technology instructions<br />
9.2 PID control<br />
Response to Reset<br />
The response to Reset = TRUE depends on the version of the PID_Compact instruction.<br />
Reset response PID_Compact V1.1<br />
A rising edge at Reset resets the errors and warnings and clears the integral action. A falling<br />
edge at Reset triggers a change to the most recently active operating mode.<br />
<br />
<br />
<br />
<br />
<br />
<br />
<br />
<br />
<br />
① Activation<br />
② Error<br />
③ Reset<br />
<br />
Reset response PID_Compact V1.0<br />
<strong>S7</strong>-<strong>1200</strong> <strong>Programmable</strong> <strong>controller</strong><br />
352 System Manual, 04/2012, A5E02486680-06<br />
<br />
<br />
<br />
A rising edge at Reset resets the errors and warnings and clears the integral action. The<br />
<strong>controller</strong> is not reactivated until the next edge at i_Mode.
① Activation<br />
② Error<br />
③ Reset<br />
Operation of the PID_Compact <strong>controller</strong><br />
<br />
<br />
<br />
<br />
<br />
<br />
<br />
<br />
<br />
<br />
<br />
<br />
<br />
<br />
<br />
<br />
Figure 9-1 Operation of the PID_Compact <strong>controller</strong><br />
<br />
<br />
<br />
<br />
<br />
Technology instructions<br />
9.2 PID control<br />
<strong>S7</strong>-<strong>1200</strong> <strong>Programmable</strong> <strong>controller</strong><br />
System Manual, 04/2012, A5E02486680-06 353
Technology instructions<br />
9.2 PID control<br />
<br />
<br />
<br />
<br />
<br />
<br />
<br />
<br />
<br />
Figure 9-2 Operation of the PID_Compact <strong>controller</strong> as a PIDT1 <strong>controller</strong> with anti-windup<br />
9.2.3 PID_Compact instruction ErrorBit parameters<br />
<strong>S7</strong>-<strong>1200</strong> <strong>Programmable</strong> <strong>controller</strong><br />
354 System Manual, 04/2012, A5E02486680-06<br />
<br />
<br />
If several errors are pending, the values of the error codes are displayed by means of binary<br />
addition. The display of error code 0003, for example, indicates that the errors 0001 and<br />
0002 are also pending.<br />
Table 9- 15 PID_Compact instruction ErrorBit parameters<br />
ErrorBit (DW#16#...) Description<br />
0000 No error<br />
0001 The "Input" parameter is outside the process value limits.<br />
Input > sPid_Cmpt.r_Pv_Hlmor<br />
Input < sPid_Cmpt.r_Pv_Llm<br />
You cannot start the actuator again until you eliminate the error.<br />
0002 Invalid value at parameter "Input_PER". Check whether an error is pending<br />
at the analog input.<br />
0004 Error during fine tuning Oscillation of the process value could not be<br />
maintained.<br />
0008 Error while starting pre-tuning. The process value is too close to the<br />
setpoint. Start fine tuning.<br />
0010 The setpoint was changed during <strong>controller</strong> tuning.<br />
0020 Pre-tuning may not be carried out in automatic mode or during fine tuning.<br />
0040 Error in fine tuning The setpoint is too close to the setpoint limits.
Technology instructions<br />
9.2 PID control<br />
ErrorBit (DW#16#...) Description<br />
0080 Incorrect configuration of output value limits.<br />
Check to see if the limits of the output value are configured correctly and<br />
match the direction in which the control is operating.<br />
0100 Error during <strong>controller</strong> tuning has resulted in invalid parameters.<br />
0200 Invalid value at parameter "Input": Numerical format of value is invalid.<br />
0400 Calculating the output value failed. Check the PID parameters.<br />
0800 Sampling time error: PID_Compact is not called within the sampling time of<br />
the cyclic interrupt OB.<br />
1000 Invalid value at parameter "Setpoint": Numerical format of value is invalid.<br />
9.2.4 PID_3STEP instruction<br />
The PID <strong>controller</strong> uses the following formula to calculate the output value for the PID_3Step<br />
instruction.<br />
1<br />
T · s D<br />
Δ y = K · s · (w - x) + (c · w - x)<br />
p [(b · w - x) +<br />
T · s<br />
a · T · s + 1<br />
I D<br />
y Output value x Process value<br />
w Setpoint value s Laplace operator<br />
Kp Proportional gain<br />
a Derivative delay coefficient<br />
(P component)<br />
(D component)<br />
T1 Integral action time<br />
b Proportional action weighting<br />
(I component)<br />
(P component)<br />
TD Derivative action time<br />
c Derivative action weighting<br />
(D component)<br />
(D component)<br />
<strong>S7</strong>-<strong>1200</strong> <strong>Programmable</strong> <strong>controller</strong><br />
System Manual, 04/2012, A5E02486680-06 355<br />
]
Technology instructions<br />
9.2 PID control<br />
Table 9- 16 PID_3Step instruction<br />
LAD / FBD SCL Description<br />
"PID_3Step_1"(<br />
SetpoInt:=_real_in_,<br />
Input:=_real_in_,<br />
ManualValue:=_real_in_,<br />
Feedback:=_real_in_,<br />
InputPer:=_word_in_,<br />
FeedbackPer:=_word_in_,<br />
ManualEnable:=_bool_in_,<br />
ManualUP:=_bool_in_,<br />
ManualDN:=_bool_in_,<br />
ActuatorH:=_bool_in_,<br />
ActuatorL:=_bool_in_,<br />
Reset:=_bool_in_,<br />
ScaledInput=>_real_out_,<br />
ScaledFeedback=>_real_out_,<br />
ErrorBits=>_dword_out_,<br />
OutputPer=>_word_out_,<br />
State=>_int_out_,<br />
OutputUP=>_bool_out_,<br />
OutputDN=>_bool_out_,<br />
SetpoIntLimitH=>_bool_out_,<br />
SetpoIntLimitL=>_bool_out_,<br />
InputWarningH=>_bool_out_,<br />
InputWarningL=>_bool_out_,<br />
Error=>_bool_out_);<br />
PID_3Step configures a PID <strong>controller</strong> with<br />
self-tuning capabilities that has been<br />
optimized for motor-controlled valves and<br />
actuators. It provides two Boolean outputs.<br />
PID_3Step is a PIDT1<strong>controller</strong> with antiwindup<br />
and weighting of the P- and Dcomponents.<br />
1 STEP 7 automatically creates the technological object and instance DB when you insert the instruction. The instance<br />
DB contains the parameters of the technological object.<br />
2 In the SCL example, "PID_3Step_1" is the name of the instance DB.<br />
Table 9- 17 Data types for the parameters<br />
Parameter and type Data type Description<br />
Setpoint IN Real Setpoint of the PID <strong>controller</strong> in automatic mode. Default value: 0.0<br />
Input IN Real Process value. Default value: 0.0<br />
You must also set Config.InputPEROn = FALSE.<br />
Input_PER IN Word Analog process value (optional). Default value: W#16#0<br />
You must also set Config.InputPEROn = TRUE.<br />
ManualEnable IN Bool Enables or disables the manual operation mode. Default value: FALSE<br />
On the edge of the change from FALSE to TRUE, the PID <strong>controller</strong><br />
switches to manual mode, State = 4, and Retain.Mode remains<br />
unchanged.<br />
On the edge of the change from TRUE to FALSE, the PID <strong>controller</strong><br />
switches to the last active operating mode and<br />
State = Retain.Mode.<br />
<strong>S7</strong>-<strong>1200</strong> <strong>Programmable</strong> <strong>controller</strong><br />
356 System Manual, 04/2012, A5E02486680-06
Technology instructions<br />
9.2 PID control<br />
Parameter and type Data type Description<br />
ManualUP IN Bool In manual mode, every rising edge opens the valve by 5% of the total<br />
actuating range, or for the duration of the minimum motor actuation<br />
time. ManualUP is evaluated only if you are not using Output_PER and<br />
there is no position feedback. Default value: FALSE<br />
If Output_PER is FALSE, the manual input turns Output_UP on for<br />
the time that corresponds to a movement of 5% of the device.<br />
If Config.ActuatorEndStopOn is TRUE, then Output_UP does not<br />
come on if Actuator_H is TRUE.<br />
ManualDN IN Bool In manual mode, every rising edge closes the valve by 5% of the total<br />
actuating range, or for the duration of the minimum motor actuation<br />
time. ManualDN is evaluated only if you are not using Output_PER and<br />
there is no position feedback. Default value: FALSE<br />
If Output_PER is FALSE, the manual input turns Output_DN on for<br />
the time that corresponds to a movement of 5% of the device.<br />
If Config.ActuatorEndStopOn is TRUE, then Output_DN does not<br />
turn on if Actuator_L is TRUE.<br />
ManualValue IN Real Process value for manual operation. Default value: 0.0<br />
In manual mode, you specify the absolute position of the valve.<br />
ManualValue is evaluated only if you are using OutputPer, or if position<br />
feedback is available. Default value: 0.0<br />
Feedback IN Real Position feedback of the valve. Default value: 0.0<br />
To use Feedback, then set Config.FeedbackPerOn = FALSE.<br />
Feedback_PER IN Word Analog feedback of the valve position. Default value: W#16#0<br />
To use Feedback_PER, set Config.FeedbackPerOn = TRUE.<br />
Feedback_PER is scaled, using the following parameters:<br />
Config.FeedbackScaling.LowerPointIn<br />
Config.FeedbackScaling.UpperPointIn<br />
Config.FeedbackScaling.LowerPointOut<br />
Config.FeedbackScaling.UpperPointOut<br />
Actuator_H IN Bool If Actuator_H = TRUE, the valve is at the upper end stop and is no<br />
longer moved in this direction. Default value: FALSE<br />
Actuator_L IN Bool If Actuator_L = TRUE, the valve is at the lower end stop and is no<br />
longer moved in this direction. Default value: FALSE<br />
Reset IN Bool Restarts the PID <strong>controller</strong>. Default value: FALSE<br />
If FALSE to TRUE edge:<br />
"Inactive" operating mode<br />
Input value = 0<br />
Interim values of the <strong>controller</strong> are reset. (PID parameters are<br />
retained.)<br />
ScaledInput OUT Real<br />
If TRUE to FALSE edge, change to the most recent active mode.<br />
Scaled process value<br />
ScaledFeedback OUT Real Scaled valve position<br />
Output_PER OUT Word Analog output value. If Config.OutputPerOn = TRUE, the parameter<br />
Output_PER is used.<br />
<strong>S7</strong>-<strong>1200</strong> <strong>Programmable</strong> <strong>controller</strong><br />
System Manual, 04/2012, A5E02486680-06 357
Technology instructions<br />
9.2 PID control<br />
Parameter and type Data type Description<br />
Output_UP OUT Bool Digital output value for opening the valve. Default value: FALSE<br />
If Config.OutputPerOn = FALSE, the parameter Output_UP is used.<br />
Output_DN OUT Bool Digital output value for closing the valve. Default value: FALSE<br />
If Config.OutputPerOn = FALSE, the parameter Output_DN is used.<br />
SetpointLimitH OUT Bool Setpoint high limit. Default value: FALSE<br />
If SetpointLimitH = TRUE, the absolute upper limit of the setpoint is<br />
reached. In the CPU, the setpoint is limited to the configured absolute<br />
upper limit of the actual value.<br />
SetpointLimitL OUT Bool Setpoint low limit. Default value: FALSE<br />
If SetpointLimitL = TRUE, the absolute lower limit of the setpoint is<br />
reached. In the CPU the setpoint is limited to the configured absolute<br />
lower limit of the actual value.<br />
InputWarningH OUT Bool If InputWarningH = TRUE, the input value has reached or exceeded the<br />
upper warning limit. Default value: FALSE<br />
InputWarningL OUT Bool If InputWarningL = TRUE, the input value has reached or exceeded the<br />
lower warning limit. Default value: FALSE<br />
State OUT Int Current operating mode of the PID <strong>controller</strong>. Default value: 0<br />
Use Retain.Mode to change the operating mode:<br />
State = 0: Inactive<br />
State = 1: Pretuning<br />
State = 2: Manual fine tuning<br />
State = 3: Automatic mode<br />
State = 4: Manual mode<br />
State = 5: Substitute output value approach<br />
State = 6: Transition time measurement<br />
State = 7: Substitute output value approach with error monitoring<br />
State = 8: Error monitoring<br />
Error OUT Bool If Error = TRUE, at least one error message is pending. Default value:<br />
FALSE<br />
ErrorBits OUT DWord The PID_3STEP instruction ErrorBits parameters table (Page 362)<br />
defines the error messages. Default value: DW#16#0000 (no error)<br />
<strong>S7</strong>-<strong>1200</strong> <strong>Programmable</strong> <strong>controller</strong><br />
358 System Manual, 04/2012, A5E02486680-06
Figure 9-3 Operation of the PID_3Step <strong>controller</strong> as a PIDT1 <strong>controller</strong> with anti-windup<br />
<br />
Technology instructions<br />
9.2 PID control<br />
<strong>S7</strong>-<strong>1200</strong> <strong>Programmable</strong> <strong>controller</strong><br />
System Manual, 04/2012, A5E02486680-06 359
Technology instructions<br />
9.2 PID control<br />
<br />
<br />
<br />
<br />
<br />
<br />
<br />
<br />
<br />
<br />
<br />
<br />
<br />
<br />
<br />
<br />
<br />
<br />
<br />
<br />
<br />
<br />
<br />
<br />
<br />
<br />
<br />
<br />
<br />
<strong>S7</strong>-<strong>1200</strong> <strong>Programmable</strong> <strong>controller</strong><br />
360 System Manual, 04/2012, A5E02486680-06<br />
<br />
<br />
Figure 9-4 Operation of the PID_3Step <strong>controller</strong> without position feedback
Technology instructions<br />
9.2 PID control<br />
<strong>S7</strong>-<strong>1200</strong> <strong>Programmable</strong> <strong>controller</strong><br />
System Manual, 04/2012, A5E02486680-06 361<br />
<br />
<br />
<br />
<br />
<br />
<br />
<br />
Figure 9-5 Operation of the PID_3Step <strong>controller</strong> the position feedback enabled
Technology instructions<br />
9.2 PID control<br />
9.2.5 PID_3STEP instruction ErrorBit parameters<br />
If several errors are pending, the values of the error codes are displayed by means of binary<br />
addition. The display of error code 0003, for example, indicates that the errors 0001 and<br />
0002 are also pending.<br />
Table 9- 18 PID_3STEP instruction ErrorBit parameters<br />
ErrorBit (DW#16#...) Description<br />
0000 No error<br />
0001 The "Input" parameter is outside the process value limits:<br />
Input > Config.InputUpperLimit or<br />
Input < Config.InputLowerLimit<br />
If ActivateRecoverMode = TRUE and ErrorBehaviour = 1, the actuator<br />
moves to the substitute output value. If ActivateRecoverMode = TRUE and<br />
ErrorBehaviour = 0, the actuator stops in its current position. If<br />
ActivateRecoverMode = FALSE, the actuator stops in its current position.<br />
PID_3STEP V1.1: You can move the actuator in manual mode.<br />
PID_3STEP V1.0: Manual mode is not possible in this state. You cannot<br />
start the actuator again until you eliminate the error.<br />
0002 Invalid value at parameter "Input_PER". Check whether an error is pending<br />
at the analog input.<br />
If automatic mode was active before the error occurred,<br />
ActivateRecoverMode = TRUE and the error is no longer pending,<br />
PID_3STEP switches back to automatic mode.<br />
0004 Error during fine tuning Oscillation of the process value could not be<br />
maintained.<br />
0008 Error while starting pre-tuning. The process value is too close to the<br />
setpoint. Start fine tuning.<br />
0010 The setpoint may not be changed during fine tuning.<br />
0020 Pre-tuning may not be carried out in automatic mode or during fine tuning.<br />
0040 Error in fine tuning The setpoint is too close to the setpoint limits.<br />
0080 Error in pre-tuning. Incorrect configuration of output value limits.<br />
Check to see if the limits of the output value are configured correctly and<br />
match the direction in which the control is operating.<br />
0100 Error during fine tuning has resulted in invalid parameters.<br />
0200 Invalid value at parameter "Input": Numerical format of value is invalid.<br />
If automatic mode was active before the error occurred,<br />
ActivateRecoverMode = TRUE and the error is no longer pending,<br />
PID_3STEP switches back to automatic mode.<br />
0400 Calculating the output value failed. Check the PID parameters.<br />
0800 Sampling time error: PID_3STEP is not called within the sampling time of<br />
the cyclic interrupt OB.<br />
If automatic mode was active before the error occurred,<br />
ActivateRecoverMode = TRUE and the error is no longer pending,<br />
PID_3STEP switches back to automatic mode.<br />
<strong>S7</strong>-<strong>1200</strong> <strong>Programmable</strong> <strong>controller</strong><br />
362 System Manual, 04/2012, A5E02486680-06
Technology instructions<br />
9.2 PID control<br />
ErrorBit (DW#16#...) Description<br />
1000 Invalid value at parameter "Setpoint": Numerical format of value is invalid.<br />
If automatic mode was active before the error occurred,<br />
ActivateRecoverMode = TRUE and the error is no longer pending,<br />
PID_3STEP switches back to automatic mode.<br />
2000 Invalid value at parameter Feedback_PER.<br />
Check whether an error is pending at the analog input.<br />
The actuator cannot be moved to the substitute output value and does not<br />
move from the current position. Manual mode is not possible in this state.<br />
You have to disable position feedback (Config. FeedbackOn = FALSE) to<br />
move the actuator from this state.<br />
If automatic mode was active before the error occurred,<br />
ActivateRecoverMode = TRUE and the error is no longer pending,<br />
PID_3STEP switches back to automatic mode.<br />
4000 Invalid value at parameter Feedback. Numerical format of value is invalid.<br />
The actuator cannot be moved to the substitute output value and does not<br />
move from the current position. Manual mode is not possible in this state.<br />
You have to disable position feedback (Config. FeedbackOn = FALSE) to<br />
move the actuator from this state.<br />
If automatic mode was active before the error occurred,<br />
ActivateRecoverMode = TRUE and the error is no longer pending,<br />
PID_3STEP switches back to automatic mode.<br />
8000 Error in digital position feedback. Actuator_H = TRUE and Actuator_L =<br />
TRUE.<br />
The actuator cannot be moved to the substitute output value and does not<br />
move from the current position. Manual mode is not possible in this state.<br />
You have to disable "Endstop signals actuator" (Config.ActuatorEndStopOn<br />
= FALSE) to move the actuator from this state.<br />
If automatic mode was active before the error occurred,<br />
ActivateRecoverMode = TRUE and the error is no longer pending,<br />
PID_3STEP switches back to automatic mode.<br />
9.2.6 Configuring the PID <strong>controller</strong><br />
The parameters of the technological object determine the operation of the PID<br />
<strong>controller</strong>. Use the icon to open the configuration editor.<br />
Figure 9-6 Configuration editor for PID_Compact (Basic settings)<br />
<strong>S7</strong>-<strong>1200</strong> <strong>Programmable</strong> <strong>controller</strong><br />
System Manual, 04/2012, A5E02486680-06 363
Technology instructions<br />
9.2 PID control<br />
Table 9- 19 Sample configuration settings for the PID_Compact instruction<br />
Settings Description<br />
Basic Controller type Selects the engineering units.<br />
Process<br />
value<br />
Invert the control logic Allows selection of a reverse-acting PID loop.<br />
Enable last mode after<br />
CPU restart<br />
If not selected, the PID loop is in direct-acting mode and the output of PID loop<br />
increases if input value < setpoint.<br />
If selected, the output of the PID loop increases if the input value > setpoint.<br />
Restarts the PID loop after it is reset or if an input limit has been exceeded and<br />
returned to the valid range.<br />
Input Selects either the Input parameter or the Input_PER parameter (for analog) for the<br />
process value. Input_PER can come directly from an analog input module.<br />
Output Selects either the Output parameter or the Output_PER parameter (for analog) for<br />
the output value. Output_PER can go directly to an analog output module.<br />
Scales both the range and the limits for the process value. If the process value goes below the low limit or<br />
above the high limit, the PID loop goes to inactive mode and sets the output value to 0.<br />
To use Input_PER, you must scale the analog process value (input value).<br />
Figure 9-7 Configuration editor for PID_3Step (Basic settings)<br />
Table 9- 20 Sample configuration settings for the PID_3Step instruction<br />
Settings Description<br />
Basic Controller type Selects the engineering units.<br />
Invert the control logic Allows selection of a reverse-acting PID loop.<br />
Enable last mode after<br />
CPU restart<br />
If not selected, the PID loop is in direct-acting mode, and the output of PID loop<br />
increases if the input value < setpoint).<br />
If selected, the output of the PID loop increases if the input value > setpoint.<br />
Restarts the PID loop after it is reset or if an input limit has been exceeded and<br />
returned to the valid range.<br />
Input Selects either the Input parameter or the Input_PER parameter (for analog) for the<br />
process value. Input_PER can come directly from an analog input module.<br />
<strong>S7</strong>-<strong>1200</strong> <strong>Programmable</strong> <strong>controller</strong><br />
364 System Manual, 04/2012, A5E02486680-06
Technology instructions<br />
9.2 PID control<br />
Settings Description<br />
Output Selects either to use the digital outputs (Output_UP and Output_DN) or to use the<br />
analog output (Output_PER) for the output value.<br />
Feedback Selects the type of device status returned to the PID loop:<br />
No feedback (default)<br />
Feedback<br />
Feedback_PER<br />
Process<br />
value<br />
Actuator<br />
Scales both the range and the limits for the process value. If the process value goes below the low limit or<br />
above the high limit, the PID loop goes to inactive mode and sets the output value to 0.<br />
To use Input_PER, you must scale the analog process value (input value).<br />
Motor transition<br />
time<br />
Sets the time from open to close for the valve. (Locate this value on the data sheet or<br />
the faceplate of the valve.)<br />
Minimum ON time Sets the minimum movement time for the valve. (Locate this value on the data sheet or<br />
the faceplate of the valve.)<br />
Minimum OFF<br />
time<br />
Sets the minimum pause time for the valve. (Locate this value on the data sheet or the<br />
faceplate of the valve.)<br />
Error behavior Defines the behavior of the valve when an error is detected or when the PID loop is<br />
reset. If you select to use a substitute position, enter the "Safety position". For analog<br />
feedback or analog output, select a value between the upper or lower limit for the<br />
output. For digital outputs, you can choose only 0% (off) or 100% (on).<br />
Scale Position<br />
Feedback 1<br />
"High stop" and "Lower limit stop" define the maximum positive position (full-open)<br />
and the maximum negative position (full-closed). "High stop" must be greater than<br />
"Lower limit stop".<br />
"High limit process value" and "Low limit process value" define the upper and lower<br />
positions of the valve during tuning and automatic mode.<br />
"FeedbackPER" ("Low" and "High") defines the analog feedback of the valve<br />
position. "FeedbackPER High" must be greater than "FeedbackPER Low".<br />
1 "Scale Position Feedback" is editable only if you enabled "Feedback" in the "Basic" settings.<br />
9.2.7 Commissioning the PID <strong>controller</strong><br />
Use the commissioning editor to configure the PID <strong>controller</strong> for autotuning at startup<br />
and for autotuning during operation. To open the commissioning editor, click the icon<br />
on either the instruction or the project navigator.<br />
<strong>S7</strong>-<strong>1200</strong> <strong>Programmable</strong> <strong>controller</strong><br />
System Manual, 04/2012, A5E02486680-06 365
Technology instructions<br />
9.3 Motion control<br />
Table 9- 21 Sample configuration screen (PID_3Step)<br />
9.3 Motion control<br />
Measurement: To display the setpoint, the<br />
process value (input value) and the output value in a<br />
real-time trend, enter the sample time and click the<br />
"Start" button.<br />
Tuning mode: To tune the PID loop, select either<br />
"Pretuning" or "Fine tuning" (manual) and click the<br />
"Start" button. The PID <strong>controller</strong> runs through<br />
multiple phases to calculate system response and<br />
update times. The appropriate tuning parameters are<br />
calculated from these values.<br />
After the completion of the tuning process, you can<br />
store the new parameters by clicking the "Upload PID<br />
parameters" button in the "PID Parameters" section of<br />
the commissioning editor.<br />
If an error occurs during tuning, the output value of the<br />
PID goes to 0. The PID mode then is set to "inactive"<br />
mode. The status indicates the error.<br />
The CPU provides motion control functionality for the operation of stepper motors and servo<br />
motors with pulse interface. The motion control functionality takes over the control and<br />
monitoring of the drives.<br />
● The "Axis" technology object configures the mechanical drive data, drive interface,<br />
dynamic parameters, and other drive properties.<br />
● You configure the pulse and direction outputs of the CPU for controlling the drive.<br />
● Your user program uses the motion control instructions to control the axis and to initiate<br />
motion tasks.<br />
● Use the PROFINET interface to establish the online connection between the CPU and<br />
the programming device. In addition to the online functions of the CPU, additional<br />
commissioning and diagnostic functions are available for motion control.<br />
Note<br />
Changes that you make to the motion control configuration and download in RUN mode<br />
do not take effect until the CPU transitions from STOP to RUN mode.<br />
<strong>S7</strong>-<strong>1200</strong> <strong>Programmable</strong> <strong>controller</strong><br />
366 System Manual, 04/2012, A5E02486680-06
S<br />
<br />
<br />
<br />
<br />
<br />
<br />
<br />
<br />
<br />
<br />
<br />
<br />
<br />
<br />
<br />
<br />
<br />
<br />
<br />
<br />
<br />
<br />
<br />
<br />
<br />
<br />
<br />
<br />
<br />
<br />
<br />
<br />
<br />
<br />
<br />
<br />
<br />
Technology instructions<br />
9.3 Motion control<br />
① PROFINET<br />
② Pulse and direction outputs<br />
③ Power section for stepper motor<br />
④ Power section for servo motor<br />
The DC/DC/DC variants of the CPU <strong>S7</strong>-<strong>1200</strong> have onboard<br />
outputs for direct control of drives. The relay variants of the<br />
CPU require the signal board with DC outputs for drive<br />
control.<br />
A signal board (SB) expands the onboard I/O to include a few additional I/O points. An SB<br />
with 2 digital outputs can be used as pulse and direction outputs to control one motor. An SB<br />
with 4 digital outputs can be used as pulse and direction outputs to control two motors. Builtin<br />
relay outputs cannot be used as pulse outputs to control motors.<br />
Note<br />
Pulse-train outputs cannot be used by other instructions in the user program<br />
When you configure the outputs of the CPU or signal board as pulse generators (for use with<br />
the PWM or motion control instructions), the corresponding output addresses (Q0.0 to Q0.3,<br />
Q4.0 to Q4.3) are removed from the Q memory and cannot be used for other purposes in<br />
your user program. If your user program writes a value to an output used as a pulse<br />
generator, the CPU does not write that value to the physical output.<br />
Table 9- 22 Maximum number of controllable drives<br />
Type of CPU No SB installed With an SB<br />
With an SB<br />
(2 x DC outputs) (4 x DC outputs)<br />
CPU 1211C DC/DC/DC 2 2 2<br />
AC/DC/RLY 0 1 2<br />
DC/DC/RLY 0 1 2<br />
CPU 1212C DC/DC/DC 2 2 2<br />
AC/DC/RLY 0 1 2<br />
DC/DC/RLY 0 1 2<br />
CPU 1214C DC/DC/DC 2 2 2<br />
AC/DC/RLY 0 1 2<br />
DC/DC/RLY 0 1 2<br />
CPU 1215C DC/DC/DC 4 4 4<br />
AC/DC/RLY 0 1 2<br />
DC/DC/RLY 0 1 2<br />
<strong>S7</strong>-<strong>1200</strong> <strong>Programmable</strong> <strong>controller</strong><br />
System Manual, 04/2012, A5E02486680-06 367
Technology instructions<br />
9.3 Motion control<br />
Table 9- 23 Limit frequencies of pulse outputs<br />
Pulse output Frequency<br />
Onboard<br />
2 PTO: 2 Hz ≤ f ≤ 100 KHz<br />
2 PTO: 2 Hz ≤ f ≤ 20 KHz<br />
Standard SB 2 Hz ≤ f ≤ 20 KHz<br />
High-speed (200 KHz) SBs MC V2 instructions: 2 Hz ≤ f ≤ 200 KHz<br />
MC V1 instructions: 2 Hz ≤ f ≤ 100 KHz 1<br />
1 MC V1 instructions support a maximum frequency of 100 KHz.<br />
NOTICE<br />
Configuring a pulse generator<br />
The maximum pulse frequency of the pulse output generators is 100 KHz for the digital<br />
outputs of the CPU, 20 KHz for the digital outputs of the standard SB, and 200 KHz for the<br />
digital outputs of the high-speed SBs (or 100 KHz for MC V1 instructions).<br />
1. Add a Technological object:<br />
<strong>S7</strong>-<strong>1200</strong> <strong>Programmable</strong> <strong>controller</strong><br />
368 System Manual, 04/2012, A5E02486680-06
Technology instructions<br />
9.3 Motion control<br />
– In the Project tree, expand the node "Technological Objects" and select "Add new<br />
object".<br />
– Select the "Axis" icon (rename if required) and click "OK" to open the configuration<br />
editor for the axis object.<br />
– Display the "Select PTO for Axis Control" properties under the "Basic parameters" and<br />
select the desired pulse. Note the two Q outputs assigned for pulse and direction.<br />
Note<br />
If the PTO has not been previously configured in the CPU Properties, the PTO is<br />
configured to use one of the onboard outputs.<br />
If you use an output signal board, then select the "Device configuration" button to go<br />
to the CPU Properties. Under "Parameter assignment", in the "Pulse options",<br />
configure the output source to a signal board output. "Pulse_1" and "Pulse_3"are the<br />
only pulse outputs available on the signal board.<br />
– Configure the remaining Basic and Extended parameters.<br />
2. Program your application: Insert the MC_Power instruction in a code block.<br />
– For the Axis input, select the axis technology object that you created and configured.<br />
– Setting the Enable input to TRUE allows the other motion instructions to function.<br />
– Setting the Enable input FALSE cancels the other motion instructions.<br />
Note<br />
Include only one MC_Power instruction per axis.<br />
3. Insert the other motion instructions to produce the required motion.<br />
Note<br />
Configuring a pulse generator to signal board outputs: Select the "Pulse generators<br />
(PTO/PWM)" properties for a CPU (in Device configuration) and enable a pulse generator.<br />
Two pulse generators are available for each <strong>S7</strong>-<strong>1200</strong> CPU V1.0, V2.0, V2.1, and V2.2.<br />
<strong>S7</strong>-<strong>1200</strong> CPU V3.0 CPUs have four pulse generators available. In this same configuration<br />
area under "Pulse options", select Pulse generator used as: "PTO".<br />
Note<br />
The CPU calculates motion tasks in "slices" or segments of 10 ms. As one slice is being<br />
executed, the next slice is waiting in the queue to be executed. If you interrupt the motion<br />
task on an axis (by executing another new motion task for that axis), the new motion task<br />
may not be executed for a maximum of 20 ms (the remainder of the current slice plus the<br />
queued slice).<br />
<strong>S7</strong>-<strong>1200</strong> <strong>Programmable</strong> <strong>controller</strong><br />
System Manual, 04/2012, A5E02486680-06 369
Technology instructions<br />
9.3 Motion control<br />
9.3.1 Configuring the axis<br />
STEP 7 provides the configuration tools, the commissioning tools, and the diagnostic tools<br />
for the "Axis" technological object.<br />
<br />
<br />
<br />
① Drive ④ Commissioning<br />
② Technological object ⑤ Diagnostics<br />
③ Configuration<br />
Note<br />
The PTO requires the internal functionality of a high-speed counter (HSC). This means the<br />
corresponding high-speed counter cannot be used elsewhere.<br />
The assignment between PTO and HSC is fixed. When PTO1 is activated, it will be<br />
connected to HSC1. If PTO2 is activated, it will be connected to HSC2. This is only true for<br />
<strong>S7</strong>-<strong>1200</strong> V1.0, V2.0, V2.1, and V2.2 CPUs. <strong>S7</strong>-<strong>1200</strong> V3.0 CPUs do not have this restriction.<br />
You cannot monitor the current value (for example, in ID 1000) when pulses are occurring.<br />
Table 9- 24 STEP 7 tools for motion control<br />
Tool Description<br />
Configuration Configures the following properties of the "Axis" technology object:<br />
Selection of the PTO to be used and configuration of the drive interface<br />
Properties of the mechanics and the transmission ratio of the drive (or machine or system)<br />
Properties for position limits, dynamics, and homing<br />
Save the configuration in the data block of the technology object.<br />
Commissioning Tests the function of your axis without having to create a user program. When the tool is started,<br />
the control panel will be displayed. The following commands are available on the control panel:<br />
Enable and disable axis<br />
Move axis in jog mode<br />
Position axis in absolute and relative terms<br />
Home axis<br />
Acknowledge errors<br />
The velocity and the acceleration / deceleration can be specified for the motion commands. The<br />
control panel also shows the current axis status.<br />
Diagnostics Monitors of the current status and error information for the axis and drive.<br />
<strong>S7</strong>-<strong>1200</strong> <strong>Programmable</strong> <strong>controller</strong><br />
370 System Manual, 04/2012, A5E02486680-06
NOTICE<br />
Technology instructions<br />
9.3 Motion control<br />
After you create the technological object for the<br />
axis, you configure the axis by defining the basic<br />
parameters, such as the PTO and the configuration<br />
of the drive interface. You also configure the other<br />
properties of the axis, such as position limits,<br />
dynamics, and homing.<br />
You may have to adapt the values of the input parameters of motion control instructions to<br />
the new dimension unit in the user program.<br />
Configure the properties for the drive signals, drive<br />
mechanics, and position monitoring (hardware and<br />
software limit switches).<br />
You configure the motion dynamics and the<br />
behavior of the emergency stop command.<br />
<strong>S7</strong>-<strong>1200</strong> <strong>Programmable</strong> <strong>controller</strong><br />
System Manual, 04/2012, A5E02486680-06 371
Technology instructions<br />
9.3 Motion control<br />
You also configure the homing behavior (passive and active).<br />
Use the "Commissioning" control panel to test the functionality independently from your user<br />
program.<br />
Click the "Startup" icon to commission the axis.<br />
The control panel shows the current status of the axis. Not only can you enable and disable<br />
the axis, but you can also test the positioning of the axis (both in absolute and relative terms)<br />
and can specify the velocity, acceleration and deceleration. You can also test the homing<br />
and jogging tasks. The control panel also allows you to acknowledge errors.<br />
9.3.2 Configuring the TO_CommandTable_PTO<br />
Adding a Technological object<br />
You can configure a CommandTable instruction using the Technological objects.<br />
1. In the Project tree, expand the node "Technological Objects" and select "Add new object".<br />
<strong>S7</strong>-<strong>1200</strong> <strong>Programmable</strong> <strong>controller</strong><br />
372 System Manual, 04/2012, A5E02486680-06
Technology instructions<br />
9.3 Motion control<br />
2. Select the "CommandTable" icon (rename if required), and click "OK" to open the<br />
configuration editor for the CommandTable object.<br />
Planning the steps for your application<br />
You can create the desired movement sequence in the "Command Table" configuration<br />
window, and check the result against the graphic view in the trend diagram.<br />
You can select the command types that are to be used for processing the command table.<br />
Up to 32 steps can be entered. The commands are processed in sequence, easily producing<br />
a complex motion profile.<br />
Table 9- 25 MC_CommandTable command types<br />
Command type Description<br />
Empty The empty serves as a placeholder for any commands to be added. The empty entry is<br />
ignored when the command table is processed<br />
Halt Pause axis.<br />
Note: The command only takes place after a "Velocity setpoint" command.<br />
Positioning Relative Positions the axis based upon distance. The command moves the axis by the given<br />
distance and velocity.<br />
Positioning Absolute Positions the axis based upon location. The command moves the axis to the given<br />
location, using the velocity specified.<br />
Velocity setpoint Moves the axis at the given velocity.<br />
Wait Waits until the given period is over. "Wait" does not stop an active traversing motion.<br />
Separator Adds a "Separator" line above the selected line. The separator line allows more than one<br />
profile to be defined in a single command table.<br />
In the figure below, "Command complete" is used as the transition to the next step. This type<br />
of transition allows your device to decelerate to the start/stop speed and then accelerate<br />
once again at the start of the next step.<br />
<strong>S7</strong>-<strong>1200</strong> <strong>Programmable</strong> <strong>controller</strong><br />
System Manual, 04/2012, A5E02486680-06 373
Technology instructions<br />
9.3 Motion control<br />
① Axis decelerates to the start/stop speed between steps.<br />
In the figure below, "Blending motion" is used as the transition to the next step. This type of<br />
transition allows your device to maintain its velocity into the start of the next step, resulting in<br />
a smooth transition for the device from one step to the next. Using blending can shorten the<br />
total time required for a profile to execute completely. Without blending, the example takes<br />
seven seconds to run. With blending, the execution time is reduced by one second to a total<br />
of six seconds.<br />
① Axis continues to move and accelerates or decelerates to the next step velocity, saving time and<br />
mechanical wear.<br />
<strong>S7</strong>-<strong>1200</strong> <strong>Programmable</strong> <strong>controller</strong><br />
374 System Manual, 04/2012, A5E02486680-06
Technology instructions<br />
9.3 Motion control<br />
The operation of your CommandTable is controlled by an MC_CommandTable instruction,<br />
as shown below:<br />
9.3.3 Motion control instructions<br />
Note<br />
The CPU calculates motion tasks in "slices" or segments of 10 ms. As one slice is being<br />
executed, the next slice is waiting in the queue to be executed. If you interrupt the motion<br />
task on an axis (by executing another new motion task for that axis), the new motion task<br />
may not be executed for a maximum of 20 ms (the remainder of the current slice plus the<br />
queued slice).<br />
9.3.3.1 MC_Power instruction<br />
NOTICE<br />
If the axis is switched off due to an error, it will be enabled again automatically after the<br />
error has been eliminated and acknowledged. This requires that the Enable input<br />
parameter has retained the value TRUE during this process.<br />
<strong>S7</strong>-<strong>1200</strong> <strong>Programmable</strong> <strong>controller</strong><br />
System Manual, 04/2012, A5E02486680-06 375
Technology instructions<br />
9.3 Motion control<br />
Table 9- 26 MC_Power instruction<br />
LAD / FBD SCL Description<br />
"MC_Power_DB"(<br />
Axis:=_multi_fb_in_,<br />
Enable:=_bool_in_,<br />
StopMode:=_int_in_,<br />
Status=>_bool_out_,<br />
Busy=>_bool_out_,<br />
Error=>_bool_out_,<br />
ErrorID=>_word_out_,<br />
ErrorInfo=>_word_out_);<br />
1 STEP 7 automatically creates the DB when you insert the instruction.<br />
2 In the SCL example, "MC_Power_DB" is the name of the instance DB.<br />
Table 9- 27 Parameters for the MC_Power instruction<br />
The MC_Power motion control instruction enables<br />
or disables an axis. Before you can enable or<br />
disable the axis, ensure the following conditions:<br />
The technology object has been configured<br />
correctly.<br />
There is no pending enable-inhibiting error.<br />
The execution of MC_Power cannot be aborted by<br />
a motion control task. Disabling the axis (input<br />
parameter Enable = FALSE ) aborts all motion<br />
control tasks for the associated technology object.<br />
Parameter and type Data type Description<br />
Axis IN TO_Axis_1 Axis technology object<br />
Enable IN Bool FALSE (default): All active tasks are aborted according to the<br />
parameterized "StopMode" and the axis is stopped.<br />
TRUE: Motion Control attempts to enable the axis.<br />
StopMode IN Int 0: Emergency stop: If a request to disable the axis is pending, the<br />
axis brakes at the configured emergency deceleration. The axis is<br />
disabled after reaching standstill.<br />
1: Immediate stop: If a request to disable the axis is pending, this<br />
axis is disabled without deceleration. Pulse output is stopped<br />
immediately.<br />
2: Emergency stop with jerk control: If a request to disable the axis is<br />
pending, the axis brakes at the configured emergency stop<br />
deceleration. If the jerk control is activated, the configured jerk is<br />
taken into account. The axis is disabled after reaching standstill.<br />
Status OUT Bool Status of axis enable:<br />
FALSE: The axis is disabled:<br />
– The axis does not execute motion control tasks and does not<br />
accept any new tasks (exception: MC_Reset task).<br />
– The axis is not homed.<br />
– Upon disabling, the status does not change to FALSE until the<br />
axis reaches a standstill.<br />
TRUE: The axis is enabled:<br />
– The axis is ready to execute motion control tasks.<br />
– Upon axis enabling, the status does not change to TRUE until<br />
the signal "Drive ready" is pending. If the "Drive ready" drive<br />
interface was not configured in the axis configuration, the status<br />
changes to TRUE immediately.<br />
<strong>S7</strong>-<strong>1200</strong> <strong>Programmable</strong> <strong>controller</strong><br />
376 System Manual, 04/2012, A5E02486680-06
Technology instructions<br />
9.3 Motion control<br />
Parameter and type Data type Description<br />
Busy OUT Bool FALSE: MC_Power is not active.<br />
TRUE: MC_Power is active.<br />
Error OUT Bool FALSE: No error<br />
TRUE: An error has occurred in motion control instruction "MC_Power"<br />
or in the associated technology object. The cause of the error can be<br />
found in parameters "ErrorID" and "ErrorInfo".<br />
ErrorID OUT Word Error ID for parameter "Error""<br />
ErrorInfo OUT Word Error info ID for parameter "ErrorID"<br />
<br />
<br />
<br />
<br />
<br />
<br />
<br />
<br />
<br />
<br />
<br />
<br />
<br />
<br />
<br />
<br />
<br />
<br />
<br />
<br />
<br />
<br />
<br />
<br />
<br />
<br />
<br />
<br />
<br />
<br />
<br />
<br />
<br />
<br />
<br />
<br />
<br />
<br />
<br />
<br />
<br />
<br />
<br />
<br />
<br />
<br />
<br />
<br />
<br />
<br />
<br />
<br />
<br />
<br />
① An axis is enabled and then disabled again. After the drive has signaled "Drive ready" back to the CPU, the<br />
successful enable can be read out via "Status_1".<br />
② Following an axis enable, an error has occurred that caused the axis to be disabled. The error is eliminated and<br />
acknowledged with "MC_Reset". The axis is then enabled again.<br />
To enable an axis with configured drive interface, follow these steps:<br />
1. Check the requirements indicated above.<br />
<strong>S7</strong>-<strong>1200</strong> <strong>Programmable</strong> <strong>controller</strong><br />
System Manual, 04/2012, A5E02486680-06 377<br />
<br />
2. Initialize input parameter "StopMode" with the desired value. Set input parameter<br />
"Enable" to TRUE.<br />
The enable output for "Drive enabled" changes to TRUE to enable the power to the drive.<br />
The CPU waits for the "Drive ready" signal of the drive.<br />
When the "Drive ready" signal is available at the configured ready input of the CPU, the<br />
axis becomes enabled. Output parameter "Status" and technology object tag .StatusBits.Enable indicates the value TRUE.<br />
To enable an axis without configured drive interface, follow these steps:<br />
1. Check the requirements indicated above.<br />
2. Initialize input parameter "StopMode" with the desired value. Set input parameter<br />
"Enable" to TRUE. The axis is enabled. Output parameter "Status" and technology object<br />
tag .StatusBits.Enable indicate the value TRUE.
Technology instructions<br />
9.3 Motion control<br />
To disable an axis, follow these steps:<br />
1. Bring the axis to a standstill.<br />
You can identify when the axis is at a standstill in technology object tag .StatusBits.StandStill.<br />
2. Set input parameter "Enable" to FALSE after standstill is reached.<br />
3. If output parameters "Busy" and "Status" and technology object tag .StatusBits.Enable indicate the value FALSE, disabling of the axis is complete.<br />
9.3.3.2 MC_Reset instruction<br />
Table 9- 28 MC_Reset instruction<br />
LAD / FBD SCL Description<br />
"MC_Reset_DB"(<br />
Axis:=_multi_fb_in_,<br />
Execute:=_bool_in_,<br />
Restart:=_bool_in_,<br />
Done=>_bool_out_,<br />
Busy=>_bool_out_,<br />
Error=>_bool_out_,<br />
ErrorID=>_word_out_,<br />
ErrorInfo=>_word_out_);<br />
1 STEP 7 automatically creates the DB when you insert the instruction.<br />
2 In the SCL example, "MC_Reset_DB" is the name of the instance DB.<br />
Use the MC_Reset instruction to acknowledge<br />
"Operating error with axis stop" and<br />
"Configuration error". The errors that require<br />
acknowledgement can be found in the "List of<br />
ErrorIDs and ErrorInfos" under "Remedy".<br />
Before using the MC_Reset instruction, you<br />
must have eliminated the cause of a pending<br />
configuration error requiring acknowledgement<br />
(for example, by changing an invalid<br />
acceleration value in "Axis" technology object<br />
to a valid value).<br />
As of V3.0 and later, the Restart command<br />
allows the axis configuration to be downloaded<br />
to the work memory in the RUN operating<br />
mode.<br />
The MC_Reset task cannot be aborted by any other motion control task. The new MC_Reset<br />
task does not abort any other active motion control tasks.<br />
Table 9- 29 Parameters of the MC_Reset instruction<br />
Parameter and type Data type Description<br />
Axis IN TO_Axis_1 Axis technology object<br />
Execute IN Bool Start of the task with a positive edge<br />
Restart IN Bool<br />
TRUE = Download the axis configuration from the load memory to the<br />
work memory. The command can only be executed when the axis is<br />
disabled.<br />
FALSE = Acknowledges pending errors<br />
Done OUT Bool TRUE = Error has been acknowledged.<br />
Busy OUT Bool TRUE = The task is being executed.<br />
<strong>S7</strong>-<strong>1200</strong> <strong>Programmable</strong> <strong>controller</strong><br />
378 System Manual, 04/2012, A5E02486680-06
Technology instructions<br />
9.3 Motion control<br />
Parameter and type Data type Description<br />
Error OUT Bool TRUE = An error has occurred during execution of the task. The<br />
cause of the error can be found in parameters "ErrorID" and<br />
"ErrorInfo".<br />
ErrorID OUTP Word Error ID for parameter "Error""<br />
ErrorInfo OUT Word Error info ID for parameter "ErrorID"<br />
To acknowledge an error with MC_Reset, follow these steps:<br />
1. Check the requirements indicated above.<br />
2. Start the acknowledgement of the error with a rising edge at the Execute input parameter.<br />
3. The error has been acknowledged when Done equals TRUE and the technology object<br />
tag .StatusBits.Error equals FALSE.<br />
9.3.3.3 MC_Home instruction<br />
Table 9- 30 MC_Home instruction<br />
LAD / FBD SCL Description<br />
"MC_Home_DB"(<br />
Axis:=_multi_fb_in_,<br />
Execute:=_bool_in_,<br />
Position:=_real_in_,<br />
Mode:=_int_in_,<br />
Done=>_bool_out_,<br />
Busy=>_bool_out_,<br />
CommandAborted=>_bool_out_,<br />
Error=>_bool_out_,<br />
ErrorID=>_word_out_,<br />
ErrorInfo=>_word_out_);<br />
1 STEP 7 automatically creates the DB when you insert the instruction.<br />
2 In the SCL example, "MC_Home_DB" is the name of the instance DB.<br />
Use the MC_Home instruction to match<br />
the axis coordinates to the real, physical<br />
drive position. Homing is required for<br />
absolute positioning of the axis:<br />
In order to use the MC_Home instruction,<br />
the axis must first be enabled.<br />
The following types of homing are available:<br />
● Direct homing absolute (Mode = 0): The current axis position is set to the value of<br />
parameter "Position".<br />
● Direct homing relative (Mode = 1): The current axis position is offset by the value of<br />
parameter "Position".<br />
● Passive homing (Mode = 2): During passive homing, the MC_Home instruction does not<br />
carry out any homing motion. The traversing motion required for this step must be<br />
implemented by the user via other motion control instructions. When the reference point<br />
switch is detected, the axis is homed.<br />
● Active homing (Mode = 3): The homing procedure is executed automatically.<br />
<strong>S7</strong>-<strong>1200</strong> <strong>Programmable</strong> <strong>controller</strong><br />
System Manual, 04/2012, A5E02486680-06 379
Technology instructions<br />
9.3 Motion control<br />
Table 9- 31 Parameters for the MC_Home instruction<br />
Parameter and type Data type Description<br />
Axis IN TO_Axis_PTO Axis technology object<br />
Execute IN Bool Start of the task with a positive edge<br />
Position IN Real Mode = 0, 2, and 3 (Absolute position of axis after<br />
completion of the homing operation)<br />
Mode = 1 (Correction value for the current axis position)<br />
Limit values: -1.0e12 ≤ Position ≤ 1.0e12 Mode IN Int Homing mode<br />
0: Direct homing absolute<br />
New axis position is the position value of parameter<br />
"Position".<br />
1: Direct homing relative<br />
New axis position is the current axis position + position<br />
value of parameter "Position".<br />
2: Passive homing<br />
Homing according to the axis configuration. Following<br />
homing, the value of parameter "Position" is set as the<br />
new axis position.<br />
3: Active homing<br />
Done OUT Bool<br />
Reference point approach in accordance with the axis<br />
configuration. Following homing, the value of parameter<br />
"Position" is set as the new axis position.<br />
TRUE = Task completed<br />
Busy OUT Bool TRUE = The task is being executed.<br />
CommandAborted OUT Bool TRUE = During execution the task was aborted by another<br />
task.<br />
Error OUT Bool TRUE = An error has occurred during execution of the task.<br />
The cause of the error can be found in parameters "ErrorID"<br />
and "ErrorInfo".<br />
ErrorID OUT Word Error ID for parameter "Error""<br />
ErrorInfo OUT Word Error info ID for parameter "ErrorID"<br />
Note<br />
Axis homing is lost under the following conditions<br />
Disabling of axis by the MC_Power instruction<br />
Switchover between automatic control and manual control<br />
Upon start of active homing (After successful completion of the homing operation, axis<br />
homing is available again.)<br />
After power-cycling the CPU<br />
After CPU restart (RUN-to-STOP or STOP-to-RUN)<br />
<strong>S7</strong>-<strong>1200</strong> <strong>Programmable</strong> <strong>controller</strong><br />
380 System Manual, 04/2012, A5E02486680-06
Table 9- 32 Override response<br />
Technology instructions<br />
9.3 Motion control<br />
To home the axis, follow these steps:<br />
1. Check the requirements indicated above.<br />
2. Initialize the necessary input parameters with values, and start the homing operation with<br />
a rising edge at input parameter "Execute".<br />
3. If output parameter "Done" and technology object tag .StatusBits.HomingDone indicate the value TRUE, homing is complete.<br />
Mode Description<br />
0 or 1 The MC_Home task cannot be aborted by any other motion control task. The new MC_Home task does not<br />
abort any active motion control tasks. Position-related motion tasks are resumed after homing according to<br />
the new homing position (value at the Position input parameter).<br />
2 The MC_Home task can be aborted by the following motion control tasks:<br />
MC_Home task Mode = 2, 3: The new MC_Home task aborts the following active motion control task.<br />
MC_Home task Mode = 2: Position-related motion tasks are resumed after homing according to the new<br />
homing position (value at the Position input parameter).<br />
3 The MC_Home task can be aborted by the following The new MC_Home task aborts the following active<br />
motion control tasks:<br />
motion control tasks:<br />
MC_Home Mode = 3<br />
MC_Home Mode = 2, 3<br />
MC_Halt<br />
MC_Halt<br />
MC_MoveAbsolute<br />
MC_MoveAbsolute<br />
MC_MoveRelative<br />
MC_MoveRelative<br />
MC_MoveVelocity<br />
MC_MoveVelocity<br />
MC_MoveJog<br />
MC_MoveJog<br />
9.3.3.4 MC_Halt instruction<br />
Table 9- 33 MC_Halt instruction<br />
LAD / FBD SCL Description<br />
"MC_Halt_DB"(<br />
Axis:=_multi_fb_in_,<br />
Execute:=_bool_in_,<br />
Done=>_bool_out_,<br />
Busy=>_bool_out_,<br />
CommandAborted=>_bool_out_,<br />
Error=>_bool_out_,<br />
ErrorID=>_word_out_,<br />
ErrorInfo=>_word_out_);<br />
1 STEP 7 automatically creates the DB when you insert the instruction.<br />
2 In the SCL example, "MC_Halt_DB" is the name of the instance DB.<br />
Use the MC_Halt instruction to stop all<br />
motion and to brings the axis to a standstill.<br />
The stand-still position is not defined.<br />
In order to use the MC_Halt instruction,<br />
the axis must first be enabled.<br />
<strong>S7</strong>-<strong>1200</strong> <strong>Programmable</strong> <strong>controller</strong><br />
System Manual, 04/2012, A5E02486680-06 381
Technology instructions<br />
9.3 Motion control<br />
Table 9- 34 Parameters for the MC_Halt instruction<br />
Parameter and type Data type Description<br />
Axis IN TO_Axis_1 Axis technology object<br />
Execute IN Bool Start of the task with a positive edge<br />
Done OUT Bool TRUE = Zero velocity reached<br />
Busy OUT Bool TRUE = The task is being executed.<br />
CommandAborted OUT Bool TRUE = During execution the task was aborted by another<br />
task.<br />
Error OUT Bool TRUE = An error has occurred during execution of the task.<br />
The cause of the error can be found in parameters "ErrorID"<br />
and "ErrorInfo".<br />
ErrorID OUT Word Error ID for parameter "Error"<br />
ErrorInfo OUT Word Error info ID for parameter "ErrorID"<br />
<br />
<br />
<br />
<br />
<br />
<br />
<br />
<br />
<br />
<br />
<br />
<br />
<br />
<br />
<br />
<br />
<br />
<br />
<br />
<br />
<br />
<br />
<br />
<br />
<br />
<br />
<br />
<br />
<br />
<br />
<br />
<br />
<br />
<br />
<br />
<br />
<br />
<br />
<br />
<br />
<br />
<br />
<br />
<br />
<br />
<br />
<br />
<br />
<br />
<br />
<br />
<br />
<br />
<br />
<br />
<br />
<br />
<br />
<br />
<br />
<br />
<br />
<br />
The following values were configured in the "Dynamics > General" configuration window: Acceleration = 10.0 and<br />
Deceleration = 5.0<br />
① The axis is braked by an MC_Halt task until it comes to a standstill. The axis standstill is signaled via "Done_2".<br />
② While an MC_Halt task is braking the axis, this task is aborted by another motion task. The abort is signaled via<br />
"Abort_2".<br />
<strong>S7</strong>-<strong>1200</strong> <strong>Programmable</strong> <strong>controller</strong><br />
382 System Manual, 04/2012, A5E02486680-06
Override response<br />
The MC_Halt task can be aborted by the<br />
following motion control tasks:<br />
MC_Home Mode = 3<br />
MC_Halt<br />
MC_MoveAbsolute<br />
MC_MoveRelative<br />
MC_MoveVelocity<br />
MC_MoveJog<br />
9.3.3.5 MC_MoveAbsolute instruction<br />
Table 9- 35 MC_MoveAbsolute instruction<br />
LAD / FBD SCL Description<br />
"MC_MoveAbsolute_DB"(<br />
Axis:=_multi_fb_in_,<br />
Execute:=_bool_in_,<br />
Position:=_real_in_,<br />
Velocity:=_real_in_,<br />
Done=>_bool_out_,<br />
Busy=>_bool_out_,<br />
CommandAborted=>_bool_out_,<br />
Error=>_bool_out_,<br />
ErrorID=>_word_out_,<br />
ErrorInfo=>_word_out_);<br />
1 STEP 7 automatically creates the DB when you insert the instruction.<br />
2 In the SCL example, "MC_MoveAbsolute_DB" is the name of the instance DB.<br />
Table 9- 36 Parameters for the MC_MoveAbsolute instruction<br />
Technology instructions<br />
9.3 Motion control<br />
The new MC_Halt task aborts the following<br />
active motion control tasks:<br />
MC_Home Mode = 3<br />
MC_Halt<br />
MC_MoveAbsolute<br />
MC_MoveRelative<br />
MC_MoveVelocity<br />
MC_MoveJog<br />
Use the MC_MoveAbsolute<br />
instruction to start a positioning<br />
motion of the axis to an absolute<br />
position.<br />
In order to use the<br />
MC_MoveAbsolute instruction, the<br />
axis must first be enabled and also<br />
must be homed.<br />
Parameter and type Data type Description<br />
Axis IN TO_Axis_1 Axis technology object<br />
Execute IN Bool Start of the task with a positive edge (Default value: False)<br />
Position IN Real Absolute target position (Default value: 0.0)<br />
Limit values: -1.0e12 ≤ Position ≤ 1.0e12 Velocity IN Real Velocity of axis (Default value: 10.0)<br />
This velocity is not always reached because of the configured<br />
acceleration and deceleration and the target position to be<br />
approached.<br />
Limit values: Start/stop velocity ≤ Velocity ≤ maximum velocity<br />
Done OUT Bool TRUE = Absolute target position reached<br />
Busy OUT Bool TRUE = The task is being executed.<br />
<strong>S7</strong>-<strong>1200</strong> <strong>Programmable</strong> <strong>controller</strong><br />
System Manual, 04/2012, A5E02486680-06 383
Technology instructions<br />
9.3 Motion control<br />
Parameter and type Data type Description<br />
CommandAborted OUT Bool TRUE = During execution the task was aborted by another task.<br />
Error OUT Bool TRUE = An error has occurred during execution of the task. The<br />
cause of the error can be found in parameters "ErrorID" and<br />
"ErrorInfo".<br />
ErrorID OUT Word Error ID for parameter "Error" (Default value: 0000)<br />
ErrorInfo OUT Word Error info ID for parameter "ErrorID" (Default value: 0000)<br />
<br />
<br />
<br />
<br />
<br />
<br />
<br />
<br />
<br />
<br />
<br />
<br />
<br />
<br />
<br />
<br />
<br />
<br />
<br />
<br />
<br />
<br />
<br />
<br />
<br />
<br />
<br />
<br />
<br />
<br />
<br />
<br />
<br />
<br />
<br />
<br />
<br />
<br />
<br />
<br />
<br />
<br />
<br />
<br />
<br />
<br />
<br />
<br />
<br />
<br />
<br />
<br />
<br />
<br />
<br />
<br />
<br />
<br />
<br />
<br />
<br />
<br />
<br />
<br />
<br />
<br />
<br />
<br />
<br />
<br />
The following values were configured in the "Dynamics > General" configuration window: Acceleration = 10.0 and<br />
Deceleration = 10.0<br />
① An axis is moved to absolute position 1000.0 with a MC_MoveAbsolute task. When the axis reaches the target<br />
position, this is signaled via "Done_1". When "Done_1" = TRUE, another MC_MoveAbsolute task, with target<br />
position 1500.0, is started. Because of the response times (e.g., cycle time of user program, etc.), the axis comes<br />
to a standstill briefly (see zoomed-in detail). When the axis reaches the new target position, this is signaled via<br />
"Done_2".<br />
② An active MC_MoveAbsolute task is aborted by another MC_MoveAbsolute task. The abort is signaled via<br />
"Abort_1". The axis is then moved at the new velocity to the new target position 1500.0. When the new target<br />
position is reached, this is signaled via "Done_2".<br />
<strong>S7</strong>-<strong>1200</strong> <strong>Programmable</strong> <strong>controller</strong><br />
384 System Manual, 04/2012, A5E02486680-06
Override response<br />
The MC_MoveAbsolute task can be<br />
aborted by the following motion control<br />
tasks:<br />
MC_Home Mode = 3<br />
MC_Halt<br />
MC_MoveAbsolute<br />
MC_MoveRelative<br />
MC_MoveVelocity<br />
MC_MoveJog<br />
9.3.3.6 MC_MoveRelative instruction<br />
Table 9- 37 MC_MoveRelative instruction<br />
Technology instructions<br />
9.3 Motion control<br />
The new MC_MoveAbsolute task aborts<br />
the following active motion control tasks:<br />
MC_Home Mode = 3<br />
MC_Halt<br />
MC_MoveAbsolute<br />
MC_MoveRelative<br />
MC_MoveVelocity<br />
MC_MoveJog<br />
LAD / FBD SCL Description<br />
"MC_MoveRelative_DB"(<br />
Axis:=_multi_fb_in_,<br />
Execute:=_bool_in_,<br />
Distance:=_real_in_,<br />
Velocity:=_real_in_,<br />
Done=>_bool_out_,<br />
Busy=>_bool_out_,<br />
CommandAborted=>_bool_out_,<br />
Error=>_bool_out_,<br />
ErrorID=>_word_out_,<br />
ErrorInfo=>_word_out_);<br />
1 STEP 7 automatically creates the DB when you insert the instruction.<br />
2 In the SCL example, "MC_MoveRelative_DB" is the name of the instance DB.<br />
Table 9- 38 Parameters for the MC_MoveRelative instruction<br />
Use the MC_MoveRelative<br />
instruction to start a positioning<br />
motion relative to the start position.<br />
In order to use the<br />
MC_MoveRelative instruction, the<br />
axis must first be enabled.<br />
Parameter and type Data type Description<br />
Axis IN TO_Axis_1 Axis technology object<br />
Execute IN Bool Start of the task with a positive edge (Default value: False)<br />
Distance IN Real Travel distance for the positioning operation (Default value: 0.0)<br />
Limit values: -1.0e12 ≤ Distance ≤ 1.0e12 Velocity IN Real Velocity of axis (Default value: 10.0)<br />
This velocity is not always reached on account of the configured<br />
acceleration and deceleration and the distance to be traveled.<br />
Limit values: Start/stop velocity ≤ Velocity ≤ maximum velocity<br />
Done OUT Bool TRUE = Target position reached<br />
Busy OUT Bool TRUE = The task is being executed.<br />
<strong>S7</strong>-<strong>1200</strong> <strong>Programmable</strong> <strong>controller</strong><br />
System Manual, 04/2012, A5E02486680-06 385
Technology instructions<br />
9.3 Motion control<br />
Parameter and type Data type Description<br />
CommandAborted OUT Bool TRUE = During execution the task was aborted by another task.<br />
Error OUT Bool TRUE = An error has occurred during execution of the task. The<br />
cause of the error can be found in parameters "ErrorID" and<br />
"ErrorInfo".<br />
ErrorID OUT Word Error ID for parameter "Error" (Default value: 0000)<br />
ErrorInfo OUT Word Error info ID for parameter "ErrorID" (Default value: 0000)<br />
<br />
<br />
<br />
<br />
<br />
<br />
<br />
<br />
<br />
<br />
<br />
<br />
<br />
<br />
<br />
<br />
<br />
<br />
<br />
<br />
<br />
<br />
<br />
<br />
<br />
<br />
<br />
<br />
<br />
<br />
<br />
<br />
<br />
<br />
<br />
<br />
<br />
<br />
<br />
<br />
<br />
<br />
<br />
<br />
<br />
<br />
<br />
<br />
<br />
<br />
<br />
<br />
<br />
<br />
<br />
<br />
<br />
<br />
<br />
<br />
<br />
<br />
<br />
<br />
<br />
The following values were configured in the "Dynamics > General" configuration window: Acceleration = 10.0 and<br />
Deceleration = 10.0<br />
① The axis is moved by an MC_MoveRelative task by the distance ("Distance") 1000.0. When the axis reaches the<br />
target position, this is signaled via "Done_1". When "Done_1" = TRUE, another MC_MoveRelative task, with travel<br />
distance 500.0, is started. Because of the response times (for example, cycle time of user program), the axis<br />
comes to a standstill briefly (see zoomed-in detail). When the axis reaches the new target position, this is signaled<br />
via "Done_2".<br />
② An active MC_MoveRelative task is aborted by another MC_MoveRelative task. The abort is signaled via<br />
"Abort_1". The axis is then moved at the new velocity by the new distance ("Distance") 500.0. When the new target<br />
position is reached, this is signaled via "Done_2".<br />
<strong>S7</strong>-<strong>1200</strong> <strong>Programmable</strong> <strong>controller</strong><br />
386 System Manual, 04/2012, A5E02486680-06
Override response<br />
The MC_MoveRelative task can be aborted<br />
by the following motion control tasks:<br />
MC_Home Mode = 3<br />
MC_Halt<br />
MC_MoveAbsolute<br />
MC_MoveRelative<br />
MC_MoveVelocity<br />
MC_MoveJog<br />
9.3.3.7 MC_MoveVelocity instruction<br />
Table 9- 39 MC_MoveVelocity instruction<br />
LAD / FBD SCL Description<br />
"MC_MoveVelocity_DB"(<br />
Axis:=_multi_fb_in_,<br />
Execute:=_bool_in_,<br />
Velocity:=_real_in_,<br />
Direction:=_int_in_,<br />
Current:=_bool_in_,<br />
InVelocity=>_bool_out_,<br />
Busy=>_bool_out_,<br />
CommandAborted=>_bool_out_,<br />
Error=>_bool_out_,<br />
ErrorID=>_word_out_,<br />
ErrorInfo=>_word_out_);<br />
1 STEP 7 automatically creates the DB when you insert the instruction.<br />
2 In the SCL example, "MC_MoveVelocity_DB" is the name of the instance DB.<br />
Table 9- 40 Parameters for the MC_MoveVelocity instruction<br />
Technology instructions<br />
9.3 Motion control<br />
The new MC_MoveRelative task aborts the<br />
following active motion control tasks:<br />
MC_Home Mode = 3<br />
MC_Halt<br />
MC_MoveAbsolute<br />
MC_MoveRelative<br />
MC_MoveVelocity<br />
MC_MoveJog<br />
Use the MC_MoveVelocity<br />
instruction to move the axis<br />
constantly at the specified velocity.<br />
In order to use the<br />
MC_MoveVelocity instruction, the<br />
axis must first be enabled.<br />
Parameter and type Data type Description<br />
Axis IN TO_Axis_1 Axis technology object<br />
Execute IN Bool Start of the task with a positive edge (Default value: False)<br />
Velocity IN Real Velocity specification for axis motion (Default value: 10.0)<br />
Limit values: Start/stop velocity ≤ |Velocity| ≤ maximum velocity<br />
(Velocity = 0.0 is allowed)<br />
<strong>S7</strong>-<strong>1200</strong> <strong>Programmable</strong> <strong>controller</strong><br />
System Manual, 04/2012, A5E02486680-06 387
Technology instructions<br />
9.3 Motion control<br />
Parameter and type Data type Description<br />
Direction IN Int Direction specification:<br />
0: Direction of rotation corresponds to the sign of the value in<br />
parameter "Velocity" (Default value)<br />
1: Positive direction of rotation (The sign of the value in<br />
parameter "Velocity" is ignored.)<br />
2: Negative direction of rotation (The sign of the value in<br />
parameter "Velocity" is ignored.)<br />
Current IN Bool Maintain current velocity:<br />
FALSE: "Maintain current velocity" is deactivated. The values<br />
of parameters "Velocity" and "Direction" are used. (Default<br />
value)<br />
TRUE: "Maintain current velocity" is activated. The values in<br />
parameters "Velocity" and "Direction" are not taken into<br />
account.<br />
InVelocity OUT Bool<br />
When the axis resumes motion at the current velocity, the<br />
"InVelocity" parameter returns the value TRUE.<br />
TRUE:<br />
If "Current" = FALSE: The velocity specified in parameter<br />
"Velocity" was reached.<br />
If "Current" = TRUE: The axis travels at the current velocity at<br />
the start time.<br />
Busy OUT Bool TRUE = The task is being executed.<br />
CommandAborted OUT Bool TRUE = During execution the task was aborted by another task.<br />
Error OUT Bool TRUE = An error has occurred during execution of the task. The<br />
cause of the error can be found in parameters "ErrorID" and<br />
"ErrorInfo".<br />
ErrorID OUT Word Error ID for parameter "Error" (Default value: 0000)<br />
ErrorInfo OUT Word Error info ID for parameter "ErrorID" (Default value: 0000)<br />
<strong>S7</strong>-<strong>1200</strong> <strong>Programmable</strong> <strong>controller</strong><br />
388 System Manual, 04/2012, A5E02486680-06
Technology instructions<br />
9.3 Motion control<br />
The following values were configured in the "Dynamics > General" configuration window: Acceleration = 10.0 and<br />
Deceleration = 10.0<br />
① An active MC_MoveVelocity task signals via "InVel_1" that its target velocity has been reached. It is then aborted<br />
by another MC_MoveVelocity task. The abort is signaled via "Abort_1". When the new target velocity 15.0 is<br />
reached, this is signaled via "InVel_2". The axis then continues moving at the new constant velocity.<br />
② An active MC_MoveVelocity task is aborted by another MC_MoveVelocity task prior to reaching its target velocity.<br />
The abort is signaled via "Abort_1". When the new target velocity 15.0 is reached, this is signaled via "InVel_2".<br />
The axis then continues moving at the new constant velocity.<br />
Override response<br />
The MC_MoveVelocity task can be aborted<br />
by the following motion control tasks:<br />
MC_Home Mode = 3<br />
MC_Halt<br />
MC_MoveAbsolute<br />
MC_MoveRelative<br />
MC_MoveVelocity<br />
MC_MoveJog<br />
The new MC_MoveVelocity task aborts the<br />
following active motion control tasks:<br />
MC_Home Mode = 3<br />
MC_Halt<br />
MC_MoveAbsolute<br />
MC_MoveRelative<br />
MC_MoveVelocity<br />
MC_MoveJog<br />
<strong>S7</strong>-<strong>1200</strong> <strong>Programmable</strong> <strong>controller</strong><br />
System Manual, 04/2012, A5E02486680-06 389
Technology instructions<br />
9.3 Motion control<br />
Note<br />
Behavior with zero set velocity (Velocity = 0.0)<br />
An MC_MoveVelocity task with "Velocity" = 0.0 (such as an MC_Halt task) aborts active<br />
motion tasks and stops the axis with the configured deceleration. When the axis comes to a<br />
standstill, output parameter "InVelocity" indicates TRUE for at least one program cycle.<br />
"Busy" indicates the value TRUE during the deceleration operation and changes to FALSE<br />
together with "InVelocity". If parameter "Execute" = TRUE is set, "InVelocity" and "Busy" are<br />
latched.<br />
When the MC_MoveVelocity task is started, status bit "SpeedCommand" is set in the<br />
technology object. Status bit "ConstantVelocity" is set upon axis standstill. Both bits are<br />
adapted to the new situation when a new motion task is started.<br />
9.3.3.8 MC_MoveJog instruction<br />
Table 9- 41 MC_MoveJog instruction<br />
LAD / FBD SCL Description<br />
"MC_MoveJog_DB"(<br />
Axis:=_multi_fb_in_,<br />
JogForward:=_bool_in_,<br />
JogBackward:=_bool_in_,<br />
Velocity:=_real_in_,<br />
InVelocity=>_bool_out_,<br />
Busy=>_bool_out_,<br />
CommandAborted=>_bool_out_,<br />
Error=>_bool_out_,<br />
ErrorID=>_word_out_,<br />
ErrorInfo=>_word_out_);<br />
1 STEP 7 automatically creates the DB when you insert the instruction.<br />
2 In the SCL example, "MC_MoveJog_DB" is the name of the instance DB.<br />
Table 9- 42 Parameters for the MC_MoveJog instruction<br />
Use the MC_MoveJog instruction to move<br />
the axis constantly at the specified<br />
velocity in jog mode. This instruction is<br />
typically used for testing and<br />
commissioning purposes.<br />
In order to use the MC_MoveJog<br />
instruction, the axis must first be enabled.<br />
Parameter and type Data type Description<br />
Axis IN TO_Axis_1 Axis technology object<br />
JogForward1 IN Bool As long as the parameter is TRUE, the axis moves in the positive<br />
direction at the velocity specified in parameter "Velocity". The sign of<br />
the value in parameter "Velocity" is ignored. (Default value: False)<br />
JogBackward1 IN Bool As long as the parameter is TRUE, the axis moves in the negative<br />
direction at the velocity specified in parameter "Velocity". The sign of<br />
the value in parameter "Velocity" is ignored. (Default value: False)<br />
Velocity IN Real Preset velocity for jog mode (Default value: 10.0)<br />
Limit values: Start/stop velocity ≤ |Velocity| ≤ maximum velocity<br />
<strong>S7</strong>-<strong>1200</strong> <strong>Programmable</strong> <strong>controller</strong><br />
390 System Manual, 04/2012, A5E02486680-06
Technology instructions<br />
9.3 Motion control<br />
Parameter and type Data type Description<br />
InVelocity OUT Bool TRUE = The velocity specified in parameter "Velocity" was reached.<br />
Busy OUT Bool TRUE = The task is being executed.<br />
CommandAborted OUT Bool TRUE = During execution the task was aborted by another task.<br />
Error OUT Bool TRUE = An error has occurred during execution of the task. The<br />
cause of the error can be found in parameters "ErrorID" and<br />
"ErrorInfo".<br />
ErrorID OUT Word Error ID for parameter "Error" (Default value: 0000)<br />
ErrorInfo OUT Word Error info ID for parameter "ErrorID" (Default value: 0000)<br />
1 If both the JogForward and JogBackward parameters are simultaneously TRUE, the axis stops with the configured<br />
deceleration. An error is indicated in parameters "Error", "ErrorID", and "ErrorInfo".<br />
<br />
<br />
<br />
<br />
<br />
<br />
<br />
<br />
<br />
<br />
<br />
<br />
<br />
<br />
<br />
<br />
<br />
<br />
<br />
<br />
<br />
<br />
<br />
<br />
<br />
<br />
<br />
<br />
<br />
<br />
<br />
<br />
The following values were configured in the "Dynamics > General" configuration window: Acceleration = 10.0 and<br />
Deceleration = 5.0<br />
① The axis is moved in the positive direction in jog mode via "Jog_F". When the target velocity 50.0 is reached, this is<br />
signaled via "InVelo_1". The axis brakes to a standstill again after Jog_F is reset.<br />
② The axis is moved in the negative direction in jog mode via "Jog_B". When the target velocity 50.0 is reached, this<br />
is signaled via "InVelo_1". The axis brakes to a standstill again after Jog_B is reset.<br />
Override response<br />
The MC_MoveJog task can be aborted by<br />
the following motion control tasks:<br />
MC_Home Mode = 3<br />
MC_Halt<br />
MC_MoveAbsolute<br />
MC_MoveRelative<br />
MC_MoveVelocity<br />
MC_MoveJog<br />
The new MC_MoveJog task aborts the<br />
following active motion control tasks:<br />
MC_Home Mode = 3<br />
MC_Halt<br />
MC_MoveAbsolute<br />
MC_MoveRelative<br />
MC_MoveVelocity<br />
MC_MoveJog<br />
<strong>S7</strong>-<strong>1200</strong> <strong>Programmable</strong> <strong>controller</strong><br />
System Manual, 04/2012, A5E02486680-06 391
Technology instructions<br />
9.3 Motion control<br />
9.3.3.9 MC_CommandTable instruction<br />
Table 9- 43 MC_CommandTable instruction<br />
LAD / FBD SCL Description<br />
"MC_CommandTable_DB"(<br />
Axis:=_multi_fb_in_,<br />
CommandTable:=_multi_fb_in_,<br />
Execute:=_bool_in_,<br />
StartIndex:=_uint_in_,<br />
EndIndex:=_uint_in_,<br />
Done=>_bool_out_,<br />
Busy=>_bool_out_,<br />
CommandAborted=>_bool_out_,<br />
Error=>_bool_out_,<br />
ErrorID=>_word_out_,<br />
ErrorInfo=>_word_out_,<br />
CurrentIndex=>_uint_out_,<br />
Code=>_word_out_);<br />
1 STEP 7 automatically creates the DB when you insert the instruction.<br />
2 In the SCL example, "MC_CommandTable_DB" is the name of the instance DB.<br />
Table 9- 44 Parameters for the MC_CommandTable instruction<br />
Executes a series of individual<br />
motions for a motor control axis<br />
that can combine into a<br />
movement sequence.<br />
Individual motions are configured<br />
in a technology object command<br />
table for pulse train output<br />
(TO_CommandTable_PTO).<br />
Parameter and type Data type Initial value Description<br />
Axis IN TO_Axis_1 - Axis technology object<br />
Table IN TO_CommandTable_1 - Command table technology object<br />
Execute IN Booll FALSE Start job with rising edge<br />
StartIndex IN Int 1 Start command table processing with this step<br />
Limits: 1 ≤ StartIndex ≤ EndIndex<br />
EndIndex IN Int 32 End command table processing with this step<br />
Limits: StartIndex ≤ EndIndex ≤ 32<br />
Done OUT Bool FALSE MC_CommandTable processing completed<br />
successfully<br />
Busy OUT Bool FALSE Operation in progress<br />
CommandAborted OUT Bool FALSE The task was aborted during processing by<br />
another task.<br />
Error OUT Bool FALSE An error ocurred during processing. The cause is<br />
indicated by the parameters ErrorID and ErrorInfo.<br />
ErrorID OUT Word 16#0000 Error identifier<br />
ErrorInfo OUT Word 16#0000 Error information<br />
Step OUT Int 0 Step currently in process<br />
Code OUT Word 16#0000 User defined identifier of the step currently in<br />
process<br />
You can create the desired movement sequence in the "Command Table" configuration<br />
window and check the result against the graphic view in the trend diagram.<br />
<strong>S7</strong>-<strong>1200</strong> <strong>Programmable</strong> <strong>controller</strong><br />
392 System Manual, 04/2012, A5E02486680-06
Technology instructions<br />
9.3 Motion control<br />
You can select the command types that are to be used for processing the command table.<br />
Up to 32 jobs can be entered. The commands are processed in sequence.<br />
Table 9- 45 MC_CommandTable command types<br />
Command type Description<br />
Empty The empty serves as a placeholder for any commands to be added. The empty entry is<br />
ignored when the command table is processed<br />
Halt Pause axis.<br />
Note: The command only takes place after a "Velocity setpoint" command.<br />
Positioning Relative Positions the axis based upon distance. The command moves the axis by the given<br />
distance and velocity.<br />
Positioning Absolute Positions the axis based upon location. The command moves the axis to the given<br />
location, using the velocity specified.<br />
Velocity setpoint Moves the axis at the given velocity.<br />
Wait Waits until the given period is over. "Wait" does not stop an active traversing motion.<br />
Separator Adds a "Separator" line above the selected line. The separator line allows more than one<br />
profile to be defined in a single command table.<br />
Prerequisites for MC_CommandTable execution:<br />
● The technology object TO_Axis_PTO V2.0 must be correctly configured.<br />
● The technology object TO_CommandTable_PTO must be correctly configured.<br />
● The axis must be released.<br />
<strong>S7</strong>-<strong>1200</strong> <strong>Programmable</strong> <strong>controller</strong><br />
System Manual, 04/2012, A5E02486680-06 393
Technology instructions<br />
9.3 Motion control<br />
Override response<br />
The MC_CommandTable task can be<br />
aborted by the following motion control<br />
tasks:<br />
MC_Home Mode = 3<br />
MC_Halt<br />
MC_MoveAbsolute<br />
MC_MoveRelative<br />
MC_MoveVelocity<br />
MC_MoveJog<br />
MC_CommandTable<br />
9.3.3.10 MC_ChangeDynamic<br />
Table 9- 46 MC_ChangeDynamic instruction<br />
The new MC_CommandTable task aborts the<br />
following active motion control tasks:<br />
MC_Home Mode = 3<br />
MC_Halt<br />
MC_MoveAbsolute<br />
MC_MoveRelative<br />
MC_MoveVelocity<br />
MC_MoveJog<br />
MC_CommandTable<br />
The current motion control job with the<br />
launch of the first "Positioning Relative",<br />
"Positioning Absolute", "Velocity setpoint"<br />
or "Halt" command<br />
LAD / FBD SCL Description<br />
"MC_ChangeDynamic_DB"(<br />
Execute:=_bool_in_,<br />
ChangeRampUp:=_bool_in_,<br />
RampUpTime:=_real_in_,<br />
ChangeRampDown:=_bool_in_,<br />
RampDownTime:=_real_in_,<br />
ChangeEmergency:=_bool_in_,<br />
EmergencyRampTime:=_real_in_,<br />
ChangeJerkTime:=_bool_in_,<br />
JerkTime:=_real_in_,<br />
Done=>_bool_out_,<br />
Error=>_bool_out_,<br />
ErrorID=>_word_out_,<br />
ErrorInfo=>_word_out_);<br />
1 STEP 7 automatically creates the DB when you insert the instruction.<br />
2 In the SCL example, "MC_ChangeDynamic_DB" is the name of the instance DB.<br />
Table 9- 47 Parameters for the MC_ChangeDynamic instruction<br />
Changes the dynamic settings of<br />
a motion control axis:<br />
Change the ramp-up time<br />
(acceleration) value<br />
Change the ramp-down time<br />
(deceleration) value<br />
Change the emergency stop<br />
ramp-down time (emergency<br />
stop deceleration) value<br />
Change the smoothing time<br />
(jerk) value<br />
Parameter and type Data type Description<br />
Axis IN TO_Axis_1 Axis technology object<br />
Execute IN Bool Start of the command with a positive edge. Default value:<br />
FALSE<br />
<strong>S7</strong>-<strong>1200</strong> <strong>Programmable</strong> <strong>controller</strong><br />
394 System Manual, 04/2012, A5E02486680-06
Technology instructions<br />
9.3 Motion control<br />
Parameter and type Data type Description<br />
ChangeRampUp IN Bool TRUE = Change ramp-up time in line with input parameter<br />
"RampUpTime". Default value: FALSE<br />
RampUpTime IN Real Time (in seconds) to accelerate from standstill to the configured<br />
maximum velocity without jerk limit. Default value: 5.00<br />
The change will influence the tag .<br />
Config.DynamicDefaults.Acceleration. The effectiveness of the<br />
change is shown in the description of this tag.<br />
ChangeRampDown IN Bool TRUE = Change ramp-down time in line with input parameter<br />
"RampDownTime". Default value: FALSE<br />
RampDownTime IN Real Time (in seconds) to decelerate axis from the configured<br />
maximum velocity to standstill without jerk limiter. Default value:<br />
5.00<br />
The change will influence the tag .<br />
Config.DynamicDefaults.Deceleration. The effectiveness of the<br />
change is shown in the description of this tag.<br />
ChangeEmergency IN Bool TRUE = Change emergency stop ramp-down time in line with<br />
input parameter "EmergencyRampTime" Default value: FALSE<br />
EmergencyRampTime IN Real Time (in seconds) to decelerate the axis from configured<br />
maximum velocity to standstill without jerk limiter in emergency<br />
stop mode. Default value: 2.00<br />
The change will influence the tag .<br />
Config.DynamicDefaults.EmergencyDeceleration. The<br />
effectiveness of the change is shown in the description of this<br />
tag.<br />
ChangeJerkTime IN Bool TRUE = Change smoothing time according to the input<br />
parameter "JerkTime". Default value: FALSE<br />
JerkTime IN Real Smoothing time (in seconds) used for the axis acceleration and<br />
deceleration ramps. Default value: 0.25<br />
The change will influence the tag .<br />
Config.DynamicDefaults.Jerk. The effectiveness of the change is<br />
shown in the description of this tag.<br />
Done OUT Bool TRUE = The changed values have been written to the<br />
technology data block. The description of the tags will show<br />
when the change becomes effective. Default value: FALSE<br />
Error OUT Bool TRUE = An error occurred during execution of the command.<br />
The cause of the error can be found in parameters "ErrorID" and<br />
"ErrorInfo". Default value: FALSE<br />
ErrorID OUT Word Error identifier. Default value: 16#0000<br />
ErrorInfo IN Word Error information. Default value: 16#0000<br />
Prerequisites for MC_ ChangeDynamic execution:<br />
● The technology object TO_Axis_PTO V2.0 must be correctly configured.<br />
● The axis must be released.<br />
Override response<br />
An MC_ChangeDynamic command cannot be aborted by any other Motion Control<br />
command.<br />
<strong>S7</strong>-<strong>1200</strong> <strong>Programmable</strong> <strong>controller</strong><br />
System Manual, 04/2012, A5E02486680-06 395
Technology instructions<br />
9.3 Motion control<br />
A new MC_ChangeDynamic command does not abort any active Motion Control jobs.<br />
Note<br />
The input parameters "RampUpTime", "RampDownTime", "EmergencyRampTime" and<br />
"RoundingOffTime" can be specified with values that makes the resultant axis parameters<br />
"acceleration", "delay", "emergency stop-delay" and "jerk" outside the permissible limits.<br />
Make sure you keep the MC_ChangeDynamic parameters within the limits of the dynamic<br />
configuration settings for the axis technological object.<br />
9.3.4 Operation of motion control for <strong>S7</strong>-<strong>1200</strong><br />
9.3.4.1 CPU outputs used for motion control<br />
The CPU provides four pulse output generators. Each pulse output generator provides one<br />
pulse output and one direction output for controlling a stepper motor drive or a servo motor<br />
drive with pulse interface. The pulse output provides the drive with the pulses required for<br />
motor motion. The direction output controls the travel direction of the drive.<br />
Pulse and direction outputs are permanently assigned to one another. Onboard CPU outputs<br />
and outputs of a signal board can be used as pulse and direction outputs. You select<br />
between onboard CPU outputs and outputs of the signal board during device configuration<br />
under Pulse generators (PTO/PWM) on the "Properties" tab. Only PTO (Pulse Train Output)<br />
applies to motion control.<br />
The PTO output generates a square wave output of variable frequency. Pulse generation is<br />
controlled by configuration and execution information supplied through H/W configuration<br />
and/or SFCs/SFBs.<br />
Based upon the user’s selection while the CPU is in RUN mode, either the values stored in<br />
the image register or the pulse generator outputs drive the digital outputs. In STOP mode,<br />
the PTO generator does not control the outputs.<br />
Table 9- 48 Address assignments of the pulse and direction outputs<br />
PTO 0<br />
PTO 1<br />
PTO 2<br />
PTO 3<br />
Usage of outputs for motion control<br />
Pulse Direction<br />
Built-in I/O Q0.0 Q0.1<br />
SB I/O Q4.0 Q4.1<br />
Built-in I/O Q0.2 Q0.3<br />
SB I/O Q4.2 Q4.3<br />
Built-in I/O Q0.41 Q0.51 SB I/O Q4.0 Q4.1<br />
<strong>S7</strong>-<strong>1200</strong> <strong>Programmable</strong> <strong>controller</strong><br />
396 System Manual, 04/2012, A5E02486680-06
Drive interface<br />
Built-in I/O<br />
Usage of outputs for motion control<br />
Q0.62 Q0.72 SB I/O Q4.2 Q4.3<br />
Technology instructions<br />
9.3 Motion control<br />
1 The CPU 1211C does not have outputs Q0.4, Q0.5, Q0.6, or Q0.7. Therefore, these outputs<br />
cannot be used in the CPU 1211C.<br />
2 The CPU 1212C does not have outputs Q0.6 or Q0.7. Therefore, these outputs cannot be used in<br />
the CPU 1212C.<br />
3 This table applies to the CPU 1211C, CPU 1212C, CPU 1214C, and CPU 1215C PTO functions<br />
For motion control, you can optionally configure a drive interface for "Drive enabled" and<br />
"Drive ready". When using the drive interface, the digital output for the drive enable and the<br />
digital input for "drive ready" can be freely selected.<br />
Note<br />
The firmware will take control via the corresponding pulse and direction outputs if the PTO<br />
(Pulse Train Output) has been selected and assigned to an axis.<br />
With this takeover of the control function, the connection between the process image and I/O<br />
output is also disconnected. While the user has the possibility of writing the process image of<br />
pulse and direction outputs via the user program or watch table, this is never transferred to<br />
the I/O output. Accordingly, it is also not possible to monitor the I/O output via the user<br />
program or watch table. The information read merely reflects the value of the process image<br />
and does not match the actual status of the I/O output in any respect.<br />
For all other CPU outputs that are not used permanently by the CPU firmware, the status of<br />
the I/O output can be controlled or monitored via the process image, as usual.<br />
9.3.4.2 Hardware and software limit switches for motion control<br />
Use the hardware and software limit switches to limit the "allowed travel range" and the<br />
"working range" of your axis.<br />
<br />
<br />
<strong>S7</strong>-<strong>1200</strong> <strong>Programmable</strong> <strong>controller</strong><br />
System Manual, 04/2012, A5E02486680-06 397<br />
<br />
<br />
① Mechanical stop A Allowed travel range for the axis<br />
② Lower and upper hardware limits B Working range of the axis<br />
③ Lower and upper software limits C Distance<br />
Hardware and software limit switches must be activated prior to use in the configuration or in<br />
the user program. Software limit switches are only active after homing the axis.
Technology instructions<br />
9.3 Motion control<br />
Hardware limit switches<br />
Hardware limit switches determine the maximum travel range of the axis. Hardware limit<br />
switches are physical switching elements that must be connected to interrupt-capable inputs<br />
of the CPU. Use only hardware limit switches that remain permanently switched after being<br />
approached. This switching status may only be revoked after a return to the allowed travel<br />
range.<br />
Table 9- 49 Available inputs for pulse generators<br />
PTO 0<br />
PTO 1<br />
PTO 2<br />
PTO 3<br />
Description RPS LIM- LIM+<br />
Built-in I/O I0.0 - I1.5<br />
SB I/O I4.0 - I4.3<br />
Built-in I/O I0.0 - I1.5<br />
SB I/O I4.0 - I4.3<br />
Built-in I/O I0.0 - I1.5<br />
SB I/O I4.0 - I4.3<br />
Built-in I/O I0.0 - I1.5<br />
SB I/O I4.0 - I4.3<br />
When the hardware limit switches are approached, the axis brakes to a standstill at the<br />
configured emergency deceleration. The specified emergency deceleration must be<br />
sufficient to reliably stop the axis before the mechanical stop. The following diagram<br />
presents the behavior of the axis after it approaches the hardware limit switches.<br />
<strong>S7</strong>-<strong>1200</strong> <strong>Programmable</strong> <strong>controller</strong><br />
398 System Manual, 04/2012, A5E02486680-06
Software limit switches<br />
<br />
<br />
<br />
① The axis brakes to a standstill at the configured emergency decleration.<br />
② Range in which the hardware limit switches signal the stats "approached".<br />
A [Velocity]<br />
B Allowed travel range<br />
C Distance<br />
D Mechanical stop<br />
E Lower hardware limit switch<br />
F Upper hardware limit switch<br />
WARNING<br />
Technology instructions<br />
9.3 Motion control<br />
<strong>S7</strong>-<strong>1200</strong> <strong>Programmable</strong> <strong>controller</strong><br />
System Manual, 04/2012, A5E02486680-06 399<br />
<br />
<br />
If the filter time for a digital input channel is changed from a previous setting, a new "0"<br />
level input value may need to be presented for up to 20.0 ms accumulated duration before<br />
the filter becomes fully responsive to new inputs. During this time, short "0" pulse events of<br />
duration less than 20.0 ms may not be detected or counted.<br />
This changing of filter times can result in unexpected machine or process operation, which<br />
may cause death or serious injury to personnel, and/or damage to equipment.<br />
To ensure that a new filter time goes immediately into effect, a power cycle of the CPU<br />
must be applied.<br />
Software limit switches limit the "working range" of the axis. They should fall inside the<br />
hardware limit switches relative to the travel range. Because the positions of the software<br />
limit switches can be set flexibly, the working range of the axis can be restricted on an<br />
individual basis depending on the current traversing profile. In contrast to hardware limit<br />
switches, software limit switches are implemented exclusively by means of the software and<br />
do not require their own switching elements.
Technology instructions<br />
9.3 Motion control<br />
Additional information<br />
If software limit switches are activated, an active motion is stopped at the position of the<br />
software limit switch. The axis is braked at the configured deceleration. The following<br />
diagram presents the behavior of the axis until it reaches the software limit switches.<br />
<br />
<strong>S7</strong>-<strong>1200</strong> <strong>Programmable</strong> <strong>controller</strong><br />
400 System Manual, 04/2012, A5E02486680-06<br />
<br />
<br />
<br />
① The axis brakes to a standstill at the configured deceleration.<br />
A [Velocity]<br />
B Working range<br />
C Distance<br />
D Lower software limit switch<br />
E Upper software limit switch<br />
Use additional hardware limit switches if a mechanical endstop is located after the software<br />
limit switches and there is a risk of mechanical damage.<br />
Your user program can override the hardware or software position limits by enabling or<br />
disabling both hardware and software limits functionality. The selection is made from the<br />
Axis DB.<br />
● To enable or disable the hardware limit functionality, access the "Active" tag (Bool) in the<br />
DB path "/Config/PositonLimits_HW". The state of the "Active" tag enables<br />
or disables the use of hardware position limits.<br />
● To enable or disable software position limit functionality, access "Active" tag (Bool) in the<br />
DB path "/Config/Position Limits_SW". The state of this "Active" tag enables<br />
or disables the software position limits.<br />
You can also modify the software position limits with your user program (for example, to add<br />
flexibility for machine setup or to shorten machine change-over time). Your user program can<br />
write new values to the " MinPosition " and " MaxPosition " tags (engineering units in Real<br />
format) in the DB "/Config/PositionLimits_SW".
Technology instructions<br />
9.3 Motion control<br />
9.3.4.3 Homing<br />
Homing refers to the matching of the axis coordinates to the real, physical drive position. (If<br />
the drive is currently at position x, the axis will be adjusted to be in position x.) For positioncontrolled<br />
axes, the entries and displays for the position refer exactly to these axis<br />
coordinates.<br />
Note<br />
The agreement between the axis coordinates and the real situation is extremely important.<br />
This step is necessary to ensure that the absolute target position of the axis is also achieved<br />
exactly with the drive.<br />
The MC_Home instruction initiates the homing of the axis.<br />
There are 4 different homing functions. The first two functions allow the user to set the<br />
current position of the axis and the second two position the axis with respect to a Home<br />
reference Sensor.<br />
● Mode 0 - Direct Referencing Absolute: When executed this mode tells the axis exactly<br />
where it is. It sets the internal position variable to the value of the Position input of the<br />
Homing instruction. This is used for machine calibration and setup.<br />
The axis position is set regardless of the reference point switch. Active traversing motions<br />
are not aborted. The value of the Position input parameter of the MC_Home instruction is<br />
set immediately as the reference point of the axis. To assign the reference point to an<br />
exact mechanical position, the axis must be at a standstill at this position at the time of<br />
the homing operation.<br />
● Mode 1 - Direct Referencing Relative: When executed this mode uses the internal<br />
position variable and adds the value of the Position input on the Homing instruction to it.<br />
This is typically used to account for machine offset.<br />
The axis position is set regardless of the reference point switch. Active traversing motions<br />
are not aborted. The following statement applies to the axis position after homing: New<br />
axis position = current axis position + value of the Position parameter of the MC_Home<br />
instruction.<br />
<strong>S7</strong>-<strong>1200</strong> <strong>Programmable</strong> <strong>controller</strong><br />
System Manual, 04/2012, A5E02486680-06 401
Technology instructions<br />
9.3 Motion control<br />
● Mode 2 - Passive Referencing: When the axis is moving and passes the Reference Point<br />
Switch the current position is set as the home position. This feature will help account for<br />
normal machine wear and gear backlash and prevent the need for manual compensation<br />
for wear. The Position input on the Homing instruction, as before, adds to the location<br />
indicated by the Reference Point Switch allowing easy offset of the Home position.<br />
During passive homing, the MC_Home instruction does not carry out any homing motion.<br />
The traversing motion required for this step must be implemented by the user via other<br />
motion control instructions. When the reference point switch is detected, the axis is<br />
homed according to the configuration. Active traversing motions are not aborted upon<br />
start of passive homing.<br />
● Mode 3 - Active Referencing: This mode is the most precise method of Homing the Axis.<br />
The initial direction and velocity of movement is configured in the Technology Object<br />
Configuration Extended Parameters-Homing. This is dependent upon machine<br />
configuration. There is also the ability to determine if the leading edge or falling edge of<br />
the Reference Point Switch signal is the Home position. Virtually all sensors have an<br />
active range and if the Steady State On position was used as the Home signal then there<br />
would be a possibility for error in the Homing position since the On signal active range<br />
would cover a range of distance. By using either the leading or falling edge of that signal<br />
a much more precise Home position results. As with all other modes the value of the<br />
Position input on the Homing instruction is added to the Hardware referenced position.<br />
In active homing mode, the MC_Home instruction performs the required reference point<br />
approach. When the reference point switch is detected, the axis is homed according to<br />
the configuration. Active traversing motions are aborted.<br />
Modes 0 and 1 do not require that the axis be moved at all. They are typically used in setup<br />
and calibration. Modes 2 and 3 require that the axis move and pass a sensor that is<br />
configured in the "Axis" technology object as the Reference Point Switch. The reference<br />
point which can be placed in the work area of the axis or outside of the normal work area but<br />
within movement range.<br />
Configuration of homing parameters<br />
Configure the parameters for active and passive homing in the "Homing" configuration<br />
window. The homing method is set using the "Mode" input parameter of the motion control<br />
instruction. Here, Mode = 2 means passive homing and Mode = 3 means active homing.<br />
NOTICE<br />
Use one of the following measures to ensure that the machine does not travel to a<br />
mechanical endstop in the event of a direction reversal:<br />
Keep the approach velocity low<br />
Increase the configured acceleration/deceleration<br />
Increase the distance between hardware limit switch and mechanical stop<br />
<strong>S7</strong>-<strong>1200</strong> <strong>Programmable</strong> <strong>controller</strong><br />
402 System Manual, 04/2012, A5E02486680-06
Table 9- 50 Configuration parameters for homing the axis<br />
Technology instructions<br />
9.3 Motion control<br />
Parameter Description<br />
Input reference point switch Select the digital input for the reference point switch from the drop-down list box. The<br />
(Active and passive homing) input must be interrupt-capable. The onboard CPU inputs and inputs of an inserted<br />
signal board can be selected as inputs for the reference point switch.<br />
The default filter time for the digital inputs is 6.4 ms. When the digital inputs are used<br />
as a reference point switch, this can result in undesired decelerations and thus<br />
inaccuracies. Depending on the reduced velocity and extent of the reference point<br />
switch, the reference point may not be detected. The filter time can be set under<br />
"Input filter" in the device configuration of the digital inputs.<br />
The specified filter time must be less than the duration of the input signal at the<br />
reference point switch.<br />
Auto reverse after reaching the Activate the check box to use the hardware limit switch as a reversing cam for the<br />
hardware limit switches<br />
reference point approach. The hardware limit switches must be configured and<br />
(Active homing only)<br />
activated for direction reversal.<br />
If the hardware limit switch is reached during active homing, the axis brakes at the<br />
configured deceleration (not with the emergency deceleration) and reverses direction.<br />
The reference point switch is then sensed in reverse direction.<br />
If the direction reversal is not active and the axis reaches the hardware limit switch<br />
during active homing, the reference point approach is aborted with an error and the<br />
axis is braked at the emergency deceleration.<br />
Approach direction<br />
With the direction selection, you determine the "approach direction" used during<br />
(Active and passive homing) active homing to search for the reference point switch, as well as the homing<br />
direction. The homing direction specifies the travel direction the axis uses to<br />
approach the configured side of the reference point switch to carry out the homing<br />
operation.<br />
Reference point switch<br />
Active homing: Select whether the axis is to be referenced on the left or right side<br />
(Active and passive homing)<br />
of the reference point switch. Depending on the start position of the axis and the<br />
configuration of the homing parameters, the reference point approach sequence<br />
can differ from the diagram in the configuration window.<br />
Passive homing: With passive homing, the traversing motions for purposes of<br />
homing must be implemented by the user via motion commands. The side of the<br />
reference point switch on which homing occurs depends on the following factors:<br />
– "Approach direction" configuration<br />
– "Reference point switch" configuration<br />
– Current travel direction during passive homing<br />
Approach velocity<br />
(Active homing only)<br />
Specify the velocity at which the reference point switch is to be searched for during<br />
the reference point approach.<br />
Limit values (independent of the selected user unit):<br />
Start/stop velocity ≤ approach velocity ≤ maximum velocity<br />
<strong>S7</strong>-<strong>1200</strong> <strong>Programmable</strong> <strong>controller</strong><br />
System Manual, 04/2012, A5E02486680-06 403
Technology instructions<br />
9.3 Motion control<br />
Parameter Description<br />
Reduced velocity<br />
Specify the velocity at which the axis approaches the reference point switch for<br />
(Active homing only)<br />
homing.<br />
Limit values (independent of the selected user unit):<br />
Start/stop velocity ≤ reduced velocity ≤ maximum velocity<br />
Home position offset<br />
If the desired reference position deviates from the position of the reference point<br />
(Active homing only)<br />
switch, the home position offset can be specified in this field.<br />
If the value does not equal 0, the axis executes the following actions following<br />
homing at the reference point switch:<br />
1. Move the axis at reduced velocity by the value of the home position offset.<br />
2. When the position of the home position offset is reached, the axis position is set<br />
to the absolute reference position. The absolute reference position is specified via<br />
parameter "Position" of motion control instruction "MC_Home".<br />
Limit values (independent of the selected user unit):<br />
-1.0e12 ≤ home position offset ≤ 1.0e12<br />
Table 9- 51 Factors that affect homing<br />
Influencing factors: Result:<br />
Configuration<br />
Configuration<br />
Current travel direction Homing on<br />
Approach direction Reference point switch<br />
Reference point switch<br />
Positive "Left (negative) side"<br />
Positive direction Left<br />
Negative direction Right<br />
Positive "Right (positive) side"<br />
Positive direction Right<br />
Negative direction Left<br />
Negative "Left (negative) side"<br />
Positive direction Right<br />
Negative direction Left<br />
Negative "Right (positive) side"<br />
Positive direction Left<br />
Negative direction Right<br />
Sequence for active homing<br />
You start active homing with motion control instruction "MC_Home" (input parameter<br />
Mode = 3). Input parameter "Position" specifies the absolute reference point coordinates in<br />
this case. Alternatively, you can start active homing on the control panel for test purposes.<br />
The following diagram shows an example of a characteristic curve for an active reference<br />
point approach with the following configuration parameters:<br />
● "Approach direction" = "Positive approach direction"<br />
● "Reference point switch" = "Right (positive) side"<br />
● Value of "home position offset" > 0<br />
<strong>S7</strong>-<strong>1200</strong> <strong>Programmable</strong> <strong>controller</strong><br />
404 System Manual, 04/2012, A5E02486680-06
Table 9- 52 Velocity characteristics of MC homing<br />
Operation Notes<br />
A Approach velocity<br />
B Reduced velocity<br />
<br />
C Home position coordinate<br />
<br />
<br />
<br />
①<br />
②<br />
③<br />
<br />
<br />
<br />
Technology instructions<br />
9.3 Motion control<br />
<strong>S7</strong>-<strong>1200</strong> <strong>Programmable</strong> <strong>controller</strong><br />
System Manual, 04/2012, A5E02486680-06 405<br />
<br />
D Home position offset<br />
Search phase (blue curve segment): When active homing starts, the axis accelerates to the configured "approach<br />
velocity" and searches at this velocity for the reference point switch.<br />
Reference point approach (red curve section): When the reference point switch is detected, the axis in this example<br />
brakes and reverses, to be homed on the configured side of the reference point switch at the configured "reduced<br />
velocity".<br />
Travel to reference point position (green curve segment): After homing at the reference point switch, the axis travels<br />
to the "Reference point coordinates" at the "reduced velocity". On reaching the "Reference point coordinates", the<br />
axis is stopped at the position value that was specified in the Position input parameter of the MC_Home instruction".<br />
Note<br />
If the homing search does not function as you expected, check the inputs assigned to the<br />
hardware limits or to the reference point. These inputs may have had their edge interrupts<br />
disabled in device configuration.<br />
Examine the configuration data for the axis technology object of concern to see which inputs<br />
(if any) are assigned for "HW Low Limit Switch Input", "HW High Limit Switch Input", and<br />
"Input reference point switch". Then open the Device configuration for the CPU and examine<br />
each of the assigned inputs. Verify the "Enable rising edge detection" and "Enable falling<br />
edge detection" are both selected. If these properties are not selected, delete the specified<br />
inputs in the axis configuration and select them again.
Technology instructions<br />
9.3 Motion control<br />
9.3.4.4 Jerk limit<br />
Table 9- 53 Jerk limit<br />
With the jerk limit you can reduce the stresses on your mechanics during an acceleration<br />
and deceleration ramp. The value for the acceleration and deceleration is not changed<br />
abruptly when the step limiter is active; it is adapted in a transition phase. The figure below<br />
shows the velocity and acceleration curve without and with jerk limit.<br />
Travel without step limiter Travel with step limiter<br />
<br />
<br />
<br />
<br />
<strong>S7</strong>-<strong>1200</strong> <strong>Programmable</strong> <strong>controller</strong><br />
406 System Manual, 04/2012, A5E02486680-06<br />
<br />
<br />
The jerk limit gives a "smoothed" velocity profile of the axis motion. This ensures soft starting<br />
and braking of a conveyor belt for example.
9.3.5 Commissioning<br />
Technology instructions<br />
9.3 Motion control<br />
"Status and error bits" diagnostic function<br />
Use the "Status and error bits" diagnostic function to monitor the most important status and<br />
error messages for the axis. The diagnostic function display is available in online mode in<br />
"Manual control" mode and in "Automatic control" when the axis is active.<br />
Table 9- 54 Status of the axis<br />
Status Description<br />
Enabled The axis is enabled and ready to be controlled via motion control tasks.<br />
(Tag of technology object: .StatusBits.Enable)<br />
Homed The axis is homed and is capable of executing absolute positioning tasks of motion control<br />
instruction "MC_MoveAbsolute". The axis does not have to be homed for relative homing. Special<br />
situations:<br />
During active homing, the status is FALSE.<br />
If a homed axis undergoes passive homing, the status is set to TRUE during passive homing.<br />
(Tag of technology object: .StatusBits.HomingDone)<br />
Error An error has occurred in the "Axis" technology object. More information about the error is available<br />
in automatic control at the ErrorID and ErrorInfo parameters of the motion control instructions. In<br />
manual mode, the "Last error" field of the control panel displays detailed information about the<br />
cause of error.<br />
(Tag of technology object: .StatusBits.Error)<br />
Control panel active The "Manual control" mode was enabled in the control panel. The control panel has control priority<br />
over the "Axis" technology object. The axis cannot be controlled from the user program.<br />
(Tag of technology object: .StatusBits.ControlPanelActive)<br />
Table 9- 55 Drive status<br />
Status Description<br />
Drive ready The drive is ready for operation.<br />
(Tag of technology object: .StatusBits.DriveReady)<br />
Error The drive has reported an error after failure of its ready signal.<br />
(Tag of technology object: .ErrorBits.DriveFault)<br />
Table 9- 56 Status of the axis motion<br />
Status Description<br />
Standstill The axis is at a standstill.<br />
(Tag of technology object: .StatusBits.StandStill)<br />
Accelerating The axis accelerates.<br />
(Tag of technology object: .StatusBits.Acceleration)<br />
<strong>S7</strong>-<strong>1200</strong> <strong>Programmable</strong> <strong>controller</strong><br />
System Manual, 04/2012, A5E02486680-06 407
Technology instructions<br />
9.3 Motion control<br />
Status Description<br />
Constant velocity The axis travels at constant velocity.<br />
(Tag of technology object: .StatusBits.ConstantVelocity)<br />
Decelerating The axis decelerates (slows down).<br />
Table 9- 57 Status of the motion mode<br />
Status Description<br />
(Tag of technology object: .StatusBits.Deceleration)<br />
Positioning The axis executes a positioning task of motion control instruction "MC_MoveAbsolute" or<br />
"MC_MoveRelative" or of the control panel.<br />
(Tag of technology object: .StatusBits.PositioningCommand)<br />
Speed Command The axis executes a task at set speed of motion control instruction "MC_MoveVelocity" or<br />
"MC_MoveJog" or of the control panel.<br />
(Tag of technology object: .StatusBits.SpeedCommand)<br />
Homing The axis executes a homing task of motion control instruction "MC_Home" or the control<br />
panel.<br />
(Tag of technology object: .StatusBits.Homing)<br />
Table 9- 58 Error bits<br />
Error Description<br />
Min software limit reached The lower software limit switch has been reached.<br />
(Tag of technology object: .ErrorBits.SwLimitMinReached)<br />
Min software limit exceeded The lower software limit switch has been exceeded.<br />
(Tag of technology object: .ErrorBits.SwLimitMinExceeded)<br />
Max software limit reached The upper software limit switch has been reached.<br />
(Tag of technology object: .ErrorBits.SwLimitMaxReached)<br />
Max software limit exceeded The upper software limit switch has been exceeded.<br />
(Tag of technology object: .ErrorBits.SwLimitMaxExceeded)<br />
Negative hardware limit The lower hardware limit switch has been approached.<br />
(Tag of technology object: .ErrorBits.HwLimitMin)<br />
Positive hardware limit The upper hardware limit switch has been approached.<br />
(Tag of technology object: .ErrorBits.HwLimitMax)<br />
PTO and HSC already used A second axis is using the same PTO and HSC and is enabled with "MC_Power".<br />
(Tag of technology object: .ErrorBits.HwUsed)<br />
Configuration error The "Axis" technology object was incorrectly configured or editable configuration data<br />
were modified incorrectly during runtime of the user program.<br />
(Tag of technology object: .ErrorBits.ConfigFault)<br />
General Error An internal error has occurred.<br />
(Tag of technology object: .ErrorBits.SystemFault)<br />
<strong>S7</strong>-<strong>1200</strong> <strong>Programmable</strong> <strong>controller</strong><br />
408 System Manual, 04/2012, A5E02486680-06
Technology instructions<br />
9.3 Motion control<br />
"Motion status" diagnostic function<br />
Use the "Motion status" diagnostic function to monitor the motion status of the axis. The<br />
diagnostic function display is available in online mode in "Manual control" mode and in<br />
"Automatic control" when the axis is active.<br />
Table 9- 59 Motion status<br />
Status Description<br />
Target position The "Target position" field indicates the current target position of an active positioning task of<br />
motion control instruction "MC_MoveAbsolute" or "MC_MoveRelative" or of the control panel.<br />
The value of the "Target position" is only valid during execution of a positioning task.<br />
(Tag of technology object: .MotionStatus.TargetPosition)<br />
Current position The "Current position" field indicates the current axis position. If the axis is not homed, the<br />
value indicates the position value relative to the enable position of the axis.<br />
(Tag of technology object: .MotionStatus.Position)<br />
Current velocity The "Current velocity" field indicates the actual axis velocity.<br />
(Tag of technology object: .MotionStatus.Velocity)<br />
Table 9- 60 Dynamic limits<br />
Dynamic limit Description<br />
Velocity The "Velocity" field indicates the configured maximum velocity of the axis.<br />
(Tag of technology object: .Config.DynamicLimits.MaxVelocity)<br />
Acceleration The "Acceleration" field indicates the currently configured acceleration of the axis.<br />
(Tag of technology object: .Config.DynamicDefaults.Acceleration)<br />
Deceleration The "Deceleration" field indicates the currently configured deceleration of the axis.<br />
(Tag of technology object: .Config.DynamicDefaults.Deceleration)<br />
<strong>S7</strong>-<strong>1200</strong> <strong>Programmable</strong> <strong>controller</strong><br />
System Manual, 04/2012, A5E02486680-06 409
Technology instructions<br />
9.3 Motion control<br />
9.3.6 Monitoring active commands<br />
9.3.6.1 Monitoring MC instructions with a "Done" output parameter<br />
Motion control instructions with the output parameter "Done" are started by the input<br />
parameter "Execute" and have a defined conclusion (for example, with motion control<br />
instruction "MC_Home": Homing was successful). The task is complete and the axis is at a<br />
standstill.<br />
● The output parameter "Done" indicates the value TRUE, if the task has been successfully<br />
completed.<br />
● The output parameters "Busy", "CommandAborted", and "Error" signal that the task is still<br />
being processed, has been aborted or an error is pending. The motion control instruction<br />
"MC_Reset" cannot be aborted and thus has no "CommandAborted" output parameter.<br />
– During processing of the motion control task, the output parameter "Busy" indicates<br />
the value TRUE. If the task has been completed, aborted, or stopped by an error, the<br />
output parameter "Busy" changes its value to FALSE. This change occurs regardless<br />
of the signal at input parameter "Execute".<br />
– Output parameters "Done", "CommandAborted", and "Error" indicate the value TRUE<br />
for at least one cycle. These status messages are latched while input parameter<br />
"Execute" is set to TRUE.<br />
The tasks of the following motion control instructions have a defined conclusion:<br />
● MC_Reset<br />
● MC_Home<br />
● MC_Halt<br />
● MC_MoveAbsolute<br />
● MC_MoveRelative<br />
The behavior of the status bits is presented below for various example situations.<br />
● The first example shows the behavior of the axis for a completed task. If the motion<br />
control task has been completely executed by the time of its conclusion, this is indicated<br />
by the value TRUE in output parameter "Done". The signal status of input parameter<br />
"Execute" influences the display duration in the output parameter "Done".<br />
● The second example shows the behavior of the axis for an aborted task. If the motion<br />
control task is aborted during execution, this is indicated by the value TRUE in output<br />
parameter "CommandAborted". The signal status of the input parameter "Execute"<br />
influences the display duration in the output parameter "CommandAborted".<br />
● The third example shows the behavior of the axis if an error occurs. If an error occurs<br />
during execution of the motion control task, this is indicated by the value TRUE in the<br />
output parameter "Error". The signal status of the input parameter "Execute" influences<br />
the display duration in the output parameter "Error".<br />
<strong>S7</strong>-<strong>1200</strong> <strong>Programmable</strong> <strong>controller</strong><br />
410 System Manual, 04/2012, A5E02486680-06
Table 9- 61 Example 1 - Complete execution of task<br />
<br />
<br />
<br />
<br />
<br />
<br />
<br />
<br />
<br />
<br />
<br />
<br />
<br />
<br />
<br />
<br />
<br />
If "Execute" = FALSE during the processing of the task<br />
<br />
Technology instructions<br />
9.3 Motion control<br />
<strong>S7</strong>-<strong>1200</strong> <strong>Programmable</strong> <strong>controller</strong><br />
System Manual, 04/2012, A5E02486680-06 411<br />
<br />
<br />
<br />
<br />
<br />
<br />
<br />
<br />
<br />
<br />
<br />
<br />
<br />
<br />
<br />
<br />
If "Execute" = FALSE after completion of the task<br />
① The task is started with a positive edge at the input parameter "Execute". Depending on the programming, "Execute"<br />
can still be reset to the value FALSE during the task, or the value TRUE can be retained until after completion of the task.<br />
② While the task is active, the output parameter "Busy" indicates the value TRUE.<br />
③ With conclusion of the task (for example, for motion control instruction "MC_Home": Homing was successful), output<br />
parameter "Busy" changes to FALSE and "Done" to TRUE.<br />
④ If "Execute" retains the value TRUE until after completion of the task, then "Done" also remains TRUE and changes its<br />
value to FALSE together with "Execute".<br />
⑤ If "Execute" has been set to FALSE before the task is complete, "Done" indicates the value TRUE for only one<br />
execution cycle.
Technology instructions<br />
9.3 Motion control<br />
Table 9- 62 Example 2 - Aborting the task<br />
<br />
<br />
<br />
<br />
<br />
<br />
<br />
<br />
<br />
<br />
<br />
<br />
<br />
<br />
<br />
<br />
Abort<br />
<br />
If "Execute" = FALSE before the task is aborted<br />
<br />
<br />
<br />
<br />
<br />
<br />
<br />
<br />
<br />
<br />
<br />
<br />
<br />
<br />
<br />
<br />
<strong>S7</strong>-<strong>1200</strong> <strong>Programmable</strong> <strong>controller</strong><br />
412 System Manual, 04/2012, A5E02486680-06<br />
Abort<br />
<br />
If "Execute" = FALSE after the task is aborted<br />
① The task is started with a positive edge at the input parameter "Execute". Depending on the programming, "Execute"<br />
can still be reset to the value FALSE during the task, or the value TRUE can be retained until after completion of the task.<br />
② While the task is active, the output parameter "Busy" indicates the value TRUE.<br />
③ During task execution, the task is aborted by another motion control task. If the task is aborted, output parameter<br />
"Busy" changes to FALSE and "CommandAborted" to TRUE.<br />
④ If "Execute" retains the value TRUE until after the task is aborted, then "CommandAborted" also remains TRUE and<br />
changes its value to FALSE together with "Execute".<br />
⑤ If "Execute" has been set to FALSE before the task is aborted, "CommandAborted" indicates the value TRUE for only<br />
one execution cycle.
Table 9- 63 Example 3 - Error during task execution<br />
<br />
<br />
<br />
<br />
<br />
<br />
<br />
<br />
<br />
<br />
<br />
<br />
<br />
<br />
<br />
<br />
Error<br />
<br />
If "Execute" = FALSE before the error occurs<br />
<br />
<br />
<br />
<br />
<br />
<br />
<br />
<br />
<br />
<br />
<br />
<br />
Technology instructions<br />
9.3 Motion control<br />
<strong>S7</strong>-<strong>1200</strong> <strong>Programmable</strong> <strong>controller</strong><br />
System Manual, 04/2012, A5E02486680-06 413<br />
<br />
<br />
<br />
<br />
<br />
Error<br />
<br />
If "Execute" = FALSE after the error occurs<br />
① The task is started with a positive edge at the input parameter "Execute". Depending on the programming, "Execute"<br />
can still be reset to the value FALSE during the task, or the value TRUE can be retained until after completion of the task.<br />
② While the task is active, the output parameter "Busy" indicates the value TRUE.<br />
③ An error occurred during task execution. When the error occurs, the output parameter "Busy" changes to FALSE and<br />
"Error" to TRUE.<br />
④ If "Execute" retains the value TRUE until after the error occurs, then "Error" also remains TRUE and only changes its<br />
value to FALSE together with "Execute".<br />
⑤ If "Execute" has been set to FALSE before the error occurs, "Error" indicates the value TRUE for only one execution<br />
cycle.
Technology instructions<br />
9.3 Motion control<br />
9.3.6.2 Monitoring the MC_Velocity instruction<br />
The tasks of motion control instruction "MC_MoveVelocity" constantly at the specified<br />
velocity.<br />
● The tasks of motion control instruction "MC_MoveVelocity" do not have a defined end.<br />
The task objective is fulfilled when the parameterized velocity is reached for the first time<br />
and the axis travels at constant velocity. When the parameterized velocity is reached, this<br />
is indicated by the value TRUE in output parameter "InVelocity".<br />
● The task is complete when the parameterized velocity has been reached and input<br />
parameter "Execute" has been set to the value FALSE. However, the axis motion is not<br />
yet complete upon completion of the task. For example, the axis motion can be stopped<br />
with motion control task "MC_Halt".<br />
● The output parameters "Busy", "CommandAborted", and "Error" signal that the task is still<br />
being processed, has been aborted or an error is pending.<br />
– During execution of the motion control task, output parameter "Busy" indicates the<br />
value TRUE. If the task has been completed, aborted, or stopped by an error, the<br />
output parameter "Busy" changes its value to FALSE. This change occurs regardless<br />
of the signal at input parameter "Execute".<br />
– The output parameters "InVelocity", "CommandAborted", and "Error" indicate the<br />
value TRUE for at least one cycle, when their conditions are met. These status<br />
messages are latched while input parameter "Execute" is set to TRUE.<br />
The behavior of the status bits is presented below for various example situations.<br />
● The first example shows the behavior when the axis reaches the parameterized velocity.<br />
If the motion control task has been executed by the time the parameterized velocity is<br />
reached, this is indicated by the value TRUE in output parameter "InVelocity". The signal<br />
status of the input parameter "Execute" influences the display duration in the output<br />
parameter "InVelocity".<br />
● The second example shows the behavior if the task is aborted before achieving the<br />
parameterized velocity. If the motion control task is aborted before the parameterized<br />
velocity is reached, this is indicated by the value TRUE in output parameter<br />
"CommandAborted". The signal status of input parameter "Execute" influences the<br />
display duration in output parameter "CommandAborted".<br />
● The third example shows the behavior of the axis if an error occurs before achieving the<br />
parameterized velocity. If an error occurs during execution of the motion control task<br />
before the parameterized velocity has been reached, this is indicated by the value TRUE<br />
in the output parameter "Error". The signal status of the input parameter "Execute"<br />
influences the display duration in the output parameter "Error".<br />
<strong>S7</strong>-<strong>1200</strong> <strong>Programmable</strong> <strong>controller</strong><br />
414 System Manual, 04/2012, A5E02486680-06
Table 9- 64 Example 1 - If the parameterized velocity is reached<br />
<br />
<br />
<br />
<br />
<br />
<br />
<br />
<br />
<br />
<br />
<br />
<br />
<br />
<br />
<br />
<br />
<br />
If "Execute" = FALSE before the configured velocity is<br />
reached<br />
<br />
<br />
<br />
Technology instructions<br />
9.3 Motion control<br />
<strong>S7</strong>-<strong>1200</strong> <strong>Programmable</strong> <strong>controller</strong><br />
System Manual, 04/2012, A5E02486680-06 415<br />
<br />
<br />
<br />
<br />
<br />
<br />
<br />
<br />
<br />
<br />
<br />
<br />
<br />
<br />
If "Execute" = FALSE after the configured velocity is<br />
reached<br />
① The task is started with a positive edge at the input parameter "Execute". Depending on the programming, "Execute"<br />
can be reset to the value FALSE event before the parameterized velocity is reached, or alternatively only after it has been<br />
reached.<br />
② While the task is active, the output parameter "Busy" indicates the value TRUE.<br />
③ When the parameterized velocity is reached, the output parameter "InVelocity" changes to TRUE.<br />
④ If "Execute" retains the value TRUE even after the parameterized velocity has been reached, the task remains active.<br />
"InVelocity" and "Busy" retain the value TRUE and only change their status to FALSE together with "Execute".<br />
⑤ If "Execute" has been reset to FALSE before the parameterized velocity is reached, the task is complete when the<br />
parameterized velocity is reached. "InVelocity" indicates the value TRUE for one execution cycle and changes to FALSE<br />
together with "Busy".
Technology instructions<br />
9.3 Motion control<br />
Table 9- 65 Example 2 - If the task is aborted prior to reaching the parameterized velocity<br />
<br />
<br />
<br />
<br />
<br />
<br />
<br />
<br />
<br />
<br />
<br />
<br />
<br />
<br />
<br />
<br />
Abort<br />
<br />
If "Execute" = FALSE before the task is aborted<br />
<br />
<br />
<br />
<br />
<br />
<br />
<br />
<br />
<br />
<br />
<br />
<br />
<br />
<br />
<br />
<br />
<strong>S7</strong>-<strong>1200</strong> <strong>Programmable</strong> <strong>controller</strong><br />
416 System Manual, 04/2012, A5E02486680-06<br />
Abort<br />
<br />
If "Execute" = FALSE after the task is aborted<br />
① The task is started with a positive edge at the input parameter "Execute". Depending on the programming, "Execute"<br />
can still be reset to the value FALSE during the task, or the value TRUE can be retained until after the task is aborted.<br />
② While the task is active, the output parameter "Busy" indicates the value TRUE.<br />
③ During task execution, the task is aborted by another motion control task. If the task is aborted, output parameter<br />
"Busy" changes to FALSE and "CommandAborted" to TRUE.<br />
④ If "Execute" retains the value TRUE until after the task is aborted, then "CommandAborted" also remains TRUE and<br />
changes its status to FALSE together with "Execute".<br />
⑤ If "Execute" has been reset to FALSE before the task is aborted, "CommandAborted" indicates the value TRUE for only<br />
one execution cycle.<br />
Note<br />
Under the following conditions, an abort is not indicated in output parameter<br />
"CommandAborted":<br />
The parameterized velocity has been reached, input parameter "Execute" has the value<br />
FALSE, and a new motion control task is initiated.<br />
When the parameterized velocity is reached and input parameter "Execute" has the value<br />
FALSE, the task is complete. Therefore, the start of a new task is not indicated as an<br />
abort.
Table 9- 66 Example 3 - If an error occurs prior to reaching the parameterized velocity<br />
<br />
<br />
<br />
<br />
<br />
<br />
<br />
<br />
<br />
<br />
<br />
<br />
<br />
<br />
<br />
<br />
Error<br />
<br />
If "Execute" = FALSE before the error occurs<br />
<br />
<br />
<br />
<br />
<br />
<br />
<br />
<br />
<br />
<br />
<br />
<br />
Technology instructions<br />
9.3 Motion control<br />
<strong>S7</strong>-<strong>1200</strong> <strong>Programmable</strong> <strong>controller</strong><br />
System Manual, 04/2012, A5E02486680-06 417<br />
<br />
<br />
<br />
<br />
<br />
Error<br />
<br />
If "Execute" = FALSE after the error occurs<br />
① The task is started with a positive edge at the input parameter "Execute". Depending on the programming, "Execute"<br />
can still be reset to the value FALSE during the task, or the value TRUE can be retained until after the error has occurred.<br />
② While the task is active, the output parameter "Busy" indicates the value TRUE.<br />
③ An error occurred during task execution. When the error occurs, the output parameter "Busy" changes to FALSE and<br />
"Error" to TRUE.<br />
④ If "Execute" retains the value TRUE until after the error has occurred, then "Error" also remains TRUE and only<br />
changes its status to FALSE together with "Execute".<br />
⑤ If "Execute" has been reset to FALSE before the error occurs, "Error" indicates the value TRUE for only one execution<br />
cycle.<br />
Note<br />
Under the following conditions, an error is not indicated in output parameter "Error":<br />
The parameterized velocity has been reached, input parameter "Execute" has the value<br />
FALSE, and an axis error occurs (software limit switch is approached, for example).<br />
When the parameterized velocity is reached and input parameter "Execute" has the value<br />
FALSE, the task is complete. After completion of the task, the axis error is only indicated<br />
in the motion control instruction "MC_Power".
Technology instructions<br />
9.3 Motion control<br />
9.3.6.3 Monitoring the MC_MoveJog instruction<br />
The tasks of motion control instruction "MC_MoveJog" implement a jog operation.<br />
● The motion control tasks "MC_MoveJog" do not have a defined end. The task objective is<br />
fulfilled when the parameterized velocity is reached for the first time and the axis travels<br />
at constant velocity. When the parameterized velocity is reached, this is indicated by the<br />
value TRUE in output parameter "InVelocity".<br />
● The order is complete when input parameter "JogForward" or "JogBackward" has been<br />
set to the value FALSE and the axis has come to a standstill.<br />
● The output parameters "Busy", "CommandAborted", and "Error" signal that the task is still<br />
being processed, has been aborted or an error is pending.<br />
– During processing of the motion control task, the output parameter "Busy" indicates<br />
the value TRUE. If the task has been completed, aborted, or stopped by an error, the<br />
output parameter "Busy" changes its value to FALSE.<br />
– The output parameter "InVelocity" indicates the status TRUE, as long as the axis is<br />
moving at the parameterized velocity. The output parameters "CommandAborted" and<br />
"Error" indicate the status for at least one cycle. These status messages are latched<br />
as long as either input parameter "JogForward" or "JogBackward" is set to TRUE.<br />
The behavior of the status bits is presented below for various example situations.<br />
● The first example shows the behavior or the axis if the parameterized velocity is reached<br />
and maintained. If the motion control task has been executed by the time the<br />
parameterized velocity is reached, this is indicated by the value TRUE in output<br />
parameter "InVelocity".<br />
● The second example shows the behavior of the axis if the task is aborted. If the motion<br />
control task is aborted during execution, this is indicated by the value TRUE in output<br />
parameter "CommandAborted". The behavior is independent of whether or not the<br />
parameterized velocity has been reached.<br />
● The third example shows the behavior of the axis if an error occurs. If an error occurs<br />
during execution of the motion control task, this is indicated by the value TRUE in output<br />
parameter "Error". The behavior is independent of whether or not the parameterized<br />
velocity has been reached.<br />
<strong>S7</strong>-<strong>1200</strong> <strong>Programmable</strong> <strong>controller</strong><br />
418 System Manual, 04/2012, A5E02486680-06
Table 9- 67 Example 1 - If the parameterized velocity is reached and maintained<br />
<br />
<br />
<br />
<br />
<br />
<br />
<br />
<br />
<br />
<br />
<br />
<br />
<br />
<br />
JogForward<br />
<br />
<br />
<br />
<br />
<br />
<br />
<br />
<br />
<br />
<br />
<br />
<br />
<br />
<br />
<br />
<br />
<br />
<br />
<br />
<br />
Technology instructions<br />
9.3 Motion control<br />
<strong>S7</strong>-<strong>1200</strong> <strong>Programmable</strong> <strong>controller</strong><br />
System Manual, 04/2012, A5E02486680-06 419<br />
<br />
<br />
<br />
<br />
<br />
JogBackward<br />
<br />
① The task is started with a positive edge at the input parameter "JogForward" or "JogBackward".<br />
② While the task is active, the output parameter "Busy" indicates the value TRUE.<br />
③ When the parameterized velocity is reached, the output parameter "InVelocity" changes to TRUE.<br />
④ When the input parameter "JogForward" or "JogBackward" is reset to the value FALSE, the axis motion ends. The axis<br />
starts to decelerate. As a result, the axis no longer moves at constant velocity and the output parameter "InVelocity"<br />
changes its status to FALSE.<br />
⑤ If the axis has come to a standstill, the motion control task is complete and the output parameter "Busy" changes its<br />
value to FALSE.
Technology instructions<br />
9.3 Motion control<br />
Table 9- 68 Example 2 - If the task is aborted during execution<br />
<br />
<br />
<br />
<br />
<br />
<br />
<br />
<br />
<br />
<br />
<br />
<br />
<br />
<br />
<br />
<br />
<br />
<br />
JogForward<br />
Abort<br />
<br />
<br />
<br />
<br />
<br />
<br />
<br />
<br />
<br />
<br />
<br />
<br />
<br />
<br />
<br />
<br />
<br />
<br />
<br />
JogBackward<br />
<strong>S7</strong>-<strong>1200</strong> <strong>Programmable</strong> <strong>controller</strong><br />
420 System Manual, 04/2012, A5E02486680-06<br />
Abort<br />
<br />
① The task is started with a positive edge at the input parameter "JogForward" or "JogBackward".<br />
② While the task is active, the output parameter "Busy" indicates the value TRUE.<br />
③ During task execution, the task is aborted by another motion control task. If the task is aborted, output parameter<br />
"Busy" changes to FALSE and "CommandAborted" to TRUE.<br />
④ When the input parameter "JogForward" or "JogBackward" is reset to the value FALSE, the output parameter<br />
"CommandAborted" changes its value to FALSE.<br />
Note<br />
The task abort is indicated in the output parameter "CommandAborted" for only one<br />
execution cycle, if all conditions below are met:<br />
The input parameters "JogForward" and "JogBackward" have the value FALSE (but the axis<br />
is still decelerating) and a new motion control task is initiated.
Table 9- 69 Example 3 - If an error has occurred during task execution<br />
<br />
<br />
<br />
<br />
<br />
<br />
<br />
<br />
<br />
<br />
<br />
<br />
<br />
<br />
JogForward<br />
<br />
<br />
<br />
<br />
<br />
Error<br />
<br />
<br />
<br />
<br />
<br />
<br />
<br />
<br />
<br />
<br />
<br />
<br />
<br />
<br />
<br />
Technology instructions<br />
9.3 Motion control<br />
<strong>S7</strong>-<strong>1200</strong> <strong>Programmable</strong> <strong>controller</strong><br />
System Manual, 04/2012, A5E02486680-06 421<br />
<br />
<br />
<br />
<br />
<br />
JogBackward<br />
Error<br />
<br />
① The task is started with a positive edge at the input parameter "JogForward" or "JogBackward".<br />
② While the task is active, the output parameter "Busy" indicates the value TRUE.<br />
③ An error occurred during task execution. When the error occurs, the output parameter "Busy" changes to FALSE and<br />
"Error" to TRUE.<br />
④ When the input parameter "JogForward" or "JogBackward" is reset to the value FALSE, the output parameter "Error"<br />
changes its value to FALSE.<br />
Note<br />
An error occurrence is indicated in the output parameter "Error" for only one execution cycle,<br />
if all the conditions below are met:<br />
The input parameters "JogForward" and "JogBackward" have the value FALSE (but the axis<br />
is still decelerating) and a new error occurs (software limit switch is approached, for<br />
example).
Technology instructions<br />
9.3 Motion control<br />
<strong>S7</strong>-<strong>1200</strong> <strong>Programmable</strong> <strong>controller</strong><br />
422 System Manual, 04/2012, A5E02486680-06
Communication 10<br />
PROFINET<br />
The <strong>S7</strong>-<strong>1200</strong> offers several types of communication between CPUs and programming<br />
devices, HMIs, and other CPUs.<br />
PROFINET is used for exchanging data through the user program with other<br />
communications partners through Ethernet:<br />
● The CPU provides the following PROFINET and PROFIBUS support:<br />
– In V3.0, PROFINET supports 16 IO devices with a maximum of 256 submodules.<br />
PROFIBUS allows 3 independent PROFIBUS DP Masters, supporting 32 IO devices<br />
with a maximum of 512 submodules per IO device.<br />
– In V2.2. PROFINET supports 8 IO devices with a maximum of 128 submodules (if<br />
eight or less PROFIBUS slaves or submodules are configured). PROFIBUS supports<br />
a maximum of 16 PROFIBUS IO devices on a single master with a maximum of 256<br />
submodules per IO device.<br />
● <strong>S7</strong> communication<br />
● User Datagram Protocol (UDP) protocol<br />
● ISO on TCP (RFC 1006)<br />
● Transport Control Protocol (TCP)<br />
PROFINET RT IO <strong>controller</strong><br />
As an IO <strong>controller</strong> using PROFINET RT, the CPU provides the following support on the<br />
local PN network or through a PN/PN coupler (link). Refer to PROFIBUS and PROFINET<br />
International, PI (www.us.profinet.com) for more information:<br />
● In V3.0, the <strong>S7</strong>-<strong>1200</strong> communicates with up to 16 PN devices.<br />
● In V2.2, the <strong>S7</strong>-<strong>1200</strong> communicates with up to 8 PN devices.<br />
PROFIBUS<br />
PROFIBUS is used for exchanging data through the user program with other<br />
communications partners through the PROFIBUS network:<br />
● With CM 1242-5, the CPU operates as a PROFIBUS DP slave.<br />
● With CM 1243-5, the CPU operates as a PROFIBUS DP master class1.<br />
● In V3.0, PROFIBUS DP Slaves, PROFIBUS DP Masters, and ASi (the 3 left-side<br />
communication modules) and PROFINET are separate.<br />
<strong>S7</strong>-<strong>1200</strong> <strong>Programmable</strong> <strong>controller</strong><br />
System Manual, 04/2012, A5E02486680-06 423
Communication<br />
10.1 Number of asynchronous communication connections supported<br />
Teleservice communication<br />
● In V2.2, The CPU provides the following PROFINET and PROFIBUS support:<br />
– A total of 16 devices and 256 submodules, with a maximum of 16 PROFIBUS DP<br />
slave devices and 256 submodules (if no PROFINET IO devices or submodules are<br />
configured).<br />
Note<br />
In V2.2, the total of 16 PROFINET and PROFIBUS devices includes the following:<br />
The PROFIBUS DP slave modules attached by the PROFIBUS DP master<br />
(CM 1243-5)<br />
Any PROFIBUS DP slave module (CM 1242-5) connected to the CPU<br />
Any PROFINET device connected to the CPU over the PROFINET port<br />
For example, a configuration with three PROFIBUS CMs (one CM 1243-5 master and<br />
two CM 1242-5 slave modules) will reduce the maximum number of slave modules<br />
that can be accessed by the PROFIBUS DP Master (CM 1243-5) to 14.<br />
● AS-i: The <strong>S7</strong>-<strong>1200</strong> CM 1243-2 AS-i Master allows the attachment of an AS-i network to<br />
an <strong>S7</strong>-<strong>1200</strong> CPU.<br />
● CPU-to-CPU <strong>S7</strong> communication<br />
In TeleService via GPRS, an engineering station on which STEP 7 is installed communicates<br />
via the GSM network and the Internet with a SIMATIC <strong>S7</strong>-<strong>1200</strong> station with a CP 1242-7.<br />
The connection runs via a telecontrol server that serves as an intermediary and is connected<br />
to the Internet.<br />
10.1 Number of asynchronous communication connections supported<br />
The CPU supports the following maximum number of simultaneous, asynchronous<br />
communication connections for PROFINET and PROFIBUS:<br />
● 8 connections for Open User Communications (active or passive): TSEND_C, TRCV_C,<br />
TCON, TDISCON, TSEND, and TRCV.<br />
● 3 CPU-to-CPU <strong>S7</strong> connections for server GET/PUT data<br />
● 8 CPU-to-CPU <strong>S7</strong> connections for client GET/PUT data<br />
Note<br />
<strong>S7</strong>-<strong>1200</strong>, <strong>S7</strong>-300, and <strong>S7</strong>-400 CPUs use the GET and PUT instructions for CPU-to-CPU<br />
<strong>S7</strong> communication. An <strong>S7</strong>-200 CPU uses ETHx_XFER instructions for CPU-to-CPU<br />
<strong>S7</strong> communication.<br />
<strong>S7</strong>-<strong>1200</strong> <strong>Programmable</strong> <strong>controller</strong><br />
424 System Manual, 04/2012, A5E02486680-06
10.2 PROFINET<br />
Communication<br />
10.2 PROFINET<br />
● HMI connections: The CPU provides dedicated HMI connections to support up to 3 HMI<br />
devices. (You can have up to 2 SIMATIC Comfort panels.) The total number of HMI is<br />
affected by the types of HMI panels in your configuration. For example, you could have<br />
up to three SIMATIC Basic panels connected to your CPU, or you could have up to two<br />
SIMATIC Comfort panels with one additional Basic panel.<br />
● PG connections: The CPU provides connections to support 1 programming device (PG).<br />
● Webserver (HTTP) connections: The CPU provides connections for the Webserver.<br />
10.2.1 Local/Partner connection<br />
A Local / Partner (remote) connection defines a logical assignment of two communication<br />
partners to establish communication services. A connection defines the following:<br />
● Communication partners involved (One active, one passive)<br />
● Type of connection (for example, a PLC, HMI, or device connection)<br />
● Connection path<br />
Communication partners execute the instructions to set up and establish the communication<br />
connection. You use parameters to specify the active and passive communication end point<br />
partners. After the connection is set up and established, it is automatically maintained and<br />
monitored by the CPU. Refer to the section on "Configuring the Local/Partner connection"<br />
(Page 127) for information about configuring the parameters for the connection.<br />
If the connection is terminated (for example, due to a line break), the active partner attempts<br />
to re-establish the configured connection. You do not have to execute the communication<br />
instruction again.<br />
<strong>S7</strong>-<strong>1200</strong> <strong>Programmable</strong> <strong>controller</strong><br />
System Manual, 04/2012, A5E02486680-06 425
Communication<br />
10.2 PROFINET<br />
Ethernet switching<br />
The CPU can communicate with other CPUs, with programming devices, with HMI devices,<br />
and with non-Siemens devices using standard TCP communications protocols.<br />
Programming device connected to the<br />
CPU<br />
HMI connected to the CPU<br />
A CPU connected to another CPU<br />
The PROFINET port on the CPU 1211C, 1212C, and 1214C does not contain an Ethernet<br />
switching device. A direct connection between a programming device or HMI and a CPU<br />
does not require an Ethernet switch. However, a network with more than two CPUs or HMI<br />
devices requires an Ethernet switch.<br />
2<br />
1<br />
① CPU 1215C<br />
② CSM1277<br />
Ethernet switch<br />
<strong>S7</strong>-<strong>1200</strong> <strong>Programmable</strong> <strong>controller</strong><br />
426 System Manual, 04/2012, A5E02486680-06
Communication<br />
10.2 PROFINET<br />
The CPU 1215C does have a 2-port Ethernet switch built into it. You can have a network<br />
with a CPU 1215C and two other <strong>S7</strong>-<strong>1200</strong> CPUs. You can also use the rack-mounted<br />
CSM1277 4-port Ethernet switch for connecting multiple CPUs and HMI devices.<br />
10.2.2 Open user communication<br />
10.2.2.1 Connection IDs for the PROFINET instructions<br />
When you insert the TSEND_C, TRCV_C or TCON PROFINET instructions into your user<br />
program, STEP 7 creates an instance DB to configure the communications channel (or<br />
connection) between the devices. Use the "Properties" of the instruction to configure the<br />
parameters for the connection. Among the parameters is the connection ID for that<br />
connection.<br />
● The connection ID must be unique for the CPU. Each connection that you create must<br />
have a different DB and connection ID.<br />
● Both the local CPU and the partner CPU can use the same connection ID number for the<br />
same connection, but the connection ID numbers are not required to match. The<br />
connection ID number is relevant only for the PROFINET instructions within the user<br />
program of the individual CPU.<br />
● You can use any number for the connection ID of the CPU. However, configuring the<br />
connection IDs sequentially from "1" provides an easy method for tracking the number of<br />
connections in use for a specific CPU.<br />
Note<br />
Each TSEND_C, TRCV_C or TCON instruction in your user program creates a new<br />
connection. It is important to use the correct connection ID for each connection.<br />
<strong>S7</strong>-<strong>1200</strong> <strong>Programmable</strong> <strong>controller</strong><br />
System Manual, 04/2012, A5E02486680-06 427
Communication<br />
10.2 PROFINET<br />
The following example shows the communication between two CPUs that utilize 2 separate<br />
connections for sending and receiving the data.<br />
● The TSEND_C instruction in CPU_1 links to the TRCV_V in CPU_2 over the first<br />
connection ("connection ID 1" on both CPU_1 and CPU_2).<br />
● The TRCV_C instruction in CPU_1 links to the TSEND_C in CPU_2 over the second<br />
connection ("connection ID 2" on both CPU_1 and CPU_2).<br />
<br />
<br />
<br />
<br />
<br />
<br />
<br />
<br />
<br />
<br />
<br />
<br />
<br />
① TSEND_C on CPU_1 creates a<br />
connection and assigns a connection<br />
ID to that connection (connection ID 1<br />
for CPU_1).<br />
② TRCV_C on CPU_2 creates the<br />
connection for CPU_2 and assigns the<br />
connection ID (connection ID 1 for<br />
CPU_2).<br />
③ TRCV_C on CPU_1 creates a second<br />
connection for CPU_1 and assigns a<br />
different connection ID for that<br />
connection (connection ID 2 for<br />
CPU_1).<br />
④ TSEND_C on CPU_2 creates a<br />
second connection and assigns a<br />
different connection ID for that<br />
connection (connection ID 2 for<br />
CPU_2).<br />
<strong>S7</strong>-<strong>1200</strong> <strong>Programmable</strong> <strong>controller</strong><br />
428 System Manual, 04/2012, A5E02486680-06
Communication<br />
10.2 PROFINET<br />
The following example shows the communication between two CPUs that utilize 1<br />
connection for both sending and receiving the data.<br />
● Each CPU uses a TCON instruction to configure the connection between the two CPUs.<br />
● The TSEND instruction in CPU_1 links to the TRCV instruction in CPU_2 by using the<br />
connection ID ("connection ID 1") that was configured by the TCON instruction in CPU_1.<br />
The TRCV instruction in CPU_2 links to the TSEND instruction in CPU_1 by using the<br />
connection ID ("connection ID 1") that was configured by the TCON instruction in CPU_2.<br />
● The TSEND instruction in CPU_2 links to the TRCV instruction in CPU_1 by using the<br />
connection ID ("connection ID 1") that was configured by the TCON instruction in CPU_2.<br />
The TRCV instruction in CPU_1 links to the TSEND instruction in CPU_2 by using the<br />
connection ID ("connection ID 1") that was configured by the TCON instruction in CPU_1.<br />
<br />
<br />
<br />
<br />
<br />
<br />
<br />
<br />
<br />
① TCON on CPU_1 creates a<br />
connection and assigns a connection<br />
ID for that connection on CPU_1<br />
(ID=1).<br />
② TCON on CPU_2 creates a<br />
connection and assigns a connection<br />
ID for that connection on CPU_2<br />
(ID=1).<br />
③ TSEND and TRCV on CPU_1 use the<br />
connection ID created by the TCON<br />
on CPU_1 (ID=1).<br />
TSEND and TRCV on CPU_2 use the<br />
connection ID created by the TCON<br />
on CPU_2 (ID=1).<br />
<strong>S7</strong>-<strong>1200</strong> <strong>Programmable</strong> <strong>controller</strong><br />
System Manual, 04/2012, A5E02486680-06 429
Communication<br />
10.2 PROFINET<br />
See also<br />
As shown in the following example, you can also use individual TSEND and TRCV<br />
instruction to communication over a connection created by a TSEND_C or TRCV_C<br />
instruction. The TSEND and TRCV instructions do not themselves create a new connection,<br />
so must use the DB and connection ID that was created by a TSEND_C, TRCV_C or TCON<br />
instruction.<br />
<br />
<br />
<br />
<br />
<br />
<br />
<br />
10.2.2.2 Protocols<br />
<br />
<br />
<br />
Configuring the Local/Partner connection path (Page 127)<br />
① TSEND_C on CPU_1 creates a<br />
connection and assigns a connection<br />
ID to that connection (ID=1).<br />
② TRCV_C on CPU_2 creates a<br />
connection and assigns the<br />
connection ID to that connection on<br />
CPU_2 (ID=1).<br />
③ TSEND and TRCV on CPU_1 use the<br />
connection ID created by the<br />
TSEND_C on CPU_1 (ID=1).<br />
TSEND and TRCV on CPU_2 use the<br />
connection ID created by the TRCV_C<br />
on CPU_2 (ID=1).<br />
The integrated PROFINET port of the CPU supports multiple communications standards<br />
over an Ethernet network:<br />
● Transport Control Protocol (TCP)<br />
● ISO on TCP (RFC 1006)<br />
● User Datagram Protocol (UDP)<br />
Table 10- 1 Protocols and communication instructions for each<br />
Protocol Usage examples Entering data in the<br />
receive area<br />
TCP CPU-to-CPU<br />
communication<br />
Transport of frames Data reception with<br />
specified length<br />
Communication<br />
instructions<br />
Ad hoc mode Only TRCV_C and<br />
TRCV<br />
TSEND_C, TRCV_C,<br />
TCON, TDISCON,<br />
TSEND, and TRCV<br />
Addressing type<br />
Assigns port numbers to<br />
the Local (active) and<br />
Partner (passive)<br />
devices<br />
<strong>S7</strong>-<strong>1200</strong> <strong>Programmable</strong> <strong>controller</strong><br />
430 System Manual, 04/2012, A5E02486680-06
Protocol Usage examples Entering data in the<br />
receive area<br />
ISO on TCP CPU-to-CPU<br />
communication<br />
Message<br />
fragmentation and reassembly<br />
UDP CPU-to-CPU<br />
communication<br />
User program<br />
communications<br />
<strong>S7</strong> communication CPU-to-CPU<br />
communication<br />
Read/write data<br />
from/to a CPU<br />
PROFINET RT CPU-to-PROFINET<br />
IO device<br />
communication<br />
10.2.2.3 Ad hoc mode<br />
Communication<br />
instructions<br />
Ad hoc mode Only TRCV_C and<br />
TRCV<br />
Protocol-controlled TSEND_C, TRCV_C,<br />
TCON, TDISCON,<br />
TSEND, and TRCV<br />
Communication<br />
10.2 PROFINET<br />
Addressing type<br />
Assigns TSAPs to the<br />
Local (active) and<br />
Partner (passive)<br />
devices<br />
User Datagram Protocol TUSEND and TURCV Assigns port numbers to<br />
the Local (active) and<br />
Partner (passive)<br />
devices, but is not a<br />
dedicated connection<br />
Data transmission and<br />
reception with specified<br />
length<br />
Data transmission and<br />
reception with specified<br />
length<br />
GET and PUT Assigns TSAPs to the<br />
Local (active) and<br />
Partner (passive)<br />
devices<br />
Built-in Built-in<br />
Typically, TCP and ISO-on-TCP receive data packets of a specified length, ranging from 1 to<br />
8192 bytes. However, the TRCV_C and TRCV communication instructions also provide an<br />
"ad hoc" communications mode that can receive data packets of a variable length from 1 to<br />
1472 bytes.<br />
Note<br />
If you store the data in an "optimized" DB (symbolic only), you can receive data only in<br />
arrays of Byte, Char, USInt, and SInt data types.<br />
To configure the TRCV_C or TRCV instruction for ad hoc mode, set the LEN parameter to<br />
65535 (0xFFFF).<br />
If you do not call the TRCV_C or TRCV instruction in ad hoc mode frequently, you could<br />
receive more than one packet in one call. For example: If you were to receive five 100-byte<br />
packets with one call, TCP would deliver these five packets as one 500-byte packet, while<br />
ISO-on-TCP would restructure the packets into five 100-byte packets.<br />
10.2.2.4 TCP and ISO on TCP<br />
Transport Control Protocol (TCP) is a standard protocol described by RFC 793:<br />
Transmission Control Protocol. The primary purpose of TCP is to provide reliable, secure<br />
connection service between pairs of processes. This protocol has the following features:<br />
● An efficient communications protocol since it is closely tied to the hardware<br />
● Suitable for medium-sized to large data amounts (up to 8192 bytes)<br />
● Provides considerably more facilities for applications, notably error recovery, flow control,<br />
and reliability<br />
<strong>S7</strong>-<strong>1200</strong> <strong>Programmable</strong> <strong>controller</strong><br />
System Manual, 04/2012, A5E02486680-06 431
Communication<br />
10.2 PROFINET<br />
● A connection-oriented protocol<br />
● Can be used very flexibly with third-party systems which exclusively support TCP<br />
● Routing-capable<br />
● Only static data lengths are applicable.<br />
● Messages are acknowledged.<br />
● Applications are addressed using port numbers.<br />
● Most of the user application protocols, such as TELNET and FTP, use TCP.<br />
● Programming effort is required for data management due to the SEND / RECEIVE<br />
programming interface.<br />
International Standards Organization (ISO) on Transport Control Protocol (TCP) (RFC 1006)<br />
(ISO on TCP) is a mechanism that enables ISO applications to be ported to the TCP/IP<br />
network. This protocol has the following features:<br />
● An efficient communications protocol closely tied to the hardware<br />
● Suitable for medium-sized to large data amounts (up to 8192 bytes)<br />
● In contrast to TCP, the messages feature an end-of-data identification and are messageoriented.<br />
● Routing-capable; can be used in WAN<br />
● Dynamic data lengths are possible.<br />
● Programming effort is required for data management due to the SEND / RECEIVE<br />
programming interface.<br />
Using Transport Service Access Points (TSAPs), TCP protocol allows multiple connections<br />
to a single IP address (up to 64K connections). With RFC 1006, TSAPs uniquely identify<br />
these communication end point connections to an IP address.<br />
TSEND_C and TRCV_C<br />
The TSEND_C instruction combines the functions of the TCON, TDISCON and TSEND<br />
instructions. The TRCV_C instruction combines the functions of the TCON, TDISCON, and<br />
TRCV instructions. (Refer to "TCON, TDISCON, TSEND, AND TRCV (Page 439)" for more<br />
information on these instructions.)<br />
<strong>S7</strong>-<strong>1200</strong> <strong>Programmable</strong> <strong>controller</strong><br />
432 System Manual, 04/2012, A5E02486680-06
Communication<br />
10.2 PROFINET<br />
The minimum size of data that you can transmit (TSEND_C) or receive (TRCV_C) is one<br />
byte; the maximum size is 8192 bytes. TSEND_C does not support the transmission of data<br />
from boolean locations, and TRCV_C will not receive data into boolean locations. For<br />
information transferring data with these instructions, see the section on data consistency<br />
(Page 153).<br />
Note<br />
Initializing the communication parameters<br />
After you insert the TSEND_C or TRCV_C instruction, use the "Properties" of the instruction<br />
(Page 127) to configure the communication parameters. As you enter the parameters for the<br />
communication partners in the inspector window, STEP 7 enters the corresponding data in<br />
the DB for the instruction.<br />
If you want to use a multi-instance DB, you must manually configure the DB on both CPUs.<br />
Table 10- 2 TSEND_C and TRCV_C instructions<br />
LAD / FBD SCL Description<br />
"TSEND_C_DB"(<br />
req:=_bool_in_,<br />
cont:=_bool_in_,<br />
len:=_uint_in_,<br />
done=>_bool_out_,<br />
busy=>_bool_out_,<br />
error=>_bool_out_,<br />
status=>_word_out_,<br />
connect:=_struct_inout_,<br />
data:=_variant_inout_,<br />
com_rst:=_bool_inout_);<br />
"TRCV_C_DB"(<br />
en_r:=_bool_in_,<br />
cont:=_bool_in_,<br />
len:=_uint_in_,<br />
done=>_bool_out_,<br />
busy=>_bool_out_,<br />
error=>_bool_out_,<br />
status=>_word_out_,<br />
rcvd_len=>_uint_out_,<br />
connect:=_struct_inout_,<br />
data:=_variant_inout_,<br />
com_rst:=_bool_inout_);<br />
1 STEP 7 automatically creates the DB when you insert the instruction.<br />
TSEND_C establishes a TCP or ISO on TCP<br />
communication connection to a partner station,<br />
sends data, and can terminate the connection.<br />
After the connection is set up and established, it<br />
is automatically maintained and monitored by<br />
the CPU.<br />
TRCV_C establishes a TCP or ISO on TCP<br />
communication connection to a partner CPU,<br />
receives data, and can terminate the connection.<br />
After the connection is set up and established, it<br />
is automatically maintained and monitored by<br />
the CPU.<br />
<strong>S7</strong>-<strong>1200</strong> <strong>Programmable</strong> <strong>controller</strong><br />
System Manual, 04/2012, A5E02486680-06 433
Communication<br />
10.2 PROFINET<br />
Table 10- 3 TSEND_C and TRCV_C data types for the parameters<br />
Parameter and type Data type Description<br />
REQ<br />
IN Bool Control parameter REQ starts the send job with the connection<br />
(TSEND_C)<br />
described in CONNECT on a rising edge.<br />
EN_R<br />
IN Bool Control parameter enabled to receive: When EN_R = 1,<br />
(TRCV_C)<br />
TRCV_C is ready to receive. The receive job is processed.<br />
CONT IN Bool 0: Disconnect<br />
1: Establish and hold connection<br />
LEN IN UInt Maximum number of bytes to be sent (TSEND_C) or received<br />
(TRCV_C):<br />
Default = 0: The DATA parameter determines the length of<br />
the data to be sent (TSEND_C) or received (TRCV_C).<br />
Ad hoc mode = 65535: A variable length of data is set for<br />
reception (TRCV_C).<br />
CONNECT IN_OUT TCON_Param Pointer to the connection description<br />
DATA IN_OUT Variant Contains address and length of data to be sent (TSEND_C)<br />
Contains start address and maximum length of received<br />
data (TRCV_C).<br />
COM_RST IN_OUT Bool Allows restart of the instruction:<br />
0: Irrelevant<br />
1: Complete restart of the function block, existing connection<br />
will be terminated.<br />
DONE OUT Bool 0: Job is not yet started or still running.<br />
1: Job completed without error.<br />
BUSY OUT Bool 0: Job is completed.<br />
1: Job is not yet completed. A new job cannot be triggered.<br />
ERROR OUT Bool Status parameters with the following values:<br />
0: No error<br />
1: Error occurred during processing. STATUS provides<br />
detailed information on the type of error.<br />
STATUS OUT Word Status information including error information. (Refer to the<br />
"Error and Status Parameters" table below.)<br />
RCVD_LEN<br />
(TRCV_C)<br />
OUT Int Amount of data actually received, in bytes<br />
Note<br />
The TSEND_C instruction requires a low-to-high transition at the REQ input parameter to<br />
start a send job. The BUSY parameter is then set to 1 during processing. Completion of the<br />
send job is indicated by either the DONE or ERROR parameters being set to 1 for one scan.<br />
During this time, any low-to-high transition at the REQ input parameter is ignored.<br />
<strong>S7</strong>-<strong>1200</strong> <strong>Programmable</strong> <strong>controller</strong><br />
434 System Manual, 04/2012, A5E02486680-06
Communication<br />
10.2 PROFINET<br />
Note<br />
The default setting of the LEN parameter (LEN = 0) uses the DATA parameter to determine<br />
the length of the data being transmitted. Ensure that the DATA transmitted by the TSEND_C<br />
instruction is the same size as the DATA parameter of the TRCV_C instruction.<br />
TSEND_C operations<br />
The following functions describe the operation of the TSEND_C instruction:<br />
● To establish a connection, execute TSEND_C with CONT = 1.<br />
● After successful establishing of the connection, TSEND_C sets the DONE parameter for<br />
one cycle.<br />
● To terminate the communication connection, execute TSEND_C with CONT = 0. The<br />
connection will be aborted immediately. This also affects the receiving station. The<br />
connection will be closed there and data inside the receive buffer could be lost.<br />
● To send data over an established connection, execute TSEND_C with a rising edge on<br />
REQ. After a successful send operation, TSEND_C sets the DONE parameter for one<br />
cycle.<br />
● To establish a connection and send data, execute TSEND_C with CONT =1 and REQ =<br />
1. After a successful send operation, TSEND_C sets the DONE parameter for one cycle.<br />
TRCV_C operations<br />
The following functions describe the operation of the TRCV_C instruction:<br />
● To establish a connection, execute TRCV_C with parameter CONT = 1.<br />
● To receive data, execute TRCV_C with parameter EN_R = 1. TRCV_C receives the data<br />
continuously when parameters EN_R = 1 and CONT = 1.<br />
● To terminate the connection, execute TRCV_C with parameter CONT = 0. The<br />
connection will be aborted immediately, and data could be lost.<br />
TRCV_C handles the same receive modes as the TRCV instruction. The following table<br />
shows how data is entered in the receive area.<br />
Table 10- 4 Entering the data into the receive area<br />
Protocol<br />
variant<br />
Entering the data in the<br />
receive area<br />
Parameter<br />
"connection_type"<br />
Value of the LEN parameter Value of the RCVD_LEN<br />
parameter (bytes)<br />
TCP Ad hoc mode B#16#11 65535 1 to 1472<br />
TCP Data reception with B#16#11 0 (recommended) or 1 to 1 to 8192<br />
specified length<br />
8192, except 65535<br />
ISO on TCP Ad hoc mode B#16#12 65535 1 to 1472<br />
ISO on TCP Protocol-controlled B#16#12 0 (recommended) or 1 to<br />
8192, except 65535<br />
1 to 8192<br />
<strong>S7</strong>-<strong>1200</strong> <strong>Programmable</strong> <strong>controller</strong><br />
System Manual, 04/2012, A5E02486680-06 435
Communication<br />
10.2 PROFINET<br />
Note<br />
Ad hoc mode<br />
The "ad hoc mode" exists with the TCP and ISO on TCP protocol variants. You set "ad hoc<br />
mode" by assigning "65535" to the LEN parameter. The receive area is identical to the area<br />
formed by DATA. The length of the received data will be output to the parameter<br />
RCVD_LEN.<br />
If you store the data in an "optimized" DB (symbolic only), you can receive data only in<br />
arrays of Byte, Char, USInt, and SInt data types.<br />
Note<br />
Importing of <strong>S7</strong>-300/400 STEP 7 projects containing "ad hoc mode" into the <strong>S7</strong>-<strong>1200</strong><br />
In <strong>S7</strong>-300/400 STEP 7 projects, "ad hoc mode" is selected by assigning "0" to the LEN<br />
parameter. In the <strong>S7</strong>-<strong>1200</strong>, you set "ad hoc mode" by assigning "65535" to the LEN<br />
parameter.<br />
If you import an <strong>S7</strong>-300/400 STEP 7 project containing "ad hoc mode" into the <strong>S7</strong>-<strong>1200</strong>, you<br />
must change the LEN parameter to "65535".<br />
Note<br />
Due to the asynchronous processing of TSEND_C, you must keep the data in the sender<br />
area consistent until the DONE parameter or the ERROR parameter assumes the value<br />
TRUE.<br />
For TSEND_C, a TRUE state at the parameter DONE means that the data was sent<br />
successfully. It does not mean that the connection partner CPU actually read the receive<br />
buffer.<br />
Due to the asynchronous processing of TRCV_C, the data in the receiver area are only<br />
consistent when parameter DONE = 1.<br />
Table 10- 5 TSEND_C and TRCV_C instructions BUSY, DONE, and ERROR parameters<br />
BUSY DONE ERROR Description<br />
TRUE irrelevant irrelevant The job is being processed.<br />
FALSE TRUE FALSE The job is successfully completed.<br />
FALSE FALSE TRUE The job was ended with an error. The cause of the error can be found<br />
in the STATUS parameter.<br />
FALSE FALSE FALSE A new job was not assigned.<br />
<strong>S7</strong>-<strong>1200</strong> <strong>Programmable</strong> <strong>controller</strong><br />
436 System Manual, 04/2012, A5E02486680-06
Error and Status Parameters<br />
Table 10- 6 TSEND_C and TRCV_C condition codes for ERROR and STATUS<br />
Communication<br />
10.2 PROFINET<br />
ERROR STATUS Description<br />
0 0000 Job executed without error<br />
0 7000 No job processing active<br />
0 7001 Start job processing, establishing connection, waiting for connection partner<br />
0 7002 Data being sent or received<br />
0 7003 Connection being terminated<br />
0 7004 Connection established and monitored, no job processing active<br />
1 8085 LEN parameter is greater than the largest permitted value.<br />
1 8086 The CONNECT parameter is outside the permitted range.<br />
1 8087 Maximum number of connections reached; no additional connection possible.<br />
1 8088 LEN parameter is not valid for the memory area specified in DATA.<br />
1 8089 The CONNECT parameter does not point to a data block.<br />
1 8091 Maximum nesting depth exceeded.<br />
1 809A The CONNECT parameter points to a field that does not match the length of the<br />
connection description.<br />
1 809B The local_device_id in the connection description does not match the CPU.<br />
1 80A1 Communications error:<br />
The specified connection was not yet established<br />
The specified connection is currently being terminated; transmission over this<br />
connection is not possible<br />
The interface is being reinitialized<br />
1 80A3 Attempt being made to terminate a nonexistent connection<br />
1 80A4 IP address of the remote partner connection is invalid. For example, the remote partner<br />
IP address is the same as the local partner IP address.<br />
1 80A5 Connection ID is already in use.<br />
1 80A7 Communications error: You called TDISCON before TSEND_C was complete.<br />
1 80B2 The CONNECT parameter points to a data block that was generated with the keyword<br />
UNLINKED.<br />
1 80B3 Inconsistent parameters:<br />
Error in the connection description<br />
Local port (parameter local_tsap_id) is already present in another connection<br />
description.<br />
ID in the connection description different from the ID specified as parameter<br />
<strong>S7</strong>-<strong>1200</strong> <strong>Programmable</strong> <strong>controller</strong><br />
System Manual, 04/2012, A5E02486680-06 437
Communication<br />
10.2 PROFINET<br />
ERROR STATUS Description<br />
1 80B4 When using the ISO on TCP (connection_type = B#16#12) to establish a passive<br />
connection, condition code 80B4 alerts you that the TSAP entered did not conform to<br />
one of the following address requirements:<br />
For a local TSAP length of 2 and a TSAP ID value of either E0 or E1 (hexadecimal)<br />
for the first byte, the second byte must be either 00 or 01.<br />
For a local TSAP length of 3 or greater and a TSAP ID value of either E0 or E1<br />
(hexadecimal) for the first byte, the second byte must be either 00 or 01 and all<br />
other bytes must be valid ASCII characters.<br />
For a local TSAP length of 3 or greater and the first byte of the TSAP ID does not<br />
have a value of either E0 or E1 (hexadecimal), then all bytes of the TSAP ID must<br />
be valid ASCII characters.<br />
1 80B7<br />
Valid ASCII characters are byte values from 20 to 7E (hexadecimal).<br />
Data type and/or length of the transmitted data does not fit in the area in the partner<br />
CPU in which it is to be written.<br />
1 80C3 All connection resources are in use.<br />
1 80C4 Temporary communications error:<br />
The connection cannot be established at this time<br />
The interface is receiving new parameters<br />
The configured connection is currently being removed by a TDISCON.<br />
1 8722 CONNECT parameter: Source area invalid: area does not exist in DB.<br />
1 873A CONNECT parameter: Access to connection description is not possible (for example,<br />
DB not available)<br />
1 877F CONNECT parameter: Internal error such as an invalid ANY reference<br />
1 893A Parameter contains the number of a DB that is not loaded.<br />
Connection Ethernet protocols<br />
Every CPU has an integrated PROFINET port, which supports standard PROFINET<br />
communications. The TSEND_C and TRCV_C and TSEND and TRCV instructions all<br />
support the TCP and ISO on TCP Ethernet protocols.<br />
Refer to "Device Configuration: Configuring the Local/Partner connection path (Page 127)"<br />
for more information.<br />
See also<br />
Parameters for the PROFINET connection (Page 129)<br />
<strong>S7</strong>-<strong>1200</strong> <strong>Programmable</strong> <strong>controller</strong><br />
438 System Manual, 04/2012, A5E02486680-06
TCON, TDISCON, TSEND, AND TRCV<br />
Ethernet communication using TCP and ISO on TCP protocols<br />
Communication<br />
10.2 PROFINET<br />
Note<br />
TSEND_C and TRCV_C instructions<br />
To help simplify the programming of PROFINET/Ethernet communication, the TSEND_C<br />
instruction and the TRCV_C instruction combine the functionality of the TCON, TDISCON.<br />
TSEND and TRCV instructions:<br />
TSEND_C combines the TCON, TDISCON and TSEND instructions.<br />
TRCV_C combines the TCON, TDISCON and TRCV instructions.<br />
The following instructions control the communication process:<br />
● TCON establishes the TCP/IP connection between the client and server (CPU) PC.<br />
● TSEND and TRCV send and receive data.<br />
● TDISCON breaks the connection.<br />
The minimum size of data that you can transmit (TSEND) or receive (TRCV) is one byte; the<br />
maximum size is 8192 bytes. TSEND does not support the transmission of data from<br />
boolean locations, and TRCV will not receive data into boolean locations. For information<br />
transferring data with these instructions, see the section on data consistency (Page 153).<br />
TCON, TDISCON, TSEND, and TRCV operate asynchronously, which means that the job<br />
processing extends over multiple instruction executions. For example, you start a job for<br />
setting up and establishing a connection by executing an instruction TCON with parameter<br />
REQ = 1. Then you use additional TCON executions to monitor the job progress and test for<br />
job completion with parameter DONE.<br />
The following table shows the relationships between BUSY, DONE, and ERROR. Use the<br />
table to determine the current job status.<br />
Table 10- 7 Interactions between the BUSY, DONE, and ERROR parameters<br />
BUSY DONE ERROR Description<br />
TRUE irrelevant irrelevant The job is being processed.<br />
FALSE TRUE FALSE The job successfully completed.<br />
FALSE FALSE TRUE The job was ended with an error. The cause of the error can be found in the<br />
STATUS parameter.<br />
FALSE FALSE FALSE A new job was not assigned.<br />
<strong>S7</strong>-<strong>1200</strong> <strong>Programmable</strong> <strong>controller</strong><br />
System Manual, 04/2012, A5E02486680-06 439
Communication<br />
10.2 PROFINET<br />
TCON and TDISCON<br />
Note<br />
Initializing the communication parameters<br />
After you insert the TCON instruction, use the "Properties" of the instruction (Page 127) to<br />
configure the communication parameters. As you enter the parameters for the<br />
communication partners in the inspector window, STEP 7 enters the corresponding data in<br />
the instance DB for the instruction.<br />
If you want to use a multi-instance DB, you must manually configure the DB on both CPUs.<br />
Table 10- 8 TCON and TDISCON instructions<br />
LAD / FBD Description<br />
"TCON_DB"(<br />
req:=_bool_in_,<br />
ID:=_undef_in_,<br />
done=>_bool_out_,<br />
busy=>_bool_out_,<br />
error=>_bool_out_,<br />
status=>_word_out_,<br />
connect:=_struct_inout_);<br />
"TDISCON_DB"(<br />
req:=_bool_in_,<br />
ID:=_word_in_,<br />
done=>_bool_out_,<br />
busy=>_bool_out_,<br />
error=>_bool_out_,<br />
status=>_word_out_);<br />
1 STEP 7 automatically creates the DB when you insert the instruction.<br />
Table 10- 9 Data types for the parameters of TCON and TDISCON<br />
TCP and ISO on TCP: TCON initiates a<br />
communications connection from the CPU to a<br />
communication partner.<br />
TCP and ISO on TCP: TDISCON terminates a<br />
communications connection from the CPU to a<br />
communication partner.<br />
Parameter and type Data type Description<br />
REQ IN Bool Control parameter REQ starts the job by establishing the<br />
connection specified by ID. The job starts at rising edge.<br />
ID IN CONN_OUC (Word) Reference to the connection to be established (TCON) or<br />
terminated (TDISCON) to the remote partner, or between<br />
the user program and the communication layer of the<br />
operating system. The ID must be identical to the<br />
associated parameter ID in the local connection description.<br />
Value range: W#16#0001 to W#16#0FFF<br />
CONNECT<br />
(TCON)<br />
IN_OUT TCON_Param Pointer to the connection description<br />
<strong>S7</strong>-<strong>1200</strong> <strong>Programmable</strong> <strong>controller</strong><br />
440 System Manual, 04/2012, A5E02486680-06
Parameter and type Data type Description<br />
DONE OUT Bool 0: Job is not yet started or still running.<br />
1: Job completed without error.<br />
Communication<br />
10.2 PROFINET<br />
BUSY OUT Bool 0: Job is completed.<br />
1: Job is not yet completed. A new job cannot be<br />
triggered.<br />
ERROR OUT Bool Status parameters with the following values:<br />
0: No error<br />
1: Error occurred during processing. STATUS provides<br />
detailed information on the type of error.<br />
STATUS OUT Word Status information including error information. (Refer to the<br />
Error and Status condition codes in the table below.)<br />
Both communication partners execute the TCON instruction to set up and establish the<br />
communication connection. You use parameters to specify the active and passive<br />
communication end point partners. After the connection is set up and established, it is<br />
automatically maintained and monitored by the CPU.<br />
If the connection is terminated due to a line break or due to the remote communications<br />
partner, for example, the active partner attempts to re-establish the configured connection.<br />
You do not have to execute TCON again.<br />
An existing connection is terminated and the set-up connection is removed when the<br />
TDISCON instruction is executed or when the CPU has gone into STOP mode. To set up<br />
and re-establish the connection, you must execute TCON again.<br />
Table 10- 10 ERROR and STATUS condition codes for TCON and TDISCON<br />
ERROR STATUS Description<br />
0 0000 Connection was established successfully.<br />
0 7000 No job processing active<br />
0 7001 Start job processing; establishing connection (TCON) or terminating connection<br />
(TDISCON)<br />
0 7002 Follow-on call (REQ irrelevant); establishing connection (TCON) or terminating<br />
connection (TDISCON)<br />
1 8086 The ID parameter is outside the permitted address range.<br />
1 8087 TCON: Maximum number of connections reached; no additional connection possible.<br />
1 809B TCON: The local_device_id in the connection description does not match the CPU.<br />
1 80A1 TCON: Connection or port is already occupied by user.<br />
1 80A2 TCON: Local or remote port is occupied by the system.<br />
1 80A3 Attempt being made to re-establish an existing connection (TCON) or terminate a nonexistent<br />
connection (TDISCON).<br />
1 80A4 TCON: IP address of the remote connection end point is invalid; it may match the local<br />
IP address.<br />
1 80A5 TCON: Connection ID is already in use.<br />
1<br />
80A7 TCON: Communications error: you executed TDISCON before TCON was complete.<br />
()<br />
TDISCON must first completely terminate the connection referenced by the ID.<br />
<strong>S7</strong>-<strong>1200</strong> <strong>Programmable</strong> <strong>controller</strong><br />
System Manual, 04/2012, A5E02486680-06 441
Communication<br />
10.2 PROFINET<br />
ERROR STATUS Description<br />
1 80B4 TCON: When using the ISO on TCP (connection_type = B#16#12) to establish a<br />
passive connection, condition code 80B4 alerts you that the TSAP entered did not<br />
conform to one of the following address requirements:<br />
For a local TSAP length of 2 and a TSAP ID value of either E0 or E1 (hexadecimal)<br />
for the first byte, the second byte must be either 00 or 01.<br />
For a local TSAP length of 3 or greater and a TSAP ID value of either E0 or E1<br />
(hexadecimal) for the first byte, the second byte must be either 00 or 01 and all<br />
other bytes must be valid ASCII characters.<br />
For a local TSAP length of 3 or greater and the first byte of the TSAP ID does not<br />
have a value of either E0 or E1 (hexadecimal), then all bytes of the TSAP ID must<br />
be valid ASCII characters.<br />
Valid ASCII characters are byte values from 20 to 7E (hexadecimal).<br />
1 80B6 TCON: Parameter assignment error in parameter connection_type<br />
1 80B7 TCON: Data type and/or length of the transmitted data does not fit in the area in the<br />
partner CPU, in which it is to be written.<br />
1) 80B8 TCON: Parameter in the local connection description and Parameter ID are different.<br />
1 80C3 TCON: All connection resources are in use.<br />
1 80C4 Temporary communications error:<br />
The connection cannot be established at this time (TCON).<br />
The configured connection is currently being removed by TDISCON (TCON).<br />
The connection is currently being established (TDISCON).<br />
The interface is receiving new parameters (TCON and TDISCON).<br />
<strong>S7</strong>-<strong>1200</strong> <strong>Programmable</strong> <strong>controller</strong><br />
442 System Manual, 04/2012, A5E02486680-06
TSEND and TRCV<br />
Table 10- 11 TSEND and TRCV instructions<br />
LAD / FBD SCL Description<br />
"TSEND_DB"(<br />
req:=_bool_in_,<br />
ID:=_word_in_,<br />
len:=_uint_in_,<br />
done=>_bool_out_,<br />
busy=>_bool_out_,<br />
error=>_bool_out_,<br />
status=>_word_out_,<br />
data:=_variant_inout_);<br />
"TRCV_DB"(<br />
en_r:=_bool_in_,<br />
ID:=_word_in_,<br />
len:=_uint_in_,<br />
ndr=>_bool_out_,<br />
busy=>_bool_out_,<br />
error=>_bool_out_,<br />
status=>_word_out_,<br />
rcvd_len=>_uint_out_,<br />
data:=_variant_inout_);<br />
1 STEP 7 automatically creates the DB when you insert the instruction.<br />
Table 10- 12 Data types for the parameters of TSEND and TRCV<br />
Communication<br />
10.2 PROFINET<br />
TCP and ISO on TCP: TSEND sends data<br />
through a communication connection from the<br />
CPU to a partner station.<br />
TCP and ISO on TCP: TRCV receives data<br />
through a communication connection from a<br />
partner station to the CPU.<br />
Parameter and type Data type Description<br />
REQ IN Bool TSEND: Starts the send job on a rising edge. The data is<br />
transferred from the area specified by DATA and LEN.<br />
EN_R<br />
IN Bool TRCV: Enables the CPU to receive; with EN_R = 1, the TRCV is<br />
ready to receive. The receive job is processed.<br />
ID IN CONN_OUC<br />
(Word)<br />
Reference to the associated connection. ID must be identical to<br />
the associated parameter ID in the local connection description.<br />
Value range: W#16#0001 to W#16#0FFF<br />
LEN IN UInt Maximum number of bytes to be sent (TSEND) or received<br />
(TRCV):<br />
Default = 0: The DATA parameter determines the length of the<br />
data to be sent (TSEND) or received (TRCV).<br />
Ad hoc mode = 65535: A variable length of data is set for<br />
reception (TRCV).<br />
DATA IN_OUT Variant Pointer to send (TSEND) or receive (TRCV) data area; data area<br />
contains the address and length. The address refers to I memory,<br />
Q memory, M memory, or a DB.<br />
<strong>S7</strong>-<strong>1200</strong> <strong>Programmable</strong> <strong>controller</strong><br />
System Manual, 04/2012, A5E02486680-06 443
Communication<br />
10.2 PROFINET<br />
Parameter and type Data type Description<br />
DONE OUT Bool TSEND:<br />
NDR OUT Bool TRCV:<br />
0: Job not yet started or still running.<br />
1: Job executed without error.<br />
NDR = 0: Job not yet started or still running.<br />
NDR = 1: Job successfully completed.<br />
BUSY OUT Bool BUSY = 1: The job is not yet complete. A new job cannot be<br />
triggered.<br />
BUSY = 0: Job is complete.<br />
ERROR OUT Bool ERROR = 1: Error occurred during processing. STATUS provides<br />
detailed information on the type of error<br />
STATUS OUT Word Status information including error information. (Refer to the Error<br />
and Status condition codes in the table below.)<br />
RCVD_LEN OUT Int TRCV: Amount of data actually received in bytes<br />
Note<br />
The TSEND instruction requires a low-to-high transition at the REQ input parameter to start<br />
a send job. The BUSY parameter is then set to 1 during processing. Completion of the send<br />
job is indicated by either the DONE or ERROR parameters being set to 1 for one scan.<br />
During this time, any low-to-high transition at the REQ input parameter is ignored.<br />
TRCV Operations<br />
The TRCV instruction writes the received data to a receive area that is specified by the<br />
following two variables:<br />
● Pointer to the start of the area<br />
● Length of the area or the value supplied at the LEN input if not 0<br />
Note<br />
The default setting of the LEN parameter (LEN = 0) uses the DATA parameter to<br />
determine the length of the data being transmitted. Ensure that the DATA transmitted by<br />
the TSEND instruction is the same size as the DATA parameter of the TRCV instruction.<br />
As soon as all the job data has been received, TRCV transfers it to the receive area and sets<br />
NDR to 1.<br />
<strong>S7</strong>-<strong>1200</strong> <strong>Programmable</strong> <strong>controller</strong><br />
444 System Manual, 04/2012, A5E02486680-06
Table 10- 13 Entering the data into the receive area<br />
Protocol<br />
variant<br />
Entering the data in the<br />
receive area<br />
Parameter<br />
"connection_type"<br />
Communication<br />
10.2 PROFINET<br />
Value of the LEN parameter Value of the RCVD_LEN<br />
parameter (bytes)<br />
TCP Ad hoc mode B#16#11 65535 1 to 1472<br />
TCP Data reception with B#16#11 0 (recommended) or 1 to 1 to 8192<br />
specified length<br />
8192, except 65535<br />
ISO on TCP Ad hoc mode B#16#12 65535 1 to 1472<br />
ISO on TCP protocol-controlled B#16#12 0 (recommended) or 1 to<br />
8192, except 65535<br />
1 to 8192<br />
Note<br />
Ad hoc mode<br />
The "ad hoc mode" exists with the TCP and ISO on TCP protocol variants. You set "ad hoc<br />
mode" by assigning "65535" to the LEN parameter. The receive area is identical to the area<br />
formed by DATA. The length of the received data will be output to the parameter<br />
RCVD_LEN. Immediately after receiving a block of data, TRCV enters the data in the receive<br />
area and sets NDR to 1.<br />
If you store the data in an "optimized" DB (symbolic only), you can receive data only in<br />
arrays of Byte, Char, USInt, and SInt data types.<br />
Note<br />
Importing of <strong>S7</strong>-300/400 STEP 7 projects containing "ad hoc mode" into the <strong>S7</strong>-<strong>1200</strong><br />
In <strong>S7</strong>-300/400 STEP 7 projects, "ad hoc mode" is selected by assigning "0" to the LEN<br />
parameter. In the <strong>S7</strong>-<strong>1200</strong>, you set "ad hoc mode" by assigning "65535" to the LEN<br />
parameter.<br />
If you import an <strong>S7</strong>-300/400 STEP 7 project containing "ad hoc mode" into the <strong>S7</strong>-<strong>1200</strong>, you<br />
must change the LEN parameter to "65535".<br />
Table 10- 14 ERROR and STATUS condition codes for TSEND and TRCV<br />
ERROR STATUS Description<br />
0 0000 Send job completed without error (TSEND)<br />
New data accepted: The current length of the received data is shown in RCVD_LEN<br />
(TRCV).<br />
0 7000 No job processing active (TSEND)<br />
Block not ready to receive (TRCV)<br />
0 7001 Start of job processing, data being sent: During this processing the operating<br />
system accesses the data in the DATA send area (TSEND).<br />
Block is ready to receive, receive job was activated (TRCV).<br />
<strong>S7</strong>-<strong>1200</strong> <strong>Programmable</strong> <strong>controller</strong><br />
System Manual, 04/2012, A5E02486680-06 445
Communication<br />
10.2 PROFINET<br />
ERROR STATUS Description<br />
0 7002 Follow-on instruction execution (REQ irrelevant), job being processed: The<br />
operating system accesses the data in the DATA send area during this processing<br />
(TSEND).<br />
Follow-on instruction execution, receive job being processed: Data is written to the<br />
receive area during this processing. For this reason, an error could result in<br />
inconsistent data in the receive area (TRCV).<br />
1 8085 LEN parameter is greater than the largest permitted value (TSEND) and (TRCV).<br />
LEN or DATA parameter changed since the first instruction execution (TRCV).<br />
1 8086 The ID parameter is not in the permitted address range.<br />
1 8088 The LEN parameter is larger than the memory area specified in DATA.<br />
1 80A1 Communications error:<br />
The specified connection has not yet established (TSEND and TRCV).<br />
The specified connection is currently being terminated. Transmission or a receive<br />
job over this connection is not possible (TSEND and TRCV).<br />
The interface is being reinitialized (TSEND).<br />
The interface is receiving new parameters (TRCV).<br />
1 80C3 Internal lack of resources: A block with this ID is already being processed in a different<br />
priority class.<br />
1 80C4 Temporary communications error:<br />
Connection Ethernet protocols<br />
See also<br />
The connection to the communications partner cannot be established at this time.<br />
The interface is receiving new parameter settings, or the connection is currently<br />
being established.<br />
Every CPU has an integrated PROFINET port, which supports standard PROFINET<br />
communications. The TSEND_C, TRCV_C, TSEND and TRCV instructions all support the<br />
TCP and ISO on TCP Ethernet protocols.<br />
Refer to "Device Configuration: Configuring the Local/Partner connection path (Page 127)"<br />
for more information.<br />
Parameters for the PROFINET connection (Page 129)<br />
10.2.2.5 UDP<br />
UDP is a standard protocol described by RFC 768: User Datagram Protocol. UDP provides a<br />
mechanism for one application to send a datagram to another; however, delivery of data is<br />
not guaranteed. This protocol has the following features:<br />
● A quick communications protocol, because it is very hardware-intimate<br />
● Suitable for small-sized to medium data amounts (up to 2048 bytes)<br />
<strong>S7</strong>-<strong>1200</strong> <strong>Programmable</strong> <strong>controller</strong><br />
446 System Manual, 04/2012, A5E02486680-06
Communication<br />
10.2 PROFINET<br />
● UDP is a simpler transport control protocol than TCP, with a thin layer that yields low<br />
overheads<br />
● Can be used very flexibly with many third-party systems<br />
● Routing-capable<br />
● Uses port numbers to direct the datagrams<br />
● Messages are unacknowledged: The application is required to take responsibility for error<br />
recovery and security<br />
● Programming effort is required for data management due to the SEND / RECEIVE<br />
programming interface<br />
UDP supports broadcast communication. To use broadcast, you must configure the IP<br />
address portion of the ADDR configuration. For example: A CPU with an IP address of<br />
192.168.2.10 and seubnet mask of 255.255.255.0 would use a broadcast address of<br />
192.168.2.255.<br />
TUSEND and TURCV<br />
The following instructions control the UDP communication process:<br />
● TCON establishes the communication between the client and server (CPU) PC.<br />
● TUSEND and TURCV send and receive data.<br />
● TDISCON disconnects the communication between the client and server.<br />
Refer to TCON, TDISCON, TSEND, and TRCV (Page 439) in the "TCP and ISO-on-TCP"<br />
section for more information on the TCON and TDISCON communication instructions.<br />
Table 10- 15 TUSEND and TURCV instructions<br />
LAD / FBD SCL Description<br />
"TUSEND_DB"(<br />
req:=_bool_in_,<br />
ID:=_word_in_,<br />
len:=_uint_in_,<br />
done=>_bool_out_,<br />
busy=>_bool_out_,<br />
error=>_bool_out_,<br />
status=>_word_out_,<br />
data:=_variant_inout_);<br />
"TURCV_DB"(<br />
en_r:=_bool_in_,<br />
ID:=_word_in_,<br />
len:=_uint_in_,<br />
ndr=>_bool_out_,<br />
busy=>_bool_out_,<br />
error=>_bool_out_,<br />
status=>_word_out_,<br />
rcvd_len=>_uint_out_,<br />
data:=_variant_inout_);<br />
1 STEP 7 automatically creates the DB when you insert the instruction.<br />
The TUSEND instruction sends data via UDP to<br />
the remote partner specified by the parameter<br />
ADDR.<br />
To start the job for sending data, call the TUSEND<br />
instruction with REQ = 1.<br />
The TURCV instruction receives data via UDP.<br />
The parameter ADDR shows the address of the<br />
sender. After successful completion of TURCV, the<br />
parameter ADDR contains the address of the<br />
remote partner (the sender).<br />
TURCV does not support ad hoc mode.<br />
To start the job for receiving data, call the TURCV<br />
instruction with EN_R = 1.<br />
<strong>S7</strong>-<strong>1200</strong> <strong>Programmable</strong> <strong>controller</strong><br />
System Manual, 04/2012, A5E02486680-06 447
Communication<br />
10.2 PROFINET<br />
TCON, TDISCON, TUSEND, and TURCV operate asynchronously, which means that the job<br />
processing extends over multiple instruction executions.<br />
Table 10- 16 TUSEND and TURCV data types for the parameters<br />
Parameter and type Data type Description<br />
REQ<br />
IN Bool Starts the send job on a rising edge. The data is transferred from<br />
(TUSEND)<br />
the area specified by DATA and LEN.<br />
EN_R IN Bool 0: CPU cannot receive.<br />
(TURCV)<br />
1: Enables the CPU to receive. The TURCV instruction is<br />
ready to receive, and the receive job is processed.<br />
ID IN Word Reference to the associated connection between the user<br />
program and the communication level of the operating system.<br />
ID must be identical to the associated parameter ID in the local<br />
connection description.<br />
Range of values: W#16#0001 to W#16#0FFF.<br />
LEN IN UInt Number of bytes to be sent (TUSEND) or received (TURCV).<br />
Default = 0. The DATA parameter determines the length of<br />
the data to be sent or received.<br />
Otherwise, range of values: 1 to 1472<br />
DONE<br />
(TUSEND)<br />
NDR<br />
(TURCV)<br />
IN Bool Status parameter DONE (TUSEND):<br />
0: Job is not yet started or still running.<br />
1: Job completed without error.<br />
OUT Bool Status parameter NDR (TURCV):<br />
0: Job not yet started or still running.<br />
1: Job has successfully completed.<br />
BUSY OUT Bool 1: Job is not yet completed. A new job cannot be triggered.<br />
0: Job has completed.<br />
ERROR OUT Bool Status parameters with the following values:<br />
0: No error<br />
1: Error occurred during processing. STATUS provides<br />
detailed information on the type of error.<br />
STATUS OUT Word Status information including error information. (Refer to the Error<br />
and Status condition codes in the table below.)<br />
<strong>S7</strong>-<strong>1200</strong> <strong>Programmable</strong> <strong>controller</strong><br />
448 System Manual, 04/2012, A5E02486680-06
Parameter and type Data type Description<br />
DATA IN_OUT Variant Address of the sender area (TUSEND) or receive area<br />
(TURCV):<br />
The process image input table<br />
The process image output table<br />
A memory bit<br />
A data block<br />
Communication<br />
10.2 PROFINET<br />
ADDR IN_OUT Variant Pointer to the address of the receiver (for TUSEND) or sender<br />
(for TURCV) (for example, P#DB100.DBX0.0 byte 8). The<br />
pointer may point to any memory area.<br />
A structure of 8 bytes is required as follows:<br />
First 4 bytes contain the remote IP address.<br />
Next 2 bytes specify the remote port number.<br />
Last 2 bytes are reserved.<br />
The job status is indicated at the output parameters BUSY and STATUS. STATUS<br />
corresponds to the RET_VAL output parameter of asynchronously functioning instructions.<br />
The following table shows the relationships between BUSY, DONE (TUSEND), NDR<br />
(TURCV), and ERROR. Using this table, you can determine the current status of the<br />
instruction (TUSEND or TURCV) or when the sending (transmission) / receiving process is<br />
complete.<br />
Table 10- 17 Status of BUSY, DONE (TUSEND) / NDR (TURCV), and ERROR parameters<br />
BUSY DONE / NDR ERROR Description<br />
TRUE irrelevant irrelevant The job is being processed.<br />
FALSE TRUE FALSE The job was completed successfully.<br />
FALSE FALSE TRUE The job was ended with an error. The cause of the error can be<br />
found in the STATUS parameter..<br />
FALSE FALSE FALSE The instruction was not assigned a (new) job.<br />
1 Due to the asynchronous function of the instructions: For TUSEND, you must keep the data in the sender area<br />
consistent until the DONE parameter or the ERROR parameter assumes the value TRUE. For TURCV, the data in the<br />
receiver area are only consistent when the NDR parameter assumes the value TRUE.<br />
Table 10- 18 TUSEND and TURCV condition codes for ERROR and STATUS<br />
ERROR STATUS Description<br />
0 0000 Send job completed without error (TUSEND).<br />
New data were accepted. The current length of the received data is shown in<br />
RCVD_LEN (TURCV).<br />
0 7000 No job processing active (TUSEND)<br />
Block not ready to receive (TURCV)<br />
<strong>S7</strong>-<strong>1200</strong> <strong>Programmable</strong> <strong>controller</strong><br />
System Manual, 04/2012, A5E02486680-06 449
Communication<br />
10.2 PROFINET<br />
ERROR STATUS Description<br />
0 7001 Start of job processing, data being sent (TUSEND): During this processing, the<br />
operating system accesses the data in the DATA send area.<br />
Block is ready to receive, receive job was activated (TURCV).<br />
0 7002 Follow-on instruction execution (REQ irrelevant), job being processed (TUSEND):<br />
During this processing, the operating system accesses the data in the DATA send<br />
area.<br />
Follow-on instruction execution, job being processed: During this processing, the<br />
TURCV instruction writes data to the receive area. For this reason, an error could<br />
result in inconsistent data in the receive area.<br />
1 8085 LEN parameter is greater than the largest permitted value, has the value 0 (TUSEND),<br />
or you changed the value of the LEN or DATA parameter since the first instruction<br />
execution (TURCV).<br />
1 8086 The ID parameter is not in the permitted address range.<br />
1 8088 LEN parameter is larger than the memory area (TUSEND) or receive area (TURCV)<br />
specified in DATA.<br />
Receive area is too small (TURCV).<br />
1 8089 ADDR parameter does not point to a data block.<br />
1 80A1 Communications error:<br />
The specified connection between user program and communications layer of the<br />
operating system has not yet been established.<br />
The specified connection between the user program and the communication layer of<br />
the operating system is currently being terminated. Transmission (TUSEND) or a<br />
receive job (TURCV) over this connection is not possible.<br />
The interface is being reinitialized.<br />
1 80A4 IP address of the remote connection end point is invalid; it is possible that it matches<br />
the local IP address (TUSEND).<br />
1 80B3 The set protocol variant (connection_type parameter in the connection description)<br />
is not UDP. Please use the TSEND or TRCV instruction.<br />
ADDR parameter: Invalid settings for port number (TUSEND)<br />
1 80C3 A block with this ID is already being processed in a different priority class.<br />
Internal lack of resources<br />
1 80C4 Temporary communications error:<br />
Connection Ethernet protocols<br />
The connection between the user program and the communication level of the<br />
operating system cannot be established at this time (TUSEND).<br />
The interface is receiving new parameters (TUSEND).<br />
The connection is currently being reinitiated (TURCV).<br />
Every CPU has an integrated PROFINET port, which supports standard PROFINET<br />
communications. The TUSEND and TURCV instructions support the UDP Ethernet protocol.<br />
Refer to "Configuring the Local/Partner connection path" (Page 127)" in the "Device<br />
configuration" chapter for more information.<br />
<strong>S7</strong>-<strong>1200</strong> <strong>Programmable</strong> <strong>controller</strong><br />
450 System Manual, 04/2012, A5E02486680-06
Operations<br />
Communication<br />
10.2 PROFINET<br />
Both partners are passive in UDP communication. Typical parameter start values for the<br />
"TCON_Param" data type are shown in the following table. Port numbers (LOCAL_TSAP_ID)<br />
are written in a 2-byte format. All ports except for 161, 34962, 34963, and 34964 are<br />
allowed.<br />
Table 10- 19 "TCON_Param" data type parameter values<br />
TCON instruction TCON "UDP Conn DB"<br />
The TUSEND instruction sends data through UDP to the remote partner specified in the<br />
"TADDR_Param" data type. The TURCV instruction receives data through UDP. After a<br />
successful execution of the TURCV instruction, the "TADDR_Param" data type shows the<br />
address of the remote partner (the sender).<br />
Table 10- 20 "TADDR_Param" data type parameter values<br />
TUSEND instruction TUSEND "UDP ADDR DB"<br />
10.2.2.6 T_CONFIG<br />
The T_CONFIG instruction changes the IP configuration parameters of the PROFINET port<br />
from the user program, allowing the permanent change or setting of the following features:<br />
● Station name<br />
● IP address<br />
<strong>S7</strong>-<strong>1200</strong> <strong>Programmable</strong> <strong>controller</strong><br />
System Manual, 04/2012, A5E02486680-06 451
Communication<br />
10.2 PROFINET<br />
● Subnet mask<br />
● Router address<br />
Table 10- 21 T_CONFIG instruction<br />
Note<br />
Located in the CPU "Properties", "Ethernet address" page, the "Set IP address using a<br />
different method" (Page 457) radio button allows you to change the IP address online or<br />
by using the "T_CONFIG" instruction after the program is downloaded. This IP address<br />
assignment method is for the CPU only.<br />
Located in the CPU "Properties", "Ethernet address" page, the "Set PROFINET device<br />
name using a different method" (Page 458) radio button allows you to change the<br />
PROFINET device name online or by using the "T_CONFIG" instruction after the program<br />
is downloaded. This PROFINET device name assignment method is for the CPU only.<br />
WARNING<br />
After you use the T_CONFIG to change an IP configuration parameter, the CPU<br />
restarts. The CPU will go to STOP mode, warm restart, and return to RUN mode.<br />
Control devices can fail in an unsafe condition, resulting in unexpected operation of<br />
controlled equipment. Such unexpected operations could result in death or serious injury<br />
to personnel, and/or damage to equipment.<br />
Ensure that your process will go to a safe state when the CPU restarts as a result of<br />
T_CONFIG instruction execution.<br />
LAD / FBD SCL Description<br />
Table 10- 22 Data types for the parameters<br />
"T_CONFIG_DB"(<br />
req:=_bool_in_,<br />
interface:=_word_in_,<br />
conf_Data:=_variant_in_,<br />
done=>_bool_out_,<br />
busy=>_bool_out_,<br />
error=>_bool_out_,<br />
status=>_dword_out_,<br />
err_loc=>_word_out_);<br />
Use the T_CONFIG instruction to change the IP<br />
configuration parameters from your user program.<br />
T_CONFIG works asynchronously. The execution<br />
extends over multiple calls.<br />
Parameter and type Data type Description<br />
REQ Input Bool Starts the instruction on the rising edge.<br />
INTERFACE Input HW_Interface ID of network interface<br />
CONF_DATA Input Variant Reference to the structure of the configuration data;<br />
CONF_DATA is defined by a System Data Type (SDT).<br />
DONE Output Bool 0: Job has not yet started or is still running.<br />
1: Job was executed without error.<br />
<strong>S7</strong>-<strong>1200</strong> <strong>Programmable</strong> <strong>controller</strong><br />
452 System Manual, 04/2012, A5E02486680-06
Communication<br />
10.2 PROFINET<br />
Parameter and type Data type Description<br />
BUSY Output Bool 0: The job is complete.<br />
1: The job is not yet complete. A new job cannot be<br />
triggered.<br />
ERROR Output Bool Status parameters with the following values:<br />
0: No error<br />
1: Error occurred during processing. STATUS provides<br />
detailed information on the type of error.<br />
STATUS Output DWord Status information including error information. (Refer to<br />
the Error and Status condition codes in the table below.)<br />
ERR_LOC Output DWord Fault location (field ID and subfield ID of the error<br />
parameter)<br />
The IP configuration information is placed in the CONF_DATA data block, along with a<br />
Variant pointer on parameter CONF_DATA referenced above. The successful execution of<br />
the T_CONFIG instruction ends with the handover of the IP configuration data to the network<br />
interface. Errors are assigned to the STATUS output parameter.<br />
Table 10- 23 Condition codes for ERROR and STATUS<br />
ERROR STATUS Description<br />
0 00000000 No error<br />
0 00700000 The job is not finished (BUSY = 1).<br />
0 00700100 Start of job execution<br />
0 00700200 Intermediate call (REQ irrelevant)<br />
1 C08xyy00 General failure<br />
1 C0808000 LADDR parameters for identification of the interface are invalid.<br />
1 C0808100 LADDR parameters for identification of the interface have been assigned a non-supported<br />
hardware interface.<br />
1 C0808200 CONF_DATA parameter error: Data type of the Variant pointer does not match the data<br />
type Byte.<br />
1 C0808300 CONF_DATA parameter error: The area pointer is not in the DB of the Variant pointer.<br />
1 C0808400 CONF_DATA parameter error: The Variant pointer is the wrong length.<br />
1 C0808600 Reserved<br />
1 C0808700 Inconsistency in the CONF_DATA data block length to the IP configuration<br />
1 C0808800 The parameters of the CONF_DATA data block field_type_id are invalid. (Only<br />
field_type_id = 0 is allowed.)<br />
1 C0808900 The parameters of the CONF_DATA data block field_type_id are invalid or have been<br />
used several times.<br />
1 C0808A00 LEN length of the IP configuration parameters or subfield_cnt errors<br />
1 C0808B00 The IP configuration ID parameter is invalid or unsupported.<br />
1 C0808C00 The Sub-block of the IP configuration is incorrectly placed (Sub-block wrong, wrong order,<br />
or used multiple times).<br />
1 C0808D00 The length of a statement LEN Sub-blocks is invalid.<br />
1 C0808E00 The value of the parameter in Sub-blocks mode is invalid.<br />
1 C0808F00 Sub-block conflict between the IP configuration and a previous Sub-block.<br />
<strong>S7</strong>-<strong>1200</strong> <strong>Programmable</strong> <strong>controller</strong><br />
System Manual, 04/2012, A5E02486680-06 453
Communication<br />
10.2 PROFINET<br />
ERROR STATUS Description<br />
1 C0809000 The parameters of the subfield are write-protected (for example: parameters are specified<br />
by configuration, or PNIO mode is enabled).<br />
1 C0809100 Reserved<br />
1 C0809400 A parameter in the Sub-block IP configuration has not been defined or may not be used.<br />
1 C0809500 There is an inconsistency between a parameter of the Sub-block IP configuration and<br />
other parameters.<br />
1 C080C200 Instruction cannot be executed. This error can occur if, for example, communication with<br />
the interface has been lost.<br />
1 C080C300 There are not enough resources. This error can occur if, for example, the instruction is<br />
called multiple times with different parameters<br />
1 C080C400 Communication failure. The error can occur temporarily and will require a repeat of the<br />
user program.<br />
1 C080D200 Execution of the instruction is not supported by the PROFINET interface.<br />
CONF_DATA Data block<br />
The following diagram shows how the configuration data to be transferred is stored in the<br />
configuration DB.<br />
<br />
<br />
<br />
<br />
<br />
<br />
<br />
<br />
① Configuration DB ④ Subfield 2<br />
② Configuration data ⑤ Subfield n<br />
③ Subfield 1 ⑥ Subfield-specific parameters<br />
The configuration data of CONF_DB consists of a field that contains a header<br />
(IF_CONF_Header) and several subfields. IF_CONF_Header provides the following<br />
elements:<br />
● field_type_id (data type UInt): Zero<br />
● field_id (data type UInt): Zero<br />
● subfield_cnt (data type UInt): Number of subfields<br />
<strong>S7</strong>-<strong>1200</strong> <strong>Programmable</strong> <strong>controller</strong><br />
454 System Manual, 04/2012, A5E02486680-06
Table 10- 24 Subfields supported<br />
Communication<br />
10.2 PROFINET<br />
Each subfield consists of a header (subfield_type_id, subfield_length, subfield_mode) and<br />
the subfield-specific parameters. Each subfield must consist of an even number of bytes.<br />
The subfield_mode supports a value of 1.<br />
Note<br />
Only one field (IF_CONF_Header) is currently allowed. Its parameters field_type_id and<br />
field_id must have the value zero. Other fields with different values for field_type_id and<br />
field_id are subject to future extensions.<br />
In the IF_CONF_Header field, only two subfields, "addr" (IP address) and "nos" (Name of<br />
station) are currently allowed.<br />
subfield_type_id Data type Explanation<br />
30 IF_CONF_V4 IP parameters: IP address, subnet mask, router address<br />
40 IF_CONF_NOS PROFINET IO device name (Name of station)<br />
Table 10- 25 Elements of the IF_CONF_V4 data type<br />
Name Data type Start value Description<br />
Id UInt 30 subfield_type_id<br />
len UInt 18 subfield_length<br />
mode UInt 1 subfield_mode (1: permanent)<br />
InterfaceAddress IP_V4<br />
- Interface address<br />
ADDR Array [1..4] of Byte<br />
ADDR[1] Byte b#16#C8 IP address high byte: 200<br />
ADDR[2] Byte b#16#0C IP address high byte: 12<br />
ADDR[3] Byte b#16#01 IP address low byte: 1<br />
ADDR[4] Byte b#16#90 IP address low byte: 144<br />
SubnetMask IP_V4<br />
- Subnet mask<br />
ADDR Array [1..4] of Byte<br />
ADDR[1] Byte b#16#FF Subnet mask high byte: 255<br />
ADDR[2] Byte b#16#FF Subnet mask high byte: 255<br />
ADDR[3] Byte b#16#FF Subnet mask low byte: 255<br />
ADDR[4] Byte b#16#00 Subnet mask low byte: 0<br />
DefaultRouter IP_V4<br />
- Default router<br />
ADDR Array [1..4] of Byte<br />
ADDR[1] Byte b#16#C8 Router high byte: 200<br />
ADDR[2] Byte b#16#0C Router high byte: 12<br />
ADDR[3] Byte b#16#01 Router low byte: 1<br />
ADDR[4] Byte b#16#01 Router low byte: 1<br />
<strong>S7</strong>-<strong>1200</strong> <strong>Programmable</strong> <strong>controller</strong><br />
System Manual, 04/2012, A5E02486680-06 455
Communication<br />
10.2 PROFINET<br />
Table 10- 26 Elements of the IF_CONF_NOS data type<br />
Name Data type Start value Description<br />
id UInt 40 subfield_type_id<br />
len UInt 246 subfield_length<br />
mode UInt 1 subfield_mode (1: permanent)<br />
Nos (Name of<br />
station)<br />
Array[1..240]<br />
of Byte<br />
0 Station name: You must occupy the ARRAY from the first byte. If<br />
the ARRAY is longer than the station name to be assigned, you<br />
must enter a zero byte after the actual station name (in<br />
conformity with IEC 61158-6-10). Otherwise, nos is rejected and<br />
the "T_CONFIG (Page 451)" instruction enters the error code<br />
DW#16#C0809400 in STATUS. If you occupy the first byte with<br />
zero, the station name is deleted.<br />
The station name is subject to the following limitations:<br />
● A name component within the station name, i.e., a character string between two dots,<br />
must not exceed 63 characters.<br />
● No special characters such as umlauts, brackets, underscore, slash, blank space, etc.<br />
The only special character permitted is the dash.<br />
● The station name must not begin or end with the "-" character.<br />
● The station name must not begin with a number.<br />
● The station name form n.n.n.n (n = 0, ... 999) is not permitted.<br />
● The station name must not begin with the string "port-xyz" or "port-xyz-abcde" (a, b, c, d,<br />
e, x, y, z = 0, ... 9).<br />
Note<br />
You can also create an ARRAY "nos" that is shorter then 240 bytes, but not less than 2<br />
bytes. In this case, you must adjust the "len" (length of subfield) tag accordingly.<br />
<strong>S7</strong>-<strong>1200</strong> <strong>Programmable</strong> <strong>controller</strong><br />
456 System Manual, 04/2012, A5E02486680-06
Communication<br />
10.2 PROFINET<br />
How to change IP parameters<br />
In the following example, in the "addr" subfield, the "InterfaceAddress" (IP address),<br />
"SubnetMask", and "DefaultRouter" (IP router) are changed. In the CPU "Properties",<br />
"Ethernet address" page, the "Set IP address using a different method" radio button must be<br />
clicked to enable you to change the IP address using the "T_CONFIG" instruction after the<br />
program is downloaded.<br />
Table 10- 27 How to change IP parameters<br />
<strong>S7</strong>-<strong>1200</strong> <strong>Programmable</strong> <strong>controller</strong><br />
System Manual, 04/2012, A5E02486680-06 457
Communication<br />
10.2 PROFINET<br />
How to change IP parameters and PROFINET IO device names<br />
In the following example, both the "addr" and "nos" (Name of station) subfields are changed.<br />
In the CPU "Properties", "Ethernet address" page, the "Set PROFINET device name using a<br />
different method" radio button must be clicked to enable you to change the PROFINET<br />
device name using the "T_CONFIG" instruction after the program is downloaded.<br />
Table 10- 28 How to change IP parameters and PROFINET IO device names<br />
10.2.2.7 Common parameters for instructions<br />
REQ input parameter<br />
Many of the Open User Communication instructions use the REQ input to initiate the<br />
operation on a low to high transition. The REQ input must be high (TRUE) for one execution<br />
of an instruction, but the REQ input can remain TRUE for as long as desired. The instruction<br />
does not initiate another operation until it has been executed with the REQ input FALSE so<br />
that the instruction can reset the history state of the REQ input. This is required so that the<br />
instruction can detect the low to high transition to initiate the next operation.<br />
When you place one of these instructions in your program, STEP 7 prompts you to identify<br />
the instance DB. Use a unique DB for each instruction call. This ensures that each<br />
instruction properly handles inputs such as REQ.<br />
<strong>S7</strong>-<strong>1200</strong> <strong>Programmable</strong> <strong>controller</strong><br />
458 System Manual, 04/2012, A5E02486680-06
Communication<br />
10.2 PROFINET<br />
ID input parameter<br />
This is a reference to the "Local ID (hex)" on the "Network view" of "Devices and networks"<br />
in STEP 7 and is the ID of the network that you want to use for this communication block.<br />
The ID must be identical to the associated parameter ID in the local connection description.<br />
DONE, NDR, ERROR, and STATUS output parameters<br />
These instructions provide outputs describing the completion status:<br />
Table 10- 29 Open User Communication instruction output parameters<br />
Parameter Data type Default Description<br />
DONE Bool FALSE Is set TRUE for one execution to indicate that the last request<br />
completed without errors; otherwise, FALSE.<br />
NDR Bool FALSE Is set TRUE for one execution to indicate that the requested action<br />
has completed without error and new data has been received;<br />
otherwise, FALSE.<br />
BUSY Bool FALSE Is set TRUE when active to indicate that:<br />
The job is not yet complete.<br />
A new job cannot be triggered.<br />
ERROR Bool FALSE<br />
Is set FALSE when job is complete.<br />
Is set TRUE for one execution to indicate that the last request<br />
completed with errors, with the applicable error code in STATUS;<br />
otherwise, FALSE.<br />
STATUS Word 0 Result status:<br />
If the DONE or NDR bit is set, then STATUS is set to 0 or to an<br />
informational code.<br />
If the ERROR bit is set, then STATUS is set to an error code.<br />
If none of the above bits are set, then the instruction returns<br />
status results that describe the current state of the function.<br />
STATUS retains its value for the duration of the execution of the<br />
function.<br />
Note<br />
Note that DONE, NDR, and ERROR are set for one execution only.<br />
<strong>S7</strong>-<strong>1200</strong> <strong>Programmable</strong> <strong>controller</strong><br />
System Manual, 04/2012, A5E02486680-06 459
Communication<br />
10.2 PROFINET<br />
Restricted TSAPs and port numbers for passive ISO and TCP communication<br />
If you use the "TCON" instruction to set up and establish a passive communications<br />
connection, the following port addresses are restricted and should not be used:<br />
● ISO TSAP (passive):<br />
– 01.00, 01.01, 02.00, 02.01, 03.00, 03.01<br />
– 10.00, 10.01, 11.00, 11.01, ... BF.00, BF.01<br />
● TCP port (passive): 5001, 102, 123, 20, 21, 25, 34962, 34963, 34964, 80<br />
● UDP port (passive): 161, 34962, 34963, 34964<br />
10.2.3 Communication with a programming device<br />
A CPU can communicate with a STEP 7<br />
programming device on a network.<br />
Consider the following when setting up communications between a CPU and a programming<br />
device:<br />
● Configuration/Setup: Hardware configuration is required.<br />
● No Ethernet switch is required for one-to-one communications; an Ethernet switch is<br />
required for more than two devices in a network.<br />
10.2.3.1 Establishing the hardware communications connection<br />
The PROFINET interfaces establish the physical connections between a programming<br />
device and a CPU. Since Auto-Cross-Over functionality is built into the CPU, either a<br />
standard or crossover Ethernet cable can be used for the interface. An Ethernet switch is not<br />
required to connect a programming device directly to a CPU.<br />
<strong>S7</strong>-<strong>1200</strong> <strong>Programmable</strong> <strong>controller</strong><br />
460 System Manual, 04/2012, A5E02486680-06
Communication<br />
10.2 PROFINET<br />
Follow the steps below to create the hardware connection between a programming device<br />
and a CPU:<br />
1. Install the CPU (Page 49).<br />
2. Plug the Ethernet cable into the PROFINET port shown below.<br />
3. Connect the Ethernet cable to the programming device.<br />
<br />
① PROFINET port<br />
An optional strain relief is available to strengthen the PROFINET connection.<br />
10.2.3.2 Configuring the devices<br />
If you have already created a project with a CPU, open your project in STEP 7.<br />
If not, create a project and insert a CPU (Page 120) into the rack. In the project below, a<br />
CPU is shown in the "Device View".<br />
<strong>S7</strong>-<strong>1200</strong> <strong>Programmable</strong> <strong>controller</strong><br />
System Manual, 04/2012, A5E02486680-06 461
Communication<br />
10.2 PROFINET<br />
10.2.3.3 Assigning Internet Protocol (IP) addresses<br />
Assigning the IP addresses<br />
In a PROFINET network, each device must also have an Internet Protocol (IP) address. This<br />
address allows the device to deliver data on a more complex, routed network:<br />
● If you have programming or other network devices that use an on-board adapter card<br />
connected to your plant LAN or an Ethernet-to-USB adapter card connected to an<br />
isolated network, you must assign IP addresses to them. Refer to "Assigning IP<br />
addresses to programming and network devices" (Page 132) for more information.<br />
● You can also assign an IP address to a CPU or network device online. This is particularly<br />
useful in an initial device configuration. Refer to "Assigning an IP address to a CPU<br />
online" (Page 132) for more information.<br />
● After you have configured your CPU or network device in your project, you can configure<br />
parameters for the PROFINET interface, to include its IP address. Refer to "Configuring<br />
an IP address for a CPU in your project" (Page 134) for more information.<br />
10.2.3.4 Testing your PROFINET network<br />
After completing the configuration, you must download your project to the CPU. All IP<br />
addresses are configured when you download the project.<br />
The CPU "Download to device" function and its "Extended download to device" dialog can<br />
show all accessible network devices and whether or not unique IP addresses have been<br />
assigned to all devices. Refer to "Testing the PROFINET network" (Page 139) for more<br />
information<br />
10.2.4 HMI-to-PLC communication<br />
The CPU supports PROFINET<br />
communications connections to HMIs. The<br />
following requirements must be considered<br />
when setting up communications between<br />
CPUs and HMIs:<br />
Configuration/Setup:<br />
● The PROFINET port of the CPU must be configured to connect with the HMI.<br />
● The HMI must be setup and configured.<br />
<strong>S7</strong>-<strong>1200</strong> <strong>Programmable</strong> <strong>controller</strong><br />
462 System Manual, 04/2012, A5E02486680-06
Communication<br />
10.2 PROFINET<br />
● The HMI configuration information is part of the CPU project and can be configured and<br />
downloaded from within the project.<br />
● No Ethernet switch is required for one-to-one communications; an Ethernet switch is<br />
required for more than two devices in a network.<br />
Note<br />
The rack-mounted CSM1277 4-port Ethernet switch can be used to connect your CPUs<br />
and HMI devices. The PROFINET port on the CPU does not contain an Ethernet<br />
switching device.<br />
Supported functions:<br />
● The HMI can read/write data to the CPU.<br />
● Messages can be triggered, based upon information retrieved from the CPU.<br />
● System diagnostics<br />
Table 10- 30 Required steps in configuring communications between an HMI and a CPU<br />
Step Task<br />
1 Establishing the hardware communications connection<br />
A PROFINET interface establishes the physical connection between an HMI and a CPU. Since Auto-<br />
Cross-Over functionality is built into the CPU, you can use either a standard or crossover Ethernet cable<br />
for the interface. An Ethernet switch is not required to connect an HMI and a CPU.<br />
Refer to "Communication with a programming device: Establishing the hardware communications<br />
connection" (Page 460) for more information.<br />
2 Configuring the devices<br />
Refer to "Communication with a programming device: Configuring the devices" (Page 461) for more<br />
information.<br />
3 Configuring the logical network connections between an HMI and a CPU<br />
Refer to "HMI-to-PLC communication: Configuring the logical network connections between two devices"<br />
(Page 463) for more information.<br />
4 Configuring an IP address in your project<br />
Use the same configuration process; however, you must configure IP addresses for the HMI and the CPU.<br />
Refer to "Device configuration: Configuring an IP address for a CPU in your project" (Page 136) for more<br />
information.<br />
5 Testing the PROFINET network<br />
You must download the configuration for each CPU and HMI device.<br />
Refer to "Device configuration: Testing the PROFINET network" (Page 139) for more information.<br />
10.2.4.1 Configuring logical network connections between two devices<br />
After you configure the rack with the CPU, you are now ready to configure your network<br />
connections.<br />
In the Devices and Networks portal, use the "Network view" to create the network<br />
connections between the devices in your project. First, click the "Connections" tab, and then<br />
select the connection type with the dropdown, just to the right (for example, an ISO on TCP<br />
connection).<br />
<strong>S7</strong>-<strong>1200</strong> <strong>Programmable</strong> <strong>controller</strong><br />
System Manual, 04/2012, A5E02486680-06 463
Communication<br />
10.2 PROFINET<br />
To create a PROFINET connection, click the green (PROFINET) box on the first device, and<br />
drag a line to the PROFINET box on the second device. Release the mouse button and your<br />
PROFINET connection is joined.<br />
Refer to "Device Configuration: Creating a network connection" (Page 126) for more<br />
information.<br />
10.2.5 PLC-to-PLC communication<br />
A CPU can communicate with another CPU on a<br />
network by using the TSEND_C and TRCV_C<br />
instructions.<br />
Consider the following when setting up communications between two CPUs:<br />
● Configuration/Setup: Hardware configuration is required.<br />
● Supported functions: Reading/Writing data to a peer CPU<br />
● No Ethernet switch is required for one-to-one communications; an Ethernet switch is<br />
required for more than two devices in a network.<br />
Table 10- 31 Required steps in configuring communications between two CPUs<br />
Step Task<br />
1 Establishing the hardware communications connection<br />
A PROFINET interface establishes the physical connection between two CPUs. Since Auto-Cross-Over<br />
functionality is built into the CPU, you can use either a standard or crossover Ethernet cable for the<br />
interface. An Ethernet switch is not required to connect the two CPUs.<br />
Refer to "Communication with a programming device: Establishing the hardware communications<br />
connection" (Page 460) for more information.<br />
2 Configuring the devices<br />
You must configure two CPUs in your project.<br />
Refer to "Communication with a programming device: Configuring the devices" (Page 461) for more<br />
information.<br />
3 Configuring the logical network connections between two CPUs<br />
Refer to "PLC-to-PLC communication: Configuring logical network connections between two devices"<br />
(Page 465) for more information.<br />
4 Configuring an IP address in your project<br />
Use the same configuration process; however, you must configure IP addresses for two CPUs (for<br />
example, PLC_1 and PLC_2).<br />
Refer to "Device configuration: Configuring an IP address for a CPU in your project" (Page 136) for more<br />
information.<br />
<strong>S7</strong>-<strong>1200</strong> <strong>Programmable</strong> <strong>controller</strong><br />
464 System Manual, 04/2012, A5E02486680-06
Communication<br />
10.2 PROFINET<br />
Step Task<br />
5 Configuring transmit (send) and receive parameters<br />
You must configure TSEND_C and TRCV_C instructions in both CPUs to enable communications between<br />
them.<br />
Refer to "Configuring communications between two CPUs: Configuring transmit (send) and receive<br />
parameters" (Page 465) for more information.<br />
6 Testing the PROFINET network<br />
You must download the configuration for each CPU.<br />
Refer to "Device configuration: Testing the PROFINET network" (Page 139) for more information.<br />
10.2.5.1 Configuring logical network connections between two devices<br />
After you configure the rack with the CPU, you are now ready to configure your network<br />
connections.<br />
In the Devices and Networks portal, use the "Network view" to create the network<br />
connections between the devices in your project. First, click the "Connections" tab, and then<br />
select the connection type with the dropdown, just to the right (for example, an ISO on TCP<br />
connection).<br />
To create a PROFINET connection, click the green (PROFINET) box on the first device, and<br />
drag a line to the PROFINET box on the second device. Release the mouse button and your<br />
PROFINET connection is joined.<br />
Refer to "Device Configuration: Creating a network connection" (Page 126) for more<br />
information.<br />
10.2.5.2 Configuring the Local/Partner connection path between two devices<br />
Configuring General parameters<br />
You specify the communication parameters in the "Properties" configuration dialog of the<br />
communication instruction. This dialog appears near the bottom of the page whenever you<br />
have selected any part of the instruction.<br />
Refer to "Device configuration: Configuring the Local/Partner connection path (Page 127)"<br />
for more information.<br />
In the "Address Details" section of the Connection parameters dialog, you define the TSAPs<br />
or ports to be used. The TSAP or port of a connection in the CPU is entered in the "Local<br />
TSAP" field. The TSAP or port assigned for the connection in your partner CPU is entered<br />
under the "Partner TSAP" field.<br />
10.2.5.3 Configuring transmit (send) and receive parameters<br />
Communication blocks (for example, TSEND_C and TRCV_C) are used to establish<br />
connections between two CPUs. Before the CPUs can engage in PROFINET<br />
communications, you must configure parameters for transmitting (or sending) messages and<br />
receiving messages. These parameters dictate how communications operate when<br />
messages are being transmitted to or received from a target device.<br />
<strong>S7</strong>-<strong>1200</strong> <strong>Programmable</strong> <strong>controller</strong><br />
System Manual, 04/2012, A5E02486680-06 465
Communication<br />
10.2 PROFINET<br />
Configuring the TSEND_C instruction transmit (send) parameters<br />
TSEND_C instruction<br />
The TSEND_C instruction (Page 432) creates a communications connection to a partner<br />
station. The connection is set up, established, and automatically monitored until it is<br />
commanded to disconnect by the instruction. The TSEND_C instruction combines the<br />
functions of the TCON, TDISCON and TSEND instructions.<br />
From the Device configuration in STEP 7, you can configure how a TSEND_C instruction<br />
transmits data. To begin, you insert the instruction into the program from the<br />
"Communications" folder in the "Instructions" task card. The TSEND_C instruction is<br />
displayed, along with the Call options dialog where you assign a DB for storing the<br />
parameters of the instruction.<br />
You can assign tag memory locations to the inputs and outputs, as shown in the following<br />
figure:<br />
<strong>S7</strong>-<strong>1200</strong> <strong>Programmable</strong> <strong>controller</strong><br />
466 System Manual, 04/2012, A5E02486680-06
Communication<br />
10.2 PROFINET<br />
Configuring General parameters<br />
You specify the parameters in the Properties configuration dialog of the TSEND_C<br />
instruction. This dialog appears near the bottom of the page whenever you have selected<br />
any part of the TSEND_C instruction.<br />
Configuring the TRCV_C instruction receive parameters<br />
TRCV_C instruction<br />
The TRCV_C instruction (Page 432) creates a communications connection to a partner<br />
station. The connection is set up, established, and automatically monitored until it is<br />
commanded to disconnect by the instruction. The TRCV_C instruction combines the<br />
functions of the TCON, TDISCON, and TRCV instructions.<br />
From the CPU configuration in STEP 7, you can configure how a TRCV_C instruction<br />
receives data. To begin, insert the instruction into the program from the "Communications"<br />
folder in the "Instructions" task card. The TRCV_C instruction is displayed, along with the<br />
Call options dialog where you assign a DB for storing the parameters of the instruction.<br />
<strong>S7</strong>-<strong>1200</strong> <strong>Programmable</strong> <strong>controller</strong><br />
System Manual, 04/2012, A5E02486680-06 467
Communication<br />
10.2 PROFINET<br />
You can assign tag memory locations to the inputs and outputs, as shown in the following<br />
figure:<br />
Configuring the General parameters<br />
You specify the parameters in the Properties configuration dialog of the TRCV_C instruction.<br />
This dialog appears near the bottom of the page whenever you have selected any part of the<br />
TRCV_C instruction.<br />
10.2.6 Configuring a CPU and PROFINET IO device<br />
Adding a PROFINET IO device<br />
In the "Devices and networks" portal, use the hardware catalog to add PROFINET IO<br />
devices.<br />
Note<br />
To add a PROFINET IO device, you can use STEP 7 Professional or Basic, V11 or greater.<br />
For example, expand the following containers in the hardware catalog to add an ET200S IO<br />
device: Distributed I/O, ET200S, Interface modules, and PROFINET. You can then select the<br />
interface module from the list of ET200S devices (sorted by part number) and add the<br />
ET200S IO device.<br />
Table 10- 32 Adding an ET200S IO device to the device configuration<br />
Insert the IO device Result<br />
<strong>S7</strong>-<strong>1200</strong> <strong>Programmable</strong> <strong>controller</strong><br />
468 System Manual, 04/2012, A5E02486680-06
Communication<br />
10.2 PROFINET<br />
You can now connect the PROFINET IO device to the CPU:<br />
1. Right-click the "Not assigned" link on the device and select "Assign new IO <strong>controller</strong>"<br />
from the context menu to display the "Select IO <strong>controller</strong>" dialog.<br />
2. Select your <strong>S7</strong>-<strong>1200</strong> CPU (in this example, "PLC_1") from the list of IO <strong>controller</strong>s in the<br />
project.<br />
3. Click "OK" to create the network connection.<br />
Configuring logical network connections<br />
After you configure the rack with the CPU, you are now ready to configure your network<br />
connections.<br />
In the "Devices and networks" portal, use the "Network view" to create the network<br />
connections between the devices in your project. To create a PROFINET connection, click<br />
the green (PROFINET) box on the first device, and drag a line to the PROFINET box on the<br />
second device. Release the mouse button and your PROFINET connection is joined.<br />
Refer to "Device Configuration: Creating a network connection" (Page 126) for more<br />
information.<br />
Assigning CPUs and device names<br />
Network connections between the devices also assign the PROFINET IO device to the CPU,<br />
which is required for that CPU to control the device. To change this assignment, click the<br />
PLC Name shown on the PROFINET IO device. A dialog box opens that allows the<br />
PROFINET IO device to be disconnected from the current CPU and reassigned or left<br />
unassigned, if desired.<br />
The devices on your PROFINET network must have an assigned name before you can<br />
connect with the CPU. Use the "Network view" to assign names to your PROFINET devices<br />
if the devices have not already been assigned a name or if the name of the device is to be<br />
changed. Right-click the PROFINET IO device, and select "Assign device name" to do this.<br />
For each PROFINET IO device, you must assign the same name to that device in both the<br />
STEP 7 project and, using the "Online & diagnostics" tool, to the PROFINET IO device<br />
configuration memory (for example, an ET200 S interface module configuration memory). If<br />
a name is missing or does not match in either location, the PROFINET IO data exchange<br />
mode will not run. Refer to "Online and diagnostic tools: Assigning a name to a PROFINET<br />
device online (Page 676)" for more information.<br />
<strong>S7</strong>-<strong>1200</strong> <strong>Programmable</strong> <strong>controller</strong><br />
System Manual, 04/2012, A5E02486680-06 469
Communication<br />
10.2 PROFINET<br />
Assigning the IP addresses<br />
Configuring the IO cycle time<br />
In a PROFINET network, each device must also have an Internet Protocol (IP) address. This<br />
address allows the device to deliver data on a more complex, routed network:<br />
● If you have programming or other network devices that use an on-board adapter card<br />
connected to your plant LAN or an Ethernet-to-USB adapter card connected to an<br />
isolated network, you must assign IP addresses to them. Refer to "Assigning IP<br />
addresses to programming and network devices" (Page 132) for more information.<br />
● You can also assign an IP address to a CPU or network device online. This is particularly<br />
useful in an initial device configuration. Refer to "Assigning an IP address to a CPU<br />
online" (Page 134) for more information.<br />
● After you have configured your CPU or network device in your project, you can configure<br />
parameters for the PROFINET interface, to include its IP address. Refer to "Configuring<br />
an IP address for a CPU in your project" (Page 136) for more information.<br />
A PROFINET IO device is supplied with new data from the CPU within an "IO cycle" time<br />
period. The update time can be separately configured for each device and determines the<br />
time interval in which data is transmitted from the CPU to and from the device.<br />
STEP 7 calculates the "IO cycle" update time automatically in the default setting for each<br />
device of the PROFINET network, taking into account the volume of data to be exchanged<br />
and the number of devices assigned to this <strong>controller</strong>. If you do not want to have the update<br />
time calculated automatically, you can change this setting.<br />
You specify the "IO cycle" parameters in the "Properties" configuration dialog of the<br />
PROFINET IO device. This dialog appears near the bottom of the page whenever you have<br />
selected any part of the instruction.<br />
In the "Device view" of the PROFINET IO device, click the PROFINET port. In the<br />
"PROFINET Interface" dialog, access the "IO cycle" parameters with the following menu<br />
selections:<br />
● "Advanced options"<br />
● "Realtime settings"<br />
● "IO cycle"<br />
Define the IO cycle "Update time" with the following selections:<br />
● To have a suitable update time calculated automatically, select "Automatic".<br />
● To set the update yourself, select "Can be set" and enter the required update time in ms.<br />
● To ensure consistency between the send clock and the update time, activate the "Adapt<br />
update time when send clock changes" option. This option ensures that the update time<br />
is not set to less than the send clock.<br />
<strong>S7</strong>-<strong>1200</strong> <strong>Programmable</strong> <strong>controller</strong><br />
470 System Manual, 04/2012, A5E02486680-06
Table 10- 33 Configuring the ET200S PROFINET IO cycle time<br />
1<br />
ET200 S PROFINET IO device ET200S PROFINET IO cycle dialog<br />
① PROFINET port<br />
10.2.7 Diagnostics<br />
Communication<br />
10.2 PROFINET<br />
Diagnostic interrupt organization block (OB82)<br />
If a module with diagnostic capability with diagnostic interrupt enabled detects a change in its<br />
diagnostic status, it sends a diagnostic interrupt request to the CPU for the following<br />
situations:<br />
● A problem has been detected by this module (for example, a wire break) or a component<br />
requires maintenance or both (incoming event).<br />
● The problem has been corrected or no longer exists, and no further components require<br />
maintenance (outgoing event).<br />
If OB82 does not exist, these errors are written to the diagnostics buffer. The CPU does not<br />
take any action or switch to STOP.<br />
If OB82 does exist, the operating system can call OB82 in response to an incoming event.<br />
You must create OB82, and this OB allows you to configure local error handling and a more<br />
detailed reaction to incoming events.<br />
If you are using a DPV1 capable CPU, you can obtain additional information on the interrupt<br />
with the help of the RALRM instruction, which provides more specific information than the<br />
start information of OB82.<br />
Peripheral access alarms<br />
These errors are written to the diagnostics buffer. The CPU does not take any action or<br />
switch to STOP. Errors written to the diagnostics buffer include:<br />
● Module faults<br />
● Module mismatch<br />
● Module missing<br />
<strong>S7</strong>-<strong>1200</strong> <strong>Programmable</strong> <strong>controller</strong><br />
System Manual, 04/2012, A5E02486680-06 471
Communication<br />
10.3 PROFIBUS<br />
IO access errors<br />
These errors are written to the diagnostics buffer. The CPU does not take any action or<br />
switch to STOP.<br />
10.2.8 Distributed I/O Instructions<br />
Refer to "Distributed I/O (PROFINET, PROFIBUS, or AS-i)" (Page 274) for information on<br />
how to use the distributed I/O instructions with these communication networks.<br />
10.2.9 Diagnostic instructions<br />
Refer to the "Diagnostics (PROFINET or PROFIBUS)": "Diagnostics instructions" (Page 297)<br />
for information on how to use these instructions with these communication networks.<br />
10.2.10 Diagnostic events for distributed I/O<br />
10.3 PROFIBUS<br />
Refer to the "Diagnostics (PROFINET or PROFIBUS)": "Diagnostics events for distributed<br />
I/O" (Page 297) for information on how to use this diagnostic information with these<br />
communication networks.<br />
A PROFIBUS system uses a bus master to poll slave devices distributed in a multi-drop<br />
fashion on an RS485 serial bus. A PROFIBUS slave is any peripheral device (I/O<br />
transducer, valve, motor drive, or other measuring device) which processes information and<br />
sends its output to the master. The slave forms a passive station on the network since it<br />
does not have bus access rights, and can only acknowledge received messages, or send<br />
response messages to the master upon request. All PROFIBUS slaves have the same<br />
priority, and all network communication originates from the master.<br />
A PROFIBUS master forms an "active station" on the network. PROFIBUS DP defines two<br />
classes of masters. A class 1 master (normally a central programmable <strong>controller</strong> (PLC) or a<br />
PC running special software) handles the normal communication or exchange of data with<br />
the slaves assigned to it. A class 2 master (usually a configuration device, such as a laptop<br />
or programming console used for commissioning, maintenance, or diagnostics purposes) is<br />
a special device primarily used for commissioning slaves and for diagnostic purposes.<br />
<strong>S7</strong>-<strong>1200</strong> <strong>Programmable</strong> <strong>controller</strong><br />
472 System Manual, 04/2012, A5E02486680-06
Communication<br />
10.3 PROFIBUS<br />
The <strong>S7</strong>-<strong>1200</strong> is connected to a PROFIBUS network as a DP slave with the CM 1242-5<br />
communication module. The CM 1242-5 (DP slave) module can be the communications<br />
partner of DP V0/V1 masters. In the figure below, the <strong>S7</strong>-<strong>1200</strong> is a DP slave to an <strong>S7</strong>-300<br />
<strong>controller</strong>.<br />
The <strong>S7</strong>-<strong>1200</strong> is connected to a PROFIBUS network as a DP master with the CM 1243-5<br />
communication module. The CM 1243-5 (DP master) module can be the communications<br />
partner of DP V0/V1 slaves. In the figure below, the <strong>S7</strong>-<strong>1200</strong> is a master controlling an<br />
ET200S DP slave.<br />
If a CM 1242-5 and a CM 1243-5 are installed together, an <strong>S7</strong>-<strong>1200</strong> can perform as both a<br />
slave of a higher-level DP master system and a master of a lower-level DP master system,<br />
simultaneously.<br />
For V3.0, you can configure a maximum of three PROFIBUS CMs per station, in which there<br />
can be any combination of DP master or DP slave CMs. DP masters in a V3.0<br />
implementation can each control a maximum of 32 slaves.<br />
For V2.2, you can configure a maximum of three PROFIBUS CMs per station, of which only<br />
one may be a DP master. A DP master in a V2.2 implementation can control a maximum of<br />
16 slaves.<br />
<strong>S7</strong>-<strong>1200</strong> <strong>Programmable</strong> <strong>controller</strong><br />
System Manual, 04/2012, A5E02486680-06 473
Communication<br />
10.3 PROFIBUS<br />
10.3.1 Communications modules PROFIBUS<br />
10.3.1.1 Connecting to PROFIBUS<br />
Connecting the <strong>S7</strong>-<strong>1200</strong> to PROFIBUS DP<br />
The <strong>S7</strong>-<strong>1200</strong> can be connected to a PROFIBUS fieldbus system with the following<br />
communications modules:<br />
● CM 1242-5<br />
Operates as DP slave<br />
● CM 1243-5<br />
Operates as DP master class 1<br />
If a CM 1242-5 and a CM 1243-5 are installed together, an <strong>S7</strong>-<strong>1200</strong> can perform the<br />
following tasks simultaneously:<br />
● Slave of a higher-level DP master system<br />
and<br />
● Master of a lower-level DP master system<br />
10.3.1.2 Communications services of the PROFIBUS CMs<br />
Bus protocol<br />
The PROFIBUS CMs use the PROFIBUS DP-V1 protocol.<br />
<strong>S7</strong>-<strong>1200</strong> <strong>Programmable</strong> <strong>controller</strong><br />
474 System Manual, 04/2012, A5E02486680-06
Communication<br />
10.3 PROFIBUS<br />
PROFIBUS communications partners of the <strong>S7</strong>-<strong>1200</strong><br />
The two PROFIBUS CMs allow the <strong>S7</strong>-<strong>1200</strong> to exchange data with the following<br />
communications partners.<br />
● CM 1242-5<br />
The CM 1242-5 (DP slave) can be the communications partner of the following DP V0/V1<br />
masters:<br />
– SIMATIC <strong>S7</strong>-<strong>1200</strong>, <strong>S7</strong>-300, <strong>S7</strong>-400, <strong>S7</strong> Modular Embedded Controller<br />
– DP master modules and the distributed IO SIMATIC ET200<br />
– SIMATIC PC stations<br />
– SIMATIC NET IE/PB Link<br />
– <strong>Programmable</strong> <strong>controller</strong>s of various vendors<br />
● CM 1243-5<br />
The CM 1243-5 (DP master) can be the communications partner of the following DP<br />
V0/V1 slaves:<br />
– Distributed I/O SIMATIC ET200<br />
– <strong>S7</strong>-<strong>1200</strong> CPUs with CM 1242-5<br />
– <strong>S7</strong>-200 CPUs with PROFIBUS DP module EM 277<br />
– SINAMICS converter<br />
– Drives and actuators from various vendors<br />
– Sensors of various vendors<br />
– <strong>S7</strong>-300/400 CPU with PROFIBUS interface<br />
– <strong>S7</strong>-300/400 CPU with PROFIBUS CP (for example CP 342-5)<br />
– SIMATIC PC stations with PROFIBUS CP<br />
Types of communication with DP-V1<br />
The following types of communication are available with DP-V1:<br />
● Cyclic communication (CM 1242-5 and CM 1243-5)<br />
Both PROFIBUS modules support cyclic communication for the transfer of process data<br />
between DP slave and DP master.<br />
Cyclic communication is handled by the operating system of the CPU. No software blocks<br />
are required for this. The I/O data is read or written directly from/to the process image of<br />
the CPU.<br />
● Acyclic communication (CM 1243-5 only)<br />
The DP master module also supports acyclic communication using software blocks:<br />
– The "RALRM" instruction is available for interrupt handling.<br />
– The "RDREC" and "WRREC" instructions are available for transferring configuration<br />
and diagnostics data.<br />
<strong>S7</strong>-<strong>1200</strong> <strong>Programmable</strong> <strong>controller</strong><br />
System Manual, 04/2012, A5E02486680-06 475
Communication<br />
10.3 PROFIBUS<br />
Functions not supported by the CM 1243-5:<br />
SYNC/FREEZE<br />
Get_Master_Diag<br />
Other communications services of the CM 1243-5<br />
The CM 1243-5 DP master module supports the following additional communications<br />
services:<br />
● <strong>S7</strong> communication<br />
– PUT/GET services<br />
The DP master functions as a client and server for queries from other <strong>S7</strong> <strong>controller</strong>s or<br />
PCs via PROFIBUS.<br />
– PG/OP communication<br />
The PG functions allow the downloading of configuration data and user programs from<br />
a PG and the transfer of diagnostics data to a PG.<br />
Possible communications partners for OP communication are HMI panels, SIMATIC<br />
panel PCs with WinCC flexible or SCADA systems that support <strong>S7</strong> communication.<br />
10.3.1.3 Other properties of the PROFIBUS CMs<br />
Configuration and module replacement<br />
You configure the modules, networks and connections in STEP 7 as of version V11.0.<br />
If you want to configure the module in a third-party system, there is a GSD file available for<br />
the CM 1242-5 (DP slave) on the CD that ships with the module and on Siemens Automation<br />
Customer Support pages on the Internet.<br />
The configuration data of the PROFIBUS CMs is stored on the local CPU. This allows simple<br />
replacement of these communications modules when necessary.<br />
You can configure a maximum of three PROFIBUS CMs per station.<br />
Electrical connections<br />
● Power supply<br />
– The CM 1242-5 is supplied with power via the backplane bus of the SIMATIC station.<br />
– The CM 1243-5 has a separate connector for the 24 VDC power supply.<br />
● PROFIBUS<br />
The RS-485 interface of the PROFIBUS connector is a 9-pin D-sub female connector.<br />
You also have the option of connecting to optical PROFIBUS networks via an Optical Bus<br />
Terminal OBT or an Optical Link Module OLM.<br />
<strong>S7</strong>-<strong>1200</strong> <strong>Programmable</strong> <strong>controller</strong><br />
476 System Manual, 04/2012, A5E02486680-06
Communication<br />
10.3 PROFIBUS<br />
Further information<br />
You will find detailed information on the PROFIBUS CMs in the manuals of the devices. You<br />
will find these on the Internet on the pages of Siemens Industrial Automation Customer<br />
Support under the following entry IDs:<br />
● CM 1242-5:<br />
49852105 (http://support.automation.siemens.com/WW/view/en/49852105)<br />
● CM 1243-5:<br />
49851842 (http://support.automation.siemens.com/WW/view/en/49851842)<br />
10.3.1.4 Configuration examples for PROFIBUS<br />
Below, you will find examples of configurations in which the CM 1242-5 is used as a<br />
PROFIBUS slave and the CM 1243-5 is used as a PROFIBUS master.<br />
SIMATIC <strong>S7</strong>-<strong>1200</strong><br />
with CM 1242-5<br />
Operator control &<br />
monitoring<br />
PG/PC/IPC<br />
SIMATIC <strong>S7</strong>-300<br />
PROFINET/<br />
Industrial Ethernet<br />
PROFIBUS<br />
(LWL)<br />
Operator control &<br />
monitoring<br />
Figure 10-1 Configuration example with a CM 1242-5 as PROFIBUS slave<br />
PROFIBUS<br />
SIMATIC <strong>S7</strong>-<strong>1200</strong><br />
with CM 1243-5<br />
SIMATIC <strong>S7</strong>-<strong>1200</strong><br />
with CM 1242-5<br />
PROFIBUS<br />
<strong>S7</strong>-<strong>1200</strong> <strong>Programmable</strong> <strong>controller</strong><br />
System Manual, 04/2012, A5E02486680-06 477<br />
OLM<br />
OLM<br />
Operator control &<br />
monitoring<br />
PG/PC/IPC SINAMICS ET 200S<br />
Figure 10-2 Configuration example with a CM 1243-5 as PROFIBUS master
Communication<br />
10.3 PROFIBUS<br />
10.3.2 Configuring a DP master and slave device<br />
10.3.2.1 Adding the CM 1243-5 (DP master) module and a DP slave<br />
In the "Devices and networks" portal, use the hardware catalog to add PROFIBUS modules<br />
to the CPU. These modules are connected to the left side of the CPU. To insert a module<br />
into the hardware configuration, select the module in the hardware catalog and either<br />
double-click or drag the module to the highlighted slot.<br />
Table 10- 34 Adding a PROFIBUS CM 1243-5 (DP master) module to the device configuration<br />
Module Select the module Insert the module Result<br />
CM 1243-5<br />
(DP<br />
master)<br />
Use the hardware catalog to add DP slaves as well. For example, to add an ET200 S DP<br />
slave, in the Hardware Catalog, expand the following containers:<br />
● Distributed I/O<br />
● ET200 S<br />
● Interface modules<br />
● PROFIBUS<br />
Next, select "6E<strong>S7</strong> 151-1BA02-0AB0" (IM151-1 HF) from the list of part numbers, and add<br />
the ET200 S DP slave as shown in the figure below.<br />
Table 10- 35 Adding an ET200 S DP slave to the device configuration<br />
Insert the DP slave Result<br />
10.3.2.2 Configuring logical network connections between two PROFIBUS devices<br />
After you configure the CM 1243-5 (DP master) module, you are now ready to configure your<br />
network connections.<br />
<strong>S7</strong>-<strong>1200</strong> <strong>Programmable</strong> <strong>controller</strong><br />
478 System Manual, 04/2012, A5E02486680-06
Communication<br />
10.3 PROFIBUS<br />
In the Devices and Networks portal, use the "Network view" to create the network<br />
connections between the devices in your project. To create the PROFIBUS connection,<br />
select the purple (PROFIBUS) box on the first device. Drag a line to the PROFIBUS box on<br />
the second device. Release the mouse button and your PROFIBUS connection is joined.<br />
Refer to "Device Configuration: Creating a network connection" (Page 126) for more<br />
information.<br />
10.3.2.3 Assigning PROFIBUS addresses to the CM 1243-5 module and DP slave<br />
Configuring the PROFIBUS interface<br />
After you configure logical network connections between two PROFIBUS devices, you can<br />
configure parameters for the PROFIBUS interfaces. To do so, click the purple PROFIBUS<br />
box on the CM 1243-5 module, and the "Properties" tab in the inspector window displays the<br />
PROFIBUS interface. The DP slave PROFIBUS interface is configured in the same manner.<br />
Table 10- 36 Configuring the CM 1243-5 (DP master) module and ET200 S DP slave PROFIBUS<br />
interfaces<br />
<br />
CM 1243-5 (DP master) module ET200 S DP slave<br />
① PROFIBUS port<br />
Assigning the PROFIBUS address<br />
In a PROFIBUS network, each device is assigned a PROFIBUS address. This address can<br />
range from 0 through 127, with the following exceptions:<br />
● Address 0: Reserved for network configuration and/or programming tools attached to the<br />
bus<br />
● Address 1: Reserved by Siemens for the first master<br />
● Address 126: Reserved for devices from the factory that do not have a switch setting and<br />
must be re-addressed through the network<br />
● Address 127: Reserved for broadcast messages to all devices on the network and may<br />
not be assigned to operational devices<br />
Thus, the addresses that may be used for PROFIBUS operational devices are 2 through<br />
125.<br />
<strong>S7</strong>-<strong>1200</strong> <strong>Programmable</strong> <strong>controller</strong><br />
System Manual, 04/2012, A5E02486680-06 479
Communication<br />
10.3 PROFIBUS<br />
In the Properties window, select the "PROFIBUS address" configuration entry. STEP 7<br />
displays the PROFIBUS address configuration dialog, which is used to assign the<br />
PROFIBUS address of the device.<br />
Table 10- 37 Parameters for the PROFIBUS address<br />
Parameter Description<br />
Subnet Name of the Subnet to which the device is connected. Click the "Add new subnet" button to create a<br />
new subnet. "Not connected" is the default. Two connection types are possible:<br />
Parameters<br />
The "Not connected" default provides a local connection.<br />
A subnet is required when your network has two or more devices.<br />
Address Assigned PROFIBUS address for the device<br />
Highest address The highest PROFIBUS address is based on the active stations on the<br />
PROFIBUS (for example, DP master). Passive DP slaves independently<br />
have PROFIBUS addresses from 1 to 125 even if the highest PROFIBUS<br />
address is set to 15, for example. The highest PROFIBUS address is<br />
relevant for token forwarding (forwarding of the send rights), and the token<br />
is only forwarded to active stations. Specifying the highest PROFIBUS<br />
address optimizes the bus.<br />
Transmission rate Transmission rate of the configured PROFIBUS network: The PROFIBUS<br />
transmission rates range from 9.6 Kbits/sec to 12 Mbits/sec. The<br />
transmission rate setting depends on the properties of the PROFIBUS<br />
nodes being used. The transmission rate should not be greater than the<br />
rate supported by the slowest node.<br />
10.3.3 Distributed I/O Instructions<br />
The transmission rate is normally set for the master on the PROFIBUS<br />
network, with all DP slaves automatically using that same transmission rate<br />
(auto-baud).<br />
Refer to "Distributed I/O (PROFINET, PROFIBUS, or AS-i)" (Page 274) for information on<br />
how to use the distributed I/O instructions with these communication networks.<br />
10.3.4 Diagnostic instructions<br />
Refer to the "Diagnostics (PROFINET or PROFIBUS)": "Diagnostics instructions" (Page 297)<br />
for information on how to use these instructions with these communication networks.<br />
<strong>S7</strong>-<strong>1200</strong> <strong>Programmable</strong> <strong>controller</strong><br />
480 System Manual, 04/2012, A5E02486680-06
10.3.5 Diagnostic events for distributed<br />
10.4 AS-i<br />
Communication<br />
10.4 AS-i<br />
Refer to the "Diagnostics (PROFINET or PROFIBUS)": "Diagnostics events for distributed<br />
I/O" (Page 297) for information on how to use this diagnostic information with these<br />
communication networks.<br />
The <strong>S7</strong>-<strong>1200</strong> AS-i master CM 1243-2 allows the attachment of an AS-i network to an <strong>S7</strong>-<br />
<strong>1200</strong> CPU.<br />
The actuator/sensor interface, or AS-i, is a single master network connection system for the<br />
lowest level in automation systems. The CM 1243-2 serves as the AS-i master for the<br />
network. Using a single AS-i cable, sensors and actuators (AS-i slave devices) can be<br />
connected to the CPU through the CM 1243-2. The CM 1243-2 handles all AS-i network<br />
coordination and relays data and status information from the actuators and sensors to the<br />
CPU through the I/O addresses assigned to the CM 1243-2. You can access binary or<br />
analog values depending on the slave type. The AS-i slaves are the input and output<br />
channels of the AS-i system and are only active when called by the CM 1243-2.<br />
In the figure below, the <strong>S7</strong>-<strong>1200</strong> is an AS-i master controlling AS-i operator panel and I/O<br />
module digital/analog slave devices.<br />
10.4.1 Configuring an AS-i master and slave device<br />
The AS-i master CM 1243-2 is integrated into the <strong>S7</strong>-<strong>1200</strong> automation system as a<br />
communication module.<br />
You can find detailed information on the AS-i master CM 1243-2 in the "AS-i master CM<br />
1243-2 and AS-i data decoupling unit DCM 1271 for SIMATIC <strong>S7</strong>-<strong>1200</strong>" Manual<br />
(http://support.automation.siemens.com/WW/view/en/50414115/133300).<br />
<strong>S7</strong>-<strong>1200</strong> <strong>Programmable</strong> <strong>controller</strong><br />
System Manual, 04/2012, A5E02486680-06 481
Communication<br />
10.4 AS-i<br />
10.4.1.1 Adding the AS-i master CM 1243-2 and AS-i slave<br />
Use the hardware catalog to add AS-i master CM1243-2 modules to the CPU. These<br />
modules are connected to the left side of the CPU, and a maximum of three AS-i master<br />
CM1243-2 modules can be used. To insert a module into the hardware configuration, select<br />
the module in the hardware catalog and either double-click or drag the module to the<br />
highlighted slot.<br />
Table 10- 38 Adding an AS-i master CM1243-2 module to the device configuration<br />
Module Select the module Insert the module Result<br />
CM 1243-2<br />
AS-i<br />
Master<br />
Use the hardware catalog to add AS-i slaves as well. For example, to add an "I/O module,<br />
compact, digital, input" slave, in the Hardware Catalog, expand the following containers:<br />
● Field devices<br />
● AS-Interface slaves<br />
Next, select "3RG9 001-0AA00" (AS-i SM-U, 4DI) from the list of part numbers, and add the<br />
"I/O module, compact, digital, input" slave as shown in the figure below.<br />
Table 10- 39 Adding an AS-i slave to the device configuration<br />
Insert the AS-i slave Result<br />
10.4.1.2 Configuring logical network connections between two AS-i devices<br />
After you configure the AS-i master CM1243-2, you are now ready to configure your network<br />
connections.<br />
In the Devices and Networks portal, use the "Network view" to create the network<br />
connections between the devices in your project. To create the AS-i connection, select the<br />
yellow (AS-i) box on the first device. Drag a line to the AS-i box on the second device.<br />
Release the mouse button and your AS-i connection is joined.<br />
Refer to "Device Configuration: Creating a network connection" (Page 126) for more<br />
information.<br />
<strong>S7</strong>-<strong>1200</strong> <strong>Programmable</strong> <strong>controller</strong><br />
482 System Manual, 04/2012, A5E02486680-06
Communication<br />
10.4 AS-i<br />
10.4.1.3 Configuring the properties of the AS-i master CM1243-2<br />
To configure parameters for the AS-i interface, click the yellow AS-i box on the AS-i master<br />
CM1243-2 module, and the "Properties" tab in the inspector window displays the AS-i<br />
interface.<br />
In the STEP 7 inspector window, you can view, configure, and change general information,<br />
addresses and operating parameters:<br />
Table 10- 40 AS-i master CM1243-2 module properties<br />
Property Description<br />
General Name of the AS-i master CM 1243-2<br />
Operating parameters Parameters for the response of the AS-i master<br />
I/O addresses Address area for the slave I/O addresses<br />
AS-i interface (X1) Assigned AS-i network<br />
Note<br />
"Diagnostic interrupt for faults in the AS-i configuration" and "Automatic address<br />
programming" are always active and are therefore shown in gray.<br />
10.4.1.4 Assigning an AS-i address to an AS-i slave<br />
Configuring the AS-i slave interface<br />
To configure parameters for the AS-i interface, click the yellow AS-i box on the AS-i slave,<br />
and the "Properties" tab in the inspector window displays the AS-i interface.<br />
1<br />
① AS-i port<br />
<strong>S7</strong>-<strong>1200</strong> <strong>Programmable</strong> <strong>controller</strong><br />
System Manual, 04/2012, A5E02486680-06 483
Communication<br />
10.4 AS-i<br />
Assigning the AS-i slave address<br />
In an AS-i network, each device is assigned an AS-i slave address. This address can range<br />
from 0 through 31; however, address 0 is reserved only for new slave devices.<br />
The slave addresses are 1(A or B) to 31(A or B) for a total of up to 62 slave devices. Any<br />
address in the range of 1 - 31 can be assigned to an AS-i slave device; in other words, it<br />
does not matter whether the slaves begin with address 21 or whether the first slave is<br />
actually given the address 1.<br />
Enter the AS-i slave address here.<br />
Table 10- 41 Parameters for the AS-i interface<br />
Parameter Description<br />
Network Name of the network to which the device is connected<br />
Address(es) Assigned AS-i address for the slave device in range of 1(A or B) to 31(A or B) for a total of up to 62<br />
slave devices<br />
10.4.2 Exchanging data between the user program and AS-i slaves<br />
10.4.2.1 STEP 7 basic configuration<br />
The AS-i master reserves a 62-byte data area in the I/O area of the CPU. Access to the<br />
digital data is performed here in bytes; for each slave, there is one byte of input and one byte<br />
of output data.<br />
<strong>S7</strong>-<strong>1200</strong> <strong>Programmable</strong> <strong>controller</strong><br />
484 System Manual, 04/2012, A5E02486680-06
Communication<br />
The assignment of the AS-i connections of the AS-i digital slaves to the data bits of the<br />
assigned byte is indicated in the inspection window of the AS-i master CM 1243-2.<br />
10.4 AS-i<br />
You can access the data of the AS-i slaves in the user program by using the displayed I/O<br />
addresses with the appropriate bit logic operations (for example, "AND") or bit assignments.<br />
Note<br />
"System assignment" is automatically activated if you do not configure the AS-i slaves with<br />
STEP 7.<br />
If you do not configure any slaves, you must inform the AS-i master CM1243-2 about the<br />
actual bus configuration using the online function "ACTUAL > EXPECTED".<br />
Further information<br />
You can find detailed information on the AS-i master CM 1243-2 in the "AS-i master CM<br />
1243-2 and AS-i data decoupling unit DCM 1271 for SIMATIC <strong>S7</strong>-<strong>1200</strong>" Manual<br />
(http://support.automation.siemens.com/WW/view/en/50414115/133300).<br />
<strong>S7</strong>-<strong>1200</strong> <strong>Programmable</strong> <strong>controller</strong><br />
System Manual, 04/2012, A5E02486680-06 485
Communication<br />
10.4 AS-i<br />
10.4.2.2 Configuring slaves with STEP 7<br />
Transferring AS-i digital values<br />
The CPU accesses the digital inputs and outputs of the AS-i slaves through the AS-i master<br />
CM1243-2 in cyclic operation. The data is accessed through I/O addresses or by means of a<br />
data record transfer.<br />
2<br />
① AS-i slave address 1<br />
② AS-i slave address 2A<br />
③ AS-i slave address 3<br />
Access to the digital data is performed here in bytes (in other words, one byte is assigned to<br />
each AS-i digital slave). When you configure the AS-i slaves in STEP 7, the I/O address for<br />
accessing the data from the user program is displayed in the inspection window for the<br />
respective AS-i slave.<br />
The digital input module (AS-i SM-U, 4DI) in the AS-i network above has been assigned<br />
slave address 1. By clicking on the digital input module, the "AS interface" tab in the device<br />
"Properties" displays the slave address, as shown below:<br />
<strong>S7</strong>-<strong>1200</strong> <strong>Programmable</strong> <strong>controller</strong><br />
486 System Manual, 04/2012, A5E02486680-06<br />
1<br />
3
Communication<br />
10.4 AS-i<br />
The digital input module (AS-i SM-U, 4DI) in the AS-i network above has been assigned I/O<br />
address 2. By clicking on the digital input module, the "I/O addresses" tab in the device<br />
"Properties" displays the I/O address, as shown below:<br />
You can access the data of the AS-i slaves in the user program by using their I/O addresses<br />
with the appropriate bit logic operations (for example, "AND") or bit assignments. The<br />
following simple program illustrates how the assignment works:<br />
Input 2.0 is polled in this program. In the AS-i system, this input belongs to slave1 (Input byte<br />
2, bit 0). Output 4.3, which is then set, corresponds to AS-i slave 3 (Output byte 4, bit 3)<br />
Transferring AS-i analog values<br />
You can access analog data of an AS-i slave through the process image of the CPU if you<br />
have configured this AS-i slave in STEP 7 as an analog slave.<br />
If you did not configure the analog slave in STEP 7, you can only access the data of the AS-i<br />
slave through the acyclic functions (data record interface). In the user program of the CPU,<br />
AS-i calls are read and written using the RDREC (read data record) and WRREC (write data<br />
record) distributed I/O instructions.<br />
Further information<br />
Note<br />
A configuration of the AS-i slaves specified through STEP 7 and downloaded into the <strong>S7</strong><br />
station is transferred by the CPU on the AS-i master CM1243-2 during <strong>S7</strong> station start-up.<br />
Any existing configuration that was determined through the "System assignment" online<br />
function (Page 484) ("ACTUAL -> EXPECTED") will be overwritten.<br />
You can find detailed information on the AS-i master CM 1243-2 in the "AS-i master CM<br />
1243-2 and AS-i data decoupling unit DCM 1271 for SIMATIC <strong>S7</strong>-<strong>1200</strong>" Manual<br />
(http://support.automation.siemens.com/WW/view/en/50414115/133300).<br />
<strong>S7</strong>-<strong>1200</strong> <strong>Programmable</strong> <strong>controller</strong><br />
System Manual, 04/2012, A5E02486680-06 487
Communication<br />
10.4 AS-i<br />
10.4.3 Distributed I/O Instructions<br />
Refer to "Distributed I/O (PROFINET, PROFIBUS, or AS-i)" (Page 274) for information on<br />
how to use the distributed I/O instructions with these communication networks.<br />
10.4.4 Working with AS-i online tools<br />
Changing AS-i operational modes online<br />
You must go online to view and change the AS-i operational modes.<br />
In order to go online, your must first be in "Device configuration" with the AS-i master<br />
CM1243-2 module selected, and then click the "Go online" button in the toolbar. Next, select<br />
the "Online and diagnostics" command from the "Online" menu.<br />
There are two AS-i operational modes:<br />
● Protection mode:<br />
– You cannot change AS-i slave device and CPU I/O addresses.<br />
– The green "CM" LED is OFF.<br />
● Configuration mode:<br />
– You can make required changes in your AS-i slave device and CPU I/O addresses.<br />
– The green "CM" LED is ON.<br />
<strong>S7</strong>-<strong>1200</strong> <strong>Programmable</strong> <strong>controller</strong><br />
488 System Manual, 04/2012, A5E02486680-06
Communication<br />
10.5 <strong>S7</strong> communication<br />
In the "Set AS-i address" field, you can change the AS-i slave address. A new slave that has<br />
not been assigned an address always has address 0. It is detected by the master as a new<br />
slave without an address assignment and is not included in normal communication until<br />
assigned an address.<br />
Configuration error<br />
When the yellow "CER" LED is ON, there is an error in the AS-i slave device configuration.<br />
Select the "ACTUAL > EXPECTED" button to overwrite the AS-i master CM1243-2 module<br />
slave device configuration with the AS-i field network slave device configuration.<br />
10.5 <strong>S7</strong> communication<br />
10.5.1 GET and PUT instructions<br />
You can use the GET and PUT instructions to communicate with <strong>S7</strong> CPUs through<br />
PROFINET and PROFIBUS connections:<br />
● Accessing data in a remote CPU: An <strong>S7</strong>-<strong>1200</strong> CPU can only use absolute addresses in<br />
the ADDR_x input field to address variables of remote CPUs (<strong>S7</strong>-200/300/400/<strong>1200</strong>).<br />
● Accessing data in a standard DB: An <strong>S7</strong>-<strong>1200</strong> CPU can only use absolute addresses in<br />
the ADDR_x input field to address DB variables in a standard DB of a remote <strong>S7</strong> CPU.<br />
● Accessing data in an optimized DB: An <strong>S7</strong>-<strong>1200</strong> CPU cannot access DB variables in an<br />
optimized DB of a remote <strong>S7</strong>-<strong>1200</strong> CPU.<br />
● Accessing data in a local CPU: An <strong>S7</strong>-<strong>1200</strong> CPU can use either absolute or symbolic<br />
addresses as inputs to the RD_x or SD_x input fields of the GET or PUT instruction,<br />
respectively.<br />
<strong>S7</strong>-<strong>1200</strong> <strong>Programmable</strong> <strong>controller</strong><br />
System Manual, 04/2012, A5E02486680-06 489
Communication<br />
10.5 <strong>S7</strong> communication<br />
Table 10- 42 GET and PUT instructions<br />
LAD / FBD SCL Description<br />
Table 10- 43 Data types for the parameters<br />
"GET_DB"(<br />
req:=_bool_in_,<br />
ID:=_word_in_,<br />
ndr=>_bool_out_,<br />
error=>_bool_out_,<br />
status=>_word_out_,<br />
addr_1:=_remote_inout_,<br />
[...addr_4:=_remote_inout_,]<br />
rd_1:=_variant_inout_<br />
[,...rd_4:=_variant_inout_]);<br />
"PUT_DB"(<br />
req:=_bool_in_,<br />
ID:=_word_in_,<br />
done=>_bool_out_,<br />
error=>_bool_out_,<br />
status=>_word_out_,<br />
addr_1:=_remote_inout_,<br />
[...addr_4:=_remote_inout_,]<br />
sd_1:=_variant_inout_,<br />
[....sd_4:=_variant_inout_]);<br />
Use the GET instruction to read data from<br />
a remote <strong>S7</strong> CPU. The remote CPU can<br />
be in either RUN or STOP mode.<br />
STEP 7 automatically creates the DB<br />
when you insert the instruction.<br />
Use the PUT instruction to write data to a<br />
remote <strong>S7</strong> CPU. The remote CPU can be<br />
in either RUN or STOP mode.<br />
STEP 7 automatically creates the DB<br />
when you insert the instruction.<br />
Parameter and type Data type Description<br />
REQ Input Bool A low to high (positive edge) signal starts the operation.<br />
ID Input CONN_PRG<br />
(Word)<br />
<strong>S7</strong> connection ID (Hex)<br />
NDR (GET) Output Bool New Data Ready:<br />
0: request has not yet started or is still running<br />
1: task was completed successfully<br />
DONE (PUT) Output Bool DONE:<br />
0: request has not yet started or is still running<br />
1: task was completed successfully<br />
<strong>S7</strong>-<strong>1200</strong> <strong>Programmable</strong> <strong>controller</strong><br />
490 System Manual, 04/2012, A5E02486680-06
Communication<br />
10.5 <strong>S7</strong> communication<br />
Parameter and type Data type Description<br />
ERROR<br />
Output Bool<br />
ERROR=0<br />
STATUS<br />
Output Word<br />
STATUS value:<br />
– 0000H: neither warning nor error<br />
– 0000H: Warning, STATUS supplies detailed information<br />
ERROR=1<br />
ADDR_1 InOut Remote<br />
ADDR_2 InOut Remote<br />
ADDR_3 InOut Remote<br />
ADDR_4 InOut Remote<br />
RD_1 (GET)<br />
SD_1 (PUT)<br />
InOut Variant<br />
RD_2 (GET)<br />
SD_2 (PUT)<br />
InOut Variant<br />
RD_3 (GET)<br />
SD_3 (PUT)<br />
InOut Variant<br />
RD_4 (GET)<br />
SD_4 (PUT)<br />
InOut Variant<br />
There is an error. STATUS supplies detailed information about<br />
the nature of the error.<br />
Pointer to the memory areas in the remote CPU that stores the<br />
data to be read (GET) or that is sent (PUT).<br />
Pointer to the memory areas in the local CPU that stores the data<br />
to be read (GET) or sent (PUT).<br />
Data types allowed: Bool (only a single bit allowed), Byte, Char,<br />
Word, Int, DWord, DInt, or Real.<br />
Note: If the pointer accesses a DB, you must specify the absolute<br />
address, such as:<br />
P# DB10.DBX5.0 Byte 10<br />
In this case, 10 represents the number of bytes to GET or PUT.<br />
You must ensure that the length (number of bytes) and data types for the ADDR_x (remote<br />
CPU) and RD_x or SD_x (local CPU) parameters match. The number after the identifier<br />
"Byte" is the number of bytes referenced by the ADDR_x, RD_x, or SD_x parameter.<br />
Note<br />
The total number of bytes received on a GET instruction or the total number of bytes sent on<br />
a PUT instruction is limited. The limitations are based on how many of the four possible<br />
address and memory areas you use:<br />
If you use only ADDR_1 and RD_1/SD_1, a GET instruction can get 222 bytes and a PUT<br />
instruction can send 212 bytes.<br />
If you use ADDR_1, RD_1/SD_1, ADDR_2, and RD_2/SD_2, a GET instruction can get a<br />
total of 218 bytes and a PUT instruction can send a total of 196 bytes.<br />
If you use ADDR_1, RD_1/SD_1, ADDR_2, RD_2/SD_2, ADDR_3, and RD_3/SD_3 a<br />
GET instruction can get a total of 214 bytes and a PUT instruction can send a total of 180<br />
bytes.<br />
If you use ADDR_1, RD_1/SD_1, ADDR_2, RD_2/SD_2, ADDR_3, RD_3/SD_3, ADDR_4,<br />
RD_4/SD_4 a GET instruction can get a total of 210 bytes and a PUT instruction can<br />
send a total of 164 bytes.<br />
The sum of the number of bytes of each of your address and memory area parameters must<br />
be less than or equal to the defined limits. If you exceed these limits, the GET or PUT<br />
instruction returns an error.<br />
<strong>S7</strong>-<strong>1200</strong> <strong>Programmable</strong> <strong>controller</strong><br />
System Manual, 04/2012, A5E02486680-06 491
Communication<br />
10.5 <strong>S7</strong> communication<br />
Table 10- 44 Error information<br />
On the rising edge of the REQ parameter, the read operation (GET) or write operation (PUT)<br />
loads the ID, ADDR_1, and RD_1 (GET) or SD_1 (PUT) parameters.<br />
● For GET: The remote CPU returns the requested data to the receive areas (RD_x),<br />
starting with the next scan. When the read operation has completed without error, the<br />
NDR parameter is set to 1. A new operation can only be started only after the previous<br />
operation has completed.<br />
● For PUT: The local CPU starts sending the data (SD_x) to the memory location (ADDR_x)<br />
in the remote CPU. When the write operation has completed without error, the remote<br />
CPU returns an execution acknowledgement. The DONE parameter of the PUT<br />
instruction is then set to 1. A new write operation can only be started after the previous<br />
operation has completed.<br />
Note<br />
To ensure data consistency, always evaluate when the operation has been completed<br />
(NDR = 1 for GET, or DONE = 1 for PUT) before accessing the data or initiating another<br />
read or write operation.<br />
The ERROR and STATUS parameters provide information about the status of the read<br />
(GET) or write (PUT) operation.<br />
ERROR STATUS<br />
(decimal)<br />
Description<br />
0 11 New job cannot take effect since previous job is not yet completed.<br />
The job is now being processed in a priority class having lower priority.<br />
0 25 Communication has started. The job is being processed.<br />
1 1 Communications problems, such as:<br />
Connection description not loaded (local or remote)<br />
Connection interrupted (for example: cable, CPU is turned off, or CM/CB/CP is in<br />
STOP mode)<br />
Connection to partner not yet established<br />
1 2 Negative acknowledgement from the partner device. The task cannot be executed.<br />
1 4 Errors in the send area pointers (RD_x for GET, or SD_x for PUT) involving the data<br />
length or the data type.<br />
1 8 Access error on the partner CPU<br />
1 10 Access to the local user memory not possible (for example, attempting to access a<br />
deleted DB)<br />
1 12 When the SFB was called:<br />
An instance DB was specified that does not belong to GET or PUT<br />
No instance DB was specified, but rather a shared DB<br />
No instance DB found (loading a new instance DB)<br />
<strong>S7</strong>-<strong>1200</strong> <strong>Programmable</strong> <strong>controller</strong><br />
492 System Manual, 04/2012, A5E02486680-06
ERROR STATUS<br />
(decimal)<br />
Description<br />
1 20 Exceeded the maximum number of parallel jobs/instances<br />
The instances were overloaded at CPU-RUN<br />
1 27<br />
This status is possible for first execution of the GET or PUT instruction<br />
There is no corresponding GET or PUT instruction in the CPU.<br />
10.5.2 Creating an <strong>S7</strong> connection<br />
Communication<br />
10.5 <strong>S7</strong> communication<br />
The connection type that you select creates a communication connection to a partner<br />
station. The connection is set up, established, and automatically monitored.<br />
In the Devices and Networks portal, use the "Network view" to create the network<br />
connections between the devices in your project. First, click the "Connections" tab, and then<br />
select the connection type with the dropdown, just to the right (for example, an <strong>S7</strong><br />
connection). Click the green (PROFINET) box on the first device, and drag a line to the<br />
PROFINET box on the second device. Release the mouse button and your PROFINET<br />
connection is joined.<br />
Refer to "Creating a network connection" (Page 126) for more information.<br />
Click the "Highlighted: Connection" button to access the "Properties" configuration dialog of<br />
the communication instruction.<br />
10.5.3 Configuring the Local/Partner connection path between two devices<br />
Configuring General parameters<br />
You specify the communication parameters in the "Properties" configuration dialog of the<br />
communication instruction. This dialog appears near the bottom of the page whenever you<br />
have selected any part of the instruction.<br />
Refer to "Device configuration: Configuring the Local/Partner connection path (Page 127)"<br />
for more information.<br />
In the "Address Details" section of the Connection parameters dialog, you define the TSAPs<br />
or ports to be used. The TSAP or port of a connection in the CPU is entered in the "Local<br />
TSAP" field. The TSAP or port assigned for the connection in your partner CPU is entered<br />
under the "Partner TSAP" field.<br />
<strong>S7</strong>-<strong>1200</strong> <strong>Programmable</strong> <strong>controller</strong><br />
System Manual, 04/2012, A5E02486680-06 493
Communication<br />
10.5 <strong>S7</strong> communication<br />
10.5.4 GET/PUT connection parameter assignment<br />
The GET/PUT instructions connection parameter assignment is a user aid for configuring<br />
CPU-to-CPU <strong>S7</strong> communication connections.<br />
After inserting a GET or PUT block, the GET/PUT instructions connection parameter<br />
assignment is started:<br />
The inspector window displays the properties of the connection whenever you have selected<br />
any part of the instruction. You can specify the communication parameters in the<br />
"Configuration" tab of the "Properties" for the communication instruction.<br />
10.5.4.1 Connection parameters<br />
The "Connection parameters" page allows the user to configure the necessary <strong>S7</strong><br />
connection and to configure the parameter "Connection ID" that is referenced by the<br />
GET/PUT block parameter "ID". The page's content has information about the local endpoint<br />
and allows the user to define the local interface. The user can also define the partner end<br />
point.<br />
The "Block parameters" page allows the user to configure the additional block parameters.<br />
<strong>S7</strong>-<strong>1200</strong> <strong>Programmable</strong> <strong>controller</strong><br />
494 System Manual, 04/2012, A5E02486680-06
Table 10- 45 Connection parameter: General definitions<br />
Parameter Definition<br />
Connection<br />
parameter:<br />
General<br />
Communication<br />
10.5 <strong>S7</strong> communication<br />
End point "Local End point": Name assigned to the Local CPU<br />
"Partner End point": Name assigned to the Partner (remote) CPU<br />
Note: In the "Partner End point" dropdown list, the system displays all potential<br />
<strong>S7</strong> connection partners of the current project as well as the option<br />
"unspecified". An unspecified partner represents a communication partner<br />
which is not currently in the STEP 7 project (for example, a third party device<br />
communication partner).<br />
Interface Name assigned to the interfaces<br />
Note: The user can change the connection by changing the Local and Partner<br />
interfaces<br />
Interface type Type of interface<br />
Subnet name Name assigned to the subnets<br />
Address Assigned IP addresses<br />
Note: The user can specify the remote address of a third party device for an<br />
"unspecified" communication partner.<br />
Connection ID ID number: Automatically generated by the GET/PUT connection parameter<br />
assignment<br />
Connection name Local and Partner CPU data storage location: Automatically generated by the<br />
GET/PUT connection parameter assignment<br />
Active connection Checkbox to select Local CPU as the active connection<br />
establishment<br />
One-way Checkbox to specify a one-way or two-way connection; read-only<br />
Note: In a PROFINET GET/PUT connection, both the local and partner<br />
devices can act as a server or a client. This allows a two-way connection, and<br />
the "One-way" checkbox is unchecked.<br />
In a PROFIBUS GET/PUT connection, in some cases, the Partner device can<br />
only act as a server (for example, an <strong>S7</strong>-300), and the "One-way" checkbox is<br />
checked.<br />
<strong>S7</strong>-<strong>1200</strong> <strong>Programmable</strong> <strong>controller</strong><br />
System Manual, 04/2012, A5E02486680-06 495
Communication<br />
10.5 <strong>S7</strong> communication<br />
Connection ID parameter<br />
There are three ways to change the system-defined connection IDs:<br />
1. The user can change the current ID directly on the GET/PUT block. If the new ID belongs<br />
to an already existing connection, the connection is changed.<br />
2. The user can change the current ID directly on the GET/PUT block, but the new ID does<br />
not already exist. A new <strong>S7</strong> connection is created by the system.<br />
3. The user can change the current ID through the "Connection overview" dialog: The userinput<br />
is synchronized with the ID-parameter on the corresponding GET/PUT block.<br />
Note<br />
The parameter "ID" of the GET/PUT block is not a connection name, but a numerical<br />
expression which is written like the following example: W#16#1<br />
Connection name parameter<br />
The connection name is editable through a special user control, the "Connection overview"<br />
dialog. This dialog offers all the available <strong>S7</strong> connections which could be selected as an<br />
alternative for the current GET/PUT communication. The user can create a completely new<br />
connection in this table. Click the button to the right of the "Connection name" field to start<br />
the "Connection overview" dialog.<br />
<strong>S7</strong>-<strong>1200</strong> <strong>Programmable</strong> <strong>controller</strong><br />
496 System Manual, 04/2012, A5E02486680-06
Communication<br />
10.5 <strong>S7</strong> communication<br />
10.5.4.2 Configuring a CPU-to-CPU <strong>S7</strong> connection<br />
Given the configuration of PLC_1, PLC_2, and PLC_3 as shown in the figure below, insert<br />
GET or PUT blocks for "PLC_1".<br />
For the GET or PUT instruction, the "Properties" tab is automatically displayed in the<br />
inspector window with the following menu selections:<br />
● "Configuration"<br />
● "Connection parameters"<br />
<strong>S7</strong>-<strong>1200</strong> <strong>Programmable</strong> <strong>controller</strong><br />
System Manual, 04/2012, A5E02486680-06 497
Communication<br />
10.5 <strong>S7</strong> communication<br />
Configuring a PROFINET <strong>S7</strong> connection<br />
For the "Partner End point", select "PLC_3".<br />
The system reacts with the following changes:<br />
Table 10- 46 Connection parameter: General values<br />
Parameter Definition<br />
Connection End point "Local End point" contains "PLC_1" as read-only.<br />
parameter:<br />
General<br />
"Partner End point" field contains "PLC_3[CPU319-3PN/DP]":<br />
The color switches from red to white<br />
The "Partner" device image is shown.<br />
A connection line appears between the PLC_1- and PLC_3 device images<br />
(green Ethernet line).<br />
Interface "Local Interface" contains "CPU1214C DC/DC/DC, PROFINET interface<br />
(R0/S1)".<br />
"Partner Interface" contains: "CPU319-3PN/DP, PROFINET interface<br />
(R0/S2)".<br />
Interface type "Local Interface type" contains "Ethernet/IP"; control is read-only.<br />
"Partner Interface type" contains "Ethernet/IP"; control is read-only.<br />
Interface type images are shown at the right beside the Local and Partner<br />
"Interface type" (green Ethernet icon).<br />
Subnet name "Local Subnet name" contains "PN/IE_1"; control is read only.<br />
"Partner Subnet name" contains "PN/IE_1"; control is read only.<br />
Address "Local Address" contains the Local IP address; control is read only.<br />
"Partner Address" contains the Partner IP address; control is read only.<br />
Connection ID "Connection ID" contains "100".<br />
In the Program editor, in the Main [OB1], the GET/PUT block "Connection ID"<br />
value also contains "100".<br />
<strong>S7</strong>-<strong>1200</strong> <strong>Programmable</strong> <strong>controller</strong><br />
498 System Manual, 04/2012, A5E02486680-06
Communication<br />
10.5 <strong>S7</strong> communication<br />
Parameter Definition<br />
Connection name "Connection name" contains the default connection name (for example,<br />
"<strong>S7</strong>_Connection_1"); control is enabled.<br />
Active connection Checked and enabled to select the Local CPU as the active connection.<br />
establishment<br />
One-way Read-only and unchecked.<br />
Note: "PLC_1" (an <strong>S7</strong>-<strong>1200</strong> CPU 1214CDC/DC/Rly) and "PLC_3" (an <strong>S7</strong>-300<br />
CPU 319-3PN/DP) can both act as a server and a client in a PROFINET<br />
GET/PUT connection, allowing a two-way connection.<br />
The GET/PUT icon in the Property View tree also changes from red to green.<br />
Completed PROFINET <strong>S7</strong> connection<br />
In the "Network view", a two-way <strong>S7</strong> connection is shown in the "Connections" table between<br />
"PLC_1" and "PLC_3".<br />
<strong>S7</strong>-<strong>1200</strong> <strong>Programmable</strong> <strong>controller</strong><br />
System Manual, 04/2012, A5E02486680-06 499
Communication<br />
10.5 <strong>S7</strong> communication<br />
Configuring a PROFIBUS <strong>S7</strong> connection<br />
For the "Partner End point", select "PLC_3".<br />
The system reacts with the following changes:<br />
Table 10- 47 Connection parameter: General values<br />
Parameter Definition<br />
Connection End point "Local End point" contains "PLC_1" as read-only.<br />
parameter:<br />
General<br />
"Partner End point" field contains "PLC_3[CPU319-3PN/DP]":<br />
The color switches from red to white<br />
The "Partner" device image is shown.<br />
A connection line appears between the PLC_1- and PLC_3 device images<br />
(purple PROFIBUS line).<br />
Interface "Local Interface" contains "CPU1214C DC/DC/DC, PROFIBUS interface<br />
(R0/S1)".<br />
"Partner Interface" contains: "CPU319-3PN/DP, PROFIBUS interface<br />
(R0/S2)".<br />
Interface type "Local Interface type" contains "PROFIBUS"; control is read-only.<br />
"Partner Interface type" contains " PROFIBUS "; control is read-only.<br />
Interface type images are shown at the right beside the Local and Partner<br />
"Interface type" (purple PROFIBUS icon).<br />
Subnet name "Local Subnet name" contains " PROFIBUS _1"; control is read only.<br />
"Partner Subnet name" contains " PROFIBUS _1"; control is read only.<br />
Address "Local Address" contains the Local IP address; control is read only.<br />
"Partner Address" contains the Partner IP address; control is read only.<br />
Connection ID "Connection ID" contains "100".<br />
In the Program editor, in the Main [OB1], the GET/PUT block "Connection ID"<br />
value also contains "100".<br />
<strong>S7</strong>-<strong>1200</strong> <strong>Programmable</strong> <strong>controller</strong><br />
500 System Manual, 04/2012, A5E02486680-06
Communication<br />
10.5 <strong>S7</strong> communication<br />
Parameter Definition<br />
Connection name "Connection name" contains the default connection name (for example,<br />
"<strong>S7</strong>_Connection_1"); control is enabled.<br />
Active connection<br />
establishment<br />
Read-only, checked, and enabled to select the Local CPU as the active<br />
connection.<br />
One-way Read-only and checked.<br />
Note: "PLC_3" (an <strong>S7</strong>-300 CPU319-3PN/DP) can act only as a server (cannot<br />
also be a client) in a PROFIBUS GET/PUT connection, allowing only a oneway<br />
connection.<br />
The GET/PUT icon in the Property View tree also changes from red to green.<br />
Completed PROFIBUS <strong>S7</strong> connection<br />
In the "Network view", a one-way <strong>S7</strong> connection is shown in the "Connections" table<br />
between "PLC_1" and "PLC_3".<br />
<strong>S7</strong>-<strong>1200</strong> <strong>Programmable</strong> <strong>controller</strong><br />
System Manual, 04/2012, A5E02486680-06 501
Communication<br />
10.5 <strong>S7</strong> communication<br />
<strong>S7</strong>-<strong>1200</strong> <strong>Programmable</strong> <strong>controller</strong><br />
502 System Manual, 04/2012, A5E02486680-06
Web server 11<br />
The Web server for the <strong>S7</strong>-<strong>1200</strong> provides Web page access to data about your CPU and<br />
process data within the CPU.<br />
Standard Web pages<br />
The <strong>S7</strong>-<strong>1200</strong> includes standard Web pages that you can access from your PC from a Web<br />
browser (Page 505):<br />
● Introduction (Page 508) - entry point to the standard Web pages<br />
● Start Page (Page 509) - general information about the CPU<br />
● Identification (Page 510) - detailed information about the CPU including serial, order, and<br />
version numbers<br />
● Module Information (Page 511) - information about the modules in the local rack<br />
● Communication (Page 513) - information about the network addresses, physical<br />
properties of the communication interfaces, and communication statistics<br />
● Diagnostic Buffer (Page 510) - the diagnostic buffer<br />
● Variable Status (Page 515) - CPU variables and I/O, accessible by address or PLC tag<br />
name<br />
● Data Logs (Page 516) - data log files stored internally in the CPU or on a memory card<br />
● Update Firmware (Page 519) - update the firmware in your CPU<br />
These pages are built in to the <strong>S7</strong>-<strong>1200</strong>. For details about the standard Web pages, and how<br />
to access them, refer to the Standard web pages (Page 505) section.<br />
User-defined Web pages<br />
The <strong>S7</strong>-<strong>1200</strong> also provides support for you to create user-defined Web pages that can<br />
access CPU data. You can develop these pages with the HTML authoring software of your<br />
choice, and include pre-defined "AWP" (Automation Web Programming) commands in your<br />
HTML code to access CPU data. Refer to the User-defined web pages (Page 521) chapter<br />
for specific information on the development of user-defined Web pages, and the associated<br />
configuration and programming in STEP 7.<br />
Web browser requirement<br />
The following Web browsers support the Web server:<br />
● Internet Explorer 8.0 or greater<br />
● Mozilla Firefox 3.0 or greater<br />
● Opera 11.0 or greater<br />
<strong>S7</strong>-<strong>1200</strong> <strong>Programmable</strong> <strong>controller</strong><br />
System Manual, 04/2012, A5E02486680-06 503
Web server<br />
11.1 Enabling the Web server<br />
For browser-related restrictions that can interfere with the display of standard or user-defined<br />
Web pages, see the Constraints (Page 558) section.<br />
11.1 Enabling the Web server<br />
You enable the Web server in STEP 7 from Device Configuration for the CPU to which you<br />
intend to connect.<br />
To enable the Web server, follow these steps:<br />
1. Select the CPU in the Device Configuration view.<br />
2. In the inspector window, select "Web server" from the CPU properties.<br />
3. Select the check box for "Enable Web server on this module".<br />
4. To require secure access to the Web server, select the "Permit access only with HTTPS"<br />
check box.<br />
WARNING<br />
Unauthorized access to the CPU or changing PLC variables to invalid values could<br />
disrupt process operation and could result in death, severe personal injury and/or<br />
property damage.<br />
Because enabling the Web server allows "admin" users to perform operating mode<br />
changes, writes to PLC data, and firmware updates, Siemens recommends that you<br />
observe the following security practices:<br />
Enable access to the Web server only with the HTTPS protocol.<br />
Password-protect the CPU (Page 164) with a strong password. Strong passwords<br />
are at least eight characters in length, mix letters, numbers, and special characters,<br />
are not words that can be found in a dictionary, and are not names or identifiers that<br />
can be derived from personal information. Keep the password secret and change it<br />
frequently.<br />
Perform error-checking and range-checking on your variables in your program logic<br />
because Web page users can change PLC variables to invalid values.<br />
After you download the device configuration, you can use the standard Web pages to access<br />
the CPU. If you select "Enable" for "Automatic update", standard Web pages refresh every<br />
ten seconds.<br />
If you created user-defined Web pages, you can access them from the standard Web page<br />
menu.<br />
Note<br />
If a "Download in RUN" (Page 690) is in progress, standard and user-defined Web pages do<br />
not update data values or permit you to write data values until the download is complete. Any<br />
attempts to write data values while the download is in progress are discarded.<br />
<strong>S7</strong>-<strong>1200</strong> <strong>Programmable</strong> <strong>controller</strong><br />
504 System Manual, 04/2012, A5E02486680-06
11.2 Standard web pages<br />
11.2.1 Accessing the standard Web pages from the PC<br />
Web server<br />
11.2 Standard web pages<br />
To access the <strong>S7</strong>-<strong>1200</strong> standard Web pages from a PC, follow these steps:<br />
1. Ensure that the <strong>S7</strong>-<strong>1200</strong> and the PC are on a common Ethernet network or are<br />
connected directly to each other with a standard Ethernet cable.<br />
2. Open a Web browser and enter the URL "http://ww.xx.yy.zz", where "ww.xx.yy.zz"<br />
corresponds to the IP address of the <strong>S7</strong>-<strong>1200</strong> CPU.<br />
The Web browser opens the Introduction page.<br />
Note<br />
If your Internet access prevents direct connection to an IP address, see your IT<br />
administrator. Your Web environment or operating system might also impose other<br />
constraints (Page 558).<br />
Alternatively, you can address your Web browser to a specific standard Web page. To do so,<br />
enter the URL in the form "http://ww.xx.yy.zz/.html", where corresponds to<br />
one of the standard Web pages:<br />
● start (Page 509) - general information about the CPU<br />
● identification (Page 510) - detailed information about the CPU including serial, order, and<br />
version numbers<br />
● module (Page 511) - information about the modules in the local rack<br />
● communication (Page 513) - information about the network addresses, physical<br />
properties of the communication interfaces, and communication statistics<br />
● diagnostic (Page 510) - the diagnostic buffer<br />
● variable (Page 515) - CPU variables and I/O, accessible by address or PLC tag name<br />
● datalog (Page 516) - data log files stored internally in the CPU or on a memory card<br />
● updatefirmware (Page 519) - page that provides ability to update the firmware in your<br />
CPU from a file<br />
● index (Page 508) - introduction page to enter the standard Web pages<br />
For example, if you enter "http://ww.xx.yy.zz/communication.html", the browser will display<br />
the communication page.<br />
<strong>S7</strong>-<strong>1200</strong> <strong>Programmable</strong> <strong>controller</strong><br />
System Manual, 04/2012, A5E02486680-06 505
Web server<br />
11.2 Standard web pages<br />
Secure access<br />
You can use https:// instead of http:// for secure access to the standard Web pages. When<br />
you connect to the <strong>S7</strong>-<strong>1200</strong> with https://, the Web site encrypts the session with a digital<br />
certificate. The data is securely transmitted and not accessible for anyone to view. You will<br />
typically get a security warning that you can confirm with "Yes" to proceed to the standard<br />
Web pages. To avoid the security warning with each secure access, you can import the<br />
Siemens software certificate to your Web browser (Page 560).<br />
11.2.2 Layout of the standard Web pages<br />
Each of the standard Web pages has a common layout with navigational links and page<br />
controls as shown below:<br />
2<br />
6<br />
① Web server header<br />
② Log in or log out<br />
③ Standard Web page header with name of the page that you are viewing. This example is the<br />
CPU Identification page. Some of the standard Web pages, such as module information, also<br />
display a navigation path here if multiple screens of that type can be accessed.<br />
④ Refresh icon: for pages with automatic refresh, enables or disables the automatic refresh<br />
function; for pages without automatic refresh, causes the page to update with current data<br />
⑤ Print icon: prepares and displays a printable version of the information available from the<br />
displayed page<br />
⑥ Navigation area to switch to another page<br />
⑦ Content area for specific standard Web page that you are viewing. This example is the CPU<br />
Identification page.<br />
<strong>S7</strong>-<strong>1200</strong> <strong>Programmable</strong> <strong>controller</strong><br />
506 System Manual, 04/2012, A5E02486680-06<br />
1<br />
3<br />
7<br />
4<br />
5
Logging in<br />
Web server<br />
11.2 Standard web pages<br />
Note<br />
Printing standard Web pages<br />
When printing standard Web page content, note that the printed contents can sometimes<br />
differ from the displayed page. For example, a print copy of the Diagnostic buffer page might<br />
contain new diagnostic entries that are not shown on the Diagnostic buffer page display. If<br />
automatic refresh is not enabled, the page display shows the diagnostic events at the time<br />
the page was initially displayed and the print copy contains the diagnostic events at the time<br />
the print function was executed.<br />
No log in is required to view the data in the standard Web pages. To perform certain actions<br />
such as changing the operating mode of the <strong>controller</strong>, writing values to memory, and<br />
updating the CPU firmware you must log in as the "admin" user.<br />
The log in frame is near the upper left corner on each page.<br />
To log in as the "admin" user, follow these steps:<br />
1. Enter "admin" for the Name field.<br />
2. Enter the CPU password if one is configured in the Password field; otherwise, press the<br />
Enter key.<br />
You are now logged in as the "admin" user.<br />
WARNING<br />
Unauthorized access to the CPU or changing PLC variables to invalid values could disrupt<br />
process operation and could result in death, severe personal injury and/or property<br />
damage.<br />
Because enabling the Web server allows "admin" users to perform operating mode<br />
changes, writes to PLC data, and firmware updates, Siemens recommends that you<br />
observe the following security practices:<br />
Enable access to the Web server only with the HTTPS protocol.<br />
Password-protect the CPU (Page 164) with a strong password. Strong passwords are at<br />
least eight characters in length, mix letters, numbers, and special characters, are not<br />
words that can be found in a dictionary, and are not names or identifiers that can be<br />
derived from personal information. Keep the password secret and change it frequently.<br />
Perform error-checking and range-checking on your variables in your program logic<br />
because Web page users can change PLC variables to invalid values.<br />
If you encounter any errors logging in, return to the Introduction page (Page 508) and<br />
download the Siemens security certificate (Page 560). You can then log in with no errors.<br />
<strong>S7</strong>-<strong>1200</strong> <strong>Programmable</strong> <strong>controller</strong><br />
System Manual, 04/2012, A5E02486680-06 507
Web server<br />
11.2 Standard web pages<br />
Logging out<br />
11.2.3 Introduction<br />
To log out the "admin" user, simply click the "Log out" link from any<br />
page.<br />
You can continue to access and view standard Web pages when not logged in, but you<br />
cannot perform the actions that are restricted to the "admin" user. Each of the standard Web<br />
page descriptions defines the actions, if any, that require the "admin" log in.<br />
The Introduction page is the welcome screen for entry into the <strong>S7</strong>-<strong>1200</strong> standard Web<br />
pages.<br />
From this page, you click "Enter" to access the <strong>S7</strong>-<strong>1200</strong> standard Web pages. At the top of<br />
the screen are links to useful Siemens Web sites, as well as a link to download the Siemens<br />
security certificate (Page 560).<br />
<strong>S7</strong>-<strong>1200</strong> <strong>Programmable</strong> <strong>controller</strong><br />
508 System Manual, 04/2012, A5E02486680-06
11.2.4 Start<br />
Web server<br />
11.2 Standard web pages<br />
The Start page displays a representation of the CPU to which you are connected and lists<br />
general information about the CPU. If you log in as the "admin" user, you can also change<br />
the operating mode of the CPU and flash the LEDs.<br />
① and ② Buttons for flashing LEDs, and changing operating mode only appear on the Start page<br />
when you log in as the "admin" user.<br />
<strong>S7</strong>-<strong>1200</strong> <strong>Programmable</strong> <strong>controller</strong><br />
System Manual, 04/2012, A5E02486680-06 509<br />
1<br />
2
Web server<br />
11.2 Standard web pages<br />
11.2.5 Identification<br />
The Identification page displays identifying characteristics of the CPU:<br />
● Serial number<br />
● Order numbers<br />
● Version information<br />
11.2.6 Diagnostic Buffer<br />
The Identification page does not vary with the "admin" login.<br />
The diagnostic buffer page displays diagnostic events. From the selector, you can choose<br />
what range of diagnostic buffer entries to display, either 1 to 25 or 26 to 50. The top part of<br />
the page displays those entries with the CPU time and date of when the event occurred. The<br />
times are system times from the CPU time-of-day clock (Page 86).<br />
From the top part of the page, you can select any individual entry to show detailed<br />
information about that entry in the bottom part of the page.<br />
<strong>S7</strong>-<strong>1200</strong> <strong>Programmable</strong> <strong>controller</strong><br />
510 System Manual, 04/2012, A5E02486680-06
The Diagnostic buffer page does not vary with the "admin" login.<br />
11.2.7 Module Information<br />
Status display<br />
Web server<br />
11.2 Standard web pages<br />
The module information page provides information about all the modules in the local rack.<br />
The top section of the screen shows a summary of the modules, and the bottom section<br />
shows status and identification of the selected module.<br />
<strong>S7</strong>-<strong>1200</strong> <strong>Programmable</strong> <strong>controller</strong><br />
System Manual, 04/2012, A5E02486680-06 511
Web server<br />
11.2 Standard web pages<br />
Identification display<br />
Drilling down<br />
You can select a link in the top section to drill down to the module information for that<br />
particular module. Modules with submodules have links for each submodule. The type of<br />
information that is displayed varies with the module selected. For example, the module<br />
information dialog initially displays the name of the SIMATIC <strong>1200</strong> station, a status indicator,<br />
and a comment. If you drill down to the CPU, the module information displays the name of<br />
the digital and analog inputs and outputs that the CPU model provides (for example,<br />
"DI14/DO10", "AI2"), addressing information for the I/O, status indicators, slot numbers, and<br />
comments.<br />
As you drill down, the module information page shows the path you have followed. You can<br />
click any link in this path to return to a higher level.<br />
<strong>S7</strong>-<strong>1200</strong> <strong>Programmable</strong> <strong>controller</strong><br />
512 System Manual, 04/2012, A5E02486680-06
Sorting fields<br />
When the list displays multiple modules, you can click the column header<br />
of a field to sort it either up or down by that field.<br />
Web server<br />
11.2 Standard web pages<br />
Filtering the module information<br />
You can filter any field in the module information list. From the drop-down list, select the field<br />
name for which you want to filter the data. Enter text in the associated text box and click the<br />
Filter link. The list updates to show you modules that correspond to your filtering criteria.<br />
Status information<br />
The status tab in the bottom section of the module information page displays a description of<br />
the current status of the module that is selected in the top section.<br />
Identification<br />
11.2.8 Communication<br />
The identification tab displays the serial number and revision numbers of the selected<br />
module.<br />
The module information page does not vary with the "admin" login.<br />
The communication page displays the parameters of the connected CPU, and<br />
communications statistics. The Parameter tab shows the MAC address of the CPU, the IP<br />
address and IP settings of the CPU, and physical properties. The Statistics tab shows send<br />
and receive communication statistics.<br />
<strong>S7</strong>-<strong>1200</strong> <strong>Programmable</strong> <strong>controller</strong><br />
System Manual, 04/2012, A5E02486680-06 513
Web server<br />
11.2 Standard web pages<br />
Communication: Parameter display<br />
Communication: Statistics display<br />
The communication page does not vary with the "admin" login.<br />
<strong>S7</strong>-<strong>1200</strong> <strong>Programmable</strong> <strong>controller</strong><br />
514 System Manual, 04/2012, A5E02486680-06
11.2.9 Variable Status<br />
Web server<br />
11.2 Standard web pages<br />
The Variable Status page allows you to view any of the I/O or memory data in your CPU.<br />
You can enter a direct address (such as I0.0), a PLC tag name, or a tag from a specific data<br />
block. For data block tags, you enclose the data block name in double quotation marks. For<br />
each monitor value you can select a display format for the data. You can continue entering<br />
and specifying values until you have as many as you want within the limitations for the page.<br />
The monitor values show up automatically and refresh by default, unless you click the "Off"<br />
icon in the upper right area of the page. When refresh is disabled, you can click "On" to reenable<br />
automatic refresh.<br />
With the "admin" log in, you can also modify data values. Enter any values that you wish to<br />
set in the appropriate "Modify Value" field. Click the "Go" button beside a value to write that<br />
value to the CPU. You can also enter multiple values and click "Modify All Values" to write all<br />
of the values to the CPU.<br />
① The "Modify Value" functionality is only visible and accessible when you are logged in as the "admin" user.<br />
<strong>S7</strong>-<strong>1200</strong> <strong>Programmable</strong> <strong>controller</strong><br />
System Manual, 04/2012, A5E02486680-06 515<br />
1
Web server<br />
11.2 Standard web pages<br />
11.2.10 Data Logs<br />
If you leave the Variable Status page and return, the Variable Status page does not retain<br />
your entries. You can bookmark the page and return to the bookmark to see the same<br />
entries. If you do not bookmark the page, you must re-enter the variables.<br />
Note<br />
Be aware of the following issues when using the standard Variable Status page:<br />
The Variable Status page does not allow you to modify a string longer than<br />
198 characters.<br />
When using exponential notation to enter a value for a Real or LReal data type in the<br />
Variable Status page:<br />
– To enter a real-number value (Real or LReal) with a positive exponent (such as<br />
+3.402823e+25), enter the value in either of the following formats:<br />
+3.402823e25<br />
+3.402823e+25<br />
– To enter real-number value (Real or LReal) with a negative exponent (such as<br />
+3.402823e-25), enter the value as follows:<br />
+3.402823e-25<br />
– Be sure that the mantissa portion of the real value in exponential notation includes a<br />
decimal point. Failure to include a decimal point results in the modification of the value<br />
to an unexpected integer value. For example, enter -1.0e8 rather than -1e8.<br />
The Variable Status page supports only 15 digits for an LReal value (regardless of the<br />
location of the decimal point). Entering more than 15 digits creates a rounding error.<br />
Limitations on the Variable Status page:<br />
● The maximum number of variable entries per page is 50.<br />
● The maximum number of characters for the URL corresponding to the Variable Status<br />
page is 2083. You can see the URL that represents your current variable page in the<br />
address bar of your browser.<br />
● For the character display format, the page displays hexadecimal values if the actual CPU<br />
values are not valid ASCII characters as interpreted by the browser.<br />
Note<br />
If a tag name displays special characters such that it is rejected as an entry on the<br />
Variable Status page, you can enclose the tag name in double quotation marks. In most<br />
cases, the Variable Status page will then recognize the tag name.<br />
The Data Logs page allows you to view or download a specified number of data log entries.<br />
With the "admin" log in, you can also clear these entries after downloading them, or you can<br />
delete them. The Web server downloads data logs to your PC in comma-separated values<br />
(CSV) file format.<br />
<strong>S7</strong>-<strong>1200</strong> <strong>Programmable</strong> <strong>controller</strong><br />
516 System Manual, 04/2012, A5E02486680-06
Web server<br />
11.2 Standard web pages<br />
The Data Logs page displays up to 40 data log files. If more than 40 data log files exist, the<br />
Data Logs page shows the first 40 created.<br />
Note<br />
Time stamp for data logs are shown in system time and not in local time<br />
The CPU writes the time stamps for the data log entries in system time (Page 86) and the<br />
standard "Data Logs" page of the Web server displays the time stamps for the data logs in<br />
system time.<br />
1 2<br />
① The "Download & Clear" option is not available if you are not logged in as the "admin" user.<br />
② The "Delete" option is not available if you are not logged in as the "admin" user.<br />
Note<br />
The data log file is in USA/UK comma-separated values format (CSV). To open it in Excel on<br />
non-USA/UK systems, you must import it into Excel with specific settings (Page 561).<br />
Recent entries: Downloading a specified number of recent data entries<br />
Set the number of recent entries to download and then click the Data log name to initiate a<br />
download of the specified number of entries. In the output .csv file, the data entries are<br />
sorted in decreasing entry order. You will be prompted by Windows to open or save the log<br />
file.<br />
<strong>S7</strong>-<strong>1200</strong> <strong>Programmable</strong> <strong>controller</strong><br />
System Manual, 04/2012, A5E02486680-06 517
Web server<br />
11.2 Standard web pages<br />
By default, the number of recent entries to view defaults to 25 entries. You can change this<br />
value in the "Number of recent entries to view" field by entering a number or by using the +<br />
or - button to increment or decrement the value.<br />
Note<br />
The Records parameter of the DataLogCreate (Page 315) instruction defines the maximum<br />
number of entries per data log file.<br />
Downloading a log file that contains all data entries<br />
To download an entire log file, click the Download icon corresponding to a specific log file.<br />
You will be prompted by Windows to open or save the log file.<br />
In the output .csv file, all data entries are included and sorted in increasing entry number<br />
order unless the data log is full and older entries (lower entry number) are being overwritten<br />
by later entries (higher entry number).<br />
Downloading and clearing a log file<br />
To download a log file and then clear all the data entries, you must be logged in as the<br />
"admin" user. Then click the "Download & Clear" icon corresponding to a specific log file.<br />
You will be prompted by Windows to open or save the log file.<br />
After the download is complete, a new "//END" line is inserted after the header entry of the<br />
Data log file stored in the PLC. This effectively clears the Data log for future internal PLC<br />
processing, but subsequent downloads of this file will have new data entries inserted above<br />
the first "//END" line.<br />
Note<br />
Data log .csv file "//END" marker<br />
The "//END" .csv file end marker is only used for the first ((max entries) -1) entries to mark<br />
the logical end of the file. Behind the logical end, the file may contain data which may be<br />
interpreted by Excel as additional data entries. You should search for the first "//END" then<br />
delete it and all entries below it. If the logical end marker is not present, you can sort the data<br />
rows using the entry number.<br />
Deleting a log file<br />
To delete a log file, you must be logged in as the "admin" user. Then click the Delete icon<br />
that corresponds to a specific log file. The Web server then deletes the selected log file.<br />
Additional information<br />
For information on programming with the Data log instructions, see the Data logging<br />
(Page 313) chapter.<br />
<strong>S7</strong>-<strong>1200</strong> <strong>Programmable</strong> <strong>controller</strong><br />
518 System Manual, 04/2012, A5E02486680-06
11.2.11 Update Firmware<br />
Web server<br />
11.2 Standard web pages<br />
The Update Firmware page allows an "admin" user to update the CPU firmware from a file..<br />
Note<br />
You can only update <strong>S7</strong>-<strong>1200</strong> CPUs of version 3.0 and higher with the Update Firmware<br />
feature.<br />
The Web server uses the "https" protocol to perform the firmware update.<br />
The CPU must be in STOP mode to perform a firmware update. If the CPU is not already in<br />
STOP mode, the Web server prompts to transition the CPU to stop mode.<br />
When the CPU is in STOP mode, you can navigate to and select a file from which to load the<br />
firmware version update. Firmware updates are available on the customer support Web site<br />
(http://support.automation.siemens.com). After you have downloaded the appropriate<br />
firmware update from the Web site to your computer, you can browse to and select the file<br />
on your computer for the update.<br />
<strong>S7</strong>-<strong>1200</strong> <strong>Programmable</strong> <strong>controller</strong><br />
System Manual, 04/2012, A5E02486680-06 519
Web server<br />
11.2 Standard web pages<br />
During the update, the Update Firmware page displays a message showing that the update<br />
is in progress. After the update completes, the Update Firmware page displays the order<br />
number and version number of the updated firmware and prompts you to allow a CPU<br />
restart.<br />
If you do not respond in ten minutes, the CPU automatically restarts.<br />
<strong>S7</strong>-<strong>1200</strong> <strong>Programmable</strong> <strong>controller</strong><br />
520 System Manual, 04/2012, A5E02486680-06
11.3 User-defined web pages<br />
Web server<br />
11.3 User-defined web pages<br />
The <strong>S7</strong>-<strong>1200</strong> Web server also provides the means for you to create your own applicationspecific<br />
HTML pages that incorporate data from the PLC. You create these pages using the<br />
HTML editor of your choice and download them to the CPU where they are accessible from<br />
the standard Web page menu. This process involves several tasks:<br />
● Creating HTML pages with an HTML editor, such as Microsoft Frontpage (Page 521)<br />
● Including AWP commands in HTML comments in the HTML code (Page 522):The AWP<br />
commands are a fixed set of commands that Siemens provides for accessing CPU<br />
information.<br />
● Configuring STEP 7 to read and process the HTML pages (Page 535)<br />
● Generating blocks from the HTML pages (Page 535)<br />
● Programming STEP 7 to control the use of the HTML pages (Page 537)<br />
● Compiling and downloading the blocks to the CPU (Page 538)<br />
● Accessing the user-defined Web pages from your PC (Page 539)<br />
This process is illustrated below:<br />
1<br />
① HTML files with embedded AWP commands<br />
11.3.1 Creating HTML pages<br />
You can use the software package of your choice to create your own HTML pages for use<br />
with the Web server. Be sure that your HTML code is compliant to the HTML standards of<br />
the W3C (World Wide Web Consortium). STEP 7 does not perform any verification of your<br />
HTML syntax.<br />
You can use a software package that lets you design in WYSIWYG or design layout mode,<br />
but you need to be able to edit your HTML code in pure HTML form. Most Web authoring<br />
tools provide this type of editing; otherwise, you can always use a simple text editor to edit<br />
the HTML code. Include the following line in your HTML page to set the charset for the page<br />
to UTF-8:<br />
<br />
<strong>S7</strong>-<strong>1200</strong> <strong>Programmable</strong> <strong>controller</strong><br />
System Manual, 04/2012, A5E02486680-06 521
Web server<br />
11.3 User-defined web pages<br />
Also be sure to save the file from the editor in UTF-8 character encoding:<br />
You use STEP 7 to compile everything in your HTML pages into STEP 7 data blocks. These<br />
data blocks consist of one control data block that directs the display of the Web pages and<br />
one or more fragment data blocks that contain the compiled Web pages. Be aware that<br />
extensive sets of HTML pages, particularly those with lots of images, require a significant<br />
amount of load memory space (Page 539) for the fragment DBs. If the internal load memory<br />
of your CPU is not sufficient for your user-defined Web pages, use a memory card<br />
(Page 107) to provide external load memory.<br />
To program your HTML code to use data from the <strong>S7</strong>-<strong>1200</strong>, you include AWP commands<br />
(Page 522) as HTML comments. When finished, save your HTML pages to your PC and<br />
note the folder path where you save them.<br />
Refreshing user-defined Web pages<br />
User-defined Web pages do not automatically refresh. It is your choice whether to program<br />
the HTML to refresh the page or not. For pages that display PLC data, refreshing periodically<br />
keeps the data current. For HTML pages that serve as forms for data entry, refreshing can<br />
interfere with the user entering data. If you want your entire page to automatically refresh,<br />
you can add this line to your HTML header, where "10" is the number of seconds between<br />
refreshes:<br />
<br />
You can also use JavaScripts or other HTML techniques to control page or data refreshing.<br />
For this, refer to documentation on HTML and JavaScript.<br />
11.3.2 AWP commands supported by the <strong>S7</strong>-<strong>1200</strong> Web server<br />
General syntax<br />
The <strong>S7</strong>-<strong>1200</strong> Web server provides AWP commands that you embed in your user-defined<br />
Web pages as HTML comments for the following purposes:<br />
● Reading variables (Page 523)<br />
● Writing variables (Page 524)<br />
● Reading special variables (Page 526)<br />
● Writing special variables (Page 527)<br />
● Defining enum types (Page 529)<br />
● Assigning variables to enum types (Page 530)<br />
● Creating fragment data blocks (Page 532)<br />
Except for the command to read a variable, the AWP commands are of the following syntax:<br />
<br />
You use the AWP commands in conjunction with typical HTML form commands to write to<br />
variables in the CPU.<br />
<strong>S7</strong>-<strong>1200</strong> <strong>Programmable</strong> <strong>controller</strong><br />
522 System Manual, 04/2012, A5E02486680-06
Web server<br />
11.3 User-defined web pages<br />
The descriptions of the AWP commands in the following pages use the following<br />
conventions:<br />
● Items enclosed in brackets [ ] are optional.<br />
● Items enclosed in angle brackets < > are parameter values to be specified.<br />
● Quotation marks are a literal part of the command. They must be present as indicated.<br />
● Special characters in tag or data block names, depending on usage, must be escaped or<br />
enclosed in quotation marks (Page 534).<br />
Use a text editor or HTML editing mode to insert AWP commands into your pages.<br />
AWP command summary<br />
The details for using each AWP command are in the topics to follow, but here is a brief<br />
summary of the commands:<br />
Reading variables<br />
:=:<br />
Writing variables<br />
<br />
This AWP command merely declares the variable in the Name clause to be writable. Your<br />
HTML code performs writes to the variable by name from , , or other HTML<br />
statements within an HTML form.<br />
Reading special variables<br />
<br />
Writing special variables<br />
<br />
Defining enum types<br />
<br />
Referencing enum types<br />
<br />
Creating fragments<br />
<br />
Importing fragments<br />
<br />
11.3.2.1 Reading variables<br />
User-defined Web pages can read variables (PLC tags) from the CPU.<br />
Syntax<br />
:=:<br />
<strong>S7</strong>-<strong>1200</strong> <strong>Programmable</strong> <strong>controller</strong><br />
System Manual, 04/2012, A5E02486680-06 523
Web server<br />
11.3 User-defined web pages<br />
Parameters<br />
Examples<br />
The variable to be read, which can be a PLC tag name from your STEP 7 program,<br />
a data block tag, I/O, or addressable memory. For memory or I/O addresses or<br />
alias names (Page 534), do not use quotation marks around the tag name. For<br />
PLC tags, use double quotation marks around the tag name. For data block tags,<br />
enclose the block name only in double quotation marks. The tag name is outside of<br />
the quotation marks. Note that you use the data block name and not a data block<br />
number.<br />
:="Conveyor_speed"::="My_Data_Block".flag1:<br />
:=I0.0:<br />
:=MW100:<br />
Example reading an aliased variable<br />
<br />
:=flag1:<br />
Note<br />
Defining alias names for PLC tags and data block tags is described in the topic Using an<br />
alias for a variable reference (Page 529).<br />
If a tag name or data block name includes special characters, you must use additional<br />
quotation marks or escape characters as described in the topic Handling tag names that<br />
contain special characters (Page 534).<br />
11.3.2.2 Writing variables<br />
User-defined pages can write data to the CPU. This is accomplished by using an AWP<br />
command to identify a variable in the CPU to be writable from the HTML page. The variable<br />
must be specified by PLC tag name or data block tag name. You can declare multiple<br />
variable names in one statement. To write the data to the CPU, you use standard HTTP<br />
POST commands.<br />
A typical usage is to design a form in your HTML page with text input fields or select list<br />
choices that correspond to writable CPU variables. As with all user-defiined pages, you then<br />
generate the blocks from STEP 7 such that they are included in your STEP 7 program.<br />
When an admin user subsequently accesses this page and types data into the input fields or<br />
selects a choice from a select list, the Web server converts the input to the appropriate data<br />
type for the variable, and writes the value to the variable in the CPU. Note that the name<br />
clause for HTML input fields and HTML select lists uses syntax typical for the name clause of<br />
the AWP_In_Variable command. Typically enclose the name in single quotation marks and if<br />
you reference a data block, enclose the data block name in double quotation marks.<br />
For form management details, refer to documentation for HTML.<br />
<strong>S7</strong>-<strong>1200</strong> <strong>Programmable</strong> <strong>controller</strong><br />
524 System Manual, 04/2012, A5E02486680-06
Syntax<br />
Parameters<br />
Web server<br />
11.3 User-defined web pages<br />
<br />
If no Use clause is provided, Varname1 is the variable to be written. It can be a<br />
PLC tag name from your STEP 7 program or a tag from a specific data block.<br />
If a Use clause is provided, Varname1 is an alternate name for the variable<br />
referenced in (Page 529). It is a local name within the HTML page.<br />
If a Use clause is provided, Varname2 is the variable to be written. It can be a PLC<br />
tag name from your STEP 7 program or a tag from a specific data block.<br />
For both Name clauses and Use clauses, the complete name must be enclosed in single<br />
quotation marks. Within the single quotes, use double quotation marks around a PLC tag<br />
and double quotation marks around a data block name. The data block name is within the<br />
double quotes but not the data block tag name. Note that for data block tags, you use the<br />
name of the block and not a data block number.<br />
Examples using HTML input field<br />
<br />
<br />
Input Target Level: <br />
<br />
<br />
<br />
<br />
Braking: <br />
%<br />
<br />
<br />
<br />
<br />
<br />
Yes<br />
No<br />
<br />
<strong>S7</strong>-<strong>1200</strong> <strong>Programmable</strong> <strong>controller</strong><br />
System Manual, 04/2012, A5E02486680-06 525
Web server<br />
11.3 User-defined web pages<br />
Note<br />
Only an admin user can write data to the CPU. The commands are ignored if the user has<br />
not logged in as the admin user.<br />
If a tag name or data block name includes special characters, you must use additional<br />
quotation marks or escape characters as described in the topic "Handling tag names that<br />
contain special characters (Page 534)".<br />
11.3.2.3 Reading special variables<br />
The Web server provides the ability to read values from the PLC to store in special variables<br />
in the HTTP response header. You might, for example, want to read a pathname from a PLC<br />
tag to redirect the URL to another location using the HEADER:Location special variable.<br />
Syntax<br />
Parameters<br />
<br />
The type of special variable and is one of the following:<br />
HEADER<br />
COOKIE_VALUE<br />
COOKIE_EXPIRES<br />
Refer to HTTP documentation for a list of all the names of HEADER variables. A<br />
few examples are listed below:<br />
Status: response code<br />
Location: path for redirection<br />
Retry-After: how long service is expected to be unavailable to the requesting client<br />
For types COOKIE_VALUE and COOKIE_EXPIRES, is the name of a<br />
specific cookie.<br />
COOKIE_VALUE:name: value of the named cookie<br />
COOKIE_EXPIRES:name: expiration time in seconds of named cookie<br />
The Name clause must be enclosed in single or double quotation marks.<br />
If no Use clause is specified, the special variable name corresponds to a PLC tag<br />
name. Enclose the complete Name clause within single quotation marks and the<br />
PLC tag in double quotation marks. The special variable name and PLC tag name<br />
must match exactly.<br />
Name of the PLC tag or data block tag for the variable to be read into<br />
The Varname must be enclosed in single quotation marks. Within the single<br />
quotes, use double quotation marks around a PLC tag or data block name. The<br />
data block name is within the double quotes but not the data block tag name. Note<br />
that for data block tags, you use the name of the block and not a data block<br />
number.<br />
<strong>S7</strong>-<strong>1200</strong> <strong>Programmable</strong> <strong>controller</strong><br />
526 System Manual, 04/2012, A5E02486680-06
Examples<br />
<br />
Web server<br />
11.3 User-defined web pages<br />
In this example, the HTTP special variable "HEADER:Status" receives the value of the PLC<br />
tag "HEADER:Status". The name in the PLC tag table must match the name of the special<br />
variable exactly if no Use clause is specified.<br />
<br />
In this example, the HTTP special variable "HEADER:Status" receives the value of the PLC<br />
tag "Status".<br />
If a tag name or data block name includes special characters, you must use additional<br />
quotation marks or escape characters as described in the topic Handling tag names that<br />
contain special characters (Page 534).<br />
11.3.2.4 Writing special variables<br />
Syntax<br />
The Web server provides the ability to write values to the CPU from special variables in the<br />
HTTP request header. For example, you can store information in STEP 7 about the cookie<br />
associated with a user-defined Web page, the user that is accessing a page, or header<br />
information. The Web server provides access to specific special variables that you can write<br />
to the CPU when logged in as the admin user.<br />
<br />
<strong>S7</strong>-<strong>1200</strong> <strong>Programmable</strong> <strong>controller</strong><br />
System Manual, 04/2012, A5E02486680-06 527
Web server<br />
11.3 User-defined web pages<br />
Parameters<br />
Examples<br />
The type of special variable and is one of the following:<br />
HEADER<br />
SERVER<br />
COOKIE_VALUE<br />
Specific variable within the types defined above, as shown in these examples:<br />
HEADER:Accept: content types that are acceptable<br />
HEADER:User-Agent: information about the user agent originating the request.<br />
SERVER:current_user_id: id of the current user; 0 if no user logged in<br />
SERVER:current_user_name: name of the current user<br />
COOKIE_VALUE:: value of the named cookie<br />
Enclose the Name clause in single quotation marks.<br />
If no Use clause is specified, the special variable name corresponds to a PLC<br />
variable name. Enclose the complete Name clause within single quotation marks<br />
and the PLC tag in double quotation marks. The special variable name must match<br />
the PLC tag name exactly.<br />
Refer to HTTP documentation for a list of all the names of HEADER variables.<br />
The variable name in your STEP 7 program into which you want to write the special<br />
variable, which can be a PLC tag name, or a data block tag.<br />
The Varname must be enclosed in single quotation marks. Within the single<br />
quotes, use double quotation marks around a PLC tag or data block name. The<br />
data block name is within the double quotes but not the data block tag name. Note<br />
that for data block tags, you use the name of the block and not a data block<br />
number.<br />
<br />
In this example, the Web page writes the value of the HTTP special variable<br />
"SERVER:current_user_id" to the PLC tag named "SERVER:current_user_id ".<br />
<br />
In this example, the Web page writes the value of the HTTP special variable<br />
"SERVER:current_user_id" to the PLC tag named "my_userid".<br />
Note<br />
Only an admin user can write data to the CPU. The commands are ignored if the user has<br />
not logged in as the admin user.<br />
If a tag name or data block name includes special characters, you must use additional<br />
quotation marks or escape characters as described in the topic "Handling tag names that<br />
contain special characters (Page 534)".<br />
<strong>S7</strong>-<strong>1200</strong> <strong>Programmable</strong> <strong>controller</strong><br />
528 System Manual, 04/2012, A5E02486680-06
Web server<br />
11.3 User-defined web pages<br />
11.3.2.5 Using an alias for a variable reference<br />
You can use an alias in your user-defined Web page for an In_Variable or an Out_Variable.<br />
For example, you can use a different symbolic name in your HTML page than the one used<br />
in the CPU, or you can equate a variable in the CPU with a special variable. The AWP Use<br />
clause provides this capability.<br />
Syntax<br />
Parameters<br />
Examples<br />
<br />
<br />
The alias name or special variable name<br />
Varname1 must be enclosed in single or double quotation marks.<br />
Name of the PLC variable for which you want to assign an alias name. The variable<br />
can be a PLC tag, a data block tag, or a special variable. Varname2 must be<br />
enclosed in single quotation marks. Within the single quotes, use double quotation<br />
marks around a PLC tag, special variable, or data block name. The data block<br />
name is within the double quotes but not the data block tag name. Note that for<br />
data block tags, you use the name of the block and not a data block number.<br />
<br />
In this example, the special variable SERVER:current_user_id is written to the tag<br />
"server_user" in data block "Data_Block_10".<br />
<br />
In this example, the value in data block structure member Data_Block_10.Tank_data.Weight<br />
can be referenced simply by "Weight" throughout the rest of the user-defined Web page.<br />
<br />
In this example, the value in the PLC tag "Raw_Milk_Tank_Weight" can be referenced simply<br />
by "Weight" throughout the rest of the user-defined Web page.<br />
If a tag name or data block name includes special characters, you must use additional<br />
quotation marks or escape characters as described in the topic Handling tag names that<br />
contain special characters (Page 534).<br />
11.3.2.6 Defining enum types<br />
Syntax<br />
You can define enum types in your user-defined pages and assign the elements in an AWP<br />
command.<br />
<br />
<strong>S7</strong>-<strong>1200</strong> <strong>Programmable</strong> <strong>controller</strong><br />
System Manual, 04/2012, A5E02486680-06 529
Web server<br />
11.3 User-defined web pages<br />
Parameters<br />
Example<br />
<br />
:<br />
The constant indicates the numerical value for the enum type assignment. The total<br />
number is unbounded.<br />
The name is the value assigned to the enum element.<br />
Note that the entire string of enum value assignments is enclosed in single quotation marks,<br />
and each individual enum type element assignment is enclosed in double quotation marks.<br />
The scope of an enum type definition is global for the user-defined Web pages. If you have<br />
set up your user-defined Web pages in language folders (Page 551), the enum type<br />
definition is global for all pages in the language folder.<br />
<br />
11.3.2.7 Referencing CPU variables with an enum type<br />
Syntax<br />
Parameters<br />
You can assign a variable in the CPU to an enum type. This variable can be used elsewhere<br />
in your user-defined Web page in a read operation (Page 523) or a write operation<br />
(Page 524). On a read operation, the Web server will replace the numerical value that is<br />
read from the CPU with the corresponding enum text value. On a write operation, the Web<br />
server will replace the text value with the integer value of the enumeration that corresponds<br />
to the text before writing the value to the CPU.<br />
<br />
Name of PLC tag or data block tag to associate with the enum type, or the name of<br />
the alias name for a PLC tag (Page 529) if declared.<br />
Varname must be enclosed in single quotation marks. Within the single quotes, use<br />
double quotation marks around a PLC tag or data block name. Note that for data<br />
block tags, you use the name of the block and not a data block number. The data<br />
block name is within the double quotes but not the data block tag name.<br />
Name of the enumerated type, which must be enclosed in single or double<br />
quotation marks<br />
The scope of an enum type reference is the current fragment.<br />
Example declaration<br />
<br />
<strong>S7</strong>-<strong>1200</strong> <strong>Programmable</strong> <strong>controller</strong><br />
530 System Manual, 04/2012, A5E02486680-06
Web server<br />
11.3 User-defined web pages<br />
Example usage in a variable read<br />
<br />
<br />
...<br />
The current value of "Alarm" is :="Alarm":<br />
If the value of "Alarm" in the CPU is 2, the HTML page displays 'The current value of "Alarm"<br />
is Tank is empty' because the enum type definion (Page 529) assigns the text string "Tank is<br />
empty" to the numerical value 2.<br />
Example usage in a variable write<br />
<br />
<br />
<br />
...<br />
<br />
<br />
<br />
<br />
Because the enum type defintion (Page 529) assigns "Tank is full" to the numerical value 1,<br />
the value 1 is written to the PLC tag named "Alarm" in the CPU.<br />
Note that the Name clause in the AWP_In_Variable declaration must correspond exactly to<br />
the Name clause in the AWP_Enum_Ref declaration.<br />
Example usage in a variable write with use of an alias<br />
<br />
<br />
<br />
...<br />
<br />
<br />
<br />
<br />
Because the enum type defintion (Page 529) assigns "Tank is full" to the numerical value 1,<br />
the value 1 is written to the alias "Alarm" which corresponds to the PLC tag named<br />
"Motor1.Alarm" in data block "Data_Block_4" in the CPU.<br />
If a tag name or data block name includes special characters, you must use additional<br />
quotation marks or escape characters as described in the topic Handling tag names that<br />
contain special characters (Page 534).<br />
<strong>S7</strong>-<strong>1200</strong> <strong>Programmable</strong> <strong>controller</strong><br />
System Manual, 04/2012, A5E02486680-06 531
Web server<br />
11.3 User-defined web pages<br />
11.3.2.8 Creating fragments<br />
Syntax<br />
Parameters<br />
Manual fragments<br />
STEP 7 converts and stores user-defined Web pages as a control DB and fragment DBs<br />
when you click "Generate blocks" in the CPU Properties for the Web server. You can set up<br />
specific fragments for specific pages or for sections of specific pages. You can identify these<br />
fragments by a name and number with the "Start_Fragment" AWP command. Everything in<br />
the page following the AWP_Start_Fragment command belongs to that fragment until<br />
another AWP_Start_Command is issued or until end of file is reached.<br />
<br />
Text string: name of fragment DB<br />
Fragment names must begin with a letter or underscore and be comprised of<br />
letters, numeric digits, and underscores. The fragment name is a regular<br />
expression of the form:<br />
[a-zA-Z_][a-zA-Z_0-9]*<br />
"manual" or "automatic"<br />
manual: The STEP 7 program must request this fragment and can respond<br />
accordingly. Operation of the fragment must be controlled with STEP 7 and the<br />
control DB variables.<br />
automatic: The Web server processes the fragment automatically.<br />
If you do not specify the type parameter, the default is "automatic".<br />
Integer identification number. If you do not specify the ID parameter, the Web<br />
server assigns a number by default. For manual fragments, set the ID to a low<br />
number. The ID is the means by which the STEP 7 program controls a manual<br />
fragment.<br />
"visible" or "hidden"<br />
visible: Contents of the fragment will display on the user-defined Web page.<br />
hidden: Contents of the fragment will not display on the user-defined Web page.<br />
If you do not specify the type parameter, the default is "visible".<br />
If you create a manual fragment for a user-defined Web page or portion of a page, then your<br />
STEP 7 program must control when the fragment is sent. The STEP 7 program must set<br />
appropriate parameters in the control DB for a user-defined page under manual control and<br />
then call the WWW instruction with the control DB as modified. For understanding the<br />
structure of the control DB and how to manipulate individual pages and fragments, see the<br />
topic Advanced user-defined Web page control (Page 555).<br />
<strong>S7</strong>-<strong>1200</strong> <strong>Programmable</strong> <strong>controller</strong><br />
532 System Manual, 04/2012, A5E02486680-06
Web server<br />
11.3 User-defined web pages<br />
11.3.2.9 Importing fragments<br />
You can create a named fragment from a portion of your HTML code and then import that<br />
fragment elsewhere in your set of user-defined Web pages. For example, consider a set of<br />
user-defined Web pages that has a start page and then several other HTML pages<br />
accessible from links on the start page. Suppose each of the separate pages is to display the<br />
company logo on the page. You could implement this by creating a fragment (Page 532) that<br />
loads the image of the company logo. Each individual HTML page could then import this<br />
fragment to display the company logo. You use the AWP Import_Fragment command for this<br />
purpose. The HTML code for the fragment only exists in one fragment, but you can import<br />
this fragment DB as many times as necessary in as many Web pages as you choose.<br />
Syntax<br />
Parameters<br />
Example<br />
<br />
Text string: name of the fragment DB to be imported<br />
Excerpt from HTML code that creates a fragment to display an image:<br />
<br />
Excerpt from HTML code in another .html file that imports the fragment that displays the logo<br />
image:<br />
<br />
Both .html files (the one that creates the fragment and the one that imports it) are in the<br />
folder structure that you define when you configure the user-defined pages in STEP 7<br />
(Page 535).<br />
11.3.2.10 Combining definitions<br />
Examples<br />
When declaring variables for use in your user-defined Web pages, you can combine a<br />
variable declaration and an alias for the variable (Page 529). You can also declare multiple<br />
In_Variables in one statement and multiple Out_Variables in one statement.<br />
<br />
<br />
<br />
<strong>S7</strong>-<strong>1200</strong> <strong>Programmable</strong> <strong>controller</strong><br />
System Manual, 04/2012, A5E02486680-06 533
Web server<br />
11.3 User-defined web pages<br />
11.3.2.11 Handling tag names that contain special characters<br />
Reading variables<br />
When specifying variable names in user-defined Web pages, you must take special care if<br />
tag names contain characters that have special meanings.<br />
You use the following syntax to read a variable (Page 523):<br />
:=:<br />
The following rules apply to reading variables:<br />
● For variable names from the PLC tag table, enclose the tag name in double quotation<br />
marks.<br />
● For variable names that are data block tags, enclose the data block name in double<br />
quotation marks. The tag is outside of the quotation marks.<br />
● For variable names that are direct I/O addresses, memory addresses, or alias names, do<br />
not use quotation marks around the read variable.<br />
● For tag names or data block tag names that contain a backslash, precede the backslash<br />
with another backslash.<br />
● If a tag name or data block tag name contains a colon, less than sign, greater than sign,<br />
or ampersand define an alias that has no special characters for the read variable, and<br />
read the variable using the alias. Precede colons in tag names in a Use clause with a<br />
backslash.<br />
Table 11- 1 Examples of Read variables<br />
Data block name Tag name Read command<br />
n/a ABC:DEF <br />
:=special_tag:<br />
n/a T\ :="T\\":<br />
n/a A \B 'C :D <br />
:=another_special_tag:<br />
n/a a<br />
:=special_tag:<br />
DB A' B C D$ E Tag :="DB A' B C D$ E".Tag:<br />
DB:DB Tag:Tag <br />
:=my_tag:<br />
<strong>S7</strong>-<strong>1200</strong> <strong>Programmable</strong> <strong>controller</strong><br />
534 System Manual, 04/2012, A5E02486680-06
Web server<br />
11.3 User-defined web pages<br />
Name and Use clauses<br />
The AWP commands AWP_In_Variable, AWP_Out_Variable, AWP_Enum_Def,<br />
AWP_Enum_Ref, AWP_Start_Fragment and AWP_Import_Fragment have Name clauses.<br />
HTML form commands such as and also have name clauses.<br />
AWP_In_Variable and AWP_Out_Variable can additionally have Use clauses. Regardless of<br />
the command, the syntax for Name and Use clauses regarding the handling of special<br />
characters is the same:<br />
● The text you provide for a Name or Use clause must be enclosed within single quotation<br />
marks. If the enclosed name is a PLC tag or Data block name, use single quotation<br />
marks for the full clause.<br />
● Within a Name or Use clause, data block names and PLC tag names must be enclosed<br />
within double quotation marks.<br />
● If a tag name or Data block name includes a single quote character or backslash, escape<br />
that character with a backslash. The backslash is the escape character in the AWP<br />
command compiler.<br />
Table 11- 2 Examples of Name clauses<br />
Data block name Tag name Name clause options<br />
n/a ABC'DEF Name='"ABC\'DEF"'<br />
n/a A \B 'C :D Name='"A \\B \'C :D"'<br />
Data_block_1 Tag_1 Name='"Data_block_1".Tag_1'<br />
Data_block_1 ABC'DEF Name='"Data_block_1".ABC\'DEF'<br />
Data_block_1 A \B 'C :D Name='"Data_block_1".A \\B \'C :D'<br />
DB A' B C D$ E Tag Name='"DB A\' B C D$ E".Tag'<br />
Use clauses follow the same conventions as Name clauses.<br />
Note<br />
Regardless of what characters you use in your HTML page, set the charset of the HTML<br />
page to UTF-8 and save it from the editor with UTF-8 character encoding.<br />
11.3.3 Configuring use of user-defined Web pages<br />
To configure user-defined Web pages from STEP 7, follow these steps:<br />
1. Select the CPU in the Device Configuration view.<br />
<strong>S7</strong>-<strong>1200</strong> <strong>Programmable</strong> <strong>controller</strong><br />
System Manual, 04/2012, A5E02486680-06 535
Web server<br />
11.3 User-defined web pages<br />
2. Display the "Web server" properties in the inspector window for the CPU.<br />
3. If not already selected, select the check box for "Enable Web server".<br />
4. Select the check box for "Permit access only with HTTPS" to ensure that the Web server<br />
uses encrypted communication and to increase the security of your Web-accessible CPU.<br />
5. Enter or browse to the folder name on your PC where you saved the HTML default page<br />
(start page).<br />
6. Enter the name of the default page.<br />
7. Provide a name for your application (optional). The application name is used to further<br />
subcategorize or group web pages. When an application name exists, the URL will<br />
appear in the following format: http://ww.xx.yy.zz/awp//.html.<br />
8. Specify filename extensions to be examined for the presence of AWP commands. By<br />
default, STEP 7 analyzes files with .htm, .html, or .js extensions. If you have additional file<br />
extensions, append them.<br />
9. Keep the default for the Web DB number, or enter a number of your choice. This is the<br />
DB number of the control DB that controls display of the Web pages.<br />
10. Keep the default for the fragment DB start number, or enter a number of your choice. This<br />
is the first of the fragment DBs that contains the Web pages.<br />
<strong>S7</strong>-<strong>1200</strong> <strong>Programmable</strong> <strong>controller</strong><br />
536 System Manual, 04/2012, A5E02486680-06
Web server<br />
11.3 User-defined web pages<br />
Generating program blocks<br />
When you click the "Generate blocks" button, STEP 7 generates data blocks from the HTML<br />
pages in the HTML source directory that you specified and a control data block for the<br />
operation of your Web pages. You can set these attributes as needed for your application<br />
(Page 537). STEP 7 also generates a set of fragment data blocks to hold the representation<br />
of all of your HTML pages. When you generate the data blocks, STEP 7 updates the<br />
properties to display the control data block number, and the number of the first of the<br />
fragment data blocks. After you generate the data blocks, your user-defined Web pages are<br />
a part of your STEP 7 program. The blocks corresponding to these pages appear in the Web<br />
server folder, which is in the System blocks folder under Program blocks in the project<br />
navigation tree.<br />
Deleting program blocks<br />
To delete data blocks that you have previously generated, click the "Delete data blocks"<br />
button. STEP 7 deletes the control data block and all of the fragment data blocks from your<br />
project that correspond to user-defined Web pages.<br />
11.3.4 Programming the WWW instruction for user-defined web pages<br />
Your STEP 7 user program must include and execute the WWW instruction in order for the<br />
user-defined Web pages to be accessible from the standard Web pages. The control data<br />
block is the input parameter to the WWW instruction and specifies the content of the pages<br />
as represented in the fragment data blocks, as well as state and control information. STEP 7<br />
creates the control data block when you click the "Create blocks" button in the configuration<br />
of user-defined Web pages (Page 535).<br />
Programming the WWW instruction<br />
The STEP 7 program must execute the WWW instruction for the user-defined Web pages to<br />
be accessible from the standard Web pages. You might want the user-defined Web pages<br />
available only under certain circumstances as dictated by your application requirements and<br />
preferences. In this case, your program logic can control when to call the WWW instruction.<br />
Table 11- 3 WWW instruction<br />
LAD / FBD SCL Description<br />
ret_val := WWW(<br />
ctrl_db:=_uint_in_);<br />
Provides access to user-defined Web pages<br />
from standard Web pages<br />
<strong>S7</strong>-<strong>1200</strong> <strong>Programmable</strong> <strong>controller</strong><br />
System Manual, 04/2012, A5E02486680-06 537
Web server<br />
11.3 User-defined web pages<br />
Table 11- 4 Return value<br />
RET_VAL Description<br />
0 No error<br />
You must provide the control data block input parameter (CTRL_DB) which corresponds to<br />
the integer DB number of the control DB. You can find this control DB block number (called<br />
Web DB Number) in the Web Server properties of the CPU after you create the blocks for<br />
the user-defined Web pages. Enter the integer DB number as the CTRL_DB parameter of<br />
the WWW instruction. The return value (RET_VAL) contains the function result. Note that the<br />
WWW instruction executes asynchronously and that the RET_VAL output might have an<br />
initial value of 0 although an error can occur later. The program can check the state of the<br />
control DB to ensure that the application started successfully, or check RET_VAL with a<br />
subsequent call to WWW.<br />
16#00yx x: The request represented by the respective bit is in the waiting state:<br />
x=1: request 0<br />
x=2: request 1<br />
x=4: request 2<br />
x=8: request 3<br />
The x values can be logically OR-ed to represent waiting states of multiple requests. If x = 6, for<br />
example, requests 1 and 2 are waiting.<br />
y: 0: no error; 1: error exists and "last_error" has been set in the control DB<br />
16#803a The control DB is not loaded.<br />
16#8081 The control DB is of the wrong type, format, or version.<br />
16#80C1 No resources are available to initialize the web application.<br />
Usage of the Control DB<br />
STEP 7 creates the control data block when you click "Generate blocks" and displays the<br />
control DB number in the User-defined Web pages properties. You can find the control DB<br />
as well in the Program blocks folder in the project navigation tree.<br />
Typically, your STEP 7 program uses the control DB directly as created by the "Generate<br />
blocks" process with no additional manipulation. However, the STEP 7 user program can set<br />
global commands in the control DB to deactivate the web server or to subsequently reenable<br />
it. Also, for user-defined pages that you create as manual fragment DBs (Page 535),<br />
the STEP 7 user program must control the behavior of these pages through a request table<br />
in the control DB. For information on these advanced tasks, see the topic Advanced userdefined<br />
Web page control (Page 555).<br />
11.3.5 Downloading the program blocks to the CPU<br />
After you have generated the blocks for user-defined Web pages, they are part of your STEP<br />
7 program just like any other program blocks. You follow the normal process to download the<br />
program blocks to the CPU. Note that you can only download user-defined Web page<br />
program blocks when the CPU is in STOP mode.<br />
<strong>S7</strong>-<strong>1200</strong> <strong>Programmable</strong> <strong>controller</strong><br />
538 System Manual, 04/2012, A5E02486680-06
11.3.6 Accessing the user-defined web pages from the PC<br />
Web server<br />
11.3 User-defined web pages<br />
You access your user-defined Web pages from the standard Web pages (Page 505). The<br />
standard Web pages display a link for "User Pages" on the left side menu where the links to<br />
the other pages appear. When you click the "User Pages" link, your Web browser goes to<br />
the page that provides access to your default page. From within the user-defined content<br />
area, navigation is according to how you designed your specific pages.<br />
The Web server displays the user-defined page content within the framework of the standard<br />
Web page display. That is, the header frame at the top and the login and navigation frames<br />
at the left remain in fixed positions.<br />
1<br />
① Link to default page of user-defined Web pages<br />
② Content area of user-defined Web pages<br />
11.3.7 Constraints specific to user-defined Web pages<br />
The constraints for standard Web pages (Page 558) also apply to user-defined Web pages.<br />
In addition, user-defined Web pages have some specific considerations.<br />
Load memory space<br />
Your user-defined Web pages become data blocks when you click "Generate blocks", which<br />
require load memory space. If you have a memory card installed, you have up to the<br />
capacity of your memory card as external load memory space for the user-defined Web<br />
pages.<br />
If you do not have a memory card installed, these blocks take up internal load memory<br />
space, which is limited according to your CPU model.<br />
<strong>S7</strong>-<strong>1200</strong> <strong>Programmable</strong> <strong>controller</strong><br />
System Manual, 04/2012, A5E02486680-06 539<br />
2
Web server<br />
11.3 User-defined web pages<br />
You can check the amount of load memory space that is used and the amount that is<br />
available from the Online and Diagnostic tools in STEP 7. You can also look at the properties<br />
for the individual blocks that STEP 7 generates from your user-defined Web pages and see<br />
the load memory consumption.<br />
Note<br />
If you need to reduce the space required for your user-defined Web pages, reduce your use<br />
of images if applicable.<br />
11.3.8 Example of a user-defined web page<br />
11.3.8.1 Web page for monitoring and controlling a wind turbine<br />
As an example of a user-defined Web page, consider a Web page that is used to remotely<br />
monitor and control a wind turbine:<br />
Note<br />
This example page is in English, but you can, of course, use any language when you are<br />
developing your own HTML pages.<br />
<strong>S7</strong>-<strong>1200</strong> <strong>Programmable</strong> <strong>controller</strong><br />
540 System Manual, 04/2012, A5E02486680-06
Description<br />
Files used<br />
Implementation<br />
Web server<br />
11.3 User-defined web pages<br />
In this application, each wind turbine in a wind turbine farm is equipped with an <strong>S7</strong>-<strong>1200</strong> for<br />
control of the turbine. Within the STEP 7 program, each wind turbine has a data block with<br />
data specific to that wind turbine and location.<br />
The user-defined Web page provides remote turbine access from a PC. A user can connect<br />
to standard web pages of the CPU of a particular wind turbine and access the user-defined<br />
"Remote Wind Turbine Monitor" Web page to see the data for that turbine. An admin user<br />
can also put the turbine in manual mode and control the variables for turbine speed, yaw,<br />
and pitch from the Web page. An admin user can also set a braking value regardless of<br />
whether the turbine is under manual or automatic control.<br />
The STEP 7 program would check the Boolean values for overriding automatic control, and if<br />
set, would use the user-entered values for turbine speed, yaw, and pitch. Otherwise, the<br />
program would ignore these values.<br />
This user-defined Web page example consists of three files:<br />
● Wind_turbine.html: This is the HTML page that implements the display shown above,<br />
using AWP commands to access <strong>controller</strong> data.<br />
● Wind_turbine.css: This is the cascading style sheet that contains formatting styles for the<br />
HTML page. Use of a cascading style sheet is optional, but it can simplify the HTML page<br />
development.<br />
● Wind_turbine.jpg: This is the background image that the HTML page uses. Use of images<br />
in user-defined Web pages is, of course, optional, and does require additional space in<br />
the CPU.<br />
These files are not provided with your installation, but are described as an example.<br />
The HTML page uses AWP commands to read values from the PLC (Page 523) for the<br />
display fields and to write values to the PLC (Page 524) for data coming from user input.<br />
This page also uses AWP commands for enum type definition (Page 529) and reference<br />
(Page 530) for handling ON/OFF settings.<br />
The first part of the page displays a header line that includes the wind turbine number and<br />
the location.<br />
The next part of the page displays atmospheric<br />
conditions at the wind turbine. These fields are<br />
supplied from I/O at the turbine site that provide<br />
the wind speed, wind direction, and current<br />
temperature.<br />
Next, the page displays the power output of the<br />
turbine as read from the <strong>S7</strong>-<strong>1200</strong>.<br />
<strong>S7</strong>-<strong>1200</strong> <strong>Programmable</strong> <strong>controller</strong><br />
System Manual, 04/2012, A5E02486680-06 541
Web server<br />
11.3 User-defined web pages<br />
The following sections allow for manual control of the turbine, overriding the normal<br />
automatic control by the <strong>S7</strong>-<strong>1200</strong>. These types are as follows:<br />
Manual override: enables manual override<br />
of the turbine. The STEP 7 user program<br />
requires that the manual override setting be<br />
true before enabling the use of any of the<br />
manual settings for turbine speed, or yaw or<br />
pitch.<br />
Yaw override: enables manual override of<br />
the yaw setting, and a manual setting for the<br />
yaw. The STEP 7 user program requires<br />
that both manual override and yaw override<br />
be true in order to apply the yaw setting.<br />
Pitch override: enables manual override of<br />
the pitch of the blades. The STEP 7 user<br />
program requires that both manual override<br />
and pitch override be true in order to apply<br />
the blade pitch setting.<br />
The HTML page includes a submit button to<br />
post the override settings to the <strong>controller</strong>.<br />
The braking user input field provides a manual<br />
setting for a braking percentage. The STEP 7<br />
user program does not require manual override<br />
to accept a braking value.<br />
In addition, the HTML page uses an AWP command to write the special variable (Page 527)<br />
that contains the user ID of the user that is accessing the page to a tag in the PLC tag table.<br />
11.3.8.2 Reading and displaying <strong>controller</strong> data<br />
Sample HTML code<br />
The "Remote Wind Turbine Monitor" HTML page uses numerous AWP commands for<br />
reading data from the <strong>controller</strong> (Page 523) and displaying it on the page. For example,<br />
consider the HTML code for displaying the power output as shown in this portion of the<br />
example Web page:<br />
The following excerpt from the "Remote Wind Turbine Monitor" HTML page displays the text<br />
"Power Output:" in the left cell of a table row and reads the variable for the power output and<br />
displays it in the right cell of the table row along with the text for the units, KW.<br />
The AWP command :="Data_block_1".PowerOutput: performs the read operation. Note that<br />
data blocks are referenced by name, not by data block number (that is, "Data_block_1" and<br />
not "DB1").<br />
<strong>S7</strong>-<strong>1200</strong> <strong>Programmable</strong> <strong>controller</strong><br />
542 System Manual, 04/2012, A5E02486680-06
Web server<br />
11.3 User-defined web pages<br />
<br />
<br />
Power output:<br />
<br />
<br />
:="Data_block_1".PowerOutput: KW<br />
<br />
<br />
11.3.8.3 Using an enum type<br />
Sample HTML code<br />
%The "Remote Wind Turbine Monitor" HTML page uses enum types for the three instances<br />
where HTML page displays "ON" or "OFF" for a Boolean value, and for where the user sets<br />
a Boolean value. The enum type for "ON" results in a value of 1, and the enum type for<br />
"OFF" results in a value of 0. For example, consider the HTML code for reading and writing<br />
the Manual Override Enable setting in "Data_block_1".ManualOverrideEnable value using an<br />
enum type:<br />
The following excerpts from the "Remote Wind Turbine Monitor" HTML page show how to<br />
declare an enum type called "OverrideStatus" with values of "Off" and "On" for 0 and 1, and<br />
then setting an enum type reference to OverrideStatus for the ManualOverrideEnable<br />
Boolean tag in the data block named "Data_block_1". Note that for each AWP_Enum_Ref<br />
declaration there must be a corresponding AWP_In_Variable declaration for the data block<br />
tag or PLC variable if the HTML page writes to the variable through an enum type.<br />
<br />
<br />
<br />
Where the HTML page includes a display field in a table cell for the current state of<br />
ManualOverrideEnable. It uses just a normal read variable command, but with the use of the<br />
previously declared and referenced enum type, the page displays "Off" or "On" rather than 0<br />
or 1.<br />
<br />
Manual override: :="Data_block_1".ManualOverrideEnable:<br />
<br />
The HTML page includes a drop-down select list for the user to change the value of<br />
ManualOverrideEnable. The select list uses the text "Yes" and "No" to display in the select<br />
lists. With the use of the enum type, "Yes" is correlated to the value "On" of the enum type,<br />
and "No" is correlated to the value "Off". The empty selection leaves the value of<br />
ManualOverrideEnable as it is.<br />
<strong>S7</strong>-<strong>1200</strong> <strong>Programmable</strong> <strong>controller</strong><br />
System Manual, 04/2012, A5E02486680-06 543
Web server<br />
11.3 User-defined web pages<br />
<br />
<br />
Yes<br />
No<br />
<br />
The select list is included within a form on the HTML page. When the user clicks the submit<br />
button, the page posts the form, which writes a value of "1" to the Boolean<br />
ManualOverrideEnable in Data_block_1 if the user had selected "Yes", or "0" if the user had<br />
selected "No".<br />
11.3.8.4 Writing user input to the <strong>controller</strong><br />
Sample HTML code<br />
The "Remote Wind Turbine Monitor" HTML page includes several AWP commands for<br />
writing data to the <strong>controller</strong> (Page 524). The HTML page declares AWP_In_Variables for<br />
Boolean variables so that an admin user can put the wind turbine under manual control and<br />
enable manual override for the turbine speed, yaw override, and/or blade pitch override. The<br />
page also uses AWP_In_Variables to allow an admin user to subsequently set floating-point<br />
values for the turbine speed, yaw, pitch, and braking percentage. The page uses an HTTP<br />
form post command to write the AWP_In_Variables to the <strong>controller</strong>.<br />
For example, consider the HTML code for manually setting the braking value:<br />
The following excerpt from the "Remote Wind Turbine Monitor" HTML page first declares an<br />
AWP_In_Variable for "Data_block_1" that enables the HTML page to write to any tags in the<br />
data block "Data_block_1". The page displays the text "Braking:" in the left cell of a table<br />
row. In the right cell of the table row is the field that accepts user input for the "Braking" tag<br />
of "Data_block_1". This user input value is within an HTML form that uses the HTTP method<br />
"POST" to post the entered text data to the CPU. The page then reads the actual braking<br />
value from the <strong>controller</strong> and displays it in the data entry field.<br />
An admin user can subsequently use this page to write a braking value to the data block in<br />
the CPU that controls braking.<br />
<br />
...<br />
<br />
Braking:<br />
<br />
<br />
%<br />
<br />
<br />
<br />
<strong>S7</strong>-<strong>1200</strong> <strong>Programmable</strong> <strong>controller</strong><br />
544 System Manual, 04/2012, A5E02486680-06
Web server<br />
11.3 User-defined web pages<br />
Note<br />
Note that if a user-defined page has a data entry field for a writable data block tag that is a<br />
string data type, the user must enclose the string in single quotation marks when entering<br />
the string value in the field.<br />
Note<br />
Note that if you declare an entire data block in an AWP_In_Variable declaration such as , then every tag within that data block can be<br />
written from the user-defined Web page. Use this when you intend for all of the tags in a data<br />
block to be writable. Otherwise, if you only want specific data block tags to be writable from<br />
the user-defined Web page, declare it specifically with a declaration such as <br />
11.3.8.5 Writing a special variable<br />
The "Remote Wind Turbine Monitor" Web page writes the special variable<br />
SERVER:current_user_id to a PLC tag in the CPU. In this case, the PLC tag value contains<br />
the user ID of whoever is accessing the "Remote Wind Turbine Monitor" Web page.<br />
Currently the admin user has a user ID of 1, so the PLC tag value is set to 1.<br />
The special variable is written to the PLC by the Web page and requires no user interface.<br />
Sample HTML code<br />
<br />
11.3.8.6 Reference: HTML listing of remote wind turbine monitor Web page<br />
Wind_turbine.html<br />
Web server<br />
11.3 User-defined web pages<br />
Location: String<br />
TurbineNumber: Int<br />
WindSpeed: Real<br />
WindDirection: Real<br />
Temperature: Real<br />
PowerOutput: Real<br />
ManualOverrideEnable: Bool<br />
TurbineSpeed: Real<br />
YawOverride: Bool<br />
Yaw: Real<br />
PitchOverride: Bool<br />
Pitch: Real<br />
Braking: Real<br />
The user-defined Web page displays current values for the PLC data,<br />
and provides a select list to set the three booleans using an<br />
enumerated type assignment. The "Submit" button posts the selected<br />
boolean values as well as the data entry fields for TurbineSpeed,<br />
Yaw, and Pitch. The value for Braking can be set without use of the<br />
"Submit" button.<br />
No actual STEP 7 program is required to use this page.<br />
Theoretically, the STEP 7 program would only act on the values of<br />
TurbineSpeed, Yaw, and Pitch, if the associated booleans were set.<br />
The only STEP 7 requirement is to call the WWW instruction with the<br />
DB number of the generated data blocks for this page.<br />
--><br />
<br />
<br />
<br />
<br />
<br />
<br />
<br />
<br />
<br />
<br />
<br />
<br />
Remote Wind Turbine Monitor<br />
<br />
<br />
<br />
Remote Wind Turbine Monitor: Turbine<br />
#:="Data_block_1".TurbineNumber: :="Data_block_1".Location:<br />
<br />
<strong>S7</strong>-<strong>1200</strong> <strong>Programmable</strong> <strong>controller</strong><br />
546 System Manual, 04/2012, A5E02486680-06
Wind<br />
speed:<br />
:="Data_block_1".WindSpeed: km/h<br />
<br />
<br />
Wind direction:<br />
:="Data_block_1".WindDirection: deg.<br />
<br />
Temperature:<br />
:="Data_block_1".Temperature: deg. C<br />
<br />
Web server<br />
11.3 User-defined web pages<br />
<br />
Power output:<br />
:="Data_block_1".PowerOutput:<br />
KW<br />
<br />
<br />
<br />
<br />
<br />
Manual override: :="Data_block_1".ManualOverrideEnable:<br />
<br />
Set:<br />
<br />
<br />
Yes<br />
No<br />
<br />
<br />
<br />
Turbine speed:<br />
<br />
RPM<br />
<br />
<br />
<br />
<br />
Yaw override: :="Data_block_1".YawOverride: <br />
<br />
Set:<br />
<br />
<strong>S7</strong>-<strong>1200</strong> <strong>Programmable</strong> <strong>controller</strong><br />
System Manual, 04/2012, A5E02486680-06 547
Web server<br />
11.3 User-defined web pages<br />
<br />
Yes<br />
No<br />
<br />
<br />
<br />
<br />
<br />
Turbine yaw:<br />
<br />
<br />
deg.<br />
<br />
<br />
<br />
<br />
Pitch override: :="Data_block_1".PitchOverride: <br />
<br />
Set:<br />
<br />
<br />
Yes<br />
No<br />
<br />
<br />
<br />
<br />
<br />
Blade pitch:<br />
<br />
<br />
deg.<br />
<br />
<br />
<br />
<br />
<br />
<br />
<br />
<br />
<br />
Braking:<br />
<br />
<br />
<strong>S7</strong>-<strong>1200</strong> <strong>Programmable</strong> <strong>controller</strong><br />
548 System Manual, 04/2012, A5E02486680-06
%<br />
<br />
<br />
<br />
<br />
<br />
<br />
<br />
Wind_turbine.css H2 {<br />
font-family: Arial;<br />
font-weight: bold;<br />
font-size: 14.0pt;<br />
color: #FFFFFF;<br />
margin-top:0px;<br />
margin-bottom:10px;<br />
}<br />
P {<br />
font-family: Arial;<br />
font-weight: bold;<br />
color: #FFFFFF;<br />
font-size: 12.0pt;<br />
margin-top:0px;<br />
margin-bottom:0px;<br />
}<br />
TD.Text {<br />
font-family: Arial;<br />
font-weight: bold;<br />
color: #FFFFFF;<br />
font-size: 12.0pt;<br />
margin-top:0px;<br />
margin-bottom:0px;<br />
}<br />
11.3.8.7 Configuration in STEP 7 of the example Web page<br />
Web server<br />
11.3 User-defined web pages<br />
To include the "Remote Wind Turbine Monitor" HTML page as a user-defined Web page for<br />
the <strong>S7</strong>-<strong>1200</strong>, you configure the data about the HTML page in STEP 7 and create data blocks<br />
from the HTML page.<br />
Access the CPU Properties for the <strong>S7</strong>-<strong>1200</strong> that controls the wind turbine, and enter the<br />
configuration information in the User-defined web pages properties of the Web Server:<br />
<strong>S7</strong>-<strong>1200</strong> <strong>Programmable</strong> <strong>controller</strong><br />
System Manual, 04/2012, A5E02486680-06 549
Web server<br />
11.3 User-defined web pages<br />
Configuration fields<br />
● HTML directory: This field specifies the fully-qualified pathname to the folder where the<br />
default page (home page or start page) is located on the computer. The "..." button allows<br />
you to browse to the folder that you need.<br />
● Default HTML page: This field specifies the filename of the default page or home page of<br />
the HTML application. The "..." button allows you to select the file that you need. For this<br />
example, WindTurbine.html is the default HTML page. The Remote Wind Turbine Monitor<br />
example only consists of a single page, but in other user-defined applications the default<br />
page can call up additional pages from links on the default page. Within the HTML code,<br />
the default page must reference other pages relative to the HTML source folder.<br />
● Application name: This optional field contains the name that the Web browser includes in<br />
the address field when displaying the page. For this example, it is "Remote Wind Turbine<br />
Monitor", but it can be any name.<br />
No other fields require configuration.<br />
<strong>S7</strong>-<strong>1200</strong> <strong>Programmable</strong> <strong>controller</strong><br />
550 System Manual, 04/2012, A5E02486680-06
Final steps<br />
Web server<br />
11.3 User-defined web pages<br />
To use the Remote Wind Turbine Monitor as configured, generate the blocks, program the<br />
WWW instruction (Page 537) with the number of the generated control DB as an input<br />
parameter, download the program blocks, and put the CPU in run mode.<br />
When an operator subsequently accesses the standard Web pages for the <strong>S7</strong>-<strong>1200</strong> that<br />
controls the wind turbine, the "Remote Wind Turbine Monitor" Web page is accessible from<br />
the "User Pages" link on the navigation bar. This page now provides the means to monitor<br />
and control the wind turbine.<br />
11.3.9 Setting up user-defined Web pages in multiple languages<br />
The Web server provides the means for you to provide user-defined Web pages in the<br />
following languages:<br />
● German (de)<br />
● English (en)<br />
● Spanish (es)<br />
● French (fr)<br />
● Italian (it)<br />
● Chinese (zh)<br />
You do this by setting up your HTML pages in a folder structure (Page 551) that corresponds<br />
to the languages and by setting a specific cookie named "siemens_automation_language"<br />
from your pages (Page 552). The Web server responds to this cookie, and switches to the<br />
default page in the corresponding language folder.<br />
11.3.9.1 Creating the folder structure<br />
To provide user-defined Web pages in multiple languages, you set up a folder structure<br />
under your HTML directory. The two-letter folder names are specific and must be named as<br />
shown below:<br />
de: German<br />
en: English<br />
es: Spanish<br />
fr: French<br />
it: Italian<br />
zh: Chinese<br />
At the same level, you can also include any other folders that your pages need, for example,<br />
folders for images or scripts.<br />
You can include any subset of the language folders. You do not have to include all six<br />
languages. Within the language folders, you create and program your HTML pages in the<br />
appropriate language.<br />
<strong>S7</strong>-<strong>1200</strong> <strong>Programmable</strong> <strong>controller</strong><br />
System Manual, 04/2012, A5E02486680-06 551
Web server<br />
11.3 User-defined web pages<br />
11.3.9.2 Programming the language switch<br />
Example<br />
The Web server performs switching between languages through the use of a cookie named<br />
"siemens_automation_language". This is a cookie defined and set in the HTML pages, and<br />
interpreted by the Web server to display a page in the appropriate language from the<br />
language folder of the same name. The HTML page must include a JavaScript to set this<br />
cookie to one of the pre-defined language identifiers: "de", "en", "es", "fr", "it', or "zh".<br />
For example, if the HTML page sets the cookie to "de", the Web server switches to the "de"<br />
folder and displays the page with the default HTML page name as defined in the STEP 7<br />
configuration (Page 554).<br />
The following example uses a default HTML page named "langswitch.html" in each of the<br />
language folders. Also in the HTML directory is a folder named "script". The script folder<br />
includes a JavaScript file named "lang.js". Each langswitch.html page uses this JavaScript to<br />
set the language cookie, "siemens_automation_language".<br />
HTML for "langswitch.html" in "en" folder<br />
The header of the HTML page sets the language to English, sets the character set to UTF-8,<br />
and sets the path to the JavaScript file lang.js.<br />
<br />
<br />
<br />
<br />
<br />
Language switching english page<br />
<br />
The body of the file uses a select list for the user to select between German and English.<br />
English ("en") is pre-selected for the language. When the user changes the language, the<br />
page calls the DoLocalLanguageChange() JavaScript function with the value of the selected<br />
option.<br />
<br />
<br />
<br />
<br />
<br />
<br />
German<br />
English<br />
<br />
<br />
<br />
<br />
<strong>S7</strong>-<strong>1200</strong> <strong>Programmable</strong> <strong>controller</strong><br />
552 System Manual, 04/2012, A5E02486680-06
Web server<br />
11.3 User-defined web pages<br />
HTML for "langswitch.html" in "de" folder<br />
The header for the German langswitch.html page is the same as English, except the<br />
language is set to German.<br />
<br />
<br />
<br />
<br />
Sprachumschaltung Deutsche Seite<br />
<br />
<br />
The HTML in the German page is identical to that of the English page, except that the default<br />
value of the selected language is German ("de").<br />
<br />
<br />
<br />
<br />
<br />
JavaScript "lang.js" in "script" folder<br />
The function "DoLocalLanguageChange()" is in the lang.js file. This function calls the<br />
"SetLangCookie()" function and then reloads the window that is displaying the HTML page.<br />
The function "SetLangCookie()" constructs an assignment that assigns the value from the<br />
select list to the "siemens_automation_language" cookie of the document. It also sets the<br />
path to the application so that the switched page, and not the requesting page, receives the<br />
value of the cookie.<br />
Optionally, in the commented section, the page could set an expiration value for the cookie.<br />
<strong>S7</strong>-<strong>1200</strong> <strong>Programmable</strong> <strong>controller</strong><br />
System Manual, 04/2012, A5E02486680-06 553
Web server<br />
11.3 User-defined web pages<br />
function DoLocalLanguageChange(oSelect) {<br />
SetLangCookie(oSelect.value);<br />
top.window.location.reload();<br />
}<br />
function SetLangCookie(value) {<br />
var strval = "siemens_automation_language=";<br />
// This is the cookie by which the Web server<br />
// detects the desired language<br />
// This name is required by the Web server.<br />
strval = strval + value;<br />
strval = strval + "; path=/ ;";<br />
// Set path to the application, since otherwise<br />
// path would be set to the requesting page<br />
// and this page would not get the cookie.<br />
/* OPTIONAL<br />
use expiration if this cookie should live longer<br />
than the current browser session:<br />
var now = new Date();<br />
var endttime = new Date(now.getTime() + expiration);<br />
strval = strval + "; expires=" +<br />
endttime.toGMTString() + ";";<br />
*/<br />
document.cookie = strval;<br />
}<br />
11.3.9.3 Configuring STEP 7 to use a multi-language page structure<br />
The procedure for configuring multi-language user-defined Web pages is similar to the<br />
general process for configuring user-defined Web pages (Page 535). When you have folders<br />
set up for languages, however, you set your HTML directory setting to the folder that<br />
contains the individual language folders. You do not set the HTML directory to be one of the<br />
language folders.<br />
When you select the default HTML page, you navigate into the language folder and select<br />
the HTML page that is to be the start page. When you subsequently generate blocks and<br />
download the blocks to the CPU, the Web server displays the start page in the language<br />
folder that you configured.<br />
For example, if the folder structure shown here was at C:\, the<br />
setting for HTML directory would be C:\html, and if English were to<br />
be the initial page display, you would navigate to en\langswitch.html<br />
for the default HTML page setting.<br />
<strong>S7</strong>-<strong>1200</strong> <strong>Programmable</strong> <strong>controller</strong><br />
554 System Manual, 04/2012, A5E02486680-06
11.3.10 Advanced user-defined Web page control<br />
Web server<br />
11.3 User-defined web pages<br />
When you generate data blocks for your user-defined Web pages, STEP 7 creates a control<br />
DB that it uses to control display of and interaction with the user-defined pages. STEP 7 also<br />
creates a set of fragment DBs that represent the individual pages. Under normal<br />
circumstances, you do not need to know the structure of the control DB or how to manipulate<br />
it.<br />
If you want to turn a web application on and off, for example, or manipulate individual manual<br />
fragments, you use the control DB tags and the WWW instruction to do so.<br />
Structure of the control DB<br />
The control DB is an extensive data structure, and is accessible when programming your<br />
STEP 7 user program. Only some of the control data block tags are described here.<br />
Commandstate structure<br />
"Commandstate" is a structure that contains global commands and global states for the Web<br />
server.<br />
Global commands in the "Commandstate" structure<br />
The global commands apply to the Web server in general. You can deactivate the Web<br />
server or restart it from the control DB parameters.<br />
Block tag Data type Description<br />
init BOOL Evaluate the control DB and initialize the<br />
Web application<br />
deactivate BOOL Deactivate the Web application<br />
Global states in the Commandstate structure<br />
The global states apply to the Web server in general and contain status information about<br />
the Web application.<br />
Block tag Data type Description<br />
initializing BOOL Web application is reading control DB<br />
error BOOL Web application could not be initialized<br />
deactivating BOOL Web application is terminating<br />
deactivated BOOL Web application is terminated<br />
initialized BOOL Web application is initialized<br />
Request table<br />
The request table is an array of structures containing commands and states that apply to<br />
individual fragment DBs. If you created fragments with the AWP_Start_Fragment (Page 532)<br />
command of type "manual", the STEP 7 user program must control these pages through the<br />
control DB. The request states are read-only and provide information about the current<br />
fragment. You use the request commands to control the current fragment.<br />
<strong>S7</strong>-<strong>1200</strong> <strong>Programmable</strong> <strong>controller</strong><br />
System Manual, 04/2012, A5E02486680-06 555
Web server<br />
11.3 User-defined web pages<br />
Struct members of requesttab struct<br />
Operation<br />
Block tag Data type Description<br />
requesttab ARRAY [ 1 .. 4 ] OF STRUCT Array of structures for individual<br />
fragment DB control.<br />
The Web server can process up to four<br />
fragments at a time. The array index for<br />
a particular fragment is arbitrary when<br />
the Web server is processing multiple<br />
fragments or fragments from multiple<br />
browser sessions.<br />
Block tag Data type Description<br />
page_index UINT Number of the current web page<br />
fragment_index<br />
// Request Commands<br />
UINT Number of the current fragment - can be<br />
set to a different fragment<br />
continue BOOL Enables current page/fragment for<br />
sending and continues with the next<br />
fragment<br />
repeat BOOL Enables current page/fragment for<br />
resending and continues with the same<br />
fragment<br />
abort BOOL Close http connection without sending<br />
finish BOOL Send this fragment; page is complete -<br />
do not process any additional fragments<br />
// Request states The request states are read-only<br />
idle BOOL Nothing to do, but active<br />
waiting BOOL Fragment is waiting to be enabled<br />
sending BOOL Fragment is sending<br />
aborting BOOL User has aborted current request<br />
Whenever your program makes changes to the control DB, it must call the WWW instruction<br />
with the number of the modified control DB as its parameter. The global commands and<br />
request commands take effect when the STEP 7 user program executes the WWW<br />
instruction (Page 537).<br />
The STEP 7 user program can set the fragment_index explicitly, thus causing the Web<br />
server to process the specified fragment with a request command. Otherwise, the Web<br />
server processes the current fragment for the current page when the WWW instruction<br />
executes.<br />
<strong>S7</strong>-<strong>1200</strong> <strong>Programmable</strong> <strong>controller</strong><br />
556 System Manual, 04/2012, A5E02486680-06
Examples<br />
Web server<br />
11.3 User-defined web pages<br />
Possible techniques for using the fragment_index include:<br />
● Processing the current fragment: Leave fragment_index unchanged and set the continue<br />
command.<br />
● Skip the current fragment: Set fragment_index to 0 and set the continue command.<br />
● Replace current fragment with a different fragment: Set the fragment_index to the new<br />
fragment ID and set the continue command.<br />
To check global states or request states that might be changing, the STEP 7 user program<br />
must call the WWW instruction to evaluate the current values of these states. A typical usage<br />
might be to call the WWW instruction periodically until a specific state occurs.<br />
Note<br />
If the STEP 7 user program sets more than one request command, the WWW instructions<br />
processes only one in this of precedence: abort, finish, repeat, continue. The WWW<br />
instruction clears all of the request commands after processing.<br />
The following example shows a STEP 7 user program that is checking for a fragment with an<br />
ID of 1 to be in the waiting state, following a prior call to the WWW instruction. It might also<br />
wait for other application-specific conditions to occur. Then it performs whatever processing<br />
is necessary for the fragment, such as setting data block tags, performing calculations, or<br />
other application-specific tasks. Afterwards, it sets the continue flag so that the Web server<br />
will execute this fragment.<br />
When the program calls the WWW instruction with this modified control DB, the user-defined<br />
Web page with this fragment can be displayed from the Web browser.<br />
Note that this is a simplified example; the fragment to check could be in any one of the four<br />
requesttab structs in the array.<br />
<strong>S7</strong>-<strong>1200</strong> <strong>Programmable</strong> <strong>controller</strong><br />
System Manual, 04/2012, A5E02486680-06 557
Web server<br />
11.4 Constraints<br />
11.4 Constraints<br />
Number of connections<br />
The following IT considerations can affect your use of the Web server:<br />
● Typically, you must use the IP address of the CPU to access the standard Web pages or<br />
user-defined Web pages. If your Web browser does not allow connecting directly to an IP<br />
address, see your IT administrator. If your local policies support DNS, you can connect to<br />
the IP address through a DNS entry to that address.<br />
● Firewalls, proxy settings, and other site-specific restrictions can also restrict access to the<br />
CPU. See your IT administrator to resolve these issues.<br />
● The standard Web pages use JavaScripts and cookies. If JavaScripts or cookies are<br />
disabled in your Web browser, enable them. If you cannot enable them, some features<br />
will be restricted (Page 558). Use of JavaScripts and cookies in user-defined Web pages<br />
is optional. If used, they must be enabled in your browser.<br />
● Secure Sockets Layer (SSL) is supported by the Web server. You can access the<br />
standard Web pages and user-defined Web pages with an URL of either<br />
http://ww.xx.yy.zz or https://ww.xx.yy.zz, where "ww.xx.yy.zz" represents the IP address<br />
of the CPU.<br />
● Siemens provides a security certificate for secure access to the Web server. From the<br />
Introduction standard Web page (Page 508), you can download and import the certificate<br />
into the Internet options of your Web browser (Page 560). If you choose to not import the<br />
certificate, you will get a security verification prompt every time you access the Web<br />
server with https://.<br />
The Web server supports a maximum of 30 active HTTP connections. These 30 connections<br />
can be consumed in various ways, depending on the Web browser that you use and the<br />
number of different objects per page (.css files, images, additional .html files). Some<br />
connections persist while the page is being displayed; others are released after the initial<br />
connection.<br />
If, for example, you are using Mozilla Firefox 8, which supports a maximum of six persistent<br />
connections, you could use five browser or browser tab instances before the Web server<br />
starts dropping connections. In the case where a page is not using all six connections, you<br />
could have additional browser or browser tab instances.<br />
Also be aware that page performance can be affected by the number of active connections.<br />
11.4.1 Features restricted when JavaScript is disabled<br />
The standard Web pages are implemented using HTML, JavaScripts, and cookies. If your<br />
site restricts the use of JavaScripts and cookies, then enable them for the pages to function<br />
properly. If you cannot enable JavaScripts for your Web browser, the features controlled by<br />
JavaScripts cannot run.<br />
<strong>S7</strong>-<strong>1200</strong> <strong>Programmable</strong> <strong>controller</strong><br />
558 System Manual, 04/2012, A5E02486680-06
General<br />
Web server<br />
11.4 Constraints<br />
The pages do not update dynamically. You must manually refresh the page with the Refresh<br />
icon (Page 506) to view fresh data.<br />
Diagnostic Buffer page<br />
● Displaying the event details: With JavaScript, you select a row in the diagnostic buffer to<br />
see the details in the bottom section. Without JavaScript, you must click the event field<br />
hyperlink of a diagnostic buffer entry to see the event data in the bottom section.<br />
● Changing the range of diagnostic buffer entries to view: With JavaScript, you use the<br />
drop-down list at the top to select the range of diagnostic buffer entries to view, and the<br />
page automatically updates. Without JavaScript, you use the drop-down list at the top to<br />
select the range of diagnostic buffer entries to view, but you must then click the "Go" link<br />
to update the diagnostic buffer page with the range you selected from the drop-down list.<br />
Note that the "Go" and the event field hyperlinks are only visible when JavaScript is not<br />
enabled. They are not necessary and therefore are not present when JavaScript is enabled.<br />
Note<br />
The Opera V11.0 browser does not support the "Go" button or hyperlinked diagnostic<br />
entries. With Opera V11.0, you cannot access event details or change the range if you have<br />
disabled JavaScript.<br />
Module Information page<br />
● You cannot filter the data.<br />
● You cannot sort fields.<br />
Variable Status page<br />
● After you enter each variable, you must manually set the focus to the "New variable" row<br />
to enter a new variable.<br />
● Selecting a display format does not automatically change the data value display to the<br />
selected format. You must click the "Monitor value" button to refresh the display with the<br />
new format.<br />
<strong>S7</strong>-<strong>1200</strong> <strong>Programmable</strong> <strong>controller</strong><br />
System Manual, 04/2012, A5E02486680-06 559
Web server<br />
11.4 Constraints<br />
Data Logs page<br />
● You cannot click a file name under "Recent entries" to open or save a log file. You can,<br />
however, use the Download icon for the same functionality.<br />
● The Data Logs page does not refresh.<br />
● The "+" and "-" buttons to increment and decrement the number of recent entries have no<br />
effect.<br />
● Entering a value directly in the number of recent entries does not set the number of<br />
entries. If you attempt to enter a value in this field from Mozilla Firefox, the display goes<br />
blank. You must reselect "Data Logs" from the navigation pane to restore the Data Logs<br />
display. The number of recent entries field remains unchanged.<br />
Note that you can leave the Data Logs page and re-enter to get the most recent 25 entries.<br />
11.4.2 Features restricted when cookies are not allowed<br />
If your Web browser does not allow cookies you cannot log in with the "admin" user name.<br />
11.4.3 Importing the Siemens security certificate<br />
Downloading the certificate<br />
You can import the Siemens security certificate into your Internet options so that you won't<br />
be prompted for security verification when you enter https://ww.xx.yy.zz in your Web<br />
browser, where "ww.xx.yy.zz" is the IP address of the CPU. If you use an http:// URL and not<br />
an https:// URL, then you do not need to download and install the certificate.<br />
You use the "download certificate" link from the Introduction page (Page 508) to download<br />
the Siemens security certificate to your PC. The procedure varies according to which Web<br />
browser you use:<br />
Importing the certificate to Internet Explorer<br />
1. Click the "download certificate" link from the Introduction page. A "File Download -<br />
Security Warning" dialog pops up.<br />
2. From the "File Download - Security Warning" dialog, click "Open" to open the file. A<br />
"Certificate" dialog appears.<br />
3. From the "Certificate" dialog, click the "Install Certificate" button to launch the Certificate<br />
Import Wizard.<br />
4. Follow the dialogs of the "Certificate Import Wizard" to import the certificate, letting the<br />
operating system automatically select the certificate store.<br />
<strong>S7</strong>-<strong>1200</strong> <strong>Programmable</strong> <strong>controller</strong><br />
560 System Manual, 04/2012, A5E02486680-06
Web server<br />
11.4 Constraints<br />
Importing the certificate to Mozilla Firefox<br />
1. Click the "download certificate" link from the Intro page. An "Opening<br />
MiniWebCA_Cer.crt" dialog pops up.<br />
2. Click "Save file" from the "Opening MiniWebCA_Cer.crt" dialog. A "Downloads" dialog<br />
appears.<br />
3. From the "Downloads" dialog, double-click "MiniWebCA_Cer.crt". If you have attempted<br />
the download more than once, multiple copies show up. Just double-click any one of the<br />
"MiniWebCA_Cer.crt". entries.<br />
4. Click "OK" if prompted to open an executable file.<br />
5. Click "Open" on the "Open File - Security Warning" dialog if it appears. A "Certificate"<br />
dialog appears.<br />
6. On the "Certificate" dialog, click the "Install Certificate" button.<br />
7. Follow the dialogs of the "Certificate Import Wizard" to import the certificate, letting the<br />
operating system automatically select the certificate store.<br />
8. If the "Security Warning" dialog appears, click "Yes" to confirm installation of the<br />
certificate.<br />
Other browsers<br />
Follow the conventions of your Web browser to import and install the Siemens certificate.<br />
After you have installed the Siemens security certificate "<strong>S7</strong>-Controller Family" in the Internet<br />
options for your Web browser content, you will not be required to verify a security prompt<br />
when you access the Web server with https:// ww.xx.yy.zz.<br />
11.4.4 Importing CSV format data logs to non-USA/UK versions of Microsoft Excel<br />
Data log files are in the comma-separated values (CSV) file format. You can open these files<br />
directly in Excel from the Data Logs page when your system is running the USA or UK<br />
version of Excel. In other countries, however, this format is not widely used because<br />
commas occur frequently in numerical notation.<br />
To open a data log file that you have saved, follow these steps for non USA/UK versions of<br />
Excel:<br />
1. Open Excel and create an empty workbook.<br />
2. From the "Data > Import External Data" menu, select the "Import Data" command.<br />
3. Navigate to and select the data log file you want to open. The Text Import Wizard starts.<br />
4. From the Text Import Wizard, change the default option for "Original data type" from<br />
"Fixed width" to "Delimited".<br />
5. Click the Next button.<br />
6. From the Step 2 dialog, select the "Comma" check box to change the delimiter type from<br />
"Tab" to "Comma".<br />
7. Click the Next button.<br />
<strong>S7</strong>-<strong>1200</strong> <strong>Programmable</strong> <strong>controller</strong><br />
System Manual, 04/2012, A5E02486680-06 561
Web server<br />
11.4 Constraints<br />
8. From the Step 3 dialog, you can optionally change the Date format from MDY<br />
(month/day/year) to another format.<br />
9. Complete the remaining steps of the Text Import Wizard to import the file.<br />
<strong>S7</strong>-<strong>1200</strong> <strong>Programmable</strong> <strong>controller</strong><br />
562 System Manual, 04/2012, A5E02486680-06
Communication processor 12<br />
12.1 Using the serial communication interfaces<br />
LED indicators<br />
Two communication modules (CMs) and one communication board (CB) provide the<br />
interface for PtP communications:<br />
● CM 1241 RS232 (Page 823)<br />
● CM 1241 RS422/485 (Page 824)<br />
● CB 1241 RS485 (Page 821)<br />
You can connect up to three CMs (of any type) plus a CB for a total of four communication<br />
interfaces. Install the CM to the left of the CPU or another CM. Install the CB on the front of<br />
the CPU. Refer to the "Installation" chapter in the <strong>S7</strong>-<strong>1200</strong> System Manual (Page 53) for<br />
detailed instructions on module installation and removal.<br />
The serial communication interfaces have the following characteristics:<br />
● Have an isolated port<br />
● Support Point-to-Point protocols<br />
● Are configured and programmed through extended instructions and library functions<br />
● Display transmit and receive activity by means of LEDs<br />
● Display a diagnostic LED (CMs only)<br />
● Are powered by the CPU: No external power connection is needed.<br />
Refer to the technical specifications for communication interfaces (Page 812).<br />
The communication modules have three LED indicators:<br />
● Diagnostic LED (DIAG): This LED flashes red until it is addressed by the CPU. After the<br />
CPU powers up, it checks for CMs and addresses them. The diagnostic LED begins to<br />
flash green. This means that the CPU has addressed the CM, but has not yet provided<br />
the configuration to it. The CPU downloads the configuration to the configured CMs when<br />
the program is downloaded to the CPU. After a download to the CPU, the diagnostic LED<br />
on the communication module should be a steady green.<br />
● Transmit LED (Tx): The transmit LED illuminates when data is being transmitted out the<br />
communication port.<br />
● Receive LED (Rx): This LED illuminates when data is being received by the<br />
communication port.<br />
The communication board provides transmit (TxD) and receive (RxD) LEDs. It has no<br />
diagnostic LED.<br />
<strong>S7</strong>-<strong>1200</strong> <strong>Programmable</strong> <strong>controller</strong><br />
System Manual, 04/2012, A5E02486680-06 563
Communication processor<br />
12.2 Biasing and terminating an RS485 network connector<br />
12.2 Biasing and terminating an RS485 network connector<br />
Siemens provides an RS485 network connector (Page 834) that you can use to easily<br />
connect multiple devices to an RS485 network. The connector has two sets of terminals that<br />
allow you to attach the incoming and outgoing network cables. The connector also includes<br />
switches for selectively biasing and terminating the network.<br />
Note<br />
You terminate and bias only the two ends of the RS485 network. The devices in between the<br />
two end devices are not terminated or biased. Bare cable shielding: Approximately 12 mm<br />
(1/2 in) must contact the metal guides of all locations.<br />
1 2 3<br />
<br />
<br />
A1 B1 A2 B2 A1 B1 A2 B2 A1 B1 A2 B2<br />
① Switch position = On: Terminated and biased<br />
② Switch position = Off: No termination or bias<br />
③ Switch position = On: Terminated and biased<br />
Table 12- 1 Termination and bias for the RS485 connector<br />
Terminating device (bias ON) Non-terminating device (bias OFF)<br />
<br />
<br />
3<br />
<br />
<br />
① Pin number<br />
② Network connector<br />
③ Cable shield<br />
<strong>S7</strong>-<strong>1200</strong> <strong>Programmable</strong> <strong>controller</strong><br />
564 System Manual, 04/2012, A5E02486680-06<br />
1<br />
2<br />
<br />
<br />
3<br />
<br />
<br />
The CB 1241 provides internal resistors for terminating and biasing the network. To<br />
terminate and bias the connection, connect TRA to TA and connect TRB to TB to include the<br />
internal resistors to the circuit. CB 1241 does not have a 9-pin connector. The following table<br />
shows the connections to a 9-pin connector on the communications partner.<br />
3<br />
<br />
<br />
<br />
<br />
1<br />
2
Table 12- 2 Termination and bias for the CB 1241<br />
Terminating device (bias ON) Non-terminating device (bias OFF)<br />
<br />
<br />
<br />
<br />
<br />
<br />
<br />
<br />
<br />
<br />
<br />
<br />
<br />
<br />
<br />
<br />
<br />
<br />
<br />
<br />
<br />
<br />
① Connect M to the cable shield<br />
② A = TxD/RxD - (Green wire / Pin 8)<br />
③ B = TxD/RxD + (Red wire / Pin 3)<br />
12.3 Point-to-Point (PtP) communication<br />
Communication processor<br />
12.3 Point-to-Point (PtP) communication<br />
The CPU supports the following Point-to-Point communication (PtP) for character-based<br />
serial protocols. PtP provides maximum freedom and flexibility, but requires extensive<br />
implementation in the user program.<br />
● PtP (Page 565)<br />
● USS (Page 604)<br />
● Modbus (Page 619)<br />
PtP enables a wide variety of possibilities:<br />
The ability to send information directly to an external<br />
device such as a printer<br />
The ability to receive information from other devices<br />
such as barcode readers, RFID readers, third-party<br />
camera or vision systems, and many other types of<br />
devices<br />
The ability to exchange information, sending and<br />
receiving data, with other devices such as GPS<br />
devices, third-party camera or vision systems, radio<br />
modems, and many more<br />
PtP communication is serial communication that uses standard UARTs to support a variety<br />
of baud rates and parity options. The RS232 and RS422/485 communication modules and<br />
the RS485 communication board provide the electrical interfaces for performing the PtP<br />
communications.<br />
<strong>S7</strong>-<strong>1200</strong> <strong>Programmable</strong> <strong>controller</strong><br />
System Manual, 04/2012, A5E02486680-06 565
Communication processor<br />
12.3 Point-to-Point (PtP) communication<br />
12.3.1 Point-to-Point instructions<br />
12.3.1.1 Common parameters for Point-to-Point instructions<br />
Table 12- 3 Common input parameters for the PTP instructions<br />
Parameter Description<br />
REQ Many of the PtP instructions use the REQ input to initiate the operation on a low to high<br />
transition. The REQ input must be high (TRUE) for one execution of an instruction, but the REQ<br />
input can remain TRUE for as long as desired. The instruction does not initiate another operation<br />
until it has been called with the REQ input FALSE so that the instruction can reset the history<br />
state of the REQ input. This is required so that the instruction can detect the low to high transition<br />
to initiate the next operation.<br />
When you place a PtP instruction in your program, STEP 7 prompts you to identify the instance<br />
DB. Use a unique DB for each PtP instruction call. This ensures that each instruction properly<br />
handles inputs such as REQ.<br />
PORT A port address is assigned during communication device configuration. After configuration, a<br />
default port symbolic name can be selected from the parameter assistant drop-list. The assigned<br />
CM or CB port value is the device configuration property "hardware identifier". The port symbolic<br />
name is assigned in the "Constants" tab of the PLC tag table.<br />
Bit time resolution Several parameters are specified in a number of bit times at the configured baud rate. Specifying<br />
the parameter in bit times allows the parameter to be independent of baud rate. All parameters<br />
that are in units of bit times can be specified to a maximum number of 65535. However, the<br />
maximum amount of time that a CM or CB can measure is eight seconds.<br />
The DONE, NDR, ERROR, and STATUS output parameters of the PtP instructions provide<br />
execution completion status for the PtP operations.<br />
Table 12- 4 DONE, NDR, ERROR, and STATUS output parameters<br />
Parameter Data type Default Description<br />
DONE Bool FALSE Set TRUE for one execution to indicate that the last request<br />
completed without errors; otherwise, FALSE.<br />
NDR Bool FALSE Set TRUE for one execution to indicate that the requested action<br />
has completed without error and that the new data has been<br />
received; otherwise, FALSE.<br />
ERROR Bool FALSE Set TRUE for one execution to indicate that the last request<br />
completed with errors, with the applicable error code in STATUS;<br />
otherwise, FALSE.<br />
STATUS Word 0 Result status:<br />
If the DONE or NDR bit is set, then STATUS is set to 0 or to an<br />
informational code.<br />
If the ERROR bit is set, then STATUS is set to an error code.<br />
If none of the above bits are set, then the instruction returns<br />
status results that describe the current state of the function.<br />
STATUS retains its value for the duration of the execution of the<br />
function.<br />
<strong>S7</strong>-<strong>1200</strong> <strong>Programmable</strong> <strong>controller</strong><br />
566 System Manual, 04/2012, A5E02486680-06
Table 12- 5 Common condition codes<br />
Communication processor<br />
12.3 Point-to-Point (PtP) communication<br />
Note<br />
The DONE, NDR, and ERROR parameters are set for one execution only. Your program<br />
logic must save temporary output state values in data latches, so you can detect state<br />
changes in subsequent program scans.<br />
STATUS (W#16#....) Description<br />
0000 No error<br />
7000 Function is not busy<br />
7001 Function is busy with the first call.<br />
7002 Function is busy with subsequent calls (polls after the first call).<br />
8x3A Illegal pointer in parameter x<br />
8070 All internal instance memory in use, too many concurrent instructions in progress<br />
8080 Port number is illegal.<br />
8081 Timeout, module error, or other internal error<br />
8082 Parameterization failed because parameterization is in progress in background.<br />
8083 Buffer overflow:<br />
The CM or CB returned a received message with a length greater than the length parameter<br />
allowed.<br />
8090 Internal error: Wrong message length, wrong sub-module, or illegal message<br />
Contact customer support.<br />
8091 Internal error: Wrong version in parameterization message<br />
Contact customer support.<br />
8092 Internal error: Wrong record length in parameterization message<br />
Contact customer support.<br />
Table 12- 6 Common error classes<br />
Class description Error classes Description<br />
Port configuration 80Ax Used to define common port configuration errors<br />
Transmit configuration 80Bx Used to define common transmit configuration errors<br />
Receive configuration 80Cx Used to define common receive configuration errors<br />
Transmission runtime 80Dx Used to define common transmission runtime errors<br />
Reception runtime 80Ex Used to define common reception runtime errors<br />
Signal handling 80Fx Used to define common errors associated with all signal<br />
handling<br />
<strong>S7</strong>-<strong>1200</strong> <strong>Programmable</strong> <strong>controller</strong><br />
System Manual, 04/2012, A5E02486680-06 567
Communication processor<br />
12.3 Point-to-Point (PtP) communication<br />
12.3.1.2 PORT_CFG instruction<br />
Table 12- 7 PORT_CFG (Port Configuration) instruction<br />
LAD / FBD SCL Description<br />
"PORT_CFG_DB"(<br />
REQ:=_bool_in_,<br />
PORT:=_uint_in_,<br />
PROTOCOL:=_uint_in_,<br />
BAUD:=_uint_in_,<br />
PARITY:=_uint_in_,<br />
DATABITS:=_uint_in_,<br />
STOPBITS:=_uint_in_,<br />
FLOWCTRL:=_uint_in_,<br />
XONCHAR:=_char_in_,<br />
XOFFCHAR:=_char_in_,<br />
WAITTIME:=_uint_in_,<br />
DONE=>_bool_out_,<br />
ERROR=>_bool_out_,<br />
STATUS=>_word_out_);<br />
1 STEP 7 automatically creates the DB when you insert the instruction.<br />
PORT_CFG allows you to change port parameters<br />
such as baud rate from your program.<br />
You can set up the initial static configuration of the<br />
port in the device configuration properties, or just use<br />
the default values. You can execute the PORT_CFG<br />
instruction in your program to change the<br />
configuration.<br />
The PORT_CFG configuration changes are not permanently stored in the CPU. The<br />
parameters configured in the device configuration are restored when the CPU transitions<br />
from RUN to STOP mode and after a power cycle. See Configuring the communication ports<br />
(Page 583) and Managing flow control (Page 585) for more information.<br />
Table 12- 8 Data types for the parameters<br />
Parameter and type Data type Description<br />
REQ IN Bool Activate the configuration change on rising edge of this input. (Default value:<br />
False)<br />
PORT IN PORT After you install and configure a CM or CB communication device, the port<br />
identifier appears in the parameter helper drop-list available at the PORT<br />
box connection. The assigned CM or CB port value is the device<br />
configuration property "hardware identifier". The port symbolic name is<br />
assigned in the "System constants" tab of the PLC tag table. (Default value:<br />
0)<br />
PROTOCOL IN UInt 0 - Point-to-Point communication protocol (Default value)<br />
1..n - future definition for specific protocols<br />
BAUD IN UInt Port baud rate (Default value: 0):<br />
1 = 300 baud, 2 = 600 baud, 3 = <strong>1200</strong> baud, 4 = 2400 baud, 5 = 4800 baud,<br />
6 = 9600 baud, 7 = 19200 baud, 8 = 38400 baud, 9 = 57600 baud,<br />
10 = 76800 baud, 11 = 115200 baud<br />
PARITY IN UInt Port parity (Default value: 0):<br />
1 = No parity, 2 = Even parity, 3 = Odd parity, 4 = Mark parity,<br />
5 = Space parity<br />
DATABITS IN UInt Bits per character (Default value:):<br />
1 = 8 data bits, 2 = 7 data bits<br />
STOPBITS IN UInt Stop bits (Default value: 0):<br />
1 = 1 stop bit, 2 = 2 stop bits<br />
<strong>S7</strong>-<strong>1200</strong> <strong>Programmable</strong> <strong>controller</strong><br />
568 System Manual, 04/2012, A5E02486680-06
Communication processor<br />
12.3 Point-to-Point (PtP) communication<br />
Parameter and type Data type Description<br />
FLOWCTRL IN UInt Flow control (Default value: 0):<br />
1 = No flow control, 2 = XON/XOFF, 3 = Hardware RTS always ON,<br />
4 = Hardware RTS switched<br />
XONCHAR IN Char Specifies the character that is used as the XON character. This is typically a<br />
DC1 character (11H). This parameter is only evaluated if flow control is<br />
enabled. (Default value: 0)<br />
XOFFCHAR IN Char Specifies the character that is used as the XOFF character. This is typically<br />
a DC3 character (13H). This parameter is only evaluated if flow control is<br />
enabled. (Default value: 0)<br />
XWAITIME IN UInt Specifies how long to wait for a XON character after receiving a XOFF<br />
character, or how long to wait for the CTS signal after enabling RTS (0 to<br />
65535 ms). This parameter is only evaluated if flow control is enabled.<br />
(Default value: 2000)<br />
DONE OUT Bool TRUE for one execution after the last request was completed with no error<br />
ERROR OUT Bool TRUE for one execution after the last request was completed with an error<br />
STATUS OUT Word Execution condition code (Default value: 0)<br />
Table 12- 9 Condition codes<br />
STATUS (W#16#....) Description<br />
80A0 Specific protocol does not exist.<br />
80A1 Specific baud rate does not exist.<br />
80A2 Specific parity option does not exist.<br />
80A3 Specific number of data bits does not exist.<br />
80A4 Specific number of stop bits does not exist.<br />
80A5 Specific type of flow control does not exist.<br />
80A6 Wait time is 0 and flow control enabled<br />
80A7 XON and XOFF are illegal values (for example, the same value)<br />
12.3.1.3 SEND_CFG instruction<br />
Table 12- 10 SEND_CFG (Send Configuration) instruction<br />
LAD / FBD SCL Description<br />
"SEND_CFG_DB"(<br />
REQ:=_bool_in_,<br />
PORT:=_uint_in_,<br />
RTSONDLY:=_uint_in_,<br />
RTSOFFDLY:=_uint_in_,<br />
BREAK:=_uint_in_,<br />
IDLELINE:=_uint_in_,<br />
DONE=>_bool_out_,<br />
ERROR=>_bool_out_,<br />
STATUS=>_word_out_);<br />
1 STEP 7 automatically creates the DB when you insert the instruction.<br />
SEND_CFG allows the dynamic configuration of serial<br />
transmission parameters for a PtP communication port.<br />
Any queued messages within a CM or CB are<br />
discarded when SEND_CFG is executed.<br />
<strong>S7</strong>-<strong>1200</strong> <strong>Programmable</strong> <strong>controller</strong><br />
System Manual, 04/2012, A5E02486680-06 569
Communication processor<br />
12.3 Point-to-Point (PtP) communication<br />
You can set up the initial static configuration of the port in the device configuration<br />
properties, or just use the default values. You can execute the SEND_CFG instruction in<br />
your program to change the configuration.<br />
The SEND_CFG configuration changes are not permanently stored in the CPU. The<br />
parameters configured in the device configuration are restored when the CPU transitions<br />
from RUN to STOP mode and after a power cycle. See Configuring transmit (send)<br />
parameters (Page 586).<br />
Table 12- 11 Data types for the parameters<br />
Parameter and type Data type Description<br />
REQ IN Bool Activate the configuration change on the rising edge of this input.. (Default<br />
value: False)<br />
PORT IN PORT After you install and configure a CM or CB communication device, the port<br />
identifier appears in the parameter helper drop-list available at the PORT<br />
box connection. The assigned CM or CB port value is the device<br />
configuration property "hardware identifier". The port symbolic name is<br />
assigned in the "System constants" tab of the PLC tag table. (Default value:<br />
0)<br />
RTSONDLY IN UInt Number of milliseconds to wait after enabling RTS before any Tx data<br />
transmission occurs. This parameter is only valid when hardware flow<br />
control is enabled. The valid range is 0 - 65535 ms. A value of 0 disables<br />
the feature. (Default value: 0)<br />
RTSOFFDLY IN UInt Number of milliseconds to wait after the Tx data transmission occurs before<br />
RTS is disabled: This parameter is only valid when hardware flow control is<br />
enabled. The valid range is 0 - 65535 ms. A value of 0 disables the feature.<br />
(Default value: 0)<br />
BREAK IN UInt This parameter specifies that a break will be sent upon the start of each<br />
message for the specified number of bit times. The maximum is 65535 bit<br />
times up to an eight second maximum. A value of 0 disables the feature.<br />
(Default value: 12)<br />
IDLELINE IN UInt This parameter specifies that the line will remain idle for the specified<br />
number of bit times before the start of each message. The maximum is<br />
65535 bit times up to an eight second maximum. A value of 0 disables the<br />
feature. (Default value: 12)<br />
DONE OUT Bool TRUE for one execution after the last request was completed with no error<br />
ERROR OUT Bool TRUE for one execution after the last request was completed with an error<br />
STATUS OUT Word Execution condition code (Default value: 0)<br />
Table 12- 12 Condition codes<br />
STATUS (W#16#....) Description<br />
80B0 Transmit interrupt configuration is not allowed. Contact customer suport.<br />
80B1 Break time is greater than the maximum allowed value.<br />
80B2 Idle time is greater than the maximum allowed value.<br />
<strong>S7</strong>-<strong>1200</strong> <strong>Programmable</strong> <strong>controller</strong><br />
570 System Manual, 04/2012, A5E02486680-06
12.3.1.4 RCV_CFG instruction<br />
Table 12- 13 RCV_CFG (Receive Configuration) instruction<br />
LAD / FBD SCL Description<br />
"RCV_CFG_DB"(<br />
REQ:=_bool_in_,<br />
PORT:=_uint_in_,<br />
CONDITIONS:=_struct_in_,<br />
DONE=>_bool_out_,<br />
ERROR=>_bool_out_,<br />
STATUS=>_word_out_);<br />
1 STEP 7 automatically creates the DB when you insert the instruction.<br />
Communication processor<br />
12.3 Point-to-Point (PtP) communication<br />
RCV_CFG performs dynamic configuration of<br />
serial receiver parameters for a PtP<br />
communication port. This instruction configures the<br />
conditions that signal the start and end of a<br />
received message. Any queued messages within a<br />
CM or CB are discarded when RCV_CFG is<br />
executed.<br />
You can set up the initial static configuration of the communication port in the device<br />
configuration properties, or just use the default values. You can execute the RCV_CFG<br />
instruction in your program to change the configuration.<br />
The RCV_CFG configuration changes are not permanently stored in the CPU. The<br />
parameters configured in the device configuration are restored when the CPU transitions<br />
from RUN to STOP mode and after a power cycle. See Configuring receive parameters<br />
(Page 586) for more information.<br />
Table 12- 14 Data types for the parameters<br />
Parameter and type Data type Description<br />
REQ IN Bool Activate the configuration change on the rising edge of this input.<br />
(Default value: False)<br />
PORT IN PORT After you install and configure a CM or CB communication device,<br />
the port identifier appears in the parameter helper drop-list available<br />
at the PORT box connection. The assigned CM or CB port value is<br />
the device configuration property "hardware identifier". The port<br />
symbolic name is assigned in the "System constants" tab of the PLC<br />
tag table. (Default value: 0)<br />
CONDITIONS IN CONDITIONS The Conditions data structure specifies the starting and ending<br />
message conditions as described below.<br />
DONE OUT Bool TRUE for one scan, after the last request was completed with no<br />
error<br />
ERROR OUT Bool TRUE for one scan, after the last request was completed with an<br />
error<br />
STATUS OUT Word Execution condition code (Default value: 0)<br />
Start conditions for the RCV_PTP instruction<br />
The RCV_PTP instruction uses the configuration specified by the RCV_CFG instruction to<br />
determine the beginning and ending of point-to-point communication messages. The start of<br />
a message is determined by the start conditions. The start of a message can be determined<br />
by one or a combination of start conditions. If more than one start condition is specified, all<br />
the conditions must be satisfied before the message is started.<br />
<strong>S7</strong>-<strong>1200</strong> <strong>Programmable</strong> <strong>controller</strong><br />
System Manual, 04/2012, A5E02486680-06 571
Communication processor<br />
12.3 Point-to-Point (PtP) communication<br />
See the topic "Configuring receive parameters (Page 587)" for a description of the message<br />
start conditions.<br />
Parameter CONDITIONS data type structure part 1 (start conditions)<br />
Table 12- 15 CONDITIONS structure for start conditions<br />
Parameter and type Data type Description<br />
STARTCOND IN UInt Specifies the start condition (Default value: 1)<br />
01H - Start Char<br />
02H - Any Char<br />
04H - Line Break<br />
08H - Idle Line<br />
10H - Sequence 1<br />
20H - Sequence 2<br />
40H - Sequence 3<br />
80H - Sequence 4<br />
IDLETIME IN UInt The number of bit times required for idle line timeout. (Default value:<br />
40). Only used with an idle line condition. 0 to 65535<br />
STARTCHAR IN Byte The start character used with the start character condition. (Default<br />
value: B#16#2)<br />
STRSEQ1CTL IN Byte Sequence 1 ignore/compare control for each character: (Default<br />
value: B#16#0)<br />
These are the enabling bits for each character in start sequence<br />
01H - Character 1<br />
02H - Character 2<br />
04H - Character 3<br />
08H - Character 4<br />
10H - Character 5<br />
STRSEQ1 IN Char[5]<br />
Disabling the bit associated with a character means any character<br />
will match, in this sequence position.<br />
Sequence 1 start characters (5 characters). Default value: 0<br />
STRSEQ2CTL IN Byte Sequence 2 ignore/compare control for each character. Default<br />
value: B#16#0)<br />
STRSEQ2 IN Char[5] Sequence 2 start characters (5 characters). Default value: 0<br />
STRSEQ3CTL IN Byte Sequence 3 ignore/compare control for each character. Default<br />
value: B#16#0<br />
STRSEQ3 IN Char[5] Sequence 3 start characters (5 characters). Default value: 0<br />
STRSEQ4CTL IN Byte Sequence 4 ignore/compare control for each character. Default<br />
value: B#16#0<br />
STRSEQ4 IN Char[5] Sequence 4 start characters (5 characters), Default value: 0<br />
<strong>S7</strong>-<strong>1200</strong> <strong>Programmable</strong> <strong>controller</strong><br />
572 System Manual, 04/2012, A5E02486680-06
Example<br />
Table 12- 16 Start conditions<br />
Communication processor<br />
12.3 Point-to-Point (PtP) communication<br />
Consider the following received hexadecimal coded message: "68 10 aa 68 bb 10 aa 16"<br />
and the configured start sequences shown in the table below. Start sequences begin to be<br />
evaluated when the first 68H character is successfully received. Upon successfully receiving<br />
the fourth character (the second 68H), then start condition 1 is satisfied. Once the start<br />
conditions are satisfied, the evaluation of the end conditions begins.<br />
The start sequence processing can be terminated due to various parity, framing, or intercharacter<br />
timing errors. These errors result in no received message, because the start<br />
condition was not satisfied.<br />
Start condition First Character First Character +1 First Character +2 First Character +3 First Character +4<br />
1 68H xx xx 68H xx<br />
2 10H aaH xx xx xx<br />
3 dcH aaH xx xx xx<br />
4 e5H xx xx xx xx<br />
End conditions for the RCV_PTP instruction<br />
The end of a message is determined by the specification of end conditions. The end of a<br />
message is determined by the first occurrence of one or more configured end conditions.<br />
The section "Message end conditions" in the topic "Configuring receive parameters<br />
(Page 587)" describes the end conditions that you can configure in the RCV_CFG<br />
instruction.<br />
You can configure the end conditions in either the properties of the communication interface<br />
in the device configuration, or from the RCV_CFG instruction. Whenever the CPU transitions<br />
from STOP to RUN, the receive parameters (both start and end conditions) return to the<br />
device configuration settings. If the STEP 7 user program executes RCV_CFG, then the<br />
settings are changed to the RCV_CFG conditions.<br />
<strong>S7</strong>-<strong>1200</strong> <strong>Programmable</strong> <strong>controller</strong><br />
System Manual, 04/2012, A5E02486680-06 573
Communication processor<br />
12.3 Point-to-Point (PtP) communication<br />
Parameter CONDITIONS data type structure part 2 (end conditions)<br />
Table 12- 17 CONDITIONS structure for end conditions<br />
Parameter Parameter type Data type Description<br />
ENDCOND IN UInt<br />
0<br />
MAXLEN IN UInt<br />
1<br />
N IN UInt<br />
0<br />
LENGTHSIZE IN UInt<br />
0<br />
LENGTHM IN UInt<br />
0<br />
RCVTIME IN UInt<br />
200<br />
MSGTIME IN UInt<br />
200<br />
CHARGAP IN UInt<br />
12<br />
This parameter specifies message end condition:<br />
01H - Response time<br />
02H - Message time<br />
04H - Inter-character gap<br />
08H - Maximum length<br />
10H - N + LEN + M<br />
20H - Sequence<br />
Maximum message length: Only used when the<br />
maximum length end condition is selected. 1 to 1024<br />
bytes<br />
Byte position within the message of the length field. Only<br />
used with the N + LEN + M end condition. 1 to 1022<br />
bytes<br />
Size of the byte field (1, 2, or 4 bytes). Only used with the<br />
N + LEN + M end condition.<br />
Specify the number of characters following the length<br />
field that are not included in the value of the length field.<br />
This is only used with the N + LEN + M end condition. 0<br />
to 255 bytes<br />
Specify how long to wait for the first character to be<br />
received. The receive operation will be terminated with an<br />
error if a character is not successfully received within the<br />
specified time. This is only used with the response time<br />
condition. (0 to 65535 bit times with an 8 second<br />
maximum)<br />
This parameter is not a message end condition since<br />
evaluation terminates when the first character of a<br />
response is received. It is an end condition only in the<br />
sense that it terminates a receiver operation because no<br />
response is received when a response is expected. You<br />
must select a separate end condition.<br />
Specify how long to wait for the entire message to be<br />
completely received once the first character has been<br />
received. This parameter is only used when the message<br />
timeout condition is selected. (0 to 65535 milliseconds)<br />
Specify the number of bit times between characters. If the<br />
number of bit times between characters exceeds the<br />
specified value, then the end condition will be satisfied.<br />
This is only used with the inter-character gap condition.<br />
(0 to 65535 bit times up to 8 second maximum)<br />
<strong>S7</strong>-<strong>1200</strong> <strong>Programmable</strong> <strong>controller</strong><br />
574 System Manual, 04/2012, A5E02486680-06
Communication processor<br />
12.3 Point-to-Point (PtP) communication<br />
Parameter Parameter type Data type Description<br />
ENDSEQ1CTL IN Byte<br />
Sequence 1 ignore/compare control for each character:<br />
B#16#0 These are the enabling bits for each character for the end<br />
sequence. Character 1 is bit 0, character 2 is bit 1, …,<br />
character 5 is bit 4. Disabling the bit associated with a<br />
character means any character will match, in this<br />
sequence position.<br />
ENDSEQ1 IN Char[5]<br />
0<br />
Sequence 1 start characters (5 characters)<br />
Table 12- 18 Condition codes<br />
STATUS (W#16#....) Description<br />
80C0 Illegal start condition selected<br />
80C1 Illegal end condition selected, no end condition selected<br />
80C2 Receive interrupt enabled and this is not possible.<br />
80C3 Maximum length end condition is enabled and max length is 0 or > 1024.<br />
80C4 Calculated length is enabled and N is >= 1023.<br />
80C5 Calculated length is enabled and length is not 1, 2 or 4.<br />
80C6 Calculated length is enabled and M value is > 255.<br />
80C7 Calculated length is enabled and calculated length is > 1024.<br />
80C8 Response timeout is enabled and response timeout is zero.<br />
80C9 Inter-character gap timeout is enabled and it is zero.<br />
80CA Idle line timeout is enabled and it is zero.<br />
80CB End sequence is enabled but all chars are "don't care".<br />
80CC Start sequence (any one of 4) is enabled but all characters are "don't care".<br />
12.3.1.5 SEND_PTP instruction<br />
Table 12- 19 SEND_PTP (Send Point-to-Point data) instruction<br />
LAD / FBD SCL Description<br />
"SEND_PTP_DB"(<br />
REQ:=_bool_in_,<br />
PORT:=_uint_in_,<br />
BUFFER:=_variant_in_,<br />
LENGTH:=_uint_in_,<br />
PTRCL:=_bool_in_,<br />
DONE=>_bool_out_,<br />
ERROR=>_bool_out_,<br />
STATUS=>_word_out_);<br />
1 STEP 7 automatically creates the DB when you insert the instruction.<br />
SEND_PTP initiates the transmission of the data<br />
and transfers the assigned buffer to the<br />
communication interface. The CPU program<br />
continues while the CM or CB sends the data at the<br />
assigned baud rate. Only one send operation can<br />
be pending at a given time. The CM or CB returns<br />
an error if a second SEND_PTP is executed while<br />
the CM or CB is already transmitting a message.<br />
<strong>S7</strong>-<strong>1200</strong> <strong>Programmable</strong> <strong>controller</strong><br />
System Manual, 04/2012, A5E02486680-06 575
Communication processor<br />
12.3 Point-to-Point (PtP) communication<br />
Table 12- 20 Data types for the parameters<br />
Parameter and type Data type Description<br />
REQ IN Bool Activates the requested transmission on the rising edge of this transmission<br />
enable input. This initiates transfer of the contents of the buffer to the Point-to-<br />
Point communication interface. (Default value: False)<br />
PORT IN PORT After you install and configure a CM or CB communication device, the port<br />
identifier appears in the parameter helper drop-list available at the PORT box<br />
connection. The assigned CM or CB port value is the device configuration<br />
property "hardware identifier". The port symbolic name is assigned in the<br />
"System constants" tab of the PLC tag table. (Default value: 0)<br />
BUFFER IN Variant This parameter points to the starting location of the transmit buffer. (Default<br />
value: 0)<br />
Note: Boolean data or Boolean arrays are not supported.<br />
LENGTH IN UInt Transmitted frame length in bytes (Default value: 0)<br />
When transmitting a complex structure, always use a length of 0.<br />
PTRCL IN Bool This parameter selects the buffer as normal point-to-point or specific Siemensprovided<br />
protocols that are implemented within the attached CM or CB.<br />
(Default value: False)<br />
FALSE = user program controlled point-to-point operations. (only valid option)<br />
DONE OUT Bool TRUE for one scan, after the last request was completed with no error<br />
ERROR OUT Bool TRUE for one scan, after the last request was completed with an error<br />
STATUS OUT Word Execution condition code (Default value: 0)<br />
While a transmit operation is in progress, the DONE and ERROR outputs are FALSE. When<br />
a transmit operation is complete, either the DONE or the ERROR output will be set TRUE to<br />
show the status of the transmit operation. While DONE or ERROR is TRUE, the STATUS<br />
output is valid.<br />
The instruction returns a status of 16#7001 if the communication interface accepts the<br />
transmit data. Subsequent SEND_PTP executions return 16#7002, if the CM or CB is still<br />
busy transmitting. When the transmit operation is complete, the CM or CB returns the status<br />
of the transmit operation as 16#0000 (if no errors occurred). Subsequent executions of<br />
SEND_PTP with REQ low return a status of 16#7000 (not busy).<br />
The following diagrams show the relationship of the output values to REQ. This assumes<br />
that the instruction is called periodically to check for the status of the transmission process.<br />
In the diagram below, it is assumed that the instruction is called every scan (represented by<br />
the STATUS values).<br />
The following diagram shows how the DONE and STATUS parameters are valid for only one<br />
scan if the REQ line is pulsed (for one scan) to initiate the transmit operation.<br />
<strong>S7</strong>-<strong>1200</strong> <strong>Programmable</strong> <strong>controller</strong><br />
576 System Manual, 04/2012, A5E02486680-06
Table 12- 21 Condition codes<br />
Communication processor<br />
12.3 Point-to-Point (PtP) communication<br />
The following diagram shows the relationship of DONE, ERROR and STATUS parameters<br />
when there is an error.<br />
The DONE, ERROR and STATUS values are only valid until SEND_PTP executes again<br />
with the same instance DB.<br />
STATUS (W#16#....) Description<br />
80D0 New request while transmitter active<br />
80D1 Transmit aborted because of no CTS within wait time<br />
80D2 Transmit aborted because of no DSR from the DCE device<br />
80D3 Transmit aborted because of queue overflow (transmit more than 1024 bytes)<br />
80D5 Reverse bias signal (wire break condition)<br />
833A The DB for the BUFFER parameter does not exist.<br />
Interaction of the LENGTH and BUFFER parameters for SEND_PTP<br />
The minimum size of data that can be transmitted by the SEND_PTP instruction is one byte.<br />
The BUFFER parameter determines the size of the data to be transmitted. You cannot use<br />
the data type Bool or arrays of Bool for the BUFFER parameter.<br />
<strong>S7</strong>-<strong>1200</strong> <strong>Programmable</strong> <strong>controller</strong><br />
System Manual, 04/2012, A5E02486680-06 577
Communication processor<br />
12.3 Point-to-Point (PtP) communication<br />
You can always set the LENGTH parameter to 0 and ensure that SEND_PTP sends the<br />
entire data structure represented by the BUFFER parameter. If you only want to send part of<br />
a data structure in the BUFFER parameter, you can set LENGTH as follows:<br />
Table 12- 22 LENGTH and BUFFER parameters<br />
LENGTH BUFFER Description<br />
= 0 Not used The complete data is sent as defined at the BUFFER parameter. You do not<br />
need to specify the number of transmitted bytes when LENGTH = 0.<br />
> 0<br />
Elementary data type The LENGTH value must contain the byte count of this data type. For<br />
example, for a Word value, the LENGTH must be two. For a Dword or Real,<br />
the LENGTH must be four. Otherwise, nothing is transferred and the error<br />
8088H is returned.<br />
Structure The LENGTH value can contain a byte count less than the complete byte<br />
length of the structure, in which case only the first LENGTH bytes of the<br />
structure are sent from the BUFFER. Since the internal byte organization of<br />
a structure cannot always be determined, you might get unexpected results.<br />
In this case, use a LENGTH of 0 to send the complete structure.<br />
Array The LENGTH value must contain a byte count that is less than the complete<br />
byte length of the array and which must be a multiple of the data element<br />
byte count. For example, the LENGTH parameter for an array of Words<br />
must be a multiple of two and for an array of Reals, a multiple of four. When<br />
LENGTH is specified, the number of array elements which are contained in<br />
LENGTH bytes is transferred. If your BUFFER, for example, contains an<br />
array of 15 Dwords (60 total bytes), and you specify a LENGTH of 20, then<br />
the first five Dwords in the array are transferred.<br />
The LENGTH value must be a multiple of the data element byte count.<br />
Otherwise, STATUS = 8088H, ERROR = 1, and no transmission occurs.<br />
String The LENGTH parameter contains the number of characters to be<br />
transmitted. Only the characters of the String are transmitted. The maximum<br />
and actual length bytes of the String are not transmitted.<br />
12.3.1.6 RCV_PTP instruction<br />
Table 12- 23 RCV_PTP (Receive Point-to-Point) instruction<br />
LAD / FBD SCL Description<br />
"RCV_PTP_DB"(<br />
EN_R:=_bool_in_,<br />
PORT:=_uint_in_,<br />
BUFFER:=_variant_in_,<br />
NDR=>_bool_out_,<br />
ERROR=>_bool_out_,<br />
STATUS=>_word_out_,<br />
LENGTH=>_uint_out_);<br />
1 STEP 7 automatically creates the DB when you insert the instruction.<br />
RCV_PTP checks for messages that have been<br />
received in the CM or CB. If a message is available, it<br />
will be transferred from the CM or CB to the CPU. An<br />
error returns the appropriate STATUS value.<br />
<strong>S7</strong>-<strong>1200</strong> <strong>Programmable</strong> <strong>controller</strong><br />
578 System Manual, 04/2012, A5E02486680-06
Table 12- 24 Data types for the parameters<br />
Communication processor<br />
12.3 Point-to-Point (PtP) communication<br />
Parameter and type Data type Description<br />
EN_R IN Bool When this input is TRUE and a message is available, the message is<br />
transferred from the CM or CB to the BUFFER. When EN_R is FALSE, the CM<br />
or CB is checked for messages and NDR, ERROR and STATUS output are<br />
updated, but the message is not transferred to the BUFFER. (Default value: 0)<br />
PORT IN PORT After you install and configure a CM or CB communication device, the port<br />
identifier appears in the parameter helper drop-list available at the PORT box<br />
connection. The assigned CM or CB port value is the device configuration<br />
property "hardware identifier". The port symbolic name is assigned in the<br />
"System constants" tab of the PLC tag table. (Default value: 0)<br />
BUFFER IN Variant This parameter points to the starting location of the receive buffer. This buffer<br />
should be large enough to receive the maximum length message.<br />
Boolean data or Boolean arrays are not supported. (Default value: 0)<br />
NDR OUT Bool TRUE for one execution when new data is ready and operation is complete<br />
with no errors.<br />
ERROR OUT Bool TRUE for one execution after the operation was completed with an error.<br />
STATUS OUT Word Execution condition code (Default value: 0)<br />
LENGTH OUT UInt Length of the returned message in bytes (Default value: 0)<br />
Table 12- 25 Condition codes<br />
The STATUS value is valid when either NDR or ERROR is TRUE. The STATUS value<br />
provides the reason for termination of the receive operation in the CM or CB. This is typically<br />
a positive value, indicating that the receive operation was successful and that the receive<br />
process terminated normally. If the STATUS value is negative (the Most Significant Bit of the<br />
hexadecimal value is set), the receive operation was terminated for an error condition such<br />
as parity, framing, or overrun errors.<br />
Each PtP communication interface can buffer up to a maximum of 1024 bytes. This could be<br />
one large message or several smaller messages. If more than one message is available in<br />
the CM or CB, the RCV_PTP instruction returns the oldest message available. A subsequent<br />
RCV_PTP instruction execution returns the next oldest message available.<br />
STATUS (W#16#...) Description<br />
0000 No buffer present<br />
80E0 Message terminated because the receive buffer is full<br />
80E1 Message terminated due to parity error<br />
80E2 Message terminated due to framing error<br />
80E3 Message terminated due to overrun error<br />
80E4 Message terminated because calculated length exceeds buffer size<br />
80E5 Reverse bias signal (wire break condition)<br />
0094 Message terminated due to received maximum character length<br />
0095 Message terminated because of message timeout<br />
0096 Message terminated because of inter-character timeout<br />
0097 Message terminated because of response timeout<br />
0098 Message terminated because the "N+LEN+M" length condition was satisfied<br />
<strong>S7</strong>-<strong>1200</strong> <strong>Programmable</strong> <strong>controller</strong><br />
System Manual, 04/2012, A5E02486680-06 579
Communication processor<br />
12.3 Point-to-Point (PtP) communication<br />
STATUS (W#16#...) Description<br />
0099 Message terminated because of end sequence was satisfied<br />
833A The DB for the BUFFER parameter does not exist.<br />
12.3.1.7 RCV_RST instruction<br />
Table 12- 26 RCV_RST (Receiver Reset) instruction<br />
LAD / FBD SCL Description<br />
"RCV_RST_DB"(<br />
REQ:=_bool_in_,<br />
PORT:=_uint_in_,<br />
DONE=>_bool_out_,<br />
ERROR=>_bool_out_,<br />
STATUS=>_word_out_);<br />
RCV_RST clears the receive buffers in the CM or CB.<br />
1 STEP 7 automatically creates the DB when you insert the instruction.<br />
Table 12- 27 Data types for parameters<br />
Parameter and type Data type Description<br />
REQ IN Bool Activates the receiver reset on the rising edge of this enable input (Default<br />
value: False)<br />
PORT IN PORT After you install and configure a CM or CB communication device, the port<br />
identifier appears in the parameter helper drop-list available at the PORT box<br />
connection. The assigned CM or CB port value is the device configuration<br />
property "hardware identifier". The port symbolic name is assigned in the<br />
"System constants" tab of the PLC tag table. (Default value: 0)<br />
DONE OUT Bool When TRUE for one scan, indicates that the last request was completed<br />
without errors.<br />
ERROR OUT Bool When TRUE, shows that the last request was completed with errors. Also,<br />
when this output is TRUE, the STATUS output will contain related error codes.<br />
STATUS OUT Word Error code (Default value: 0)<br />
<strong>S7</strong>-<strong>1200</strong> <strong>Programmable</strong> <strong>controller</strong><br />
580 System Manual, 04/2012, A5E02486680-06
12.3.1.8 SGN_GET instruction<br />
Table 12- 28 SGN_GET (Get RS232 signals) instruction<br />
LAD / FBD SCL Description<br />
"SGN_GET_DB"(<br />
REQ:=_bool_in_,<br />
PORT:=_uint_in_,<br />
NDR=>_bool_out_,<br />
ERROR=>_bool_out_,<br />
STATUS=>_word_out_,<br />
DTR=>_bool_out_,<br />
DSR=>_bool_out_,<br />
RTS=>_bool_out_,<br />
CTS=>_bool_out_,<br />
DCD=>_bool_out_,<br />
RING=>_bool_out_);<br />
1 STEP 7 automatically creates the DB when you insert the instruction.<br />
Table 12- 29 Data types for the parameters<br />
Communication processor<br />
12.3 Point-to-Point (PtP) communication<br />
SGN_GET reads the current states of RS232<br />
communication signals.<br />
This function is valid only for the RS232 CM.<br />
Parameter and type Data type Description<br />
REQ IN Bool Get RS232 signal state values on the rising edge of this input (Default value:<br />
False)<br />
PORT IN PORT After you install and configure a CM or CB communication device, the port<br />
identifier appears in the parameter helper drop-list available at the PORT box<br />
connection. The assigned CM or CB port value is the device configuration<br />
property "hardware identifier". The port symbolic name is assigned in the<br />
"System constants" tab of the PLC tag table.<br />
NDR OUT Bool TRUE for one scan, when new data is ready and the operation is complete<br />
with no errors<br />
ERROR OUT Bool TRUE for one scan, after the operation was completed with an error<br />
STATUS OUT Word Execution condition code (Default value: 0)<br />
DTR OUT Bool Data terminal ready, module ready (output). Default value: False<br />
DSR OUT Bool Data set ready, communication partner ready (input). Default value: False<br />
RTS OUT Bool Request to send, module ready to send (output). Default value: False<br />
CTS OUT Bool Clear to send, communication partner can receive data (input). Default value:<br />
False<br />
DCD OUT Bool Data carrier detect, receive signal level (always False, not supported)<br />
RING OUT Bool Ring indicator, indication of incoming call (always False, not supported)<br />
Table 12- 30 Condition codes<br />
STATUS (W#16#....) Description<br />
80F0 CM or CB is RS485 and no signals are available<br />
<strong>S7</strong>-<strong>1200</strong> <strong>Programmable</strong> <strong>controller</strong><br />
System Manual, 04/2012, A5E02486680-06 581
Communication processor<br />
12.3 Point-to-Point (PtP) communication<br />
12.3.1.9 SGN_SET instruction<br />
Table 12- 31 SGN_SET (Set RS232 signals) instruction<br />
LAD / FBD SCL Description<br />
"SGN_SET_DB"(<br />
REQ:=_bool_in_,<br />
PORT:=_uint_in_,<br />
SIGNAL:=_byte_in_,<br />
RTS:=_bool_in_,<br />
DTR:=_bool_in_,<br />
DSR:=_bool_in_,<br />
DONE=>_bool_out_,<br />
ERROR=>_bool_out_,<br />
STATUS=>_word_out_);<br />
1 STEP 7 automatically creates the DB when you insert the instruction.<br />
Table 12- 32 Data types for parameters<br />
SGN_SET sets the states of RS232 communication<br />
signals.<br />
This function is valid only for the RS232 CM.<br />
Parameter and type Data type Description<br />
REQ IN Bool Start the set RS232 signals operation, on the rising edge of this input<br />
(Default value: False)<br />
PORT IN PORT After you install and configure a CM or CB communication device, the<br />
port identifier appears in the parameter helper drop-list available at the<br />
PORT box connection. The assigned CM or CB port value is the device<br />
configuration property "hardware identifier". The port symbolic name is<br />
assigned in the "System constants" tab of the PLC tag table. (Default<br />
value: 0)<br />
SIGNAL IN Byte Selects which signal to set: (multiple allowed). Default value: 0<br />
01H = Set RTS<br />
02H = Set DTR<br />
04H = Set DSR<br />
RTS IN Bool Request to send, module ready to send value to set (true or false),<br />
Default value: False<br />
DTR IN Bool Data terminal ready, module ready to send value to set (true or false).<br />
Default value: False<br />
DSR IN Bool Data set ready (only applies to DCE type interfaces), not used.<br />
DONE OUT Bool TRUE for one execution after the last request was completed with no<br />
error<br />
ERROR OUT Bool TRUE for one execution after the last request was completed with an<br />
error<br />
STATUS OUT Word Execution condition code (Default value: 0)<br />
<strong>S7</strong>-<strong>1200</strong> <strong>Programmable</strong> <strong>controller</strong><br />
582 System Manual, 04/2012, A5E02486680-06
Table 12- 33 Condition codes<br />
STATUS (W#16#....) Description<br />
80F0 CM or CB is RS485 and no signals can be set<br />
80F1 Signals cannot be set because of Hardware flow control<br />
80F2 Cannot set DSR because module is DTE<br />
80F3 Cannot set DTR because module is DCE<br />
12.3.2 Configuring the communication ports<br />
Communication processor<br />
12.3 Point-to-Point (PtP) communication<br />
The communication interfaces can be configured by two methods:<br />
● Use the device configuration in STEP 7 to configure the port parameters (baud and<br />
parity), the send parameters and the receive parameters. The device configuration<br />
settings are stored in the CPU. These settings are applied after a power cycle and a RUN<br />
to STOP transition.<br />
● Use the PORT_CFG (Page 568), SEND_CFG (Page 569) and RCV_CFG (Page 571)<br />
instructions to set the parameters. The port settings set by the instructions are valid while<br />
the CPU is in RUN mode. The port settings revert to the device configuration settings<br />
after a STOP transition or power cycle.<br />
After configuring the hardware devices (Page 119), you configure parameters for the<br />
communication interfaces by selecting one of the CMs in your rack or the CB, if configured.<br />
The "Properties" tab of the inspector window<br />
displays the parameters of the selected CM or<br />
CB. Select "Port configuration" to edit the<br />
following parameters:<br />
Baud rate<br />
Parity<br />
Data bits per character<br />
Number of stop bits<br />
Flow control (RS232 only)<br />
Wait time<br />
For the CM 1241 RS232 and RS485 and CB RS485 (except for flow control, which only the<br />
CM 1241 RS232 supports), the port configuration parameters are the same regardless of<br />
whether you are configuring an RS232 or an RS485 communication module or the RS485<br />
communication board. The parameter values can differ.<br />
For the CM 1241 RS422/485, the Port configuration is performed differently as shown in the<br />
figure below. The 422 mode of the CM 1241 RS422/485 module supports software flow<br />
control as well.<br />
<strong>S7</strong>-<strong>1200</strong> <strong>Programmable</strong> <strong>controller</strong><br />
System Manual, 04/2012, A5E02486680-06 583
Communication processor<br />
12.3 Point-to-Point (PtP) communication<br />
Select "Port configuration" to edit the following<br />
RS422/485 parameters:<br />
"Operating mode":<br />
– Full duplex (RS422) four wire mode (point-topoint<br />
connection)<br />
– Full duplex (RS422) four wire mode (multipoint<br />
master)<br />
– Full duplex (RS422) four wire mode (multipoint<br />
slave)<br />
– Half duplex (RS485) two wire mode<br />
"Receive line initial state":<br />
– None<br />
– Forward bias (Signal R(A) 0V, signal R(B) 5V)<br />
The STEP 7 user program can also configure the port or change the existing configuration<br />
with the PORT_CFG instruction (Page 568).<br />
Note<br />
Parameter values set from the PORT_CFG instruction in the user program override port<br />
configuration settings set from the device configuration. Note that the <strong>S7</strong>-<strong>1200</strong> does not<br />
retain parameters set from the PORT_CFG instruction in the event of power down.<br />
Parameter Definition<br />
Baud rate The default value for the baud rate is 9.6 Kbits per second. Valid choices are: 300 baud,<br />
600 baud, 1.2 Kbits, 2.4 Kbits, 4.8 Kbits, 9.6 Kbits, 19.2 Kbits, 38.4 Kbits, 57.6 Kbits, 76.8<br />
Kbits, and 115.2 Kbits.<br />
Parity The default value for parity is no parity. Valid choices are: No parity, even, odd, mark (parity<br />
bit always set to 1), and space (parity bit always set to 0).<br />
Data bits per character The number of data bits in a character. Valid choices are 7 or 8.<br />
Number of stop bits The number of stop bits can be either one or two. The default is one.<br />
Flow control For the RS232 communication module, you can select either hardware or software flow<br />
control, as described in the section "Managing flow control (Page 585)". If you select<br />
hardware flow control, you can select whether the RTS signal is always on, or RTS is<br />
switched. If you select software flow control, you can define the XON and XOFF characters.<br />
The RS485 communication interfaces do not support flow control. The 422 mode of the CM<br />
1241 RS422/485 module supports software flow control.<br />
Wait time Wait time specifies the time that the CM or CB waits to receive CTS after asserting RTS, or<br />
for receiving an XON after receiving an XOFF, depending on the type of flow control. If the<br />
wait time expires before the communication interface receives an expected CTS or XON,<br />
the CM or CB aborts the transmit operation and returns an error to the user program. You<br />
specify the wait time in milliseconds. The range is 0 to 65535 milliseconds.<br />
Operating mode This selects the operating mode RS422 or RS485 and network configurations.<br />
Receive line initial state This selects the bias options. Valid values are none, forward bias and reverse bias.<br />
Reverse bias is used to allow cable break detection.<br />
<strong>S7</strong>-<strong>1200</strong> <strong>Programmable</strong> <strong>controller</strong><br />
584 System Manual, 04/2012, A5E02486680-06
Communication processor<br />
12.3 Point-to-Point (PtP) communication<br />
12.3.2.1 Managing flow control<br />
Flow control refers to a mechanism for balancing the sending and receiving of data<br />
transmissions so that no data is lost. Flow control ensures that a transmitting device is not<br />
sending more information than a receiving device can handle. Flow control can be<br />
accomplished through either hardware or software. The RS232 CM supports both hardware<br />
and software flow control. The RS485 CM and CB do not support flow control. The 422<br />
mode of the CM 1241 RS422/485 module supports software flow control. You specify the<br />
type of flow control either when you configure the port (Page 583) or with the PORT_CFG<br />
instruction (Page 568).<br />
Hardware flow control works through the Request-to-send (RTS) and Clear-to-send (CTS)<br />
communication signals. With the RS232 CM, the RTS signal is output from pin 7 and the<br />
CTS signal is received through pin 8. The RS232 CM is a DTE (Data Terminal Equipment)<br />
device which asserts RTS as an output and monitors CTS as an input.<br />
Hardware flow control: RTS switched<br />
If you enable RTS switched hardware flow control for an RS232 CM, the module sets the<br />
RTS signal active to send data. It monitors the CTS signal to determine whether the<br />
receiving device can accept data. When the CTS signal is active, the module can transmit<br />
data as long as the CTS signal remains active. If the CTS signal goes inactive, then the<br />
transmission must stop.<br />
Transmission resumes when the CTS signal becomes active. If the CTS signal does not<br />
become active within the configured wait time, the module aborts the transmission and<br />
returns an error to the user program. You specify the wait time in the port configuration<br />
(Page 583).<br />
The RTS switched flow control is useful for devices that require a signal that the transmit is<br />
active. An example would be a radio modem that uses RTS as a "Key" signal to energize the<br />
radio transmitter. The RTS switched flow control will not function with standard telephone<br />
modems. Use the RTS always on selection for telephone modems.<br />
Hardware flow control: RTS always on<br />
In RTS always on mode, the CM 1241 sets RTS active by default. A device such as a<br />
telephone modem monitors the RTS signal from the CM and utilizes this signal as a clear-tosend.<br />
The modem only transmits to the CM when RTS is active, that is, when the telephone<br />
modem sees an active CTS. If RTS is inactive, the telephone module does not transmit to<br />
the CM.<br />
To allow the modem to send data to the CM at any time, configure "RTS always on"<br />
hardware flow control. The CM thus sets the RTS signal active all the time. The CM will not<br />
set RTS inactive even if the module cannot accept characters. The transmitting device must<br />
ensure that it does not overrun the receive buffer of the CM.<br />
Data Terminal Block Ready (DTR) and Data Set Ready (DSR) signal utilization<br />
The CM sets DTR active for either type of hardware flow control. The module transmits only<br />
when the DSR signal becomes active. The state of DSR is only evaluated at the start of the<br />
send operation. If DSR becomes inactive after transmission has started, the transmission will<br />
not be paused.<br />
<strong>S7</strong>-<strong>1200</strong> <strong>Programmable</strong> <strong>controller</strong><br />
System Manual, 04/2012, A5E02486680-06 585
Communication processor<br />
12.3 Point-to-Point (PtP) communication<br />
Software flow control<br />
Software flow control uses special characters in the messages to provide flow control. You<br />
configure Hex characters that represent XON and XOFF.<br />
XOFF indicates that a transmission must stop. XON indicates that a transmission can<br />
resume. XOFF and XON must not be the same character.<br />
When the transmitting device receives an XOFF character from the receiving device, it stops<br />
transmitting. Transmitting resumes when the transmitting device receives an XON character.<br />
If it does not receive an XON character within the wait time that is specified in the port<br />
configuration (Page 583), the CM aborts the transmission and returns an error to the user<br />
program.<br />
Software flow control requires full-duplex communication, as the receiving partner must be<br />
able to send XOFF to the transmitting partner while a transmission is in progress. Software<br />
flow control is only possible with messages that contain only ASCII characters. Binary<br />
protocols cannot utilize sofware flow control.<br />
12.3.3 Configuring the transmit (send) and receive parameters<br />
Before the CPU can engage in PtP communications, you must configure parameters for<br />
transmitting (or sending) messages and receiving messages. These parameters dictate how<br />
communications operate when messages are being transmitted to or received from a target<br />
device.<br />
12.3.3.1 Configuring transmit (send) parameters<br />
From the device<br />
configuration, you configure<br />
how a communication<br />
interface transmits data by<br />
specifying the "Configuration<br />
of transmitted message"<br />
properties for the selected<br />
interface.<br />
You can also dynamically configure or change the transmit message parameters from the<br />
user program by using the SEND_CFG (Page 569) instruction.<br />
Note<br />
Parameter values set from the SEND_CFG instruction in the user program override the port<br />
configuration settings. Note that the CPU does not retain parameters set from the<br />
SEND_CFG instruction in the event of power down.<br />
<strong>S7</strong>-<strong>1200</strong> <strong>Programmable</strong> <strong>controller</strong><br />
586 System Manual, 04/2012, A5E02486680-06
Communication processor<br />
12.3 Point-to-Point (PtP) communication<br />
Parameter Definition<br />
RTS On delay Specifies the amount of time to wait after activating RTS before transmission is initiated.<br />
The range is 0 to 65535 ms, with a default value of 0. This parameter is valid only when the<br />
port configuration (Page 583) specifies hardware flow control. CTS is evaluated after the<br />
RTS On delay time has expired.<br />
This parameter is applicable for RS232 modules only.<br />
RTS Off delay Specifies the amount of time to wait before de-activating RTS after completion of<br />
transmission. The range is 0 to 65535 ms, with a default value of 0. This parameter is valid<br />
only when the port configuration (Page 583) specifies hardware flow control.<br />
This parameter is applicable for RS232 modules only.<br />
Send break at message start Specifies that upon the start of each message, a break will be sent after the RTS On delay<br />
Number of bit times in a (if configured) has expired and CTS is active.<br />
break<br />
You specify how many bit times constitute a break where the line is held in a spacing<br />
condition. The default is 12 and the maximum is 65535, up to a limit of eight seconds.<br />
Send idle line after a break Specifies that an idle line will be sent before message start. It is sent after the break, if a<br />
Idle line after a break break is configured. The "Idle line after a break" parameter specifies how many bit times<br />
constitute an idle line where the line is held in a marking condition. The default is 12 and<br />
the maximum is 65535, up to a limit of eight seconds.<br />
12.3.3.2 Configuring receive parameters<br />
From the device<br />
configuration, you<br />
configure how a<br />
communication interface<br />
receives data, and how<br />
it recognizes both the<br />
start of and the end of a<br />
message. Specify these<br />
parameters in the<br />
Receive message<br />
configuration for the<br />
selected interface.<br />
You can also dynamically configure or change the receive message parameters from the<br />
user program by using the RCV_CFG instruction (Page 571).<br />
Note<br />
Parameter values set from the RCV_CFG instruction in the user program override the port<br />
configuration settings. Note that the CPU does not retain parameters set from the RCV_CFG<br />
instruction in the event of power down.<br />
<strong>S7</strong>-<strong>1200</strong> <strong>Programmable</strong> <strong>controller</strong><br />
System Manual, 04/2012, A5E02486680-06 587
Communication processor<br />
12.3 Point-to-Point (PtP) communication<br />
Message start conditions<br />
You can determine how the communication interface recognizes the start of a message. The<br />
start characters and the characters comprising the message go into the receive buffer until a<br />
configured end condition is met.<br />
You can specify multiple start conditions. If you specify more than one start condition, all of<br />
the start conditions must be met before the message is considered started. For example, if<br />
you configure an idle line time and a specific start character, the CM or CB will first look for<br />
the idle line time requirement to be met and then the CM will look for the specified start<br />
character. If some other character is received (not the specified start character), the CM or<br />
CB will restart the start of message search by again looking for an idle line time.<br />
Parameter Definition<br />
Start on Any Character The Any Character condition specifies that any successfully received character indicates the<br />
start of a message. This character is the first character within a message.<br />
Line Break The Line Break conditions specifies that a message receive operation starts after a break<br />
character is received.<br />
Idle Line The Idle Line condition specifies that a message reception starts once the receive line has<br />
been idle or quiet for the number of specified bit times. Once this condition occurs, the start<br />
of a message begins.<br />
Special condition:<br />
Recognize message start<br />
with single character<br />
Special condition:<br />
Recognize message start<br />
with a character sequence<br />
<br />
<br />
① Characters<br />
② Restarts the idle line timer<br />
③ Idle line is detected and message receive is started<br />
Specifies that a particular character indicates the start of a message. This character is then<br />
the first character within a message. Any character that is received before this specific<br />
character is discarded. The default character is STX.<br />
Specifies that a particular character sequence from up to four configured sequences<br />
indicates the start of a message. For each sequence, you can specify up to five characters.<br />
For each character position, you specify either a specific hex character, or that the character<br />
is ignored in sequence matching (wild-card character). The last specific character of a<br />
character sequence terminates that start condition sequence.<br />
Incoming sequences are evaluated against the configured start conditions until a start<br />
condition has been satisfied. Once the start sequence has been satisfied, evaluation of end<br />
conditions begins.<br />
You can configure up to four specific character sequences. You use a multiple-sequence<br />
start condition when different sequences of characters can indicate the start of a message. If<br />
any one of the character sequences is matched, the message is started.<br />
<strong>S7</strong>-<strong>1200</strong> <strong>Programmable</strong> <strong>controller</strong><br />
588 System Manual, 04/2012, A5E02486680-06
Communication processor<br />
12.3 Point-to-Point (PtP) communication<br />
The order of checking start conditions is:<br />
● Idle line<br />
● Line break<br />
● Characters or character sequences<br />
While checking for multiple start conditions, if one of the conditions is not met, the CM or CB<br />
will restart the checking with the first required condition. After the CM or CB establishes that<br />
the start conditions have been met, it begins evaluating end conditions.<br />
Sample configuration - start message on one of two character sequences<br />
Consider the following start message condition configuration:<br />
<strong>S7</strong>-<strong>1200</strong> <strong>Programmable</strong> <strong>controller</strong><br />
System Manual, 04/2012, A5E02486680-06 589
Communication processor<br />
12.3 Point-to-Point (PtP) communication<br />
Message end conditions<br />
With this configuration, the start condition is satisfied when either pattern occurs:<br />
● When a five-character sequence is received where the first character is 0x6A and the fifth<br />
character is 0x1C. The characters at positions 2, 3, and 4 can be any character with this<br />
configuration. After the fifth character is received, evaluation of end conditions begins.<br />
● When two consecutive 0x6A characters are received, preceded by any character. In this<br />
case, evaluation of end conditions begins after the second 0x6A is received (3<br />
characters). The character preceding the first 0x6A is included in the start condition.<br />
Example sequences that would satisfy this start condition are:<br />
● 6A 6A<br />
● 6A 12 14 18 1C<br />
● 6A 44 A5 D2 1C<br />
You also configure how the communication interface recognizes the end of a message. You<br />
can configure multiple message end conditions. If any one of the configured conditions<br />
occurs, the message ends.<br />
For example, you could specify an end condition with an end of message timeout of 300<br />
milliseconds, an inter-character timeout of 40 bit times, and a maximum length of 50 bytes.<br />
The message will end if the message takes longer than 300 milliseconds to receive, or if the<br />
gap between any two characters exceeds 40 bit times, or if 50 bytes are received.<br />
<strong>S7</strong>-<strong>1200</strong> <strong>Programmable</strong> <strong>controller</strong><br />
590 System Manual, 04/2012, A5E02486680-06
Parameter Definition<br />
Recognize message end by<br />
message timeout<br />
Recognize message end by<br />
response timeout<br />
Communication processor<br />
12.3 Point-to-Point (PtP) communication<br />
The message end occurs when the configured amount of time to wait for the message end<br />
has expired. The message timeout period begins when a start condition has been satisfied.<br />
The default is 200 ms and the range is 0 to 65535 ms.<br />
<br />
<br />
① Received characters<br />
②Start Message condition satisfied: message timer starts<br />
③ Message timer expires and terminates the message<br />
The message end occurs when the configured amount of time to wait for a response<br />
expires before a valid start sequence is received. The response timeout period begins<br />
when a transmission ends and the CM or CB begins the receive operation. The default<br />
response timeout is 200 ms and the range is 0 to 65535 ms. If a character is not received<br />
within the response time period, RCVTIME, then an error is returned to the corresponding<br />
RCV_PTP instruction. The response timeout does not define a specific end condition. It<br />
only specifies that a character must be successfully received within the specified time. You<br />
must configure another end condition to indicate the actual end of a message.<br />
<br />
<br />
① Transmitted characters<br />
② Received characters<br />
③ First character must be successfully received by this time.<br />
<strong>S7</strong>-<strong>1200</strong> <strong>Programmable</strong> <strong>controller</strong><br />
System Manual, 04/2012, A5E02486680-06 591
Communication processor<br />
12.3 Point-to-Point (PtP) communication<br />
Parameter Definition<br />
Recognize message end by<br />
inter-character gap<br />
Recognize message end by<br />
max length<br />
Read message length from<br />
message<br />
Recognize message end<br />
with a character<br />
Recognize message end<br />
with a character sequence<br />
The message end occurs when the maximum configured timeout between any two<br />
consecutive characters of a message has expired. The default value for the inter-character<br />
gap is 12 bit times and the maximum number is 65535 bit times, up to a maximum of eight<br />
seconds.<br />
<br />
<br />
① Received characters<br />
② Restarts the intercharacter timer<br />
③ The intercharacter timer expires and terminates the message.<br />
The message end occurs when the configured maximum number of characters has been<br />
received. The valid range for maximum length is 1 to 1023.<br />
This condition can be used to prevent a message buffer overrun error. When this end<br />
condition is combined with timeout end conditions and the timeout condition occurs, any<br />
valid received characters are provided even if the maximum length is not reached. This<br />
allows support for varying length protocols when only the maximum length is known.<br />
The message itself specifies the length of the message. The message end occurs when a<br />
message of the specified length has been received. The method for specifying and<br />
interpreting the message length is described below.<br />
The message end occurs when a specified character is received.<br />
The message end occurs when a specified character sequence is received. You can<br />
specify a sequence of up to five characters. For each character position, you specify either<br />
a specific hex character, or that the character is ignored in sequence matching.<br />
Leading characters that are ignored characters are not part of the end condition. Trailing<br />
characters that are ignored characters are part of the end condition.<br />
<strong>S7</strong>-<strong>1200</strong> <strong>Programmable</strong> <strong>controller</strong><br />
592 System Manual, 04/2012, A5E02486680-06
Sample configuration - end message with a character sequence<br />
Consider the following end message condition configuration:<br />
Communication processor<br />
12.3 Point-to-Point (PtP) communication<br />
In this case, the end condition is satisfied when two consecutive 0x7A characters are<br />
received, followed by any two characters. The character preceding the 0x7A 0x7A pattern is<br />
not part of the end character sequence. Two characters following the 0x7A 0x7A pattern are<br />
required to terminate the end character sequence. The values received at character<br />
positions 4 and 5 are irrelevant, but they must be received to satisfy the end condition.<br />
Specification of message length within the message<br />
When you select the special condition where the message length is included in the message,<br />
you must provide three parameters that define information about the message length.<br />
The actual message structure varies according to the protocol in use. The three parameters<br />
are as follows:<br />
● n: the character position (1-based) within the message that starts the length specifier<br />
● Length size: The number of bytes (one, two, or four) of the length specifier<br />
● Length m: the number of characters following the length specifier that are not included in<br />
the length count<br />
The ending characters do not need to be contiguous. The "Length m" value can be used to<br />
specify the length of a checksum field whose size is not included in the length field.<br />
These fields appear in the Receive message configuration of the device properties:<br />
Example 1: Consider a message structured according to the following protocol:<br />
<strong>S7</strong>-<strong>1200</strong> <strong>Programmable</strong> <strong>controller</strong><br />
System Manual, 04/2012, A5E02486680-06 593
Communication processor<br />
12.3 Point-to-Point (PtP) communication<br />
STX Len<br />
Characters 3 to 14 counted by the length<br />
(n) ADR PKE INDEX PWD STW HSW BCC<br />
1 2 3 4 5 6 7 8 9 10 11 12 13 14<br />
STX 0x0C xx xxxx xxxx xxxx xxxx xxxx xx<br />
SD1 Len (n) Len (n) SD2<br />
Configure the receive message length parameters for this message as follows:<br />
● n = 2 (The message length starts with byte 2.)<br />
● Length size = 1 (The message length is defined in one byte.)<br />
● Length m = 0 (There are no additional characters following the length specifier that are<br />
not counted in the length count. Twelve characters follow the length specifier.)<br />
In this example, the characters from 3 to 14 inclusive are the characters counted by Len (n).<br />
Example 2: Consider another message structured according to the following protocol:<br />
Characters 5 to 10 counted by length<br />
DA SA FA Data unit=3 bytes<br />
FCS ED<br />
1 2 3 4 5 6 7 8 9 10 11 12<br />
xx 0x06 0x06 xx xx xx xx xx xx xx xx xx<br />
Configure the receive message length parameters for this message as follows:<br />
● n = 3 (The message length starts at byte 3.)<br />
● Length size = 1 (The message length is defined in one byte.)<br />
● Length m = 3 (There are three characters following the length specifier that are not<br />
counted in the length. In the protocol of this example, the characters SD2, FCS, and ED<br />
are not counted in the length count. The other six characters are counted in the length<br />
count; therefore the total number of characters following the length specifier is nine.)<br />
In this example, the characters from 5 to 10 inclusive are the characters counted by Len (n).<br />
12.3.4 Programming the PtP communications<br />
Configuration instructions<br />
STEP 7 provides extended instructions that enable the user program to perform Point-to-<br />
Point communications with a protocol designed and specified in the user program. These<br />
instructions can be considered in two categories:<br />
● Configuration instructions<br />
● Communication instructions<br />
Before your user program can engage in PtP communication, you must configure the<br />
communication interface port and the parameters for sending data and receiving data.<br />
<strong>S7</strong>-<strong>1200</strong> <strong>Programmable</strong> <strong>controller</strong><br />
594 System Manual, 04/2012, A5E02486680-06
Communication processor<br />
12.3 Point-to-Point (PtP) communication<br />
You can perform the port configuration and message configuration for each CM or CB<br />
through the device configuration or through these instructions in your user program:<br />
● PORT_CFG (Page 568)<br />
● SEND_CFG (Page 569)<br />
● RCV_CFG (Page 571)<br />
Communication instructions<br />
The PtP communication instructions enable the user program to send messages to and<br />
receive messages from the communication interfaces. For information about transferring<br />
data with these instructions, see the section on data consistency (Page 153).<br />
All of the PtP functions operate asynchronously. The user program can use a polling<br />
architecture to determine the status of transmissions and receptions. SEND_PTP and<br />
RCV_PTP can execute concurrently. The communication modules and communication board<br />
buffer the transmit and receive messages as necessary up to a maximum buffer size of 1024<br />
bytes.<br />
The CMs and CB send messages to and receive messages from the actual point-to-point<br />
devices. The message protocol is in a buffer that is either received from or sent to a specific<br />
communication port. The buffer and port are parameters of the send and receive<br />
instructions:<br />
● SEND_PTP (Page 575)<br />
● RCV_PTP (Page 578)<br />
Additional instructions provide the capability to reset the receive buffer, and to get and set<br />
specific RS232 signals:<br />
● RCV_RST (Page 580)<br />
● SGN_GET (Page 581)<br />
● SGN_SET (Page 582)<br />
12.3.4.1 Polling architecture<br />
The <strong>S7</strong>-<strong>1200</strong> point-to-point instructions must be called cyclically/periodically to check for<br />
received messages. Polling the send will tell the user program when the transmit has<br />
completed.<br />
Polling architecture: master<br />
The typical sequence for a master is as follows:<br />
1. A SEND_PTP instruction initiates a transmission to the CM or CB.<br />
2. The SEND_PTP instruction is executed on subsequent scans to poll for the transmit<br />
complete status.<br />
3. When the SEND_PTP instruction indicates that the transmission is complete, the user<br />
code can prepare to receive the response.<br />
<strong>S7</strong>-<strong>1200</strong> <strong>Programmable</strong> <strong>controller</strong><br />
System Manual, 04/2012, A5E02486680-06 595
Communication processor<br />
12.3 Point-to-Point (PtP) communication<br />
Polling architecture: slave<br />
4. The RCV_PTP instruction is executed repeatedly to check for a response. When the CM<br />
or CB has collected a response message, the RCV_PTP instruction copies the response<br />
to the CPU and indicates that new data has been received.<br />
5. The user program can process the response.<br />
6. Go to step 1 and repeat the cycle.<br />
The typical sequence for a slave is as follows:<br />
1. The user program executes the RCV_PTP instruction every scan.<br />
2. When the CM or CB has received a request, the RCV_PTP instruction indicates that new<br />
data is ready and the request is copied into the CPU.<br />
3. The user program services the request and generates a response.<br />
4. Use a SEND_PTP instruction to send the response back to the master.<br />
5. Repeatedly execute SEND_PTP to be sure the transmit occurs.<br />
6. Go to step 1 and repeat the cycle.<br />
The slave must be responsible for calling RCV_PTP frequently enough to receive a<br />
transmission from the master before the master times out while waiting for a response. To<br />
accomplish this task, the user program can call RCV_PTP from a cyclic OB, where the cycle<br />
time is sufficient to receive a transmission from the master before the timeout period expires.<br />
If you set the cycle time for the OB to provide for two executions within the timeout period of<br />
the master, the user program can receive transmissions without missing any.<br />
12.3.5 Example: Point-to-Point communication<br />
In this example, an <strong>S7</strong>-<strong>1200</strong> CPU communicates to a PC with a terminal emulator through a<br />
CM 1241 RS232 module. The point-to-point configuration and STEP 7 program in this<br />
example illustrate how the CPU can receive a message from the PC and echo the message<br />
back to the PC.<br />
. . .<br />
<strong>S7</strong>-<strong>1200</strong> <strong>Programmable</strong> <strong>controller</strong><br />
596 System Manual, 04/2012, A5E02486680-06
Communication processor<br />
12.3 Point-to-Point (PtP) communication<br />
You must connect the communication interface of the CM 1241 RS232 module to the RS232<br />
interface of the PC, which is normally COM1. Because both of these ports are Data Terminal<br />
Equipment (DTE), you must switch the receive and transmit pins (2 and 3) when connecting<br />
the two ports, which you can accomplish by either of the following methods:<br />
● Use a NULL modem adapter to swap pins 2 and 3 together with a standard RS232 cable.<br />
● Use a NULL modem cable, which already has pins 2 and 3 swapped. You can usually<br />
identify a NULL modem cable as one with two female 9-pin D connector ends.<br />
12.3.5.1 Configuring the communication module<br />
You can configure the CM 1241 from the Device configuration in STEP 7 or with user<br />
program instructions. This example uses the Device configuration method.<br />
● Port configuration: Click the communication port of the CM module from the Device<br />
configuration, and configure the port as shown:<br />
Note<br />
The configuration settings for "Operating mode" and "Receive line initial state" are only<br />
applicable for the CM 1241 (RS422/RS485) module. The other CM 1241 modules do not<br />
have these port configuration settings. Refer to Configuring the RS422 and RS485<br />
(Page 599)<br />
● Transmit message configuration: Accept the default for transmit message configuration.<br />
No break is to be sent at message start.<br />
<strong>S7</strong>-<strong>1200</strong> <strong>Programmable</strong> <strong>controller</strong><br />
System Manual, 04/2012, A5E02486680-06 597
Communication processor<br />
12.3 Point-to-Point (PtP) communication<br />
● Receive message start configuration: Configure the CM 1241 to start receiving a<br />
message when the communication line is inactive for at least 50 bit times (about 5<br />
milliseconds at 9600 baud = 50 * 1/9600):<br />
● Receive message end configuration: Configure the CM 1241 to end a message when it<br />
receives a maximum of 100 bytes or a linefeed character (10 decimal or A hexadecimal).<br />
The end sequence allows up to five end characters in sequence. The fifth character in the<br />
sequence is the linefeed character. The preceding four end sequence characters are<br />
"don’t care" or unselected characters. The CM 1241 does not evaluate the "don’t care"<br />
characters but looks for a linefeed character preceded by zero or more "don’t care"<br />
characters to indicate the message end.<br />
<strong>S7</strong>-<strong>1200</strong> <strong>Programmable</strong> <strong>controller</strong><br />
598 System Manual, 04/2012, A5E02486680-06
12.3.5.2 Configuring the RS422 and RS485<br />
Communication processor<br />
12.3 Point-to-Point (PtP) communication<br />
Configuring the RS422<br />
For RS422 mode, there are three operating modes depending on your network configuration.<br />
Select one of these operating modes based on the devices in your network. The different<br />
selections for Receive line initial state reference the cases shown below for more details.<br />
● Full duplex (RS422) four wire mode (point-to-point connection): select this option when<br />
there are two devices on your network. In the Receive line initial state:<br />
– Select none when you supply the bias and termination (Case 3).<br />
– Select forward bias to use internal bias and termination (Case 2).<br />
– Select reverse bias to use internal bias and termination, and enable cable break<br />
detection for both devices (Case 1).<br />
● Full duplex (RS422) four wire mode (multipoint master): select this option for the master<br />
device when you have a network with one master and multiple slaves. In the Receive line<br />
initial state:<br />
– Select none when you supply the bias and termination (Case 3).<br />
– Select forward bias to use internal bias and termination (Case 2).<br />
– Cable break detection is not possible in this mode.<br />
● Full duplex (RS422) four wire mode (multipoint slave): Select this option for all the slave<br />
devices when you have a network with one master and multiple slaves. In the Receive<br />
line initial state:<br />
– Select none when you supply the bias and termination (Case 3).<br />
– Select forward bias to use internal bias and termination (Case 2).<br />
– Select reverse bias to use internal bias and termination, and enable cable break<br />
detection for the slaves (Case 1).<br />
<strong>S7</strong>-<strong>1200</strong> <strong>Programmable</strong> <strong>controller</strong><br />
System Manual, 04/2012, A5E02486680-06 599
Communication processor<br />
12.3 Point-to-Point (PtP) communication<br />
Case 1: RS422 with cable break detection<br />
● Mode of operation: RS422<br />
● Receive line initial state: Reverse bias (biased with R(A) > R(B) > 0V)<br />
● Cable break: Cable break detection enabled (transmitter always active)<br />
<br />
<br />
<br />
<br />
<br />
<br />
<br />
<br />
<br />
<strong>S7</strong>-<strong>1200</strong> <strong>Programmable</strong> <strong>controller</strong><br />
600 System Manual, 04/2012, A5E02486680-06<br />
<br />
<br />
<br />
<br />
<br />
<br />
Case 2: RS422 No cable break detection, forward bias<br />
● Mode of operation: RS422<br />
● Receive line initial state: Forward bias (biased with R(B) > R(A) > 0V)<br />
<br />
<br />
● Cable break: No cable break detection (transmitter enabled only while transmitting)
Communication processor<br />
12.3 Point-to-Point (PtP) communication<br />
Case 3: RS422: No cable break detection, no bias<br />
● Mode of operation: RS422<br />
● Receive line initial state: no bias<br />
● Cable break: No cable break detection (transmitter enabled only while transmitting)<br />
Bias and termination are added by the user at the end nodes of the network.<br />
<br />
<br />
Configuring the RS485<br />
Case 4: RS485: Forward bias<br />
<br />
<br />
<br />
<br />
<br />
<br />
<br />
<br />
<br />
<br />
<br />
<br />
<br />
<br />
<br />
<br />
<br />
<br />
<br />
<br />
<strong>S7</strong>-<strong>1200</strong> <strong>Programmable</strong> <strong>controller</strong><br />
System Manual, 04/2012, A5E02486680-06 601<br />
<br />
<br />
<br />
<br />
<br />
<br />
<br />
<br />
<br />
<br />
For RS485 mode, there is only one operating mode. The different selections for Receive line<br />
initial state reference the cases shown below for more details.<br />
● Half duplex (RS485) two wire mode. In the Receive line initial state:<br />
– Select none when you supply the bias and termination (Case 5).<br />
– Select forward bias to use internal bias and termination (Case 4).<br />
● Mode of operation: RS485<br />
● Receive line initial state: Forward bias (biased with R(B) > R(A) > 0V)
Communication processor<br />
12.3 Point-to-Point (PtP) communication<br />
Case 5: RS485: No bias (external bias)<br />
● Mode of operation: RS485<br />
● Receive line initial state: No bias (external bias required)<br />
<br />
<br />
12.3.5.3 Programming the STEP 7 program<br />
<strong>S7</strong>-<strong>1200</strong> <strong>Programmable</strong> <strong>controller</strong><br />
602 System Manual, 04/2012, A5E02486680-06<br />
<br />
<br />
The example program uses a global data block for the communication buffer, a RCV_PTP<br />
instruction (Page 578) to receive data from the terminal emulator, and a SEND_PTP<br />
instruction (Page 575) to echo the buffer back to the terminal emulator. To program the<br />
example, add the data block configuration and program OB1 as described below.<br />
Global data block "Comm_Buffer": Create a global data block (DB) and name it<br />
"Comm_Buffer". Create one value in the data block called "buffer" with a data type of "array<br />
[0 .. 99] of byte".<br />
Network 1: Enable the RCV_PTP instruction whenever SEND_PTP is not active. Tag_8 at<br />
MW20.0 indicates when sending is complete in Network 4, and when the communication<br />
module is thus ready to receive a message.<br />
Network 2: Use the NDR value (Tag_1 at M0.0) set by the RCV_PTP instruction to make a<br />
copy of the number of bytes received and to set a flag (Tag_8 at M20.0) to trigger the<br />
SEND_PTP instruction.
Communication processor<br />
12.3 Point-to-Point (PtP) communication<br />
Network 3: Enable the SEND_PTP instruction when the M20.0 flag is set. Also use this flag<br />
to set the REQ input to TRUE for one scan. The REQ input tells the SEND_PTP instruction<br />
that a new request is to be transmitted. The REQ input must only be set to TRUE for one<br />
execution of SEND_PTP. The SEND_PTP instruction is executed every scan until the<br />
transmit completes. The transmit is complete when the last byte of the message has been<br />
transmitted from the CM 1241. When the transmit is complete, the DONE output (Tag_5 at<br />
M10.0) is set TRUE for one execution of SEND_PTP.<br />
Network 4: monitor the DONE output of SEND_PTP and reset the transmit flag (Tag_8 at<br />
M20.0) when the transmit operation is complete. When the transmit flag is reset, the<br />
RCV_PTP instruction in Network 1 is enabled to receive the next message.<br />
12.3.5.4 Configuring the terminal emulator<br />
You must set up the terminal emulator to support the example program. You can use most<br />
any terminal emulator on your PC, such as HyperTerminal. Make sure that the terminal<br />
emulator is in the disconnected mode before editing the settings as follows:<br />
1. Set the terminal emulator to use the RS232 port on the PC (normally COM1).<br />
2. Configure the port for 9600 baud, 8 data bits, no parity (none), 1 stop bit and no flow<br />
control.<br />
3. Change the settings of the terminal emulator to emulate an ANSI terminal.<br />
4. Configure the terminal emulator ASCII setup to send a line feed after every line (after the<br />
user presses the Enter key).<br />
5. Echo the characters locally so that the terminal emulator displays what is typed.<br />
<strong>S7</strong>-<strong>1200</strong> <strong>Programmable</strong> <strong>controller</strong><br />
System Manual, 04/2012, A5E02486680-06 603
Communication processor<br />
12.4 Universal serial interface (USS) communication<br />
12.3.5.5 Running the example program<br />
To exercise the example program, follow these steps:<br />
1. Download the STEP 7 program to the CPU and ensure that it is in RUN mode.<br />
2. Click the "connect" button on the terminal emulator to apply the configuration changes<br />
and open a terminal session to the CM 1241.<br />
3. Type characters at the PC and press Enter.<br />
The terminal emulator sends the characters to the CM 1241 and to the CPU. The CPU<br />
program then echoes the characters back to the terminal emulator.<br />
12.4 Universal serial interface (USS) communication<br />
The USS instructions control the operation of motor drives which support the universal serial<br />
interface (USS) protocol. You can use the USS instructions to communicate with multiple<br />
drives through RS485 connections to CM 1241 RS485 communication modules or a CB<br />
1241 RS485 communication board. Up to three CM 1241 RS422/RS485 modules and one<br />
CB 1241 RS485 board can be installed in a <strong>S7</strong>-<strong>1200</strong> CPU. Each RS485 port can operate up<br />
to sixteen drives.<br />
The USS protocol uses a master-slave network for communications over a serial bus. The<br />
master uses an address parameter to send a message to a selected slave. A slave itself can<br />
never transmit without first receiving a request to do so. Direct message transfer between<br />
the individual slaves is not possible. USS communication operates in half-duplex mode. The<br />
following USS illustration shows a network diagram for an example drive application.<br />
<br />
<br />
<br />
<br />
<br />
<br />
<br />
<br />
<br />
<br />
<strong>S7</strong>-<strong>1200</strong> <strong>Programmable</strong> <strong>controller</strong><br />
604 System Manual, 04/2012, A5E02486680-06
12.4.1 Requirements for using the USS protocol<br />
Communication processor<br />
12.4 Universal serial interface (USS) communication<br />
The four USS instructions use 1 FB and 3 FCs to support the USS protocol. One<br />
USS_PORT instance data block (DB) is used for each USS network. The USS_PORT<br />
instance data block contains temporary storage and buffers for all drives on that USS<br />
network. The USS instructions share the information in this data block.<br />
<br />
<br />
<br />
<br />
<br />
<br />
<br />
<br />
<br />
<br />
<br />
<br />
<br />
<br />
<br />
<br />
<br />
<br />
<br />
<br />
<strong>S7</strong>-<strong>1200</strong> <strong>Programmable</strong> <strong>controller</strong><br />
System Manual, 04/2012, A5E02486680-06 605<br />
<br />
<br />
<br />
<br />
<br />
<br />
<br />
<br />
<br />
<br />
<br />
<br />
<br />
<br />
<br />
<br />
<br />
<br />
<br />
<br />
<br />
<br />
<br />
<br />
<br />
All drives (up to 16) connected to a single RS485 port are part of the same USS network. All<br />
drives connected to a different RS485 port are part of a different USS network. Each USS<br />
network is managed using a unique data block. All instructions associated with a single USS<br />
network must share this data block. This includes all USS_DRV, USS_PORT, USS_RPM,<br />
and USS_WPM instructions used to control all drives on a single USS network.<br />
The USS_DRV instruction is a Function Block (FB). When you place the USS_DRV<br />
instruction into the program editor, you will be prompted by the "Call options" dialog to assign<br />
a DB for this FB. If this is the first USS_DRV instruction in this program for this USS network,<br />
then you can accept the default DB assignment (or change the name if you wish) and the<br />
new DB is created for you. If however this is not the first USS_DRV instruction for this<br />
channel, then you must use the drop-down list in the "Call options" dialog to select the DB<br />
name that was previously assigned for this USS network.<br />
Instructions USS_PORT, USS_RPM, and USS_WPM are all Functions (FCs). No DB is<br />
assigned when you place these FCs in the editor. Instead, you must assign the appropriate<br />
DB reference to the "USS_DB" input of these instructions. Double-click on the parameter<br />
field and then click on the parameter helper icon to see the available DB names).
Communication processor<br />
12.4 Universal serial interface (USS) communication<br />
The USS_PORT function handles the actual communication between the CPU and the<br />
drives via the Point-to-Point (PtP) RS485 communication port. Each call to this function<br />
handles one communication with one drive. Your program must call this function fast enough<br />
to prevent a communication timeout by the drives. You may call this function in a main<br />
program cycle OB or any interrupt OB.<br />
Typically, you should call the USS_PORT function from a cyclic interrupt OB. The cycle time<br />
of the cyclic interrupt OB should be set to about half of the minimum call interval (As an<br />
example, <strong>1200</strong> baud communication should use a cyclic time of 350 ms or less).<br />
The USS_DRV function block provides your program access to a specified drive on the USS<br />
network. Its inputs and outputs are the status and controls for the drive. If there are 16 drives<br />
on the network, your program must have at least 16 USS_DRV calls, one for each drive.<br />
These blocks should be called at the rate that is required to control the operation of the drive.<br />
You may only call the USS_DRV function block from a main program cycle OB.<br />
CAUTION<br />
Only call USS_DRV, USS_RPM, and USS_WPM from a main program cycle OB. The<br />
USS_PORT function can be called from any OB, usually from a cyclic interrupt OB.<br />
Do not use instructions USS_DRV, USS_RPM, or USS_WPM in a higher priority OB than<br />
the corresponding USS_PORT instruction. For example, do not place the USS_PORT in<br />
the main and a USS_RPM in a cyclic interrupt OB. Failure to prevent interruption of<br />
USS_PORT execution may produce unexpected errors.<br />
The USS_RPM and USS_WPM functions read and write the remote drive operating<br />
parameters. These parameters control the internal operation of the drive. See the drive<br />
manual for the definition of these parameters. Your program can contain as many of these<br />
functions as necessary, but only one read or write request can be active per drive, at any<br />
given time. You may only call the USS_RPM and USS_WPM functions from a main program<br />
cycle OB.<br />
Calculating the time required for communicating with the drive<br />
Communications with the drive are asynchronous to the <strong>S7</strong>-<strong>1200</strong> scan cycle. The <strong>S7</strong>-<strong>1200</strong><br />
typically completes several scans before one drive communications transaction is<br />
completed.<br />
The USS_PORT interval is the time required for one drive transaction. The table below<br />
shows the minimum USS_PORT interval for each communication baud rate. Calling the<br />
USS_PORT function more frequently than the USS_PORT interval will not increase the<br />
number of transactions. The drive timeout interval is the amount of time that might be taken<br />
for a transaction, if communications errors caused 3 tries to complete the transaction. By<br />
default, the USS protocol library automatically does up to 2 retries on each transaction.<br />
<strong>S7</strong>-<strong>1200</strong> <strong>Programmable</strong> <strong>controller</strong><br />
606 System Manual, 04/2012, A5E02486680-06
Table 12- 34 Calculating the time requirements<br />
Baud rate Calculated minimum USS_PORT call<br />
Interval ( milliseconds )<br />
<strong>1200</strong> 790 2370<br />
2400 405 1215<br />
4800 212.5 638<br />
9600 116.3 349<br />
19200 68.2 205<br />
38400 44.1 133<br />
57600 36.1 109<br />
115200 28.1 85<br />
Communication processor<br />
12.4 Universal serial interface (USS) communication<br />
Drive message interval timeout per<br />
drive ( milliseconds )<br />
<strong>S7</strong>-<strong>1200</strong> <strong>Programmable</strong> <strong>controller</strong><br />
System Manual, 04/2012, A5E02486680-06 607
Communication processor<br />
12.4 Universal serial interface (USS) communication<br />
12.4.2 USS_DRV instruction<br />
Table 12- 35 USS_DRV instruction<br />
LAD / FBD SCL Description<br />
Default view<br />
Expanded view<br />
"USS_DRV_DB"(<br />
RUN:=_bool_in_,<br />
OFF2:=_bool_in_,<br />
OFF3:=_bool_in_,<br />
F_ACK:=_bool_in_,<br />
DIR:=_bool_in_,<br />
DRIVE:=_usint_in_,<br />
PZD_LEN:=_usint_in_,<br />
SPEED_SP:=_real_in_,<br />
CTRL3:=_word_in_,<br />
CTRL4:=_word_in_,<br />
CTRL5:=_word_in_,<br />
CTRL6:=_word_in_,<br />
CTRL7:=_word_in_,<br />
CTRL8:=_word_in_,<br />
NDR=>_bool_out_,<br />
ERROR=>_bool_out_,<br />
STATUS=>_word_out_,<br />
RUN_EN=>_bool_out_,<br />
D_DIR=>_bool_out_,<br />
INHIBIT=>_bool_out_,<br />
FAULT=>_bool_out_,<br />
SPEED=>_real_out_,<br />
STATUS1=>_word_out_,<br />
STATUS3=>_word_out_,<br />
STATUS4=>_word_out_,<br />
STATUS5=>_word_out_,<br />
STATUS6=>_word_out_,<br />
STATU<strong>S7</strong>=>_word_out_,<br />
STATUS8=>_word_out_);<br />
The USS_DRV instruction exchanges data with a drive<br />
by creating request messages and interpreting the drive<br />
response messages. A separate function block should<br />
be used for each drive, but all USS functions<br />
associated with one USS network and PtP<br />
communication port must use the same instance data<br />
block. You must create the DB name when you place<br />
the first USS_DRV instruction and then reference the<br />
DB that was created by the initial instruction usage.<br />
STEP 7 automatically creates the DB when you insert<br />
the instruction.<br />
1 LAD and FBD: Expand the box to reveal all the parameters by clicking the bottom of the box. The parameter pins that<br />
are grayed are optional and parameter assignment is not required.<br />
Table 12- 36 Data types for the parameters<br />
Parameter and type Data type Description<br />
RUN IN Bool Drive start bit: When true, this input enables the drive to run at the<br />
preset speed. When RUN goes to false while a drive is running, the<br />
motor will be ramped down to a stop. This behavior differs from the<br />
dropping power (OFF2) or braking the motor (OFF3).<br />
OFF2 IN Bool Electrical stop bit: When false, this bit cause the drive to coast to a stop<br />
with no braking.<br />
OFF3 IN Bool Fast stop bit: When false, this bit causes a fast stop by braking the<br />
drive rather than just allowing the drive to coast to a stop.<br />
<strong>S7</strong>-<strong>1200</strong> <strong>Programmable</strong> <strong>controller</strong><br />
608 System Manual, 04/2012, A5E02486680-06
Communication processor<br />
12.4 Universal serial interface (USS) communication<br />
Parameter and type Data type Description<br />
F_ACK IN Bool Fault acknowledge bit: This bit is set to reset the fault bit on a drive.<br />
The bit is set after the fault is cleared to indicate to the drive it no longer<br />
needs to indicate the previous fault.<br />
DIR IN Bool Drive direction control: This bit is set to indicate that the direction is<br />
forward (for positive SPEED_SP).<br />
DRIVE IN USInt Drive address: This input is the address of the USS drive. The valid<br />
range is drive 1 to drive 16.<br />
PZD_LEN IN USInt Word length: This is the number of words of PZD data. The valid values<br />
are 2, 4, 6, or 8 words. The default value is 2.<br />
SPEED_SP IN Real Speed set point: This is the speed of the drive as a percentage of<br />
configured frequency. A positive value specifies forward direction<br />
(when DIR is true). Valid range is 200.00 to -200.00.<br />
CTRL3 IN Word Control word 3: A value written to a user-configurable parameter on the<br />
drive. You must configure this on the drive. (optional parameter)<br />
CTRL4 IN Word Control word 4: A value written to a user-configurable parameter on the<br />
drive. You must configure this on the drive. (optional parameter)<br />
CTRL5 IN Word Control word 5: A value written to a user-configurable parameter on the<br />
drive. You must configure this on the drive. (optional parameter)<br />
CTRL6 IN Word Control word 6: A value written to a user-configurable parameter on the<br />
drive. You must configure this on the drive. (optional parameter)<br />
CTRL7 IN Word Control word 7: A value written to a user-configurable parameter on the<br />
drive. You must configure this on the drive. (optional parameter)<br />
CTRL8 IN Word Control word 8: A value written to a user-configurable parameter on the<br />
drive. You must configure this on the drive. (optional parameter)<br />
NDR OUT Bool New data ready: When true, the bit indicates that the outputs contain<br />
data from a new communication request.<br />
ERROR OUT Bool Error occurred: When true, this indicates that an error has occurred and<br />
the STATUS output is valid. All other outputs are set to zero on an<br />
error. Communication errors are only reported on the USS_PORT<br />
instruction ERROR and STATUS outputs.<br />
STATUS OUT Word The status value of the request indicates the result of the scan. This is<br />
not a status word returned from the drive.<br />
RUN_EN OUT Bool Run enabled: This bit indicates whether the drive is running.<br />
D_DIR OUT Bool Drive direction: This bit indicates whether the drive is running forward.<br />
INHIBIT OUT Bool Drive inhibited: This bit indicates the state of the inhibit bit on the drive.<br />
FAULT OUT Bool Drive fault: This bit indicates that the drive has registered a fault. You<br />
must fix the problem and then set the F_ACK bit to clear this bit when<br />
set.<br />
SPEED OUT Real Drive Current Speed (scaled value of drive status word 2): The value of<br />
the speed of the drive as a percentage of configured speed.<br />
STATUS1 OUT Word Drive Status Word 1: This value contains fixed status bits of a drive.<br />
STATUS3 OUT Word Drive Status Word 3: This value contains a user-configurable status<br />
word on the drive.<br />
STATUS4 OUT Word Drive Status Word 4: This value contains a user-configurable status<br />
word on the drive.<br />
STATUS5 OUT Word Drive Status Word 5: This value contains a user-configurable status<br />
word on the drive.<br />
<strong>S7</strong>-<strong>1200</strong> <strong>Programmable</strong> <strong>controller</strong><br />
System Manual, 04/2012, A5E02486680-06 609
Communication processor<br />
12.4 Universal serial interface (USS) communication<br />
Parameter and type Data type Description<br />
STATUS6 OUT Word Drive Status Word 6: This value contains a user-configurable status<br />
word on the drive.<br />
STATU<strong>S7</strong> OUT Word Drive Status Word 7: This value contains a user-configurable status<br />
word on the drive.<br />
STATUS8 OUT Word Drive Status Word 8: This value contains a user-configurable status<br />
word on the drive.<br />
When the initial USS_DRV execution occurs, the drive indicated by the USS address<br />
(parameter DRIVE) is initialized in the Instance DB. After this initialization, subsequent<br />
executions of USS_PORT can begin communication to the drive at this drive number.<br />
Changing the drive number requires a CPU STOP-to-RUN mode transition that initializes the<br />
instance DB. Input parameters are configured into the USS TX message buffer and outputs<br />
are read from a "previous" valid response buffer if any exists. There is no data transmission<br />
during USS_DRV execution. Drives communicate when USS_PORT is executed. USS_DRV<br />
only configures the messages to be sent and interprets data that might have been received<br />
from a previous request.<br />
You can control the drive direction of rotation using either the DIR input (Bool) or using the<br />
sign (positive or negative) with the SPEED_SP input (Real). The following table indicates<br />
how these inputs work together to determine the drive direction, assuming the motor is wired<br />
for forward rotation.<br />
Table 12- 37 Interaction of the SPEED_SP and DIR parameters<br />
SPEED_SP DIR Drive rotation direction<br />
Value > 0 0 Reverse<br />
Value > 0 1 Forward<br />
Value < 0 0 Forward<br />
Value < 0 1 Reverse<br />
12.4.3 USS_PORT instruction<br />
Table 12- 38 USS_PORT instruction<br />
LAD / FBD SCL Description<br />
USS_PORT(<br />
PORT:=_uint_in_,<br />
BAUD:=_dint_in_,<br />
ERROR=>_bool_out_,<br />
STATUS=>_word_out_,<br />
USS_DB:=_fbtref_inout_);<br />
The USS_PORT instruction handles communication<br />
over a USS network.<br />
<strong>S7</strong>-<strong>1200</strong> <strong>Programmable</strong> <strong>controller</strong><br />
610 System Manual, 04/2012, A5E02486680-06
Table 12- 39 Data types for the parameters<br />
Communication processor<br />
12.4 Universal serial interface (USS) communication<br />
Parameter and type Data type Description<br />
PORT IN Port After you install and configure a CM or CB communication device, the<br />
port identifier appears in the parameter helper drop-list available at the<br />
PORT box connection. The assigned CM or CB port value is the device<br />
configuration property "hardware identifier". The port symbolic name is<br />
assigned in the "System constants" tab of the PLC tag table.<br />
BAUD IN DInt The baud rate used for USS communication.<br />
USS_DB INOUT USS_BASE The name of the instance DB that is created and initialized when a<br />
USS_DRV instruction is placed in your program.<br />
ERROR OUT Bool When true, this output indicates that an error has occurred and the<br />
STATUS output is valid.<br />
STATUS OUT Word The status value of the request indicates the result of the scan or<br />
initialization. Additional information is available in the<br />
"USS_Extended_Error" variable for some status codes.<br />
Typically, there is only one USS_PORT instruction per PtP communication port in the<br />
program, and each call of this function handles a transmission to or from a single drive. All<br />
USS functions associated with one USS network and PtP communication port must use the<br />
same instance DB.<br />
Your program must execute the USS_PORT instruction often enough to prevent drive<br />
timeouts. USS_PORT is usually called from a cyclic interrupt OB to prevent drive timeouts<br />
and keep the most recent USS data updates available for USS_DRV calls.<br />
12.4.4 USS_RPM instruction<br />
Table 12- 40 USS_RPM instruction<br />
LAD / FBD SCL Description<br />
Table 12- 41 Data types for the parameters<br />
USS_RPM(REQ:=_bool_in_,<br />
DRIVE:=_usint_in_,<br />
PARAM:=_uint_in_,<br />
INDEX:=_uint_in_,<br />
DONE=>_bool_out_,<br />
ERROR=>_bool_out_,<br />
STATUS=>_word_out_,<br />
VALUE=>_variant_out_,<br />
USS_DB:=_fbtref_inout_);<br />
The USS_RPM instruction reads a parameter from<br />
a drive. All USS functions associated with one USS<br />
network and PtP communication port must use the<br />
same data block. USS_RPM must be called from a<br />
main program cycle OB.<br />
Parameter type Data type Description<br />
REQ IN Bool Send request: When true, REQ indicates that a new read request is<br />
desired. This is ignored if the request for this parameter is already<br />
pending.<br />
DRIVE IN USInt Drive address: DRIVE is the address of the USS drive. The valid range is<br />
drive 1 to drive 16.<br />
<strong>S7</strong>-<strong>1200</strong> <strong>Programmable</strong> <strong>controller</strong><br />
System Manual, 04/2012, A5E02486680-06 611
Communication processor<br />
12.4 Universal serial interface (USS) communication<br />
Parameter type Data type Description<br />
PARAM IN UInt Parameter number: PARAM designates which drive parameter is written.<br />
The range of this parameter is 0 to 2047. On some drives, the most<br />
significant byte can access PARAM values greater than 2047. See your<br />
drive manual for details on how to access an extended range.<br />
INDEX IN UInt Parameter index: INDEX designates which Drive Parameter index is to be<br />
written. A 16-bit value where the Least Significant Byte is the actual index<br />
value with a range of (0 to 255). The Most Significant Byte may also be<br />
used by the drive and is drive-specific. See your drive manual for details.<br />
USS_DB INOUT USS_BASE Then name of the instance DB that is created and initialized when a<br />
USS_DRV instruction is placed in your program.<br />
VALUE IN Word, Int, UInt,<br />
DWord, DInt,<br />
UDInt, Real<br />
This is the value of the parameter that was read and is valid only when<br />
the DONE bit is true.<br />
DONE1 OUT Bool When true, indicates that the VALUE output holds the previously<br />
requested read parameter value. This bit is set when USS_DRV sees the<br />
read response data from the drive. This bit is reset when either: you<br />
request the response data via another USS_RPM poll, or on the second<br />
of the next two calls to USS_DRV<br />
ERROR OUT Bool Error occurred: When true, ERROR indicates that an error has occurred<br />
and the STATUS output is valid. All other outputs are set to zero on an<br />
error. Communication errors are only reported on the USS_PORT<br />
instruction ERROR and STATUS outputs.<br />
STATUS OUT Word STATUS indicates the result of the read request. Additional information is<br />
available in the "USS_Extended_Error" variable for some status codes.<br />
1 The DONE bit indicates that valid data has been read from the referenced motor drive and delivered to the CPU. It does<br />
not indicate that the USS library is capable of immediately reading another parameter. A blank PKW request must be<br />
sent to the motor drive and must also be acknowledged by the instruction before the parameter channel for the specific<br />
drive becomes available for use. Immediately calling a USS_RPM or USS_WPM FC for the specified motor drive will<br />
result in a 0x818A error.<br />
12.4.5 USS_WPM instruction<br />
Note<br />
EEPROM write operations (for the EEPROM inside a USS drive)<br />
Do not overuse the EEPROM permanent write operation. Minimize the number of EEPROM<br />
write operations to extend the EEPROM life.<br />
<strong>S7</strong>-<strong>1200</strong> <strong>Programmable</strong> <strong>controller</strong><br />
612 System Manual, 04/2012, A5E02486680-06
Table 12- 42 USS_WPM instruction<br />
LAD / FBD SCL Description<br />
Table 12- 43 Data types for the parameters<br />
USS_WPM(REQ:=_bool_in_,<br />
DRIVE:=_usint_in_,<br />
PARAM:=_uint_in_,<br />
INDEX:=_uint_in_,<br />
EEPROM:=_bool_in_,<br />
VALUE:=_variant_in_,<br />
DONE=>_bool_out_,<br />
ERROR=>_bool_out_,<br />
STATUS=>_word_out_,<br />
USS_DB:=_fbtref_inout_);<br />
Communication processor<br />
12.4 Universal serial interface (USS) communication<br />
The USS_WPM instruction modifies a parameter in the<br />
drive. All USS functions associated with one USS<br />
network and PtP communication port must use the<br />
same data block.<br />
USS_WPM must be called from a main program cycle<br />
OB.<br />
Parameter and type Data type Description<br />
REQ IN Bool Send request: When true, REQ indicates that a new write request is<br />
desired. This is ignored if the request for this parameter is already<br />
pending.<br />
DRIVE IN USInt Drive address: DRIVE is the address of the USS drive. The valid range is<br />
drive 1 to drive 16.<br />
PARAM IN UInt Parameter number: PARAM designates which drive parameter is written.<br />
The range of this parameter is 0 to 2047. On some drives, the most<br />
significant byte can access PARAM values greater than 2047. See your<br />
drive manual for details on how to access an extended range.<br />
INDEX IN UInt Parameter index: INDEX designates which Drive Parameter index is to be<br />
written. A 16-bit value where the least significant byte is the actual index<br />
value with a range of (0 to 255). The most significant byte may also be<br />
used by the drive and is drive-specific. See your drive manual for details.<br />
EEPROM IN Bool Store To Drive EEPROM: When true, a write drive parameter transaction<br />
will be stored in the drive EEPROM. If false, the write is temporary and<br />
will not be retained if the drive is power cycled.<br />
VALUE IN Word, Int, UInt,<br />
DWord, DInt,<br />
UDInt, Real<br />
The value of the parameter that is to be written. It must be valid on the<br />
transition of REQ.<br />
USS_DB INOUT USS_BASE The name of the instance DB that is created and initialized when a<br />
USS_DRV instruction is placed in your program.<br />
DONE1 OUT Bool When true, DONE indicates that the input VALUE has been written to the<br />
drive. This bit is set when USS_DRV sees the write response data from<br />
the drive. This bit is reset when either you request the response data via<br />
another USS_WPM poll, or on the second of the next two calls to<br />
USS_DRV<br />
<strong>S7</strong>-<strong>1200</strong> <strong>Programmable</strong> <strong>controller</strong><br />
System Manual, 04/2012, A5E02486680-06 613
Communication processor<br />
12.4 Universal serial interface (USS) communication<br />
Parameter and type Data type Description<br />
ERROR OUT Bool When true, ERROR indicates that an error has occurred and the STATUS<br />
output is valid. All other outputs are set to zero on an error.<br />
Communication errors are only reported on the USS_PORT instruction<br />
ERROR and STATUS outputs.<br />
STATUS OUT Word STATUS indicates the result of the write request. Additional information is<br />
available in the "USS_Extended_Error" variable for some status codes.<br />
1 The DONE bit indicates that valid data has been read from the referenced motor drive and delivered to the CPU. It does<br />
not indicate that the USS library is capable of immediately reading another parameter. A blank PKW request must be<br />
sent to the motor drive and must also be acknowledged by the instruction before the parameter channel for the specific<br />
drive becomes available for use. Immediately calling a USS_RPM or USS_WPM FC for the specified motor drive will<br />
result in a 0x818A error.<br />
12.4.6 USS status codes<br />
Table 12- 44 STATUS codes 1<br />
USS instruction status codes are returned at the STATUS output of the USS functions.<br />
STATUS<br />
(W#16#....)<br />
Description<br />
0000 No error<br />
8180 The length of the drive response did not match the characters received from the drive. The drive number<br />
where the error occurred is returned in the "USS_Extended_Error" variable. See the extended error<br />
description below this table.<br />
8181 VALUE parameter was not a Word, Real or DWord data type.<br />
8182 The user supplied a Word for a parameter value and received a DWord or Real from the drive in the<br />
response.<br />
8183 The user supplied a DWord or Real for a parameter value and received a Word from the drive in the<br />
response.<br />
8184 The response telegram from drive had a bad checksum. The drive number where the error occurred is<br />
returned in the "USS_Extended_Error" variable. See the extended error description below this table.<br />
8185 Illegal drive address (valid drive address range: 1 to16)<br />
8186 The speed set point is out of the valid range (valid speed SP range: -200% to 200%).<br />
8187 The wrong drive number responded to the request sent. The drive number where the error occurred is<br />
returned in the "USS_Extended_Error" variable. See the extended error description below this table.<br />
8188 Illegal PZD word length specified (valid range = 2, 4, 6 or 8 words)<br />
8189 Illegal Baud Rate was specified.<br />
818A The parameter request channel is in use by another request for this drive.<br />
818B The drive has not responded to requests and retries. The drive number where the error occurred is<br />
returned in the "USS_Extended_Error" variable. See the extended error description below this table.<br />
818C The drive returned an extended error on a parameter request operation. See the extended error<br />
description below this table.<br />
818D The drive returned an illegal access error on a parameter request operation. See your drive manual for<br />
information of why parameter access may be limited.<br />
<strong>S7</strong>-<strong>1200</strong> <strong>Programmable</strong> <strong>controller</strong><br />
614 System Manual, 04/2012, A5E02486680-06
Communication processor<br />
12.4 Universal serial interface (USS) communication<br />
STATUS Description<br />
(W#16#....)<br />
818E The drive has not been initialized. This error code is returned to USS_RPM or USS_WPM when<br />
USS_DRV, for that drive, has not been called at least once. This keeps the initialization on first scan of<br />
USS_DRV from overwriting a pending parameter read or write request, since it initializes the drive as a<br />
new entry. To fix this error, call USS_DRV for this drive number.<br />
80Ax-80Fx Specific errors returned from PtP communication FBs called by the USS Library - These error code<br />
values are not modified by the USS library and are defined in the PtP instruction descriptions.<br />
1 In addition to the USS instruction errors listed above, errors can be returned from the<br />
underlying PtP communication instructions (Page 566).<br />
For several STATUS codes, additional information is provided in the "USS_Extended_Error"<br />
variable of the USS_DRV Instance DB. For STATUS codes hexadecimal 8180, 8184, 8187,<br />
and 818B, USS_Extended_Error contains the drive number where the communication error<br />
occurred. For STATUS code hexadecimal 818C, USS_Extended_Error contains a drive error<br />
code returned from the drive when using a USS_RPM or USS_WPM instruction.<br />
Communication errors (STATUS = 16#818B) are only reported on the USS_PORT<br />
instruction and not on the USS_DRV instruction. For example, if the network is not properly<br />
terminated then it is possible for a drive to go to RUN but the USS_DRV instruction will show<br />
all 0's for the output parameters. In this case, you can only detect the communication error<br />
on the USS_PORT instruction. Since this error is only visible for one scan, you will need to<br />
add some capture logic as illustrated in the following example. In this example, when the<br />
error bit of the USS_PORT instruction is TRUE, then the STATUS and the<br />
USS_Extended_Error values are saved into M memory. The drive number is placed in<br />
USS_Extended_Error variable when the STATUS code value is hexadecimal 8180, 8184,<br />
8187, or 818B.<br />
Network 1 "PortStatus" port status and<br />
"USS_DRV_DB".USS_Extended_Error<br />
extended error code values are only<br />
valid for one program scan. The<br />
values must be captured for later<br />
processing.<br />
Network 2 The "PortError" contact<br />
triggers the storage of the "PortStatus"<br />
value in "LastPortStatus" and the<br />
"USS_DRV_DB".USS_Extended_Error<br />
value in "LastExtError".<br />
<strong>S7</strong>-<strong>1200</strong> <strong>Programmable</strong> <strong>controller</strong><br />
System Manual, 04/2012, A5E02486680-06 615
Communication processor<br />
12.4 Universal serial interface (USS) communication<br />
USS drives support read and write access to a drive's internal parameters. This feature<br />
allows remote control and configuration of the drive. Drive parameter access operations can<br />
fail due to errors such as values out of range or illegal requests for a drive's current mode.<br />
The drive generates an error code value that is returned in the "USS_Extended_Error"<br />
variable. This error code value is only valid for the last execution of a USS_RPM or<br />
USS_WPM instruction. The drive error code is put into USS_Extended_Error variable when<br />
the STATUS code value is hexadecimal 818C. The error code value of<br />
"USS_Extended_Error" depends on the drive model. See the drive's manual for a description<br />
of the extended error codes for read and write parameter operations.<br />
12.4.7 General drive setup information<br />
General drive setup requirements<br />
Connecting a MicroMaster drive<br />
● The drives must be set to use 4 PKW words.<br />
● The drives can be configured for 2, 4, 6, or 8 PZD words.<br />
● The number of PZD word's in the drive must match PZD_LEN input on the USS_DRV<br />
instruction for that drive.<br />
● The baud rate in all the drives must match the BAUD input on the USS_PORT instruction.<br />
● The drive must be set for remote control.<br />
● The drive must be set for frequency set-point to USS on COM Link.<br />
● The drive address must be set to 1 to 16 and match the DRIVE input on the USS_DRV<br />
block for that drive.<br />
● The drive direction control must be set to use the polarity of the drive set-point.<br />
● The RS485 network must be terminated properly.<br />
This information about SIEMENS MicroMaster drives is provided as an example. For other<br />
drives, refer to the drive's manual for setup instructions.<br />
To make the connection to a MicroMaster Series 4 (MM4) drive, insert the ends of the<br />
RS485 cable into the two caged-clamp, screw-less terminals provided for USS operation.<br />
Standard PROFIBUS cable and connectors can be used to connect the <strong>S7</strong>-<strong>1200</strong>.<br />
CAUTION<br />
Interconnecting equipment with different reference potentials can cause unwanted currents<br />
to flow through the interconnecting cable<br />
These unwanted currents can cause communications errors or damage equipment. Be sure<br />
all equipment that you are about to connect with a communications cable either shares a<br />
common circuit reference or is isolated to prevent unwanted current flows. The shield must<br />
be tied to chassis ground or pin 1 on the 9-pin connector. It is recommended that you tie<br />
wiring terminal 2--0V on the MicroMaster drive to chassis ground.<br />
<strong>S7</strong>-<strong>1200</strong> <strong>Programmable</strong> <strong>controller</strong><br />
616 System Manual, 04/2012, A5E02486680-06
The two wires at the opposite end of<br />
the RS485 cable must be inserted into<br />
the MM4 drive terminal blocks. To<br />
make the cable connection on a MM4<br />
drive, remove the drive cover(s) to<br />
access the terminal blocks. See the<br />
MM4 user manual for details about<br />
how to remove the covers(s) of your<br />
specific drive.<br />
Communication processor<br />
12.4 Universal serial interface (USS) communication<br />
B(P) A(N)<br />
The terminal block connections are labeled numerically. Using a PROFIBUS connector on<br />
the <strong>S7</strong>-<strong>1200</strong> side, connect the A terminal of the cable to the drive terminal 15 (for an MM420)<br />
or terminal 30 (MM440). Connect the B terminal of B (P) A (N) the cable connector to<br />
terminal 14 (MM420) or terminal 29 (MM440).<br />
If the <strong>S7</strong>-<strong>1200</strong> is a terminating node in the network, or if the connection is point-to-point, it is<br />
necessary to use terminals A1 and B1 (not A2 and B2) of the connector since they allow the<br />
termination settings to be set (for example, with DP connector type 6E<strong>S7</strong> 972--0BA40--<br />
0X40).<br />
CAUTION<br />
Make sure the drive covers are replaced properly before supplying power to the unit.<br />
If the drive is configured as the terminating<br />
node in the network, then termination and<br />
bias resistors must also be wired to the<br />
appropriate terminal connections. This<br />
diagram shows examples of the MM4 drive<br />
connections necessary for termination and<br />
bias.<br />
MM420<br />
14<br />
120 ohm<br />
15<br />
470 ohm<br />
2<br />
<strong>S7</strong>-<strong>1200</strong> <strong>Programmable</strong> <strong>controller</strong><br />
System Manual, 04/2012, A5E02486680-06 617<br />
P<br />
N<br />
0V<br />
+10 V<br />
P<br />
N<br />
0V<br />
+10 V<br />
1<br />
29<br />
30<br />
2<br />
1<br />
MM440<br />
120 ohm<br />
470 ohm<br />
1.5K ohm<br />
1.5K ohm
Communication processor<br />
12.4 Universal serial interface (USS) communication<br />
Setting up the MM4 drive<br />
Before you connect a drive to the <strong>S7</strong>-<strong>1200</strong>, you must ensure that the drive has the following<br />
system parameters. Use the keypad on the drive to set the parameters:<br />
1. Reset the drive to factory settings (optional). P0010=30<br />
P0970=1<br />
If you skip step 1, then ensure that these parameters are set to the indicated<br />
values.<br />
2. Enable the read/write access to all parameters (Expert mode). P0003=3<br />
3. Check the motor settings for your drive. The settings will vary according to<br />
the motor(s) being used.<br />
To set the parameters P304, P305, P307, P310, and P311, you must first set<br />
parameter P010 to 1 (quick commissioning mode). When you are finished<br />
setting the parameters, set parameter P010 to 0. Parameters P304, P305,<br />
P307, P310, and P311 can only be changed in the quick commissioning<br />
mode.<br />
USS PZD length = P2012 Index 0=(2, 4, 6,<br />
or 8)<br />
USS PKW length = P2013 Index 0=4<br />
P0304 = Rated motor voltage (V)<br />
P0305 = Rated motor current (A)<br />
P0307 = Rated motor power (W)<br />
P03010 = Rated motor frequency (Hz)<br />
P0311 = Rated motor speed<br />
4. Set the local/remote control mode. P0700 Index 0=5<br />
5. Set selection of frequency set-point to USS on COM link. P1000 Index 0=5<br />
6. Ramp up time (optional)<br />
P1120=(0 to 650.00)<br />
This is the time in seconds that it takes the motor to accelerate to maximum<br />
frequency.<br />
7. Ramp down time (optional)<br />
P1121=(0 to 650.00)<br />
This the time in seconds that it takes the motor to decelerate to a complete<br />
stop.<br />
8. Set the serial link reference frequency: P2000=(1 to 650 Hz)<br />
9. Set the USS normalization: P2009 Index 0=0<br />
10. Set the baud rate of the RS485 serial interface: P2010 Index 0= 4 (2400 baud)<br />
5 (4800 baud)<br />
6 (9600 baud)<br />
7 (19200 baud<br />
8 (38400 baud)<br />
9 (57600 baud)<br />
12 (115200 baud)<br />
11. Enter the Slave address.<br />
P2011 Index 0=(0 to 31)<br />
Each drive (a maximum of 31) can be operated over the bus.<br />
12. Set the serial link timeout.<br />
P2014 Index 0=(0 to 65,535 ms)<br />
This is the maximum permissible period between two incoming data<br />
0=timeout disabled<br />
telegrams. This feature is used to turn off the inverter in the event of a<br />
communications failure. Timing starts after a valid data telegram has been<br />
received. If a further data telegram is not received within the specified time<br />
period, the inverter will trip and display fault code F0070. Setting the value to<br />
zero switches off the control.<br />
13. Transfer the data from RAM to EEPROM: P0971=1 (Start transfer) Save the changes<br />
to the parameter settings to EEPROM<br />
<strong>S7</strong>-<strong>1200</strong> <strong>Programmable</strong> <strong>controller</strong><br />
618 System Manual, 04/2012, A5E02486680-06
12.5 Modbus communication<br />
12.5.1 Overview of Modbus RTU and TCP communication<br />
Communication processor<br />
12.5 Modbus communication<br />
Modbus function codes<br />
● A CPU operating as a Modbus RTU master (or Modbus TCP client) can read/write both<br />
data and I/O states in a remote Modbus RTU slave (or Modbus TCP server). Remote<br />
data can be read and processed in the user program.<br />
● A CPU operating as a Modbus RTU slave (or Modbus TCP server) allows a supervisory<br />
device to read/write both data and I/O states in a remote CPU. The supervisor device can<br />
write new values in remote CPU memory that can be processed in the user program.<br />
Table 12- 45 Read data functions: Read remote I/O and program data<br />
Modbus function code Read slave (server) functions - standard addressing<br />
01 Read output bits: 1 to 2000 bits per request<br />
02 Read input bits: 1 to 2000 bits per request<br />
03 Read Holding registers: 1 to 125 words per request<br />
04 Read input words: 1 to 125 words per request<br />
Table 12- 46 Write data functions: Write remote I/O and modify program data<br />
Modbus function code Write slave (server) functions - standard addressing<br />
05 Write one output bit: 1 bit per request<br />
06 Write one holding register: 1 word per request<br />
15 Write one or more output bits: 1 to 1968 bits per request<br />
16 Write one or more holding registers: 1 to 123 words per request<br />
● Modbus function codes 08 and 11 provide slave device communication diagnostic<br />
information.<br />
● Modbus function code 0 broadcasts a message to all slaves (with no slave response).<br />
The broadcast function is not available for Modbus TCP, because communication is<br />
connection based.<br />
Table 12- 47 Modbus network station addresses<br />
Station Address<br />
RTU station<br />
Standard station address 1 to 247<br />
Extended station address 1 to 65535<br />
TCP station Station address IP address and port number<br />
<strong>S7</strong>-<strong>1200</strong> <strong>Programmable</strong> <strong>controller</strong><br />
System Manual, 04/2012, A5E02486680-06 619
Communication processor<br />
12.5 Modbus communication<br />
Modbus memory addresses<br />
The actual number of Modbus memory addresses available depends on the CPU model,<br />
how much work memory exists, and how much CPU memory is used by other program data.<br />
The table below gives the nominal value of the address range.<br />
Table 12- 48 Modbus memory addresses<br />
Station Address range<br />
RTU station<br />
Standard memory address 10K<br />
Extended memory address 64K<br />
TCP station Standard memory address 10K<br />
Modbus RTU communication<br />
Modbus RTU (Remote Terminal Unit) is a standard network communication protocol that<br />
uses the RS232 or RS485 electrical connection for serial data transfer between Modbus<br />
network devices. You can add PtP (Point to Point) network ports to a CPU with a RS232 or<br />
RS485 CM or a RS485 CB.<br />
Modbus RTU uses a master/slave network where all communications are initiated by a<br />
single Master device and slaves can only respond to a master’s request. The master sends a<br />
request to one slave address and only that slave address responds to the command.<br />
Modbus TCP communication<br />
Modbus TCP (Transmission Control Protocol) is a standard network communication protocol<br />
that uses the PROFINET connector on the CPU for TCP/IP communication. No additional<br />
communication hardware module is required.<br />
Modbus TCP uses Open User Communications (OUC) connections as a Modbus<br />
communication path. Multiple client-server connections may exist, in addition to the<br />
connection between STEP 7 and the CPU. Mixed client and server connections are<br />
supported up to the maximum number of connections allowed by the CPU model<br />
(Page 424).<br />
Each MB_SERVER connection must use a unique instance DB and IP port number. Only 1<br />
connection per IP port is supported. Each MB_SERVER (with its unique instance DB and IP<br />
port) must be executed individually for each connection.<br />
Note<br />
Modbus TCP will only operate correctly with CPU firmware release V1.02 or later. An<br />
attempt to execute the Modbus instructions on an earlier firmware version will result in an<br />
error.<br />
<strong>S7</strong>-<strong>1200</strong> <strong>Programmable</strong> <strong>controller</strong><br />
620 System Manual, 04/2012, A5E02486680-06
Communication processor<br />
12.5 Modbus communication<br />
A Modbus TCP client (master) must control the client-server connection with the<br />
DISCONNECT parameter. The basic Modbus client actions are shown below.<br />
1. Initiate a connection to a particular server (slave) IP address and IP port number<br />
2. Initiate client transmission of a Modbus messages and receive the server responses<br />
3. When desired, initiate the disconnection of client and server to enable connection with a<br />
different server.<br />
Modbus RTU instructions in your program<br />
● MB_COMM_LOAD: One execution of MB_COMM_LOAD is used to set up PtP port<br />
parameters like baud rate, parity, and flow control. After a CPU port is configured for the<br />
Modbus RTU protocol, it can only be used by either the MB_MASTER or MB_SLAVE<br />
instructions.<br />
● MB_MASTER: The Modbus master instruction enables the CPU to act as a Modbus RTU<br />
master device and communicate with one or more Modbus slave devices.<br />
● MB_SLAVE: The Modbus slave instruction enables the CPU to act as a Modbus RTU<br />
slave device and communicate with a Modbus master device.<br />
Modbus TCP instructions in your program<br />
● MB_CLIENT: Make client-server TCP connection, send command message, receive<br />
response, and control the disconnection from the server<br />
● MB_SERVER: Connect to a Modbus TCP client upon request, receive Modbus message,<br />
and send response<br />
<strong>S7</strong>-<strong>1200</strong> <strong>Programmable</strong> <strong>controller</strong><br />
System Manual, 04/2012, A5E02486680-06 621
Communication processor<br />
12.5 Modbus communication<br />
12.5.2 Modbus TCP<br />
12.5.2.1 MB_CLIENT (Modbus TCP)<br />
Table 12- 49 MB_CLIENT instruction<br />
LAD / FBD SCL Description<br />
Table 12- 50 Data types for the parameters<br />
"MB_CLIENT_DB"(<br />
REQ:=_bool_in_,<br />
DISCONNECT:=_bool_in_,<br />
CONNECT_ID=_uint_in_,<br />
IP_OCTET_1:=_byte_in_,<br />
IP_OCTET_2:=_byte_in_,<br />
IP_OCTET_3:=_byte_in_,<br />
IP_OCTET_4:=_byte_in_,<br />
IP_PORT:=_uint_in_,<br />
MB_MODE:=_usint_in_,<br />
MB_DATA_ADDR:=_udint_in_,<br />
MB_DATA_LEN:=_uint_in_,<br />
DONE=>_bool_out_,<br />
BUSY=>_bool_out_,<br />
ERROR=>_bool_out_,<br />
STATUS=>_word_out_,<br />
MB_DATA_PTR:=_variant_inout_);<br />
MB_CLIENT communicates as a<br />
Modbus TCP client through the<br />
PROFINET connector on the <strong>S7</strong>-<br />
<strong>1200</strong> CPU. No additional<br />
communication hardware module<br />
is required.<br />
MB_CLIENT can make a clientserver<br />
connection, send a<br />
Modbus function request, receive<br />
a response, and control the<br />
disconnection from a Modbus<br />
TCP server.<br />
Parameter and type Data type Description<br />
REQ In Bool FALSE = No Modbus communication request<br />
TRUE = Request to communicate with a Modbus TCP server<br />
DISCONNECT IN Bool The DISCONNECT parameter allows your program to control connection<br />
and disconnection with a Modbus server device.<br />
If DISCONNECT = 0 and a connection does not exist, then MB_CLIENT<br />
attempts to make a connection to the assigned IP address and port number.<br />
If DISCONNECT = 1 and a connection exists, then a disconnect operation is<br />
attempted. Whenever this input is enabled, no other operation will be<br />
attempted.<br />
CONNECT_ID IN UInt The CONNECT_ID parameter must uniquely identify each connection within<br />
the PLC. Each unique instance of the MB_CLIENT or MB_SERVER<br />
instruction must contain a unique CONNECT_ID parameter.<br />
IP_OCTET_1 IN USInt Modbus TCP server IP address: Octet 1<br />
8-bit part of the 32-bit IPv4 IP address of the Modbus TCPserver to which<br />
the client will connect and communicate using the Modbus TCP protocol.<br />
IP_OCTET_2 IN USInt Modbus TCP server IP address: Octet 2<br />
IP_OCTET_3 IN USInt Modbus TCP server IP address: Octet 3<br />
IP_OCTET_4 IN USInt Modbus TCP server IP address: Octet 4<br />
IP_PORT IN UInt Default value = 502: The IP port number of the server to which the client will<br />
attempt to connect and ultimately communicate using the TCP/IP protocol.<br />
<strong>S7</strong>-<strong>1200</strong> <strong>Programmable</strong> <strong>controller</strong><br />
622 System Manual, 04/2012, A5E02486680-06
Communication processor<br />
12.5 Modbus communication<br />
Parameter and type Data type Description<br />
MB_MODE IN USInt Mode Selection: Assigns the type of request (read, write, or diagnostic). See<br />
the Modbus functions table below for details.<br />
MB_DATA_ADDR IN UDInt Modbus starting Address: Assigns the starting address of the data to be<br />
accessed by MB_CLIENT. See the Modbus functions table below for valid<br />
addresses.<br />
MB_DATA_LEN IN UInt Modbus data Length: Assigns the number of bits or words to be accessed in<br />
this request. See the Modbus functions table below for valid lengths<br />
MB_DATA_PTR IN_OUT Variant Pointer to the Modbus data register: The register buffers data going to or<br />
coming from a Modbus server. The pointer must assign a standard global<br />
DB or a M memory address.<br />
DONE OUT Bool The DONE bit is TRUE for one scan, after the last request was completed<br />
with no error.<br />
BUSY OUT Bool 0 - No MB_CLIENT operation in progress<br />
1 - MB_CLIENT operation in progress<br />
ERROR OUT Bool The ERROR bit is TRUE for one scan, after the MB_CLIENT execution was<br />
terminated with an error. The error code value at the STATUS parameter is<br />
valid only during the single cycle where ERROR = TRUE.<br />
STATUS OUT Word Execution condition code<br />
REQ parameter<br />
FALSE = No Modbus communication request<br />
TRUE = Request to communicate with a Modbus TCP server<br />
If no instance of MB_CLIENT is active and parameter DISCONNECT=0, when REQ=1 a new<br />
Modbus request will start. If the connection is not already established then a new connection<br />
will be made.<br />
If the same instance of MB_CLIENT is executed again with DISCONNECT=0 and REQ=1,<br />
before the completion of the current request, then no subsequent Modbus transmission will<br />
be made. However, as soon as the current request is completed, a new request can be<br />
processed if MB_CLIENT is executed with REQ=1.<br />
When the current MB_CLIENT communication request is complete, the DONE bit is TRUE<br />
for one cycle. The DONE bit can be used as a time gate to sequence multiple MB_CLIENT<br />
requests.<br />
Note<br />
Input data consistency during MB_CLIENT processing<br />
Once a Modbus client initiates a Modbus operation, all the input states are saved internally<br />
and are then compared on each successive call. The comparison is used to determine if this<br />
particular call was the originator of the active client request. More than one MB_CLIENT call<br />
can be performed using a common instance DB.<br />
As a result, it is important that the inputs are not changed during the period of time that a<br />
MB_CLIENT operation is actively being processed. If this rule is not followed, then a<br />
MB_CLIENT cannot determine that it is the active instance.<br />
<strong>S7</strong>-<strong>1200</strong> <strong>Programmable</strong> <strong>controller</strong><br />
System Manual, 04/2012, A5E02486680-06 623
Communication processor<br />
12.5 Modbus communication<br />
MB_MODE and MB_DATA_ADDR parameters select the Modbus communication function<br />
Table 12- 51 Modbus functions<br />
MB_DATA_ADDR assigns the starting Modbus address of the data to be accessed. The<br />
MB_CLIENT instruction uses a MB_MODE input rather than a function code input.<br />
The combination of MB_MODE and MB_DATA_ADDR values determine the function code<br />
that is used in the actual Modbus message. The following table shows the correspondence<br />
between parameter MB_MODE, Modbus function, and Modbus address range.<br />
MB_MODE Modbus<br />
function<br />
Data length Operation and data MB_DATA_ADDR<br />
0 01 1 to 2000 Read output bits:<br />
1 to 2000 bits per request<br />
1 to 9999<br />
0 02 1 to 2000 Read input bits:<br />
1 to 2000 bits per request<br />
10001 to 19999<br />
0 03 1 to 125 Read Holding registers:<br />
1 to 125 words per request<br />
0 04 1 to 125 Read input words:<br />
1 to 125 words per request<br />
1 05 1 Write one output bit:<br />
One bit per request<br />
1 06 1 Write one holding register:<br />
1 word per request<br />
1 15 2 to 1968 Write multiple output bits:<br />
2 to 1968 bits per request<br />
1 16 2 to 123 Write multiple holding registers:<br />
2 to 123 words per request<br />
2 15 1 to 1968 Write one or more output bits:<br />
1 to 1968 bits per request<br />
2 16 1 to 123 Write one or more holding registers:<br />
1 to 123 words per request<br />
11 11 0 Read the server communication status word<br />
and event counter. The status word<br />
indicates busy (0 – not busy, 0xFFFF -<br />
busy). The event counter is incremented for<br />
each successful completion of a message.<br />
Both the MB_DATA_ADDR and<br />
MB_DATA_LEN parameters of MB_CLIENT<br />
are ignored for this function.<br />
80 08 1 Check server status using data diagnostic<br />
code 0x0000 (Loopback test – server<br />
echoes the request)<br />
1 word per request<br />
40001 to 49999 or<br />
400001 to 465535<br />
30001 to 39999<br />
1 to 9999<br />
40001 to 49999 or<br />
400001 to 465535<br />
1 to 9999<br />
40001 to 49999 or<br />
400001 to 465535<br />
1 to 9999<br />
40001 to 49999 or<br />
400001 to 465535<br />
<strong>S7</strong>-<strong>1200</strong> <strong>Programmable</strong> <strong>controller</strong><br />
624 System Manual, 04/2012, A5E02486680-06
MB_MODE Modbus<br />
function<br />
Data length Operation and data MB_DATA_ADDR<br />
81 08 1 Reset server event counter using data<br />
diagnostic code 0x000A<br />
1 word per request<br />
3 to 10,<br />
12 to 79,<br />
82 to 255<br />
Reserved<br />
Communication processor<br />
12.5 Modbus communication<br />
Note<br />
MB_DATA_PTR assigns a buffer to store data read/written to/from a Modbus TCP server<br />
The data buffer can be in a standard global DB or M memory address.<br />
For a buffer in M memory, use the standard Any Pointer format. This is in the format P#"Bit<br />
Address" "Data Type" "Length", an example would be P#M1000.0 WORD 500.<br />
MB_DATA_PTR assigns a communication buffer<br />
● MB_CLIENT communication functions:<br />
– Read and write 1-bit data from Modbus server addresses (00001 to 09999)<br />
– Read 1-bit data from Modbus server addresses (10001 to 19999)<br />
– Read 16-bit word data from Modbus server addresses (30001 to 39999) and (40001 to<br />
49999)<br />
– Write 16-bit word data to Modbus server addresses (40001 to 49999)<br />
● Word or bit sized data is transferred to/from the DB or M memory buffer assigned by<br />
MB_DATA_PTR.<br />
● If a DB is assigned as the buffer by MB_DATA_PTR, then you must assign data types to<br />
all DB data elements.<br />
– The 1-bit Bool data type represents one Modbus bit address<br />
– 16-bit single word data types like WORD, UInt, and Int represent one Modbus word<br />
address<br />
– 32-bit double word data types like DWORD, DInt, and Real represent two Modbus<br />
word addresses<br />
<strong>S7</strong>-<strong>1200</strong> <strong>Programmable</strong> <strong>controller</strong><br />
System Manual, 04/2012, A5E02486680-06 625
Communication processor<br />
12.5 Modbus communication<br />
Multiple client connections<br />
● Complex DB elements can be assigned by MB_DATA_PTR, such as<br />
– Standard arrays<br />
– Named structures where each element is unique.<br />
– Named complex structures where each element has a unique name and a 16 or 32 bit<br />
data type.<br />
● There is no requirement that the MB_DATA_PTR data areas be in the same global data<br />
block (or M memory area). You can assign one data block for Modbus reads, another<br />
data block for Modbus writes, or one data block for each MB_CLIENT station.<br />
A Modbus TCP client can support concurrent connections up to the maximum number of<br />
Open User Communications connections allowed by the PLC. The total number of<br />
connections for a PLC, including Modbus TCP Clients and Servers, must not exceed the<br />
maximum number of supported Open User Communications connections (Page 424). The<br />
Modbus TCP connections may be shared between Client and/or Server type connections.<br />
Individual client connections must follow these rules:<br />
● Each MB_CLIENT connection must use a distinct instance DB<br />
● Each MB_CLIENT connection must specify a unique server IP address<br />
● Each MB_CLIENT connection must specify a unique connection ID<br />
● Unique IP port numbers may or may not be required depending upon the server<br />
configuration<br />
The Connection ID must be unique for each individual connection. This means a single,<br />
unique Connection ID must only be used with each individual instance DB. In summary, the<br />
instance DB and the Connection ID are paired together and must be unique for every<br />
connection.<br />
Table 12- 52 MB_CLIENT instance data block user accessible static variables<br />
Variable Data type Default description<br />
Blocked_Proc_Timeout Real 3.0 Amount of time (in seconds) to wait upon a blocked Modbus client<br />
instance before removing this instance as being ACTIVE. This can<br />
occur, for example, when a client request has been issued and then<br />
application stops executing the client function before it has completely<br />
finished the request. The maximum <strong>S7</strong>-<strong>1200</strong> limit is 55 seconds.<br />
MB_Unit_ID Word 255 Modbus unit identifier:<br />
A Modbus TCP server is addressed using its IP address. As a result,<br />
the MB_UNIT_ID parameter is not used for Modbus TCP addressing.<br />
The MB_UNIT_ID parameter corresponds to the slave address in the<br />
Modbus RTU protocol. If a Modbus TCP server is used for a gateway to<br />
a Modbus RTU protocol, the MB_UNIT_ID can be used to identify the<br />
slave device connected on the serial network. The MB_UNIT_ID would<br />
be used to forward the request to the correct Modbus RTU slave<br />
address.<br />
Please note that some Modbus TCP devices may require the<br />
MB_UNIT_ID parameter to be initialized within a restricted range of<br />
values.<br />
<strong>S7</strong>-<strong>1200</strong> <strong>Programmable</strong> <strong>controller</strong><br />
626 System Manual, 04/2012, A5E02486680-06
Communication processor<br />
12.5 Modbus communication<br />
Variable Data type Default description<br />
RCV_TIMEOUT Real 2.0 Time in seconds that the MB_CLIENT waits for a server to respond to a<br />
request.<br />
Connected Bool 0 Indicates whether the connection to the assigned server is connected<br />
or disconnected: 1=connected, 0=disconnected<br />
Table 12- 53 MB_CLIENT protocol errors<br />
STATUS<br />
(W#16#)<br />
Response code to<br />
Modbus client<br />
(B#16#)<br />
Modbus protocol errors<br />
8381 01 Function code not supported<br />
8382 03 Data length error<br />
8383 02 Data address error or access outside the bounds of the MB_HOLD_REG address area<br />
8384 03 Data value error<br />
8385 03 Data diagnostic code value not supported (function code 08)<br />
Table 12- 54 MB_CLIENT execution condition codes 1<br />
STATUS MB_CLIENT parameter errors<br />
(W#16#)<br />
7001 MB_CLIENT is waiting for a Modbus server response to a connect or disconnect request, on the assigned<br />
TCP port. This is only reported for the first execution of a connect or disconnect operation.<br />
7002 MB_CLIENT is waiting for a Modbus server response to a connect or disconnect request, for the assigned<br />
TCP port. This will be reported for any subsequent executions, while waiting for completion of a connect<br />
or disconnect operation.<br />
7003 A disconnect operation has successfully completed (Only valid for one PLC scan).<br />
80C8 The server did not respond in the assigned time. MB_CLIENT must receive a response using the<br />
transaction ID that was originally transmitted within the assigned time or this error is returned. Check the<br />
connection to the Modbus server device.<br />
This error is only reported after any configured retries (if applicable) have been attempted.<br />
8188 Invalid mode value<br />
8189 Invalid data address value<br />
818A Invalid data length value<br />
818B Invalid pointer to the DATA_PTR area. This can be the combination of MB_DATA_ADDRESS +<br />
MB_DATA_LEN.<br />
818C Pointer to a optimized DATA_PTR area (must be a standard DB area or M memory area)<br />
8200 The port is busy processing an existing Modbus request.<br />
8380 Received Modbus frame is malformed or too few bytes have been received.<br />
<strong>S7</strong>-<strong>1200</strong> <strong>Programmable</strong> <strong>controller</strong><br />
System Manual, 04/2012, A5E02486680-06 627
Communication processor<br />
12.5 Modbus communication<br />
STATUS MB_CLIENT parameter errors<br />
(W#16#)<br />
8387 The assigned Connection ID parameter is different from the ID used for previous requests. There can only<br />
be a single Connection ID used within each MB_CLIENT instance DB.<br />
This is also used as an internal error if the Modbus TCP protocol ID received from a server is not 0.<br />
8388 A Modbus server returned a quantity of data that is different than what was requested. This applies to<br />
Modbus functions 15 or 16 only.<br />
1 In addition to the MB_CLIENT errors listed above, errors can be returned from the underlying T block communication<br />
instructions (TCON, TDISCON, TSEND, and TRCV).<br />
See also<br />
TCON, TDISCON, TSEND, AND TRCV (Page 439)<br />
12.5.2.2 MB_SERVER (Modbus TCP)<br />
Table 12- 55 MB_SERVER instruction<br />
LAD / FBD SCL Description<br />
Table 12- 56 Data types for the parameters<br />
"MB_SERVER_DB"(<br />
DISCONNECT:=_bool_in_,<br />
CONNECT_ID:=_uint_in_,<br />
IP_PORT:=_uint_in_,<br />
NDR=>_bool_out_,<br />
DR=>_bool_out_,<br />
ERROR=>_bool_out_,<br />
STATUS=>_word_out_,<br />
MB_HOLD_REG:=_variant_inout_);<br />
MB_SERVER communicates as a<br />
Modbus TCP server through the<br />
PROFINET connector on the <strong>S7</strong>-<strong>1200</strong><br />
CPU. No additional communication<br />
hardware module is required.<br />
MB_SERVER can accept a request to<br />
connect with Modbus TCP client ,<br />
receive a Modbus function request, and<br />
send a response message.<br />
Parameter and type Data type Description<br />
DISCONNECT IN Bool MB_SERVER attempts to make a "passive" connection with a partner device.<br />
This means that the server is passively listening for a TCP connection request<br />
from any requesting IP address.<br />
If DISCONNECT = 0 and a connection does not exist, then a passive<br />
connection can be initiated.<br />
If DISCONNECT = 1 and a connection exists, then a disconnect operation is<br />
initiated. This allows your program to control when a connection is accepted.<br />
Whenever this input is enabled, no other operation will be attempted.<br />
CONNECT_ID IN UInt CONNECT_ID uniquely identifies each connection within the PLC. Each<br />
unique instance of the MB_CLIENT or MB_SERVER instruction must contain a<br />
unique CONNECT_ID parameter.<br />
<strong>S7</strong>-<strong>1200</strong> <strong>Programmable</strong> <strong>controller</strong><br />
628 System Manual, 04/2012, A5E02486680-06
Communication processor<br />
12.5 Modbus communication<br />
Parameter and type Data type Description<br />
IP_PORT IN UInt Default value = 502: The IP port number that identifies the IP port that will be<br />
monitored for a connection request from a Modbus client.<br />
These TCP port numbers are not allowed for a MB_SERVER passive<br />
connection: 20, 21, 25, 80, 102, 123, 5001, 34962, 34963, and 34964.<br />
MB_HOLD_REG IN_OUT Variant Pointer to the MB_SERVER Modbus holding register: The holding register<br />
must either be a standard global DB or a M memory address. This memory<br />
area is used to hold the values a Modbus client is allowed to access using<br />
Modbus register functions 3 (read), 6 (write), and 16 (write).<br />
NDR OUT Bool New Data Ready: 0 = No new data, 1 = Indicates that new data has been<br />
written by a Modbus client<br />
DR OUT Bool Data Read: 0 = No data read, 1 = Indicates that data has been read by a<br />
Modbus client.<br />
ERROR OUT Bool The ERROR bit is TRUE for one scan, after MB_SERVER execution was<br />
terminated with an error. The error code value at the STATUS parameter is<br />
valid only during the single cycle where ERROR = TRUE.<br />
STATUS OUT Word Execution condition code<br />
MB_SERVER allows incoming Modbus function codes (1, 2, 4, 5, and 15) to read or write<br />
bits and words directly in the input process image and output process image of the <strong>S7</strong>-<strong>1200</strong><br />
CPU. For data transfer function codes (3, 6, and 16), the MB_HOLD_REG parameter must<br />
be defined as a data type larger than a byte. The following table shows the mapping of<br />
Modbus addresses to the process image in the CPU.<br />
Table 12- 57 Mapping of Modbus addresses to the process image<br />
Modbus functions <strong>S7</strong>-<strong>1200</strong><br />
Codes Function Data area Address range Data area CPU address<br />
01 Read bits Output 1 To 8192 Output Process Image Q0.0 to Q1023.7<br />
02 Read bits Input 10001 To 18192 Input Process Image I0.0 to I1023.7<br />
04 Read words Input 30001 To 30512 Input Process Image IW0 to IW1022<br />
05 Write bit Output 1 To 8192 Output Process Image Q0.0 to Q1023.7<br />
15 Write bits Output 1 To 8192 Output Process Image Q0.0 to Q1023.7<br />
Incoming Modbus message function codes function codes (3, 6, and 16) read or write words<br />
in a Modbus holding register which can be an M memory address range or a data block. The<br />
type of holding register is specified by the MB_HOLD_REG parameter.<br />
Note<br />
MB_HOLD_REG parameter assignment<br />
The Modbus Holding Register can be in a standard global DB or a M memory address.<br />
For A Modbus holding register in M memory, use the standard Any Pointer format. This is in<br />
the format P#"Bit Address" "Data Type" "Length". An example would be P#M1000.0 WORD<br />
500<br />
<strong>S7</strong>-<strong>1200</strong> <strong>Programmable</strong> <strong>controller</strong><br />
System Manual, 04/2012, A5E02486680-06 629
Communication processor<br />
12.5 Modbus communication<br />
The following table shows examples of Modbus address to holding register mapping used for<br />
Modbus function codes 03 (read words), 06 (write word), and 16 (write words). The actual<br />
upper limit of DB addresses is determined by the maximum work memory limit and M<br />
memory limit, for each CPU model.<br />
Table 12- 58 Mapping examples of Modbus address to CPU memory address<br />
Modbus Address<br />
MB_HOLD_REG parameter examples<br />
P#M100.0 Word 5 P#DB10.DBx0.0 Word 5 "Recipe".ingredient<br />
40001 MW100 DB10.DBW0 "Recipe".ingredient[1]<br />
40002 MW102 DB10.DBW2 "Recipe".ingredient[2]<br />
40003 MW104 DB10.DBW4 "Recipe".ingredient[3]<br />
40004 MW106 DB10.DBW6 "Recipe".ingredient[4]<br />
40005 MW108 DB10.DBW8 "Recipe".ingredient[5]<br />
Multiple server connections<br />
Multiple server connections may be created. This permits a single PLC to establish<br />
concurrent connections to multiple Modbus TCP clients.<br />
A Modbus TCP server can support concurrent connections up to the maximum number of<br />
Open User Communications connections allowed by the PLC. The total number of<br />
connections for a PLC, including Modbus TCP Clients and Servers, must not exceed the<br />
maximum number of supported Open User Communications connections (Page 424). The<br />
Modbus TCP connections may be shared between Client and/or Server type connections.<br />
Individual server connection must follow these rules:<br />
● Each MB_SERVER connection must use a distinct instance DB.<br />
● Each MB_SERVER connection must be established with a unique IP port number. Only 1<br />
connection per port is supported.<br />
● Each MB_SERVER connection must use a unique connection ID.<br />
● The MB_SERVER must be called individually for each connection (with its respective<br />
instance DB).<br />
The Connection ID must be unique for each individual connection. This means a single,<br />
unique Connection ID must only be used with each individual instance DB. In summary, the<br />
instance DB and the Connection ID are paired together and must be unique for every<br />
connection.<br />
<strong>S7</strong>-<strong>1200</strong> <strong>Programmable</strong> <strong>controller</strong><br />
630 System Manual, 04/2012, A5E02486680-06
Table 12- 59 Modbus diagnostic function codes<br />
Communication processor<br />
12.5 Modbus communication<br />
MB_SERVER Modbus diagnostic functions<br />
Codes Sub-function Description<br />
08 0x0000 Return query data echo test: The MB_SERVER will echo back to a Modbus client a word of data<br />
that is received.<br />
08 0x000A Clear communication event counter: The MB_SEVER will clear out the communication event<br />
counter that is used for Modbus function 11.<br />
11 Get communication event counter: The MB_SERVER uses an internal communication event<br />
counter for recording the number of successful Modbus read and write requests that are sent to<br />
the Modbus server. The counter does not increment on any Function 8 or Function 11 requests. It<br />
is also not incremented on any requests that result in a communication error.<br />
The broadcast function is not available for Modbus TCP, because only one client-server<br />
connection exists at any one time.<br />
MB_SERVER variables<br />
This table shows the public static variables stored in the MB_SERVER instance data block<br />
that can be used in your program<br />
Table 12- 60 MB_SERVER public static variables<br />
Variable Data type Default<br />
value<br />
Description<br />
HR_Start_Offset Word 0 Assigns the starting address of the Modbus Holding register<br />
Request_Count Word 0 The number of all requests received by this server.<br />
Server_Message_Count Word 0 The number of requests received for this specific server.<br />
Xmt_Rcv_Count Word 0 The number of transmissions or receptions that have encountered an<br />
error. Also, incremented if a message is received that is an invalid<br />
Modbus message.<br />
Exception_Count Word 0 Modbus specific errors that require a returned exception<br />
Success_Count Word 0 The number of requests received for this specific server that have no<br />
protocol errors.<br />
Connected Bool 0 Indicates whether the connection to the assigned client is connected or<br />
disconnected: 1=connected, 0=disconnected<br />
HR_Start_Offset<br />
Your program can write values to the HR_Start_Offset and control Modbus server<br />
operations. The other variables can be read to monitor Modbus status.<br />
Modbus holding register addresses begin at 40001 . These addresses correspond to the<br />
beginning PLC memory address of the holding register. However, you can configure the<br />
"HR_Start_Offset" variable to start the beginning Modbus holding register address at another<br />
value instead of 40001.<br />
For example, if the holding register is configured to start at MW100 and is 100 words long.<br />
An offset of 20 specifies a beginning holding register address of 40021 instead of 40001.<br />
Any address below 40021 and above 40119 will result in an addressing error.<br />
<strong>S7</strong>-<strong>1200</strong> <strong>Programmable</strong> <strong>controller</strong><br />
System Manual, 04/2012, A5E02486680-06 631
Communication processor<br />
12.5 Modbus communication<br />
Table 12- 61 Example of Modbus holding register addressing<br />
HR_Start_Offset Address Minimum Maximum<br />
0<br />
20<br />
Modbus address (Word) 40001 40099<br />
<strong>S7</strong>-<strong>1200</strong> address MW100 MW298<br />
Modbus address (Word) 40021 40119<br />
<strong>S7</strong>-<strong>1200</strong> address MW100 MW298<br />
HR_Start_Offset is a word value that specifies the starting address of the Modbus holding<br />
register and is stored in the MB_SERVER instance data block. You can set this public static<br />
variable value by using the parameter helper drop-list, after MB_SERVER is placed in your<br />
program.<br />
For example, after MB_SERVER is placed in a LAD network, you can go to a previous<br />
network and assign the HR_Start_Offset value. The value must be assigned prior to<br />
execution of MB_SERVER.<br />
Table 12- 62 MB_SERVER execution condition codes 1<br />
STATUS<br />
(W#16#)<br />
Response code to<br />
Modbus server<br />
(B#16#)<br />
Modbus protocol errors<br />
Entering a Modbus server<br />
variable using the default DB name:<br />
1. Set the cursor in the parameter field and<br />
type an m character.<br />
2. Select "MB_SERVER_DB" from the droplist<br />
of DB names.<br />
3. Select<br />
"MB_SERVER_DB.HR_Start_Offset" from<br />
the drop-list of DB variables.<br />
7001 MB_SERVER is waiting for a Modbus client to connect to the assigned TCP port. This<br />
code is reported on the first execution of a connect or disconnect operation.<br />
7002 MB_SERVER is waiting for a Modbus client to connect to the assigned TCP port. This<br />
code is reported for any subsequent executions, while waiting for completion of a<br />
connect or disconnect operation.<br />
7003 A disconnect operation has successfully completed (Only valid for one PLC scan).<br />
8187 Invalid pointer to MB_HOLD_REG: area is too small<br />
<strong>S7</strong>-<strong>1200</strong> <strong>Programmable</strong> <strong>controller</strong><br />
632 System Manual, 04/2012, A5E02486680-06
STATUS<br />
(W#16#)<br />
Response code to<br />
Modbus server<br />
(B#16#)<br />
Modbus protocol errors<br />
Communication processor<br />
12.5 Modbus communication<br />
818C Pointer to a optimized MB_HOLD_REG area (must be a standard DB area or M<br />
memory area) or Blocked process timeout exceeds the limit of 55 seconds. (<strong>S7</strong>-<strong>1200</strong><br />
specific)<br />
8381 01 Function code not supported<br />
8382 03 Data length error<br />
8383 02 Data address error or access outside the bounds of the MB_HOLD_REG address area<br />
8384 03 Data value error<br />
8385 03 Data diagnostic code value not supported (function code 08)<br />
See also<br />
1 In addition to the MB_SERVER errors listed above, errors can be returned from the<br />
underlying T block communication instructions (TCON, TDISCON, TSEND, and TRCV).<br />
TCON, TDISCON, TSEND, AND TRCV (Page 439)<br />
12.5.2.3 MB_SERVER example: Multiple TCP connections<br />
You can have multiple Modbus TCP server connections. To accomplish this, MB_SERVER<br />
must be independently executed for each connection. Each connection must use an<br />
independent instance DB, connection ID, and IP port. The <strong>S7</strong>-<strong>1200</strong> allows only one<br />
connection per IP port.<br />
For best performance, MB_SERVER should be executed every cycle for each connection.<br />
Network 1: Connection #1 with independent IP_PORT, connection ID, and instance DB<br />
<strong>S7</strong>-<strong>1200</strong> <strong>Programmable</strong> <strong>controller</strong><br />
System Manual, 04/2012, A5E02486680-06 633
Communication processor<br />
12.5 Modbus communication<br />
Network 2: Connection #2 with independent IP_PORT, connection ID, and instance DB<br />
12.5.2.4 MB_CLIENT example 1: Multiple requests with common TCP connection<br />
Multiple Modbus client requests can be sent over the same connection. To accomplish this,<br />
use the same instance DB, connection ID, and port number.<br />
Only 1 client can be active at any given time. Once a client completes its execution, the next<br />
client begins execution. Your program is responsible for the order of execution.<br />
The example shows both clients writing to the same memory area. Also, a returned error is<br />
captured which is optional.<br />
Network 1: Modbus function 1 - Read 16 output image bits<br />
<strong>S7</strong>-<strong>1200</strong> <strong>Programmable</strong> <strong>controller</strong><br />
634 System Manual, 04/2012, A5E02486680-06
Network 2: Modbus function 2 - Read 32 input image bits<br />
Communication processor<br />
12.5 Modbus communication<br />
12.5.2.5 MB_CLIENT example 2: Multiple requests with different TCP connections<br />
Modbus client requests can be sent over different connections. To accomplish this, different<br />
instance DBs, IP addresses, and connection IDs must be used.<br />
The port number must be different if the connections are established to the same Modbus<br />
server. If the connections are on different servers, there is no port number restriction.<br />
The example shows both clients writing to the same memory area. Also, a returned error is<br />
captured which is optional.<br />
Network 1:<br />
Modbus function 4 - Read input words (in <strong>S7</strong>-<strong>1200</strong> memory)<br />
<strong>S7</strong>-<strong>1200</strong> <strong>Programmable</strong> <strong>controller</strong><br />
System Manual, 04/2012, A5E02486680-06 635
Communication processor<br />
12.5 Modbus communication<br />
Network 2:<br />
Modbus function 3 - Read holding register words (in <strong>S7</strong>-<strong>1200</strong> memory)<br />
12.5.2.6 MB_CLIENT example 3: Output image write request<br />
This example shows a Modbus client request to write the <strong>S7</strong>-<strong>1200</strong> output image.<br />
Network 1: Modbus function 15 - Write <strong>S7</strong>-<strong>1200</strong> output image bits<br />
12.5.2.7 MB_CLIENT example 4: Coordinating multiple requests<br />
You must ensure that each individual Modbus TCP request finishes execution. This<br />
coordination must be provided by your program. The example below shows how the outputs<br />
of the first and second client requests can be used to coordinate execution.<br />
<strong>S7</strong>-<strong>1200</strong> <strong>Programmable</strong> <strong>controller</strong><br />
636 System Manual, 04/2012, A5E02486680-06
12.5.3 Modbus RTU<br />
Communication processor<br />
12.5 Modbus communication<br />
The example shows both clients writing to the same memory area. Also, a returned error is<br />
captured which is optional.<br />
Network 1: Modbus function 3 - Read holding register words<br />
Network 2: Modbus function 3 - Read holding register words<br />
There are two versions of the Modbus RTU instructions available in STEP 7:<br />
● Version 1 was initially available in STEP 7 Basic V10.5.<br />
● Version 2 is available in STEP 7 Basic/Professional V11. The version 2 design adds REQ<br />
and DONE parameters to MB_COMM_LOAD. Also, the MB_ADDR parameter for<br />
MB_MASTER and MB_SLAVE now allows a UInt value for extended addressing.<br />
For compatibility and ease of migration, you can choose which instruction version to insert<br />
into your user program.<br />
<strong>S7</strong>-<strong>1200</strong> <strong>Programmable</strong> <strong>controller</strong><br />
System Manual, 04/2012, A5E02486680-06 637
Communication processor<br />
12.5 Modbus communication<br />
12.5.3.1 MB_COMM_LOAD<br />
Do not use both 1.x and 2.y instruction versions in the same CPU program. Your program's<br />
Modbus instructions must have the same major version number (1.x, 2.y, or V.z). The<br />
individual instructions within a major version group may have different minor versions (1.x).<br />
Click the icon on the instruction tree task card to enable the headers and columns<br />
of the instruction tree.<br />
To change the version of the Modbus<br />
instructions, select the version from the dropdown<br />
list. You can select the group or<br />
individual instructions.<br />
When you use the instruction tree to place a Modbus instruction in your program, a new FB<br />
instance is created in the project tree. You can see new FB instance in the project tree under<br />
PLC_x > Program blocks > System blocks > Program resources.<br />
To verify the version of a Modbus instruction in a program, you must inspect project tree<br />
properties and not the properties of a box displayed in the program editor. Select a project<br />
tree Modbus FB instance, right-click, select "Properties", and select the "Information" page to<br />
see the Modbus instruction version number.<br />
Table 12- 63 MB_COMM_LOAD instruction<br />
LAD / FBD SCL Description<br />
"MB_COMM_LOAD_DB"(<br />
REQ:=_bool_in,<br />
PORT:=_uint_in_,<br />
BAUD:=_udint_in_,<br />
PARITY:=_uint_in_,<br />
FLOW_CTRL:=_uint_in_,<br />
RTS_ON_DLY:=_uint_in_,<br />
RTS_OFF_DLY:=_uint_in_,<br />
RESP_TO:=_uint_in_,<br />
DONE=>_bool_out,<br />
ERROR=>_bool_out_,<br />
STATUS=>_word_out_,<br />
MB_DB:=_fbtref_inout_);<br />
The MB_COMM_LOAD instruction configures a<br />
PtP port for Modbus RTU protocol<br />
communications. Modbus port hardware options:<br />
Install up to three CMs (RS485 or RS232), plus<br />
one CB (R4845). An instance data block is<br />
assigned automatically when you place the<br />
MB_COMM_LOAD instruction in your program.<br />
<strong>S7</strong>-<strong>1200</strong> <strong>Programmable</strong> <strong>controller</strong><br />
638 System Manual, 04/2012, A5E02486680-06
Table 12- 64 Data types for the parameters<br />
Communication processor<br />
12.5 Modbus communication<br />
Parameter and type Data type Description<br />
REQ IN Bool A low to high (positive edge) signal starts the operation.<br />
(Version 2.0 only)<br />
PORT IN Port After you install and configure a CM or CB communication device, the<br />
port identifier appears in the parameter helper drop-list available at the<br />
PORT box connection. The assigned CM or CB port value is the device<br />
configuration property "hardware identifier". The port symbolic name is<br />
assigned in the "System constants" tab of the PLC tag table.<br />
BAUD IN UDInt Baud rate selection:<br />
300, 600, <strong>1200</strong>, 2400, 4800, 9600, 19200, 38400, 57600, 76800, 115200,<br />
all other values are invalid<br />
PARITY IN UInt Parity selection:<br />
0 – None<br />
1 – Odd<br />
2 – Even<br />
FLOW_CTRL IN UInt Flow control selection:<br />
0 – (default) no flow control<br />
1 – Hardware flow control with RTS always ON (does not apply to<br />
RS485 ports)<br />
2 – Hardware flow control with RTS switched<br />
RTS_ON_DLY IN UInt RTS ON delay selection:<br />
0 – (default) No delay from RTS active until the first character of the<br />
message is transmitted<br />
1 to 65535 – Delay in milliseconds from RTS active until the first<br />
character of the message is transmitted (does not apply to RS485<br />
ports). RTS delays shall be applied independent of the FLOW_CTRL<br />
selection.<br />
RTS_OFF_DLY IN UInt RTS OFF delay selection:<br />
0 – (default) No delay from the last character transmitted until RTS<br />
goes inactive<br />
1 to 65535 – Delay in milliseconds from the last character transmitted<br />
until RTS goes inactive (does not apply to RS485 ports). RTS delays<br />
shall be applied independent of the FLOW_CTRL selection.<br />
RESP_TO IN UInt Response timeout:<br />
Time in milliseconds allowed by MB_MASTER for the slave to respond. If<br />
the slave does not respond in this time period, MB_MASTER will retry the<br />
request or terminate the request with an error when the specified number<br />
of retries has been sent.<br />
5 ms to 65535 ms (default value = 1000 ms).<br />
MB_DB IN Variant A reference to the instance data block used by the MB_MASTER or<br />
MB_SLAVE instructions. After MB_SLAVE or MB_MASTER is placed in<br />
your program, the DB identifier appears in the parameter helper drop-list<br />
available at the MB_DB box connection.<br />
DONE OUT Bool The DONE bit is TRUE for one scan, after the last request was completed<br />
with no error. (Version 2.0 only)<br />
<strong>S7</strong>-<strong>1200</strong> <strong>Programmable</strong> <strong>controller</strong><br />
System Manual, 04/2012, A5E02486680-06 639
Communication processor<br />
12.5 Modbus communication<br />
Parameter and type Data type Description<br />
ERROR OUT Bool The ERROR bit is TRUE for one scan, after the last request was<br />
terminated with an error. The error code value at the STATUS parameter<br />
is valid only during the single scan where ERROR = TRUE.<br />
STATUS OUT Word Execution condition code<br />
MB_COMM_LOAD is executed to configure a port for the Modbus RTU protocol. Once a port<br />
is configured for the Modbus RTU protocol, it can only be used by either the MB_MASTER or<br />
MB_SLAVE instructions.<br />
One execution of MB_COMM_LOAD must be used to configure each communication port<br />
that is used for Modbus communication. Assign a unique MB_COMM_LOAD instance DB for<br />
each port that you use. You can install up to three communication modules (RS232 or<br />
RS485) and one communication board (RS485) in the CPU. Call MB_COMM_LOAD from a<br />
startup OB and execute it one time or use the first scan system flag (Page 84) to initiate the<br />
call to execute it one time. Only execute MB_COMM_LOAD again if communication<br />
parameters like baud rate or parity must change.<br />
An instance data block is assigned for MB_MASTER or MB_SLAVE when you place these<br />
instructions in your program. This instance data block is referenced when you specify the<br />
MB_DB parameter for the MB_COMM_LOAD instruction.<br />
MB_COMM_LOAD data block variables<br />
The following table shows the public static variables stored in the instance DB for the<br />
MB_COMM_LOAD that can be used in your program.<br />
Table 12- 65 Static variables in the instance DB<br />
Variable Data type Description<br />
ICHAR_GAP Word Delay for Inter-character gap between characters. This parameter is specified<br />
in milliseconds and is used to increase the expected amount of time between<br />
received characters. The corresponding number of bit times for this parameter<br />
is added to the Modbus default of 35 bit times (3.5 character times).<br />
RETRIES Word Number of retries that the master will attempt before returning the no response<br />
error code 0x80C8.<br />
Table 12- 66 MB_COMM_LOAD execution condition codes 1<br />
STATUS (W#16#) Description<br />
0000 No error<br />
8180 Invalid port ID value (wrong port/hardware identifier for communication module)<br />
8181 Invalid baud rate value<br />
8182 Invalid parity value<br />
8183 Invalid flow control value<br />
<strong>S7</strong>-<strong>1200</strong> <strong>Programmable</strong> <strong>controller</strong><br />
640 System Manual, 04/2012, A5E02486680-06
Communication processor<br />
12.5 Modbus communication<br />
STATUS (W#16#) Description<br />
8184 Invalid response timeout value (response timeout less than the 5 ms minimum)<br />
8185 MB_DB parameter is not an instance data block of a MB_MASTER or MB_SLAVE<br />
instruction.<br />
1 In addition to the MB_COMM_LOAD errors listed above, errors can be returned from the underlying PtP communication<br />
instructions.<br />
See also<br />
12.5.3.2 MB_MASTER<br />
Table 12- 67 MB_MASTER instruction<br />
Point-to-Point instructions (Page 566)<br />
LAD / FBD SCL Description<br />
Table 12- 68 Data types for the parameters<br />
"MB_MASTER_DB"(<br />
REQ:=_bool_in_,<br />
MB_ADDR:=_uint_in_,<br />
MODE:=_usint_in_,<br />
DATA_ADDR:=_udint_in_,<br />
DATA_LEN:=_uint_in_,<br />
DONE=>_bool_out_,<br />
BUSY=>_bool_out_,<br />
ERROR=>_bool_out_,<br />
STATUS=>_word_out_,<br />
DATA_PTR:=_variant_inout_);<br />
The MB_MASTER instruction communicates as a<br />
Modbus master using a port that was configured by<br />
a previous execution of the MB_COMM_LOAD<br />
instruction. An instance data block is assigned<br />
automatically when you place the MB_MASTER<br />
instruction in your program. This MB_MASTER<br />
instance data block is used when you specify the<br />
MB_DB parameter for the MB_COMM_LOAD<br />
instruction.<br />
Parameter and type Data type Description<br />
REQ IN Bool 0=No request<br />
1= Request to transmit data to Modbus slave<br />
MB_ADDR IN V1.0: USInt Modbus RTU station address:<br />
V2.0: UInt Standard addressing range (1 to 247)<br />
Extended addressing range (1 to 65535)<br />
The value of 0 is reserved for broadcasting a message to all Modbus<br />
slaves. Modbus function codes 05, 06, 15 and 16 are the only function<br />
codes supported for broadcast.<br />
MODE IN USInt Mode Selection: Specifies the type of request (read, write, or diagnostic).<br />
See the Modbus functions table below for details.<br />
DATA_ADDR IN UDInt Starting Address in the slave: Specifies the starting address of the data to<br />
be accessed in the Modbus slave. See the Modbus functions table below<br />
for valid addresses.<br />
DATA_LEN IN UInt Data Length: Specifies the number of bits or words to be accessed in this<br />
request. See the Modbus functions table below for valid lengths.<br />
<strong>S7</strong>-<strong>1200</strong> <strong>Programmable</strong> <strong>controller</strong><br />
System Manual, 04/2012, A5E02486680-06 641
Communication processor<br />
12.5 Modbus communication<br />
Parameter and type Data type Description<br />
DATA_PTR IN Variant Data Pointer: Points to the M or DB address (Standard DB type) for the<br />
data being written or read.<br />
DONE OUT Bool The DONE bit is TRUE for one scan, after the last request was completed<br />
with no error.<br />
BUSY OUT Bool 0 – No MB_MASTER operation in progress<br />
1 – MB_MASTER operation in progress<br />
ERROR OUT Bool The ERROR bit is TRUE for one scan, after the last request was<br />
terminated with an error. The error code value at the STATUS parameter<br />
is valid only during the single scan where ERROR = TRUE.<br />
STATUS OUT Word Execution condition code<br />
Modbus master communication rules<br />
● MB_COMM_LOAD must be executed to configure a port before a MB_MASTER<br />
instruction can communicate with that port.<br />
● If a port is to be used to initiate Modbus master requests, that port should not be used by<br />
MB_SLAVE . One or more instances of MB_MASTER execution can be used with that<br />
port, but all MB_MASTER execution must use the same MB_MASTER instance DB for<br />
that port.<br />
● The Modbus instructions do not use communication interrupt events to control the<br />
communication process. Your program must poll the MB_MASTER instruction for transmit<br />
and receive complete conditions.<br />
● It is recommended that you call all MB_MASTER execution for a given port from a<br />
program cycle OB. Modbus master instructions may execute in only one of the program<br />
cycle or cyclic/time delay execution levels. They must not execute in both execution<br />
priority levels. Pre-emption of a Modbus Master instruction by another Modbus master<br />
instruction in a higher priority execution priority level will result in improper operation.<br />
Modbus master instructions must not execute in the startup, diagnostic or time error<br />
execution priority levels.<br />
● Once a master instruction initiates a transmission, this instance must be continually<br />
executed with the EN input enabled until a DONE=1 state or ERROR=1 state is returned.<br />
A particular MB_MASTER instance is considered active until one of these two events<br />
occurs. While the original instance is active, any call to any other instance with the REQ<br />
input enabled will result in an error. If the continuous execution of the original instance<br />
stops, the request state remains active for a period of time specified by the static variable<br />
Blocked_Proc_Timeout. Once this period of time expires, the next master instruction<br />
called with an enabled REQ input will become the active instance. This prevents a single<br />
Modbus master instance from monopolizing or locking access to a port. If the original<br />
active instance is not enabled within the period of time specified by the static variable<br />
"Blocked_Proc_Timeout", then the next execution by this instance (with REQ not set) will<br />
clear the active state. If (REQ is set), then this execution initiates a new master request<br />
as if no other instance was active.<br />
<strong>S7</strong>-<strong>1200</strong> <strong>Programmable</strong> <strong>controller</strong><br />
642 System Manual, 04/2012, A5E02486680-06
REQ parameter<br />
Communication processor<br />
12.5 Modbus communication<br />
0 = No request; 1 = Request to transmit data to Modbus Slave<br />
You may control this input either through the use of a level or edge triggered contact.<br />
Whenever this input is enabled, a state machine is started to ensure that no other<br />
MB_MASTER using the same instance DB is allowed to issue a request, until the current<br />
request is completed. All other input states are captured and held internally for the current<br />
request, until the response is received or an error detected.<br />
If the same instance of MB_MASTER is executed again with REQ input = 1 before the<br />
completion of the current request, then no subsequent transmissions are made. However,<br />
when the request is completed, a new request is issued whenever MB_MASTER is executed<br />
again with REQ input = 1.<br />
DATA_ADDR and MODE parameters select the Modbus function type<br />
DATA_ADDR (starting Modbus address in the slave): Specifies the starting address of the<br />
data to be accessed in the Modbus slave.<br />
The MB_MASTER instruction uses a MODE input rather than a Function Code input. The<br />
combination of MODE and Modbus address determine the Function Code that is used in the<br />
actual Modbus message. The following table shows the correspondence between parameter<br />
MODE, Modbus function code, and Modbus address range.<br />
Table 12- 69 Modbus functions<br />
MODE Modbus<br />
Function<br />
0 01 1 to 2000<br />
1 to 1992 1<br />
0 02 1 to 2000<br />
1 to 1992 1<br />
0 03 1 to 125<br />
1 to 124 1<br />
0 04 1 to 125<br />
1 to 124 1<br />
Data length Operation and data Modbus<br />
Address<br />
Read output bits:<br />
1 to (1992 or 2000) bits per request<br />
Read input bits:<br />
1 to (1992 or 2000) bits per request<br />
Read Holding registers:<br />
1 to (124 or 125) words per request<br />
Read input words:<br />
1 to (124 or 125) words per request<br />
1 05 1 Write one output bit:<br />
One bit per request<br />
1 06 1 Write one holding register:<br />
1 word per request<br />
1 15 2 to 1968<br />
2 to 1960 1<br />
1 16 2 to 123<br />
2 to 122 1<br />
2 15 1 to 1968<br />
2 to 1960 1<br />
2 16 1 to 123<br />
1 to 122 1<br />
Write multiple output bits:<br />
2 to (1960 or 1968) bits per request<br />
Write multiple holding registers:<br />
2 to (122 or 123) words per request<br />
Write one or more output bits:<br />
1 to (1960 or 1968) bits per request<br />
Write one or more holding registers:<br />
1 to (122 or 123) words per request<br />
1 to 9999<br />
10001 to 19999<br />
40001 to 49999 or<br />
400001 to 465535<br />
30001 to 39999<br />
1 to 9999<br />
40001 to 49999 or<br />
400001 to 465535<br />
1 to 9999<br />
40001 to 49999 or<br />
400001 to 465535<br />
1 to 9999<br />
40001 to 49999 or<br />
400001 to 465535<br />
<strong>S7</strong>-<strong>1200</strong> <strong>Programmable</strong> <strong>controller</strong><br />
System Manual, 04/2012, A5E02486680-06 643
Communication processor<br />
12.5 Modbus communication<br />
MODE Modbus<br />
Function<br />
Data length Operation and data Modbus<br />
Address<br />
11 11 0 Read the slave communication status word and event<br />
counter. The status word indicates busy (0 – not busy,<br />
0xFFFF - busy). The event counter is incremented for<br />
each successful completion of a message.<br />
Both the DATA_ADDR and DATA_LEN operands of<br />
MB_MASTER are ignored for this function.<br />
80 08 1 Check slave status using data diagnostic code 0x0000<br />
(Loopback test – slave echoes the request)<br />
1 word per request<br />
81 08 1 Reset slave event counter using data diagnostic code<br />
0x000A<br />
1 word per request<br />
3 to 10,<br />
12 to 79,<br />
82 to 255<br />
Reserved<br />
1 For "Extended Addressing" mode the maximum data lengths are reduced by 1 byte or 1 word depending upon the data<br />
type used by the function.<br />
DATA_PTR parameter<br />
The DATA_PTR parameter points to the DB or M address that is written to or read from. If<br />
you use a data block, then you must create a global data block that provides data storage for<br />
reads and writes to Modbus slaves.<br />
Note<br />
The DATA_PTR data block type must allow direct addressing<br />
The data block must allow both direct (absolute) and symbolic addressing. When you create<br />
the data block the "Standard" access attribute must be selected.<br />
<strong>S7</strong>-<strong>1200</strong> <strong>Programmable</strong> <strong>controller</strong><br />
644 System Manual, 04/2012, A5E02486680-06
Communication processor<br />
12.5 Modbus communication<br />
Data block structures for the DATA_PTR parameter<br />
● These data types are valid for word reads of Modbus addresses 30001 to 39999, 40001<br />
to 49999, and 400001 to 465536 and also for word writes to Modbus addresses 40001 to<br />
49999 and 400001 to 465536.<br />
– Standard array of WORD, UINT, or INT data types<br />
– Named WORD, UINT, or INT structure where each element has a unique name and<br />
16 bit data type.<br />
– Named complex structure where each element has a unique name and a 16 or 32 bit<br />
data type.<br />
● For bit reads and writes of Modbus addresses 00001 to 09999 and bit reads of 10001 to<br />
19999.<br />
– Standard array of Boolean data types.<br />
– Named Boolean structure of uniquely named Boolean variables..<br />
● Although not required, it is recommended that each MB_MASTER instruction have its<br />
own separate memory area. The reason for this recommendation is that there is a greater<br />
possibility of data corruption if multiple MB_MASTER instructions are reading and writing<br />
to the same memory area.<br />
● There is no requirement that the DATA_PTR data areas be in the same global data block.<br />
You can create one data block with multiple areas for Modbus reads, one data block for<br />
Modbus writes, or one data block for each slave station.<br />
Modbus master data block variables<br />
The following table shows the public static variables stored in the instance DB for<br />
MB_MASTER that can be used in your program.<br />
Table 12- 70 Static variables in the instance DB<br />
Variable Data type Initial value Description<br />
Blocked_Proc_T<br />
imeout<br />
Extended_Addr<br />
essing<br />
Real 3.0 Amount of time (in seconds) to wait for a blocked Modbus Master instance<br />
before removing this instance as being ACTIVE. This can occur, for example,<br />
when a Master request has been issued and then the program stops calling<br />
the Master function before it has completely finished the request. The time<br />
value must be greater than 0 and less than 55 seconds, or an error occurs.<br />
The default value is .5 seconds.<br />
Bool False Configures single or double-byte slave addressing. The default value = 0.<br />
(0=single byte address, 1=double-byte address)<br />
Your program can write values to the Blocked_Proc_Timeout and Extended_Addressing<br />
variables to control Modbus master operations. See the MB_SLAVE topic description of<br />
HR_Start_Offset and Extended_Addressing for an example of how to use these variables in<br />
the program editor and details about Modbus extended addressing (Page 647).<br />
<strong>S7</strong>-<strong>1200</strong> <strong>Programmable</strong> <strong>controller</strong><br />
System Manual, 04/2012, A5E02486680-06 645
Communication processor<br />
12.5 Modbus communication<br />
Condition codes<br />
Table 12- 71 MB_MASTER execution condition codes (communication and configuration errors) 1<br />
STATUS (W#16#) Description<br />
0000 No error<br />
80C8 Slave timeout. Check baud rate, parity, and wiring of slave.<br />
80D1 The receiver issued a flow control request to suspend an active transmission and never reenabled<br />
the transmission during the specified wait time.<br />
This error is also generated during hardware flow control when the receiver does not assert<br />
CTS within the specified wait time.<br />
80D2 The transmit request was aborted because no DSR signal is received from the DCE.<br />
80E0 The message was terminated because the receive buffer is full.<br />
80E1 The message was terminated as a result of a parity error.<br />
80E2 The message was terminated as a result of a framing error.<br />
80E3 The message was terminated as a result of an overrun error.<br />
80E4 The message was terminated as a result of the specified length exceeding the total buffer size.<br />
8180 Invalid port ID value or error with MB_COMM_LOAD instruction<br />
8186 Invalid Modbus station address<br />
8188 Invalid Mode specified for broadcast request<br />
8189 Invalid Data Address value<br />
818A Invalid Data Length value<br />
818B Invalid pointer to the local data source/destination: Size not correct<br />
818C Invalid pointer for DATA_PTR or invalid Blocked_Proc_Timeout: The data area must be a DB<br />
(that allows both symbolic and direct access) or a M memory.<br />
8200 Port is busy processing a transmit request.<br />
Table 12- 72 MB_MASTER execution condition codes (Modbus protocol errors) 1<br />
STATUS (W#16#) Response code from<br />
slave<br />
8380 - CRC error<br />
Modbus protocol errors<br />
8381 01 Function code not supported<br />
8382 03 Data length error<br />
8383 02 Data address error or address outside the valid range of the<br />
DATA_PTR area<br />
8384 Greater than 03 Data value error<br />
8385 03 Data diagnostic code value not supported (function code 08)<br />
8386 - Function code in the response does not match the code in the request.<br />
8387 - Wrong slave responded<br />
8388 - The slave response to a write request is incorrect. The write request<br />
returned by the slave does not match what the master actually sent.<br />
1 In addition to the MB_MASTER errors listed above, errors can be returned from the underlying PtP communication<br />
instructions.<br />
<strong>S7</strong>-<strong>1200</strong> <strong>Programmable</strong> <strong>controller</strong><br />
646 System Manual, 04/2012, A5E02486680-06
See also<br />
12.5.3.3 MB_SLAVE<br />
Table 12- 73 MB_SLAVE instruction<br />
Point-to-Point instructions (Page 566)<br />
LAD / FBD SCL Description<br />
Table 12- 74 Data types for the parameters<br />
"MB_SLAVE_DB"(<br />
MB_ADDR:=_uint_in_,<br />
NDR=>_bool_out_,<br />
DR=>_bool_out_,<br />
ERROR=>_bool_out_,<br />
STATUS=>_word_out_,<br />
MB_HOLD_REG:=_variant_inout_);<br />
Communication processor<br />
12.5 Modbus communication<br />
The MB_SLAVE instruction allows your<br />
program to communicate as a Modbus slave<br />
through a PtP port on the CM (RS485 or<br />
RS232) and CB (RS485). When a remote<br />
Modbus RTU master issues a request, your<br />
user program responds to the request by<br />
MB_SLAVE execution. STEP 7 automatically<br />
creates an instance DB when you insert the<br />
instruction. Use this MB_SLAVE_DB name<br />
when you specify the MB_DB parameter for<br />
the MB_COMM_LOAD instruction.<br />
Parameter and type Data type Description<br />
MB_ADDR IN V1.0: USInt The station address of the Modbus slave:<br />
V2.0: UInt Standard addressing range (1 to 247)<br />
Extended addressing range (0 to 65535)<br />
MB_HOLD_REG IN Variant Pointer to the Modbus Holding Register DB: The Modbus holding<br />
register can be M memory or a data block.<br />
NDR OUT Bool New Data Ready:<br />
DR OUT Bool Data Read:<br />
0 – No new data<br />
1 – Indicates that new data has been written by the Modbus<br />
master<br />
0 – No data read<br />
1 – Indicates that data has been read by the Modbus master<br />
ERROR OUT Bool The ERROR bit is TRUE for one scan, after the last request was<br />
terminated with an error. If execution is terminated with an error,<br />
then the error code value at the STATUS parameter is valid only<br />
during the single scan where ERROR = TRUE.<br />
STATUS OUT Word Execution error code<br />
Modbus communication function codes (1, 2, 4, 5, and 15) can read and write bits and words<br />
directly in the input process image and output process image of the CPU. For these function<br />
codes, the MB_HOLD_REG parameter must be defined as a data type larger than a byte.<br />
The following table shows the example mapping of Modbus addresses to the process image<br />
in the CPU.<br />
<strong>S7</strong>-<strong>1200</strong> <strong>Programmable</strong> <strong>controller</strong><br />
System Manual, 04/2012, A5E02486680-06 647
Communication processor<br />
12.5 Modbus communication<br />
Table 12- 75 Mapping of Modbus addresses to the process image<br />
Modbus functions <strong>S7</strong>-<strong>1200</strong><br />
Codes Function Data area Address range Data area CPU address<br />
01 Read bits Output 1 to 8192 Output Process Image Q0.0 to Q1023.7<br />
02 Read bits Input 10001 to 18192 Input Process Image I0.0 to I1023.7<br />
04 Read words Input 30001 to 30512 Input Process Image IW0 to IW1022<br />
05 Write bit Output 1 to 8192 Output Process Image Q0.0 to Q1023.7<br />
15 Write bits Output 1 to 8192 Output Process Image Q0.0 to Q1023.7<br />
Modbus communication function codes (3, 6, 16) use a Modbus holding register which can<br />
be a M memory address range or a data block. The type of holding register is specified by<br />
the MB_HOLD_REG parameter on the MB_SLAVE instruction.<br />
Note<br />
MB_HOLD_REG data block type<br />
A Modbus holding register data block must allow both direct (absolute) and symbolic<br />
addressing. When you create the data block the "Standard" access attribute must be<br />
selected.<br />
The following table shows examples of Modbus address to holding register mapping that is<br />
used for Modbus function codes 03 (read words), 06 (write word), and 16 (write words). The<br />
actual upper limit of DB addresses is determined by the maximum work memory limit and M<br />
memory limit, for each CPU model.<br />
Table 12- 76 Mapping of Modbus addresses to CPU memory<br />
Modbus Master<br />
MB_HOLD_REG parameter examples<br />
Address<br />
MW100 DB10.DBw0 MW120 DB10.DBW50 "Recipe".ingredient<br />
40001 MW100 DB10.DBW0 MW120 DB10.DBW50 "Recipe".ingredient[1]<br />
40002 MW102 DB10.DBW2 MW122 DB10.DBW52 "Recipe".ingredient[2]<br />
40003 MW104 DB10.DBW4 MW124 DB10.DBW54 "Recipe".ingredient[3]<br />
40004 MW106 DB10.DBW6 MW126 DB10.DBW56 "Recipe".ingredient[4]<br />
40005 MW108 DB10.DBW8 MW128 DB10.DBW58 "Recipe".ingredient[5]<br />
Table 12- 77 Diagnostic functions<br />
<strong>S7</strong>-<strong>1200</strong> MB_SLAVE Modbus diagnostic functions<br />
Codes Sub-function Description<br />
08 0000H Return query data echo test: The MB_SLAVE will echo back to a Modbus master a<br />
word of data that is received.<br />
<strong>S7</strong>-<strong>1200</strong> <strong>Programmable</strong> <strong>controller</strong><br />
648 System Manual, 04/2012, A5E02486680-06
Communication processor<br />
12.5 Modbus communication<br />
<strong>S7</strong>-<strong>1200</strong> MB_SLAVE Modbus diagnostic functions<br />
08 000AH Clear communication event counter: The MB_SLAVE will clear out the communication<br />
event counter that is used for Modbus function 11.<br />
11 Get communication event counter: The MB_SLAVE uses an internal communication<br />
event counter for recording the number of successful Modbus read and write requests<br />
that are sent to the Modbus slave. The counter does not increment on any Function 8,<br />
Function 11, or broadcast requests. It is also not incremented on any requests that<br />
result in a communication error (for example, parity or CRC errors).<br />
The MB_SLAVE instruction supports broadcast write requests from any Modbus master as<br />
long as the request is for accessing valid addresses. MB_SLAVE will produce error code<br />
0x8188 for function codes not supported in broadcast.<br />
Modbus slave communication rules<br />
● MB_COMM_LOAD must be executed to configure a port, before a MB_SLAVE instruction<br />
can communicate through that port.<br />
● If a port is to respond as a slave to a Modbus master, then do not program that port with<br />
the MB_MASTER instruction.<br />
● Only one instance of MB_SLAVE can be used with a given port, otherwise erratic<br />
behavior may occur.<br />
● The Modbus instructions do not use communication interrupt events to control the<br />
communication process. Your program must control the communication process by<br />
polling the MB_SLAVE instruction for transmit and receive complete conditions.<br />
● The MB_SLAVE instruction must execute periodically at a rate that allows it to make a<br />
timely response to incoming requests from a Modbus master. It is recommended that you<br />
execute MB_SLAVE every scan from a program cycle OB. Executing MB_SLAVE from a<br />
cyclic interrupt OB is possible, but is not recommended because of the potential for<br />
excessive time delays in the interrupt routine to temporarily block the execution of other<br />
interrupt routines.<br />
<strong>S7</strong>-<strong>1200</strong> <strong>Programmable</strong> <strong>controller</strong><br />
System Manual, 04/2012, A5E02486680-06 649
Communication processor<br />
12.5 Modbus communication<br />
Modbus signal timing<br />
<br />
MB_SLAVE must be executed periodically to receive each request from the Modbus master<br />
and then respond as required. The frequency of execution for MB_SLAVE is dependent<br />
upon the response timeout period of the Modbus master. This is illustrated in the following<br />
diagram.<br />
<br />
<br />
<br />
<br />
Modbus slave variables<br />
Table 12- 78 Modbus slave variables<br />
<br />
<br />
<br />
<br />
<br />
<br />
<br />
<br />
The response timeout period RESP_TO is the amount of time a Modbus master waits for the<br />
start of a response from a Modbus slave. This time period is not defined by the Modbus<br />
protocol, but is a parameter of each Modbus master. The frequency of execution (the time<br />
between one execution and the next execution) of MB_SLAVE must be based on the<br />
particular parameters of your Modbus master. At a minimum, you should execute<br />
MB_SLAVE twice within the response timeout period of the Modbus master.<br />
This table shows the public static variables stored in the MB_SLAVE instance data block that<br />
can be used in your program<br />
Variable Data type Description<br />
HR_Start_Offset Word Specifies the starting address of the Modbus Holding register (default = 0)<br />
Extended_Addressing Bool Configures single or double-byte slave addressing<br />
(0=single byte address, 1=double-byte address, default = 0)<br />
Request_Count Word The number of all requests received by this slave<br />
Slave_Message_Count Word The number of requests received for this specific slave<br />
Bad_CRC_Count Word The number of requests received that have a CRC error<br />
Broadcast_Count Word The number of broadcast requests received<br />
Exception_Count Word Modbus specific errors that require a returned exception<br />
Success_Count Word The number of requests received for this specific slave that have no protocol<br />
errors<br />
Your program can write values to the HR_Start_Offset and Extended_Addressing variables<br />
and control Modbus slave operations. The other variables can be read to monitor Modbus<br />
status.<br />
<strong>S7</strong>-<strong>1200</strong> <strong>Programmable</strong> <strong>controller</strong><br />
650 System Manual, 04/2012, A5E02486680-06
Communication processor<br />
12.5 Modbus communication<br />
HR_Start_Offset<br />
Modbus holding register addresses begin at 40001 or 400001. These addresses correspond<br />
to the beginning PLC memory address of the holding register. However, you can configure<br />
the "HR_Start_Offset" variable to start the beginning Modbus holding register address at<br />
another value instead of 40001 or 400001.<br />
For example, if the holding register is configured to start at MW100 and is 100 words long.<br />
An offset of 20 specifies a beginning holding register address of 40021 instead of 40001.<br />
Any address below 40021 and above 400119 will result in an addressing error.<br />
Table 12- 79 Example of Modbus holding register addressing<br />
HR_Start_Offset Address Minimum Maximum<br />
0<br />
Modbus address (Word) 40001 40099<br />
<strong>S7</strong>-<strong>1200</strong> address MW100 MW298<br />
20<br />
Modbus address (Word) 40021 40119<br />
<strong>S7</strong>-<strong>1200</strong> address MW100 MW298<br />
HR_Start_Offset is a word value that specifies the starting address of the Modbus holding<br />
register and is stored in the MB_SLAVE instance data block. You can set this public static<br />
variable value by using the parameter helper drop-list, after MB_SLAVE is placed in your<br />
program.<br />
For example, after MB_SLAVE is placed in a LAD network, you can go to a previous network<br />
and assign the HR_Start_Offset value. The value must be assigned prior to execution of<br />
MB_SLAVE.<br />
Entering a Modbus slave variable using the<br />
default DB name:<br />
1. Set the cursor in the parameter field and<br />
type an m character.<br />
2. Select "MB_SLAVE_DB" from the drop-list.<br />
3. Set the cursor at the right side of the DB<br />
name (after the quote character) and enter<br />
a period character.<br />
4. Select "MB_SLAVE_DB.HR_Start_Offset"<br />
from the drop list.<br />
<strong>S7</strong>-<strong>1200</strong> <strong>Programmable</strong> <strong>controller</strong><br />
System Manual, 04/2012, A5E02486680-06 651
Communication processor<br />
12.5 Modbus communication<br />
Extended_Addressing<br />
The Extended_Addressing variable is accessed in a similar way as the HR_Start_Offset<br />
reference discussed above except that the Extended_Addressing variable is a boolean<br />
value. The boolean value must be written by an output coil and not a move box.<br />
Modbus slave addressing can be configured to be either a single byte (which is the Modbus<br />
standard) or double byte. Extended addressing is used to address more than 247 devices<br />
within a single network. Selecting extended addressing allows you to address a maximum of<br />
64000 addresses. A Modbus function 1 frame is shown below as an example.<br />
Table 12- 80 Single-byte slave address (byte 0)<br />
Function 1 Byte 0 Byte 1 Byte 2 Byte 3 Byte 4 Byte 5<br />
Request Slave addr. F code Start address Length of coils<br />
Valid Response Slave addr. F code Length Coil data<br />
Error response Slave addr. 0x81 E code<br />
Table 12- 81 Double-byte slave address (byte 0 and byte 1)<br />
Byte 0 Byte 1 Byte 2 Byte 3 Byte 4 Byte 5 Byte 6<br />
Request Slave address F code Start address Length of coils<br />
Valid Response Slave address F code Length Coil data<br />
Error response Slave address 0x81 E code<br />
Condition codes<br />
Table 12- 82 MB_SLAVE execution condition codes (communication and configuration errors) 1<br />
STATUS (W#16#) Description<br />
80D1 The receiver issued a flow control request to suspend an active transmission and never reenabled<br />
the transmission during the specified wait time.<br />
This error is also generated during hardware flow control when the receiver does not assert<br />
CTS within the specified wait time.<br />
80D2 The transmit request was aborted because no DSR signal is received from the DCE.<br />
80E0 The message was terminated because the receive buffer is full.<br />
80E1 The message was terminated as a result of a parity error.<br />
80E2 The message was terminated as a result of a framing error.<br />
80E3 The message was terminated as a result of an overrun error.<br />
80E4 The message was terminated as a result of the specified length exceeding the total buffer<br />
size.<br />
8180 Invalid port ID value or error with MB_COMM_LOAD instruction<br />
8186 Invalid Modbus station address<br />
8187 Invalid pointer to MB_HOLD_REG DB: Area is too small<br />
818C Invalid MB_HOLD_REG pointer to M memory or DB (DB area must allow both symbolic and<br />
direct address)<br />
<strong>S7</strong>-<strong>1200</strong> <strong>Programmable</strong> <strong>controller</strong><br />
652 System Manual, 04/2012, A5E02486680-06
Table 12- 83 MB_SLAVE execution condition codes (Modbus protocol errors) 1<br />
Communication processor<br />
12.5 Modbus communication<br />
STATUS (W#16#) Response code from<br />
slave<br />
Modbus protocol errors<br />
8380 No response CRC error<br />
8381 01 Function code not supported or not supported within broadcasts<br />
8382 03 Data length error<br />
8383 02 Data address error or address outside the valid range of the<br />
DATA_PTR area<br />
8384 03 Data value error<br />
8385 03 Data diagnostic code value not supported (function code 08)<br />
1 In addition to the MB_SLAVE errors listed above, errors can be returned from the underlying PtP communication<br />
instructions.<br />
See also<br />
Point-to-Point instructions (Page 566)<br />
12.5.3.4 Modbus RTU master example program<br />
MB_COMM_LOAD is initialized during start-up by using the first scan flag. Execution of<br />
MB_COMM_LOAD in this manner should only be done when the serial port configuration will<br />
not change at runtime.<br />
Network 1 Initialize the RS485 module parameters only once during the first scan.<br />
One MB_MASTER instruction is used in the program cycle OB to communicate with a single<br />
slave. Additional MB_MASTER instructions can be used in the program cycle OB to<br />
communicate with other slaves, or one MB_MASTER FB could be re-used to communicate<br />
with additional slaves.<br />
<strong>S7</strong>-<strong>1200</strong> <strong>Programmable</strong> <strong>controller</strong><br />
System Manual, 04/2012, A5E02486680-06 653
Communication processor<br />
12.5 Modbus communication<br />
Network 2 Read 100 words from the slave holding register.<br />
Network 3 This is an optional network that just shows the values of the first 3 words once the<br />
read operation is done.<br />
Network 4 Write 64 bits to the output image register starting at slave address Q2.0.<br />
12.5.3.5 Modbus RTU slave example program<br />
MB_COMM_LOAD shown below is initialized each time "Tag_1" is enabled.<br />
Execution of MB_COMM_LOAD in this manner should only be done when the serial port<br />
configuration will change at runtime, as a result of HMI configuration.<br />
<strong>S7</strong>-<strong>1200</strong> <strong>Programmable</strong> <strong>controller</strong><br />
654 System Manual, 04/2012, A5E02486680-06
Communication processor<br />
12.6 Telecontrol and TeleService with the CP 1242-7<br />
Network 1 Initialize the RS485 module parameters each time they are changed by an HMI<br />
device.<br />
MB_SLAVE shown below is placed in a cyclic OB that is executed every 10ms. While this<br />
does not give the absolute fastest response by the slave, it does provide good performance<br />
at 9600 baud for short messages (20 bytes or less in the request).<br />
Network 2 Check for Modbus master requests during each scan. The Modbus holding<br />
register is configured for 100 words starting at MW1000.<br />
12.6 Telecontrol and TeleService with the CP 1242-7<br />
12.6.1 Connection to a GSM network<br />
IP-based WAN communication via GPRS<br />
Using the CP 1242-7 communications processor, the <strong>S7</strong>-<strong>1200</strong> can be connected to GSM<br />
networks. The CP 1242-7 allows WAN communication from remote stations with a control<br />
center and inter-station communication.<br />
Inter-station communication is possible only via a GSM network. For communication<br />
between a remote station and a control room, the control center must have a PC with<br />
Internet access.<br />
<strong>S7</strong>-<strong>1200</strong> <strong>Programmable</strong> <strong>controller</strong><br />
System Manual, 04/2012, A5E02486680-06 655
Communication processor<br />
12.6 Telecontrol and TeleService with the CP 1242-7<br />
Requirements<br />
The CP 1242-7 supports the following services for communication via the GSM network:<br />
● GPRS (General Packet Radio Service)<br />
The packet-oriented service for data transmission "GPRS" is handled via the GSM<br />
network.<br />
● SMS (Short Message Service)<br />
The CP 1242-7 can receive and send SMS messages. The communications partner can<br />
be a mobile phone or an <strong>S7</strong>-<strong>1200</strong>.<br />
The CP 1242-7 is suitable for use in industry worldwide and supports the following frequency<br />
bands:<br />
● 850 MHz<br />
● 900 MHz<br />
● 1 800 MHz<br />
● 1 900 MHz<br />
The equipment used in the stations or the control center depends on the particular<br />
application.<br />
● For communication with or via a central control room, the control center requires a PC<br />
with Internet access.<br />
● Apart from the station equipment, a remote <strong>S7</strong>-<strong>1200</strong> station with a CP 1242-7 must meet<br />
the following requirements to be able to communicate via the GSM network:<br />
– A contract with a suitable GSM network provider<br />
If GPRS is used, the contract must allow the use of the GPRS service.<br />
If there is to be direct communication between stations only via the GSM network, the<br />
GSM network provider must assign a fixed IP address to the CPs. In this case,<br />
communication between stations is not via the control center.<br />
– The SIM card belonging to the contract<br />
The SIM card is inserted in the CP 1242-7.<br />
– Local availability of a GSM network in the range of the station<br />
<strong>S7</strong>-<strong>1200</strong> <strong>Programmable</strong> <strong>controller</strong><br />
656 System Manual, 04/2012, A5E02486680-06
12.6.2 Applications of the CP 1242-7<br />
The CP 1242-7 can be used for the following applications:<br />
Communication processor<br />
12.6 Telecontrol and TeleService with the CP 1242-7<br />
Telecontrol applications<br />
● Sending messages by SMS<br />
Via the CP 1242-7, the CPU of a remote <strong>S7</strong>-<strong>1200</strong> station can receive SMS messages<br />
from the GSM network or send messages by SMS to a configured mobile phone or an<br />
<strong>S7</strong>-<strong>1200</strong>.<br />
● Communication with a control center<br />
Remote <strong>S7</strong>-<strong>1200</strong> stations communicate via the GSM network and the Internet with a<br />
telecontrol server in the master station. For data transfer using GPRS, the<br />
"TELECONTROL SERVER BASIC" application is installed on the telecontrol server in the<br />
master station. The telecontrol server communicates with a higher-level central control<br />
system using the integrated OPC server function.<br />
● Communication between <strong>S7</strong>-<strong>1200</strong> stations via a GSM network<br />
Communication between remote stations with a CP 1242-7 can be handled in two<br />
different ways:<br />
– Inter-station communication via a master station<br />
In this configuration, a permanent secure connection between <strong>S7</strong>-<strong>1200</strong> stations that<br />
communicate with each other and the telecontrol server is established in the master<br />
station. Communication between the stations is via the telecontrol server. The<br />
CP 1242-7 operates in "Telecontrol" mode.<br />
– Direct communication between the stations<br />
For direct communication between stations without the detour via the master station,<br />
SIM cards with a fixed IP address are used that allow the stations to address each<br />
other directly. The possible communications services and security functions (for<br />
example VPN) depend on what is offered by the network provider. The CP 1242-7<br />
operates in "GPRS direct" mode.<br />
TeleService via GPRS<br />
A TeleService connection can be established between an engineering station with STEP 7<br />
and a remote <strong>S7</strong>-<strong>1200</strong> station with a CP 1242-7 via the GSM network and the Internet. The<br />
connection runs from the engineering station via a telecontrol server or a TeleService<br />
gateway that acts as an intermediary forwarding frames and establishing the authorization.<br />
These PCs use the functions of the "TELECONTROL SERVER BASIC" application.<br />
You can use the TeleService connection for the following purposes:<br />
● Downloading configuration or program data from the STEP 7 project to the station<br />
● Querying diagnostics data on the station<br />
<strong>S7</strong>-<strong>1200</strong> <strong>Programmable</strong> <strong>controller</strong><br />
System Manual, 04/2012, A5E02486680-06 657
Communication processor<br />
12.6 Telecontrol and TeleService with the CP 1242-7<br />
12.6.3 Other properties of the CP<br />
Other services and functions of the CP 1242-7<br />
● Time-of-day synchronization of the CP via the Internet<br />
You can set the time on the CP as follows:<br />
– In "Telecontrol" mode, the time of day is transferred by the telecontrol server. The CP<br />
uses this to set its time.<br />
– In "GPRS direct" mode, the CP can request the time using SNTP.<br />
To synchronize the CPU time, you can read out the current time from the CP using a<br />
block.<br />
● Interim buffering of messages to be sent if there are connection problems<br />
● Increased availability thanks to the option of connecting to a substitute telecontrol server<br />
● Optimized data volume (temporary connection)<br />
As an alternative to a permanent connection to the telecontrol server, the CP can be<br />
configured in STEP 7 with a temporary connection to the telecontrol server. In this case,<br />
a connection to the telecontrol server is established only when required.<br />
● Logging the volume of data<br />
The volumes of data transferred are logged and can be evaluated for specific purposes.<br />
Configuration and module replacement<br />
To configure the module, the following configuration tool is required:<br />
STEP 7 version V11.0 SP1 or higher<br />
For STEP 7 V11.0 SP1, you also require support package "CP 1242-7" (HSP0003001).<br />
For process data transfer using GPRS, use the telecontrol communications instructions in<br />
the user program of the station.<br />
The configuration data of the CP 1242-7 is stored on the local CPU. This allows simple<br />
replacement of the CP when necessary.<br />
You can insert up to three modules of the CP 1242-7 type per <strong>S7</strong>-<strong>1200</strong>. This, for example,<br />
allows redundant communications paths to be established.<br />
Electrical connections<br />
● Power supply of the CP 1242-7<br />
The CP has a separate connection for the external 24 VDC power supply.<br />
● Wireless interface for the GSM network<br />
An extra antenna is required for GSM communication. This is connected via the SMA<br />
socket of the CP.<br />
<strong>S7</strong>-<strong>1200</strong> <strong>Programmable</strong> <strong>controller</strong><br />
658 System Manual, 04/2012, A5E02486680-06
Communication processor<br />
12.6 Telecontrol and TeleService with the CP 1242-7<br />
Further information<br />
The CP 1242-7 manual contains detailed information. You will find this on the Internet on the<br />
pages of Siemens Industrial Automation Customer Support under the following entry ID:<br />
42330276 (http://support.automation.siemens.com/WW/view/en/42330276)<br />
12.6.4 Accessories<br />
The ANT794-4MR GSM/GPRS antenna<br />
The following antennas are available for use in GSM/GPRS networks and can be installed<br />
both indoors and outdoors:<br />
● Quadband antenna ANT794-4MR<br />
Figure 12-1 ANT794-4MR GSM/GPRS antenna<br />
Short name Order no. Explanation<br />
ANT794-4MR 6NH9 860-1AA00 Quadband antenna (900, 1800/1900 MHz, UMTS);<br />
weatherproof for indoor and outdoor areas; 5 m<br />
connecting cable connected permanently to the<br />
antenna; SMA connector, including installation<br />
bracket, screws, wall plugs<br />
● Flat antenna ANT794-3M<br />
Figure 12-2 Flat antenna ANT794-3M<br />
<strong>S7</strong>-<strong>1200</strong> <strong>Programmable</strong> <strong>controller</strong><br />
System Manual, 04/2012, A5E02486680-06 659
Communication processor<br />
12.6 Telecontrol and TeleService with the CP 1242-7<br />
Further information<br />
Short name Order no. Explanation<br />
ANT794-3M 6NH9 870-1AA00 Flat antenna (900, 1800/1900 MHz); weatherproof<br />
for indoor and outdoor areas; 1.2 m connecting cable<br />
connected permanently to the antenna; SMA<br />
connector, including adhesive pad, screws mounting<br />
possible<br />
The antennas must be ordered separately.<br />
You will find detailed information in the device manual. You will find this on the Internet on<br />
the pages of Siemens Industrial Automation Customer Support under the following entry ID:<br />
23119005 (http://support.automation.siemens.com/WW/view/en/23119005)<br />
12.6.5 Configuration examples for telecontrol<br />
Sending messages by SMS<br />
Below, you will find several configuration examples for stations with a CP 1242-7.<br />
<br />
<br />
<br />
<br />
<br />
<br />
Figure 12-3 Sending messages by SMS from an <strong>S7</strong>-<strong>1200</strong> station<br />
A SIMATIC <strong>S7</strong>-<strong>1200</strong> with a CP 1242-7 can send messages by SMS to a mobile phone or a<br />
configured <strong>S7</strong>-<strong>1200</strong> station.<br />
<strong>S7</strong>-<strong>1200</strong> <strong>Programmable</strong> <strong>controller</strong><br />
660 System Manual, 04/2012, A5E02486680-06
Telecontrol by a control center<br />
<br />
<br />
<br />
<br />
<br />
<br />
Communication processor<br />
12.6 Telecontrol and TeleService with the CP 1242-7<br />
<br />
<br />
<br />
<br />
<br />
<br />
<br />
<br />
<br />
<strong>S7</strong>-<strong>1200</strong> <strong>Programmable</strong> <strong>controller</strong><br />
System Manual, 04/2012, A5E02486680-06 661<br />
<br />
<br />
<br />
Figure 12-4 Communication between <strong>S7</strong>-<strong>1200</strong> stations and a control center<br />
In telecontrol applications, SIMATIC <strong>S7</strong>-<strong>1200</strong> stations with a CP 1242-7 communicate with a<br />
control center via the GSM network and the Internet. The "TELECONTROL SERVER<br />
BASIC" (TCSB) application is installed on the telecontrol server in the master station. This<br />
results in the following use cases:<br />
● Telecontrol communication between station and control center<br />
In this use case, data from the field is sent by the stations to the telecontrol server in the<br />
master station via the GSM network and Internet. The telecontrol server is used to<br />
monitor remote stations.<br />
● Communication between a station and a control room with OPC client<br />
As in the first case, the stations communicate with the telecontrol server. Using its<br />
integrated OPC server, the telecontrol server exchanges data with the OPC client of the<br />
control room.<br />
The OPC client and telecontrol server can be located on a single computer, for example<br />
when TCSB is installed on a control center computer with WinCC.<br />
● Inter-station communication via a control center<br />
Inter-station communication is possible with <strong>S7</strong> stations equipped with a CP 1242-7.<br />
To allow inter-station communication, the telecontrol server forwards the messages of the<br />
sending station to the receiving station.
Communication processor<br />
12.6 Telecontrol and TeleService with the CP 1242-7<br />
Direct communication between stations<br />
<br />
TeleService via GPRS<br />
<br />
<br />
<br />
<br />
<br />
<br />
<br />
<br />
<br />
<br />
<br />
<strong>S7</strong>-<strong>1200</strong> <strong>Programmable</strong> <strong>controller</strong><br />
662 System Manual, 04/2012, A5E02486680-06<br />
<br />
Figure 12-5 Direct communication between two <strong>S7</strong>-<strong>1200</strong> stations<br />
In this configuration, two SIMATIC <strong>S7</strong>-<strong>1200</strong> stations communicate directly with each other<br />
using the CP 1242-7 via the GSM network. Each CP 1242-7 has a fixed IP address. The<br />
relevant service of the GSM network provider must allow this.<br />
In TeleService via GPRS, an engineering station on which STEP 7 is installed communicates<br />
via the GSM network and the Internet with the CP 1242-7 in the <strong>S7</strong>-<strong>1200</strong>.<br />
Since a firewall is normally closed for connection requests from the outside, a switching<br />
station between the remote station and the engineering station is required. This switching<br />
station can be a telecontrol server or, if there is no telecontrol server in the configuration, a<br />
TeleService gateway.
Communication processor<br />
12.6 Telecontrol and TeleService with the CP 1242-7<br />
TeleService with telecontrol server<br />
The connection runs via the telecontrol server.<br />
● The engineering station and telecontrol server are connected via the Intranet (LAN) or<br />
Internet.<br />
● The telecontrol server and remote station are connected via the Internet and via the GSM<br />
network.<br />
The engineering station and telecontrol server can also be the same computer; in other<br />
words, STEP 7 and TCSB are installed on the same computer.<br />
<br />
<br />
<br />
<br />
<br />
<br />
<strong>S7</strong>-<strong>1200</strong> <strong>Programmable</strong> <strong>controller</strong><br />
System Manual, 04/2012, A5E02486680-06 663<br />
<br />
<br />
<br />
<br />
<br />
Figure 12-6 TeleService via GPRS in a configuration with telecontrol server
Communication processor<br />
12.6 Telecontrol and TeleService with the CP 1242-7<br />
TeleService without a telecontrol server<br />
The connection runs via the TeleService gateway.<br />
The connection between the engineering station and the TeleService gateway can be local<br />
via a LAN or via the Internet.<br />
<br />
<br />
<br />
<br />
<br />
<strong>S7</strong>-<strong>1200</strong> <strong>Programmable</strong> <strong>controller</strong><br />
664 System Manual, 04/2012, A5E02486680-06<br />
<br />
<br />
<br />
<br />
<br />
<br />
<br />
Figure 12-7 TeleService via GPRS in a configuration with TeleService gateway
Teleservice communication (SMTP email) 13<br />
13.1 TM_Mail transfer email instruction<br />
Table 13- 1 TM_MAIL instruction<br />
LAD / FBD SCL Description<br />
"TM_MAIL_DB"(<br />
REQ:=_bool_in_,<br />
ID:=_int_in_,<br />
TO_S:=_string_in_,<br />
CC:=_string_in_,<br />
SUBJECT:=_string_in_,<br />
TEXT:= _string_in_,<br />
ATTACHMENT:=_variant_in_,<br />
BUSY=>_bool_out_,<br />
DONE=>_bool_out_,<br />
ERROR=>_bool_out_,<br />
STATUS=>_word_out_,);<br />
1 STEP 7 automatically creates the instance DB when you insert the instruction.<br />
The TM_MAIL instruction sends an email<br />
message using the SMTP (Simple Mail<br />
Transfer Protocol) over TCP/IP via the<br />
CPU Industrial Ethernet connection. Where<br />
Ethernet-based Internet connectivity is not<br />
available, an optional Teleservice adapter<br />
can be used for connection with telephone<br />
land lines. TM_MAIL executes<br />
asynchronously and the job extends over<br />
multiple TM_MAIL calls. When you call<br />
TM_MAIL, you must assign an instance<br />
DB. The instance DB retentive attribute<br />
must not be set. This ensures that the<br />
instance DB is initialized in the transition of<br />
the CPU from STOP to RUN and that a<br />
new TM_MAIL operation can be triggered.<br />
You start sending an email with a positive edge change from 0 to 1, at input parameter REQ.<br />
The following table shows the relationship between BUSY, DONE and ERROR. You can<br />
monitor the progress of TM_MAIL execution and detect completion, by evaluating these<br />
parameters in successive calls.<br />
The output parameters DONE, ERROR, STATUS, and SFC_STATUS are valid for only one<br />
cycle, when the state of the output parameter BUSY changes from 1 to 0. Your program<br />
logic must save temporary output state values, so you can detect state changes in<br />
subsequent program execution cycles.<br />
Table 13- 2 Interaction of the Done, Busy and Error parameters<br />
DONE BUSY ERROR Description<br />
Irrelevant 1 Irrelevant Job is in progress.<br />
1 0 0 The job was completed successfully.<br />
0 0 1 The job was terminated with an error. For the cause of the error, refer to the<br />
STATUS parameter.<br />
0 0 0 No job in progress<br />
<strong>S7</strong>-<strong>1200</strong> <strong>Programmable</strong> <strong>controller</strong><br />
System Manual, 04/2012, A5E02486680-06 665
Teleservice communication (SMTP email)<br />
13.1 TM_Mail transfer email instruction<br />
If the CPU is changed to STOP mode while TM_MAIL is active, then the communication<br />
connection to the email server is terminated. The communication connection to the email<br />
server is also lost if problems occur in CPU communication on the Industrial Ethernet bus. In<br />
these cases, the send process is suspended and the email does not reach the recipient.<br />
CAUTION<br />
Modifiying user programs<br />
Only change the parts of your user program that directly affect the TM_MAIL calls in the<br />
following cases:<br />
The CPU in the STOP mode<br />
No email is sent (REQ and BUSY = 0)<br />
This refers, in particular, to the deletion and replacement of program blocks, the calls to<br />
TM_MAIL, or calls to the instance DBs of TM_MAIL.<br />
If you fail to maintain linked program blocks, then the TPC/IP communication functions can<br />
enter an undefined state. After transferring a modified program block, you must perform a<br />
CPU restart (warm) or cold start.<br />
Data consistency<br />
The input parameter ADDR_MAIL_SERVER is read when the operation is started. A new<br />
value does not take effect until the current operation is complete and a new TM_MAIL<br />
operation is initiated.<br />
In contrast, the parameters WATCH_DOG_TIME, TO_S, CC, FROM, SUBJECT, TEXT,<br />
ATTACHMENT, USERNAME and PASSWORD are read during the execution of TM_MAIL<br />
and may be changed only when the job is finished (BUSY = 0)<br />
Dial-up connection: Configuring the TS adapter IE parameters<br />
You must configure the Teleservice adapter IE parameters for outgoing calls to connect with<br />
the dial-up server of your Internet Service Provider. If you set the call "on demand" attribute,<br />
then the connection is established only when an e-mail will be sent. For an analog modem<br />
connection, more time is required for the connection process (approx. a minute longer). You<br />
must include the extra time, in the WATCH_DOG_TIME value.<br />
Table 13- 3 Data types for the parameters<br />
Parameter and type Data types Description<br />
REQ IN Bool A low to high (positive edge) signal starts the operation.<br />
ID IN Int Connection identifier: See the ID parameter of the<br />
instructions TCON, TDISCON, TSEND and TRCV.<br />
A number that is not used for any additional instances of this<br />
instruction in the user program must be used.<br />
TO_S IN String Recipient addresses: STRING data with a maximum length<br />
of 240 characters<br />
<strong>S7</strong>-<strong>1200</strong> <strong>Programmable</strong> <strong>controller</strong><br />
666 System Manual, 04/2012, A5E02486680-06
Teleservice communication (SMTP email)<br />
13.1 TM_Mail transfer email instruction<br />
Parameter and type Data types Description<br />
CC IN String CC copy to recipient addresses (optional): STRING data<br />
with a maximum length of 240 characters<br />
SUBJECT IN String Subject name of the email: STRING data with a maximum<br />
length 240 characters.<br />
TEXT IN String Text message of the email (optional): STRING data with a<br />
maximum length of 240 characters.<br />
If this parameter is an empty string, then the email will be<br />
sent without message text.<br />
ATTACHMENT IN Variant Pointer to email attachment data: Byte, word, or double<br />
word data with a maximum length of 65534 bytes.<br />
If no value is assigned, then the email sent without an<br />
attachment.<br />
DONE OUT Bool 0 - Job not yet started or still executing.<br />
1 - Job was executed error-free.<br />
BUSY OUT Bool 0 - No operation in progress<br />
1- Operation in progress<br />
ERROR OUT Bool The ERROR bit =1 for one scan, after the last request was<br />
terminated with an error. The error code value at the<br />
STATUS output is valid only during the single scan where<br />
ERROR = 1.<br />
STATUS OUT Word Return value or error information of the TM_MAIL<br />
instruction.<br />
ADDR_MAIL_SERVER 1 Static DWord IP address of the mail server: You must assign each IP<br />
address fragment as an octet of two 4-bit hexadecimal<br />
characters. If the IP address fragment = decimal value 10<br />
which equals hexadecimal value A, then you must enter<br />
"0A" for that octet.<br />
For example: IP address = 192.168.0.10<br />
ADDR_MAIL_SERVER = DW#16#C0A8000A, where:<br />
192 = 16#C0,<br />
168 =16#A8<br />
0 = 16#00<br />
10 = 16#0A<br />
WATCH_DOG_TIME 1 Static Time The maximum time allowed for TM_MAIL to establish a<br />
server connection. If this time is exceeded, then TM_MAIL<br />
execution ends with an error.<br />
The actual time delay until TM_MAIL ends and the error is<br />
issued may exceed the WATCH_DOG_TIME, because of<br />
the additional time required for the disconnect operation.<br />
At first you should set a time of 2 minutes. This time can be<br />
much smaller for an ISDN phone connection.<br />
USERNAME 1 Static String Mail account user name: STRING data with a maximum<br />
length 180 characters.<br />
PASSWORD 1 Static String Mail server password: STRING data with a maximum length<br />
180 characters.<br />
<strong>S7</strong>-<strong>1200</strong> <strong>Programmable</strong> <strong>controller</strong><br />
System Manual, 04/2012, A5E02486680-06 667
Teleservice communication (SMTP email)<br />
13.1 TM_Mail transfer email instruction<br />
Parameter and type Data types Description<br />
FROM 1 Static String Sender address: STRING with a maximum length of 240<br />
characters<br />
SFC_STATUS 1 Static Word Execution condition code of the called communication<br />
blocks<br />
1 The values of these parameters are not modified at every call of TM_MAIL. The values are assigned in the TM_MAIL<br />
instance data block and are only referenced once, on the first call of TM_MAIL.<br />
SMTP authentication<br />
TM_MAIL supports the SMTP AUTH LOGIN authentication method. For information on this<br />
authentication method, please refer to the manual of the mail server or the website of your<br />
internet service provider.<br />
The AUTH LOGIN authentication method uses the TM_MAIL USERNAME and PASSWORD<br />
parameters to connect with the mail server. The user name and password must be<br />
previously set up on an email account at an email server.<br />
If no value is assigned for the USERNAME parameter, then the AUTH LOGIN authentication<br />
method is not used and the email is sent without authentication.<br />
TO_S:, CC:, and FROM: parameters<br />
The parameters TO_S:, CC: and FROM: are strings, as shown in the following examples:<br />
TO_S: , ,<br />
CC: , ,<br />
FROM: <br />
The following rules must be used when entering these character strings:<br />
● The characters "TO_S:", "CC:" and "FROM:" must be entered, including the colon<br />
character.<br />
● A space character and an opening angle bracket "" must be entered after each address.<br />
● A comma character "," must be entered after each email address for the TO_S: and CC:<br />
addresses. For example, the comma after the single email address is required in "TO_S:<br />
,".<br />
● Only one email address may be used for the FROM: entry, with no comma at the end.<br />
Because of run-time mode and memory usage, a syntax check is not performed on the<br />
TM_MAIL TO_S:, CC: and FROM: data. If the format rules above are not followed exactly.<br />
The SMTP email server transaction will fail.<br />
<strong>S7</strong>-<strong>1200</strong> <strong>Programmable</strong> <strong>controller</strong><br />
668 System Manual, 04/2012, A5E02486680-06
Teleservice communication (SMTP email)<br />
13.1 TM_Mail transfer email instruction<br />
STATUS and SFC_STATUS parameters<br />
The execution condition codes returned by TM_MAIL can be classified as follows:<br />
● W#16#0000: Operation of TM_MAIL was completed successfully<br />
● W#16#7xxx: Status of TM_MAIL operation<br />
● W#16#8xxx: An error in an internal call to a communication device or the mail server<br />
The following table shows the execution condition codes of TM_MAIL with the exception of<br />
the error codes from internally called communication modules.<br />
Note<br />
Email server requirements<br />
TM_MAIL can only communicate with an email server using SMTP via port 25. The assigned<br />
port number cannot be changed.<br />
Most IT departments and external email servers now block port 25 to prevent a PC infected<br />
with a virus from becoming a rogue email generator.<br />
You can connect to an internal mail server via SMTP and let the internal server manage the<br />
current security enhancements that are required to relay email through the Internet to an<br />
external mail server.<br />
Internal email server configuration example<br />
If you use Microsoft Exchange as an internal mail server, then you can configure the server<br />
to allow SMTP access from the IP address assigned the <strong>S7</strong>-<strong>1200</strong> PLC. Configure the<br />
Exchange management console: Server configuration > Hub transport > Receive connectors<br />
> IP relay. On the Network tab, there is a box named "Receive mail from remote servers that<br />
have these IP addresses". This is where you put the IP address of the PLC that is executing<br />
the TM_MAIL instruction. No authentication is required for this type of connection with an<br />
internal Microsoft Exchange server.<br />
Email server configuration<br />
TM_MAIL can only use an email server that allows port 25 communication, SMTP, and<br />
AUTH LOGIN authentication (optional).<br />
Configure a compatible email server account to accept remote SMTP log in. Then edit the<br />
instance DB for TM_MAIL to put in the TM_MAIL USERNAME and PASSWORD character<br />
strings that are used to authenticate the connection with your email account.<br />
<strong>S7</strong>-<strong>1200</strong> <strong>Programmable</strong> <strong>controller</strong><br />
System Manual, 04/2012, A5E02486680-06 669
Teleservice communication (SMTP email)<br />
13.1 TM_Mail transfer email instruction<br />
Table 13- 4 Condition codes<br />
STATUS SFC_STATUS Description<br />
(W#16#...): (W#16#...):<br />
0000 - The TM_MAIL operation completed without error. This zero STATUS code does<br />
not guarantee that an email was actually sent (See the first item in the note<br />
following this table).<br />
7001 - TM_MAIL is active (BUSY = 1).<br />
7002 7002 TM_MAIL is active (BUSY = 1).<br />
8xxx xxxx The TM_MAIL operation was completed with an error in the internal<br />
communication instruction calls. For more information about the SFC_STATUS<br />
parameter, see the descriptions of the STATUS parameter of the underlying<br />
PROFINET open user communication instructions.<br />
8010 xxxx Failed to connect: For more information about the SFC_STATUS parameter, see<br />
the STATUS parameter of the TCON instruction.<br />
8011 xxxx Error sending data: For more information about SFC_STATUS parameter ,see<br />
the STATUS parameter of the TSEND instruction.<br />
8012 xxxx Error while receiving data: For more information about the SFC_STATUS<br />
parameter, see the STATUS parameter descriptions of the TRCV instruction.<br />
8013 xxxx Failed to connect: For more information for evaluating the SFC_STATUS<br />
parameter, see the STATUS parameter descriptions of the TCON and TDISCON<br />
instructions.<br />
8014 - Failed to connect: You may have entered an incorrect mail server IP address<br />
(ADDR_MAIL_SERVER) or too little time (WATCH_DOG_TIME) for the<br />
connection. It is also possible that the CPU has no connection to the network or<br />
the CPU configuration is incorrect.<br />
82xx, 84xx, - The error message comes from the mail server and corresponds to error number<br />
85xx<br />
"8" of the SMTP protocol. See the second item in the note following this table.<br />
8450 - Operation does not run: Mailbox is not available; try again later.<br />
8451 - Operation aborted: Local error in processing, .try again later<br />
8500 - Command syntax error: The cause may be that the email server does not<br />
support the LOGIN authentication process. Check the parameters of TM_MAIL.<br />
Try to send an email without authentication. Try replacing the parameter<br />
USERNAME with an empty string.<br />
8501 - Syntax error: Incorrect parameter or argument; you may have typed an incorrect<br />
address in the TO_S or CC parameters.<br />
8502 - Command is unknown or not implemented: Check your entries, especially the<br />
parameter FROM. Perhaps this is incomplete and you have omitted the "@" or<br />
"." characters.<br />
8535 - SMTP authentication is incomplete. You may have entered an incorrect<br />
username or password.<br />
8550 - The mail server cannot be reached, or you have no access rights. You may have<br />
entered an incorrect username or password or of your mail server does not<br />
support log in access. Another cause of this error could be an erroneous entry of<br />
the domain name after the "@" character in the TO_S or CC parameters.<br />
8552 - Operation aborted: Exceeded the allocated memory size; try again later.<br />
8554 - Transmission failed: Try again later.<br />
<strong>S7</strong>-<strong>1200</strong> <strong>Programmable</strong> <strong>controller</strong><br />
670 System Manual, 04/2012, A5E02486680-06
Teleservice communication (SMTP email)<br />
13.1 TM_Mail transfer email instruction<br />
Note<br />
Possible unreported email transmission errors<br />
Incorrect entry of a recipient address does not generate a STATUS error for TM_MAIL. In<br />
this case, there is no guarantee that additional recipients (with correct email addresses),<br />
will receive the email.<br />
More information on SMTP error codes can be found on the internet or in the error<br />
documentation for the mail server. You can also read the last error message from the<br />
mail server. The error message in stored in buffer1parameter of the instance DB for<br />
TM_MAIL.<br />
<strong>S7</strong>-<strong>1200</strong> <strong>Programmable</strong> <strong>controller</strong><br />
System Manual, 04/2012, A5E02486680-06 671
Teleservice communication (SMTP email)<br />
13.1 TM_Mail transfer email instruction<br />
<strong>S7</strong>-<strong>1200</strong> <strong>Programmable</strong> <strong>controller</strong><br />
672 System Manual, 04/2012, A5E02486680-06
Online and diagnostic tools 14<br />
14.1 Status LEDs<br />
The CPU and the I/O modules use LEDs to provide information about either the operational<br />
status of the module or the I/O.<br />
Status LEDs on a CPU<br />
The CPU provides the following status indicators:<br />
● STOP/RUN<br />
– Solid yellow indicates STOP mode<br />
– Solid green indicates RUN mode<br />
– Flashing (alternating green and yellow) indicates that the CPU is in STARTUP mode<br />
● ERROR<br />
– Flashing red indicates an error, such as an internal error in the CPU, a error with the<br />
memory card, or a configuration error (mismatched modules)<br />
– Solid red indicates defective hardware<br />
● MAINT (Maintenance) flashes whenever you insert a memory card. The CPU then<br />
changes to STOP mode. After the CPU has changed to STOP mode, perform one of the<br />
following functions to initiate the evaluation of the memory card:<br />
– Change the CPU to RUN mode<br />
– Perform a memory reset (MRES)<br />
– Power-cycle the CPU<br />
You can also use the LED instruction (Page 298) to determine the status of the LEDs.<br />
Table 14- 1 Status LEDs for a CPU<br />
Description STOP/RUN<br />
Yellow / Green<br />
ERROR<br />
Red<br />
MAINT<br />
Yellow<br />
Power is off Off Off Off<br />
Startup, self-test, or firmware update Flashing<br />
(alternating yellow and green)<br />
- Off<br />
Stop mode On (yellow) - -<br />
Run mode On (green) - -<br />
Remove the memory card On (yellow) - Flashing<br />
Error On (either yellow or green) Flashing -<br />
Maintenance requested On (either yellow or green) - On<br />
<strong>S7</strong>-<strong>1200</strong> <strong>Programmable</strong> <strong>controller</strong><br />
System Manual, 04/2012, A5E02486680-06 673
Online and diagnostic tools<br />
14.1 Status LEDs<br />
Description STOP/RUN<br />
Yellow / Green<br />
ERROR<br />
Red<br />
Defective hardware On (yellow) On Off<br />
LED test or defective CPU firmware Flashing<br />
(alternating yellow and green)<br />
Status LEDs on an SM<br />
MAINT<br />
Yellow<br />
Flashing Flashing<br />
The CPU also provides two LEDs that indicate the status of the PROFINET communications.<br />
Open the bottom terminal block cover to view the PROFINET LEDs.<br />
● Link (green) turns on to indicate a successful connection<br />
● Rx/Tx (yellow) turns on to indicate transmission activity<br />
The CPU and each digital signal module (SM) provide an I/O Channel LED for each of the<br />
digital inputs and outputs. The I/O Channel (green) turns on or off to indicate the state of the<br />
individual input or output.<br />
In addition, each digital SM provides a DIAG LED that indicates the status of the module:<br />
● Green indicates that the module is operational<br />
● Red indicates that the module is defective or non-operational<br />
Each analog SM provides an I/O Channel LED for each of the analog inputs and outputs.<br />
● Green indicates that the channel has been configured and is active<br />
● Red indicates an error condition of the individual analog input or output<br />
In addition, each analog SM provides a DIAG LED that indicates the status of the module:<br />
● Green indicates that the module is operational<br />
● Red indicates that the module is defective or non-operational<br />
The SM detects the presence or absence of power to the module (field-side power, if<br />
required).<br />
Table 14- 2 Status LEDs for a signal module (SM)<br />
Description DIAG<br />
I/O Channel<br />
(Red / Green)<br />
(Red / Green)<br />
Field-side power is off Flashing red Flashing red<br />
Not configured or update in progress Flashing green Off<br />
Module configured with no errors On (green) On (green)<br />
Error condition Flashing red -<br />
I/O error (with diagnostics enabled) - Flashing red<br />
I/O error (with diagnostics disabled) - On (green)<br />
<strong>S7</strong>-<strong>1200</strong> <strong>Programmable</strong> <strong>controller</strong><br />
674 System Manual, 04/2012, A5E02486680-06
14.2 Going online and connecting to a CPU<br />
Online and diagnostic tools<br />
14.2 Going online and connecting to a CPU<br />
An online connection between the programming device and CPU is required for loading<br />
programs and project engineering data as well as for activities such as the following:<br />
● Testing user programs<br />
● Displaying and changing the operating mode of the CPU (Page 679)<br />
● Displaying and setting the date and time of day of the CPU (Page 678)<br />
● Displaying the module information<br />
● Comparing and synchronizing (Page 681) offline to online program blocks<br />
● Uploading and downloading program blocks<br />
● Displaying diagnostics and the diagnostics buffer (Page 680)<br />
● Using a watch table (Page 685) to test the user program by monitoring and modifying<br />
values<br />
● Using a force table to force values in the CPU (Page 688)<br />
To establish an online connection to a configured CPU, click<br />
the CPU from the Project Navigation tree and click the "Go<br />
online" button from the Project View:<br />
If this is the first time to go<br />
online with this CPU, you<br />
must select the type of PG/PC<br />
interface and the specific<br />
PG/PC interface from the Go<br />
Online dialog before<br />
establishing an online<br />
connection to a CPU found on<br />
that interface.<br />
Your programming device is now connected to the CPU. The orange color frames indicate<br />
an online connection. You can now use the Online & diagnostics tools from the Project tree<br />
and the Online tools task card.<br />
<strong>S7</strong>-<strong>1200</strong> <strong>Programmable</strong> <strong>controller</strong><br />
System Manual, 04/2012, A5E02486680-06 675
Online and diagnostic tools<br />
14.3 Assigning a name to a PROFINET IO device online<br />
14.3 Assigning a name to a PROFINET IO device online<br />
The devices on your PROFINET network must have an assigned name before you can<br />
connect with the CPU. Use the "Devices & networks" editor to assign names to your<br />
PROFINET devices if the devices have not already been assigned a name or if the name of<br />
the device is to be changed.<br />
For each PROFINET IO device, you must assign the same name to that device in both the<br />
STEP 7 project and, using the "Online & diagnostics" tool, to the PROFINET IO device<br />
configuration memory (for example, an ET200 S interface module configuration memory). If<br />
a name is missing or does not match in either location, the PROFINET IO data exchange<br />
mode will not run.<br />
<strong>S7</strong>-<strong>1200</strong> <strong>Programmable</strong> <strong>controller</strong><br />
676 System Manual, 04/2012, A5E02486680-06
1. In the "Devices & networks"<br />
editor, right-click on the<br />
required PROFINET IO<br />
device, and select "Online &<br />
diagnostics".<br />
2. In the "Online &<br />
diagnostics" dialog, make the<br />
following menu selections:<br />
"Functions"<br />
"Assign name"<br />
Click the "Accessible devices<br />
in the network" icon to display<br />
all of the PROFINET IO<br />
devices on the network.<br />
3. In the list that is displayed,<br />
click the required PROFINET<br />
IO device, and click the<br />
"Assign name" button to write<br />
the name to the PROFINET IO<br />
device configuration memory.<br />
Online and diagnostic tools<br />
14.3 Assigning a name to a PROFINET IO device online<br />
<strong>S7</strong>-<strong>1200</strong> <strong>Programmable</strong> <strong>controller</strong><br />
System Manual, 04/2012, A5E02486680-06 677
Online and diagnostic tools<br />
14.4 Setting the IP address and time of day<br />
14.4 Setting the IP address and time of day<br />
You can set the IP address (Page 134) and time of day in the online CPU. After accessing<br />
"Online & diagnostics" from the Project tree for an online CPU, you can display or change<br />
the IP address. You can also display or set the time and date parameters of the online CPU.<br />
Note<br />
This feature is available only for a CPU that either has only a MAC address (has not yet<br />
been assigned an IP address) or has been reset to factory settings.<br />
14.5 Resetting to factory settings<br />
You can reset an <strong>S7</strong>-<strong>1200</strong> to its original factory settings under the following conditions:<br />
● No memory card is inserted in the CPU.<br />
● The CPU has an online connection.<br />
● The CPU is in STOP mode.<br />
Note<br />
If the CPU is in RUN mode and you start the reset operation, you can place it in STOP<br />
mode after acknowledging a confirmation prompt.<br />
<strong>S7</strong>-<strong>1200</strong> <strong>Programmable</strong> <strong>controller</strong><br />
678 System Manual, 04/2012, A5E02486680-06
Procedure<br />
Result<br />
Online and diagnostic tools<br />
14.6 CPU operator panel for the online CPU<br />
To reset a CPU to its factory settings, follow these steps:<br />
1. Open the Online and Diagnostics view of the CPU.<br />
2. Select "Reset to factory settings" from the "Functions" folder.<br />
3. Select the "Keep IP address" check box if you want to retain the IP address or the "Reset<br />
IP address" check box if you want to delete the IP address.<br />
4. Click the "Reset" button.<br />
5. Acknowledge the confirmation prompt with "OK".<br />
The module is switched to STOP mode if necessary, and it is reset to the factory settings:<br />
● The work memory and internal load memory and all operand areas are cleared.<br />
● All parameters are reset to their defaults.<br />
● The diagnostics buffer is cleared.<br />
● The time of day is reset.<br />
● The IP address is retained or deleted based on the setting you made. (The MAC address<br />
is fixed and is never changed.)<br />
14.6 CPU operator panel for the online CPU<br />
The "CPU operator panel" displays the operating mode (STOP or<br />
RUN) of the online CPU. The panel also shows whether the CPU has<br />
an error or if values are being forced.<br />
Use the CPU operating panel of the Online Tools task card to change the operating mode of<br />
an online CPU. The Online Tools task card is accessible whenever the CPU is online.<br />
<strong>S7</strong>-<strong>1200</strong> <strong>Programmable</strong> <strong>controller</strong><br />
System Manual, 04/2012, A5E02486680-06 679
Online and diagnostic tools<br />
14.7 Monitoring the cycle time and memory usage<br />
14.7 Monitoring the cycle time and memory usage<br />
You can monitor the cycle<br />
time and memory usage of<br />
an online CPU.<br />
After connecting to the<br />
online CPU, open the Online<br />
tools task card to view the<br />
following measurements:<br />
Cycle time<br />
Memory usage<br />
14.8 Displaying diagnostic events in the CPU<br />
Use the diagnostics buffer to review the recent activity in the CPU. The diagnostics buffer is<br />
accessible from "Online & Diagnostics" for an online CPU in the Project tree. It contains the<br />
following entries:<br />
● Diagnostic events<br />
● Changes in the CPU operating mode (transitions to STOP or RUN mode)<br />
<strong>S7</strong>-<strong>1200</strong> <strong>Programmable</strong> <strong>controller</strong><br />
680 System Manual, 04/2012, A5E02486680-06
Online and diagnostic tools<br />
14.9 Comparing offline and online CPUs<br />
The first entry contains the latest event.<br />
Each entry in the diagnostic buffer<br />
contains the date and time the event<br />
was logged, and a description.<br />
The maximum number of entries is<br />
dependent on the CPU. A maximum of<br />
50 entries is supported.<br />
Only the 10 most recent events in the<br />
diagnostic buffer are stored<br />
permanently. Resetting the CPU to the<br />
factory settings resets the diagnostic<br />
buffer by deleting the entries.<br />
You can also use the GET_DIAG instruction (Page 302) to collect the diagnostic information.<br />
14.9 Comparing offline and online CPUs<br />
You can compare the code blocks in an online CPU with the code blocks in your project. If<br />
the code blocks of your project do not match the code blocks of the online CPU, the<br />
"Compare" editor allows you to synchronize your project with the online CPU by downloading<br />
the code blocks of your project to the CPU, or by deleting blocks from the project that do not<br />
exist in the online CPU.<br />
Select the CPU in your project.<br />
Use the "Compare Offline/online" command to open the<br />
"Compare" editor. (Access the command either from the "Tools"<br />
menu or by right-clicking the CPU in your project.)<br />
Click in the "Action" column for an object to<br />
select whether to delete the object, take no<br />
action, or download the object to the device.<br />
Click the "Synchronize" button to load the code<br />
blocks.<br />
<strong>S7</strong>-<strong>1200</strong> <strong>Programmable</strong> <strong>controller</strong><br />
System Manual, 04/2012, A5E02486680-06 681
Online and diagnostic tools<br />
14.10 Monitoring and modifying values in the CPU<br />
14.10 Monitoring and modifying values in the CPU<br />
Right-click an object in the "Compare to" column and<br />
select "Start detailed comparison" button to show the<br />
code blocks side-by-side.<br />
The detailed comparison highlights the differences<br />
between the code blocks of online CPU and the code<br />
blocks of the CPU in your project.<br />
STEP 7 provides online tools for monitoring the CPU:<br />
● You can display or monitor the current values of the tags. The monitoring function does<br />
not change the program sequence. It presents you with information about the program<br />
sequence and the data of the program in the CPU.<br />
● You can also use other functions to control the sequence and the data of the user<br />
program:<br />
– You can modify the value for the tags in the online CPU to see how the user program<br />
responds.<br />
– You can force a peripheral output (such as Q0.1:P or "Start":P) to a specific value.<br />
– You can enable outputs in STOP mode.<br />
Note<br />
Always exercise caution when using control functions. These functions can seriously<br />
influence the execution of the user/system program.<br />
Table 14- 3 Online capabilities of the STEP 7 editors<br />
Editor Monitor Modify Force<br />
Watch table Yes Yes No<br />
Force table Yes No Yes<br />
Program editor Yes Yes No<br />
Tag table Yes No No<br />
DB editor Yes No No<br />
<strong>S7</strong>-<strong>1200</strong> <strong>Programmable</strong> <strong>controller</strong><br />
682 System Manual, 04/2012, A5E02486680-06
14.10.1 Going online to monitor the values in the CPU<br />
Online and diagnostic tools<br />
14.10 Monitoring and modifying values in the CPU<br />
To monitor the tags, you must have an online connection to the CPU. Simply click the "Go<br />
online" button in the toolbar.<br />
When you have connected to the CPU, STEP 7 turns the headers of<br />
the work areas orange.<br />
The project tree displays a comparison of the offline project and the<br />
online CPU. A green circle means that the CPU and the project are<br />
synchronized, meaning that both have the same configuration and<br />
user program.<br />
Tag tables show the tags. Watch tables can also show the tags, as<br />
well as direct addresses.<br />
To monitor the execution of the user program and to display the values of the tags,<br />
click the "Monitor all" button in the toolbar.<br />
The "Monitor value" field shows the value for each tag.<br />
<strong>S7</strong>-<strong>1200</strong> <strong>Programmable</strong> <strong>controller</strong><br />
System Manual, 04/2012, A5E02486680-06 683
Online and diagnostic tools<br />
14.10 Monitoring and modifying values in the CPU<br />
14.10.2 Displaying status in the program editor<br />
You can monitor the status of the tags in the LAD and FBD program editors. Use the editor<br />
bar to display the LAD editor. The editor bar allows you to change the view between the<br />
open editors without having to open or close the editors.<br />
In the toolbar of the program editor, click the "Monitoring on/off" button to display the status<br />
of your user program.<br />
The network in the program editor displays power flow in green.<br />
You can also right-click on the instruction or parameter to modify the value for the instruction.<br />
14.10.3 Capturing the online values of a DB to reset the start values<br />
You can capture the current values being monitored in an online CPU to become the start<br />
values for a global DB.<br />
● You must have an online connection to the CPU.<br />
● The CPU must be in RUN mode.<br />
● You must have opened the DB in STEP 7.<br />
Use the "Show a snapshot of the monitored values" button to capture the current<br />
values of the selected tags in the DB. You can then copy these values into the "Start<br />
value" column of the DB.<br />
1. In the DB editor, click the "Monitor all tags" button. The "Monitor value" column displays<br />
the current data values.<br />
2. Click the "Show a snapshot of the monitored values" button to display the current values<br />
in the "Snapshot" column.<br />
3. Click the "Monitor all" button to stop monitoring the data in the CPU.<br />
4. Copy a value in the "Snapshot" column for a tag.<br />
– Select a value to be copied.<br />
– Right-click the selected value to display the context menu.<br />
– Select the "Copy" command.<br />
5. Paste the copied value into the corresponding "Start value" column for the tag. (Rightclick<br />
the cell and select "Paste" from the context menu.)<br />
<strong>S7</strong>-<strong>1200</strong> <strong>Programmable</strong> <strong>controller</strong><br />
684 System Manual, 04/2012, A5E02486680-06
Online and diagnostic tools<br />
14.10 Monitoring and modifying values in the CPU<br />
6. Save the project to configure the copied values as the new start values for the DB.<br />
7. Compile and download the DB to the CPU. The DB uses the new start values after the<br />
CPU goes to RUN mode.<br />
Note<br />
The values that are shown in the "Monitor value" column are always copied from the<br />
CPU. STEP 7 does not check whether all values come from the same scan cycle of the<br />
CPU.<br />
14.10.4 Using a watch table to monitor and modify values in the CPU<br />
A watch table allows you to perform monitoring and control functions on data points as the<br />
CPU executes your program. These data points can be process image (I or Q), M, DB or<br />
physical inputs (I_:P), depending on the monitor or control function. You cannot accurately<br />
monitor the physical outputs (Q_:P) because the monitor function can only display the last<br />
value written from Q memory and does not read the actual value from the physical outputs.<br />
The monitoring function does not change the program sequence. It presents you with<br />
information about the program sequence and the data of the program in the CPU.<br />
Control functions enable the user to control the sequence and the data of the program.<br />
Caution must be exercised when using control functions. These functions can seriously<br />
influence the execution of the user/system program. The three control functions are Modify,<br />
Force and Enable Outputs in STOP.<br />
With the watch table, you can perform the following online functions:<br />
● Monitoring the status of the tags<br />
● Modifying values for the individual tags<br />
You select when to monitor or modify the tag:<br />
● Beginning of scan cycle: Reads or writes the value at the beginning of the scan cycle<br />
● End of scan cycle: Reads or writes the value at the end of the scan cycle<br />
● Switch to stop<br />
To create a watch table:<br />
1. Double-click "Add new watch table" to open a new<br />
watch table.<br />
2. Enter the tag name to add a tag to the watch table.<br />
The following options are available for monitoring tags:<br />
Monitor all: This command starts the monitoring of<br />
the visible tags in the active watch table.<br />
Monitor now: This command starts the monitoring<br />
of the visible tags in the active watch table. The<br />
watch table monitors the tags immediately and<br />
once only.<br />
<strong>S7</strong>-<strong>1200</strong> <strong>Programmable</strong> <strong>controller</strong><br />
System Manual, 04/2012, A5E02486680-06 685
Online and diagnostic tools<br />
14.10 Monitoring and modifying values in the CPU<br />
The following options are available for modifying tags:<br />
● "Modify to 0" sets the value of a selected address to "0".<br />
● "Modify to 1" sets the value of a selected address to "1".<br />
● "Modify now" immediately changes the value for the selected addresses for one scan<br />
cycle.<br />
● "Modify with trigger" changes the values for the selected addresses.<br />
This function does not provide feedback to indicate that the selected addresses were<br />
actually modified. If feedback of the change is required, use the "Modify now" function.<br />
● "Enable peripheral outputs" disables the command output disable and is available only<br />
when the CPU is in STOP mode.<br />
To monitor the tags, you must have an online connection to the CPU.<br />
The various functions can be selected using the buttons at the top of the watch table.<br />
Enter the tag name to monitor and select a display format from the dropdown selection. With<br />
an online connection to the CPU, clicking the "Monitor" button displays the actual value of<br />
the data point in the "Monitor value" field.<br />
14.10.4.1 Using a trigger when monitoring or modifying PLC tags<br />
Triggering determines at what point in the scan cycle the selected address will be monitored<br />
or modified.<br />
Table 14- 4 Types of triggers<br />
Trigger Description<br />
Permanent Continuously collects the data<br />
At scan cycle start Permanent: Continuously collects the data at the start of the scan cycle, after<br />
the CPU reads the inputs<br />
Once: Collects the data at the start of the scan cycle, after the CPU reads the<br />
inputs<br />
At scan cycle end Permanent: Continuously collects the data at the end of the scan cycle, before<br />
the CPU writes the outputs<br />
Once: Collects the data once at the end of the scan cycle, before the CPU<br />
writes the outputs<br />
At transition to Permanent: Continuously collects data when the CPU transitions to STOP<br />
STOP Once: Collects the data once after the CPU transitions to STOP<br />
<strong>S7</strong>-<strong>1200</strong> <strong>Programmable</strong> <strong>controller</strong><br />
686 System Manual, 04/2012, A5E02486680-06
Online and diagnostic tools<br />
14.10 Monitoring and modifying values in the CPU<br />
For modifying a PLC tag at a given trigger, select either the start or the end of cycle.<br />
● Modifying an output: The best trigger event for modifying an output is at the end of the<br />
scan cycle, immediately before the CPU writes the outputs.<br />
Monitor the value of the outputs at the beginning of the scan cycle to determine what<br />
value is written to the physical outputs. Also, monitor the outputs before the CPU writes<br />
the values to the physical outputs in order to check program logic and to compare to the<br />
actual I/O behavior.<br />
● Modifying an input: The best trigger event for modifying an input is at the start of the<br />
cycle, immediately after the CPU reads the inputs and before the user program uses the<br />
input values.<br />
If you are modifying inputs the start of the scan cycle, you should also monitor the value<br />
of the inputs at the end of the scan cycle to ensure that the value of the input at the end<br />
the scan cycle has not changed from the start of the scan cycle. If there is a difference in<br />
the values, your user program may be writing to an input in error.<br />
To diagnose why the CPU might have gone to STOP, use the "Transition to STOP" trigger to<br />
capture the last process values.<br />
14.10.4.2 Enabling outputs in STOP mode<br />
The watch table allows you to write to the outputs when the CPU is in STOP mode. This<br />
functionality allows you to check the wiring of the outputs and verify that the wire connected<br />
to an output pin initiates a high or low signal to the terminal of the process device to which it<br />
is connected.<br />
WARNING<br />
Even though the CPU is in STOP mode, enabling a physical output can activate the<br />
process point to which it is connected.<br />
You can change the state of the outputs in STOP mode when the outputs are enabled. If the<br />
outputs are disabled, you cannot modify the outputs in STOP mode.<br />
● To enable the modification of the outputs in STOP, select the "Enable peripheral outputs"<br />
option of the "Modify" command of the "Online" menu, or by right-clicking the row of the<br />
Watch table.<br />
You cannot enable outputs in STOP mode if you have configured distributed I/O,. An<br />
error is returned when you try to do this.<br />
● Setting the CPU to RUN mode disables "Enable peripheral outputs" option.<br />
● If any inputs or outputs are forced, the CPU is not allowed to enable outputs while in<br />
STOP mode. The force function must first be cancelled.<br />
<strong>S7</strong>-<strong>1200</strong> <strong>Programmable</strong> <strong>controller</strong><br />
System Manual, 04/2012, A5E02486680-06 687
Online and diagnostic tools<br />
14.10 Monitoring and modifying values in the CPU<br />
14.10.5 Forcing values in the CPU<br />
14.10.5.1 Using the force table<br />
A force table provides a "force" function that overwrites the value for an input or output point<br />
to a specified value for the peripheral input or peripheral output address. The CPU applies<br />
this forced value to the input process image prior to the execution of the user program and to<br />
the output process image before the outputs are written to the modules.<br />
Note<br />
The force values are stored in the CPU and not in the force table.<br />
You cannot force an input (or "I" address) or an output (or "Q" address). However, you can<br />
force a peripheral input or peripheral output. The force table automatically appends a ":P" to<br />
the address (for example: "On":P or "Run":P).<br />
In the "Force value" cell, enter the value for the input or output to be forced. You can then<br />
use the check box in the "Force" column to enable forcing of the input or output.<br />
Use the "Start or replace forcing" button to force the value of the tags in the force<br />
table. Click the "Stop forcing" button to reset the value of the tags.<br />
In the force table, you can monitor the status of the forced value for an input. However, you<br />
cannot monitor the forced value of an output.<br />
You can also view the status of the forced value in the program editor.<br />
NOTICE<br />
When an input or output is forced in a force table, the force actions become part of the<br />
project configuration. If you close STEP 7, the forced elements remain active in the CPU<br />
program until they are cleared. To clear these forced elements, you must use STEP 7 to<br />
connect with the online CPU and then use the force table to turn off or stop the force<br />
function for those elements.<br />
<strong>S7</strong>-<strong>1200</strong> <strong>Programmable</strong> <strong>controller</strong><br />
688 System Manual, 04/2012, A5E02486680-06
Online and diagnostic tools<br />
14.10 Monitoring and modifying values in the CPU<br />
14.10.5.2 Operation of the Force function<br />
The CPU allows you to force input and output point(s) by specifying the physical input or<br />
output address (I_:P or Q_:P) in the force table and then starting the force function.<br />
In the program, reads of physical inputs are overwritten by the forced value. The program<br />
uses the forced value in processing. When the program writes a physical output, the output<br />
value is overwritten by the force value. The forced value appears at the physical output and<br />
is used by the process.<br />
When an input or output is forced in the force table, the force actions become part of the<br />
user program. Even though the programming software has been closed, the force selections<br />
remain active in the operating CPU program until they are cleared by going online with the<br />
programming software and stopping the force function. Programs with forced points loaded<br />
on another CPU from a memory card will continue to force the points selected in the<br />
program.<br />
If the CPU is executing the user program from a write-protected memory card, you cannot<br />
initiate or change the forcing of I/O from a watch table because you cannot override the<br />
values in the write-protected user program. Any attempt to force the write-protected values<br />
generates an error. If you use a memory card to transfer a user program, any forced<br />
elements on that memory card will be transferred to the CPU.<br />
Note<br />
Digital I/O points assigned to HSC, PWM, and PTO cannot be forced<br />
The digital I/O points used by the high-speed counter (HSC), pulse-width modulation (PWM),<br />
and pulse-train output (PTO) devices are assigned during device configuration. When digital<br />
I/O point addresses are assigned to these devices, the values of the assigned I/O point<br />
addresses cannot be modified by the force function of the watch table.<br />
<strong>S7</strong>-<strong>1200</strong> <strong>Programmable</strong> <strong>controller</strong><br />
System Manual, 04/2012, A5E02486680-06 689
Online and diagnostic tools<br />
14.11 Downloading in RUN mode<br />
<br />
<br />
Startup RUN<br />
A The clearing of the I memory area is not<br />
affected by the Force function.<br />
B The initialization of the outputs values is<br />
not affected by the Force function.<br />
C During the execution of the startup OBs,<br />
the CPU applies the force value when<br />
the user program accesses the physical<br />
input.<br />
D The storing of interrupt events into the<br />
queue is not affected.<br />
E The enabling of the writing to the<br />
outputs is not affected.<br />
14.11 Downloading in RUN mode<br />
<br />
<strong>S7</strong>-<strong>1200</strong> <strong>Programmable</strong> <strong>controller</strong><br />
690 System Manual, 04/2012, A5E02486680-06<br />
<br />
<br />
<br />
① While writing Q memory to the physical<br />
outputs, the CPU applies the force value as<br />
the outputs are updated.<br />
② When reading the physical inputs, the CPU<br />
applies the force values just prior to copying<br />
the inputs into I memory.<br />
③ During the execution of the user program<br />
(program cycle OBs), the CPU applies the<br />
force value when the user program accesses<br />
the physical input or writes the physical<br />
output.<br />
④ Handling of communication requests and selftest<br />
diagnostics are not affected by the Force<br />
function.<br />
⑤ The processing of interrupts during any part of<br />
the scan cycle is not affected.<br />
The CPU supports "Download in RUN mode". This capability is intended to allow you to<br />
make small changes to a user program with minimal disturbance to the process being<br />
controlled by the program. However, implementing this capability also allows massive<br />
program changes that could be disruptive or even dangerous.<br />
WARNING<br />
When you download changes to the CPU in RUN mode, the changes immediately affect<br />
process operation. Changing the program in RUN mode can result in unexpected system<br />
operation, which could cause death or serious injury to personnel, and/or damage to<br />
equipment.<br />
Only authorized personnel who understand the effects of RUN mode changes on system<br />
operation should perform a download in RUN mode.
Online and diagnostic tools<br />
14.11 Downloading in RUN mode<br />
The "Download in RUN mode" feature allows you to make changes to a program and<br />
download them to your CPU without switching to STOP mode:<br />
● You can make minor changes to your current process without having to shut down (for<br />
example, change a parameter value).<br />
● You can debug a program more quickly with this feature (for example, invert the logic for<br />
a normally open or normally closed switch).<br />
You can make the following program block and tag changes and download them in RUN<br />
mode:<br />
● Create, overwrite, and delete Functions (FC), Function Blocks (FB), and Tag tables.<br />
● Create and delete Data Blocks (DB); however, DB structure changes cannot be<br />
overwritten. Initial DB values can be overwritten. You cannot download a web server DB<br />
(control or fragment) in RUN mode.<br />
● Overwrite Organization Blocks (OB); however, you cannot create or delete OBs.<br />
A maximum number of ten blocks can be downloaded in RUN mode at one time. If more<br />
than ten blocks are downloaded, the CPU must be placed into STOP mode.<br />
If you download changes to a real process (as opposed to a simulated process, which you<br />
might do in the course of debugging a program), it is vital to think through the possible safety<br />
consequences to machines and machine operators before you download.<br />
Note<br />
If the CPU is in RUN mode and program changes have been made, STEP 7 always try to<br />
download in RUN first. If you do not want this to happen, you must put the CPU into STOP.<br />
If the changes made are not supported in "Download in RUN", STEP 7 prompts the user that<br />
the CPU must go to STOP.<br />
14.11.1 Prerequisites for "Download in RUN mode"<br />
You cannot download your program changes to a CPU that is in RUN mode unless you have<br />
met these prerequisites:<br />
● Your program must compile successfully.<br />
● You must have successfully established communication between the programming<br />
device where you are running STEP 7 and the CPU.<br />
● In V3.0 or later, the firmware of the target CPU must support the "Download in RUN<br />
mode" feature.<br />
<strong>S7</strong>-<strong>1200</strong> <strong>Programmable</strong> <strong>controller</strong><br />
System Manual, 04/2012, A5E02486680-06 691
Online and diagnostic tools<br />
14.11 Downloading in RUN mode<br />
14.11.2 Changing your program in RUN mode<br />
To change the program in RUN mode, your must first ensure that the CPU supports<br />
"Download in RUN mode" and that the CPU is in RUN mode:<br />
1. To download your program in RUN mode, select one of the following methods:<br />
– "Download to device" command from the "Online" menu<br />
– "Download to device" button in the toolbar<br />
– In the "Project tree", right-click "Program blocks" and select the "Download to device ><br />
Software" command.<br />
2. If the program compiles successfully, STEP 7 downloads the program to the CPU.<br />
3. STEP 7 prompts you to load your program or cancel the operation.<br />
4. If you click "Load", STEP 7 downloads the program to the CPU.<br />
<strong>S7</strong>-<strong>1200</strong> <strong>Programmable</strong> <strong>controller</strong><br />
692 System Manual, 04/2012, A5E02486680-06
14.11.3 Downloading selected blocks<br />
Online and diagnostic tools<br />
14.11 Downloading in RUN mode<br />
The focus is on the Program blocks folder, selection of blocks, or one single block.<br />
1. If the user selects a single<br />
block for downloading from<br />
within the block editor, then<br />
the only option in the "Action"<br />
column is "Consistent<br />
download".<br />
The user can expand the<br />
category line to be sure what<br />
blocks are to be loaded. In this<br />
example, a small change was<br />
made to the offline block, and<br />
no other blocks need to be<br />
loaded.<br />
2. In this example, more than<br />
one block is needed for<br />
downloading.<br />
Note<br />
A maximum number of ten blocks can be downloaded in RUN mode at one time. If more<br />
than ten blocks are downloaded, the CPU must be placed into STOP mode.<br />
<strong>S7</strong>-<strong>1200</strong> <strong>Programmable</strong> <strong>controller</strong><br />
System Manual, 04/2012, A5E02486680-06 693
Online and diagnostic tools<br />
14.11 Downloading in RUN mode<br />
3. If the user attempts to<br />
download in RUN, but the<br />
system detects that this is not<br />
possible prior to the actual<br />
download, then the Stop<br />
modules category line appears<br />
in the dialog.<br />
4. Click the "Load" button, and<br />
the "Load results" dialog<br />
appears. Click the "Finish"<br />
button to complete the<br />
download.<br />
14.11.4 Downloading a single selected block with a compile error in another block<br />
If the user attempts a consistent download with compile error in another block, then the<br />
dialog will indicate an error, and the load button will be disabled.<br />
<strong>S7</strong>-<strong>1200</strong> <strong>Programmable</strong> <strong>controller</strong><br />
694 System Manual, 04/2012, A5E02486680-06
Online and diagnostic tools<br />
14.11 Downloading in RUN mode<br />
The user must correct the compile error in the other block. Then, the "Load" button becomes<br />
active.<br />
14.11.5 System reaction if the download process fails<br />
During the initial Download in RUN operation, if a network connection failure occurs, a "Load<br />
preview" dialog will result as shown in the figure below.<br />
<strong>S7</strong>-<strong>1200</strong> <strong>Programmable</strong> <strong>controller</strong><br />
System Manual, 04/2012, A5E02486680-06 695
Online and diagnostic tools<br />
14.11 Downloading in RUN mode<br />
14.11.6 Downloading the program in RUN mode<br />
Before downloading the program in RUN mode, consider the effect of a RUN-mode<br />
modification on the operation of the CPU for the following situations:<br />
● If you deleted the control logic for an output, the CPU maintains the last state of the<br />
output until the next power cycle or transition to STOP mode.<br />
● If you deleted a high-speed counter or pulse output functions which were running, the<br />
high-speed counter or pulse output continues to run until the next power cycle or<br />
transition to STOP mode.<br />
● Any logic that is conditional on the state of the first scan bit will not be executed until the<br />
next power cycle or transition from STOP to RUN mode. The first scan bit is set only by<br />
the transition to RUN mode and is not affected by a download in RUN mode.<br />
● The current values of data blocks (DB) and/or tags will not be overwritten.<br />
Note<br />
Before you can download your program in RUN mode, the CPU must support changes in<br />
RUN mode, the program must compile with no errors, and the communication between<br />
STEP 7, and the CPU must be error-free.<br />
You can make the following changes in program blocks and tags and download them in<br />
RUN mode:<br />
Create, overwrite, and delete Functions (FC), Function Blocks (FB), and Tag tables.<br />
Create and delete Data Blocks (DB); however, DB structure changes cannot be<br />
overwritten. Initial DB values can be overwritten. You cannot download a web server<br />
DB (control or fragment) in RUN mode.<br />
Overwrite Organization Blocks (OB); however, you cannot create or delete OBs.<br />
A maximum number of ten blocks can be downloaded in RUN mode at one time. If more<br />
than ten blocks are downloaded, the CPU must be placed into STOP mode.<br />
Once a download is initiated, you cannot perform other tasks in STEP 7 until the<br />
download is complete.<br />
<strong>S7</strong>-<strong>1200</strong> <strong>Programmable</strong> <strong>controller</strong><br />
696 System Manual, 04/2012, A5E02486680-06
Online and diagnostic tools<br />
14.11 Downloading in RUN mode<br />
Instructions that may fail due to "Download in RUN mode"<br />
The following instructions may experience a temporary error when download in run changes<br />
are being activated in the CPU. The error occurs when the instruction is initiated while the<br />
CPU is preparing to activate the downloaded changes. During this time, the CPU suspends<br />
initiation of user-program access to the Load Memory, while it completes in-progress userprogram<br />
access to Load Memory. This is done so that downloaded changes can be<br />
activated consistently.<br />
Instruction Response while Activation is Pending<br />
DataLogCreate STATUS = W#16#80C0, ERROR = TRUE<br />
DataLogOpen STATUS = W#16#80C0, ERROR = TRUE<br />
DataLogWrite STATUS = W#16#80C0, ERROR = TRUE<br />
DataLogClose STATUS = W#16#80C0, ERROR = TRUE<br />
DataLogNewFile STATUS = W#16#80C0, ERROR = TRUE<br />
READ_DBL RET_VAL = W#16#82C0<br />
WRIT_DBL RET_VAL = W#16#82C0<br />
RTM RET_VAL = 0x80C0<br />
In all cases the RLO output from the instruction will be false when the error occurs. The error<br />
is temporary. If it occurs, the instruction should be retried later.<br />
Note<br />
You must not retry the operation in the current execution of the OB.<br />
<strong>S7</strong>-<strong>1200</strong> <strong>Programmable</strong> <strong>controller</strong><br />
System Manual, 04/2012, A5E02486680-06 697
Online and diagnostic tools<br />
14.11 Downloading in RUN mode<br />
<strong>S7</strong>-<strong>1200</strong> <strong>Programmable</strong> <strong>controller</strong><br />
698 System Manual, 04/2012, A5E02486680-06
Technical specifications A<br />
A.1 General Technical Specifications<br />
Standards compliance<br />
The <strong>S7</strong>-<strong>1200</strong> automation system design conforms with the following standards and test<br />
specifications. The test criteria for the <strong>S7</strong>-<strong>1200</strong> automation system are based on these<br />
standards and test specifications.<br />
Note that not all <strong>S7</strong>-<strong>1200</strong> models may be certified to these standards, and certification status<br />
may change without notification. It is the user's responsibility to determine applicable<br />
certifications by referring to the ratings marked on the product. Consult your local Siemens<br />
representative if you need additional information related to the latest listing of exact<br />
approvals by part number.<br />
CE approval<br />
The <strong>S7</strong>-<strong>1200</strong> Automation System satisfies requirements and safety related objectives<br />
according to the EC directives listed below, and conforms to the harmonized European<br />
standards (EN) for the programmable <strong>controller</strong>s listed in the Official Journals of the<br />
European Community.<br />
● EC Directive 2006/95/EC (Low Voltage Directive) "Electrical Equipment Designed for Use<br />
within Certain Voltage Limits"<br />
– EN 61131-2:2007 <strong>Programmable</strong> <strong>controller</strong>s - Equipment requirements and tests<br />
● EC Directive 2004/108/EC (EMC Directive) "Electromagnetic Compatibility"<br />
– Emission standard<br />
EN 61000-6-4:2007: Industrial Environment<br />
– Immunity standard<br />
EN 61000-6-2:2005: Industrial Environment<br />
● EC Directive 94/9/EC (ATEX) "Equipment and Protective Systems Intended for Use in<br />
Potentially Explosive Atmosphere"<br />
– EN 60079-15:2005: Type of Protection 'n'<br />
The CE Declaration of Conformity is held on file available to competent authorities at:<br />
Siemens AG<br />
IA AS RD ST PLC Amberg<br />
Werner-von-Siemens-Str. 50<br />
D92224 Amberg<br />
Germany<br />
<strong>S7</strong>-<strong>1200</strong> <strong>Programmable</strong> <strong>controller</strong><br />
System Manual, 04/2012, A5E02486680-06 699
Technical specifications<br />
A.1 General Technical Specifications<br />
cULus approval<br />
FM approval<br />
ATEX approval<br />
Underwriters Laboratories Inc. complying with:<br />
● Underwriters Laboratories, Inc.: UL 508 Listed (Industrial Control Equipment)<br />
● Canadian Standards Association: CSA C22.2 Number 142 (Process Control Equipment)<br />
NOTICE<br />
The SIMATIC <strong>S7</strong>-<strong>1200</strong> series meets the CSA standard.<br />
The cULus logo indicates that the <strong>S7</strong>-<strong>1200</strong> has been examined and certified by<br />
Underwriters Laboratories (UL) to standards UL 508 and CSA 22.2 No. 142.<br />
Factory Mutual Research (FM)<br />
Approval Standard Class Number 3600 and 3611<br />
Approved for use in:<br />
Class I, Division 2, Gas Group A, B, C, D, Temperature Class T3C Ta = 60° C<br />
Class I, Zone 2, IIC, Temperature Class T3 Ta = 60° C<br />
Canadian Class I, Zone 2 Installation per CEC 18-150<br />
IMPORTANT EXCEPTION: See Technical Specifications for the number of inputs or outputs<br />
allowed on simultaneously. Some models are de-rated for Ta = 60° C.<br />
WARNING<br />
Substitution of components may impair the suitability for Class I, Division 2 and Zone 2.<br />
Repair of units should only be performed by an authorized Siemens Service Center.<br />
ATEX approval applies to DC models only. ATEX approval does not apply to AC and Relay<br />
models.<br />
EN 60079-0:2006: Explosive Atmospheres - General Requirements<br />
EN 60079-15:2005: Electrical Apparatus for Potentially Explosive Atmospheres;<br />
Type of protection 'nA'<br />
II 3 G Ex nA II T3<br />
IMPORTANT EXCEPTION: See Technical Specifications for the number of inputs or outputs<br />
allowed on simultaneously. Some models are de-rated for Ta = 60° C.<br />
Install modules in a suitable enclosure providing a minimum degree of protection of IP54<br />
according to EN 60529 and take into account the environmental conditions under which the<br />
equipment will be used.<br />
When the temperature under rated conditions exceed 70° C at the cable entry point, or 80° C<br />
at the branching point of the conductors, the temperature specification of the selected cable<br />
should be in compliance with the actual measured temperature.<br />
<strong>S7</strong>-<strong>1200</strong> <strong>Programmable</strong> <strong>controller</strong><br />
700 System Manual, 04/2012, A5E02486680-06
C-Tick approval<br />
Technical specifications<br />
A.1 General Technical Specifications<br />
Provisions should be made to prevent the rated voltage from being exceeded by transient<br />
disturbances of more than 40%.<br />
The <strong>S7</strong>-<strong>1200</strong> automation system satisfies requirements of standards to AS/NZS 2064<br />
(Class A).<br />
Korea Certification<br />
The <strong>S7</strong>-<strong>1200</strong> automation system satisfies the requirements of the Korean Certification (KC<br />
Mark). It has been defined as Class A Equipment and is intended for industrial applications<br />
and has not been considered for home use.<br />
Maritime approval<br />
The <strong>S7</strong>-<strong>1200</strong> products are periodically submitted for special agency approvals related to<br />
specific markets and applications. Consult your local Siemens representative if you need<br />
additional information related to the latest listing of exact approvals by part number.<br />
Classification societies:<br />
● ABS (American Bureau of Shipping)<br />
● BV (Bureau Veritas)<br />
● DNV (Det Norske Veritas)<br />
● GL (Germanischer Lloyd)<br />
● LRS (Lloyds Register of Shipping)<br />
● Class NK (Nippon Kaiji Kyokai)<br />
Industrial environments<br />
The <strong>S7</strong>-<strong>1200</strong> automation system is designed for use in industrial environments.<br />
Table A- 1 Industrial environments<br />
Application field Noise emission requirements Noise immunity requirements<br />
Industrial EN 61000-6-4:2007 EN 61000-6-2:2005<br />
<strong>S7</strong>-<strong>1200</strong> <strong>Programmable</strong> <strong>controller</strong><br />
System Manual, 04/2012, A5E02486680-06 701
Technical specifications<br />
A.1 General Technical Specifications<br />
Electromagnetic compatibility<br />
Electromagnetic Compatibility (EMC) is the ability of an electrical device to operate as<br />
intended in an electromagnetic environment and to operate without emitting levels of<br />
electromagnetic interference (EMI) that may disturb other electrical devices in the vicinity.<br />
Table A- 2 Immunity per EN 61000-6-2<br />
Electromagnetic compatibility - Immunity per EN 61000-6-2<br />
EN 61000-4-2<br />
Electrostatic discharge<br />
EN 61000-4-3<br />
Radiated, radio-frequency,<br />
electromagnetic field immunity test<br />
EN 61000-4-4<br />
Fast transient bursts<br />
EN 6100-4-5<br />
Surge immunity<br />
EN 61000-4-6<br />
Conducted disturbances<br />
EN 61000-4-11<br />
Voltage dips<br />
Table A- 3 Conducted and radiated emissions per EN 61000-6-4<br />
8 kV air discharge to all surfaces<br />
6 kV contact discharge to exposed conductive surfaces<br />
80 to 1000 MHz, 10 V/m, 80% AM at 1 kHz<br />
1.4 to 2.0 GHz, 3 V/m, 80% AM at 1 kHz<br />
2.0 to 2.7 GHz, 1 V/m, 80% AM at 1 kHz<br />
2 kV, 5 kHz with coupling network to AC and DC system power<br />
2 kV, 5 kHz with coupling clamp to I/O<br />
AC systems - 2 kV common mode, 1kV differential mode<br />
DC systems - 2 kV common mode, 1kV differential mode<br />
For DC systems (I/O signals, DC power systems) external protection is<br />
required.<br />
150 kHz to 80 MHz, 10 V RMS, 80% AM at 1kHz<br />
AC systems<br />
0% for 1 cycle, 40% for 12 cycles and 70% for 30 cycles at 60 Hz<br />
Electromagnetic compatibility - Conducted and radiated emissions per EN 61000-6-4<br />
Conducted Emissions<br />
0.15 MHz to 0.5 MHz
Table A- 5 Operating conditions<br />
Technical specifications<br />
A.1 General Technical Specifications<br />
Environmental conditions - Operating<br />
Ambient temperature range<br />
-20° C to 60° C horizontal mounting<br />
(Inlet Air 25 mm below unit)<br />
-20° C to 50° C vertical mounting<br />
95% non-condensing humidity<br />
Unless otherwise specified<br />
Atmospheric pressure 1080 to 795 hPa (corresponding to an altitude of -1000 to 2000m)<br />
Concentration of contaminants S02: < 0.5 ppm; H2S: < 0.1 ppm; RH < 60% non-condensing<br />
EN 60068-2-14, Test Nb, temperature change 5° C to 55° C, 3° C/minute<br />
EN 60068-2-27 Mechanical shock 15 G, 11 ms pulse, 6 shocks in each of 3 axis<br />
EN 60068-2-6 Sinusoidal vibration DIN rail mount: 3.5 mm from 5-9 Hz, 1G from 9 - 150 Hz<br />
Panel Mount: 7.0 mm from 5-9 Hz, 2G from 9 to 150 Hz<br />
10 sweeps each axis, 1 octave per minute<br />
NOTICE<br />
Table A- 6 High potential isolation test<br />
For systems that must start up in the range of -20° C to 0° C, the user program should<br />
delay energizing outputs for 10 seconds following startup.<br />
High potential isolation test<br />
24 V/5 V nominal circuits<br />
115/230 V circuits to ground<br />
115/230 V circuits to 115/230 V circuits<br />
115 V/230V circuits to 24 V/5 V circuits<br />
Ethernet port to 24V/5V circuits and ground1 520 VDC (type test of optical isolation boundaries)<br />
1500 VAC<br />
1500 VAC<br />
1500 VAC (3000 VAC / 4242 VDC type test)<br />
1500 VAC (type test only)<br />
1 Ethernet port isolation is designed to limit hazard during short term network faults to hazardous voltages. It does not<br />
conform to safety requirements for routine AC line voltage isolation.<br />
Protection class<br />
Degree of protection<br />
● Protection Class II according to EN 61131-2 (Protective conductor not required)<br />
● IP20 Mechanical Protection, EN 60529<br />
● Protects against finger contact with high voltage as tested by standard probe. External<br />
protection required for dust, dirt, water and foreign objects of < 12.5mm in diameter.<br />
<strong>S7</strong>-<strong>1200</strong> <strong>Programmable</strong> <strong>controller</strong><br />
System Manual, 04/2012, A5E02486680-06 703
Technical specifications<br />
A.1 General Technical Specifications<br />
Rated voltages<br />
Table A- 7 Rated voltages<br />
Rated voltage Tolerance<br />
24 VDC 20.4 VDC to 28.8 VDC<br />
22.0 VDC to 28.8 VDC for ambient temperature -20° C to 0° C<br />
120/230 VAC 85 VAC to 264 VAC, 47 to 63 Hz<br />
NOTICE<br />
Reverse voltage protection<br />
DC Outputs<br />
When a mechanical contact turns on output power to the <strong>S7</strong>-<strong>1200</strong> CPU, or any digital<br />
signal module, it sends a "1" signal to the digital outputs for approximately 50<br />
microseconds. This could cause unexpected machine or process operation which could<br />
result in death or serious injury to personnel and/or damage to equipment. You must plan<br />
for this, especially if you are using devices which respond to short duration pulses.<br />
Reverse voltage protection circuitry is provided on each terminal pair of +24 VDC power or<br />
user input power for CPUs, signal modules (SMs), and signal boards (SBs). It is still possible<br />
to damage the system by wiring different terminal pairs in opposite polarities.<br />
Some of the 24 VDC power input ports in the <strong>S7</strong>-<strong>1200</strong> system are interconnected, with a<br />
common logic circuit connecting multiple M terminals. For example, the following circuits are<br />
interconnected when designated as "not isolated" in the data sheets: the 24 VDC power<br />
supply of the CPU, the power input for the relay coil of an SM, or the power supply for a nonisolated<br />
analog input. All non-isolated M terminals must connect to the same external<br />
reference potential.<br />
WARNING<br />
Connecting non-isolated M terminals to different reference potentials will cause unintended<br />
current flows that may cause damage or unpredictable operation in the PLC and any<br />
connected equipment.<br />
Failure to comply with these guidelines could cause damage or unpredictable operation<br />
which could result in death or serve personal injury and/or property damage.<br />
Always ensure that all non-isolated M terminals in an <strong>S7</strong>-<strong>1200</strong> system are connected to the<br />
same reference potential.<br />
Short circuit protection circuitry is not provided for DC outputs on CPUs, signal modules<br />
(SMs) and signal boards (SBs).<br />
<strong>S7</strong>-<strong>1200</strong> <strong>Programmable</strong> <strong>controller</strong><br />
704 System Manual, 04/2012, A5E02486680-06
Technical specifications<br />
A.2 CPU 1211C<br />
Relay electrical service life<br />
The typical performance data supplied by relay vendors is shown below. Actual performance<br />
may vary depending upon your specific application. An external protection circuit that is<br />
adapted to the load will enhance the service life of the contacts.<br />
<br />
<br />
<br />
<br />
<br />
<br />
A.2 CPU 1211C<br />
<br />
<br />
A.2.1 General specifications and features<br />
Table A- 8 General specifications<br />
Technical data CPU 1211C<br />
AC/DC/Relay<br />
<br />
<br />
① Service life (x 10 3 operations)<br />
② 250 VAC resistive load<br />
30 VDC resistive load<br />
③ 250 VAC inductive load (p.f=0.4)<br />
30 VDC inductive load (L/R=7ms)<br />
④ Rated Operating Current (A)<br />
CPU 1211C<br />
DC/DC/Relay<br />
CPU 1211C<br />
DC/DC/DC<br />
Order number 6E<strong>S7</strong> 211-1BE31-0XB0 6E<strong>S7</strong> 211-1HE31-0XB0 6E<strong>S7</strong> 211-1AE31-0XB0<br />
Dimensions W x H x D (mm) 90 x 100 x 75 90 x 100 x 75 90 x 100 x 75<br />
Shipping weight 420 grams 380 grams 370 grams<br />
Power dissipation 10 W 8 W 8 W<br />
Current available (CM bus) 750 mA max. (5 VDC) 750 mA max. (5 VDC) 750 mA max. (5 VDC)<br />
Current available (24 VDC) 300 mA max. (sensor 300 mA max. (sensor 300 mA max. (sensor<br />
power)<br />
power)<br />
power)<br />
Digital input current consumption<br />
(24VDC)<br />
4 mA/input used 4 mA/input used 4 mA/input used<br />
<strong>S7</strong>-<strong>1200</strong> <strong>Programmable</strong> <strong>controller</strong><br />
System Manual, 04/2012, A5E02486680-06 705
Technical specifications<br />
A.2 CPU 1211C<br />
Table A- 9 CPU features<br />
Technical data Description<br />
User memory 1<br />
Work 30 Kbytes<br />
Load 1 Mbyte internal, expandable up to SD card size<br />
Retentive 10 Kbytes<br />
On-board digital I/O 6 inputs/4 outputs<br />
On-board analog I/O 2 inputs<br />
Process image size 1024 bytes of inputs (I) /1024 bytes of outputs (Q)<br />
Bit memory (M) 4096 bytes<br />
Temporary (local) memory 16 Kbytes for startup and program cycle (including associated FBs and<br />
FCs)<br />
Signal modules expansion none<br />
SB, CB, BB expansion 1 max.<br />
Communication module expansion 3 CMs max.<br />
4 Kbytes for standard interrupt events including FBs and FCs<br />
4 Kbytes for error interrupt events including FBs and FCs<br />
High-speed counters 3 built-in I/O, 5 with signal board, refer to table, HSC input assignments for<br />
CPU 1211C (Page 339)<br />
Pulse outputs 2 4<br />
Pulse catch inputs 6<br />
Single phase: 3 at 100 kHz, SB: 2 at 30 kHz<br />
Quadrature phase: 3 at 80 kHz, SB: 2 at 20 kHz<br />
Time delay / cyclic interrupts 4 total with 1 ms resolution<br />
Edge interrupts 6 rising and 6 falling (10 and 10 with optional signal board)<br />
Memory card SIMATIC Memory Card (optional)<br />
Real time clock accuracy +/- 60 seconds/month<br />
Real time clock retention time 20 days typ./12 days min. at 40°C (maintenance-free Super Capacitor)<br />
1 The size of the user program, data, and configuration is limited by the available load memory and work memory in the<br />
CPU. There is no specific limit to the number of OB, FC, FB and DB blocks supported or to the size of a particular block;<br />
the only limit is due to overall memory size.<br />
2 For CPU models with relay outputs, you must install a digital signal board (SB) to use the pulse outputs.<br />
Table A- 10 Performance<br />
Type of instruction Execution speed<br />
Boolean 0.08 μs/instruction<br />
Move Word 1.7 μs/instruction<br />
Real math 2.3 μs/instruction<br />
<strong>S7</strong>-<strong>1200</strong> <strong>Programmable</strong> <strong>controller</strong><br />
706 System Manual, 04/2012, A5E02486680-06
A.2.2 Timers, counters and code blocks supported by CPU 1211C<br />
Table A- 11 Blocks, timers and counters supported by CPU 1211C<br />
Technical specifications<br />
A.2 CPU 1211C<br />
Element Description<br />
Blocks<br />
Type OB, FB, FC, DB<br />
Size 30 Kbytes<br />
Quantity Up to 1024 blocks total (OBs + FBs + FCs + DBs)<br />
Address range for FBs, FCs,<br />
and DBs<br />
1 to 65535 (such as FB 1 to FB 65535)<br />
Nesting depth 16 from the program cycle or start up OB; 4 from the time delay<br />
interrupt, time-of-day interrupt, cyclic interrupt, hardware interrupt,<br />
time error interrupt, or diagnostic error interrupt OB<br />
Monitoring Status of 2 code blocks can be monitored simultaneously<br />
Program cycle Multiple: OB 1, OB 200 to OB 65535<br />
Startup Multiple: OB 100, OB 200 to OB 65535<br />
Time-delay interrupts and<br />
cyclic interrupts<br />
41 OBs<br />
(1 per event): OB 200 to OB 65535<br />
Hardware interrupts (edges<br />
and HSC)<br />
50 (1 per event): OB 200 to OB 65535<br />
Time error interrupts 1: OB 80<br />
Diagnostic error interrupts 1: OB 82<br />
Timers<br />
Type IEC<br />
Quantity Limited only by memory size<br />
Storage Structure in DB, 16 bytes per timer<br />
Counters<br />
Type IEC<br />
Quantity Limited only by memory size<br />
Storage Structure in DB, size dependent upon count type<br />
SInt, USInt: 3 bytes<br />
Int, UInt: 6 bytes<br />
DInt, UDInt: 12 bytes<br />
1 Time-delay and cyclic interrupts use the same resources in the CPU. You can have only a total of 4 of these interrupts<br />
(time-delay plus cyclic interrupts). You cannot have 4 time-delay interrupts and 4 cyclic interrupts.<br />
Table A- 12 Communication<br />
Technical data Description<br />
Number of ports 1<br />
Type Ethernet<br />
HMI device1 3<br />
Programming device (PG) 1<br />
<strong>S7</strong>-<strong>1200</strong> <strong>Programmable</strong> <strong>controller</strong><br />
System Manual, 04/2012, A5E02486680-06 707
Technical specifications<br />
A.2 CPU 1211C<br />
Technical data Description<br />
Connections 8 for Open User Communication (active or passive): TSEND_C,<br />
TRCV_C, TCON, TDISCON, TSEND, and TRCV<br />
3 for server GET/PUT (CPU-to-CPU) <strong>S7</strong> communication<br />
8 for client GET/PUT (CPU-to-CPU) <strong>S7</strong> communication<br />
Data rates 10/100 Mb/s<br />
Isolation (external signal to PLC logic) Transformer isolated, 1500 VAC, for short term event safety only<br />
Cable type CAT5e shielded<br />
1 The CPU provides dedicated HMI connections to support up to 3 HMI devices. (You can have up to 2 SIMATIC Comfort<br />
panels.) The total number of HMI is affected by the types of HMI panels in your configuration. For example, you could<br />
have up to three SIMATIC Basic panels connected to your CPU, or you could have up to two SIMATIC Comfort panels<br />
with one additional Basic panel.<br />
Table A- 13 Power supply<br />
Technical data CPU 1211C<br />
AC/DC/Relay<br />
CPU 1211C<br />
DC/DC/Relay<br />
CPU 1211C<br />
DC/DC/DC<br />
Voltage range 85 to 264 VAC 20.4 VDC to 28.8 VDC<br />
22.0 VDC to 28.8 VDC for ambient temperature<br />
-20° C to 0° C<br />
Line frequency 47 to 63 Hz -- --<br />
Input<br />
current<br />
CPU only at max. load 60 mA at 120 VAC<br />
30 mA at 240 VAC<br />
CPU with all expansion<br />
accessories at max. load<br />
180 mA at 120 VAC<br />
90 mA at 240 VAC<br />
300 mA at 24 VDC 300 mA at 24 VDC<br />
900 mA at 24 VDC 900 mA at 24 VDC<br />
Inrush current (max.) 20 A at 264 VAC 12 A at 28.8 VDC 12 A at 28.8 VDC<br />
Isolation (input power to logic) 1500 VAC Not isolated Not isolated<br />
Ground leakage, AC line to functional<br />
earth<br />
0.5 mA max. -- --<br />
Hold up time (loss of power) 20 ms at 120 VAC<br />
80 ms at 240 VAC<br />
10 ms at 24 VDC 10 ms at 24 VDC<br />
Internal fuse, not user replaceable 3 A, 250 V, slow blow 3 A, 250 V, slow blow 3 A, 250 V, slow blow<br />
Table A- 14 Sensor power<br />
Technical data CPU 1211C<br />
AC/DC/Relay<br />
CPU 1211C<br />
DC/DC/Relay<br />
CPU 1211C<br />
DC/DC/DC<br />
Voltage range 20.4 to 28.8 VDC L+ minus 4 VDC min.<br />
L+ minus 5 VDC min. for ambient temperature<br />
-20° C to 0° C<br />
Output current rating (max.) 300 mA (short circuit<br />
protected)<br />
300 mA (short circuit<br />
protected)<br />
300 mA (short circuit<br />
protected)<br />
Maximum ripple noise (
A.2.3 Digital inputs and outputs<br />
Table A- 15 Digital inputs<br />
Technical data CPU 1211C AC/DC/Relay, CPU 1211C DC/DC/Relay, and<br />
CPU 1211C DC/DC/DC<br />
Number of inputs 6<br />
Type Sink/Source (IEC Type 1 sink)<br />
Rated voltage 24 VDC at 4 mA, nominal<br />
Continuous permissible voltage 30 VDC, max.<br />
Surge voltage 35 VDC for 0.5 sec.<br />
Logic 1 signal (min.) 15 VDC at 2.5 mA<br />
Logic 0 signal (max.) 5 VDC at 1 mA<br />
Isolation (field side to logic) 500 VAC for 1 minute<br />
Isolation groups 1<br />
Filter times 0.2, 0.4, 0.8, 1.6, 3.2, 6.4, and 12.8 ms (selectable in groups of 4)<br />
HSC clock input rates (max.)<br />
Single phase: 100 KHz<br />
(Logic 1 Level = 15 to 26 VDC)<br />
Quadrature phase: 80 KHz<br />
Number of inputs on simultaneously 6 at 60° C horizontal, 50° C vertical<br />
Cable length (meters) 500 m shielded, 300 m unshielded, 50 m shielded for HSC inputs<br />
Table A- 16 Digital outputs<br />
Technical specifications<br />
A.2 CPU 1211C<br />
Technical data CPU 1211C AC/DC/Relay and<br />
CPU 1211C DC/DC/Relay<br />
CPU 1211C DC/DC/DC<br />
Number of outputs 4 4<br />
Type Relay, dry contact Solid state - MOSFET (sourcing)<br />
Voltage range 5 to 30 VDC or 5 to 250 VAC 20.4 to 28.8 VDC<br />
Logic 1 signal at max. current -- 20 VDC min.<br />
Logic 0 signal with 10 KΩ load -- 0.1 VDC max.<br />
Current (max.) 2.0 A 0.5 A<br />
Lamp load 30 W DC / 200 W AC 5 W<br />
ON state resistance 0.2 Ω max. when new 0.6 Ω max.<br />
Leakage current per point -- 10 μA max.<br />
Surge current 7 A with contacts closed 8 A for 100 ms max.<br />
Overload protection No No<br />
Isolation (field side to logic) 1500 VAC for 1 minute<br />
(coil to contact)<br />
None (coil to logic)<br />
500 VAC for 1 minute<br />
Isolation resistance 100 MΩ min. when new --<br />
Isolation between open contacts 750 VAC for 1 minute --<br />
Isolation groups 1 1<br />
Inductive clamp voltage -- L+ minus 48 VDC, 1 W dissipation<br />
<strong>S7</strong>-<strong>1200</strong> <strong>Programmable</strong> <strong>controller</strong><br />
System Manual, 04/2012, A5E02486680-06 709
Technical specifications<br />
A.2 CPU 1211C<br />
Technical data CPU 1211C AC/DC/Relay and<br />
CPU 1211C DC/DC/Relay<br />
CPU 1211C DC/DC/DC<br />
Maximum relay switching frequency 1 Hz --<br />
Switching delay (Qa.0 to Qa.3) 10 ms max. 1.0 μs max., off to on<br />
3.0 μs max., on to off<br />
Pulse Train Output rate<br />
Not recommended<br />
(Qa.0 and Qa.2)<br />
1 100 KHz max.,<br />
2 Hz min. 2<br />
Lifetime mechanical (no load) 10,000,000 open/close cycles --<br />
Lifetime contacts at rated load 100,000 open/close cycles --<br />
Behavior on RUN to STOP Last value or substitute value Last value or substitute value<br />
(default value 0)<br />
(default value 0)<br />
Number of outputs on simultaneously 4 at 60° C horizontal, 50° C vertical<br />
Cable length (meters) 500 m shielded,<br />
500 m shielded,<br />
150 m unshielded<br />
150 m unshielded<br />
1 For CPU models with relay outputs, you must install a digital signal board (SB) to use the pulse outputs.<br />
2 Depending on your pulse receiver and cable, an additional load resistor (at least 10% of rated current) may improve<br />
pulse signal quality and noise immunity.<br />
A.2.4 Analog inputs<br />
Table A- 17 Analog inputs<br />
Technical data Description<br />
Number of inputs 2<br />
Type Voltage (single-ended)<br />
Full-scale range 0 to 10 V<br />
Full-scale range (data word) 0 to 27648<br />
Overshoot range 10.001 to 11.759 V<br />
Overshoot range (data word) 27,649 to 32,511<br />
Overflow range 11.760 to 11.852 V<br />
Overflow range (data word) 32,512 to 32,767<br />
Resolution 10 bits<br />
Maximum withstand voltage 35 VDC<br />
Smoothing None, Weak, Medium, or Strong<br />
See the table for step response (ms) for the analog inputs of the CPU<br />
(Page 711).<br />
Noise rejection 10, 50, or 60 Hz<br />
Impedance ≥100 KΩ<br />
Isolation (field side to logic) None<br />
Accuracy (25°C / -20 to 60°C) 3.0% / 3.5% of full-scale<br />
Cable length (meters) 100 m, shielded twisted pair<br />
<strong>S7</strong>-<strong>1200</strong> <strong>Programmable</strong> <strong>controller</strong><br />
710 System Manual, 04/2012, A5E02486680-06
A.2.4.1 Step response of the built-in analog inputs of the CPU<br />
Table A- 18 Step Response (ms), 0V to 10V measured at 95%<br />
Technical specifications<br />
A.2 CPU 1211C<br />
Smoothing selection (sample averaging)<br />
Rejection frequency (Integration time)<br />
60 Hz 50 Hz 10 Hz<br />
None (1 cycle): No averaging 50 ms 50 ms 100 ms<br />
Weak (4 cycles): 4 samples 60ms 70 ms 200 ms<br />
Medium (16 cycles): 16 samples 200 ms 240 ms 1150 ms<br />
Strong (32 cycles): 32 samples 400 ms 480 ms 2300 ms<br />
Sample time 4.17 ms 5 ms 25 ms<br />
A.2.4.2 Sample time for the built-in analog ports of the CPU<br />
Table A- 19 Sample time for built-in analog inputs of the CPU<br />
Rejection frequency (Integration time selection) Sample time<br />
60 Hz (16.6 ms) 4.17 ms<br />
50 Hz (20 ms) 5 ms<br />
10 Hz (100 ms) 25 ms<br />
<strong>S7</strong>-<strong>1200</strong> <strong>Programmable</strong> <strong>controller</strong><br />
System Manual, 04/2012, A5E02486680-06 711
Technical specifications<br />
A.2 CPU 1211C<br />
A.2.5 CPU 1211C Wiring diagrams<br />
Table A- 20 CPU 1211C AC/DC/Relay (6E<strong>S7</strong> 211-1BE31-0XB0)<br />
X10<br />
<br />
X12<br />
① 24 VDC Sensor Power<br />
Out<br />
For additional noise<br />
immunity, connect "M"<br />
to chassis ground even<br />
if not using sensor<br />
supply.<br />
② For sinking inputs,<br />
connect "-" to "M"<br />
(shown).<br />
For sourcing inputs,<br />
connect "+" to "M".<br />
Note: X11 connectors must<br />
be gold. See Appendix C,<br />
Spare Parts for order<br />
number.<br />
<strong>S7</strong>-<strong>1200</strong> <strong>Programmable</strong> <strong>controller</strong><br />
712 System Manual, 04/2012, A5E02486680-06<br />
X11<br />
Table A- 21 Connector pin locations for CPU 1211C AC/DC/Relay (6E<strong>S7</strong> 211-1BE31-0XB0)<br />
Pin X10 X11 (gold) X12<br />
1 L1 / 120-240 VAC 2 M 1L<br />
2 N / 120-240 VAC AI 0 DQ a.0<br />
3 Functional Earth AI 1 DQ a.1<br />
4 L+ / 24VDC Sensor Out -- DQ a.2<br />
5 M / 24VDC Sensor Out -- DQ a.3<br />
6 1M -- No connection<br />
7 DI a.0 -- No connection<br />
8 DI a.1 -- No connection<br />
9 DI a.2 -- --<br />
10 DI a.3 -- --<br />
11 DI a.4 -- --<br />
12 DI a.5 -- --<br />
13 No connection -- --<br />
14 No connection -- --
Table A- 22 CPU 1211C DC/DC/Relay (6E<strong>S7</strong> 211-1HE31-0XB0)<br />
X10<br />
<br />
X12<br />
Technical specifications<br />
A.2 CPU 1211C<br />
① 24 VDC Sensor Power<br />
Out<br />
For additional noise<br />
immunity, connect "M"<br />
to chassis ground even<br />
if not using sensor<br />
supply.<br />
② For sinking inputs,<br />
connect "-" to "M"<br />
(shown).<br />
For sourcing inputs,<br />
connect "+" to "M".<br />
<strong>S7</strong>-<strong>1200</strong> <strong>Programmable</strong> <strong>controller</strong><br />
System Manual, 04/2012, A5E02486680-06 713<br />
X11<br />
Note: X11 connectors must<br />
be gold. See Appendix C,<br />
Spare Parts for order<br />
number.<br />
Table A- 23 Connector pin locations for CPU 1211C DC/DC/Relay (6E<strong>S7</strong> 211-1HE31-0XB0)<br />
Pin X10 X11 (gold) X12<br />
1 L+ / 24VDC 2 M 1L<br />
2 M / 24VDC AI 0 DQ a.0<br />
3 Functional Earth AI 1 DQ a.1<br />
4 L+ / 24VDC Sensor Out -- DQ a.2<br />
5 M / 24VDC Sensor Out -- DQ a.3<br />
6 1M -- No connection<br />
7 DI a.0 -- No connection<br />
8 DI a.1 -- No connection<br />
9 DI a.2 -- --<br />
10 DI a.3 -- --<br />
11 DI a.4 -- --<br />
12 DI a.5 -- --<br />
13 No connection -- --<br />
14 No connection -- --
Technical specifications<br />
A.2 CPU 1211C<br />
Table A- 24 CPU 1211C DC/DC/DC (6E<strong>S7</strong> 211-1AE31-0XB0)<br />
X10<br />
<br />
X12<br />
① 24 VDC Sensor Power<br />
Out<br />
For additional noise<br />
immunity, connect "M"<br />
to chassis ground even<br />
if not using sensor<br />
supply.<br />
② For sinking inputs,<br />
connect "-" to "M"<br />
(shown).<br />
For sourcing inputs,<br />
connect "+" to "M".<br />
Note: X11 connectors must<br />
be gold. See Appendix C,<br />
Spare Parts for order<br />
number.<br />
<strong>S7</strong>-<strong>1200</strong> <strong>Programmable</strong> <strong>controller</strong><br />
714 System Manual, 04/2012, A5E02486680-06<br />
X11<br />
Table A- 25 Connector pin locations for CPU 1211C DC/DC/DC (6E<strong>S7</strong> 211-1AE31-0XB0)<br />
Pin X10 X11 (gold) X12<br />
1 L+ / 24VDC 2 M 3L+<br />
2 M / 24VDC AI 0 3M<br />
3 Functional Earth AI 1 DQ a.0<br />
4 L+ / 24VDC Sensor Out -- DQ a.1<br />
5 M / 24VDC Sensor Out -- DQ a.2<br />
6 1M -- DQ a.3<br />
7 DI a.0 -- No connection<br />
8 DI a.1 -- No connection<br />
9 DI a.2 -- --<br />
10 DI a.3 -- --<br />
11 DI a.4 -- --<br />
12 DI a.5 -- --<br />
13 No connection -- --<br />
14 No connection -- --<br />
Note<br />
Unused analog inputs should be shorted.
A.3 CPU 1212C<br />
A.3.1 General specifications and features<br />
Table A- 26 General<br />
Technical data CPU 1212C<br />
AC/DC/Relay<br />
CPU 1212C<br />
DC/DC/Relay<br />
Technical specifications<br />
CPU 1212C<br />
DC/DC/DC<br />
A.3 CPU 1212C<br />
Order number 6E<strong>S7</strong> 212-1BE31-0XB0 6E<strong>S7</strong> 212-1HE31-0XB0 6E<strong>S7</strong> 212-1AE31-0XB0<br />
Dimensions W x H x D (mm) 90 x 100 x 75 90 x 100 x 75 90 x 100 x 75<br />
Shipping weight 425 grams 385 grams 370 grams<br />
Power dissipation 11 W 9 W 9 W<br />
Current available<br />
1000 mA max.<br />
1000 mA max.<br />
1000 mA max.<br />
(SM and CM bus)<br />
(5 VDC)<br />
(5 VDC)<br />
(5 VDC)<br />
Current available (24 VDC) 300 mA max.<br />
300 mA max.<br />
300 mA max.<br />
(sensor power)<br />
(sensor power)<br />
(sensor power)<br />
Digital input current consumption (24<br />
VDC)<br />
4 mA/input used 4 mA/input used 4 mA/input used<br />
Table A- 27 CPU features<br />
Technical data Description<br />
User memory Work 50 Kbytes<br />
Load 1 Mbyte internal, expandable up to SD card size<br />
1<br />
Retentive 10 Kbytes<br />
On-board digital I/O 8 inputs/6 outputs<br />
On-board analog I/O 2 inputs<br />
Process image size 1024 bytes of inputs (I)/1024 bytes of outputs (Q)<br />
Bit memory (M) 4096 bytes<br />
Temporary (local) memory 16 Kbytes for startup and program cycle (including associated FBs and FCs)<br />
4 Kbytes for standard interrupt events including FBs and FCs<br />
4 Kbytes for error interrupt events including FBs and FCs<br />
Signal modules expansion 2 SMs max.<br />
SB, CB, BB expansion 1 max.<br />
Communication module expansion 3 CMs max.<br />
High-speed counters 5 built in I/O, 6 with signal board, see table, HSC input assignments for CPU<br />
1212C (Page 339)<br />
Pulse outputs 2 4<br />
Pulse catch inputs 8<br />
Single phase: 3 at 100 kHz and 1 at 30 kHz clock rate, SB: 2 at 30 kHz<br />
Quadrature phase: 3 at 80 kHz and 1 at 20 kHz clock rate, SB: 2 at 20 kHz<br />
<strong>S7</strong>-<strong>1200</strong> <strong>Programmable</strong> <strong>controller</strong><br />
System Manual, 04/2012, A5E02486680-06 715
Technical specifications<br />
A.3 CPU 1212C<br />
Technical data Description<br />
Time delay / cyclic interrupts 4 total with 1 ms resolution<br />
Edge interrupts 8 rising and 8 falling (12 and 12 with optional signal board)<br />
Memory card SIMATIC Memory Card (optional)<br />
Real time clock accuracy +/- 60 seconds/month<br />
Real time clock retention time 20 days typ./12 days min. at 40°C (maintenance-free Super Capacitor)<br />
1 The size of the user program, data, and configuration is limited by the available load memory and work memory in the<br />
CPU. There is no specific limit to the number of OB, FC, FB and DB blocks supported or to the size of a particular block;<br />
the only limit is due to overall memory size.<br />
2 For CPU models with relay outputs, you must install a digital signal board (SB) to use the pulse outputs.<br />
Table A- 28 Performance<br />
Type of instruction Execution speed<br />
Boolean 0.08 μs/instruction<br />
Move Word 1.7 μs/instruction<br />
Real math 2.3 μs/instruction<br />
A.3.2 Timers, counters and code blocks supported by CPU 1212C<br />
Table A- 29 Blocks, timers and counters supported by CPU 1212C<br />
Element Description<br />
Blocks<br />
Type OB, FB, FC, DB<br />
OBs<br />
Timers<br />
Size 50 Kbytes<br />
Quantity Up to 1024 blocks total (OBs + FBs + FCs + DBs)<br />
Address range for FBs, FCs,<br />
and DBs<br />
1 to 65535 (such as FB 1 to FB 65535)<br />
Nesting depth 16 from the program cycle or start up OB; 4 from the time delay<br />
interrupt, time-of-day interrupt, cyclic interrupt, hardware interrupt,<br />
time error interrupt, or diagnostic error interrupt OB<br />
Monitoring Status of 2 code blocks can be monitored simultaneously<br />
Program cycle Multiple: OB 1, OB 200 to OB 65535<br />
Startup Multiple: OB 100, OB 200 to OB 65535<br />
Time-delay interrupts and<br />
cyclic interrupts<br />
41 (1 per event): OB 200 to OB 65535<br />
Hardware interrupts (edges<br />
and HSC)<br />
50 (1 per event): OB 200 to OB 65535<br />
Time error interrupts 1: OB 80<br />
Diagnostic error interrupts 1: OB 82<br />
Type IEC<br />
Quantity Limited only by memory size<br />
Storage Structure in DB, 16 bytes per timer<br />
<strong>S7</strong>-<strong>1200</strong> <strong>Programmable</strong> <strong>controller</strong><br />
716 System Manual, 04/2012, A5E02486680-06
Element Description<br />
Counters<br />
Type IEC<br />
Quantity Limited only by memory size<br />
Storage Structure in DB, size dependent upon count type<br />
SInt, USInt: 3 bytes<br />
Int, UInt: 6 bytes<br />
DInt, UDInt: 12 bytes<br />
Technical specifications<br />
A.3 CPU 1212C<br />
1 Time-delay and cyclic interrupts use the same resources in the CPU. You can have only a total of 4 of these interrupts<br />
(time-delay plus cyclic interrupts). You cannot have 4 time-delay interrupts and 4 cyclic interrupts.<br />
Table A- 30 Communication<br />
Technical data Description<br />
Number of ports 1<br />
Type Ethernet<br />
HMI device1 3<br />
Programming device (PG) 1<br />
Connections 8 for Open User Communication (active or passive): TSEND_C,<br />
TRCV_C, TCON, TDISCON, TSEND, and TRCV<br />
3 for server GET/PUT (CPU-to-CPU) <strong>S7</strong> communication<br />
8 for client GET/PUT (CPU-to-CPU) <strong>S7</strong> communication<br />
Data rates 10/100 Mb/s<br />
Isolation (external signal to PLC logic) Transformer isolated, 1500 VAC, for short term event safety only<br />
Cable type CAT5e shielded<br />
1 The CPU provides dedicated HMI connections to support up to 3 HMI devices. (You can have up to 2 SIMATIC Comfort<br />
panels.) The total number of HMI is affected by the types of HMI panels in your configuration. For example, you could<br />
have up to three SIMATIC Basic panels connected to your CPU, or you could have up to two SIMATIC Comfort panels<br />
with one additional Basic panel.<br />
Table A- 31 Power supply<br />
Technical data CPU 1212C<br />
AC/DC/Relay<br />
CPU 1212C<br />
DC/DC/Relay<br />
CPU 1212C<br />
DC/DC/DC<br />
Voltage range 85 to 264 VAC 20.4 VDC to 28.8 VDC<br />
22.0 VDC to 28.8 VDC for ambient temperature<br />
-20° to 0° C<br />
Line frequency 47 to 63 Hz -- --<br />
Input current<br />
(max. load)<br />
CPU only 80 mA at 120 VAC<br />
40 mA at 240 VAC<br />
CPU with all expansion<br />
accessories<br />
240 mA at 120 VAC<br />
120 mA at 240 VAC<br />
400 mA at 24 VDC 400 mA at 24 VDC<br />
<strong>1200</strong> mA at 24 VDC <strong>1200</strong> mA at 24 VDC<br />
Inrush current (max.) 20 A at 264 VAC 12 A at 28.8 VDC 12 A at 28.8 VDC<br />
Isolation (input power to logic) 1500 VAC Not isolated Not isolated<br />
Ground leakage, AC line to functional earth 0.5 mA max. -- --<br />
<strong>S7</strong>-<strong>1200</strong> <strong>Programmable</strong> <strong>controller</strong><br />
System Manual, 04/2012, A5E02486680-06 717
Technical specifications<br />
A.3 CPU 1212C<br />
Technical data CPU 1212C<br />
AC/DC/Relay<br />
Hold up time (loss of power) 20 ms at 120 VAC<br />
80 ms at 240 VAC<br />
CPU 1212C<br />
DC/DC/Relay<br />
CPU 1212C<br />
DC/DC/DC<br />
10 ms at 24 VDC 10 ms at 24 VDC<br />
Internal fuse, not user replaceable 3 A, 250 V, slow blow 3 A, 250 V, slow blow 3 A, 250 V, slow blow<br />
Table A- 32 Sensor power<br />
Technical data CPU 1212C<br />
AC/DC/Relay<br />
CPU 1212C<br />
DC/DC/Relay<br />
CPU 1212C<br />
DC/DC/DC<br />
Voltage range 20.4 to 28.8 VDC L+ minus 4 VDC min.<br />
L+ minus 5 VDC min. for ambient temperature<br />
-20° C to 0° C<br />
Output current rating (max.) 300 mA (short circuit<br />
protected)<br />
300 mA (short circuit<br />
protected)<br />
300 mA (short circuit<br />
protected)<br />
Maximum ripple noise (
Table A- 34 Digital outputs<br />
Technical data CPU 1212C AC/DC/Relay<br />
and DC/DC/Relay<br />
CPU 1212C<br />
DC/DC/DC<br />
Technical specifications<br />
A.3 CPU 1212C<br />
Number of outputs 6 6<br />
Type Relay, dry contact Solid state - MOSFET (sourcing)<br />
Voltage range 5 to 30 VDC or 5 to 250 VAC 20.4 to 28.8 VDC<br />
Logic 1 signal at max. current -- 20 VDC min.<br />
Logic 0 signal with 10 KΩ load -- 0.1 VDC max.<br />
Current (max.) 2.0 A 0.5 A<br />
Lamp load 30 W DC / 200 W AC 5 W<br />
ON state resistance 0.2 Ω max. when new 0.6 Ω max.<br />
Leakage current per point -- 10 μA max.<br />
Surge current 7 A with contacts closed 8 A for 100 ms max.<br />
Overload protection No No<br />
Isolation (field side to logic) 1500 VAC for 1 minute (coil to contact)<br />
None (coil to logic)<br />
500 VAC for 1 minute<br />
Isolation resistance 100 MΩ min. when new --<br />
Isolation between open contacts 750 VAC for 1 minute --<br />
Isolation groups 2 1<br />
Inductive clamp voltage -- L+ minus 48 VDC, 1 W dissipation<br />
Switching delay (Qa.0 to Qa.3) 10 ms max. 1.0 μs max., off to on<br />
3.0 μs max., on to off<br />
Switching delay (Qa.4 to Qa.5) 10 ms max. 50 μs max., off to on<br />
200 μs max., on to off<br />
Maximum relay switching frequency 1 Hz --<br />
Pulse Train Output rate<br />
Not recommended<br />
(Qa.0 and Qa.2)<br />
1 100 KHz max.,<br />
2 Hz min. 2<br />
Lifetime mechanical (no load) 10,000,000 open/close cycles --<br />
Lifetime contacts at rated load 100,000 open/close cycles --<br />
Behavior on RUN to STOP Last value or substitute value<br />
Last value or substitute value (default<br />
(default value 0)<br />
value 0)<br />
Number of outputs on simultaneously 6 up to 60°C horizontal, 50°C vertical<br />
Cable length (meters) 500 m shielded,<br />
500 m shielded,<br />
150 m unshielded<br />
150 m unshielded<br />
1 For CPU models with relay outputs, you must install a digital signal board (SB) to use the pulse outputs.<br />
2 Depending on your pulse receiver and cable, an additional load resistor (at least 10% of rated current) may improve<br />
pulse signal quality and noise immunity.<br />
<strong>S7</strong>-<strong>1200</strong> <strong>Programmable</strong> <strong>controller</strong><br />
System Manual, 04/2012, A5E02486680-06 719
Technical specifications<br />
A.3 CPU 1212C<br />
A.3.4 Analog inputs<br />
Table A- 35 Analog inputs<br />
Technical data Description<br />
Number of inputs 2<br />
Type Voltage (single-ended)<br />
Full-scale range 0 to 10 V<br />
Full-scale range (data word) 0 to 27648<br />
Overshoot range 10.001 to 11.759 V<br />
Overshoot range (data word) 27,649 to 32,511<br />
Overflow range 11.760 to 11.852 V<br />
Overflow range (data word) 32,512 to 32,767<br />
Resolution 10 bits<br />
Maximum withstand voltage 35 VDC<br />
Smoothing None, Weak, Medium, or Strong<br />
Noise rejection 10, 50, or 60 Hz<br />
Impedance ≥100 KΩ<br />
Isolation (field side to logic) None<br />
Accuracy (25°C / -20 to 60°C) 3.0% / 3.5% of full-scale<br />
Cable length (meters) 100 m, shielded twisted pair<br />
A.3.4.1 Step response of the built-in analog inputs of the CPU<br />
Table A- 36 Step Response (ms), 0V to 10V measured at 95%<br />
Smoothing selection (sample averaging)<br />
See the table for step response (ms) for the analog inputs of the CPU<br />
(Page 720).<br />
Rejection frequency (Integration time)<br />
60 Hz 50 Hz 10 Hz<br />
None (1 cycle): No averaging 50 ms 50 ms 100 ms<br />
Weak (4 cycles): 4 samples 60ms 70 ms 200 ms<br />
Medium (16 cycles): 16 samples 200 ms 240 ms 1150 ms<br />
Strong (32 cycles): 32 samples 400 ms 480 ms 2300 ms<br />
Sample time 4.17 ms 5 ms 25 ms<br />
<strong>S7</strong>-<strong>1200</strong> <strong>Programmable</strong> <strong>controller</strong><br />
720 System Manual, 04/2012, A5E02486680-06
A.3.4.2 Sample time for the built-in analog ports of the CPU<br />
Table A- 37 Sample time for built-in analog inputs of the CPU<br />
Rejection frequency (Integration time selection) Sample time<br />
60 Hz (16.6 ms) 4.17 ms<br />
50 Hz (20 ms) 5 ms<br />
10 Hz (100 ms) 25 ms<br />
A.3.5 CPU 1212C Wiring diagrams<br />
Table A- 38 CPU 1212C AC/DC/Relay (6E<strong>S7</strong> 212-1BE31-0XB0)<br />
X10<br />
<br />
X12<br />
Technical specifications<br />
A.3 CPU 1212C<br />
① 24 VDC Sensor Power<br />
Out<br />
For additional noise<br />
immunity, connect "M"<br />
to chassis ground even<br />
if not using sensor<br />
supply.<br />
② For sinking inputs,<br />
connect "-" to "M"<br />
(shown).<br />
For sourcing inputs,<br />
connect "+" to "M".<br />
Note: X11 connectors must<br />
be gold. See Appendix C,<br />
Spare Parts for order<br />
number.<br />
<strong>S7</strong>-<strong>1200</strong> <strong>Programmable</strong> <strong>controller</strong><br />
System Manual, 04/2012, A5E02486680-06 721<br />
X11<br />
Table A- 39 Connector pin locations for CPU 1212C AC/DC/Relay (6E<strong>S7</strong> 212-1BE31-0XB0)<br />
Pin X10 X11 (gold) X12<br />
1 L1 / 120-240 VAC 2 M 1L<br />
2 N / 120-240 VAC AI 0 DQ a.0<br />
3 Functional Earth AI 1 DQ a.1<br />
4 L+ / 24VDC Sensor Out -- DQ a.2<br />
5 M / 24VDC Sensor Out -- DQ a.3<br />
6 1M -- 2L<br />
7 DI a.0 -- DQ a.4<br />
8 DI a.1 -- DQ a.5
Technical specifications<br />
A.3 CPU 1212C<br />
Pin X10 X11 (gold) X12<br />
9 DI a.2 -- --<br />
10 DI a.3 -- --<br />
11 DI a.4 -- --<br />
12 DI a.5 -- --<br />
13 DI a.6 -- --<br />
14 DI a.7 -- --<br />
Table A- 40 CPU 1212C DC/DC/Relay (6E<strong>S7</strong> 212-1HE31-0XB0)<br />
X10<br />
<br />
X12<br />
① 24 VDC Sensor Power<br />
Out<br />
For additional noise<br />
immunity, connect "M"<br />
to chassis ground even<br />
if not using sensor<br />
supply.<br />
② For sinking inputs,<br />
connect "-" to "M"<br />
(shown).<br />
For sourcing inputs,<br />
connect "+" to "M".<br />
Note: X11 connectors must<br />
be gold. See Appendix C,<br />
Spare Parts for order<br />
number.<br />
<strong>S7</strong>-<strong>1200</strong> <strong>Programmable</strong> <strong>controller</strong><br />
722 System Manual, 04/2012, A5E02486680-06<br />
X11<br />
Table A- 41 Connector pin locations for CPU 1212C DC/DC/Relay (6E<strong>S7</strong> 212-1HE31-0XB0)<br />
Pin X10 X11 (gold) X12<br />
1 L+ / 24VDC 2 M 1L<br />
2 M / 24VDC AI 0 DQ a.0<br />
3 Functional Earth AI 1 DQ a.1<br />
4 L+ / 24VDC Sensor Out -- DQ a.2<br />
5 M / 24VDC Sensor Out -- DQ a.3<br />
6 1M -- 2L<br />
7 DI a.0 -- DQ a.4<br />
8 DI a.1 -- DQ a.5<br />
9 DI a.2 -- --<br />
10 DI a.3 -- --
Technical specifications<br />
Pin X10 X11 (gold) X12<br />
11 DI a.4 -- --<br />
12 DI a.5 -- --<br />
13 DI a.6 -- --<br />
14 DI a.7 -- --<br />
Table A- 42 CPU 1212C DC/DC/DC (6E<strong>S7</strong>-212-1AE31-0XB0)<br />
X10<br />
<br />
X12<br />
A.3 CPU 1212C<br />
① 24 VDC Sensor Power<br />
Out<br />
For additional noise<br />
immunity, connect "M"<br />
to chassis ground even<br />
if not using sensor<br />
supply.<br />
② For sinking inputs,<br />
connect "-" to "M"<br />
(shown).<br />
For sourcing inputs,<br />
connect "+" to "M".<br />
<strong>S7</strong>-<strong>1200</strong> <strong>Programmable</strong> <strong>controller</strong><br />
System Manual, 04/2012, A5E02486680-06 723<br />
X11<br />
Note: X11 connectors must<br />
be gold. See Appendix C,<br />
Spare Parts for order<br />
number.<br />
Table A- 43 Connector pin locations for CPU 1212C DC/DC/DC (6E<strong>S7</strong> 212-1AE31-0XB0)<br />
Pin X10 X11 (gold) X12<br />
1 L+ / 24VDC 2 M 3L+<br />
2 M / 24VDC AI 0 3M<br />
3 Functional Earth AI 1 DQ a.0<br />
4 L+ / 24VDC Sensor Out -- DQ a.1<br />
5 M / 24VDC Sensor Out -- DQ a.2<br />
6 1M -- DQ a.3<br />
7 DI a.0 -- DQ a.4<br />
8 DI a.1 -- DQ a.5<br />
9 DI a.2 -- --<br />
10 DI a.3 -- --<br />
11 DI a.4 -- --<br />
12 DI a.5 -- --
Technical specifications<br />
A.4 CPU 1214C<br />
A.4 CPU 1214C<br />
Pin X10 X11 (gold) X12<br />
13 DI a.6 -- --<br />
14 DI a.7 -- --<br />
Note<br />
Unused analog inputs should be shorted.<br />
A.4.1 General specifications and features<br />
Table A- 44 General<br />
Technical data CPU 1214C<br />
AC/DC/Relay<br />
CPU 1214C<br />
DC/DC/Relay<br />
CPU 1214C<br />
DC/DC/DC<br />
Order number 6E<strong>S7</strong> 214-1BG31-0XB0 6E<strong>S7</strong> 214-1HG31-0XB0 6E<strong>S7</strong> 214-1AG31-0XB0<br />
Dimensions W x H x D (mm) 110 x 100 x 75 110 x 100 x 75 110 x 100 x 75<br />
Shipping weight 475 grams 435 grams 415 grams<br />
Power dissipation 14 W 12 W 12 W<br />
Current available (SM and CM bus) 1600 mA max.<br />
1600 mA max.<br />
1600 mA max.<br />
(5 VDC)<br />
(5 VDC)<br />
(5 VDC)<br />
Current available (24 VDC) 400 mA max.<br />
400 mA max.<br />
400 mA max.<br />
(sensor power)<br />
(sensor power)<br />
(sensor power)<br />
Digital input current consumption<br />
(24VDC)<br />
4 mA/input used 4 mA/input used 4 mA/input used<br />
Table A- 45 CPU features<br />
Technical data Description<br />
User memory Work 75 Kbytes<br />
Load 4 Mbytes internal, expandable up to SD card size<br />
1<br />
Retentive 10 Kbytes<br />
On-board digital I/O 14 inputs/10 outputs<br />
On-board analog I/O 2 inputs<br />
Process image size 1024 bytes of inputs (I)/1024 bytes of outputs (Q)<br />
Bit memory (M) 8192 bytes<br />
<strong>S7</strong>-<strong>1200</strong> <strong>Programmable</strong> <strong>controller</strong><br />
724 System Manual, 04/2012, A5E02486680-06
Technical specifications<br />
A.4 CPU 1214C<br />
Technical data Description<br />
Temporary (local) memory 16 Kbytes for startup and program cycle (including associated FBs and FCs)<br />
4 Kbytes for standard interrupt events including FBs and FCs<br />
4 Kbytes for error interrupt events including FBs and FCs<br />
Signal modules expansion 8 SMs max.<br />
SB, CB, BB expansion 1 max.<br />
Communication module expansion 3 CMs max.<br />
High-speed counters 6 total, see table Operation of the high-speed counter (Page 339)<br />
Single phase: 3 at 100 kHz and 3 at 30 kHz clock rate,<br />
Quadrature phase: 3 at 80 kHz and 3 at 20 kHz clock rate<br />
Pulse outputs 2 4<br />
Pulse catch inputs 14<br />
Time delay / cyclic interrupts 4 total with 1 ms resolution<br />
Edge interrupts 12 rising and 12 falling (14 and 14 with optional signal board)<br />
Memory card SIMATIC Memory Card (optional)<br />
Real time clock accuracy +/- 60 seconds/month<br />
Real time clock retention time 20 days typ./12 days min. at 40°C (maintenance-free Super Capacitor)<br />
1 The size of the user program, data, and configuration is limited by the available load memory and work memory in the<br />
CPU. There is no specific limit to the number of OB, FC, FB and DB blocks supported or to the size of a particular block;<br />
the only limit is due to overall memory size.<br />
2 For CPU models with relay outputs, you must install a digital signal board (SB) to use the pulse outputs.<br />
Table A- 46 Performance<br />
Type of instruction Execution speed<br />
Boolean 0.08 μs/instruction<br />
Move Word 1.7 μs/instruction<br />
Real math 2.3 μs/instruction<br />
A.4.2 Timers, counters and code blocks supported by CPU 1214C<br />
Table A- 47 Blocks, timers and counters supported by CPU 1214C<br />
Element Description<br />
Blocks<br />
Type OB, FB, FC, DB<br />
Size 64 Kbytes<br />
Quantity Up to 1024 blocks total (OBs + FBs + FCs + DBs)<br />
Address range for FBs, FCs,<br />
and DBs<br />
1 to 65535 (such as FB 1 to FB 65535)<br />
Nesting depth 16 from the program cycle or start up OB; 4 from the time delay<br />
interrupt, time-of-day interrupt, cyclic interrupt, hardware interrupt,<br />
time error interrupt, or diagnostic error interrupt OB<br />
<strong>S7</strong>-<strong>1200</strong> <strong>Programmable</strong> <strong>controller</strong><br />
System Manual, 04/2012, A5E02486680-06 725
Technical specifications<br />
A.4 CPU 1214C<br />
Element Description<br />
OBs<br />
Timers<br />
Counters<br />
Monitoring Status of 2 code blocks can be monitored simultaneously<br />
Program cycle Multiple: OB 1, OB 200 to OB 65535<br />
Startup Multiple: OB 100, OB 200 to OB 65535<br />
Time-delay interrupts and<br />
cyclic interrupts<br />
41 (1 per event): OB 200 to OB 65535<br />
Hardware interrupts (edges<br />
and HSC)<br />
50 (1 per event): OB 200 to OB 65535<br />
Time error interrupts 1: OB 80<br />
Diagnostic error interrupts 1: OB 82<br />
Type IEC<br />
Quantity Limited only by memory size<br />
Storage Structure in DB, 16 bytes per timer<br />
Type IEC<br />
Quantity Limited only by memory size<br />
Storage Structure in DB, size dependent upon count type<br />
SInt, USInt: 3 bytes<br />
Int, UInt: 6 bytes<br />
DInt, UDInt: 12 bytes<br />
1 Time-delay and cyclic interrupts use the same resources in the CPU. You can have only a total of 4 of these interrupts<br />
(time-delay plus cyclic interrupts). You cannot have 4 time-delay interrupts and 4 cyclic interrupts.<br />
Table A- 48 Communication<br />
Technical data Description<br />
Number of ports 1<br />
Type Ethernet<br />
HMI device1 3<br />
Programming device (PG) 1<br />
Connections 8 for Open User Communication (active or passive): TSEND_C,<br />
TRCV_C, TCON, TDISCON, TSEND, and TRCV<br />
3 for server GET/PUT (CPU-to-CPU) <strong>S7</strong> communication<br />
8 for client GET/PUT (CPU-to-CPU) <strong>S7</strong> communication<br />
Data rates 10/100 Mb/s<br />
Isolation (external signal to PLC logic) Transformer isolated, 1500 VAC, for short term event safety only<br />
Cable type CAT5e shielded<br />
1 The CPU provides dedicated HMI connections to support up to 3 HMI devices. (You can have up to 2 SIMATIC Comfort<br />
panels.) The total number of HMI is affected by the types of HMI panels in your configuration. For example, you could<br />
have up to three SIMATIC Basic panels connected to your CPU, or you could have up to two SIMATIC Comfort panels<br />
with one additional Basic panel.<br />
<strong>S7</strong>-<strong>1200</strong> <strong>Programmable</strong> <strong>controller</strong><br />
726 System Manual, 04/2012, A5E02486680-06
Table A- 49 Power supply<br />
Technical data CPU 1214C<br />
AC/DC/Relay<br />
CPU 1214C<br />
DC/DC/Relay<br />
Technical specifications<br />
A.4 CPU 1214C<br />
CPU 1214C<br />
DC/DC/DC<br />
Voltage range 85 to 264 VAC 20.4 VDC to 28.8 VDC<br />
22.0 VDC to 28.8 VDC for ambient<br />
temperature -20° C to 0° C<br />
Line frequency 47 to 63 Hz --<br />
Input current<br />
(max. load)<br />
CPU only 100 mA at 120 VAC<br />
50 mA at 240 VAC<br />
CPU with all expansion<br />
accessories<br />
300 mA at 120 VAC<br />
150 mA at 240 VAC<br />
500 mA at 24 VDC<br />
1500 mA at 24 VDC<br />
Inrush current (max.) 20 A at 264 VAC 12 A at 28.8 VDC<br />
Isolation (input power to logic) 1500 VAC Not isolated<br />
Ground leakage, AC line to functional<br />
earth<br />
0.5 mA max. -<br />
Hold up time (loss of power) 20 ms at 120 VAC<br />
80 ms at 240 VAC<br />
10 ms at 24 VDC<br />
Internal fuse, not user replaceable 3 A, 250 V, slow blow<br />
Table A- 50 Sensor power<br />
Technical data CPU 1214C<br />
AC/DC/Relay<br />
CPU 1214C<br />
DC/DC/Relay<br />
CPU 1214C<br />
DC/DC/DC<br />
Voltage range 20.4 to 28.8 VDC L+ minus 4 VDC min.<br />
L+ minus 5 VDC min. for ambient<br />
temperature -20° C to 0° C<br />
Output current rating (max.) 400 mA (short circuit protected)<br />
Maximum ripple noise (
Technical specifications<br />
A.4 CPU 1214C<br />
Technical data CPU 1214C<br />
AC/DC/Relay<br />
Isolation (field side to logic) 500 VAC for 1 minute<br />
Isolation groups 1<br />
CPU 1214C<br />
DC/DC/Relay<br />
CPU 1214C<br />
DC/DC/DC<br />
Filter times 0.2, 0.4, 0.8, 1.6, 3.2, 6.4, and 12.8 ms (selectable in groups of 4)<br />
HSC clock input rates (max.)<br />
(Logic 1 Level = 15 to 26 VDC)<br />
Single phase: 100 KHz (Ia.0 to Ia.5) and 30 KHz (Ia.6 to Ib.5)<br />
Quadrature phase: 80 KHz (Ia.0 to Ia.5) and 20 KHz (Ia.6 to Ib.5)<br />
Number of inputs on simultaneously 7 (no adjacent points) at 60° C horizontal or 50° C vertical<br />
14 at 55° C horizontal or 45° C vertical<br />
Cable length (meters) 500 m shielded, 300 m unshielded, 50 m shielded for HSC inputs<br />
Table A- 52 Digital outputs<br />
Technical data CPU 1214C AC/DC/Relay<br />
and DC/DC/Relay<br />
CPU 1214C<br />
DC/DC/DC<br />
Number of outputs 10 10<br />
Type Relay, dry contact Solid state - MOSFET (sourcing)<br />
Voltage range 5 to 30 VDC or 5 to 250 VAC 20.4 to 28.8 VDC<br />
Logic 1 signal at max. current -- 20 VDC min.<br />
Logic 0 signal with 10 KΩ load -- 0.1 VDC max.<br />
Current (max.) 2.0 A 0.5 A<br />
Lamp load 30 W DC / 200 W AC 5 W<br />
ON state resistance 0.2 Ω max. when new 0.6 Ω max.<br />
Leakage current per point -- 10 μA max.<br />
Surge current 7 A with contacts closed 8 A for 100 ms max.<br />
Overload protection No No<br />
Isolation (field side to logic) 1500 VAC for 1 minute (coil to contact)<br />
None (coil to logic)<br />
500 VAC for 1 minute<br />
Isolation resistance 100 MΩ min. when new --<br />
Isolation between open contacts 750 VAC for 1 minute --<br />
Isolation groups 2 1<br />
Inductive clamp voltage -- L+ minus 48 VDC,<br />
1 W dissipation<br />
Switching delay (Qa.0 to Qa.3) 10 ms max. 1.0 μs max., off to on<br />
3.0 μs max., on to off<br />
Switching delay (Qa.4 to Qb.1) 10 ms max. 50 μs max., off to on<br />
200 μs max., on to off<br />
Maximum relay switching frequency 1 Hz --<br />
Pulse Train Output rate<br />
Not recommended<br />
(Qa.0 and Qa.2)<br />
1 100 KHz max.,<br />
2 Hz min. 2<br />
Lifetime mechanical (no load) 10,000,000 open/close cycles --<br />
Lifetime contacts at rated load 100,000 open/close cycles --<br />
Behavior on RUN to STOP Last value or substitute value (default value 0)<br />
<strong>S7</strong>-<strong>1200</strong> <strong>Programmable</strong> <strong>controller</strong><br />
728 System Manual, 04/2012, A5E02486680-06
Technical data CPU 1214C AC/DC/Relay<br />
and DC/DC/Relay<br />
CPU 1214C<br />
DC/DC/DC<br />
Number of outputs on simultaneously 5 (no adjacent points) at 60° C horizontal or 50° C vertical<br />
10 at 55° C horizontal or 45° C vertical<br />
Cable length (meters) 500 m shielded, 150 m unshielded<br />
Technical specifications<br />
A.4 CPU 1214C<br />
1 For CPU models with relay outputs, you must install a digital signal board (SB) to use the pulse outputs.<br />
2 Depending on your pulse receiver and cable, an additional load resistor (at least 10% of rated current) may improve<br />
pulse signal quality and noise immunity.<br />
A.4.4 Analog inputs<br />
Table A- 53 Analog inputs<br />
Technical data Description<br />
Number of inputs 2<br />
Type Voltage (single-ended)<br />
Full-scale range 0 to 10 V<br />
Full-scale range (data word) 0 to 27648<br />
Overshoot range 10.001 to 11.759 V<br />
Overshoot range (data word) 27,649 to 32,511<br />
Overflow range 11.760 to 11.852 V<br />
Overflow range (data word) 32,512 to 32,767<br />
Resolution 10 bits<br />
Maximum withstand voltage 35 VDC<br />
Smoothing None, Weak, Medium, or Strong<br />
See the table for step response (ms) for the analog inputs of the CPU<br />
(Page 730).<br />
Noise rejection 10, 50, or 60 Hz<br />
Impedance ≥100 KΩ<br />
Isolation (field side to logic) None<br />
Accuracy (25°C / -20 to 60°C) 3.0% / 3.5% of full-scale<br />
Cable length (meters) 100 m, shielded twisted pair<br />
<strong>S7</strong>-<strong>1200</strong> <strong>Programmable</strong> <strong>controller</strong><br />
System Manual, 04/2012, A5E02486680-06 729
Technical specifications<br />
A.4 CPU 1214C<br />
A.4.4.1 Step response of the built-in analog inputs of the CPU<br />
Table A- 54 Step Response (ms), 0V to 10V measured at 95%<br />
Smoothing selection (sample averaging)<br />
Rejection frequency (Integration time)<br />
60 Hz 50 Hz 10 Hz<br />
None (1 cycle): No averaging 50 ms 50 ms 100 ms<br />
Weak (4 cycles): 4 samples 60ms 70 ms 200 ms<br />
Medium (16 cycles): 16 samples 200 ms 240 ms 1150 ms<br />
Strong (32 cycles): 32 samples 400 ms 480 ms 2300 ms<br />
Sample time 4.17 ms 5 ms 25 ms<br />
A.4.4.2 Sample time for the built-in analog ports of the CPU<br />
Table A- 55 Sample time for built-in analog inputs of the CPU<br />
Rejection frequency (Integration time selection) Sample time<br />
60 Hz (16.6 ms) 4.17 ms<br />
50 Hz (20 ms) 5 ms<br />
10 Hz (100 ms) 25 ms<br />
<strong>S7</strong>-<strong>1200</strong> <strong>Programmable</strong> <strong>controller</strong><br />
730 System Manual, 04/2012, A5E02486680-06
A.4.5 CPU 1214C Wiring Diagrams<br />
Table A- 56 CPU 1214C AC/DC/Relay (6E<strong>S7</strong> 214-1BG31-0XB0)<br />
X10<br />
<br />
X12<br />
Technical specifications<br />
A.4 CPU 1214C<br />
① 24 VDC Sensor Power<br />
Out<br />
For additional noise<br />
immunity, connect "M"<br />
to chassis ground even<br />
if not using sensor<br />
supply.<br />
② For sinking inputs,<br />
connect "-" to "M"<br />
(shown).<br />
For sourcing inputs,<br />
connect "+" to "M".<br />
Note: X11 connectors must<br />
be gold. See Appendix C,<br />
Spare Parts for order<br />
number.<br />
Table A- 57 Connector pin locations for CPU 1214C AC/DC/Relay (6E<strong>S7</strong> 214-1BG31-0XB0)<br />
Pin X10 X11 (gold) X12<br />
1 L1 / 120-240 VAC 2 M 1L<br />
2 N / 120-240 VAC AI 0 DQ a.0<br />
3 Functional Earth AI 1 DQ a.1<br />
4 L+ / 24VDC Sensor Out -- DQ a.2<br />
5 M / 24VDC Sensor Out -- DQ a.3<br />
6 1M -- DQ a.4<br />
7 DI a.0 -- 2L<br />
8 DI a.1 -- DQ a.5<br />
9 DI a.2 -- DQ a.6<br />
10 DI a.3 -- DQ a.7<br />
11 DI a.4 -- DQ b.0<br />
12 DI a.5 -- DQ b.1<br />
13 DI a.6 -- --<br />
14 DI a.7 -- --<br />
15 DI b.0 -- --<br />
16 DI b.1 -- --<br />
17 DI b.2 -- --<br />
18 DI b.3 -- --<br />
19 DI b.4 -- --<br />
20 DI b.5 -- --<br />
<strong>S7</strong>-<strong>1200</strong> <strong>Programmable</strong> <strong>controller</strong><br />
System Manual, 04/2012, A5E02486680-06 731<br />
X11
Technical specifications<br />
A.4 CPU 1214C<br />
Table A- 58 CPU 1214C DC/DC/Relay (6E<strong>S7</strong> 214-1HG31-0XB0)<br />
X10<br />
<br />
X12<br />
① 24 VDC Sensor Power<br />
Out<br />
For additional noise<br />
immunity, connect "M"<br />
to chassis ground even<br />
if not using sensor<br />
supply.<br />
② For sinking inputs,<br />
connect "-" to "M"<br />
(shown).<br />
For sourcing inputs,<br />
connect "+" to "M".<br />
Note: X11 connectors must<br />
be gold. See Appendix C,<br />
Spare Parts for order<br />
number.<br />
Table A- 59 Connector pin locations for CPU 1214C DC/DC/Relay (6E<strong>S7</strong> 214-1HG31-0XB0)<br />
Pin X10 X11 (gold) X12<br />
1 L+ / 24VDC 2 M 1L<br />
2 M / 24VDC AI 0 DQ a.0<br />
3 Functional Earth AI 1 DQ a.1<br />
4 L+ / 24VDC Sensor Out -- DQ a.2<br />
5 M / 24VDC Sensor Out -- DQ a.3<br />
6 1M -- DQ a.4<br />
7 DI a.0 -- 2L<br />
8 DI a.1 -- DQ a.5<br />
9 DI a.2 -- DQ a.6<br />
10 DI a.3 -- DQ a.7<br />
11 DI a.4 -- DQ b.0<br />
12 DI a.5 -- DQ b.1<br />
13 DI a.6 -- --<br />
14 DI a.7 -- --<br />
15 DI b.0 -- --<br />
16 DI b.1 -- --<br />
17 DI b.2 -- --<br />
18 DI b.3 -- --<br />
19 DI b.4 -- --<br />
20 DI b.5 -- --<br />
<strong>S7</strong>-<strong>1200</strong> <strong>Programmable</strong> <strong>controller</strong><br />
732 System Manual, 04/2012, A5E02486680-06<br />
X11
Table A- 60 CPU 1214C DC/DC/DC (6E<strong>S7</strong> 214-1AG31-0XB0)<br />
X10<br />
<br />
X12<br />
Technical specifications<br />
A.4 CPU 1214C<br />
① 24 VDC Sensor Power<br />
Out<br />
For additional noise<br />
immunity, connect "M"<br />
to chassis ground even<br />
if not using sensor<br />
supply.<br />
② For sinking inputs,<br />
connect "-" to "M"<br />
(shown).<br />
For sourcing inputs,<br />
connect "+" to "M".<br />
Note: X11 connectors must<br />
be gold. See Appendix C,<br />
Spare Parts for order<br />
number.<br />
Table A- 61 Connector pin locations for CPU 1214C DC/DC/DC (6E<strong>S7</strong> 214-1AG31-0XB0)<br />
Pin X10 X11 (gold) X12<br />
1 L+ / 24VDC 2 M 3L+<br />
2 M / 24VDC AI 0 3M<br />
3 Functional Earth AI 1 DQ a.0<br />
4 L+ / 24VDC Sensor Out -- DQ a.1<br />
5 M / 24VDC Sensor Out -- DQ a.2<br />
6 1M -- DQ a.3<br />
7 DI a.0 -- DQ a.4<br />
8 DI a.1 -- DQ a.5<br />
9 DI a.2 -- DQ a.6<br />
10 DI a.3 -- DQ a.7<br />
11 DI a.4 -- DQ b.0<br />
12 DI a.5 -- DQ b.1<br />
13 DI a.6 -- --<br />
14 DI a.7 -- -<br />
15 DI b.0 -- --<br />
16 DI b.1 -- --<br />
17 DI b.2 -- --<br />
18 DI b.3 -- --<br />
<strong>S7</strong>-<strong>1200</strong> <strong>Programmable</strong> <strong>controller</strong><br />
System Manual, 04/2012, A5E02486680-06 733<br />
X11
Technical specifications<br />
A.5 CPU 1215C<br />
A.5 CPU 1215C<br />
Pin X10 X11 (gold) X12<br />
19 DI b.4 -- --<br />
20 DI b.5 -- --<br />
Note<br />
Unused analog inputs should be shorted.<br />
A.5.1 General specifications and features<br />
Table A- 62 General<br />
Technical data CPU 1215C<br />
AC/DC/Relay<br />
CPU 1215C<br />
DC/DC/Relay<br />
CPU 1215C<br />
DC/DC/DC<br />
Order number 6E<strong>S7</strong> 215-1BG31-0XB0 6E<strong>S7</strong> 215-1HG31-0XB0 6E<strong>S7</strong> 215-1AG31-0XB0<br />
Dimensions W x H x D (mm) 130 x 100 x 75 130 x 100 x 75 130 x 100 x 75<br />
Shipping weight 550 grams 585 grams 520 grams<br />
Power dissipation 14 W 12 W 12 W<br />
Current available (SM and CM bus) 1600 mA max.<br />
1600 mA max.<br />
1600 mA max.<br />
(5 VDC)<br />
(5 VDC)<br />
(5 VDC)<br />
Current available (24 VDC) 400 mA max.<br />
400 mA max.<br />
400 mA max.<br />
(sensor power)<br />
(sensor power)<br />
(sensor power)<br />
Digital input current consumption<br />
(24VDC)<br />
4 mA/input used 4 mA/input used 4 mA/input used<br />
Table A- 63 CPU features<br />
Technical data Description<br />
User memory Work 100 Kbytes<br />
Load 4 Mbytes, internal, expandable up to SD card size<br />
1<br />
Retentive 10 Kbytes<br />
On-board digital I/O 14 inputs/10 outputs<br />
On-board analog I/O 2 inputs/2 outputs<br />
Process image size 1024 bytes of inputs (I)/1024 bytes of outputs (Q)<br />
Bit memory (M) 8192 bytes<br />
<strong>S7</strong>-<strong>1200</strong> <strong>Programmable</strong> <strong>controller</strong><br />
734 System Manual, 04/2012, A5E02486680-06
Technical specifications<br />
A.5 CPU 1215C<br />
Technical data Description<br />
Temporary (local) memory 16 Kbytes for startup and program cycle (including associated FBs and FCs)<br />
4 Kbytes for standard interrupt events including FBs and FCs<br />
4 Kbytes for error interrupt events including FBs and FCs<br />
Signal modules expansion 8 SMs max.<br />
SB, CB, BB expansion 1 max.<br />
Communication module expansion 3 CMs max.<br />
High-speed counters 6 total, see table HSC input assignments for CPU 1215C<br />
Single phase: 3 at 100 kHz and 3 at 30 kHz clock rate<br />
Quadrature phase: 3 at 80 kHz and 3 at 20 kHz clock rate<br />
Pulse outputs 2 4<br />
Pulse catch inputs 14<br />
Time delay / cyclic interrupts 4 total with 1 ms resolution<br />
Edge interrupts 12 rising and 12 falling (14 and 14 with optional signal board)<br />
Memory card SIMATIC Memory Card (optional)<br />
Real time clock accuracy +/- 60 seconds/month<br />
Real time clock retention time 20 days typ./12 days min. at 40°C (maintenance-free Super Capacitor)<br />
1 The size of the user program, data, and configuration is limited by the available load memory and work memory in the<br />
CPU. There is no specific limit to the number of OB, FC, FB and DB blocks supported or to the size of a particular block;<br />
the only limit is due to overall memory size.<br />
2 For CPU models with relay outputs, you must install a digital signal board (SB) to use the pulse outputs.<br />
Table A- 64 Performance<br />
Type of instruction Execution speed<br />
Boolean 0.08 μs/instruction<br />
Move Word 1.7 μs/instruction<br />
Real math 2.3 μs/instruction<br />
A.5.2 Timers, counters and code blocks supported by CPU 1215C<br />
Table A- 65 Blocks, timers and counters supported by CPU 1215C<br />
Element Description<br />
Blocks<br />
Type OB, FB, FC, DB<br />
Size 64 Kbytes<br />
Quantity Up to 1024 blocks total (OBs + FBs + FCs + DBs)<br />
Address range for FBs, FCs,<br />
and DBs<br />
1 to 65535 (such as FB 1 to FB 65535)<br />
Nesting depth 16 from the program cycle or start up OB; 4 from the time delay<br />
interrupt, time-of-day interrupt, cyclic interrupt, hardware interrupt,<br />
time error interrupt, or diagnostic error interrupt OB<br />
<strong>S7</strong>-<strong>1200</strong> <strong>Programmable</strong> <strong>controller</strong><br />
System Manual, 04/2012, A5E02486680-06 735
Technical specifications<br />
A.5 CPU 1215C<br />
Element Description<br />
OBs<br />
Timers<br />
Counters<br />
Monitoring Status of 2 code blocks can be monitored simultaneously<br />
Program cycle Multiple: OB 1, OB 200 to OB 65535<br />
Startup Multiple: OB 100, OB 200 to OB 65535<br />
Time-delay interrupts and<br />
cyclic interrupts<br />
41 (1 per event): OB 200 to OB 65535<br />
Hardware interrupts (edges<br />
and HSC)<br />
50 (1 per event): OB 200 to OB 65535<br />
Time error interrupts 1: OB 80<br />
Diagnostic error interrupts 1: OB 82<br />
Type IEC<br />
Quantity Limited only by memory size<br />
Storage Structure in DB, 16 bytes per timer<br />
Type IEC<br />
Quantity Limited only by memory size<br />
Storage Structure in DB, size dependent upon count type<br />
SInt, USInt: 3 bytes<br />
Int, UInt: 6 bytes<br />
DInt, UDInt: 12 bytes<br />
1 Time-delay and cyclic interrupts use the same resources in the CPU. You can have only a total of 4 of these interrupts<br />
(time-delay plus cyclic interrupts). You cannot have 4 time-delay interrupts and 4 cyclic interrupts.<br />
Table A- 66 Communication<br />
Technical data Description<br />
Number of ports 2<br />
Type Ethernet<br />
HMI device1 3<br />
Programming device (PG) 1<br />
Connections 8 for Open User Communication (active or passive): TSEND_C,<br />
TRCV_C, TCON, TDISCON, TSEND, and TRCV<br />
3 for server GET/PUT (CPU-to-CPU) <strong>S7</strong> communication<br />
8 for client GET/PUT (CPU-to-CPU) <strong>S7</strong> communication<br />
Data rates 10/100 Mb/s<br />
Isolation (external signal to PLC logic) Transformer isolated, 1500 VAC, for short term event safety only<br />
Cable type CAT5e shielded<br />
1 The CPU provides dedicated HMI connections to support up to 3 HMI devices. (You can have up to 2 SIMATIC Comfort<br />
panels.) The total number of HMI is affected by the types of HMI panels in your configuration. For example, you could<br />
have up to three SIMATIC Basic panels connected to your CPU, or you could have up to two SIMATIC Comfort panels<br />
with one additional Basic panel.<br />
<strong>S7</strong>-<strong>1200</strong> <strong>Programmable</strong> <strong>controller</strong><br />
736 System Manual, 04/2012, A5E02486680-06
Table A- 67 Power supply<br />
Technical data CPU 1215C<br />
AC/DC/Relay<br />
CPU 1215C<br />
DC/DC/Relay<br />
Technical specifications<br />
A.5 CPU 1215C<br />
CPU 1215C<br />
DC/DC/DC<br />
Voltage range 85 to 264 VAC 20.4 VDC to 28.8 VDC<br />
22.0 VDC to 28.8 VDC for ambient<br />
temperature -20° C to 0° C<br />
Line frequency 47 to 63 Hz --<br />
Input current<br />
(max. load)<br />
CPU only 100 mA at 120 VAC<br />
50 mA at 240 VAC<br />
CPU with all expansion<br />
accessories<br />
300 mA at 120 VAC<br />
150 mA at 240 VAC<br />
500 mA at 24 VDC<br />
1500 mA at 24 VDC<br />
Inrush current (max.) 20 A at 264 VAC 12 A at 28.8 VDC<br />
Isolation (input power to logic) 1500 VAC Not isolated<br />
Ground leakage, AC line to functional<br />
earth<br />
0.5 mA max. -<br />
Hold up time (loss of power) 20 ms at 120 VAC<br />
80 ms at 240 VAC<br />
10 ms at 24 VDC<br />
Internal fuse, not user replaceable 3 A, 250 V, slow blow<br />
Table A- 68 Sensor power<br />
Technical data CPU 1215C<br />
AC/DC/Relay<br />
CPU 1215C<br />
DC/DC/Relay<br />
CPU 1215C<br />
DC/DC/DC<br />
Voltage range 20.4 to 28.8 VDC L+ minus 4 VDC min.<br />
L+ minus 5 VDC min. for ambient<br />
temperature -20° C to 0° C<br />
Output current rating (max.) 400 mA (short circuit protected)<br />
Maximum ripple noise (
Technical specifications<br />
A.5 CPU 1215C<br />
Technical data CPU 1215C<br />
AC/DC/Relay<br />
Isolation (field side to logic) 500 VAC for 1 minute<br />
Isolation groups 1<br />
CPU 1215C<br />
DC/DC/Relay<br />
CPU 1215C<br />
DC/DC/DC<br />
Filter times 0.2, 0.4, 0.8, 1.6, 3.2, 6.4, and 12.8 ms (selectable in groups of 4)<br />
HSC clock input rates (max.)<br />
(Logic 1 Level = 15 to 26 VDC)<br />
Single phase: 100 KHz (Ia.0 to Ia.5) and 30 KHz (Ia.6 to Ib.5)<br />
Quadrature phase: 80 KHz (Ia.0 to Ia.5) and 20 KHz (Ia.6 to Ib.5)<br />
Number of inputs on simultaneously 7 (no adjacent points) at 60° C horizontal or 50° C vertical<br />
14 at 55° C horizontal or 45° C vertical<br />
Cable length (meters) 500 m shielded, 300 m unshielded, 50 m shielded for HSC inputs<br />
Table A- 70 Digital outputs<br />
Technical data CPU 1215C AC/DC/Relay<br />
and CPU 1215C DC/DC/Relay<br />
CPU 1215C DC/DC/DC<br />
Number of outputs 10 10<br />
Type Relay, dry contact Solid state - MOSFET (sourcing)<br />
Voltage range 5 to 30 VDC or 5 to 250 VAC 20.4 to 28.8 VDC<br />
Logic 1 signal at max. current -- 20 VDC min.<br />
Logic 0 signal with 10 KΩ load -- 0.1 VDC max.<br />
Current (max.) 2.0 A 0.5 A<br />
Lamp load 30 W DC / 200 W AC 5 W<br />
ON state resistance 0.2 Ω max. when new 0.6 Ω max.<br />
Leakage current per point -- 10 μA max.<br />
Surge current 7 A with contacts closed 8 A for 100 ms max.<br />
Overload protection No No<br />
Isolation (field side to logic) 1500 VAC for 1 minute (coil to contact)<br />
None (coil to logic)<br />
500 VAC for 1 minute<br />
Isolation resistance 100 MΩ min. when new --<br />
Isolation between open contacts 750 VAC for 1 minute --<br />
Isolation groups 2 1<br />
Inductive clamp voltage -- L+ minus 48 VDC,<br />
1 W dissipation<br />
Switching delay (Qa.0 to Qa.3) 10 ms max. 1.0 μs max., off to on<br />
3.0 μs max., on to off<br />
Switching delay (Qa.4 to Qb.1) 10 ms max. 50 μs max., off to on<br />
200 μs max., on to off<br />
Maximum relay switching frequency 1 Hz --<br />
Pulse Train Output rate<br />
Not recommended<br />
(Qa.0 and Qa.2)<br />
1 100 KHz max.,<br />
2 Hz min. 2<br />
Lifetime mechanical (no load) 10,000,000 open/close cycles --<br />
Lifetime contacts at rated load 100,000 open/close cycles --<br />
Behavior on RUN to STOP Last value or substitute value (default value 0)<br />
<strong>S7</strong>-<strong>1200</strong> <strong>Programmable</strong> <strong>controller</strong><br />
738 System Manual, 04/2012, A5E02486680-06
Technical data CPU 1215C AC/DC/Relay<br />
and CPU 1215C DC/DC/Relay<br />
CPU 1215C DC/DC/DC<br />
Number of outputs on simultaneously 5 (no adjacent points) at 60° C horizontal or 50° C vertical<br />
10 at 55° C horizontal or 45° C vertical<br />
Cable length (meters) 500 m shielded, 150 m unshielded<br />
Technical specifications<br />
A.5 CPU 1215C<br />
1 For CPU models with relay outputs, you must install a digital signal board (SB) to use the pulse outputs.<br />
2 Depending on your pulse receiver and cable, an additional load resistor (at least 10% of rated current) may improve<br />
pulse signal quality and noise immunity.<br />
A.5.4 Analog inputs and outputs<br />
A.5.4.1 Analog input specifications<br />
Table A- 71 Analog inputs<br />
Technical data Description<br />
Number of inputs 2<br />
Type Voltage (single-ended)<br />
Full-scale range 0 to 10 V<br />
Full-scale range (data word) 0 to 27648<br />
Overshoot range 10.001 to 11.759 V<br />
Overshoot range (data word) 27,649 to 32,511<br />
Overflow range 11.760 to 11.852 V<br />
Overflow range (data word) 32,512 to 32,767<br />
Resolution 10 bits<br />
Maximum withstand voltage 35 VDC<br />
Smoothing None, Weak, Medium, or Strong<br />
See the table for step response (ms) for the analog inputs of the CPU.<br />
Noise rejection 10, 50, or 60 Hz<br />
Impedance ≥100 KΩ<br />
Isolation (field side to logic) None<br />
Accuracy (25°C / -20 to 60°C) 3.0% / 3.5% of full-scale<br />
Cable length (meters) 100 m, shielded twisted pair<br />
<strong>S7</strong>-<strong>1200</strong> <strong>Programmable</strong> <strong>controller</strong><br />
System Manual, 04/2012, A5E02486680-06 739
Technical specifications<br />
A.5 CPU 1215C<br />
A.5.4.2 Step response of built-in analog inputs of the CPU<br />
Table A- 72 Step Response (ms), 0V to 10V measured at 95%<br />
Smoothing selection (sample averaging)<br />
Rejection frequency (Integration time)<br />
60 Hz 50 Hz 10 Hz<br />
None (1 cycle): No averaging 50 ms 50 ms 100 ms<br />
Weak (4 cycles): 4 samples 60ms 70 ms 200 ms<br />
Medium (16 cycles): 16 samples 200 ms 240 ms 1150 ms<br />
Strong (32 cycles): 32 samples 400 ms 480 ms 2300 ms<br />
Sample time 4.17 ms 5 ms 25 ms<br />
A.5.4.3 Sample time for the built-in analog ports of the CPU<br />
Table A- 73 Sample time for built-in analog inputs of the CPU<br />
Rejection frequency (Integration time selection) Sample time<br />
60 Hz (16.6 ms) 4.17 ms<br />
50 Hz (20 ms) 5 ms<br />
10 Hz (100 ms) 25 ms<br />
A.5.4.4 Analog output specifications<br />
Analog outputs<br />
Table A- 74 Analog outputs<br />
Technical data Description<br />
Number of outputs 2<br />
Type Current<br />
Full-scale range 0 to 20 mA<br />
Full-scale range (data word) 0 to 27648<br />
Overshoot range 20.01 to 23.52 mA 1<br />
Overshoot range (data word) 27,649 to 32,511<br />
Overflow range see footnote 2<br />
Overflow range data word 32,512 to 32,767<br />
Resolution 10 bits<br />
Output drive impedance ≤500 Ω max.<br />
Isolation (field side to logic) None<br />
Accuracy (25°C / -20 to 60°C) 3.0% / 3.5% of full-scale<br />
<strong>S7</strong>-<strong>1200</strong> <strong>Programmable</strong> <strong>controller</strong><br />
740 System Manual, 04/2012, A5E02486680-06
Technical data Description<br />
Settling time 2 ms<br />
Cable length (meters) 100 m, shielded twisted pair<br />
Technical specifications<br />
A.5 CPU 1215C<br />
1 For the CPU 1215C with DC power supply: at supply voltage 20.4 VDC, up to 400 Ω output drive impedance is<br />
supported in overshoot range.<br />
2 In an overflow condition, analog outputs will behave according to the device configuration properties settings. In the<br />
"Reaction to CPU STOP" parameter, select either: Use substitute value or Keep last value.<br />
A.5.5 CPU 1215C Wiring Diagrams<br />
Table A- 75 CPU 1215C AC/DC/Relay (6E<strong>S7</strong> 215-1BG31-0XB0)<br />
X10<br />
<br />
<br />
<strong>S7</strong>-<strong>1200</strong> <strong>Programmable</strong> <strong>controller</strong><br />
System Manual, 04/2012, A5E02486680-06 741<br />
X12<br />
① 24 VDC Sensor Power Out<br />
For additional noise immunity, connect "M" to chassis ground even if not using sensor<br />
supply.<br />
② For sinking inputs, connect "-" to "M" (shown).<br />
For sourcing inputs, connect "+" to "M".<br />
Note: X11 connectors must be gold. See Appendix C, Spare Parts for order number.<br />
Table A- 76 Connector pin locations for CPU 1215C AC/DC/Relay (6E<strong>S7</strong> 215-1BG31-0XB0)<br />
Pin X10 X11 (gold) X12<br />
1 L1 /120-240 VAC 2 M 1L<br />
2 N / 120 - 240 VAC AQ 0 DQ a.0<br />
X11
Technical specifications<br />
A.5 CPU 1215C<br />
Pin X10 X11 (gold) X12<br />
3 Functional Earth AQ 1 DQ a.1<br />
4 L+ / 24VDC Sensor Out 3M DQ a.2<br />
5 M / 24VDC Sensor Out AI 0 DQ a.3<br />
6 1M AI 1 DQ a.4<br />
7 DI a.0 -- 2L<br />
8 DI a.1 -- DQ a.5<br />
9 DI a.2 -- DQ a.6<br />
10 DI a.3 -- DQ a.7<br />
11 DI a.4 -- DQ b.0<br />
12 DI a.5 -- DQ b.1<br />
13 DI a.6 -- --<br />
14 DI a.7 -- --<br />
15 DI b.0 -- --<br />
16 DI b.1 -- --<br />
17 DI b.2 -- --<br />
18 DI b.3 -- --<br />
19 DI b.4 -- --<br />
20 DI b.5 -- --<br />
<strong>S7</strong>-<strong>1200</strong> <strong>Programmable</strong> <strong>controller</strong><br />
742 System Manual, 04/2012, A5E02486680-06
Table A- 77 CPU 1215C DC/DC/Relay (6E<strong>S7</strong> 215-1HG31-0XB0)<br />
X10<br />
<br />
<br />
Technical specifications<br />
A.5 CPU 1215C<br />
<strong>S7</strong>-<strong>1200</strong> <strong>Programmable</strong> <strong>controller</strong><br />
System Manual, 04/2012, A5E02486680-06 743<br />
X12<br />
① 24 VDC Sensor Power Out<br />
For additional noise immunity, connect "M" to chassis ground even if not using sensor<br />
supply.<br />
② For sinking inputs, connect "-" to "M" (shown). For sourcing inputs, connect "+" to "M".<br />
Note: X11 connectors must be gold. See Appendix C, Spare Parts for order number.<br />
Table A- 78 Connector pin locations for CPU 1215C DC/DC/Relay (6E<strong>S7</strong> 215-1HG31-0XB0)<br />
Pin X10 X11 (gold) X12<br />
1 L+ / 24VDC 2 M 1L<br />
2 M / 24VDC AQ 0 DQ a.0<br />
3 Functional Earth AQ 1 DQ a.1<br />
4 L+ / 24VDC Sensor Out 2M DQ a.2<br />
5 M / 24VDC Sensor Out AI 0 DQ a.3<br />
6 1M AI 1 DQ a.4<br />
7 DI a.0 -- 2L<br />
8 DI a.1 -- DQ a.5<br />
9 DI a.2 -- DQ a.6<br />
10 DI a.3 -- DQ a.7<br />
11 DI a.4 -- DQ b.0<br />
12 DI a.5 -- DQ b.1<br />
13 DI a.6 -- --<br />
14 DI a.7 -- --<br />
X11
Technical specifications<br />
A.5 CPU 1215C<br />
Pin X10 X11 (gold) X12<br />
15 DI b.0 -- --<br />
16 DI b.1 -- --<br />
17 DI b.2 -- --<br />
18 DI b.3 -- --<br />
19 DI b.4 -- --<br />
20 DI b.5 -- --<br />
Table A- 79 CPU 1215C DC/DC/DC (6E<strong>S7</strong> 215-1AG31-0XB0)<br />
X10<br />
<br />
<br />
① 24 VDC Sensor Power Out<br />
For additional noise immunity, connect "M" to chassis ground even if not using sensor<br />
supply.<br />
② For sinking inputs, connect "-" to "M" (shown). For sourcing inputs, connect "+" to "M".<br />
Note: X11 connectors must be gold. See Appendix C, Spare Parts for order number.<br />
Table A- 80 Connector pin locations for CPU 1215C DC/DC/DC (6E<strong>S7</strong> 215-1AG31-0XB0)<br />
<strong>S7</strong>-<strong>1200</strong> <strong>Programmable</strong> <strong>controller</strong><br />
744 System Manual, 04/2012, A5E02486680-06<br />
X12<br />
Pin X10 X11 (gold) X12<br />
1 L1 / 24VDC 2 M 4L+<br />
2 M / 24VDC AQ 0 4M<br />
3 Functional Earth AQ 1 DQ a.0<br />
4 L+ / 24VDC Sensor Out 3M DQ a.1<br />
X11
Technical specifications<br />
A.6 Digital signal modules (SMs)<br />
Pin X10 X11 (gold) X12<br />
5 M / 24VDC Sensor Out AI 0 DQ a.2<br />
6 1M AI 1 DQ a.3<br />
7 DI a.0 -- DQ a.4<br />
8 DI a.1 -- DQ a.5<br />
9 DI a.2 -- DQ a.6<br />
10 DI a.3 -- DQ a.7<br />
11 DI a.4 -- DQ b.0<br />
12 DI a.5 -- DQ b.1<br />
13 DI a.6 -- --<br />
14 DI a.7 -- --<br />
15 DI b.0 -- --<br />
16 DI b.1 -- --<br />
17 DI b.2 -- --<br />
18 DI b.3 -- --<br />
19 DI b.4 -- --<br />
20 DI b.5 -- --<br />
Note<br />
Unused analog inputs should be shorted.<br />
A.6 Digital signal modules (SMs)<br />
A.6.1 SM 1221 digital input specifications<br />
Table A- 81 General specifications<br />
Model SM 1221 DI 8 x 24 VDC SM 1221 DI 16 x 24 VDC<br />
Order number 6E<strong>S7</strong> 221-1BF30-0XB0 6E<strong>S7</strong> 221-1BH30-0XB0<br />
Dimensions W x H x D (mm) 45 x 100 x 75 45 x 100 x 75<br />
Weight 170 grams 210 grams<br />
Power dissipation 1.5 W 2.5 W<br />
Current consumption (SM Bus) 105 mA 130 mA<br />
Current consumption (24 VDC) 4 mA / input used 4 mA / input used<br />
<strong>S7</strong>-<strong>1200</strong> <strong>Programmable</strong> <strong>controller</strong><br />
System Manual, 04/2012, A5E02486680-06 745
Technical specifications<br />
A.6 Digital signal modules (SMs)<br />
Table A- 82 Digital inputs<br />
Model SM 1221 DI 8 x 24 VDC SM 1221 DI 16 x 24 VDC<br />
Number of inputs 8 16<br />
Type Sink/Source (IEC Type 1 sink) Sink/Source (IEC Type 1 sink)<br />
Rated voltage 24 VDC at 4 mA, nominal 24 VDC at 4 mA, nominal<br />
Continuous permissible voltage 30 VDC, max. 30 VDC, max.<br />
Surge voltage 35 VDC for 0.5 sec. 35 VDC for 0.5 sec.<br />
Logic 1 signal (min.) 15 VDC at 2.5 mA 15 VDC at 2.5 mA<br />
Logic 0 signal (max.) 5 VDC at 1 mA 5 VDC at 1 mA<br />
Isolation (field side to logic) 500 VAC for 1 minute 500 VAC for 1 minute<br />
Isolation groups 2 4<br />
Filter times 0.2, 0.4, 0.8, 1.6, 3.2, 6.4, and 12.8 ms<br />
(selectable in groups of 4)<br />
Number of inputs on simultaneously 8 16<br />
0.2, 0.4, 0.8, 1.6, 3.2, 6.4, and 12.8 ms<br />
(selectable in groups of 4)<br />
Cable length (meters) 500 m shielded, 300 unshielded 500 m shielded, 300 unshielded<br />
Table A- 83 Wiring diagrams for the digital input SMs<br />
SM 1221 DI 8 x 24 VDC (6E<strong>S7</strong> 221-1BF30-0XB0) SM 1221 DI 16 x 24 VDC (6E<strong>S7</strong> 221-1BH30-0XB0)<br />
X10<br />
X11<br />
<br />
<br />
① For sinking inputs, connect "-" to "M" (shown). For sourcing inputs, connect "+" to "M".<br />
<strong>S7</strong>-<strong>1200</strong> <strong>Programmable</strong> <strong>controller</strong><br />
746 System Manual, 04/2012, A5E02486680-06<br />
X10<br />
X11<br />
X12<br />
X13
Technical specifications<br />
A.6 Digital signal modules (SMs)<br />
Table A- 84 Connector pin locations for SM 1221 DI 8 x 24 VDC (6E<strong>S7</strong> 221-1BF30-0XB0)<br />
Pin X10 X11<br />
1 GND No connection<br />
2 No connection No connection<br />
3 1M 2M<br />
4 DI a.0 DI a.4<br />
5 DI a.1 DI a.5<br />
6 DI a.2 DI a.6<br />
7 DI a.3 DI a.7<br />
Table A- 85 Connector pin locations for SM 1221 DI 16 x 24 VDC (6E<strong>S7</strong> 221-1BH30-0XB0)<br />
Pin X10 X11 X12 X13<br />
1 GND No connection No connection No connection<br />
2 No connection No connection No connection No connection<br />
3 1M 2M 3 M 4 M<br />
4 DI a.0 DI a.4 DI b.0 DI b.4<br />
5 DI a.1 DI a.5 DI b.1 DI b.5<br />
6 DI a.2 DI a.6 DI b.2 DI b.6<br />
7 DI a.3 DI a.7 DI b.3 DI b.7<br />
A.6.2 SM 1222 8-Point Digital Output Specifications<br />
Table A- 86 General specifications<br />
Model SM 1222 DQ 8 x Relay SM 1222 DQ8 RLY<br />
Changeover<br />
SM 1222 DQ 8 x 24 VDC<br />
Order number 6E<strong>S7</strong> 222-1HF30-0XB0 6E<strong>S7</strong> 222-1XF30-0XB0 6E<strong>S7</strong> 222-1BF30-0XB0<br />
Dimensions W x H x D (mm) 45 x 100 x 75 70 x 100 x 75 45 x 100 x 75<br />
Weight 190 grams 310 grams 180 grams<br />
Power dissipation 4.5 W 5 W 1.5 W<br />
Current consumption (SM Bus) 120 mA 140 mA 120 mA<br />
Current consumption (24 VDC) 11 mA / Relay coil used 16.7 mA/Relay coil used 11 mA / Relay coil used<br />
Table A- 87 Digital outputs<br />
Model SM 1222<br />
DQ 8 x Relay<br />
SM 1222 DQ8 RLY<br />
Changeover<br />
Number of outputs 8 8 8<br />
Type Relay, dry contact Relay change over<br />
contact<br />
SM 1222<br />
DQ 8 x 24 VDC<br />
Solid state - MOSFET<br />
(sourcing)<br />
<strong>S7</strong>-<strong>1200</strong> <strong>Programmable</strong> <strong>controller</strong><br />
System Manual, 04/2012, A5E02486680-06 747
Technical specifications<br />
A.6 Digital signal modules (SMs)<br />
Model SM 1222<br />
DQ 8 x Relay<br />
Voltage range 5 to 30 VDC or 5 to 250<br />
VAC<br />
SM 1222 DQ8 RLY<br />
Changeover<br />
5 to 30 VDC or 5 to 250<br />
VAC<br />
SM 1222<br />
DQ 8 x 24 VDC<br />
20.4 to 28.8 VDC<br />
Logic 1 signal at max. current -- -- 20 VDC min.<br />
Logic 0 signal with 10K Ω load -- -- 0.1 VDC max<br />
Current (max.) 2.0 A 2.0 A 0.5 A<br />
Lamp load 30 W DC/200 W AC 30 W DC/200 W AC 5W<br />
ON state contact resistance 0.2 Ω max. when new 0.2 Ω max. when new 0.6 Ω max.<br />
Leakage current per point -- -- 10 μA max.<br />
Surge current 7 A with contacts closed 7 A with contacts closed 8 A for 100 ms max.<br />
Overload protection No No No<br />
Isolation (field side to logic) 1500 VAC for 1 minute (coil 1500 VAC for 1 minute 500 VAC for 1 minute<br />
to contact)<br />
None (coil to logic)<br />
(coil to contact)<br />
Isolation resistance 100 MΩ min. when new 100 MΩ min. when new --<br />
Isolation between open contacts 750 VAC for 1 minute 750 VAC for 1 minute --<br />
Isolation groups 2 8 1<br />
Current per common (max.) 10 A 2 A 4 A<br />
Inductive clamp voltage -- -- L+ minus 48 V, 1 W<br />
dissipation<br />
Switching delay 10 ms max. 10 ms max 50 μs max. off to on<br />
200 μs max. on to off<br />
Maximum relay switching frequency 1 Hz 1 Hz --<br />
Lifetime mechanical (no load) 10,000,000 open/close 10,000,000 open/close --<br />
cycles<br />
cycles<br />
Lifetime contacts at rated load 100,000 open/close cycles 100,000 open/close<br />
cycles<br />
--<br />
Behavior on RUN to STOP Last value or substitute Last value or substitute Last value or substitute<br />
value (default value 0) value (default value 0) value (default value 0)<br />
Number of outputs on simultaneously 8 4 (no adjacent points)<br />
at 60° C horizontal or<br />
50° C vertical<br />
8<br />
8 at 55° C horizontal<br />
or 45° C vertical<br />
Cable length (meters) 500 m shielded, 150 m<br />
unshielded<br />
500 m shielded, 150 m<br />
unshielded<br />
500 m shielded, 150 m<br />
unshielded<br />
<strong>S7</strong>-<strong>1200</strong> <strong>Programmable</strong> <strong>controller</strong><br />
748 System Manual, 04/2012, A5E02486680-06
A.6.3 SM 1222 16-Point Digital Output Specifications<br />
Table A- 88 General specifications<br />
Technical specifications<br />
A.6 Digital signal modules (SMs)<br />
Model SM 1222 DQ 16 x Relay SM 1222 DQ 16 x 24 VDC<br />
Order number 6E<strong>S7</strong> 222-1HH30-0XB0 6E<strong>S7</strong> 222-1BH30-0XB0<br />
Dimensions W x H x D (mm) 45 x 100 x 75 45 x 100 x 75<br />
Weight 260 grams 220 grams<br />
Power dissipation 8.5 W 2.5 W<br />
Current consumption (SM Bus) 135 mA 140 mA<br />
Current consumption (24 VDC) 11 mA / Relay coil used -<br />
Table A- 89 Digital outputs<br />
Model SM1222<br />
DQ 16 x Relay<br />
SM1222<br />
DQ 16 x 24 VDC<br />
Number of outputs 16 16<br />
Type Relay, dry contact Solid state - MOSFET (sourcing)<br />
Voltage range 5 to 30 VDC or 5 to 250 VAC 20.4 to 28.8 VDC<br />
Logic 1 signal at max. current - 20 VDC min.<br />
Logic 0 signal with 10K Ω load - 0.1 VDC max.<br />
Current (max.) 2.0 A 0.5 A<br />
Lamp load 30 W DC/200 W AC 5W<br />
ON state contact resistance 0.2 Ω max. when new 0.6 Ω max.<br />
Leakage current per point -- 10 μA max.<br />
Surge current 7 A with contacts closed 8 A for 100 ms max.<br />
Overload protection No No<br />
Isolation (field side to logic) 1500 VAC for 1 minute (coil to<br />
contact)<br />
None (coil to logic)<br />
500 VAC for 1 minute<br />
Isolation resistance 100 MΩ min. when new -<br />
Isolation between open contacts 750 VAC for 1 minute -<br />
Isolation groups 4 1<br />
Current per common (max.) 10 A 8 A<br />
Inductive clamp voltage - L+ minus 48 V, 1 W dissipation<br />
Switching delay 10 ms max. 50 μs max. off to on<br />
200 μs max. on to off<br />
Maximum relay switching frequency 1 Hz -<br />
Lifetime mechanical (no load) 10,000,000 open/close cycles -<br />
Lifetime contacts at rated load 100,000 open/close cycles -<br />
Behavior on RUN to STOP Last value or substitute value (default Last value or substitute value (default<br />
value 0)<br />
value 0)<br />
<strong>S7</strong>-<strong>1200</strong> <strong>Programmable</strong> <strong>controller</strong><br />
System Manual, 04/2012, A5E02486680-06 749
Technical specifications<br />
A.6 Digital signal modules (SMs)<br />
Model SM1222<br />
DQ 16 x Relay<br />
Number of outputs on simultaneously 8 (no adjacent points) at 60° C<br />
horizontal or 50° C vertical<br />
16 at 55° C horizontal or 45° C<br />
vertical<br />
SM1222<br />
DQ 16 x 24 VDC<br />
16<br />
Cable length (meters) 500 m shielded, 150 m unshielded 500 m shielded, 150 m unshielded<br />
Table A- 90 Wiring diagrams for the 8-point digital output SMs<br />
SM 1222 DQ 8 x Relay (6E<strong>S7</strong> 222-1HF30-0XB0) SM 1222 DQ 8 x 24 VDC (6E<strong>S7</strong> 222-1BF30-0XB0)<br />
X10<br />
X11<br />
Table A- 91 Connector pin locations for SM 1222 DQ 8 x Relay (6E<strong>S7</strong> 222-1HF30-0XB0)<br />
Pin X10 X11<br />
1 L+ / 24VDC No connection<br />
2 M / 24VDC 2L<br />
3 Functional Earth DQ a.3<br />
4 1L DQ a.4<br />
5 DQ a.0 DQ a.5<br />
6 DQ a.1 DQ a.6<br />
7 DQ a.2 DQ a.7<br />
<strong>S7</strong>-<strong>1200</strong> <strong>Programmable</strong> <strong>controller</strong><br />
750 System Manual, 04/2012, A5E02486680-06<br />
X10<br />
X11
Technical specifications<br />
A.6 Digital signal modules (SMs)<br />
Table A- 92 Connector pin locations for SM 1222 DQ 8 x 24 VDC (6E<strong>S7</strong> 222-1BF30-0XB0)<br />
Pin X10 X11<br />
1 L+ / 24VDC No connection<br />
2 M / 24VDC No connection<br />
3 Functional Earth No connection<br />
4 DQ a.0 DQ a.4<br />
5 DQ a.1 DQ a.5<br />
6 DQ a.2 DQ a.6<br />
7 DQ a.2 DQ a.7<br />
Table A- 93 Wiring diagram for the 8-point digital output relay changeover SM<br />
SM 1222 DQ 8 x Relay Changeover (6E<strong>S7</strong> 222-1XF30-0XB0)<br />
X10<br />
X11<br />
X12<br />
X13<br />
Table A- 94 Connector pin locations for SM 1222 DQ 8 x Relay Changeover (6E<strong>S7</strong> 222-1XF30-<br />
0XB0)<br />
Pin X10 X11 X12 X13<br />
1 L+ / 24VDC Functional Earth No connection No connection<br />
2 M / 24VDC No connection No connection No connection<br />
3 No connection No connection No connection No connection<br />
4 No connection No connection No connection No connection<br />
5 0L 2L 4L 6L<br />
<strong>S7</strong>-<strong>1200</strong> <strong>Programmable</strong> <strong>controller</strong><br />
System Manual, 04/2012, A5E02486680-06 751
Technical specifications<br />
A.6 Digital signal modules (SMs)<br />
Pin X10 X11 X12 X13<br />
6 DQ a.0X DQ a.2X DQ a.4X DQ a.6X<br />
7 DQ a.0 DQ a.2 DQ a.4 DQ a.6<br />
8 No connection No connection No connection No connection<br />
9 1L 3L 5L 7L<br />
10 DQ a.1X DQ a.3X DQ a.5X DQ a.7X<br />
11 DQ a.1 DQ a.3 DQ a.5 DQ a.7<br />
Table A- 95 Wiring diagrams for the 16-point digital output SMs<br />
SM 1222 DQ 16 x Relay (6E<strong>S7</strong> 222-1HH30-0XB0) SM 1222 DQ 16 x 24 VDC (6E<strong>S7</strong> 222-1BH30-0XB0)<br />
X10<br />
X11<br />
X12<br />
X13<br />
Table A- 96 Connector pin locations for SM 1222 DQ 16 x Relay (6E<strong>S7</strong> 222-1HH30-0XB0)<br />
Pin X10 X11 X12 X13<br />
1 L+ / 24VDC Functional Earth No connection 4L<br />
2 M / 24VDC No connection No connection DQ b.2<br />
3 1L 2L No connection DQ b.3<br />
4 DQ a.0 DQ a.4 No connection DQ b.4<br />
5 DQ a.1 DQ a.5 3L DQ b.5<br />
6 DQ a.2 DQ a.6 DQ b.0 DQ b.6<br />
7 DQ a.3 DQ a.7 DQ b.1 DQ b.7<br />
<strong>S7</strong>-<strong>1200</strong> <strong>Programmable</strong> <strong>controller</strong><br />
752 System Manual, 04/2012, A5E02486680-06<br />
X10<br />
X11<br />
X12<br />
X13
Technical specifications<br />
A.6 Digital signal modules (SMs)<br />
Table A- 97 Connector pin locations for SM 1222 DQ 16 x 24 VDC (6E<strong>S7</strong> 222-1BH30-0XB0)<br />
Pin X10 X11 X12 X13<br />
1 L+ / 24VDC Functional Earth No connection No connection<br />
2 M / 24VDC No connection No connection No connection<br />
3 No connection No connection No connection No connection<br />
4 DQ a.0 DQ a.4 DQ b.0 DQ b.4<br />
5 DQ a.1 DQ a.5 DQ b.1 DQ b.5<br />
6 DQ a.2 DQ a.6 DQ b.2 DQ b.6<br />
7 DQ a.3 DQ a.7 DQ b.3 DQ b.7<br />
A.6.4 SM 1223 Digital Input/Output VDC Specifications<br />
Table A- 98 General specifications<br />
Model SM 1223<br />
DI 8 x 24 VDC, DQ<br />
8 x Relay<br />
Order number 6E<strong>S7</strong> 223-1PH30-<br />
0XB0<br />
SM 1223<br />
DI 16 x 24 VDC,<br />
DQ 16 x Relay<br />
6E<strong>S7</strong> 223-1PL30-<br />
0XB0<br />
SM 1223<br />
DI 8 x 24 VDC, DQ<br />
8 x 24 VDC<br />
6E<strong>S7</strong> 223-1BH30-<br />
0XB0<br />
SM 1223<br />
DI 16 x 24 VDC,<br />
DQ 16 x 24 VDC<br />
6E<strong>S7</strong> 223-1BL30-<br />
0XB0<br />
Dimensions W x H x D (mm) 45 x 100 x 75 70 x 100 x 75 45 x 100 x 75 70 x 100 x 75<br />
Weight 230 grams 350 grams 210 grams 310 grams<br />
Power dissipation 5.5 W 10 W 2.5 W 4.5 W<br />
Current consumption (SM Bus) 145 mA 180 mA 145 mA 185 mA<br />
Current consumption (24 VDC) 4 mA / Input used<br />
4 mA / Input used<br />
11 mA / Relay coil used<br />
Table A- 99 Digital inputs<br />
Model SM 1223<br />
DI 8 x 24 VDC, DQ<br />
8 x Relay<br />
SM 1223<br />
DI 16 x 24 VDC,<br />
DQ 16 x Relay<br />
SM 1223<br />
DI 8 x 24 VDC, DQ<br />
8 x 24 VDC<br />
Number of inputs 8 16 8 16<br />
Type Sink/Source (IEC Type 1 sink)<br />
Rated voltage 24 VDC at 4 mA, nominal<br />
Continuous permissible voltage 30 VDC max.<br />
Surge voltage 35 VDC for 0.5 sec.<br />
Logic 1 signal (min.) 15 VDC at 2.5 mA<br />
Logic 0 signal (max.) 5 VDC at 1 mA<br />
Isolation (field side to logic) 500 VAC for 1 minute<br />
Isolation groups 2 2 2 2<br />
Filter times 0.2, 0.4, 0.8, 1.6, 3.2, 6.4, and 12.8 ms, selectable in groups of 4<br />
SM 1223<br />
DI 16 x 24 VDC,<br />
DQ 16 x 24 VDC<br />
<strong>S7</strong>-<strong>1200</strong> <strong>Programmable</strong> <strong>controller</strong><br />
System Manual, 04/2012, A5E02486680-06 753
Technical specifications<br />
A.6 Digital signal modules (SMs)<br />
Model SM 1223<br />
DI 8 x 24 VDC, DQ<br />
8 x Relay<br />
SM 1223<br />
DI 16 x 24 VDC,<br />
DQ 16 x Relay<br />
Number of inputs on simultaneously 8 8 (no adjacent<br />
points) at 60° C<br />
horizontal or<br />
50° C vertical<br />
16 at 55° C<br />
horizontal or<br />
45° C vertical<br />
Cable length (meters) 500 m shielded, 300 m unshielded<br />
Table A- 100 Digital outputs<br />
Model SM 1223<br />
DI 8 x 24 VDC,<br />
DQ 8 x Relay<br />
SM 1223<br />
DI 16 x 24 VDC,<br />
DQ 16 x Relay<br />
SM 1223<br />
DI 8 x 24 VDC, DQ<br />
8 x 24 VDC<br />
8 16<br />
SM 1223<br />
DI 8 x 24 VDC,<br />
DQ 8 x 24 VDC<br />
SM 1223<br />
DI 16 x 24 VDC,<br />
DQ 16 x 24 VDC<br />
SM 1223<br />
DI 16 x 24 VDC,<br />
DQ 16 x 24 VDC<br />
Number of outputs 8 16 8 16<br />
Type Relay, dry contact Solid state - MOSFET (sourcing)<br />
Voltage range 5 to 30 VDC or 5 to 250 VAC 20.4 to 28.8 VDC<br />
Logic 1 signal at max. current -- 20 VDC, min.<br />
Logic 0 signal with 10 KΩ load -- 0.1 VDC, max.<br />
Current (max.) 2.0 A 0.5 A<br />
Lamp load 30 W DC / 200 W AC 5 W<br />
ON state contact resistance 0.2 Ω max. when new 0.6 Ω max.<br />
Leakage current per point -- 10 μA max.<br />
Surge current 7 A with contacts closed 8 A for 100 ms max.<br />
Overload protection No<br />
Isolation (field side to logic) 1500 VAC for 1 minute (coil to contact)<br />
None (coil to logic)<br />
500 VAC for 1 minute<br />
Isolation resistance 100 MΩ min. when new --<br />
Isolation between open contacts 750 VAC for 1 minute --<br />
Isolation groups 2 4 1 1<br />
Current per common 10A 8 A 4 A 8 A<br />
Inductive clamp voltage -- L+ minus 48 V, 1 W dissipation<br />
Switching delay 10 ms max. 50 μs max. off to on<br />
200 μs max. on to off<br />
Maximum relay switching frequency 1 Hz --<br />
Lifetime mechanical (no load) 10,000,000 open/close cycles --<br />
Lifetime contacts at rated load 100,000 open/close cycles --<br />
Behavior on RUN to STOP Last value or substitute value (default value 0)<br />
<strong>S7</strong>-<strong>1200</strong> <strong>Programmable</strong> <strong>controller</strong><br />
754 System Manual, 04/2012, A5E02486680-06
Model SM 1223<br />
DI 8 x 24 VDC,<br />
DQ 8 x Relay<br />
SM 1223<br />
DI 16 x 24 VDC,<br />
DQ 16 x Relay<br />
Number of outputs on simultaneously 8 8 (no adjacent<br />
points) at 60° C<br />
horizontal or<br />
50° C vertical<br />
16 at 55° C<br />
horizontal or<br />
45° C vertical<br />
Cable length (meters) 500 m shielded, 150 m unshielded<br />
Table A- 101 Wiring diagrams for the digital input VDC/output relay SMs<br />
SM 1223 DI 8 x 24 VDC, DQ 8 x Relay<br />
(6E<strong>S7</strong> 223-1PH30-0XB0)<br />
X10<br />
X11<br />
X12<br />
X13<br />
<br />
Technical specifications<br />
A.6 Digital signal modules (SMs)<br />
SM 1223<br />
DI 8 x 24 VDC,<br />
DQ 8 x 24 VDC<br />
SM 1223 DI 16 x 24 VDC, DQ 16 x Relay<br />
(6E<strong>S7</strong> 223-1PL30-0XB0)<br />
X10<br />
X11<br />
X12<br />
X13<br />
8 16<br />
SM 1223<br />
DI 16 x 24 VDC,<br />
DQ 16 x 24 VDC<br />
<strong>S7</strong>-<strong>1200</strong> <strong>Programmable</strong> <strong>controller</strong><br />
System Manual, 04/2012, A5E02486680-06 755<br />
<br />
Notes<br />
① For sinking<br />
inputs, connect "-"<br />
to "M" (shown).<br />
For sourcing inputs,<br />
connect "+" to "M".<br />
Table A- 102 Connector Pin Locations for SM 1223 DI 8 x 24 VDC, DQ 8 x Relay (6E<strong>S7</strong> 223-1PH30-<br />
0XB0)<br />
Pin X10 X11 X12 X13<br />
1 L+ / 24VDC GND No connection No connection<br />
2 M / 24VDC No connection No connection No connection<br />
3 1M 2M 1L 2L<br />
4 DI a.0 DI a.4 DQ a.0 DQ a.4
Technical specifications<br />
A.6 Digital signal modules (SMs)<br />
Pin X10 X11 X12 X13<br />
5 DI a.1 DI a.5 DQ a.1 DQ a.5<br />
6 DI a.2 DI a.6 DQ a.2 DQ a.6<br />
7 DI a.3 DI a.7 DQ a.3 DQ a.7<br />
Table A- 103 Connector Pin Locations for SM 1223 DI 16 x 24 VDC, DQ 16 x Relay (6E<strong>S7</strong> 223-<br />
1PL30-0XB0)<br />
Pin X10 X11 X12 X13<br />
1 L+ / 24VDC GND 1L 3L<br />
2 M / 24VDC No connection DQ a.0 DQ b.0<br />
3 1M 2M DQ a.1 DQ b.1<br />
4 DI a.0 DI b.0 DQ a.2 DQ b.2<br />
5 DI a.1 DI b.1 DQ a.3 DQ b.3<br />
6 DI a.2 DI b.2 No connection No connection<br />
7 DI a.3 DI b.3 2L 4L<br />
8 DI a.4 DI b.4 DQ a.4 DQ b.4<br />
9 DI a.5 DI b.5 DQ a.5 DQ b.5<br />
10 DI a.6 DI b.6 DQ a.6 DQ b.6<br />
11 DI a.7 DI b.7 DQ a.7 DQ b.7<br />
Table A- 104 Wiring diagrams for the digital input VDC/output SMs<br />
SM 1223 DI 8 x 24 VDC, DQ 8 x 24 VDC<br />
(6E<strong>S7</strong> 223-1BH30-0XB0)<br />
X10<br />
X11<br />
X12<br />
X13<br />
<br />
SM 1223 DI 16 x 24 VDC, DQ 16 x 24 VDC<br />
(6E<strong>S7</strong> 223-1BL30-0XB0)<br />
<strong>S7</strong>-<strong>1200</strong> <strong>Programmable</strong> <strong>controller</strong><br />
756 System Manual, 04/2012, A5E02486680-06<br />
X10<br />
X10<br />
X12<br />
X13<br />
<br />
Notes<br />
① For sinking<br />
inputs, connect "-"<br />
to "M" (shown).<br />
For sourcing inputs,<br />
connect "+" to "M".
Technical specifications<br />
A.6 Digital signal modules (SMs)<br />
Table A- 105 Connector Pin Locations for SM 1223 DI 8 x 24 VDC, DQ 8 x 24 VDC (6E<strong>S7</strong> 223-<br />
1BH30-0XB0)<br />
Pin X10 X11 X12 X13<br />
1 L+ / 24VDC GND No connection No connection<br />
2 M / 24VDC No connection No connection No connection<br />
3 1M 2M No connection No connection<br />
4 DI a.0 DI a.4 DQ a.0 DQ a.4<br />
5 DI a.1 DI a.5 DQ a.1 DQ a.5<br />
6 DI a.2 DI a.6 DQ a.2 DQ a.6<br />
7 DI a.3 DI a.7 DQ a.3 DQ a.7<br />
Table A- 106 Connector Pin Locations for SM 1223 DI 16 x 24 VDC, DQ 16 x 24 VDC (6E<strong>S7</strong> 223-<br />
1BL30-0XB0)<br />
Pin X10 X11 X12 X13<br />
1 L+ / 24VDC GND No connection No connection<br />
2 M / 24VDC No connection No connection No connection<br />
3 1M 2M No connection No connection<br />
4 DI a.0 DI b.0 DQ a.0 DQ b.0<br />
5 DI a.1 DI b.1 DQ a.1 DQ b.1<br />
6 DI a.2 DI b.2 DQ a.2 DQ b.2<br />
7 DI a.3 DI b.3 DQ a.3 DQ b.3<br />
8 DI a.4 DI b.4 DQ a.4 DQ b.4<br />
9 DI a.5 DI b.5 DQ a.5 DQ b.5<br />
10 DI a.6 DI b.6 DQ a.6 DQ b.6<br />
11 DI a.7 DI b.7 DQ a.7 DQ b.7<br />
A.6.5 SM 1223 Digital Input/Output AC Specifications<br />
Table A- 107 General specifications<br />
Model SM 1223 DI 8 x120/230 VAC / DQ 8 x Relay<br />
Order number 6E<strong>S7</strong> 223-1QH30-0XB0<br />
Dimensions W x H x D (mm) 45 x 100 x 75 mm<br />
Weight 190 grams<br />
Power dissipation 7.5 W<br />
Current consumption (SM Bus) 120 mA<br />
Current consumption (24 VDC) 11 mA per output when on<br />
<strong>S7</strong>-<strong>1200</strong> <strong>Programmable</strong> <strong>controller</strong><br />
System Manual, 04/2012, A5E02486680-06 757
Technical specifications<br />
A.6 Digital signal modules (SMs)<br />
Table A- 108 Digital inputs<br />
Model SM 1223 DI 8 x 120/230 VAC / DQ 8 x Relay<br />
Number of inputs 8<br />
Type IEC Type 1<br />
Rated voltage 120 VAC at 6 mA, 230 VAC at 9 mA<br />
Continuous permissible voltage 264 VAC<br />
Surge voltage --<br />
Logic 1 signal (min.) 79 VAC at 2.5 mA<br />
Logic 0 signal (max.) 20 VAC at 1 mA<br />
Leakage current (max.) 1 mA<br />
Isolation (field side to logic) 1500 VAC for 1 minute<br />
Isolation groups 1 4<br />
Input delay times Typical: 0.2 to 12.8 ms, user selectable<br />
Maximum: -<br />
Connection of 2 wire proximity sensor (Bero) 1 mA<br />
(max.)<br />
Cable length Unshielded: 300 meters<br />
Shielded: 500 meters<br />
Number of inputs on simultaneously 8<br />
1 Channels within a group must be of the same phase.<br />
Table A- 109 Digital outputs<br />
Model SM 1223 DI 8 x 120/230 VAC / DQ 8 x Relay<br />
Number of outputs 8<br />
Type Relay, dry contact<br />
Voltage range 5 to 30 VDC or 5 to 250 VAC<br />
Logic 1 signal at max. current --<br />
Logic 0 signal with 10K Ω load --<br />
Current (max.) 2.0 A<br />
Lamp load 30 W DC / 200 W AC<br />
ON state contact resistance 0.2 Ω max. when new<br />
Leakage current per point --<br />
Surge current 7 A with contacts closed<br />
Overload protection No<br />
Isolation (field side to logic) 1500 VAC for 1 minute (coil to contact)<br />
None (coil to logic)<br />
Isolation resistance 100 MΩ min. when new<br />
Isolation between open contacts 750 VAC for 1 minute<br />
Isolation groups 2<br />
Current per common (max.) 10 A<br />
Inductive clamp voltage --<br />
<strong>S7</strong>-<strong>1200</strong> <strong>Programmable</strong> <strong>controller</strong><br />
758 System Manual, 04/2012, A5E02486680-06
Technical specifications<br />
A.6 Digital signal modules (SMs)<br />
Model SM 1223 DI 8 x 120/230 VAC / DQ 8 x Relay<br />
Switching delay (max.) 10 ms<br />
Maximum relay switching frequency 1 Hz<br />
Lifetime mechanical (no load) 10,000,000 open/close cycles<br />
Lifetime contacts at rated load 1000,000 open/close cycles<br />
Behavior on RUN to STOP Last value or substitute value (default value 0)<br />
Number of outputs on simultaneously 4 (no adjacent points) at 60° C horizontal or 50° C vertical<br />
8 at 55° C horizontal or 45° C vertical<br />
Cable length (meters) 500 m shielded, 150 m unshielded<br />
Table A- 110 SM 1223 DI 8 x 120/230 VAC, DQ 8 x Relay (6E<strong>S7</strong> 223-1QH30-0XB0)<br />
X10<br />
X11<br />
X12<br />
X13<br />
Table A- 111 Connector Pin Locations for SM 1223 DI 8 x 120/240 VAC, DQ 8 x Relay (6E<strong>S7</strong> 223-<br />
1QH30-0XB0)<br />
Pin X10 X11 X12 X13<br />
1 L+ / 24VDC GND No connection No connection<br />
2 M / 24VDC No connection No connection No connection<br />
3 1N 2N 1L 2L<br />
4 DI a.0 DI a.4 DQ a.0 DQ a.4<br />
5 DI a.1 DI a.5 DQ a.1 DQ a.5<br />
6 DI a.2 DI a.6 DQ a.2 DQ a.6<br />
7 DI a.3 DI a.7 DQ a.3 DQ a.7<br />
<strong>S7</strong>-<strong>1200</strong> <strong>Programmable</strong> <strong>controller</strong><br />
System Manual, 04/2012, A5E02486680-06 759
Technical specifications<br />
A.7 Analog signal modules (SMs)<br />
A.7 Analog signal modules (SMs)<br />
A.7.1 SM 1231 analog input module specifications<br />
Table A- 112 General specifications<br />
Model SM 1231 AI 4 x 13 bit SM 1231 AI 8 x 13 bit SM 1231 AI 4 x 16 bit<br />
Order number 6E<strong>S7</strong> 231-4HD30-0XB0 6E<strong>S7</strong> 231-4HF30-0XB0 6E<strong>S7</strong> 231-5ND30-0XB0<br />
Dimensions W x H x D (mm) 45 x 100 x 75 45 x 100 x 75 45 x 100 x 75<br />
Weight 180 grams 180 grams 180 grams<br />
Power dissipation 2.2 W 2.3 W 2.0 W<br />
Current consumption (SM Bus) 80 mA 90 mA 80 mA<br />
Current consumption (24 VDC) 45 mA 45 mA 65 mA<br />
Table A- 113 Analog inputs<br />
Model SM 1231 AI 4 x 13 bit SM 1231 AI 8 x 13 bit SM 1231 AI 4 x 16 bit<br />
Number of inputs 4 8 4<br />
Type Voltage or current (differential): Selectable in groups of<br />
2<br />
Voltage or current<br />
(differential)<br />
Range ±10 V, ±5 V, ±2.5 V, or 0 to 20 mA ±10 V, ±5 V, ±2.5 V, ±1.25<br />
V, 0 to 20 mA or 4 mA to<br />
20 mA<br />
Full scale range (data word) -27,648 to 27,648 voltage / 0 to 27,648 current<br />
Overshoot/undershoot range<br />
(data word)<br />
Refer to the section on analog input<br />
ranges for voltage and current<br />
(Page 770).<br />
Overflow/underflow (data word)<br />
Refer to the section on input<br />
ranges for voltage and current<br />
(Page 770).<br />
Voltage: 32,511 to 27,649 / -27,649 to -32,512<br />
Current: 32,511 to 27,649 / 0 to -4864<br />
Voltage: 32,767 to 32,512 / -32,513 to -32,768<br />
Current: 32,767 to 32,512 / -4865 to -32,768<br />
Voltage:<br />
32,511 to 27649 /<br />
-27,649 to -32,512<br />
Current:(0-20 mA): to<br />
32,511 to 27,649 /<br />
0 to -4864; 4-20 mA: 32511<br />
to 27,649 /<br />
-1 to -4,864<br />
Voltage: 32,767 to 32,512 /<br />
-32,513 to -32,768<br />
Current: 0 to 20 mA 32,767<br />
to 32,512 / -4865 to -<br />
32,768<br />
4-20 mA 32,767 to 32,512/<br />
-4,865 to -32,768<br />
Resolution1 12 bits + sign bit 15 bits + sign bit<br />
Maximum withstand voltage/current ±35 V / ±40 mA<br />
Smoothing None, weak, medium, or strong<br />
Refer to the section on step response times (Page 769).<br />
Noise rejection 400, 60, 50, or 10 Hz<br />
Refer to the section on sample rates (Page 769).<br />
<strong>S7</strong>-<strong>1200</strong> <strong>Programmable</strong> <strong>controller</strong><br />
760 System Manual, 04/2012, A5E02486680-06
Technical specifications<br />
A.7 Analog signal modules (SMs)<br />
Model SM 1231 AI 4 x 13 bit SM 1231 AI 8 x 13 bit SM 1231 AI 4 x 16 bit<br />
Input impedance ≥ 9 MΩ (voltage) / 280 Ω (current) ≥ 1 MΩ (voltage) /<br />
280 Ω (current)<br />
Isolation<br />
None<br />
Field side to logic<br />
500 VAC<br />
Logic to 24 VDC<br />
500 VAC<br />
Field side to 24 VDC<br />
500 VAC<br />
Channel to channel<br />
None<br />
Accuracy (25°C / -20 to 60°C) ±0.1% / ±0.2% of full scale ±0.1% / ±0.3% of full scale<br />
Measuring principle Actual value conversion<br />
Common mode rejection 40 dB, DC to 60 Hz<br />
Operational signal range1 Signal plus common mode voltage must be less than +12 V and greater than -12 V<br />
Cable length (meters) 100 m, twisted and shielded<br />
1 Voltages outside the operational range applied to one channel may cause interference on other channels.<br />
Table A- 114 Diagnostics<br />
Model SM 1231 AI 4 x 13 bit SM 1231 AI 8 x 13 bit SM 1231 AI 4 x 16 bit<br />
Overflow/underflow Yes 1 Yes Yes<br />
24 VDC low voltage Yes Yes Yes<br />
Open wire -- -- 4 to 20 mA range only (if<br />
input is below -4,164; 1.0<br />
mA)<br />
1 For SM 1231 AI 4 x 13 bit: If a voltage greater than +30 VDC or less than -15 VDC is applied to the input, the resulting<br />
value will be unknown and the corresponding overflow or underflow may not be active.<br />
<strong>S7</strong>-<strong>1200</strong> <strong>Programmable</strong> <strong>controller</strong><br />
System Manual, 04/2012, A5E02486680-06 761
Technical specifications<br />
A.7 Analog signal modules (SMs)<br />
Table A- 115 Wiring diagrams for the analog input SMs<br />
SM 1231 AI 4 x 13 bit (6E<strong>S7</strong> 231-4HD30-0XB0) SM 1231 AI 8 x 13 bit (6E<strong>S7</strong> 231-4HF30-0XB0)<br />
X10<br />
X11<br />
Note: Connectors must be gold. See Appendix C, Spare Parts for order number.<br />
Table A- 116 Connector pin locations for SM 1231 AI 4 x 13 bit (6E<strong>S7</strong> 231-4HD30-0XB0)<br />
Pin X10 (gold) X11 (gold)<br />
1 L+ / 24VDC No connection<br />
2 M / 24VDC No connection<br />
3 GND No connection<br />
4 AI 0+ AI 2+<br />
5 AI 0- AI 2-<br />
6 AI 1+ AI 3+<br />
7 AI 1- AI 3-<br />
Table A- 117 Connector pin locations for SM 1231 AI 8 x 13 bit (6E<strong>S7</strong> 231-4HF30-0XB0)<br />
Pin X10 (gold) X11 (gold) X12 (gold) X13 (gold)<br />
1 L+ / 24VDC No connection No connection No connection<br />
2 M / 24VDC No connection No connection No connection<br />
3 GND No connection No connection No connection<br />
4 AI 0+ AI 2+ AI 4+ AI 6+<br />
5 AI 0- AI 2- AI 4- AI 6-<br />
<strong>S7</strong>-<strong>1200</strong> <strong>Programmable</strong> <strong>controller</strong><br />
762 System Manual, 04/2012, A5E02486680-06<br />
X10<br />
X11<br />
X12<br />
X13
Technical specifications<br />
A.7 Analog signal modules (SMs)<br />
Pin X10 (gold) X11 (gold) X12 (gold) X13 (gold)<br />
6 AI 1+ AI 3+ AI 5+ AI 7+<br />
7 AI 1- AI 3- AI 5- AI 7-<br />
Table A- 118 Wiring diagram for the analog input SM<br />
SM 1231 AI 4 x 16 bit (6E<strong>S7</strong> 231-5ND30-0XB0)<br />
Note: Connectors must be gold. See Appendix C, Spare Parts for order number.<br />
X10<br />
X11<br />
Table A- 119 Connector pin locations for SM 1231 AI 4 x 16 bit (6E<strong>S7</strong> 231-5ND30-0XB0)<br />
Pin X10 (gold) X11 (gold)<br />
1 L+ / 24VDC No connection<br />
2 M / 24VDC No connection<br />
3 GND No connection<br />
4 AI 0+ AI 2+<br />
5 AI 0- AI 2-<br />
6 AI 1+ AI 3+<br />
7 AI 1- AI 3-<br />
<strong>S7</strong>-<strong>1200</strong> <strong>Programmable</strong> <strong>controller</strong><br />
System Manual, 04/2012, A5E02486680-06 763
Technical specifications<br />
A.7 Analog signal modules (SMs)<br />
Note<br />
Unused analog inputs should be shorted.<br />
When the inputs are configured for "current" mode, no current will flow through the input<br />
unless you supply external power to the module.<br />
A.7.2 SM 1232 analog output module specifications<br />
Table A- 120 General specifications<br />
Technical data SM 1232 AQ 2 x 14 bit SM 1232 AQ 4 x 14 bit<br />
Order number 6E<strong>S7</strong> 232-4HB30-0XB0 6E<strong>S7</strong> 232-4HD30-0XB0<br />
Dimensions W x H x D (mm) 45 x 100 x 75 45 x 100 x 75<br />
Weight 180 grams 180 grams<br />
Power dissipation 1.8 W 2.0 W<br />
Current consumption (SM Bus) 80 mA 80 mA<br />
Current consumption (24 VDC) 45 mA (no load) 45 mA (no load)<br />
Table A- 121 Analog outputs<br />
Technical data SM 1232 AQ 2 x 14 bit SM 1232 AQ 4 x 14 bit<br />
Number of outputs 2 4<br />
Type Voltage or current Voltage or current<br />
Range ±10 V or 0 to 20 mA ±10 V or 0 to 20 mA<br />
Resolution Voltage: 14 bits<br />
Voltage: 14 bits<br />
Current: 13 bits<br />
Current: 13 bits<br />
Full scale range (data word) Voltage: -27,648 to 27,648 ; Current: 0 to 27,648<br />
Refer to the output ranges for voltage and current (Page 771).<br />
Accuracy (25°C / -20 to 60°C) ±0.3% / ±0.6% of full scale<br />
Settling time (95% of new value) Voltage: 300 μS (R), 750 μS (1 uF)<br />
Current: 600 μS (1 mH), 2 ms (10 mH)<br />
Load impedance Voltage: ≥ 1000 Ω<br />
Current: ≤ 600 Ω<br />
Behavior on RUN to STOP Last value or substitute value (default value 0)<br />
Isolation (field side to logic) none<br />
Cable length (meters) 100 m twisted and shielded<br />
<strong>S7</strong>-<strong>1200</strong> <strong>Programmable</strong> <strong>controller</strong><br />
764 System Manual, 04/2012, A5E02486680-06
Table A- 122 Diagnostics<br />
Technical specifications<br />
A.7 Analog signal modules (SMs)<br />
Technical data SM 1232 AQ 2 x 14 bit SM 1232 AQ 4 x 14 bit<br />
Overflow/underflow Yes Yes<br />
Short to ground (voltage mode only) Yes Yes<br />
Wire break (current mode only) Yes Yes<br />
24 VDC low voltage Yes Yes<br />
Table A- 123 Wiring diagrams for the analog output SMs<br />
SM 1232 AQ 2 x 14 bit (6E<strong>S7</strong> 232-4HB30-0XB0) SM 1232 AQ 4 x 14 bit (6E<strong>S7</strong> 232-4HD30-0XB0)<br />
X10<br />
X11<br />
Note: Connectors must be gold. See Appendix C, Spare Parts for order number.<br />
Table A- 124 Connector pin locations for SM 1232 AQ 2 x 14 bit (6E<strong>S7</strong> 232-4HB30-0XB0)<br />
Pin X10 (gold) X11 (gold)<br />
1 L+ / 24VDC No connection<br />
2 M / 24VDC No connection<br />
3 GND No connection<br />
4 No connection AQ 0M<br />
5 No connection AQ 0<br />
6 No connection AQ 1M<br />
7 No connection AQ 1<br />
<strong>S7</strong>-<strong>1200</strong> <strong>Programmable</strong> <strong>controller</strong><br />
System Manual, 04/2012, A5E02486680-06 765<br />
X10<br />
X11<br />
X12<br />
X13
Technical specifications<br />
A.7 Analog signal modules (SMs)<br />
Table A- 125 Connector pin locations for SM 1232 AQ 4 x 14 bit (6E<strong>S7</strong> 232-4HD30-0XB0)<br />
Pin X10 (gold) X11 (gold) X12 (gold) X13 (gold)<br />
1 L+ / 24VDC No connection No connection No connection<br />
2 M / 24VDC No connection No connection No connection<br />
3 GND No connection No connection No connection<br />
4 No connection No connection AQ 0M AQ 2M<br />
5 No connection No connection AQ 0 AQ 2<br />
6 No connection No connection AQ 1M AQ 3M<br />
7 No connection No connection AQ 1 AIQ 3<br />
A.7.3 SM 1234 analog input/output module specifications<br />
Table A- 126 General specifications<br />
Technical data SM 1234 AI 4 x 13 bit / AQ 2 x 14 bit<br />
Order number 6E<strong>S7</strong> 234-4HE30-0XB0<br />
Dimensions W x H x D (mm) 45 x 100 x 75<br />
Weight 220 grams<br />
Power dissipation 2.4 W<br />
Current consumption (SM Bus) 80 mA<br />
Current consumption (24 VDC) 60 mA (no load)<br />
Table A- 127 Analog inputs<br />
Model SM 1234 AI 4 x 13 bit / AQ 2 x 14 bit<br />
Number of inputs 4<br />
Type Voltage or Current (differential): Selectable in groups of 2<br />
Range ±10 V, ±5 V, ±2.5 V, or 0 to 20 mA<br />
Full scale range (data word) -27,648 to 27,648<br />
Overshoot/undershoot range<br />
Voltage: 32,511 to 27,649 / -27,649 to -32,512<br />
(data word)<br />
Current: 32,511 to 27,649 / 0 to -4864<br />
Refer to the section on input ranges for voltage and current (Page 770).<br />
Overflow/underflow (data word) Voltage: 32,767 to 32,512 / -32,513 to -32,768<br />
Current: 32,767 to 32,512 / -4865 to -32,768<br />
Refer to the section on input ranges for voltage and current (Page 770).<br />
Resolution 12 bits + sign bit<br />
Maximum withstand voltage/current ±35 V / ±40 mA<br />
Smoothing None, weak, medium, or strong<br />
Refer to the section on step response times (Page 769).<br />
Noise rejection 400, 60, 50, or 10 Hz<br />
Refer to the section on sample rates (Page 769).<br />
<strong>S7</strong>-<strong>1200</strong> <strong>Programmable</strong> <strong>controller</strong><br />
766 System Manual, 04/2012, A5E02486680-06
Technical specifications<br />
A.7 Analog signal modules (SMs)<br />
Model SM 1234 AI 4 x 13 bit / AQ 2 x 14 bit<br />
Input impedance ≥ 9 MΩ (voltage) / 280 Ω (current)<br />
Isolation (field side to logic) None<br />
Accuracy (25 °C / -20 to 60°C) ±0.1% / ±0.2% of full scale<br />
Analog to digital conversion time 625 μs (400 Hz rejection)<br />
Common mode rejection 40 dB, DC to 60 Hz<br />
Operational signal range1 Signal plus common mode voltage must be less than +12 V and greater<br />
than -12 V<br />
Cable length (meters) 100 m, twisted and shielded<br />
1 Voltages outside the operational range applied to one channel may cause interference on other channels.<br />
Table A- 128 Analog outputs<br />
Technical data SM 1234 AI 4 x 13 bit / AQ 2 x 14 bit<br />
Number of outputs 2<br />
Type Voltage or current<br />
Range ±10 V or 0 to 20 mA<br />
Resolution Voltage: 14 bits ; Current: 13 bits<br />
Full scale range (data word) Voltage: -27,648 to 27,648; Current: 0 to 27,648<br />
Refer to to the section on output ranges for voltage and current<br />
(Page 771).<br />
Accuracy (25°C / -20 to 60°C) ±0.3% / ±0.6% of full scale<br />
Settling time (95% of new value) Voltage: 300 μS (R), 750 μS (1 uF)<br />
Current: 600 μS (1 mH), 2 ms (10 mH)<br />
Load impedance Voltage: ≥ 1000 Ω<br />
Current: ≤ 600 Ω<br />
Behavior on RUN to STOP Last value or substitute value (default value 0)<br />
Isolation (field side to logic) none<br />
Cable length (meters) 100 m twisted and shielded<br />
Table A- 129 Diagnostics<br />
Model SM 1234 AI 4 x 13 bit / AQ 2 x 14 bit<br />
Overflow/underflow Yes 1<br />
Short to ground (voltage mode only) Yes on outputs<br />
Wire break (current mode only) Yes on outputs<br />
24 VDC low voltage Yes<br />
1 If a voltage greater than +30 VDC or less than -15 VDC is applied to the input, the resulting value will be unknown and<br />
the corresponding overflow or underflow may not be active.<br />
<strong>S7</strong>-<strong>1200</strong> <strong>Programmable</strong> <strong>controller</strong><br />
System Manual, 04/2012, A5E02486680-06 767
Technical specifications<br />
A.7 Analog signal modules (SMs)<br />
Table A- 130 Wiring diagrams for the analog input/output SM<br />
SM 1234 AI 4 x 13 Bit / AQ 2 x 14 bit (6E<strong>S7</strong> 234-4HE30-0XB0)<br />
X10<br />
X11<br />
X12<br />
X13<br />
Note: Connectors must be gold. See Appendix C, Spare Parts for order number.<br />
Table A- 131 Connector pin locations for SM 1234 AI 4 x 13 Bit / AQ 2 x 14 bit (6E<strong>S7</strong> 234-4HE30-<br />
0XB0)<br />
Pin X10 (gold) X11 (gold) X12 (gold) X13 (gold)<br />
1 L+ / 24VDC No connection No connection No connection<br />
2 M / 24VDC No connection No connection No connection<br />
3 GND No connection No connection No connection<br />
4 AI 0+ AI 2+ No connection AQ 0M<br />
5 AI 0- AI 2- No connection AQ 0<br />
6 AI 1+ AI 3+ No connection AQ 1M<br />
7 AI 1- AI 3- No connection AIQ 1<br />
Note<br />
Unused analog inputs should be shorted.<br />
When the inputs are configured for "current" mode, no current will flow through the input<br />
unless you supply external power to the module.<br />
<strong>S7</strong>-<strong>1200</strong> <strong>Programmable</strong> <strong>controller</strong><br />
768 System Manual, 04/2012, A5E02486680-06
A.7.4 Step response of the analog inputs<br />
Table A- 132 Step response (ms), 0 to full-scale measured at 95%<br />
Technical specifications<br />
A.7 Analog signal modules (SMs)<br />
Smoothing selection (sample averaging)<br />
Noise reduction/rejection frequency (Integration time selection)<br />
400 Hz (2.5 ms) 60 Hz (16.6 ms) 50 Hz (20 ms) 10 Hz (100 ms)<br />
None (1 cycle): No averaging 4 ms 18 ms 22 ms 100 ms<br />
Weak (4 cycles): 4 samples 9 ms 52 ms 63 ms 320 ms<br />
Medium (16 cycles): 16 samples 32 ms 203 ms 241 ms <strong>1200</strong> ms<br />
Strong (32 cycles): 32 samples<br />
Sample time<br />
61 ms 400 ms 483 ms 2410 ms<br />
4 AI x 13 bits<br />
0.625 ms 4.17 ms 5 ms<br />
25 ms<br />
8 AI x 13 bits<br />
1.25 ms 4.17 ms 5 ms<br />
25 ms<br />
4 AI4 x 16 bits<br />
0.417 ms 0.397 ms 0.400 ms 0.400 ms<br />
A.7.5 Sample time and update times for the analog inputs<br />
Table A- 133 Sample time and update time<br />
Rejection frequency<br />
(Integration time)<br />
Sample time<br />
400 Hz (2.5 ms) 4-channel SM: 0.625 ms<br />
8-channel SM: 1.250 ms<br />
Module update time for all channels<br />
4-channel SM 8-channel SM<br />
0.625 ms 1.250 ms<br />
60 Hz (16.6 ms) 4.170 ms 4.17 ms 4.17 ms<br />
50 Hz (20 ms) 5.000 ms 5 ms 5 ms<br />
10 Hz (100 ms) 25.000 ms 25 ms 25 ms<br />
<strong>S7</strong>-<strong>1200</strong> <strong>Programmable</strong> <strong>controller</strong><br />
System Manual, 04/2012, A5E02486680-06 769
Technical specifications<br />
A.7 Analog signal modules (SMs)<br />
A.7.6 Measurement ranges of the analog inputs for voltage<br />
Table A- 134 Analog input representation for voltage<br />
System Voltage Measuring Range<br />
Decimal Hexadecimal ±10 V ±5 V ±2.5 V ±1.25V 0 to 10 V<br />
32767 7FFF 11.851 V 5.926 V 2.963 V 1.481 V Overflow 11.851 V<br />
32512 7F00<br />
32511 7EFF 11.759 V 5.879 V 2.940 V 1.470 V Overshoot 11.759 V<br />
27649 6C01<br />
range<br />
27648 6C00 10 V 5 V 2.5 V 1.250 V Rated range 10 V<br />
20736 5100 7.5 V 3.75 V 1.875 V 0.938 V 7.5 V<br />
1 1 361.7 μV 180.8 μV 90.4 μV 45.2 μV 361.7 μV<br />
0 0 0 V 0 V 0 V 0 V 0 V<br />
-1 FFFF<br />
Negative<br />
-20736<br />
-27648<br />
AF00<br />
9400<br />
-7.5 V<br />
-10 V<br />
-3.75 V<br />
-5 V<br />
-1.875 V<br />
-2.5 V<br />
-0.938 V<br />
-1.250 V<br />
values are<br />
not<br />
supported<br />
-27649 93FF<br />
Undershoot<br />
-32512 8100 -11.759 V -5.879 V -2.940 V -1.470 V range<br />
-32513 80FF<br />
Underflow<br />
-32768 8000 -11.851 V -5.926 V -2.963 V -1.481 V<br />
A.7.7 Measurement ranges of the analog inputs for current<br />
Table A- 135 Analog input representation for current<br />
System Current measuring range<br />
Decimal Hexidecimal 0 mA to 20 mA 4 mA to 20 mA<br />
32767 7FFF 23.70 mA 22.96 mA<br />
Overflow<br />
32512 7F00<br />
32511 7EFF 23.52 mA 22.81 mA<br />
Overshoot range<br />
27649 6C01<br />
27648 6C00 20 mA 20 mA<br />
Nominal range<br />
20736 5100 15 mA 16 mA<br />
1 1 723.4 nA 4 mA + 578.7 nA<br />
0 0 0 mA 4 mA<br />
-1 FFFF<br />
Undershoot range<br />
-4864 ED00 -3.52 mA 1.185 mA<br />
-4865 ECFF<br />
Underflow<br />
-32768 8000<br />
Overflow<br />
Overshoot<br />
range<br />
Rated<br />
range<br />
<strong>S7</strong>-<strong>1200</strong> <strong>Programmable</strong> <strong>controller</strong><br />
770 System Manual, 04/2012, A5E02486680-06
Technical specifications<br />
A.7 Analog signal modules (SMs)<br />
A.7.8 Output (AQ) measurement ranges for voltage and current (SB and SM)<br />
Table A- 136 Analog output representation for voltage<br />
System Voltage Output Range<br />
Decimal Hexadecimal ± 10 V<br />
32767 7FFF See note 1<br />
Overflow<br />
32512 7F00 See note 1<br />
32511 7EFF 11.76 V<br />
Overshoot range<br />
27649 6C01<br />
27648 6C00 10 V<br />
Rated range<br />
20736 5100 7.5 V<br />
1 1 361.7 μ V<br />
0 0 0 V<br />
-1 FFFF -361.7 μ V<br />
-20736 AF00 -7.5 V<br />
-27648 9400 -10 V<br />
-27649 93FF<br />
Undershoot range<br />
-32512 8100 -11.76 V<br />
-32513 80FF See note 1<br />
Underflow<br />
-32768 8000 See note 1<br />
1 In an overflow or underflow condition, analog outputs will behave according to the device configuration properties set for<br />
the analog signal module. In the "Reaction to CPU STOP" parameter, select either: Use substitute value or Keep last<br />
value.<br />
Table A- 137 Analog output representation for current<br />
System Current Output Range<br />
Decimal Hexadecimal 0 mA to 20 mA<br />
32767 7FFF See note 1<br />
Overflow<br />
32512 7F00 See note 1<br />
32511 7EFF 23.52 mA<br />
Overshoot range<br />
27649 6C01<br />
27648 6C00 20 mA<br />
Rated range<br />
20736 5100 15 mA<br />
1 1 723.4 nA<br />
0 0 0 mA<br />
1 In an overflow or underflow condition, analog outputs will behave according to the device configuration properties set for<br />
the analog signal module. In the "Reaction to CPU STOP" parameter, select either: Use substitute value or Keep last<br />
value.<br />
<strong>S7</strong>-<strong>1200</strong> <strong>Programmable</strong> <strong>controller</strong><br />
System Manual, 04/2012, A5E02486680-06 771
Technical specifications<br />
A.8 Thermocouple and RTD signal modules (SMs)<br />
A.8 Thermocouple and RTD signal modules (SMs)<br />
A.8.1 SM 1231 Thermocouple<br />
Table A- 138 General specifications<br />
Model SM 1231 AI 4 x 16 bit TC SM 1231 AI 8 x 16 bit TC<br />
Order number 6E<strong>S7</strong> 231-5QD30-0XB0 6E<strong>S7</strong> 231-5QF30-0XB0<br />
Dimensions W x H x D (mm) 45 x 100 x 75 45 x 100 x 75<br />
Weight 180 grams 190 grams<br />
Power dissipation 1.5 W 1.5 W<br />
Current consumption (SM Bus) 80 mA 80 mA<br />
Current consumption (24 VDC) 1 40 mA 40 mA<br />
1 20.4 to 28.8 VDC (Class 2, Limited Power, or sensor power from PLC)<br />
Table A- 139 Analog inputs<br />
Model SM 1231 AI 4 x 16 bit TC SM 1231 AI 8 x 16 bit TC<br />
Number of inputs 4 8<br />
Range<br />
See Thermocouple selection table See Thermocouple selection table<br />
Nominal range (data word)<br />
Overrange/underrange (data word)<br />
Overflow/underflow (data word)<br />
(Page 776).<br />
(Page 776).<br />
Resolution Temperature 0.1° C/0.1° F 0.1° C/0.1° F<br />
Voltage 15 bits plus sign 15 bits plus sign<br />
Maximum withstand voltage ± 35 V ± 35 V<br />
Noise rejection 85 dB for selected filter setting<br />
85 dB for selected filter setting<br />
(10 Hz, 50 Hz, 60 Hz or 400 Hz) (10 Hz, 50 Hz, 60 Hz or 400 Hz)<br />
Common mode rejection > 120 dB at 120 VAC > 120 dB at 120 VAC<br />
Impedance ≥ 10 MΩ ≥ 10 MΩ<br />
Isolation Field to logic 500 VAC 500 VAC<br />
Field to 24 VDC 500 VAC 500 VAC<br />
24 VDC to logic 500 VAC 500 VAC<br />
Channel to channel 120 VAC 120 VAC<br />
Accuracy See Thermocouple selection table See Thermocouple selection table<br />
(Page 776).<br />
(Page 776).<br />
Repeatability ±0.05% FS ±0.05% FS<br />
Measuring principle Integrating Integrating<br />
Module update time See Noise reduction selection table See Noise reduction selection table<br />
(Page 776).<br />
(Page 776).<br />
Cold junction error ±1.5°C ±1.5°C<br />
<strong>S7</strong>-<strong>1200</strong> <strong>Programmable</strong> <strong>controller</strong><br />
772 System Manual, 04/2012, A5E02486680-06
Technical specifications<br />
A.8 Thermocouple and RTD signal modules (SMs)<br />
Model SM 1231 AI 4 x 16 bit TC SM 1231 AI 8 x 16 bit TC<br />
Cable length (meters) 100 meters to sensor max. 100 meters to sensor max.<br />
Wire resistance 100 Ω max. 100 Ω max.<br />
Table A- 140 Diagnostics<br />
Model SM 1231 AI 4 x 16 bit TC SM 1231 AI 8 x 16 bit TC<br />
Overflow/underflow 1 Yes Yes<br />
Wire break (current mode only) 2 Yes Yes<br />
24 VDC low voltage 1 Yes Yes<br />
1 The overflow, underflow and low voltage diagnostic alarm information will be reported in the analog data values even if<br />
the alarms are disabled in the module configuration.<br />
2 When wire break alarm is disabled and an open wire condition exists in the sensor wiring, the module may report<br />
random values.<br />
The SM 1231 Thermocouple (TC) analog signal module measures the value of voltage<br />
connected to the module inputs. The temperature measurement type can be either<br />
"Thermocouple" or "Voltage".<br />
● "Thermocouple": The value will be reported in degrees multiplied by ten (for example, 25.3<br />
degrees will be reported as decimal 253).<br />
● "Voltage": The nominal range full scale value will be decimal 27648.<br />
<strong>S7</strong>-<strong>1200</strong> <strong>Programmable</strong> <strong>controller</strong><br />
System Manual, 04/2012, A5E02486680-06 773
Technical specifications<br />
A.8 Thermocouple and RTD signal modules (SMs)<br />
Table A- 141 Wiring diagrams for the thermocouple SMs<br />
SM 1231 AI 4 x TC 16 bit (6E<strong>S7</strong> 231-5QD30-0XB0) SM 1231 AI 8 x TC bit (6E<strong>S7</strong> 231-5QF30-0XB0)<br />
X10<br />
X11<br />
Note: Connectors must be gold. See Appendix C, Spare Parts for order number.<br />
① TC 2, 3, 4, and 5 not shown connected for clarity.<br />
Table A- 142 Connector pin locations for SM 1231 AI 4 x TC 16 bit (6E<strong>S7</strong> 231-5QD30-0XB0)<br />
Pin X10 (gold) X11 (gold)<br />
1 L+ / 24VDC No connection<br />
2 M / 24VDC No connection<br />
3 GND No connection<br />
4 AI 0+ /TC AI 2+ /TC<br />
5 AI 0- /TC AI 2- /TC<br />
6 AI 1+ /TC AI 3+ /TC<br />
7 AI 1- /TC AI 3- /TC<br />
Table A- 143 Connector Pin Locations for SM 1231 AI 8 x TC bit (6E<strong>S7</strong> 231-5QF30-0XB0)<br />
Pin X10 (gold) X11 (gold) X12 (gold) X13 (gold)<br />
1 L+ / 24VDC No connection No connection No connection<br />
2 M / 24VDC No connection No connection No connection<br />
3 GND No connection No connection No connection<br />
4 AI 0+ /TC AI 2+ /TC AI 4 I- /TC AI 6 I- /TC<br />
5 AI 0- /TC AI 2- /TC AI 4 I+ /TC AI 6 I+ /TC<br />
<strong>S7</strong>-<strong>1200</strong> <strong>Programmable</strong> <strong>controller</strong><br />
774 System Manual, 04/2012, A5E02486680-06<br />
X10<br />
X11<br />
X12<br />
X13
Technical specifications<br />
A.8 Thermocouple and RTD signal modules (SMs)<br />
Pin X10 (gold) X11 (gold) X12 (gold) X13 (gold)<br />
6 AI 1+ /TC AI 3+ /TC AI 5 M- /TC AI 7 M- /TC<br />
7 AI 1- /TC AI 3- /TC AI 5 M+ /TC AI 7 M+ /TC<br />
Note<br />
Unused analog inputs should be shorted.<br />
The thermocouple unused channels can be deactivated. No error will occur if an unused<br />
channel is deactivated.<br />
A.8.1.1 Basic operation for a thermocouple<br />
Thermocouples are formed whenever two dissimilar metals are electrically bonded to each<br />
other. A voltage is generated that is proportional to the junction temperature. This voltage is<br />
small; one microvolt could represent many degrees. Measuring the voltage from a<br />
thermocouple, compensating for extra junctions, and then linearizing the result forms the<br />
basis of temperature measurement using thermocouples.<br />
When you connect a thermocouple to the SM 1231 Thermocouple module, the two dissimilar<br />
metal wires are attached to the module at the module signal connector. The place where the<br />
two dissimilar wires are attached to each other forms the sensor thermocouple.<br />
Two more thermocouples are formed where the two dissimilar wires are attached to the<br />
signal connector. The connector temperature causes a voltage that adds to the voltage from<br />
the sensor thermocouple. If this voltage is not corrected, then the temperature reported will<br />
deviate from the sensor temperature.<br />
Cold junction compensation is used to compensate for the connector thermocouple.<br />
Thermocouple tables are based on a reference junction temperature, usually zero degrees<br />
Celsius. The cold junction compensation compensates the connector to zero degrees<br />
Celsius. The cold junction compensation restores the voltage added by the connector<br />
thermocouples. The temperature of the module is measured internally, then converted to a<br />
value to be added to the sensor conversion. The corrected sensor conversion is then<br />
linearized using the thermocouple tables.<br />
For optimum operation of the cold junction compensation, the thermocouple module must be<br />
located in a thermally stable environment. Slow variation (less than 0.1° C/minute) in<br />
ambient module temperature is correctly compensated within the module specifications. Air<br />
movement across the module will also cause cold junction compensation errors.<br />
If better cold junction error compensation is needed, an external iso-thermal terminal block<br />
may be used. The thermocouple module provides for use of a 0° C referenced or 50° C<br />
referenced terminal block.<br />
<strong>S7</strong>-<strong>1200</strong> <strong>Programmable</strong> <strong>controller</strong><br />
System Manual, 04/2012, A5E02486680-06 775
Technical specifications<br />
A.8 Thermocouple and RTD signal modules (SMs)<br />
A.8.1.2 Selection tables for the SM 1231 thermocouple<br />
The ranges and accuracy for the different thermocouple types supported by the SM 1231<br />
Thermocouple signal module are shown in the table below.<br />
Table A- 144 SM 1231 Thermocouple selection table<br />
Type Under-range<br />
minimum1 Nominal range Nominal range Over-range<br />
low limit high limit maximum2 Normal range 3, 4 Normal range<br />
accuracy @ 25°C accuracy -20°C<br />
to 60°C<br />
J -210.0°C -150.0°C <strong>1200</strong>.0°C 1450.0°C ±0.3°C ±0.6°C<br />
K -270.0°C -200.0°C 1372.0°C 1622.0°C ±0.4°C ±1.0°C<br />
T -270.0°C -200.0°C 400.0°C 540.0°C ±0.5°C ±1.0°C<br />
E -270.0°C -200.0°C 1000.0°C <strong>1200</strong>.0°C ±0.3°C ±0.6°C<br />
R & S -50.0°C 100.0°C 1768.0°C 2019.0°C ±1.0°C ±2.5°C<br />
N -270.0°C -200.0°C 1300.0°C 1550.0°C ±1.0°C ±1.6°C<br />
C 0.0°C 100.0°C 2315.0°C 2500.0°C ±0.7°C ±2.7°C<br />
TXK/XK(L) -200.0°C -150.0°C 800.0°C 1050.0°C ±0.6°C ±1.2°C<br />
Voltage -32512 -27648<br />
27648<br />
32511 ±0.05% ±0.1%<br />
-80mV<br />
80mV<br />
1 Thermocouple values below the under-range minimum value are reported as -32768.<br />
2 Thermocouple values above the over-range minimum value are reported as 32767.<br />
3 Internal cold junction error is ±1.5°C for all ranges. This adds to the error in this table. The module requires at least 30<br />
minutes of warmup time to meet this specification.<br />
4 In the presence of radiated radio frequency of 970 MHz to 990 MHz, the accuracy of the SM 1231 AI 4 x 16 bit TC may<br />
be degraded.<br />
Table A- 145 Noise reduction and update times for the SM 1231 Thermocouple<br />
Rejection frequency selection Integration time 4 Channel module update<br />
time (seconds)<br />
<strong>S7</strong>-<strong>1200</strong> <strong>Programmable</strong> <strong>controller</strong><br />
776 System Manual, 04/2012, A5E02486680-06<br />
1, 2<br />
8 Channel module update<br />
time (seconds)<br />
400 Hz (2.5 ms) 10 ms 1 0.143 0.285<br />
60 Hz (16.6 ms) 16.67 ms 0.223 0.445<br />
50 Hz (20 ms) 20 ms 0.263 0.525<br />
10 Hz (100 ms) 100 ms 1.225 2.450<br />
1 To maintain module resolution and accuracy when 400 Hz rejection is selected, the integration time is 10 ms. This<br />
selection also rejects 100 Hz and 200 Hz noise.
Technical specifications<br />
A.8 Thermocouple and RTD signal modules (SMs)<br />
It is recommended for measuring thermocouples that a 100 ms integration time be used. The<br />
use of smaller integration times will increase the repeatability error of the temperature<br />
readings.<br />
Note<br />
After power is applied, the module performs internal calibration for the analog-to-digital<br />
converter. During this time the module reports a value of 32767 on each channel until valid<br />
data is available on that channel. Your user program may need to allow for this initialization<br />
time. Because the configuration of the module can vary the length of the initialization time,<br />
you should verify the behavior of the module in your configuration. If required, you can<br />
include logic in your user program to accommodate the initialization time of the module.<br />
Representation of analog values for Thermocouple Type J<br />
A representation of the analog values of thermocouples type J is shown in the table below.<br />
Table A- 146 Representation of analog values of thermocouples type J<br />
Type J in °C<br />
Units Type J in °F<br />
Units<br />
Decimal Hexadecimal<br />
Decimal Hexadecimal Range<br />
> 1450.0 32767 7FFF > 2642.0 32767 7FFF Overflow<br />
1450.0 14500 38A4<br />
2642.0 26420 6734<br />
Overrange<br />
:<br />
:<br />
:<br />
:<br />
:<br />
:<br />
<strong>1200</strong>.1 <strong>1200</strong>1 2EE1 2192.2 21922 55A2<br />
<strong>1200</strong>.0 <strong>1200</strong>0 2EE0 2192.0 21920 55A0 Rated range<br />
:<br />
:<br />
:<br />
:<br />
:<br />
:<br />
-150.0 -1500 FA24<br />
-238.0 -2380 F6B4<br />
< -150.0 -32768 8000 < -238.0 -32768 8000 Underflow1 1 Faulty wiring (for example, polarity reversal, or open inputs) or sensor error in the negative<br />
range (for example, wrong type of thermocouple) may cause the thermocouple module to<br />
signal underflow.<br />
<strong>S7</strong>-<strong>1200</strong> <strong>Programmable</strong> <strong>controller</strong><br />
System Manual, 04/2012, A5E02486680-06 777
Technical specifications<br />
A.8 Thermocouple and RTD signal modules (SMs)<br />
A.8.2 SM 1231 RTD<br />
SM 1231 RTD specifications<br />
Table A- 147 General specifications<br />
Technical data SM 1231 AI 4 x RTD x 16 bit SM 1231 AI 8 x RTD x 16 bit<br />
Order number 6E<strong>S7</strong> 231-5PD30-0XB0 6E<strong>S7</strong> 231-5PF30-0XB0<br />
Dimensions W x H x D (mm) 45 x 100 x 75 70 x 100 x 75<br />
Weight 220 grams 270 grams<br />
Power dissipation 1.5 W 1.5 W<br />
Current consumption (SM Bus) 80 mA 90 mA<br />
Current consumption (24 VDC) 1 40 mA 40 mA<br />
1 20.4 to 28.8 VDC (Class 2, Limited Power, or sensor power from CPU)<br />
Table A- 148 Analog inputs<br />
Technical data SM 1231 AI 4 x RTD x 16 bit SM 1231 AI 8 x RTD x16 bit<br />
Number of inputs 4 8<br />
Type Module referenced RTD and Ω Module referenced RTD and Ω<br />
Range<br />
See RTD Sensor selection table See RTD Sensor selection table<br />
Nominal range (data word)<br />
Overshoot/undershoot range<br />
(data word)<br />
Overflow/underflow (data word)<br />
(Page 781).<br />
(Page 781).<br />
Resolution Temperature 0.1° C/0.1° F 0.1° C/0.1° F<br />
Resistance 15 bits plus sign 15 bits plus sign<br />
Maximum withstand voltage ± 35 V ± 35 V<br />
Noise rejection 85 dB for the selected noise reduction 85 dB for the selected noise reduction<br />
(10 Hz, 50 Hz, 60 Hz or 400 Hz) (10 Hz, 50 Hz, 60 Hz or 400 Hz)<br />
Common mode rejection > 120dB > 120dB<br />
Impedance ≥ 10 MΩ ≥ 10 MΩ<br />
Isolation Field side to logic 500 VAC 500 VAC<br />
Field to 24 VDC 500 VAC 500 VAC<br />
24 VDC to logic 500 VAC 500 VAC<br />
Channel to channel isolation none none<br />
Accuracy See RTD Sensor selection table See RTD Sensor selection table<br />
(Page 781).<br />
(Page 781).<br />
Repeatability ±0.05% FS ±0.05% FS<br />
Maximum sensor dissipation 0.5m W 0.5m W<br />
Measuring principle Integrating Integrating<br />
Module update time See Noise reduction selection table See Noise reduction selection table<br />
(Page 781).<br />
(Page 781).<br />
<strong>S7</strong>-<strong>1200</strong> <strong>Programmable</strong> <strong>controller</strong><br />
778 System Manual, 04/2012, A5E02486680-06
Technical specifications<br />
A.8 Thermocouple and RTD signal modules (SMs)<br />
Technical data SM 1231 AI 4 x RTD x 16 bit SM 1231 AI 8 x RTD x16 bit<br />
Cable length (meters) 100 meters to sensor max. 100 meters to sensor max.<br />
Wire resistance 20 Ω, 2.7 Ω for 10 Ω RTD max. 20 Ω, 2.7 Ω for 10 Ω RTD max.<br />
Table A- 149 Diagnostics<br />
Technical data SM 1231 AI 4 x RTD x 16 bit SM 1231 AI 8 x RTD x16 bit<br />
Overflow/underflow 1,2 Yes Yes<br />
Wire break 3 Yes Yes<br />
24 VDC low voltage 1 Yes Yes<br />
1 The overflow, underflow and low voltage diagnostic alarm information will be reported in the analog data values even if<br />
the alarms are disabled in the module configuration.<br />
2 For resistance ranges underflow detection is never enabled.<br />
3 When wire break alarm is disabled and an open wire condition exists in the sensor wiring, the module may report<br />
random values.<br />
The SM 1231 RTD analog signal module measures the value of resistance connected to the<br />
module inputs. The measurement type can be selected as either "Resistor" or "Thermal<br />
resistor".<br />
● "Resistor": The nominal range full scale value will be decimal 27648.<br />
● "Thermal resistor": The value will be reported in degrees multiplied by ten (for example,<br />
25.3 degrees will be reported as decimal 253).<br />
The SM 1231 RTD module supports measurements with 2-wire, 3-wire and 4-wire<br />
connections to the sensor resistor.<br />
<strong>S7</strong>-<strong>1200</strong> <strong>Programmable</strong> <strong>controller</strong><br />
System Manual, 04/2012, A5E02486680-06 779
Technical specifications<br />
A.8 Thermocouple and RTD signal modules (SMs)<br />
Table A- 150 Wiring diagrams for the RTD SMs<br />
SM 1231 RTD 4 x 16 bit (6E<strong>S7</strong> 231-5PD30-0XB0) SM 1231 RTD 8 x 16 bit (6E<strong>S7</strong> 231-5PF30-0XB0)<br />
X10<br />
X11<br />
X12<br />
X13<br />
① Loop-back unused RTD inputs<br />
② 2-wire RTD ③ 3-wire RTD ④ 4-wire RTD<br />
NOTE: Note: Connectors must be gold. See Appendix C, Spare Parts for order number.<br />
Table A- 151 Connector Pin Locations for SM 1231 RTD 4 x 16 bit (6E<strong>S7</strong> 231-5PD30-0XB0)<br />
Pin X10 (gold) X11 (gold) X12 (gold) X13 (gold)<br />
1 L+ / 24VDC No connection No connection No connection<br />
2 M / 24VDC No connection No connection No connection<br />
3 GND No connection No connection No connection<br />
4 AI 0 M+ /RTD AI 1 M+ /RTD AI 2 M+ /RTD AI 3 M+ /RTD<br />
5 AI 0 M- /RTD AI 1 M- /RTD AI 2 M- /RTD AI 3 M- /RTD<br />
6 AI 0 I+ /RTD AI 1 I+ /RTD AI 2 I+ /RTD AI 3 I+ /RTD<br />
7 AI 0 I- /RTD AI 1 I- /RTD AI 2 I- /RTD AI 3 I- /RTD<br />
Table A- 152 Connector Pin Locations for SM 1231 RTD 8 x 16 bit (6E<strong>S7</strong> 231-5PF30-0XB0)<br />
Pin X10 (gold) X11 (gold) X12 (gold) X13 (gold)<br />
1 L+ / 24VDC No connection No connection No connection<br />
2 M / 24VDC No connection No connection No connection<br />
3 GND No connection No connection No connection<br />
4 AI 0 M+ /RTD AI 2 M+ /RTD AI 4 M+ /RTD AI 6 M+ /RTD<br />
5 AI 0 M- /RTD AI 2 M- /RTD AI 4 M- /RTD AI 6 M- /RTD<br />
6 AI 0 I+ /RTD AI 2 I+ /RTD AI 4 I+ /RTD AI 6 I+ /RTD<br />
<strong>S7</strong>-<strong>1200</strong> <strong>Programmable</strong> <strong>controller</strong><br />
780 System Manual, 04/2012, A5E02486680-06<br />
X10<br />
X11<br />
X12<br />
X13
Technical specifications<br />
A.8 Thermocouple and RTD signal modules (SMs)<br />
Pin X10 (gold) X11 (gold) X12 (gold) X13 (gold)<br />
7 AI 0 I- /RTD AI 2 I- /RTD AI 4 I- /RTD AI 6 I- /RTD<br />
8 AI 1 M+ /RTD AI 3 M+ /RTD AI 5 M+ /RTD A7 M+ /RTD<br />
9 AI 1 M- /RTD AI 3 M- /RTD AI 5 M- /RTD AI 7 M- /RTD<br />
10 AI 1 I+ /RTD AI 3 I+ /RTD AI 5 I+ /RTD AI 7 I+ /RTD<br />
11 AI 1 I- /RTD AI 3 I- /RTD AI 5 I- /RTD AI 7 I- /RTD<br />
Note<br />
The RTD unused channels can be deactivated. No error will occur if an unused channel is<br />
deactivated.<br />
The RTD module needs to have the current loop continuous to eliminate extra stabilization<br />
time which is automatically added to an unused channel that is not deactivated. For<br />
consistency the RTD module should have a resistor connected (like the 2-wire RTD<br />
connection).<br />
A.8.2.1 Selection tables for the SM 1231 RTD<br />
Table A- 153 Ranges and accuracy for the different sensors supported by the RTD modules<br />
Temperature<br />
coefficient<br />
Pt 0.003850<br />
ITS90<br />
DIN EN 60751<br />
Pt 0.003902<br />
Pt 0.003916<br />
Pt 0.003920<br />
Pt 0.003910<br />
Ni 0.006720<br />
Ni 0.006180<br />
RTD type Under range<br />
minimum 1<br />
Nominal<br />
range low limit<br />
Nominal<br />
range high<br />
limit<br />
Over range<br />
maximum 2<br />
Normal<br />
range<br />
accuracy<br />
@ 25°C<br />
Normal<br />
range<br />
accuracy<br />
-20°C to<br />
60°C<br />
Pt 10 -243.0°C -200.0°C 850.0°C 1000.0°C ±1.0°C ±2.0°C<br />
Pt 50<br />
Pt 100<br />
Pt 200<br />
Pt 500<br />
Pt 1000<br />
-243.0°C -200.0°C 850.0°C 1000.0°C ±0.5°C ±1.0°C<br />
Pt 100 -243.0°C -200.0°C 850.0°C 1000.0°C ± 0.5°C ±1.0°C<br />
Pt 200<br />
Pt 500<br />
Pt 1000<br />
-243.0°C -200.0°C 850.0°C 1000.0°C ± 0.5°C ±1.0°C<br />
Pt 10 -273.2°C -240.0°C 1100.0°C 1295°C ±1.0°C ±2.0°C<br />
Pt 50<br />
Pt 100<br />
Pt 500<br />
-273.2°C -240.0°C 1100.0°C 1295°C ±0.8°C ±1.6°C<br />
Ni 100<br />
Ni 120<br />
Ni 200<br />
Ni 500<br />
-105.0°C -60.0°C 250.0°C 295.0°C ±0.5°C ±1.0°C<br />
<strong>S7</strong>-<strong>1200</strong> <strong>Programmable</strong> <strong>controller</strong><br />
System Manual, 04/2012, A5E02486680-06 781
Technical specifications<br />
A.8 Thermocouple and RTD signal modules (SMs)<br />
Temperature<br />
coefficient<br />
RTD type Under range<br />
minimum 1<br />
Nominal<br />
range low limit<br />
Nominal<br />
range high<br />
limit<br />
Over range<br />
maximum 2<br />
Normal<br />
range<br />
accuracy<br />
@ 25°C<br />
Normal<br />
range<br />
accuracy<br />
-20°C to<br />
60°C<br />
LG-Ni 0.005000<br />
Ni 1000<br />
LG-Ni 1000 -105.0°C -60.0°C 250.0°C 295.0°C ±0.5°C ±1.0°C<br />
Ni 0.006170 Ni 100 -105.0°C -60.0°C 180.0°C 212.4°C ±0.5°C ±1.0°C<br />
Cu 0.004270 Cu 10 -240.0°C -200.0°C 260.0°C 312.0°C ±1.0°C ±2.0°C<br />
Cu 0.004260 Cu 10 -60.0°C -50.0°C 200.0°C 240.0°C ±1.0°C ±2.0°C<br />
Cu 50<br />
Cu 100<br />
-60.0°C -50.0°C 200.0°C 240.0°C ±0.6°C ±1.2°C<br />
Cu 0.004280 Cu 10 -240.0°C -200.0°C 200.0°C 240.0°C ±1.0°C ±2.0°C<br />
Cu 50<br />
Cu 100<br />
-240.0°C -200.0°C 200.0°C 240.0°C ±0.7°C ±1.4°C<br />
1 RTD values below the under-range minimum value report -32768.<br />
2 RTD values above the over-range maximum value report +32767.<br />
Table A- 154 Resistance<br />
Range Under range<br />
minimum<br />
Nominal range<br />
low limit<br />
Nominal range<br />
high limit<br />
Over range<br />
maximum 1<br />
Normal range<br />
accuracy<br />
@ 25°C<br />
150 Ω n/a 0 (0 Ω) 27648 (150 Ω) 176.383 Ω ±0.05% ±0.1%<br />
300 Ω n/a 0 (0 Ω) 27648 (300 Ω) 352.767 Ω ±0.05% ±0.1%<br />
600 Ω n/a 0 (0 Ω) 27648 (600 Ω) 705.534 Ω ±0.05% ±0.1%<br />
1 Resistance values above the over-range minimum value are reported as +32767.<br />
Normal range<br />
accuracy<br />
-20°C to 60°C<br />
Note<br />
The module reports 32767 on any activated channel with no sensor connected. If open wire<br />
detection is also enabled, the module flashes the appropriate red LEDs.<br />
When 500 Ω and 1000 Ω RTD ranges are used with other lower value resistors, the error<br />
may increase to two times the specified error.<br />
Best accuracy will be achieved for the 10 Ω RTD ranges if 4 wire connections are used.<br />
The resistance of the connection wires in 2 wire mode will cause an error in the sensor<br />
reading and therefore accuracy is not guaranteed.<br />
<strong>S7</strong>-<strong>1200</strong> <strong>Programmable</strong> <strong>controller</strong><br />
782 System Manual, 04/2012, A5E02486680-06
Table A- 155 Noise reduction and update times for the RTD modules<br />
Technical specifications<br />
A.8 Thermocouple and RTD signal modules (SMs)<br />
Rejection frequency Integration time<br />
Update time (seconds)<br />
selection<br />
4-channel module 8-channel module<br />
400 Hz (2.5 ms) 10 ms 1 4-/2-wire: 0.142<br />
4-/2-wire: 0.285<br />
3-wire: 0.285<br />
3-wire: 0.525<br />
60 Hz (16.6 ms) 16.67 ms 4-/2-wire: 0.222<br />
4-/2-wire: 0.445<br />
3-wire: 0.445<br />
3-wire: 0.845<br />
50 Hz (20 ms) 20 ms 4-/2-wire: 0.262<br />
4-/2-wire: 0.524<br />
3-wire: .505<br />
3-wire: 1.015<br />
10 Hz (100 ms) 100 ms 4-/2-wire: 1.222<br />
4-/2-wire: 2.425<br />
3-wire: 2.445<br />
3-wire: 4.845<br />
1 To maintain module resolution and accuracy when the 400 Hz filter is selected, the integration time is 10 ms. This<br />
selection also rejects 100 Hz and 200 Hz noise.<br />
NOTICE<br />
After power is applied, the module performs internal calibration for the analog-to-digital<br />
converter. During this time the module reports a value of 32767 on each channel until valid<br />
data is available on that channel. Your user program may need to allow for this initialization<br />
time. Because the configuration of the module can vary the length of the initialization time,<br />
you should verify the behavior or the module in your configuration. If required, you can<br />
include logic in your user program to accommodate the initialization time of the module.<br />
Representation of Analog values for RTDs<br />
A representation of the digitized measured value for the RTD standard temperature range<br />
sensors are shown in the tables below.<br />
Table A- 156 Representation of analog values for resistance thermometers PT 100, 200, 500, 1000<br />
and PT 10, 50, 100, 500 GOST (0.003850) standard<br />
Pt x00<br />
Units Pt x00<br />
Units<br />
standard in<br />
standard in<br />
°C (1 digit =<br />
0.1° C)<br />
Decimal Hexadecimal<br />
°F (1 digit =<br />
0.1 F)<br />
Decimal Hexadecimal Range<br />
> 1000.0 32767 7FFF > 1832.0 32767 7FFF Overflow<br />
1000.0 10000 2710<br />
1832.0 18320 4790<br />
Overrange<br />
:<br />
:<br />
:<br />
:<br />
:<br />
:<br />
850.1 8501 2135<br />
1562.1 15621 3D05<br />
850.0 8500 2134<br />
1562.0 15620 3D04 Rated range<br />
:<br />
:<br />
:<br />
:<br />
:<br />
:<br />
-200.0 -2000 F830<br />
-328.0 -3280 F330<br />
<strong>S7</strong>-<strong>1200</strong> <strong>Programmable</strong> <strong>controller</strong><br />
System Manual, 04/2012, A5E02486680-06 783
Technical specifications<br />
A.9 Digital signal boards (SBs)<br />
Pt x00<br />
Units Pt x00<br />
Units<br />
standard in<br />
standard in<br />
°C (1 digit =<br />
0.1° C)<br />
Decimal Hexadecimal<br />
°F (1 digit =<br />
0.1 F)<br />
Decimal Hexadecimal Range<br />
-200.1 -2001 F82F<br />
-328.1 -3281 F32F Underrange<br />
:<br />
:<br />
:<br />
:<br />
:<br />
:<br />
-243.0 -2430 F682<br />
-405.4 -4054 F02A<br />
< -243.0 -32768 8000 < -405.4 -32768 8000 Underflow<br />
A.9 Digital signal boards (SBs)<br />
A.9.1 SB 1221 200 kHz digital input specifications<br />
Table A- 157 General specifications<br />
Technical data SB 1221 DI 4 x 24 VDC, 200 kHz SB 1221 DI 4 x 5 VDC, 200 kHz<br />
Order number 6E<strong>S7</strong> 221-3BD30-0XB0 6E<strong>S7</strong> 221-3AD30-0XB0<br />
Dimensions W x H x D (mm) 38 x 62 x 21 38 x 62 x 21<br />
Weight 35 grams 35 grams<br />
Power dissipation 1.5 W 1.0 W<br />
Current consumption (SM Bus) 40 mA 40 mA<br />
Current consumption (24 VDC) 7 mA / input + 20 mA 15 mA / input + 15 mA<br />
Table A- 158 Digital inputs<br />
Technical data SB 1221 DI 4 x 24 VDC, 200 kHz SB 1221 DI 4 x 5 VDC, 200 kHz<br />
Number of inputs 4 4<br />
Type Source Source<br />
Rated voltage 24 VDC at 7 mA, nominal 5 VDC at 15 mA, nominal<br />
Continuous permissible voltage 28.8 VDC 6 VDC<br />
Surge voltage 35 VDC for 0.5 sec. 6 V<br />
Logic 1 signal (min.) L+ minus 10 VDC at 2.9 mA L+ minus 2.0 VDC at 5.1 mA<br />
Logic 0 signal (max.) L+ minus 5 VDC at 1.4 mA L+ minus 1.0 VDC at 2.2 mA<br />
HSC clock input rates (max.) Single phase: 200 kHz<br />
Single phase: 200 kHz<br />
Quadrature phase: 160 kHz<br />
Quadrature phase: 160 kHz<br />
Isolation (field side to logic) 500 VAC for 1 minute 500 VAC for 1 minute<br />
Isolation groups 1 1<br />
Filter times 0.2, 0.4, 0.8, 1.6, 3.2, 6.4, and 12.8 ms; 0.2, 0.4, 0.8, 1.6, 3.2, 6.4, and 12.8 ms;<br />
Selectable in groups of 4<br />
Selectable in groups of 4<br />
<strong>S7</strong>-<strong>1200</strong> <strong>Programmable</strong> <strong>controller</strong><br />
784 System Manual, 04/2012, A5E02486680-06
Technical specifications<br />
A.9 Digital signal boards (SBs)<br />
Technical data SB 1221 DI 4 x 24 VDC, 200 kHz SB 1221 DI 4 x 5 VDC, 200 kHz<br />
Number of inputs on simultaneously 2 (no adjacent points) at 60° C<br />
horizontal or 50° C vertical<br />
4<br />
4 at 55° C horizontal or 45° C<br />
vertical<br />
Cable length (meters) 50 shielded twisted pair 50 shielded twisted pair<br />
NOTICE<br />
When switching frequencies above 20 kHz, it is important that the digital inputs receive a<br />
square wave. Consider the following options to improve the signal quality to the inputs:<br />
Minimize the cable length<br />
Change a driver from a sink only driver to a sinking and sourcing driver<br />
Change to a higher quality cable<br />
Reduce the circuit/components from 24 V to 5 V<br />
Add an external load at the input<br />
Table A- 159 Wiring diagrams for the 200 kHz digital input SBs<br />
SB 1221 DI 4 x 24 VDC, 200 kHz<br />
(6E<strong>S7</strong> 221-3BD30-0XB0)<br />
① Supports sourcing inputs only<br />
X19<br />
SB 1221 DI 4 x 5 VDC, 200 kHz<br />
(6E<strong>S7</strong> 221-3AD30-0XB0)<br />
<strong>S7</strong>-<strong>1200</strong> <strong>Programmable</strong> <strong>controller</strong><br />
System Manual, 04/2012, A5E02486680-06 785<br />
X19
Technical specifications<br />
A.9 Digital signal boards (SBs)<br />
Table A- 160 Connector pin locations for SB 1221 DI 4 x 24 VDC, 200 kHz (6E<strong>S7</strong> 221-3BD30-0XB0)<br />
Pin X19<br />
1 L+ / 24VDC<br />
2 M / 24VDC<br />
3 DI e.0<br />
4 DI e.1<br />
5 DI e.2<br />
6 DI e.3<br />
Table A- 161 Connector pin locations for SB 1221 DI 4 x 5 VDC, 200 kHz (6E<strong>S7</strong> 221-3AD30-0XB0)<br />
Pin X19<br />
1 L+ / 5VDC<br />
2 M / 5VDC<br />
3 DI e.0<br />
4 DI e.1<br />
5 DI e.2<br />
6 DI e.3<br />
A.9.2 SB 1222 200 kHz digital output specifications<br />
Table A- 162 General specifications<br />
Technical data SB 1222 DQ 4 x 24 VDC, 200 kHz SB 1222 DQ 4 x 5 VDC, 200 kHz<br />
Order number 6E<strong>S7</strong> 222-1BD30-0XB0 6E<strong>S7</strong> 222-1AD30-0XB0<br />
Dimensions W x H x D (mm) 38 x 62 x 21 38 x 62 x 21<br />
Weight 35 grams 35 grams<br />
Power dissipation 0.5 W 0.5 W<br />
Current consumption (SM Bus) 35 mA 35 mA<br />
Current consumption (24 VDC) 15 mA 15 mA<br />
Table A- 163 Digital outputs<br />
Technical data SB 1222 DQ 4 x 24 VDC, 200 kHz SB 1222 DQ 4 x 5 VDC, 200 kHz<br />
Number of outputs 4 4<br />
Output type Solid state - MOSFET sink and source 1 Solid state - MOSFET sink and source 1<br />
Voltage range 20.4 to 28.8 VDC 4.25 to 6.0 VDC<br />
Logic 1 signal at max. current L+ minus 1.5 V L+ minus 0.7 V<br />
Logic 0 signal at max. current 1.0 VDC, max. 0.2 VDC, max.<br />
Current (max.) 0.1 A 0.1 A<br />
<strong>S7</strong>-<strong>1200</strong> <strong>Programmable</strong> <strong>controller</strong><br />
786 System Manual, 04/2012, A5E02486680-06
Technical specifications<br />
A.9 Digital signal boards (SBs)<br />
Technical data SB 1222 DQ 4 x 24 VDC, 200 kHz SB 1222 DQ 4 x 5 VDC, 200 kHz<br />
Lamp load -- --<br />
On state contact resistance 11 Ω max. 7 Ω max.<br />
Off state resistance 6 Ω max. 0.2 Ω max.<br />
Leakage current per point -- --<br />
Pulse Train Output rate 200 kHz max., 2 Hz min. 200 kHz max., 2 Hz min.<br />
Surge current 0.11 A 0.11 A<br />
Overload protection No No<br />
Isolation (field side to logic) 500 VAC for 1 minute 500 VAC for 1 minute<br />
Isolation groups 1 1<br />
Currents per common 0.4 A 0.4 A<br />
Inductive clamp voltage None None<br />
Switching delay 1.5 μs + 300 ns rise<br />
200 ns + 300 ns rise<br />
1.5 μs + 300 ns fall<br />
200 ns + 300 ns fall<br />
Behavior on RUN to STOP Last value or substitute value (default Last value or substitute value (default<br />
value 0)<br />
value 0)<br />
Number of outputs on simultaneously 2 (no adjacent points) at 60° C<br />
horizontal or 50° C vertical<br />
4<br />
4 at 55° C horizontal or 45° C<br />
vertical<br />
Cable length (meters) 50 shielded twisted pair 50 shielded twisted pair<br />
1 Because both sinking and sourcing configurations are supported by the same circuitry, the active state of a sourcing<br />
load is opposite that of a sinking load. A source output exhibits positive logic (Q bit and LED are ON when the load has<br />
current flow), while a sink output exhibits negative logic (Q bit and LED are OFF when the load has current flow). If the<br />
module is plugged in with no user program, the default for this module is 0 V, which means that a sinking load will be<br />
turned ON.<br />
NOTICE<br />
When switching frequencies above 20 kHz, it is important that the digital inputs receive a<br />
square wave. Consider the following options to improve the signal quality to the inputs:<br />
Minimize the cable length<br />
Change a driver from a sink only driver to a sinking and sourcing driver<br />
Change to a higher quality cable<br />
Reduce the circuit/components from 24 V to 5 V<br />
Add an external load at the input<br />
<strong>S7</strong>-<strong>1200</strong> <strong>Programmable</strong> <strong>controller</strong><br />
System Manual, 04/2012, A5E02486680-06 787
Technical specifications<br />
A.9 Digital signal boards (SBs)<br />
Table A- 164 Wiring diagrams for the 200 kHz digital output SBs<br />
SB 1222 DQ 4 x 24 VDC, 200 kHz<br />
(6E<strong>S7</strong> 222-1BD30-0XB0)<br />
X19<br />
SB 1222 DQ 4 x 5 VDC, 200 kHz<br />
(6E<strong>S7</strong> 222-1AD30-0XB0)<br />
① For sourcing outputs, connect "Load" to "-" (shown). For sinking outputs, connect "Load" to "+". Because both sinking<br />
and sourcing configurations are supported by the same circuitry, the active state of a sourcing load is opposite that of a<br />
sinking load. A source output exhibits positive logic (Q bit and LED are ON when the load has current flow), while a sink<br />
output exhibits negative logic (Q bit and LED are OFF when the load has current flow). If the module is plugged in with<br />
no user program, the default for this module is 0 V, which means that a sinking load will be turned ON.<br />
Table A- 165 Connector pin locations for SB 1222 DQ 4 x 24 VDC, 200 kHz (6E<strong>S7</strong> 222-1BD30-0XB0)<br />
Pin X19<br />
1 L+ / 24VDC<br />
2 M / 24VDC<br />
3 DQ e.0<br />
4 DQ e.1<br />
5 DQ e.2<br />
6 DQ e.3<br />
Table A- 166 Connector pin locations for SB 1222 DQ 4 x 5 VDC, 200 kHz (6E<strong>S7</strong> 222-1AD30-0XB0)<br />
Pin X19<br />
1 L+ / 5VDC<br />
2 M / 5VDC<br />
3 DQ e.0<br />
4 DQ e.1<br />
5 DQ e.2<br />
6 DQ e.3<br />
<strong>S7</strong>-<strong>1200</strong> <strong>Programmable</strong> <strong>controller</strong><br />
788 System Manual, 04/2012, A5E02486680-06<br />
X19
A.9.3 SB 1223 200 kHz digital input / output specifications<br />
Table A- 167 General specifications<br />
Technical data SB 1223 DI 2 x 24 VDC /<br />
DQ 2 x 24 VDC, 200 kHz<br />
Technical specifications<br />
A.9 Digital signal boards (SBs)<br />
SB 1223 DI 2 x 5 VDC /<br />
DQ 2 x 5 VDC, 200 kHz<br />
Order number 6E<strong>S7</strong> 223-3BD30-0XB0 6E<strong>S7</strong> 223-3AD30-0XB0<br />
Dimensions W x H x D (mm) 38 x 62 x 21 38 x 62 x 21<br />
Weight 35 grams 35 grams<br />
Power dissipation 1.0 W 0.5 W<br />
Current consumption (SM Bus) 35 mA 35 mA<br />
Current consumption (24 VDC) 7 mA / Input + 30 mA 15 mA / input + 15 mA<br />
Table A- 168 Digital inputs<br />
Technical data SB 1223 DI 2 x 24 VDC /<br />
DQ 2 x 24 VDC, 200 kHz<br />
SB 1223 DI 2 x 5 VDC /<br />
DQ 2 x 5 VDC, 200 kHz<br />
Number of inputs 2 2<br />
Type Source Source<br />
Rated voltage 24 VDC at 7 mA, nominal 5 VDC at 15 mA, nominal<br />
Continuous permissible voltage 28.8 VDC 6 VDC<br />
Surge voltage 35 VDC for 0.5 sec. 6 V<br />
Logic 1 signal (min.) L+ minus 10 VDC at 2.9 mA L+ minus 2.0 VDC at 5.1 mA<br />
Logic 0 signal (max.) L+ minus 5 VDC at 1.4 mA L+ minus 1.0 VDC at 2.2 mA<br />
HSC clock input rates (max.) Single phase: 200 kHz<br />
Single phase: 200 kHz<br />
Quadrature phase: 160 kHz<br />
Quadrature phase: 160 kHz<br />
Isolation (field side to logic) 500 VAC for 1 minute 500 VAC for 1 minute<br />
Isolation groups 1 (no isolation to outputs) 1 (no isolation to outputs)<br />
Filter times 0.2, 0.4, 0.8, 1.6, 3.2, 6.4, and 12.8 ms; 0.2, 0.4, 0.8, 1.6, 3.2, 6.4, and 12.8 ms;<br />
Selectable in groups of 4<br />
Selectable in groups of 4<br />
Number of inputs on simultaneously 2 2<br />
Cable length (meters) 50 shielded twisted pair 50 shielded twisted pair<br />
Table A- 169 Digital outputs<br />
Technical data SB 1223 DI 2 x 24 VDC /<br />
DQ 2 x 24 VDC, 200 kHz<br />
SB 1223 DI 2 x 5 VDC /<br />
DQ 2 x 5 VDC, 200 kHz<br />
Number of outputs 2 2<br />
Output type Solid state - MOSFET sink and source1 Solid state - MOSFET sink and source1 Voltage range 20.4 to 28.8 VDC 4.25 to 6.0 VDC<br />
Rated value 24 VDC 5 VDC<br />
Logic 1 signal at max. current L+ minus 1.5 V L+ minus 0.7 V<br />
Logic 0 signal at max. current 1.0 VDC, max. 0.2 VDC, max.<br />
<strong>S7</strong>-<strong>1200</strong> <strong>Programmable</strong> <strong>controller</strong><br />
System Manual, 04/2012, A5E02486680-06 789
Technical specifications<br />
A.9 Digital signal boards (SBs)<br />
Technical data SB 1223 DI 2 x 24 VDC /<br />
DQ 2 x 24 VDC, 200 kHz<br />
Current (max.) 0.1 A 0.1 A<br />
Lamp load -- --<br />
On state contact resistance 11 Ω max. 7 Ω max.<br />
Off state resistance 6 Ω max. 0.2 Ω max.<br />
Leakage current per point -- --<br />
SB 1223 DI 2 x 5 VDC /<br />
DQ 2 x 5 VDC, 200 kHz<br />
Pulse Train Output rate 200 kHz max., 2 Hz min. 200 kHz max., 2 Hz min.<br />
Surge current 0.11 A 0.11 A<br />
Overload protection No No<br />
Isolation (field side to logic) 500 VAC for 1 minute 500 VAC for 1 minute<br />
Isolation groups 1 (no isolation to inputs) 1 (no isolation to inputs)<br />
Currents per common 0.2 A 0.2 A<br />
Inductive clamp voltage None None<br />
Switching delay 1.5 μs + 300 ns rise<br />
1.5 μs + 300 ns fall<br />
Behavior on RUN to STOP Last value or substitute<br />
(default value 0)<br />
200 ns + 300 ns rise<br />
200 ns + 300 ns fall<br />
Last value or substitute<br />
(default value 0)<br />
Number of outputs on simultaneously 2 2<br />
Cable length (meters) 50 shielded twisted pair 50 shielded twisted pair<br />
1 Because both sinking and sourcing configurations are supported by the same circuitry, the active state of a sourcing<br />
load is opposite that of a sinking load. A source output exhibits positive logic (Q bit and LED are ON when the load has<br />
current flow), while a sink output exhibits negative logic (Q bit and LED are OFF when the load has current flow). If the<br />
module is plugged in with no user program, the default for this module is 0 V, which means that a sinking load will be<br />
turned ON.<br />
NOTICE<br />
When switching frequencies above 20 kHz, it is important that the digital inputs receive a<br />
square wave. Consider the following options to improve the signal quality to the inputs:<br />
Minimize the cable length<br />
Change a driver from a sink only driver to a sinking and sourcing driver<br />
Change to a higher quality cable<br />
Reduce the circuit/components from 24 V to 5 V<br />
Add an external load at the input<br />
<strong>S7</strong>-<strong>1200</strong> <strong>Programmable</strong> <strong>controller</strong><br />
790 System Manual, 04/2012, A5E02486680-06
Table A- 170 Wiring diagrams for the 200 kHz digital input/output SBs<br />
SB 1223 DI 2 x 24 VDC/DQ 2 x 24 VDC,<br />
200 kHz (6E<strong>S7</strong> 223-3BD30-0XB0)<br />
X19<br />
SB 1223 DI 2 x 5 VDC / DQ 2 x 5 VDC,<br />
200 kHz (6E<strong>S7</strong> 223-3AD30-0XB0)<br />
Technical specifications<br />
A.9 Digital signal boards (SBs)<br />
① Supports sourcing inputs only<br />
② For sourcing outputs, connect "Load" to "-" (shown). For sinking outputs, connect "Load" to "+". 1 Because both sinking<br />
and sourcing configurations are supported by the same circuitry, the active state of a sourcing load is opposite that of a<br />
sinking load. A source output exhibits positive logic (Q bit and LED are ON when the load has current flow), while a sink<br />
output exhibits negative logic (Q bit and LED are OFF when the load has current flow). If the module is plugged in with<br />
no user program, the default for this module is 0 V, which means that a sinking load will be turned ON.<br />
Table A- 171 Connector pin locations for SB 1223 DI 2 x 24 VDC/DQ 2 x 24 VDC, 200 kHz (6E<strong>S7</strong><br />
223-3BD30-0XB0)<br />
Pin X19<br />
1 L+ / 24VDC<br />
2 M / 24VDC<br />
3 DI e.0<br />
4 DI e.1<br />
5 DQ e.0<br />
6 DQ e.1<br />
Table A- 172 Connector pin locations for SB 1223 DI 2 x 5 VDC / DQ 2 x 5 VDC, 200 kHz (6E<strong>S7</strong> 223-<br />
3AD30-0XB0)<br />
Pin X19<br />
1 L+ / 5VDC<br />
2 M / 5VDC<br />
3 DI e.0<br />
4 DI e.1<br />
<strong>S7</strong>-<strong>1200</strong> <strong>Programmable</strong> <strong>controller</strong><br />
System Manual, 04/2012, A5E02486680-06 791<br />
X19
Technical specifications<br />
A.9 Digital signal boards (SBs)<br />
Pin X19<br />
5 DQ e.0<br />
6 DQ e.1<br />
A.9.4 SB 1223 2 X 24 VDC input / 2 X 24 VDC output specifications<br />
Table A- 173 General specifications<br />
Technical Data SB 1223 DI 2 x 24 VDC, DQ 2 x 24 VDC<br />
Order number 6E<strong>S7</strong> 223-0BD30-0XB0<br />
Dimensions W x H x D (mm) 38 x 62 x 21<br />
Weight 40 grams<br />
Power dissipation 1.0 W<br />
Current consumption (SM Bus) 50 mA<br />
Current consumption (24 VDC) 4 mA / Input used<br />
Table A- 174 Digital inputs<br />
Technical Data SB 1223 DI 2 x 24 VDC, DQ 2 x 24 VDC<br />
Number of inputs 2<br />
Type IEC Type 1 sink<br />
Rated voltage 24 VDC at 4 mA, nominal<br />
Continuous permissible voltage 30 VDC, max.<br />
Surge voltage 35 VDC for 0.5 sec.<br />
Logic 1 signal (min.) 15 VDC at 2.5 mA<br />
Logic 0 signal (max.) 5 VDC at 1 mA<br />
HSC clock input rates (max.) 20 kHz (15 to 30 VDC)<br />
30 kHz (15 to 26 VDC)<br />
Isolation (field side to logic) 500 VAC for 1 minute<br />
Isolation groups 1<br />
Filter times 0.2, 0.4, 0.8, 1.6, 3.2, 6.4, and 12.8 ms<br />
Selectable in groups of 2<br />
Number of inputs on simultaneously 2<br />
Cable length (meters) 500 shielded, 300 unshielded<br />
Table A- 175 Digital outputs<br />
Technical Data SB 1223 DI 2 x 24 VDC, DQ 2 x 24 VDC<br />
Number of outputs 2<br />
Output type Solid state - MOSFET (sourcing)<br />
<strong>S7</strong>-<strong>1200</strong> <strong>Programmable</strong> <strong>controller</strong><br />
792 System Manual, 04/2012, A5E02486680-06
Technical specifications<br />
A.9 Digital signal boards (SBs)<br />
Technical Data SB 1223 DI 2 x 24 VDC, DQ 2 x 24 VDC<br />
Voltage range 20.4 to 28.8 VDC<br />
Logic 1 signal at max. current 20 VDC min.<br />
Logic 0 signal with 10K Ω load 0.1 VDC max.<br />
Current (max.) 0.5 A<br />
Lamp load 5 W<br />
On state contact resistance 0.6 Ω max.<br />
Leakage current per point 10 μA max.<br />
Pulse Train Output (PTO) rate 20 KHz max., 2 Hz min. 1<br />
Surge current 5 A for 100 ms max.<br />
Overload protection No<br />
Isolation (field side to logic) 500 VAC for 1 minute<br />
Isolation groups 1<br />
Currents per common 1 A<br />
Inductive clamp voltage L+ minus 48 V, 1 W dissipation<br />
Switching delay 2 μs max. off to on<br />
10 μs max. on to off<br />
Behavior on RUN to STOP Last value or substitute value (default value 0)<br />
Number of outputs on simultaneously 2<br />
Cable length (meters) 500 m shielded, 150 m unshielded<br />
1 Depending on your pulse receiver and cable, an additional load resistor (at least 10% of rated current) may improve<br />
pulse signal quality and noise immunity.<br />
Table A- 176 Wiring diagram for the digital input/output SB<br />
SB 1223 DI 2 x 24 VDC, DQ 2 x 24 VDC (6E<strong>S7</strong> 223-0BD30-0XB0)<br />
① Supports sinking inputs only<br />
<strong>S7</strong>-<strong>1200</strong> <strong>Programmable</strong> <strong>controller</strong><br />
System Manual, 04/2012, A5E02486680-06 793<br />
<br />
X19
Technical specifications<br />
A.10 Analog signal boards (SBs)<br />
Table A- 177 Connector pin locations for SB 1223 DI 2 x 24 VDC, DQ 2 x 24 VDC (6E<strong>S7</strong> 223-0BD30-<br />
0XB0)<br />
Pin X19<br />
1 L+ / 24VDC<br />
2 M / 24VDC<br />
3 DI e.0<br />
4 DI e.1<br />
5 DQ e.0<br />
6 DQ e.1<br />
A.10 Analog signal boards (SBs)<br />
A.10.1 SB 1231 1 analog input specifications<br />
Table A- 178 General specifications<br />
Note<br />
To use this SB, your CPU firmware must be V2.0 or higher.<br />
Technical data SB 1231 AI 1 x 12 bit<br />
Order number 6E<strong>S7</strong> 231-4HA30-0XB0<br />
Dimensions W x H x D (mm) 38 x 62 x 21<br />
Weight 35 grams<br />
Power dissipation 0.4 W<br />
Current consumption (SM Bus) 55 mA<br />
Current consumption (24 VDC) none<br />
Table A- 179 Analog inputs<br />
Technical data SB 1231 AI 1x12 bit<br />
Number of inputs 1<br />
Type Voltage or current (differential)<br />
Range ±10V, ±5V, ±2.5 or 0 to 20 mA<br />
Resolution 11 bits + sign bit<br />
Full scale range (data word) -27,648 to 27,648<br />
<strong>S7</strong>-<strong>1200</strong> <strong>Programmable</strong> <strong>controller</strong><br />
794 System Manual, 04/2012, A5E02486680-06
Technical specifications<br />
A.10 Analog signal boards (SBs)<br />
Technical data SB 1231 AI 1x12 bit<br />
Over/Under range (data word) Voltage: 32,511 to 27,649 / -27,649 to -32,512<br />
Current: 32,511 to 27,649 / 0 to -4,864<br />
(Refer to Analog input representation for voltage and Analog input<br />
representation for current.)<br />
Overflow/Underflow (data word) Voltage: 32,767 to 32,512 / -32,513 to -32,768<br />
Current: 32,767 to 32,512 / -4,865 to -32,768<br />
(Refer to Analog input representation for voltage and Analog input<br />
representation for current.)<br />
Maximum withstand voltage / current ±35V / ±40 mA<br />
Smoothing None, weak, medium, or strong (refer to Analog input response<br />
times for step response time.)<br />
Noise rejection 400, 60, 50, or 10 Hz (refer to Analog input response times for<br />
sample rates.)<br />
Accuracy (25°C / -20 to 60°C) ±0.3% / ±0.6% of full scale<br />
Input impedance<br />
Differential<br />
Voltage: 220 kΩ; Current: 250 Ω<br />
Common mode<br />
Voltage: 55 kΩ; Current: 55 kΩ<br />
Behavior on RUN to STOP Last value or substitute value (default value 0)<br />
Measuring principle Actual value conversion<br />
Common mode rejection 400 dB, DC to 60 Hz<br />
Operational signal range Signal plus common mode voltage must be less than +35 V and<br />
greater than -35 V<br />
Isolation (field side to logic) None<br />
Cable length (meters) 100 m, twisted and shielded<br />
Table A- 180 Diagnostics<br />
Technical data SB 1231 AI 1 x 12 bit<br />
Overflow/underflow Yes<br />
24 VDC low voltage no<br />
<strong>S7</strong>-<strong>1200</strong> <strong>Programmable</strong> <strong>controller</strong><br />
System Manual, 04/2012, A5E02486680-06 795
Technical specifications<br />
A.10 Analog signal boards (SBs)<br />
Table A- 181 Wiring diagram for the analog input SB<br />
SB 1231 AI x 12 bit (6E<strong>S7</strong> 231-4HA30-0XB0)<br />
<strong>S7</strong>-<strong>1200</strong> <strong>Programmable</strong> <strong>controller</strong><br />
796 System Manual, 04/2012, A5E02486680-06<br />
X19<br />
① Connect "R" and "0+" for current<br />
Note: Connectors must be gold. See Appendix C, Spare Parts for order number.<br />
Table A- 182 Connector pin locations for SB 1231 AI x 12 bit (6E<strong>S7</strong> 231-4HA30-0XB0)<br />
Pin X19 (gold)<br />
1 No connection<br />
2 No connection<br />
3 AI R<br />
4 AI 0+<br />
5 AI 0+<br />
6 AI 0-<br />
A.10.2 SB 1232 1 analog output specifications<br />
Table A- 183 General specifications<br />
Technical data SB 1232 AQ 1 x 12 bit<br />
Order number 6E<strong>S7</strong> 232-4HA30-0XB0<br />
Dimensions W x H x D (mm) 38 x 62 x 21<br />
Weight 40 grams<br />
Power dissipation 1.5 W<br />
Current consumption (SM Bus) 15 mA<br />
Current consumption (24 VDC) 40 mA (no load)
Table A- 184 Analog outputs<br />
Technical specifications<br />
A.10 Analog signal boards (SBs)<br />
Technical data SB 1232 AQ 1 x 12 bit<br />
Number of outputs 1<br />
Type Voltage or current<br />
Range ±10 V or 0 to 20 mA<br />
Resolution Voltage: 12 bits<br />
Current: 11 bits<br />
Full scale range (data word)<br />
Voltage: -27,648 to 27,648<br />
Refer to the output ranges for voltage and current<br />
(Page 800).<br />
Current: 0 to 27,648<br />
Accuracy (25°C / -20 to 60°C) ±0.5% / ±1% of full scale<br />
Settling time (95% of new value) Voltage: 300 μS (R), 750 μS (1 uF)<br />
Current: 600 μS (1 mH), 2 ms (10 mH)<br />
Load impedance Voltage: ≥ 1000 Ω<br />
Current: ≤ 600 Ω<br />
Behavior on RUN to STOP Last value or substitute value (default value 0)<br />
Isolation (field side to logic) None<br />
Cable length (meters) 100 m, twisted and shielded<br />
Table A- 185 Diagnostics<br />
Technical data SB 1232 AQ 1 x 12 bit<br />
Overflow/underflow Yes<br />
Short to ground (voltage mode only) Yes<br />
Wire break (current mode only) Yes<br />
<strong>S7</strong>-<strong>1200</strong> <strong>Programmable</strong> <strong>controller</strong><br />
System Manual, 04/2012, A5E02486680-06 797
Technical specifications<br />
A.10 Analog signal boards (SBs)<br />
Table A- 186 Wiring diagram for the SB 1232 AQ 1 x 12 bit<br />
SB 1232 AQ 1 x 12 bit (6E<strong>S7</strong> 232-4HA30-0XB0)<br />
X19<br />
Note: Connectors must be gold. See Appendix C, Spare Parts for order number.<br />
Table A- 187 Connector pin locations for SB 1232 AQ 1 x 12 bit (6E<strong>S7</strong> 232-4HA30-0XB0)<br />
Pin X19 (gold)<br />
1 AQ 0M<br />
2 AQ 0<br />
3 GND<br />
4 No connection<br />
5 No connection<br />
6 No connection<br />
A.10.3 Measurement ranges for analog inputs and outputs<br />
A.10.3.1 Step response of the analog inputs<br />
Table A- 188 Step response (ms), 0V to 10V measured at 95%<br />
Smoothing selection (sample averaging)<br />
Integration time selection<br />
400 Hz (2.5 ms) 60 Hz (16.6 ms) 50 Hz (20 ms) 10 Hz (100 ms)<br />
None (1 cycle): No averaging 4.5 ms 18.7 ms 22.0 ms 102 ms<br />
Weak (4 cycles): 4 samples 10.6 ms 59.3 ms 70.8 ms 346 ms<br />
<strong>S7</strong>-<strong>1200</strong> <strong>Programmable</strong> <strong>controller</strong><br />
798 System Manual, 04/2012, A5E02486680-06
Technical specifications<br />
A.10 Analog signal boards (SBs)<br />
Smoothing selection (sample averaging)<br />
Integration time selection<br />
400 Hz (2.5 ms) 60 Hz (16.6 ms) 50 Hz (20 ms) 10 Hz (100 ms)<br />
Medium (16 cycles): 16 samples 33.0 ms 208 ms 250 ms 1240 ms<br />
Strong (32 cycles): 32 samples 63.0 ms 408 ms 490 ms 2440 ms<br />
Sample time 0.156 ms 1.042 ms 1.250 ms 6.250 ms<br />
A.10.3.2 Sample time and update times for the analog inputs<br />
Table A- 189 Sample time and update time<br />
Selection Sample time SB update time<br />
400 Hz (2.5 ms) 0.156 ms 0.156 ms<br />
60 Hz (16.6 ms) 1.042 ms 1.042 ms<br />
50 Hz (20 ms) 1.250 ms 1.25 ms<br />
10 Hz (100 ms) 6.250 ms 6.25 ms<br />
A.10.3.3 Measurement ranges of the analog inputs for voltage<br />
Table A- 190 Analog input representation for voltage<br />
System Voltage Measuring Range<br />
Decimal Hexadecimal ±10 V ±5 V ±2.5 V ±1.25V 0 to 10 V<br />
32767 7FFF 11.851 V 5.926 V 2.963 V 1.481 V Overflow 11.851 V<br />
32512 7F00<br />
32511 7EFF 11.759 V 5.879 V 2.940 V 1.470 V Overshoot 11.759 V<br />
27649 6C01<br />
range<br />
27648 6C00 10 V 5 V 2.5 V 1.250 V Rated range 10 V<br />
20736 5100 7.5 V 3.75 V 1.875 V 0.938 V 7.5 V<br />
1 1 361.7 μV 180.8 μV 90.4 μV 45.2 μV 361.7 μV<br />
0 0 0 V 0 V 0 V 0 V 0 V<br />
-1 FFFF<br />
Negative<br />
-20736<br />
-27648<br />
AF00<br />
9400<br />
-7.5 V<br />
-10 V<br />
-3.75 V<br />
-5 V<br />
-1.875 V<br />
-2.5 V<br />
-0.938 V<br />
-1.250 V<br />
values are<br />
not<br />
supported<br />
-27649 93FF<br />
Undershoot<br />
-32512 8100 -11.759 V -5.879 V -2.940 V -1.470 V range<br />
-32513 80FF<br />
Underflow<br />
-32768 8000 -11.851 V -5.926 V -2.963 V -1.481 V<br />
Overflow<br />
Overshoot<br />
range<br />
Rated<br />
range<br />
<strong>S7</strong>-<strong>1200</strong> <strong>Programmable</strong> <strong>controller</strong><br />
System Manual, 04/2012, A5E02486680-06 799
Technical specifications<br />
A.10 Analog signal boards (SBs)<br />
A.10.3.4 Measurement ranges of the analog inputs for current<br />
Table A- 191 Analog input representation for current<br />
System Current measuring range<br />
Decimal Hexidecimal 0 mA to 20 mA 4 mA to 20 mA<br />
32767 7FFF 23.70 mA 22.96 mA<br />
32512 7F00<br />
32511 7EFF 23.52 mA 22.81 mA<br />
27649 6C01<br />
27648 6C00 20 mA 20 mA<br />
20736 5100 15 mA 16 mA<br />
1 1 723.4 nA 4 mA + 578.7 nA<br />
0 0 0 mA 4 mA<br />
-1 FFFF<br />
-4864 ED00 -3.52 mA 1.185 mA<br />
-4865 ECFF<br />
-32768 8000<br />
Overflow<br />
Overshoot range<br />
Nominal range<br />
Undershoot range<br />
Underflow<br />
A.10.3.5 Output (AQ) measurement ranges for voltage and current (SB and SM)<br />
Table A- 192 Analog output representation for voltage<br />
System Voltage Output Range<br />
Decimal Hexadecimal ± 10 V<br />
32767 7FFF See note 1<br />
32512 7F00 See note 1<br />
32511 7EFF 11.76 V<br />
27649 6C01<br />
27648 6C00 10 V<br />
20736 5100 7.5 V<br />
1 1 361.7 μ V<br />
0 0 0 V<br />
-1 FFFF -361.7 μ V<br />
-20736 AF00 -7.5 V<br />
-27648 9400 -10 V<br />
Overflow<br />
Overshoot range<br />
Rated range<br />
<strong>S7</strong>-<strong>1200</strong> <strong>Programmable</strong> <strong>controller</strong><br />
800 System Manual, 04/2012, A5E02486680-06
System Voltage Output Range<br />
Decimal Hexadecimal ± 10 V<br />
-27649 93FF<br />
Undershoot range<br />
-32512 8100 -11.76 V<br />
-32513 80FF See note 1<br />
Underflow<br />
-32768 8000 See note 1<br />
Technical specifications<br />
A.10 Analog signal boards (SBs)<br />
1 In an overflow or underflow condition, analog outputs will behave according to the device configuration properties set for<br />
the analog signal module. In the "Reaction to CPU STOP" parameter, select either: Use substitute value or Keep last<br />
value.<br />
Table A- 193 Analog output representation for current<br />
System Current Output Range<br />
Decimal Hexadecimal 0 mA to 20 mA<br />
32767 7FFF See note 1<br />
Overflow<br />
32512 7F00 See note 1<br />
32511 7EFF 23.52 mA<br />
Overshoot range<br />
27649 6C01<br />
27648 6C00 20 mA<br />
Rated range<br />
20736 5100 15 mA<br />
1 1 723.4 nA<br />
0 0 0 mA<br />
1 In an overflow or underflow condition, analog outputs will behave according to the device configuration properties set for<br />
the analog signal module. In the "Reaction to CPU STOP" parameter, select either: Use substitute value or Keep last<br />
value.<br />
A.10.4 Thermocouple SBs<br />
A.10.4.1 SB 1231 1 analog thermocouple input specifications<br />
Table A- 194 General specifications<br />
Note<br />
To use this SB, your CPU firmware must be V2.0 or higher.<br />
Technical data SB 1231 AI 1 x 16 bit Thermocouple<br />
Order number 6E<strong>S7</strong> 231-5QA30-0XB0<br />
Dimensions W x H x D (mm) 38 x 62 x 21<br />
<strong>S7</strong>-<strong>1200</strong> <strong>Programmable</strong> <strong>controller</strong><br />
System Manual, 04/2012, A5E02486680-06 801
Technical specifications<br />
A.10 Analog signal boards (SBs)<br />
Technical data SB 1231 AI 1 x 16 bit Thermocouple<br />
Weight 35 grams<br />
Power dissipation 0.5 W<br />
Current consumption (SM Bus) 5 mA<br />
Current consumption (24 VDC) 20 mA<br />
Table A- 195 Analog inputs<br />
Technical data SB 1231 AI 1x16 bit Thermocouple<br />
Number of inputs 1<br />
Type Floating TC and mV<br />
Range<br />
See Thermocouple filter selection table (Page 803).<br />
Nominal range (data word)<br />
Overrange/underrange (data word)<br />
Overflow/underflow (data word)<br />
Resolution<br />
Temperature 0.1° C / 0.1° F<br />
Voltage 15 bits plus sign<br />
Maximum withstand voltage ±35 V<br />
Noise rejection 85 dB for the selected filter setting<br />
(10 Hz, 50 Hz, 60 Hz, 400 Hz)<br />
Common mode rejection > 120 dB at 120 VAC<br />
Impedance ≥ 10 M Ω<br />
Accuracy See Thermocouple selection table (Page 803).<br />
Repeatability ±0.05% FS<br />
Measuring principle Integrating<br />
Module update time See Thermocouple filter selection table (Page 803).<br />
Cold junction error ±1.5° C<br />
Isolation (field side to logic) 500 VAC<br />
Cable length (meters) 100 m to sensor max.<br />
Wire resistance 100 Ω max.<br />
Table A- 196 Diagnostics<br />
Technical data SB 1231 AI 1 x 16 bit Thermocouple<br />
Overflow/underflow1 Yes<br />
Wire break2 Yes<br />
1 The overflow and underflow diagnostic alarm information will be reported in the analog data values even if the alarms<br />
are disabled in the module configuration.<br />
2 When wire break alarm is disabled and an open wire condition exists in the sensor wiring, the module may report<br />
random values.<br />
<strong>S7</strong>-<strong>1200</strong> <strong>Programmable</strong> <strong>controller</strong><br />
802 System Manual, 04/2012, A5E02486680-06
Technical specifications<br />
A.10 Analog signal boards (SBs)<br />
The SM 1231 Thermocouple (TC) analog signal module measures the value of voltage<br />
connected to the module inputs.<br />
The SB 1231 Thermocouple analog signal board measures the value of voltage connected<br />
to the signal board inputs. The temperature measurement type can be either<br />
"Thermocouple" or "Voltage".<br />
● "Thermocouple": The value will be reported in degrees multiplied by ten (for example,<br />
25.3 degrees will be reported as decimal 253).<br />
● "Voltage": The nominal range full scale value will be decimal 27648.<br />
A.10.4.2 Basic operation for a thermocouple<br />
Thermocouples are formed whenever two dissimilar metals are electrically bonded to each<br />
other. A voltage is generated that is proportional to the junction temperature. This voltage is<br />
small; one microvolt could represent many degrees. Measuring the voltage from a<br />
thermocouple, compensating for extra junctions, and then linearizing the result forms the<br />
basis of temperature measurement using thermocouples.<br />
When you connect a thermocouple to the SM 1231 Thermocouple module, the two dissimilar<br />
metal wires are attached to the module at the module signal connector. The place where the<br />
two dissimilar wires are attached to each other forms the sensor thermocouple.<br />
Two more thermocouples are formed where the two dissimilar wires are attached to the<br />
signal connector. The connector temperature causes a voltage that adds to the voltage from<br />
the sensor thermocouple. If this voltage is not corrected, then the temperature reported will<br />
deviate from the sensor temperature.<br />
Cold junction compensation is used to compensate for the connector thermocouple.<br />
Thermocouple tables are based on a reference junction temperature, usually zero degrees<br />
Celsius. The cold junction compensation compensates the connector to zero degrees<br />
Celsius. The cold junction compensation restores the voltage added by the connector<br />
thermocouples. The temperature of the module is measured internally, then converted to a<br />
value to be added to the sensor conversion. The corrected sensor conversion is then<br />
linearized using the thermocouple tables.<br />
For optimum operation of the cold junction compensation, the thermocouple module must be<br />
located in a thermally stable environment. Slow variation (less than 0.1° C/minute) in<br />
ambient module temperature is correctly compensated within the module specifications. Air<br />
movement across the module will also cause cold junction compensation errors.<br />
If better cold junction error compensation is needed, an external iso-thermal terminal block<br />
may be used. The thermocouple module provides for use of a 0° C referenced or 50° C<br />
referenced terminal block.<br />
<strong>S7</strong>-<strong>1200</strong> <strong>Programmable</strong> <strong>controller</strong><br />
System Manual, 04/2012, A5E02486680-06 803
Technical specifications<br />
A.10 Analog signal boards (SBs)<br />
Selection table for the SB 1231 thermocouple<br />
The ranges and accuracy for the different thermocouple types supported by the SB 1231<br />
Thermocouple signal board are shown in the table below.<br />
Table A- 197 SB 1231 Thermocouple selection table<br />
Thermocouple<br />
Type<br />
Under range<br />
minimum 1<br />
Nominal<br />
range low limit<br />
Nominal range<br />
high limit<br />
Over range<br />
maximum 2<br />
Normal range 3<br />
accuracy @ 25°C<br />
Normal range 3,<br />
accuracy<br />
-20°C to 60°C<br />
J -210.0°C -150.0°C <strong>1200</strong>.0°C 1450.0°C ±0.3°C ±0.6°C<br />
K -270.0°C -200.0°C 1372.0°C 1622.0°C ±0.4°C ±1.0°C<br />
T -270.0°C -200.0°C 400.0°C 540.0°C ±0.5°C ±1.0°C<br />
E -270.0°C -200.0°C 1000.0°C <strong>1200</strong>.0°C ±0.3°C ±0.6°C<br />
R & S -50.0°C 100.0°C 1768.0°C 2019.0°C ±1.0°C ±2.5°C<br />
N -270.0°C 0.0°C 1300.0°C 1550.0°C ±1.0°C ±1.6°C<br />
C 0.0°C 100.0°C 2315.0°C 2500.0°C ±0.7°C ±2.7°C<br />
TXK/XK(L) -200.0°C -150.0°C 800.0°C 1050.0°C ±0.6°C ±1.2°C<br />
Voltage -32511 -27648 27648<br />
32511 ±0.05% ±0.1%<br />
-80mV 80mV<br />
1 Thermocouple values below the under-range minimum value are reported as -32768.<br />
2 Thermocouple values above the over-range minimum value are reported as 32767.<br />
3 Internal cold junction error is ±1.5°C for all ranges. This adds to the error in this table. The signal board requires at least<br />
30 minutes of warmup time to meet this specification.<br />
Table A- 198 Filter selection table for the SB 1231 Thermocouple<br />
Rejection frequency (Hz) Integration time (ms) Signal board update time (seconds)<br />
10 100 0.306<br />
50 20 0.066<br />
60 16.67 0.056<br />
4001 10 0.036<br />
1 To maintain module resolution and accuracy when 400 Hz rejection is selected, the integration time is 10 ms. This<br />
selection also rejects 100 Hz and 200 Hz noise.<br />
It is recommended for measuring thermocouples that a 100 ms integration time be used. The<br />
use of smaller integration times will increase the repeatability error of the temperature<br />
readings.<br />
Note<br />
After power is applied to the module, it performs internal calibration for the analog to digital<br />
converter. During this time, the module reports a value of 32767 on each channel until valid<br />
data is available on that channel. Your user program may need to allow for this initialization<br />
time.<br />
<strong>S7</strong>-<strong>1200</strong> <strong>Programmable</strong> <strong>controller</strong><br />
804 System Manual, 04/2012, A5E02486680-06
A.10.5 RTD SBs<br />
Table A- 199 Wiring diagram for the analog input thermocouple SB<br />
SB 1231 AI 1 x 16 bit thermocouple (6E<strong>S7</strong> 231-5QA30-0XB0)<br />
Note: Connectors must be gold. See Appendix C, Spare Parts for order number.<br />
Technical specifications<br />
A.10 Analog signal boards (SBs)<br />
Table A- 200 Connector pin locations for SB 1231 AI 1 x 16 bit thermocouple (6E<strong>S7</strong> 231-5QA30-<br />
0XB0)<br />
Pin X19 (gold)<br />
1 No connection<br />
2 No connection<br />
3 No connection<br />
4 No connection<br />
5 AI 0- /TC<br />
6 AI 0+ /TC<br />
A.10.5.1 SB 1231 1 analog RTD input specifications<br />
Note<br />
To use this SB, your CPU firmware must be V2.0 or higher.<br />
<strong>S7</strong>-<strong>1200</strong> <strong>Programmable</strong> <strong>controller</strong><br />
System Manual, 04/2012, A5E02486680-06 805<br />
X19
Technical specifications<br />
A.10 Analog signal boards (SBs)<br />
Table A- 201 General specifications<br />
Technical data SB 1231 AI 1 x 16 bit RTD<br />
Order number 6E<strong>S7</strong> 231-5PA30-0XB0<br />
Dimensions W x H x D (mm) 38 x 62 x 2<br />
Weight 35 grams<br />
Power dissipation 0.7 W<br />
Current consumption (SM Bus) 5 mA<br />
Current consumption (24 VDC) 25 mA<br />
Table A- 202 Analog inputs<br />
Technical data SB 1231 AI 1 x 16 bit RTD<br />
Number of inputs 1<br />
Type Module referenced RTD and Ohms<br />
Range<br />
See Selection tables (Page 808).<br />
Nominal range (data word)<br />
Overrange/underrange (data word)<br />
Overflow/underflow (data word)<br />
Resolution<br />
Temperature 0.1° C/ 0.1° F<br />
Voltage 15 bits plus sign<br />
Maximum withstand voltage ±35 V<br />
Noise rejection 85 dB (10 Hz, 50 Hz, 60 Hz, 400 Hz)<br />
Common mode rejection > 120 dB<br />
Impedance ≥ 10 MΩ<br />
Accuracy See Selection tables (Page 808).<br />
Repeatability ±0.05% FS<br />
Maximum sensor dissipation 0.5 m W<br />
Measuring principle Integrating<br />
Module update time See Selection table (Page 808).<br />
Isolation (field side to logic) 500 VAC<br />
Cable length (meters) 100 m to sensor max.<br />
Wire resistance 20 Ω, 2.7 for 10 Ω RTD max.<br />
<strong>S7</strong>-<strong>1200</strong> <strong>Programmable</strong> <strong>controller</strong><br />
806 System Manual, 04/2012, A5E02486680-06
Table A- 203 Diagnostics<br />
Technical data SB 1231 AI 1 x 16 bit RTD<br />
Overflow/underflow1, 2 Yes<br />
Wire break 3 Yes<br />
Technical specifications<br />
A.10 Analog signal boards (SBs)<br />
1 The overflow and underflow diagnostic alarm information will be reported in the analog data values even if the alarms<br />
are disabled in the module configuration.<br />
2 For resistance ranges underflow detection is never enabled.<br />
3 When wire break alarm is disabled and an open wire condition exists in the sensor wiring, the module may report<br />
random values.<br />
The SM 1231 RTD analog signal board measures the value of resistance connected to the<br />
signal board inputs. The measurement type can be selected as either "Resistor" or "Thermal<br />
resistor".<br />
● "Resistor": The nominal range full scale value will be decimal 27648.<br />
● "Thermal resistor": The value will be reported in degrees multiplied by ten (for example,<br />
25.3 degrees will be reported as decimal 253).<br />
The SB 1231 RTD signal board supports measurements with 2-wire, 3-wire and 4-wire<br />
connections to the sensor resistor.<br />
Table A- 204 Wiring diagram for SB 1231 AI 1 x 16 bit RTD<br />
SB 1231 AI 1 x 16 bit RTD (6E<strong>S7</strong> 231-5PA30-0XB0)<br />
AI0 -<br />
X19<br />
① Loop-back unused RTD input<br />
② 2-wire RTD<br />
③ 3-wire RTD<br />
④ 4-wire RTD<br />
Note: Connectors must be gold. See Appendix C, Spare Parts for order number.<br />
<strong>S7</strong>-<strong>1200</strong> <strong>Programmable</strong> <strong>controller</strong><br />
System Manual, 04/2012, A5E02486680-06 807
Technical specifications<br />
A.10 Analog signal boards (SBs)<br />
Table A- 205 Connector pin locations for SB 1231 AI 1 x 16 bit RTD (6E<strong>S7</strong> 231-5PA30-0XB0)<br />
Pin X19 (gold)<br />
1 No connection<br />
2 No connection<br />
3 AI 0 M+ /RTD<br />
4 AI 0 M- /RTD<br />
5 AI 0 I+ /RTD<br />
6 AI 0 I- /RTD<br />
A.10.5.2 Selection tables for the SB 1231 RTD<br />
Table A- 206 Ranges and accuracy for the different sensors supported by the RTD modules<br />
Temperature<br />
coefficient<br />
Pt 0.003850<br />
ITS90<br />
DIN EN 60751<br />
Pt 0.003902<br />
Pt 0.003916<br />
Pt 0.003920<br />
Pt 0.003910<br />
Ni 0.006720<br />
Ni 0.006180<br />
RTD type Under range<br />
minimum 1<br />
Nominal<br />
range<br />
low limit<br />
Nominal<br />
range<br />
high limit<br />
Over range<br />
maximum 2<br />
Normal<br />
range<br />
accuracy @<br />
25°C<br />
Normal<br />
range<br />
accuracy<br />
-20°C to<br />
60°C<br />
Pt 10 -243.0°C -200.0°C 850.0°C 1000.0°C ±1.0°C ±2.0°C<br />
Pt 50<br />
Pt 100<br />
Pt 200<br />
Pt 500<br />
Pt 1000<br />
-243.0°C -200.0°C 850.0°C 1000.0°C ±0.5°C ±1.0°C<br />
Pt 100<br />
Pt 200<br />
Pt 500<br />
Pt 1000<br />
-243.0°C -200.0°C 850.0°C 1000.0°C ± 0.5°C ±1.0°C<br />
Pt 10 -273.2°C -240.0°C 1100.0°C 1295°C ±1.0°C ±2.0°C<br />
Pt 50<br />
Pt 100<br />
Pt 500<br />
-273.2°C -240.0°C 1100.0°C 1295°C ±0.8°C ±1.6°C<br />
Ni 100<br />
Ni 120<br />
Ni 200<br />
Ni 500<br />
Ni 1000<br />
-105.0°C -60.0°C 250.0°C 295.0°C ±0.5°C ±1.0°C<br />
<strong>S7</strong>-<strong>1200</strong> <strong>Programmable</strong> <strong>controller</strong><br />
808 System Manual, 04/2012, A5E02486680-06
Temperature<br />
coefficient<br />
RTD type Under range<br />
minimum 1<br />
Nominal<br />
range<br />
low limit<br />
Nominal<br />
range<br />
high limit<br />
Technical specifications<br />
A.10 Analog signal boards (SBs)<br />
Over range<br />
maximum 2<br />
Normal<br />
range<br />
accuracy @<br />
25°C<br />
Normal<br />
range<br />
accuracy<br />
-20°C to<br />
60°C<br />
LG-Ni 0.005000 LG-Ni 1000 -105.0°C -60.0°C 250.0°C 295.0°C ±0.5°C ±1.0°C<br />
Ni 0.006170 Ni 100 -105.0°C -60.0°C 180.0°C 212.4°C ±0.5°C ±1.0°C<br />
Cu 0.004270 Cu 10 -240.0°C -200.0°C 260.0°C 312.0°C ±1.0°C ±2.0°C<br />
Cu 0.004260 Cu 10 -60.0°C -50.0°C 200.0°C 240.0°C ±1.0°C ±2.0°C<br />
Cu 50<br />
Cu 100<br />
-60.0°C -50.0°C 200.0°C 240.0°C ±0.6°C ±1.2°C<br />
Cu 0.004280 Cu 10 -240.0°C -200.0°C 200.0°C 240.0°C ±1.0°C ±2.0°C<br />
Cu 50<br />
Cu 100<br />
-240.0°C -200.0°C 200.0°C 240.0°C ±0.7°C ±1.4°C<br />
1 RTD values below the under-range minimum value are reported as -32768.<br />
2 RTD values above the over-range maximum value are reported as +32768.<br />
Table A- 207 Resistance<br />
Range Under range<br />
minimum<br />
Nominal range<br />
low limit<br />
Nominal range<br />
high limit<br />
Over range<br />
maximum 1<br />
Normal range<br />
accuracy<br />
@ 25°C<br />
150 Ω n/a 0 (0 Ω) 27648 (150 Ω) 176.383 Ω ±0.05% ±0.1%<br />
300 Ω n/a 0 (0 Ω) 27648 (300 Ω) 352.767 Ω ±0.05% ±0.1%<br />
600 Ω n/a 0 (0 Ω) 27648 (600 Ω) 705.534 Ω ±0.05% ±0.1%<br />
1 Resistance values above the over-range maximum value are reported as 32767.<br />
Normal range<br />
accuracy<br />
-20°C to 60°C<br />
Note<br />
The module reports 32767 on any activated channel with no sensor connected. If open wire<br />
detection is also enabled, the module flashes the appropriate red LEDs.<br />
When 500 Ω and 1000 Ω RTD ranges are used with other lower value resistors, the error<br />
may increase to two times the specified error.<br />
Best accuracy will be achieved for the 10 Ω RTD ranges if 4 wire connections are used.<br />
The resistance of the connection wires in 2 wire mode will cause an error in the sensor<br />
reading and therefore accuracy is not guaranteed.<br />
<strong>S7</strong>-<strong>1200</strong> <strong>Programmable</strong> <strong>controller</strong><br />
System Manual, 04/2012, A5E02486680-06 809
Technical specifications<br />
A.11 BB 1297 Battery Board<br />
Table A- 208 Noise reduction and update times for the RTD modules<br />
Rejection frequency<br />
selection<br />
Integration time 4-/2-wire, 1-channel module<br />
Update time (seconds)<br />
3-wire, 1-channel module<br />
Update time (seconds)<br />
400 Hz (2.5 ms) 10 ms 1 0.036 0.071<br />
60 Hz (16.6 ms) 16.67 ms 0.056 0.111<br />
50 Hz (20 ms) 20 ms 0.066 1.086<br />
10 Hz (100 ms) 100 ms 0.306 0.611<br />
1 To maintain module resolution and accuracy when the 400 Hz filter is selected, the integration time is 10 ms. This<br />
selection also rejects 100 Hz and 200 Hz noise.<br />
NOTICE<br />
After power is applied, the module performs internal calibration for the analog-to-digital<br />
converter. During this time the module reports a value of 32767 on each channel until valid<br />
data is available on that channel. Your user program may need to allow for this initialization<br />
time. Because the configuration of the module can vary the length of the initialization time,<br />
you should verify the behavior or the module in your configuration. If required, you can<br />
include logic in your user program to accommodate the initialization time of the module.<br />
A.11 BB 1297 Battery Board<br />
BB 1297 Battery Board<br />
The <strong>S7</strong>-<strong>1200</strong> BB 1297 Battery Board is designed for long-term backup of the Real-time<br />
clock. It is pluggable in the signal board slot of the <strong>S7</strong>-<strong>1200</strong> CPU (firmware 3.0 and later<br />
versions). You must add the BB 1297 to the device configuration and download the<br />
hardware configuration to the CPU for the BB to be functional.<br />
The battery (type CR1025) is not included with the BB 1297 and must be purchased by the<br />
user.<br />
Note<br />
The BB 1297 is mechanically designed to fit the CPUs with the firmware 3.0 and later<br />
versions.<br />
Do not use the BB 1297 with earlier version CPUs as the BB 1297 connector will not plug<br />
into the CPU.<br />
<strong>S7</strong>-<strong>1200</strong> <strong>Programmable</strong> <strong>controller</strong><br />
810 System Manual, 04/2012, A5E02486680-06
Table A- 209 General specifications<br />
Technical data BB 1297 Battery Board<br />
Order number 6E<strong>S7</strong> 297-0AX30-0XA0<br />
Dimensions W x H x D (mm) 38 x 62 x 21<br />
Weight 28 grams<br />
Power dissipation 0.5 W<br />
Current consumption (SM Bus) 11 mA<br />
Current consumption (24 VDC) none<br />
Technical specifications<br />
A.11 BB 1297 Battery Board<br />
Battery (not included) BB 1297 Battery Board<br />
Hold up time Approximately 1 year<br />
Battery type CR1025 Refer to Installing or replacing a battery in the BB<br />
1297 battery board (Page 51)<br />
Nominal voltage 3 V<br />
Nominal capacity At least 30 mAH<br />
Diagnostics BB 1297 Battery Board<br />
Critical battery level < 2.5 V<br />
Battery diagnostic Low voltage indicator:<br />
Low battery voltage causes the CPU MAINT LED to<br />
illuminate with the amber light continuously ON.<br />
Diagnostic Buffer Event: 16#06:2700 "Submodule<br />
maintenance demanded: At least one battery exhausted<br />
(BATTF)"<br />
Battery status Battery status bit provided<br />
0 = Battery OK<br />
1 = Battery low<br />
Battery status update Battery status is updated at power up and then once per day<br />
while CPU is in RUN mode.<br />
<strong>S7</strong>-<strong>1200</strong> <strong>Programmable</strong> <strong>controller</strong><br />
System Manual, 04/2012, A5E02486680-06 811
Technical specifications<br />
A.12 Communication interfaces<br />
Table A- 210 Insertion diagram for the BB 1297 battery board<br />
BB 1297 battery board (6E<strong>S7</strong> 297-0AX30-0XA0)<br />
A.12 Communication interfaces<br />
A.12.1 PROFIBUS<br />
A.12.1.1 CM 1242-5<br />
Table A- 211 Technical specifications of the CM 1242-5<br />
Technical specifications<br />
Order number 6GK7 242-5DX30-0XE0<br />
Interfaces<br />
Connection to PROFIBUS 9-pin D-sub female connector<br />
Maximum current consumption on the PROFIBUS interface<br />
when network components are connected (for example<br />
optical network components)<br />
15 mA at 5 V (only for bus termination) * )<br />
Permitted ambient conditions<br />
Ambient temperature<br />
during storage<br />
-40 °C to 70 °C<br />
during transportation<br />
-40 °C to 70 °C<br />
during operation with a vertical installation (DIN rail<br />
horizontal)<br />
0 °C to 55 °C<br />
during operation with a horizontal installation (DIN rail<br />
vertical)<br />
0 °C to 45 °C<br />
Relative humidity at 25 °C during operation, without<br />
condensation, maximum<br />
<strong>S7</strong>-<strong>1200</strong> <strong>Programmable</strong> <strong>controller</strong><br />
812 System Manual, 04/2012, A5E02486680-06<br />
95 %
Technical specifications<br />
Degree of protection IP20<br />
Power supply, current consumption and power loss<br />
Type of power supply DC<br />
Power supply from the backplane bus 5 V<br />
Current consumption (typical) 150 mA<br />
Effective power loss (typical) 0.75 W<br />
Dimensions and weights<br />
Width<br />
Height<br />
Depth<br />
Weight<br />
Net weight<br />
Weight including packaging<br />
<br />
<br />
<br />
<br />
<br />
<br />
<br />
<br />
<br />
30 mm<br />
100 mm<br />
75 mm<br />
115 g<br />
152 g<br />
Technical specifications<br />
A.12 Communication interfaces<br />
* ) The current load of an external consumer connected between VP (pin 6) and DGND (pin 5) must not exceed a maximum<br />
of 15 mA (short-circuit proof) for bus termination.<br />
PROFIBUS interface<br />
A.12.1.2 CM 1243-5<br />
Table A- 212 Pinout of the D-sub socket<br />
Pin Description Pin Description<br />
1 - not used - 6 P5V2: +5V power supply<br />
2 - not used - 7 - not used -<br />
3 RxD/TxD-P: Data line B 8 RxD/TxD-N: Data line A<br />
4 RTS 9 - not used -<br />
5 M5V2: Data reference potential<br />
(ground DGND)<br />
Housing Ground connector<br />
Table A- 213 Technical specifications of the CM 1243-5<br />
Technical specifications<br />
Order number 6GK7 243-5DX30-0XE0<br />
Interfaces<br />
Connection to PROFIBUS 9-pin D-sub female connector<br />
Maximum current consumption on the PROFIBUS interface 15 mA at 5 V (only for bus termination) *<br />
when network components are connected (for example<br />
optical network components)<br />
)<br />
<strong>S7</strong>-<strong>1200</strong> <strong>Programmable</strong> <strong>controller</strong><br />
System Manual, 04/2012, A5E02486680-06 813
Technical specifications<br />
A.12 Communication interfaces<br />
Technical specifications<br />
Permitted ambient conditions<br />
Ambient temperature<br />
during storage<br />
during transportation<br />
during operation with a vertical installation (DIN rail<br />
horizontal)<br />
during operation with a horizontal installation (DIN rail<br />
vertical)<br />
-40 °C to 70 °C<br />
-40 °C to 70 °C<br />
0 °C to 55 °C<br />
0 °C to 45 °C<br />
Relative humidity at 25 °C during operation, without<br />
condensation, maximum<br />
95 %<br />
Degree of protection<br />
Power supply, current consumption and power loss<br />
IP20<br />
Type of power supply DC<br />
Power supply / external<br />
24 V<br />
minimum<br />
19.2 V<br />
maximum<br />
28.8 V<br />
Current consumption (typical)<br />
from 24 V DC<br />
from the <strong>S7</strong>-<strong>1200</strong> backplane bus<br />
Effective power loss (typical)<br />
from 24 V DC<br />
from the <strong>S7</strong>-<strong>1200</strong> backplane bus<br />
Power supply 24 VDC / external<br />
Min. cable cross section<br />
Max. cable cross section<br />
Tightening torque of the screw terminals<br />
Dimensions and weights<br />
Width<br />
Height<br />
Depth<br />
Weight<br />
Net weight<br />
Weight including packaging<br />
100 mA<br />
0 mA<br />
2.4 W<br />
0 W<br />
min.: 0.14 mm2 (AWG 25)<br />
max.: 1.5 mm2 (AWG 15)<br />
0.45 Nm (4 lb-in)<br />
30 mm<br />
100 mm<br />
75 mm<br />
134 g<br />
171 g<br />
* ) The current load of an external consumer connected between VP (pin 6) and DGND (pin 5) must not exceed a maximum<br />
of 15 mA (short-circuit proof) for bus termination.<br />
Note<br />
The CM 1243-5 (PROFIBUS master module) must receive power from the 24 VDC sensor<br />
supply of the CPU.<br />
<strong>S7</strong>-<strong>1200</strong> <strong>Programmable</strong> <strong>controller</strong><br />
814 System Manual, 04/2012, A5E02486680-06
PROFIBUS interface<br />
<br />
<br />
<br />
<br />
<br />
<br />
<br />
<br />
<br />
PROFIBUS cable<br />
A.12.2 GPRS<br />
Table A- 214 Pinout of the D-sub socket<br />
Technical specifications<br />
A.12 Communication interfaces<br />
Pin Description Pin Description<br />
NOTICE<br />
A.12.2.1 CP 1242-7<br />
1 - not used - 6 VP: Power supply +5 V only for bus<br />
terminating resistors;<br />
not for supplying external devices<br />
2 - not used - 7 - not used -<br />
3 RxD/TxD-P: Data line B 8 RxD/TxD-N: Data line A<br />
4 CNTR-P: RTS 9 - not used -<br />
5 DGND: Ground for data signals<br />
and VP<br />
Housing Ground connector<br />
Contacting the shield of the PROFIBUS cable<br />
The shield of the PROFIBUS cable must be contacted.<br />
To do this, strip the insulation from the end of the PROFIBUS cable and connect the shield<br />
to functional earth.<br />
Note<br />
The GPRS CP is not approved for Maritime applications<br />
The following module does not have Maritime approval:<br />
CP 1242-7 GPRS module<br />
Note<br />
To use these modules, your CPU firmware must be V2.0 or higher.<br />
Table A- 215 Technical specifications of the CP 1242-7<br />
Technical specifications<br />
Order number 6GK7 242-7KX30-0XE0<br />
Wireless interface<br />
<strong>S7</strong>-<strong>1200</strong> <strong>Programmable</strong> <strong>controller</strong><br />
System Manual, 04/2012, A5E02486680-06 815
Technical specifications<br />
A.12 Communication interfaces<br />
Technical specifications<br />
Antenna connector SMA socket<br />
Nominal impedance 50 ohms<br />
Wireless connection<br />
Maximum transmit power GSM 850, class 4: +33 dBm ±2dBm<br />
GSM 900, class 4: +33 dBm ±2dBm<br />
GSM 1800, class 1: +30 dBm ±2dBm<br />
GSM 1900, class 1: +30 dBm ±2dBm<br />
GPRS Multislot class 10<br />
device class B<br />
coding scheme 1...4 (GMSK)<br />
SMS<br />
Permitted ambient conditions<br />
Ambient temperature<br />
Mode outgoing: MO<br />
service: point-to-point<br />
during storage<br />
-40 °C to 70 °C<br />
during transportation<br />
-40 °C to 70 °C<br />
during operation with a vertical installation (DIN rail<br />
horizontal)<br />
0 °C to 55 °C<br />
during operation with a horizontal installation (DIN rail<br />
vertical)<br />
0 °C to 45 °C<br />
Relative humidity at 25 °C during operation, without<br />
condensation, maximum<br />
95 %<br />
Degree of protection<br />
Power supply, current consumption and power loss<br />
IP20<br />
Type of power supply DC<br />
Power supply / external<br />
24 V<br />
minimum<br />
19.2 V<br />
maximum<br />
28.8 V<br />
Current consumption (typical)<br />
from 24 V DC<br />
from the <strong>S7</strong>-<strong>1200</strong> backplane bus<br />
Effective power loss (typical)<br />
from 24 V DC<br />
from the <strong>S7</strong>-<strong>1200</strong> backplane bus<br />
24 V DC power supply<br />
Min. cable cross section<br />
Max. cable cross section<br />
Tightening torque of the screw terminals<br />
100 mA<br />
0 mA<br />
2.4 W<br />
0 W<br />
min.: 0.14 mm2 (AWG 25)<br />
max.: 1.5 mm2 (AWG 15)<br />
0.45 Nm (4 lb-in)<br />
<strong>S7</strong>-<strong>1200</strong> <strong>Programmable</strong> <strong>controller</strong><br />
816 System Manual, 04/2012, A5E02486680-06
Technical specifications<br />
Dimensions and weights<br />
Width<br />
Height<br />
Depth<br />
Weight<br />
Net weight<br />
Weight including packaging<br />
30 mm<br />
100 mm<br />
75 mm<br />
133 g<br />
170 g<br />
Technical specifications of the ANT794-4MR GSM/GPRS antenna<br />
Technical specifications<br />
A.12 Communication interfaces<br />
ANT794-4MR<br />
Order number 6NH9860-1AA00<br />
Mobile wireless networks GSM/GPRS<br />
Frequency ranges 824 to 960 MHz (GSM 850, 900)<br />
1 710 to 1 880 MHz (GSM 1 800)<br />
1 900 to 2 200 MHz (GSM / UMTS)<br />
Characteristics omnidirectional<br />
Antenna gain 0 dB<br />
Impedance 50 ohms<br />
Standing wave ratio (SWR) < 2,0<br />
Max. power 20 W<br />
Polarity linear vertical<br />
Connector SMA<br />
Length of antenna cable 5 m<br />
External material Hard PVC, UV-resistant<br />
Degree of protection<br />
Permitted ambient conditions<br />
IP20<br />
Operating temperature<br />
-40 °C through +70 °C<br />
Transport/storage temperature<br />
-40 °C through +70 °C<br />
Relative humidity<br />
100 %<br />
External material Hard PVC, UV-resistant<br />
Construction Antenna with 5 m fixed cable and SMA male<br />
connector<br />
Dimensions (D x H) in mm<br />
Weight<br />
25 x 193<br />
Antenna incl. cable<br />
310 g<br />
Fittings<br />
54 g<br />
Installation With supplied bracket<br />
<strong>S7</strong>-<strong>1200</strong> <strong>Programmable</strong> <strong>controller</strong><br />
System Manual, 04/2012, A5E02486680-06 817
Technical specifications<br />
A.12 Communication interfaces<br />
Technical specifications of the flat antenna ANT794-3M<br />
Order number 6NH9870-1AA00<br />
Mobile wireless networks GSM 900 GSM 1800/1900<br />
Frequency ranges 890 - 960 MHz 1710 - 1990 MHz<br />
Standing wave ratio (VSWR) ≤ 2:1 ≤ 1,5:1<br />
Return loss (Tx) ≈ 10 dB ≈ 14 dB<br />
Antenna gain 0 dB<br />
Impedance 50 ohms<br />
Max. power 10 W<br />
Antenna cable HF cable RG 174 (fixed) with SMA male connector<br />
Cable length 1.2 m<br />
Degree of protection IP64<br />
Permitted temperature range -40°C to +75°C<br />
Flammability UL 94 V2<br />
External material ABS Polylac PA-765, light gray (RAL 7035)<br />
Dimensions (W x L x H) in mm 70.5 x 146.5 x 20.5<br />
Weight 130 g<br />
A.12.3 CM 1243-2 AS-i Master<br />
A.12.3.1 Technical data for the AS-i master CM 1243-2<br />
Table A- 216 Technical data for the AS-i master CM 1243-2<br />
Technical data<br />
Order number 3RK7243-2AA30-0XB0<br />
Interfaces<br />
Maximum current consumption<br />
From the SIMATIC backplane bus<br />
Max. 250 mA,<br />
SIMATIC backplane bus supply voltage 5 V DC<br />
From the AS-i cable<br />
Max. 100 mA<br />
Pin assignment See section Electrical connections of the AS-i master CM<br />
1243-2 (Page 819)<br />
Conductor cross-section 0.2 mm² (AWG 24) ... 3.3 mm² (AWG 12)<br />
ASI connector tightening torque 0.56 Nm<br />
<strong>S7</strong>-<strong>1200</strong> <strong>Programmable</strong> <strong>controller</strong><br />
818 System Manual, 04/2012, A5E02486680-06
Technical data<br />
Permissible ambient conditions<br />
Ambient temperature<br />
During storage<br />
-40 °C ... 70 °C<br />
During transport<br />
-40 °C ... 70 °C<br />
During the operating phase, with vertical installation<br />
(horizontal standard mounting rail)<br />
0 °C ... 55 °C<br />
During the operating phase, with horizontal installation<br />
(vertical standard mounting rail)<br />
0 °C ... 45 °C<br />
Relative humidity at 25 °C during operating phase, no 95 %<br />
condensation, maximum<br />
Degree of protection IP20<br />
Power supply, current consumption, power loss<br />
Type of power supply DC<br />
Current consumption (typically)<br />
From the <strong>S7</strong>-<strong>1200</strong> backplane bus<br />
200 mA<br />
Power loss (typically)<br />
2.4 W from AS-i<br />
From the <strong>S7</strong>-<strong>1200</strong> backplane bus<br />
0.5 W<br />
Dimensions and weights<br />
Width<br />
30 mm<br />
Height<br />
100 mm<br />
Depth<br />
75 mm<br />
Weight<br />
Net weight<br />
122 g<br />
Weight including packaging<br />
159 g<br />
A.12.3.2 Electrical connections of the AS-i master CM 1243-2<br />
Power supply of the AS-i master CM 1243-2<br />
Technical specifications<br />
A.12 Communication interfaces<br />
The AS-i master CM 1243-2 is supplied over the communications bus of the <strong>S7</strong>-<strong>1200</strong>. This<br />
means that a diagnostics message can still be sent to the <strong>S7</strong>-<strong>1200</strong> following failure of the<br />
AS-i supply voltage. The connection to the communications bus is on the right-hand side of<br />
the AS-i master CM 1243-2.<br />
<strong>S7</strong>-<strong>1200</strong> <strong>Programmable</strong> <strong>controller</strong><br />
System Manual, 04/2012, A5E02486680-06 819
Technical specifications<br />
A.12 Communication interfaces<br />
AS-Interface terminals<br />
Terminal assignment<br />
The removable terminal for connecting the AS-i cable is located behind the lower cover on<br />
the front of the AS-i master CM 1243-2.<br />
If the AS-i shaped cable is used, you can recognize the correct polarity of the cable by<br />
means of the symbol .<br />
Information on how to remove and re-install the terminal block can be found in the system<br />
manual "SIMATIC <strong>S7</strong>-<strong>1200</strong> <strong>Programmable</strong> Controller" (Order No.: 6E<strong>S7</strong>298-8FA30-8AH0).<br />
NOTICE<br />
Maximum current carrying capacity of the terminal contacts<br />
The current carrying capacity of the connection contacts is max. 8 A. If this value is<br />
exceeded on the AS-i cable, the AS-i master CM 1243-2 must not be "looped in" to the ASi<br />
cable, but must instead be connected via a spur line (only one connection pair assigned<br />
on the AS-i master CM 1243-2).<br />
You will find additional information on connecting the AS-i cable in the section "Installation,<br />
connection and commissioning of the modules" in the manual "AS-i Master CM 1243-2 and<br />
AS-i data decoupling unit DCM 1271 for SIMATIC <strong>S7</strong>-<strong>1200</strong>".<br />
Label Meaning<br />
ASI+ AS-i connection – positive polarity<br />
ASI– AS-i connection – negative polarity<br />
Functional ground<br />
<strong>S7</strong>-<strong>1200</strong> <strong>Programmable</strong> <strong>controller</strong><br />
820 System Manual, 04/2012, A5E02486680-06
A.12.4 RS232, RS422, and RS485<br />
A.12.4.1 CB 1241 RS485 Specifications<br />
Table A- 217 General specifications<br />
Note<br />
To use this CB, your CPU firmware must be V2.0 or higher.<br />
Technical data CB 1241 RS485<br />
Order number 6E<strong>S7</strong> 241-1CH30-1XB0<br />
Dimensions W x H x D (mm) 38 x 62 x 21<br />
Weight 40 grams<br />
Table A- 218 Transmitter and receiver<br />
Technical specifications<br />
A.12 Communication interfaces<br />
Technical data CB 1241 RS485<br />
Type RS485 (2-wire half-duplex)<br />
Common mode voltage range -7 V to +12 V, 1 second, 3 VRMS continuous<br />
Transmitter differential output voltage 2 V min. at RL = 100 Ω<br />
1.5 V min. at RL = 54 Ω<br />
Termination and bias 10K to +5 V on B, RS485 Pin 3<br />
10K to GND on A, RS485 Pin 4<br />
Optional termination Short Pin TB to Pin T/RB, effective termination impedance is 127 Ω,<br />
connects to RS485 Pin 3<br />
Short Pin TA to Pin T/RA, effective termination impedance is 127 Ω,<br />
connects to RS485 Pin 4<br />
Receiver input impedance 5.4K Ω min. including termination<br />
Receiver threshold/sensitivity +/- 0.2 V min., 60 mV typical hysteresis<br />
Isolation<br />
RS485 signal to chassis ground<br />
RS485 signal to CPU logic common<br />
500 VAC, 1 minute<br />
Cable length, shielded 1000 m max.<br />
Baud rate 300 baud, 600 baud, 1.2 kbits, 2.4 kbits, 4.8 kbits, 9.6 kbits (default),<br />
19.2 kbits, 38.4 kbits, 57.6 kbits, 76.8 kbits, 115.2 kbits,<br />
Parity No parity (default), even, odd, Mark (parity bit always set to 1),<br />
Space (parity bit always set to 0)<br />
Number of stop bits 1 (default), 2<br />
Flow control Not supported<br />
Wait time 0 to 65535 ms<br />
<strong>S7</strong>-<strong>1200</strong> <strong>Programmable</strong> <strong>controller</strong><br />
System Manual, 04/2012, A5E02486680-06 821
Technical specifications<br />
A.12 Communication interfaces<br />
Table A- 219 Power supply<br />
Technical data CB 1241 RS485<br />
Power loss (dissipation) 1.5 W<br />
Current consumption (SM Bus), max. 50 mA<br />
Current consumption (24 VDC) max. 80 mA<br />
CB 1241 RS485 (6E<strong>S7</strong> 241-1CH30-1XB0)<br />
① Connect "TA" and TB" as shown to terminate the network. (Terminate only the end<br />
devices on the RS485 network.)<br />
② Use shielded twisted pair cable and connect the cable shield to ground.<br />
You terminate only the two ends of the RS485 network. The devices in between the two end<br />
devices are not terminated or biased. See the <strong>S7</strong>-<strong>1200</strong> System Manual section on "Biasing<br />
and terminating an RS485 network connector"<br />
Table A- 220 Connector pin locations for CB 1241 RS485 (6E<strong>S7</strong> 241-1CH30-1XB0)<br />
Pin 9-Pin connector X20<br />
1 RS485 / Logic GND --<br />
2 RS485 / Not Used --<br />
3 RS485 / TxD+ 3 - T/RB<br />
4 RS485 / RTS 1 - RTS<br />
5 RS485 / Logic GND --<br />
6 RS485 / 5V Power --<br />
7 RS485 / Not used --<br />
8 RS485 / TxD- 4 - T/RA<br />
<strong>S7</strong>-<strong>1200</strong> <strong>Programmable</strong> <strong>controller</strong><br />
822 System Manual, 04/2012, A5E02486680-06
See also<br />
Pin 9-Pin connector X20<br />
9 RS485 / Not Used --<br />
Shell 7 - M<br />
Biasing and terminating an RS485 network connector (Page 564)<br />
A.12.4.2 CM 1241 RS232 Specifications<br />
Table A- 221 General specifications<br />
Technical data CM 1241 RS232<br />
Order number 6E<strong>S7</strong> 241-1AH30-0XB0<br />
Dimensions (mm) 30 x 100 x 75<br />
Weight 150 grams<br />
Table A- 222 Transmitter and receiver<br />
Technical specifications<br />
A.12 Communication interfaces<br />
Technical data CM 1241 RS232<br />
Type RS232 (full-duplex)<br />
Transmitter output voltage +/- 5 V min. at RL = 3K Ω<br />
Transmit output voltage +/- 15 VDC max.<br />
Receiver input impedance 3 K Ω min.<br />
Receiver threshold/sensitivity 0.8 V min. low, 2.4 max. high<br />
0.5 V typical hysteresis<br />
Receiver input voltage +/- 30VDC max.<br />
Isolation<br />
RS 232 signal to chassis ground<br />
RS 232 signal to CPU logic common<br />
500 VAC, 1 minute<br />
Cable length, shielded 10 m max.<br />
Baud rate 300 baud, 600 baud, 1.2 kbits, 2.4 kbits, 4.8 kbits, 9.6 kbits (default),<br />
19.2 kbits, 38.4 kbits, 57.6 kbits, 76.8 kbits, 115.2 kbits,<br />
Parity No parity (default), even, odd, Mark (parity bit always set to 1),<br />
Space (parity bit always set to 0)<br />
Number of stop bits 1 (default), 2<br />
Flow control Hardware, software<br />
Wait time 0 to 65535 ms<br />
<strong>S7</strong>-<strong>1200</strong> <strong>Programmable</strong> <strong>controller</strong><br />
System Manual, 04/2012, A5E02486680-06 823
Technical specifications<br />
A.12 Communication interfaces<br />
Table A- 223 Power supply<br />
Technical data CM 1241 RS232<br />
Power loss (dissipation) 1.1 W<br />
From +5 VDC 220 mA<br />
Table A- 224 RS232 connector (male)<br />
Pin Description Connector<br />
(male)<br />
Pin Description<br />
1 DCD Data carrier detect: Input 6 DSR Data set ready: Input<br />
<br />
2 RxD Received data from DCE: Input 7 RTS Request to send: Output<br />
3 TxD Transmitted data to DCE: Output 8 CTS Clear to send: Input<br />
4 DTR Data terminal ready: Output 9 RI Ring indicator (not used)<br />
5 GND Logic ground <br />
A.12.4.3 CM 1241 RS422/485 Specifications<br />
CM 1241 RS422/485 Specifications<br />
Table A- 225 General specifications<br />
Technical data CM 1241 RS422/485<br />
Order number 6E<strong>S7</strong> 241-1CH31-0XB0<br />
Dimensions W x H x H (mm) 30 x 100 x 75<br />
Weight 155 grams<br />
Table A- 226 Transmitter and receiver<br />
<br />
<br />
<br />
<strong>S7</strong>-<strong>1200</strong> <strong>Programmable</strong> <strong>controller</strong><br />
824 System Manual, 04/2012, A5E02486680-06<br />
<br />
<br />
SHELL Chassis ground<br />
Technical data CM 1241 RS422/485<br />
Type RS422 or RS485, 9-pin sub D female connector<br />
Common mode voltage range -7 V to +12 V, 1 second, 3 VRMS continuous<br />
Transmitter differential output voltage 2 V min. at RL = 100 Ω<br />
1.5 V min. at RL = 54 Ω
Technical specifications<br />
A.12 Communication interfaces<br />
Technical data CM 1241 RS422/485<br />
Termination and bias 10K Ω to +5 V on B, PROFIBUS Pin 3<br />
10K Ω to GND on A, PROFIBUS Pin 8<br />
Internal bias options provided, or no internal bias. In all cases,<br />
external termination is required, see Biasing and terminating an<br />
RS485 network connector (Page 564) and Configuring the RS422<br />
and RS485 in the <strong>S7</strong>-<strong>1200</strong> System Manual (Page 599)<br />
Receiver input impedance 5.4K Ω min. including termination<br />
Receiver threshold/sensitivity +/- 0.2 V min., 60 mV typical hysteresis<br />
Isolation<br />
500 VAC, 1 minute<br />
RS485 signal to chassis ground<br />
RS485 signal to CPU logic common<br />
Cable length, shielded 1000 m max. (baud rate dependent)<br />
Baud rate 300 baud, 600 baud, 1.2 kbits, 2.4 kbits, 4.8 kbits, 9.6 kbits (default),<br />
19.2 kbits, 38.4 kbits, 57.6 kbits, 76.8 kbits, 115.2 kbits,<br />
Parity No parity (default), even, odd, Mark (parity bit always set to 1),<br />
Space (parity bit always set to 0)<br />
Number of stop bits 1 (default), 2<br />
Flow control XON/XOFF supported for the RS422 mode<br />
Wait time 0 to 65535 ms<br />
Table A- 227 Power supply<br />
Technical data CM 1241 RS422/485<br />
Power loss (dissipation) 1.2 W<br />
From +5 VDC 240 mA<br />
Table A- 228 RS485 or RS422 connector (female)<br />
Pin Description Connector<br />
(female)<br />
Pin Description<br />
1 Logic or communication ground 6 PWR +5V with 100 ohm series resistor: Output<br />
2 TxD+ 1 Connected for RS422<br />
Not used for RS485: Output<br />
7 Not connected<br />
3 TxD+ Signal B (RxD/TxD+): Input/Output 8 TXD- Signal A (RxD/TxD-): Input/Output<br />
4 RTS 2 Request to send (TTL level) Output 9 TXD- 1 <br />
<br />
<br />
<br />
<br />
<br />
<br />
<br />
<br />
Connected for RS422<br />
Not used for RS485: Output<br />
5 GND Logic or communication ground<br />
SHELL Chassis ground<br />
1 Pins 2 and 9 are only used as transmit signals for RS422.<br />
2 The RTS is a TTL level signal and can be used to control another half duplex device based on this signal. It is active<br />
when you transmit and is inactive all other times.<br />
<strong>S7</strong>-<strong>1200</strong> <strong>Programmable</strong> <strong>controller</strong><br />
System Manual, 04/2012, A5E02486680-06 825
Technical specifications<br />
A.13 TeleService (TS Adapter and TS Adapter modular)<br />
A.13 TeleService (TS Adapter and TS Adapter modular)<br />
The following manuals contain the technical specification for the TS Adapter IE Basic and<br />
the TS Adapter modular:<br />
● Industrial Software Engineering Tools<br />
Modular TS Adapter<br />
● Industrial Software Engineering Tools<br />
TS Adapter IE Basic<br />
A.14 SIMATIC memory cards<br />
A.15 Input simulators<br />
Table A- 229 General specifications<br />
Order Number Capacity<br />
6E<strong>S7</strong> 954-8LF01-0AA0 24 MB<br />
6E<strong>S7</strong> 954-8LE01-0AA0 12 MB<br />
6E<strong>S7</strong> 954-8LB01-0AA0 2 MB<br />
Technical data 8 Position Simulator 14 Position Simulator<br />
Order number 6E<strong>S7</strong> 274-1XF30-0XA0 6E<strong>S7</strong> 274-1XH30-0XA0<br />
Dimensions W x H x D (mm) 43 x 35 x 23 67 x 35 x 23<br />
Weight 20 grams 30 grams<br />
Points 8 14<br />
Used with CPU CPU 1211C, CPU 1212C CPU 1214C<br />
WARNING<br />
These input simulators are not approved for use in Class I DIV 2 or Class I Zone 2<br />
hazardous locations. The switches present a potential spark hazard/explosion hazard if<br />
used in a Class I DIV 2 or Class I Zone 2 location.<br />
<strong>S7</strong>-<strong>1200</strong> <strong>Programmable</strong> <strong>controller</strong><br />
826 System Manual, 04/2012, A5E02486680-06
8 Position Simulator (6E<strong>S7</strong> 274-1XF30-0XA0)<br />
<br />
Technical specifications<br />
A.16 I/O expansion cable<br />
<strong>S7</strong>-<strong>1200</strong> <strong>Programmable</strong> <strong>controller</strong><br />
System Manual, 04/2012, A5E02486680-06 827<br />
<br />
14 Position Simulator (6E<strong>S7</strong> 274-1XF30-0XA0)<br />
A.16 I/O expansion cable<br />
<br />
<br />
Technical Data<br />
Order number 6E<strong>S7</strong> 290-6AA30-0XA0<br />
Cable length 2 m<br />
Weight 200 g<br />
① 24 VDC sensor power out<br />
① 24 VDC sensor<br />
power out<br />
Refer to the installation section (Page 56) for information about installing and removing the<br />
<strong>S7</strong>-<strong>1200</strong> expansion cable.
Technical specifications<br />
A.17 Companion products<br />
A.17 Companion products<br />
A.17.1 PM 1207 power module<br />
The PM 1207 is a power supply module for the SIMATIC <strong>S7</strong>-<strong>1200</strong>. It provides the following<br />
features:<br />
● Input 120/230 VAC, output 24 VDC/2.5A<br />
● Order number 6ESP 332-1SH71<br />
For more information about this product and for the product documentation, refer to the<br />
customer support web site (http://www.siemens.com/automation/).<br />
A.17.2 CSM 1277 compact switch module<br />
The CSM1277 is an Industrial Ethernet compact switch module. It can be used to multiply<br />
the Ethernet interface of the <strong>S7</strong>-<strong>1200</strong> to allow simultaneous communication with operator<br />
panels, programming devices, or other <strong>controller</strong>s. It provides the following features:<br />
● 4 x RJ45 sockets for connecting to Industrial Ethernet<br />
● 3 pole plug in terminal strip for connection of the external 24 VDC supply on top<br />
● LEDs for diagnostics and status display of Industrial Ethernet ports<br />
● Order number 6GK7 277-1AA00-0AA0<br />
For more information about this product and for the product documentation, refer to the<br />
customer support web site (http://www.siemens.com/automation/).<br />
<strong>S7</strong>-<strong>1200</strong> <strong>Programmable</strong> <strong>controller</strong><br />
828 System Manual, 04/2012, A5E02486680-06
Calculating a power budget B<br />
The CPU has an internal power supply that provides power for the CPU itself, for any<br />
expansion modules, and for other 24 VDC user power requirements.<br />
There are four types of expansion modules:<br />
● Signal modules (SM) are installed on the right-side of the CPU. Each CPU allows a<br />
maximum number of signal modules possible without regard to the power budget.<br />
– CPU 1214C and CPU 1215C allows 8 signal modules<br />
– CPU 1212C allows 2 signal modules<br />
– CPU 1211C allows no signal modules<br />
● Communication modules (CM), are installed on the left-side of the CPU. A maximum of 3<br />
communication modules is allowed for any CPU without regard to the power budget.<br />
● Signal boards (SB), communications boards (CB), and battery boards (BB) are installed<br />
on top of the CPU. A maximum of 1 signal board, communication board, or battery board<br />
is allowed for any CPU.<br />
Use the following information as a guide for determining how much power (or current) the<br />
CPU can provide for your configuration.<br />
Each CPU supplies both 5 VDC and 24 VDC power:<br />
● The CPU provides 5 VDC power for the expansion modules when an expansion module<br />
is connected. If the 5 VDC power requirements for expansion modules exceed the power<br />
budget of the CPU, you must remove expansion modules until the requirement is within<br />
the power budget.<br />
● Each CPU has a 24 VDC sensor supply that can supply 24 VDC for local input points or<br />
for relay coils on the expansion modules. If the power requirement for 24 VDC exceeds<br />
the power budget of the CPU, you can add an external 24 VDC power supply to provide<br />
24 VDC to the expansion modules. You must manually connect the 24 VDC supply to the<br />
input points or relay coils.<br />
WARNING<br />
Connecting an external 24 VDC power supply in parallel with the DC sensor supply can<br />
result in a conflict between the two supplies as each seeks to establish its own preferred<br />
output voltage level.<br />
The result of this conflict can be shortened lifetime or immediate failure of one or both<br />
power supplies, with consequent unpredictable operation of the PLC system.<br />
Unpredictable operation could result in death, severe personal injury and/or property<br />
damage.<br />
The DC sensor supply on the CPU and any external power supply should provide power<br />
to different points. A single connection of the commons is allowed.<br />
<strong>S7</strong>-<strong>1200</strong> <strong>Programmable</strong> <strong>controller</strong><br />
System Manual, 04/2012, A5E02486680-06 829
Calculating a power budget<br />
Some of the 24V power input ports in the PLC system are interconnected, with a logic<br />
common circuit connecting multiple M terminals. The CPU 24V power supply input, the SM<br />
relay coil power input, and a non-isolated analog power supply input are examples of circuits<br />
that are interconnected when designated as not isolated in the data sheets. All non-isolated<br />
M terminals must connect to the same external reference potential.<br />
WARNING<br />
Connecting non-isolated M terminals to different reference potentials will cause unintended<br />
current flows that may cause damage or unpredictable operation in the PLC and connected<br />
equipment.<br />
Such damage or unpredictable operation could result in death, severe personal injury<br />
and/or property damage.<br />
Always be sure that all non-isolated M terminals in a PLC system are connected to the<br />
same reference potential.<br />
Information about the power budgets of the CPUs and the power requirements of the signal<br />
modules is provided in the technical specifications (Page 699).<br />
Note<br />
Exceeding the power budget of the CPU may result in not being able to connect the<br />
maximum number of modules allowed for your CPU.<br />
Sample power budget<br />
The following example shows a sample calculation of the power requirements for a<br />
configuration that includes one CPU 1214C AC/DC/Relay, one SB 1223 2 x 24 VDC Input/ 2<br />
x 24 VDC Output, one CM 1241, three SM 1223 8 DC In/8 Relay Out, and one SM 1221 8<br />
DC In. This example has a total of 48 inputs and 36 outputs.<br />
Table B- 1 Sample power budget<br />
Note<br />
The CPU has already allocated the power required to drive the internal relay coils. You do<br />
not need to include the internal relay coil power requirements in a power budget calculation.<br />
The CPU in this example provides sufficient 5 VDC current for the SMs, but does not provide<br />
enough 24 VDC current from the sensor supply for all of the inputs and expansion relay<br />
coils. The I/O requires 456 mA and the CPU provides only 400 mA. This installation requires<br />
an additional source of at least 56 mA at 24 VDC power to operate all the included 24 VDC<br />
inputs and outputs.<br />
CPU power budget 5 VDC 24 VDC<br />
CPU 1214C AC/DC/Relay 1600 mA 400 mA<br />
Minus<br />
<strong>S7</strong>-<strong>1200</strong> <strong>Programmable</strong> <strong>controller</strong><br />
830 System Manual, 04/2012, A5E02486680-06
CPU power budget 5 VDC 24 VDC<br />
System requirements 5 VDC 24 VDC<br />
CPU 1214C, 14 inputs - 14 * 4 mA = 56 mA<br />
1 SB 1223 2 x 24 VDC Input/ 2 x 24<br />
VDC Output<br />
50 mA 2 * 4 mA = 8 mA<br />
1 CM 1241 RS422/485, 5 V power 220 mA<br />
3 SM 1223, 5 V power 3 * 145 mA = 435 mA -<br />
1 SM 1221, 5 V power 1 * 105 mA = 105 mA -<br />
3 SM 1223, 8 inputs each - 3 * 8 * 4 mA = 96 mA<br />
3 SM 1223, 8 relay coils each - 3 * 8 * 11 mA = 264 mA<br />
1 SM 1221, 8 inputs each - 8 * 4 mA = 32 mA<br />
Total requirements 810 mA<br />
Equals<br />
456 mA<br />
Current balance 5 VDC 24 VDC<br />
Current balance total 790 mA (56 mA)<br />
Form for calculating your power budget<br />
Calculating a power budget<br />
Use the following table to determine how much power (or current) the <strong>S7</strong>-<strong>1200</strong> CPU can<br />
provide for your configuration. Refer to the technical specifications (Page 699) for the power<br />
budgets of your CPU model and the power requirements of your signal modules.<br />
Table B- 2 Calculations for a power budget<br />
CPU power budget 5 VDC 24 VDC<br />
Minus<br />
System requirements 5 VDC 24 VDC<br />
Total requirements<br />
Equals<br />
Current balance<br />
Current balance total<br />
5 VDC 24 VDC<br />
<strong>S7</strong>-<strong>1200</strong> <strong>Programmable</strong> <strong>controller</strong><br />
System Manual, 04/2012, A5E02486680-06 831
Calculating a power budget<br />
<strong>S7</strong>-<strong>1200</strong> <strong>Programmable</strong> <strong>controller</strong><br />
832 System Manual, 04/2012, A5E02486680-06
Order numbers C<br />
C.1 CPU modules<br />
Table C- 1 <strong>S7</strong>-<strong>1200</strong> CPUs<br />
CPU models Order Number<br />
CPU 1211C CPU 1211C DC/DC/DC 6E<strong>S7</strong> 211-1AE31-0XB0<br />
CPU 1211C AC/DC/Relay 6E<strong>S7</strong> 211-1BE31-0XB0<br />
CPU 1211C DC/DC/Relay 6E<strong>S7</strong> 211-1HE31-0XB0<br />
CPU 1212C CPU 1212C DC/DC/DC 6E<strong>S7</strong> 212-1AE31-0XB0<br />
CPU 1212C AC/DC/Relay 6E<strong>S7</strong> 212-1BE31-0XB0<br />
CPU 1212C DC/DC/Relay 6E<strong>S7</strong> 212-1HE31-0XB0<br />
CPU 1214C CPU 1214C DC/DC/DC 6E<strong>S7</strong> 214-1AG31-0XB0<br />
CPU 1214C AC/DC/Relay 6E<strong>S7</strong> 214-1BG31-0XB0<br />
CPU 1214C DC/DC/Relay 6E<strong>S7</strong> 214-1HG31-0XB0<br />
CPU 1215C CPU 1215C DC/DC/DC 6E<strong>S7</strong> 215-1AG31-0XB0<br />
CPU 1215C AC/DC/Relay 6E<strong>S7</strong> 215 -1BG31-0XB0<br />
CPU 1215C DC/DC/Relay 6E<strong>S7</strong> 215-1HG31-0XB0<br />
C.2 Signal modules (SMs), signal boards (SBs) and battery boards (BB)<br />
Table C- 2 Signal modules (SMs)<br />
Signal modules Order Number<br />
Digital input SM 1221 8 x 24 VDC Input (Sink/Source) 6E<strong>S7</strong> 221-1BF30-0XB0<br />
SM 1221 16 x 24 VDC Input (Sink/Source) 6E<strong>S7</strong> 221-1BH30-0XB0<br />
Digital output SM 1222 8 x 24 VDC Output (Source) 6E<strong>S7</strong> 222-1BF30-0XB0<br />
SM 1222 16 x 24 VDC Output (Source) 6E<strong>S7</strong> 222-1BH30-0XB0<br />
SM 1222 8 x Relay Output 6E<strong>S7</strong> 222-1HF30-0XB0<br />
SM 1222 8 x Relay Output (Changeover) 6E<strong>S7</strong> 222-1XF30-0XB0<br />
SM 1222 16 x Relay Output 6E<strong>S7</strong> 222-1HH30-0XB0<br />
Digital input / SM 1223 8 x 24 VDC Input (Sink/Source) / 8 x 24 VDC Output 6E<strong>S7</strong> 223-1BH30-0XB0<br />
output<br />
(Source)<br />
SM 1223 16 x 24 VDC Input (Sink/Source) / 16 x 24 VDC Output<br />
(Source)<br />
6E<strong>S7</strong> 223-1BL30-0XB0<br />
SM 1223 8 x 24 VDC Input (Sink/Source) / 8 x Relay Output 6E<strong>S7</strong> 223-1PH30-0XB0<br />
SM 1223 16 x 24 VDC Input (Sink/Source) / 16 x Relay Output 6E<strong>S7</strong> 223-1PL30-0XB0<br />
SM 1223 8 x 120/230 VAC Input (Sink/Source) / 8 x Relay Outputs 6E<strong>S7</strong> 223-1QH30-0XB0<br />
<strong>S7</strong>-<strong>1200</strong> <strong>Programmable</strong> <strong>controller</strong><br />
System Manual, 04/2012, A5E02486680-06 833
Order numbers<br />
C.3 Communication<br />
Signal modules Order Number<br />
Analog input<br />
Analog output<br />
Analog input /<br />
output<br />
RTD and<br />
thermocouple<br />
SM 1231 4 x Analog Input 6E<strong>S7</strong> 231-4HD30-0XB0<br />
SM 1231 8 x Analog Input 6E<strong>S7</strong> 231-4HF30-0XB0<br />
SM 1231 4 x Analog Input x 16 bit (high feature) 6E<strong>S7</strong> 231-5ND30-0XB0<br />
SM 1232 2 x Analog Output 6E<strong>S7</strong> 232-4HB30-0XB0<br />
SM 1232 4 x Analog Output 6E<strong>S7</strong> 232-4HD30-0XB0<br />
SM 1234 4 x Analog Input / 2 x Analog Output 6E<strong>S7</strong> 234-4HE30-0XB0<br />
SM 1231 TC 4 x 16 bit 6E<strong>S7</strong> 231-5QD30-0XB0<br />
SM 1231 TC 8 x 16 bit 6E<strong>S7</strong> 231-5QF30-0XB0<br />
SM 1231 RTD 4 x 16 bit 6E<strong>S7</strong> 231-5PD30-0XB0<br />
SM 1231 RTD 8 x 16 bit 6E<strong>S7</strong> 231-5PF30-0XB0<br />
Table C- 3 Signal boards (SB) and battery boards (BBs)<br />
Signal and battery boards Order Number<br />
Digital input SB 1221 200 KHz 4 x 24 VDC Input (Source), 6E<strong>S7</strong> 221-3BD30-0XB0<br />
SB 1221 200 KHz 4 x 5 VDC Input (Source) 6E<strong>S7</strong> 221-3AD30-0XB0<br />
Digital output SB 1222 200 KHz 4 x 24 VDC Output (Sink/Source) 6E<strong>S7</strong> 222-1BD30-0XB0<br />
SB 1222 200 KHz 4 x 5 VDC Output (Sink/Source) 6E<strong>S7</strong> 222-1AD30-0XB0<br />
Digital input / SB 1223 2 x 24 VDC Input (Sink) / 2 x 24 VDC Output (Source) 6E<strong>S7</strong> 223-0BD30-0XB0<br />
output<br />
SB 1223 200 KHz 2 x 24 VDC Input (Source) / 2 x 24 VDC Output<br />
(Sink/Source)<br />
6E<strong>S7</strong> 223-3BD30-0XB0<br />
SB 1223 200 KHz 2 x 5 VDC Input (Source) / 2 x 5 VDC Output<br />
(Sink/Source)<br />
6E<strong>S7</strong> 223-3AD30-0XB0<br />
Analog<br />
SB 1232 1 Analog Output 6E<strong>S7</strong> 232-4HA30-0XB0<br />
SB 1231 1 Analog Input 6E<strong>S7</strong> 231-4HA30-0XB0<br />
SB 1231 1 Analog Input Thermocouple 6E<strong>S7</strong> 231-5QA30-0XB0<br />
SB 1231 1 Analog Input RTD 6E<strong>S7</strong> 231-5PA30-0XB0<br />
Battery BB 1297 Battery 6E<strong>S7</strong> 297-0AX30-0XA0<br />
C.3 Communication<br />
Table C- 4 Communication module (CM)<br />
Communication module (CM) Order Number<br />
RS232, RS422, CM 1241 RS232 RS232 6E<strong>S7</strong> 241-1AH30-0XB0<br />
and RS485 CM 1241 RS422/485 RS422/485 6E<strong>S7</strong> 241-1CH31-0XB0<br />
PROFIBUS CM 1243-5 PROFIBUS Master 6GK7 243-5DX30-0XE0<br />
CM 1242-5 PROFIBUS Slave 6GK7 242-5DX30-0XE0<br />
AS-i Master CM 1243-2 AS-i Master 3RK7 243-2AA30-0XB0<br />
<strong>S7</strong>-<strong>1200</strong> <strong>Programmable</strong> <strong>controller</strong><br />
834 System Manual, 04/2012, A5E02486680-06
Table C- 5 Communication board (CB)<br />
Communication board (CB) Order Number<br />
RS485 CB 1241 RS485 RS485 6E<strong>S7</strong> 241-1CH30-1XB0<br />
Table C- 6 Communication Processor (CP)<br />
Communication processor (CP) Order Number<br />
CP 1242-7 GPRS 6GK7 242-7KX30-0XE0<br />
Table C- 7 TeleService<br />
TS Adapter Order Number<br />
TS Adapter IE Basic 6E<strong>S7</strong> 972-0EB00-0XA0<br />
TS Module GSM 6GK7 972-0MG00-0XA0<br />
TS Module RS232 6E<strong>S7</strong> 792-0MS00-0XA0<br />
TS Module Modem 6E<strong>S7</strong> 972-0MM00-0XA0<br />
TS Module ISDN 6E<strong>S7</strong> 972-0MD00-0XA0<br />
Table C- 8 Accessories<br />
Accessory Order Number<br />
Antenna ANT794-4MR GSM/GPRS antenna 6NH9 860-1AA00<br />
ANT794-3M Flat antenna 6NH9 870-1AA00<br />
Table C- 9 Connectors<br />
Type of Connector Order Number<br />
RS485<br />
35-degree cable output, screw-terminal connection 6E<strong>S7</strong> 972-0BA42-0XA0<br />
35-degree cable output, FastConnect connection 6E<strong>S7</strong> 972-0BA60-0XA0<br />
C.4 Other modules<br />
Table C- 10 Companion products<br />
Order numbers<br />
C.4 Other modules<br />
Item Order Number<br />
Power supply module PM 1207 power supply 6EP1 332-1SH71<br />
Ethernet switch CSM 1277 Ethernet switch - 4 ports 6GK7 277-1AA10-0AA0<br />
<strong>S7</strong>-<strong>1200</strong> <strong>Programmable</strong> <strong>controller</strong><br />
System Manual, 04/2012, A5E02486680-06 835
Order numbers<br />
C.5 Memory cards<br />
C.5 Memory cards<br />
Table C- 11 Memory cards<br />
SIMATIC memory cards Order Number<br />
SIMATIC MC 2 MB 6E<strong>S7</strong> 954-8LB01-0AA0<br />
SIMATIC MC 12 MB 6E<strong>S7</strong> 954-8LE01-0AA0<br />
SIMATIC MC 24 MB 6E<strong>S7</strong> 954-8LF01-0AA0<br />
C.6 Basic HMI devices<br />
Table C- 12 HMI devices<br />
HMI Basic Panels Order Number<br />
KTP400 Basic (Mono, PN) 6AV6 647-0AA11-3AX0<br />
KTP600 Basic (Mono, PN) 6AV6 647-0AB11-3AX0<br />
KTP600 Basic (Color, PN) 6AV6 647-0AD11-3AX0<br />
KTP1000 Basic (Color, PN) 6AV6 647-0AF11-3AX0<br />
TP1500 Basic (Color, PN) 6AV6 647-0AG11-3AX0<br />
C.7 Spare parts and other hardware<br />
Table C- 13 Expansion cables, simulators and connector blocks<br />
Item Order Number<br />
I/O expansion cable I/O Expansion cable, 2 m 6E<strong>S7</strong> 290-6AA30-0XA0<br />
I/O simulator<br />
Spare door kit<br />
Connector block Tin<br />
Simulator (1214C/1211C - 8 position) 6E<strong>S7</strong> 274-1XF30-0XA0<br />
Simulator (1214C - 14 position) 6E<strong>S7</strong> 274-1XH30-0XA0<br />
CPU 1211C/1212C 6E<strong>S7</strong> 291-1AA30-0XA0<br />
CPU 1214C 6E<strong>S7</strong> 291-1AB30-0XA0<br />
CPU 1215C 6E<strong>S7</strong> 291-1AC30-0XA0<br />
Signal module, 45 mm 6E<strong>S7</strong> 291-1BA30-0XA0<br />
Signal module, 70 mm 6E<strong>S7</strong> 291-1BB30-0XA0<br />
Communication module 6E<strong>S7</strong> 291-1CC30-0XA0<br />
7 terminal, 4/pk 6E<strong>S7</strong> 292-1AG30-0XA0<br />
8 terminal, 4/pk 6E<strong>S7</strong> 292-1AH30-0XA0<br />
11 terminal, 4/pk 6E<strong>S7</strong> 292-1AL30-0XA0<br />
12 terminal, 4/pk 6E<strong>S7</strong> 292-1AM30-0XA0<br />
14 terminal, 4/pk 6E<strong>S7</strong> 292-1AP30-0XA0<br />
20 terminal, 4/pk 6E<strong>S7</strong> 292-1AV30-0XA0<br />
<strong>S7</strong>-<strong>1200</strong> <strong>Programmable</strong> <strong>controller</strong><br />
836 System Manual, 04/2012, A5E02486680-06
Order numbers<br />
C.8 Programming software<br />
Item Order Number<br />
Gold 3 terminal, 4/pk (for analog CPU) 6E<strong>S7</strong> 292-1BC30-0XA0<br />
6 terminal, 4/pk (for signal board) 6E<strong>S7</strong> 292-1BF30-0XA0<br />
6 terminal, 4/pk (for analog CPU) 6E<strong>S7</strong> 292-1BF30-0XB0<br />
7 terminal, 4/pk (for analog signal module) 6E<strong>S7</strong> 292-1BG30-0XA0<br />
11 terminal, 4/pk (for analog signal module) 6E<strong>S7</strong> 292-1BL30-0XA0<br />
C.8 Programming software<br />
Table C- 14 Programming software<br />
SIMATIC software Order Number<br />
Programming software STEP 7 Basic V11 6E<strong>S7</strong> 822-0AA01-0YA0<br />
STEP 7 Professional V11 6E<strong>S7</strong> 822-1AA01-0YA5<br />
Visualization software WinCC Basic V11 6AV2100-0AA01-0AA0<br />
WinCC Comfort V11 6AV2101-0AA01-0AA5<br />
WinCC Advanced V11 6AV2102-0AA01-0AA5<br />
WinCC Professional 512 PowerTags V11 6AV2103-0DA01-0AA5<br />
WinCC Professional 4096 PowerTags V11 6AV2103-0HA01-0AA5<br />
WinCC Professional max. PowerTags V11 6AV2103-0XA01-0AA5<br />
C.9 Documentation<br />
Table C- 15 <strong>S7</strong>-<strong>1200</strong> documentation<br />
Printed documentation Language Order Number<br />
<strong>S7</strong>-<strong>1200</strong> <strong>Programmable</strong> Controller System Manual German 6E<strong>S7</strong> 298-8FA30-8AH0<br />
English 6E<strong>S7</strong> 298-8FA30-8BH0<br />
French 6E<strong>S7</strong> 298-8FA30-8CH0<br />
Spanish 6E<strong>S7</strong> 298-8FA30-8DH0<br />
Italian 6E<strong>S7</strong> 298-8FA30-8EH0<br />
Chinese 6E<strong>S7</strong> 298-8FA30-8KH0<br />
<strong>S7</strong>-<strong>1200</strong> Easy Book<br />
German 6E<strong>S7</strong> 298-8FA30-8AQ0<br />
English 6E<strong>S7</strong> 298-8FA30-8BQ0<br />
French 6E<strong>S7</strong> 298-8FA30-8CQ0<br />
Spanish 6E<strong>S7</strong> 298-8FA30-8DQ0<br />
Italian 6E<strong>S7</strong> 298-8FA30-8EQ0<br />
Chinese 6E<strong>S7</strong> 298-8FA30-8KQ0<br />
<strong>S7</strong>-<strong>1200</strong> <strong>Programmable</strong> <strong>controller</strong><br />
System Manual, 04/2012, A5E02486680-06 837
Order numbers<br />
C.9 Documentation<br />
<strong>S7</strong>-<strong>1200</strong> <strong>Programmable</strong> <strong>controller</strong><br />
838 System Manual, 04/2012, A5E02486680-06
Index<br />
A<br />
ABS (absolute value), 202<br />
AC<br />
grounding, 63<br />
inductive loads, 64<br />
isolation guidelines, 62<br />
wiring guidelines, 61, 63<br />
Access protection<br />
CPU, 164<br />
Accessing<br />
data logs from PC, 516<br />
user-defined Web pages, 539<br />
ACOS (arc cosine or inverse cosine), 205<br />
Active/passive communication<br />
configuring the partners, 127, 494<br />
connection IDs, 427<br />
parameters, 129<br />
Active/Passive connection, 425<br />
Ad hoc mode<br />
ISO on TCP, 431<br />
TCP, 431<br />
ADD (add), 199<br />
Add new device<br />
CPU, 120<br />
detect existing hardware, 121<br />
unspecific CPU, 121<br />
Adding inputs or outputs to LAD or FBD<br />
instructions, 35<br />
Addressing<br />
Boolean or bit values, 88<br />
individual inputs (I) or outputs (Q), 88<br />
memory areas, 88<br />
process image, 88<br />
Air flow, 44<br />
Alarm<br />
peripheral access, 471<br />
Alarm interrupt, 296<br />
Aliases in user-defined Web pages, 529<br />
Analog I/O<br />
configuration, 125<br />
conversion to engineering units, 34, 92, 220<br />
input representation (current), 770, 800<br />
input representation (voltage), 770, 799<br />
output representation (current), 771, 801<br />
output representation (voltage), 771, 800<br />
status indicators, 674<br />
step response times (CPU), 711, 720, 730, 740<br />
step response times (SB), 798<br />
step response times (SM), 769<br />
Analog signal (SM)<br />
SM 1232 AQ 4 x 14bit, 764<br />
Analog signal board (SB)<br />
SB 1231 AI 1 x 12 bit, 794<br />
SB 1231 AI 1 x 16 bit RTD, 806<br />
SB 1231 AI 1 x 16 bit Thermocouple, 801<br />
SB 1232 AQ 1x12 bit, 797<br />
Analog signal module (SM)<br />
SM 1231 AI 4 x RTD x 16 bit, 778<br />
SM 1231 AI 8 x 13 bit, 760<br />
SM 1231 AI 8 x 16 bit TC, 772<br />
SM 1231 AI 8 x RTD x 16 bit, 778<br />
SM 1231 AI4 x 16 bit TC, 772<br />
SM 1232 AQ 2 x 14bit, 764<br />
SM 1234 AI 4 x 13 bit / AQ 2 x 14 bit, 766<br />
AND, 239<br />
Approvals<br />
ATEX approval, 700<br />
CE approval, 699<br />
C-Tick approval, 701<br />
cULus approval, 700<br />
FM approval, 700<br />
maritime approval, 701<br />
Arrays<br />
accessing members with a variable, 210<br />
AS-i<br />
add AS-i master CM1243-2 module, 482<br />
add AS-i slave, 482<br />
AS-i address, 484<br />
AS-i address properties, 484<br />
distributed I/O instructions, 274<br />
network connection, 482<br />
RDREC, 275<br />
system assignment, 484<br />
system assignment of slave addresses, 484<br />
transferring analog values, 486<br />
transferring digital values, 486<br />
WRREC, 275<br />
AS-I<br />
slave configuration with STEP 7, 486<br />
slave configuration without STEP 7, 484<br />
AS-i address, 484<br />
configuring, 484<br />
AS-i master CM 1243-2, 481<br />
<strong>S7</strong>-<strong>1200</strong> <strong>Programmable</strong> <strong>controller</strong><br />
System Manual, 04/2012, A5E02486680-06 839
Index<br />
module features, 481<br />
ASIN (arc sine or inverse sine), 205<br />
Assigning enum types, user-defined Web pages, 530<br />
ATEX approval, 700<br />
ATH (ASCII to hexadecimal), 265<br />
ATTACH, 288<br />
AWP commands, 522<br />
combining definitions, 533<br />
defining an enum type, 529<br />
generating fragments, 532<br />
importing fragments, 533<br />
reading special variables, 526<br />
referencing an enum type, 530<br />
using an alias, 529<br />
writing special variables, 527<br />
writing variables, 524<br />
AWP_Enum_Def, 529<br />
AWP_Enum_Ref, 530<br />
AWP_Import_Fragment, 533<br />
AWP_In_Variable, 524, 527<br />
AWP_Out_Variable, 526<br />
AWP_Start_Fragment, 532<br />
B<br />
Basic panels (HMI), 26<br />
Baud rate, 584<br />
Binding to a CPU or memory card, 166<br />
Bit logic, 175<br />
Block<br />
consistency check, 172<br />
Block move (MOVE_BLK), 207<br />
Blocks<br />
block calls, 67<br />
calling an FB or FC with SCL, 157<br />
copying blocks from an online CPU, 168<br />
counters (quantity and memory requirements), 21,<br />
707, 717, 726, 736<br />
data block (DB), 67<br />
download, 168<br />
events, 75<br />
function (FC), 67, 150<br />
function block (FB), 67, 150<br />
initial value of an FB, 150<br />
instance data block (DB), 150<br />
interrupts, 21, 75, 707, 716, 726, 736<br />
linear and structured programs, 146<br />
monitoring, 21, 707, 716, 726, 736<br />
nesting depth, 21, 67, 707, 716, 725, 735<br />
number of code blocks, 21, 707, 716, 725, 735<br />
number of OBs, 21, 75, 707, 716, 726, 736<br />
organization blocks (OBs), 21, 67, 73, 75, 707, 716,<br />
726, 736<br />
password protection, 165<br />
single instance or multi-instance DB, 150<br />
size of the user program, 21, 67, 707, 716, 725, 735<br />
start-up OBs, 75<br />
timers (quantity and memory requirements), 21,<br />
707, 716, 726, 736<br />
types of code blocks, 67<br />
valid FC, FB, and DB numbers, 67<br />
Boolean or bit values, 88<br />
Break, 587, 588<br />
BUFFER parameter, SEND_PTP, 577<br />
Bus connector, 24<br />
<strong>S7</strong>-<strong>1200</strong> <strong>Programmable</strong> <strong>controller</strong><br />
840 System Manual, 04/2012, A5E02486680-06<br />
C<br />
CALCULATE, 33, 198<br />
scaling analogs, 34<br />
Calendar, 247<br />
Call structure, 172<br />
Calling code blocks within the user program, 148<br />
CAN_DINT (cancel time delay interrupt), 294<br />
Capturing values from an online DB, 684<br />
CB 1241 RS485 specifications, 822<br />
CE approval, 699<br />
CEIL (ceiling), 218<br />
Certificate Import Wizard, 560<br />
Changing settings for STEP 7, 36<br />
Char (character data type), 98<br />
Character position<br />
message length, 593<br />
Character sequence<br />
message end, 592<br />
message start, 588<br />
Clearance<br />
airflow and cooling, 44<br />
Clock<br />
memory byte, 85<br />
RD_LOC_T (read local time), 249<br />
RD_SYS_T (read system time), 249<br />
time-of-day clock, 86<br />
WR_SYS_T (write system time), 249<br />
CM 1241<br />
RS232 specifications, 824<br />
RS422/RS485 specifications, 824<br />
Code block<br />
binding to a CPU or memory card, 166<br />
block calls, 67<br />
calling code blocks within the user program, 148<br />
copy protection, 166
counters (quantity and memory requirements), 21,<br />
707, 717, 726, 736<br />
DB (data block), 67, 151<br />
FB (function block), 67, 150<br />
FC (function), 67, 150<br />
initial value of an FB, 150<br />
instance data block (DB), 150<br />
interrupts, 21, 707, 716, 726, 736<br />
know-how protection, 165<br />
linear and structured programs, 146<br />
monitoring, 21, 707, 716, 726, 736<br />
nesting depth, 21, 707, 716, 725, 735<br />
number of code blocks, 21, 707, 716, 725, 735<br />
number of OBs, 21, 707, 716, 726, 736<br />
organization block (OB), 148<br />
organization blocks (OBs), 21, 707, 716, 726, 736<br />
size of the user program, 21, 707, 716, 725, 735<br />
timers (quantity and memory requirements), 21,<br />
707, 716, 726, 736<br />
types of code blocks, 67<br />
valid FC, FB, and DB numbers, 67<br />
Code blocks, 148<br />
Cold junction compensation<br />
Thermocouple, 775, 803<br />
Columns and headers in task cards, 36<br />
Communication<br />
active/passive, 127, 129, 494<br />
AS-i address, 484<br />
communication load, 81<br />
configuration, 127, 129, 494<br />
connection IDs, 427<br />
cycle time, 81<br />
flow control, 585<br />
hardware connection, 460<br />
IP address, 136<br />
MAC address, 136<br />
network, 460<br />
network connection, 126<br />
number of connections (PROFINET), 424<br />
parameters, 129, 513<br />
polling architecture, 595<br />
PROFIBUS address, 479<br />
PROFINET and PROFIBUS, 423<br />
send and receive parameters, 586<br />
statistics, 513<br />
TCON_Param, 129<br />
time synchronization property (PROFINET), 142<br />
Communication board (CB)<br />
add modules, 122<br />
CB 1241 RS485, 822<br />
comparison chart, 22<br />
configuration of parameters, 125<br />
Index<br />
device configuration, 119<br />
installation, 51<br />
LED indicators, 563, 673<br />
overview, 24<br />
programming, 594<br />
removal, 51<br />
RS485, 563<br />
Communication interfaces<br />
add modules, 122<br />
CB 1241 RS485, 822<br />
CM 1241 RS232, 824<br />
comparison chart of the modules, 22<br />
configuration, 583<br />
device configuration, 119<br />
LED indicators, 673<br />
programming, 594<br />
RS232 and RS485, 563<br />
Communication module<br />
CM 1241 RS422/RS485 specifications, 824<br />
Communication module (CM)<br />
add AS-i master CM1243-2 module, 482<br />
add CM 1243-5 (DP master) module, 478<br />
add modules, 122<br />
CM 1241 RS232 specifications, 824<br />
comparison chart, 22<br />
configuration for PtP example program, 597<br />
configuration of parameters, 125<br />
data reception, 578<br />
device configuration, 119<br />
installation, 53<br />
LED indicators, 563, 673<br />
overview, 24<br />
power requirements, 829<br />
programming, 594<br />
removal, 53<br />
RS232 and RS485, 563<br />
Communication processor (CP)<br />
add modules, 122<br />
comparison chart, 22<br />
configuration of parameters, 125<br />
device configuration, 119<br />
overview, 24<br />
Communication standard Web page, 513<br />
Compare, 196<br />
Comparing and synchronizing online/offline CPUs, 681<br />
Comparing code blocks, 681<br />
Comparison chart<br />
CPU models, 20<br />
HMI devices, 26<br />
modules, 22<br />
Computer requirements, 29<br />
CONCAT (concatenate), 268<br />
<strong>S7</strong>-<strong>1200</strong> <strong>Programmable</strong> <strong>controller</strong><br />
System Manual, 04/2012, A5E02486680-06 841
Index<br />
Configuration<br />
add modules, 122<br />
AS-i, 483<br />
AS-i address, 484<br />
AS-i port, 483<br />
communication interfaces, 583<br />
communication load, 81<br />
CPU parameters, 123<br />
cycle time, 80<br />
discover, 121<br />
download, 168<br />
Ethernet port, 136<br />
HSC (high-speed counter), 346<br />
IP address, 136<br />
MAC address, 136<br />
modules, 125<br />
network connection, 126<br />
PLC to PLC communication, 464<br />
ports, 583<br />
PROFIBUS, 479<br />
PROFIBUS address, 479<br />
PROFIBUS port, 479<br />
PROFINET, 136<br />
receive message, 587<br />
startup parameters, 110<br />
time synchronization property (PROFINET), 142<br />
user-defined Web pages, 535<br />
user-defined Web pages (multiple languages), 554<br />
Configuration of transmitted message, 586<br />
Connection contacts<br />
Maximum current carrying capacity, 820<br />
Connections<br />
configuration, 129<br />
connection IDs, 427<br />
Ethernet protocols, 493<br />
number of connections (PROFINET), 424<br />
partners, 127, 494<br />
<strong>S7</strong> connection, 493<br />
types of communication, 423<br />
types, multi-node connections, 493<br />
Connections, Web server, 558<br />
Connector<br />
installation and removal, 55<br />
Consistency check, 172<br />
Constraints<br />
user-defined Web pages, 539<br />
Web server, 558<br />
Contact information, 3<br />
Control DB for user-defined Web pages<br />
global commands, 555<br />
parameter to WWW instruction, 537<br />
request commands and states, 555<br />
CONV (convert), 213<br />
Conversion (SCL instructions), 214<br />
Cookie restrictions, standard Web pages, 560<br />
Cookie, siemens_automation_language, 552<br />
Cooling, 44<br />
Copy protection<br />
binding to a CPU or memory card, 166<br />
Copying blocks from an online CPU, 168<br />
COS (cosine), 205<br />
Counters<br />
HSC (high-speed counter), 337<br />
HSC configuration, 346<br />
HSC operation, 339<br />
quantity, 21, 707, 717, 726, 736<br />
size, 21, 707, 717, 726, 736<br />
CPU<br />
1211C specifications, 705<br />
1211C wiring diagrams, 714<br />
1212C specifications, 715<br />
1212C wiring diagrams, 723<br />
1214C specifications, 724<br />
1214C wiring diagrams, 733<br />
1215C specifications, 734<br />
1215C wiring diagrams, 744<br />
access protection, 164<br />
add modules, 122<br />
add new device, 120<br />
analog input representation (voltage), 770, 799<br />
AS-i, 483<br />
AS-i address, 484<br />
AS-i port, 483<br />
assigning an IP address to an online CPU, 134<br />
capturing values of a DB, 684<br />
communication board (CB), 24<br />
communication load, 81<br />
comparing and synchronizing blocks, 681<br />
comparison chart, 20<br />
configuring communication to HMI, 462<br />
configuring multiple, 464<br />
configuring parameters, 123<br />
configuring pulse channels, 312<br />
configuring the modules, 125<br />
copying blocks from an online CPU, 168<br />
creating a program card, 113<br />
creating a transfer card, 110<br />
cycle time configuration, 81<br />
cycle time monitoring, 80<br />
device configuration, 119<br />
displaying the MAC and IP addresses, 140<br />
download, 168<br />
download to device, 140<br />
empty transfer card, 118<br />
<strong>S7</strong>-<strong>1200</strong> <strong>Programmable</strong> <strong>controller</strong><br />
842 System Manual, 04/2012, A5E02486680-06
enable outputs in STOP mode, 687<br />
Ethernet port, 136<br />
expansion cable, 56<br />
force, 688, 689<br />
going online, 675<br />
grounding, 63<br />
HMI devices, 26<br />
HSC configuration, 346<br />
inductive loads, 64<br />
inserting the memory card, 108<br />
installation, 47, 49<br />
IP address, 136<br />
isolation guidelines, 62<br />
know-how protection, 165<br />
lamp loads, 64<br />
LED indicators, 673<br />
lost password, 118<br />
MAC address, 136, 140<br />
memory card, 107, 826<br />
monitoring, 683<br />
network connection, 126<br />
number of communication connections, 424<br />
online, 678, 683<br />
operating modes, 69<br />
operating panel (online CPU), 679<br />
operator panel, 38<br />
overview, 19<br />
password protection, 164<br />
power budget, 44<br />
power requirements, 829<br />
processing the OBs, 148<br />
PROFIBUS, 479<br />
PROFIBUS address, 479<br />
PROFIBUS port, 479<br />
PROFINET, 136<br />
PROFINET IO, 468<br />
program card, 107, 113<br />
program execution, 67<br />
pulse outputs, 311<br />
RD_LOC_T (read local time), 249<br />
RD_SYS_T (read system time), 249<br />
recover from a lost password, 118<br />
reset to factory settings, 678<br />
resetting the start values of a DB, 684<br />
RUN and STOP mode, 679<br />
run time meter, 251<br />
RUN/STOP buttons, 38<br />
Security levels, 164<br />
signal board (SB), 24<br />
startup parameters, 110<br />
startup processing, 71<br />
step response times, 711, 720, 730, 740<br />
terminal block connector, 55<br />
thermal zone, 44, 46<br />
time synchronization property, 142<br />
transfer card, 107, 110<br />
types of communication, 423<br />
unspecific CPU, 121<br />
watch table, 685<br />
wiring guidelines, 61, 63<br />
WR_SYS_T (write system time), 249<br />
CPU communication, 426<br />
CPU Identification standard Web page, 510<br />
CPU properties, user-defined Web pages, 535<br />
CPU properties, user-defined Web pages (multiple<br />
languages), 554<br />
Creating a network connection, 126<br />
Creating user-defined Web page DBs, 537<br />
Creating user-defined Web pages, 521<br />
Cross-references, 171<br />
Introduction, 171<br />
Uses, 171<br />
CTD (count down), 190<br />
C-Tick approval, 701<br />
CTRL_PWM, 309<br />
CTS, 585<br />
CTU (count up), 190<br />
CTUD (count up and down), 190<br />
cULus approval, 700<br />
Customer support, 3<br />
Cycle time<br />
configuration, 81<br />
monitoring, 680<br />
overview, 80<br />
Cyclic-interrupt OB, 74<br />
D<br />
Data block<br />
capturing values, 684<br />
CONF_DATA, 454<br />
global data block, 87, 151<br />
instance data block, 87<br />
organization block (OB), 148<br />
overview, 67, 151<br />
resetting the start values, 684<br />
single FB with multiple instance DBs, 151<br />
valid DB numbers, 67<br />
data block control, 332<br />
Data blocks for user-defined Web pages<br />
importing fragments, 533<br />
Data handling block (DHB), 151<br />
Data log<br />
Data log overview, 313<br />
Index<br />
<strong>S7</strong>-<strong>1200</strong> <strong>Programmable</strong> <strong>controller</strong><br />
System Manual, 04/2012, A5E02486680-06 843
Index<br />
data record structure, 314<br />
DataLogClose (close Data log), 319<br />
DataLogCreate (create Data log), 315<br />
DataLogNewFile (create Data log based on existing<br />
Data log), 322<br />
DataLogOpen (open Data log), 318<br />
DataLogWite (write Data log), 320<br />
example program, 327<br />
limits to Data log size, 325<br />
viewing Data logs, 324<br />
Data Logs standard Web page, 516<br />
Data transmission, initiating, 575<br />
Data types, 93<br />
Any (pointer), 102<br />
arrays, 99<br />
Bool, Byte, Word, and DWord, 94<br />
Char (character) and string, 98<br />
PLC data type editor, 100<br />
Pointer (pointer), 101<br />
pointer data type overview, 101<br />
Real, LReal (floating-point real), 95<br />
Struc, 100<br />
Time, Date, TOD (time of day), DTL (date and time<br />
long), 96<br />
USInt, SInt, UInt, Int, UDInt, Dint (integer), 95<br />
Variant (pointer), 103<br />
Date<br />
Date data type, 96<br />
DTL (date and time long data type), 97<br />
SET_TIMEZONE (set time zone), 252<br />
T_ADD (add time), 248<br />
T_COMBINE (combine times), 249<br />
T_CONV (convert time), 247<br />
T_DIFF (time difference), 248<br />
T_SUB (subtract time), 248<br />
DB (data block), 67, 151<br />
capturing values, 684<br />
resetting the start values, 684<br />
valid DB numbers, 67<br />
DC<br />
grounding, 63<br />
inductive loads, 64<br />
isolation guidelines, 62<br />
wiring guidelines, 61, 63<br />
Debugging<br />
downloading in RUN mode, 690, 696<br />
DEC (decrement), 202<br />
DECO (decode), 240<br />
Defining enum types, user-defined Web pages, 529<br />
DELETE (delete substring), 270<br />
Designing a PLC system, 145, 146<br />
DETACH, 288<br />
Device<br />
PROFINET IO, 468<br />
Device configuration, 119, 461<br />
add modules, 122<br />
add new device, 120<br />
AS-i, 483<br />
AS-i port, 483<br />
configuring the CPU, 123<br />
configuring the modules, 125<br />
discover, 121<br />
download, 168<br />
Ethernet port, 136<br />
network connection, 126<br />
PROFIBUS, 479<br />
PROFIBUS port, 479<br />
PROFINET, 136<br />
time synchronization property (PROFINET), 142<br />
unplugged modules, 41<br />
Device names<br />
PROFINET IO, 469<br />
DeviceStates, 299<br />
Diagnostic data<br />
Reading out with GET_DIAG, 302<br />
Diagnostic error interrupt OB, 74<br />
Diagnostic standard Web page, 510<br />
Diagnostics<br />
cycle time, 680<br />
DeviceStates, 299<br />
diagnostics buffer, 680<br />
GET_DIAG, 302<br />
interrupt OB, 471<br />
LED indicators, 673<br />
LED instruction, 298<br />
memory usage, 680<br />
ModuleStates, 301<br />
status, 471<br />
status indicator, 85<br />
watch table, 685<br />
Diagnostics buffer, 86, 680<br />
Digital I/O<br />
configuration, 125<br />
status indicators, 674<br />
Digital signal board (SB) specifications<br />
SB 1221 DI 4, 200 kHz, 784<br />
SB 1222 DQ 4, 200 kHz, 786<br />
SB 1223 DI 2 / DQ 2, 792<br />
SB 1223 DI 2 / DQ 2, 200 kHz, 789<br />
Digital signal module (SM)<br />
SM 1221, 745<br />
SM 1222, 748, 750<br />
SM 1223, 755<br />
DIN rail, 47<br />
<strong>S7</strong>-<strong>1200</strong> <strong>Programmable</strong> <strong>controller</strong><br />
844 System Manual, 04/2012, A5E02486680-06
Directories, languages for user-defined Web<br />
pages, 551<br />
DIS_AIRT (disable alarm interrupt), 296<br />
Discover to upload an online CPU, 121<br />
Displaying the MAC and IP addresses, 140<br />
DIV (divide), 199<br />
Documentation, 4<br />
Downloading<br />
displaying the MAC and IP addresses, 140<br />
firmware update, 115<br />
project, 168<br />
Siemens security certificate to PC, 508, 560<br />
user program, 168<br />
user-defined Web page DBs, 538<br />
DPNRM_DG, 286<br />
DPRD_DAT, 284<br />
DPWR_DAT, 284<br />
Drag and drop between editors, 37<br />
DTL data type<br />
system clock instructions, 249<br />
E<br />
Electromagnetic compatibility (EMC), 702<br />
EN and ENO (power flow), 163<br />
EN_AIRT (enable alarm interrupt), 296<br />
ENCO (encode), 240<br />
End conditions, 590<br />
End message character, 592<br />
Enum types in user-defined Web pages, 529, 530<br />
Environmental<br />
industrial environments, 701<br />
operating conditions, 702<br />
transport and storage conditions, 702<br />
Error codes<br />
common errors for extended instructions, 335<br />
RALRM, 280<br />
RDREC, 280<br />
WRREC, 280<br />
Errors<br />
diagnostic errors, 78<br />
time errors, 77<br />
Ethernet<br />
ad hoc mode, 431<br />
connection IDs, 427<br />
DPNRM_DG, 286<br />
DPRD_DAT, 284<br />
DPWR_DAT, 284<br />
GET, 489<br />
IP address, 136<br />
MAC address, 136<br />
network connection, 126<br />
number of communication connections, 424<br />
overview, 430<br />
PUT, 489<br />
RALRM, 278<br />
RDREC, 275<br />
T_CONFIG, 451<br />
TCON, 439<br />
TDISCON, 439<br />
TRCV, 439<br />
TRCV_C, 432<br />
TSEND, 439<br />
TSEND_C, 432<br />
TURCV, 447<br />
TUSEND, 447<br />
types of communication, 423<br />
WRREC, 275<br />
Ethernet protocols, 430<br />
multi-node connections, 493<br />
Event execution, 75<br />
Example<br />
Modbus slave, 655<br />
PtP communication, 596<br />
PtP communication, configuration, 597<br />
PtP communication, running, 604<br />
PtP communication, STEP 7 programming, 602<br />
PtP communication, terminal emulator, 603<br />
user-defined Web pages, 540<br />
EXP (natural exponential), 205<br />
Expandable instructions, 35<br />
Expanding the capabilities of the <strong>S7</strong>-<strong>1200</strong>, 22<br />
Expansion cable<br />
installation, 56<br />
removal, 56<br />
EXPT (general exponential), 205<br />
Index<br />
<strong>S7</strong>-<strong>1200</strong> <strong>Programmable</strong> <strong>controller</strong><br />
System Manual, 04/2012, A5E02486680-06 845<br />
F<br />
Factory settings reset, 678<br />
FAQs, 4<br />
Favorites toolbar, 32<br />
FB (function block)<br />
overview, 67<br />
valid FB numbers, 67<br />
FBD (function block diagram), 156<br />
FC (function), 67, 150<br />
valid FC numbers, 67<br />
FieldRead, 209<br />
FieldWrite, 209<br />
FILL_BLK, 211<br />
FIND (find substring), 273<br />
Firmware update, 115<br />
First scan indicator, 85
Index<br />
Floating-point math, 205<br />
FLOOR, 218<br />
Flow control, 584, 585<br />
configuration, 584<br />
FM approval, 700<br />
Folders, languages for user-defined Web pages, 551<br />
Force, 688, 689<br />
I memory, 688, 689<br />
inputs and outputs, 689<br />
memory card, 107<br />
peripheral inputs, 688, 689<br />
scan cycle, 689<br />
watch table, 685<br />
Force table<br />
addressing peripheral inputs, 688<br />
force, 688<br />
force operation, 689<br />
FRAC (fraction), 205<br />
Fragment DBs (user-defined Web pages)<br />
generating, 537<br />
Fragments (user-defined Web pages)<br />
creating from AWP command, 532<br />
importing with AWP command, 533<br />
Freeport protocol, 565<br />
Frequency, clock bits, 85<br />
Function (FC)<br />
calling code blocks within the user program, 148<br />
know-how protection, 165<br />
linear and structured programs, 146<br />
overview, 67, 150<br />
valid FC numbers, 67<br />
Function block (FB)<br />
calling code blocks within the user program, 148<br />
initial value, 150<br />
instance data block, 150<br />
know-how protection, 165<br />
linear and structured programs, 146<br />
output parameters, 150<br />
overview, 67, 150<br />
single FB with multiple instance DBs, 151<br />
valid FB numbers, 67<br />
G<br />
General technical specifications, 699<br />
Generating user-defined Web page DBs, 537<br />
GET, 489<br />
configuring the connection, 128<br />
Get LED status, 298<br />
GET_DIAG, 302<br />
GetError, 236<br />
GetErrorID, 237<br />
Global data block, 87, 151<br />
Global library<br />
USS protocol overview, 604<br />
Guidelines<br />
CPU installation, 49<br />
grounding, 63<br />
inductive loads, 64<br />
installation, 43<br />
installation procedures, 47<br />
isolation, 62<br />
lamp loads, 64<br />
wiring guidelines, 61, 63<br />
<strong>S7</strong>-<strong>1200</strong> <strong>Programmable</strong> <strong>controller</strong><br />
846 System Manual, 04/2012, A5E02486680-06<br />
H<br />
Hardware configuration, 119<br />
add modules, 122<br />
add new device, 120<br />
AS-i, 483<br />
AS-i port, 483<br />
configuring the CPU, 123<br />
configuring the modules, 125<br />
discover, 121<br />
download, 168<br />
Ethernet port, 136<br />
network connection, 126<br />
PROFIBUS, 479<br />
PROFIBUS port, 479<br />
PROFINET, 136<br />
Hardware flow control, 585<br />
Hardware-interrupt OB, 74<br />
High-speed counter<br />
configuration, 346<br />
HSC, 337<br />
operation, 339<br />
High-speed counter (HSC)<br />
cannot be forced, 689<br />
HMI devices<br />
configuring PROFINET communication, 462<br />
network connection, 126<br />
overview, 26<br />
Hotline, 3<br />
HSC (high-speed counter)<br />
configuration, 346<br />
operation, 337, 339<br />
HTA (hexadecimal to ASCII), 266<br />
HTML listing, user-defined Web page example, 545<br />
HTML pages, user-defined, 521<br />
accessing <strong>S7</strong>-<strong>1200</strong> data, 522<br />
developing, 521<br />
language locations, 554<br />
page locations, 535
efreshing, 522<br />
HTTP connections, Web server, 558<br />
I<br />
I memory<br />
force, 688<br />
force operation, 689<br />
force table, 688<br />
HSC (high-speed counter), 339<br />
monitor, 683<br />
monitor LAD, 684<br />
peripheral input addresses (force table), 688<br />
watch table, 683<br />
I/O<br />
access errors, PROFINET, 472<br />
addressing, 92<br />
analog input representation (current), 770, 800<br />
analog input representation (voltage), 770, 799<br />
analog output representation (current), 771, 801<br />
analog output representation (voltage), 771, 800<br />
analog status indicators, 674<br />
digital status indicators, 674<br />
force, 688<br />
force operation, 689<br />
inductive loads, 64<br />
monitoring status in LAD, 684<br />
monitoring with a watch table, 685<br />
step response times (CPU), 711, 720, 730, 740<br />
step response times (SB), 798<br />
step response times of the signal module (SM), 769<br />
Identification standard Web page, 510<br />
Idle line, 587, 588<br />
Importing Siemens security certificate, 560<br />
IN_RANGE (within a range), 197<br />
INC (increment), 202<br />
Indexing arrays with variables, 210<br />
Inductive loads, 64<br />
Information resources, 4<br />
Initial values<br />
capturing and resetting the start values of a DB, 684<br />
Input simulators, 827<br />
Inputs and outputs<br />
monitoring, 683<br />
INSERT (insert substring), 271<br />
Inserting a device<br />
unspecific CPU, 121<br />
Inserting instructions<br />
drag and drop, 31<br />
drag and drop between editors, 37<br />
favorites, 32<br />
Inserting the memory card into CPU, 108<br />
Installation<br />
air flow, 44<br />
clearance, 44<br />
communication board (CB), 51<br />
communication module (CM), 53<br />
cooling, 44<br />
CPU, 49<br />
expansion cable, 56<br />
grounding, 63<br />
guidelines, 43<br />
inductive loads, 64<br />
isolation guidelines, 62<br />
lamp loads, 64<br />
mounting dimensions, 46<br />
overview, 43, 47<br />
power budget, 44<br />
signal board (SB), 51<br />
signal module (SM), 24, 52<br />
terminal block connector, 55<br />
thermal zone, 44, 46<br />
TS Adapter and TS module, 58<br />
TS Adapter on a DIN rail, 59<br />
TS Adapter on a wall, 60<br />
TS Adapter SIM card, 58<br />
wiring guidelines, 61, 63<br />
Installation requirements, 29<br />
Instance data block, 87<br />
Instructions<br />
ABS (absolute value), 202<br />
ACOS (arc cosine or inverse cosine), 205<br />
ADD (add), 199<br />
adding inputs or outputs to LAD or FBD<br />
instructions, 35<br />
AND, 239<br />
AS-i distributed I/O, 274<br />
ASIN (arc sine or inverse sine), 205<br />
ATAN (arc tangent or inverse tangent), 205<br />
ATH (ASCII to hexadecimal), 265<br />
ATTACH, 288<br />
bit logic, 175<br />
block move (MOVE_BLK), 207<br />
CALCULATE, 33, 198<br />
calendar, 247<br />
CAN_DINT (cancel time delay interrupt), 294<br />
CASE (SCL), 224<br />
CEIL (ceiling), 218<br />
clock, 249<br />
columns and headers, 36, 637<br />
common parameters, 458<br />
compare, 196<br />
CONCAT (concatenate), 268<br />
CONTINUE (SCL), 227<br />
Index<br />
<strong>S7</strong>-<strong>1200</strong> <strong>Programmable</strong> <strong>controller</strong><br />
System Manual, 04/2012, A5E02486680-06 847
Index<br />
CONV (convert), 213<br />
COS (cosine), 205<br />
counters, 190<br />
CTD (count down), 190<br />
CTRL_PWM), 309<br />
CTU (count up), 190<br />
CTUD (count up and down), 190<br />
data block control, 332<br />
DataLogClose (close Data log), 319<br />
DataLogCreate (create Data log), 315<br />
DataLogNewFile (create Data log based on existing<br />
Data log), 322<br />
DataLogOpen (open Data log), 318<br />
DataLogWite (write Data log), 320<br />
date, 247<br />
DEC (decrement), 202<br />
DECO (decode), 240<br />
DELETE (delete substring), 270<br />
DETACH, 288<br />
DeviceStates, 299<br />
DIS_AIRT (disable alarm interrupt), 296<br />
DIV (divide), 199<br />
DPNRM_DG, 286<br />
DPRD_DAT, 284<br />
DPWR_DAT, 284<br />
drag and drop, 31<br />
drag and drop between editors, 37<br />
EN_AIRT (enable alarm interrupt), 296<br />
ENCO (encode), 240<br />
EXIT (SCL), 228<br />
EXP (natural exponential), 205<br />
expandable instructions, 35<br />
EXPT (general exponential), 205<br />
favorites, 32<br />
FieldRead, 209<br />
FieldWrite, 209<br />
FILL_BLK, 211<br />
FIND (find substring), 273<br />
floating-point math, 205<br />
FLOOR, 218<br />
FOR (SCL), 225<br />
force, 688<br />
force operation, 689<br />
FRAC (fraction), 205<br />
GET, 489<br />
GET_DIAG, 302<br />
GetError, 236<br />
GetErrorID, 237<br />
GOTO (SCL), 229<br />
HSC (high-speed counter), 337, 339<br />
HTA (Hex to ASCII), 266<br />
IF-THEN (SCL), 223<br />
IN_RANGE (within a range), 197<br />
INC (increment), 202<br />
INSERT (insert substring), 271<br />
inserting, 31<br />
INV (invert), 240<br />
JMP, 230<br />
JMP_LIST, 230<br />
Label, 230<br />
LED status, 298<br />
LEFT (left substring), 269<br />
LEN (length), 267<br />
limit, 204<br />
LN (natural logarithm), 205<br />
MAX (maximum), 203<br />
MB_CLIENT, 622<br />
MC_ChangeDynamic, 394<br />
MC_CommandTable, 392<br />
MC_Halt, 381<br />
MC_Home, 379<br />
MC_MoveAbsolute, 383<br />
MC_MoveJog, 390<br />
MC_MoveRelative, 385<br />
MC_MoveVelocity, 387<br />
MC_Power, 376<br />
MC_Reset, 378<br />
MID (middle substring), 269<br />
MIN (minimum), 203<br />
MOD (modulo), 200<br />
ModuleStates, 301<br />
monitor, 683, 684<br />
MOVE, 207<br />
MUL (multiply), 199<br />
MUX (multiplex), 242<br />
N_TRIG, 181<br />
NEG (negation), 201<br />
negative edge, 180<br />
NORM_X (normalize), 219<br />
NOT OK, 197<br />
OK, 197<br />
OR, 239<br />
OUT_RANGE (outside of a range), 197<br />
P_TRIG, 181<br />
PID_Compact, 350<br />
PORT_CFG (port configuration), 568<br />
positive edge, 180<br />
PROFIBUS distributed I/O, 274<br />
PROFINET distributed I/O, 274<br />
program control (SCL), 222<br />
PUT, 489<br />
QRY_CINT (query cyclic interrupt), 293<br />
RALRM, 278<br />
RCV_CFG (receive configuration), 571<br />
<strong>S7</strong>-<strong>1200</strong> <strong>Programmable</strong> <strong>controller</strong><br />
848 System Manual, 04/2012, A5E02486680-06
RCV_PtP (receive Point-to-Point), 578<br />
RCV_RST (receiver reset), 580<br />
RD_LOC_T (read local time), 249<br />
RD_SYS_T (read system time), 249<br />
RDREC, 275<br />
RE_TRIGR, 80, 234<br />
REPEAT (SCL), 227<br />
REPLACE (replace substring), 272<br />
reset, 178<br />
RETURN (SCL), 229<br />
return value (RET), 233<br />
RIGHT (right substring), 269<br />
ROL and ROR (rotate left and rotate right), 245<br />
ROUND, 217<br />
RT (reset timer), 182<br />
run time meter, 251<br />
S_CONV (value to string conversions), 255<br />
S_MOV (string move), 254<br />
SCALE_X (scale), 219<br />
scaling analog values, 34<br />
SCL conversion instructions, 214<br />
SEL (select), 242<br />
SEND_CFG (send configuration), 569<br />
SEND_PTP (send Point-to-Point data), 575<br />
Set, 178<br />
SET_CINT (set cyclic interrupt), 291<br />
SET_TIMEZONE, 252<br />
SGN_GET (get RS232 signals), 581<br />
SGN_SET (set RS232 signals), 582<br />
SHL and SHR (shift left and shift right), 244<br />
SIN (sine), 205<br />
SQR (square), 205<br />
SQRT (square root), 205<br />
SRT_DINT (start time delay interrupt), 294<br />
status, 683, 684<br />
STP (stop PLC scan cycle), 235<br />
STRG_VAL (string to value), 255<br />
SUB (subtract), 199<br />
SWAP, 212<br />
SWITCH, 231<br />
T_ADD (add time), 248<br />
T_COMBINE (combine times), 249<br />
T_CONFIG, 451<br />
T_CONV (convert time), 247<br />
T_DIFF (time difference), 248<br />
T_SUB (subtract time), 248<br />
TAN (tangent), 205<br />
TCON, 439<br />
TDISCON, 439<br />
time, 247<br />
timer, 182<br />
timer operations, 186<br />
TOF (off-delay timer), 182<br />
TON (on-delay timer), 182<br />
TONR (on-delay retentive timer), 182<br />
TP (pulse timer), 182<br />
TRCV, 439<br />
TRCV_C, 432, 467<br />
TRUNC (truncate), 217<br />
TSEND, 439<br />
TSEND_C, 432, 466<br />
TURCV, 447<br />
TUSEND, 447<br />
UFILL_BLK (uninterruptible fill), 211<br />
uninterruptible move (UMOVE_BLK), 207<br />
USS status codes, 614<br />
USS_DRV, 608<br />
USS_PORT, 610<br />
USS_RPM, 611<br />
USS_WPM, 613<br />
VAL_STRG (value to string), 255<br />
versions of instructions, 36, 637<br />
WHILE (SCL), 226<br />
WR_SYS_T (write system time), 249<br />
WRREC, 275<br />
WWW (enable user-defined Web pages), 537<br />
XOR (exclusive OR), 239<br />
Inter-character gap, 592<br />
Interrupts<br />
ATTACH and DETACH, 288<br />
CAN_DINT (cancel time delay interrupt), 294<br />
interrupt latency, 75<br />
overview, 73<br />
SRT_DINT (start time delay interrupt), 294<br />
Intro standard Web page, 508<br />
Invert (INV), 240<br />
IP address, 136, 137<br />
assigning, 132, 139<br />
assigning online, 134<br />
configuring, 136<br />
configuring the online CPU, 678<br />
device configuration, 123<br />
MAC address, 136<br />
IP router, 136<br />
ISO on TCP<br />
ad hoc mode, 431<br />
ISO on TCP protocol, 430<br />
Isolation guidelines, 62<br />
ISO-on-TCP<br />
connection configuration, 127<br />
connection IDs, 427<br />
parameters, 129<br />
Index<br />
<strong>S7</strong>-<strong>1200</strong> <strong>Programmable</strong> <strong>controller</strong><br />
System Manual, 04/2012, A5E02486680-06 849
Index<br />
J<br />
JavaScript restrictions, standard Web pages, 558<br />
JMP, 230<br />
JMP_LIST, 230<br />
JMPN, 230<br />
K<br />
Know-how protection<br />
password protection, 165<br />
L<br />
Label, 230<br />
LAD (ladder logic)<br />
monitor, 683, 684<br />
overview, 155<br />
program editor, 684<br />
status, 683, 684, 688<br />
Lamp loads, 64<br />
Languages, user-defined Web pages, 551<br />
Latency, 75<br />
LED (Get LED status), 298<br />
LED indicators<br />
communication interface, 563, 673<br />
CPU status, 673<br />
LED instruction, 298<br />
LEFT (left substring), 269<br />
LEN (length), 267<br />
Length<br />
message, 593<br />
Length m, 593<br />
Length n, 593<br />
LENGTH parameter, SEND_PTP, 577<br />
Limit, 204<br />
Linear programming, 146<br />
LN (natural logarithm), 205<br />
Load memory, 20<br />
CPU 1211C, 705<br />
CPU 1212C, 715<br />
CPU 1214C, 724<br />
CPU 1215C, 734<br />
memory card, 107<br />
program card, 107<br />
transfer card, 107<br />
Load memory, user-defined Web pages, 539<br />
Local time<br />
RD_LOC_T (read local time), 249<br />
Local/Partner connection, 425<br />
Logging in/out<br />
standard Web pages, 507<br />
Lost password, 118<br />
<strong>S7</strong>-<strong>1200</strong> <strong>Programmable</strong> <strong>controller</strong><br />
850 System Manual, 04/2012, A5E02486680-06<br />
M<br />
MAC address, 136, 140<br />
Manual fragment DB control, 555<br />
Manuals, 4<br />
Maritime approval, 701<br />
Master polling architecture, 595<br />
Math, 33, 198, 199<br />
MAX (maximum), 203<br />
Maximum message length, 592<br />
Maximum Web server connections, 558<br />
MB_CLIENT, 622<br />
MB_COMM_LOAD, 638<br />
MB_MASTER, 641<br />
MB_SERVER, 628<br />
MB_SLAVE, 647<br />
MC_ChangeDynamic, 394<br />
MC_CommandTable, 392<br />
MC_Halt, 381<br />
MC_Home, 379<br />
MC_MoveAbsolute, 383<br />
MC_MoveJog, 390<br />
MC_MoveRelative, 385<br />
MC_MoveVelocity, 387<br />
MC_Power, 376<br />
MC_Reset, 378<br />
Memory<br />
clock memory, 84<br />
I (process image input), 89<br />
L (local memory), 87<br />
load memory, 82<br />
M (bit memory), 90<br />
monitoring memory usage, 680<br />
peripheral input addresses (force table), 688<br />
Q (process image output), 90<br />
retentive memory, 82<br />
system memory, 84<br />
Temp memory, 91<br />
work memory, 82<br />
Memory areas<br />
addressing Boolean or bit values, 88<br />
immediate access, 88<br />
process image, 88<br />
Memory card<br />
configure the startup parameters, 110<br />
empty transfer card for a lost password, 118<br />
firmware update, 115<br />
inserting into CPU, 108<br />
lost password, 118<br />
operation, 107
order number, 826<br />
overview, 107<br />
program card, 113<br />
specifications, 826<br />
transfer card, 110<br />
Memory locations, 87, 89<br />
Message configuration<br />
instructions, 595<br />
receive, 587<br />
transmit, 586<br />
Message end, 590<br />
Message length, 592<br />
Message start, 588<br />
MID (middle substring), 269<br />
MIN (minimum), 203<br />
Miscellaneous PtP parameter errors, 567<br />
MOD (modulo), 200<br />
MODBUS<br />
MB_CLIENT, 622<br />
MB_COMM_LOAD, 638<br />
MB_MASTER, 641<br />
MB_SERVER, 628<br />
MB_SLAVE, 647<br />
Modbus slave example, 655<br />
versions, 36, 637<br />
Modifying<br />
program editor status, 684<br />
watch table, 685<br />
Modifying variables from PC, 515<br />
Module information standard Web page, 511<br />
Modules<br />
CB 1241 RS485, 822<br />
CM 1241 RS232, 824<br />
communication board (CB), 24<br />
communication module (CM), 24<br />
communication processor (CP), 24<br />
comparison chart, 22<br />
configuring parameters, 125<br />
CPU 1211C specifications, 705<br />
CPU 1212C specifications, 715<br />
CPU 1214C specifications, 724<br />
CPU 1215C specifications, 734<br />
SB 1221 DI 4, 200 kHz, 784<br />
SB 1222 DQ 4, 200 kHz, 200 kHz, 786<br />
SB 1223 DI 2 / DQ 2, 792<br />
SB 1223 DI 2 / DQ 2, 200 kHz, 789<br />
SB 1231 AI 1 x 12 bit, 794<br />
SB 1231 AI 1 x 16 bit RTD, 806<br />
SB 1231 AI 1 x 16 bit Thermocouple signal<br />
board, 801<br />
SB 1232 AQ 1x12 bit, 797<br />
signal board (SB), 24<br />
signal module (SM), 24<br />
SM 1221, 745<br />
SM 1222, 748, 750<br />
SM 1222 DQ8 RLY Changeover, 748<br />
SM 1223, 755<br />
SM 1231 AI 4 x 16 bit TC, 772<br />
SM 1231 AI 4 x RTD x 16 bit, 778<br />
SM 1231 AI 8 x 13 bit, 760<br />
SM 1231 AI 8 x 16 bit TC signal module, 772<br />
SM 1231 AI 8 x RTD x 16 bit, 778<br />
SM 1232 AQ 2 x 14bit, 764<br />
SM 1232 AQ 4 x 14bit, 764<br />
SM 1234 AI 4 x 13 bit / AQ 2 x 14 bit, 766<br />
thermal zone, 44, 46<br />
ModuleStates, 301<br />
Monitor<br />
capturing values of a DB, 684<br />
resetting the start values of a DB, 684<br />
Monitoring<br />
cycle time, 680<br />
force operation, 689<br />
force table, 688<br />
LAD status, 683, 684<br />
LED instruction, 298<br />
memory usage, 680<br />
watch table, 683, 685<br />
Monitoring the program, 170<br />
Monitoring variables from PC, 515<br />
Motion control<br />
configuring the axis, 370<br />
hardware and software limit switches, 397<br />
homing (sequence for active homing), 404<br />
homing configuration parameters, 402<br />
homing the axis, 401<br />
MC_ChangeDynamic, 394<br />
MC_CommandTable, 392<br />
MC_Halt, 381<br />
MC_Home, 379<br />
MC_MoveAbsolute, 383<br />
MC_MoveJog, 390<br />
MC_MoveRelative, 385<br />
MC_MoveVelocity, 387<br />
MC_Power, 376<br />
MC_Reset, 378<br />
overview, 366<br />
Mounting<br />
airflow, 44<br />
clearance, 44<br />
communication board (CB), 51<br />
communication module (CM), 53<br />
cooling, 44<br />
CPU, 49<br />
Index<br />
<strong>S7</strong>-<strong>1200</strong> <strong>Programmable</strong> <strong>controller</strong><br />
System Manual, 04/2012, A5E02486680-06 851
Index<br />
dimensions, 46<br />
expansion cable, 56<br />
grounding, 63<br />
guidelines, 43<br />
inductive loads, 64<br />
isolation, 62<br />
lamp loads, 64<br />
overview, 47<br />
signal board (SB), 51<br />
signal module (SM), 52<br />
terminal block connector, 55<br />
thermal zone, 44, 46<br />
wiring guidelines, 61, 63<br />
MOVE, 207<br />
MRES<br />
operator panel, 38<br />
MUL (multiply), 199<br />
Multi-node connections<br />
connection types, 493<br />
Ethernet protocols, 493<br />
Multiple AWP variable definitions, 533<br />
MUX (multiplex), 242<br />
My Documentation Manager, 4<br />
N<br />
N_TRIG, 181<br />
NEG (negation), 201<br />
Negative edge, 180<br />
Nesting depth, 67<br />
Network communication, 460<br />
Network connection<br />
configuration, 126<br />
multiple CPUs, 463, 465, 469, 478, 482<br />
Network time protocol (NTP), 141<br />
No restart, 69<br />
NORM_X (normalize), 219<br />
Normalizing analogs, 220<br />
NOT OK instruction, 197<br />
Numbers<br />
binary, 94<br />
integer, 95<br />
real, 95<br />
O<br />
Off-delay (TOF), 182<br />
operation, 186<br />
OK instruction, 197<br />
On-delay delay (TON), 182<br />
operation, 186<br />
On-delay retentive (TONR), 182<br />
operation, 186<br />
Online<br />
assigning an IP address, 134<br />
capturing values of a DB, 684<br />
comparing and synchronizing, 681<br />
cycle time, 680<br />
diagnostics buffer, 680<br />
force, 688<br />
force operation, 689<br />
going online, 675<br />
IP address, 678<br />
memory usage, 680<br />
monitor, 683<br />
operating panel, 679<br />
operator panel, 38<br />
resetting the start values of a DB, 684<br />
RUN/STOP buttons, 37<br />
status, 683, 684<br />
time of day, 678<br />
tools, 682<br />
watch table, 683, 684, 685<br />
Online and diagnostic tools<br />
downloading in RUN mode, 690<br />
Online device names<br />
PROFINET IO, 676<br />
OPC, configuration, 661<br />
Open User Communication instructions return<br />
values, 459<br />
Operating mode, 37, 38<br />
changing STOP/RUN, 679<br />
operating modes of the CPU, 69<br />
Operator panel, 38<br />
operating modes of the CPU, 69<br />
Operator panels, 26<br />
OR, 239<br />
Order numbers<br />
Communication interfaces (CM, CB and CP), 834,<br />
835<br />
connector blocks, 836<br />
Connectors and terminal connections, 835<br />
CPUs, 833<br />
CSM 1277 Ethernet switch, 835<br />
documentation, 837<br />
Expansion cables, 836<br />
HMI basic panels, 836<br />
memory cards, 836<br />
PM 1207 power supply, 835<br />
programming software, 837<br />
Signal boards (SB), 834<br />
Signal modules (SM), 833<br />
simulators, 836<br />
<strong>S7</strong>-<strong>1200</strong> <strong>Programmable</strong> <strong>controller</strong><br />
852 System Manual, 04/2012, A5E02486680-06
STEP 7, 837<br />
visualization software, 837<br />
WinCC, 837<br />
Organization block<br />
call, 73<br />
calling code blocks within the user program, 148<br />
configuring operation, 150<br />
creating, 149<br />
function, 73<br />
know-how protection, 165<br />
linear and structured programming, 146<br />
multiple cyclic, 149<br />
overview, 67<br />
priority classes, 73<br />
processing, 148<br />
startup processing, 71<br />
OUT_RANGE (outside of a range), 197<br />
Output parameters, 150<br />
configuring pulse channels, 312<br />
pulse outputs, 311<br />
P<br />
P_TRIG, 181<br />
Panels (HMI), 26<br />
Parameter assignment, 150<br />
Parameters configuration<br />
LENGH and BUFFER for SEND_PTP, 577<br />
receive, 468<br />
transmit, 467<br />
Parity, 584<br />
Passive/active communication<br />
configuring the partners, 127, 494<br />
connection IDs, 427<br />
parameters, 129<br />
Password protection<br />
access to the CPU, 164<br />
binding to a CPU or memory card, 166<br />
code block, 165<br />
copy protection, 166<br />
CPU, 164<br />
empty transfer card, 118<br />
lost password, 118<br />
Peripheral access alarms, 471<br />
PID<br />
overview, 347<br />
PID_3STEP, 355<br />
PID_3Step algorithm, 347, 355<br />
PID_Compact, 350<br />
PID_Compact algorithm, 347, 350<br />
PLC<br />
add modules, 122<br />
assigning an IP address to an online CPU, 134<br />
communication load, 81<br />
comparing and synchronizing, 681<br />
copying blocks from an online CPU, 168<br />
CPU 1211C, 705<br />
CPU 1212C, 715<br />
CPU 1214C, 724<br />
CPU 1215C, 734<br />
cycle time, 81<br />
cycle time, 81<br />
device configuration, 119<br />
download, 168<br />
expansion cable, 56<br />
force, 688<br />
force operation, 689<br />
HSC configuration, 346<br />
installation, 47, 49<br />
know-how protection, 165<br />
memory card, 107, 826<br />
monitoring, 683<br />
operating modes, 69<br />
overview of the CPU, 19<br />
power budget, 44<br />
RD_LOC_T (read local time), 249<br />
RD_SYS_T (read system time), 249<br />
run time meter, 251<br />
startup processing, 71<br />
system design, 145<br />
tags, 87<br />
terminal block connector, 55<br />
time synchronization property, 142<br />
using blocks, 146<br />
watch table, 685<br />
WR_SYS_T (write system time), 249<br />
Podcasts, 4<br />
Pointer<br />
pointer overview, 101<br />
Pointers<br />
Any data type, 102<br />
Pointer data type, 101<br />
Variant data type, 103<br />
Point-to-Point communication, 565<br />
Point-to-Point programming, 594<br />
Polling architecture, 595<br />
Port configuration, 583<br />
errors, 569<br />
instructions, 595<br />
PtP example program, 597<br />
Port number, 430<br />
Port numbers<br />
restricted, 460<br />
PORT_CFG (port configuration), 568<br />
Index<br />
<strong>S7</strong>-<strong>1200</strong> <strong>Programmable</strong> <strong>controller</strong><br />
System Manual, 04/2012, A5E02486680-06 853
Index<br />
Portal view, 30<br />
Positive edge, 180<br />
Power budget, 44<br />
example, 830<br />
form for calculations, 831<br />
overview, 829<br />
Power requirements<br />
calculating a power budget, 830<br />
form for calculations, 831<br />
power budget, 829<br />
Priority<br />
priority class, 73<br />
priority in processing, 75<br />
Priority class, 73<br />
Process image<br />
force, 688<br />
force operation, 689<br />
monitor, 683, 684<br />
status, 683, 684, 688<br />
PROFIBUS<br />
add CM 1243-5 (DP master) module, 478<br />
add DP slave, 478<br />
CM 1242-5 (DP slave) module, 473<br />
CM 1243-5 (DP master) module, 473<br />
distributed I/O instructions, 274<br />
DPNRM_DG, 286<br />
DPRD_DAT, 284<br />
DPWR_DAT, 284<br />
GET, 489<br />
master, 472<br />
network connection, 126, 478<br />
PROFIBUS address, 479<br />
PROFIBUS address properties, 480<br />
PUT, 489<br />
RALRM, 278<br />
RDREC, 275<br />
<strong>S7</strong> connection, 493<br />
slave, 472<br />
WRREC, 275<br />
PROFIBUS address, 479, 480<br />
configuring, 479<br />
PROFINET<br />
ad hoc mode, 431<br />
configuring communication between CPU and HMI<br />
device, 462<br />
configuring the IP address, 123<br />
connection IDs, 427<br />
CPU-to-CPU communication, 464<br />
device naming and addressing, 143<br />
diagnostics, 472<br />
distributed I/O instructions, 274<br />
DPRD_DAT, 284<br />
DPWR_DAT, 284<br />
Ethernet address properties, 137<br />
GET, 489<br />
IP address, 136<br />
IP address assignment, 143<br />
MAC address, 136<br />
network connection, 126, 463, 465, 469<br />
number of communication connections, 424<br />
overview, 430<br />
PLC-to-PLC communication, 464<br />
PUT, 489<br />
RALRM, 278<br />
RDREC, 275<br />
<strong>S7</strong> connection, 493<br />
system start-up time, 142<br />
T_CONFIG, 451<br />
TCON, 439<br />
TDISCON, 439<br />
testing a network, 139<br />
time synchronization, 123<br />
time synchronization property, 142<br />
TRCV, 439<br />
TRCV_C, 432<br />
TSEND, 439<br />
TSEND_C, 432<br />
TURCV, 447<br />
TUSEND, 447<br />
types of communication, 423<br />
WRREC, 275<br />
PROFINET IO<br />
Adding a device, 468<br />
Assigning a CPU, 469<br />
Assigning device names, 469<br />
Assigning device names online, 676<br />
Device names, 469<br />
Devices, 468<br />
Online device names, 676<br />
PROFINET RT, 430<br />
Program<br />
binding to a CPU or memory card, 166<br />
calling code blocks within the user program, 148<br />
capturing values of a DB, 684<br />
copying blocks from an online CPU, 168<br />
download, 168<br />
linear and structured programs, 146<br />
memory card, 107<br />
organization block (OB), 148<br />
password protection, 165<br />
priority class, 73<br />
resetting the start values of a DB, 684<br />
Program card<br />
configure the startup parameters, 110<br />
<strong>S7</strong>-<strong>1200</strong> <strong>Programmable</strong> <strong>controller</strong><br />
854 System Manual, 04/2012, A5E02486680-06
creating, 113<br />
inserting into CPU, 108<br />
operation, 107<br />
order number, 826<br />
overview, 107<br />
Program control (SCL), 222<br />
CASE, 224<br />
CONTINUE, 227<br />
EXIT, 228<br />
FOR, 225<br />
GO TO, 229<br />
IF-THEN, 223<br />
REPEAT, 227<br />
RETURN, 229<br />
WHILE, 226<br />
Program editor<br />
capturing values of a DB, 684<br />
monitor, 684<br />
resetting the start values of a DB, 684<br />
status, 684<br />
Program execution, 67<br />
Program information<br />
In the call structure, 172<br />
Program structure, 148<br />
calling code blocks, 148<br />
Programming<br />
adding inputs or outputs to LAD or FBD<br />
instructions, 35<br />
binding to a CPU or memory card, 166<br />
block calls, 67<br />
calling code blocks within the user program, 148<br />
comparing and synchronizing code blocks, 681<br />
counters, 190<br />
data block (DB), 67<br />
drag and drop between editors, 37<br />
expandable instructions, 35<br />
favorites, 32<br />
FBD (function block diagram), 156<br />
function (FC), 150<br />
function block (FB), 67, 150<br />
initial value of an FB, 150<br />
inserting instructions, 31<br />
instance data block (DB), 150<br />
LAD (ladder), 155<br />
linear program, 146<br />
operating modes of the CPU, 69<br />
organization block (OB), 148<br />
PID overview, 347<br />
PID_3STEP, 355<br />
PID_3Step algorithm, 347, 355<br />
PID_Compact, 350<br />
PID_Compact algorithm, 347, 350<br />
power flow (EN and ENO), 163<br />
priority class, 73<br />
PtP instructions, 594<br />
RD_LOC_T (read local time), 249<br />
RD_SYS_T (read system time), 249<br />
run time meter, 251<br />
SCL (Structured Control Language), 156, 157<br />
structured program, 146<br />
types of code blocks, 67<br />
unplugged modules, 41<br />
unspecific CPU, 121<br />
valid FC, FB, and DB numbers, 67<br />
WR_SYS_T (write system time), 249<br />
Programming user-defined Web page language<br />
switch, 552<br />
Project<br />
access protection, 164<br />
binding to a CPU or memory card, 166<br />
comparing and synchronizing, 681<br />
download, 168<br />
empty transfer card, 118<br />
lost password, 118<br />
program card, 113<br />
protecting a code block, 165<br />
restricting access to a CPU, 164<br />
transfer card, 110<br />
Project view, 30<br />
Protection class, 703<br />
Protection level<br />
binding to a CPU or memory card, 166<br />
code block, 165<br />
CPU, 164<br />
lost password, 118<br />
Protocol<br />
communication, 565<br />
freeport, 565<br />
ISO on TCP, 430<br />
Modbus, 565<br />
PROFINET RT, 430<br />
TCP, 430<br />
UDP, 430<br />
USS, 565<br />
PTO (pulse train output)<br />
cannot be forced, 689<br />
configuring pulse channels, 312<br />
CTRL_PWM, 309<br />
operation, 311<br />
PtP communication, 565<br />
configuring parameters, 586<br />
configuring ports, 583<br />
example program, 596<br />
example program configuration, 597<br />
Index<br />
<strong>S7</strong>-<strong>1200</strong> <strong>Programmable</strong> <strong>controller</strong><br />
System Manual, 04/2012, A5E02486680-06 855
Index<br />
example program, running, 604<br />
example program, STEP 7 programming, 602<br />
programming, 594<br />
terminal emulator for example program, 603<br />
PtP error classes, 567<br />
PtP instruction return values, 566<br />
Pulse delay (TP), 182<br />
operation, 186<br />
Pulse outputs, 311<br />
PUT, 489<br />
configuring the connection, 128<br />
PWM (pulse width modulation)<br />
cannot be forced, 689<br />
configuring pulse channels, 312<br />
CTRL_PWM, 309<br />
operation, 311<br />
Q<br />
Q memory<br />
configuring pulse channels, 312<br />
pulse outputs, 311<br />
QRY_CINT (query cyclic interrupt), 293<br />
Queuing, 75<br />
Quotation mark conventions, Web server, 534<br />
R<br />
RALRM, 278, 280<br />
Rated voltages, 704<br />
RCV_CFG (receive configuration), 571<br />
RCV_PTP (receive Point-to-Point), 578<br />
RCV_RST (receiver reset), 580<br />
RD_LOC_T (read local time), 249<br />
RD_SYS_T (read system time), 249<br />
RDREC, 275, 280<br />
RE_TRIGR, 234<br />
READ_DBL, 332<br />
Reading HTTP variables, 526<br />
Receive configuration errors, 575<br />
Receive message configuration, 587<br />
PtP example program, 598<br />
Receive parameters configuration, 468<br />
Receive runtime return values, 578<br />
Referencing enum types, user-defined Web pages, 530<br />
Refreshing user-defined Web pages, 522<br />
Relay electrical service life, 705<br />
REPLACE (replace substring), 272<br />
Replacing modules, 41<br />
Requirements, installation, 29<br />
Reset, 178<br />
Reset timer (RT), 182<br />
Reset to factory settings, 678<br />
Resetting the start values of a DB, 684<br />
Restricted TSAPs and port numbers, 460<br />
Retentive memory, 20, 82<br />
CPU 1211C, 705<br />
CPU 1212C, 715<br />
CPU 1214C, 724<br />
CPU 1215C, 734<br />
Return value (RET), 233<br />
Return values<br />
Open User Communication instructions, 459<br />
PtP instructions, 566<br />
RIGHT (right substring), 269<br />
ROL and ROR (rotate left and rotate right), 245<br />
ROUND, 217<br />
Router IP address, 137<br />
RS232 and RS485 communication modules, 563<br />
RT (reset timer), 182<br />
RTS, 585<br />
RTS always on, 585<br />
RTS Off delay, 587<br />
RTS On delay, 587<br />
RTS switched, 585<br />
RUN mode, 69, 72, 679<br />
force operation, 689<br />
operator panel, 38<br />
toolbar buttons, 37<br />
Run time meter, 251<br />
RUN to STOP transition, 87<br />
RUN/STOP buttons, 37<br />
<strong>S7</strong>-<strong>1200</strong> <strong>Programmable</strong> <strong>controller</strong><br />
856 System Manual, 04/2012, A5E02486680-06<br />
S<br />
S_CONV (value to string conversions), 255<br />
S_MOV (string move), 254<br />
<strong>S7</strong> communication<br />
configuring the connection, 128<br />
<strong>S7</strong>-<strong>1200</strong><br />
access protection, 164<br />
add modules, 122<br />
add new device, 120<br />
airflow, 44<br />
AS-i, 483<br />
AS-i address, 484<br />
AS-i port, 483<br />
capturing values of a DB, 684<br />
clearance, 44<br />
communication board (CB), 24<br />
communication load, 81<br />
communication module (CM), 24<br />
communication processor (CP), 24
compare code blocks, 681<br />
comparison chart of CPU models, 20<br />
configuring the CPU parameters, 123<br />
configuring the modules, 125<br />
cooling, 44<br />
CPU installation, 49<br />
cycle time, 81<br />
device configuration, 119<br />
empty transfer card for a lost password, 118<br />
Ethernet port, 136<br />
expansion cable, 56<br />
force, 688<br />
force operation, 689<br />
grounding, 63<br />
HMI devices, 26<br />
HSC configuration, 346<br />
inductive loads, 64<br />
installation, 47<br />
installing a CB, 51<br />
installing a CM, 53<br />
installing an SB, 51<br />
installing an SM, 52<br />
IP address, 136<br />
isolation guidelines, 62<br />
know-how protection, 165<br />
lamp loads, 64<br />
lost password, 118<br />
MAC address, 136<br />
memory card, 826<br />
modules, 22<br />
monitoring, 683<br />
mounting dimensions, 46<br />
network connection, 126<br />
operating modes, 69<br />
operation, 685<br />
operator panel, 38<br />
overview of the CPU, 19<br />
password protection, 164<br />
power budget, 44<br />
PROFIBUS, 479<br />
PROFIBUS address, 479<br />
PROFIBUS port, 479<br />
PROFINET, 136<br />
program card, 113<br />
pulse outputs, 311<br />
resetting the start values of a DB, 684<br />
RUN/STOP buttons, 37<br />
signal board (SB), 24<br />
signal module (SM), 24<br />
startup parameters, 110<br />
startup processing, 71<br />
terminal block connector, 55<br />
Index<br />
thermal zone, 44, 46<br />
transfer card, 110<br />
TS Adapter, 22<br />
wiring guidelines, 61, 63<br />
SB 1221<br />
SB 1221 DI 4, 200 kHz wiring diagram, 785<br />
SB 1222<br />
SB 1222 DQ 4 x 24 VDC, 200 kHz wiring<br />
diagram, 788<br />
SB 1223<br />
SB 1223 DI 2 / DQ 2 wiring diagram, 793<br />
SB 1223 DI 2 / DQ, 200 kHz wiring diagram, 791<br />
SB 1231 AI 1 x 16 bit Thermocouple<br />
Filter selection table, 804<br />
SB 1232<br />
SB 1232 AQ 1 x 12 bit wiring diagram, 798<br />
SCALE_X (scale), 219<br />
Scaling analogs, 34, 220<br />
Scan cycle<br />
force, 688<br />
force operation, 689<br />
Scan cycle time<br />
overview, 80<br />
SCL (Structured Control Language)<br />
ABS (absolute value), 202<br />
ACOS (arc cosine or inverse cosine), 205<br />
addressing, 157<br />
AND, 239<br />
ASIN (arc sine or inverse sine), 205<br />
ATAN (arc tangent or inverse tangent), 205<br />
ATH (ASCII to hexadecimal), 265<br />
ATTACH and DETACH, 288<br />
bit logic, 175<br />
calling an FB or FC, 157<br />
calling blocks, 148<br />
CAN_DINT (cancel time delay interrupt), 294<br />
CASE, 224<br />
CEIL (ceiling), 218<br />
compare, 196<br />
CONCAT (concatenate), 268<br />
conditions, 157<br />
CONTINUE, 227<br />
control statements, 157, 222, 223, 224, 225, 226,<br />
227, 228, 229<br />
CONV (convert), 213<br />
Conversion instructions, 214<br />
COS (cosine), 205<br />
counters, 190<br />
CTD (count down), 190<br />
CTU (count up), 190<br />
CTUD (count up and down), 190<br />
DataLogClose (close Data log), 319<br />
<strong>S7</strong>-<strong>1200</strong> <strong>Programmable</strong> <strong>controller</strong><br />
System Manual, 04/2012, A5E02486680-06 857
Index<br />
DataLogCreate (create Data log), 315<br />
DataLogNewFile (create Data log based on existing<br />
Data log), 322<br />
DataLogOpen (open Data log), 318<br />
DataLogWrite (write Data log), 320<br />
DEC (decrement), 202<br />
DECO (decode), 240<br />
DELETE (delete substring), 270<br />
DeviceStates, 299<br />
DIS_AIRT (disable alarm interrupt), 296<br />
EN and ENO (power flow), 163<br />
EN_AIRT (enable alarm interrupt), 296<br />
ENCO (encode), 240<br />
EXIT, 228<br />
EXP (natural exponential), 205<br />
expressions, 157<br />
EXPT (general exponential), 205<br />
FILL_BLK, 211<br />
FIND (find substring), 273<br />
floating-point math, 205<br />
FLOOR, 218<br />
FOR, 225<br />
FRAC (fraction), 205<br />
GET_DIAG, 302<br />
GOTO, 229<br />
HTA (hexadecimal to ASCII), 266<br />
IF-THEN, 223<br />
IN_RANGE (within a range), 197<br />
INC (increment), 202<br />
INSERT (insert substring), 271<br />
INV (invert), 240<br />
JMP_LIST, 230<br />
LED status, 298<br />
LEFT (left substring), 269<br />
LEN (length), 267<br />
LIMIT, 204<br />
LN (natural logarithm), 205<br />
math, 199<br />
math (floating-point), 205<br />
MAX (maximum), 203<br />
MC_ChangeDynamic, 394<br />
MC_CommandTable, 392<br />
MC_Halt, 381<br />
MC_Home, 379<br />
MC_MoveAbsolute, 383<br />
MC_MoveJog, 390<br />
MC_MoveRelative, 385<br />
MC_MoveVelocity, 387<br />
MC_Power, 376<br />
MC_Reset, 378<br />
MID (middle substring), 269<br />
MIN (minimum), 203<br />
MOD (modulo), 200<br />
ModuleStates, 301<br />
move, 207<br />
MUX (multiplex), 242<br />
N_TRIG, 181<br />
NEG (negation), 201<br />
NORM_X (normalize), 219<br />
OK, 197<br />
operators, 157<br />
OR, 239<br />
OUT_RANGE (outside of a range), 197<br />
overview, 156<br />
P_TRIG, 181<br />
PID overview, 347<br />
PID_3STEP, 355<br />
PID_3Step algorithm, 347, 355<br />
PID_Compact, 350<br />
PID_Compact algorithm, 347, 350<br />
priority of operators, 157<br />
program control, 222<br />
program editor, 156<br />
QRY_CINT (query cyclic interrupt), 293<br />
RD_LOC_T (read local time), 249<br />
RD_SYS_T (read system time), 249<br />
REPEAT, 227<br />
REPLACE (replace substring), 272<br />
RETURN, 229<br />
RIGHT (right substring), 269<br />
ROL and ROR (rotate left and rotate right), 245<br />
round, 217<br />
run time meter, 251<br />
S_CONV (value to string conversions), 255<br />
S_MOV (move string), 254<br />
SCALE_X (scale), 219<br />
SEL (select), 242<br />
Set and Reset, 178<br />
SET_CINT (set cyclic interrupt), 291<br />
SET_TIMEZONE (set time zone), 252<br />
SHL and SHR (shift left and shift right), 244<br />
SIN (sine), 205<br />
SQR (square), 205<br />
SQRT (square root), 205<br />
SRT_DINT (start time delay interrupt), 294<br />
STRG_VAL (string to value), 255<br />
swap, 212<br />
SWITCH, 231<br />
T_ADD (add time), 248<br />
T_COMBINE (combine times), 249<br />
T_CONV (convert time), 247<br />
T_DIFF (time difference), 248<br />
T_SUB (subtract time), 248<br />
TAN (tangent), 205<br />
<strong>S7</strong>-<strong>1200</strong> <strong>Programmable</strong> <strong>controller</strong><br />
858 System Manual, 04/2012, A5E02486680-06
timer operations, 186<br />
timers, 182<br />
truncate, 217<br />
UFILL_BLK (uninterruptible fill), 211<br />
VAL_STRG (value to string), 255<br />
Var section, 156<br />
WHILE, 226<br />
WR_SYS_T (write system time), 249<br />
XOR (exclusive OR), 239<br />
Security<br />
access protection, 164<br />
binding to a CPU or memory card, 166<br />
copy protection, 166<br />
CPU, 164<br />
know-how protectionf for a code block, 165<br />
lost password, 118<br />
SEL (select), 242<br />
Send message configuration, 586<br />
Send parameters configuration, 127, 467, 494<br />
SEND_CFG (send configuration), 569<br />
SEND_PTP (send Point-to-Point data), 575<br />
LENGH and BUFFER parameters, 577<br />
Serial communication, 565<br />
Service and support, 3<br />
Set, 178<br />
SET_CINT (set cyclic interrupt), 291<br />
SET_TIMEZONE (set time zone), 252<br />
Settings, 36<br />
SGN_GET (get RS232 signals), 581<br />
SGN_SET (set RS232 signals), 582<br />
SHL and SHR (shift left and shift right), 244<br />
Siemens security certificate, Web pages, 508, 560<br />
Siemens technical support, 3<br />
siemens_automation_language cookie, 552<br />
Signal board (SB)<br />
add modules, 122<br />
analog output representation (current), 771, 801<br />
analog output representation (voltage), 771, 800<br />
configuration of parameters, 125<br />
input representation (current), 770, 800<br />
input representation (voltage), 770, 799<br />
installation, 51<br />
overview, 24<br />
power requirements, 829<br />
removal, 51<br />
SB 1221 DI 4, 200 kHz, 784<br />
SB 1222 DQ, 200 kHz, 786<br />
SB 1223 DI 2 / DQ 2, 792<br />
SB 1223 DI 2 / DQ 2, 200 kHz, 789<br />
SB 1231 AI 1 x 12 bit, 794<br />
SB 1231 AI 1 x 16 bit RTD, 806<br />
SB 1231 AI 1 x 16 bit Thermocouple, 801<br />
SB 1232 AQ 1x12 bit, 797<br />
step response times, 798<br />
Signal handling errors, 581, 583<br />
Signal module (SM)<br />
add modules, 122<br />
analog input representation (current), 770, 800<br />
analog input representation (voltage), 770, 799<br />
analog output representation (current), 771, 801<br />
analog output representation (voltage), 771, 800<br />
configuration of parameters, 125<br />
expansion cable, 56<br />
installation, 52<br />
overview, 24<br />
power requirements, 829<br />
removal, 53<br />
SM 1221, 745<br />
SM 1222, 748, 750<br />
SM 1222 DQ8 RLY Changeover, 748<br />
SM 1223, 755<br />
SM 1223 specifications, 757<br />
SM 1231 AI 4 x 13 bit, 760<br />
SM 1231 AI 4 x 16 bit TC, 772<br />
SM 1231 AI 4 x RTD x 16 bit, 778<br />
SM 1231 AI 8 x 16 bit TC, 772<br />
SM 1231 AI 8 x RTD x 16 bit, 778<br />
SM 1232 AQ 2 x 14bit, 764<br />
SM 1232 AQ 4 x 14bit, 764<br />
SM 1234 AI 4 x 13 bit / AQ 2 x 14 bit, 766<br />
step response times, 769<br />
Simulators, 827<br />
SIN (sine), 205<br />
Slave polling architecture, 596<br />
SM 1231 RTD<br />
selection tables, 783, 810<br />
SM and SB<br />
comparison chart, 22<br />
device configuration, 119<br />
SMS, 660<br />
Software flow control, 586<br />
Special characters<br />
User-defined Web pages, 534<br />
Specifications<br />
analog input representation (current), 770, 800<br />
analog input representation (voltage), 770, 799<br />
analog output representation (current), 771, 801<br />
analog output representation (voltage), 771, 800<br />
ATEX approval, 700<br />
CB 1241 RS485, 822<br />
CE approval, 699<br />
CM 1241 RS232, 824<br />
CPU 1211C, 705<br />
CPU 1212C, 715<br />
Index<br />
<strong>S7</strong>-<strong>1200</strong> <strong>Programmable</strong> <strong>controller</strong><br />
System Manual, 04/2012, A5E02486680-06 859
Index<br />
CPU 1214C, 724<br />
CPU 1215C, 734<br />
C-Tick approval, 701<br />
cULus approval, 700<br />
electromagnetic compatibility (EMC), 702<br />
environmental conditions, 702<br />
FM approval, 700<br />
general technical specifications, 699<br />
industrial environments, 701<br />
input simulators, 827<br />
maritime approval, 701<br />
memory cards, 826<br />
protection, 703<br />
rated voltages, 704<br />
relay electrical service life, 705<br />
SB 1221 DI 4, 200 kHz, 784<br />
SB 1222 DQ 4, 200 kHz, 786<br />
SB 1223 DI 2 / DQ 2, 792<br />
SB 1223 DI 2 x / DQ 2, 200 kHz, 789<br />
SB 1231 AI 1 x 12 bit, 794<br />
SB 1231 AI 1 x 16 bit RTD, 806<br />
SB 1231 AI 1 x 16 bit RTD wiring diagram, 808<br />
SB 1231 AI 1 x 16 bit Thermocouple, 801<br />
SB 1231 AI 1 x 16 bit thermocouple wiring<br />
diagram, 805<br />
SB 1231 AI x 12 bit wiring diagram, 796<br />
SB 1232 AQ 1x12 bit, 797<br />
SM 1221 signal module, 745<br />
SM 1221 wiring diagram, 746<br />
SM 1222 DQ8 RLY Changeover, 748<br />
SM 1222 signal module, 748, 750<br />
SM 1222 wiring diagram, 750<br />
SM 1223 signal module, 755, 757<br />
SM 1223 wiring diagram, 755, 757<br />
SM 1231 AI 4 x 13 bit, 760<br />
SM 1231 AI 4 x 16 bit TC signal module, 772<br />
SM 1231 AI 4 x 16 bit TC wiring diagram, 774<br />
SM 1231 AI 4 x RTD x 16 bit signal module, 778<br />
SM 1231 AI 8 x 16 bit TC signal module, 772<br />
SM 1231 AI 8 x 16 bit TC wiring diagram, 774<br />
SM 1231 AI 8 x RTD x 16 bit signal module, 778<br />
SM 1231 RTD 4 x 16 bit wiring diagram, 780<br />
SM 1231 RTD 8 x 16 bit wiring diagram, 780<br />
SM 1232 AQ 2 x 14bit, 764<br />
SM 1232 AQ 4 x 14bit, 764<br />
SM 1234 AI 4 x 13 bit / AQ 2 x 14 bit, 766<br />
step response times (CPU), 711, 720, 730, 740<br />
step response times (SB), 798<br />
step response times (SM), 769<br />
wiring diagrams SM 1231 analog input, 764<br />
wiring diagrams SM 1232 analog output, 765<br />
wiring diagrams SM 1234 analog input/output, 768<br />
SQR (square), 205<br />
SQRT (square root), 205<br />
SRT_DINT (start time delay interrupt), 294<br />
Standard Web pages, 503<br />
accessing from PC, 505<br />
changing operating mode, 509<br />
communication, 513<br />
cookie restrictions, 560<br />
Data Logs, 516<br />
Diagnostic, 510<br />
Identification, 510<br />
Intro, 508<br />
JavaScript restrictions, 558<br />
layout, 506<br />
logging in and out, 507<br />
Module information, 511<br />
secure access, 506<br />
Start, 509<br />
Variable Status, 515<br />
Start conditions, 588<br />
Start message character, 588<br />
Start standard Web page, 509<br />
Startup after POWER ON, 69<br />
startup processing, 71<br />
STARTUP mode<br />
force operation, 689<br />
Startup OB, 74<br />
Startup parameters, 110<br />
Status<br />
LED indicators, 673<br />
LED indicators (communication interface), 563<br />
LED instruction, 298<br />
STEP 7<br />
add modules, 122<br />
add new device, 120<br />
Adding a PROFINET IO device, 468<br />
adding inputs or outputs to a LAD or FBD<br />
instruction, 35<br />
AS-i, 483<br />
AS-i port, 483<br />
assigning an IP address to an online CPU, 134<br />
block calls, 67<br />
calling code blocks within the user program, 148<br />
capturing values of a DB, 684<br />
changing the settings, 36<br />
communication load, 81<br />
comparing and synchronizing, 681<br />
configuring the CPU, 123<br />
configuring the modules, 125<br />
copying blocks from an online CPU, 168<br />
counters, 190<br />
cycle time, 81<br />
<strong>S7</strong>-<strong>1200</strong> <strong>Programmable</strong> <strong>controller</strong><br />
860 System Manual, 04/2012, A5E02486680-06
cycle time, 81<br />
data block (DB), 67<br />
device configuration, 119<br />
download, 168<br />
drag and drop between editors, 37<br />
Ethernet port, 136<br />
expandable inputs or outputs, 35<br />
favorites, 32<br />
force, 688<br />
force operation, 689<br />
function (FC), 150<br />
function block (FB), 67, 150<br />
HSC configuration, 346<br />
initial value of an FB, 150<br />
inserting instructions, 31<br />
instance data block (DB), 150<br />
linear and structured programs, 146<br />
memory card, 107, 826<br />
monitoring, 683, 684<br />
network connection, 126<br />
operating modes, 69<br />
operation, 685<br />
operator panel, 38<br />
password protection, 165<br />
Portal view, 30<br />
priority class (OB), 73<br />
PROFIBUS, 479<br />
PROFIBUS port, 479<br />
PROFINET, 136<br />
program card, 107<br />
Project view, 30<br />
RD_LOC_T (read local time), 249<br />
RD_SYS_T (read system time), 249<br />
resetting the start values of a DB, 684<br />
run time meter, 251<br />
RUN/STOP buttons, 37<br />
startup processing, 71<br />
time synchronization property (PROFINET), 142<br />
transfer card, 107<br />
types of code blocks, 67<br />
unplugged modules, 41<br />
valid FC, FB, and DB numbers, 67<br />
WR_SYS_T (write system time), 249<br />
STEP 7 programming<br />
PtP example program, 602<br />
user-defined Web pages, 537<br />
STEP 7 web pages, 4<br />
Stop bits, 584<br />
STOP mode, 69, 679<br />
enable outputs in STOP mode, 687<br />
force operation, 689<br />
operator panel, 38<br />
toolbar buttons, 37<br />
STP (stop PLC scan cycle), 235<br />
STRG_VAL (string to value), 255<br />
String<br />
S_MOVE (string move), 254<br />
string data overview, 254<br />
String data type, 98<br />
string operations overview, 267<br />
Structured programming, 146, 148<br />
calling blocks, 148<br />
SUB (subtract), 199<br />
Subnet mask, 136<br />
Support, 3<br />
SWAP, 212<br />
SWITCH, 231<br />
Switching languages, user-defined Web pages, 551<br />
Synchronization<br />
time synchronization property (PROFINET), 142<br />
System clock<br />
RD_LOC_T (read local time), 249<br />
RD_SYS_T (read system time), 249<br />
WR_SYS_T (write system time), 249<br />
System memory byte, 85<br />
System requirements, 29<br />
Index<br />
<strong>S7</strong>-<strong>1200</strong> <strong>Programmable</strong> <strong>controller</strong><br />
System Manual, 04/2012, A5E02486680-06 861<br />
T<br />
T_ADD (add time), 248<br />
T_COMBINE (combine times), 249<br />
T_CONFIG, 451<br />
T_CONV (convert time), 247<br />
T_DIFF (time difference), 248<br />
T_SUB (subtract timet), 248<br />
Tags<br />
force, 688<br />
force operation, 689<br />
monitor, 683<br />
status, 683<br />
TAN (tangent), 205<br />
Task cards<br />
columns and headers, 36, 637<br />
TCON, 439<br />
configuration, 127<br />
connection IDs, 427<br />
connection parameters, 129<br />
TCON_Param, 129<br />
TCP<br />
ad hoc mode, 431<br />
connection configuration, 127<br />
connection IDs, 427<br />
parameters, 129<br />
protocol, 430
Index<br />
TCP/IP communication, 430<br />
TDISCON, 439<br />
Technical specifications, 699<br />
Technical support, 3<br />
Technological objects<br />
HSC (high-speed counter), 339<br />
Telecontrol, 657<br />
Teleservice communication<br />
TM_MAIL, 665<br />
TeleService via GPRS, 657<br />
Terminal block connector, 55<br />
Terminal emulator for PtP example program, 603<br />
Testing the program, 170<br />
Thermal zone, 44, 46<br />
Thermocouple<br />
basic operation, 775, 803<br />
cold junction compensation, 775, 803<br />
SB 1231 Thermocouple filter selection table, 804<br />
SB 1231 Thermocouple selection table, 804<br />
SM 1231 Thermocouple filter selection table, 776<br />
SM 1231 Thermocouple selection table, 776<br />
TIA Portal<br />
Portal view, 30<br />
Project view, 30<br />
Time<br />
DTL (date and time long data type), 97<br />
RD_LOC_T (read local time), 249<br />
RD_SYS_T (read system time), 249<br />
SET_TIMEZONE (set time zone), 252<br />
T_ADD (add time), 248<br />
T_COMBINE (combine times), 249<br />
T_CONV (convert time), 247<br />
T_DIFF (time difference), 248<br />
T_SUB (subtract time), 248<br />
Time data type, 96<br />
TOD (time of day data type), 96<br />
WR_SYS_T (write system time), 249<br />
Time delay interrupt), 294<br />
Time of day<br />
configuring the online CPU, 678<br />
Time synchronization property, 142<br />
Time-error interrupt OB, 74<br />
Timers<br />
operation, 186<br />
quantity, 21, 707, 716, 726, 736<br />
RT (reset timer), 182<br />
size, 21, 707, 716, 726, 736<br />
TOF (off-delay timer), 182<br />
TON (on-delay delay timer), 182<br />
TONR (on-delay retentive) timer, 182<br />
TP (pulse delay timer), 182<br />
TM_MAIL, 665<br />
Transfer card, 110<br />
configure the startup parameters, 110<br />
empty transfer card for a lost password, 118<br />
inserting into CPU, 108<br />
lost password, 118<br />
operation, 107<br />
order number, 826<br />
overview, 107<br />
Transmission block (T-block), 465<br />
Transmit configuration errors, 570<br />
Transmit message configuration, 586<br />
PtP example program, 597<br />
Transmit runtime errors, 577<br />
TRCV, 439<br />
ad hoc mode, 431<br />
connection IDs, 427<br />
TRCV_C, 432, 467<br />
ad hoc mode, 431<br />
configuration, 127<br />
connection IDs, 427<br />
connection parameters, 129<br />
TRCV_C instruction configuration, 468<br />
Triggering values in the watch table, 686<br />
Troubleshooting<br />
diagnostics buffer, 680<br />
LED indicators, 673<br />
TRUNC (truncate), 217<br />
TS Adapter, 22<br />
installing a TS module, 58<br />
installing on a DIN rail, 59<br />
installing on a wall, 60<br />
SIM card, 58<br />
TSAP, 430<br />
TSAP (transport service access points), 129, 432, 465,<br />
493<br />
TSAPs<br />
restricted, 460<br />
TSEND, 439<br />
connection IDs, 427<br />
TSEND_C, 466<br />
configuration, 127<br />
connection IDs, 427<br />
connection parameters, 129<br />
TSEND_C, 466<br />
TSEND_C instruction configuration, 467<br />
TURCV, 447<br />
configuration, 127<br />
connection parameters, 129<br />
TUSEND, 447<br />
configuration, 127<br />
parameters, 129<br />
<strong>S7</strong>-<strong>1200</strong> <strong>Programmable</strong> <strong>controller</strong><br />
862 System Manual, 04/2012, A5E02486680-06
U<br />
UDP<br />
connection configuration, 127<br />
parameters, 129<br />
UDP protocol, 430<br />
UFILL_BLK (uninterruptible fill), 211<br />
Uninterruptible move (UMOVE_BLK), 207<br />
Unplugged modules, 41<br />
Unspecific CPU, 121<br />
Updating user-defined Web pages, 522<br />
Uploading<br />
copying blocks from an online CPU, 168<br />
user program, 168<br />
User interface<br />
Portal view, 30<br />
Project view, 30<br />
User program<br />
adding inputs or outputs to LAD or FBD<br />
instructions, 35<br />
binding to a CPU or memory card, 166<br />
calling code blocks within the user program, 148<br />
copying blocks from an online CPU, 168<br />
download, 168<br />
drag and drop between editors, 37<br />
expandable instructions, 35<br />
favorites, 32<br />
inserting instructions, 31<br />
linear and structured programs, 146<br />
memory card, 107<br />
organization block (OB), 148<br />
password protection, 165<br />
program card, 107<br />
transfer card, 107<br />
User-defined Web pages, 503, 521<br />
accessing from PC, 539<br />
activating and deactivating from control DB, 555<br />
AWP commands for accessing <strong>S7</strong>-<strong>1200</strong> data, 522<br />
configuring, 535<br />
creating fragments, 532<br />
creating with HTML editor, 521<br />
deleting program blocks, 537<br />
downloading corresponding DBs, 538<br />
enabling with WWW instruction, 537<br />
example, 540<br />
generating program blocks, 537<br />
handling special characters, 534<br />
HTML listing, 545<br />
importing fragments, 533<br />
load memory constraints, 539<br />
manual fragment DB control, 555<br />
multiple language configuration, 554<br />
multiple languages, 551<br />
programming in STEP 7, 537<br />
reading special variables, 526<br />
reading variables, 523<br />
refreshing, 522<br />
writing special variables, 527<br />
writing variables, 524<br />
USS protocol library<br />
general drive setup inforamtion, 616<br />
overview, 604<br />
requirements for using, 605<br />
status codes, 614<br />
USS_DRV, 608<br />
USS_PORT, 610<br />
USS_RPM, 611<br />
USS_WPM, 613<br />
Index<br />
<strong>S7</strong>-<strong>1200</strong> <strong>Programmable</strong> <strong>controller</strong><br />
System Manual, 04/2012, A5E02486680-06 863<br />
V<br />
VAL_STRG (value to string), 255<br />
Variable index for an array, 210<br />
Variable Status standard Web page, 515<br />
Variables<br />
monitoring and modifying from PC, 515<br />
Versions of instructions, 36, 637<br />
Visualization<br />
HMI devices, 26<br />
W<br />
Wait time, 584<br />
Warm restart, 69<br />
Watch table<br />
enable outputs in STOP mode, 687<br />
force, 170<br />
memory card, 107<br />
monitor, 683<br />
operation, 685<br />
trigger values, 686<br />
Watchdog, 234<br />
Web pages<br />
STEP 7, 4<br />
Web server, 503<br />
constraints, 558<br />
enabling, 504<br />
maximum HTTP connections, 558<br />
Quotation mark conventions, 534<br />
standard Web pages, 505<br />
update rate, 504<br />
Web server, user-defined Web pages, 521<br />
Wiring diagrams<br />
CPU 1211C, 714
Index<br />
CPU 1212C, 723<br />
CPU 1214C, 733<br />
CPU 1215C, 744<br />
SB 1221 DI 4, 200 kHz, 785<br />
SB 1222 DQ 4, 200 kHz, 788<br />
SB 1223 DI 2 / DQ 2, 200 kHz, 791<br />
SB 1223 DI 2/ DQ 2, 793<br />
SB 1231 AI 1 x 16 bit RTD, 808<br />
SB 1231 AI 1 x 16 bit thermocouple, 805<br />
SB 1231 AI x 12 bit, 796<br />
SB 1232 AQ 1 x 12 bit, 798<br />
SM 1221 signal module, 746<br />
SM 1222 signal module, 750<br />
SM 1223 signal module, 755, 757<br />
SM 1231 AI 4 x 16 bit TC, 774<br />
SM 1231 AI 8 x 16 bit TC, 774<br />
SM 1231 analog input, 764<br />
SM 1231 RTD 4 x 16 bit, 780<br />
SM 1231 RTD 8 x 16 bit, 780<br />
SM 1232 analog output, 765<br />
SM 1234 analog input/output, 768<br />
Wiring guidelines, 63<br />
clearance for airflow and cooling, 44<br />
grounding, 63<br />
prerequisites, 61<br />
Work memory, 20<br />
CPU 1211C, 705<br />
CPU 1212C, 715<br />
CPU 1214C, 724<br />
CPU 1215C, 734<br />
WR_SYS_T (write system time), 249<br />
WRIT_DBL, 332<br />
WRREC, 275, 280<br />
WWW (enable user-defined Web pages), 537<br />
X<br />
XON / XOFF, 586<br />
XOR (exclusive OR), 239<br />
<strong>S7</strong>-<strong>1200</strong> <strong>Programmable</strong> <strong>controller</strong><br />
864 System Manual, 04/2012, A5E02486680-06