Installation description - Schmiedmann
Installation description - Schmiedmann
Installation description - Schmiedmann

You also want an ePaper? Increase the reach of your titles
YUMPU automatically turns print PDFs into web optimized ePapers that Google loves.
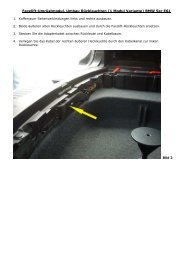
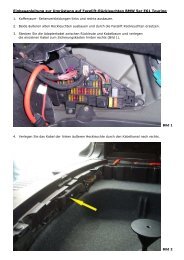
1, Lift up engine hood<br />
7, Take out H8 Bulb<br />
13, Put the lamp fixture into the<br />
lamp base<br />
19, Connect auto lamp bulb<br />
connector to the power control<br />
box connector<br />
25, When the operation is tested<br />
to be working normally, cover up<br />
the dust damper<br />
2, Start installation of H8 LED Bulb.<br />
Please ensure all electrical switches<br />
are turned off.<br />
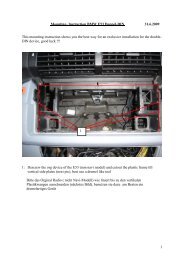
8, Release the catches of H8 Bulb<br />
Connector at both sides<br />
14, Check the lamp base and<br />
position properly<br />
20, When fitting in, check the<br />
colors of wire and insert in pairs.<br />
26, Press the Dust Damper and let<br />
it caught up.<br />
<strong>Installation</strong> <strong>description</strong><br />
3, Check the position of Dust<br />
Damper of H8 Lamp Fixture<br />
9, Pull out H8 Bulb Connector<br />
15, Turn H8 LED to fit into<br />
position<br />
21, Fit the connector firmly ;<br />
4, Use slot screw driver to<br />
open the Dust Damper<br />
carefully<br />
10, Check the position of<br />
lamp base.<br />
16, Connect LED to power<br />
control box<br />
22, Sort out the wires and<br />
place properly<br />
5, Lift open the Dust Damper 6, Check position of H8 Bulb<br />
11, Take out H8 LED Bule<br />
carefully<br />
17, Connect Connector<br />
23,Fine-tune the LED fixing position;<br />
(Refer to the Supplementary<br />
explanation to Page 2.)<br />
27, When both side of lamp is installed with H8 LED Bule, cover up the engine hood.<br />
12, Clamp the handle of lamp<br />
base<br />
18, Search for carefully and<br />
install power control box<br />
24, Test by light up the lamp bulb
a). Insert H8 LED Bule into lamp cup<br />
vertically.<br />
e). Rotate LED Bule to position but LED light<br />
source position is not at proper position.<br />
i). After positioning LED Bule light source<br />
correctly, pull up or bend down the fixing<br />
handle to fix it.<br />
23, Fine-Tuning of LED Fixing Position (Supplementary Explanation of Page 2)<br />
b). Push H8 LED Bule down to the<br />
bottom.<br />
f). Turn the rotating table (at the<br />
straight line embosing)<br />
j). Fix the position by pulling up or<br />
bending down the fixing handle.<br />
c). Check H8 LED Bule for fitting<br />
into the positioning slot of Lamp Cup<br />
.<br />
g). Turn and adjust LED Bule to the light<br />
source position and fix ( Front view)<br />
i). After the LED Bule light source<br />
position is fixed. .<br />
d). Hold LED Bule Base Handle and<br />
turn to fixed position.<br />
h). Turn and adjust LED Bule to the light<br />
source position and fix it (side view)<br />
k). H8 LED Blue Lamp is on.