EE 410 / Saraswat Handout #3 - Stanford Nanofabrication Facility
EE 410 / Saraswat Handout #3 - Stanford Nanofabrication Facility
EE 410 / Saraswat Handout #3 - Stanford Nanofabrication Facility

Create successful ePaper yourself
Turn your PDF publications into a flip-book with our unique Google optimized e-Paper software.
<strong>EE</strong><strong>410</strong> / <strong>Saraswat</strong> <strong>Handout</strong> <strong>#3</strong><br />
• Inspect each one to be sure that the resist has been removed.<br />
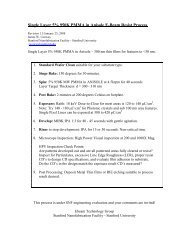
15. PM #4: N-Select (STEPS 4.000-4.190)<br />
N-Select Lithography:<br />
N-select defines the n+ source-drains and the n-poly. Remember that in this process we make<br />
both n and p poly. The litho process steps are:<br />
• Singe & Prime in the yes<br />
• Spin coat using svgcoat/2 programs 9 (no prime), 7 (1.0 µm of 3612 resist w/2 mm EBR),<br />
and 1 (prebake 90 C for 60").<br />
• Expose on the asml<br />
Job name: <strong>EE</strong><strong>410</strong>R_1<br />
Layer ID: 5<br />
Layer Number: NSELECT<br />
Image ID: NSELECT<br />
Reticle ID: <strong>EE</strong><strong>410</strong>RET3<br />
• Post-exposure bake on svgdev/2 using programs 9 (no develop) and 1 (post-expose<br />
bake@110º C for 60").<br />
• Resist develop on svgdev using programs 3 (develop) and 1 (postbake@110º C for 60")<br />
• Inspect. Check the alignment Verniers and record the alignment offsets. You should be<br />
able to align to within 0.5 µm from the ACTIVE level.<br />
• Rework as necessary.<br />
Vernier #41: SELECT to ACTIVE (offset: ____ / ____ )<br />
Vernier #43: SELECT to POLY (offset: ____ / ____ )<br />
Resist hardening (below) should be performed immediately after patterning.<br />
4G. Week #4: Preparation<br />
16. N-SourceDrain Implant (STEPS 4.2000-4.260)<br />
Resist Hardening<br />
The n+ implant, while of moderate energy is of high dose. This dose will burn and wrinkle<br />
unhardened resist. This UV treatment hardens the resist just enough to withstand this implant.<br />
Higher temperature postbaking over-hardens the resist, making it unnecessarily difficult to strip.<br />
• The resist has to be hardened to avoid the resist flowing or blistering as the wafers are<br />
dosed and heated during implant.<br />
• UV harden resist for 15 min.<br />
• Final bake resist @ 110°C for 30 min.<br />
Revised Jan. 11, 2008 Page 24/47