rally round the king – historical sampler - Two Hour Wargames
rally round the king – historical sampler - Two Hour Wargames
rally round the king – historical sampler - Two Hour Wargames

Create successful ePaper yourself
Turn your PDF publications into a flip-book with our unique Google optimized e-Paper software.
HISTORICAL SAMPLER<br />
FREE HISTORICAL ARMY LISTS AND LOCAL CAMPAIGN SYSTEM
INTRODUCTION<br />
RALLY ROUND THE KING <strong>–</strong> HISTORICAL SAMPLER<br />
In Rally Round <strong>the</strong> King we saw mighty armies engaged in a<br />
struggle for dominance in <strong>the</strong> mystic land of Talomir, <strong>the</strong><br />
world of Warrior Heroes <strong>–</strong> Armies and Adventures. But if we<br />
go far<strong>the</strong>r back in time, real time, we can see that Talomir has<br />
its roots in <strong>the</strong> past of our own world, Earth.<br />
Now we bring <strong>the</strong> armies from Earth’s past into <strong>the</strong> fray. Now<br />
you can recreate actual <strong>historical</strong> battles or even see how a<br />
Roman legion will fair in a face off with a Goblin horde.<br />
Recreate a battle of five armies from fantasy? Why not, as we<br />
see Teutonic Knights, Elves and Dwarves face off against<br />
Saracens and Orcs on <strong>the</strong> lonely windswept slopes of an<br />
ancient mountain.<br />
In <strong>the</strong> future over 120 <strong>historical</strong> armies for Rally Round <strong>the</strong><br />
King (RRtK) divided into four convenient releases:<br />
Ancients and Alexander.<br />
Pax Romana.<br />
Crusaders and Norsemen.<br />
For King and Country.<br />
This <strong>sampler</strong> contains three <strong>historical</strong> armies from each and a<br />
simple Campaign system called, Local Campaigns, we’ve<br />
used many time. Enjoy!<br />
RULES ADJUSTMENTS<br />
The only change in <strong>the</strong> rules for <strong>the</strong>se <strong>historical</strong> armies is <strong>the</strong><br />
expansion of <strong>the</strong> armor classes to include AC3 and AC5.<br />
These new classes can easily retrofit onto Rally Round <strong>the</strong><br />
King using <strong>the</strong> movement charts below.<br />
FOOT MOVEMENT RATES<br />
Normal move (retire/pursue*)<br />
FIGS AC 2 AC 3 AC 4 AC 5 AC 6<br />
2 8" (3") 8” (3") 8" (3") 7” (2”) 6" (2")<br />
3 8" (3") 8” (3") 8" (3") 7” (2”) 6" (2")<br />
4 6" (2") 6” (2”) 6" (2") 5” (1”) 4" (1")<br />
MOUNTED MOVEMENT RATES<br />
Normal move (retire/pursue*)<br />
FIGS AC 2 AC 3 AC 4 AC 5 AC 6<br />
2 16" (6") 15” (6") 14" (6") 12” (5”) 10" (4")<br />
3 12" (6") 12" (6") 12" (6") 10” (4”) 8" (3")<br />
4 10" (4") 9” (4”) 8" (4") 7” (3”) 6" (3")<br />
© 2012 DAVID GRAY <strong>–</strong> ED TEIXEIRA- TWO HOUR WARGAMES 2/18/2012<br />
1<br />
LOCAL CAMPAIGNING<br />
In RRtK we gave you a National Campaign system (RRtK,<br />
page, 59) where each battle affected whe<strong>the</strong>r <strong>the</strong> country<br />
continued to fight. This works great for <strong>the</strong> big picture. In<br />
Local Campaigning we let you fight a smaller, more localized<br />
campaign. Is it better? That’s for you to say, it’s just ano<strong>the</strong>r<br />
toll for you to use. So let’s get started.<br />
SETTING UP THE CAMPAIGN<br />
Follow this procedure when starting <strong>the</strong> campaign and note<br />
that this is extremely solo and same side friendly.<br />
Decide which armies will fight.<br />
Build each list to <strong>the</strong> agreed upon points total.<br />
Divide your forces into 4 to 6 army groups of at<br />
least three units. These army groups are never<br />
reorganized. Be sure to track <strong>the</strong> current<br />
composition of each army group as losses occur.<br />
As long as you have at least one unit left <strong>the</strong><br />
army group still exists.<br />
Get a regular deck of playing cards or perhaps<br />
you have something else that can be used for<br />
mar<strong>king</strong> <strong>the</strong>se army groups. For simplicity’s sake<br />
we will assume that you are using cards.<br />
Designate one side as red and <strong>the</strong> o<strong>the</strong>r black.<br />
Give <strong>the</strong> black side one Spade for each army<br />
group that it has. Count <strong>the</strong> number of Spades he<br />
has <strong>the</strong>n divide this number by two and <strong>round</strong><br />
down. Give <strong>the</strong> black side that many Clubs. The<br />
Spades are actual units while <strong>the</strong> Clubs are<br />
phony army groups or \decoys.<br />
Do <strong>the</strong> same with <strong>the</strong> red player counting<br />
Diamonds as army groups and Hearts as decoys.<br />
Once all of <strong>the</strong> units in <strong>the</strong> army group have been<br />
destroyed <strong>the</strong> corresponding card is removed<br />
from play.
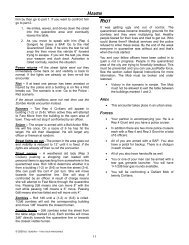
THE CAMPAIGN MAP<br />
RALLY ROUND THE KING <strong>–</strong> HISTORICAL SAMPLER<br />
The Campaign Map can be as simple or detailed as you like.<br />
Regardless of your decision it all starts with <strong>the</strong> Ladder. Here’s<br />
a picture of <strong>the</strong> Campaign Ladder.<br />
Let’s go over <strong>the</strong> map in detail.<br />
TIME LINE<br />
The numbered rows across <strong>the</strong> Campaign Map represent <strong>the</strong><br />
total number of turns in <strong>the</strong> campaign and are used to track<br />
time. At its simplest form it is numbered 1 to 8. This could<br />
have been 1 to 6 or 1 to 10; <strong>the</strong> choice is yours.<br />
If desired, months or days can be substituted for <strong>the</strong> numbers.<br />
It doesn’t matter as all we’re doing is trac<strong>king</strong> time and<br />
limiting <strong>the</strong> turns that <strong>the</strong> campaign takes place.<br />
THEATER OF WAR<br />
Across <strong>the</strong> three columns of <strong>the</strong> Campaign map you see <strong>the</strong><br />
words Left, Center, and Right. This names each column and<br />
© 2012 DAVID GRAY <strong>–</strong> ED TEIXEIRA- TWO HOUR WARGAMES 2/18/2012<br />
2<br />
gives a reference to <strong>the</strong> part of <strong>the</strong> map that army groups may<br />
occupy.<br />
When combined with <strong>the</strong> Time Line each army group will<br />
have its location during each moment of <strong>the</strong> campaign<br />
pinpointed.<br />
DETAILING THE MAP<br />
To add character and flavor to <strong>the</strong> Campaign Map we<br />
recommend doing <strong>the</strong> following:<br />
Make some boxes on <strong>the</strong> map more valuable in<br />
<strong>the</strong> campaign by placing a +1 in <strong>the</strong> box. The<br />
Campaign is decided by <strong>the</strong> number of Victory<br />
Points (page, ##) each player accumulates during<br />
<strong>the</strong> campaign. The +1 represents and additional<br />
Victory Point that can be gained by occupying<br />
this box during <strong>the</strong> campaign.<br />
Instead of using Left, Center, and Right giver<br />
each column a geographical name. In <strong>the</strong><br />
following Campaign Map we have modeled it<br />
after <strong>the</strong> Levant during <strong>the</strong> Crusades so named<br />
<strong>the</strong>m <strong>the</strong> Coast, inland and <strong>the</strong> Desert.<br />
CRUSADER CAMPAIGN MAP
RALLY ROUND THE KING <strong>–</strong> HISTORICAL SAMPLER<br />
If you desire you can pre-roll <strong>the</strong> actual<br />
battlefields for all of <strong>the</strong> boxes on <strong>the</strong> map. Just<br />
be sure that <strong>the</strong> boxes you use are in proportion<br />
to <strong>the</strong> table size you wish to play your games on.<br />
The sample map is set for square tables.<br />
Superimpose <strong>the</strong> map grid over an actual map of<br />
<strong>the</strong> area. This adds a bit more flavor to <strong>the</strong><br />
campaign as you can say that you are fighting<br />
outside Damascus or o<strong>the</strong>r important area of <strong>the</strong><br />
map.<br />
OPENING STAGES OF THE CAMPAIGN<br />
Once you have divided your units into army groups and laid<br />
out <strong>the</strong> Campaign Map <strong>the</strong> Campaign can begin.<br />
Each player rolls 1d6 with <strong>the</strong> higher score<br />
choosing to go first or defer.<br />
All cards are placed in <strong>the</strong> Turn One row.<br />
The first player now chooses one of his cards,<br />
ei<strong>the</strong>r an army group or decoy, and places it face<br />
down on <strong>the</strong> table (1) and declares in what<br />
Theater (column on <strong>the</strong> map) it is located. This<br />
can be Left, Center, or Right as he so desires.<br />
The second player now chooses one of his cards,<br />
ei<strong>the</strong>r an army group or decoy, and places it face<br />
down on <strong>the</strong> table and declares in what Theater<br />
(column on <strong>the</strong> map) it is located. This can be<br />
Left, Center, or Right as he so desires.<br />
Both players alternate until all of <strong>the</strong>ir cards have<br />
been placed. This may result in cards in all or<br />
some of <strong>the</strong> Theaters.<br />
This ends <strong>the</strong> Opening Stages of <strong>the</strong> Campaign.<br />
If using markers <strong>the</strong>se could actually be placed on <strong>the</strong> Campaign<br />
Map. If using cards it is important to remember in what column <strong>the</strong><br />
card is in and what row as <strong>the</strong> game plays out.<br />
TURN SEQUENCE<br />
The Campaign has a limited number of turns and each turn has<br />
a strict turn sequence. Here’s how we do it:<br />
At <strong>the</strong> start of each turn only <strong>the</strong> cards that are in<br />
a box in <strong>the</strong> current turn are used. If <strong>the</strong> card is in<br />
a box at a later turn it is not used this turn.<br />
Example <strong>–</strong> It is turn 4 of <strong>the</strong> campaign. Loo<strong>king</strong> at <strong>the</strong><br />
following picture we see red and black cards on <strong>the</strong> map. Only<br />
<strong>the</strong> cards in <strong>the</strong> turn four boxes will be sued this turn. The<br />
cards in <strong>the</strong> turn five boxes do not come into play until turn 5.<br />
© 2012 DAVID GRAY <strong>–</strong> ED TEIXEIRA- TWO HOUR WARGAMES 2/18/2012<br />
3<br />
Starting with <strong>the</strong> boxes that are occupied by red<br />
or black cards, but not both, we hand out Victory<br />
Points (page, ##).<br />
After that has been done any box with red and<br />
black cards must be resolved. Both sides now<br />
choose to Fight (page, ##) or Flight (page, ##)<br />
and any resulting Victory Points (page, ##) are<br />
handed out. Once this is resolved <strong>the</strong> turn is over<br />
and we proceed to <strong>the</strong> next turn in <strong>the</strong> Campaign.<br />
FIGHT OR FLIGHT<br />
When a campaign box is occupied by both red and black cards<br />
each player must choose to fight a battle (Fight) or leave <strong>the</strong><br />
box to <strong>the</strong> enemy (Flight). Both players must write down <strong>the</strong>ir<br />
decisions and reveal <strong>the</strong>m at <strong>the</strong> same time.<br />
FIGHT<br />
When both sides have chosen to Fight, a battle is fought using<br />
Rally Round <strong>the</strong> King. The first player to have occupied <strong>the</strong><br />
box is <strong>the</strong> defender. If both started in <strong>the</strong> box, as in <strong>the</strong> first<br />
turn, <strong>the</strong>n players can dice at random to see who defends.<br />
Note that if after a player has exercised his Right of Refusal<br />
(RRtK, page, ##) and he has not accepted <strong>the</strong> terrain his Fight<br />
result has now become a Flight result.<br />
Note that cards are never revealed to be army groups nor<br />
decoys. When a battle results simply ga<strong>the</strong>r <strong>the</strong> units involved.<br />
FLIGHT<br />
When a player has chosen to leave <strong>the</strong> box to <strong>the</strong> enemy<br />
(Flight) <strong>the</strong>ir army must move down <strong>the</strong> Campaign Map.<br />
Here’s how we do it:<br />
Army groups and decoys forced to Flight have<br />
two options.<br />
Move down one box (turn) staying in<br />
<strong>the</strong> same column.
RALLY ROUND THE KING <strong>–</strong> HISTORICAL SAMPLER<br />
Example <strong>–</strong> Continuing from <strong>the</strong> previous picture we see <strong>the</strong> red<br />
card in box Desert 4 has chosen Flight. The player chooses to<br />
move <strong>the</strong> card down to box Desert 5 staying in <strong>the</strong> same<br />
column. The card will be active in <strong>the</strong> 5 th turn and has<br />
reinforced <strong>the</strong> red card already in <strong>the</strong> box.<br />
Move down two boxes (turns) and shift<br />
to an adjacent column.<br />
Example <strong>–</strong> Continuing from <strong>the</strong> previous picture we see <strong>the</strong> red<br />
card in box Desert 4 has chosen Flight. The player chooses to<br />
move <strong>the</strong> card down two boxes and over one column into box<br />
Inland 6. The card is not active until <strong>the</strong> 6 th turn.<br />
Players may choose to Flight some cards and<br />
Fight with o<strong>the</strong>rs.<br />
When both sides choose Flight <strong>the</strong>y will roll 1d6<br />
with <strong>the</strong> higher score moving first.<br />
You can always Flight into an empty, friendly or<br />
enemy occupied box.<br />
© 2012 DAVID GRAY <strong>–</strong> ED TEIXEIRA- TWO HOUR WARGAMES 2/18/2012<br />
4<br />
AFTER THE BATTLE<br />
After <strong>the</strong> battle is over each sides recovers casualties normally<br />
(RRtK, page, 43).<br />
LOSING THE BATTLE OR GAINING A DRAW<br />
If a player has lost <strong>the</strong> battle, left <strong>the</strong> field, or if <strong>the</strong> battle was<br />
a draw, both sides remained on <strong>the</strong> field at <strong>the</strong> end of <strong>the</strong><br />
battle, he has two options and must do one or <strong>the</strong> o<strong>the</strong>r.<br />
All army groups involved in <strong>the</strong> battle are<br />
dropped one to three boxes down <strong>the</strong> map<br />
staying in <strong>the</strong> same column.<br />
All army groups involved in <strong>the</strong> battle are<br />
dropped two to four boxes down <strong>the</strong> map and<br />
shifted to an adjacent column.<br />
Any army groups that fall off <strong>the</strong> map are out of <strong>the</strong> campaign.<br />
WINNING THE BATTLE<br />
If a player has won <strong>the</strong> battle, driven <strong>the</strong> enemy from <strong>the</strong> field,<br />
he has two options and must do one or <strong>the</strong> o<strong>the</strong>r.<br />
All army groups involved in <strong>the</strong> battle are<br />
dropped one box down <strong>the</strong> map staying in <strong>the</strong><br />
same column.<br />
All army groups involved in <strong>the</strong> battle are<br />
dropped two boxes down <strong>the</strong> map and shifted to<br />
an adjacent column.<br />
RECOVERY OF LOSSES<br />
After each battle <strong>the</strong>re may be some units that were destroyed<br />
and removed from <strong>the</strong> campaign. Here’s how <strong>the</strong>y may be<br />
recovered:<br />
For each box down <strong>the</strong> surviving army moves it<br />
is allowed to recover 33% of <strong>the</strong>ir destroyed<br />
units, <strong>round</strong>ed to <strong>the</strong> nearest whole number.<br />
Only units lost <strong>the</strong> previous battle may be<br />
recovered.<br />
All troops from both sides that are not recovered<br />
are removed from <strong>the</strong> campaign.<br />
Example <strong>–</strong> The Norman player lost <strong>the</strong> battle and has lost<br />
eight units. They drop down two boxes so will recover 66% of<br />
his losses or five units. The Norman player is allowed to<br />
choose which units he will recover. The Vi<strong>king</strong> player won <strong>the</strong><br />
battle and lost two units. He has chosen to drop down only one<br />
box so will recover 33% of his losses or one unit.
WINNING THE CAMPAIGN<br />
RALLY ROUND THE KING <strong>–</strong> HISTORICAL SAMPLER<br />
To win <strong>the</strong> Campaign must accumulate more Victory Points<br />
than your opponent. The first player to do so has won. This<br />
can happen while <strong>the</strong>re are still turns left in <strong>the</strong> Campaign!<br />
What are Victory Points and how do you get <strong>the</strong>m?<br />
VICTORY POINTS<br />
Victory Points are a measure of how successful you are during<br />
<strong>the</strong> Campaign. At <strong>the</strong> end of each turn Victory Points are<br />
handed out for <strong>the</strong> following results:<br />
X VICTORY POINTS<br />
CIRCUMSTANCE VP<br />
AWARDED<br />
Nei<strong>the</strong>r side has army groups remaining in <strong>the</strong> 0<br />
box at <strong>the</strong> end of <strong>the</strong> turn.<br />
OR<br />
Both sides have Decoys with Fight orders.<br />
Your side has Fight orders and <strong>the</strong> o<strong>the</strong>r has 1<br />
Flight or you are unopposed in <strong>the</strong> box.<br />
The tabletop battle ended in a draw. 1 each<br />
You won <strong>the</strong> tabletop battle. 2<br />
Your side has Fight orders and <strong>the</strong> o<strong>the</strong>r only 2<br />
has Decoys with Fight orders.<br />
HOW MANY VICTORY POINTS NEEDED TO WIN?<br />
Here’s how to determine how many Victory Points are needed<br />
to win:<br />
Count how many boxes <strong>the</strong>re are on <strong>the</strong><br />
Campaign Map.<br />
Add to this total all <strong>the</strong> Bonus Points on <strong>the</strong> map.<br />
Divide this new total by two, <strong>round</strong>ing down.<br />
The number of Victory Points needed to win is<br />
this final total plus one.<br />
Example <strong>–</strong> Using <strong>the</strong> Crusader Campaign Map (page, ##) we<br />
see <strong>the</strong>re are twenty four boxes. To this number we add <strong>the</strong> five<br />
Bonus Points for a total of twenty nine. Diving this by two we<br />
have fourteen. Adding one gives <strong>the</strong> number of VP needed to<br />
be fifteen. The first player to reach this has won <strong>the</strong> campaign.<br />
How big of a win? If you accumulate three times his number<br />
you have crushed him. Twice his number is a sound beating<br />
while having more is a win. If you have more <strong>the</strong>n you won a<br />
clear victory.<br />
© 2012 DAVID GRAY <strong>–</strong> ED TEIXEIRA- TWO HOUR WARGAMES 2/18/2012<br />
5<br />
CUSTOMIZING YOUR CAMPAIGN<br />
After you have played <strong>the</strong> campaign we have included and<br />
gotten <strong>the</strong> hang of it, try some of <strong>the</strong> following ideas.<br />
SAMPLE GAME<br />
First, you can change <strong>the</strong> gaming periods, even<br />
naval and space battles.<br />
Add more boxes to Campaign Map.<br />
Start one side with a 20% larger point total than<br />
<strong>the</strong> o<strong>the</strong>r but only allow <strong>the</strong>m to use 60% of <strong>the</strong>ir<br />
force at <strong>the</strong> start. The rest may not come into<br />
play until later turns.<br />
Here’s a few sample turns to explain in more detail how to<br />
gain Victory Points.<br />
Turn 1 <strong>–</strong> Alternating one card at a time Blue and Yellow<br />
places all <strong>the</strong>ir cards in <strong>the</strong> first turn row. When <strong>the</strong>y are<br />
finished <strong>the</strong>y must give Fight of Flight orders for each box.<br />
These are written down prior to being revealed. Note that <strong>the</strong><br />
cards are not revealed, just <strong>the</strong> orders.<br />
In <strong>the</strong> left box Blue decides that he is outnumbered and<br />
Chooses Flight while Yellow chooses Fight. Yellow gains one<br />
Victory Point. Blue has to choose what to do and decides to<br />
drop back one box into <strong>the</strong> turn two row. Yellow decides to<br />
move his cards down one box as well.<br />
In <strong>the</strong> center box both players choose Fight orders. Cards are<br />
not revealed but <strong>the</strong> units are placed on <strong>the</strong> table and a battle<br />
fought. The battle is a draw. Both sides gain 1 Victory Point.<br />
Each now rolls 1d6 with <strong>the</strong> higher score (Blue) going first.<br />
Blue decides to drop back one box so will recover 33% of his<br />
losses. Yellow now decides to drop down two boxes and will<br />
cover 66% of his losses.<br />
In <strong>the</strong> right box Yellow is grossly outnumbered and chooses<br />
Flight. Blue chooses Flight as well but for a different reason.<br />
Each now rolls 1d6 with <strong>the</strong> higher score (Yellow) going first.<br />
Yellow decides to drop down one box. Blue decides to drop<br />
down two boxes and over one column. He is now placed in <strong>the</strong>
RALLY ROUND THE KING <strong>–</strong> HISTORICAL SAMPLER<br />
third row center box with Yellow’s cards. As both sides had<br />
Flight orders and nei<strong>the</strong>r had cards remaining in <strong>the</strong> box<br />
nei<strong>the</strong>r will gain any Victory Points.<br />
After one turn <strong>the</strong> score is Yellow 2 Victory Points and Blue 1.<br />
Here’s <strong>the</strong> campaign map at <strong>the</strong> start of turn 2.<br />
Turn 2 <strong>–</strong> In <strong>the</strong> left box Blue decides to Fight as does Yellow.<br />
Yellow wins <strong>the</strong> battle and scores 2 Victory Points. Blue must<br />
move first and decides to drop down three boxes so recovers<br />
99% or all of his losses. Yellow decides to drop down two<br />
boxes and over one column ending its move in row four center<br />
box.<br />
Blue is unopposed in <strong>the</strong> center so gains one Victory Point. He<br />
chooses to drop down one box and joins his forces in <strong>the</strong> third<br />
row center box.<br />
Yellow is unopposed in <strong>the</strong> right so gains one Victory Point.<br />
He decides to drop down one box.<br />
After two turns <strong>the</strong> score is Yellow 5 Victory Points and Blue 2.<br />
Here’s <strong>the</strong> campaign map at <strong>the</strong> start of turn 3.<br />
© 2012 DAVID GRAY <strong>–</strong> ED TEIXEIRA- TWO HOUR WARGAMES 2/18/2012<br />
6<br />
Turn 3 <strong>–</strong> Row three left box is empty so no Victory Points are<br />
scored.<br />
The center box sees a big battle as each chooses to Fight. The<br />
battle is a draw and each side gains 1 Victory Point. Both<br />
sides roll 1d6 to determine who will move first. Yellow goes<br />
first and drops down two boxes and moves to <strong>the</strong> left column<br />
into <strong>the</strong> turn five left column box which is occupied by Blue’s<br />
force. He drops his o<strong>the</strong>r force down one box staying in <strong>the</strong><br />
center. Blue drops down three boxes and over to <strong>the</strong> left<br />
column into box six left column.<br />
The right box is occupied by only Yellow who gains 1 Victory<br />
Point. Yellow chooses to drop down one box into row four.<br />
After three turns <strong>the</strong> score is Yellow 7 Victory Points and Blue<br />
3. Here’s <strong>the</strong> campaign map at <strong>the</strong> start of turn 3.<br />
Turn 4 <strong>–</strong> Yellow is starting to extend its lead as it picks up two<br />
points for being in unopposed boxes. Yellow has a<br />
commanding lead in <strong>the</strong> campaign and being unopposed in <strong>the</strong><br />
right column can keep collecting Victory Points for being<br />
unopposed. It is important to remember that Yellow could have<br />
only Decoys in that column, it doesn’t matter as Blue has<br />
chosen not to oppose him!<br />
The Local Campaign system requires <strong>the</strong> player to strike a<br />
balance between recovering battlefield losses and opposing <strong>the</strong><br />
enemy in all columns or <strong>the</strong>aters.<br />
The use of Decoys limits <strong>the</strong> intelligence of <strong>the</strong> players and<br />
reflects <strong>the</strong> influence, whe<strong>the</strong>r actual armies or not, over <strong>the</strong><br />
area of <strong>the</strong> campaign.<br />
FINAL WORDS<br />
We hope this <strong>sampler</strong> has allowed you to see that Rally <strong>round</strong><br />
<strong>the</strong> King can be used with your <strong>historical</strong> battles as well as<br />
fantasy ones. Enjoy <strong>the</strong> Local Campaign system which is<br />
ano<strong>the</strong>r tool for your THW toolbox.
RALLY ROUND THE KING <strong>–</strong> HISTORICAL SAMPLER<br />
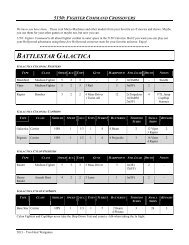
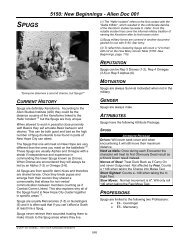
ANCIENTS & ALEXANDER<br />
# Unit Type Figures Combat<br />
Middle Kingdom Egyptian<br />
Motivation<br />
Conquest<br />
Morale<br />
3<br />
Tactics<br />
A<br />
War Rating Recruiting Rolls<br />
0 12<br />
Class<br />
Value<br />
Armor<br />
Class<br />
Special Cost Recruiting Rolls Total<br />
2 Elite Infantry Foot Melee 4 5 3 0 32 2, 12<br />
64<br />
2 Infantry Foot Melee 3 4 3 0 21 4, 7<br />
42<br />
2 Conscripts - UD Foot Melee 3 3 3 -1 15 5-6<br />
30<br />
3 Archers Foot Missile 3 4 2 -1 15 8-9<br />
45<br />
1 Nubian Archers Foot Missile 2 4 2 -1 10 3<br />
10<br />
1 Bedouin Slingers Foot Skirmish 2 4 2 -2 8 11<br />
8<br />
0 Libyan Javelinmen Foot Skirmish 2 4 2 -2 8 10<br />
0<br />
11 199<br />
# Unit Type Figures Combat<br />
Middle Assyrian<br />
Motivation<br />
Conquest<br />
Morale<br />
3<br />
Tactics<br />
B<br />
War Rating Recruiting Rolls<br />
1 16<br />
Class<br />
Value<br />
Armor<br />
Class<br />
Special Cost Recruiting Rolls Total<br />
3 Heavy Chariots - Shock Terror Dual Mounted Melee 1 5 3 4 12 3-4<br />
36<br />
5 Light Chariots Mounted Missile 1 5 2 0 7 6, 8<br />
35<br />
1 Cavalry - Dual Mounted Melee 2 4 3 2 18 2, 12<br />
18<br />
3 Asharittu - Dual Foot Melee 3 4 3 1 24 7<br />
72<br />
1 Hupshu - UD Dual Foot Melee 3 4 3 0 21 5<br />
21<br />
2 Tribal Archers - UD Foot Missile 2 3 2 -2 6 9<br />
12<br />
1 Tribal Slingers Foot Skirmish 2 3 2 -2 6 10<br />
6<br />
1 Tribal Javelinmen Foot Skirmish 2 3 2 -2 6 11<br />
6<br />
0 0<br />
17 206<br />
# Unit Type Figures Combat<br />
Alexandrian Macedonian<br />
Motivation<br />
Conquest<br />
Morale<br />
4<br />
Tactics<br />
A<br />
War Rating Recruiting Rolls<br />
2 9<br />
Class<br />
Value<br />
Armor<br />
Class<br />
Special Cost Recruiting Rolls Total<br />
1 Companion Cavalry - Shock Elite Mounted Melee 3 6 4 3 39 -<br />
39<br />
0 Thessalian Cavalry Mounted Melee 3 5 4 1 30 5<br />
0<br />
1 Thracian Horse Mounted Skirmish 2 4 2 -2 8 8<br />
8<br />
1 Hypaspists Foot Melee 4 5 3 0 32 4, 10<br />
32<br />
3 Phalanx - Pikes Foot Melee 4 4 3 1 32 7, 9<br />
96<br />
1 Mercenary Hoplites Foot Melee 3 4 3 0 21 6<br />
21<br />
1 Javelinmen Foot Skirmish 2 5 2 -2 10 2<br />
10<br />
0 Rhodian Slingers Foot Skirmish 2 4 2 -2 8 12<br />
0<br />
0 Cretan Archers Foot Missile 2 5 2 -1 12 3<br />
0<br />
0 Archers Foot Missile 2 4 2 -1 10 11<br />
0<br />
8 206<br />
© 2012 DAVID GRAY <strong>–</strong> ED TEIXEIRA- TWO HOUR WARGAMES 2/18/2012<br />
7
PAX ROMANA<br />
RALLY ROUND THE KING <strong>–</strong> HISTORICAL SAMPLER<br />
# Unit Type Figures Combat<br />
Principate Roman<br />
Motivation<br />
Conquest<br />
Morale<br />
4<br />
Tactics<br />
A<br />
War Rating Recruiting Rolls<br />
1 7<br />
Class<br />
Value<br />
Armor<br />
Class<br />
Special Cost Recruiting Rolls Total<br />
3 Legionaries - Elite Foot Melee 4 5 4 1 40 5-7<br />
120<br />
1 Lanciarii - CW Foot Melee 3 5 4 1 30 9<br />
30<br />
1 Auxiliary Foot - CW Foot Melee 3 4 4 1 27 4, 8<br />
27<br />
0 Auxiliary Cavalry Mounted Melee 3 4 4 1 27 10<br />
0<br />
1 Equites Mounted Skirmish 2 4 2 -1 10 3, 3<br />
10<br />
1 Slingers Foot Skirmish 2 4 2 -2 8 2<br />
8<br />
0 Archers Foot Missile 3 4 2 -1 15 12<br />
0<br />
7 195<br />
# Unit Type Figures Combat<br />
Parthians<br />
Motivation<br />
Conquest<br />
Morale<br />
3<br />
Tactics<br />
B<br />
War Rating Recruiting Rolls<br />
1 12<br />
Class<br />
Value<br />
Armor<br />
Class<br />
Special Cost Recruiting Rolls Total<br />
3 Cataphracts - UD Shock Mounted Melee 3 5 5 1 33 2, 5-6, 12 99<br />
10 Horse Archers Mounted Skirmish 2 4 2 -1 10 3-4, 7-11 100<br />
0 0<br />
13 199<br />
# Unit Type Figures Combat<br />
Spartacus<br />
Motivation<br />
Loot<br />
Morale<br />
2<br />
Tactics<br />
A<br />
War Rating Recruiting Rolls<br />
0 11<br />
Class<br />
Value<br />
Armor<br />
Class<br />
Special Cost Recruiting Rolls Total<br />
0 Cavalry - UD Mounted Melee 3 4 3 0 21 5<br />
0<br />
1 Gladiators - UD Foot Melee 4 5 4 -1 32 9<br />
32<br />
2 Equipped Slaves - UD Foot Melee 4 4 4 -1 28 8<br />
56<br />
2 Slaves- UD Foot Melee 4 4 3 -1 24 4, 10<br />
48<br />
4 Mob - UD Foot Melee 3 3 2 -1 12 6-7<br />
48<br />
1 Javelinmen Foot Skirmish 2 3 2 -2 6 2-3<br />
6<br />
1 Slingers Foot Skirmish 2 3 2 -2 6 11-12<br />
6<br />
11 196<br />
© 2012 DAVID GRAY <strong>–</strong> ED TEIXEIRA- TWO HOUR WARGAMES 2/18/2012<br />
8
RALLY ROUND THE KING <strong>–</strong> HISTORICAL SAMPLER<br />
CRUSADERS & NORSEMEN<br />
# Unit Type Figures Combat<br />
Anglo-Norman<br />
Motivation<br />
Conquest<br />
Morale<br />
3<br />
Tactics<br />
A<br />
War Rating Recruiting Rolls<br />
0 8<br />
Class<br />
Value<br />
Armor<br />
Class<br />
Special Cost Recruiting Rolls Total<br />
2 Knights - UD Shock Frenzy Mounted Melee 4 5 4 2 44 9-10<br />
88<br />
0 Sergeants - UD Shock Mounted Melee 3 4 3 1 24 2, 12<br />
0<br />
4 Foot Sergeants - UD Foot Melee 4 4 3 -1 24 6-8<br />
96<br />
2 Archers - UD Foot Missile 2 4 2 -2 8 3, 11<br />
16<br />
0 Welsh Foot - UD Foot Melee 3 4 2 -1 15 4<br />
0<br />
8 200<br />
# Unit Type Figures Combat<br />
Vi<strong>king</strong>s<br />
Motivation<br />
Loot<br />
Morale<br />
4<br />
Tactics<br />
A<br />
War Rating Recruiting Rolls<br />
0 7<br />
Class<br />
Value<br />
Armor<br />
Class<br />
Special Cost Recruiting Rolls Total<br />
2 Huscarls - UD Fanatic Frenzy Foot Melee 4 5 4 36 6, 8, 11 72<br />
3 Freemen - UD Frenzy Foot Melee 4 4 3 28 7, 9-10, 12 84<br />
1 Irish - UD Frenzy Foot Melee 3 4 2 18 5<br />
18<br />
1 Archers - UD Foot Missile 2 4 2 12 4<br />
12<br />
1 Thralls - UD Foot Melee 3 3 2 15 2-3<br />
15<br />
8 201<br />
# Unit Type Figures Combat<br />
Early Crusader<br />
Motivation<br />
Religious<br />
Morale<br />
4<br />
Tactics<br />
A<br />
War Rating Recruiting Rolls<br />
0 8<br />
Class<br />
Value<br />
Armor<br />
Class<br />
Special Cost Recruiting Rolls Total<br />
2 Knights - UD Shock Frenzy Mounted Melee 4 5 4 2 44 4-5<br />
88<br />
3 Spearmen - UD Foot Melee 4 4 3 -1 24 6-8<br />
72<br />
2 Crossbowmen - UD Foot Missile 3 4 3 -2 15 9-10<br />
30<br />
1 Pilgrims - UD Foot Melee 3 3 2 -1 12 2, 12<br />
12<br />
0 Archers - UD Foot Missile 2 4 2 -2 8 3<br />
0<br />
0 Turcopoles - UD Dual Mounted Melee 2 4 2 1 14 11<br />
0<br />
0 0<br />
8 202<br />
© 2012 DAVID GRAY <strong>–</strong> ED TEIXEIRA- TWO HOUR WARGAMES 2/18/2012<br />
9
RALLY ROUND THE KING <strong>–</strong> HISTORICAL SAMPLER<br />
FOR KING & COUNTRY<br />
# Unit Type Figures Combat<br />
Motivation Morale Tactics War Rating Recruiting Rolls<br />
Loot 3 A 0 7<br />
Class<br />
Value<br />
Armor<br />
Class<br />
Special Cost Recruiting Rolls Total<br />
1 Knights - UD Shock Frenzy Mounted Melee 4 5 6 2 52 4<br />
52<br />
1 Mounted Crossbowmen - UD Mounted Missile 3 4 4 -1 21 3, 11<br />
21<br />
2 Feudal Levy - CW Foot Melee 3 4 4 1 27 8-10<br />
54<br />
2 Mercenary Pikemen - Pikes Foot Melee 4 4 3 1 32 5-7<br />
64<br />
1 Handgunners - Firearms Foot Missile 2 4 2 0 12 2, 12<br />
12<br />
7 203<br />
Late Medieval Danish<br />
# Unit Type Figures Combat<br />
Mediev al Aragon<br />
Motivation<br />
Conquest<br />
Morale<br />
3<br />
Tactics<br />
A<br />
War Rating Recruiting Rolls<br />
0 7<br />
Class<br />
Value<br />
Armor<br />
Class<br />
Special Cost Recruiting Rolls Total<br />
1 Knights - UD Shock Frenzy Mounted Melee 4 5 6 2 52 9-10<br />
52<br />
1 Jinetes Mounted Skirmish 2 4 3 -1 12 2-3<br />
12<br />
2 Militia Foot Melee 4 4 3 0 28 5, 7<br />
56<br />
2 Crossbowmen Foot Missile 3 4 3 -1 18 2-4<br />
36<br />
2 Almughavars - UD Frenzy Foot Melee 3 5 3 0 24 6, 8<br />
48<br />
8 204<br />
# Unit Type Figures Combat<br />
Motivation Morale Tactics War Rating Recruiting Rolls<br />
Conquest 3 B 0 7<br />
Class<br />
Value<br />
Armor<br />
Class<br />
Special Cost Recruiting Rolls Total<br />
1 Crusader Bro<strong>the</strong>rs - Shock Frenzy Elite Mounted Melee 4 5 6 4 60 2, 4-5 60<br />
1 Crusader Knights - UD Shock Frenzy Mounted Melee 4 5 5 2 48 11-12 48<br />
1 Turcopoles Mounted Skirmish 2 4 2 -1 10 9<br />
10<br />
1 Mounted Crossbowmen - Dual Mounted Melee 3 4 3 2 27 10<br />
27<br />
2 Feudal Spearmen - UD Foot Melee 3 4 3 -1 18 3, 8<br />
36<br />
2 Archers - UD Foot Missile 2 4 2 -2 8 7<br />
16<br />
0 Handgunners - Firearms Foot Missile 2 4 3 0 14 6<br />
0<br />
8 197<br />
Late Teutonic Knights<br />
© 2012 DAVID GRAY <strong>–</strong> ED TEIXEIRA- TWO HOUR WARGAMES 2/18/2012<br />
10
ALEXANDER OR CAESAR<br />
OR MAYBE ATTILA?<br />
In Rally Round <strong>the</strong> King we saw mighty armies engaged in a struggle for dominance in <strong>the</strong> mystic land of<br />
Talomir, <strong>the</strong> world of Warrior Heroes <strong>–</strong> Armies and Adventures. But if we go far<strong>the</strong>r back in time, real time,<br />
we can see that Talomir has its roots in <strong>the</strong> past of our own world, Earth.<br />
Now we bring <strong>the</strong> armies from Earth’s past into <strong>the</strong> fray. Now you can recreate actual <strong>historical</strong> battles or<br />
even see how a Roman legion will fair in a face off with a Goblin horde. Recreate a battle of five armies<br />
from fantasy? Why not, as we see Teutonic Knights, Elves and Dwarves face off against Saracens and Orcs<br />
on <strong>the</strong> lonely windswept slopes of an ancient mountain.<br />
This <strong>sampler</strong> contains twelve <strong>historical</strong> armies and a simple Campaign system called, Local Campaigns,<br />
we’ve used many time. Enjoy!