UPGRADING REPAIRING PCs
UPGRADING REPAIRING PCs
UPGRADING REPAIRING PCs

You also want an ePaper? Increase the reach of your titles
YUMPU automatically turns print PDFs into web optimized ePapers that Google loves.
100<br />
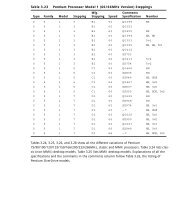
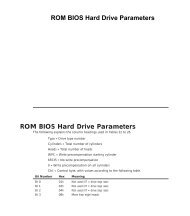
Chapter 4—SCSI and IDE Hard Drives and Optical Drives<br />
Table 4.4 Problems Associated with Disabling LBA Mode<br />
Drive Operating<br />
Configuration System Symptom End Result<br />
C: and D: MS-DOS Can’t access Usually no harm<br />
partitions D: because to data, because<br />
on single part of it drive is inaccessible<br />
physical drive is beyond until LBA mode<br />
cylinder 1024. is reset<br />
C: or C:, D:, etc. Windows 9x, Can’t boot Usually no harm<br />
Windows 2000, drive because to data because<br />
Windows NT, of incorrect drive is inaccessible<br />
Windows Me geometry. until LBA mode is<br />
reset<br />
C: only MS-DOS System boots Drive wraps around<br />
and operates to cylinder 0<br />
normally until (location of<br />
data is written partition<br />
to a cylinder table and other<br />
beyond 1024. vital disk structures)<br />
because LBA translation<br />
to access<br />
cylinders past 1024<br />
is absent; drive<br />
overwrites beginning<br />
of disk, causing<br />
loss of all data<br />
I used the last scenario in a computer troubleshooting class a few<br />
times, and it was quite a surprise to see a hard disk “eat” itself!<br />
However, it is never a good idea to “play” with LBA translation<br />
after it has been set in a system.<br />
Detecting Lack of LBA Mode Support in Your System<br />
To determine whether your system lacks LBA support or doesn’t<br />
have LBA support enabled, do the following:<br />
1. Install the hard drive set for Master, Slave, or Cable Select as<br />
appropriate.<br />
2. Turn on the computer and detect the drive in the BIOS Setup<br />
program. Note the size of the drive reported.<br />
3. Boot the computer from a floppy disk containing the operating<br />
system and FDISK.<br />
4. Select the drive you want to view with option #5.