Baha Fitting Guide for Professionals - Cochlear
Baha Fitting Guide for Professionals - Cochlear
Baha Fitting Guide for Professionals - Cochlear

You also want an ePaper? Increase the reach of your titles
YUMPU automatically turns print PDFs into web optimized ePapers that Google loves.
A Bone ConduCtion HeAring Solution<br />
<strong>Fitting</strong> <strong>Guide</strong><br />
FOR PROFessiOnals
<strong>Fitting</strong> <strong>Guide</strong><br />
Products in this manual are protected by the following patents: US 5 735 790, US 5 935 170, EP 0715839, EP 0715838 and corresponding patents<br />
in other countries and pending patent applications. No part of this publications may be replaced, stored in a retrieval system, or transmitted<br />
in any <strong>for</strong>m, by electronic, mechanical, photocopying, recording, or other means, without the prior consent of the publisher.<br />
Caution: Federal law (USA) restricts this device to sale by or on the order of a medical practitioner.<br />
© <strong>Cochlear</strong> 2011. All rights reserved.<br />
Contents<br />
5 Introduction<br />
6 PART 1: Inspection of the abutment area<br />
7 PART 2: Connecting the sound processor<br />
8 PART 3: <strong>Fitting</strong><br />
12 PART 4: Using the sound processor<br />
15 PART 5: Caring <strong>for</strong> the abutment and sound processor<br />
18 PART 6: Troubleshooting<br />
22 PART 7: Accessories<br />
25 PART 8: Patient kit and documents<br />
28 PART 9: Follow-up<br />
29 PART 10: Pediatric fitting with <strong>Baha</strong> ® Softband<br />
33 References<br />
34 Notes<br />
2 3<br />
<strong>Fitting</strong> <strong>Guide</strong>
introduction<br />
Introduction<br />
This guide covers the steps required <strong>for</strong> the successful fitting of a<br />
<strong>Baha</strong> ® Sound Processor <strong>for</strong> both adult and pediatric patients. It also<br />
provides in<strong>for</strong>mation on the aftercare required and the accessories<br />
that are available <strong>for</strong> the <strong>Cochlear</strong> <strong>Baha</strong> ® 3 System.<br />
Each part of the fitting process included in this guide should be<br />
covered during a fitting session. Demonstrating care of the implant<br />
site and care and use of the sound processor are of particular<br />
importance. However, the order of the steps involved in the fitting<br />
process can be modified to suit individual preferences.<br />
The <strong>Fitting</strong> <strong>Guide</strong> is part of a range of <strong>Baha</strong> audiology documents<br />
designed to guide you through the process of identifying patients,<br />
selecting a suitable sound processor <strong>for</strong> patients, fitting the chosen<br />
device and providing follow-up support.<br />
4 5<br />
introduction
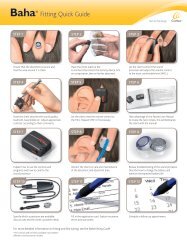
PaRT 1: inspection of the abutment area<br />
PART 1 Inspection of the abutment area<br />
1<br />
2<br />
3<br />
1. Try rotating the abutment to check that it is stable. If the abutment connection seems<br />
loose, refer the patient to a trained healthcare professional to have it tightened.<br />
2. Inspect the skin around the abutment be<strong>for</strong>e the sound processor is connected.<br />
3. Any skin debris from around the base of the abutment should be removed.<br />
This prevents infections. Skin debris may be found inside the abutment itself, and<br />
this should also be removed. Should there be any sign of a skin irritation around the<br />
abutment area, apply a mild antibiotic cream/ointment. The clinic should provide<br />
counseling to the patient on how to treat skin reactions and which ointments to use.<br />
Make it clear that, should soreness persist, the patient must contact the clinic.<br />
PaRT 2: Connecting the sound processor<br />
PART 2 Connecting the sound processor<br />
Training with the snap trainer<br />
Use a “dummy” sound processor <strong>for</strong> this training to avoid damaging the patient’s<br />
sound processor. Have the patient practice connecting and disconnecting the sound<br />
processor to a snap trainer to avoid damage to the snap coupling.<br />
Instructions <strong>for</strong> the patient<br />
1. Hold the sound processor so that the snap coupling is accessible.<br />
Tilt and push the unit carefully in and it will connect to the<br />
abutment on the snap trainer.<br />
2. To release the sound processor, put one finger under the device<br />
and tilt it until it releases.<br />
Training on the patient’s abutment<br />
When the patient is com<strong>for</strong>table with the tilt technique, have the patient practice<br />
connecting and disconnecting the sound processor on their own abutment.<br />
Instructions <strong>for</strong> the patient<br />
1. Move any stray hair away from the abutment.<br />
2. Use the same technique that you practiced with the snap trainer to<br />
tilt and push the device on to your abutment.<br />
3. To release the sound processor, put one finger under the device and<br />
tilt it until it releases.<br />
imPORTanT!<br />
Use the tilt technique to avoid pushing the sound processor straight<br />
in or out. This reduces pressure on the snap coupling and abutment,<br />
preventing any discom<strong>for</strong>t.<br />
6 7<br />
1<br />
2<br />
1<br />
2<br />
3
PaRT 3: <strong>Fitting</strong><br />
PART 3 <strong>Fitting</strong><br />
Initial settings<br />
The new generation <strong>Baha</strong> ® 3 Sound Processors are programmable. The factory setting<br />
may be a starting point <strong>for</strong> a quick demonstration in some cases but it is suggested that<br />
a processor is custom programmed using <strong>Baha</strong> <strong>Fitting</strong> Software <strong>for</strong> optimized per<strong>for</strong>mance.<br />
Once the sound processor is programmed (please see page 9), further evaluate patient<br />
feedback on sound quality and fine tune the processor using the Hearing Mentor feature<br />
of the <strong>Baha</strong> <strong>Fitting</strong> Software.<br />
Basic programming steps <strong>for</strong> <strong>Baha</strong> 3 (BP100) and <strong>Baha</strong> 3 Power (BP110)<br />
Programmable Sound Processors<br />
Program the <strong>Cochlear</strong> <strong>Baha</strong> Sound Processor using the <strong>Cochlear</strong> <strong>Baha</strong> <strong>Fitting</strong> Software. Launch this software from NOAH or start<br />
it directly in stand-alone mode. Be<strong>for</strong>e launching the software, install it on a computer as described in the Installation Instructions.<br />
NOAH<br />
1. Start NOAH.<br />
2. Select or add a patient in NOAH. For a returning patient,<br />
select a session.<br />
3. If needed, enter hearing thresholds in the audiogram.<br />
4. Click the NOAH module selection button and choose<br />
<strong>Cochlear</strong> <strong>Baha</strong> <strong>Fitting</strong> Software.<br />
5. Connect the sound processor to the NOAHlink or<br />
HI-PRO USB box and then to the patient’s abutment.<br />
sTeP 1 Sound Processor<br />
Select sound processor and<br />
press the Detect button:<br />
sTeP 2 BC Select<br />
To match the patient’s individual profile,<br />
be sure to choose parameters that best<br />
describe your patient in each of the<br />
following items:<br />
1. Patient<br />
2. Indication<br />
3. Connection<br />
sTeP 3 <strong>Fitting</strong> (recommended)<br />
Make adjustments to match the<br />
patient’s needs:<br />
(a) BC Direct — Measure the patient’s bone<br />
conduction responses directly through<br />
the sound processor.<br />
(b) Hearing Mentor — Make adjustments<br />
to meet individual patient needs.<br />
sTeP 4 Finalize > Save<br />
Click the Save button. If needed, click<br />
Session Report <strong>for</strong> a printable PDF<br />
document that includes useful in<strong>for</strong>mation<br />
<strong>for</strong> both the patient and the clinician.<br />
Stand-alone Mode<br />
1. Start the <strong>Cochlear</strong> <strong>Baha</strong> <strong>Fitting</strong> Software by double-clicking the<br />
icon on your desktop or from the start menu.<br />
2. Connect the sound processor to the NOAHlink or HI-PRO USB<br />
box and then to the patient’s abutment.<br />
sTeP 1 Patient > Audiogram<br />
Enter the patient’s personal data and thresholds<br />
in the audiogram or click the import button to<br />
import the patient’s personal in<strong>for</strong>mation and<br />
audiogram data from where you have the data<br />
stored on your computer.<br />
sTeP 2 Sound Processor<br />
Select sound processor and<br />
press the Detect button:<br />
sTeP 3 BC Select<br />
To match the patient’s individual profile, be<br />
sure to choose parameters that best describe<br />
your patient in each of the following items:<br />
1. Patient<br />
2. Indication<br />
3. Connection<br />
Evaluation by the patient<br />
1. Upon completion of initial fitting using <strong>Baha</strong> <strong>Fitting</strong> Sofware, let<br />
the patient keep the processor connected to his/her abutment.<br />
2. Ensure the processor is on and connected to the computer hosting<br />
the <strong>Baha</strong> <strong>Fitting</strong> Software through the programming cable.<br />
3. Click on the menu “Hearing Mentor” in the <strong>Baha</strong> <strong>Fitting</strong> Software.<br />
4. Have the patient describe the sound quality: Is it too loud/soft?<br />
What about the patient’s own voice? Is their voice too low or too<br />
high pitched?<br />
5. Adjust the slider controls according to the patient’s comments on<br />
sound quality in the “Hearing Mentor” screen.<br />
6. Repeat step 4 and 5 until the patient is satisfied with the sound.<br />
sTeP 4 <strong>Fitting</strong> (recommended)<br />
PaRT 3: <strong>Fitting</strong><br />
Make adjustments to match the patient’s needs:<br />
(a) BC Direct — Measure the patient’s bone<br />
conduction responses directly through the<br />
sound processor.<br />
(b) Hearing Mentor — Make adjustments to<br />
meet individual patient needs.<br />
sTeP 5 Finalize > Save<br />
Click the Save button to download settings to the<br />
sound processor. You also have the option to click<br />
the Export button to export the patient’s personal<br />
in<strong>for</strong>mation and audiogram data to where you<br />
would like to save it on your computer. If needed,<br />
click Session Report <strong>for</strong> a printable PDF document<br />
that includes useful in<strong>for</strong>mation <strong>for</strong> both the patient<br />
and the clinician.<br />
Hearing Mentor task lets you quickly and easily make overall changes<br />
to the sound processor <strong>for</strong> the typical patient comments.<br />
• Loudness — Adjusts overall loudness of the chosen program in the<br />
patient’s sound processor.<br />
• Sound Quality — For a brighter sound with high frequency<br />
emphasis, increase the setting. For a fuller sound with a flatter<br />
frequency response, decrease the setting.<br />
• Own Voice — Increase or decrease to make the patient’s voice<br />
louder or softer.<br />
• Per<strong>for</strong>mance in Noise — For a clearer sound with greater<br />
emphasis on softer high frequency speech sounds in a noisy<br />
environment, increase this setting. For a more com<strong>for</strong>table sound<br />
with less high frequency emphasis, decrease this setting.<br />
8 9
PaRT 3: <strong>Fitting</strong><br />
Alternate fitting option: Button programming <strong>for</strong> <strong>Cochlear</strong> <strong>Baha</strong>® 3 Sound Processors<br />
Please note that the steps below occur sequentially, i.e., in order to per<strong>for</strong>m step 4, steps 1-3 must be completed first.<br />
nOTe: If the sound processor has been programmed using the <strong>Baha</strong> <strong>Fitting</strong> Software, adjustments made using Button Programming will be cumulative.<br />
SteP 1 Activating programming mode<br />
Press (preferably using the tool) the Volume buttons and the<br />
Program button at the same time and hold <strong>for</strong> three seconds. The orange<br />
and blue indicators will then emit a long flash followed by a<br />
series of short, alternating flashes to indicate that programming<br />
mode is active.<br />
SteP 2 Selecting the left or right side<br />
• Press left — to select the left side — the blue indicator illuminates<br />
• Press right — to select the right side — the orange indicator illuminates<br />
To save your selected side or to move on to the next step, press the<br />
Program button. Two long flashes are followed by a series of short,<br />
alternating flashes.<br />
SteP 3 Adjusting gain (by +/- 5dB)<br />
· Press left — decreases the gain 5dB — the blue indicator illuminates<br />
· Press right — increases the gain 5dB — the orange indicator illuminates<br />
· Press left and right – returns to the default setting – the blue/orange<br />
indicators illuminate<br />
To save your selection or to move on to the next step, press the Program button.<br />
Three long flashes are followed by a series of short, alternating flashes.<br />
SteP 4 Adjusting the low cut setting<br />
· Press left — sets the default frequency response — the orange and blue<br />
indicator illuminate<br />
· Press right — sets low cut — orange indicator illuminates<br />
To save your setting or to move on to the next step, press the Program button.<br />
Four long flashes are followed by a series of short, alternating flashes.<br />
SteP 5 Activating or disabling visual indicators<br />
· Press left — turns off the visual indicators — the orange indicator illuminates<br />
· Press right — turns on the visual indicators — the blue indicator illuminates<br />
To save the indicator status or to move on to the next step, press the Program<br />
button. Five long flashes are followed by a series of short, alternating flashes.<br />
SteP 6 Exiting the programming mode<br />
Press (preferably using the tool) all three buttons and hold <strong>for</strong> three seconds.<br />
The indicators will stop flashing.<br />
Button<br />
programming tool<br />
Initial settings<br />
Make sure the sound processor is set to the following<br />
initial settings: LB Minimum, TK Maximum, Tone =<br />
N and Telecoil in the M position. The TK trimmer will<br />
adjust the gain <strong>for</strong> soft sounds and the LB trimmer<br />
will adjust loud sounds.<br />
Sound too weak<br />
Increase the LB slightly.<br />
If feedback occurs or the patient feels that soft sounds<br />
are too loud, decrease the TK slightly.<br />
Let the patient adjust the volume to the most<br />
com<strong>for</strong>table level. If the sound is still perceived as<br />
weak, repeat this step. Ask the patient what kind of<br />
sounds (soft or loud sounds) are too low and then<br />
adjust the respective trimmer.<br />
Sound too loud<br />
Check the volume. Decrease the LB.<br />
If soft sounds become too low, increase<br />
the TK slightly.<br />
Let the patient adjust the volume to the most<br />
com<strong>for</strong>table level. If the sound is still perceived as<br />
loud, repeat this step. Ask the patient what kind of<br />
sounds (soft or loud sounds) are too loud and then<br />
adjust the respective trimmer.<br />
Too much bass/problem<br />
with own voice<br />
Set the tone control to H.<br />
Too much treble<br />
Set the tone control to L.<br />
For more in<strong>for</strong>mation on the effect of the tone<br />
switch, see the <strong>Baha</strong> Cordelle II data sheet.<br />
LB Minimum TK Maximum<br />
PaRT 3: <strong>Fitting</strong><br />
10 11<br />
*The illustrations used <strong>for</strong> describing the process of Button Programming, applies to both the <strong>Cochlear</strong> <strong>Baha</strong> 3 (BP100) and <strong>Cochlear</strong> <strong>Baha</strong> 3 Power (BP110) processors.<br />
Left<br />
Default<br />
Program<br />
Volume<br />
Right<br />
- +<br />
Low cut<br />
OFF ON<br />
Program<br />
3 SEC<br />
3 SeC<br />
Program<br />
Program<br />
Program<br />
Program<br />
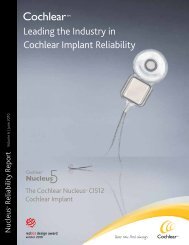
Fine tunning <strong>for</strong> <strong>Cochlear</strong> <strong>Baha</strong> Cordelle II Sound Processor<br />
LB<br />
LB<br />
N<br />
H<br />
L<br />
N<br />
H<br />
L<br />
TK<br />
TK<br />
Trimmers<br />
LB = Loudness boost<br />
TK = Threshold knee<br />
Tone selector<br />
N = Normal<br />
H = High frequency emphasis<br />
L = Low frequency emphasis<br />
Telecoil selector<br />
M = Microphone<br />
MT = Microphone and telecoil<br />
T = Telecoil
PaRT 4: Using the sound processor<br />
1<br />
2<br />
3<br />
4<br />
Part 4-8 (pages 12-27) are particularly important <strong>for</strong> the patient. Going through these<br />
parts carefully will help ensure that patients get the maximum benefit from <strong>Baha</strong> ® .<br />
Many of the points covered in part 4-8 are included in the Patient User Manual.<br />
Using the manual to review these steps will familiarize the patient with the document.<br />
1. Demonstrate how to use the volume control, including switching the device on<br />
and off. Explain that moving the volume control wheel from position 0 to 1 or<br />
vice- versa turns the sound processor on or off, in a non programmable processor.<br />
In a programmable processor, LEDs flash to confirm when the processor turns on.<br />
2. Review all the available programs and how they should be used.<br />
CHANgINg PROgRAM: A <strong>Baha</strong> 3 Sound Processor can hold up to 3 programs.<br />
To switch programs, quickly press and release the middle button. Audio and<br />
visual signals let you know which program you have switched to.<br />
3. Show how to connect accessories to the sound processor.<br />
4. Explain how to change the battery and where the patient can obtain new<br />
batteries <strong>for</strong> the sound processor.<br />
5. Describe the different factors that can affect battery life. Recommend that<br />
the patient uses powerful batteries when high current consumption is common.<br />
The batteries delivered with the sound processor reflect the <strong>Cochlear</strong> latest<br />
battery recommendations.<br />
Factors affecting battery life:<br />
• Hours of use per day<br />
• Program setting<br />
• Volume setting<br />
• Sound environment<br />
• Battery brand<br />
• Use of an FM receiver<br />
nOTe: If the patient connects an FM receiver, battery life will decrease, even when the<br />
device is switched off, as the FM receiver uses the sound processor as its power source.<br />
PaRT 5: Care of the abutment and sound processor<br />
PART 4 Using the sound processor PART 5 Care of the abutment and<br />
sound processor<br />
BP100 BP110 Power<br />
BP100 BP110 Power<br />
Regular aftercare is needed <strong>for</strong> the abutment area, the inside of the abutment<br />
and the sound processor. This care is crucial to the best outcomes <strong>for</strong> the<br />
patient. It is important that the patient understands the need <strong>for</strong> aftercare and<br />
can comply to the requirements needed to maintain their <strong>Baha</strong> 3 System.<br />
12 13
PaRT 5: Care of the abutment and sound processor PaRT 5: Care of the abutment and sound processor<br />
First weeks<br />
During the first weeks after surgery, once the dressing is removed, cleaning the<br />
abutment with the abutment cleaning brush may feel a little rough <strong>for</strong> the patient.<br />
A strip of alcohol-free wet wipe can be used around the abutment until the skin<br />
becomes less sensitive and the brush can be used.<br />
Daily cleaning<br />
Explain that the abutment area must be cleaned on a daily basis in order to keep<br />
it reaction-free. Skin debris may build-up around and inside the abutment and it is<br />
important that it is removed. Demonstrate to the patient how to use the abutment<br />
cleaning brush to keep the abutment area clean.<br />
Instructions <strong>for</strong> the patient<br />
1. Bristles should be aimed at the side of the abutment rather than at the<br />
skin. The focus is to remove crust and debris from the base of the abutment<br />
rather than on brushing the skin. You can demonstrate the proper cleaning<br />
brush technique using the snap trainer.<br />
2. Using a mild soap with plenty of warm water is recommended. Cleaning the<br />
abutment is commonly done in conjunction with taking a shower or a bath.<br />
Weekly cleaning<br />
1. Explain that the patient should clean the inside of the abutment on a weekly basis.<br />
If the inside of the abutment is not clean it can prevent a smooth fitting of the<br />
<strong>Baha</strong> Sound Processor onto the abutment and can also affect the sound quality.<br />
2. Describe how to keep the sound processor clean by wiping it regularly with an<br />
alcohol free wipe.<br />
3. Make sure the patient knows that the snap coupling of the sound processor<br />
must always be kept visibly clean. Use the sound processor brush to clean the<br />
snap coupling. Do not use water when cleaning the sound processor.<br />
4. Suggest that a relative or friend can help the patient make regular visual<br />
checks around the abutment <strong>for</strong> signs of infection as there may be parts of the<br />
abutment area that are hard <strong>for</strong> the patient to see <strong>for</strong> themselves.<br />
5. If the patient does not want to involve anyone else in the care of the abutment,<br />
they could use a mirror to check the site. If it is hard to see all angles in the<br />
mirror, a digital camera can be used to take pictures of the abutment. Using<br />
the pictures the site can be seen from all angles.<br />
nOTe: In<strong>for</strong>m the patient that the snap coupling is a sensitive part of the sound<br />
processor. Patients should not put excessive <strong>for</strong>ce on the snap coupling during<br />
cleaning as this may damage the sound processor.<br />
All of these items are available in the <strong>Baha</strong> Aftercare Kit.<br />
14 15<br />
1<br />
2<br />
3
PaRT 5: Care of the abutment and sound processor<br />
1<br />
2<br />
Cleaning brushes<br />
1. Advise the patient that the sound processor brush (1) (<strong>for</strong> snap coupling) and the<br />
abutment cleaning brush (2) (<strong>for</strong> abutment and surrounding area) should be cleaned<br />
each time they are used. When the patient has finished with the brush, it should be<br />
rinsed in soap and water, and left upright to dry. The brushes should also be<br />
changed at regular intervals (<strong>Cochlear</strong> recommends every 3 months).<br />
2. Explain to the patient that it is also important that different brushes are used <strong>for</strong><br />
cleaning the abutment and the snap coupling respectively. If the patient is bilaterally<br />
fitted, different brushes should be used <strong>for</strong> each side.<br />
nOTe: Water should not be used when cleaning the sound processor. Should you<br />
require any additional in<strong>for</strong>mation on the cleaning of devices, please contact your<br />
local <strong>Cochlear</strong> office.<br />
nOTe: <strong>Cochlear</strong> does not recommend using a standard toothbrush <strong>for</strong> the<br />
cleaning of the abutment area as it may be too abrasive. Please use a an<br />
abutment cleaning brush as supplied with the <strong>Baha</strong> ® Sound Processor.<br />
Signs of problems<br />
Instruct the patient to clean the skin and apply a mild antibiotic cream/ointment if<br />
any redness and/or soreness should occur around the abutment. Additional instruction<br />
may be required on how to properly treat skin reactions, and which ointments should<br />
be used.<br />
Make it clear that, should redness and/or soreness persist, the patient must contact the<br />
clinic. If in any doubt, the patient should always contact the clinic. A skin reaction is<br />
easier to treat at an early stage; once it becomes an infection it will require more care.<br />
PaRT 5: Care of the abutment and sound processor<br />
16 17
PaRT 6: Troubleshooting<br />
PART 6 Troubleshooting<br />
No sound/weak sound<br />
• Weak or dead battery — try a new battery<br />
• In DAI program — try a different program<br />
• Volume too low — increase volume<br />
• Clogged microphone cover — change battery door<br />
• Programming mode enabled — if the LEDs are flashing alternatively,<br />
remove battery to reset device<br />
nOTe: Programming adjustment should not be per<strong>for</strong>med by the patient.<br />
Distorted/intermittent sound<br />
• Volume is set too high — decrease volume setting<br />
• Weak or dead battery — try a new battery<br />
• Battery door not closed completely — use instructions<br />
in the user manual to close the battery door properly<br />
• Battery door damaged — replace battery door<br />
• Loose abutment — tighten abutment<br />
• Programming adjustments may be needed<br />
nOTe: Abutment tightening should be per<strong>for</strong>med by authorized professional only.<br />
Programming adjustment should not be per<strong>for</strong>med by the patient.<br />
Buttons not working<br />
• Keylock enabled<br />
Visual Indicator will flash 6x on start-up:<br />
BlUe indicator gives three short flashes<br />
ORanGe indicator gives three short flashes<br />
• Activating keylocks<br />
Press the two volume buttons at the same time and hold <strong>for</strong> five seconds.<br />
BlUe indicator gives three short flashes.<br />
• Deactivating keylocks<br />
Press the two volume buttons at the same time and hold <strong>for</strong> five seconds.<br />
ORanGe indicator gives three short flashes.<br />
PaRT 6: Troubleshooting<br />
18 19
PaRT 6: Troubleshooting<br />
Feedback<br />
• Battery door in the wrong position<br />
• Objects in contact with sound processor<br />
• Volume is set too high<br />
• Battery door damaged<br />
• Programming adjustments may be needed<br />
nOTe: Programming adjustment should not be per<strong>for</strong>med by the patient.<br />
If the sound processor has become damp/wet<br />
1. Immediately open the battery door and remove the battery.<br />
2. Put the sound processor in a container with drying capsules. Leave the device to dry<br />
out overnight. Drying kits are available from most hearing healthcare professionals.<br />
nOTe: The sound processor is not waterproof! Instruct the patient not the get the<br />
sound processor wet!<br />
Should any problem persist after<br />
the recommended actions have<br />
been taken, return the device to<br />
your local <strong>Cochlear</strong> office <strong>for</strong><br />
repair/inspection.<br />
PaRT 6: Troubleshooting<br />
20 21<br />
1
PaRT 7: accessories<br />
PART 7 Accessories<br />
A number of accessories have been developed <strong>for</strong> <strong>Baha</strong> ® Sound Processors.<br />
The accessories are designed to maximize access to technologies that make<br />
listening easier in specific environments.<br />
Specify which accessories are available; discuss how they are used and how<br />
the accessories meet the patient’s possible needs.<br />
Audio adapter<br />
The audio adapter allows direct input from personal stereos, TVs, MP3 players<br />
and other external audio equipment. The audio adapter also works as an isolator,<br />
protecting the sound processor from sudden power peaks.<br />
WARNINg! It is extremely dangerous and potentially fatal to connect<br />
any equipment that is plugged into a 110 and/or 220 V power supply<br />
without using the Audio adapter. Only connection cables supplied by<br />
<strong>Cochlear</strong> should be used. Non-standard connection cables can cause<br />
damage to the sound processor and injury to the patient. <strong>Cochlear</strong> is<br />
not liable <strong>for</strong> any damage resulting from incorrect use or connecting<br />
incorrect equipment.<br />
FM-receiver<br />
FM systems are primarily used in the classroom and other settings where there is a<br />
primary speaker that needs to be heard clearly in spite of background noise. There<br />
are various FM receivers that are compatible with <strong>Cochlear</strong> <strong>Baha</strong> Sound Processors.<br />
Telecoil unit<br />
The telecoil unit is specifically designed to improve sound when using<br />
telephones. In addition, it enables access to loop facilities in homes and<br />
public buildings with the head worn devices. Body worn devices have a<br />
built-in telecoil.<br />
PaRT 7: accessories<br />
For Cordelle II, Intenso, Divino,<br />
Compact Processors<br />
For Intenso, Divino, Compact Processors<br />
For Intenso, Divino,<br />
Compact Processors<br />
22 23<br />
For <strong>Baha</strong> 3 Processors<br />
For <strong>Baha</strong> 3 Processors<br />
For <strong>Baha</strong> 3 Processors
PaRT 7: accessories<br />
Bluetooth ® accessories<br />
Bluetooth accessories allow wireless connection between a <strong>Baha</strong> and a Bluetooth<br />
compatible device such as a cell phone. Bluetooth accessories are connected to the<br />
<strong>Baha</strong> ® Sound Processor by using a telecoil and the neck-loop provided with the<br />
Bluetooth accessory.<br />
nOTe: <strong>Cochlear</strong> recommends testing any Bluetooth device with the <strong>Baha</strong> Sound<br />
Processor and the patient’s mobile phone be<strong>for</strong>e purchase, as the signal strength<br />
and sound quality differ between mobile phones.<br />
Connection<br />
1. Explain that all accessories plug into the Direct Audio Input (DAI) on<br />
the sound processors.<br />
2. Explain that accessories must be correctly connected to the sound processor.<br />
Instructions <strong>for</strong> the patient<br />
A. Accessories <strong>for</strong> the new <strong>Baha</strong> 3 Sound Processors use a 3 pin connector. One of the<br />
3 pins are thicker than the others. The thicker pin should be aligned with the thicker<br />
hole in the processor be<strong>for</strong>e connecting an accessory.<br />
B. The telecoil and the audio adapter <strong>for</strong> the older <strong>Baha</strong> Sound Processors are marked<br />
with a red dot/mark beside one of the pin plugs. On the sound processor there is a<br />
corresponding mark beside one of the three DAI holes.<br />
C. The marks on the sound processor and the marks on the telecoil/audio adapter<br />
must match up when connecting.<br />
<strong>Cochlear</strong> <strong>Baha</strong> Sound Processors are delivered in a kit that includes useful<br />
components and important documentation. The kit includes: abutment cover,<br />
safety line, soft cleaning brush, Share the Experience (test rod), Patient User<br />
Manual, Device Registration Card and Warranty Card and a pack of recommended<br />
batteries. Introducing the kit and its contents will help ensure your patient<br />
gets the maximum benefit from their <strong>Baha</strong>.<br />
PaRT 8: Patient kit and documents<br />
PART 8 Patient kit and documents<br />
24 25
PaRT 8: Patient kit and documentation<br />
Patient kit<br />
Abutment cover<br />
An abutment cover is included in the kit. It can be attached when the device is not being worn.<br />
It counteracts reflection of light from the abutment and keeps the inside of the abutment<br />
clean. The patient should use the abutment cover during hair treatments such as coloring.<br />
Safety line<br />
The safety line prevents the sound processor from being lost if it is inadvertently knocked off,<br />
<strong>for</strong> example during sporting activities. <strong>Cochlear</strong> recommends that children wear the safety line<br />
at all times. The safety line is also considered useful <strong>for</strong> new users.<br />
Abutment cleaning brush<br />
The abutment cleaning brush included in the kit is important <strong>for</strong> aftercare. Read more about<br />
it under Caring <strong>for</strong> the abutment and sound processor (see page 13-17). In<strong>for</strong>m the patient<br />
where new brushes can be purchased.<br />
Share the Experience<br />
A modified test rod is delivered along with the <strong>Baha</strong> ® Sound Processor. The purpose of<br />
the test rod is to encourage the patient’s relatives and friends to share the experience of bone<br />
conducted hearing. It is also useful <strong>for</strong> checking that a child’s sound processor is working.<br />
Demonstrate using the test rod<br />
First, snap the patient’s sound processor onto the test rod using the same tilting<br />
motion that is used when attaching the processor to their abutment. Then hold the<br />
test rod firmly against the skull bone behind the ear without touching the sound<br />
processor housing. Have the person listening to the <strong>Baha</strong> plug their ears so they<br />
can fully appreciate the sound.<br />
Documentation<br />
Patient User Manual<br />
Go through the Patient User Manual together with the patient.<br />
Device Registration Card<br />
Fill in the Device Registration Card together with the patient and send this to <strong>Cochlear</strong>.<br />
Warranty, service and repair<br />
Explain warranties.<br />
Warranties <strong>for</strong> <strong>Baha</strong> differ from country to country. For in<strong>for</strong>mation about the warranty<br />
in your country please consult your local <strong>Cochlear</strong> office.<br />
The requirement <strong>for</strong> service and repair of the sound processor depends on the patient’s use<br />
of the device, as well as hygiene and the environment. Make sure that the patient is aware<br />
of how the sound processor should be used and maintained.<br />
PaRT 8: Patient kit and documentation<br />
26 27
PaRT 9: Follow-up<br />
PART 9 Follow-up PART 10 Pediatric fitting<br />
with <strong>Baha</strong> Softband<br />
<strong>Cochlear</strong> recommends scheduling a follow-up appointment with the patient<br />
within 6 weeks after initial fitting <strong>for</strong> evaluation and final adjustment of the sound<br />
processor. It is very important to make a new adjustment of the settings once<br />
the patient has become accustomed to the sound of the <strong>Baha</strong> ® device.<br />
PaRT 10: Pediatric fitting with <strong>Baha</strong> softband<br />
Pediatric fittings are particularly challenging because the results can often be difficult to verify.<br />
When using a <strong>Baha</strong> Softband the sound signal from a <strong>Baha</strong> device is reduced by approximately<br />
10 dB 1 , compared to the sound from a device fitted to an osseointegrated implant. There<strong>for</strong>e,<br />
<strong>Cochlear</strong> recommends that you use a stronger sound processor <strong>for</strong> the test than the child’s<br />
audiogram indicates. This will have a greater impact on the higher frequencies. High frequencies<br />
are weakened by passing through skin more than low frequency signals. 1–2 The new <strong>Baha</strong> <strong>Fitting</strong><br />
Software offers features such as BC Select and BC Direct that may help in best optimizing a<br />
<strong>Baha</strong> 3 Sound Processor fitting with <strong>Baha</strong> Softband.<br />
28 29
PaRT 10: Pediatric fitting with <strong>Baha</strong> softband<br />
<strong>Fitting</strong> the <strong>Baha</strong> ® Softband<br />
Try to make the first moments with the <strong>Baha</strong> Softband as pleasant <strong>for</strong> the child as possible.<br />
It is very important that the child has positive associations with using the <strong>Baha</strong> Softband.<br />
1. Program the sound processor <strong>for</strong> patient’s individual bone line using the <strong>Baha</strong><br />
<strong>Fitting</strong> software. Optimize the sound processor fitting <strong>for</strong> use with <strong>Baha</strong> Softband<br />
by selecting suitable parameters in the BC Select screen. Also, whenever possible,<br />
conduct BC Direct measurements, which are in-situ bone conduction thresholds,<br />
using patient’s processor.<br />
2. Attach the sound processor to the plastic snap connector disc on the <strong>Baha</strong> Softband.<br />
3. Test that the <strong>Baha</strong> Softband works by putting it on yourself, plugging your ears and<br />
introducing sound.<br />
4. Put the <strong>Baha</strong> Softband around the child’s head, quite loosely at first.<br />
5. Place the plastic snap connector disc against the mastoid or another bony location<br />
of the skull. Avoid placing it on the temple, as this may be uncom<strong>for</strong>table.<br />
6. Check that the entire snap connector disc is in contact with the skull bone.<br />
7. Tighten the <strong>Baha</strong> Softband until it is close-fitting enough to ensure effective sound<br />
transmission but loose enough not to cause the child any discom<strong>for</strong>t.<br />
TiP: Make sure your finger fits between the skull and <strong>Baha</strong> Softband – this will ensure<br />
that the <strong>Baha</strong> Softband is not too tight.<br />
nOTe: Once the <strong>Baha</strong> Softband is tight enough to transmit sound effectively,<br />
additional tightening will only increase the sound marginally. 3<br />
CaUTiOn: The older <strong>Baha</strong> Softbands contain natural rubber latex<br />
that may cause allergic reactions. The newer generation <strong>Baha</strong><br />
Softbands are latex free.<br />
2<br />
3<br />
4<br />
5<br />
8. Make sure the sound processor does not touch the auricle or have any<br />
other contact with the skin, to prevent feedback.<br />
9. Present some noise and observe the child. Verify that there is adequate<br />
gain via soundfield audiometry or other age-appropriate testing.<br />
10. If necessary increase the volume, monitoring the child to check that the sound<br />
is not too loud.<br />
nOTe: The amount of sound that gets transferred is based on both the volume<br />
setting and the contact area of the plastic snap connector disc.<br />
PaRT 10: Pediatric fitting with <strong>Baha</strong> softband<br />
30 31<br />
8<br />
9
PaRT 10: Pediatric fitting with <strong>Baha</strong> softband<br />
Period of use<br />
1. Keep the <strong>Baha</strong> ® Softband on <strong>for</strong> very short periods (10 –15 minutes) <strong>for</strong> the<br />
first few occasions.<br />
2. Use <strong>for</strong> longer periods once the child accepts the <strong>Baha</strong> Softband.<br />
3. Rotate the position of the plastic snap connector disc regularly.<br />
4. Reduce the time of use if there is any sign of discom<strong>for</strong>t. This is to ensure that the<br />
child maintains positive associations with using the <strong>Baha</strong> Softband.<br />
nOTe: <strong>Cochlear</strong> recommends rotating the position of the plastic snap connector<br />
disc regularly to avoid discom<strong>for</strong>t and soreness. If soreness arises, avoid placing the<br />
plastic snap connector disc on this area <strong>for</strong> a couple of days. Should the soreness<br />
persist, discontinue use of the <strong>Baha</strong> Softband <strong>for</strong> a couple of days or until the<br />
soreness is gone.<br />
Safety line<br />
Important! <strong>Cochlear</strong> recommends that the safety line is used to attach the device<br />
securely to the child’s clothing.<br />
nOTe: Ensure that infants have adult supervision when wearing the <strong>Baha</strong> Softband.<br />
Pediatric considerations<br />
For children who have been fitted with a <strong>Baha</strong> on an implant or with a Softband, it is<br />
important that the parent or caregiver help with inspection, cleaning and maintenance<br />
of the abutment area, Softband and sound processor. Provide the parents or caregivers<br />
with the following in<strong>for</strong>mation.<br />
• Demonstrate the sound processor using the test rod.<br />
• Review care and maintenance of the abutment area and the sound processor.<br />
• Go through troubleshooting the sound processor.<br />
• Advise the parent/caregiver that the test rod or <strong>Baha</strong> Softband can also be<br />
used to check that the sound processor is working properly. A demonstration<br />
may be needed.<br />
nOTe: The <strong>Baha</strong> Softband can also be used by older children who are<br />
contraindicated <strong>for</strong> surgery.<br />
References<br />
1. B. Håkansson, A. Tjellström, U. Rosenhall, Hearing thresholds with direct bone conduction<br />
versus conventional bone conduction. Scandinavian Audiology 1984;13(1):3-13.<br />
2. Gründer I, Seidl RO, Ernst A, Todt I. Relative value of <strong>Baha</strong> testing <strong>for</strong> the postoperative<br />
audiological outcome. HNO 2007 Sep 20.<br />
3. Hodgetts WE, Scollie SD, Swain R. Effect of applied contact <strong>for</strong>ce and volume control<br />
setting on output <strong>for</strong>ce levels of the <strong>Baha</strong> Softband. Int J Audiol. 2006;45(5):301-8.<br />
32 33<br />
References
notes<br />
Notes<br />
Notes<br />
34 35<br />
notes
this is the <strong>Cochlear</strong> promise to you. As the global leader<br />
in hearing solutions, <strong>Cochlear</strong> is dedicated to bringing the<br />
gift of sound to people all over the world. With our hearing<br />
solutions, <strong>Cochlear</strong> has reconnected over 250,000 cochlear<br />
implant and <strong>Baha</strong> ® recipients to their families, friends and<br />
communities in more than 100 countries.<br />
Along with the industry’s largest investment in research<br />
and development, we continue to partner with leading<br />
international researchers and hearing professionals, ensuring<br />
that we are at the <strong>for</strong>efront in the science of hearing.<br />
For patients receiving any <strong>Cochlear</strong> hearing system, our<br />
commitment is that <strong>for</strong> the rest of your life we will be<br />
here to support you.<br />
As your patient’s partner in hearing <strong>for</strong> life, <strong>Cochlear</strong> believes it is important to convey<br />
not only the benefits, but also the potential risks associated with a <strong>Baha</strong> procedure.<br />
Not everyone with hearing loss is a candidate <strong>for</strong> a <strong>Baha</strong>. <strong>Baha</strong> is contraindicated in<br />
patients with inadequate bone quality or quantity to provide stability and support <strong>for</strong><br />
the implant, or in patients who will be unable to maintain and clean the skin around<br />
the abutment. In the U.S., use of the implanted fixture is also contraindicated in children<br />
under age 5 years.<br />
All surgical procedures include an element of risk, and it is impossible to guarantee success.<br />
The device may fail to osseointegrate <strong>for</strong> a number of reasons, including physiological<br />
and surgical issues as well as traumatic impact to the implant site. On rare occasions the<br />
skin around the abutment may become inflamed from a mild infection or the skin may<br />
grow back towards its original thickness. For complete in<strong>for</strong>mation regarding the risks and<br />
benefits of a <strong>Baha</strong> procedure, please refer to the instructions <strong>for</strong> use <strong>for</strong> the <strong>Baha</strong> implant<br />
available at ww.<strong>Cochlear</strong>Americas.com/<strong>Baha</strong>indications<br />
www.<strong>Cochlear</strong>americas.com<br />
<strong>Cochlear</strong> americas<br />
13059 East Peakview avenue<br />
Centennial Co 80111<br />
uSa<br />
tel: 1 303 790 9010<br />
Fax: 1 303 792 9025<br />
<strong>Cochlear</strong> Canada inc<br />
2500-120 adelaide Street West<br />
toronto, on M5H 1t1<br />
Canada<br />
tel: 1 416 972 5082<br />
Fax: 1 416 972 5083<br />
<strong>Baha</strong>, <strong>Baha</strong> Divino and <strong>Baha</strong> intenso are trademarks of <strong>Cochlear</strong> Bone anchored Solutions. <strong>Cochlear</strong> and the elliptical<br />
logo are trademarks of <strong>Cochlear</strong> Limited. the names of actual companies and products mentioned herein may be the<br />
trademarks of their respective owners. © <strong>Cochlear</strong> Bone anchored Solutions 2011.<br />
Bun027 iSS1 DEC11