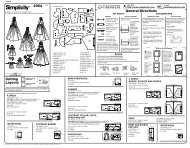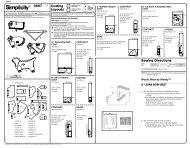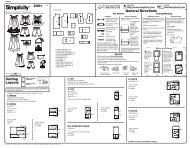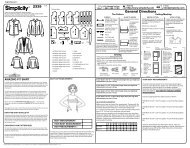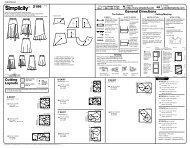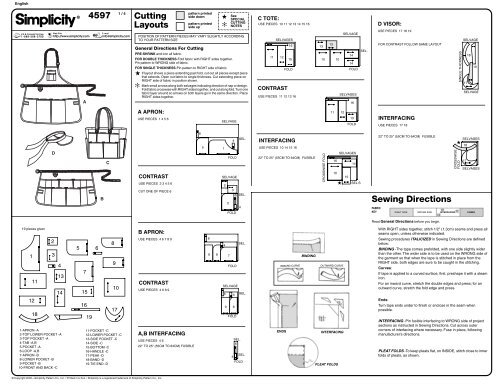
4597 Cutting Layouts Sewing Directions - PrintSew
4597 Cutting Layouts Sewing Directions - PrintSew
4597 Cutting Layouts Sewing Directions - PrintSew

You also want an ePaper? Increase the reach of your titles
YUMPU automatically turns print PDFs into web optimized ePapers that Google loves.
English<br />
U.S. & Canada Toll-Free<br />
1-888-588-2700<br />
19 pieces given<br />
1<br />
12<br />
11<br />
18<br />
®<br />
Web Site<br />
http://www.simplicity.com<br />
D<br />
2<br />
3<br />
4<br />
13<br />
14<br />
1-APRON -A<br />
2-TOP LOWER POCKET -A<br />
3-TOP POCKET -A<br />
4-TAB -A,B<br />
5-POCKET -A<br />
6-LOOP -A,B<br />
7-APRON -B<br />
8-LOWER POCKET -B<br />
9-POCKET -B<br />
10-FRONT AND BACK -C<br />
5<br />
A<br />
7<br />
15<br />
16<br />
<strong>4597</strong><br />
19<br />
e<br />
E-mail<br />
info@simplicity.com<br />
© Copyright 2005—Simplicity Pattern Co., Inc. / Printed in U.S.A. / Simplicity is a registered trademark of Simplicity Pattern Co., Inc.<br />
6<br />
B<br />
C<br />
8<br />
9<br />
10<br />
17<br />
1 / 4<br />
11-POCKET -C<br />
12-LOWER POCKET -C<br />
13-SIDE POCKET -C<br />
14-SIDE -C<br />
15-BOTTOM -C<br />
16-HANDLE -C<br />
17-PEAK -D<br />
18-BAND -D<br />
19-TIE END -D<br />
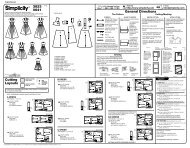
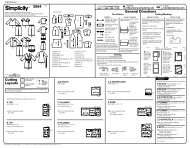
<strong>Cutting</strong><br />
<strong>Layouts</strong><br />
General <strong>Directions</strong> For <strong>Cutting</strong><br />
PRE-SHRINK and iron all fabric.<br />
FOR DOUBLE THICKNESS-Fold fabric with RIGHT sides together.<br />
Pin pattern to WRONG side of fabric.<br />
FOR SINGLE THICKNESS-Pin pattern to RIGHT side of fabric.<br />
★<br />
pattern printed<br />
side down<br />
pattern printed<br />
side up<br />
★<br />
✻<br />
See<br />
SPECIAL<br />
CUTTING<br />
NOTES<br />
POSITION OF PATTERN PIECES MAY VARY SLIGHTLY ACCORDING<br />
TO YOUR PATTERN SIZE<br />
If layout shows a piece extending past fold, cut out all pieces except piece<br />
that extends. Open out fabric to single thickness. Cut extending piece on<br />
RIGHT side of fabric in position shown.<br />
✻ Mark small arrows along both selvages indicating direction of nap or design.<br />
Fold fabric crosswise with RIGHT sides together, and cut along fold. Turn one<br />
fabric layer around so arrows on both layers go in the same direction. Place<br />
RIGHT sides together.<br />
A APRON:<br />
USE PIECES 1 4 5 6<br />
CONTRAST<br />
USE PIECES 2 3 4 5 6<br />
CUT ONE OF PIECE 6<br />
B APRON:<br />
USE PIECES 4 6 7 8 9<br />
CONTRAST<br />
USE PIECES 4 6 8 9<br />
A,B INTERFACING<br />
USE PIECES 4 6<br />
22" TO 25" (55CM TO 64CM) FUSIBLE<br />
6<br />
5<br />
6<br />
9<br />
8<br />
SELVAGE<br />
1<br />
2<br />
5<br />
4<br />
FOLD<br />
SELVAGE<br />
4<br />
3<br />
6<br />
FOLD<br />
7<br />
FOLD<br />
SELVAGE<br />
6 4<br />
9<br />
8<br />
FOLD<br />
SEL.<br />
SEL.<br />
4<br />
SEL.<br />
6<br />
SEL.<br />
SEL.<br />
SEL.<br />
4<br />
FOLD<br />
C TOTE:<br />
USE PIECES 10 11 12 13 14 15 16<br />
11<br />
SELVAGES<br />
12<br />
CONTRAST<br />
15<br />
FOLD<br />
USE PIECES 11 12 13 16<br />
INTERFACING<br />
USE PIECES 10 14 15 16<br />
16 13<br />
22" TO 25" (55CM TO 64CM) FUSIBLE<br />
10 10<br />
CROSSWISE FOLD<br />
13<br />
11<br />
16<br />
10<br />
SELVAGE<br />
14<br />
14<br />
FOLD<br />
SELVAGES<br />
12<br />
16<br />
13<br />
FOLD<br />
SELVAGES<br />
★<br />
INWARD CURVE OUTWARD CURVE<br />
ENDS<br />
BINDING<br />
INTERFACING<br />
PLEAT FOLDS<br />
15<br />
14<br />
SEL.S<br />
SEL.<br />
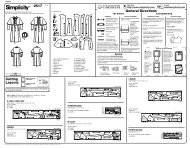
<strong>Sewing</strong> <strong>Directions</strong><br />
FABRIC<br />
KEY<br />
D VISOR:<br />
USE PIECES 17 18 19<br />
FOR CONTRAST FOLLOW SAME LAYOUT<br />
INTERFACING<br />
USE PIECES 17 18<br />
22" TO 25" (55CM TO 64CM) FUSIBLE<br />
RIGHT SIDE WRONG SIDE INTERFACING LINING<br />
Read General <strong>Directions</strong> before you begin.<br />
CROSSWISE<br />
FOLD<br />
SELVAGE<br />
With RIGHT sides together, stitch 1/2" (1.3cm) seams and press all<br />
seams open, unless otherwise indicated.<br />
<strong>Sewing</strong> procedures ITALICIZED in <strong>Sewing</strong> <strong>Directions</strong> are defined<br />
below:<br />
BINDING -The tape comes prefolded, with one side slightly wider<br />
than the other. The wider side is to be used on the WRONG side of<br />
the garment so that when the tape is stitched in place from the<br />
RIGHT side, both edges are sure to be caught in the stitching.<br />
Curves:<br />
If tape is applied to a curved surface, first, preshape it with a steam<br />
iron.<br />
For an inward curve, stretch the double edges and press; for an<br />
outward curve, stretch the fold edge and press.<br />
Ends:<br />
Turn tape ends under to finish or enclose in the seam when<br />
possible.<br />
INTERFACING -Pin fusible interfacing to WRONG side of project<br />
sections as instructed in <strong>Sewing</strong> <strong>Directions</strong>. Cut across outer<br />
corners of interfacing where necessary. Fuse in place, following<br />
manufacturer’s directions.<br />
PLEAT FOLDS -To keep pleats flat, on INSIDE, stitch close to inner<br />
folds of pleats, as shown.<br />
SINGLE THICKNESS<br />
★<br />
17<br />
18<br />
19<br />
SELVAGE<br />
SELVAGES<br />
18<br />
17<br />
SELVAGES
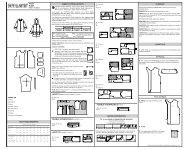
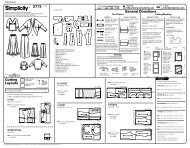
English<br />
<strong>4597</strong><br />
7<br />
6<br />
3<br />
4<br />
5<br />
1<br />
2<br />
2 / 4<br />
APRON A<br />
© Copyright 2005—Simplicity Pattern Co., Inc. / Printed in U.S.A. / Simplicity is a registered trademark of Simplicity Pattern Co., Inc.<br />
1. Make top pocket and top lower pocket as follows: Press<br />
under 1/2"(1.3cm) on side and lower edges of pocket. Encase<br />
upper edge of pocket in BINDING.<br />
2. Pin WRONG side of top lower pocket to RIGHT side of top<br />
pocket, placing upper edge of lower pocket at small dots.<br />
Stitch lower pocket along stitching lines. On OUTSIDE, pin<br />
top pocket to apron along pocket line. Stitch sides and lower<br />
edge.<br />
3. With WRONG sides together, baste lower pocket sections<br />
together, having raw edges even. Encase upper edge of<br />
pocket in BINDING.<br />
4. To make pleats in pocket, on OUTSIDE (contrast side), fold<br />
along solid lines.<br />
Bring folds to broken lines and center; pin. Press.<br />
Stitch PLEAT FOLDS.<br />
Baste across lower raw edge.<br />
5. With WRONG sides together, baste fabric to contrast tab<br />
sections, having raw edges even. Encase long edges of tab<br />
in BINDING.<br />
6. With contrast sides together, pin tabs to lower pocket, placing<br />
one end of tab 1/2" (1.3cm) over solid line. Stitch 1/2" (1.3cm)<br />
from end of tab. Back-stitch to reinforce. Turn tab over<br />
stitched end and pin remaining end to pocket between small<br />
dots.<br />
7. On OUTSIDE, pin lower pocket to apron, placing upper edge<br />
of pocket at small dots, having raw edges even. Baste raw<br />
edges together. Stitch pocket to front along broken lines and<br />
center between folds of pleats.<br />
13<br />
12<br />
10<br />
15<br />
8<br />
9<br />
11<br />
14<br />
8. Encase curved side edges of apron in BINDING. Encase<br />
upper edge in BINDING, turning under ends at side edges.<br />
Encase side and lower edges in BINDING, turning under<br />
ends at curved side edges.<br />
Make loop same as for tabs, see step 5. On OUTSIDE, pin<br />
loop to right side of apron, placing ends between small dots<br />
and lapping ends 1/2" (1.3cm) over placement line. Stitch<br />
across ends along placement line.<br />
9. Cut a piece of grosgrain ribbon 53"(135cm) long for waist<br />
belt. Press under 2" (5cm) on one end of belt and 11" (28cm)<br />
on other end. Stitch long edges together at each end of belt.<br />
10. On OUTSIDE, pin belt to apron, placing lower edge of belt<br />
along placement line and having short end extend 2"(5cm)<br />
beyond right side edge of apron. Stitch belt in place close to<br />
both long edges.<br />
11. Insert short end of belt through plastic ring and stitch end in<br />
place on WRONG side of apron. Back-stitch to reinforce.<br />
12. Cut a piece of Velcro® 2-1/2" (6.3cm) long. Separate<br />
Velcro®. Stitch both pieces of Velcro® to long end of belt, as<br />
shown. Wrap belt around waist and insert Velcro® end<br />
through plastic ring and fasten, when wearing.<br />
13. Cut a piece of ribbon 6" (15cm) long for loop. Fold loop in half<br />
and stitch long edges together.<br />
14. Insert loop through plastic ring, having ends even. Pin loop to<br />
upper left corner of apron, lapping apron 1/2"(1.3cm) over<br />
ends of loop. From RIGHT side, stitch loop in place, squaring<br />
stitching on binding, as shown.<br />
15. Cut a piece of ribbon 55" (140cm) long for strap. Fold and<br />
stitch strap same as for loop. Cut and apply Velcro® to folded<br />
end of strap same as for waist belt. Pin strap (side without<br />
Velcro®) to upper right corner of apron, lapping apron<br />
1/2"(1.3cm) over end of strap. From RIGHT side, stitch strap<br />
in place, squaring stitching on binding, as shown.
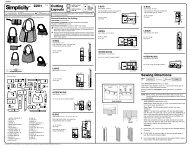
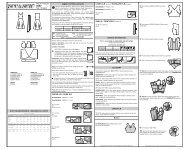
English<br />
<strong>4597</strong><br />
1<br />
2<br />
4<br />
6<br />
5<br />
7<br />
3<br />
3 / 4<br />
APRON B<br />
© Copyright 2005—Simplicity Pattern Co., Inc. / Printed in U.S.A. / Simplicity is a registered trademark of Simplicity Pattern Co., Inc.<br />
1. With RIGHT sides together, stitch pocket sections at lower<br />
edge. Trim seam.<br />
2. Turn pocket RIGHT side out; press. Baste raw edges<br />
together. Encase upper edge of pocket in BINDING.<br />
3. To make pleats in pocket, on OUTSIDE, fold along solid lines.<br />
Bring folds to broken line; pin. Press. Stitch PLEAT FOLDS.<br />
Hand-baste across lower edge of pleat.<br />
4. On OUTSIDE, pin pocket to apron, placing lower edge of<br />
pocket along placement line and upper edge at small dots,<br />
having raw edges even. Stitch lower edge in place. Baste raw<br />
edges together. Stitch pocket along broken lines at center of<br />
pleats. Remove basting.<br />
5. Make lower pocket and tabs same as for Apron A, see<br />
steps 3 through 6. On OUTSIDE, pin lower pocket to apron<br />
(over pocket), placing upper edge of pocket at small dots.<br />
Baste raw edges together. Stitch pocket and lower pocket<br />
through all thicknesses along stitching lines, broken lines and<br />
center of pleat on lower pocket.<br />
6. Encase side and lower edges of apron in BINDING.<br />
Make loop same as you did for tab.<br />
On OUTSIDE, pin contrast side of loop to upper right side of<br />
apron between small dots, placing ends 1/2" (1.3cm) below<br />
raw edge of apron. Baste ends in place.<br />
7. Cut a piece of grosgrain ribbon 53"(135cm) long for waist<br />
belt. Press under 2" (5cm) on one end of belt and 11" (28cm)<br />
on other end. Stitch long edges together at each end of belt.<br />
On WRONG side, pin belt to upper edge of apron, lapping<br />
edge of belt 1/2"(1.3cm) over raw edge, having short end<br />
extend 2"(5cm) beyond right side edge of apron. Stitch belt in<br />
place close to inner edge.<br />
5<br />
8<br />
1<br />
3<br />
4<br />
2<br />
POCKET<br />
LOWER POCKET<br />
6<br />
8. Turn belt to OUTSIDE over loop; press. Stitch remaining edge<br />
of belt in place.<br />
Insert short end of belt through plastic ring and stitch end in<br />
place on WRONG side of apron.<br />
Cut a piece of Velcro® 2-1/2" (6.3cm) long. Separate<br />
Velcro®. Stitch both pieces of Velcro® to long end of belt, as<br />
shown. Wrap belt around waist and insert Velcro® end<br />
through plastic ring and fasten, when wearing.<br />
TOTE C<br />
Make two pockets and two lower pockets as follows:<br />
1. With WRONG sides together, baste pocket sections together,<br />
having raw edges even. Encase upper edge of pocket in<br />
BINDING.<br />
2. To make pleats in pocket, on OUTSIDE, fold along solid lines.<br />
Bring folds to broken line; pin. Press.<br />
Baste across lower raw edge. Stitch PLEAT FOLDS.<br />
3. Apply INTERFACING to two front and back sections. On<br />
OUTSIDE, pin pocket to front, matching small dots and<br />
placing upper edge of pocket at small dots. Baste raw edges<br />
together. Stitch pocket to front along broken lines on center of<br />
pleat. Apply pocket to back in same manner.<br />
4. To make pleats in lower pocket, on OUTSIDE, fold along solid<br />
lines.<br />
Bring folds to broken line; pin. Press.<br />
Baste across lower raw edge. Stitch PLEAT FOLDS.<br />
5. On OUTSIDE, pin lower pocket to front (over pocket), placing<br />
upper edge of lower pocket at small dots and having raw<br />
edges even. Baste side and lower edges together, being<br />
careful not to catch side pleats on lower pocket. Stitch lower<br />
pocket to front along broken line on center of pleat. Apply<br />
lower pocket to back in same manner.<br />
6. Make side pocket same as for pocket. Press under 1/2"<br />
(1.3cm) on side edges of pocket. Apply interfacing to two side<br />
sections. On OUTSIDE, pin side pocket to each side section<br />
along pocket lines and having raw edges even. Stitch<br />
pressed edges of pocket in place. Stitch PLEAT FOLDS.<br />
Baste raw edges together.
English<br />
<strong>4597</strong><br />
7<br />
9<br />
10<br />
11<br />
12<br />
4 / 4<br />
8<br />
© Copyright 2005—Simplicity Pattern Co., Inc. / Printed in U.S.A. / Simplicity is a registered trademark of Simplicity Pattern Co., Inc.<br />
7. With RIGHT sides together, pin sides to front and back,<br />
matching small dots. Stitch above small dots; back-stitch to<br />
reinforce seams.<br />
8. Apply interfacing to one bottom section. With RIGHT sides<br />
together, pin tote to bottom, matching small dots. Stitch,<br />
pivoting with needle in fabric at small dots.<br />
9. Stitch facing sections together same as for tote, leaving an<br />
opening in bottom for turning. With RIGHT sides together,<br />
stitch facing to upper edge of tote, matching seams. Trim<br />
seam.<br />
10. Turn tote RIGHT side out; press. Slip-stitch opening closed.<br />
11. Make two handles as follows: Apply INTERFACING to handle<br />
cut of fabric. With WRONG sides together, pin handle to<br />
contrast handle, having raw edges even. Baste raw edges<br />
together.<br />
12. Encase long raw edges of handle in BINDING. Press under<br />
1/2"(1.3cm) on ends of handle. On OUTSIDE, pin handles to<br />
front and back between small dots, placing pressed ends at<br />
lower small dots. Stitch handles in place, squaring stitching<br />
and diagonally across handles, as shown.<br />
10<br />
3<br />
7<br />
5<br />
1<br />
9<br />
2<br />
6<br />
8<br />
4<br />
11<br />
VISOR D<br />
1. Apply INTERFACING to both peak sections. With WRONG<br />
sides together, pin peak sections, having raw edges even.<br />
Baste 1/4" (6mm) from outer edge and along seam line on<br />
inner edge. Clip inner edge of peak to basting.<br />
2. Encase outer curved edge of peak in BINDING. Apply<br />
INTERFACING to band contrast side. With RIGHT sides<br />
together, pin peak to band, matching centers and placing<br />
ends of peak at large dots. Baste.<br />
3. With RIGHT sides together, pin band facing to band (over<br />
visor), matching centers and having raw edges even. Stitch.<br />
Trim seam. Clip curves.<br />
4. Make each tie end as follows: With RIGHT sides together,<br />
stitch fabric tie end to contrast tie end in a 3/8"(1cm) seam,<br />
leaving notched ends open. Trim seams. TRIM CORNERS.<br />
5. Turn tie end RIGHT side out; press. Open out band facing.<br />
With RIGHT sides together, pin tie ends to ends of bands,<br />
matching small dots. Baste.<br />
6. Cut a piece of elastic 2-1/2" (6.3cm) long. Working on one<br />
end of band at a time, pin elastic to end of band, centering it<br />
between small dots. Baste.<br />
7. With RIGHT sides together, pin band facing to band (over<br />
elastic). Stitch across end of band. Trim seam.<br />
8. Turn facing to INSIDE; press, pressing tie end and elastic out.<br />
9. Pin remaining end of elastic to remaining end of band,<br />
centering it between small dots. Baste.<br />
10. With RIGHT sides together, pin band facing to band (over<br />
elastic). Stitch across end of band. Trim seam.<br />
11. Turn facing to INSIDE; press, pressing tie end and elastic out.<br />
Baste raw edges of band together.<br />
Encase raw edges of band in BINDING, turning under ends<br />
at ends of band. Fasten tie ends into a bow when wearing<br />
visor.