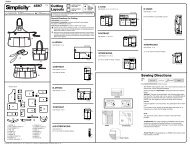
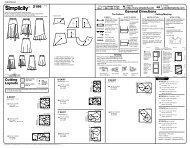
3667 Cutting Layouts Sewing Directions - PrintSew
3667 Cutting Layouts Sewing Directions - PrintSew
3667 Cutting Layouts Sewing Directions - PrintSew

You also want an ePaper? Increase the reach of your titles
YUMPU automatically turns print PDFs into web optimized ePapers that Google loves.
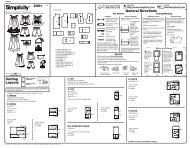
English<br />
<strong>3667</strong><br />
1<br />
2<br />
3<br />
3<br />
4<br />
2 / 4<br />
© Copyright 2007—Simplicity Pattern Co., Inc. / Printed in U.S.A. / Simplicity is a registered trademark of Simplicity Pattern Co., Inc.<br />
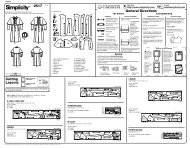
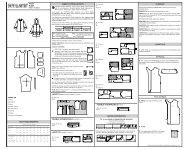
3. With the RIGHT sides of the fabric together:<br />
a-Slip the Collar over the Neck Opening.<br />
b-Match the Center Front Seams and pin together.<br />
c-Sew the Collar Edges to the Neck Opening, stretching<br />
the collar to fit.<br />
4. Press the Neck Seam toward the Collar.<br />
a-To form fringe, on the INSIDE, make Slashes from the Back<br />
and Lower Edges of the Coat to the Solid Line, spaced 1/2"<br />
(1.3cm) apart.<br />
b-Cut a piece of Velcro® 2" (5cm) long:<br />
Separate the Velcro® and place the Loopy Half on the<br />
OUTSIDE of the RIGHT end of Belt, centered over large<br />
dot. Stitch close to all Edges.<br />
c-Stitch the Fuzzy Half of the Velcro® to the INSIDE of the<br />
opposite end of Belt, centered over large dot.<br />
Sew fringe to hat brim, as shown on front of pattern<br />
envelope.<br />
B “SALTY DAWG”<br />
1. Fold each Cuff in half, lengthwise with the WRONG sides<br />
together. Sew a Cuff onto the bottom edge of each Sleeve<br />
stretching cuff to fit. Press seam toward cuff.<br />
2. With the RIGHT sides of the fabric together:<br />
a-Match the dots on the top of the Front Sleeves to the dots<br />
on the Coat/Front Sleeve Openings and pin together.<br />
b-Sew the Front Sleeves into the Front Sleeve Openings.<br />
3. With the RIGHT sides of the fabric together:<br />
a-Sew the Front Sleeve Seam together.<br />
b-Trim/cut a triangular wedge from the cuff edge of the<br />
seams.<br />
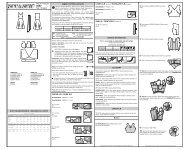
5<br />
9<br />
7<br />
10<br />
6<br />
8<br />
4<br />
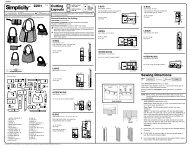
4. With the RIGHT sides of the fabric together:<br />
Sew the Center Front (Chest) Seam together.<br />
5. With the RIGHT sides of the fabric together:<br />
a-Sew the center front seam of the Collar together.<br />
b-With the WRONG sides of the fabric together fold the<br />
Collar down onto itself to form a circle.<br />
6. With the RIGHT sides of the fabric together:<br />
a-Slip the Collar over the Neck Opening.<br />
b-Match the Chest Seam and the Collar Seam and pin<br />
together.<br />
c-Match the Collar Edges and the notches.<br />
d-Sew the Collar Edges to the Neck Opening, stretching<br />
the collar to fit. Press seam up.<br />
7. With the RIGHT sides of the fabric together:<br />
a-Sew the Belly band ends together.<br />
b-With the WRONG sides of the fabric together fold the<br />
Belly Band down onto itself to form a cuff.<br />
8. With the RIGHT sides of the fabric together:<br />
a- Match the centers back and the center front seam and pin<br />
together.<br />
b. Sew the Belly Band onto the Belly Opening stretching the<br />
Belly Band to fit.<br />
Press the seam down.<br />
Hand-sew or glue applique to coat, as shown on front of<br />
pattern envelope or as you prefer.<br />
9. Hem Outer Edges of Scarf 1/4" (6mm).<br />
a- Fold the Scarf in half, diagonally, with WRONG sides<br />
together.<br />
b- Fold Diagonal Edge down along fold line. Press.<br />
10. Separate the Velcro® Square:<br />
a-Place the Loopy Half on the INSIDE of the left end of<br />
Scarf, centered over large dot. Stitch close to all Edges.<br />
b-Stitch the Fuzzy Half of the Velcro® to the OUTSIDE of the<br />
opposite end of Scarf, centered over large dot.