3667 Cutting Layouts Sewing Directions - PrintSew
3667 Cutting Layouts Sewing Directions - PrintSew
3667 Cutting Layouts Sewing Directions - PrintSew

You also want an ePaper? Increase the reach of your titles
YUMPU automatically turns print PDFs into web optimized ePapers that Google loves.
English<br />
U.S. & Canada Toll-Free<br />
1-888-588-2700<br />
®<br />
Web Site<br />
http://www.simplicity.com<br />
<strong>3667</strong><br />
Thank you for purchasing this Simplicity pattern.<br />
We have made every effort to provide you with a high quality product<br />
1<br />
A<br />
10<br />
B<br />
16 pieces given<br />
3<br />
5<br />
11<br />
D<br />
12<br />
15 16<br />
1-COAT -A<br />
2-BELT -A<br />
3-COLLAR -A<br />
4-COAT -B<br />
5-COLLAR -B,C<br />
6-SLEEVE -B,C<br />
7-CUFF -B,C,D<br />
8-BELLY BAND -B<br />
2<br />
4<br />
9-SCARF -B<br />
10-COAT -C<br />
e<br />
E-mail<br />
info@simplicity.com<br />
© Copyright 2007—Simplicity Pattern Co., Inc. / Printed in U.S.A. / Simplicity is a registered trademark of Simplicity Pattern Co., Inc.<br />
13<br />
8<br />
9<br />
B<br />
C<br />
6<br />
14<br />
11-CAPE -C<br />
12-COAT -D<br />
13-SPIKES -D<br />
14-HOOD -D<br />
15-SPIKES FOR HOOD -D<br />
16-SLEEVE -D<br />
7<br />
1 / 4<br />
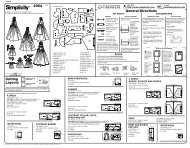
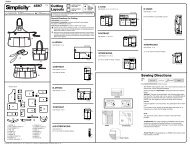
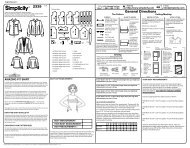
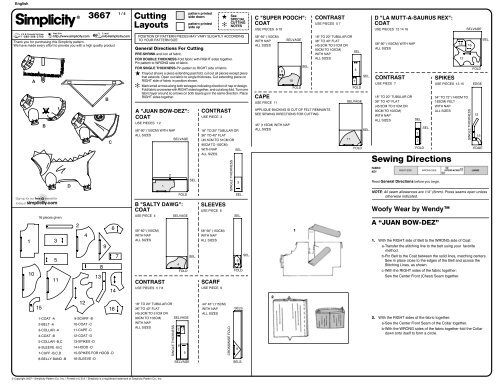
<strong>Cutting</strong><br />
<strong>Layouts</strong><br />
General <strong>Directions</strong> For <strong>Cutting</strong><br />
PRE-SHRINK and iron all fabric.<br />
FOR DOUBLE THICKNESS-Fold fabric with RIGHT sides together.<br />
Pin pattern to WRONG side of fabric.<br />
FOR SINGLE THICKNESS-Pin pattern to RIGHT side of fabric.<br />
★<br />
pattern printed<br />
side down<br />
pattern printed<br />
side up<br />
★<br />
✻<br />
See<br />
SPECIAL<br />
CUTTING<br />
NOTES<br />
POSITION OF PATTERN PIECES MAY VARY SLIGHTLY ACCORDING<br />
TO YOUR PATTERN SIZE<br />
If layout shows a piece extending past fold, cut out all pieces except piece<br />
that extends. Open out fabric to single thickness. Cut extending piece on<br />
RIGHT side of fabric in position shown.<br />
✻ Mark small arrows along both selvages indicating direction of nap or design.<br />
Fold fabric crosswise with RIGHT sides together, and cut along fold. Turn one<br />
fabric layer around so arrows on both layers go in the same direction. Place<br />
RIGHT sides together.<br />
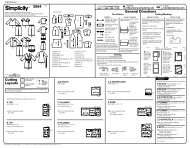
A "JUAN BOW-DEZ":<br />
COAT<br />
USE PIECES 1 2<br />
58" 60" (150CM) WITH NAP<br />
ALL SIZES<br />
58" 60" (150CM)<br />
1<br />
CONTRAST<br />
18" TO 20" TUBULAR OR<br />
2<br />
SINGLE THICKNESS<br />
SELVAGE<br />
FOLD<br />
B "SALTY DAWG":<br />
COAT<br />
USE PIECE 4<br />
WITH NAP<br />
ALL SIZES<br />
USE PIECES 5 7 8<br />
36" TO 40" FLAT<br />
(45.5CM TO 51CM OR<br />
90CM TO 102CM)<br />
WITH NAP<br />
ALL SIZES<br />
SELVAGE<br />
4<br />
7<br />
8<br />
FOLD<br />
SELVAGE<br />
7<br />
5<br />
SELVAGE<br />
SEL.<br />
SEL.<br />
CONTRAST<br />
USE PIECE 3<br />
18" TO 20" TUBULAR OR<br />
36" TO 40" FLAT<br />
(45.5CM TO 51CM OR<br />
90CM TO 102CM)<br />
WITH NAP<br />
SEL.<br />
ALL SIZES<br />
SLEEVES<br />
USE PIECE 6<br />
58" 60" (150CM)<br />
WITH NAP<br />
ALL SIZES<br />
SCARF<br />
USE PIECE 9<br />
44" 45" (115CM)<br />
WITH NAP<br />
ALL SIZES<br />
SINGLE THICKNESS<br />
CROSSWISE FOLD<br />
3<br />
SEL.<br />
SEL.<br />
6<br />
FOLD<br />
SELS.<br />
9<br />
SELS.<br />
SEL.<br />
C "SUPER POOCH":<br />
COAT<br />
USE PIECES 6 10<br />
58" 60" (150CM)<br />
WITH NAP<br />
ALL SIZES<br />
CAPE<br />
USE PIECE 11<br />
6<br />
SELVAGE<br />
10<br />
FOLD<br />
SEL.<br />
CONTRAST<br />
APPLIQUE BACKING IS CUT OF FELT REMNANTS<br />
SEE SEWING DIRECTIONS FOR CUTTING<br />
45" (115CM) WITH NAP<br />
ALL SIZES<br />
2<br />
1<br />
USE PIECES 5 7<br />
18" TO 20" TUBULAR OR<br />
36" TO 40" FLAT<br />
(45.5CM TO 51CM OR<br />
90CM TO 102CM)<br />
SEL.<br />
WITH NAP<br />
ALL SIZES<br />
5<br />
SEL.<br />
7<br />
FOLD<br />
SELVAGE<br />
11<br />
FOLD<br />
SEL.<br />
D "LA MUTT-A-SAURUS REX":<br />
COAT<br />
USE PIECES 12 14 16<br />
58" 60" (150CM) WITH NAP<br />
ALL SIZES<br />
CONTRAST<br />
USE PIECE 7<br />
18" TO 20" TUBULAR OR<br />
36" TO 40" FLAT<br />
(45.5CM TO 51CM OR<br />
90CM TO 102CM)<br />
WITH NAP<br />
ALL SIZES<br />
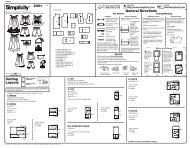
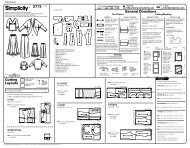
<strong>Sewing</strong> <strong>Directions</strong><br />
FABRIC<br />
KEY<br />
SEL.<br />
FOLD<br />
SEL.<br />
RIGHT SIDE WRONG SIDE INTERFACING LINING<br />
Read General <strong>Directions</strong> before you begin.<br />
NOTE: All seam allowances are 1/4" (6mm). Press seams open unless<br />
otherwise indicated.<br />
Woofy Wear by Wendy<br />
A “JUAN BOW-DEZ”<br />
7<br />
7<br />
SPIKES<br />
SELVAGE<br />
FOLD<br />
1. With the RIGHT side of Belt to the WRONG side of Coat:<br />
a-Transfer the stitching line to the belt using your favorite<br />
method.<br />
b-Pin Belt to the Coat between the solid lines, matching centers.<br />
Sew in place close to the edges of the Belt and across the<br />
Stitching Lines, as shown.<br />
c-With the RIGHT sides of the fabric together:<br />
Sew the Center Front (Chest) Seam together.<br />
2. With the RIGHT sides of the fabric together:<br />
a-Sew the Center Front Seam of the Collar together.<br />
b-With the WRONG sides of the fabric together fold the Collar<br />
down onto itself to form a circle.<br />
14<br />
12<br />
USE PIECES 13 15<br />
54" TO 72" (140CM TO<br />
183CM) FELT<br />
WITH NAP<br />
ALL SIZES<br />
16<br />
SINGLE THICKNESS<br />
EDGE<br />
13<br />
15<br />
EDGE<br />
SEL.
English<br />
<strong>3667</strong><br />
1<br />
2<br />
3<br />
3<br />
4<br />
2 / 4<br />
© Copyright 2007—Simplicity Pattern Co., Inc. / Printed in U.S.A. / Simplicity is a registered trademark of Simplicity Pattern Co., Inc.<br />
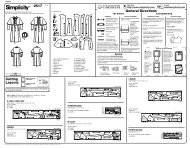
3. With the RIGHT sides of the fabric together:<br />
a-Slip the Collar over the Neck Opening.<br />
b-Match the Center Front Seams and pin together.<br />
c-Sew the Collar Edges to the Neck Opening, stretching<br />
the collar to fit.<br />
4. Press the Neck Seam toward the Collar.<br />
a-To form fringe, on the INSIDE, make Slashes from the Back<br />
and Lower Edges of the Coat to the Solid Line, spaced 1/2"<br />
(1.3cm) apart.<br />
b-Cut a piece of Velcro® 2" (5cm) long:<br />
Separate the Velcro® and place the Loopy Half on the<br />
OUTSIDE of the RIGHT end of Belt, centered over large<br />
dot. Stitch close to all Edges.<br />
c-Stitch the Fuzzy Half of the Velcro® to the INSIDE of the<br />
opposite end of Belt, centered over large dot.<br />
Sew fringe to hat brim, as shown on front of pattern<br />
envelope.<br />
B “SALTY DAWG”<br />
1. Fold each Cuff in half, lengthwise with the WRONG sides<br />
together. Sew a Cuff onto the bottom edge of each Sleeve<br />
stretching cuff to fit. Press seam toward cuff.<br />
2. With the RIGHT sides of the fabric together:<br />
a-Match the dots on the top of the Front Sleeves to the dots<br />
on the Coat/Front Sleeve Openings and pin together.<br />
b-Sew the Front Sleeves into the Front Sleeve Openings.<br />
3. With the RIGHT sides of the fabric together:<br />
a-Sew the Front Sleeve Seam together.<br />
b-Trim/cut a triangular wedge from the cuff edge of the<br />
seams.<br />
5<br />
9<br />
7<br />
10<br />
6<br />
8<br />
4<br />
4. With the RIGHT sides of the fabric together:<br />
Sew the Center Front (Chest) Seam together.<br />
5. With the RIGHT sides of the fabric together:<br />
a-Sew the center front seam of the Collar together.<br />
b-With the WRONG sides of the fabric together fold the<br />
Collar down onto itself to form a circle.<br />
6. With the RIGHT sides of the fabric together:<br />
a-Slip the Collar over the Neck Opening.<br />
b-Match the Chest Seam and the Collar Seam and pin<br />
together.<br />
c-Match the Collar Edges and the notches.<br />
d-Sew the Collar Edges to the Neck Opening, stretching<br />
the collar to fit. Press seam up.<br />
7. With the RIGHT sides of the fabric together:<br />
a-Sew the Belly band ends together.<br />
b-With the WRONG sides of the fabric together fold the<br />
Belly Band down onto itself to form a cuff.<br />
8. With the RIGHT sides of the fabric together:<br />
a- Match the centers back and the center front seam and pin<br />
together.<br />
b. Sew the Belly Band onto the Belly Opening stretching the<br />
Belly Band to fit.<br />
Press the seam down.<br />
Hand-sew or glue applique to coat, as shown on front of<br />
pattern envelope or as you prefer.<br />
9. Hem Outer Edges of Scarf 1/4" (6mm).<br />
a- Fold the Scarf in half, diagonally, with WRONG sides<br />
together.<br />
b- Fold Diagonal Edge down along fold line. Press.<br />
10. Separate the Velcro® Square:<br />
a-Place the Loopy Half on the INSIDE of the left end of<br />
Scarf, centered over large dot. Stitch close to all Edges.<br />
b-Stitch the Fuzzy Half of the Velcro® to the OUTSIDE of the<br />
opposite end of Scarf, centered over large dot.
English<br />
<strong>3667</strong><br />
4<br />
1<br />
2<br />
6<br />
3 / 4<br />
3<br />
© Copyright 2007—Simplicity Pattern Co., Inc. / Printed in U.S.A. / Simplicity is a registered trademark of Simplicity Pattern Co., Inc.<br />
5<br />
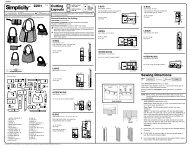
C “SUPER POOCH”<br />
1. Fold each Cuff in half, lengthwise with the WRONG sides<br />
together. Sew a Cuff onto the bottom edge of each Sleeve<br />
stretching cuff to fit. Press seam toward cuff.<br />
2. With the RIGHT sides of the fabric together:<br />
a-Match the dots on the top of the Front Sleeves to the dots<br />
on the Coat/Front Sleeve Openings and pin together.<br />
b-Sew the Front Sleeves into the Front Sleeve Openings.<br />
3. With the RIGHT sides of the fabric together:<br />
a-Sew the Front Sleeve seam together.<br />
b-Trim/cut a triangular wedge from the cuff edge of the<br />
seams.<br />
4. With the RIGHT sides of the fabric together:<br />
Sew the center front (Chest) Seam together.<br />
5. Hem outer edges of Cape 1/2" (1.3cm).<br />
a-With the WRONG side of Cape to the RIGHT side of<br />
coat:<br />
b-Match the Cape to Coat at Neck Edge.<br />
c-Match the Centers Back and the small dots.<br />
d-Sew the Upper Cape Edge to the Neck Opening.<br />
6. With the RIGHT sides of the fabric together:<br />
a-Sew the center front seam of the Collar together.<br />
b-With the WRONG sides of the fabric together fold the<br />
Collar down onto itself to form a circle.<br />
1<br />
9<br />
2<br />
8<br />
7<br />
7. With the RIGHT sides of the fabric together:<br />
a-Slip the Collar over the Neck Opening.<br />
b-Match the Chest Seam and the Collar Seam and pin<br />
together.<br />
c-Match the Collar Edges and the notches.<br />
d-Sew the Collar Edges to the Neck Opening, stretching<br />
the collar to fit. Press seam up.<br />
8. Hem Belly Opening 1/2” (1.3cm).<br />
9. Cut a 3-1/2" (9cm) Circle out of one color of felt. Cut a slightly<br />
smaller Circle out of the second color of felt. Glue the felt<br />
circles together.<br />
Hand-sew or glue the Applique to the felt circles and then on<br />
the OUTSIDE, hand-sew the entire applique to the Cape<br />
centered over the large dot.<br />
D “LA MUTT-A-SAURUS REX”<br />
1. With the RIGHT sides of the fabric together:<br />
a-Match the dots on the Spikes to the dots on the Upper<br />
Edge of the Coat and pin together.<br />
b-Sew the Spikes onto the Coat.<br />
2. With the RIGHT sides of the fabric together:<br />
Sew the Center Back Seam of the Coat from the Neck<br />
Edge to the small dot, being careful not to catch in Spikes.
English<br />
<strong>3667</strong><br />
5<br />
3<br />
4<br />
6<br />
4 / 4<br />
© Copyright 2007—Simplicity Pattern Co., Inc. / Printed in U.S.A. / Simplicity is a registered trademark of Simplicity Pattern Co., Inc.<br />
3. Fold each Cuff in half, lengthwise, with the WRONG sides<br />
together. Sew a Cuff onto the bottom edge of each Sleeve<br />
(front and back) stretching cuff to fit. Press seam toward cuff.<br />
4. With the RIGHT sides of the fabric together:<br />
a-Match the dots on the top of the Front Sleeves to the dots<br />
on the Coat/Front Sleeve Openings and pin together.<br />
b-Sew the Front Sleeves into the Front Sleeve Openings.<br />
5. With the RIGHT sides of the fabric together:<br />
a-Sew the Front Sleeve Seams together.<br />
b-Trim/cut a triangular wedge from the cuff/bottom edge of<br />
the seams.<br />
6. With the RIGHT sides of the fabric together:<br />
a-Sew the Back Sleeve Seams together, matching the<br />
single notches.<br />
b-Trim/cut a triangular wedge from the cuff/bottom edge of<br />
the seams.<br />
9<br />
7<br />
11<br />
8<br />
10<br />
7. With the RIGHT sides of the fabric together:<br />
Sew the Center Front (Chest) Seam together.<br />
8. With the RIGHT sides of the fabric together:<br />
a-Match the dots on the Spikes for Hood to the dots on the<br />
top of the Hood and pin together.<br />
b-Sew the Spikes onto the Hood.<br />
9. With the RIGHT sides of the fabric together:<br />
a-Sew the Center front and Center Back Seam of the Hood.<br />
b-Hem the front edge of the Hood 1/2" (1.3cm).<br />
10. With the RIGHT sides of the fabric together:<br />
a-Match the Hood Edges to the Neck Opening and pin<br />
together.<br />
b-Match the Center front and Centers Back seam.<br />
c-Sew the Hood Edges to the Neck Opening.<br />
11. Hem the Belly Opening 1/2” (1.3cm).