2339 General Directions - PrintSew
2339 General Directions - PrintSew 2339 General Directions - PrintSew
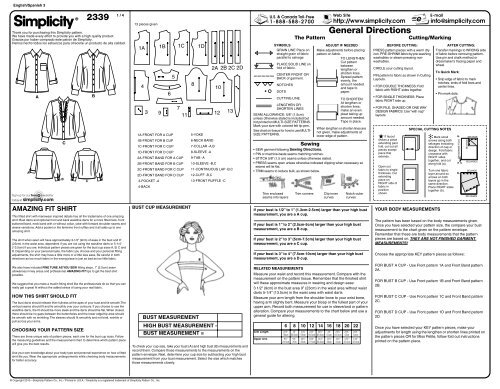
English/Spanish 3 ® 2339 © Copyright 2010—Simplicity Pattern Co., Inc. / Printed in U.S.A. / Simplicity is a registered trademark of Simplicity Pattern Co., Inc. 1 / 4 Thank you for purchasing this Simplicity pattern. We have made every effort to provide you with a high quality product. Gracias por haber comprado este patrón de Simplicity. Hemos hecho todos los esfuerzos para ofrecerle un producto de alta calidad. A A AMAZING FIT SHIRT C B This fitted shirt with menswear inspired details has all the trademarks of one amazing shirt: Bust darts and optional front and back waistline darts for a more fitted look, front buttoned band, neck band with or without collar, yoke with forward shoulder seams and sleeve variations. Add a pocket or the feminine front ruffles and it all adds up to one amazing shirt. The shirt when sewn will have approximately 3-1/2” (9cm) of ease in the bust and 9” (23cm) in the waist area, dependent if you are not using the waistline darts or 5-1/4” (13.5cm) if you are. Individual pattern pieces are given for the bust cup sizes A, B, C and D. Depending on your personal taste, the fabric you choose and your personal fitting adjustments, the shirt may have a little more or a little less ease. Be careful in both directions as too much fabric in the wrong place is just as bad as too little fabric. We also have included FINE TUNE AS YOU SEW fitting steps, 1” (2.5cm) seam allowances in key areas and professional AMAZING FIT tips to get the best shirt possible. We suggest that you make a muslin fitting shell like the professionals do so that you can really get a great fit without the added stress of using your real fabric. HOW THIS SHIRT SHOULD FIT The bust darts should release thier fullness at the apex of your bust and lie smooth.The vertical seams should fit and lie smoothly over your contours. If you choose to use the waistline darts, the fit should be more sleek and the darts should lie flat. When closed, there should be no gaps between the buttonholes and the lower edge/hip area should be smooth with no wrinkling. The sleeves should fit smoothly and not bind, wrinkle or pull across your arms. CHOOSING YOUR PATTERN SIZE There are three unique sets of pattern pieces, each one for the bust cup sizes. Follow the measuring guidelines and the measurement chart to determine which pattern piece will give you the best results. Use your own knowledge about your body type and personal experience on how a fitted shirt fits you. Wear the appropriate undergarments while checking body measurements for better accuracy. C B 13 pieces given 1A 1B 1C 1D 4 3 9 BUST CUP MEASUREMENT 6 5 7 1A-FRONT FOR A CUP 1B-FRONT FOR B CUP 1C-FRONT FOR C CUP 1D-FRONT FOR D CUP 2A-FRONT BAND FOR A CUP 2B-FRONT BAND FOR B CUP 2C-FRONT BAND FOR C CUP 2D-FRONT BAND FOR D CUP 3-POCKET -A 4-BACK 11 BUST MEASUREMENT HIGH BUST MEASUREMENT - BUST MEASUREMENT = To check your cup size, take your bust (A) and high bust (B) measurements and record them. Compare those measurements to the measurements on the pattern envelope. Next, determine your cup size by subtracting your high bust measurement from your bust measurement. Select the size which matches those measurements closely. 8 5-YOKE 6-NECK BAND 7-COLLAR -A,B 8-SLEEVE -A 9-TAB -A 10-SLEEVE -B,C 11-CONTINUOUS LAP -B,C 12-CUFF -B,C 13-FRONT RUFFLE -C 2A 2B 2C 2D 10 12 13 U.S. & Canada Toll-Free 1-888-588-2700 The Pattern SYMBOLS GRAIN LINE Place on straight grain of fabric parallel to selvage PLACE SOLID LINE on fold of fabric. CENTER FRONT OR BACK of garment. NOTCHES DOTS CUTTING LINE LENGTHEN OR SHORTEN LINES SEAM ALLOWANCE: 5/8" (1.5cm) unless otherwise stated is included but not printed on MULTI-SIZE PATTERNS. Mark your size with colored felt tip pen. See chart on tissue for how to use MULTI- SIZE PATTERNS. Web Site http://www.simplicity.com General Directions ADJUST IF NEEDED Make adjustments before placing pattern on fabric. TO LENGTHEN: Cut pattern between lengthen or shorten lines. Spread pattern evenly, the amount needed and tape to paper. TO SHORTEN: At lengthen or shorten lines, make an even pleat taking up amount needed. Tape in place. When lengthen or shorten lines are not given, make adjustments at lower edge of pattern. Sewing • SEW garment following Sewing Directions. • PIN or machine-baste seams matching notches. • STITCH 5/8" (1.5 cm) seams unless otherwise stated. • PRESS seams open unless otherwise indicated clipping when necessary so seams will lie flat. • TRIM seams to reduce bulk, as shown below. Trim enclosed seams into layers Trim corners Clip inner curves Notch outer curves If your bust is 1/2” to 1” (1.3cm-2.5cm) larger than your high bust measurement, you are a A cup. If your bust is 1” to 2” (2.5cm-5cm) larger than your high bust measurement, you are a B cup. If your bust is 2” to 3” (5cm-7.5cm) larger than your high bust measurement, you are a C cup. If your bust is 3” to 4” (7.5cm-10cm) larger than your high bust measurement, you are a D cup. RELATED MEASUREMENTS Measure your waist and record this measurement. Compare with the measurement on the pattern tissue. Remember that the finished shirt will these approximate measures in wearing and design ease: 3 1/2” (9cm) in the bust area 9” (23cm) in the waist area without waist darts 5-1/4” (13.5cm) in the waist area with waist darts Measure your arm length from the shoulder bone to your wrist bone, having arm slightly bent. Measure your bicep or the fullest part of your upper arm. Record both measurement for use in sleeve/and or pattern alteration. Compare your measurements to the chart below and use a general guide for altering. Arm Length 22˚” 58cm Upper Arm 9˙” 23.5cm 6 8 10 12 14 16 18 20 22 23” 58.5cm 9˚” 25m 23˙ 59cm 10˙” 26cm 23˘” 59.5cm 10˚” 27.5cm 23˚” 60.5cm 11˙” 28.5cm 24” 61cm 11˚” 30cm 24˙” 61.5cm 12˙” 31cm 24˘” 62cn 12˚” 32.5cm 24˚” 63cm 13˙” 33.5cm e E-mail info@simplicity.com Cutting/Marking BEFORE CUTTING: PRESS pattern pieces with a warm dry iron. PRE-SHRINK fabric by pre-washing washables or steam-pressing nonwashables. CIRCLE your cutting layout. PIN pattern to fabric as shown in Cutting Layouts. • FOR DOUBLE THICKNESS: Fold fabric with RIGHT sides together. • FOR SINGLE THICKNESS: Place fabric RIGHT side up. • FOR PILE, SHADED OR ONE WAY DESIGN FABRICS: Use “with nap” layouts ★ If layout shows a piece extending past fold, cut out all pieces except piece that extends. Open out fabric to single thickness. Cut extending piece on RIGHT side of fabric in position shown. AFTER CUTTING: Transfer markings to WRONG side of fabric before removing pattern. Use pin and chalk method or dressmaker’s tracing paper and wheel. To Quick Mark: • Snip edge of fabric to mark notches, ends of fold lines and center lines. • Pin mark dots. SPECIAL CUTTING NOTES ✻ Mark small arrows along both selvages indicating direction of nap or design. Fold fabric crosswise with RIGHT sides together, and cut along fold (a). YOUR BODY MEASUREMENTS Turn one fabric layer around so arrows on both layers go in the same direction. Place RIGHT sides together (b). a. CROSSWISE FOLD ✁ b. SELVAGE SELVAGE SELVAGES SELVAGE SELVAGES The pattern has been based on the body measurements given. Once you have selected your pattern size, the compare your bust measurement to the chart given on the pattern envelope. Remember that these are body measurements that the pattern pieces are based on. THEY ARE NOT FINISHED GARMENT MEASUREMENTS! Choose the appropriate KEY pattern pieces as follows: FOR BUST A CUP - Use Front pattern 1A and Front Band pattern 2A. FOR BUST B CUP - Use Front pattern 1B and Front Band pattern 2B. FOR BUST C CUP - Use Front pattern 1C and Front Band pattern 2C. FOR BUST D CUP - Use Front pattern 1D and Front Band pattern 2D. Once you have selected your KEY pattern pieces, make your adjustments for length using the lengthen or shorten lines printed on the pattern pieces OR for Miss Petite, follow fold out instructions printed on the pattern piece.
- Page 2 and 3: English/Spanish 3 2339 Cutting Layo
- Page 4: English/Spanish 3 2339 26 30 23 28
English/Spanish 3<br />
®<br />
<strong>2339</strong><br />
© Copyright 2010—Simplicity Pattern Co., Inc. / Printed in U.S.A. / Simplicity is a registered trademark of Simplicity Pattern Co., Inc.<br />
1 / 4<br />
Thank you for purchasing this Simplicity pattern.<br />
We have made every effort to provide you with a high quality product.<br />
Gracias por haber comprado este patrón de Simplicity.<br />
Hemos hecho todos los esfuerzos para ofrecerle un producto de alta calidad.<br />
A<br />
A<br />
AMAZING FIT SHIRT<br />
C<br />
B<br />
This fitted shirt with menswear inspired details has all the trademarks of one amazing<br />
shirt: Bust darts and optional front and back waistline darts for a more fitted look, front<br />
buttoned band, neck band with or without collar, yoke with forward shoulder seams and<br />
sleeve variations. Add a pocket or the feminine front ruffles and it all adds up to one<br />
amazing shirt.<br />
The shirt when sewn will have approximately 3-1/2” (9cm) of ease in the bust and 9”<br />
(23cm) in the waist area, dependent if you are not using the waistline darts or 5-1/4”<br />
(13.5cm) if you are. Individual pattern pieces are given for the bust cup sizes A, B, C and<br />
D. Depending on your personal taste, the fabric you choose and your personal fitting<br />
adjustments, the shirt may have a little more or a little less ease. Be careful in both<br />
directions as too much fabric in the wrong place is just as bad as too little fabric.<br />
We also have included FINE TUNE AS YOU SEW fitting steps, 1” (2.5cm) seam<br />
allowances in key areas and professional AMAZING FIT tips to get the best shirt<br />
possible.<br />
We suggest that you make a muslin fitting shell like the professionals do so that you can<br />
really get a great fit without the added stress of using your real fabric.<br />
HOW THIS SHIRT SHOULD FIT<br />
The bust darts should release thier fullness at the apex of your bust and lie smooth.The<br />
vertical seams should fit and lie smoothly over your contours. If you choose to use the<br />
waistline darts, the fit should be more sleek and the darts should lie flat. When closed,<br />
there should be no gaps between the buttonholes and the lower edge/hip area should<br />
be smooth with no wrinkling. The sleeves should fit smoothly and not bind, wrinkle or<br />
pull across your arms.<br />
CHOOSING YOUR PATTERN SIZE<br />
There are three unique sets of pattern pieces, each one for the bust cup sizes. Follow<br />
the measuring guidelines and the measurement chart to determine which pattern piece<br />
will give you the best results.<br />
Use your own knowledge about your body type and personal experience on how a fitted<br />
shirt fits you. Wear the appropriate undergarments while checking body measurements<br />
for better accuracy.<br />
C<br />
B<br />
13 pieces given<br />
1A 1B 1C 1D<br />
4<br />
3<br />
9<br />
BUST CUP MEASUREMENT<br />
6<br />
5<br />
7<br />
1A-FRONT FOR A CUP<br />
1B-FRONT FOR B CUP<br />
1C-FRONT FOR C CUP<br />
1D-FRONT FOR D CUP<br />
2A-FRONT BAND FOR A CUP<br />
2B-FRONT BAND FOR B CUP<br />
2C-FRONT BAND FOR C CUP<br />
2D-FRONT BAND FOR D CUP<br />
3-POCKET -A<br />
4-BACK<br />
11<br />
BUST MEASUREMENT<br />
HIGH BUST MEASUREMENT -<br />
BUST MEASUREMENT =<br />
To check your cup size, take your bust (A) and high bust (B) measurements and<br />
record them. Compare those measurements to the measurements on the<br />
pattern envelope. Next, determine your cup size by subtracting your high bust<br />
measurement from your bust measurement. Select the size which matches<br />
those measurements closely.<br />
8<br />
5-YOKE<br />
6-NECK BAND<br />
7-COLLAR -A,B<br />
8-SLEEVE -A<br />
9-TAB -A<br />
10-SLEEVE -B,C<br />
11-CONTINUOUS LAP -B,C<br />
12-CUFF -B,C<br />
13-FRONT RUFFLE -C<br />
2A 2B 2C 2D<br />
10<br />
12 13<br />
U.S. & Canada Toll-Free<br />
1-888-588-2700<br />
The Pattern<br />
SYMBOLS<br />
GRAIN LINE Place on<br />
straight grain of fabric<br />
parallel to selvage<br />
PLACE SOLID LINE on<br />
fold of fabric.<br />
CENTER FRONT OR<br />
BACK of garment.<br />
NOTCHES<br />
DOTS<br />
CUTTING LINE<br />
LENGTHEN OR<br />
SHORTEN LINES<br />
SEAM ALLOWANCE: 5/8" (1.5cm)<br />
unless otherwise stated is included but<br />
not printed on MULTI-SIZE PATTERNS.<br />
Mark your size with colored felt tip pen.<br />
See chart on tissue for how to use MULTI-<br />
SIZE PATTERNS.<br />
Web Site<br />
http://www.simplicity.com<br />
<strong>General</strong> <strong>Directions</strong><br />
ADJUST IF NEEDED<br />
Make adjustments before placing<br />
pattern on fabric.<br />
TO LENGTHEN:<br />
Cut pattern<br />
between<br />
lengthen or<br />
shorten lines.<br />
Spread pattern<br />
evenly, the<br />
amount needed<br />
and tape to<br />
paper.<br />
TO SHORTEN:<br />
At lengthen or<br />
shorten lines,<br />
make an even<br />
pleat taking up<br />
amount needed.<br />
Tape in place.<br />
When lengthen or shorten lines are<br />
not given, make adjustments at<br />
lower edge of pattern.<br />
Sewing<br />
• SEW garment following Sewing <strong>Directions</strong>.<br />
• PIN or machine-baste seams matching notches.<br />
• STITCH 5/8" (1.5 cm) seams unless otherwise stated.<br />
• PRESS seams open unless otherwise indicated clipping when necessary so<br />
seams will lie flat.<br />
• TRIM seams to reduce bulk, as shown below.<br />
Trim enclosed<br />
seams into layers<br />
Trim corners<br />
Clip inner<br />
curves<br />
Notch outer<br />
curves<br />
If your bust is 1/2” to 1” (1.3cm-2.5cm) larger than your high bust<br />
measurement, you are a A cup.<br />
If your bust is 1” to 2” (2.5cm-5cm) larger than your high bust<br />
measurement, you are a B cup.<br />
If your bust is 2” to 3” (5cm-7.5cm) larger than your high bust<br />
measurement, you are a C cup.<br />
If your bust is 3” to 4” (7.5cm-10cm) larger than your high bust<br />
measurement, you are a D cup.<br />
RELATED MEASUREMENTS<br />
Measure your waist and record this measurement. Compare with the<br />
measurement on the pattern tissue. Remember that the finished shirt<br />
will these approximate measures in wearing and design ease:<br />
3 1/2” (9cm) in the bust area 9” (23cm) in the waist area without waist<br />
darts 5-1/4” (13.5cm) in the waist area with waist darts<br />
Measure your arm length from the shoulder bone to your wrist bone,<br />
having arm slightly bent. Measure your bicep or the fullest part of your<br />
upper arm. Record both measurement for use in sleeve/and or pattern<br />
alteration. Compare your measurements to the chart below and use a<br />
general guide for altering.<br />
Arm Length 22˚”<br />
58cm<br />
Upper Arm 9˙”<br />
23.5cm<br />
6 8 10 12 14 16 18 20 22<br />
23”<br />
58.5cm<br />
9˚”<br />
25m<br />
23˙<br />
59cm<br />
10˙”<br />
26cm<br />
23˘”<br />
59.5cm<br />
10˚”<br />
27.5cm<br />
23˚”<br />
60.5cm<br />
11˙”<br />
28.5cm<br />
24”<br />
61cm<br />
11˚”<br />
30cm<br />
24˙”<br />
61.5cm<br />
12˙”<br />
31cm<br />
24˘”<br />
62cn<br />
12˚”<br />
32.5cm<br />
24˚”<br />
63cm<br />
13˙”<br />
33.5cm<br />
e<br />
E-mail<br />
info@simplicity.com<br />
Cutting/Marking<br />
BEFORE CUTTING:<br />
PRESS pattern pieces with a warm dry<br />
iron. PRE-SHRINK fabric by pre-washing<br />
washables or steam-pressing nonwashables.<br />
CIRCLE your cutting layout.<br />
PIN pattern to fabric as shown in Cutting<br />
Layouts.<br />
• FOR DOUBLE THICKNESS: Fold<br />
fabric with RIGHT sides together.<br />
• FOR SINGLE THICKNESS: Place<br />
fabric RIGHT side up.<br />
• FOR PILE, SHADED OR ONE WAY<br />
DESIGN FABRICS: Use “with nap”<br />
layouts<br />
★ If layout<br />
shows a piece<br />
extending past<br />
fold, cut out all<br />
pieces except<br />
piece that<br />
extends.<br />
Open out<br />
fabric to single<br />
thickness. Cut<br />
extending<br />
piece on<br />
RIGHT side of<br />
fabric in<br />
position<br />
shown.<br />
AFTER CUTTING:<br />
Transfer markings to WRONG side<br />
of fabric before removing pattern.<br />
Use pin and chalk method or<br />
dressmaker’s tracing paper and<br />
wheel.<br />
To Quick Mark:<br />
• Snip edge of fabric to mark<br />
notches, ends of fold lines and<br />
center lines.<br />
• Pin mark dots.<br />
SPECIAL CUTTING NOTES<br />
✻ Mark small<br />
arrows along both<br />
selvages indicating<br />
direction of nap or<br />
design. Fold fabric<br />
crosswise with<br />
RIGHT sides<br />
together, and cut<br />
along fold (a).<br />
YOUR BODY MEASUREMENTS<br />
Turn one fabric<br />
layer around so<br />
arrows on both<br />
layers go in the<br />
same direction.<br />
Place RIGHT sides<br />
together (b).<br />
a.<br />
CROSSWISE FOLD<br />
✁<br />
b.<br />
SELVAGE<br />
SELVAGE<br />
SELVAGES<br />
SELVAGE<br />
SELVAGES<br />
The pattern has been based on the body measurements given.<br />
Once you have selected your pattern size, the compare your bust<br />
measurement to the chart given on the pattern envelope.<br />
Remember that these are body measurements that the pattern<br />
pieces are based on. THEY ARE NOT FINISHED GARMENT<br />
MEASUREMENTS!<br />
Choose the appropriate KEY pattern pieces as follows:<br />
FOR BUST A CUP - Use Front pattern 1A and Front Band pattern<br />
2A.<br />
FOR BUST B CUP - Use Front pattern 1B and Front Band pattern<br />
2B.<br />
FOR BUST C CUP - Use Front pattern 1C and Front Band pattern<br />
2C.<br />
FOR BUST D CUP - Use Front pattern 1D and Front Band pattern<br />
2D.<br />
Once you have selected your KEY pattern pieces, make your<br />
adjustments for length using the lengthen or shorten lines printed on<br />
the pattern pieces OR for Miss Petite, follow fold out instructions<br />
printed on the pattern piece.
English/Spanish 3<br />
<strong>2339</strong><br />
Cutting<br />
Layouts<br />
2 / 4<br />
SPECIAL BUST DART ADJUSTMENT<br />
If the bust dart is too high or too low, determine the amount you have to move the dart<br />
for a correct fit.<br />
Correct the Front pattern as follows:<br />
A. Draw a rectangle around the bust dart and a portion of the waist line dart, keeping<br />
lines 1” (2.5cm) above and below broken bust dart lines.<br />
B. Cut out along the lines. Place a piece of paper under the pattern. Slide the dart<br />
section up or down the amount needed, keeping the vertical edges even. Tape in place.<br />
Re-draw the cutting lines, seam lines, blending into the original lines. Re-draw waistline<br />
darts if used.<br />
pattern printed<br />
side down<br />
pattern printed<br />
side up<br />
POSITION OF PATTERN PIECES MAY VARY SLIGHTLY ACCORDING<br />
TO YOUR PATTERN SIZE<br />
MISS PETITE: ADJUST PATTERN BEFORE CUTTING<br />
A SHIRT<br />
USE PIECES 1 (A,B,C OR D) 2 (A,B,C OR D) 3 4 5 6 7 8 9<br />
1A<br />
44" 45" (115CM)<br />
WITH NAP<br />
ALL SIZES<br />
1B 58" 60" (150CM)<br />
WITH NAP<br />
SIZES 6 8 10 12 14<br />
1C<br />
58" 60" (150CM)<br />
WITH NAP<br />
SIZES 16 18 20 22<br />
CUT ONE OF PIECE 3<br />
2<br />
★<br />
1<br />
8<br />
3<br />
4<br />
© Copyright 2010—Simplicity Pattern Co., Inc. / Printed in U.S.A. / Simplicity is a registered trademark of Simplicity Pattern Co., Inc.<br />
5<br />
4<br />
7<br />
1<br />
2<br />
★<br />
✻<br />
SELVAGES<br />
4<br />
1<br />
See<br />
SPECIAL<br />
CUTTING<br />
NOTES<br />
FOLD<br />
1<br />
STAY-STITCHING<br />
9<br />
2<br />
2 7<br />
8<br />
9<br />
7<br />
SINGLE THICKNESS<br />
SEL.<br />
6<br />
SEL.<br />
SELVAGES<br />
8<br />
5<br />
FOLD<br />
SELVAGES<br />
9<br />
6<br />
5<br />
3<br />
FOLD<br />
6<br />
3<br />
★<br />
INTERFACING<br />
USE PIECES 2 (A,B,C OR D) 6 7<br />
1D 20" TO 25" (51CM TO 64CM) FUSIBLE<br />
ALL SIZES<br />
B SHIRT<br />
USE PIECES 1 (A,B,C OR D) 2 (A,B,C OR D) 4 5 6 7 10 11 12<br />
2A<br />
2B<br />
Sewing <strong>Directions</strong><br />
FABRIC<br />
KEY<br />
44" 45" (115CM)<br />
WITH NAP<br />
ALL SIZES<br />
58" 60" (150CM)<br />
WITH NAP<br />
SIZES 6 8 10 12 14<br />
10<br />
2<br />
5<br />
11<br />
12 7<br />
INTERFACING<br />
SELVAGES<br />
6<br />
1<br />
FOLD<br />
USE PIECES 2 (A,B,C OR D) 6 7 12<br />
RIGHT SIDE WRONG SIDE INTERFACING LINING<br />
Read <strong>General</strong> <strong>Directions</strong> on page 1 before you begin.<br />
SHIRT A, B, C<br />
4<br />
12<br />
11 12 2<br />
READ ALL THE AMAZING FIT SHIRT INFORMATION BEFORE SEWING!<br />
NOTE: You will see that most of the seams will be machine-basted first and then<br />
your fine tuning adjustments will be made. This will make adjusting your<br />
fit easier during construction. The waistline darts on all views are<br />
optional.<br />
1. Stay-stitch front and yoke neck edges 1/2" (1.3cm) from cut edge in direction<br />
of arrows. This stitching stays in permanently and helps prevent stretching<br />
on curved edges. Stay-stitching will not be shown in the following<br />
illustrations.<br />
2. To make bust darts in front, with RIGHT sides together, fold the fabric<br />
through the center of the dart, bringing broken lines and small dots together.<br />
On INSIDE, place pins at RIGHT angles to the broken lines. Stitch the dart<br />
from wide end to point.<br />
TIP- To prevent a “bubble” at the point, make the last few stitches right on the<br />
fold and leave the thread ends long enough to tie a knot. DO NOT back-stitch<br />
at the point. Press the dart flat along the stitching to “blend” the stitches, then<br />
press dart down<br />
10<br />
2D 20" TO 25" (51CM TO 64CM) FUSIBLE<br />
ALL SIZES<br />
A<br />
4<br />
2C<br />
11<br />
TO RAISE DART<br />
7<br />
7<br />
2<br />
SELVAGES<br />
1<br />
FOLD<br />
58" 60" (150CM)<br />
WITH NAP<br />
SIZES 16 18 20 22<br />
4<br />
1<br />
2<br />
6<br />
7<br />
5<br />
12<br />
5<br />
12<br />
2<br />
SELVAGE<br />
6<br />
FOLD<br />
FOLD<br />
SINGLE THICKNESS<br />
SELVAGES<br />
10<br />
7<br />
6<br />
SELVAGE<br />
FOLD<br />
SEL.<br />
SEL.<br />
SEL.<br />
★<br />
6<br />
SEL.<br />
4<br />
B<br />
C SHIRT<br />
USE PIECES 1 (A,B,C OR D) 2 (A,B,C OR D) 4 5 6 10 11 12 13<br />
3A 44" 45" (115CM)<br />
WITH NAP<br />
SIZES 6 8 10 12 14<br />
3B<br />
44" 45" (115CM)<br />
WITH NAP<br />
SIZES 16 18 20 22<br />
INTERFACING<br />
USE PIECES 2 (A,B,C OR D) 6 12<br />
20" TO 25" (51CM TO 64CM) FUSIBLE<br />
ALL SIZES<br />
4<br />
12<br />
4<br />
SELVAGES<br />
1<br />
6<br />
DOUBLE THICKNESS ✻<br />
SELVAGES<br />
11<br />
12<br />
10<br />
13<br />
FOLD SELVAGES<br />
SELVAGES<br />
1<br />
★<br />
DOUBLE THICKNESS ✻<br />
5<br />
2<br />
SELVAGES<br />
11<br />
13 6<br />
10<br />
12<br />
5<br />
FOLD 2 SELVAGES<br />
3C 58" 60" (150CM)<br />
3D 58" 60" (150CM)<br />
WITH NAP WITH NAP<br />
SIZES 6 8 10 12 14<br />
SIZES 16 18 20 22<br />
2 SELVAGES<br />
12 2 SELVAGES<br />
3E<br />
10<br />
3<br />
1<br />
6<br />
5 12 12 6<br />
11<br />
4<br />
13<br />
FOLD<br />
5<br />
11<br />
4<br />
A B<br />
1<br />
6<br />
10<br />
TO LOWER DART<br />
2<br />
5<br />
13<br />
FOLD<br />
SELVAGE<br />
FOLD<br />
6<br />
12<br />
SEL.<br />
★<br />
Español<br />
3. To make waistline darts, with RIGHT sides together, fold the fabric through<br />
the center of the dart, bringing broken lines and small dots together. On<br />
INSIDE, place pins at RIGHT angles to the broken lines. Stitch the dart from<br />
the middle to one point. Then, overlapping several stitches, work from the<br />
middle to the other point. Carefully clip the dart at its widest point so that it<br />
will lie flat.<br />
TIP- To prevent a “bubble” at each point, make the last few stitches right on<br />
the fold and leave the thread ends long enough to tie a knot. DO NOT backstitch<br />
at the points.<br />
Press the dart flat along the stitching to “blend” the stitches, then press dart<br />
toward center.<br />
POCKET A<br />
SEÑORITA PEQUEÑA: AJUSTE EL PATRÓN ANTES DE CORTAR<br />
A CAMISA<br />
USE LAS PIEZAS 1 (A,B,C O D) 2 (A,B,C O D) 3 4 5 6 7 8 9<br />
1A<br />
44" 45" (115CM) CON PELUSA / TODAS LAS TALLAS<br />
1B<br />
58" 60" (150CM) CON PELUSA<br />
TALLAS 6 8 10 12 14<br />
1C<br />
58" 60" (150CM) CON PELUSA<br />
TALLAS 16 18 20 22 / CORTE UNA PIEZA 3<br />
ENTRETELA USE LAS PIEZAS 2 (A,B,C OR D) 6 7<br />
1D 20" A 25" (51CM A 64CM) ADHESIVA<br />
TODAS LAS TALLAS<br />
B CAMISA<br />
USE LAS PIEZAS 1 (A,B,C O D) 2 (A,B,C O D) 4 5 6 7 10 11 12<br />
2A<br />
44" 45" (115CM) CON PELUSA / TODAS LAS TALLAS<br />
2B 58" 60" (150CM) CON PELUSA/ TALLAS 6 8 10 12 14<br />
2C 58" 60" (150CM) CON PELUSA / TALLAS 16 18 20 22<br />
ENTRETELA USE LAS PIEZAS 2 (A,B,C O D) 6 7 12<br />
2D 20" A 25" (51CM A 64CM) ADHESIVA<br />
TODAS LAS TALLAS<br />
C CAMISA<br />
USE LAS PIEZAS 1 (A,B,C O D) 2 (A,B,C O D) 4 5 6 10 11 12 13<br />
3A 44" 45" (115CM) CON PELUSA /TALLAS 6 8 10 12 14<br />
3B 44" 45" (115CM) CON PELUSA /TALLAS 16 18 20 22<br />
3C 58" 60" (150CM) CON PELUSA /TALLAS 6 8 10 12 14<br />
3D 58" 60" (150CM) CON PELUSA / TALLAS 16 18 20 22<br />
ENTRETELA USE LAS PIEZAS 2 (A,B,C O D) 6 12<br />
3E 20" A 25" (51CM A 64CM) ADHESIVA/ TODAS LAS TALLAS<br />
Double Thickness= Espesor Doble<br />
Single Thickness= Espesor Sencillo<br />
Fold= Doblez<br />
Selvage (s) Sel.)= Orillo(s)<br />
4. Press under 1/4" (6mm) on upper edge of pocket. Turn upper edge to<br />
OUTSIDE along fold line, forming facing. Stitch along seam line on raw<br />
edges. Trim seam allowance in the facing area to 1/4” (6mm) as shown.<br />
5. Turn corners RIGHT side out, turn facing to the WRONG side; press,<br />
pressing under raw edges along stitching. Stitch facing close to inner edge.<br />
6. On OUTSIDE, pin pocket to LEFT front, placing upper corners at large dots.<br />
Stitch close to side and lower edges.
English/Spanish 3<br />
<strong>2339</strong><br />
13<br />
7<br />
10<br />
14<br />
8<br />
12<br />
3 / 4<br />
9<br />
11<br />
YOKE<br />
FACING<br />
FRONT RUFFLE C<br />
© Copyright 2010—Simplicity Pattern Co., Inc. / Printed in U.S.A. / Simplicity is a registered trademark of Simplicity Pattern Co., Inc.<br />
YOKE<br />
YOKE FACING<br />
15<br />
BACK<br />
16<br />
7. Fold front ruffle in half in half lengthwise, with WRONG sides together. Press.<br />
Pin raw edges together. To gather ruffle between small and large dots, stitch<br />
along seam line and 1/4” (6mm) INSIDE seam line, using a long machinestitch.<br />
8. On OUTSIDE, pin ruffle to front, matching small and large dots, having raw<br />
edges even. Pull up gathering stitches to fit. Machine-baste.<br />
CONTINUE AS FOLLOWS FOR ALL VIEWS<br />
9. Make optional waistline darts on back in same manner as front darts and<br />
press darts toward center.<br />
NOTE: Yoke will be applied using a professional no hand-sewing method. Follow<br />
directions carefully.<br />
10. With RIGHT sides together, pin back to yoke, matching centers. Machinebaste.<br />
11. With back sandwiched between yoke and yoke facing, pin notched edges<br />
together, having RIGHT side of back and yoke together. Stitch seam through<br />
all thicknesses. Trim seam; press. Press yoke up, leaving yoke facing down<br />
toward shirt back, as shown.<br />
12. With RIGHT sides together, pin yoke to fronts at shoulder edges. Machinebaste.<br />
13. Roll back and both front sections together toward yoke, as shown. Having<br />
RIGHT side of yoke facing against the WRONG side of fronts, pin shoulder<br />
edges together. (Rolled shirt is between yoke layers.) Stitch seams through<br />
all thicknesses, being careful not to catch in rolled shirt. Trim and press<br />
seams.<br />
14. Reach in and pull out rolled shirt through one armhole opening, turning shirt<br />
RIGHT side out. Press all yoke seams. Machine-baste neck and armhole<br />
edges together.<br />
15. With WRONG sides together, pin front to back at side seams. Machine-baste<br />
along the 1” (2.5cm) seam line. Press up hem. Machine-baste along center<br />
of hem allowance to within 2” (5cm) of basted side seams.<br />
16. Apply fusible interfacing to WRONG side of front band following<br />
manufacturer’s directions. Press under 1/2” (1.3cm) on long unnotched edge<br />
of band.<br />
F<br />
19<br />
A<br />
17<br />
D<br />
21<br />
18<br />
B C<br />
G<br />
MARKING TIP<br />
20<br />
E<br />
22<br />
17. With RIGHT sides together, pin front band to front, matching small dots and<br />
notches. Lower edge of band will extend 5/8” (1.5cm) beyond basted hem.<br />
Machine-baste.<br />
18. Fold band along fold line, with WRONG sides together. Press. On OUTSIDE,<br />
machine-baste band along seam.<br />
FINE TUNE AS YOU SEW<br />
Check the fit of your garment at this point before permanently stitching your side<br />
seams and apply the fashion details. For clarity, the pocket for View A or the ruffle<br />
for View C.<br />
Try the shirt shell on with the appropriate undergarment, Lap RIGHT front over<br />
LEFT, matching centers. Pin the centers front in place. Have your tools handy and<br />
keep checking your fit as you make the adjustment to see your progress. If<br />
possible, enlist the help of a friend for any back adjustments.<br />
A. First check the overall fit of the bust, hip and waist areas. Make sure that the<br />
your seams, darts and centers are in the right places.<br />
Side seams are at your sides, the centers match your centers.<br />
Bust darts are releasing fullness over your bust apex smoothly.<br />
Waistline darts lie flat and smooth over your body contours, providing adequate<br />
suppression (nipped in waist).<br />
The front closing lies flat and smooth without gapping or pulling open and the<br />
garment fits smoothly over your hips.<br />
NOW, work on fine tuning the shell of the shirt remembering that a little<br />
adjustment goes a long way!<br />
B. If the bust area is too tight or the front closing gaps at your bust line, let out the<br />
basting from the underarm to the notch. Shift more of the seam toward front,<br />
tapering back into the normal seam line at notch. NOTE: The seam allowances<br />
will be uneven.<br />
C. If the back feels tight or is forming wrinkles underneath the armhole, let out the<br />
basting from the underarm to the notch. Shift more of the seam toward back,<br />
tapering back into the normal seam line at notch. NOTE: The seam allowances<br />
will be uneven.<br />
D. If the hip area feels tight around your derriere and the side seam pulls toward<br />
the back, release the basting from the seams below the waist line. Smooth the<br />
back of the garment over contours, making sure that the side seams are<br />
perpendicular to the floor. Pin. NOTE: The seam allowance will be uneven.<br />
E. If the hip is too loose, take in the side seams below the waist line, tapering back<br />
to the basted seam allowance.<br />
F. If the overall body width is too loose, take in deeper side seams between<br />
armhole edge and waist line, tapering back to seam allowance OR if too snug,<br />
reverse the process, letting out the seam.<br />
G. If the waist is too loose, take in deeper side seams between the notch and 2”<br />
(2.5cm) below waist line, tapering back into basted seam allowances OR if too<br />
snug, reverse the process, letting out the seam.<br />
REMEMBER - If you made any adjustments that affected the armhole, keep in<br />
mind that the sleeve will have to be adjusted accordingly.<br />
Take off the shell being careful not to disturb the pins. Mark all of the new seam<br />
lines using chalk, dressmakers pencil, water soluble fabric marker or a silver of<br />
soap.<br />
MARKING TIP - Separate seam allowance at pins and mark new lines on<br />
WRONG side. Remember to transfer any other pattern markings to the new seam<br />
line. Remove pins. Stitch seams as instructed along your newly marked seam<br />
lines.<br />
NOW separate the shell along all machine bastings. After stitching seams as<br />
instructed below, trim any excess seam allowances to within 5/8” (1.5cm) of<br />
stitching.<br />
CONTINUE AS FOLLOWS FOR ALL VIEWS<br />
19. With RIGHT sides together, stitch front to back at side seams.<br />
AMAZING TIP: Finish the seam allowances by overlocking with your serger or<br />
with a zig zag stitch.<br />
20. Press under hem allowance on lower edge of garment. To form narrow hem,<br />
tuck under raw edge to meet crease. Press. Stitch hem in place.<br />
21. Attach the prepared front band to garment as follows: With RIGHT sides<br />
together, pin front band to front, placing lower edge at small dot, having raw<br />
edges even. Stitch. Trim seam.<br />
22. Press seam toward band, pressing band out. Turn lower edge of band to<br />
OUTSIDE along fold line. Stitch across lower end of band along seam line.<br />
Trim seam.
English/Spanish 3<br />
<strong>2339</strong><br />
26<br />
30<br />
23<br />
28<br />
25<br />
4 / 4<br />
27<br />
24<br />
31<br />
© Copyright 2010—Simplicity Pattern Co., Inc. / Printed in U.S.A. / Simplicity is a registered trademark of Simplicity Pattern Co., Inc.<br />
29<br />
32 33<br />
34<br />
35<br />
36<br />
37 38<br />
40 41<br />
39<br />
23. Turn band to INSIDE along fold line, forming facing and turning corner out.<br />
Press. Pin pressed under edge of band facing over seam, placing pins on<br />
OUTSIDE. On OUTSIDE, stitch close to band seam, catching in pressed<br />
edge of facing on INSIDE and removing pins as you come to them. If you<br />
prefer, edge-stitch front edge of band.<br />
NECK BAND AND COLLAR A, B<br />
24. Pin fusible interfacing to WRONG side of one neck band and one collar<br />
section. Cut across corners that will be enclosed with seams. Fuse<br />
interfacing in place, following manufacturer’s directions. Remaining neck<br />
band and collar sections will be referred to as facings.<br />
25. Clip garment neck edge to stay-stitching. With RIGHT sides together, pin<br />
single notched edge of band to neck edge, matching centers and placing<br />
small dots at shoulder seams. (Neck band extends 5/8" (1.5cm) beyond front<br />
opening edges.) Stitch neck edge. Trim seam; clip curves. Press band out;<br />
press seam toward band.<br />
26. With RIGHT sides together and raw edges even, stitch facing to collar,<br />
leaving notched edges open. Trim seam and corners.<br />
27. Turn collar; press. Machine-baste raw edges together. With RIGHT sides<br />
together and raw edges even, pin collar (facing side) to neck band, matching<br />
centers back and double notches and placing ends at small dots. Machinebaste.<br />
28. Press under 5/8" (1.5cm) on single notched edge of neck band facing; trim to<br />
1/4" (6mm). With RIGHT sides together, pin neck band facing to neck band<br />
(over collar), matching centers back. Stitch front and double notched edge.<br />
Trim seam; clip curves.<br />
29. Turn band facing to INSIDE; press. Pin pressed edge of facing over seam,<br />
placing pins on OUTSIDE. On OUTSIDE, stitch close to all edges of neck<br />
band, catching in pressed edge of facing on INSIDE and removing pins as<br />
you come to them.<br />
NECK BAND C<br />
30. Apply fusible interfacing to WRONG side of one neck band section following<br />
manufacturer’s directions. Press under edge 5/8" (1.5cm) on single notched<br />
edge of neck band facing; 1/4" (6mm).<br />
31. With RIGHT sides together, stitch neck band facing to neck band, leaving<br />
single notched edge open. Trim seam; clip curves.<br />
32. Turn neck band; press. Clip garment neck edge to stay-stitching along<br />
curves. On OUTSIDE, pin neck band to neck edge, matching centers back<br />
and placing small dots at shoulder seams. Machine-baste. Stitch, being<br />
careful not to catch in pressed edge of neck band. Trim seam; clip curves.<br />
33. Press seam toward band, pressing band out. Pin pressed edge of facing<br />
over seam, placing pins on OUTSIDE. On OUTSIDE, stitch close to all<br />
edges of neck band, catching in pressed edge of facing on INSIDE and<br />
removing pins as you come to them.<br />
SLEEVES A<br />
34. Apply fusible interfacing to WRONG side of tab, following manufacturer’s<br />
directions. With RIGHT sides together, fold tab in half lengthwise having raw<br />
edges even. Stitch in a 3/8” (1cm) seam, leaving end with small and large<br />
dots open. Trim seam and corners.<br />
35. Turn tab RIGHT side out; press. Make buttonhole in tab at marking.<br />
36. On INSIDE, pin tab to sleeve, matching small and large dots. Stitch across<br />
end of tab between dots 3/8” (1cm) from raw edge. Trim seam to 1/4” (6mm).<br />
Turn tab down; press. Stitch 3/8” (1cm) from upper edge of tab.<br />
37. Turn lower edge of sleeve to INSIDE along fold line, forming hem. Press.<br />
Press under 1/4” (6mm) on raw edge. Machine-baste hem in place, keeping<br />
tab free.<br />
38. Turn lower edge to OUTSIDE 2” (5cm), forming cuff. Sew button to small dot<br />
on sleeve. Turn tab over cuff and fasten to button.<br />
39. With WRONG sides together, pin underarm seam of sleeve, having lower<br />
edges even. Machine-baste along the 1” (2.5cm) seam line. To ease top of<br />
sleeve between notches, stitch along seam line and 1/4” (6mm) INSIDE<br />
seam line using a long machine-stitch.<br />
SLEEVES B, C<br />
40. To make slash opening at lower edge of sleeve, stitch along stitching lines...<br />
pivot and take one small stitch across the point.<br />
41. Slash between stitching, being careful not to slash through the stitch at the<br />
point.<br />
42<br />
46<br />
49<br />
52<br />
A<br />
C<br />
43<br />
50<br />
47<br />
B<br />
D<br />
45<br />
44<br />
48<br />
53<br />
51<br />
42. Stitch along stitching lines on continuous lap.<br />
43. Spread slashed edges of sleeve apart so that they form a straight line. Baste<br />
RIGHT side of continuous lap to WRONG side of slashed edges, matching<br />
stitching lines and small dots. Stitch along stitching line.<br />
44. Press lap out, pressing seam toward lap. Press under 1/4” (6mm) on<br />
remaining long edge of lap. Stitch pressed edge over seam.<br />
45. Press front portion of lap to INSIDE; baste in place across lower edge. Stitch<br />
diagonally across upper edge of lap, as shown.<br />
46. To make pleats, on OUTSIDE, fold along solid lines. Bring folds to broken<br />
lines; pin. Baste across lower edge.<br />
47. With WRONG sides together, pin underarm seam of sleeve. Machine-baste<br />
along the 1” (2.5cm) seam line. To ease top of sleeve between notches,<br />
stitch along seam line and 1/4” (6mm) INSIDE seam line using a long<br />
machine-stitch.<br />
CONTINUE AS FOLLOWS FOR ALL VIEWS<br />
48. Turn sleeve RIGHT side out.<br />
Hold garment WRONG side out with the armhole toward you. With RIGHT<br />
sides together, pin sleeve to armhole edge, matching underarm seams and<br />
small dots. Pull up ease-stitches to fit. To distribute fullness evenly, slide<br />
fabric along bobbin threads until there are no puckers or tucks on the seam<br />
line. Machine-baste<br />
FINE TUNE AS YOU SEW<br />
Check the fit of the sleeves before permanently stitching into the armhole. Try on<br />
the shirt and stand in front of a mirror. The sleeves should hang straight without<br />
twisting, binding or puling across your biceps.<br />
A. If the bicep is too snug, let out the basted seam where its tight. Re-pin seam,<br />
tapering back to the seam allowance near armhole edge.<br />
B. FOR VIEW A - If the overall fit of the sleeve is too loose including the opening,<br />
crease the seam and pin out the fullness along crease, tapering back to seam at<br />
armhole edge.<br />
C. FOR ALL VIEWS - If you have a sloping shoulder on one side of your body,<br />
insert a thin shoulder pad on the sloping side to balance out the shoulders.<br />
D. Take off the garment, being careful not to disturb the pins, Mark all the seam<br />
lines the same way you marked your seams on the previous fitting.<br />
NOW, remove the sleeves. Remove basting from seams. Stitch underarm<br />
seam along newly marked lines. Trim any excess seam allowances to within<br />
5/8” (1.5cm) of stitching.<br />
For View A: Turn up hem and stitch in place along upper edge. Turn back<br />
cuff. Fasten tab<br />
For All Views: Pin, baste and ease sleeve into the armhole same as Step 48.<br />
Stitch. Stitch again 1/8" (3mm) from first stitching. Trim seam below notches<br />
close to stitching. Press only the seam allowance, shrinking out fullness.<br />
CUFFS - VIEWS B, C<br />
49. Pin fusible interfacing to WRONG side of cuff. Cut diagonally across corners<br />
that will be enclosed with seams. Fuse interfacing in place, following<br />
manufacturer’s directions.<br />
50. Press under 5/8" (1.5cm) on notched edge of cuff facing; trim to 1/4" (6mm).<br />
With RIGHT sides together, stitch facing to cuff, leaving notched edge open.<br />
Trim seam and corners.<br />
51. Turn cuff; press. With RIGHT sides together, pin sleeve to cuff, placing<br />
opening edges at small dots. Baste. Stitch. Trim seam; press toward cuff.<br />
52. Pin pressed edge of cuff facing over seam, placing pins on OUTSIDE. On<br />
OUTSIDE, top-stitch cuff close to seam and along outer edges, catching in<br />
pressed edge on INSIDE and removing pins as you come to them. Make<br />
buttonholes in cuff. Sew buttons at small dots.<br />
FINISHING FOR ALL VIEWS<br />
NOTE: For View C, upper buttonhole and button are optional.<br />
53. If pattern has been altered, respace buttonhole markings. Make buttonholes<br />
in RIGHT front and at end of neck band for Views A, B. Lap RIGHT front over<br />
LEFT, matching centers. Sew buttons under buttonholes.<br />
Now that you have finished, mark all your adjustments onto your pattern<br />
pieces. The next time, just cut and sew....AMAZING!


