3584 Cutting Layouts General Directions - PrintSew
3584 Cutting Layouts General Directions - PrintSew 3584 Cutting Layouts General Directions - PrintSew
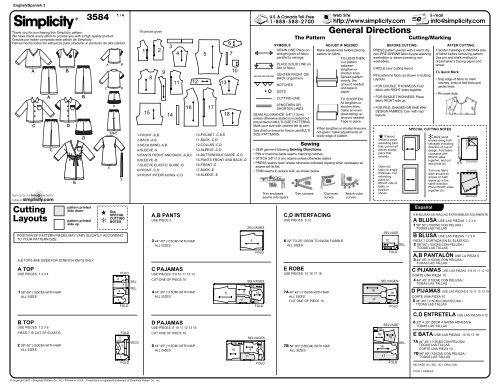
English/Spanish 3 Cutting Layouts ® pattern printed side down pattern printed side up 3584 © Copyright 2007—Simplicity Pattern Co., Inc. / Printed in U.S.A. / Simplicity is a registered trademark of Simplicity Pattern Co., Inc. ★ ✻ 1 / 4 Thank you for purchasing this Simplicity pattern. We have made every effort to provide you with a high quality product. Gracias por haber comprado este patrón de Simplicity. Hemos hecho todos los esfuerzos para ofrecerle un producto de alta calidad. A C See SPECIAL CUTTING NOTES POSITION OF PATTERN PIECES MAY VARY SLIGHTLY ACCORDING TO YOUR PATTERN SIZE A,B TOPS ARE SIZED FOR STRETCH KNITS ONLY A TOP USE PIECES 1 2 3 4 1 58" 60" (150CM) WITH NAP ALL SIZES B TOP A C USE PIECES 1 2 3 6 PIECE 7 IS CUT OF ELASTIC 2 58" 60" (150CM) WITH NAP ALL SIZES B D E B D C A E D A/B/C 2 4 FOLD 3 1 FOLD 6 2 B D E FOLD 3 1 FOLD SEL. SEL. SELS. 18 pieces given 1 15 8 2 9 3 14 4 1-FRONT -A,B 2-BACK -A,B 3-NECK BAND -A,B 4-SLEEVE -A 5-PANTS FRONT AND BACK -A,B,C 6-SLEEVE -B 7-SLEEVE ELASTIC GUIDE -B 8-FRONT -C,D 9-FRONT INTERFACING -C,D A,B PANTS USE PIECE 5 3 44" 45" (115CM) WITH NAP ALL SIZES C PAJAMAS USE PIECES 5 8 10 11 12 13 CUT ONE OF PIECE 10 4 44" 45" (115CM) WITH NAP ALL SIZES D PAJAMAS 5 44" 45" (115CM) WITH NAP ALL SIZES 5 11 12 13 USE PIECES 8 10 11 12 13 15 CUT ONE OF PIECE 10 16 17 10-POCKET -C,D,E 11-BACK -C,D 12-COLLAR -C,D 13-SLEEVE -C,D 14-BUTTONHOLE GUIDE -C,D 15-PANTS FRONT AND BACK -D 16-FRONT -E 17-BACK -E 18-SLEEVE -E 6 18 5 7 10 12 15 11 U.S. & Canada Toll-Free 1-888-588-2700 The Pattern SYMBOLS GRAIN LINE Place on straight grain of fabric parallel to selvage PLACE SOLID LINE on fold of fabric. CENTER FRONT OR BACK of garment. NOTCHES DOTS CUTTING LINE LENGTHEN OR SHORTEN LINES SEAM ALLOWANCE: 5/8" (1.5cm) unless otherwise stated is included but not printed on MULTI-SIZE PATTERNS. Mark your size with colored felt tip pen. See chart on tissue for how to use MULTI- SIZE PATTERNS. Web Site http://www.simplicity.com General Directions ADJUST IF NEEDED Make adjustments before placing pattern on fabric. TO LENGTHEN: Cut pattern between lengthen or shorten lines. Spread pattern evenly, the amount needed and tape to paper. TO SHORTEN: At lengthen or shorten lines, make an even pleat taking up amount needed. Tape in place. When lengthen or shorten lines are not given, make adjustments at lower edge of pattern. Sewing • SEW garment following Sewing Directions. • PIN or machine-baste seams matching notches. • STITCH 5/8" (1.5 cm) seams unless otherwise stated. • PRESS seams open unless otherwise indicated clipping when necessary so seams will lie flat. • TRIM seams to reduce bulk, as shown below. SELVAGES 5 12 8 13 11 FOLD SELVAGES 8 10 FOLD SELVAGES 10 13 FOLD Trim enclosed seams into layers Trim corners Clip inner curves C,D INTERFACING USE PIECES 9 12 6 22" TO 25" (55CM TO 64CM) FUSIBLE ALL SIZES E ROBE USE PIECES 10 16 17 18 7A 44" 45" (115CM) WITH NAP ALL SIZES CUT ONE OF PIECE 10 7B 58" 60" (150CM) WITH NAP ALL SIZES Notch outer curves e E-mail info@simplicity.com Cutting/Marking BEFORE CUTTING: PRESS pattern pieces with a warm dry iron. PRE-SHRINK fabric by pre-washing washables or steam-pressing nonwashables. CIRCLE your cutting layout. PIN pattern to fabric as shown in Cutting Layouts. 16 • FOR DOUBLE THICKNESS: Fold fabric with RIGHT sides together. • FOR SINGLE THICKNESS: Place fabric RIGHT side up. • FOR PILE, SHADED OR ONE WAY DESIGN FABRICS: Use “with nap” layouts 17 ★ If layout shows a piece extending past fold, cut out all pieces except piece that extends. Open out fabric to single thickness. Cut extending piece on RIGHT side of fabric in position shown. 16 17 SELVAGE 12 SEL. 9 FOLD SELVAGES 18 10 FOLD SELVAGE 10 18 18 FOLD SEL. Español AFTER CUTTING: Transfer markings to WRONG side of fabric before removing pattern. Use pin and chalk method or dressmaker’s tracing paper and wheel. To Quick Mark: • Snip edge of fabric to mark notches, ends of fold lines and center lines. • Pin mark dots. SPECIAL CUTTING NOTES ✻ Mark small arrows along both selvages indicating direction of nap or design. Fold fabric crosswise with RIGHT sides together, and cut along fold (a). Turn one fabric layer around so arrows on both layers go in the same direction. Place RIGHT sides together (b). a. CROSSWISE FOLD ✁ b. SELVAGE SELVAGE SELVAGES SELVAGE SELVAGES A,B BLUSAS EN MALLAS EXTENSIBLES SOLAMENTE A BLUSA USE LAS PIEZAS 1 2 3 4 1 58" 60" (150CM) CON PELUSA / TODAS LAS TALLAS B BLUSA USE LAS PIEZAS 1 2 3 6 PIEZA 7 CORTADA EN EL ELÁSTICO 2 58" 60" (150CM) CON PELUSA / TODAS LAS TALLAS A,B PANTALÓN USE LA PIEZA 5 3 44" 45" (115CM) CON PELUSA / TODAS LAS TALLAS C PIJAMAS USE LAS PIEZAS 5 8 10 11 12 13 CORTE UNA PIEZA 10 4 44" 45" (115CM) CON PELUSA / TODAS LAS TALLAS D PIJAMAS USE LAS PIEZAS 8 10 11 12 13 15 CORTE UNA PIEZA 10 5 44" 45" (115CM) CON PELUSA / TODAS LAS TALLAS C,D ENTRETELA USE LAS PIEZAS 9 12 6 22" A 25" (55CM A 64CM) ADHESIVA TODAS LAS TALLAS E BATA USE LAS PIEZAS 10 16 17 18 7A 44" 45" (115CM) CON PELUSA/ TODAS LAS TALLAS CORTE UNA PIEZA 10 7B 58" 60" (150CM) CON PELUSA / TODAS LAS TALLAS SELVAGE (S) / SEL. (S) = ORILLO(S) FOLD = DOBLEZ
- Page 2 and 3: English/Spanish 3 2 / 4 3584 Sewing
- Page 4: English/Spanish 3 3584 4 7 6 9 4 /
English/Spanish 3<br />
<strong>Cutting</strong><br />
<strong>Layouts</strong><br />
®<br />
pattern printed<br />
side down<br />
pattern printed<br />
side up<br />
<strong>3584</strong><br />
© Copyright 2007—Simplicity Pattern Co., Inc. / Printed in U.S.A. / Simplicity is a registered trademark of Simplicity Pattern Co., Inc.<br />
★<br />
✻<br />
1 / 4<br />
Thank you for purchasing this Simplicity pattern.<br />
We have made every effort to provide you with a high quality product.<br />
Gracias por haber comprado este patrón de Simplicity.<br />
Hemos hecho todos los esfuerzos para ofrecerle un producto de alta calidad.<br />
A<br />
C<br />
See<br />
SPECIAL<br />
CUTTING<br />
NOTES<br />
POSITION OF PATTERN PIECES MAY VARY SLIGHTLY ACCORDING<br />
TO YOUR PATTERN SIZE<br />
A,B TOPS ARE SIZED FOR STRETCH KNITS ONLY<br />
A TOP<br />
USE PIECES 1 2 3 4<br />
1 58" 60" (150CM) WITH NAP<br />
ALL SIZES<br />
B TOP<br />
A<br />
C<br />
USE PIECES 1 2 3 6<br />
PIECE 7 IS CUT OF ELASTIC<br />
2 58" 60" (150CM) WITH NAP<br />
ALL SIZES<br />
B<br />
D<br />
E<br />
B<br />
D<br />
C<br />
A<br />
E<br />
D<br />
A/B/C<br />
2<br />
4<br />
FOLD<br />
3<br />
1<br />
FOLD<br />
6<br />
2<br />
B<br />
D<br />
E<br />
FOLD<br />
3<br />
1<br />
FOLD<br />
SEL.<br />
SEL.<br />
SELS.<br />
18 pieces given<br />
1<br />
15<br />
8<br />
2<br />
9<br />
3<br />
14<br />
4<br />
1-FRONT -A,B<br />
2-BACK -A,B<br />
3-NECK BAND -A,B<br />
4-SLEEVE -A<br />
5-PANTS FRONT AND BACK -A,B,C<br />
6-SLEEVE -B<br />
7-SLEEVE ELASTIC GUIDE -B<br />
8-FRONT -C,D<br />
9-FRONT INTERFACING -C,D<br />
A,B PANTS<br />
USE PIECE 5<br />
3 44" 45" (115CM) WITH NAP<br />
ALL SIZES<br />
C PAJAMAS<br />
USE PIECES 5 8 10 11 12 13<br />
CUT ONE OF PIECE 10<br />
4 44" 45" (115CM) WITH NAP<br />
ALL SIZES<br />
D PAJAMAS<br />
5 44" 45" (115CM) WITH NAP<br />
ALL SIZES<br />
5<br />
11 12 13<br />
USE PIECES 8 10 11 12 13 15<br />
CUT ONE OF PIECE 10<br />
16 17<br />
10-POCKET -C,D,E<br />
11-BACK -C,D<br />
12-COLLAR -C,D<br />
13-SLEEVE -C,D<br />
14-BUTTONHOLE GUIDE -C,D<br />
15-PANTS FRONT AND BACK -D<br />
16-FRONT -E<br />
17-BACK -E<br />
18-SLEEVE -E<br />
6<br />
18<br />
5<br />
7<br />
10<br />
12<br />
15<br />
11<br />
U.S. & Canada Toll-Free<br />
1-888-588-2700<br />
The Pattern<br />
SYMBOLS<br />
GRAIN LINE Place on<br />
straight grain of fabric<br />
parallel to selvage<br />
PLACE SOLID LINE on<br />
fold of fabric.<br />
CENTER FRONT OR<br />
BACK of garment.<br />
NOTCHES<br />
DOTS<br />
CUTTING LINE<br />
LENGTHEN OR<br />
SHORTEN LINES<br />
SEAM ALLOWANCE: 5/8" (1.5cm)<br />
unless otherwise stated is included but<br />
not printed on MULTI-SIZE PATTERNS.<br />
Mark your size with colored felt tip pen.<br />
See chart on tissue for how to use MULTI-<br />
SIZE PATTERNS.<br />
Web Site<br />
http://www.simplicity.com<br />
<strong>General</strong> <strong>Directions</strong><br />
ADJUST IF NEEDED<br />
Make adjustments before placing<br />
pattern on fabric.<br />
TO LENGTHEN:<br />
Cut pattern<br />
between<br />
lengthen or<br />
shorten lines.<br />
Spread pattern<br />
evenly, the<br />
amount needed<br />
and tape to<br />
paper.<br />
TO SHORTEN:<br />
At lengthen or<br />
shorten lines,<br />
make an even<br />
pleat taking up<br />
amount needed.<br />
Tape in place.<br />
When lengthen or shorten lines are<br />
not given, make adjustments at<br />
lower edge of pattern.<br />
Sewing<br />
• SEW garment following Sewing <strong>Directions</strong>.<br />
• PIN or machine-baste seams matching notches.<br />
• STITCH 5/8" (1.5 cm) seams unless otherwise stated.<br />
• PRESS seams open unless otherwise indicated clipping when necessary so<br />
seams will lie flat.<br />
• TRIM seams to reduce bulk, as shown below.<br />
SELVAGES<br />
5<br />
12<br />
8 13<br />
11<br />
FOLD<br />
SELVAGES<br />
8<br />
10<br />
FOLD<br />
SELVAGES<br />
10<br />
13<br />
FOLD<br />
Trim enclosed<br />
seams into layers<br />
Trim corners<br />
Clip inner<br />
curves<br />
C,D INTERFACING<br />
USE PIECES 9 12<br />
6 22" TO 25" (55CM TO 64CM) FUSIBLE<br />
ALL SIZES<br />
E ROBE<br />
USE PIECES 10 16 17 18<br />
7A 44" 45" (115CM) WITH NAP<br />
ALL SIZES<br />
CUT ONE OF PIECE 10<br />
7B 58" 60" (150CM) WITH NAP<br />
ALL SIZES<br />
Notch outer<br />
curves<br />
e<br />
E-mail<br />
info@simplicity.com<br />
<strong>Cutting</strong>/Marking<br />
BEFORE CUTTING:<br />
PRESS pattern pieces with a warm dry<br />
iron. PRE-SHRINK fabric by pre-washing<br />
washables or steam-pressing nonwashables.<br />
CIRCLE your cutting layout.<br />
PIN pattern to fabric as shown in <strong>Cutting</strong><br />
<strong>Layouts</strong>.<br />
16<br />
• FOR DOUBLE THICKNESS: Fold<br />
fabric with RIGHT sides together.<br />
• FOR SINGLE THICKNESS: Place<br />
fabric RIGHT side up.<br />
• FOR PILE, SHADED OR ONE WAY<br />
DESIGN FABRICS: Use “with nap”<br />
layouts<br />
17<br />
★ If layout<br />
shows a piece<br />
extending past<br />
fold, cut out all<br />
pieces except<br />
piece that<br />
extends.<br />
Open out<br />
fabric to single<br />
thickness. Cut<br />
extending<br />
piece on<br />
RIGHT side of<br />
fabric in<br />
position<br />
shown.<br />
16<br />
17<br />
SELVAGE<br />
12<br />
SEL.<br />
9<br />
FOLD<br />
SELVAGES<br />
18<br />
10<br />
FOLD<br />
SELVAGE<br />
10<br />
18<br />
18<br />
FOLD<br />
SEL.<br />
Español<br />
AFTER CUTTING:<br />
Transfer markings to WRONG side<br />
of fabric before removing pattern.<br />
Use pin and chalk method or<br />
dressmaker’s tracing paper and<br />
wheel.<br />
To Quick Mark:<br />
• Snip edge of fabric to mark<br />
notches, ends of fold lines and<br />
center lines.<br />
• Pin mark dots.<br />
SPECIAL CUTTING NOTES<br />
✻ Mark small<br />
arrows along both<br />
selvages indicating<br />
direction of nap or<br />
design. Fold fabric<br />
crosswise with<br />
RIGHT sides<br />
together, and cut<br />
along fold (a).<br />
Turn one fabric<br />
layer around so<br />
arrows on both<br />
layers go in the<br />
same direction.<br />
Place RIGHT sides<br />
together (b).<br />
a.<br />
CROSSWISE FOLD<br />
✁<br />
b.<br />
SELVAGE<br />
SELVAGE<br />
SELVAGES<br />
SELVAGE<br />
SELVAGES<br />
A,B BLUSAS EN MALLAS EXTENSIBLES SOLAMENTE<br />
A BLUSA USE LAS PIEZAS 1 2 3 4<br />
1 58" 60" (150CM) CON PELUSA /<br />
TODAS LAS TALLAS<br />
B BLUSA USE LAS PIEZAS 1 2 3 6<br />
PIEZA 7 CORTADA EN EL ELÁSTICO<br />
2 58" 60" (150CM) CON PELUSA /<br />
TODAS LAS TALLAS<br />
A,B PANTALÓN USE LA PIEZA 5<br />
3 44" 45" (115CM) CON PELUSA /<br />
TODAS LAS TALLAS<br />
C PIJAMAS USE LAS PIEZAS 5 8 10 11 12 13<br />
CORTE UNA PIEZA 10<br />
4 44" 45" (115CM) CON PELUSA /<br />
TODAS LAS TALLAS<br />
D PIJAMAS USE LAS PIEZAS 8 10 11 12 13 15<br />
CORTE UNA PIEZA 10<br />
5 44" 45" (115CM) CON PELUSA /<br />
TODAS LAS TALLAS<br />
C,D ENTRETELA USE LAS PIEZAS 9 12<br />
6 22" A 25" (55CM A 64CM) ADHESIVA<br />
TODAS LAS TALLAS<br />
E BATA USE LAS PIEZAS 10 16 17 18<br />
7A 44" 45" (115CM) CON PELUSA/<br />
TODAS LAS TALLAS<br />
CORTE UNA PIEZA 10<br />
7B 58" 60" (150CM) CON PELUSA /<br />
TODAS LAS TALLAS<br />
SELVAGE (S) / SEL. (S) = ORILLO(S)<br />
FOLD = DOBLEZ
English/Spanish 3<br />
2 / 4<br />
<strong>3584</strong><br />
Sewing <strong>Directions</strong><br />
2<br />
FABRIC<br />
KEY<br />
Read <strong>General</strong> <strong>Directions</strong> on page 1 before you begin.<br />
About Knits<br />
Use polyester/cotton thread and ball point needles.<br />
Type Of Knit Fabrics Needle Stitches To<br />
Sizes Inch (2.5cm)<br />
Single Knit—usually lightweight jersey, 9, 11 10 - 12<br />
tricot. Most have 50% stretch.<br />
Double Knit—most often used in polyester 11, 14 10 - 12<br />
pants suits. Many have 18 — 25% stretch.<br />
Sweater Knit—loosely woven. 11, 14 10<br />
Most have 100% stretch.<br />
Swimwear, Power Net Knits— 14, 16 10 - 12<br />
2-way stretch. 100% stretch or more.<br />
Seam allowances are 5/8" (1.5cm)<br />
unless otherwise indicated. If you<br />
use a zig-zag machine ... use a<br />
narrow stitch, medium length; trim<br />
seam to 1/4" (6mm) and overcast<br />
edges together by machine. If you<br />
use a straight stitch ... stretch fabric<br />
as you sew (unless working on a<br />
firm double knit) and sew seams 2<br />
or 3 times close together.<br />
NOTE: A roller presser foot, used on double knits, will not stretch the top<br />
layer of fabric and thus keeps seams even. On single knits, it will not<br />
hold tricots and sometimes causes skipped stitches. For sweater knits, it<br />
is a must since yarn loops catch on a regular foot.<br />
1<br />
4<br />
RIGHT SIDE WRONG SIDE INTERFACING LINING<br />
© Copyright 2007—Simplicity Pattern Co., Inc. / Printed in U.S.A. / Simplicity is a registered trademark of Simplicity Pattern Co., Inc.<br />
3<br />
SIMPLY THE BEST TECHNIQUES FOR<br />
OVERLOCK SERGER<br />
The Serger can be used alone or as a supplement to your conventional<br />
sewing machine as a Fast, Efficient, Functional way to sew these<br />
garments.<br />
CHECK FIT: Because, Overlock sewing stitches, trims and finishes all in<br />
one operation, it is VERY important to Check Fit before stitching seams.<br />
Using matching color thread, baste seams and try garment on. If no<br />
adjustments are needed, overlock seams along basting.<br />
TWO THREAD THREE THREAD FOUR THREAD<br />
W/ SAFETY STITCH<br />
Seams: The three thread overlock is ideal for major seams such<br />
as...shoulder, side, underarm and sleeve seams.<br />
For stress areas such as crotch seams and armholes, the four thread<br />
overlock/safety stitch is best...OR, use a three thread overlock, and<br />
stitch along seam with a conventional machine to reinforce.<br />
Edge Finishes: The two or three thread overlock stitch is a perfect finish<br />
for edges of facings and hems...and a fast, easy Clean Finish for seam<br />
allowances in unlined garments where seams are pressed open.<br />
Rolled Hem: A great, Narrow Hem alternative for finishing circular skirts,<br />
ruffles, shawls and lingerie. See your sewing machine manual for<br />
instructions.<br />
PAJAMA TOP A, B<br />
ROLLED HEM<br />
1. To reinforce center front, stitch along stitching line, being<br />
careful not to stretch fabric as you sew.<br />
Clip to stitching at point of V-neckline, being careful not to clip<br />
through stitching, as shown.<br />
Stitch/Serge front to back at shoulder seams.<br />
2. Fold band in half, lengthwise, with WRONG sides together;<br />
press. Pin.<br />
3. Lap ends of neck band LEFT over RIGHT, or RIGHT over<br />
LEFT, having raw edges even; pin. This is the RIGHT side of<br />
your band.<br />
Machine-baste ends of neck band together along seam line,<br />
through all thicknesses.<br />
Machine-baste ends of neck band through center where<br />
folded edges meet, as shown.<br />
4. With RIGHT sides together, pin band to neck edge, matching<br />
center back, placing small dots at shoulder seams and<br />
lapped ends of band at center front at large dot, having raw<br />
edges even.<br />
Turn garment WRONG side out. Smooth out fullness at point<br />
of “V” and spread clipped edge apart, placing a pin 1”(2.5cm)<br />
each side of clip. Baste along seam line between pins<br />
keeping raw edges even.<br />
With band against the machine and garment toward you,<br />
stitch along seam line and along stitching line on neck edge,<br />
stretching band to fit and pivoting with needle in fabric at<br />
center front, as shown. To reinforce seam, stitch seam again<br />
1/4” (6mm) below first stitching.<br />
9<br />
12<br />
5<br />
11<br />
7<br />
6<br />
10<br />
8<br />
5. Trim seam close to second stitching; clip curves.<br />
Remove basting. Press seam toward garment, pressing band<br />
out.<br />
6. On OUTSIDE, top-stitch garment close to neck seam.<br />
7. With RIGHT sides together, pin sleeve to armhole edge with<br />
center small dot at shoulder seam, matching remaining small<br />
dots.<br />
Stitch. Stitch again 1/8" (3mm) from first stitching.<br />
Trim seam below notches close to stitching.<br />
Press seam toward sleeve.<br />
8. With RIGHT sides together, pin front to back at entire side<br />
seam, matching armhole seams. Stitch/Serge.<br />
9. FOR VIEW A- Press up hem along lower edge of sleeve.<br />
Stitch OR zig-zag 1/4" (6mm) from raw edge.<br />
10. FOR VIEW B- Press 5/8" (1.5cm) on lower edge of sleeve to<br />
INSIDE, forming casing. Press under 1/4" (6mm) on raw<br />
edge. Stitch close to upper edge of casing leaving an opening<br />
to insert elastic.<br />
11. Cut a piece of elastic for each sleeve to fit arm, plus 1"<br />
(2.5cm). Insert elastic through casing; adjust to fit.<br />
Stitch ends of elastic together securely.<br />
Stitch opening closed.<br />
CONTINUE AS FOLLOWS FOR VIEW A, B<br />
12. Press up hem along lower edge of top.<br />
Stitch OR zig-zag 1/4" (6mm) from raw edge.<br />
FOR VIEW B- If you prefer, hand-sew applique to front of<br />
pajama top, as shown on front of pattern envelope.
English/Spanish 3<br />
<strong>3584</strong><br />
2<br />
8<br />
10<br />
12<br />
4<br />
6<br />
3 / 4<br />
1<br />
9<br />
11<br />
5<br />
3<br />
© Copyright 2007—Simplicity Pattern Co., Inc. / Printed in U.S.A. / Simplicity is a registered trademark of Simplicity Pattern Co., Inc.<br />
13<br />
STAY-STITCHING<br />
7<br />
PAJAMA TOP C, D<br />
1. Stay-stitch front and back neck edges 1/2" (1.3cm) from cut<br />
edge in direction of arrows. This stitching stays in<br />
permanently and helps prevent stretching on curved edges.<br />
Stay-stitching will not be shown in the following illustrations.<br />
2. Apply fusible interfacing to WRONG side of front extension,<br />
placing straight edge along fold line, having outer edges<br />
even, following manufacturer’s directions. To EDGE FINISH<br />
long unnotched edge and shoulder edge of front<br />
extension...stitch 1/4" (6mm) from edge, turn under along<br />
stitching and stitch OR zig-zag over the edge OR overlock/<br />
serge over the edge.<br />
3. Press under 1/4" (6mm) on upper edge of pocket.<br />
Turn upper edge to OUTSIDE along fold line, forming facing.<br />
Stitch along seam line on raw edges; trim to 1/4" (6mm).<br />
4. Turn facing to INSIDE, turning under raw edges along<br />
stitching; press.<br />
Stitch facing close to inner edge.<br />
5. FOR VIEW D- To prepare all trim, pin lower long edge of<br />
ribbon over bound edge of pregathered lace trim. Stitch close<br />
to lower edge of ribbon.<br />
6. On OUTSIDE, pin combined trim to pocket placing upper<br />
edge of ribbon along finished edge of pocket, turning under<br />
ends.<br />
Stitch close to both long edges of ribbon.<br />
CONTINUE AS FOLLOWS FOR VIEW C, D<br />
7. On OUTSIDE, pin pocket to front placing upper corners at<br />
large dots.<br />
Stitch close to side and lower edges.<br />
8. Stitch front to back at shoulder seams.<br />
9. Pin fusible interfacing to WRONG side of collar. Cut<br />
diagonally across corners that will be enclosed with seams.<br />
Fuse interfacing in place, following manufacturer’s directions.<br />
Machine-stitch 5/8" (1.5cm) from notched edge of collar. Clip<br />
notched edge of collar to stitching at small dots.<br />
10. Press under 5/8" (1.5cm) on raw edge between clips. Trim to<br />
1/4" (6mm). With RIGHT sides together, stitch facing to collar,<br />
leaving notched edges open. Trim seam and corners.<br />
Turn collar; press.<br />
11. FOR VIEW C- On OUTSIDE, top-stitch collar 1/4" (6mm)<br />
from finished edges.<br />
CONTINUE AS FOLLOWS FOR VIEW C, D<br />
12. Clip neck edge of garment to stay-stitching. On OUTSIDE,<br />
pin collar (facing side) to neck edge, matching centers back,<br />
placing small dot at shoulder seam and front end at center<br />
front. Baste both collar and facing sections to front neck edge<br />
as far as small dot. Baste only the collar facing section to<br />
remaining neck edge between small dots.<br />
13. Turn front extension to OUTSIDE along fold line, forming<br />
facing; baste to neck edge. Clip neck edge though all<br />
thicknesses at small dot. Stitch entire neck edge as basted,<br />
being careful not to catch in free edge of collar. Trim seam;<br />
clip curves.<br />
18<br />
20<br />
16<br />
2<br />
22<br />
14<br />
21<br />
17<br />
19<br />
1<br />
15<br />
3<br />
INNER<br />
LEG<br />
SEAM<br />
14. Turn facing to INSIDE, turning back neck seam toward collar;<br />
press. Baste. To keep facing in place, tack facing to shoulder<br />
seam allowance by tacking it by hand or using a small piece<br />
of fusible web.<br />
15. On OUTSIDE, stitch in the ditch or groove of collar seam<br />
between shoulder seams.<br />
16. With RIGHT sides together, pin sleeve to armhole edge with<br />
center small dot at shoulder seam, matching remaining small<br />
dots.<br />
Stitch. Stitch again 1/8" (3mm) from first stitching.<br />
Trim seam below notches close to stitching.<br />
Press seam toward sleeve.<br />
17. Stitch front to back at entire underarm seam matching<br />
armhole seams.<br />
18. Press up hem along lower edge of sleeve.<br />
Press under 1/4" (6mm) on raw edge.<br />
Stitch close to inner pressed edge.<br />
19. FOR VIEW D- On OUTSIDE, pin combined trim to sleeve<br />
placing upper edge of ribbon 1" (2.5cm) above lower edge of<br />
sleeve, turning under and lapping one end at underarm<br />
seam. Stitch close to both long edges of ribbon.<br />
CONTINUE AS FOLLOWS FOR VIEW C, D<br />
20. Turn facing to OUTSIDE.<br />
Stitch across facing along hem marking.<br />
Trim facing close to stitching.<br />
Trim garment to within 5/8" (1.5cm) of inner edge of facing.<br />
21. Turn facing to INSIDE; press. Press up hem.<br />
Press under 1/4" (6mm) on raw edge.<br />
Stitch hem in place starting at opening edge.<br />
22. To mark buttonholes in RIGHT or LEFT front place guide<br />
along finished edge of garment, matching centers, as shown.<br />
Transfer buttonhole markings to garment. Make buttonholes<br />
at markings. Lap fronts, matching centers. Sew buttons under<br />
buttonholes.<br />
PAJAMA PANTS A, B, C, D<br />
1. FOR VIEW D-Press up hem.<br />
Press under 1/4" (6mm) on raw edge.<br />
Stitch close to inner pressed edge.<br />
2. On OUTSIDE, pin upper row of combined trim to front and<br />
back section placing upper edge of ribbon 2-1/2" (6.3cm)<br />
above lower edge. Stitch close to both long edges of ribbon.<br />
Pin lower row of trim to pajama front and back placing upper<br />
edge of ribbon 1-1/4 (3.2cm) above lower edge. Stitch in<br />
same manner.<br />
CONTINUE AS FOLLOWS FOR VIEW A, B, C, D<br />
3. Stitch inner leg seam of each pant section.
English/Spanish 3<br />
<strong>3584</strong><br />
4<br />
7<br />
6<br />
9<br />
4 / 4<br />
FUSIBLE WEB MACHINE-BASTING<br />
INWARD CURVE OUTWARD CURVE<br />
Curves<br />
© Copyright 2007—Simplicity Pattern Co., Inc. / Printed in U.S.A. / Simplicity is a registered trademark of Simplicity Pattern Co., Inc.<br />
8<br />
5<br />
CENTER<br />
BACK<br />
Double Fold<br />
Bias Tape<br />
Ends<br />
CENTER<br />
FRONT<br />
4. With RIGHT sides together, insert one pant leg INSIDE the<br />
other.<br />
5. With RIGHT sides together, pin center seam, matching inner<br />
leg seams and notches. Stitch.<br />
To reinforce seam, stitch again over first stitching. Trim seam<br />
in curved area to 1/4" (6mm). Press remaining seam open.<br />
6. To keep elastic from getting stuck in the seam allowances as<br />
it’s inserted, use fusible web or machine-basting to anchor<br />
them to garment within the casing area.<br />
Be sure to remove basting after casing is finished.<br />
7. Press 1-1/4" (3.2cm) on upper edge to INSIDE, forming<br />
casing. Press under 1/4" (6mm) on raw edge.<br />
Stitch close to lower edge of casing, leaving an opening to<br />
insert elastic.<br />
8. Cut a piece of elastic to fit waist, plus 1" (2.5cm).<br />
Insert elastic through casing.<br />
Overlap ends and hold with a safety pin.<br />
Try on garment and adjust to fit.<br />
Stitch ends of elastic together securely.<br />
Stitch opening closed.<br />
Distribute fullness evenly. Remove basting.<br />
TIP-To secure elastic so it won’t twist in wearing, stitch<br />
through all thicknesses of casing in the groove of each seam.<br />
9. HEM A, B, C- Press up hem.<br />
Press under 1/4" (6mm) on raw edge.<br />
Stitch close to inner pressed edge.<br />
ROBE E<br />
SIMPLY THE BEST DIRECTIONS FOR<br />
APPLYING DOUBLE FOLD BIAS TAPE<br />
The tape comes prefolded, with one side slightly wider than<br />
the other. The wider side is to be used on the WRONG side<br />
of the garment so that when the tape is stitched in place from<br />
the RIGHT side, both edges are sure to be caught in the<br />
stitching.<br />
Curves:<br />
If tape is applied to a curved surface, first, preshape it with a<br />
steam iron.<br />
For an inward curve, stretch the double edges and press; for<br />
an outward curve, stretch the fold edge and press.<br />
Ends:<br />
Turn tape ends under to finish or enclose in the seam when<br />
possible.<br />
When tape completely encloses an edge, arrange to have<br />
ends meet at a seam; then turn both ends under where they<br />
meet and tack together invisibly after stitching on tape.<br />
1<br />
STAY-STITCHING<br />
4<br />
5<br />
7<br />
6<br />
3<br />
2<br />
1. Stay-stitch front and back neck edges 1/2" (1.3cm) from cut<br />
edge in direction of arrows.<br />
This stitching stays in permanently and helps prevent<br />
stretching on curved edges.<br />
Stay-stitching will not be shown in the following illustrations.<br />
2. Trim away 1" (2.5cm) from upper edge of pocket section.<br />
Encase upper edge of pocket with double fold trim.<br />
See SIMPLY THE BEST DIRECTIONS FOR APPLYING<br />
DOUBLE FOLD BIAS TAPE.<br />
Stitch along seam line on raw edges; trim to 1/4" (6mm).<br />
3. ON INSIDE, turn under raw edges along stitching; press.<br />
Apply pocket same as for View C, D, see step 8.<br />
Continue same as for View C, D, see step 7.<br />
4. Cut a piece of bias tape, 6" (15cm) long for loops.<br />
On OUTSIDE, edge-stitch both pressed edges of tape.<br />
Cut two pieces, each 3" (7.5cm) long.<br />
Fold tape in half, forming loop. Pin tape to side edge of front<br />
centered over large dot, having raw edges even.<br />
Continue same as for View A, B, 7.<br />
5. Stitch front to back at entire underarm seam, matching<br />
armhole seams.<br />
6. Press up hem.<br />
Press under 1/4" (6mm) on raw edge.<br />
Stitch close to inner pressed edge.<br />
OR<br />
If you find that your fabric curls at raw edge of hem, zig-zag or<br />
overlock/serge over the edge then stitch hem in place.<br />
7. Encase front and neck edge of robe with double fold bias<br />
tape.<br />
Encase lower edge of each sleeve turning under ends at<br />
underarm seams.<br />
See SIMPLY THE BEST DIRECTIONS FOR APPLYING<br />
DOUBLE FOLD BIAS TAPE.<br />
Cut a piece of tape 56" (143cm) long for tie. Edge-stitch both<br />
pressed edges. Tie ends in a knot. Insert through loops and<br />
tie in a bow when garment is worn.


