AVS Image Converter help in PDF Download - AVS4YOU >> Online ...
AVS Image Converter help in PDF Download - AVS4YOU >> Online ... AVS Image Converter help in PDF Download - AVS4YOU >> Online ...
AVS4YOU Programs Help - AVS Image Converter Page 32 of 48 Editing Images AVS Image Converter gives you a possibility to edit your image files before converting them. Please refer to the appropriate sections to learn more about the editing options offered by the AVS Image Converter program. Resizing Images This chapter gives you information about the available resizing options. Correcting Images Refer to this chapter to read about correction options available in AVS Image Converter and learn how to apply them. Adding Watermark You can add a text or image watermark to your images if you want to copyright them. In this chapter you will find all the necessary instructions how to do that. Resizing Images AVS Image Converter allows you to resize a bunch of digital pictures before conversion. The program offers a number of presets which can be used to fit your images to most popular printing formats or to an avatar size, to send them via e-mail or post them on the web sites. To use one of the available presets switch to the Conversion tab and select the desired one from the Preset drop-down list in the Resize section. If you need to fit your images to a particular size you can create your custom preset. Click the Advanced >> button near the Preset field. In the opened Resize panel open the drop-down list and choose one of the following options: © Online Media Technologies Ltd., UK 2004 - 2012 All rights reserved. www.avs4you.com
AVS4YOU Programs Help - AVS Image Converter Page 33 of 48 Original Size — select this option to preserve your original image file size. Set output size — select this option to adjust your images according to the specified width and height. Enter the necessary values in the boxes below this field using the arrow buttons or the keyboard. By Width — select this option to adjust your images according to the specified width. Set the necessary Width value in the box below this field using the arrow buttons or the keyboard. By Height - select this option to adjust your images according to the specified height. Set the necessary Height value in the box below this field using the arrow buttons or the keyboard. When you change the height and width values manually the image proportions can get affected. Some image areas might be cut out and lost. To avoid this make sure the following options are checked: The Keep original proportion box selected by default allows you to keep the original image aspect. In this case the output image width and height may differ from the values set in the Resize section. The output image parameters are displayed at the bottom of the image within the Preview Area if the Show Output File Info option is checked in the View section of the Main Menu. Image resized without keeping the original proportion Image resized keeping the original proportion In case you need to get the file of a particular size keeping the original image aspect you can add the stripes checking the corresponding box and selecting the necessary Color. © Online Media Technologies Ltd., UK 2004 - 2012 All rights reserved. www.avs4you.com
- Page 1 and 2: AVS4YOU Programs Help AVS Image Con
- Page 3 and 4: AVS4YOU Programs Help - AVS Image C
- Page 5 and 6: AVS4YOU Programs Help - AVS Image C
- Page 7 and 8: AVS4YOU Programs Help - AVS Image C
- Page 9 and 10: AVS4YOU Programs Help - AVS Image C
- Page 11 and 12: AVS4YOU Programs Help - AVS Image C
- Page 13 and 14: AVS4YOU Programs Help - AVS Image C
- Page 15 and 16: AVS4YOU Programs Help - AVS Image C
- Page 17 and 18: AVS4YOU Programs Help - AVS Image C
- Page 19 and 20: AVS4YOU Programs Help - AVS Image C
- Page 21 and 22: AVS4YOU Programs Help - AVS Image C
- Page 23 and 24: AVS4YOU Programs Help - AVS Image C
- Page 25 and 26: AVS4YOU Programs Help - AVS Image C
- Page 27 and 28: AVS4YOU Programs Help - AVS Image C
- Page 29 and 30: AVS4YOU Programs Help - AVS Image C
- Page 31: AVS4YOU Programs Help - AVS Image C
- Page 35 and 36: AVS4YOU Programs Help - AVS Image C
- Page 37 and 38: AVS4YOU Programs Help - AVS Image C
- Page 39 and 40: AVS4YOU Programs Help - AVS Image C
- Page 41 and 42: AVS4YOU Programs Help - AVS Image C
- Page 43 and 44: AVS4YOU Programs Help - AVS Image C
- Page 45 and 46: AVS4YOU Programs Help - AVS Image C
- Page 47 and 48: AVS4YOU Programs Help - AVS Image C
<strong>AVS</strong>4YOU Programs Help - <strong>AVS</strong> <strong>Image</strong> <strong>Converter</strong> Page 32 of 48<br />
Edit<strong>in</strong>g <strong>Image</strong>s<br />
<strong>AVS</strong> <strong>Image</strong> <strong>Converter</strong> gives you a possibility to edit your image files before convert<strong>in</strong>g them.<br />
Please refer to the appropriate sections to learn more about the edit<strong>in</strong>g options offered by the <strong>AVS</strong> <strong>Image</strong> <strong>Converter</strong> program.<br />
Resiz<strong>in</strong>g <strong>Image</strong>s<br />
This chapter gives you <strong>in</strong>formation about the available resiz<strong>in</strong>g options.<br />
Correct<strong>in</strong>g <strong>Image</strong>s<br />
Refer to this chapter to read about correction options available <strong>in</strong> <strong>AVS</strong> <strong>Image</strong> <strong>Converter</strong> and learn how to apply them.<br />
Add<strong>in</strong>g Watermark<br />
You can add a text or image watermark to your images if you want to copyright them. In this chapter you will f<strong>in</strong>d all the<br />
necessary <strong>in</strong>structions how to do that.<br />
Resiz<strong>in</strong>g <strong>Image</strong>s<br />
<strong>AVS</strong> <strong>Image</strong> <strong>Converter</strong> allows you to resize a bunch of digital pictures before conversion.<br />
The program offers a number of presets which can be used to fit your images to most popular pr<strong>in</strong>t<strong>in</strong>g formats or to an avatar size,<br />
to send them via e-mail or post them on the web sites.<br />
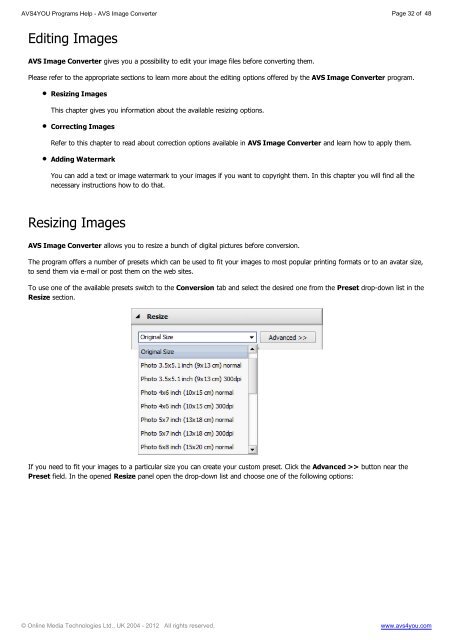
To use one of the available presets switch to the Conversion tab and select the desired one from the Preset drop-down list <strong>in</strong> the<br />
Resize section.<br />
If you need to fit your images to a particular size you can create your custom preset. Click the Advanced >> button near the<br />
Preset field. In the opened Resize panel open the drop-down list and choose one of the follow<strong>in</strong>g options:<br />
© Onl<strong>in</strong>e Media Technologies Ltd., UK 2004 - 2012 All rights reserved. www.avs4you.com


