You also want an ePaper? Increase the reach of your titles
YUMPU automatically turns print PDFs into web optimized ePapers that Google loves.
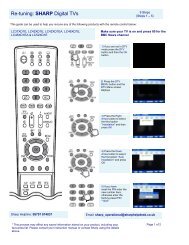
3 x HDMI<br />
Inputs<br />
7. Connections.<br />
IMPORTANT. When making connections ensure the TV is disconnected from the MAINS supply<br />
input, and that the appliance being connected is also disconnected from the mains supply.<br />
POWER INPUT : Mains supply input. 100 – 240V 50/60 Hz<br />
USB. : PVR interface.<br />
HDMI 1, 2, 3. : 3 x Inputs from HDMI source (High Definition).<br />
VGA. : PC input (RGB).<br />
PC AUDIO. : Stereo audio input from PC (Used in conjunction with VGA input).<br />
SCART. : Audio /Video input and output. (General quality).<br />
CI SLOT. : Place a CAM (Conditional Access Module) into this point to allow a “Pay per View” card.<br />
CVBS. : Low quality video input (1vPP 75 Ω).<br />
AUDIO L/R. : Low level audio inputs used in conjunction with CVBS and Y,Pb,Pr.<br />
Y,Pb,Pr. : Interlace or Sequential Component Video Input, “typical use PS3 or X Box”.<br />
TUNER. : RF input from TV aerial or cable source.( 1 m/V @ 75 Ω) typical.<br />
HEAD PHONES : Stereo output to headphones only.<br />
Connect HDMI input.<br />
Use SOURCE button to select<br />
HDMI 1, 2 or 3<br />
Typical connections<br />
8<br />
8<br />
CVBS/<br />
AV<br />
Input<br />
Connect CVBS and<br />
Audio L/R (if required).<br />
Use SOURCE button to<br />
select AV<br />
Headphones.<br />
Plug in headphones.<br />
Set volume level for<br />
comfortable listening.<br />
Note :- Do NOT use<br />
headphones at high<br />
volume levels for<br />
prolonged periods.<br />
7