APC Smart-UPS 5000 User Manual - ExcessUPS
APC Smart-UPS 5000 User Manual - ExcessUPS
APC Smart-UPS 5000 User Manual - ExcessUPS

You also want an ePaper? Increase the reach of your titles
YUMPU automatically turns print PDFs into web optimized ePapers that Google loves.
Determine the Location of the <strong>UPS</strong> in the Rack (continued)<br />
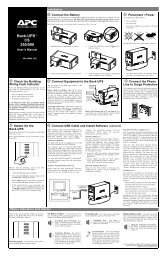
Install the Mounting Rails in the Rack<br />
1<br />
Remove the two screws that hold the rails together so<br />
that the rails can slide outward . Do not detach the rails.<br />
3<br />
<br />
<br />
Expand the rails so that it spans from the front rack post to<br />
the back rack post. Replace the two screws (removed in<br />
step 1) that hold the rail sections together.<br />
<br />
1. Determine where in the rack you’ll mount the <strong>UPS</strong>. The SU<strong>5000</strong><br />
requires a space of 5U. Some racks have tick marks to indicate<br />
the U-spaces.<br />
2. Using the mounting template provided (part number 990-0195),<br />
identify and mark the correct mounting holes for the <strong>UPS</strong><br />
mounting brackets.<br />
3. Locate and mark the bottom hole in the designated U-space .<br />
The bottom screw on the mounting rail will attach to the bottom<br />
hole in the U-space.<br />
4. Repeat steps 3 and 4 for the remaining three rack posts.<br />
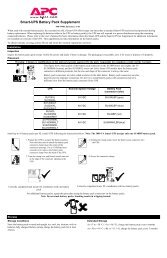
5. Prepare the rack holes, if necessary. Racks with threaded holes<br />
require no preparation.<br />
3<br />
If your rack has round holes, insert clip nuts (provided) into<br />
the holes in step 2.<br />
If your rack has square holes, insert either clip or cage<br />
nuts into the holes marked in step 2 (cage nut shown).<br />
2<br />
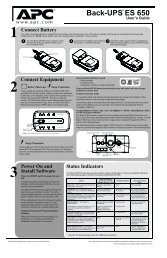
Front<br />
Align the bottom hole on the mounting rail with the bottom<br />
hole in the U-space (marked in step 3 above). Use the flat,<br />
Phillips head screws (10-32) and conical washers to attach<br />
the front rail to the rack. Position the rails so that the lip of<br />
the rail is on the bottom.<br />
4<br />
Back<br />
Attach the rail to the back rack post using the same<br />
hardware (10-32 flat head screws and conical washers)<br />
used in step 2. Repeat the process for the other rails.<br />
Caution:<br />
990-7032A, Revision 3 7/01