Smart-UPS Battery Pack Supplement - APC Media
Smart-UPS Battery Pack Supplement - APC Media
Smart-UPS Battery Pack Supplement - APC Media

Create successful ePaper yourself
Turn your PDF publications into a flip-book with our unique Google optimized e-Paper software.
<strong>Smart</strong>-<strong>UPS</strong> <strong>Battery</strong> <strong>Pack</strong> <strong>Supplement</strong><br />
990-7990A Revision 2 1 98<br />
When used with external battery packs, the extended run (XL) <strong>Smart</strong>-<strong>UPS</strong> offers longer run times than a standard <strong>Smart</strong>-<strong>UPS</strong> and extra load protection during<br />
battery replacement. When replacing the batteries either in the <strong>UPS</strong> or battery pack(s), the <strong>UPS</strong> can still respond to a power disturbance using the remaining<br />
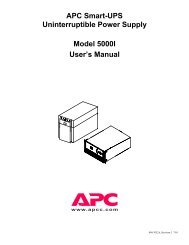
connected batteries. Please refer to the User’s Manual for basic information about the <strong>Smart</strong>-<strong>UPS</strong> and the <strong>Smart</strong>-<strong>UPS</strong> XL <strong>Supplement</strong> for additional information<br />
on extended run versions of the <strong>UPS</strong>. This supplement provides information on the battery packs.<br />
To obtain warranty coverage, please fill out and return the warranty registration card now.<br />
Installation<br />
Inspection<br />
Inspect the battery pack upon receipt. Notify the carrier and dealer if there is damage. The packaging is recyclable; save it for reuse or dispose of it properly.<br />
Placement<br />
Warning: Changes or modifications to this unit not expressly approved by the party responsible for compliance could void the warranty.<br />
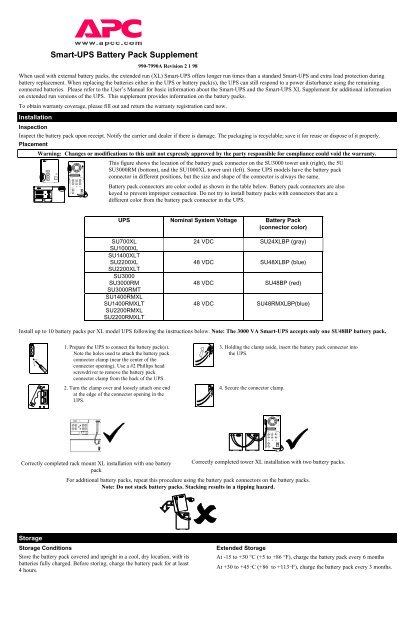
This figure shows the location of the battery pack connector on the SU3000 tower unit (right), the 5U<br />
SU3000RM (bottom), and the SU1000XL tower unit (left). Some <strong>UPS</strong> models have the battery pack<br />
connector in different positions, but the size and shape of the connector is always the same.<br />
<strong>Battery</strong> pack connectors are color coded as shown in the table below. <strong>Battery</strong> pack connectors are also<br />
keyed to prevent improper connection. Do not try to install battery packs with connectors that are a<br />
different color from the battery pack connector in the <strong>UPS</strong>.<br />
<strong>UPS</strong> Nominal System Voltage <strong>Battery</strong> <strong>Pack</strong><br />
(connector color)<br />
SU700XL<br />
SU1000XL<br />
SU1400XLT<br />
SU2200XL<br />
SU2200XLT<br />
SU3000<br />
SU3000RM<br />
SU3000RMT<br />
SU1400RMXL<br />
SU1400RMXLT<br />
SU2200RMXL<br />
SU2200RMXLT<br />
24 VDC SU24XLBP (gray)<br />
48 VDC SU48XLBP (blue)<br />
48 VDC SU48BP (red)<br />
48 VDC SU48RMXLBP(blue)<br />
Install up to 10 battery packs per XL model <strong>UPS</strong> following the instructions below. Note: The 3000 VA <strong>Smart</strong>-<strong>UPS</strong> accepts only one SU48BP battery pack.<br />
1. Prepare the <strong>UPS</strong> to connect the battery pack(s).<br />
Note the holes used to attach the battery pack<br />
connector clamp (near the center of the<br />
connector opening). Use a #2 Phillips head<br />
screwdriver to remove the battery pack<br />
connector clamp from the back of the <strong>UPS</strong>.<br />
2. Turn the clamp over and loosely attach one end<br />
at the edge of the connector opening in the<br />
<strong>UPS</strong>.<br />
Correctly completed rack mount XL installation with one battery<br />
pack<br />
Storage<br />
Storage Conditions<br />
3. Holding the clamp aside, insert the battery pack connector into<br />
the <strong>UPS</strong>.<br />
4. Secure the connector clamp.<br />
Correctly completed tower XL installation with two battery packs.<br />
For additional battery packs, repeat this procedure using the battery pack connectors on the battery packs.<br />
Note: Do not stack battery packs. Stacking results in a tipping hazard.<br />
Store the battery pack covered and upright in a cool, dry location, with its<br />
batteries fully charged. Before storing, charge the battery pack for at least<br />
4 hours.<br />
Extended Storage<br />
At -15 to +30 °C (+5 to +86 °F), charge the battery pack every 6 months<br />
At +30 to +45 °C (+86 to +113 °F), charge the battery pack every 3 months.
<strong>Battery</strong> Charge and Run Times<br />
A floppy disk is shipped with each battery pack to configure your <strong>Smart</strong>-<strong>UPS</strong> for use with each new battery pack added. Your <strong>Smart</strong>-<strong>UPS</strong> needs to be configured<br />
appropriately so that it can better calculate the discharge time. Connect the <strong>UPS</strong>’ port to a serial port on a PC or workstation running DOS or Windows, by using<br />
the black colored communications cable included. Next, while at the DOS prompt, insert the floppy disk into a drive and change to that drive’s letter (e.g.. A:)<br />
Then type: battpack com[X] [Y], where [X] = 1 or 2 depending on the serial port used, and [Y] = number of battery packs attached to the <strong>UPS</strong>.<br />
The <strong>Smart</strong>-<strong>UPS</strong> XL <strong>Supplement</strong> contains tables showing both the time required for charging <strong>UPS</strong> and battery pack batteries for rated protection and typical run<br />
times.<br />
Note: When configuring a <strong>Smart</strong>-<strong>UPS</strong> for use with an SU48RMXLBP, remember that one SU48RMXLBP is equivalent to two battery packs of any<br />
other model.<br />
Replacing the <strong>Battery</strong><br />
This battery pack has easy to replace hot-swappable batteries. <strong>Battery</strong> replacement is a safe procedure, isolated from electrical hazards. You may leave the <strong>UPS</strong><br />
and loads on for the following procedure. See your dealer or call the number in this manual for information on replacement battery kits.<br />
Note: Please read the cautions in the <strong>APC</strong> Safety Guide. Save your data before beginning this procedure. Once the battery is disconnected, the loads<br />
are not protected from power outages.<br />
<strong>Battery</strong> Replacement Procedure - Rack Mount XL <strong>Battery</strong> <strong>Pack</strong>s <strong>Battery</strong> Replacement Procedure - Tower XL <strong>Battery</strong> <strong>Pack</strong>s<br />
Specifications<br />
1. Reach into the finger pull and remove the front cover.<br />
2. Use a flat-blade, screwdriver or coin to remove the battery<br />
door screws and open the door.<br />
Warning! Do not force the battery out. This may<br />
damage internal wiring!<br />
3. Disconnect the battery connector by pulling on the white<br />
cord on the side of the battery.<br />
4. Slide the battery out of the battery pack.<br />
5. Remove the foam separator.<br />
6. Repeat steps 3 - 5 for the second battery.<br />
7. Repeat steps 3 - 6 for the two batteries on the other side of<br />
the battery pack.<br />
Note: Be careful removing the batteries - they are<br />
heavy..<br />
8. Slide the new battery into the battery pack.<br />
9. Connect the battery connector<br />
Note: Small sparks at the battery connectors are normal<br />
during connection.<br />
10. Push the battery in as far as it will go. There are stops in<br />
the back to prevent it from going too far.<br />
11. Replace the foam separator.<br />
12. Repeat steps 8 - 10 for the second battery.<br />
13. Repeat steps 8 - 12 for the two batteries on the other side<br />
of the battery pack.<br />
14. Close the battery door, replace the battery compartment<br />
screws, and replace the front cover.<br />
15. Dispose of the old battery properly at an appropriate<br />
recycling facility or return it to the supplier in the packing<br />
material for the new battery. See the new battery<br />
instructions for more information.<br />
All Models<br />
<strong>Battery</strong> Type Valve-regulated, sealed, lead-acid<br />
Typical <strong>Battery</strong> Life 3 to 6 years, depending on number of discharge<br />
cycles and ambient temperature<br />
Operating Temperature 0 to 40°C (+32 to +104°F)<br />
Storage Temperature -15 to 45°C (+5 to _113°F)<br />
Operating and Storage<br />
Relative Humidity<br />
0 to 95%, non-condensing<br />
Operating Elevation 0 to +3,000 m (0 to +10,000 ft.)<br />
Storage Elevation 0 to +15,000 m (0 to +50,000 ft.)<br />
Size (H x W x D) Tower:<br />
21.6 x 17.0 x 43.9 cm<br />
(8.5 x 6.7 x 17.3 in.)<br />
Weight - net (shipping) 31.3 (33.1) kg<br />
69.0 (73.0) lb.<br />
Rack Mount:<br />
17.8 x 48.3 x 45.7 cm<br />
(7.0 x 19.0 x 18.0 in.)<br />
61.7 (69.4) kg<br />
136.0 (153.0) lb.<br />
Service Contacts<br />
1. Grasp the side of the front cover and tilt it out and down.<br />
2. Unhook the bottom of the cover from the chassis and<br />
remove it to expose the battery door<br />
3. Use a flat-blade screwdriver or a coin to remove the two<br />
battery door screws and open the door.<br />
4. Pull the white cord on the front battery connector to remove<br />
the battery connector.<br />
5. Grasp the tab and gently pull the battery out of the battery<br />
pack.<br />
6. Reach into the battery compartment and grasp the white<br />
cord on the other battery connector. Pull firmly to<br />
disconnect the connector and remove the second set of<br />
batteries.<br />
Note: Be careful removing the batteries - they are heavy..<br />
8. Slide the first set of new batteries into the unit. Hold the<br />
connector down below the top of the batteries and toward<br />
the door, otherwise the assembly will not fit. Guide the<br />
connector over the top of the batteries and press firmly to<br />
connect it to the rear connector of the battery compartment.<br />
Note: Small sparks at the battery connectors are normal<br />
during connection.<br />
9. Slide the second set of batteries in, then guide the<br />
connector over the batteries and press firmly to connect it<br />
to the front connector of the battery compartment.<br />
10. Now close the battery door, replace the screws, and<br />
replace the front cover.<br />
11. Dispose of the old battery properly at an appropriate<br />
recycling facility or return it to the supplier in the packing<br />
material for the new battery. See the new battery<br />
instructions for more information.<br />
North & Latin America Europe<br />
<strong>APC</strong> <strong>APC</strong><br />
132 Fairgrounds Road Ballybritt Business Park<br />
West Kingston, Rhode Island Galway, Ireland 10800-<br />
02892 USA<br />
702000<br />
1-800-800-4<strong>APC</strong>/1-401-789-5735 353-91-702020<br />
E-Mail:<br />
Internet: http://www.apcc.com<br />
E-Mail:<br />
North America: apctech@apcc.com<br />
Latin America: apctchla@apcc.com<br />
apceurtech@apcc.com