WebAccess and its modules for ECL Comfort 200 / 300 - Danfoss.com
WebAccess and its modules for ECL Comfort 200 / 300 - Danfoss.com
WebAccess and its modules for ECL Comfort 200 / 300 - Danfoss.com

Create successful ePaper yourself
Turn your PDF publications into a flip-book with our unique Google optimized e-Paper software.
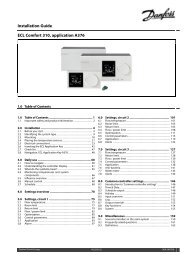
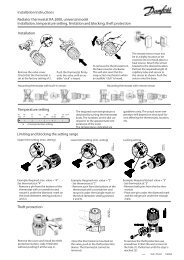
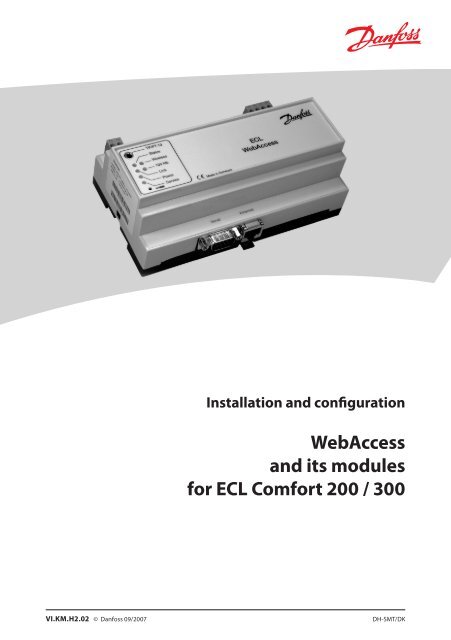
Installation <strong>and</strong> configuration<br />
<strong>WebAccess</strong><br />
<strong>and</strong> <strong>its</strong> <strong>modules</strong><br />
<strong>for</strong> <strong>ECL</strong> Com<strong>for</strong>t <strong>200</strong> / <strong>300</strong><br />
VI.KM.H2.02 © <strong>Danfoss</strong> 09/<strong>200</strong>7 DH-SMT/DK
<strong>WebAccess</strong><br />
Application principle<br />
2 VI.KM.H2.02 © <strong>Danfoss</strong> 09/<strong>200</strong>7 DH-SMT/DK<br />
<strong>WebAccess</strong><br />
Table of Contents<br />
Be<strong>for</strong>e you start .......................................................................2<br />
System requirements ..................................................................................... 2<br />
Installation address ......................................................................................... 2<br />
IP addresses* ...................................................................................................... 2<br />
E-mail accounts ................................................................................................. 2<br />
<strong>ECL</strong> name (menu location 1-4) .................................................................... 2<br />
Heat meters ........................................................................................................ 3<br />
Pulse interface 1 ............................................................................................... 3<br />
Pulse interface 2 ............................................................................................... 3<br />
Pulse interface 3 ............................................................................................... 4<br />
Pulse interface 4 ............................................................................................... 4<br />
Analog interface 1............................................................................................ 5<br />
Analog interface 2............................................................................................ 5<br />
LON wiring ...............................................................................6<br />
Wiring to the <strong>ECL</strong> Com<strong>for</strong>t controller ....................................7<br />
LAN / Ethernet wiring .............................................................9<br />
Powering up ..........................................................................10<br />
Ethernet configuration .........................................................10<br />
Configuration of <strong>ECL</strong> Com<strong>for</strong>t controllers ........................... 11<br />
Configuration of <strong>modules</strong> ....................................................12<br />
Configuration of input channels ..........................................13<br />
IP configuration .....................................................................14<br />
Light emitting diodes ...........................................................15<br />
WAH analog interface ...........................................................16<br />
WAH pulse interface .............................................................17<br />
Screen examples ...................................................................18<br />
DH-SMT/DK VI.KM.H2.02 © <strong>Danfoss</strong> 09/<strong>200</strong>7 3
<strong>WebAccess</strong><br />
Be<strong>for</strong>e you start<br />
System requirements<br />
• Microsoft Explorer 6.xx browser or later versions<br />
• Adobe SVG Viewer 3.xx or later versions<br />
• Intranet / Internet connection<br />
It is strongly re<strong>com</strong>mended to write down the in<strong>for</strong>mation that may be<br />
needed on a later occasion.<br />
Installation address<br />
IP addresses*<br />
• IP address (fixed)<br />
• Subnet mask<br />
• Default gateway<br />
* All addresses must be written as dig<strong>its</strong><br />
E-mail accounts<br />
Name SMTP addresses*<br />
* All addresses must be written as dig<strong>its</strong><br />
<strong>ECL</strong> name (menu location 1-4)<br />
1 3<br />
2 4<br />
Menu option: Configuration / Installation address<br />
Menu option: Configuration / IP addresses<br />
Menu option: Configuration / E-mail accounts<br />
Menu option: Configuration / Un<strong>its</strong><br />
2 VI.KM.H2.02 © <strong>Danfoss</strong> 09/<strong>200</strong>7 DH-SMT/DK<br />
<strong>WebAccess</strong><br />
Heat meters<br />
<strong>ECL</strong> menu location Menu label<br />
1 2 3 4<br />
1 2 3 4<br />
1 2 3 4<br />
1 2 3 4<br />
1 2 3 4<br />
Pulse interface 1<br />
<strong>ECL</strong> menu location Menu label<br />
1 2 3 4<br />
Description Pulse factor Unit<br />
Pulse interface 2<br />
<strong>ECL</strong> menu location Menu label<br />
1 2 3 4<br />
Menu option: Configuration / Un<strong>its</strong> / Additional <strong>modules</strong> / Add (Edit)<br />
Menu option: Configuration / Un<strong>its</strong> / Additional <strong>modules</strong> / Add (Edit)<br />
Description Pulse factor Unit<br />
/<br />
/<br />
/<br />
/<br />
Menu option: Configuration / Un<strong>its</strong> / Additional <strong>modules</strong> / Add (Edit)<br />
/<br />
/<br />
/<br />
/<br />
DH-SMT/DK VI.KM.H2.02 © <strong>Danfoss</strong> 09/<strong>200</strong>7 3
<strong>WebAccess</strong><br />
Pulse interface 3<br />
<strong>ECL</strong> menu location Menu label<br />
1 2 3 4<br />
Description Pulse factor Unit<br />
Pulse interface 4<br />
<strong>ECL</strong> menu location Menu label<br />
1 2 3 4<br />
4 VI.KM.H2.02 © <strong>Danfoss</strong> 09/<strong>200</strong>7 DH-SMT/DK<br />
<strong>WebAccess</strong><br />
Analog interface 1<br />
Menu option: Configuration / Un<strong>its</strong> / Additional <strong>modules</strong> / Add (Edit) Menu option: Configuration / Un<strong>its</strong> / Additional <strong>modules</strong> / Add (Edit)<br />
/<br />
/<br />
/<br />
/<br />
Menu option: Configuration / Un<strong>its</strong> / Additional <strong>modules</strong> / Add (Edit)<br />
Description Pulse factor Unit<br />
/<br />
/<br />
/<br />
/<br />
<strong>ECL</strong> menu location Menu label<br />
1 2 3 4<br />
Description<br />
Analog interface 2<br />
Range<br />
0 V 10 V<br />
<strong>ECL</strong> menu location Menu label<br />
1 2 3 4<br />
Description<br />
Range<br />
0 V 10 V<br />
Unit<br />
Menu option: Configuration / Un<strong>its</strong> / Additional <strong>modules</strong> / Add (Edit)<br />
Unit<br />
DH-SMT/DK VI.KM.H2.02 © <strong>Danfoss</strong> 09/<strong>200</strong>7 5
<strong>WebAccess</strong><br />
LON wiring<br />
6 VI.KM.H2.02 © <strong>Danfoss</strong> 09/<strong>200</strong>7 DH-SMT/DK<br />
<strong>WebAccess</strong><br />
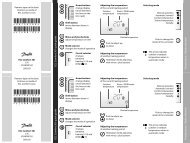
Wiring to the <strong>ECL</strong> Com<strong>for</strong>t controller<br />
Step 1<br />
Mount the ECA 82 LON module<br />
in the <strong>ECL</strong> Com<strong>for</strong>t controller by<br />
dismounting cover plate B on the<br />
back of the <strong>ECL</strong> Com<strong>for</strong>t by means of<br />
a small slice cutter nipper.<br />
Step 2<br />
Mount the ECA 82 in the slides <strong>and</strong><br />
press it gently into the connector on<br />
the <strong>ECL</strong> Com<strong>for</strong>t print board.<br />
DH-SMT/DK VI.KM.H2.02 © <strong>Danfoss</strong> 09/<strong>200</strong>7 7
<strong>WebAccess</strong><br />
Step 3<br />
Mount the new cover plate B, which<br />
is delivered with the option card.<br />
Pin connection ECA 82:<br />
1: LON data 1. Left side pin of the<br />
connector.<br />
2: Middle pin of the connector. Do<br />
not use!<br />
3: LON data 2. Right side pin of the<br />
connector.<br />
LON data 1 <strong>and</strong> 3 can be reversed.<br />
Pin connection <strong>WebAccess</strong> unit:<br />
1: LON data 1. Left side pin of the<br />
connector.<br />
2: LON data 2. Right side pin of the<br />
connector.<br />
LON data 1 <strong>and</strong> 2 can be reversed.<br />
Step 4<br />
Mount the LON connectors in the<br />
<strong>WebAccess</strong> unit <strong>and</strong> in the ECA 82<br />
module.<br />
LON termination<br />
Check that the termination jumper is<br />
mounted as ‘FT’.<br />
<strong>WebAccess</strong><br />
(TP/FT-10)<br />
1 2 3<br />
ECA 82<br />
8 VI.KM.H2.02 © <strong>Danfoss</strong> 09/<strong>200</strong>7 DH-SMT/DK<br />
<strong>WebAccess</strong><br />
LAN / Ethernet wiring<br />
DH-SMT/DK VI.KM.H2.02 © <strong>Danfoss</strong> 09/<strong>200</strong>7 9
<strong>WebAccess</strong><br />
Powering up<br />
When powering up the <strong>ECL</strong> Com<strong>for</strong>t controller, a period of about 30 seconds<br />
will elapse during which the database of the controller will be copied to<br />
the ECA 82 module. During this period it is not possible to contact the ECA<br />
82 module, neither from the <strong>ECL</strong> Com<strong>for</strong>t controller nor from the network.<br />
The start-up period will occur in connection with reset / powering up of the<br />
controller <strong>and</strong> ECA 82 module <strong>and</strong> also when the application is changed in<br />
the <strong>ECL</strong> Com<strong>for</strong>t controller.<br />
The <strong>WebAccess</strong> unit needs 2-3 min. to start up. During start-up, the status<br />
LED has a constant light. The unit is ready when the status LED starts flashing.<br />
Ethernet configuration<br />
First of all, the contact to the <strong>WebAccess</strong> unit must be established. This is<br />
achieved by means of a PC (Laptop / Notebook) <strong>and</strong> an xover Ethernet<br />
cable.<br />
Connect the Ethernet cable <strong>and</strong> configure your PC to the fixed IP addresses:<br />
IP: 192.168.1.32<br />
Subnet: 255.255.255.0<br />
Gateway: No<br />
Status LED<br />
Now the <strong>WebAccess</strong> unit can be contacted with the IP address 192.168.1.100<br />
via the Microsoft Internet Explorer.<br />
Remember to install the Adobe SVG Viewer be<strong>for</strong>e contacting the <strong>WebAccess</strong><br />
unit. It can be downloaded <strong>for</strong> free from www.adobe.<strong>com</strong>. If you fail to install<br />
the Adobe SVG Viewer, you will not be able to see the application graphics.<br />
10 VI.KM.H2.02 © <strong>Danfoss</strong> 09/<strong>200</strong>7 DH-SMT/DK<br />
<strong>WebAccess</strong><br />
Configuration of <strong>ECL</strong> Com<strong>for</strong>t controllers<br />
Add the <strong>ECL</strong> Com<strong>for</strong>t applications to the <strong>WebAccess</strong> unit:<br />
Select menu option: Configuration / Un<strong>its</strong><br />
• Add <strong>ECL</strong><br />
Click ‘Add’. State the <strong>ECL</strong> name <strong>for</strong> this menu location. If you already<br />
have set up alarm recipients, choose the one to be alerted in case of<br />
<strong>com</strong>munication failure. Click ‘Continue’.<br />
Follow the instructions on the screen.<br />
• Edit <strong>ECL</strong><br />
Click ‘Edit’. Edit the <strong>ECL</strong> name <strong>for</strong> this menu location. Choose alarm<br />
recipient in case of <strong>com</strong>munication failure. Click ‘save’.<br />
• Remove <strong>ECL</strong><br />
Click ‘Remove’ <strong>for</strong> the <strong>ECL</strong> you want to disconnect. Confirm the removal<br />
of the selected <strong>ECL</strong> by clicking ‘Remove’ once again.<br />
DH-SMT/DK VI.KM.H2.02 © <strong>Danfoss</strong> 09/<strong>200</strong>7 11
<strong>WebAccess</strong><br />
Configuration of <strong>modules</strong><br />
Select menu option: Configuration / Un<strong>its</strong> / Additional <strong>modules</strong><br />
• Add<br />
Click ‘Add’. State the module name <strong>and</strong> choose under which <strong>ECL</strong> menu<br />
locations the module is to be shown. If you already have set up alarm<br />
recipients, choose the one to be alerted in case of <strong>com</strong>munication<br />
failure. Click ‘Continue’.<br />
Follow the instructions on the screen.<br />
• Edit<br />
Click ‘Edit’. Edit the module name <strong>for</strong> this menu location. Choose alarm<br />
recipient in case of <strong>com</strong>munication failure. Click ‘save’.<br />
• Remove<br />
Click ‘Remove’ <strong>for</strong> the module you want to disconnect. Confirm the<br />
removal of the selected module by clicking ‘Remove’ once again.<br />
When a new <strong>ECL</strong> unit or additional module is added, you might be asked<br />
to close your Internet browser <strong>and</strong> then restart it. This also applies if un<strong>its</strong><br />
/ additional <strong>modules</strong> have been changed or deleted when you close the<br />
dialog. This enables the Internet Explorer to show you the new / changed<br />
un<strong>its</strong> / additional <strong>modules</strong> correctly.<br />
12 VI.KM.H2.02 © <strong>Danfoss</strong> 09/<strong>200</strong>7 DH-SMT/DK<br />
<strong>WebAccess</strong><br />
Configuration of input channels<br />
Heat meters:<br />
• No additional set-up is required.<br />
WAH pulse interface:<br />
• Select the <strong>ECL</strong> menu location under which the pulse interface is shown.<br />
• Select the menu option: Modules / ‘Menu label’.<br />
Click ‘Add’ <strong>and</strong> confirm use of licence.<br />
Click ‘Edit’. State the name / description, un<strong>its</strong> (kWh or m3 ) <strong>and</strong> pulse<br />
factor. Also state the accumulated value of the meter (actual value<br />
displayed on the meter) <strong>and</strong> the max. possible value of the meter.<br />
WAH analog interface:<br />
• Select the <strong>ECL</strong> menu location under which the analog interface is shown.<br />
• Select the menu option: Modules / ‘Menu label’.<br />
Select the menu option: Modules / ‘Menu label’.<br />
Click ‘Add’ <strong>and</strong> confirm use of licence.<br />
Click ‘Edit’. State the name / description <strong>and</strong> un<strong>its</strong>. Set the range of the<br />
input device by stating the min. / max. value that equals 0 <strong>and</strong> 10 V.<br />
DH-SMT/DK VI.KM.H2.02 © <strong>Danfoss</strong> 09/<strong>200</strong>7 13
<strong>WebAccess</strong><br />
IP configuration<br />
Set the IP address, subnet mask <strong>and</strong> st<strong>and</strong>ard gateway of the <strong>WebAccess</strong> data<br />
logger to <strong>com</strong>ply with the relevant network. You can get these addresses<br />
from your network administrator or from your Internet supplier.<br />
When the IP address is changed, the <strong>WebAccess</strong> data logger restarts. After<br />
a period of 2-5 min. the Internet explorer should be restarted, <strong>and</strong> the<br />
<strong>WebAccess</strong> data logger can be found on the new IP address.<br />
It is extremely important to remember your IP address. Without this<br />
address, it will not be possible to access the data logger again.<br />
14 VI.KM.H2.02 © <strong>Danfoss</strong> 09/<strong>200</strong>7 DH-SMT/DK<br />
<strong>WebAccess</strong><br />
Light emitting diodes<br />
1. TP / FT-10 LON connection: Free topology / twisted pair<br />
2. Power supply: 8-24 V a.c. or 12-30 V d.c.<br />
3. RS 232 interface <strong>for</strong> PC connection<br />
4. Ethernet connection<br />
5. TP / FT-10 LON connection: Free topology / twisted pair<br />
6. Wireless<br />
• Constant light: Fatal error “no net”.<br />
It is not possible to get connected to the network (typically the SIM<br />
card is missing)<br />
• Slowly flashing light (½ Hz) : Connected to GSM “net found!<br />
• Fast flashing light (1 Hz): Connected to “dial up”<br />
7. Status<br />
• Constant light: The data logger is starting up <strong>and</strong> <strong>and</strong> there is no<br />
connection<br />
• Flashing light: The data logger is ready<br />
8. 100 Mb<br />
• Flashing light: Data are being trasmitted via the Ethernet<br />
9. Link<br />
• Constant light: The data logger is connected to the Ethernet<br />
10. Power<br />
• Constant light: The data logger is connected to the mains<br />
• No light: The power is disconnected<br />
11. Service (configuration of data logger)<br />
• Flashing light: The data logger is not configured<br />
DH-SMT/DK VI.KM.H2.02 © <strong>Danfoss</strong> 09/<strong>200</strong>7 15
<strong>WebAccess</strong><br />
16 VI.KM.H2.02 © <strong>Danfoss</strong> 09/<strong>200</strong>7 DH-SMT/DK<br />
<strong>WebAccess</strong><br />
WAH analog interface WAH pulse interface<br />
DH-SMT/DK VI.KM.H2.02 © <strong>Danfoss</strong> 09/<strong>200</strong>7 17
<strong>WebAccess</strong><br />
Screen examples<br />
18 VI.KM.H2.02 © <strong>Danfoss</strong> 09/<strong>200</strong>7 DH-SMT/DK<br />
<strong>WebAccess</strong><br />
DH-SMT/DK VI.KM.H2.02 © <strong>Danfoss</strong> 09/<strong>200</strong>7 19
<strong>WebAccess</strong><br />
20 VI.KM.H2.02 © <strong>Danfoss</strong> 09/<strong>200</strong>7 DH-SMT/DK<br />
<strong>WebAccess</strong><br />
Extension <strong>modules</strong>, serial nos.<br />
Disposal Instruction<br />
Equipment containing electrical <strong>com</strong>ponents shall not be disposed together<br />
with domestic waste.<br />
It must be collected separately with other electrical <strong>and</strong> electronic waste<br />
according to local legislation.<br />
DH-SMT/DK VI.KM.H2.02 © <strong>Danfoss</strong> 09/<strong>200</strong>7 21
<strong>WebAccess</strong><br />
*087R9748*<br />
*VIKMH202*<br />
<strong>Danfoss</strong> can accept no responsibility <strong>for</strong> possible errors in catalogues, brochures <strong>and</strong> other printed material. <strong>Danfoss</strong> reserves the right to alter <strong>its</strong> products without notice. This also applies to products<br />
already on order provided that such alterations can be made without subsequential changes being necessary in specications already agreed.<br />
All trademarks in this material are property of the respective <strong>com</strong>panies. <strong>Danfoss</strong> <strong>and</strong> the <strong>Danfoss</strong> logotype are trademarks of <strong>Danfoss</strong> A/S. All rights reserved.<br />
22 VI.KM.H2.02 © <strong>Danfoss</strong> 09/<strong>200</strong>7 DH-SMT/DK