Create successful ePaper yourself
Turn your PDF publications into a flip-book with our unique Google optimized e-Paper software.
<strong>RCS</strong>-<strong>LX60D</strong><br />
SX-<strong>LX60D</strong><br />
SSP-<strong>LX60D</strong><br />
DVR-<strong>LX60D</strong><br />
Operating Instructions<br />
Audio Multi-channel Receiver Subwoofer<br />
Speaker System<br />
HDD/DVD Recorder<br />
Discover the benefits of registering your product online at<br />
http://www.pioneer.co.uk (or http://www.pioneer.eu)<br />
®<br />
®
Thank you for buying this Pioneer product.<br />
Please read through these operating instructions so that you will know how to operate your model properly.<br />
After you have finished reading the instructions, put them in a safe place for future reference.<br />
IMPORTANT<br />
The lightning flash with arrowhead symbol,<br />
within an equilateral triangle, is intended to<br />
alert the user to the presence of uninsulated<br />
"dangerous voltage" within the product's<br />
enclosure that may be of sufficient<br />
magnitude to constitute a risk of electric<br />
shock to persons.<br />
WARNING<br />
This equipment is not waterproof. To prevent a fire<br />
or shock hazard, do not place any container filed<br />
with liquid near this equipment (such as a vase or<br />
flower pot) or expose it to dripping, splashing, rain<br />
or moisture. D3-4-2-1-3_A_En<br />
This product complies with the Low Voltage Directive<br />
(73/23/EEC, amended by 93/68/EEC), EMC Directives<br />
(89/336/EEC, amended by 92/31/EEC and<br />
93/68/EEC). D3-4-2-1-9a_En<br />
POWER-CORD CAUTION<br />
Handle the power cord by the plug. Do not pull out the<br />
plug by tugging the cord and never touch the power<br />
cord when your hands are wet as this could cause a<br />
short circuit or electric shock. Do not place the unit, a<br />
piece of furniture, etc., on the power cord, or pinch the<br />
cord. Never make a knot in the cord or tie it with other<br />
cords. The power cords should be routed such that they<br />
are not likely to be stepped on. A damaged power cord<br />
can cause a fire or give you an electrical shock. Check<br />
the power cord once in a while. When you find it<br />
damaged, ask your nearest PIONEER authorized<br />
service center or your dealer for a replacement. S002_En<br />
CAUTION<br />
This product is a class 1 laser product, but this<br />
product contains a laser diode higher than Class 1.<br />
To ensure continued safety, do not remove any covers<br />
or attempt to gain access to the inside of the product.<br />
Refer all servicing to qualified personnel.<br />
The following caution label appears on your unit.<br />
Location: inside of the HDD/DVD Recorder<br />
CAUTION<br />
RISK OF ELECTRIC SHOCK<br />
DO NOT OPEN<br />
CAUTION:<br />
TO PREVENT THE RISK OF ELECTRIC<br />
SHOCK, DO NOT REMOVE COVER (OR<br />
BACK). NO USER-SERVICEABLE PARTS<br />
INSIDE. REFER SERVICING TO QUALIFIED<br />
SERVICE PERSONNEL.<br />
The exclamation point within an equilateral<br />
triangle is intended to alert the user to the<br />
presence of important operating and<br />
maintenance (servicing) instructions in the<br />
literature accompanying the appliance.<br />
D3-4-2-1-1_En-A<br />
WARNING<br />
Before plugging in for the first time, read the following<br />
section carefully.<br />
The voltage of the available power supply differs<br />
according to country or region. Be sure that the<br />
power supply voltage of the area where this unit<br />
will be used meets the required voltage (e.g., 230V<br />
or 120V) written on the rear panel. D3-4-2-1-4_A_En<br />
Operating Environment<br />
Operating environment temperature and humidity:<br />
+5 ºC to +35 ºC (+41 ºF to +95 ºF); less than 85 %RH<br />
(cooling vents not blocked)<br />
Do not install this unit in a poorly ventilated area, or in<br />
locations exposed to high humidity or direct sunlight (or<br />
strong artificial light) D3-4-2-1-7c_A_En<br />
This product is for general household purposes. Any<br />
failure due to use for other than household purposes<br />
(such as long-term use for business purposes in a<br />
restaurant or use in a car or ship) and which<br />
requires repair will be charged for even during the<br />
warranty period. K041_En<br />
D3-4-2-1-8_B_En
If the AC plug of this unit does not match the AC<br />
outlet you want to use, the plug must be removed<br />
and appropriate one fitted. Replacement and<br />
mounting of an AC plug on the power supply cord of<br />
this unit should be performed only by qualified<br />
service personnel. If connected to an AC outlet, the<br />
cut-off plug can cause severe electrical shock. Make<br />
sure it is properly disposed of after removal.<br />
The equipment should be disconnected by removing<br />
the mains plug from the wall socket when left<br />
unused for a long period of time (for example, when<br />
on vacation). D3-4-2-2-1a_A_En<br />
CAUTION<br />
The STANDBY/ON switch on this unit will not<br />
completely shut off all power from the AC outlet.<br />
Since the power cord serves as the main disconnect<br />
device for the unit, you will need to unplug it from<br />
the AC outlet to shut down all power. Therefore,<br />
make sure the unit has been installed so that the<br />
power cord can be easily unplugged from the AC<br />
outlet in case of an accident. To avoid fire hazard,<br />
the power cord should also be unplugged from the<br />
AC outlet when left unused for a long period of time<br />
(for example, when on vacation).<br />
WARNING<br />
To prevent a fire hazard, do not place any naked<br />
flame sources (such as a lighted candle) on the<br />
equipment. D3-4-2-1-7a_A_En<br />
If you want to dispose this product, do not mix it with general household waste. There is a separate collection system for used<br />
electronic products in accordance with legislation that requires proper treatment, recovery and recycling.<br />
Private households in the member states of the EU, in Switzerland and Norway may return their used electronic products free of charge to<br />
designated collection facilities or to a retailer (if you purchase a similar new one).<br />
For countries not mentioned above, please contact your local authorities for the correct method of disposal.<br />
By doing so you will ensure that your disposed product undergoes the necessary treatment, recovery and recycling and thus prevent potential<br />
negative effects on the environment and human health. K058_En<br />
Replacement and mounting of an AC plug on the power supply cord of this unit should be performed only by qualified<br />
service personnel.<br />
IMPORTANT: THE MOULDED PLUG<br />
This appliance is supplied with a moulded three pin mains plug for your safety and convenience. A 5 amp fuse is fitted in this plug. Should the<br />
fuse need to be replaced, please ensure that the replacement fuse has a rating of 5 amps and that it is approved by ASTA or BSI to BS1362.<br />
Check for the ASTA mark or the BSI mark on the body of the fuse.<br />
If the plug contains a removable fuse cover, you must ensure that it is refitted when the fuse is replaced. If you lose the fuse cover the plug<br />
must not be used until a replacement cover is obtained. A replacement fuse cover can be obtained from your local dealer.<br />
If the fitted moulded plug is unsuitable for your socket outlet, then the fuse shall be removed and the plug cut off and disposed of<br />
safely. There is a danger of severe electrical shock if the cut off plug is inserted into any 13 amp socket.<br />
If a new plug is to be fitted, please observe the wiring code as shown below. If in any doubt, please consult a qualified electrician.<br />
IMPORTANT: The wires in this mains lead are coloured in accordance with the following code:<br />
Blue : Neutral Brown : Live<br />
As the colours of the wires in the mains lead of this appliance may not correspond with the coloured markings identifying the terminals in<br />
your plug, proceed as follows ;<br />
The wire which is coloured BLUE must be connected to the terminal which is marked with the<br />
letter N or coloured BLACK.<br />
The wire which is coloured BROWN must be connected to the terminal which is marked with the<br />
letter L or coloured RED.<br />
How to replace the fuse: Open the fuse compartment with a screwdriver and replace the fuse.<br />
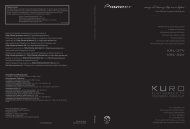
VENTILATION CAUTION (Receiver subwoofer)<br />
When installing this unit, make sure to leave space<br />
around the unit for ventilation to improve heat<br />
radiation (at least 5 cm at top, 5 cm at rear, and 5<br />
cm at each side).<br />
VENTILATION CAUTION (HDD/DVD Recorder)<br />
When installing this unit, make sure to leave space<br />
around the unit for ventilation to improve heat<br />
radiation (at least 10 cm at top, 10 cm at rear, and<br />
10 cm at each side).<br />
WARNING<br />
Slots and openings in the cabinet are provided for<br />
ventilation to ensure reliable operation of the<br />
product, and to protect it from overheating. To<br />
prevent fire hazard, the openings should never be<br />
blocked or covered with items (such as newspapers,<br />
table-cloths, curtains) or by operating the<br />
equipment on thick carpet or a bed. D3-4-2-1-7b_A_En<br />
5 cm<br />
5 cm 5 cm<br />
10 cm<br />
10 cm 10 cm<br />
Receiver subwoofer HDD/DVD Recorder<br />
D3-4-2-1-2-2_B_En
4<br />
En<br />
Section One<br />
Contents<br />
Section One<br />
What’s in the box . . . . . . . . . . . . . . . . . . . . . . . . . . . . 5<br />
01 Speaker Setup Guide<br />
Safety precautions when setting up . . . . . . . . . . . . . . 6<br />
Home theater sound setup . . . . . . . . . . . . . . . . . . . . . 6<br />
Front surround setup (recommended) . . . . . . . . . . . 6<br />
Standard surround setup . . . . . . . . . . . . . . . . . . . . . 8<br />
Wall mounting the speakers . . . . . . . . . . . . . . . . . . . . 9<br />
Before mounting . . . . . . . . . . . . . . . . . . . . . . . . . . . 9<br />
Additional notes on speaker placement . . . . . . . . . . . 9<br />
02 Connecting up<br />
Basic connections . . . . . . . . . . . . . . . . . . . . . . . . . . 10<br />
Using this system for TV audio . . . . . . . . . . . . . . . . . 14<br />
03 Controls and displays<br />
Display unit . . . . . . . . . . . . . . . . . . . . . . . . . . . . . . . 15<br />
Display . . . . . . . . . . . . . . . . . . . . . . . . . . . . . . . . . . 15<br />
HDD/DVD Recorder . . . . . . . . . . . . . . . . . . . . . . . . . 16<br />
Display . . . . . . . . . . . . . . . . . . . . . . . . . . . . . . . . . . 17<br />
Common Interface . . . . . . . . . . . . . . . . . . . . . . . . . . 17<br />
Inserting a CA module . . . . . . . . . . . . . . . . . . . . . . 17<br />
Remote control. . . . . . . . . . . . . . . . . . . . . . . . . . . . . 18<br />
Using the remote control . . . . . . . . . . . . . . . . . . . . . 20<br />
Putting the batteries in the remote control . . . . . . . . 21<br />
04 Before you start<br />
Switching on . . . . . . . . . . . . . . . . . . . . . . . . . . . . . . 22<br />
Setting up. . . . . . . . . . . . . . . . . . . . . . . . . . . . . . . . . 22<br />
Basic operation . . . . . . . . . . . . . . . . . . . . . . . . . . . . 23<br />
Watching a DVD . . . . . . . . . . . . . . . . . . . . . . . . . . 23<br />
Listening to a CD . . . . . . . . . . . . . . . . . . . . . . . . . . 23<br />
Watching a title recorded on the HDD . . . . . . . . . . 23<br />
Listening to the radio . . . . . . . . . . . . . . . . . . . . . . . 23<br />
05 Getting started<br />
System demo setting . . . . . . . . . . . . . . . . . . . . . . . . 24<br />
Using the Auto MCACC setup for optimal<br />
surround sound . . . . . . . . . . . . . . . . . . . . . . . . . . . . 24<br />
06 Listening to your system<br />
Auto listening mode . . . . . . . . . . . . . . . . . . . . . . . . . 26<br />
Listening in surround sound. . . . . . . . . . . . . . . . . . . 26<br />
Dolby Pro Logic II Music settings . . . . . . . . . . . . . . 26<br />
Using Front Stage Surround Advance . . . . . . . . . . . 27<br />
Using Advanced Surround . . . . . . . . . . . . . . . . . . . . 27<br />
Listening in stereo . . . . . . . . . . . . . . . . . . . . . . . . . . 27<br />
Using the Sound Retriever . . . . . . . . . . . . . . . . . . . . 27<br />
Listening with Acoustic Calibration EQ. . . . . . . . . . . 28<br />
Enhancing dialogue . . . . . . . . . . . . . . . . . . . . . . . . . 28<br />
Using Quiet and Midnight listening modes . . . . . . . 28<br />
Adjusting the bass and treble. . . . . . . . . . . . . . . . . . 28<br />
Boosting the bass level. . . . . . . . . . . . . . . . . . . . . . . 28<br />
07 Listening to the radio<br />
Listening to the radio . . . . . . . . . . . . . . . . . . . . . . . . 29<br />
Improving poor FM reception . . . . . . . . . . . . . . . . . 29<br />
Improving poor AM sound . . . . . . . . . . . . . . . . . . . 29<br />
Changing the noise cut mode . . . . . . . . . . . . . . . . 29<br />
Memorizing stations. . . . . . . . . . . . . . . . . . . . . . . . 30<br />
Listening to station presets . . . . . . . . . . . . . . . . . . 30<br />
Using RDS . . . . . . . . . . . . . . . . . . . . . . . . . . . . . . . . 30<br />
Displaying RDS information. . . . . . . . . . . . . . . . . . 30<br />
Searching for RDS programs . . . . . . . . . . . . . . . . . 30<br />
08 Surround sound settings<br />
Using the Setup menu . . . . . . . . . . . . . . . . . . . . . . . 31<br />
Channel level setting . . . . . . . . . . . . . . . . . . . . . . . 31<br />
Speaker distance setting . . . . . . . . . . . . . . . . . . . . 31<br />
Dynamic Range Control . . . . . . . . . . . . . . . . . . . . . 32<br />
Dual mono setting . . . . . . . . . . . . . . . . . . . . . . . . . 32<br />
Adjusting the channel levels using the test tone. . . . 32<br />
09 Other connections<br />
Connecting auxiliary components . . . . . . . . . . . . . . 33<br />
Connecting an analog audio component . . . . . . . . 33<br />
Listening to an external audio source . . . . . . . . . . . . 33<br />
Connecting external antennas . . . . . . . . . . . . . . . . . 34<br />
Using this unit with a Pioneer plasma display . . . . . 34<br />
SR+ Setup for Pioneer plasma displays. . . . . . . . . 35<br />
Using the SR+ mode with a Pioneer<br />
plasma display . . . . . . . . . . . . . . . . . . . . . . . . . . . . 35<br />
10 Additional information<br />
Dimming the display . . . . . . . . . . . . . . . . . . . . . . . . 36<br />
DTS CD setting . . . . . . . . . . . . . . . . . . . . . . . . . . . . . 36<br />
Setting the sleep timer . . . . . . . . . . . . . . . . . . . . . . . 36<br />
Resetting the system . . . . . . . . . . . . . . . . . . . . . . . . 36<br />
Installation and maintenance . . . . . . . . . . . . . . . . . . 37<br />
Hints on installation. . . . . . . . . . . . . . . . . . . . . . . . 37<br />
Troubleshooting . . . . . . . . . . . . . . . . . . . . . . . . . . . . 37<br />
General . . . . . . . . . . . . . . . . . . . . . . . . . . . . . . . . . 37<br />
Tuner . . . . . . . . . . . . . . . . . . . . . . . . . . . . . . . . . . . 38<br />
Error Messages . . . . . . . . . . . . . . . . . . . . . . . . . . . 38<br />
Glossary . . . . . . . . . . . . . . . . . . . . . . . . . . . . . . . . . . 39<br />
Specifications. . . . . . . . . . . . . . . . . . . . . . . . . . . . . . 39<br />
Section Two<br />
Operating instructions for HDD/DVD<br />
Recorder (DVR-<strong>LX60D</strong>) . . . . . . . . . . . . . . 40
Section One<br />
What’s in the box<br />
Please confirm that the following items are all supplied.<br />
Receiver subwoofer (SX-<strong>LX60D</strong>) box:<br />
Remote control (page 18)<br />
AA/R6 dry cell batteries (to confirm operation) x2<br />
(page 21)<br />
Display unit (page 15)<br />
Power cord (page 12)<br />
AM loop antenna (page 10)<br />
FM wire antenna (page 10)<br />
Control cable (page 10)<br />
Display cable (page 10)<br />
Coaxial cable (page 10)<br />
Microphone (for Auto MCACC setup) (page 24)<br />
Non-skid pads (large) x4 (page 7)<br />
Spacers x2 (page 11)<br />
These operating instructions<br />
Warranty card<br />
HDD/DVD recorder (DVR-<strong>LX60D</strong>) box:<br />
Remote control<br />
AA/R6P dry cell batteries x 2<br />
Audio/video cable (red/white/yellow) (page 14)<br />
G-LINK cable (page 51)<br />
RF antenna cable x 2 (page 14)<br />
Power cord (page 14)<br />
Operating instructions<br />
Warranty card<br />
Speakers (SSP-<strong>LX60D</strong>) box:<br />
Speakers (front x2, surround x2, center x2) (page 12)<br />
Speaker cables x5 (page 12)<br />
Non-skid pads (small) x24 (page 7)<br />
Brackets x2 (page 7)<br />
Spiral wrap x2 (page 13)<br />
Screws x8 (page 7)<br />
5<br />
En
01<br />
6<br />
En<br />
Speaker Setup Guide<br />
Chapter 1<br />
Speaker Setup Guide<br />
Safety precautions when setting up<br />
When assembling the speakers, lay them down flat on<br />
their side to avoid accidents or injury. Make sure to use a<br />
stable surface when assembling, setting up, and placing<br />
the speakers.<br />
If the speakers are to be used in a stacked configuration,<br />
always use the provided brackets to secure them<br />
together (page 7, 8).<br />
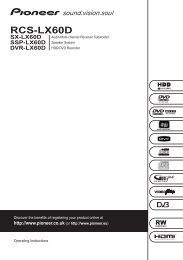
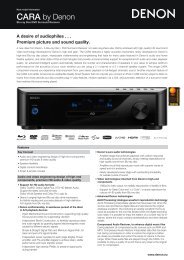
Home theater sound setup<br />
Most 5.1 channel home theater systems are designed so<br />
that speakers are placed to surround the listener’s<br />
position as shown in the illustration. Such designs,<br />
however, produce the undesirable effect of forcing the<br />
center speaker to be mounted above or below the<br />
television monitor, and require room for the surround<br />
speakers.<br />
Surround left<br />
Front left Front right<br />
Center<br />
Bass<br />
Surround right<br />
The present system, however, features Pioneer’s<br />
proprietary New Front Surround technology and Dual<br />
Center Speakers, using only two speaker positions (to<br />
right and left of television as shown in the illustration) in<br />
order to provide full home theater sound while greatly<br />
simplifying the issue of speaker placement.<br />
Surround left<br />
Front left<br />
Center<br />
Front right<br />
Bass<br />
Surround right<br />
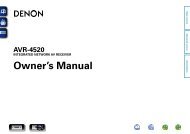
Front surround setup (recommended)<br />
This recommended method places the surround<br />
speakers in front, to simplify the issue of speaker<br />
placement in the room. The center speakers can be<br />
placed in independently in the center if desired.<br />
Surround<br />
left<br />
Center<br />
Front<br />
left<br />
Listening position<br />
*When center speakers are placed in the center.<br />
Surround<br />
left<br />
Front<br />
left<br />
Center<br />
Surround<br />
right<br />
Center<br />
Front<br />
right<br />
Surround<br />
right<br />
Front<br />
right<br />
Receiver<br />
subwoofer
Speaker Setup Guide 01<br />
1 Attach the smaller non-skid pads to the base of<br />
each of the front, center and surround speakers. The<br />
four large non-skid pads are for the receiver<br />
subwoofer (as shown).<br />
Use the adhesive side of the pads to attach them to the<br />
base (flat surface) of each speaker.<br />
2 Stack the speakers and fix with the brackets.<br />
Each speaker is provided with a color-coded indicator on<br />
the model label on the rear side to assist identification.<br />
Refer to the color indicators and install the speakers<br />
correctly.<br />
Model label<br />
Non-skid pads<br />
(small) x 24<br />
Non-skid pads<br />
(large) x 4<br />
Color indicator<br />
Front, Center and Surround speakers<br />
Left<br />
Blue<br />
Green<br />
White<br />
Receiver subwoofer<br />
Surround speaker<br />
Center speaker<br />
Front speaker<br />
Right<br />
Gray<br />
Green<br />
Red<br />
As shown in the illustration, stack the speakers from the<br />
bottom up in the order front speaker, center speaker,<br />
surround speaker. Align the bracket with the respective<br />
upper screw hole on the back of the front speaker, the<br />
two screw holes on the center speaker, and the bottom<br />
screw hole on the surround speaker, and fasten the<br />
screws securely.<br />
Surround speaker<br />
Center speaker<br />
Front speaker<br />
When placing the center speakers independently, stack<br />
the front speaker on the bottom and the surround<br />
speaker on top, then align the 1st and 3rd screw holes<br />
from the top of the bracket with the upper screw holes on<br />
the back of the speakers, and fasten the two securely.<br />
Surround speaker<br />
Front speaker<br />
Bracket<br />
Bracket<br />
Screw<br />
Screw<br />
Caution<br />
Do not attempt to carry the speakers when they are<br />
connected with the bracket. Doing so may cause<br />
damage to the bracket or worsen damage to the<br />
bracket and speakers in the event they are dropped.<br />
3 Connect the speaker system.<br />
Refer to Connecting up to connect the speakers properly.<br />
After connecting everything, place the speakers as<br />
shown in the diagram above for optimal surround sound.<br />
After placing the speakers, run the Auto MCACC setup<br />
(page 24) to complete your surround sound setup.<br />
7<br />
En
01<br />
8<br />
En<br />
Speaker Setup Guide<br />
Standard surround setup<br />
This is a standard multichannel surround sound speaker<br />
setup for optimal 5.1 channel home theater sound.<br />
The center speakers can be installed independently in<br />
the center if desired.<br />
Center<br />
Front<br />
left<br />
Surround left<br />
*When center speakers are placed in the center.<br />
Front<br />
left<br />
1 Attach the smaller non-skid pads to the base of<br />
each of the front, center and surround speakers. The<br />
four large non-skid pads are for the receiver<br />
subwoofer (as shown).<br />
Use the adhesive side of the pads to attach them to the<br />
base (flat surface) of each speaker.<br />
Non-skid pads<br />
(small) x 24<br />
Non-skid pads<br />
(large) x 4<br />
Listening position<br />
Center<br />
Center<br />
Front<br />
right<br />
Receiver<br />
subwoofer<br />
Surround right<br />
Front<br />
right<br />
Front, Center and Surround speakers<br />
Receiver subwoofer<br />
2 (When mounting center speakers to right and<br />
left) Stack the speakers and fix with the bracket.<br />
Each speaker is provided with a color-coded indicator on<br />
the model label on the rear side to assist identification.<br />
Refer to the color indicators and install the speakers<br />
correctly.<br />
Model label<br />
As shown in the illustration, stack the speakers with the<br />
front speaker on the bottom and center speaker on top,<br />
then align the 1st and 3rd screw holes from the top of the<br />
bracket with the upper screw holes on the back of the<br />
speakers, and fasten the two securely.<br />
Center speaker<br />
Front speaker<br />
Color indicator<br />
Left<br />
Green<br />
White<br />
Center speaker<br />
Front speaker<br />
Bracket<br />
Screw<br />
Right<br />
Green<br />
Caution<br />
Do not attempt to carry the speakers when they are<br />
connected with the bracket. Doing so may cause<br />
damage to the bracket or worsen damage to the<br />
bracket and speakers in the event they are dropped.<br />
3 Connect the speaker system.<br />
Refer to Connecting up to connect the speakers properly.<br />
After connecting everything, place the speakers as<br />
shown in the diagram above for optimal surround sound.<br />
After placing the speakers, run the Auto MCACC setup<br />
(page 24) to complete your surround sound setup.<br />
Red
Speaker Setup Guide 01<br />
Wall mounting the speakers<br />
The front, center and surround speakers have a<br />
mounting hole which can be used to mount the speaker<br />
on the wall.<br />
Before mounting<br />
Remember that the speaker system is heavy and that<br />
its weight could cause the screws to work loose, or<br />
the wall material to fail to support it, resulting in the<br />
speaker falling. Make sure that the wall you intend to<br />
mount the speakers on is strong enough to support<br />
them. Do not mount on plywood or soft surface walls.<br />
Mounting screws are not supplied. Use screws<br />
suitable for the wall material and support the weight<br />
of the speaker.<br />
Caution<br />
If you are unsure of the qualities and strength of the<br />
wall, consult a professional for advice.<br />
Pioneer is not responsible for any accidents or<br />
damage that result from improper installation.<br />
5 mm to 7 mm<br />
5 mm<br />
10 mm<br />
Additional notes on speaker placement<br />
Install the main front left and right speakers at an<br />
equal distance from the TV.<br />
When using the Front surround setup, separate the<br />
left and right speakers by about 1.5 m for optimum<br />
effect.<br />
When using the Standard surround setup, install the<br />
surround speakers slightly above ear level for<br />
optimum effect.<br />
Precautions:<br />
When installing the center speaker on top of the TV,<br />
be sure to secure it with tape or some other suitable<br />
means. Otherwise, the speaker may fall from the TV<br />
due to external shocks such as earthquakes,<br />
endangering those nearby or damaging the speaker.<br />
The front (x2), center (x2) and surround (x2) speakers<br />
supplied with this system are magnetically shielded.<br />
However, depending on the installation location,<br />
color distortion may occur if the speaker is installed<br />
extremely close to the screen of a television set. If this<br />
happens, turn the power switch of the television set<br />
OFF, and turn it ON after 15 min to 30 min. If the<br />
problem persists, place the speaker system away<br />
from the television set.<br />
The receiver subwoofer is not magnetically shielded<br />
and so should not be placed near a TV or monitor.<br />
Magnetic storage media (such as floppy discs and<br />
tape or video cassettes) should also not be kept close<br />
to the receiver subwoofer.<br />
Do not attach the receiver subwoofer to the wall or<br />
ceiling. They may fall off and cause injury.<br />
For safety, make sure that there is no exposed bare<br />
speaker wire outside of the speaker terminals.<br />
Do not connect the supplied speakers with any other<br />
amplifier. This may result in malfunction or fire.<br />
Do not connect any speakers other than those<br />
supplied to this system.<br />
9<br />
En
02<br />
10<br />
En<br />
Connecting up<br />
Chapter 2<br />
Connecting up<br />
Basic connections<br />
Important<br />
When connecting this system or changing connections, be sure to switch power off and disconnect the power<br />
cord from the wall socket.<br />
After completing all connections, connect the power cords to the wall socket.<br />
Receiver subwoofer (SX-<strong>LX60D</strong>)<br />
USE ONLY WITH DISPLAY UNIT.<br />
SEE INSTRUCTION MANUAL.<br />
AC IN<br />
CENTER R FRONT L<br />
ANTENNA<br />
MCACC<br />
SETUP MIC CONTROL IN<br />
SYSTEM CONNECTOR CONTROL<br />
DVD/DVR1<br />
OUT SUBWOOFER<br />
SURROUND<br />
(COAXIAL) DVD/DVR2<br />
FM UNBAL 75 AM LOOP ANTENNA<br />
AUDIO INPUT<br />
DIGITAL<br />
SPEAKERS<br />
DIGITAL ANALOG<br />
R L<br />
(OPTICAL) (OPTICAL)<br />
Note<br />
When using the display unit in a wall-mounted<br />
location, take full precautions to prevent the unit<br />
from accidentally falling.<br />
Screws and other fixtures for use in wall mounting<br />
are not included.<br />
L<br />
R<br />
AUDIO VIDEO<br />
ANTENNA<br />
R<br />
L<br />
IN<br />
S-VIDEO<br />
INPUT 3<br />
AV 2 (INPUT 1/DECODER)<br />
OUT<br />
Y PB PR<br />
COMPONENT VIDEO OUT<br />
b Coaxial cable<br />
a Control cable<br />
Display cable<br />
FM antenna<br />
4<br />
OUTPUT<br />
2<br />
AV 1 (RGB) ñ TV<br />
G-LINK IN<br />
CONTROL<br />
3<br />
AM loop antenna<br />
ANTENNA(DIGITAL)<br />
OUT<br />
IN<br />
5 V 30 mA<br />
1<br />
HDD/DVD Recorder (DVR-<strong>LX60D</strong>)<br />
HDMI OUT<br />
DIGITAL<br />
AUDIO OUT<br />
WARNING<br />
Pioneer bears no responsibility for accidents<br />
resulting from faulty assembly or installation,<br />
insufficient mounting strength of walls, mounting<br />
fixtures (or other building fixtures), misuse or natural<br />
disasters.<br />
COAXIAL<br />
AC IN<br />
Display unit
Connecting up 02<br />
1 Connect the HDD/DVD recorder to the receiver<br />
subwoofer.<br />
a. Plug the control cable into the CONTROL OUT jack<br />
on the rear of the receiver subwoofer.<br />
Plug the other end of the cable into the CONTROL IN<br />
jack on the rear of the HDD/DVD recorder.<br />
b. Plug the coaxial cable into the DIGITAL AUDIO<br />
INPUT (DVD/DVR 1) jack on the rear of the receiver<br />
subwoofer.<br />
Plug the other end of the cable into the DIGITAL<br />
AUDIO OUT (COAXIAL) jack on the rear of the HDD/<br />
DVD recorder.<br />
Note that unless the control cable is connected, you<br />
can’t use the remote control with the HDD/DVD recorder.<br />
2 Fasten the spacers to the display unit and connect.<br />
If the display unit is difficult to view, the spacers can be<br />
attached to allow changing of the viewing angle. Peel off<br />
the protective paper from the spacers and press the<br />
spacers onto the depressions on the bottom of the display<br />
unit.<br />
Plug the L-shaped end of the display cable into the<br />
connector on the rear of the display unit, then plug the<br />
other end of the display cable into SYSTEM CONNECTOR<br />
jack on the receiver subwoofer.<br />
3 Assemble the AM loop antenna.<br />
a b c<br />
a. Bend the stand in the direction indicated by the arrow.<br />
b. Clip the loop onto the stand.<br />
c. If you want to fix to a wall or other surface, perform<br />
step b after first securing the stand with screws.<br />
It is recommended that you determine the reception<br />
strength before securing the stand with the screws.<br />
4 Connect the AM and FM antennas 1 .<br />
a. Connect one wire of the AM loop antenna to each AM<br />
antenna terminal 2 .<br />
For each terminal, press down on the tab to open;<br />
insert the wire, then release to secure.<br />
b. Push the FM antenna 3 plug onto the center pin of the<br />
FM antenna socket.<br />
Note<br />
1 Keep antenna cables away from other cables, the display unit, receiver subwoofer and HDD/DVD recorder.<br />
If reception with the supplied antenna is poor, see Improving poor FM reception and Improving poor AM sound on page 29 or Connecting<br />
external antennas on page 34.<br />
Do not attach any antenna other than the provided loop antenna, or an external antenna as described on page 34.<br />
2 Don’t let it come into contact with metal objects and avoid placing near computers, television sets or other electrical appliances.<br />
If radio reception is poor, you may be able improve it by re-inserting each antenna wire into the opposite terminal.<br />
For best reception, do not untwist the AM loop antenna wires or wrap them around the loop antenna.<br />
3 To ensure optimum reception, make sure the FM antenna is fully extended and not coiled or hanging at the rear of the unit.<br />
1<br />
2<br />
11<br />
En
02<br />
12<br />
En<br />
Connecting up<br />
Receiver subwoofer (SX-<strong>LX60D</strong>)<br />
6<br />
MCACC<br />
SETUP MIC CONTROL IN<br />
SYSTEM CONNECTOR CONTROL<br />
DVD/DVR1<br />
OUT SUBWOOFER<br />
SURROUND<br />
(COAXIAL) DVD/DVR2<br />
FM UNBAL 75 AM LOOP ANTENNA<br />
AUDIO INPUT<br />
DIGITAL<br />
SPEAKERS<br />
DIGITAL ANALOG<br />
R L<br />
(OPTICAL) (OPTICAL)<br />
USE ONLY WITH DISPLAY UNIT.<br />
SEE INSTRUCTION MANUAL.<br />
8<br />
AC IN<br />
CENTER R FRONT L<br />
5 Connect each speaker.<br />
The front and surround speaker cables have a colorcoded<br />
connector at one end and two bare wires at the<br />
other end.<br />
Since there is only one terminal to connect the two<br />
center speakers, you will need to use the supplied Ycable<br />
for the connection.<br />
Twist and pull off the protective shields on each wire.<br />
Connect the wires to the speaker. Each speaker in the<br />
illustration can be identified by means of the colorcoded<br />
indicator provided on the rear-surface model<br />
label. Match the color-coded wire with the color<br />
indicator on the model label, then insert the colorcoded<br />
wire into the red (+) side and the other wire<br />
into the black (–) side.<br />
ANTENNA<br />
5<br />
Color-coded connector<br />
(Connect to rear panel)<br />
L<br />
R<br />
To AC outlet<br />
Color-coded wire<br />
(Connect to speaker)<br />
Surround right<br />
(Gray)<br />
Center<br />
(Green)<br />
Front right<br />
(Red)<br />
Listening position<br />
Y-cable<br />
Speaker system (SSP-<strong>LX60D</strong>)<br />
Surround left<br />
(Blue)<br />
Center<br />
(Green)<br />
Front left<br />
(White)<br />
When connecting the center speakers, connect the Ycable<br />
dual end to the two center speakers in the<br />
same way.<br />
Y-cable<br />
To Receiver subwoofer<br />
Connect the other end to the color-coded speaker<br />
terminals on the rear of the receiver subwoofer. Make<br />
sure to insert completely.<br />
The small lug at the wire-end of the speaker plug<br />
should face up or down depending on whether it’s<br />
being plugged into one of the upper or lower speaker<br />
terminals. Please make sure to connect correctly.<br />
Upper terminal Lower terminal
Connecting up 02<br />
When connections are completed, adjust the cable<br />
placements. If the speakers have been fixed with the<br />
brackets, fix the cable to the groove in the brackets as<br />
shown.<br />
Fasten the cables together with the spiral wrap.<br />
Hold multiple cables together and place the wrap<br />
over the cables from the end.<br />
Wrap the spiral wrap with the cables in the center.<br />
The spiral wrap may be cut at a desired length.<br />
6 Connect the subwoofer cable.<br />
Just below the subwoofer speaker, to the left of<br />
center, you should see the subwoofer connecting<br />
cable. Plug this into the SUBWOOFER SPEAKER<br />
terminal.<br />
Caution<br />
These speaker terminals carry HAZARDOUS LIVE<br />
voltage. To prevent the risk of electric shock when<br />
connecting or disconnecting the speaker cables,<br />
disconnect the power cord before touching any<br />
uninsulated parts.<br />
Do not connect any speakers other than those<br />
supplied to this system.<br />
Do not connect the supplied speakers to any<br />
amplifier other than the one supplied with this<br />
system. Connection to any other amplifier may result<br />
in malfunction or fire.<br />
The center speakers and front/surround speakers are<br />
designed with different impedance values. Be sure to<br />
identify and connect the speakers correctly since<br />
improper connections may result in degraded sound<br />
or operation.<br />
13<br />
En
02<br />
14<br />
En<br />
Connecting up<br />
ANTENNA<br />
OUT<br />
7<br />
RF antenna cable<br />
ANTENNA<br />
R<br />
IN<br />
AUDIO L VIDEO<br />
S-VIDEO<br />
INPUT 3<br />
OUT<br />
RF antenna cable<br />
ANTENNA<br />
IN<br />
Y PB PR<br />
COMPONENT VIDEO OUT<br />
AV 2 (INPUT 1/DECODER)<br />
AV 1 (RGB) ñ TV<br />
G-LINK IN<br />
7 Connect the HDD/DVD recorder to your TV. 1<br />
Connect the VIDEO OUTPUT jack to a video input on<br />
your TV.<br />
Use the yellow jack of the supplied audio/video cable<br />
for the video connection.<br />
Connect the AUDIO OUTPUT jacks to the<br />
corresponding audio inputs on your TV.<br />
Use the red and white jacks of the supplied audio/<br />
video cable for the audio connection. Make sure you<br />
match the left and right outputs with their<br />
corresponding inputs for correct stereo sound.<br />
See Connecting a TV antenna on page 49 to connect<br />
the antenna.<br />
8 Connect the power cord. 2<br />
Connect the power cord to AC inlet on the receiver<br />
subwoofer and HDD/DVD recorder. Connect the<br />
power cord to a wall socket.<br />
Using this system for TV audio<br />
If your TV has a stereo audio output you can connect it to<br />
this system and enjoy surround TV sound.<br />
Important<br />
When connecting this system, be sure to switch<br />
power off and disconnect the power cord from the<br />
wall socket. Connect the power cord to the wall<br />
socket only after completing all other connections.<br />
7<br />
OUTPUT<br />
Audio/video cable<br />
(red/white/yellow)<br />
To Video input<br />
To Audio input<br />
To Antenna in<br />
Antenna wall outlet<br />
7<br />
CONTROL<br />
RF antenna cable<br />
ANTENNA(DIGITAL)<br />
OUT<br />
IN<br />
5 V 30 mA<br />
DIGITAL<br />
AUDIO OUT ANTENNA<br />
(DIGITAL) IN<br />
Note<br />
1 Other types of video connection are possible. See page 50 to page 52 for more on this.<br />
2 Do not use any power cord other than the one supplied with this system.<br />
Do not use the supplied power cord for any purpose other than connecting to this system.<br />
HDMI OUT<br />
USE ONLY WITH DISPLAY UNIT.<br />
SEE INSTRUCTION MANUAL.<br />
AC IN<br />
COAXIAL<br />
TV<br />
CENTER R FRONT L<br />
Antenna wall outlet<br />
or indoor antenna<br />
HDD/DVD Recorder<br />
(DVR-<strong>LX60D</strong>)<br />
8<br />
MCACC<br />
SETUP MIC CONTROL IN<br />
SYSTEM CONNECTOR CONTROL<br />
DVD/DVR1<br />
OUT SUBWOOFER<br />
SURROUND<br />
(COAXIAL) DVD/DVR2<br />
AUDIO INPUT<br />
DIGITAL<br />
SPEAKERS<br />
DIGITAL ANALOG<br />
R L<br />
(OPTICAL) (OPTICAL)<br />
1 Connect the audio output jacks on your TV to the<br />
ANALOG AUDIO INPUT jacks on the receiver<br />
subwoofer.<br />
Use the red/white stereo audio cable (not supplied) for<br />
this connection. Make sure you match the left and right<br />
outputs with their corresponding inputs for correct<br />
stereo sound.<br />
You can use the ANALOG AUDIO INPUT jacks for<br />
any analog source you want, such as a tape deck, etc.<br />
L<br />
R<br />
AC IN<br />
To AC outlet<br />
To Audio output<br />
TV<br />
1
Controls and displays 03<br />
Chapter 3<br />
Controls and displays<br />
Display unit<br />
1 STANDBY/ON<br />
Press to switch the system on/into standby.<br />
2 Front panel display<br />
See below for details.<br />
3 IR remote sensor (page 20)<br />
Display<br />
1 DTS<br />
Lights during playback of a DTS source (page 26).<br />
2 F.SURR.<br />
Lights when one of the Front Stage Surround<br />
Advance listening modes is selected (page 27).<br />
SURR.<br />
Lights when one of the Advanced Surround listening<br />
modes is selected (page 27).<br />
3 SOUND<br />
Lights when Sound Retriever is active (page 27).<br />
4 Tuner indicators<br />
– Lights when a broadcast is being received.<br />
– Lights when a stereo FM broadcast is being<br />
received in auto stereo mode.<br />
1 2 3 4 5 6<br />
4 AUDIO INPUT (page 33)<br />
Press repeatedly to select one of the external audio<br />
inputs (DVD/DVR1, DVD/DVR2, DIGITAL or ANALOG).<br />
5 SURROUND<br />
Use to select a Surround mode (page 26).<br />
6 VOLUME +/– buttons<br />
Use to adjust the volume.<br />
1<br />
2 3<br />
SOUND<br />
DTS F.SURR.<br />
2D<br />
2PL<br />
kHz<br />
MHz<br />
9 8 7<br />
6<br />
5 4<br />
– Lights when FM mono reception is selected.<br />
– Lights when in one of the RDS display or search<br />
modes.<br />
5 kHz/MHz<br />
Indicates the frequency unit shown in the character<br />
display (kHz for AM, MHz for FM).<br />
6 Character display<br />
7<br />
Lights when sleep timer is active (page 36).<br />
8 2 PL II<br />
Lights during Dolby Pro Logic II decoding (page 26).<br />
9 2 D<br />
Lights during playback of a Dolby Digital source (page 26).<br />
15<br />
En
03<br />
16<br />
En<br />
Controls and displays<br />
HDD/DVD Recorder<br />
1<br />
HDD/DVD<br />
1 A.TV indicator<br />
Lights when analog TV is selected.<br />
D.TV indicator<br />
Lights when digital TV is selected.<br />
PLTV indicator<br />
Lights during recording started using the Pause Live<br />
TV feature.<br />
DivX indicator<br />
Lights during DivX playback.<br />
COPY indicator<br />
Lights when copying is underway.<br />
2 HDD/DVD<br />
Press to switch between HDD and DVD for recording and<br />
playback.<br />
3 Disc tray<br />
4 HDD/DVD indicator<br />
Indicator lights blue when the hard disk (HDD) is<br />
selected; orange when the DVD drive is selected.<br />
5 OPEN/CLOSE<br />
Press to open/close the disc tray.<br />
A.TV D.TV PLTV DivX COPY HDMI<br />
STANDBY/ON DV IN<br />
USB<br />
6 HDMI indicator<br />
Lights when this recorder is connected to HDMI (HDCP)<br />
compatible component.<br />
7 Front panel display<br />
See Display on page 17 for details.<br />
8 STANDBY/ON<br />
Press to switch the recorder on/into standby.<br />
9 Front panel inputs<br />
See Front panel connections on page 49 for more<br />
information on these.<br />
2 3 4 5 6<br />
COMMON INTERFACE<br />
CH<br />
OPEN/CLOSE<br />
STOP REC<br />
INPUT<br />
SELECT<br />
8 9 10 11<br />
ONE TOUCH<br />
COPY<br />
A.TV/D.TV<br />
INPUT 2 S-VIDEO VIDEO L(MONO) R AUDIO REC<br />
10 COMMON INTERFACE slot<br />
Slot for CA module and smart card used to decode<br />
scrambled D.TV channels. See Common Interface on<br />
page 17.<br />
11 <br />
Press to start or restart playback.<br />
<br />
Press to stop playback.<br />
STOP REC<br />
Press to stop recording.<br />
ONE TOUCH COPY<br />
Press to start One Touch Copy of the currently<br />
playing title to DVD or the HDD.<br />
CH +/–<br />
Use to change channels, skip chapters/tracks, etc.<br />
INPUT SELECT<br />
Press to change the input used for recording.<br />
A.TV/D.TV<br />
Switches between analog TV antenna input and<br />
digital TV antenna input. The A.TV and D.TV<br />
indicators show which is selected.<br />
12 REC<br />
Press to start recording. Press repeatedly to set the<br />
recording time in 30 minute blocks.<br />
7<br />
9<br />
12
Controls and displays 03<br />
Display<br />
1 <br />
Lights during playback; blinks when playback is paused.<br />
2 <br />
Lights when copying.<br />
1<br />
8 7<br />
3 <br />
Lights during recording; blinks when recording is paused.<br />
4 (page 86)<br />
Lights when a timer recording has been set.<br />
(Indicator blinks if the timer has been set to DVD but<br />
there isn’t a recordable disc loaded, or the timer has<br />
been set to HDD but the HDD is not recordable.)<br />
NTSC<br />
Lights when the video output signal format is NTSC.<br />
(page 140)<br />
Indicates which channels of a bilingual broadcast<br />
are recorded.<br />
(page 139)<br />
Lights when the component video output is set to<br />
progressive scan.<br />
VPS/PDC (page 86)<br />
Lights when receiving a VPS/PDC broadcast during a<br />
VPS/PDC-enabled timer recording.<br />
5 Recording quality indicators (page 83)<br />
XP<br />
Lights when the recording mode is set to XP (high<br />
quality).<br />
SP<br />
Lights when the recording mode is set to SP<br />
(standard play).<br />
LP/SLP<br />
Lights when the recording mode is set to LP (long<br />
play) or SLP (super-long play).<br />
EP/SEP<br />
Lights when the recording mode is set to EP<br />
(extended play) or SEP (super-extended play).<br />
MN<br />
Lights when the recording mode is set to MN<br />
(manual recording level) mode.<br />
2 3 4 5<br />
6<br />
L R P<br />
6 Character display<br />
7 R/RW<br />
Lights when a recordable DVD-R or DVD-RW disc is<br />
loaded.<br />
8 PL (page 105)<br />
Lights when a VR mode disc is loaded and the<br />
recorder is in Play List mode.<br />
2 3 (page 145)<br />
Shows the remote control mode (if nothing is<br />
displayed, the remote control mode is 1).<br />
V<br />
Lights when an unfinalized Video mode disc is<br />
loaded.<br />
Common Interface<br />
To receive scrambled D.TV channels you will need a CA<br />
module and smart card provided by your service provider.<br />
Different CA modules support different encryption<br />
systems. This recorder is designed to work with modules<br />
that support the DVB standard. Contact your service<br />
provider to obtain the right kind of CA module.<br />
Note that neither CA modules nor smart cards are<br />
supplied or sold by Pioneer.<br />
Inserting a CA module<br />
The Common Interface card slot is located on the front<br />
panel of the recorder.<br />
• Insert the CA module into the card slot as far as<br />
it will go.<br />
The Common Interface card slot accepts Type I and Type<br />
II PC Cards (PCMCIA cards).<br />
17<br />
En
03<br />
18<br />
En<br />
Controls and displays<br />
Remote control<br />
1<br />
3<br />
5<br />
6<br />
9<br />
12<br />
13<br />
15<br />
17<br />
19<br />
22<br />
27<br />
29<br />
RECORDER<br />
<br />
HDD/DVD FM/AM<br />
PAUSE PLAY STOP<br />
<br />
<br />
RECEIVER<br />
<br />
SOUND<br />
AUDIO IN RETRIEVER<br />
REC<br />
<br />
STOP REC HELP INFO<br />
TOP MENU<br />
DISC<br />
NAVIGATOR<br />
HOME MENU<br />
GUIDE<br />
CHANNEL<br />
CHANNEL<br />
A.TV / D.TV<br />
PREV NEXT<br />
<br />
AUDIO<br />
SUBTITLE<br />
ENTER<br />
ANGLE<br />
CM BACK<br />
CM SKIP<br />
RETURN/EXIT<br />
VOLUME<br />
MCACC<br />
/ / TIMER REC REC MODE<br />
<br />
SETUP / TUNE+ SR + ONE TOUCH COPY<br />
1 2 3<br />
/ ST-<br />
/ ST+ PAUSE LIVE TV<br />
F. S. SURR / TUNE- TEST TONE VIDEO IN<br />
SURROUND ADVANCED<br />
SOUND<br />
SLEEP CLEAR<br />
INPUT<br />
MAIN<br />
ENTER<br />
4 5 6<br />
7 8<br />
0<br />
CHANNEL<br />
SUB<br />
9<br />
VOLUME<br />
TEXT TV / DVD<br />
TV CONTROL<br />
OPEN OPEN<br />
MENU<br />
JUKEBOX<br />
DISPLAY<br />
RDS DISP<br />
2<br />
4<br />
7<br />
8<br />
10<br />
11<br />
14<br />
16<br />
18<br />
20<br />
21<br />
23<br />
24<br />
25<br />
26<br />
28<br />
Important<br />
Functions printed in green on the remote control are<br />
accessed by switching the MAIN/SUB switch<br />
to SUB.<br />
1 RECORDER<br />
Press to switch the recorder on or into standby.<br />
2 RECEIVER<br />
Press to switch the receiver subwoofer on or into standby.<br />
3 Input select buttons<br />
HDD/DVD (page 83)<br />
Press to select the hard disk (HDD) or DVD for<br />
recording and playback. The receiver subwoofer’s<br />
audio input is also switched to DVD/DVR1. 1<br />
MAIN<br />
SUB<br />
FM/AM (page 29)<br />
Press to select the built-in radio tuner.<br />
AUDIO IN (page 33)<br />
Press repeatedly to select one of the receiver<br />
subwoofer’s audio inputs (DVD/DVR1, DVD/DVR2,<br />
DIGITAL or ANALOG).<br />
4 SOUND RETRIEVER<br />
Press to restore CD quality sound to compressed audio<br />
sources (page 27).<br />
5 Playback controls (page 91)<br />
PAUSE<br />
Press to pause playback or recording.<br />
PLAY<br />
Press to start playback.<br />
STOP<br />
Press to stop playback.<br />
6 Recording controls (page 83)<br />
REC<br />
Press to start recording. Press repeatedly to set the<br />
recording time in blocks of 30 mins.<br />
When the red action button is visible in a GUIDE<br />
Plus+® screen, use for One-Button-Record.<br />
STOP REC<br />
Press to stop recording.<br />
7 INFO<br />
While watching D.TV, press to display information<br />
banner.<br />
Press to see additional information highlighted item in<br />
the EPG.<br />
8 HELP<br />
Press for help on how to use the current GUI screen.<br />
Note<br />
1 If the recorder is set to remote mode 2 or 3, the receiver subwoofer’s audio input will not be switched. See also Remote Control Mode on<br />
page 145.
Controls and displays 03<br />
9 DISC NAVIGATOR (page 94, 105) / TOP MENU<br />
(page 92)<br />
Press to display the Disc Navigator screen, or the top<br />
menu if a DVD-Video or finalized DVD-R/-RW (Video) disc<br />
is loaded.<br />
10 GUIDE<br />
Press to display the EPG screen; press again to exit.<br />
11 HOME MENU<br />
Press to display the Home Menu, from which you can<br />
navigate many functions of the system.<br />
12 /// and ENTER (Smart Jog)<br />
Used to navigate all on-screen displays. Rotate the<br />
Smart Jog to move the cursor up or down. Press<br />
ENTER to select the currently highlighted option.<br />
When using the Smart Jog, turn it lighty to avoid<br />
pressing down on the cursor keys.<br />
While watching D.TV press ENTER to display the<br />
Channel List screen.<br />
Rotate the Smart Jog when playback is paused to do<br />
a frame-by-frame search back/forward.<br />
CM BACK (commercial back)<br />
Turn the Smart Jog counter-clockwise during<br />
playback to skip progressively backward through the<br />
video playing.<br />
CM SKIP (commercial skip)<br />
Turn the Smart Jog clockwise during playback to<br />
skip progressively forward through the video playing.<br />
CHANNEL +/– (page 81)<br />
While stopped, turn the Smart Jog to change the<br />
channel of the built-in TV tuner.<br />
13 A.TV/D.TV<br />
Press to switch between analog TV antenna input and<br />
digital TV antenna input. The A.TV and D.TV indicators<br />
on the front panel show which is selected.<br />
14 RETURN/EXIT<br />
Press to go back one level in the on-screen menu or<br />
display.<br />
Also press to exit the MHEG application.<br />
15 PREV / NEXT <br />
Press to skip to the previous or next title/chapter/track/<br />
folder; or to display the previous or next menu page.<br />
When GUIDE Plus+® is displayed, use to display the<br />
previous/next page.<br />
16 VOLUME +/–<br />
Use to adjust the volume.<br />
17 GUIDE Plus+ Action buttons<br />
Use when an EPG screen is displayed or when tuned to a<br />
data channel of a digital broadcast. The function of each<br />
button will be described on-screen, and changes<br />
depending on the screen being displayed.<br />
AUDIO (page 82, 98, 99)<br />
Press to change the audio language or channel.<br />
(When the recorder is stopped, press to change the<br />
tuner audio.)<br />
SUBTITLE (page 98)<br />
Press to display/change the subtitles included in<br />
multilingual DVD-Video discs.<br />
While watching D.TV, press to change the D.TV<br />
subtitles.<br />
ANGLE (page 99)<br />
Press to switch camera angles on discs with multiangle<br />
scenes.<br />
MCACC<br />
Starts the Auto MCACC setup (page 24).<br />
18 TIMER REC (page 63, 86)<br />
Press to set a timer recording.<br />
19 / (page 95)<br />
Press to start reverse or forward scanning. Press<br />
again to change the speed.<br />
/, / (page 96)<br />
While paused, press and hold to start slow-motion<br />
playback. Press repeatedly to change the playback<br />
speed.<br />
While paused, press to advance a single frame in<br />
either direction.<br />
When GUIDE Plus+® is displayed, use to display the<br />
previous/next day.<br />
20 REC MODE (page 83)<br />
Press repeatedly to change the recording mode (picture<br />
quality).<br />
21 ONE TOUCH COPY (page 114)<br />
Press to start One Touch Copy of the currently playing<br />
title to DVD or the HDD.<br />
22 Number buttons<br />
Use the number buttons for track/chapter/title<br />
selection; channel selection, and so on.<br />
/// (cursor buttons) and ENTER<br />
Use to control receiver functions.<br />
SETUP<br />
Use to access the menu system for surround sound<br />
setup, tuner settings and so on (page 24, 29, 30, 31, 36).<br />
SR+<br />
Use to setup the SR+ features and to select the SR+<br />
mode (page 35).<br />
F.S.SURR<br />
Use to select a Front Stage Surround Advance mode<br />
(page 27).<br />
TEST TONE<br />
Use to output the test tone (for speaker setup)<br />
(page 32).<br />
19<br />
En
03<br />
20<br />
En<br />
Controls and displays<br />
SURROUND<br />
Use to select a Surround mode (page 26).<br />
ADVANCED<br />
Use to select a Pioneer original surround mode<br />
(page 27).<br />
SOUND (page 28)<br />
Press to access the sound menu, from which you can<br />
adjust bass and treble, etc.<br />
SLEEP<br />
Press to set the sleep timer (page 36).<br />
CLEAR<br />
Press to clear an entry and start again.<br />
23 PAUSE LIVE TV (page 84)<br />
Press to start recording the current TV channel, but with<br />
playback paused, effectively pausing the broadcast.<br />
24 VIDEO IN (page 88)<br />
Press to change the HDD/DVD recorder input to use for<br />
recording.<br />
25 MENU (page 92)<br />
Press to display the disc menu if a DVD-Video, finalized<br />
DVD-R/-RW (Video mode) or finalized DVD+R/+RW disc<br />
is loaded.<br />
When in the GUIDE Plus+® system, use to jump directly<br />
to the Menu bar.<br />
26 JUKEBOX (page 121)<br />
Press to display the Jukebox screen of the HDD/DVD<br />
recorder, from where you can copy music to the HDD for<br />
playback.<br />
27 TV CONTROL (page 148)<br />
After setting up, use these controls to control your TV.<br />
TEXT (page 82)<br />
Press to display Teletext information (in <strong>Europe</strong>an<br />
countries except the UK) or to start the MHEG<br />
application display (UK only) if available during<br />
digital broadcasts.<br />
TV/DVD<br />
Press to switch between ‘TV mode’, in which you get<br />
the picture and sound from the TV’s tuner, and ‘DVD<br />
mode’, in which you get picture and sound from the<br />
system’s tuner (or an external input).<br />
28 DISPLAY (page 99)<br />
Displays/changes the on-screen information<br />
displays.<br />
RDS DISP<br />
Changes RDS displays (page 30).<br />
29 MAIN/SUB<br />
Change from MAIN to SUB to access the green<br />
functions/commands on the remote.<br />
Using the remote control<br />
Please keep in mind the following when using the remote<br />
control:<br />
Make sure that there are no obstacles between the<br />
remote and the remote sensor on the unit.<br />
Remote operation may become unreliable if strong<br />
sunlight or fluorescent light is shining on the unit’s<br />
remote sensor.<br />
Remote controllers for different devices can interfere<br />
with each other. Avoid using remotes for other<br />
equipment located close to this unit.<br />
Replace the batteries when you notice a fall off in the<br />
operating range of the remote.<br />
When the batteries run down or you change the<br />
batteries, the remote control mode is reset to<br />
Recorder 1. See Remote Control Mode on page 145.<br />
Use within the operating range in front of the remote<br />
control sensor on the display unit, as shown.<br />
30 30<br />
7 m
Controls and displays 03<br />
Putting the batteries in the remote<br />
control<br />
1 Open the battery compartment cover on the<br />
back of the remote control.<br />
2 Insert two AA/R6 batteries into the battery<br />
compartment following the indications (,) inside<br />
the compartment.<br />
3 Close the cover.<br />
Caution<br />
Incorrect use of batteries can result in hazards such<br />
as leakage and bursting. Please observe the<br />
following:<br />
Don’t mix new and old batteries together.<br />
Don’t use different kinds of battery together —<br />
although they may look similar, different batteries<br />
may have different voltages.<br />
Make sure that the plus and minus ends of each<br />
battery match the indications in the battery<br />
compartment.<br />
Remove batteries from equipment that isn’t going to<br />
be used for a month or more.<br />
When disposing of used batteries, please comply<br />
with governmental regulations or environmental<br />
public instruction’s rules that apply in your country or<br />
area.<br />
WARNING<br />
Do not use or store batteries in direct sunlight or<br />
other excessively hot place, such as inside a car or<br />
near a heater. This can cause batteries to leak,<br />
overheat, explode or catch fire. It can also reduce the<br />
life or performance of batteries.<br />
21<br />
En
04<br />
22<br />
En<br />
Before you start<br />
Chapter 4<br />
Before you start<br />
Switching on<br />
The HDD/DVD recorder and receiver subwoofer have separate power switches. The power switch for the receiver<br />
subwoofer is located on the display unit.<br />
Remote Control<br />
RECORDER<br />
<br />
HDD/DVD FM/AM<br />
PAUSE PLAY STOP<br />
<br />
REC STOP REC HELP<br />
<br />
TOP MENU<br />
INFO<br />
DISC<br />
NAVIGATOR<br />
HOME MENU<br />
GUIDE<br />
CHANNEL<br />
CHANNEL<br />
A.TV / D.TV<br />
PREV NEXT<br />
<br />
The table below shows what needs to be switched on for<br />
various system functions: Setting up<br />
HDD/DVD<br />
OPEN/CLOSE<br />
A.TV D.TV PLTV DivX COPY HDMI<br />
STANDBY/ON DV IN<br />
USB<br />
Function Display unit<br />
RECEIVER<br />
<br />
SOUND<br />
AUDIO IN RETRIEVER<br />
ENTER<br />
CM BACK<br />
CM SKIP<br />
RETURN/EXIT<br />
VOLUME<br />
AUDIO SUBTITLE ANGLE OPEN OPEN<br />
OPEN MCACC<br />
/ / TIMER REC REC MODE<br />
<br />
SETUP / TUNE+ SR+<br />
HDD/DVD<br />
recorder<br />
DVD playback On On<br />
CD playback On On<br />
HDD playback On On<br />
Radio On Off<br />
Timer recording Off On<br />
COMMON INTERFACE<br />
CH<br />
HDD/DVD Recorder (DVR-<strong>LX60D</strong>)<br />
STOP REC<br />
INPUT<br />
SELECT<br />
ONE TOUCH<br />
COPY<br />
A.TV/D.TV<br />
Display Unit<br />
VIDEO<br />
INPUT 2 S-VIDEO L(MONO) R AUDIO REC<br />
After connecting and installing the HDD/DVD recorder<br />
and receiver subwoofer, complete the steps below to set<br />
the system up for use.<br />
HDD/DVD recorder<br />
Set the date and time, TV channel tuning and the type<br />
of TV in the Setup Navigator (page 56).<br />
Receiver subwoofer<br />
Switch off the display demo mode (page 24).<br />
Complete the Auto MCACC setup to optimize the<br />
surround sound (page 24).
Before you start 04<br />
Basic operation<br />
This manual is split into to parts, one covering using the<br />
receiver subwoofer, the other using the HDD/DVD<br />
recorder. Below are some common operations and<br />
where to find them explained in this manual.<br />
Watching a DVD<br />
Remember that when using the remote to control the<br />
HDD/DVD recorder, you should point the remote towards<br />
the display unit, not the recorder itself.<br />
RECORDER<br />
<br />
HDD/DVD<br />
FM/AM<br />
PAUSE PLAY STOP<br />
<br />
<br />
REC<br />
<br />
STOP REC HELP INFO<br />
TOP MENU<br />
DISC<br />
NAVIGATOR<br />
HOME MENU<br />
GUIDE<br />
CHANNEL<br />
CHANNEL<br />
A.TV / D.TV<br />
PREV NEXT<br />
<br />
AUDIO<br />
SUBTITLE<br />
ENTER<br />
RECEIVER<br />
<br />
SOUND<br />
AUDIO IN RETRIEVER<br />
VOLUME<br />
MCACC<br />
1 Switch on the display unit (receiver subwoofer).<br />
2 Switch on the HDD/DVD recorder.<br />
3 Switch on your TV.<br />
Turn on your TV and make sure that it is set to the correct<br />
video input.<br />
4 Press HDD/DVD to select DVD.<br />
5 Press OPEN/CLOSE on the HDD/DVD recorder<br />
to open the disc tray.<br />
6 Load a disc.<br />
Load a disc with the label side facing up, using the disc<br />
tray guide to align the disc (if you’re loading a doublesided<br />
DVD disc, load it with the side you want to play<br />
face-down).<br />
ANGLE<br />
CM BACK<br />
CM SKIP<br />
RETURN/EXIT<br />
/ / / <br />
TIMER REC REC MODE<br />
<br />
SETUP / TUNE+ SR + ONE TOUCH COPY<br />
7 Press (play) to start playback.<br />
<br />
<br />
<br />
Press to stop playback.<br />
You can resume playback from the same<br />
point by pressing . (Press again to<br />
cancel the resume function.)<br />
Pauses playback, or restarts playback<br />
when paused.<br />
Press to start scanning. Press repeatedly<br />
to increase the scanning speed.<br />
See Basic playback on page 91 for more on playing discs.<br />
8 Adjust the volume.<br />
9 Adjust the sound using the surround effects.<br />
See Listening to your system on page 26 for details.<br />
Listening to a CD<br />
1 Switch on the display unit (receiver subwoofer).<br />
2 Switch on the HDD/DVD recorder.<br />
3 Press HDD/DVD to select DVD.<br />
4 Load a CD and start playback (page 93).<br />
5 Adjust the volume.<br />
6 Adjust the sound using the surround effects<br />
(page 26).<br />
Watching a title recorded on the HDD<br />
1 Switch on the display unit (receiver subwoofer).<br />
2 Switch on the HDD/DVD recorder.<br />
3 Switch on your TV.<br />
4 Press HDD/DVD to select HDD.<br />
5 Start playback of the HDD title (page 92).<br />
6 Adjust the volume.<br />
7 Adjust the sound using the surround effects<br />
(page 26).<br />
Listening to the radio<br />
1 Switch on the display unit (receiver subwoofer).<br />
2 Tune to a station (page 29).<br />
3 Adjust the volume.<br />
4 Adjust the sound using the surround effects<br />
(page 26).<br />
23<br />
En
05<br />
24<br />
En<br />
Getting started<br />
Chapter 5<br />
Getting started<br />
Important<br />
To access green functions on the remote, move the<br />
slider switch from MAIN to SUB.<br />
System demo setting<br />
Switches the automatic demo feature on or off (this<br />
starts when you plug in for the first time).<br />
AUDIO<br />
SUBTITLE<br />
ANGLE<br />
MCACC<br />
/ / TIMER REC REC MODE<br />
<br />
SETUP<br />
/ TUNE+ SR + ONE TOUCH COPY<br />
1 2<br />
3<br />
/ ST- ENTER<br />
4 5 6<br />
/ ST+ PAUSE LIVE TV<br />
F. S. SURR / TUNE- TEST TONE VIDEO IN<br />
7 8<br />
9<br />
SURROUND ADVANCED<br />
SOUND<br />
MENU<br />
SLEEP CLEAR JUKEBOX<br />
1 Switch the system into standby.<br />
2 Press SETUP.<br />
3 Use the / buttons to select DEMO from the<br />
menu, then press ENTER.<br />
4 Use the / buttons to select a setting, then<br />
press ENTER.<br />
Select from:<br />
DEMO ON – Switches the demo display on.<br />
DEMO OFF – Switches the demo display off and the<br />
system into standby.<br />
<br />
INPUT<br />
0<br />
CHANNEL<br />
VOLUME<br />
DISPLAY<br />
TEXT TV/DVD RDS DISP<br />
MAIN<br />
TV CONTROL<br />
SUB<br />
Using the Auto MCACC setup for<br />
optimal surround sound<br />
The Multichannel Acoustic Calibration (MCACC) system<br />
measures the acoustic characteristics of your listening<br />
area, taking into account ambient noise, and testing for<br />
channel delay and channel level. After you have set up<br />
the microphone provided, the system uses the<br />
information from a series of test tones to optimize the<br />
speaker settings and equalization (Acoustic Calibration<br />
EQ) for your particular room. 1<br />
Important<br />
The test tones used for Auto MCACC setup are loud;<br />
however, do not turn the volume down during setup<br />
as this may result in a sub-optimal setup.<br />
Make sure the microphone and speakers are not<br />
moved during the MCACC setup.<br />
RECORDER<br />
Note<br />
1 You only need to use the Auto MCACC setup once (unless you change the placement of your speakers or your room layout).<br />
<br />
HDD/DVD FM/AM<br />
RECEIVER<br />
<br />
SOUND<br />
AUDIO IN RETRIEVER<br />
PAUSE PLAY STOP<br />
<br />
REC<br />
<br />
STOP REC HELP INFO<br />
TOP MENU<br />
AUDIO SUBTITLE ANGLE MCACC<br />
/ / TIMER REC REC MODE<br />
<br />
SETUP / TUNE+ SR + ONE TOUCH COPY<br />
1 2 3<br />
/ ST-<br />
<br />
/ ST+ PAUSE LIVE TV<br />
F. S. SURR / TUNE- TEST TONE VIDEO IN<br />
SURROUND ADVANCED<br />
SOUND<br />
SLEEP CLEAR<br />
INPUT<br />
ENTER<br />
4 5 6<br />
7 8<br />
0<br />
CHANNEL<br />
9<br />
VOLUME<br />
TEXT TV/DVD<br />
MAIN<br />
TV CONTROL<br />
SUB<br />
MENU<br />
JUKEBOX<br />
DISPLAY<br />
RDS DISP
Getting started 05<br />
1 Connect the microphone to the MCACC SETUP<br />
MIC jack on the rear panel.<br />
MCACC<br />
SETUP MIC CONTROL IN<br />
SYSTEM CONNECTOR CONTROL<br />
DVD/DVR1<br />
OUT SUBWOOFER<br />
SURROUND<br />
(COAXIAL) DVD/DVR2<br />
FM UNBAL 75 AM LOOP ANTENNA<br />
AUDIO INPUT<br />
DIGITAL<br />
SPEAKERS<br />
DIGITAL ANALOG<br />
R L<br />
(OPTICAL) (OPTICAL)<br />
USE ONLY WITH DISPLAY UNIT.<br />
SEE INSTRUCTION MANUAL.<br />
AC IN<br />
CENTER R FRONT L<br />
MCACC<br />
SETUP MIC<br />
ANTENNA<br />
2 Place the microphone at your normal listening<br />
position.<br />
Place it about ear height, and make sure it is level by<br />
using a table or chair.<br />
Make sure there are no obstacles between the speakers<br />
and the microphone.<br />
3 If the receiver subwoofer is off, press RECEIVER<br />
to turn the power on.<br />
4 Press MCACC.<br />
Try to be as quiet as possible after pressing MCACC. The<br />
volume increases automatically and the system outputs<br />
a series of test tones.<br />
To cancel Auto MCACC setup before it has finished,<br />
press MCACC. The unit will continue to use the<br />
previous settings.<br />
If the ambient noise level is too high, NOISY blinks in<br />
the display for five seconds. To exit and check the<br />
noise levels 1 , press MCACC, or to try again, press<br />
ENTER when RETRY shows in the display.<br />
If you see an ERR MIC or ERR SP message in the<br />
display, there may be a problem with your mic or the<br />
speaker connections. To try again, press ENTER<br />
when you see RETRY 2 .<br />
When the MCACC setup is complete, the volume level<br />
returns to normal, COMPLETE 3 shows in the display, and<br />
Acoustic Calibration EQ is activated. 4<br />
L<br />
R<br />
Note<br />
1 If the room environment is not optimal for the Auto MCACC setup (too much ambient noise, echo off the walls, obstacles blocking the speakers<br />
from the microphone) the final settings may be incorrect. Check for household appliances (air conditioner, fridge, fan, etc.), that may be<br />
affecting the environment and switch them off if necessary.<br />
Some older TVs may interfere with the operation of the mic. If this seems to be happening, switch off the TV during Auto MCACC setup.<br />
2 If this doesn’t work, press MCACC, turn off the power, and check the problem indicated by the ERR message, then try the Auto MCACC setup<br />
again.<br />
3 If COMPLETE doesn’t appear, it is likely an error occurred during the setup. Please check all connections and try again.<br />
4 See Listening with Acoustic Calibration EQ on page 28 to switch on/off Acoustic Calibration EQ.<br />
25<br />
En
06<br />
26<br />
En<br />
Listening to your system<br />
Chapter 6<br />
Listening to your system<br />
Important<br />
To access green functions on the remote, move the<br />
slider switch from MAIN to SUB.<br />
Auto listening mode<br />
The Auto listening mode is the simplest way to listen to<br />
any source as it was mastered: the output from the<br />
speakers mirrors the channels in the source material.<br />
If you set up the system for Front surround (page 6), the<br />
Front Surround modes will give the best results (see<br />
Using Front Stage Surround Advance on page 27).<br />
7 8<br />
SURROUND<br />
ADVANCED SOUND<br />
SLEEP CLEAR<br />
<br />
INPUT<br />
0<br />
CHANNEL<br />
VOLUME<br />
• Press SURROUND to select the AUTO listening<br />
mode.<br />
If the source is Dolby Digital or DTS, the front panel 2 D<br />
or DTS indicator lights.<br />
You can also use the SURROUND button on the<br />
display unit to change the listening mode.<br />
Listening in surround sound<br />
You can listen to stereo or multichannel sources in<br />
surround sound. Surround sound is generated from<br />
stereo sources using one of the Dolby Pro Logic<br />
decoding modes.<br />
If you set up the system for Front surround (page 6), the<br />
Front Surround modes will give the best results (see<br />
Using Front Stage Surround Advance on page 27).<br />
• Press SURROUND repeatedly to select a listening<br />
mode.<br />
You can also use the SURROUND button on the<br />
display unit to change the listening mode.<br />
9<br />
MENU<br />
JUKEBOX<br />
DISPLAY<br />
TEXT TV/DVD RDS DISP<br />
MAIN<br />
TV CONTROL<br />
SUB<br />
7 8<br />
SURROUND<br />
ADVANCED SOUND<br />
SLEEP CLEAR<br />
<br />
INPUT<br />
0<br />
CHANNEL<br />
9<br />
VOLUME<br />
MENU<br />
JUKEBOX<br />
DISPLAY<br />
TEXT TV/DVD RDS DISP<br />
MAIN<br />
TV CONTROL<br />
SUB<br />
The choices that appear in the display will vary according<br />
to the type of source that’s playing.<br />
If the source is Dolby Digital or DTS, the front panel 2 D<br />
or DTS indicator lights.<br />
AUTO – Auto listening mode (see above)<br />
DOLBY PL (Dolby Pro Logic) – 4.1 channel surround<br />
sound for use with any two-channel source<br />
MOVIE (Dolby Pro Logic II Movie) – 5.1 channel<br />
surround sound, especially suited to movie sources,<br />
for use with any two-channel source<br />
MUSIC (Dolby Pro Logic II Music) – 5.1 channel<br />
surround sound, especially suited to music sources,<br />
for use with any two-channel source; see Dolby Pro<br />
Logic II Music settings below<br />
STEREO – See Listening in stereo on page 27.<br />
Dolby Pro Logic II Music settings<br />
When listening in Dolby Pro Logic II Music mode (see<br />
above), there are three settings you can adjust: Center<br />
Width, Dimension, and Panorama.<br />
SETUP<br />
/ ST- ENTER<br />
/ ST+ PAUSE LIVE TV<br />
F. S. SURR / TUNE- TEST TONE VIDEO IN<br />
SURROUND ADVANCED<br />
/ TUNE+ SR + ONE TOUCH COPY<br />
1 2<br />
3<br />
4 5 6<br />
7 8<br />
0<br />
9<br />
SOUND<br />
SLEEP CLEAR<br />
MENU<br />
JUKEBOX<br />
<br />
1 With Dolby Pro Logic II Music mode active, press<br />
SOUND.<br />
2 Use / to select C WIDTH, DIMEN. or<br />
PANORAMA then press ENTER.<br />
C WIDTH (Center Width) – Provides a better blend of<br />
the front speakers by spreading the center channel<br />
between the front right and left speakers, making it<br />
sound wider (higher settings) or narrower (lower<br />
settings).<br />
DIMEN. (Dimension) – Adjusts the depth of the<br />
surround sound balance from front to back, making<br />
the sound more distant (minus settings), or more<br />
forward (positive settings).<br />
PANORAMA – Extends the front stereo image to<br />
include the surround speakers for a ‘wraparound’<br />
effect.<br />
3 Use / to adjust the setting then press ENTER<br />
to confirm.<br />
<br />
INPUT<br />
CHANNEL<br />
VOLUME<br />
TEXT TV/DVD<br />
MAIN<br />
TV CONTROL<br />
SUB<br />
JUKEBOX<br />
DISPLAY<br />
RDS DISP
Listening to your system 06<br />
Using Front Stage Surround Advance<br />
The Front Stage Surround Advance modes are effective<br />
when you are using the Front surround speaker setup as<br />
described on page 6.<br />
/ ST<br />
<br />
/ ST+ PAUSE LIVE TV<br />
F. S. SURR<br />
/ TUNE- TEST TONE VIDEO IN<br />
SURROUND ADVANCED<br />
• Press F.S.SURR to select a Front Stage Surround<br />
Advance mode.<br />
Press repeatedly to select FOCUS5.1, WIDE5.1 or<br />
EXTRAPWR.<br />
FOCUS5.1 – Use to provide a rich surround sound<br />
effect directed to the center area where the left and<br />
right speakers’ sound projection converges.<br />
WIDE5.1 – Use to provide a surround sound effect to<br />
a wider area than FOCUS5.1 mode.<br />
EXTRAPWR – Outputs stereo sound (in the case of<br />
multi-channel sources, down-mixed stereo sound)<br />
from the surround speakers for powerful stereo<br />
effect.<br />
Using Advanced Surround<br />
The Advanced Surround effects can be used with any<br />
multichannel or stereo source for a variety of additional<br />
surround sound effects. These modes are designed to<br />
provide optimum listening effect when using the<br />
Standard surround setup described on page 8.<br />
• Press ADVANCED to select an Advanced<br />
Surround mode.<br />
Press repeatedly to select:<br />
ACTION – Suitable for action movies<br />
UNPLUGED – Suitable for acoustic musical sources<br />
EXPANDED – Wide sound field<br />
SOUND<br />
SLEEP CLEAR<br />
INPUT<br />
ENTER<br />
4 5 6<br />
7 8<br />
0<br />
CHANNEL<br />
9<br />
VOLUME<br />
MENU<br />
JUKEBOX<br />
DISPLAY<br />
TEXT TV/DVD RDS DISP<br />
MAIN<br />
TV CONTROL<br />
SUB<br />
7 8<br />
SURROUND ADVANCED SOUND<br />
SLEEP CLEAR<br />
<br />
INPUT<br />
0<br />
CHANNEL<br />
9<br />
VOLUME<br />
MENU<br />
JUKEBOX<br />
DISPLAY<br />
TEXT TV/DVD RDS DISP<br />
MAIN<br />
TV CONTROL<br />
SUB<br />
TV SURR. – Surround sound for mono or stereo TV<br />
broadcasts<br />
SPORTS – Suitable for sports programming<br />
ADV.GAME – Suitable for TV game units<br />
VIRTUAL – A virtual surround effect using just the<br />
subwoofer and front speakers.<br />
X-STEREO – Powerful surround sound for stereo<br />
music sources<br />
Listening in stereo<br />
You can listen to any source — stereo or multichannel —<br />
in stereo. When playing a multichannel source, all<br />
channels are downmixed to the front left/right speakers<br />
and the subwoofer.<br />
F. S. SURR / TUNE- TEST TONE VIDEO IN<br />
7 8<br />
SURROUND<br />
ADVANCED SOUND<br />
SLEEP CLEAR<br />
<br />
INPUT<br />
0<br />
CHANNEL<br />
VOLUME<br />
• Press SURROUND repeatedly until STEREO shows<br />
in the display.<br />
You can also use the SURROUND button on the<br />
display unit to change the listening mode.<br />
Using the Sound Retriever<br />
When audio data is removed during the MP3 or WMA<br />
compression process, sound quality often suffers from<br />
an uneven sound image. The Sound Retriever feature<br />
employs new DSP technology that helps bring CD quality<br />
sound back to compressed 2-channel audio by restoring<br />
sound pressure and smoothing jagged artifacts left over<br />
after compression.<br />
Tip<br />
This feature is effective when used together with the<br />
Jukebox function of the HDD/DVD recorder.<br />
9<br />
MENU<br />
JUKEBOX<br />
DISPLAY<br />
TEXT TV/DVD RDS DISP<br />
MAIN<br />
TV CONTROL<br />
SUB<br />
RECORDER<br />
<br />
RECEIVER<br />
<br />
SOUND<br />
HDD/DVD FM/AM AUDIO IN RETRIEVER<br />
PAUSE PLAY STOP<br />
<br />
REC<br />
<br />
STOP REC HELP INFO<br />
27<br />
En
06<br />
28<br />
En<br />
Listening to your system<br />
• While listening to a stereo source, press SOUND<br />
RETRIEVER.<br />
Press repeatedly to switch between:<br />
RTRV ON — Switches the Sound Retriever on.<br />
RTRV OFF — Switches the Sound Retriever off.<br />
Listening with Acoustic Calibration EQ<br />
You can listen to sources using the Acoustic Calibration<br />
EQ set in Using the Auto MCACC setup for optimal<br />
surround sound on page 24.<br />
1 Press SOUND.<br />
2 Use the / buttons to select MCACC EQ then<br />
press ENTER.<br />
3 Use the / buttons to switch EQ ON or EQ OFF<br />
then press ENTER to confirm.<br />
On the EQ OFF setting, equalization is set to off and<br />
speaker settings (channel delay and channel level)<br />
remains as it is set.<br />
Acoustic Calibration EQ is set to on automatically<br />
after Auto MCACC setup is used.<br />
Enhancing dialogue<br />
The Dialogue Enhancement feature is designed to make<br />
the dialogue stand out from other background sounds in<br />
a TV or movie sound track.<br />
1 Press SOUND.<br />
SETUP<br />
<br />
/ ST+ PAUSE LIVE TV<br />
F. S. SURR / TUNE- TEST TONE VIDEO IN<br />
SURROUND ADVANCED<br />
SOUND<br />
SLEEP CLEAR<br />
INPUT<br />
/ TUNE+ SR + ONE TOUCH COPY<br />
1 2<br />
3<br />
/ ST- ENTER<br />
4 5 6<br />
7 8<br />
0<br />
CHANNEL<br />
VOLUME<br />
2 Use the / buttons to select DIALOGUE then<br />
press ENTER.<br />
3 Use the / buttons to select the amount<br />
dialogue enhancement then press ENTER to confirm.<br />
Select between OFF, MID or MAX.<br />
9<br />
MENU<br />
JUKEBOX<br />
DISPLAY<br />
TEXT TV/DVD RDS DISP<br />
MAIN<br />
TV CONTROL<br />
SUB<br />
Using Quiet and Midnight listening<br />
modes<br />
The Quiet listening feature reduces excessive bass or<br />
treble in a sound source.<br />
The Midnight listening feature allows you to hear<br />
effective surround sound of movies at low volume levels.<br />
1 Press SOUND.<br />
2 Use the / buttons to select TONE then press<br />
ENTER.<br />
3 Use the / buttons to select QUIET or MIDNIGHT<br />
then press ENTER to confirm.<br />
To cancel the Quiet or Midnight listening modes,<br />
select BASS/TRE.<br />
Adjusting the bass and treble<br />
Use the bass and treble controls to adjust the overall tone.<br />
1 Press SOUND.<br />
2 Use the / buttons to select TONE then press<br />
ENTER.<br />
3 Use the / buttons to select BASS/TRE then<br />
press ENTER.<br />
Selecting BASS/TRE cancels the Quiet and Midnight<br />
listening modes. These modes cannot be used at the<br />
same time.<br />
4 Use the / buttons to select BASS or TREBLE;<br />
use the / buttons to adjust the sound then press<br />
ENTER to confirm.<br />
Boosting the bass level<br />
There are two bass modes you can use to enhance the<br />
bass in a source.<br />
1 Press SOUND.<br />
2 Use the / buttons to select BASSMODE then<br />
press ENTER.<br />
3 Use the / buttons to select the sound then<br />
press ENTER to confirm.<br />
Select between OFF, MUSIC or CINEMA.
Listening to the radio 07<br />
Chapter 7<br />
Listening to the radio<br />
Important<br />
To access green functions on the remote, move the<br />
slider switch from MAIN to SUB.<br />
Listening to the radio<br />
The tuner can receive both FM and AM broadcasts, and<br />
lets you memorize your favorite stations so you don’t have<br />
to manually tune in every time you want to listen.<br />
RECORDER<br />
<br />
HDD/DVD FM/AM<br />
AUDIO IN<br />
PAUSE PLAY STOP<br />
<br />
REC STOP REC HELP<br />
<br />
TOP MENU<br />
INFO<br />
DISC<br />
NAVIGATOR<br />
HOME MENU<br />
GUIDE<br />
CHANNEL<br />
CHANNEL<br />
A.TV / D.TV<br />
PREV NEXT<br />
<br />
ENTER<br />
RECEIVER<br />
1 Press FM/AM to switch to the tuner, then press<br />
repeatedly to select the FM or AM band.<br />
The display shows the band and frequency.<br />
2 Tune to a frequency.<br />
There are three tuning modes — manual, auto, and highspeed:<br />
<br />
SOUND<br />
RETRIEVER<br />
VOLUME<br />
AUDIO SUBTITLE ANGLE MCACC<br />
/ / TIMER REC REC MODE<br />
<br />
SETUP<br />
/ TUNE+<br />
SR + ONE TOUCH COPY<br />
1 2<br />
3<br />
4 5 6<br />
7 8<br />
0<br />
9<br />
SOUND<br />
SLEEP<br />
<br />
CLEAR<br />
/ ST-<br />
ENTER<br />
/ ST+ PAUSE LIVE TV<br />
F. S. SURR / TUNE-<br />
TEST TONE VIDEO IN<br />
SURROUND ADVANCED<br />
CM BACK<br />
CM SKIP<br />
RETURN/EXIT<br />
MENU<br />
JUKEBOX<br />
INPUT CHANNEL VOLUME DISPLAY<br />
TEXT TV / DVD RDS DISP<br />
MAIN<br />
TV CONTROL<br />
SUB<br />
Manual tuning – Press TUNE +/– repeatedly to<br />
change the displayed frequency.<br />
Auto tuning – Press and hold TUNE +/– until the<br />
frequency display starts to move, then release. The<br />
tuner will stop on the next station it finds. Repeat to<br />
keep searching.<br />
High-speed tuning – Press and hold TUNE +/– until<br />
the frequency display starts to move rapidly. Keep the<br />
button held down until you reach the frequency you<br />
want. If necessary, fine tune the frequency using the<br />
manual tuning method.<br />
Improving poor FM reception<br />
If you’re listening to an FM station in stereo but the<br />
reception is weak, you can improve the sound quality by<br />
switching to mono.<br />
1 Tune to an FM radio station then press SETUP.<br />
2 Use the / buttons to choose FM MODE then<br />
press ENTER.<br />
3 Use the / buttons to select FM MONO then<br />
press ENTER.<br />
The mono indicator ( ) lights when the tuner is in mono<br />
reception mode.<br />
Select FM AUTO above to switch back to auto-stereo<br />
mode (the stereo indicator ( ) lights when receiving a<br />
stereo broadcast).<br />
Improving poor AM sound<br />
The simplest way to improve the sound quality of AM<br />
radio is to make sure that the TV in the room is switched<br />
off. Also try changing the position and direction of the<br />
AM loop antenna.<br />
Changing the noise cut mode<br />
If you find that the sound quality is bad even after trying<br />
the above, you may be able to improve it using a different<br />
noise cut mode. Just choose the one that sounds best.<br />
1 Tune to an AM radio station then press SETUP.<br />
2 Use the / buttons to choose NOISECUT then<br />
press ENTER.<br />
3 Use the / buttons to select a Noise cut mode<br />
(1, 2 or 3) then press ENTER.<br />
29<br />
En
07<br />
30<br />
En<br />
Listening to the radio<br />
Memorizing stations<br />
You can save up to 30 station presets so that you always<br />
have easy access to your favorite stations without having<br />
to tune in manually each time.<br />
1 Tune to an AM or FM radio station.<br />
Select mono or auto-stereo reception (FM) or the Noise<br />
Cut mode (AM) as necessary. These settings are saved<br />
along with the preset.<br />
2 Press SETUP.<br />
3 Use the / buttons to choose ST.MEM. then<br />
press ENTER.<br />
4 Use the / buttons to select the station preset<br />
you want then press ENTER.<br />
Listening to station presets<br />
1 Make sure the tuner function is selected.<br />
2 Use the ST +/– buttons to select a station preset.<br />
Using RDS<br />
Radio Data System (RDS) is a system used by most FM<br />
radio stations to provide listeners with various kinds of<br />
information — the name of the station and the kind of<br />
show they’re broadcasting, for example.<br />
One feature of RDS is that you can search by type of<br />
program. For example, you can search for a station that’s<br />
broadcasting a show with the program type, JAZZ.<br />
You can search the following program types: 1<br />
NEWS – News<br />
FINANCE – Stock market reports,<br />
AFFAIRS – Current Affairs commerce, trading, etc.<br />
INFO – General Information CHILDREN – Programs for<br />
SPORT – Sport<br />
children<br />
EDUCATE – Educational SOCIAL – Social affairs<br />
DRAMA – Radio plays, etc. RELIGION – Programs<br />
CULTURE – National or regional concerning religion<br />
culture, theater, etc.<br />
PHONE IN – Public expressing<br />
SCIENCE – Science and their views by phone<br />
technology<br />
TRAVEL – Holiday-type travel<br />
VARIED – Usually talk-based rather than traffic<br />
material, such as quiz shows or announcements<br />
interviews<br />
LEISURE – Leisure interests and<br />
POP M – Pop music<br />
hobbies<br />
ROCK M – Rock music JAZZ – Jazz<br />
EASY M – Easy listening COUNTRY – Country music<br />
LIGHT M – ‘Light’ classical music NATION M – Popular music in a<br />
CLASSICS – ‘Serious’ classical language other than English<br />
music<br />
OLDIES – Popular music from the<br />
OTHER M – Music not fitting ’50s and ’60s<br />
above categories<br />
FOLK M – Folk music<br />
WEATHER – Weather reports DOCUMENT – Documentary<br />
Displaying RDS information<br />
You can display the different types of RDS information<br />
available. 2<br />
• Press RDS DISP for RDS information.<br />
Each press changes the display as follows:<br />
Radio Text (RT) – Messages sent by the radio station.<br />
For example, a talk radio station may provide a phone<br />
number as RT.<br />
Program Service Name (PS) – The name of the radio<br />
station.<br />
Program Type (PTY) – This indicates the kind of<br />
program currently being broadcast.<br />
SEARCH – PTY search (see below)<br />
Current tuner frequency<br />
Searching for RDS programs<br />
You can search for a program type listed above.<br />
1 Press the FM/AM button for the FM band. 3<br />
2 Press RDS DISP repeatedly until SEARCH appears in<br />
the display.<br />
3 Use the / buttons to select the program type<br />
you want to hear.<br />
4 Press ENTER to start the search.<br />
The system searches the station presets for a match. If it<br />
finds one, searching stops for five sec.<br />
5 If you want to keep listening to the station, press<br />
ENTER within the five seconds.<br />
If you don’t press ENTER, searching resumes.<br />
Note<br />
1 In addition, there are three other program types, TEST, ALARM, and NO TYPE. ALARM and TEST are used for emergency announcements.<br />
You can’t search for these, but the tuner will switch automatically to this RDS broadcast signal. NO TYPE appears when a program type cannot<br />
be found.<br />
2 If any noise is picked up while displaying the RT scroll, some characters may be displayed incorrectly.<br />
If you see NO RADIO TEXT DATA in the RT display, it means no RT data is sent from the broadcast station. The display will automatically<br />
switch to the PS data display (if no PS data, the frequency is displayed).<br />
In the PTY display, NO DATA or NO TYPE may be shown. In this case, the PS display is shown after a few seconds.<br />
3 RDS is only possible in the FM band.<br />
S U<br />
<br />
O OUC CO<br />
/ ST+ PAUSE LIVE TV<br />
F. S. SURR / TUNE- TEST TONE VIDEO IN<br />
SURROUND ADVANCED<br />
SOUND<br />
SLEEP CLEAR<br />
INPUT<br />
U<br />
1 2 3<br />
/ ST- ENTER<br />
4 5 6<br />
7 8<br />
0<br />
CHANNEL<br />
MAIN<br />
SUB<br />
S<br />
9<br />
VOLUME<br />
MENU<br />
JUKEBOX<br />
DISPLAY<br />
TEXT TV/DVD RDS DISP<br />
TV CONTROL
Surround sound settings 08<br />
Chapter 8<br />
Surround sound settings<br />
Important<br />
To access green functions on the remote, move the<br />
slider switch from MAIN to SUB.<br />
Using the Setup menu<br />
From the Setup menu you can access all the surround<br />
sound settings of the system 1 , including channel levels,<br />
speaker distances, dynamic range adjustment and dual<br />
mono audio playback.<br />
Use the following buttons to use the Setup menu.<br />
<br />
SETUP<br />
<br />
/ ST+ PAUSE LIVE TV<br />
F. S. SURR / TUNE- TEST TONE VIDEO IN<br />
SURROUND ADVANCED<br />
Channel level setting<br />
The Auto MCACC feature (see page 24) should give you<br />
the best surround sound setup. However you may find<br />
that by further adjustment of the channel levels you can<br />
improve the surround sound in your listening room.<br />
This method of setting the channel levels allows you to<br />
listen to a source and adjust the levels of each playback<br />
channel. Note that the channel level settings for stereo<br />
playback are independent of the settings for surround<br />
sound playback.<br />
A further method of setting the channel levels is to use<br />
the test tone method. See Adjusting the channel levels<br />
using the test tone on page 32 for more on this.<br />
SOUND<br />
SLEEP CLEAR<br />
INPUT<br />
<br />
/ TUNE+ SR + ONE TOUCH COPY<br />
1 2<br />
3<br />
/ ST- ENTER<br />
4 5 6<br />
7 8<br />
0<br />
CHANNEL<br />
9<br />
VOLUME<br />
MENU<br />
JUKEBOX<br />
DISPLAY<br />
TEXT TV/DVD RDS DISP<br />
MAIN<br />
TV CONTROL<br />
SUB<br />
1 Select stereo or multichannel playback for a source.<br />
2 Press SETUP.<br />
3 Use the / buttons to select CH LEVEL, then<br />
press ENTER.<br />
4 Use / to select a channel; / to adjust the<br />
level of that channel.<br />
You can adjust the level of each channel by ±10 dB.<br />
If the system is in Stereo or Virtual mode, or a stereo<br />
source is playing in Auto mode, you will not be able<br />
to adjust the center or surround channels.<br />
5 Press ENTER when you’re finished.<br />
If you use the Auto MCACC feature again, it will<br />
overwrite the settings you have made here.<br />
Speaker distance setting<br />
The Auto MCACC feature (see page 24) should give you<br />
the best surround sound setup. However you may find<br />
that by further adjustment of the speaker distance<br />
settings you can improve the surround sound in your<br />
listening room.<br />
Set the distance of each speaker from your normal<br />
listening position.<br />
1 Press SETUP.<br />
2 Use the / buttons to select DISTANCE, then<br />
press ENTER.<br />
3 Use / to select a speaker; / to adjust the<br />
distance.<br />
Adjust the following speakers:<br />
L – Front left speaker<br />
C – Center speaker<br />
R – Front right speaker<br />
SR – Surround right speaker<br />
SL – Surround left speaker<br />
SW – Subwoofer<br />
Each speaker can be adjusted from 0.3 m to 9.0 m.<br />
4 Press ENTER when you’re finished.<br />
If you use the Auto MCACC feature again, it will<br />
overwrite the settings you have made here.<br />
Note<br />
1 There are other settings you can adjust from the Setup menu; these are explained in Listening to the radio on page 29 and Additional information<br />
on page 36.<br />
31<br />
En
08<br />
32<br />
En<br />
Surround sound settings<br />
Dynamic Range Control 1<br />
When watching Dolby Digital or DTS material at low<br />
volume, low level sounds — including some of the dialog<br />
— can be difficult to hear properly. Using one of the<br />
Dynamic Range Control (DRC) settings can help by<br />
bringing up the low level sounds, while controlling high<br />
level peaks.<br />
Dynamic Range Control works only with Dolby Digital<br />
soundtracks and some DTS soundtracks.<br />
1 Press SETUP.<br />
2 Use the / buttons to select DRC, then press<br />
ENTER.<br />
3 Use / to select a setting.<br />
Select one of the following:<br />
DRC OFF (default) – No dynamic range adjustment<br />
(use when listening at higher volume)<br />
DRC MID – Mid setting<br />
DRC HIGH – Dynamic range is reduced (loud sounds<br />
are reduced in volume while quieter sounds are<br />
increased)<br />
4 Press ENTER to exit.<br />
Dual mono setting 2<br />
Specifies how dual mono encoded Dolby Digital or DTS<br />
soundtracks should be played. You can also use this<br />
setting to switch the audio channel on DVD-RW discs<br />
recorded with bilingual audio.<br />
1 Press SETUP.<br />
2 Use the / buttons to select DUALMONO,<br />
then press ENTER.<br />
3 Use / to select a setting.<br />
Select one of the following:<br />
CH1 MONO (default) – Only channel 1 is played<br />
CH2 MONO – Only channel 2 is played<br />
CH1/CH2 – Both channels are played through the<br />
front speakers<br />
4 Press ENTER to exit.<br />
Adjusting the channel levels using<br />
the test tone<br />
If you prefer, you can set the channel levels using a test<br />
tone as a reference, rather than playing a source (see<br />
Channel level setting on page 31). A test tone is played<br />
through each speaker in turn, allowing you to adjust the<br />
level as it plays.<br />
Note that the channel level settings for stereo sources<br />
are independent of the settings for surround sound<br />
sources.<br />
1 Press SURROUND to select the Auto listening<br />
mode.<br />
If you want to set the channel levels for stereo (two<br />
channel) playback, select the STEREO listening<br />
mode.<br />
2 Press TEST TONE.<br />
The test tone is output from each speaker in turn.<br />
3 While a test tone is playing, use the / buttons<br />
to adjust that channel level.<br />
The aim is to adjust the levels so that you hear the test<br />
tone at the same volume from each speaker. You can<br />
adjust the level of each channel by ±10 dB.<br />
You can adjust the overall volume of test tone output<br />
using the VOLUME +/– buttons (this does not affect<br />
the channel level settings).<br />
If the system is in Stereo or Virtual mode, you will not<br />
be able to adjust the center or surround channels.<br />
Because of the ultra low frequencies the subwoofer<br />
produces, it may sound quieter than it really is. We<br />
suggest adjusting the subwoofer level while listening<br />
to a source. See the method described in Channel<br />
level setting on page 31.<br />
4 When you’re done, press ENTER to exit test tone<br />
setup.<br />
If you use the Auto MCACC feature again, it will<br />
overwrite the settings you have made here.<br />
Note<br />
1 This setting is effective for the speaker output. A similar adjustment feature is available on the HDD/DVD recorder — see Audio DRC on<br />
page 141.<br />
2 This setting is effective for the speaker output. A similar adjustment feature is available on the HDD/DVD recorder — see Switching audio<br />
channels on page 99.<br />
<br />
SETUP<br />
/ ST- ENTER<br />
<br />
/ ST+ PAUSE LIVE TV<br />
F. S. SURR / TUNE- TEST TONE<br />
VIDEO IN<br />
SURROUND<br />
ADVANCED SOUND<br />
SLEEP CLEAR<br />
INPUT<br />
CHANNEL<br />
MAIN<br />
SUB<br />
<br />
/ TUNE+ SR + ONE TOUCH COPY<br />
1 2<br />
3<br />
4 5 6<br />
7 8 9<br />
0<br />
VOLUME<br />
TEXT TV/DVD<br />
TV CONTROL<br />
MENU<br />
JUKEBOX<br />
DISPLAY<br />
RDS DISP
Other connections 9<br />
Chapter 9<br />
Other connections<br />
Important<br />
When connecting this system or changing<br />
connections, be sure to switch power off and<br />
disconnect the power cord from the wall socket.<br />
After completing all connections, connect the power<br />
cord to the wall socket.<br />
Connecting auxiliary components<br />
This system has optical-type digital inputs. Use these to<br />
connect external components, such as your MD or CD<br />
recorder.<br />
MCACC<br />
SETUP MIC CONTROL IN<br />
SYSTEM CONNECTOR CONTROL<br />
DVD/DVR1<br />
OUT SUBWOOFER<br />
SURROUND<br />
(COAXIAL) DVD/DVR2<br />
FM UNBAL 75 AM LOOP ANTENNA<br />
AUDIO INPUT<br />
DIGITAL<br />
SPEAKERS<br />
DIGITAL ANALOG<br />
R L<br />
(OPTICAL) (OPTICAL)<br />
USE ONLY WITH DISPLAY UNIT.<br />
SEE INSTRUCTION MANUAL.<br />
AC IN<br />
MD, CD Recorder, etc.<br />
VR1<br />
AL) DVD/DVR2<br />
AUDIO INPUT<br />
DIGITAL<br />
DIGITAL<br />
(OPTICAL) (OPTICAL)<br />
CENTER R FRONT L<br />
• Connect the DVD/DVR2 (OPTICAL) or DIGITAL<br />
(OPTICAL) jack on the rear panel to the optical<br />
output of an external playback component.<br />
These include digital components such as an MD player,<br />
digital satellite, or a game system.<br />
Connecting an analog audio component<br />
You can use the ANALOG input jacks to connect an<br />
analog audio component, such as a tape player. See<br />
Using this system for TV audio on page 14 for connection<br />
details (this explains connecting the audio output from<br />
your TV, but any analog audio component can be<br />
connected).<br />
ANTENNA<br />
L<br />
R<br />
To digital audio<br />
output (optical)<br />
Listening to an external audio source<br />
You can connect both analog and digital external audio<br />
sources to this system. Digital audio sources include<br />
digital satellite receivers, CD recorders, etc. Analog<br />
sources include your TV. See also Using this system for<br />
TV audio on page 14 and Connecting auxiliary<br />
components above.<br />
RECORDER<br />
<br />
HDD/DVD FM/AM AUDIO IN<br />
<br />
RECEIVER<br />
<br />
SOUND<br />
RETRIEVER<br />
PAUSE PLAY STOP<br />
<br />
1 If the system isn’t already on, press RECEIVER<br />
to switch on.<br />
Also make sure that the external source (TV, satellite<br />
receiver, etc.) is switched on.<br />
2 Use the AUDIO IN button to select an audio input<br />
source.<br />
DVD/DVR1<br />
DVD/DVR2<br />
ANALOG DIGITAL<br />
3 If necessary, start playback of the external<br />
source.<br />
33<br />
En
9<br />
34<br />
En<br />
Other connections<br />
Connecting external antennas<br />
For an external AM antenna, use 5 to 6 meters of vinylinsulated<br />
wire and set up either indoors or outdoors.<br />
Leave the loop antenna connected.<br />
For an external FM antenna, use a PAL connector to hook<br />
up an external FM antenna.<br />
external FM antenna external AM antenna<br />
ANTENNA<br />
PAL connector<br />
FM UNBAL 75<br />
MCACC<br />
SETUP MIC CONTROL IN<br />
SYSTEM CONNECTOR CONTROL<br />
DVD/DVR1<br />
OUT SUBWOOFER<br />
SURROUND<br />
(COAXIAL) DVD/DVR2<br />
FM UNBAL 75 AM LOOP ANTENNA<br />
AUDIO INPUT<br />
DIGITAL<br />
SPEAKERS<br />
DIGITAL ANALOG<br />
R L<br />
(OPTICAL) (OPTICAL)<br />
AM LOOP ANTENNA<br />
USE ONLY WITH DISPLAY UNIT.<br />
SEE INSTRUCTION MANUAL.<br />
Indoor antenna<br />
(vinyl-coated Wire)<br />
(5 m to 6 m)<br />
AC IN<br />
CENTER R FRONT L<br />
ANTENNA<br />
Outdoor antenna<br />
Loop antenna<br />
L<br />
R<br />
Using this unit with a Pioneer plasma<br />
display<br />
If you have a Pioneer plasma display 1 , you can use an<br />
SR+ cable 2 to connect it to this unit and take advantage<br />
of various convenient features, such as controlling this<br />
unit via the plasma display’s remote sensor, automatic<br />
video input switching of the plasma display, display unit<br />
messages appearing on the plasma display screen, and<br />
automatic volume muting on the plasma display.<br />
MCACC<br />
SETUP MIC CONTROL IN<br />
SYSTEM CONNECTOR CONTROL<br />
DVD/DVR1<br />
OUT SUBWOOFER<br />
SURROUND<br />
(COAXIAL) DVD/DVR2<br />
FM UNBAL 75 AM LOOP ANTENNA<br />
AUDIO INPUT<br />
DIGITAL<br />
SPEAKERS<br />
DIGITAL ANALOG<br />
R L<br />
(OPTICAL) (OPTICAL)<br />
USE ONLY WITH DISPLAY UNIT.<br />
SEE INSTRUCTION MANUAL.<br />
Important<br />
With an SR+ cable connected, the remote must now<br />
be pointed towards your plasma display rather than<br />
the display unit of the receiver subwoofer in order to<br />
control the receiver subwoofer.<br />
• Use a 3-ringed miniplug SR+ cable to connect the<br />
CONTROL IN jack of this unit to the CONTROL OUT<br />
jack of your plasma display. 3<br />
Before you can use the extra SR+ features, you need to<br />
make a few settings in the unit—see SR+ Setup for<br />
Pioneer plasma displays on page 35.<br />
Note<br />
1 This system is compatible with all Pioneer plasma displays from 2003 onward.<br />
2 The 3-ringed SR+ cable from Pioneer is commercially available under the part number ADE7095. Contact the Pioneer Customer Support division<br />
for more information on obtaining an SR+ cable.<br />
3 You won’t be able to use the remote sensor of this unit with the CONTROL IN jack of this unit connected to the CONTROL OUT jack of your<br />
plasma display. You can use the remote sensor of the plasma display (even in standby) as long as the power isn’t switched off.<br />
AC IN<br />
CENTER R FRONT L<br />
Pioneer plasma display<br />
CONTROL IN<br />
L<br />
R<br />
CONTROL<br />
OUT
Other connections 9<br />
SR+ Setup for Pioneer plasma displays<br />
Make the following settings if you have connected a<br />
Pioneer plasma display to this unit using an SR+ cable.<br />
/ / TIMER REC REC MODE<br />
<br />
SETUP / TUNE+ SR + ONE TOUCH COPY<br />
1 2 3<br />
/ ST- ENTER<br />
4 5 6<br />
<br />
/ ST+ PAUSE LIVE TV<br />
F. S. SURR / TUNE- TEST TONE VIDEO IN<br />
7 8<br />
SURROUND ADVANCED<br />
1 Press SR+.<br />
2 Use the / buttons to choose SETUP, then<br />
press ENTER.<br />
3 Use the / buttons to choose the setting you<br />
want to adjust.<br />
The current setting is shown for each option as you cycle<br />
through the display. See below for a full list and<br />
description of each.<br />
4 Use the / buttons to adjust the setting.<br />
5 Repeat steps 3 and 4 to make other settings.<br />
6 When you’re done, press ENTER to leave the SR+<br />
setup menu.<br />
Automatic plasma display volume muting<br />
When Volume Control is switched on, the volume of the<br />
plasma display is automatically muted when the receiver<br />
subwoofer is switched on, or the receiver subwoofer’s<br />
input function is changed to one that you would want to<br />
hear the sound from the receiver subwoofer rather than<br />
the plasma display (DVD, for example).<br />
VOL.C ON – When this unit is switched on, or the<br />
input function is changed, the volume on the plasma<br />
display is muted so only sound from this unit is<br />
heard.<br />
VOL.C OFF – This unit does not control the volume of<br />
the plasma display.<br />
SOUND<br />
SLEEP CLEAR<br />
INPUT<br />
0<br />
CHANNEL<br />
9<br />
VOLUME<br />
MENU<br />
JUKEBOX<br />
DISPLAY<br />
TEXT TV/DVD RDS DISP<br />
MAIN<br />
TV CONTROL<br />
SUB<br />
Automatic plasma display input switching<br />
In order that the plasma display can switch automatically<br />
to the correct input when you switch the input function of<br />
the receiver subwoofer, you need to tell it how your<br />
system is connected.<br />
For example, if you connected your HDD/DVD recorder to<br />
the DV1 input on the receiver subwoofer, and to input 2<br />
on your plasma display, select the DV1 PDP2 setting here<br />
so that when you switch the input function of the receiver<br />
subwoofer to DV1 to watch your HDD/DVD recorder, the<br />
plasma display will automatically switch to input 2.<br />
For each receiver subwoofer input function (DV1 (DVD/<br />
DVR1), DV2 (DVD/DVR2), DIG (DIGITAL), ANA<br />
(ANALOG)) you can select:<br />
NONE – does not switch the plasma display input<br />
PDP1 to PDP7 – switches the plasma display input to<br />
one of the numbered inputs. (Note that the number<br />
displayed may vary depending on the plasma display<br />
to which you connect this unit.)<br />
TVTN – switches the plasma display to its built-in<br />
TV tuner<br />
Note<br />
Note that certain PDP inputs (ex. PDP7) may be<br />
referred to on your plasma display as ‘PC Input’.<br />
The SR+ setting remains in effect even in standby.<br />
The SR+ setting does not affect the FM/AM tuner<br />
function.<br />
Using the SR+ mode with a Pioneer plasma<br />
display<br />
1 Press SR+ on the remote.<br />
2 Use / to select SR+ ON then press ENTER.<br />
The SR+ setting is maintained even after switching<br />
the receiver subwoofer into standby then back on.<br />
Automatic muting and input switching will be<br />
effective when the receiver subwoofer is switched on.<br />
If you disconnect the SR+ cable or switch the plasma<br />
display off while SR+ is on, the SR+ ON setting<br />
remains.<br />
To switch to SR+ OFF, follow steps 1 and 2, selecting<br />
SR+ OFF.<br />
Note<br />
You can control this unit with the plasma display’s<br />
remote sensor even in standby, but you can’t control<br />
this unit with either this unit’s remote sensor or the<br />
plasma display’s remote sensor when the plasma<br />
display is switched off (AC off) and the SR+ cable is<br />
connected to the CONTROL IN jack of this unit.<br />
35<br />
En
10<br />
36<br />
En<br />
Additional information<br />
Chapter 10<br />
Additional information<br />
Important<br />
To access green functions on the remote, move the<br />
slider switch from MAIN to SUB.<br />
Dimming the display<br />
You can choose to dim the display if you find it too bright. 1<br />
1 Press SETUP.<br />
<br />
SETUP<br />
/ ST- ENTER<br />
<br />
/ ST+ PAUSE LIVE TV<br />
F. S. SURR / TUNE- TEST TONE VIDEO IN<br />
SURROUND ADVANCED<br />
2 Use the / buttons to select DIMMER then<br />
press ENTER.<br />
3 Use the / buttons to select LIGHT or DARK<br />
then press ENTER.<br />
DTS CD setting<br />
If you play a DTS-encoded CD, you will need to change<br />
this setting to hear the decoded signal.<br />
1 Switch the system into standby.<br />
2 Press SETUP.<br />
3 Use the / buttons to select CD TYPE from the<br />
menu, then press ENTER.<br />
4 Use the / buttons to select a setting, then<br />
press ENTER.<br />
Select from:<br />
NORMAL – Use for playback of regular audio CDs.<br />
Some DTS-encoded CDs will output noise when played.<br />
SOUND<br />
SLEEP CLEAR<br />
INPUT<br />
<br />
/ TUNE+ SR + ONE TOUCH COPY<br />
1 2<br />
3<br />
4 5 6<br />
7 8<br />
0<br />
CHANNEL<br />
9<br />
VOLUME<br />
MENU<br />
JUKEBOX<br />
DISPLAY<br />
TEXT TV/DVD RDS DISP<br />
MAIN<br />
TV CONTROL<br />
SUB<br />
DTS-CD – Use for playback of DTS-encoded CDs, but<br />
note that the beginning of regular CD tracks may be<br />
skipped.<br />
Setting the sleep timer<br />
SURROUND ADVANCED<br />
The sleep timer switches off the receiver subwoofer after<br />
a specified time so you can fall asleep without worrying<br />
about it. 2<br />
1 Press the SLEEP button to select an option.<br />
Choose between the following options:<br />
SLP ON – Switches off after about an hour<br />
SLP OFF – Cancels the sleep timer<br />
After selecting SLP ON, you can press SLEEP again to<br />
check how much time is left. Each line indicates<br />
approximately 12 minutes (remaining):<br />
Resetting the system<br />
Use this procedure to reset all system settings to the<br />
factory default.<br />
1 Switch the system on.<br />
2 Press and hold SURROUND then press the<br />
STANDBY/ON button on the display unit.<br />
The next time you switch on, all the system settings<br />
should be reset.<br />
Note<br />
1 The display dims when the sleep timer is set, regardless of this setting.<br />
2 The display dims when the sleep timer is set. The HDD/DVD recorder does not automatically switch off with the sleep timer.<br />
<br />
SOUND<br />
MENU<br />
SLEEP<br />
CLEAR JUKEBOX<br />
INPUT<br />
0<br />
CHANNEL<br />
VOLUME<br />
DISPLAY<br />
TEXT TV/DVD RDS DISP<br />
MAIN<br />
TV CONTROL<br />
SUB<br />
SLP - - - - -
Additional information 10<br />
Installation and maintenance<br />
Hints on installation<br />
We want you to enjoy using this system for years to come,<br />
so please bear in mind the following points when<br />
choosing a location:<br />
Do...<br />
Use in a well-ventilated room.<br />
Place on a solid, flat, level surface, such as a table, shelf or<br />
stereo rack.<br />
Don’t...<br />
Use in a place exposed to high temperatures or humidity,<br />
including near radiators and other heat-generating<br />
appliances.<br />
Place on a window sill or other place where the system will<br />
be exposed to direct sunlight.<br />
Use in an excessively dusty or damp environment.<br />
Place directly on top of an amplifier, or other component in<br />
your stereo system that becomes hot in use.<br />
Use near a television or monitor as you may experience<br />
interference — especially if the television uses an indoor<br />
antenna.<br />
Use in a kitchen or other room where the system may be<br />
exposed to smoke or steam.<br />
Use on a thick rug or carpet, or cover with cloth — this may<br />
prevent proper cooling of the system unit.<br />
Place on an unstable surface, or one that is not large enough<br />
to support all four of the system unit’s feet.<br />
Troubleshooting<br />
Incorrect operations are often mistaken for trouble and malfunctions. If you think that there is something wrong with<br />
this component, check the points below. Sometimes the trouble may lie in another component. Investigate the other<br />
components and electrical appliances being used. If the trouble cannot be rectified even after exercising the checks<br />
listed below, ask your nearest Pioneer authorized service center or your dealer to carry out repair work.<br />
If the system does not operate normally due to external effects such as static electricity disconnect the plug from<br />
the outlet and insert again to return to normal operating conditions.<br />
If there is no sound or no multichannel sound from the DVR-<strong>LX60D</strong> HDD/DVD recorder, try setting the recorder’s<br />
audio-related settings back to their defaults — see The Initial Setup menu on page 137.<br />
General<br />
Problem Remedy<br />
The power does not turn on, or<br />
switches off suddenly (an error<br />
message may be displayed at<br />
startup).<br />
No sound is output when an<br />
input function is selected.<br />
No sound from surround or<br />
center speakers.<br />
Leave the unit plugged in, wait for one minute, then switch back on.<br />
Make sure there are no loose strands of wire touching the unit. This could cause the<br />
system to shut off automatically.<br />
Check that the speakers are connected correctly.<br />
Make sure there is enough space for ventilation around the receiver subwoofer.<br />
Make sure the voltage of the mains power source is correct for the model.<br />
Try reducing the volume level.<br />
If the problem persists, take it to your nearest Pioneer authorized service center or your<br />
dealer for servicing.<br />
If you’re playing from the HDD/DVD recorder, make sure that the digital coaxial cable is<br />
connected properly. Also make sure that the HDD/DVD recorder’s Digital Out and DTS Out<br />
settings are set to On, and that the MPEG Out setting is set to MPEG PCM.<br />
If you’re using the line input, make sure the component is connected correctly (see<br />
Connecting auxiliary components on page 33).<br />
Turn up the volume.<br />
Refer to Channel level setting on page 31 to check the speaker levels.<br />
Check that you haven’t selected the AUTO, STEREO, or VIRTUAL mode (see Listening in<br />
surround sound on page 26).<br />
Connect the speakers properly (refer to Connecting up on page 10).<br />
If you’re playing from the HDD/DVD recorder, check that the Dolby Digital Out setting is<br />
set to Dolby Digital.<br />
If the source is 96 kHz, this will be played in stereo. If you want to play it in surround<br />
sound, set the HDD/DVD recorder’s 96 kHz PCM Out setting to 96 kHz 48 kHz.<br />
37<br />
En
10<br />
38<br />
En<br />
Additional information<br />
Problem Remedy<br />
Can’t operate using the remote<br />
control.<br />
Tuner<br />
Problem Remedy<br />
Considerable noise in radio<br />
broadcasts.<br />
Auto tuning does not pick up<br />
some stations.<br />
Error Messages<br />
Replace the batteries (Putting the batteries in the remote control on page 21).<br />
Operate within 7 m, 30° of the remote sensor (Using the remote control on page 20).<br />
Remove any obstacles or operate from another position.<br />
Avoid exposing the remote sensor on the front panel to direct light.<br />
For operating the HDD/DVD recorder, make sure that the control cable and coaxial cable<br />
are connected (page 10).<br />
If the receiver subwoofer is connected to a Pioneer plasma display with an SR+ cable,<br />
check that the plasma display is switched on. Point the remote control at the plasma<br />
display in order to operate the receiver subwoofer.<br />
Check that nothing is mistakenly plugged into the CONTROL IN jack.<br />
Connect the AM antenna (refer to Connecting up on page 10) and adjust the direction<br />
and position for best reception. You may also connect an additional internal or external AM<br />
antenna (refer to Connecting external antennas on page 34).<br />
Fully extend the FM wire antenna, position for best reception, and secure to a wall. You<br />
may also connect an outdoor FM antenna (see Connecting external antennas on page 34).<br />
Turn off other equipment that may be causing the noise or move it further away.<br />
The radio signal is weak. Auto tuning will only detect radio stations with a good signal.<br />
For more sensitive tuning, connect an outdoor antenna.<br />
Message Description<br />
2CH ONLY An operation is prohibited because it is only applicable to 2 channel sources, while the<br />
current source is a multichannel source.<br />
96K An operation is prohibited because the source is 96 kHz digital.<br />
EXIT Appears when a menu is automatically exited after a set period of inactivity.<br />
NOISY Background noise is too high to complete MCACC setup successfully.<br />
ERR MIC An error occurred during MCACC setup because the microphone is not connected or is<br />
not connected properly.<br />
ERR SP An error occurred during MCACC setup because the speakers are not connected or are<br />
not connected properly.<br />
EEP ERROR Contact your Pioneer authorized service center or your dealer for servicing.<br />
NO SPTYP Try switching the unit off then on again. If the error still appears, please contact a<br />
Pioneer authorized service center or your dealer.
Additional information 10<br />
Glossary<br />
Dolby Digital A multi-channel audio<br />
encoding system developed<br />
by Dolby Laboratories that<br />
enables far more audio to be<br />
stored on a disc than PCM<br />
encoding.<br />
Dolby<br />
Pro Logic II<br />
Manufactured under license from Dolby Laboratories.<br />
“Dolby”, “Pro Logic” and the double-D symbol are<br />
trademarks of Dolby Laboratories.<br />
“DTS” and “DTS Digital Surround” are registered<br />
trademarks of DTS, Inc.<br />
Specifications<br />
A matrix decoding technology<br />
developed by Dolby<br />
Laboratories that expands any<br />
two-channel source audio,<br />
such as CDs and TV<br />
broadcasts, to a five-channel<br />
playback (left/center/right/left<br />
surround/right surround),<br />
resulting in a surround<br />
experience.<br />
DTS A multi-channel audio<br />
encoding system developed<br />
by DTS that enables far more<br />
audio to be stored on a disc<br />
than PCM encoding.<br />
SX-<strong>LX60D</strong> Audio Multi-channel Receiver Subwoofer<br />
• Amplifier section<br />
RMS Power Output:<br />
Front, Center, Surround. . . . . . . . . . . . . 100 W per channel<br />
(1 kHz, 10 % T.H.D., 4 Ω)<br />
Subwoofer. . . . . . . . . . . . . .100 W (100 Hz, 10 % T.H.D., 4 Ω)<br />
• FM tuner section<br />
Frequency range . . . . . . . . . . . . . . . . . 87.5 MHz to 108 MHz<br />
Antenna . . . . . . . . . . . . . . . . . . . . . . . . . . . 75 Ω, unbalanced<br />
• AM tuner section<br />
Frequency range . . . . . . . . . . . . . . . . . . 531 kHz to 1602 kHz<br />
Antenna . . . . . . . . . . . . . . . . . . . . . . . . . . . . . . .Loop antenna<br />
• Subwoofer section<br />
Enclosure. . . . . . . . . . . . . . . . . . . . . . . .Bass-reflex floor type<br />
System . . . . . . . . . . . . . . . . . . . . . . . . . . 16 cm 1-way system<br />
Speaker . . . . . . . . . . . . . . . . . . . . . . . . . . . . 16 cm cone type<br />
Nominal impedance . . . . . . . . . . . . . . . . . . . . . . . . . . . . . 4 Ω<br />
Frequency range . . . . . . . . . . . . . . . . . . . . . 25 Hz to 1.0 kHz<br />
Maximum Input Power. . . . . . . . . . . . . . . . . . . . . . . . . 100 W<br />
• Miscellaneous<br />
Power requirements . . . . . . AC 220 V to 240 V, 50 Hz/60 Hz<br />
Power consumption . . . . . . . . . . . . . . . . . . . . . . . . . . . .50 W<br />
Power consumption in standby . . . . . . . . . . . . . . . . . . 0.3 W<br />
Dimensions . . . . .200 mm (W) x 375 mm (H) x 428 mm (D)<br />
Weight . . . . . . . . . . . . . . . . . . . . . . . . . . . . . . . . . . . . . . 9.0 kg<br />
• Accessories<br />
Remote control . . . . . . . . . . . . . . . . . . . . . . . . . . . . . . . . . . . 1<br />
Display unit . . . . . . . . . . . . . . . . . . . . . . . . . . . . . . . . . . . 1<br />
AA/R6 dry cell batteries (to confirm operation) . . . . . . . . . 2<br />
Coaxial cable . . . . . . . . . . . . . . . . . . . . . . . . . . . . . . . . . . . . . 1<br />
Control cable . . . . . . . . . . . . . . . . . . . . . . . . . . . . . . . . . . 1<br />
Display cable . . . . . . . . . . . . . . . . . . . . . . . . . . . . . . . . . . 1<br />
AM loop antenna . . . . . . . . . . . . . . . . . . . . . . . . . . . . . . . . . . 1<br />
FM wire antenna . . . . . . . . . . . . . . . . . . . . . . . . . . . . . . . . . . 1<br />
Microphone (for Auto MCACC setup) . . . . . . . . . . . . . . . . . 1<br />
Power cord . . . . . . . . . . . . . . . . . . . . . . . . . . . . . . . . . . . . . . . 1<br />
Non-skid pads (large) . . . . . . . . . . . . . . . . . . . . . . . . . . . . . . 4<br />
Spacers. . . . . . . . . . . . . . . . . . . . . . . . . . . . . . . . . . . . . . . . . . 2<br />
Warranty card . . . . . . . . . . . . . . . . . . . . . . . . . . . . . . . . . . . . 1<br />
This operating instructions<br />
SSP-<strong>LX60D</strong> Speaker system<br />
(Front speakers x2, surround speakers x2, center speakers x2)<br />
• Front/surround speakers<br />
Enclosure . . . . . . . . . . . . . . . . . . Closed-box bookshelf type<br />
(magnetically shielded)<br />
System . . . . . . . . . . . . . . . . . . . . . . . . 7.7 cm 1-way system<br />
Speakers. . . . . . . . . . . . . . . . . . . . . . . . . . .7.7 cm cone type<br />
Nominal impedance . . . . . . . . . . . . . . . . . . . . . . . . . . . . 4 Ω<br />
Frequency range . . . . . . . . . . . . . . . . . . . . . 80 Hz to 20 kHz<br />
Maximum input power . . . . . . . . . . . . . . . . . . . . . . . .100 W<br />
Dimensions . . 100 mm (W) x 100 mm (H) x 102.5 mm (D)<br />
Weight . . . . . . . . . . . . . . . . . . . . . . . . . . . . . . . . . . . . 0.55 kg<br />
• Center speakers<br />
Enclosure . . . . . . . . . . . . . . . . . . Closed-box bookshelf type<br />
(magnetically shielded)<br />
System . . . . . . . . . . . . . . . . . . . . . . . . 7.7 cm 1-way system<br />
Speakers. . . . . . . . . . . . . . . . . . . . . . . . . . .7.7 cm cone type<br />
Nominal impedance . . . . . . . . . . . . . . . . . . . . . . . . . . . . 8 Ω<br />
Frequency range . . . . . . . . . . . . . . . . . . . . . 80 Hz to 20 kHz<br />
Maximum input power . . . . . . . . . . . . . . . . . . . . . . . . .50 W<br />
Dimensions . . 100 mm (W) x 100 mm (H) x 102.5 mm (D)<br />
Weight . . . . . . . . . . . . . . . . . . . . . . . . . . . . . . . . . . . . 0.55 kg<br />
• Accessories<br />
Speaker cables . . . . . . . . . . . . . . . . . . . . . . . . . . . . . . . . . . 5<br />
Non-skid pads (small) . . . . . . . . . . . . . . . . . . . . . . . . . . . . 24<br />
Brackets . . . . . . . . . . . . . . . . . . . . . . . . . . . . . . . . . . . . . . . . 2<br />
Screws . . . . . . . . . . . . . . . . . . . . . . . . . . . . . . . . . . . . . . . . . 8<br />
Spiral wrap . . . . . . . . . . . . . . . . . . . . . . . . . . . . . . . . . . . . . . 2<br />
Note<br />
Specifications and design subject to possible<br />
modification without notice, due to improvements.<br />
39<br />
En
Section Two<br />
HDD/DVD Recorder<br />
DVR-<strong>LX60D</strong>
Section Two<br />
Contents<br />
01 Before you start<br />
Symbols used in this manual. . . . . . . . . . . . . . . . . . 43<br />
Disc/content format playback compatibility . . . . . . . 43<br />
About the internal hard disk drive . . . . . . . . . . . . . . 47<br />
02 Connections<br />
Rear panel connections . . . . . . . . . . . . . . . . . . . . . . 48<br />
Front panel connections . . . . . . . . . . . . . . . . . . . . . 49<br />
Connecting a TV antenna. . . . . . . . . . . . . . . . . . . . . 49<br />
Easy connections. . . . . . . . . . . . . . . . . . . . . . . . . . . 50<br />
Using the S-video or component video output . . . . . 50<br />
Connecting to a cable box or satellite receiver . . . . . 51<br />
Connecting an external decoder box (1). . . . . . . . . . 52<br />
Connecting an external decoder box (2). . . . . . . . . . 52<br />
Connecting using HDMI . . . . . . . . . . . . . . . . . . . . . 53<br />
Connecting other AV sources . . . . . . . . . . . . . . . . . 54<br />
Connecting a USB device . . . . . . . . . . . . . . . . . . . . 55<br />
Plugging in . . . . . . . . . . . . . . . . . . . . . . . . . . . . . . . 55<br />
03 Getting started<br />
Switching on and setting up . . . . . . . . . . . . . . . . . . 56<br />
For users receiving digital broadcast services . . . . . 58<br />
Setting up the GUIDE Plus+® system. . . . . . . . . . . 59<br />
04 Using the GUIDE Plus+® electronic programme<br />
guide<br />
The GUIDE Plus+ system . . . . . . . . . . . . . . . . . . . . 62<br />
Using the GUIDE Plus+ system. . . . . . . . . . . . . . . . 62<br />
Areas . . . . . . . . . . . . . . . . . . . . . . . . . . . . . . . . . . . . 64<br />
GUIDE Plus+ FAQ and troubleshooting . . . . . . . . . 71<br />
05 Using the digital electronic programme guide<br />
The Digital EPG system . . . . . . . . . . . . . . . . . . . . . . 73<br />
Using the Digital EPG . . . . . . . . . . . . . . . . . . . . . . . 74<br />
Setting timer programmes. . . . . . . . . . . . . . . . . . . . 74<br />
Other useful EPG functions . . . . . . . . . . . . . . . . . . . 78<br />
06 Recording<br />
About DVD recording. . . . . . . . . . . . . . . . . . . . . . . . 79<br />
About HDD recording . . . . . . . . . . . . . . . . . . . . . . . 80<br />
Recorded audio . . . . . . . . . . . . . . . . . . . . . . . . . . . . 80<br />
Restrictions on video recording . . . . . . . . . . . . . . . . 80<br />
Using the built-in A.TV and D.TV tuners . . . . . . . . . . 81<br />
Setting the picture quality/recording time . . . . . . . . 83<br />
Basic recording from the TV . . . . . . . . . . . . . . . . . . 83<br />
Pause Live TV. . . . . . . . . . . . . . . . . . . . . . . . . . . . . . 84<br />
About timer recordings . . . . . . . . . . . . . . . . . . . . . . 86<br />
Timer recording FAQ . . . . . . . . . . . . . . . . . . . . . . . . 87<br />
Simultaneous recording and playback (Chase Play). . 87<br />
Recording from an external component. . . . . . . . . . 88<br />
Playing your recordings on other DVD players . . . . . 88<br />
Initializing recordable DVD discs . . . . . . . . . . . . . . . 89<br />
DVD-RW Auto Initialize . . . . . . . . . . . . . . . . . . . . . . 90<br />
07 Playback<br />
Introduction. . . . . . . . . . . . . . . . . . . . . . . . . . . . . . . 91<br />
Basic playback. . . . . . . . . . . . . . . . . . . . . . . . . . . . . 91<br />
Using the Disc Navigator to browse the contents<br />
of a disc. . . . . . . . . . . . . . . . . . . . . . . . . . . . . . . . . . 94<br />
Scanning discs . . . . . . . . . . . . . . . . . . . . . . . . . . . . 95<br />
Playing in slow motion. . . . . . . . . . . . . . . . . . . . . . . 96<br />
Frame advance/frame reverse . . . . . . . . . . . . . . . . . 96<br />
The Play Mode menu . . . . . . . . . . . . . . . . . . . . . . . . 96<br />
Displaying and switching subtitles . . . . . . . . . . . . . 98<br />
Switching DVD and DivX soundtracks . . . . . . . . . . . 98<br />
Switching audio channels . . . . . . . . . . . . . . . . . . . . 99<br />
Switching camera angles . . . . . . . . . . . . . . . . . . . . 99<br />
Displaying disc information on-screen. . . . . . . . . . . 99<br />
08 Playing and recording from a DV camcorder<br />
Playing from a DV camcorder . . . . . . . . . . . . . . . . 101<br />
Recording from a DV camcorder . . . . . . . . . . . . . . 101<br />
About DV . . . . . . . . . . . . . . . . . . . . . . . . . . . . . . . . 103<br />
09 Editing<br />
Editing options . . . . . . . . . . . . . . . . . . . . . . . . . . . 104<br />
The Disc Navigator screen . . . . . . . . . . . . . . . . . . . 105<br />
10 Copying and backup<br />
Introduction. . . . . . . . . . . . . . . . . . . . . . . . . . . . . . 114<br />
One Touch Copy . . . . . . . . . . . . . . . . . . . . . . . . . . 114<br />
Using Copy Lists . . . . . . . . . . . . . . . . . . . . . . . . . . 115<br />
Using disc backup . . . . . . . . . . . . . . . . . . . . . . . . . 119<br />
11 Using the Jukebox<br />
Copying music to the HDD . . . . . . . . . . . . . . . . . . 121<br />
Copying files via USB. . . . . . . . . . . . . . . . . . . . . . . 121<br />
Playing music from the Jukebox . . . . . . . . . . . . . . 123<br />
Editing Jukebox albums. . . . . . . . . . . . . . . . . . . . . 124<br />
12 The PhotoViewer<br />
Locating JPEG picture files . . . . . . . . . . . . . . . . . . 125<br />
Changing the display style of the PhotoViewer. . . . 126<br />
Playing a slideshow . . . . . . . . . . . . . . . . . . . . . . . . 126<br />
Reloading files from a disc or USB device . . . . . . . 127<br />
Importing files to the HDD. . . . . . . . . . . . . . . . . . . 127<br />
Selecting multiple files or folders. . . . . . . . . . . . . . 128<br />
Copying files to a DVD-R/-RW . . . . . . . . . . . . . . . . 128<br />
Copying selected files to a DVD-R/-RW . . . . . . . . . 129<br />
Editing files on the HDD . . . . . . . . . . . . . . . . . . . . 129<br />
Printing files . . . . . . . . . . . . . . . . . . . . . . . . . . . . . 131<br />
41<br />
En
42<br />
En<br />
Section Two<br />
13 The Disc Setup menu<br />
Basic settings. . . . . . . . . . . . . . . . . . . . . . . . . . . . . 132<br />
Initialize settings. . . . . . . . . . . . . . . . . . . . . . . . . . . 132<br />
Finalize settings . . . . . . . . . . . . . . . . . . . . . . . . . . . 133<br />
Optimize HDD . . . . . . . . . . . . . . . . . . . . . . . . . . . . 133<br />
Initialize HDD . . . . . . . . . . . . . . . . . . . . . . . . . . . . . 133<br />
14 The Video Adjust menu<br />
Setting the picture quality for TV and external<br />
inputs . . . . . . . . . . . . . . . . . . . . . . . . . . . . . . . . . . . 134<br />
Setting the picture quality for disc playback . . . . . . 135<br />
15 The Initial Setup menu<br />
Using the Initial Setup menu . . . . . . . . . . . . . . . . . 137<br />
Selecting other languages for language options. . . 147<br />
Using Software Update (Digital tuner) . . . . . . . . . . 147<br />
16 Additional information<br />
Setting up the remote to control your TV. . . . . . . . . 148<br />
TV Preset code list . . . . . . . . . . . . . . . . . . . . . . . . . 149<br />
Minimum copying times. . . . . . . . . . . . . . . . . . . . . 150<br />
Manual recording modes . . . . . . . . . . . . . . . . . . . . 151<br />
Troubleshooting . . . . . . . . . . . . . . . . . . . . . . . . . . . 152<br />
If the picture freezes and the front panel and<br />
remote control buttons stop working . . . . . . . . . . . 155<br />
On-screen displays . . . . . . . . . . . . . . . . . . . . . . . . . 156<br />
Front-panel displays . . . . . . . . . . . . . . . . . . . . . . . . 158<br />
Language code list . . . . . . . . . . . . . . . . . . . . . . . . . 158<br />
Country/Area code list . . . . . . . . . . . . . . . . . . . . . . 159<br />
Screen sizes and disc formats . . . . . . . . . . . . . . . . 159<br />
Handling discs . . . . . . . . . . . . . . . . . . . . . . . . . . . . 160<br />
Cleaning the pickup lens . . . . . . . . . . . . . . . . . . . . 160<br />
Condensation . . . . . . . . . . . . . . . . . . . . . . . . . . . . . 160<br />
Hints on installation . . . . . . . . . . . . . . . . . . . . . . . . 161<br />
Moving the recorder . . . . . . . . . . . . . . . . . . . . . . . . 161<br />
Resetting the recorder . . . . . . . . . . . . . . . . . . . . . . 161<br />
Specifications (DVR-<strong>LX60D</strong>) . . . . . . . . . . . . . . . . . . 162
Before you start 01<br />
Chapter 1<br />
Before you start<br />
Symbols used in this manual<br />
The following icons are provided to help you quickly<br />
identify which instructions you need for which kind of<br />
disc.<br />
HDD<br />
DVD<br />
DVD-Video<br />
DVD (Video)<br />
DVD (VR)<br />
DVD+R<br />
DVD+RW<br />
DVD-RAM<br />
CD<br />
Video CD<br />
Super VCD<br />
WMA/MP3<br />
DivX<br />
A L L<br />
HDD<br />
Any type of DVD disc (recordable or<br />
playback only), finalized or not.<br />
Commercially produced DVD, finalized<br />
Video mode DVD-R/-RW.<br />
Video mode DVD-R/-RW (unfinalized)<br />
VR mode DVD-R/-RW<br />
DVD+R<br />
DVD+RW<br />
DVD-RAM<br />
Audio CD<br />
Video CD<br />
Super VCD<br />
WMA or MP3 files<br />
DivX files<br />
All of the above<br />
Disc/content format playback<br />
compatibility<br />
Compatible media<br />
• DVD-RW ver. 1.1 / 1x / 1x to 2x, ver. 1.2 / 2x to 4x / 2x<br />
to 6x<br />
• DVD-R ver. 2.0 /1x / 1x to 4x / 1x to 8x / 1x to 16x,<br />
ver. 2.1 / 1x to 8x / 1x to 16x<br />
• DVD+RW 1x to 2.4x / 1x to 4x / 3.3x to 8x<br />
• DVD+R 1x to 2.4x / 1x to 4x / 1x to 8x / 1x to 16x<br />
• DVD-RAM ver. 2.0 / 2x, ver. 2.1 / 2x / 2x to 3x / 2x to 5x,<br />
ver. 2.2 / 2x / 2x to 3x / 2x to 5x<br />
• DVD-R DL ver. 3.0 / 2x to 4x / 2x to 8x<br />
• DVD+R DL 2.4x / 2.4x to 8x<br />
Note that older models of DVD recorders and DVD<br />
writers may reject DVD-RW ver. 1.2 discs and/or corrupt<br />
the data on the disc. If you want to share DVD-RW discs<br />
between this recorder and an older recorder/writer, we<br />
recommend using ver. 1.1 discs.<br />
The following table shows older Pioneer DVD recorders’<br />
limited compatibility with DVD-RW ver. 1.2 discs.<br />
Model Playable Recordable<br />
DVR-7000 *1,2,3<br />
Yes No<br />
DVR-3100/<br />
DVR-5100H<br />
*1 Yes No<br />
*1 Discs should be finalized in this recorder before playing. Unfinalized<br />
VR mode and Video mode discs may not play.<br />
*2 Cannot read the CPRM information will show in the display when<br />
you load a disc. However, this will not affect playback.<br />
*3 Copy-once protected disc titles will not play.<br />
Readable file system<br />
This recorder can play DVDs recorded under the<br />
following file systems 1 : ISO 9660*, UDF 1.02, UDF 1.50,<br />
UDF 2.00, UDF 2.01.<br />
* ISO 9660 Level 1 or 2 compliant. Romeo and Joliet file<br />
systems are both compatible with this recorder.<br />
Note<br />
1• Depending on the recording technique used, even files recorded in compatible file systems may not play correctly.<br />
• MP3/WMA files can be played back when recorded onto a DVD that contains no video files and uses the UDF 1.02, UDF 1.50, UDF 2.01 or<br />
ISO 9660 file systems.<br />
43<br />
En
01<br />
44<br />
En<br />
Before you start<br />
HDD/DVD Recording and playback compatibility<br />
This recorder can play and record all widely-used DVD disc types, and additionally provides HDD functionality. The<br />
table below shows some specific compatibility differences between the different disc types.<br />
Marks used in this manual<br />
Logos<br />
Notes to table<br />
*1 Must be initialized for VR mode recording (page 132).<br />
*2 Must be initialized for Video mode recording (page 132).<br />
*3 Erasable, but free space does not increase.<br />
*4 Cannot erase sections, edit chapters or use playlist editing.<br />
*5 Must be compatible with DVD-R (VR) playback.<br />
*6 Finalize using this recorder (may not playback in some units)<br />
(page 88).<br />
*7 Must be compatible with DVD-RW (VR) playback.<br />
*8 Must be compatible with DVD+RW playback.<br />
*9 Must be compatible with DVD-RAM playback.<br />
*10 Only when HDD Recording Format is set to Video Mode Off<br />
(page 143).<br />
*11 Only when the recording mode is not set to LPCM.<br />
*12 CPRM-compatible discs only.<br />
*13 Take the disc out of the cartridge before use. Only Panasonic and<br />
Maxell discs have been tested to work reliably with this recorder. Discs<br />
from other makers may become unusable when recorded or edited.<br />
*14 Erasing a title does not increase the available recording time, nor<br />
increase the number of recordable titles left.<br />
*15 Must be compatible with DVD+R playback.<br />
*16 Depending on the disc, it may have to be initialized before it can be<br />
recorded (page 132). In this case, initialization will take about an hour.<br />
is a trademark of DVD Format/Logo Licensing<br />
Corporation.<br />
HDD DVD-R DVD-RW DVD+R<br />
DVD<br />
+RW<br />
DVD-<br />
RAM<br />
HDD DVD (VR) DVD (Video) DVD (VR) DVD (Video) DVD+R DVD+RW DVD-RAM<br />
*1 *1 *2 *13, 16<br />
Re-recordable/Erasable *3 *3 *3 <br />
*14<br />
Editing of recorded programmes <br />
*4<br />
Recording of Copy-once protected<br />
material<br />
<br />
*12<br />
Playback in other players/recorders n/a *5 <br />
*6<br />
Chase play <br />
<br />
*4<br />
<br />
*12<br />
*7 <br />
*6<br />
<br />
*4<br />
<br />
*6, 15<br />
16:9 and 4:3 programme recording <br />
Bilingual broadcast recording of<br />
both audio channels<br />
<br />
*10, 11<br />
<br />
*11<br />
<br />
*11<br />
<br />
*4<br />
<br />
*8<br />
Using DVD-R DL/DVD+R DL discs<br />
DVD-R DL (Dual-Layer) and DVD+R DL (Double-Layer)<br />
discs contain two recordable layers on a single side,<br />
giving about 1.8 times the recording capacity of a<br />
conventional single-layer disc. This recorder can record<br />
to both DVD-R DL and DVD+R DL discs.<br />
• If you intend to play DVD-R DL (Video mode) or<br />
DVD+R DL discs recorded on this recorder on other<br />
DVD recorders/players, you must finalize them. (Note<br />
that some DVD recorders/players may not play even<br />
finalized DL discs.)<br />
• This logo indicates that the disc is a DVD-R DL or<br />
DVD+R DL disc:<br />
<br />
<br />
<br />
*12<br />
<br />
*9<br />
<br />
*11
Before you start 01<br />
Correct operation has been confirmed for DL discs:<br />
• DVD-R DL ver. 3.0/2x to 4x<br />
Mitsubishi Kagaku Media (Verbatim)<br />
• DVD-R DL ver. 3.0/2x to 8x<br />
Mitsubishi Kagaku Media (Verbatim)<br />
That’s<br />
JVC<br />
• DVD+R DL 2.4x<br />
Mitsubishi Kagaku Media (Verbatim)<br />
RICOH<br />
• DVD+R DL 2.4x to 8x<br />
Mitsubishi Kagaku Media (Verbatim)<br />
RICOH<br />
About DualDisc playback<br />
A DualDisc is a new two -sided disc, one side of which<br />
contains DVD content –video, audio, etc. –while the other<br />
side contains non-DVD content such as digital audio<br />
material.<br />
The non-DVD, audio side of the disc is not compliant with<br />
the CD Audio specification and therefore may not play.<br />
It is possible that when loading or ejecting a DualDisc,<br />
the opposite side to that being played will be scratched.<br />
Scratched discs may not be playable.<br />
The DVD side of a DualDisc plays in this product. DVD<br />
-Audio content will not play.<br />
For more detailed information on the DualDisc<br />
specification, please refer to the disc manufacturer or<br />
disc retailer.<br />
Other disc compatibility<br />
In addition to DVD, this recorder is compatible with a<br />
wide range of disc types (media) and formats. Playable<br />
discs will generally feature one of the logos on the disc<br />
and/or disc packaging shown below. Note however that<br />
some disc types, such as recordable CD (and DVD), may<br />
be in an unplayable format — see below for further<br />
compatibility information.<br />
Audio CD CD-R CD-RW<br />
Video CD<br />
Super Video CD (Super VCD)<br />
CD-R/-RW compatibility<br />
This recorder cannot record CD-R or CD-RW discs.<br />
• Readable formats: CD-Audio, Video CD/Super VCD,<br />
ISO 9660 CD-ROM* containing MP3, WMA, JPEG or<br />
DivX files<br />
* ISO 9660 Level 1 or 2 compliant. CD physical format:<br />
Mode1, Mode2 XA Form1. Romeo and Joliet file<br />
systems are both compatible with this recorder.<br />
• Multi-session playback: Yes (except CD-Audio and<br />
Video CD/Super VCD)<br />
• Unfinalized disc playback: CD-Audio only<br />
Compressed audio compatibility<br />
• Compatible media: DVD-ROM, DVD-R/-RW, DVD+R/<br />
+RW, DVD-RAM, CD-ROM, CD-R, CD-RW, USB<br />
• Compatible formats: MPEG-1 Audio Layer 3 (MP3),<br />
Windows Media Audio (WMA)<br />
• Sampling rates: 32 kHz, 44.1 kHz or 48 kHz<br />
• Bit-rates: Any (128 kbps or higher recommended)<br />
• Variable bit-rate (VBR) MP3 playback: Yes<br />
• VBR WMA playback: No<br />
• WMA encoder compatibility: Windows Media Codec<br />
8 (files encoded using Windows Media Codec 9 may be<br />
playable but some parts of the specification are not<br />
supported; specifically, Pro, Lossless, Voice and VBR)<br />
• DRM (Digital Rights Management) 1 file playback: No<br />
• File extensions: .mp3, .wma (these must be used for<br />
the recorder to recognize MP3 and WMA files – do<br />
not use for other file types)<br />
• File structure: Up to 99 folders/999 files (if these limits<br />
are exceeded, only files and folders up to these limits<br />
are playable)<br />
WMA (Windows Media Audio)<br />
compatibility<br />
This recorder can playback Windows Media Audio<br />
content.<br />
WMA is an acronym for Windows Media Audio and refers<br />
to an audio compression technology developed by<br />
Microsoft Corporation. WMA content can be encoded by<br />
using Windows Media Player for Windows XP, Windows<br />
Media Player 9 or Windows Media Player 10 series.<br />
Windows Media is a trademark of Microsoft Corporation.<br />
This product includes technology owned by Microsoft<br />
Corporation and cannot be used or distributed without a<br />
license from Microsoft Licensing, Inc.<br />
Note<br />
1 DRM (digital rights management) copy protection is a technology designed to prevent unauthorized copying by restricting playback, etc. of<br />
compressed audio files on devices other than the PC (or other recording equipment) used to record it. For detailed information, please see<br />
the instruction manuals or help files that came with your PC and/or software.<br />
45<br />
En
01<br />
46<br />
En<br />
Before you start<br />
DivX video compatibility<br />
DivX is a compressed digital video format created by the<br />
DivX ® video codec from DivX, Inc. This recorder can play<br />
DivX video files burned on CD-R/-RW/-ROM discs.<br />
Keeping the same terminology as DVD-Video, individual<br />
DivX video files are called “Titles”. When naming files/<br />
titles on a CD-R/-RW disc prior to burning, keep in mind<br />
that by default they will be played in alphabetical order.<br />
• Official DivX ® Certified product.<br />
• Plays all versions of DivX ® video (including DivX ® 6)<br />
with standard playback of DivX ® media files.<br />
• File extensions: .avi and .divx (these must be used for<br />
the recorder to recognize DivX video files). Note that<br />
all files with the .avi extension are recognized as<br />
MPEG4, but not all of these are necessarily DivX video<br />
files and therefore may not be playable on this recorder.<br />
• File structure: Up to 99 folders or 999 files.<br />
DivX, DivX Certified, and associated logos are trademarks of<br />
DivX, Inc. and are used under license.<br />
DivX ® VOD content<br />
DivX<br />
In order to play DivX VOD (video on demand) content on<br />
this recorder, you first need to register the recorder with<br />
your DivX VOD content provider. You do this by<br />
generating a DivX VOD registration code, which you<br />
submit to your provider.<br />
Some DivX VOD content may only be playable a fixed<br />
number of times. When you load a disc containing this<br />
type of DivX VOD content, the remaining number of plays<br />
is shown on-screen and you then have the option of<br />
playing the disc (thereby using up one of the remaining<br />
plays), or stopping. If you load a disc that contains<br />
expired DivX VOD content (for example, content that has<br />
zero remaining plays), the message Rental Expired is<br />
displayed.<br />
If your DivX VOD content allows an unlimited number of<br />
plays, then you may load the disc into your recorder and<br />
play the content as often as you like, and no message will<br />
be displayed.<br />
Important<br />
• DivX VOD content is protected by a DRM system. This<br />
restricts playback of content to specific, registered<br />
devices.<br />
• If you load a disc that contains DivX VOD content not<br />
authorized for this recorder, the message<br />
Authorization Error is displayed and the content<br />
will not play.<br />
• Resetting the recorder (as described in Resetting the<br />
recorder on page 161) will not cause you to lose your<br />
registration code.<br />
JPEG file compatibility<br />
• Compatible formats: Baseline JPEG and EXIF 2.2*<br />
still image files<br />
*File format used by digital still cameras<br />
• Sampling ratio: 4:4:4, 4:2:2, 4:2:0<br />
• Horizontal resolution: 160 to 5120 pixels<br />
• Vertical resolution: 120 to 3840 pixels<br />
• Progressive JPEG compatible: No<br />
• File extensions: .jpg, .jpeg, .jpe, .jif, .jfif (must be used<br />
for the recorder to recognize JPEG files – do not use<br />
for other file types)<br />
• File structure: The recorder can load up to 99 folders/<br />
999 files at one time (if there are more files/folders that<br />
this on the disc then more can be reloaded)<br />
PC-created disc compatibility<br />
Discs recorded using a personal computer may not be<br />
playable in this recorder due to the setting of the<br />
application software used to create the disc. In these<br />
particular instances, check with the software publisher<br />
for more detailed information.<br />
Discs recorded in packet write mode (UDF format) are<br />
not compatible with this recorder.<br />
Check the DVD-R/-RW or CD-R/-RW software disc boxes<br />
for additional compatibility information.<br />
Dolby Digital<br />
Manufactured under license from Dolby Laboratories.<br />
“Dolby” and the double-D symbol are trademarks of Dolby<br />
Laboratories.
Before you start 01<br />
DTS<br />
“DTS” and “DTS Digital Out” are registered trademarks of<br />
DTS, Inc.<br />
DVB<br />
The Digital Video Broadcasting Project, or DVB for short,<br />
is a set of open standards for digital broadcasting,<br />
covering terrestrial, cable and satellite broadcasts.<br />
Based around the MPEG-2 coding system, these open<br />
standards ensure that compliant systems are able to<br />
work together, independent of manufacturer.<br />
DVB is extremely flexible, being able to deliver virtually<br />
any kind of digital content to the home, including High<br />
Definition and Standard Definition TV, broadband<br />
multimedia content and interactive services.<br />
DVB is a registered trademark of the DVB Project.<br />
About the internal hard disk drive<br />
The internal hard disk drive (HDD) is a fragile piece of<br />
equipment. When used without the proper care or in the<br />
wrong conditions, it is possible that recorded contents<br />
may be damaged or lost entirely, in some cases making<br />
even normal playback or recording impossible. Please<br />
understand that in the event of repair or replacement of<br />
the HDD or related components, all your HDD recordings<br />
will be lost.<br />
Please use the recorder following the guidelines below to<br />
protect against possible HDD failure.<br />
The HDD should not be regarded as a place to store<br />
recordings permanently. We recommend that you back up<br />
your important recordings onto DVD discs in order to<br />
protect against accidental loss.<br />
Pioneer cannot under any circumstances accept<br />
responsibility for any direct or indirect loss arising from any<br />
inconvenience or loss of recorded material resulting from<br />
HDD failure.<br />
• Do not move the recorder while it is on (this includes<br />
during EPG download when the display shows EPG).<br />
• Install and use the recorder on a stable, level surface.<br />
• Do not block the rear vent/cooling fan.<br />
• Do not use the recorder in excessively hot or humid<br />
places, or in places that may be subject to sudden<br />
changes in temperature. Sudden changes in<br />
temperature can cause condensation to form inside<br />
the recorder. This can be a cause of HDD failure.<br />
• While the recorder is switched on (including during<br />
EPG download when the display shows EPG), do not<br />
unplug from the wall socket or switch the electricity<br />
off from the breaker switch.<br />
• Do not move the recorder immediately after<br />
switching it off. If you need to move the recorder,<br />
please follow the steps below:<br />
1 After the message POWER OFF is shown on the<br />
front panel display, wait at least two minutes.<br />
2 Unplug from the wall socket.<br />
3 Move the recorder.<br />
• If there’s a power failure while the recorder is on<br />
there is a chance that some data on the HDD will be<br />
lost.<br />
• The HDD is very delicate. If used over time in an<br />
improper manner or in an unsuitable environment, it<br />
is possible that the HDD will fail. Signs of problems<br />
include playback unexpectedly freezing and<br />
noticeable block noise (mosaic) in the picture.<br />
However, sometimes there will be no warning signs<br />
of HDD failure. If the HDD fails, no playback of<br />
recorded material will be possible. In this case it will<br />
be necessary to replace the HDD unit.<br />
Optimizing HDD performance<br />
As you record and edit material on the HDD, the data on<br />
the disk becomes fragmented, eventually affecting the<br />
recorder’s performance. Before this happens, the<br />
recorder will warn you that it is time to optimize the HDD<br />
(which you can do from the Disc Setup menu; see<br />
Optimize HDD on page 133).<br />
47<br />
En
02<br />
48<br />
En<br />
Connections<br />
Chapter 2<br />
Connections<br />
Rear panel connections<br />
1 2<br />
ANTENNA<br />
R<br />
IN<br />
AUDIO L VIDEO<br />
OUT<br />
Y PB PR<br />
COMPONENT VIDEO OUT<br />
S-VIDEO<br />
INPUT 3<br />
AV 2 (INPUT 1/DECODER)<br />
AV 1 (RGB) – TV<br />
G-LINK IN<br />
1 ANTENNA IN (RF IN)/OUT<br />
Connect your TV antenna to the ANTENNA IN (RF IN)<br />
jack. The signal is passed through to the ANTENNA OUT<br />
jack for connection to your TV.<br />
2 INPUT 3<br />
Stereo analog audio, video and S-video inputs for<br />
connection to a VCR or other source component.<br />
CONTROL<br />
3 AV2 (INPUT 1/DECODER) AV connector<br />
Audio/video input/output SCART-type AV connector for<br />
connecting to a VCR, or other equipment with a SCART<br />
connector. The input accepts video, S-video and RGB.<br />
See AV2/L1 In on page 140 for how to set this up.<br />
4 HDMI OUT<br />
HDMI output for high quality digital audio and video.<br />
5 DIGITAL AUDIO OUT (COAXIAL)<br />
Connect to the DVD/DVR1 coaxial jack on the receiver<br />
subwoofer.<br />
6 COMPONENT VIDEO OUT<br />
A high-quality video output for connecting to a TV or<br />
monitor with a component video input.<br />
7 OUTPUT<br />
Stereo analog audio, video and S-video outputs for<br />
connection to a TV or AV amplifier/receiver.<br />
OUTPUT<br />
8 AV1 (RGB)-TV AV connector<br />
Audio/video output SCART-type AV connector for<br />
connecting to a TV or other equipment with a SCART<br />
connector. The video output is switchable between video,<br />
S-video and RGB. See AV1 Out on page 140 for how to set<br />
this up.<br />
9 G-LINK<br />
Use to connect the supplied G-LINK cable to enable<br />
GUIDE Plus+® to control an external satellite receiver,<br />
etc.<br />
3 4 5<br />
ANTENNA(DIGITAL)<br />
OUT<br />
IN<br />
5 V 30 mA<br />
HDMI OUT<br />
DIGITAL<br />
AUDIO OUT<br />
6 7 8 9 10 11 12<br />
COAXIAL<br />
10 CONTROL IN<br />
Connect to the CONTROL OUT terminal of the receiver<br />
subwoofer.<br />
11 ANTENNA (DIGITAL) IN/OUT<br />
Connect your DTV antenna to the ANTENNA (DIGITAL)<br />
IN jack. The signal is passed through to the ANTENNA<br />
(DIGITAL) OUT jack for connection to your TV.<br />
12 AC IN – Power inlet<br />
AC IN
Connections 02<br />
Front panel connections<br />
On the front panel there is a flip-down cover that hides<br />
more connections.<br />
Left side:<br />
13 DV IN<br />
A DV input i.LINK connector, suitable for connecting a<br />
DV camcorder.<br />
14 USB port (Type B)<br />
USB port for connecting a PictBridge-compatible printer<br />
or PC.<br />
15 USB port (Type A)<br />
USB port for connecting a digital camera, keyboard or<br />
other USB device.<br />
Right side:<br />
DV IN<br />
16 INPUT 2<br />
Audio/video input (stereo analog audio; composite and Svideo),<br />
especially suitable for camcorders, game<br />
consoles, portable audio, etc.<br />
Connecting a TV antenna<br />
This recorder has separate built-in TV tuners for<br />
terrestrial digital and terrestrial analog TV broadcasts.<br />
If you are ready to receive digital broadcasts now, use one<br />
of the supplied RF antenna cables connect an antenna<br />
(either an antenna wall outlet or indoor antenna) to the<br />
ANTENNA (DIGITAL) IN connector. Next, connect the<br />
other supplied RF antenna cable to connect an antenna<br />
to the ANTENNA IN (RF IN) connector. Lastly, connect<br />
the recorder to your TV from the ANTENNA OUT<br />
connector.<br />
USB<br />
13 14 15<br />
INPUT 2 S-VIDEO VIDEO L(MONO) R AUDIO<br />
16<br />
AUDIO VIDEO<br />
ANTENNA<br />
R<br />
L<br />
IN<br />
S-VIDEO<br />
INPUT 3<br />
AV 2 (INPUT 1/DECODER)<br />
OUT<br />
ANTENNA<br />
IN (RF IN)<br />
Y PB PR<br />
COMPONENT VIDEO OUT<br />
ANTENNA<br />
OUT<br />
OUTPUT<br />
To antenna input<br />
Antenna wall outlet<br />
AV 1 (RGB) – TV<br />
TV<br />
G-LINK IN<br />
CONTROL<br />
ANTENNA(DIGITAL)<br />
OUT<br />
IN<br />
5 V 30 mA<br />
ANTENNA<br />
(DIGITAL) IN<br />
Antenna wall outlet<br />
or indoor antenna<br />
Important<br />
• If there is only one antenna outlet on your wall, use a<br />
divider.<br />
• Do not connect a component that can receive analog<br />
signals to the ANTENNA (DIGITAL) OUT.<br />
If your area is not yet served with terrestrial digital<br />
services, connect your antenna’s output to the<br />
ANTENNA IN (RF IN) connector using one of the<br />
supplied RF antenna cables. Next, connect the recorder<br />
to your TV from the ANTENNA OUT connector.<br />
AUDIO VIDEO<br />
ANTENNA<br />
R<br />
L<br />
IN<br />
S-VIDEO<br />
INPUT 3<br />
AV 2 (INPUT 1/DECODER)<br />
OUT<br />
ANTENNA<br />
IN (RF IN)<br />
Y PB PR<br />
COMPONENT VIDEO OUT<br />
ANTENNA<br />
OUT<br />
OUTPUT<br />
To antenna input<br />
Antenna<br />
wall outlet<br />
AV 1 (RGB) – TV<br />
TV<br />
G-LINK IN<br />
CONTROL<br />
ANTENNA(DIGITAL)<br />
OUT<br />
IN<br />
5 V 30 mA<br />
We strongly recommend using an outdoor antenna for<br />
better broadcast picture quality.<br />
If, however, you want to use an indoor antenna, use one<br />
with a signal amplifier rated at 5 V, 30 mA and set Aerial<br />
Power to On in the Initial Setup menu (see page 138).<br />
DIGITAL<br />
AUDIO OUT<br />
HDMI OUT<br />
COAXIAL<br />
DIGITAL<br />
AUDIO OUT<br />
HDMI OUT<br />
COAXIAL<br />
AC IN<br />
AC IN<br />
49<br />
En
02<br />
50<br />
En<br />
Connections<br />
Easy connections<br />
The setup described below is a basic setup that allows<br />
you to watch and record TV programmes, and play discs.<br />
Other types of connections are explained starting on the<br />
following page.<br />
Important<br />
• These connections use SCART cables (not supplied).<br />
If your TV (or VCR) does not have a SCART<br />
connection, and you want to use the supplied audio/<br />
video cable, see Basic connections on page 10.<br />
• The AV1 (RGB)-TV AV connector can output ordinary<br />
(composite), S-video or RGB video, plus stereo<br />
analog audio. The AV2 (INPUT 1/DECODER)<br />
connector accepts ordinary, S-video and RGB video<br />
input, as well as stereo analog audio. See AV1 Out<br />
and AV2/L1 In on page 140 for how to setup these<br />
options.<br />
• Before making or changing any rear panel<br />
connections, make sure that all components are<br />
switched off and unplugged from the wall outlet.<br />
From antenna output<br />
To recorder's<br />
antenna input<br />
AV2 (INPUT 1/<br />
DECODER)<br />
AUDIO VIDEO<br />
ANTENNA<br />
R<br />
L<br />
IN<br />
S-VIDEO<br />
INPUT 3<br />
AV 2 (INPUT 1/DECODER)<br />
OUT<br />
Y PB PR<br />
COMPONENT VIDEO OUT<br />
AV1 (RGB) - TV<br />
OUTPUT<br />
TV<br />
To antenna input<br />
VCR<br />
AV 1 (RGB) – TV<br />
G-LINK IN<br />
CONTROL<br />
ANTENNA(DIGITAL)<br />
OUT<br />
IN<br />
5 V 30 mA<br />
DIGITAL<br />
AUDIO OUT<br />
HDMI OUT<br />
COAXIAL<br />
Antenna/cable TV<br />
wall outlet<br />
1 Connect your TV antenna to the recorder and TV.<br />
See Connecting a TV antenna on page 49 for details.<br />
• If you want to incorporate a VCR in your setup, connect<br />
it before the recorder (i.e., between the antenna wall<br />
outlet and the antenna input on the recorder).<br />
3<br />
1<br />
2<br />
From SCART AV<br />
connector<br />
To SCART AV<br />
connector<br />
AC IN<br />
2 Use a SCART cable (not supplied) to connect the<br />
AV1 (RGB)-TV AV connector on this recorder to the<br />
SCART AV connector on your TV.<br />
3 Use another SCART cable to connect the AV2<br />
(INPUT 1/DECODER) AV connector to a SCART AV<br />
connector on your VCR.<br />
Tip<br />
• This recorder has a ‘through’ function which allows<br />
you to record a TV programme from the built-in TV<br />
tuner in this recorder while watching a video playing<br />
on your VCR (To use this feature when the recorder is<br />
in standby, Power Save must be set to Off — see<br />
Power Save on page 137).<br />
Using the S-video or component<br />
video output<br />
If you can’t use the SCART AV connector to connect your<br />
TV to this recorder, there are standard audio/video output<br />
jacks, as well as an S-video and component video output.<br />
To component video input<br />
AUDIO<br />
OUTPUT<br />
COMPONENT<br />
VIDEO OUT<br />
TV<br />
AUDIO VIDEO<br />
ANTENNA<br />
R<br />
L<br />
IN<br />
S-VIDEO<br />
INPUT 3<br />
AV 2 (INPUT 1/DECODER)<br />
OUT<br />
To audio input<br />
2<br />
Y PB PR<br />
COMPONENT VIDEO OUT<br />
S-VIDEO<br />
OUTPUT<br />
OUTPUT<br />
AV 1 (RGB) – TV<br />
G-LINK IN<br />
CONTROL<br />
ANTENNA(DIGITAL)<br />
OUT<br />
IN<br />
5 V 30 mA<br />
1 Connect the S-video or component video output<br />
to a similar input on your TV.<br />
For an S-video connection, use an S-video cable (not<br />
supplied) to connect the S-VIDEO OUTPUT jack to an Svideo<br />
input on your TV.<br />
For a component video connection, use a component<br />
video cable (not supplied) to connect the COMPONENT<br />
VIDEO OUT jacks to a component video input on your TV.<br />
See also Component Video Out on page 139 for how to set<br />
up the component video output for use with a progressive<br />
scan-compatible TV.<br />
1<br />
DIGITAL<br />
AUDIO OUT<br />
HDMI OUT<br />
COAXIAL<br />
To video input<br />
AC IN
Connections 02<br />
2 Connect the AUDIO OUTPUT jacks to the<br />
corresponding audio inputs on your TV.<br />
You can use the supplied audio/video cable, leaving the<br />
yellow video plug disconnected. Make sure you match up<br />
the left and right outputs with their corresponding inputs<br />
for correct stereo sound.<br />
Connecting to a cable box or satellite<br />
receiver<br />
If you have a cable box or satellite receiver with a built-in<br />
decoder, connect it to this recorder and your TV as shown<br />
on this page. 1 If you are using a separate decoder box for<br />
your cable/satellite TV, set up following the instructions<br />
on the next page.<br />
Using the setup on this page you can:<br />
• Record any channel by selecting it on the cable box,<br />
satellite receiver or digital terrestrial receiver.<br />
• Change channels and set timer recordings on the<br />
external receiver using the GUIDE Plus+® system<br />
(via the G-LINK cable, and after setting up).<br />
Important<br />
• Do not connect this recorder to your TV ‘through’<br />
your VCR, satellite receiver or other component.<br />
Always connect each component directly to your TV<br />
or AV amplifier/receiver.<br />
• When using the GUIDE Plus+ system to make a<br />
timer recording from an external receiver, make sure<br />
that the external receiver is switched on.<br />
From antenna output<br />
To recorder's<br />
antenna input<br />
AUDIO VIDEO<br />
ANTENNA<br />
R<br />
L<br />
IN<br />
S-VIDEO<br />
INPUT 3<br />
AV 2 (INPUT 1/DECODER)<br />
1 Connect RF antenna cables as shown.<br />
See Connecting a TV antenna on page 49 for more on RF<br />
antenna connections, including from this recorder to<br />
your TV.<br />
2 Use a SCART cable (not supplied) to connect the<br />
AV1 (RGB)-TV AV connector to a SCART AV connector<br />
on your TV.<br />
This enables you to watch discs.<br />
3 Use another SCART cable to connect the AV2<br />
(INPUT 1/DECODER) AV connector to a SCART AV<br />
connector on your cable box/satellite receiver.<br />
This enables you to record scrambled TV channels.<br />
4 Plug the supplied G-LINK cable to the G-LINK<br />
jack.<br />
This enables you to control the tuner in the external<br />
receiver using the GUIDE Plus+® system.<br />
Position the IR transmitter end of the G-LINK cable so<br />
that the IR receiver on your cable/satellite receiver will<br />
pick up the control signals (see diagram).<br />
Note<br />
1 The diagram shows SCART video connections, but you can alternatively use any of the other audio/video connections.<br />
OUT<br />
Y PB PR<br />
COMPONENT VIDEO OUT<br />
G-LINK cable<br />
OUTPUT<br />
TV<br />
To antenna input<br />
Cable/Satellite<br />
receiver<br />
AV 1 (RGB) – TV<br />
G-LINK IN<br />
3<br />
AV2 (INPUT 1/<br />
DECODER)<br />
CONTROL<br />
ANTENNA(DIGITAL)<br />
OUT<br />
IN<br />
5 V 30 mA<br />
AV1 (RGB) - TV<br />
DIGITAL<br />
AUDIO OUT<br />
HDMI OUT<br />
COAXIAL<br />
2<br />
1<br />
From SCART AV<br />
connector<br />
O<br />
S-VIDEO<br />
INPUT 3<br />
4<br />
To SCART AV<br />
connector<br />
OUTPUT<br />
Satellite dish/<br />
antenna/cable TV<br />
wall outlet<br />
AV 2 (INPUT 1/DECODER)<br />
AV 1 (RGB) – TV<br />
G-LINK IN<br />
AC IN<br />
CONTROL<br />
51<br />
En
02<br />
52<br />
En<br />
Connections<br />
See the manual that came with your cable/satellite<br />
receiver if you’re not sure where the IR receiver is on the<br />
front panel. Alternatively, experiment with the remote<br />
control, operating it from very close range until you find<br />
the place where the receiver responds.<br />
Tip<br />
• This recorder has a ‘through’ function which allows<br />
you to record a TV programme from the built-in TV<br />
tuner in this recorder while watching a video playing<br />
on your VCR (To use this feature when the recorder is<br />
in standby, Power Save must be set to Off — see<br />
Power Save on page 137).<br />
Connecting an external decoder box (1)<br />
If you have an external, dedicated decoder box for your<br />
satellite or cable TV system, use the setup described on<br />
this page. See above for how to connect the G-LINK<br />
cable.<br />
Important<br />
• Do not connect your decoder box directly to this<br />
recorder.<br />
• Information from the decoder (for example, relating<br />
to pay TV services), is only viewable when this<br />
recorder is off (in standby).<br />
• For timer recording to work properly on this recorder,<br />
the VCR/satellite receiver/cable box must also be<br />
switched on during recording.<br />
• It is not possible to watch one TV programme and<br />
record another using this setup.<br />
Antenna/cable TV<br />
wall outlet<br />
From SCART AV<br />
connector<br />
VCR/Satellite receiver<br />
/Cable box<br />
3<br />
AUDIO VIDEO<br />
ANTENNA<br />
R<br />
L<br />
DIGITAL<br />
IN<br />
AUDIO OUT<br />
S-VIDEO<br />
INPUT 3<br />
AV 2 (INPUT 1/DECODER)<br />
HDMI OUT<br />
COAXIAL<br />
ANTENNA(DIGITAL)<br />
G-LINK IN<br />
OUT<br />
IN<br />
OUTPUT<br />
OUT<br />
Y PB PR<br />
CONTROL<br />
5 V 30 mA<br />
AV 1 (RGB) – TV<br />
COMPONENT VIDEO OUT<br />
1 Connect the cable from the antenna/cable TV<br />
outlet to the antenna input on your VCR/satellite<br />
receiver/cable box.<br />
2 Use a SCART cable (not supplied) to connect your<br />
decoder to your VCR/satellite receiver/cable box.<br />
See the manual for your decoder box for more detailed<br />
instructions.<br />
3 Use a SCART cable to connect your VCR/satellite<br />
receiver/cable box to the AV2 (INPUT 1/DECODER)<br />
AV connector on this recorder.<br />
4 Use a SCART cable to connect the AV1 (RGB)-TV<br />
AV connector to your TV.<br />
Connecting an external decoder box (2)<br />
If you only have a decoder, connect it to this recorder and<br />
your TV as shown on this page. 1<br />
Using the setup on this page you can:<br />
• Record scrambled channels received using the<br />
recorder’s built-in analog TV tuner.<br />
Note<br />
1 In order to use this setup, you will need to make the following settings from the Initial Setup menu:<br />
• Set the AV2/L1 In setting to Decoder from the Initial Setup menu (see AV2/L1 In on page 140).<br />
• From the Manual CH Setting screen, set the Decoder setting for the scrambled channels to On (see Manual CH Setting on page 139).<br />
1<br />
To antenna input<br />
TV<br />
SCART AV<br />
connection<br />
2<br />
Decoder<br />
AV2 (INPUT 1/<br />
DECODER)<br />
AV1 (RGB) - TV<br />
4<br />
To SCART AV<br />
connector<br />
AC IN
Connections 02<br />
Important<br />
• Do not connect this recorder ‘through’ your VCR,<br />
satellite receiver or cable box. Always connect each<br />
component directly to your TV or AV amplifier/<br />
receiver.<br />
AUDIO VIDEO<br />
ANTENNA<br />
R<br />
L<br />
IN<br />
S-VIDEO<br />
INPUT 3<br />
AV 2 (INPUT 1/DECODER)<br />
OUT<br />
Y PB PR<br />
COMPONENT VIDEO OUT<br />
OUTPUT<br />
TV<br />
Decoder<br />
AV 1 (RGB) – TV<br />
G-LINK IN<br />
1 Connect your TV antenna to the recorder and TV.<br />
See Connecting a TV antenna on page 49 for details.<br />
2 Use a SCART cable (not supplied) to connect the<br />
AV1 (RGB)-TV AV connector to a SCART AV<br />
connector on your TV.<br />
This enables you to watch discs.<br />
3 Use another SCART cable to connect the AV2<br />
(INPUT 1/DECODER) AV connector to a SCART AV<br />
connector on your decoder box.<br />
This enables you to record scrambled TV channels.<br />
Connecting using HDMI<br />
CONTROL<br />
ANTENNA(DIGITAL)<br />
OUT<br />
IN<br />
5 V 30 mA<br />
DIGITAL<br />
AUDIO OUT<br />
HDMI OUT<br />
COAXIAL<br />
If you have an HDMI or DVI-equipped 1 monitor or<br />
display 2 , you can connect it to this recorder using an<br />
HDMI cable (not supplied).<br />
The HDMI connector outputs uncompressed digital<br />
video, as well as almost every kind of digital audio.<br />
3<br />
AV2 (INPUT 1/<br />
DECODER)<br />
AV1 (RGB) - TV<br />
From SCART AV<br />
connector<br />
2<br />
To SCART AV<br />
connector<br />
AC IN<br />
1 Use an HDMI cable to connect the HDMI OUT<br />
connector on this recorder to an HDMI connector on<br />
an HDMI-compatible display.<br />
AUDIO VIDEO<br />
ANTENNA<br />
R<br />
L<br />
IN<br />
S-VIDEO<br />
INPUT 3<br />
AV 2 (INPUT 1/DECODER)<br />
• The arrow on the cable connector body should be<br />
face down for correct alignment with the connector<br />
on the recorder.<br />
When connected to an HDMI component or HDCPcompatible<br />
DVI component, the HDMI indicator lights.<br />
HDMI setup is generally automatic. There are however<br />
settings you can change if you need to. See HDMI Output<br />
(only available when an HDMI device is connected) on<br />
page 144 for more information. Note that the HDMI<br />
settings remain in effect until you change them, or<br />
connect a new HDMI component.<br />
Important<br />
• An HDMI connection can only be made with DVIequipped<br />
components compatible with both DVI and<br />
High-bandwidth Digital Content Protection (HDCP).<br />
If you choose to connect to a DVI connector, you will<br />
need a DVI to HDMI adaptor cable. A DVI to HDCP<br />
connection, however, does not support audio.<br />
Consult your local audio dealer for more information.<br />
• The HDMI connection is compatible with 32 kHz,<br />
44.1 kHz, 48 kHz, 96 kHz, 16 bit/20 bit/24 bit 2-channel<br />
linear PCM signals, as well as Dolby Digital, DTS and<br />
MPEG audio bitstream.<br />
• If your connected component is only compatible with<br />
Linear PCM, the signal is output as Linear PCM (DTS<br />
audio is not output).<br />
Note<br />
1 Depending on the component you have connected, using a DVI connection may result in unreliable signal transfers.<br />
2 The pixel resolution of this recorder’s HDMI video output is (according to TV format): NTSC (720 x 480i/p, 1280 x 720p, 1920 x 1080i/p) and PAL<br />
(720 x 576i/p, 1280 x 720p, 1920 x 1080i/p). If your display is not compatible with these resolutions the picture may not be correctly reproduced.<br />
OUT<br />
Y PB PR<br />
COMPONENT VIDEO OUT<br />
HDMI To HDMI<br />
IN input<br />
OUTPUT<br />
AV 1 (RGB) – TV<br />
HDMI-compatible display<br />
G-LINK IN<br />
CONTROL<br />
HDMI<br />
OUT<br />
ANTENNA(DIGITAL)<br />
OUT<br />
IN<br />
5 V 30 mA<br />
DIGITAL<br />
AUDIO OUT<br />
HDMI OUT<br />
COAXIAL<br />
AC IN<br />
53<br />
En
02<br />
54<br />
En<br />
Connections<br />
• If you have connected to a Pioneer plasma display,<br />
please select the HDMI setup on the display (refer to<br />
the supplied manual for more on this).<br />
About HDMI<br />
HDMI (High-Definition Multimedia Interface) supports<br />
both video and audio on a single digital connection for<br />
use with DVD players and recorders, DTV, set-top boxes,<br />
and other AV devices. HDMI was developed to provide<br />
the technologies of High-bandwidth Digital Content<br />
Protection (HDCP) as well as Digital Visual Interface<br />
(DVI) in one specification. HDCP is used to protect digital<br />
content transmitted and received by DVI-compliant<br />
displays.<br />
HDMI has the capability to support standard, enhanced,<br />
or high-definition video plus standard to multi-channel<br />
surround-sound audio. HDMI features include uncompressed<br />
digital video, a bandwidth of up to five gigabits<br />
per second (Dual Link), one connector (instead of several<br />
cables and connectors), and communication between<br />
the AV source and AV devices such as DTVs.<br />
HDMI, the HDMI logo and High-Definition Multimedia<br />
Interface are trademarks or registered trademarks of HDMI<br />
licensing LLC.<br />
Connecting other AV sources<br />
Connecting a VCR or analog camcorder<br />
A.TV D.TV PLTV<br />
STANDBY/ON DV IN<br />
USB<br />
HDD/DVD<br />
DivX COPY HDMI<br />
AUDIO/VIDEO<br />
OUTPUT<br />
(Rear panel)<br />
VCR<br />
COMMON INTERFACE<br />
Analog camcorder<br />
1 Connect a set of audio and video inputs of your<br />
VCR or camcorder to a set of outputs on this<br />
recorder.<br />
This enables you to record from this recorder to your VCR<br />
or camcorder.<br />
CH<br />
OPEN/CLOSE<br />
ONE TOUCH<br />
STOP REC<br />
COPY<br />
INPUT<br />
A.TV/D.TV<br />
SELECT<br />
AUDIO/VIDEO<br />
INPUT<br />
(Front panel)<br />
INPUT 2 S-VIDEO VIDEO L(MONO) R AUDIO REC<br />
1 2<br />
To audio/video input<br />
From audio/video output<br />
• You can use standard video or S-video cables for the<br />
video connection.<br />
• Alternatively, you can use the AV2 (INPUT 1/<br />
DECODER) SCART connector for audio/video input<br />
and output with just one SCART cable.<br />
2 Connect a set of audio and video outputs of your<br />
VCR or camcorder to a set of inputs on this recorder.<br />
This enables you to record tapes from your VCR or<br />
camcorder.<br />
• You can use standard video or S-video cables for the<br />
video connection.<br />
• The front panel connections make convenient<br />
connections for a camcorder input.<br />
• When connecting an external AV source that only<br />
supports monaural sound, only insert the left (white)<br />
audio jack to this device. Doing so will allow the same<br />
sound track to be recorded to both channels. You<br />
must connect to the INPUT 2 jack on the front panel.<br />
Connecting a DV camcorder<br />
You can connect a DV camcorder or DVD recorder with<br />
DV output to the front panel DV IN jack.<br />
Important<br />
• This jack is for connection to DV equipment only. It is<br />
not compatible with digital satellite receivers or D-<br />
VHS video decks.<br />
A.TV D.TV PLTV<br />
STANDBY/ON DV IN<br />
USB<br />
HDD/DVD<br />
DivX COPY HDMI<br />
DV<br />
IN<br />
COMMON INTERFACE<br />
From DV output<br />
DV camcorder<br />
• Use a DV cable (not supplied) to connect the DV<br />
jack of your DV camcorder to the front panel DV<br />
IN jack of this recorder.<br />
CH<br />
OPEN/CLOSE<br />
ONE TOUCH<br />
STOP REC<br />
COPY<br />
INPUT<br />
A.TV/D.TV<br />
SELECT<br />
INPUT 2 S-VIDEO VIDEO L(MONO) R AUDIO REC
Connections 02<br />
Connecting a USB device<br />
Using the USB ports on the front of the recorder you can<br />
connect USB devices such as digital cameras, printers,<br />
keyboards and PCs. Please also see the instructions that<br />
came with the device you want to connect before using.<br />
PictBridge-compatible<br />
Printer<br />
PC<br />
USB<br />
HDD/DVD<br />
OPEN/CLOSE<br />
A.TV D.TV PLTV DivX COPY HDMI<br />
STANDBY/ON DV IN<br />
COMMON INTERFACE<br />
USB<br />
INPUT 2 S-VIDEO VIDEO L(MONO) R AUDIO REC<br />
ONE TOUCH<br />
STOP REC<br />
COPY<br />
INPUT<br />
CH<br />
A.TV/D.TV<br />
SELECT<br />
USB<br />
(Type B)<br />
USB<br />
(Type A)<br />
Digital Camera<br />
Important<br />
• Some USB devices may not work with this recorder.<br />
• When connecting a PC to this unit, make sure the<br />
power is turned off on both the PC and this unit when<br />
you connect them via USB.<br />
• We recommend connecting USB devices when this<br />
recorder is switched off (in standby).<br />
JPEG file storage devices<br />
• Digital still camera<br />
• Memory card reader (any type of memory card)<br />
• USB memory<br />
The Mass Storage Class (MSC) device should be FATcompatible.<br />
Note that if the device is partitioned, this<br />
recorder may not recognize it.<br />
The Picture Transfer Protocol (PTP) can be used to<br />
transfer up to a maximum of 4000 files.<br />
WMA/MP3 file storage devices<br />
• Memory card reader (any type of memory card)<br />
• USB memory<br />
• PC (Use Connect PC function)<br />
The Mass Storage Class (MSC) device should be FATcompatible.<br />
Note that if the device is partitioned, this<br />
recorder may not recognize it.<br />
Note that although multi-slot card readers can be used,<br />
the recorder will only recognize the first card inserted. To<br />
read another card, remove all the cards and insert the<br />
card to be read again.<br />
USB<br />
Keyboard<br />
Using a USB hub<br />
• Use a hub compatible with USB 1.1 and/or 2.0.<br />
• Use an independently powered hub (bus powered<br />
hubs may not work reliably).<br />
• In the event of unreliable operation with the hub, we<br />
recommend plugging the device directly into the<br />
recorder’s USB port.<br />
• Operation may become unreliable if too many<br />
devices are connected to the hub. In this case, try<br />
unplugging some devices.<br />
• If the power delivered through a hub is insufficient for<br />
the devices connected, communication can become<br />
unreliable. In this case, disconnect one or more<br />
devices then perform a USB restart. (See Restart USB<br />
Device on page 145.)<br />
Using a USB printer<br />
• Use a PictBridge-compatible printer.<br />
Using a USB keyboard<br />
• Do not use a PS/2 keyboard connected using a PS/2-<br />
USB adapter.<br />
Using a PC<br />
• Note that you can connect a PC to this device via USB<br />
to copy WMA and MP3 files. For more information,<br />
see Connect PC on page 121. To use Connect PC with<br />
this device, your PC must run either the Windows XP<br />
Home Edition (SP2) or Windows XP Professional<br />
(SP2) operating system and be able to run Windows<br />
Media Player 10. Even if your PC can run Windows<br />
Media Player 10, we cannot guarantee that it will<br />
function properly with this device. For more details<br />
see the ‘Help’ section of Windows Media Player 10.<br />
Plugging in<br />
After checking all the connections, plug in the recorder.<br />
• Use the supplied power cable to connect this<br />
recorder to a power outlet.<br />
55<br />
En
03<br />
56<br />
En<br />
Getting started<br />
Chapter 3<br />
Getting started<br />
Switching on and setting up<br />
When you switch the recorder on for the first time, you<br />
can make several basic settings using the Setup<br />
Navigator feature. This takes you through setting the<br />
clock, the internal TV tuner and the video output.<br />
If you’re using the recorder for the first time, we strongly<br />
recommend you use the Setup Navigator before starting<br />
to use the recorder.<br />
1 Switch on your TV and set the video input to this<br />
recorder.<br />
RECORDER<br />
2 Switch on the recorder.<br />
When you switch on for the first time, your TV should<br />
display the Setup Navigator screen (If the Setup<br />
Navigator doesn’t appear, you can also access it from the<br />
Initial Setup menu; see page 137).<br />
• If this recorder is connected to a compatible TV using<br />
a fully-wired 21-pin SCART cable, the recorder will<br />
take a few seconds to download country, TV screen<br />
size and language information. (Check the manual<br />
that came with your TV for compatibility information.)<br />
ENTER<br />
3 Choose a language (then press ENTER).<br />
Initial Setup<br />
Basic<br />
Tuner<br />
Video In/Out<br />
Audio In<br />
Audio Out<br />
Language<br />
Recording<br />
Playback<br />
Clock Setting Language<br />
Input Line System<br />
Power Save<br />
HELPp<br />
Setup N avigator<br />
ENTER 4 Start the Setup Navigator.<br />
k Setting<br />
t Line<br />
Complete<br />
System<br />
this setup before you<br />
start using your recorder.<br />
er Save<br />
P Start<br />
p Navigator Cancel<br />
Please use the Initial Setup if you<br />
want to make more detailed settings.<br />
• If you don’t want to use the Setup Navigator, press <br />
to select Cancel, then press ENTER to exit the Setup<br />
Navigator.<br />
5 Select an Aerial Power setting 1 for the<br />
built-in digital tuner.<br />
• On: power is always supplied to the connected aerial,<br />
whether the recorder is on or in standby.<br />
• Auto: power is only supplied when this recorder is on.<br />
• Off: power is never supplied to the aerial.<br />
6 Select ‘Auto Scan’ to start scanning for<br />
D.TV channels.<br />
• Select Do not set if you want to skip D.TV channel<br />
setup (because they have already been set up, for<br />
example), then skip to step 8 below.<br />
7 Select your country.<br />
The recorder starts scanning for new channels. After the<br />
scan is complete the recorder will let you know how many<br />
new channels were found.<br />
• The country setting will apply to both the digital and<br />
analog TV tuners.<br />
• The clock will also be set automatically here if D.TV<br />
channels are found.<br />
• If no new channels were found a message appears<br />
asking if you want to scan again. Check the aerial<br />
connection before selecting Yes. (If you select No,<br />
skip to step 8 below.)<br />
Note<br />
1 If the recorder does not accept the On or Auto setting (the highlight jumps back to Off), check that the antenna is properly connected and<br />
that it is not shorted, then try making the setting again.<br />
ENTER<br />
ENTER<br />
ENTER
Getting started 03<br />
ENTER<br />
8 Select the analog TV (A.TV) Auto<br />
Channel Setting (‘Auto Scan’ or ‘Download from<br />
TV’), or ‘Do not set’.<br />
k Setting Auto Channel Setting<br />
Line System<br />
er Save Auto English Scan<br />
P Download from TV<br />
p Navigator Do not Set<br />
• Select Do not set if you want to skip channel setup<br />
(because they have already been set up, for example).<br />
• You can only use the Download from TV feature if<br />
this recorder is connected to your TV using a fullywired<br />
21-pin SCART cable via the AV1 (RGB)-TV<br />
connector, and if your TV supports this function<br />
(check your TV’s instruction manual for more details).<br />
ENTER<br />
• Select your country.<br />
k Setting Country Selection<br />
t Line System<br />
er Save Country UK<br />
P<br />
• Auto-tuning channels<br />
The Auto Scan option automatically scans and sets the<br />
channel presets.<br />
Tuning<br />
Cancel<br />
32/99<br />
• Downloading channels from your TV<br />
Use the Download from TV option to download all the<br />
channels that your TV is tuned to.<br />
ENTER<br />
Downloading Pr 5<br />
Cancel<br />
32/99<br />
9 Select ‘Auto’ for automatic time setting,<br />
or ‘Manual’ to set the clock manually.<br />
If the clock was already set from a D.TV channel in step 6,<br />
this step is skipped.<br />
k Setting Clock Setting<br />
Line System<br />
er Save Auto<br />
P Manual<br />
• Auto clock setting<br />
Some TV channels broadcast time signals together<br />
with the programme. This recorder can use these<br />
signals to set the clock automatically.<br />
Set ‘Clock Set CH‘ to the channel preset number<br />
that broadcasts a time signal, then move the<br />
cursor down to ‘Start’ and press ENTER.<br />
k Setting Auto Clock Setting<br />
Line System<br />
Date<br />
er Save<br />
–– / –– / ––––<br />
P Time<br />
–– : ––<br />
p Navigator<br />
Clock Set CH<br />
Pr 1<br />
Start<br />
The recorder takes a short while to set the time. After<br />
you see that it’s set, select Next to proceed.<br />
k Setting Auto Clock Setting<br />
Line System<br />
Date<br />
er Save<br />
MON 01 / 01 / 2007<br />
P Time<br />
11 : 20<br />
p Navigator<br />
Clock Set CH<br />
Pr 1<br />
Start<br />
Next<br />
If the time could not be set automatically, press<br />
RETURN/EXIT to go back to the previous screen and<br />
select Manual.<br />
• Manual clock setting<br />
If no stations in your area are broadcasting time<br />
signals, you can set the clock manually.<br />
Use the / buttons to set your time zone.<br />
You can set this by selecting a city or a time relative<br />
to GMT.<br />
k Setting Manual Clock Setting<br />
Line System<br />
er Save Time Zone<br />
P<br />
p Navigator Summer Time Off<br />
England<br />
London<br />
Press then use the / buttons to select ‘On’<br />
or ‘Off’ for summer time, then press ENTER.<br />
Select On if you are currently using summer time.<br />
k Setting Manual Clock Setting<br />
Line System<br />
er Save Time Zone<br />
P<br />
p Navigator Summer Time On<br />
England<br />
London<br />
1/2<br />
1/2<br />
57<br />
En
03<br />
58<br />
En<br />
Getting started<br />
Set the date (day/month/year) and time, then<br />
press ENTER to make all the settings.<br />
k Setting Manual Clock Setting<br />
Line Date System<br />
er Save<br />
MON 01 / 01 / 2007<br />
P Time<br />
00 : 00<br />
p Navigator<br />
Time Zone<br />
England<br />
London<br />
Summer Time On<br />
• Use the / buttons to change the value in the<br />
highlighted field.<br />
• Use the / buttons to move from one field to<br />
another.<br />
• You can go back to the previous screen in the Setup<br />
Navigator by pressing RETURN/EXIT.<br />
ENTER<br />
10 Select the EPG (Electronic Programme<br />
Guide) type to use.<br />
• GUIDE Plus+: Use the Gemstar GUIDE Plus+ EPG<br />
(see also Setting up the GUIDE Plus+® system on<br />
page 59 and Using the GUIDE Plus+® electronic<br />
programme guide on page 62).<br />
• Digital EPG: Use the SI EPG (programme information<br />
broadcast together with digital channels).<br />
• If no channels were found when scanning for digital<br />
TV channels then this screen does not appear and<br />
the EPG is set according to the country set in step 7<br />
above.<br />
ENTER<br />
11 Select the TV screen type, ‘Wide (16:9)’<br />
or ‘Standard (4:3)’.<br />
ENTER<br />
k Setting TV Screen Size<br />
Line System<br />
er Save<br />
P<br />
p Navigator<br />
Wide (16:9)<br />
Standard (4:3)<br />
12 Select whether or not your TV is<br />
compatible with progressive scan video.<br />
k Setting Progressive<br />
Line System<br />
er Save Compatible<br />
P Not Compatible<br />
p Navigator Don't Know<br />
• This screen is not displayed when an HDMI signal is<br />
being output.<br />
2/2<br />
ENTER 13 Press to continue after reading the HDD<br />
caution.<br />
ENTER<br />
k Setting In the event of HDD failure, recordings may<br />
be lost or normal playback/recording may<br />
Line<br />
not<br />
System<br />
be possible.<br />
er Save<br />
As recordings might be lost in case of a HDD<br />
P failure, we recommend to use the HDD only<br />
p Navigator as temporary storage media.<br />
Please copy recordings you want to keep<br />
to recordable DVD.<br />
Press ENTER to continue.<br />
14 Select ‘Finish Setup’ to exit the Setup<br />
Navigator, or ‘Go Back’ if you want to start again.<br />
k Setting<br />
Line System Setup is complete!<br />
er Save<br />
Finish Setup<br />
p Navigator Go Back<br />
That completes basic setup using the Setup Navigator.<br />
• If there are blank channels with no station, you can<br />
set these to skip using the manual channel setting.<br />
See Manual CH Setting on page 139.<br />
For users receiving digital broadcast<br />
services<br />
This unit can set its internal clock automatically from<br />
digital broadcasts. However, depending on the<br />
broadcaster, the clock information received may not be<br />
accurate.<br />
Use the following procedure (while the recorder is not<br />
recording) to set the clock manually.<br />
1 HOME MENU Press HOME MENU.<br />
ENTER<br />
2 Select ‘Initial Setup’ > ‘Basic’ > ‘Clock<br />
Setting’.<br />
3 Highlight the time setting.<br />
ENTER<br />
4 Press to display the manual clock setting<br />
screen.<br />
5 Set the correct time.<br />
Return to automatic clock setting<br />
• To return to the automatic clock setting, follow the<br />
instructions for ‘Replace Channels’ (page 137).
Getting started 03<br />
Setting up the GUIDE Plus+® system<br />
This section is only applicable if you chose to use the<br />
GUIDE Plus+ system as the EPG type in step 10 of the<br />
Setup Navigator above.<br />
The GUIDE Plus+® system is a free, interactive onscreen<br />
television programming guide. The system offers<br />
programme listings for all major channels, one-touch<br />
recording, search by genre, recommendations according<br />
to your profile and more.<br />
For the GUIDE Plus+ system to function correctly, it is<br />
important that you set the language and country<br />
correctly in the Setup Navigator, and that you have<br />
performed a scan for available channels, as these are all<br />
used by the GUIDE Plus+ system. If any of these things<br />
are not yet set, please run the Setup Navigator first (see<br />
Switching on and setting up on page 56).<br />
TV listings information is received via ‘host channels’. In<br />
order to receive the correct TV listings information for<br />
your country or region you need to set up the GUIDE<br />
Plus+ system and ‘download’ the TV listings information.<br />
The initial download can take up to 24 hours, but once<br />
this is done, all future updates are automatic.<br />
GUIDE<br />
1 Display the GUIDE Plus+ setup menu.<br />
The language and country settings are already set to<br />
whatever you selected in the Setup Navigator.<br />
ENTER<br />
2 Highlight ‘Postal Code’.<br />
SETUP /TUNE+<br />
1 2<br />
SR+<br />
3<br />
/ST– /ST+<br />
4<br />
ENTER<br />
5 6<br />
F.S.SURR /TUNE– TEST TONE<br />
7 8 9<br />
ENTER<br />
ADVANCED<br />
3 0<br />
Enter your postal code.<br />
The system uses your postal code to identify which TV<br />
listings data is correct for the area in which you live, so it<br />
is important that you enter it correctly.<br />
59<br />
En
03<br />
60<br />
En<br />
Getting started<br />
4 If you are using an external receiver (such as a<br />
satellite receiver) with the supplied G-LINK cable,<br />
complete this step, otherwise jump to step 5 below.<br />
• See Connecting to a cable box or satellite receiver on<br />
page 51 for more on using the supplied G-LINK cable.<br />
• Select External Receiver 1, 2 or 3, then press<br />
ENTER. (If you have just one external receiver, use<br />
External Receiver 1. You can add further receivers in<br />
2 and 3 if you need to.)<br />
After pressing ENTER:<br />
• Select your reception method (Terrestrial, Cable or<br />
Satellite).<br />
• Select your provider (if applicable).<br />
• Select the brand of your external receiver.<br />
• Identify which input your external receiver is<br />
connected to.<br />
After completing these steps the recorder will try and<br />
communicate with your external receiver and change the<br />
channel via the G-LINK cable. If the channel was<br />
successfully changed, select Yes to confirm.<br />
If the channel did not change, select No. The GUIDE<br />
Plus+ system will try other codes assigned to your<br />
external receiver. If none of the codes changes the<br />
channel successfully, tune your external receiver to the<br />
host channel for your country (refer to step 5 below) and<br />
leave it on overnight. The recorder needs to be in standby;<br />
it will wake up automatically and download new codes<br />
from the host channel. The next day, try this setup<br />
process again:<br />
• Press GUIDE to display the GUIDE Plus+ screen.<br />
• Press to highlight the Menu bar, then use to<br />
reach the Setup area and select Setup.<br />
• Continue setting up from the start of this step again.<br />
If your external receiver still doesn’t respond to the G-<br />
LINK controller, please call customer support and report<br />
the brand and model of your external receiver.<br />
See also GUIDE Plus+ FAQ and troubleshooting on<br />
page 71.<br />
5 Identify the host channel for your country.<br />
The TV listings information available in the GUIDE Plus+<br />
system is distributed throughout <strong>Europe</strong> by selected<br />
broadcasters called host channels. It is important that<br />
the host (analog) channel for your country is correctly<br />
identified in order to receive listings information (EPG<br />
download).<br />
Follow A, B or C below depending on your setup:<br />
A If you are not using an external receiver, this<br />
recorder will automatically scan all channels for the<br />
host channel:<br />
• Leave the recorder in standby overnight (do not leave<br />
it switched on).<br />
B If you are using an external receiver, you need to<br />
identify the host channel from the table below:<br />
Country/<br />
Region<br />
Host channels Comments<br />
Austria Eurosport<br />
Belgium RTL-TVI<br />
France Canal+ Analog only<br />
Germany Eurosport<br />
Italy MTV Analog only<br />
Netherlands Eurosport<br />
Spain Tele 5 Analog only<br />
Switzerland Eurosport<br />
UK ITV, Eurosport ITV is analog only. Use Eurosport<br />
if you are a SKY subscriber and<br />
you no longer have an analog<br />
terrestrial antenna.<br />
• Tune your external receiver to the appropriate host<br />
channel and leave the receiver on and the recorder in<br />
standby overnight.<br />
C If you use both an external receiver and this<br />
recorder as sources, follow the instructions above for<br />
setting up without an external receiver. Only if this is<br />
unsuccessful try the external receiver method.<br />
About EPG download<br />
• EPG data can only be received when the recorder is<br />
in standby. (When not using the recorder, therefore,<br />
please switch it into standby.) If you’re using an<br />
external receiver, leave this on when EPG data is<br />
downloading.<br />
• If you cannot receive any of the host channels (see<br />
the above table) then you won’t be able to use the<br />
GUIDE Plus+ system. In this case do not set the<br />
postal code (or set Country to Other) in the GUIDE<br />
Plus+ setup screen. (When GUIDE Plus+ service<br />
starts in your area, set the postal code again.)
Getting started 03<br />
If digital broadcasts start in your area, please set the<br />
EPG Type Select setting in the Initial Setup menu to<br />
Digital EPG.<br />
• Even if you can’t use the EPG functions where you<br />
live, you can still set VIDEO Plus+ recordings and<br />
manual recordings — see Setting a manual recording<br />
on page 69.<br />
• The front panel display shows EPG when receiving<br />
data. If you power on the recorder during an EPG<br />
download, the download is cancelled.<br />
• EPG data may be received several times a day. All<br />
updates are automatic.<br />
• When downloading EPG data, the recorder may<br />
sound as though it is on. This is normal.<br />
Checking the downloaded data the<br />
following day<br />
GUIDE 1 Display the GUIDE Plus+ screen.<br />
You should see a grid filled with channel logos and TV<br />
listings information. Use the / buttons to review the<br />
list. If you notice that there are channels missing, or that<br />
there are channels in the list that you don’t get, go to the<br />
Editor screen:<br />
• Press repeatedly until the Menu bar is highlighted.<br />
• Press until Editor is highlighted. The main area of<br />
the screen now shows a list of channels. Those that<br />
are turned ON are displayed in the grid; those that<br />
are OFF are hidden. Use the /// buttons to<br />
move down the list and turn channels ON or OFF as<br />
necessary.<br />
• For any channel that you turn ON, the GUIDE Plus+<br />
system will need to know how it is received (the<br />
source) and on which programme number. The<br />
source may be the built-in tuner of this recorder, or<br />
an external receiver. The programme number is the<br />
number on which the channel can be found on its<br />
receiving device/source. The entry in the Editor<br />
screen must match this number for correct<br />
recording of that channel.<br />
• The above is especially important for the ‘host<br />
channel’. Please make sure that the host channel is<br />
always switched ON.<br />
SETUP /TUNE+<br />
1 2<br />
SR+<br />
3<br />
/ST– /ST+<br />
4<br />
ENTER<br />
5 6<br />
F.S.SURR /TUNE– TEST TONE<br />
7 8 9<br />
ADVANCED<br />
2 0 Change the programme numbers as you<br />
like.<br />
Changing the programme numbers allows you to decide<br />
the order in which the channels change when stepping<br />
through them sequentially. You can do this to group<br />
certain channels together, for example.<br />
Name On/Off Source Prog. No.<br />
BBC1<br />
On D. TV 001<br />
BBC2 On D. TV 002<br />
ITV On D. TV 003<br />
CH4 On D. TV 004<br />
CH5 On D. TV 005<br />
BBC3 On Ext. Rec. 1 007<br />
ITV2 On D. TV 006<br />
E4 Off D. TV 014<br />
UKGOL On<br />
D. TV 017<br />
3 When you’re done, press the BLUE Action button<br />
(Home) to get back to the GUIDE Plus+ home screen.<br />
• You can find detailed information on using the GUIDE<br />
Plus+ system in the following chapter.<br />
61<br />
En
04<br />
62<br />
En<br />
Using the GUIDE Plus+® electronic programme guide<br />
Chapter 4<br />
Using the GUIDE Plus+® electronic<br />
programme guide<br />
This chapter is only applicable if the EPG Type Select<br />
setting made in the Setup Navigator (or the Initial Setup<br />
menu) is set to GUIDE Plus+.<br />
The GUIDE Plus+ system<br />
The GUIDE Plus+® system* is a free, interactive onscreen<br />
television programming guide. 1 The system<br />
provides programme listings for all major channels, onetouch<br />
recording, searching by genre, recommendations<br />
according to your profile and more. The GUIDE Plus+<br />
system is a convenient way to find out what’s on right<br />
now or during the coming week, by channel or by genre.<br />
The GUIDE Plus+ system also allows you to<br />
automatically set your viewing and recording selections<br />
quickly and easily.<br />
In order to receive the correct TV listings information for<br />
your country or region you need to set up the GUIDE<br />
Plus+ system and ‘download’ the TV listings information.<br />
If you haven’t already done this, please turn to Setting up<br />
the GUIDE Plus+® system on page 59 before<br />
proceeding.<br />
* GUIDE Plus+, SHOWVIEW, VIDEO Plus+, G-LINK are (1)<br />
registered trademarks or trademarks of, (2) manufactured<br />
under license from and (3) subject of various international<br />
patents and patent applications owned by, or licensed to,<br />
Gemstar-TV Guide International, Inc. and/or its related<br />
affiliates.<br />
Legal Notice<br />
GEMSTAR-TV GUIDE INTERNATIONAL, INC. AND/OR ITS<br />
RELATED AFFILIATES ARE NOT IN ANY WAY LIABLE FOR THE<br />
ACCURACY OF THE PROGRAMME SCHEDULE INFORMATION<br />
PROVIDED BY THE GUIDE PLUS+ SYSTEM. IN NO EVENT SHALL<br />
GEMSTAR-TV GUIDE INTERNATIONAL, INC. AND/OR ITS<br />
RELATED AFFILIATES BE LIABLE FOR ANY AMOUNTS<br />
REPRESENTING LOSS OF PROFITS, LOSS OF BUSINESS, OR<br />
INDIRECT, SPECIAL, OR CONSEQUENTIAL DAMAGES IN<br />
CONNECTION WITH THE PROVISION OR USE OF ANY<br />
INFORMATION, EQUIPMENT, OR SERVICES RELATING TO THE<br />
GUIDE PLUS+ SYSTEM.<br />
Using the GUIDE Plus+ system<br />
All the various features and areas are colour-coded for<br />
ease of navigation. All screens (with the exception of<br />
some setup screens) have the following common<br />
elements:<br />
1 Video window – Allows you to continue watching<br />
the current programme while using the GUIDE<br />
Plus+ system.<br />
2 Information panels – Display programme<br />
promotions or instructions on the GUIDE Plus+<br />
system.<br />
3 Action bar – Colour-coded Action buttons change<br />
function depending on the area.<br />
4 Information box – Shows short programme<br />
descriptions or help menus.<br />
5 Menu bar – Gives access to the various areas of the<br />
GUIDE Plus+ system.<br />
6 Grid – Shows TV listings information for the next<br />
seven days by channel and time.<br />
Note<br />
1 The GUIDE Plus+ system can’t be used when the Input Line System is set to 525 System (see also Input Line System on page 137).<br />
1<br />
2<br />
3<br />
4<br />
5<br />
6
Using the GUIDE Plus+® electronic programme guide 04<br />
GUIDE Plus+ navigation<br />
The table below shows a summary of the remote buttons<br />
you’ll use to navigate the GUIDE Plus+ system.<br />
Key What it does<br />
REC Press to set or cancel One Button<br />
Recording.<br />
GUIDE Press to display the GUIDE Plus+ screen<br />
(also use to exit).<br />
/// Use to navigate screens (highlight an<br />
item).<br />
RED, GREEN,<br />
YELLOW, BLUE<br />
Action buttons that change functionality<br />
depending on the Area.<br />
MENU Press to jump directly to the Menu bar.<br />
TIMER REC Press to go directly to the Schedule area.<br />
INFO Press to display extended information for<br />
the current programme.<br />
ENTER Press to confirm a selection or to leave<br />
the GUIDE Plus+ screen.<br />
Number<br />
buttons<br />
PREV/<br />
NEXT<br />
Use for numeric entry.<br />
Press to select the previous/next page of<br />
information (in the grid, for example).<br />
/ Press to select the previous/next day.<br />
One-Button-Record<br />
The RED Action button (Record) is visible anytime you<br />
can highlight a programme title, including from the Grid,<br />
after a search, or in your recommendations in the My TV<br />
area.<br />
The programme name, date, channel, recording start<br />
and end times are all set automatically when you set a<br />
timer recording using One-Button-Record.<br />
If you need to, you can edit the settings at any time before<br />
the recording is due to start (see Editing a scheduled<br />
recording on page 67).<br />
1 Highlight a programme title.<br />
2 Press the RED Action button (Record).<br />
The programme is now set for recording. When the<br />
programme is due to start, the recorder will switch to the<br />
correct channel and start recording 1 .<br />
• You can also use the REC button to set the<br />
recording.<br />
• You can review the shows you have set to record in<br />
the Schedule Area (see also The Schedule Area on<br />
page 67).<br />
Lock/Unlock video window<br />
When you enter the GUIDE Plus+ system, the channel<br />
you were watching remains visible in the video window.<br />
The date stamp above the window lets you know the<br />
channel, date and time.<br />
The default setting for this window is ‘locked’, as<br />
indicated by a closed padlock icon above the video<br />
window. When locked, the video window always shows<br />
the channel you were previously watching as you move<br />
up and down through the listings grid.<br />
If you prefer, you can unlock the video window so that as<br />
you highlight different channels in the listings grid, that<br />
channel is shown in the video window.<br />
Note<br />
1 Recording times set using the GUIDE Plus+ system do not automatically change to reflect any changes that may occur in the programme<br />
broadcast schedules.<br />
63<br />
En
04<br />
64<br />
En<br />
Using the GUIDE Plus+® electronic programme guide<br />
1 Highlight a channel logo.<br />
Channel logos are displayed to the left of programme<br />
titles.<br />
2 Press the RED Action button (Unlock).<br />
The padlock icon above the video window becomes<br />
unlocked. It remains unlocked for the remainder of your<br />
current TV viewing session.<br />
If you want to lock the video window again, follow the<br />
same procedure. The RED Action button will now act as<br />
Lock.<br />
Channel mosaic screen<br />
You can switch the display style of channels in the Grid<br />
Area, Schedule Area or My TV Area from a list to a mosaic<br />
of channel icons by pressing the YELLOW Action button.<br />
Select the channel icon you want using the cursor<br />
buttons, then press ENTER to return to the previous<br />
screen on that channel.<br />
Areas<br />
The GUIDE Plus+® system consists of seven Areas. All<br />
Areas can be accessed from the Menu bar.<br />
• Grid – The GUIDE Plus+ system Home Area.<br />
Displays TV listings information for the next seven<br />
days by time and channel.<br />
• Search – Search for TV programmes by category<br />
(e.g., Sport), subcategory (e.g., Football) or keyword.<br />
• My TV – Set up a profile and receive<br />
recommendations according to your preferences.<br />
• Schedule – Show all scheduled recordings.<br />
• Info – Area for additional information, such as<br />
weather (not available in all regions).<br />
• Editor – Change channel settings.<br />
• Setup – Setup the GUIDE Plus+® system.<br />
The Grid Area<br />
The Grid is the main TV listings screen of the GUIDE<br />
Plus+ system and is the first screen that you see when<br />
you press GUIDE. You can see TV listings for the next<br />
seven days, starting with the current day.<br />
When you highlight a programme in the Grid, you can<br />
see information about it in the Information Box, including<br />
title, synopsis, channel, source, time and length. If there<br />
is an i symbol in the Information Box, it means that there<br />
is an extended synopsis available. Press the INFO button<br />
to see it.<br />
In some countries, you can also see a rating for a<br />
particular programme (mostly movies). These ratings are<br />
provided by local partners, such as TV magazines.<br />
From the Grid Area you can:<br />
• View and scroll through programme listings<br />
• Read programme synopses<br />
• Tune to a programme that’s currently showing 1<br />
• Set a programme to record<br />
• Lock or unlock the video window<br />
• Access Information panels<br />
Browsing the Grid<br />
Use the following remote buttons to browse the grid:<br />
/// (cursor buttons) – Navigate the Grid<br />
PREV/ NEXT – Previous / next page<br />
/ – Previous / next day<br />
BLUE Action button – Return to the current time/date in<br />
the Grid<br />
ENTER – Press on the current selection to exit the GUIDE<br />
Plus+ system and start watching the programme<br />
The Search Area<br />
From the Search Area you can:<br />
• Search by category<br />
• Search by subcategory<br />
• Search by keyword<br />
• Read programme synopses<br />
• Tune to a programme that’s currently showing<br />
• Set a programme to record<br />
• Access Information panels<br />
Note<br />
1 If you’re using an external tuner (satellite tuner, for example), there will be a short delay of a couple of seconds while it tunes to the channel.<br />
This is normal.
Using the GUIDE Plus+® electronic programme guide 04<br />
Searching<br />
You can search for programmes by category,<br />
subcategory or by keyword (My Choice). Categories for<br />
searching include Movies (purple), Sport (green),<br />
Children (blue) and Others (teal). In some countries there<br />
is a further subcategory available called ‘Tip of the Day’.<br />
These are programmes recommended by a local partner,<br />
such as a TV magazine.<br />
1 Select ‘Search’ from the Menu bar.<br />
2 Select a category and a subcategory.<br />
• If you choose All as the subcategory, all programmes<br />
in the category you selected will show up in the<br />
search results.<br />
ENTER 3 Start the search.<br />
The search results are shown sorted by time and date.<br />
• If no search results are displayed, it means there are<br />
no programmes for the current day that match your<br />
search criteria.<br />
Using My Choice keywords for a search<br />
In addition to the standard categories, you can also set<br />
your own keywords.<br />
1 Access My Choice.<br />
2 Press the YELLOW Action button to add a keyword.<br />
ENTER<br />
3 Enter a keyword to appear in the menu.<br />
When you’re finished, press the GREEN Action button to<br />
exit and continue.<br />
ENTER<br />
4 Start the keyword search.<br />
• You can delete or edit keywords using the RED and<br />
GREEN Action buttons.<br />
• When you have set more than two keywords, an All<br />
subcategory automatically appears which allows you<br />
to search for all your keywords.<br />
65<br />
En
04<br />
66<br />
En<br />
Using the GUIDE Plus+® electronic programme guide<br />
My TV Area<br />
The My TV Area allows you to set up a personal profile. You<br />
can define a profile by channels, themes and/or keywords.<br />
As soon as a personal profile has been set, the GUIDE<br />
Plus+ system continuously scans the TV listings for the<br />
next seven days. Whenever you access the My TV Area, a<br />
list of programmes matching your profile appears.<br />
From the My TV Area you can:<br />
• Set up a profile by channel, theme and/or keyword<br />
• Edit and delete profiles<br />
• Read programme synopses<br />
• Tune to a programme that’s currently showing<br />
• Set a programme to record<br />
• Access Information panels<br />
Setting up a profile<br />
You can set up a profile with any combination of up to 16<br />
channels, four categories and 16 keywords.<br />
1 Select ‘My TV’ from the Menu bar.<br />
2 Press the YELLOW Action button to set a profile.<br />
Channels is now highlighted.<br />
3 To add a channel to your profile, press the<br />
YELLOW Action button.<br />
Select a channel from the mosaic of channel icons and<br />
press ENTER. Repeat this step to add up to 16 channels.<br />
4 To add a category to your profile, highlight<br />
‘Categories’ and press the YELLOW Action button.<br />
Select a category from the Search Area categories and<br />
press ENTER. Repeat this step to add up to four categories.<br />
5 To add a keyword to your profile, highlight<br />
‘Keywords’ and press the YELLOW Action button.<br />
Use the /// buttons followed by ENTER to select<br />
characters from the on-screen keyboard. When you’re<br />
finished, press the GREEN Action button to exit and<br />
continue.<br />
6 Press ENTER to activate your profile.<br />
• You can add up to 16 keywords by repeating step 5.<br />
• You can edit or delete your profile using the RED and<br />
GREEN Action buttons.
Using the GUIDE Plus+® electronic programme guide 04<br />
The Schedule Area<br />
The Schedule Area is where you can set, see, edit and<br />
delete scheduled (timer) recordings.<br />
From the Schedule Area you can:<br />
• Edit or delete a One-Button-Recording<br />
• Set, edit or delete a VIDEO Plus+ recording<br />
• Set, edit or delete a manual recording<br />
Editing a scheduled recording<br />
You can edit any parameter in a scheduled recording, or<br />
delete it if you no longer require it 1 .<br />
1 Highlight the left tile of a scheduled recording.<br />
• If you only want to edit the recording quality,<br />
frequency, destination, timing or genre settings, skip<br />
to step 5 below.<br />
2 Press the GREEN Action button (Edit).<br />
3 Use the cursor and number buttons to edit the<br />
recording date, start time, end time and channel.<br />
Use the / buttons or the number buttons to edit.<br />
Press the GREEN Action button to go to continue, or the<br />
RED Action button to go back.<br />
4 Enter a name for the scheduled recording.<br />
Use the /// buttons followed by ENTER to select<br />
characters from the on-screen keyboard.<br />
After entering the whole name, press the GREEN Action<br />
button to continue.<br />
5 Highlight the right recording tile.<br />
6 Press the RED Action button (Quality) to change<br />
the recording quality.<br />
Select from AUTO 2 , XP, SP, LP, EP, SLP, SEP or a manual<br />
recording mode (see Manual Recording on page 142 and<br />
Manual recording modes on page 151).<br />
Note<br />
1 See About timer recordings on page 86 for more information about scheduled recordings.<br />
2 This mode maximizes the recording quality to fit on to a single DVD disc. Can also be used when recording to HDD.<br />
67<br />
En
04<br />
68<br />
En<br />
Using the GUIDE Plus+® electronic programme guide<br />
7 Press the GREEN Action button (Frequency) to<br />
change the recording frequency.<br />
Select from the various options for one-time, daily and<br />
weekly recordings.<br />
8 Press YELLOW Action button (Destination) to<br />
select the recording destination.<br />
Select from DVD, HDD or HDDr (Auto Replace<br />
Recording) 1 .<br />
• Auto Replace Recording is only available as an<br />
option with regular daily or weekly recordings.<br />
9 Press to access the extended recording options.<br />
• If you want to record to a particular HDD genre, use<br />
the YELLOW Action button (Genre) to select one.<br />
• Use the GREEN Action button (Timing) to add extra<br />
time to the end of the recording (+0, +10, +20, +30 or<br />
VPS/PDC 2 (V–P)).<br />
• Press to display the standard recording options<br />
again.<br />
Deleting a scheduled recording<br />
1 Highlight the left tile of a scheduled recording.<br />
2 Press the RED Action button (Delete).<br />
The scheduled event is deleted.<br />
Note<br />
1• For a DVD timer recording, if Optimized Rec (see Optimized Rec on page 142) is set to On (and VPS/PDC is off), the recorder will adjust the<br />
recording quality to try and fit the recording on the disc. If the recording will not fit onto the disc even on MN1 recording quality (MN4 for<br />
DVD+R/+RW) then the Recovery Recording feature will automatically make the recording to the HDD instead.<br />
• If there is very little free space left on the HDD, an Auto Replace Recording may not complete successfully.<br />
• If the HDD is being used for playback or high-speed copying when an Auto Replace Recording is due to start, the new timer recording will<br />
not replace the old one. However, the next time the timer recording starts, both of the older two programmes will be erased.<br />
2• If you set the timer recording to use VPS/PDC, you must switch the recorder into standby before the timer recording is due to start for it to<br />
work correctly. For non-VPS/PDC timer recordings there is no need to switch the recorder into standby.<br />
• Optimized Recording will not work if VPS/PDC is on.<br />
• Up to eight timer recordings can be set with VPS/PDC.<br />
• VPS/PDC cannot be set for recordings made from digital broadcasts or an external input, or when the recording mode is set to AUTO.
Using the GUIDE Plus+® electronic programme guide 04<br />
Setting a VIDEO Plus+® recording<br />
1 Select ‘Schedule’ from the Menu bar.<br />
2 Press the RED Action button (VIDEO Plus+).<br />
3 Use the number buttons to enter a PlusCode<br />
programming number.<br />
• If you live in an area not yet covered by the GUIDE<br />
Plus+ system you may also have to input a channel<br />
number. Follow the on-screen display to do this.<br />
4 Press ENTER to confirm.<br />
Please enter the PlusCode programming number and press<br />
ENTER to confirm.<br />
Setting a manual recording<br />
1 Select ‘Schedule’ from the Menu bar.<br />
2 Press the GREEN Action button (Manual).<br />
3 Use the number and /// buttons to enter<br />
the recording date, then press the GREEN Action<br />
button (Next).<br />
4 In the same way, enter the recording start time,<br />
followed by the GREEN Action button (Next) to<br />
confirm.<br />
5 Enter the recording end time in the same way,<br />
followed by the GREEN Action button (Next) to<br />
confirm.<br />
69<br />
En
04<br />
70<br />
En<br />
Using the GUIDE Plus+® electronic programme guide<br />
6 Use the number buttons to enter a channel<br />
number, then press the GREEN Action button (Next)<br />
to confirm.<br />
Alternatively, you can press the YELLOW Action button<br />
(Mosaic) and use the /// buttons to select a<br />
channel from the mosaic, followed by ENTER.<br />
The Info Area<br />
This area is reserved for additional information such as<br />
news, weather reports, stock quotes, and so on, and<br />
varies by region. (Note that this feature is not available in<br />
all countries/regions.)<br />
The Editor Area<br />
The Editor Area is the central location for you to manage<br />
your channels. Any changes you make here will affect<br />
what is displayed in the Grid Area. The Editor Area is<br />
mainly used when setting up the GUIDE Plus+ system to<br />
make any manual changes as necessary.<br />
You can also use the Editor Area if new channels become<br />
available in your area, or if you change from cable to<br />
satellite, say, or move house.<br />
From the Editor Area you can:<br />
• Display/hide channels in the grid (switch the channel<br />
on/off)<br />
• Select a channel source (A.TV, D.TV, Ext. Rec. 1,<br />
Ext. Rec. 2, etc.)<br />
• Enter a channel programme number<br />
Switching a channel on/off<br />
You can choose whether or not to display a channel in the<br />
Grid Area by switching the channel on or off in the Editor<br />
Area.<br />
1 Select ‘Editor’ from the Menu bar.<br />
Name On/Off Source Prog. No.<br />
D.TV 001 BBC1<br />
On D. TV 001<br />
BBC2 On D. TV 002<br />
ITV On D. TV 003<br />
CH4 On D. TV 004<br />
CH5 On D. TV 005<br />
BBC3 On Ext. Rec. 1 007<br />
ITV2 On D. TV 006<br />
E4 Off D. TV 014<br />
UKGOL On D. TV 017<br />
2 Highlight the left channel tile of the channel you<br />
want to switch on or off.<br />
3 Press the RED Action button to switch the<br />
channel on or off.<br />
Changing the source and programme number<br />
1 Select ‘Editor’ from the Menu bar.<br />
Name On/Off Source Prog. No.<br />
BBC1<br />
On D. TV 001<br />
BBC2 On D. TV 002<br />
ITV On D. TV 003<br />
CH4 On D. TV 004<br />
CH5 On D. TV 005<br />
BBC3 On Ext. Rec. 1 007<br />
ITV2 On D. TV 006<br />
E4 Off D. TV 014<br />
UKGOL On<br />
D. TV 017<br />
2 Highlight the right channel tile of the channel<br />
you want to make a change to.<br />
3 Press the RED Action button to change the<br />
channel source, or the GREEN Action button to enter<br />
a programme number.<br />
Each press of the RED Action button changes the<br />
channel source (A.TV, D.TV, Ext. Rec. 1, etc.). To set a<br />
programme number, use the number buttons to enter a<br />
programme number then press ENTER (When set to<br />
A.TV or D.TV, make sure that the programme number<br />
matches the preset number of this recorder for what you<br />
want to record).<br />
The Setup Area<br />
The Setup Area is where you can set up the GUIDE Plus+<br />
system for your particular region, TV reception<br />
conditions, and so on.
Using the GUIDE Plus+® electronic programme guide 04<br />
Making changes to your GUIDE Plus+ setup<br />
1 Select ‘Setup’ from the Menu bar.<br />
2 Highlight the part you want to change.<br />
You can change the Language, Country, Postal Code 1<br />
and the External Receiver settings.<br />
3 Press ENTER to confirm.<br />
Press ENTER to access the Basic Setup screen.<br />
Basic Setup<br />
Host Channel Setup<br />
GUIDE Plus+ System Information<br />
You can reset the Host Channel settings at any time back<br />
to the default setting of automatic. Please be aware that<br />
resetting the Host Channel will erase all TV listings data.<br />
GUIDE Plus+ FAQ and<br />
troubleshooting<br />
This FAQ covers only a few questions. For a complete list<br />
please consult the GUIDE Plus+ website at:<br />
www.europe.guideplus.com<br />
FAQ<br />
• When I tried setting up my external receiver I could not<br />
get any of the attempts to work, what should I do?<br />
There could be several reasons why your external<br />
receiver could not be controlled.<br />
– The connections could be wrong. Make sure that<br />
the G-LINK cable is connected to the G-LINK<br />
connector on the recorder and the IR blaster is in<br />
front of the external receiver, pointing towards the IR<br />
receiver of your external receiver. See Connecting to a<br />
cable box or satellite receiver on page 51.<br />
– The code that is listed under your brand could be<br />
wrong. Please try other codes for your brand under<br />
satellite, cable or terrestrial. Go to the Setup Area and<br />
choose one of the three options (cable, satellite or<br />
terrestrial) that you have not already tried. Follow the<br />
on-screen prompts to make sure that the GUIDE<br />
Plus+ system can change channels on your external<br />
receiver. If it does not work, repeat the process,<br />
choosing different reception and external receiver<br />
combinations until you have tried all the codes for<br />
your brand of receiver that are already in the GUIDE<br />
Plus+ system. If it still does not work, see below on<br />
how to receive new codes overnight.<br />
– The unit has not yet received new codes. The nightly<br />
data downloads frequently include new codes for<br />
controlling external receivers. Please tune your<br />
external receiver to your local host channel and leave<br />
it on overnight. Switch this recorder into standby. The<br />
next morning, please perform the GUIDE Plus+<br />
setup again to see if your external receiver can now<br />
be controlled.<br />
– The external receiver that you use is currently not<br />
supported. If, after leaving your external receiver on<br />
overnight, and doing the Reception and External<br />
Receiver Setup again, it still does not respond, please<br />
call Customer Support to report your brand and<br />
model.<br />
Manual Host Channel setup<br />
The GUIDE Plus+ system will automatically identify your<br />
Host Channel as soon as the recorder is put into standby<br />
for the first time. See the table on page 60 for a list of all<br />
the <strong>Europe</strong>an Host Channels.<br />
If you know your Host Channel details (source and<br />
programme number) or if the automatic identification<br />
did not provide the expected result, you can identify your<br />
Host Channel manually. Select Host Channel Setup in<br />
the Setup area and follow the instructions on the TV.<br />
Select the correct source (e.g., internal tuner or external<br />
receiver) and enter the respective programme number<br />
(e.g., if you have to press 9 on the remote to watch your<br />
Host Channel, enter 9 as the programme number). When<br />
you next switch the recorder into standby the GUIDE<br />
Plus+ system will complete the Host Channel setup.<br />
Note<br />
1 Making changes to the Country or Postal Code settings may require a new download of TV listings information. This can take up to 24 hours.<br />
71<br />
En
04<br />
72<br />
En<br />
Using the GUIDE Plus+® electronic programme guide<br />
• My external receiver was successfully setup. However<br />
I have found that when the GUIDE Plus+ system has<br />
to change to a channel with a three-digit programme<br />
number in the external receiver’s preset, it does not<br />
work. It looks like the GUIDE Plus+ system can only<br />
send two digits.<br />
With the number of channels increasing, the number<br />
of digits has increased as well. While older boxes use<br />
only two digits, newer boxes require up to four. It is<br />
possible that you selected an older code for your<br />
brand during set-up. Please access the Setup Area,<br />
select External Receiver and repeat the setup for your<br />
brand (Note: Every time you see the on-screen<br />
question about whether the receiver has changed to<br />
a certain channel, the GUIDE Plus+ system has sent<br />
a different code). Try all the different codes until your<br />
GUIDE Plus+ system can control your external<br />
receiver correctly. If you have no success, try to<br />
receive new codes overnight.<br />
•I used to receive data through my terrestrial antenna or<br />
analog cable without a set-top box. Now, I have<br />
“upgraded” to a satellite system or to digital cable with<br />
external receiver. What should I do to receive data for<br />
the GUIDE Plus+ system?<br />
You can try to receive your host channel through your<br />
new reception method. If you have problems to<br />
receive data we recommend that you keep your<br />
analog terrestrial or cable connection only to receive<br />
data this way. It is important that you identify your<br />
host channel correctly in the Editor Area.<br />
• After I performed the initial set-up I found that the lineup<br />
for all the channels received via the external set top<br />
box is incorrect. How do I correct this?<br />
You can change the line-up in the editor according to<br />
your preferences. Access the Editor Area. Select the<br />
channels that you would like to change. Change the<br />
source and preset number according to your<br />
preferences.<br />
•I performed the set-up but after many hours I still have<br />
a blank EPG what is going wrong?<br />
There are several possibilities:<br />
– Connections are wrong. See Connections on<br />
page 48 to double check everything.<br />
– The initial setup of GUIDE Plus+ was completed<br />
incorrectly. Try setting it up again (see Setting up the<br />
GUIDE Plus+® system on page 59).<br />
– Your cabling and setup is OK, but the recorder has<br />
not been connected for enough time to receive the TV<br />
listings data. Leave the recorder in standby overnight.<br />
– For external receiver users only: The connections<br />
and setup are OK, but the external receiver was not<br />
tuned to the correct host channel. Check the list of<br />
host channels (see step 5 of Setting up the GUIDE<br />
Plus+® system on page 59) and leave the recorder<br />
in standby and the external receiver on overnight<br />
tuned to the correct host channel.<br />
– You live in a country/region where the GUIDE Plus+<br />
system is not yet available. Check the list of countries<br />
to see if you are in a region that is supported.<br />
•I used the One-Button-Record feature (red Action<br />
button) to set a recording, but I recorded the wrong<br />
channel.<br />
If the channel to be recorded is received via the<br />
external receiver first make sure that the external<br />
receiver was left switched on. Next, in the Editor<br />
Area, make sure that the channel to be recorded is<br />
correctly set: Access the Editor Area. Check the<br />
source and programme number of the channel that<br />
you wanted to record. Change the source and preset<br />
numbers if incorrect.<br />
If you are recording from the recorder’s internal tuner<br />
(the A.TV or D.TV setting), make sure that the<br />
programme number is the same as the preset<br />
number set on this recorder. If they are different, go<br />
to the Editor Area and change the programme<br />
number to match the recorder’s preset number.<br />
• The TV listings information doesn’t update.<br />
The latest TV listings information is automatically<br />
downloaded by the recorder overnight. This only<br />
happens if the recorder is in standby; if the recorder<br />
is left on, it will not download. When not using the<br />
recorder, please switch it into standby.<br />
Data downloads can take several hours. The front<br />
panel display shows EPG when downloading. If you<br />
switch the recorder on while EPG is displayed, the<br />
download will be cancelled.<br />
• The GUIDE Plus+ system is not supported in my area,<br />
but when I switch the recorder into standby, after a<br />
while the front panel display shows EPG. Can I stop<br />
this from happening?<br />
If the GUIDE Plus+ system is not supported in your<br />
area, please do not set the postal code in the GUIDE<br />
Plus+ setup (see Setting up the GUIDE Plus+®<br />
system on page 59). When the GUIDE Plus+ service<br />
starts in your area, please set the postal code again.<br />
• The automatic Host Channel search failed or the<br />
GUIDE Plus+ system identified the wrong Host<br />
Channel for my region.<br />
You can identify your Host Channel manually. See<br />
Manual Host Channel setup on page 71 for how to do<br />
this.
Using the digital electronic programme guide 05<br />
Chapter 5<br />
Using the digital electronic<br />
programme guide<br />
This chapter is only applicable if the EPG Type Select<br />
setting made in the Setup Navigator (or the Initial Setup<br />
menu) is set to Digital EPG.<br />
The Digital EPG system<br />
The Digital EPG shows a table of scheduled digital TV<br />
programmes and detailed information about individual<br />
programmes. It also allows you easily to select and tune<br />
to a particular programme. 1<br />
The Digital EPG screen consists of programme<br />
Information, Channel List and General Programme List.<br />
This section describes information displayed in the<br />
schedule and information windows.<br />
Note that the recorder’s clock must be set to the correct<br />
time and date to ensure all relevant EPG information is<br />
displayed.<br />
General Programme List<br />
D007<br />
1 Appears when the schedule table can be scrolled<br />
forward or backward<br />
2 Time schedule<br />
3 Channel list<br />
4 Highlights the currently selected channel<br />
5 Indicates the programme set for recording<br />
6 Appears when other programmes (often short ones)<br />
have been scheduled for the same period<br />
7 Programme title<br />
8 Time dividers<br />
Note<br />
1 EPG information is only viewable for D.TV programmes that provide EPG information.<br />
• The general programme list may show sections<br />
whose bottom right corners have been folded. This<br />
indicates that other programmes have been<br />
scheduled for that period. To view the title of such a<br />
programme and related information, highlight a<br />
folded section, and then press /.<br />
Programme information<br />
D007<br />
1 Channel number<br />
2 Station name<br />
3 Programme title<br />
4 Appear when other programmes have been<br />
scheduled for the same period<br />
5 Programme schedule<br />
6 Programme genre<br />
73<br />
En
05<br />
74<br />
En<br />
Using the digital electronic programme guide<br />
Using the Digital EPG<br />
Using the Digital EPG you can check the schedule of<br />
digital TV programmes, view information about desired<br />
programmes, and/or select programmes.<br />
GUIDE<br />
1 Press to display the Digital EPG screen.<br />
The EPG screen updates automatically if the EPG data is<br />
acquired successfully. If not, the Digital EPG screen<br />
shows a blank image.<br />
2 Select a TV programme.<br />
D007<br />
• Press PREV/ NEXT to skip to the next or<br />
previous channel list page.<br />
• Information about the selected programme appears<br />
in the information window. 1<br />
• To watch a programme currently on air, select the<br />
programme (then press ENTER).<br />
• You can check information about programmes<br />
scheduled up to one week ahead, depending on<br />
conditions.<br />
• Depending on conditions, it may take some time to<br />
acquire EPG data.<br />
INFO<br />
3 Press to view more information about the<br />
selected programme.<br />
Detailed information appears in the schedule window.<br />
If the screen contains further information, More ... is<br />
displayed.<br />
Note<br />
1 The general programme list does not show programmes that have already finished.<br />
2 For more information on timer programmes, see About timer recordings on page 86.<br />
• To quit the display of detailed information, press<br />
INFO again (or RETURN/EXIT).<br />
D007 ************<br />
*************<br />
**************************<br />
4 GUIDE Press to exit the Digital EPG screen.<br />
Setting timer programmes<br />
Using the Digital EPG, it’s easy to set digital TV<br />
programmes for recording 2 .<br />
GUIDE 1 Press to display the Digital EPG screen.<br />
2 Select a programme.<br />
D007<br />
ENTER<br />
13:40 -14:05<br />
More...<br />
• Select a programme currently on-air: press ENTER to<br />
close the Digital EPG screen and watch the channel<br />
immediately, or press RED to set the programme for<br />
recording immediately.<br />
• Select a programme not yet started then press<br />
ENTER or RED to set the programme for recording.
Using the digital electronic programme guide 05<br />
3 Enter the timer recording settings.<br />
Use the / buttons to select a field; use the /<br />
buttons to change the value 1 .<br />
Timer Programme Set<br />
Manhattan Open Tennis<br />
CH Date Start Stop Extend<br />
D.TV003 SUN 1/4 18:00 19:00 Off<br />
Detailed Settings Enter Details<br />
Record To HDD<br />
Recording Mode XP<br />
VPS/PDC ------<br />
Auto Replace Rec. ------<br />
Genre No Category<br />
Store Programme<br />
Set Detailed<br />
Set Title Name<br />
Cancel<br />
VPS/PDC 0/8<br />
• CH – Choose a channel (Pr 1 to Pr 99 for analog<br />
channels and available digital channels (excluding<br />
skip channels)), or one of the external inputs from<br />
which to record.<br />
• Date – Choose a date up to one month in advance, or<br />
select a daily or weekly programme.<br />
• Start – Set the recording start time.<br />
• Stop – Set the recording end time (maximum length<br />
of a timer recording is 24 hours).<br />
• Extend – Extend the end time of the timer recording<br />
(select Off, 10, 20 or 30 mins.)<br />
4 If you want to change the recording mode,<br />
recording destination, etc., select ‘Set Detailed’.<br />
In this area you can set:<br />
Record to – Select HDD for hard disk recording or DVD<br />
for DVD recording 2 .<br />
Recording Mode – Select from AUTO 3 , XP, SP, LP, EP,<br />
SLP, SEP (See Setting the picture quality/recording time on<br />
page 83). If Manual Recording is on, then you can also<br />
select the LPCM setting, XP+ or MN (press ENTER then<br />
use the / buttons to select the level).<br />
VPS/PDC 4 – Choose whether or not to use VPS/PDC<br />
when making timer recordings of analog programmes<br />
(see About timer recordings on page 86).<br />
Auto Replace Rec. – Automatically erases the previous<br />
daily or weekly recording when the next one is recorded.<br />
Genre – Select a record genre (for HDD recording only).<br />
EPG Link 5 (UK only) – Choose whether or not to have this<br />
device automatically record scheduled programmes<br />
from the Digital EPG even if the times in which they are<br />
broadcast change.<br />
Series Recording6 (UK only) – Choose whether or not to<br />
record all programmes from a series when you make a<br />
recording from the Digital EPG (for HDD recordings only).<br />
5 After entering all the timer recording information,<br />
highlight ‘Store Programme’ and press ENTER.<br />
A red clock icon appears for the programme.<br />
6 GUIDE<br />
Press to exit the Digital EPG screen.<br />
Tip<br />
• To enter a title name for the timer recording in<br />
advance, select Set Title Name and follow the onscreen<br />
display.<br />
Note<br />
1 You cannot change the CH, Date, Start, Stop, Extend and title name when you have EPG Link set to On (see below).<br />
2• For a DVD timer recording, if Optimized Rec (see Optimized Rec on page 142) is set to On (and VPS/PDC is off), the recorder will adjust the<br />
recording quality to try and fit the recording on the disc. If the recording will not fit onto the disc even on MN1 recording quality (MN4 for<br />
DVD+R/+RW) then the Recovery Recording feature will automatically make the recording to the HDD instead.<br />
• If there is very little free space left on the HDD, an Auto Replace Recording may not complete successfully.<br />
• If the HDD is being used for playback or high-speed copying when an Auto Replace Recording is due to start, the new timer recording will<br />
not replace the old one. However, the next time the timer recording starts, both of the older two programmes will be erased.<br />
3 This mode maximizes the recording quality to fit on to a single DVD disc. Can also be used when recording to HDD.<br />
4• If you set the timer recording to use VPS/PDC, you must switch the recorder into standby before the timer recording is due to start for it to<br />
work correctly. For non-VPS/PDC timer recordings there is no need to switch the recorder into standby.<br />
• Optimized Recording will not work if VPS/PDC is on.<br />
• Up to eight timer recordings can be set with VPS/PDC.<br />
• VPS/PDC cannot be set for recordings made from digital broadcasts or an external input, or when the recording mode is set to AUTO.<br />
5• You cannot set an EPG Link when recording mode is set to AUTO.<br />
• You cannot change the CH, Date, Start, Stop, Extend and title name when you have EPG Link set to On.<br />
• When you have EPG Link set to On and you set a timer recording for a programme that is divided into multiple parts, all parts of that<br />
programme are recorded automatically. In the programme list, the earliest part of the programme to be recorded has a red icon, with<br />
successive parts indicated by a gray icon. Data provided by the broadcaster determines which programmes are classified as divided<br />
programmes.<br />
6• In the programme list, the earliest programme to be recorded has a red icon, with successive programmes indicated by a gray icon.<br />
• There is a limit to the number of programmes you can schedule to record with the Series Recording function.<br />
• Data provided by the broadcaster determines which programmes are classified as part of a series.<br />
75<br />
En
05<br />
76<br />
En<br />
Using the digital electronic programme guide<br />
Editing a timer programme<br />
You can change any of the settings in a timer programme<br />
before the recording is due to start. Even if a programme<br />
is currently being recorded, you can program a new end<br />
time or edit its extend time parameter.<br />
TIMER REC<br />
1 Press to display the Timer Programme<br />
View screen.<br />
You can also access the Timer Programme View screen<br />
from the Home Menu (press HOME MENU, select Timer<br />
Recording, then Timer Recording).<br />
This screen shows all the timer programmes currently set.<br />
Timer Programme View<br />
SUN 25/3 15:00<br />
VPS/PDC 0/8 Tmr Pgms 3/32<br />
Manhattan Open Tennis OK<br />
SUN 25/3 18:00 – 19:00 Pr 4<br />
World Journey OK<br />
MON 26/3 19:30 – 21:00 Pr 6<br />
Flower Until 20/4<br />
MON – FRI 13:30 – 14:00<br />
New Input<br />
Pr 8<br />
HDD Remain<br />
DVD Remain<br />
59h59m(SP)<br />
1h59m(SP)<br />
• Each row is for one timer recording programme, with<br />
the date and time information, channel, recording<br />
mode, DVD or HDD and recording status.<br />
• The amount of free space available on the HDD and<br />
the currently loaded recordable DVD is shown<br />
towards the bottom of the screen.<br />
• In the upper-right corner, the number of timer<br />
programmes already set is shown next to Tmr Pgms.<br />
• If there are more than five timer programmes already<br />
set, press NEXT to switch page (go back using<br />
the PREV button).<br />
• You can also delete a timer programme before it’s<br />
started (before the recorder enters timer recording<br />
standby) by highlighting it and pressing CLEAR. See<br />
also Deleting a timer programme on page 77.<br />
2 Highlight the timer programme you<br />
want to change.<br />
If you want to set a new timer programme, select ‘New<br />
Input’ and skip to step 4.<br />
ENTER<br />
3 Press then select ‘Modify’ from the<br />
command menu panel.<br />
Alternatively, press ENTER.<br />
The Timer Programme Set screen appears from which<br />
you can edit the settings.<br />
ENTER<br />
4 Enter the timer recording settings.<br />
Use the / buttons to select a field; use the /<br />
buttons to change the value. For more information on the<br />
options available at the Timer Programme Set screen,<br />
See Setting timer programmes on page 74.<br />
ENTER<br />
5 After entering all the timer recording<br />
information, highlight ‘Store Programme’ and press<br />
ENTER.<br />
The timer recording list screen is displayed again. The<br />
timer programme you just input appears in the list. The<br />
rightmost column shows various timer recording status<br />
messages:<br />
• OK – Can be recorded.<br />
• Time Over – Not enough space on the HDD (the<br />
recording won’t finish).<br />
• Over 12h – Recording time of over 12 hours set<br />
(when recording to the HDD the recording will be<br />
split into two titles).<br />
• Overlap – Two timer programmes partially or<br />
completely overlap. The one starting earlier will take<br />
priority.<br />
• Until ... (eg., Until 13/8) – For a regular recording,<br />
the last programme that could be recorded is shown.<br />
• Data Over – Can’t record because the disc<br />
management area of the disc is full.<br />
• Cancel Once – A regular timer programme is set to<br />
skip.<br />
• Can’t Rec – Not possible to record.<br />
• Title Over – Can’t record because there is already<br />
the maximum number of titles on the disc (HDD: 999;<br />
DVD: 99).<br />
• Recording – The programme is currently recording.<br />
• Standby – The recorder is in timer recording standby.<br />
• Valid Until ... (eg., Valid Until 13/8) (UK only) – When<br />
you have set to make a series recording of a<br />
programme that has no new scheduled broadcasts,<br />
the date displayed indicates the last day until which<br />
the scheduled programme settings remain valid. (If<br />
the programme is not broadcast for over 13 weeks, its<br />
settings are automatically deleted.)<br />
• No Broadcast (UK only) – Displays when a<br />
programme for which you had the EPG Link set to On<br />
does not record because the date of the scheduled<br />
recording has already passed.<br />
• nothing displayed – Another timer recording or<br />
copying is in progress.<br />
6 HOME MENU<br />
Press to exit the timer recording screen.
Using the digital electronic programme guide 05<br />
Note<br />
• If you set a DVD timer recording but there is no<br />
recordable DVD disc loaded, or the disc loaded<br />
doesn’t have enough free space for the complete<br />
recording, Recovery is shown. In this case (unless<br />
you load a suitable disc before the recording actually<br />
starts), the recorder will use the HDD for recording.<br />
(The message Can’t Rec will appear if there are<br />
already 999 titles on the HDD or if there is not enough<br />
free space on the HDD for recording.)<br />
• When you have EPG Link or Series Recording set to<br />
On, any changes in broadcast time or division of<br />
broadcasts are automatically accommodated for and<br />
your scheduled recordings are carried out without<br />
any additional settings. As a result, even when you<br />
have not scheduled programmes to record at the<br />
same time, changes in broadcasting schedules can<br />
cause scheduled recordings to overlap.<br />
Deleting a timer programme<br />
You can delete timer programmes you no longer need.<br />
TIMER REC<br />
1 Press TIMER REC.<br />
2 Highlight the timer programme you<br />
want to erase.<br />
ENTER<br />
3 Press then select ‘Erase’ from the<br />
command menu panel.<br />
• Select Yes to confirm or No to cancel.<br />
• You can also just press CLEAR when the timer<br />
programme is highlighted.<br />
Skipping a regular timer programme<br />
If you’ve set a regular daily or weekly timer programme,<br />
you can set the recorder to skip the next scheduled<br />
recording.<br />
TIMER REC<br />
1 Press TIMER REC.<br />
2 Highlight the timer programme you<br />
want to skip.<br />
Note<br />
1• Programme search results are based upon data provided by the broadcaster.<br />
• This function may not be applicable to all programmes.<br />
ENTER<br />
3 Press then select ‘Cancel Once’ from<br />
the command menu panel.<br />
• In the timer programme list, Cancel Once appears by<br />
the programme.<br />
• You can also just press PAUSE when the timer<br />
programme is highlighted.<br />
Checking for alternative broadcast times<br />
(UK only)<br />
You can check to see if a programme you have scheduled<br />
to record is airing at an alternative time slot 1 .<br />
TIMER REC<br />
1 Press TIMER REC.<br />
2 Highlight the timer programme you<br />
want to search.<br />
ENTER<br />
3 Press then select ‘Alternate Search’<br />
from the command menu panel.<br />
• The search results are displayed. Choose the<br />
programme you would like to record and press either<br />
the RED button or ENTER to schedule a recording.<br />
Searching for series<br />
(UK only)<br />
You can search for broadcasts of programmes of the<br />
same series as a programme you have scheduled to<br />
record 1 .<br />
TIMER REC<br />
1 Press TIMER REC.<br />
2 Highlight the timer programme you<br />
want to search.<br />
ENTER<br />
3 Press then select ‘Series Search’ from<br />
the command menu panel.<br />
• The search results are displayed. Choose the<br />
programme you would like to record and press either<br />
the RED button or ENTER to schedule a recording.<br />
77<br />
En
05<br />
78<br />
En<br />
Using the digital electronic programme guide<br />
Searching for recommendations<br />
(UK only)<br />
You can search for recommended programmes<br />
generated from the content of the programmes you have<br />
scheduled to record 1 .<br />
TIMER REC<br />
1 Press TIMER REC.<br />
2 Highlight the timer programme you<br />
want to search.<br />
ENTER<br />
3 Press then select ‘Recommendation<br />
Search’ from the command menu panel.<br />
The search results are displayed. Choose the programme<br />
you would like to record and press either the RED button<br />
or ENTER to schedule a recording.<br />
Other useful EPG functions<br />
EPG Jump<br />
1 Press GREEN when the Digital EPG screen<br />
(Programme List, Detailed information or Search<br />
Result) is displayed.<br />
2 In the ‘Date’ field select a date (within<br />
one week) to jump to.<br />
Date<br />
Time<br />
3 In the ‘Time’ field select a time of the<br />
day (0:00 to 23:00) to jump to.<br />
ENTER<br />
Jump<br />
Mon.13.Sep<br />
14:00<br />
Cancel<br />
4 Select ‘Jump’.<br />
The Programme List for the specified day and time is<br />
displayed.<br />
Note<br />
1• Programme search results are based upon data provided by the broadcaster.<br />
• This function may not be applicable to all programmes.<br />
EPG Search<br />
1 Press YELLOW when the EPG screen (Programme<br />
List, Detailed information or Search Result) is<br />
displayed.<br />
2 In the ‘Date’ field select a date (within<br />
one week) to search in.<br />
Date<br />
Time<br />
Genre<br />
•<br />
•<br />
•<br />
0/16<br />
3 In the ‘Time’ field select the time of day<br />
(0:00 to 23:00) to search in.<br />
4 In the ‘Genre’ field, select the genre to<br />
search for.<br />
You can search for multiple genres by pressing ENTER<br />
after each genre.<br />
ENTER<br />
5 Select ‘OK’.<br />
ENTER<br />
6 Select ‘Search’.<br />
The results of your search are displayed.<br />
•<br />
•<br />
•<br />
Search<br />
Sun.12.Sep<br />
12:00<br />
Select<br />
Cancel
Recording 06<br />
Chapter 6<br />
Recording<br />
About DVD recording<br />
This recorder can record to DVD-R, DVD-RW, DVD+R,<br />
DVD+RW, DVD-RAM, DVD-R DL and DVD+R DL media.<br />
DVD-R and DVD-RW discs can be initialized for Video<br />
mode or VR mode recording. Each has its advantages,<br />
and it depends on what you want to do with the recording<br />
which mode you choose.<br />
If you want to edit your recordings in any significant way,<br />
VR mode offers greater possibilities for cutting, copying,<br />
and changing the way the video is presented.<br />
Video mode is less flexible when it comes to editing, but<br />
it has the advantage that it is compatible with standard<br />
DVD players (many of which won’t play VR mode discs 1 ).<br />
Once a disc is initialized for a particular mode, all<br />
recording on that disc will be in that mode.<br />
DVD+RW discs can be initialized for +VR mode recording.<br />
DVD-RAM discs can be initialized for VR mode recording.<br />
DVD+R discs do not require initializing.<br />
Important<br />
• The table below shows the maximum number of titles<br />
recordable per disc and the maximum number of<br />
chapters per title:<br />
Disc type/rec. format<br />
DVD-R/-RW<br />
Video mode<br />
DVD-R/-RW/-RAM<br />
VR mode<br />
Max. titles<br />
(per disc)<br />
*1 A maximum of 999 chapters are recordable per disc.<br />
*2<br />
A maximum of 254 chapters are recordable per disc.<br />
Max. chapters<br />
(per title)<br />
99 99<br />
99 999 *1<br />
DVD+R/+RW 49 99 *2<br />
• This recorder cannot play or record unfinalized DVD<br />
-R/-RW (Video mode) and DVD+R discs recorded on<br />
another recorder. DVD+RW discs recorded on<br />
another recorder are playable on this recorder but are<br />
not recordable.<br />
• The maximum continuous recording time for one title<br />
is eight hours when using a DVD+R/+RW disc.<br />
• If you delete a title from a DVD+R/+RW disc, the<br />
total number of recordable titles remaining may not<br />
increase.<br />
• Although this recorder can record PAL, SECAM,<br />
NTSC and PAL-60, you can’t mix multiple TV line<br />
systems on one disc. A disc can contain PAL and<br />
SECAM recordings, or NTSC and PAL-60. See also<br />
Additional information about the TV system settings<br />
on page 146.<br />
• Fingerprints, dirt and small scratches on a disc can<br />
affect playback and/or recording performance.<br />
Please take proper care of your discs.<br />
• Pioneer takes no responsibility for recording failure<br />
due to power cuts, defective discs, or damage to the<br />
recorder.<br />
• See also Disc/content format playback compatibility<br />
on page 43 for detailed disc compatibility information.<br />
Recording to DVD-R DL/DVD+R DL discs<br />
Recording to DVD-R DL/DVD+R DL discs is generally the<br />
same as recording to regular single-layer discs; however,<br />
please note the following points:<br />
• When the recorder switches from the first layer to the<br />
second during recording a DVD-R DL (Video mode)<br />
disc, a new title is automatically started on the new<br />
layer.<br />
• Up to 99 titles can be recorded on a DVD-R DL (Video<br />
mode) disc. If the 99th title is being recorded when<br />
the layer is switched, recording will stop.<br />
• Up to 49 titles can be recorded on a DVD+R DL disc.<br />
• You cannot play, record additional material to, edit or<br />
finalize a DVD-R DL or DVD+R DL disc that has been<br />
recorded on but not yet finalized on another DVD<br />
recorder.<br />
Note<br />
1 Some DVD players, such as some Pioneer models, are compatible with VR mode discs. Check the operating instructions for your player for<br />
VR mode compatibility information.<br />
79<br />
En
06<br />
80<br />
En<br />
Recording<br />
About HDD recording<br />
Recording to the hard disk drive (HDD) is very flexible;<br />
you have the full choice of recording quality options,<br />
including manual mode, and of course you can record,<br />
erase and re-record as many times as you like.<br />
The capacity of the hard disk drive means that you can<br />
store many hours of video on it, even using the higher<br />
quality recording modes.<br />
Important<br />
• The maximum number of titles/chapters per title that<br />
can be recorded on the HDD is 999 and 99<br />
respectively. No more recording is possible on the<br />
HDD after the maximum number of titles has been<br />
reached.<br />
• The maximum continuous recording time for one title<br />
is 12 hours.<br />
• It is possible to record both PAL and NTSC titles on<br />
the HDD. Before recording, you need to make sure<br />
that the Input Line System setting (page 146)<br />
matches the TV line system of the source you’re<br />
recording.<br />
HDD Video mode compatibility<br />
When recording to the HDD you can choose to record in<br />
one of two formats. Set the format from the HDD<br />
Recording Format item in the Initial Setup menu (see<br />
page 143).<br />
When set to Video Mode On, high-speed copying from<br />
HDD to DVD-R/-RW (Video mode) or DVD+R/+RW is<br />
possible. When recording a bilingual broadcast, set<br />
which channel you want to record from the Initial Setup<br />
menu (see Bilingual Recording on page 140).<br />
When HDD Recording Format is set to Video Mode Off,<br />
high-speed copying from HDD to DVD-R/-RW (Video<br />
mode) or DVD+R/+RW isn’t possible. However, both<br />
channels of bilingual broadcasts are recorded and you<br />
can switch the audio on playback.<br />
Recorded audio<br />
In all except the LPCM mode, sound is recorded in two<br />
channel Dolby Digital format (only Dolby Digital 2.0 can<br />
be recorded; Dolby Digital 5.1 recording is not possible).<br />
When set to LPCM, sound is recorded in high quality,<br />
uncompressed Linear PCM format.<br />
If the broadcast audio is bilingual and you are recording<br />
to DVD-R/-RW (Video mode), DVD+R/+RW, or to the<br />
HDD with the HDD Recording Format set to Video Mode<br />
On, or on the LPCM setting, use the Bilingual Recording<br />
setting (page 140) to select the A/L or B/R audio channel<br />
to record before recording starts. In other cases, both<br />
channels of a bilingual broadcast will be recorded and<br />
you can switch on playback.<br />
Restrictions on video recording<br />
You cannot record copy-protected video using this<br />
recorder. Copy-protected video includes DVD-Video discs<br />
and some satellite broadcasts. If copy-protected material<br />
is encountered during a recording, recording will pause<br />
automatically and an error message will be displayed onscreen.<br />
Video that is ‘copy-once only’ can only be recorded to<br />
DVD-RAM or HDD, CPRM-compatible VR mode DVD-R/<br />
-RW (see below).<br />
When recording a TV broadcast or through an external<br />
input, you can display copy control information on screen<br />
(see Displaying disc information on-screen on page 99).<br />
CPRM<br />
CPRM is a copy protection/scrambling system developed<br />
for the recording of ‘copy once’ broadcast programmes.<br />
CPRM stands for Content Protection for Recordable Media.<br />
This recorder is CPRM compatible, which means that<br />
you can record copy-once broadcast programmes, but<br />
you cannot then make a copy of those recordings. CPRM<br />
recordings can only be made on CPRM-compatible DVD<br />
-R (ver. 2.0/8x or higher) or DVD-RW (ver. 1.1 or higher)<br />
discs formatted in VR mode, DVD-RAM discs or on the<br />
HDD.<br />
DVD CPRM recordings can only be played on players that<br />
are specifically compatible with CPRM.<br />
Recording equipment and copyright<br />
Recording equipment should be used only for lawful<br />
copying. You are advised to check carefully what<br />
constitutes lawful copying in the country in which you are<br />
making a copy. Copying of copyrighted material such as<br />
films or music is unlawful unless permitted by a legal<br />
exception or consented to by the rightowners.<br />
This product incorporates copyright protection technology that is<br />
protected by method claims of certain U.S. patents and other<br />
intellectual property rights owned by Macrovision Corporation and<br />
other rights owners. Use of this copyright protection technology must<br />
be authorized by Macrovision Corporation, and is intended for home<br />
and other limited viewing uses only unless otherwise authorized by<br />
Macrovision Corporation. Reverse engineering or disassembly is<br />
prohibited.
Recording 06<br />
Using the built-in A.TV and D.TV tuners<br />
Switching between A.TV and D.TV tuners<br />
A.TV/D.TV<br />
• Press to switch between D.TV (digital) and<br />
A.TV (analog).<br />
Changing channels<br />
There are a number of ways to select analog and digital<br />
TV channels. 1 Note that you can’t change the TV channel<br />
during playback, recording or during recording standby.<br />
CHANNEL<br />
• CHANNEL Smart Jog<br />
SETUP /TUNE+<br />
1 2<br />
SR+<br />
3<br />
/ST– /ST+<br />
4<br />
ENTER<br />
5 6<br />
F.S.SURR /TUNE– TEST TONE<br />
7 8 9<br />
• Number buttons<br />
For example, to select channel 4 (digital channel<br />
D004), press 4 then ENTER; for channel 34 (digital<br />
channel D034), press 3, 4, ENTER. 2<br />
ADVANCED<br />
0<br />
• CH +/– buttons on the front panel.<br />
• For D.TV channels only, you can also use the Channel<br />
List — see below.<br />
Tip<br />
• When changing terrestrial digital broadcast<br />
channels, channels with a low signal strength may<br />
result in a black screen being displayed.<br />
• For other channels, it may take a short while for the<br />
channel picture to appear, and/or for the channel<br />
number to appear.<br />
• In both of the above cases, some improvement may<br />
be possible by adjusting the antenna.<br />
Using the D.TV Channel List<br />
When in D.TV mode, you can call up the on-screen Channel<br />
List anytime by pressing ENTER. Use the / buttons to<br />
select a channel, then press ENTER to switch to that channel. 3<br />
D001 ************<br />
D002 ************<br />
D003 ******<br />
D004 ************<br />
D005 ****<br />
D006 ******<br />
Displaying a channel banner<br />
A channel banner shows programme titles, start and end<br />
times of the current programme and other channel<br />
information. The information is updated every minute.<br />
• Press to display the channel banner for the<br />
current channel.<br />
• Use the / buttons to display the channel banner<br />
for other channels. To switch to the displayed<br />
banner’s channel, press ENTER.<br />
• The channel banner displays the Subtitles ( ) and<br />
Teletext/MHEG ( ) icon if they apply to the selected<br />
channel. 4<br />
• To see more detailed channel information, press<br />
INFO again. 5<br />
Use the / buttons to display information about<br />
previous and following programmes. Use the /<br />
buttons to see information about other channels.<br />
• If there is still more information to be displayed,<br />
More ... is displayed; press the BLUE button to see<br />
the extra information.<br />
• To hide the channel banner, press RETURN/EXIT.<br />
Note<br />
1• If you select a locked channel, you will need to enter your password to access it.<br />
• While listening to D.TV radio channels, the screen saver automatically starts after no button has been pressed for three minutes.<br />
2 Analog channel presets are numbered 1 to 99; digital channel presets are numbered D001 to D999.<br />
3• If you select a locked channel, you will need to enter your password to access it.<br />
• While listening to D.TV radio channels, the screen saver automatically starts after no button has been pressed for three minutes.<br />
4 Due to inaccurate information provided by the broadcaster, some icons may occasionally be present or absent in error.<br />
5 Not all channels supply more detailed information.<br />
INFO<br />
D001 ************<br />
Now ********************<br />
Next *************<br />
Now ************************<br />
Wed.30.Apr 12:46<br />
11:30 -12:00<br />
12:00 - 12:30<br />
11:30 -12:00<br />
More...<br />
81<br />
En
06<br />
82<br />
En<br />
Recording<br />
Changing D.TV audio languages<br />
AUDIO<br />
+<br />
• MAIN SUB Press to display the current audio<br />
language. Press repeatedly to change it to other<br />
available languages.<br />
Changing D.TV subtitle languages<br />
SUBTITLE<br />
+<br />
• MAIN SUB Press to display the current subtitle<br />
language. Press repeatedly to change it to other<br />
available languages.<br />
Using the MHEG application<br />
(UK only)<br />
Some stations bring you programmes with the MHEG<br />
(Multimedia and Hypermedia Expert Group) application<br />
encoded, letting you experience D.TV interactively. 1<br />
The channel banner displays an icon ( ) to indicate that<br />
the MHEG application can be run.<br />
• Press to start the MHEG application. 2<br />
+<br />
MAIN SUB TEXT<br />
• You can also use any of the colour buttons.<br />
• Press TEXT to quit the MHEG application.<br />
Viewing Teletext<br />
(<strong>Europe</strong>an countries except the UK.)<br />
You can view the Teletext that comes simultaneously with<br />
certain programmes.<br />
+ TEXT<br />
• MAIN SUB Press to display the Teletext.<br />
• You can also use any of the colour buttons.<br />
• Press the TEXT button again to hide the Teletext<br />
screen.<br />
Changing A.TV audio channels<br />
You can change the audio channel of the broadcast or<br />
external input signal.<br />
AUDIO<br />
+<br />
• MAIN SUB Press to change the audio type.<br />
The current audio channel is displayed on-screen.<br />
• If the NICAM audio setting (see NICAM Select on<br />
page 140) is set to NICAM and you are watching a<br />
NICAM broadcast, you can switch between NICAM<br />
and Regular (non-NICAM) audio.<br />
• If the NICAM broadcast is bilingual, you can also<br />
select the language.<br />
• You can also select the language for a non-NICAM<br />
bilingual broadcast.<br />
• When watching a recording made from an external<br />
input with Bilingual recording selected (see External<br />
Audio on page 140), you can switch the audio<br />
channel between left (L), right (R) or both (L+R).<br />
Note<br />
• When recording to the HDD with HDD Recording<br />
Format set to Video Mode On, to DVD-R/-RW (Video<br />
mode), to DVD+R/+RW, or on the LPCM setting, only<br />
one channel of a bilingual broadcast is recorded. In<br />
this case, decide which language you want to record<br />
before recording by setting the Bilingual Recording<br />
setting (see Bilingual Recording on page 140).<br />
Switching between TV and DVD<br />
When the recorder is stopped or recording you can<br />
choose whether to have the audio/video from the built-in<br />
TV tuner (or external input) play on your TV (‘DVD mode’),<br />
or watch the channel that the TV is currently set to (‘TV<br />
mode’).<br />
During playback or when a menu is being displayed onscreen,<br />
the sound and video is always routed to your TV<br />
and is unaffected by the TV/DVD mode setting.<br />
Note that the recorder must be connected to your TV<br />
using a SCART cable to be able to use this feature.<br />
• MAIN<br />
+<br />
SUB TV/DVD<br />
Switch between TV mode and DVD<br />
mode.<br />
Note<br />
1 If you start recording while the MHEG application is running, the MHEG application screen will also be recorded. To avoid this, quit the<br />
application first, then start recording. It is not possible to start the MHEG application while recording is in progress.<br />
2 This function is not available when subtitle display is active.<br />
NICAM<br />
Regular<br />
NICAM A NICAM B<br />
Regular NICAM A+B<br />
A (L) B (R)<br />
A + B (L+R)<br />
L R<br />
L+R
Recording 06<br />
Setting the picture quality/recording<br />
time<br />
DVD (VR) DVD (Video) DVD+R DVD+RW DVD-RAM HDD<br />
Before starting a recording, you will usually want to set<br />
the picture quality/recording time. There are six standard<br />
settings available, which allow you to choose a balance<br />
between picture quality and recording time.<br />
When Manual Recording is set to On (see Manual<br />
Recording on page 142), a further option will be available<br />
(MN1 to MN32, LPCM, or XP+ (a super-high quality HDD<br />
recording mode that features a transfer rate of around 15<br />
Mbps) depending on what you set).<br />
When recording to DVD, MN32 is the highest recording<br />
quality available. If you select XP+, the recording mode<br />
will automatically revert to MN32.<br />
When recording to DVD+R/+RW, SLP is the longest<br />
recording time available. If you select SEP or MN1 to<br />
MN3, the recording mode will automatically revert to SLP.<br />
REC MODE<br />
• Press repeatedly to select the recording<br />
quality.<br />
• XP – High quality setting, gives about one hour of<br />
recording time on a DVD disc.<br />
• SP (Standard Play) – Default quality, used for most<br />
applications, gives about two hours of recording time<br />
on a DVD.<br />
• LP (Long Play) – Lower video quality than SP, but<br />
doubles the recording time on a DVD to about four<br />
hours.<br />
• EP (Extended Play) – Lower quality than LP, but gives<br />
about six hours of recording time on a DVD disc.<br />
• SLP (Super Long Play) – Lower quality than EP, but<br />
gives about eight hours of recording time on a DVD<br />
disc.<br />
• SEP (Super Extended Play) – Lowest video quality but<br />
gives about ten hours of recording time on a DVD<br />
disc.<br />
• MN1 to MN32/LPCM 1 /XP+ 2 – Manual/Linear PCM/<br />
XP+ (available only when manual recording is on).<br />
The setting is indicated in the front panel display, and<br />
shown on-screen together with the recording time for a<br />
blank recordable disc. If a recordable disc is loaded, the<br />
approximate remaining recording time for that disc is<br />
also shown. (Note that if the On Screen Display setting<br />
(see On Screen Display on page 144) is Off then this<br />
information is not displayed.)<br />
Basic recording from the TV<br />
DVD (VR) DVD (Video) DVD+R DVD+RW DVD-RAM HDD<br />
Basic recording from the TV involves just setting the<br />
channel to record, choosing whether to record to the<br />
HDD or a DVD and selecting the recording quality.<br />
1 Select the HDD or DVD for recording.<br />
• If you’re recording to DVD, load a recordable disc (if<br />
you load a new blank DVD-RW or DVD+RW disc, the<br />
recorder takes a short while to initialize the disc).<br />
• If you want to record a VR mode DVD-R or a Video<br />
mode DVD-RW, you must initialize it before<br />
proceeding (see Initializing recordable DVD discs on<br />
page 89).<br />
2 Press to switch between D.TV (digital) and<br />
A.TV (analog).<br />
3 CHANNEL Select a TV channel to record.<br />
The front panel display shows the channel number, or<br />
channel name if it’s available:<br />
• While the recorder is stopped, you can also use the<br />
number buttons on the remote to select the channel<br />
(For channel 24, press 2, 4 then ENTER).<br />
• If the recorder is stopped, you can also use the<br />
CH +/– buttons on the front panel to select the<br />
channel number.<br />
4 Set the picture quality/recording time.<br />
• See Setting the picture quality/recording time above<br />
for detailed instructions.<br />
Note<br />
1 Audio is recorded in 16-bit Linear PCM format, video is recorded at XP quality. When recording a bilingual broadcast, select which audio channel<br />
to record (see Bilingual Recording on page 140).<br />
2 Applicable only to HDD recording. (If this setting is used when recording to DVD, MN32 is used.) When copied to DVD, XP+ recordings are<br />
always copied in real time.<br />
HDD/DVD<br />
A.TV/D.TV<br />
CHANNEL<br />
REC MODE<br />
A.TV Channel preset<br />
83<br />
En
06<br />
84<br />
En<br />
Recording<br />
5 MAIN SUB If you’re recording from the A.TV<br />
tuner, select the audio channel to record.<br />
See Changing A.TV audio channels on page 82 for more<br />
on this.<br />
• When recording in VR mode, if a broadcast is<br />
bilingual, both audio channels are recorded, allowing<br />
you to switch the audio channel on playback. The<br />
only exception to this is when the picture quality is set<br />
to LPCM, in which case you do need to select the<br />
audio channel before recording.<br />
6 MAIN SUB If you’re recording from the D.TV<br />
tuner, select the audio language to record.<br />
• You may also be able to set which subtitle language<br />
to record; use SUBTITLE to select.<br />
• Note that audio and subtitle languages cannot be<br />
changed during the recording of a digital broadcast.<br />
REC<br />
7 Start recording.<br />
If you want to set a recording end time, press the REC<br />
button repeatedly. The recording time increases in 30<br />
minute increments, up to a maximum of six hours. The<br />
time the recording will end is shown on-screen and in the<br />
front panel display. When the recording ends, the<br />
recorder automatically switches into standby if no other<br />
operation is being performed.<br />
• To cancel the set recording time, press REC.<br />
• If you want to pause recording at any time1 <br />
, press<br />
PAUSE. Press again to restart the recording (If<br />
recording to the HDD, DVD-RAM or in VR mode, a<br />
new chapter is started after recording restarts).<br />
STOP REC<br />
AUDIO<br />
+<br />
AUDIO<br />
+<br />
8 Press to stop recording.<br />
• If you set the recording time in the previous step, you<br />
can still stop the recording anytime by pressing<br />
STOP REC.<br />
• Recording will stop automatically when there is no<br />
more space on the HDD/DVD, or after 12 hours of<br />
HDD recording (whichever is sooner).<br />
Tip<br />
• During recording you can turn on/off the SCART loop<br />
through function. During recording, press the front<br />
panel CH + button to switch to SCART THRU (loop<br />
through on), or CH – to switch to SCART NORM (loop<br />
through off). Loop through is automatically reset to<br />
off after recording has finished. Note that you can’t<br />
switch loop through on if recording from the<br />
AV1 (RGB)-TV connector.<br />
Note<br />
1 Except during Chase Play.<br />
Pause Live TV<br />
HDD<br />
The Pause Live TV feature lets you effectively pause a TV<br />
programme you’re watching. When you’re ready to<br />
resume watching, just press the PLAY button.<br />
Setting up for Pause Live TV<br />
You can use the Pause Live TV feature with an AV Linkcompatible<br />
TV connected using a SCART cable (see TV<br />
tuner setup for Pause Live TV below), or using this<br />
recorder’s internal tuner (see Using the recorder’s<br />
internal tuner for Pause Live TV on page 85).<br />
TV tuner setup for Pause Live TV<br />
To use this feature with an external TV tuner, the recorder<br />
must be connected to your TV using a SCART cable, and<br />
the AV. Link setting (page 145) should be set to This<br />
Recorder Only. 2 See also Pause Live TV on page 145 for<br />
In order to use Pause Live TV, make the following<br />
connections and settings.<br />
• Pause Live TV will not work as expected when<br />
watching TV via an external component such as a<br />
VCR or digital tuner. It only works with the channel<br />
selected on the TV.<br />
Important<br />
• Pause Live TV only works with the built-in A.TV<br />
(analog) tuner. It does not work with the D.TV tuner or<br />
the external inputs. Make sure the Auto Channel<br />
Setting is set to Download from TV (see Auto<br />
Channel Setting on page 139).<br />
1 Connect this recorder to your TV with a SCART<br />
cable.<br />
2 Press HOME MENU.<br />
3 Select ‘Initial Setup’ > ‘Options2’ > ‘Pause Live<br />
TV’ > ‘TV’s Tuner’.<br />
4 Select ‘Initial Setup’ > ‘Analog Tuner’ > ‘Auto<br />
Channel Setting’ > ‘Download from TV’.<br />
• If the Download from TV option appears grayed out,<br />
check the connections to your TV and try again.<br />
• Depending on your TV, you might have to switch off<br />
and unplug it for a few moments before plugging it<br />
back in and switching it on again.<br />
5 Follow the on-screen instructions.
Recording 06<br />
Using the recorder’s internal tuner for Pause Live TV<br />
If you haven’t connected to your TV using a SCART cable<br />
(or your TV is not compatible with AV Link) you can use<br />
the recorder’s internal tuner for the Pause Live TV.<br />
1 Press HOME MENU.<br />
2 Select ‘Initial Setup’ > ‘Options2’ > ‘Pause Live<br />
TV’ > ‘Recorder’s Tuner’.<br />
See Pause Live TV on page 145 to do this.<br />
You can record the channel selected on the recorder.<br />
Using Pause Live TV<br />
PAUSE LIVE TV<br />
1 Start recording the current TV channel.<br />
Recording continues with playback paused.<br />
• Note that it may take up to 10 seconds for recording<br />
to start.<br />
PLAY<br />
2 Press to start playback.<br />
You can also use the scan buttons (/), pause<br />
( PAUSE) and stop ( STOP) — all without affecting the<br />
recording.<br />
Operation table<br />
Viewing source<br />
TV/DVD<br />
Pause Live TV<br />
DVR source<br />
mode of DVR function button<br />
*1 No Chase Play! Warning if you change input this will stop the recording.<br />
<br />
3 Press to stop the recording.<br />
The operation is slightly different depending on the<br />
viewing source. See the Operation table below for details.<br />
Tip<br />
•When the Pause Live TV setting (see page 145) is set to<br />
TV’s Tuner, you can press PAUSE LIVE TV while the<br />
recorder is in standby to switch on and immediately<br />
start recording. When set to Recorder’s Tuner, it is not<br />
possible to use the Pause Live TV feature from standby.<br />
• After pressing PAUSE LIVE TV, it will take at least 10<br />
seconds for the picture to change (during this time,<br />
all controls except the power button are inoperative).<br />
(Note that startup from standby is not possible if you<br />
have selected Recorder’s Tuner in Pause Live TV on<br />
page 145.)<br />
• Please note that you can’t record from another<br />
component (VCR, etc.) that is connected by a SCART<br />
cable to the AV2 (INPUT 1/DECODER) connector<br />
using the Pause Live TV feature.<br />
2• Not all TVs support this feature. Check the instructions that came with your TV if you are unsure.<br />
• This feature will not work unless your TV is compatible with AV Link. See the operating instructions that came with your TV if you’re unsure<br />
about your TV’s compatibility with this feature.<br />
STOP REC<br />
Condition<br />
TV built-in analog tuner TV – Pause Live TV Preset channel of DVR and TV are matched after<br />
downloading from TV.<br />
Direct TV recording*1 Preset channel of DVR and TV are NOT matched after<br />
downloading from TV. Record TV programme that you’re<br />
watching.<br />
TV built-in digital tuner TV – Direct TV recording*1 Preset channel info. in D.TV cannot be shared by DVR even<br />
after Download from TV. Record TV programme that you’re<br />
watching.<br />
External input of TV TV – Direct TV recording*1 Record TV programme that you’re watching.<br />
DVR built-in analog tuner DVD DVR built-in Pause Live TV<br />
analog tuner<br />
DVR built-in digital tuner DVD DVR built-in<br />
digital tuner<br />
Pause Live TV<br />
85<br />
En
06<br />
86<br />
En<br />
Recording<br />
About timer recordings<br />
DVD (VR) DVD (Video) DVD+R DVD+RW DVD-RAM HDD<br />
Using the timer recording features you can program up<br />
to 32 timer recordings up to a month in advance. Timer<br />
recording programmes can be set to record just once,<br />
every day, or every week.<br />
You can set the recording quality for your timer recording<br />
in the same way as for a regular recording, but with the<br />
added option of an AUTO mode, which maximizes the<br />
recording quality for the space available on the disc (if<br />
recording to DVD), or to fit on to a blank DVD disc (if<br />
recording to the HDD).<br />
You can set timer recordings to record to a recordable<br />
DVD or to the hard disk drive. For regular (daily or weekly)<br />
HDD timer recordings that you don’t need to keep, you<br />
can use the Auto Replace Recording feature to<br />
automatically replace the previous timer recording with<br />
the new one. Note that when you use this feature, the<br />
previous recording made on that timer programme will<br />
be replaced by the next one, regardless of whether you<br />
have watched it yet or not.<br />
You can also set the recorder so that it will adjust the<br />
recording quality to try and fit the recording on to the disc<br />
if it would not otherwise fit at the recording quality you set<br />
(see Optimized Rec on page 142 for more on this).<br />
Finally, if you set a timer recording to record to DVD but<br />
there isn’t a recordable DVD loaded at the time of the<br />
recording, the Recovery Recording feature will<br />
automatically record the programme to the HDD for you.<br />
This recorder is compatible with VPS (Video<br />
Programming System) and PDC (Programme Delivery<br />
Control) systems used by many analog TV stations to<br />
ensure that a timer recording catches the whole<br />
programme even when the programme is not running to<br />
schedule. Up to eight timer programmes can be set with<br />
VPS/PDC on.<br />
Important<br />
•A timer recording can’t be set if there are already 32<br />
timer programmes waiting to be recorded.<br />
• Timer recording will not start if:<br />
– The recorder is already recording.<br />
– A disc is being initialized, finalized or unfinalized.<br />
• Timer recording will start when the operation<br />
preventing timer recording has finished.<br />
• When the front panel display is set to ON, the timer<br />
indicator ( ) lights in the front panel display when<br />
the timer is active. If the indicator is blinking it means<br />
that (for a DVD timer recording) there is no disc<br />
loaded, or the disc loaded is not recordable (for an<br />
HDD timer recording it means that the HDD is not<br />
recordable).<br />
• Approximately two minutes before a timer recording<br />
is set to start, the recorder will go into timer recording<br />
standby. In timer recording standby you cannot use<br />
some functions.<br />
• The maximum length for timer recordings made to<br />
the HDD is 24 hours. However, because one title<br />
(HDD) is limited to 12 hours, recordings over 12<br />
hours will be spread over two titles. Note that there<br />
will be a break in the recording of a few seconds<br />
between titles.<br />
• VPS/PDC works only with analog stations; it does not<br />
work with digital TV stations.<br />
• VPS/PDC may not work with all broadcast stations in<br />
your country/area. Check with the stations for<br />
compatibility.<br />
• The hours between 3:00 and 5:00 in the morning are<br />
used by the GUIDE Plus+ system to download<br />
programme information. During these times, VPS/<br />
PDC may not work reliably; leave VPS/PDC off if you<br />
set a timer recording for these times.<br />
• If VPS/PDC is active for two timer programmes that<br />
are programmed to start at the same time, then the<br />
programme that actually starts first takes priority.<br />
Extending a timer recording in progress<br />
You can extend a timer recording beyond the<br />
programmed end time. This can be useful if a broadcast<br />
programme overruns, for example.<br />
Cancelling or extending the timer<br />
REC<br />
1 Press and hold for three seconds during a<br />
timer recording.<br />
Recording continues, but the timer indicator disappears<br />
from the front panel display indicating that the timer has<br />
been cancelled.<br />
REC<br />
2 <br />
Press repeatedly to extend recording in 30<br />
minute blocks.
Recording 06<br />
Stopping a timer recording<br />
STOP REC<br />
1<br />
<br />
Press during a timer recording.<br />
ENTER<br />
2 Select ‘Yes’ to confirm.<br />
Preventing use of the recorder before a<br />
timer recording (child lock)<br />
You can make all the front panel and remote control<br />
buttons inoperative using the child lock feature. This is<br />
useful when you set a timer recording and want to make<br />
sure that the timer settings are not changed before<br />
recording has finished.<br />
RECORDER<br />
1 If the recorder is on, switch it into standby.<br />
2 [Front panel] Press and hold for three<br />
seconds to lock the controls.<br />
The front panel display briefly shows LOCKED. If any<br />
buttons are pressed on the remote or front panel,<br />
LOCKED is briefly displayed again.<br />
• To unlock the recorder, press and hold (Stop) on<br />
the front panel (while the recorder is stopped) for<br />
three seconds until the display shows UNLOCKED.<br />
the lesser important programme. If one of the<br />
overlapping programmes is a regular timer<br />
programme for a digital broadcast, you may choose<br />
‘Cancel Once’ in order to avoid having it overlap with<br />
a separately scheduled programme (see Skipping a<br />
regular timer programme on page 77).<br />
Simultaneous recording and<br />
playback (Chase Play)<br />
Chase Play allows you to watch a recording that is still in<br />
progress from the start, without having to wait until the<br />
recording has finished (i.e., playback is ‘chasing’ the<br />
recording).<br />
In fact, you’re not just limited to watching the recording<br />
in progress. You can watch anything else already on the<br />
HDD (or on a DVD if you’re recording to the HDD) by<br />
selecting it from the Disc Navigator screen (see Using<br />
the Disc Navigator with recordable discs and the HDD on<br />
page 94).<br />
Chase Play is not possible when DV is the recording input.<br />
• Press during recording to start playback<br />
from the beginning of the current recording1 <br />
.<br />
NAVIGATOR<br />
• Press during recording to select another<br />
Timer recording FAQ<br />
title to play.<br />
You can use all the usual playback controls, such as<br />
Frequently Asked Questions<br />
pause, slow-motion play, scan and skip.<br />
• Even though the timer is set, the recorder doesn’t start • To stop playback, press STOP (recording will<br />
recording!<br />
continue).<br />
Check that the disc loaded or HDD is recordable, not • To stop recording, press STOP REC (playback will<br />
locked (see Lock Disc on page 132), and that there are continue).<br />
fewer than 99/999 titles already on the DVD/HDD. • During recording or in timer recording standby, you<br />
• The recorder won’t let me enter a timer programme! can’t play an HDD title, DVD or Video CD/Super VCD<br />
Why not?<br />
disc if the Input Line System setting doesn’t match<br />
You can’t enter a timer programme if the clock isn’t the TV line system of the disc/HDD title (see also<br />
set.<br />
Additional information about the TV system settings<br />
• What happens when two or more timer programmes<br />
on page 146). Also, during simultaneous recording<br />
overlap?<br />
and playback, if the TV line system of the playback<br />
track/title changes then playback will automatically<br />
Basically, the programme with the earlier recording<br />
stop.<br />
start time has priority. However, the recorder will<br />
start recording the programme with the later start<br />
time after the earlier programme is finished.<br />
If schedule to record two programmes have the same<br />
times (but different channels, for example), then only<br />
one of the two programmes will be recorded. In this<br />
event you should cancel the scheduled recording of<br />
Note<br />
1 You can’t start playback immediately after recording starts. Simultaneous playback and recording doesn’t work while copying or backing up.<br />
HDD<br />
DISC<br />
PLAY<br />
87<br />
En
06<br />
88<br />
En<br />
Recording<br />
Recording from an external component<br />
DVD (VR) DVD (Video) DVD+R DVD+RW DVD-RAM HDD<br />
You can record from an external component, such as a<br />
camcorder or VCR, connected to one of the recorder’s<br />
external inputs.<br />
1 Make sure that the component you want to<br />
record from is connected properly to the HDD/DVD<br />
recorder.<br />
See Chapter 2 (Connecting up) for connection options.<br />
VIDEO IN<br />
2 Press repeatedly to select one of the<br />
external inputs to record from.<br />
The current input is shown on-screen and in the front<br />
panel display:<br />
• AV2/L1 – Input 1 1<br />
• L2 – Input 2 (front panel)<br />
• L3 – Input 3<br />
Check that the Audio In settings for External Audio and<br />
Bilingual Recording are as you want them (see Audio In<br />
on page 140).<br />
• If the aspect ratio is distorted (squashed or stretched),<br />
adjust on the source component or your TV before<br />
recording.<br />
• To watch video coming in via the DV input (front<br />
panel), select DV > DV Video Playback from the<br />
Home Menu (see also Playing from a DV camcorder on<br />
page 101).<br />
REC MODE<br />
3 Set the recording quality.<br />
• See Setting the picture quality/recording time on<br />
page 83 for detailed information.<br />
HDD/DVD<br />
4 Select the HDD or DVD for recording.<br />
REC<br />
5 Press to start recording.<br />
• If your source is copy-protected using Copy Guard,<br />
you will not be able to record it. See Restrictions on<br />
video recording on page 80 for more details.<br />
Playing your recordings on other DVD<br />
players<br />
DVD (VR) DVD (Video) DVD+R DVD+RW<br />
Most regular DVD players can play finalized discs<br />
recorded in DVD-R/-RW (Video mode) and DVD+R discs.<br />
A number of players (including many Pioneer models)<br />
can also play DVD-RW discs recorded in VR mode,<br />
finalized or not. Most players will not play VR mode DVD<br />
-R discs, although some DVD-ROM drives and DVD<br />
recorders may be able to (finalization might be<br />
necessary). Check the manual that came with the player<br />
to check what kinds of discs it will play.<br />
When you finalize a DVD-R/-RW (Video mode) or DVD+R<br />
disc, a title menu is created from which you can select<br />
titles when you play the disc. There are a number of<br />
different styles of title menu to choose from to suit the<br />
content of the disc.<br />
All the title menus are navigated in the usual way,<br />
pressing MENU or TOP MENU to display the menu, then<br />
using the /// followed by ENTER to select titles<br />
and start playback.<br />
Finalizing a disc<br />
DVD (VR) DVD (Video) DVD+R DVD+RW<br />
Finalizing ‘fixes’ the recordings on the disc so that it can<br />
be played on a regular DVD player or computer equipped<br />
with a suitable DVD-ROM drive. 2<br />
Note that the disc name will appear in the title menu after<br />
you finalize a disc. Make sure the disc name is as you<br />
want it before you finalize the disc as it can’t be changed<br />
afterwards. If you want to rename the disc, see Input Disc<br />
Name on page 132 before starting the steps below.<br />
DVD+RW discs don’t generally need finalizing. However,<br />
if you want a title menu to appear when you play the disc,<br />
then you will need to finalize. When using a DVD+RW,<br />
you can still record and edit even after finalizing.<br />
although the title menu will disappear if you do so.<br />
Finalize the disc again to generate a new title menu.<br />
Important<br />
• Once you’ve finalized a DVD-R/-RW (Video mode) or<br />
DVD+R disc, you can’t edit or record anything else<br />
on that disc. However, the finalization on a DVD-RW<br />
disc maybe ‘undone’; see Undo Finalize on page 133<br />
for how to do this.<br />
Note<br />
1 This cannot be selected if AV2/L1 In is set to Decoder (see AV2/L1 In on page 140).<br />
2 If the TV line system of the disc is different to the current setting of the recorder, you will not be able to finalize the disc. See Additional<br />
information about the TV system settings on page 146 for how to change the recorder’s setting.
Recording 06<br />
•A VR mode DVD-R/-RW (excluding DVD-R DL) disc<br />
can still be recorded and edited on this recorder even<br />
after finalizing.<br />
• DVD-R DL (Video mode) discs and DVD+R DL discs<br />
must be finalized in order to play in other recorders/<br />
players. Note however that some recorders/players<br />
will not play even finalized dual-layer discs.<br />
1 Load the disc you want to finalize.<br />
Make sure that the recorder is stopped before proceeding.<br />
2 HOME MENU Select ‘Disc Setup’ from the Home Menu.<br />
ENTER<br />
3 Select ‘Finalize’ > ‘Finalize’ > ‘Next Screen’.<br />
Disc Setup<br />
Basic<br />
Initialize<br />
Finalize<br />
Optimize HDD<br />
ENTER<br />
4 For DVD-R/-RW (Video mode) and<br />
DVD+R/+RW discs only, select a title menu style,<br />
then select ‘Yes’ to start finalization or ‘No’ to<br />
cancel.<br />
The menu you select will be the one that appears when<br />
the ‘top menu’ (or ‘menu’ for a DVD+R/+RW) is selected<br />
on any DVD player.<br />
Finalize<br />
Finalize<br />
Undo Finalize<br />
Next Screen<br />
Start<br />
• Discs recorded partially or fully on the Pioneer DVR-<br />
7000 DVD recorder do not support this feature. These<br />
discs will have only a text title menu when finalized on<br />
this recorder.<br />
5 The recorder will now start finalizing the disc.<br />
During finalization:<br />
• If the finalization process of a DVD-RW or DVD+R/<br />
+RW disc is going to take more than around four<br />
minutes, you can press ENTER to cancel. Around<br />
four minutes before completion, the option to cancel<br />
disappears.<br />
• You can’t cancel the finalization of a VR mode DVD-R<br />
disc.<br />
• How long finalization takes depends on the type of<br />
disc, how much is recorded on the disc and the<br />
number of titles on the disc. A disc recorded in VR<br />
mode can take up to one hour to finalize. DVD-R/-RW<br />
(Video mode) and DVD+R/+RW discs can take up to<br />
20 minutes.<br />
Initializing recordable DVD discs<br />
DVD-R DVD-RW DVD+RW DVD-RAM<br />
DVD-R/-RW discs can be initialized for either Video mode<br />
recording or VR mode recording. 1<br />
When you first load a blank DVD-RW or DVD+RW disc,<br />
the recorder initializes it for recording automatically. By<br />
default, blank DVD-RW discs are initialized for VR mode<br />
recording. See DVD-RW Auto Initialize on page 90 if you<br />
want to change the default to Video mode.<br />
DVD-R discs are ready for Video mode recordings out of<br />
the box; if you want to use a DVD-R for VR mode<br />
recording, you must initialize it before recording anything<br />
on the disc.<br />
DVD+RW and DVD-RAM discs can also be initialized in<br />
order to erase the contents of the disc.<br />
Important<br />
• Initializing a DVD-RW, DVD+RW or DVD-RAM disc<br />
will erase everything recorded on it. Make sure there<br />
is nothing on the disc that you want to keep!<br />
• You may not be able to re-initialize a DVD-RW disc in<br />
a different format if it was originally initialized on an<br />
older DVD recorder.<br />
• Once initialized for VR mode recording, you can’t reinitialize<br />
a DVD-R back to Video mode.<br />
Note<br />
1 If a disc was previously finalized on an older DVD recorder, you may not be able to re-initialize and/or initialize it for Video mode recording.<br />
89<br />
En
06<br />
90<br />
En<br />
Recording<br />
1 HOME MENU Select ‘Disc Setup’ from the Home Menu.<br />
ENTER<br />
2 Select ‘Initialize’ > ‘Video Mode’, ‘VR<br />
Mode’ or ‘Initialize DVD+RW’.<br />
Disc Setup<br />
Basic<br />
Initialize<br />
Finalize<br />
Optimize HDD<br />
ENTER<br />
VR Mode<br />
Video Mode<br />
Initialize DVD+RW<br />
Start<br />
Start<br />
Start<br />
3 Select ‘Start’.<br />
It takes about 30 seconds to initialize the disc (except<br />
DVD-RAM discs, which can take up to an hour).<br />
Initializing Disc<br />
1 min left<br />
Pr 1<br />
DVD-RW Auto Initialize<br />
DVD-RW<br />
• Default setting: VR Mode<br />
Initialization mode is automatically carried out when you<br />
insert a blank DVD-RW. You must set the desired<br />
initialization mode before inserting a disc.<br />
1 HOME MENU Select ‘Disc Setup’ from the Home Menu.<br />
ENTER<br />
2 Select ‘Basic’>’DVD-RW Auto Init.’, then<br />
‘VR Mode’ or ‘Video Mode’.<br />
Disc Setup<br />
Basic Input Disc Name<br />
VR Mode<br />
Initialize<br />
Lock Disc<br />
Video Mode<br />
Finalize<br />
Optimize HDD<br />
DVD-RW Auto Init.
Playback 07<br />
Chapter 7<br />
Playback<br />
Introduction<br />
Most of the features described in this chapter make use<br />
of on-screen displays. Navigate these using the cursor<br />
buttons and ENTER. To go back one level from any<br />
screen, use the RETURN/EXIT button.<br />
Remember also that the button guide at the bottom of<br />
every screen shows which buttons do what.<br />
Many of the functions covered in this chapter apply to the<br />
HDD, DVD discs, Video CDs, Super VCDs, WMA/MP3/<br />
DivX discs and CDs, although the exact operation of<br />
some varies slightly with the kind of disc loaded.<br />
• Many functions are not available when a Video CD is<br />
playing in PBC mode. Start playback from the Disc<br />
Navigator screen for non-PBC playback (see Using the<br />
Disc Navigator with playback-only discs on page 95).<br />
• For discs that contain JPEG picture files, see The<br />
PhotoViewer on page 125.<br />
Basic playback<br />
A L L<br />
This section shows you how to use your recorder for<br />
playback of discs (DVD, CD, etc.), and for playback of<br />
video from the HDD.<br />
Important<br />
• Throughout this manual, the term ‘DVD’ means any<br />
kind of playable or recordable DVD. If a function is<br />
specific to a particular kind of DVD disc, it is specified.<br />
• Some DVD-Video, DVD+R and DVD+RW discs don’t<br />
allow certain playback controls to operate at certain<br />
points in the disc. This is not a malfunction.<br />
HDD/DVD<br />
1 Select the HDD or DVD for playback.<br />
• If playing video from the HDD, skip to step 3 below.<br />
• Select DVD for any kind of disc playback.<br />
OPEN/CLOSE<br />
2 [Front panel] Load a disc.<br />
Load a disc with the label side facing up, using the disc<br />
tray guide to align the disc (if you’re loading a doublesided<br />
DVD-Video disc, load it with the side you want to<br />
play face down).<br />
• If you want to play a DTS audio CD, please first read<br />
the note on page 93.<br />
<br />
3 Start playback.<br />
• If you’re playing a DVD-Video or Video CD, a disc<br />
menu may appear when you start playback. Use the<br />
/// buttons, number buttons, and ENTER to<br />
navigate DVD disc menus, and the number buttons<br />
and ENTER for Video CD menus.<br />
• When playing video from the HDD, playback will<br />
automatically stop after the end of a title is reached.<br />
• There may be a slight pause when playback switches<br />
from the first to the second layer of a dual-layer disc.<br />
• See the following sections for more details on playing<br />
specific kinds of discs.<br />
STOP<br />
PLAY<br />
4 Press to stop playback.<br />
5 When you’ve finished using the recorder, eject<br />
the disc and switch the recorder back into standby.<br />
Playing DVD discs<br />
The table below shows the basic playback controls for<br />
DVD-Video, and recordable DVD discs.<br />
PLAY<br />
<br />
STOP<br />
<br />
PAUSE<br />
<br />
PREV NEXT<br />
<br />
Press to start playback.<br />
If RESUME is displayed on-screen, playback<br />
starts from the place last stopped.<br />
Press to stop playback.<br />
You can resume playback from the same<br />
point by pressing PLAY. (Press STOP<br />
again to cancel the resume function.)<br />
Pauses playback, or restarts playback<br />
when paused.<br />
Press to start scanning. Press repeatedly<br />
to increase the scanning speed.<br />
Press to skip to previous/next chapter/title.<br />
(During playback you can also use the<br />
front panel CH +/– buttons.)<br />
DVD+R/DVD+RW only:<br />
PREV may not always skip to the previous<br />
title.<br />
91<br />
En
07<br />
92<br />
En<br />
Playback<br />
SETUP /TUNE+ SR+<br />
1 2 3<br />
/ST– ENTER /ST+<br />
4 5 6<br />
F.S.SURR /TUNE– TEST TONE<br />
7 8 9<br />
ADVANCED SOUND<br />
0<br />
CLEAR<br />
/<br />
TOP MENU<br />
DISC<br />
NAVIGATOR<br />
ENTER<br />
ENTER<br />
CM BACK<br />
CM SKIP<br />
/<br />
MENU<br />
RETURN / EXIT<br />
Except VR mode: During playback, enter a<br />
chapter number then press ENTER to skip<br />
directly to that chapter within the currently<br />
playing title.<br />
On some discs, you can also use the number<br />
buttons to select numbered items in<br />
the disc menu.<br />
VR mode only: During playback, enter a<br />
title number then press ENTER.<br />
All: Press CLEAR to clear a number entry<br />
and start again.<br />
(Commercial back/skip)<br />
Turn the Smart Jog counter-clockwise for<br />
backward skip; turn clockwise for forward<br />
skip. You can search up to two hours in<br />
either direction.<br />
While paused, press and hold to start<br />
slow-motion playback. Press repeatedly to<br />
change the playback speed.<br />
While paused, press to advance a single<br />
frame in either direction. You can also execute<br />
frame-by-frame playback/backward<br />
scanning via the Smart Jog.<br />
Press to display the menu of a DVD-Video<br />
disc. (DVD+R/+RW discs finalized on this<br />
recorder will display the Disc Navigator.<br />
Press MENU to display the disc menu.)<br />
Use the cursor buttons to navigate DVD-<br />
Video disc menus; press ENTER to select<br />
items.<br />
Press to return to the previous level of a<br />
DVD-Video disc menu.<br />
Playing from the HDD<br />
The table below shows the basic playback controls when<br />
playing video recorded on the hard disk (HDD).<br />
PLAY<br />
<br />
STOP<br />
<br />
PAUSE<br />
<br />
PREV NEXT<br />
<br />
SETUP /TUNE+ SR+<br />
1 2 3<br />
/ST– ENTER /ST+<br />
4 5 6<br />
F.S.SURR /TUNE– TEST TONE<br />
7 8 9<br />
ADVANCED SOUND<br />
0<br />
CLEAR<br />
/<br />
ENTER<br />
CM BACK<br />
CM SKIP<br />
/<br />
Press to start playback.<br />
If RESUME is displayed on-screen, playback<br />
starts from the place last stopped.<br />
Playback automatically stops after the end<br />
of a title is reached.<br />
Press to stop playback.<br />
You can resume playback from the same<br />
point by pressing PLAY. (Press STOP<br />
again to cancel the resume function.)<br />
Pauses playback, or restarts playback<br />
when paused.<br />
Press to start scanning. Press repeatedly<br />
to increase the scanning speed.<br />
Press to skip to previous/next chapter/title.<br />
(During playback you can also use the<br />
front panel CH +/– buttons.)<br />
During playback, enter a title number then<br />
press ENTER to skip directly to that title.<br />
Press CLEAR to clear a number entry and<br />
start again.<br />
(Commercial back/skip)<br />
Turn the Smart Jog counter-clockwise for<br />
backward skip; turn clockwise for forward<br />
skip. You can search up to two hours in<br />
either direction.<br />
While paused, press and hold to start<br />
slow-motion playback. Press repeatedly to<br />
change the playback speed.<br />
While paused, press to advance a single<br />
frame in either direction. You can also execute<br />
frame-by-frame playback/backward<br />
scanning via the Smart Jog.
Playback 07<br />
Playing CDs and WMA/MP3 discs<br />
The table below shows the basic playback controls for<br />
audio CDs 1 , and WMA/MP3 files.<br />
PLAY<br />
<br />
STOP<br />
<br />
PAUSE<br />
<br />
PREV NEXT<br />
<br />
SETUP /TUNE+ SR+<br />
1 2 3<br />
/ST– ENTER /ST+<br />
4 5 6<br />
F.S.SURR /TUNE– TEST TONE<br />
7 8 9<br />
ADVANCED SOUND<br />
0<br />
CLEAR<br />
ENTER<br />
Press to start playback.<br />
Press to stop playback.<br />
Pauses playback, or restarts playback<br />
when paused.<br />
Except WMA: Press to start scanning.<br />
Press again to increase the scanning<br />
speed. (There are two scan speeds; the<br />
current scan speed is shown on-screen.)<br />
Press to skip to previous/next track (or<br />
folder for WMA/MP3 disc). (During<br />
playback you can also use the front panel<br />
CH +/– buttons.)<br />
During playback, enter a track number<br />
then press ENTER to skip directly to that<br />
track.<br />
Press CLEAR to clear a number entry and<br />
start again.<br />
Playing Video CD/Super VCDs<br />
The table below shows the basic playback controls for<br />
Video CD/Super VCDs.<br />
Some discs feature Playback Control (PBC for short)<br />
menus. These discs show PBC in the display when you<br />
load them and display a menu on-screen from where you<br />
can select what to watch. 2<br />
PLAY<br />
<br />
STOP<br />
<br />
Press to start playback.<br />
Video CD only: If RESUME is displayed onscreen,<br />
playback starts from the place last<br />
stopped.<br />
Press to stop playback.<br />
Video CD only: You can resume playback<br />
from the same point by pressing PLAY.<br />
(Press STOP again to cancel the<br />
resume function.)<br />
PAUSE<br />
<br />
PREV NEXT<br />
<br />
SETUP /TUNE+ SR+<br />
1 2 3<br />
/ST– ENTER /ST+<br />
4 5 6<br />
F.S.SURR /TUNE– TEST TONE<br />
7 8 9<br />
ADVANCED SOUND<br />
0<br />
CLEAR<br />
Pauses playback, or restarts playback<br />
when paused.<br />
Press to start scanning. Press repeatedly<br />
to increase the scanning speed.<br />
Press to skip to previous/next track.<br />
When a PBC menu is displayed, press to<br />
display the previous/next page. (During<br />
playback you can also use the front panel<br />
CH +/– buttons.)<br />
During playback, enter a track number<br />
then press ENTER to skip directly to that<br />
track.<br />
Press CLEAR to clear a number entry and<br />
start again.<br />
While a PBC menu screen is displayed,<br />
use to select numbered menu items.<br />
Video CD in non-PBC mode only:<br />
(Commercial back/skip)<br />
Turn the Smart Jog counter-clockwise for<br />
backward skip; turn clockwise for forward<br />
skip. You can search up to two hours in<br />
either direction.<br />
While paused, press and hold to start<br />
slow-motion playback. Press repeatedly to<br />
change the playback speed (forward only).<br />
While paused, press to advance a single<br />
frame (forward only). You can also execute<br />
frame-by-frame playback via the<br />
Smart Jog.<br />
Press to display the disc menu of a Video<br />
CD/Super VCD playing in PBC mode.<br />
Note<br />
1 If you want to play a DTS audio CD, make sure the recorder is connected to a DTS-compatible amp/receiver with a digital connection. Noise<br />
will be output through the analog outputs. Also make sure that STEREO is selected using the AUDIO button (see Switching audio channels<br />
on page 99).<br />
2 When playing in PBC mode, some playback features, such as search, repeat and programme play are not available. You can play a PBC Video<br />
CD/Super VCD in non-PBC mode by starting playback using the Disc Navigator (see Using the Disc Navigator with playback-only discs on<br />
page 95).<br />
ENTER<br />
CM BACK<br />
CM SKIP<br />
/<br />
RETURN / EXIT<br />
93<br />
En
07<br />
94<br />
En<br />
Playback<br />
Playing DivX video files<br />
The table below shows the basic playback controls for<br />
DivX video files.<br />
PLAY<br />
<br />
STOP<br />
<br />
PAUSE<br />
<br />
PREV NEXT<br />
<br />
/<br />
AUDIO<br />
+<br />
MAIN SUB<br />
MAIN<br />
SUB<br />
SUBTITLE<br />
+<br />
Press to start playback.<br />
If RESUME is displayed on-screen, playback<br />
starts from the place last stopped.<br />
Playback of titles (DivX files) proceeds in<br />
alphabetical order.<br />
Press to stop playback.<br />
You can resume playback from the same<br />
point by pressing PLAY. (Press STOP<br />
again to cancel the resume function.)<br />
Pauses playback, or restarts playback<br />
when paused.<br />
Press to start scanning. Press repeatedly<br />
to increase the scanning speed.<br />
Press to skip to previous/next title. (During<br />
playback you can also use the front panel<br />
CH +/– buttons.)<br />
While paused, press to advance one<br />
frame. Press and hold to start slow motion<br />
playback (press repeatedly to change the<br />
slow motion play speed). You can also<br />
execute frame-by-frame playback via the<br />
Smart Jog.<br />
Press to display the playback audio type;<br />
press repeatedly to change the playback<br />
audio type.<br />
Press to display subtitle information; press<br />
repeatedly to change subtitles.<br />
Using the Disc Navigator to browse<br />
the contents of a disc<br />
Use the Disc Navigator to browse the contents of a disc<br />
and start playback.<br />
Using the Disc Navigator with recordable<br />
discs and the HDD<br />
DVD-R DVD-RW DVD+R DVD+RW DVD-RAM HDD<br />
You can use the Disc Navigator to browse and edit video<br />
on recordable DVDs and the HDD, and to view<br />
information on titles.<br />
See also Editing on page 104 for more on editing<br />
recordable discs.<br />
HDD/DVD<br />
1 Select the HDD or DVD.<br />
DISC<br />
2 NAVIGATOR Open the Disc Navigator.<br />
Disc Navigator (HDD)<br />
4 Titles<br />
Recent first<br />
All Genres<br />
HDD<br />
SP<br />
Remain<br />
30h30m<br />
101<br />
9<br />
8<br />
7<br />
10Titles<br />
11/29 23:00 FRI MON 3/12 7:00PM Pr 4 SP<br />
11/29Mon 23:00 Fri 3/12 7:00PM Pr 4 SP 2ch SP<br />
2h00m(1.0G)<br />
20:00 FRI 3/12 Pr 9 SP<br />
20:00 Fri 3/12 Pr 9 SP<br />
2h00m(1.0G)<br />
22:00 THU 2/12 Pr 7 SP<br />
22:00 Thu 2/12 Pr 7 SP<br />
1h00m(1.0G)<br />
19:00 MON 29/11 Pr 2 SP<br />
19:00 Mon 29/11 Pr 2 SP<br />
1h00m(1.0G)<br />
• You can also access the Disc Navigator from the<br />
Home Menu.<br />
3 Browse the list of titles.<br />
• You can also use the Smart Jog to select titles.<br />
• Use the PREV/ NEXT buttons to display the<br />
previous/next page of titles.<br />
• To change the thumbnail picture displayed for a title<br />
see Set Thumbnail on page 108.<br />
• For HDD recordings, you should be able to see a<br />
thumbnail title digest. If it doesn’t display, set Set<br />
Preview to Normal. See Set Preview on page 145.<br />
ENTER<br />
4 Play the highlighted title.<br />
• You can also select Play from the command menu<br />
options.<br />
MENU
Playback 07<br />
Changing the display style of the Disc<br />
Navigator<br />
You can choose to display titles in the Disc Navigator in<br />
various different ways, sorted alphabetically, by<br />
recording date, by genre, and so on. You can also choose<br />
whether to display four or eight titles on the screen at the<br />
same time.<br />
1 Display the View Options panel.<br />
The View Options panel<br />
Disc Navigator (HDD)<br />
1<br />
Style<br />
4 Titles<br />
4 Titles<br />
Sort order 2<br />
Recent first<br />
NEW first<br />
Genre<br />
3<br />
All Genres<br />
All Genres<br />
7<br />
HDD<br />
SP<br />
Remain<br />
30h30m<br />
ENTER<br />
10Titles<br />
11/29 23:00 FRI MON 3/12 7:00PM Pr 4 SP<br />
11/29Mon 23:00 Fri 3/12 7:00PM Pr 4 SP 2ch SP<br />
2h00m(1.0G)<br />
20:00 FRI 3/12 Pr 9 SP<br />
20:00 Fri 3/12 Pr 9 SP<br />
2h00m(1.0G)<br />
22:00 THU 2/12 Pr 7 SP<br />
22:00 Thu 2/12 Pr 7 SP<br />
1h00m(1.0G)<br />
19:00 MON 29/11 Pr 2 SP<br />
19:00 Mon 29/11 Pr 2 SP<br />
1h00m(1.0G)<br />
2 Choose ‘Style’, ‘Sort order’ or ‘Genre’,<br />
then press ENTER to see the available view options.<br />
• Style – Select four or eight titles per screen view<br />
• Sort order – Sort by date (most recent first),<br />
unwatched first, title name or recording date (oldest<br />
first)<br />
• Genre – Display all genres or just a selected genre<br />
ENTER<br />
3 Choose a view option, then press ENTER.<br />
The title list display is updated according to the new<br />
display preferences.<br />
Using the Disc Navigator with playback-only<br />
discs<br />
DVD-Video CD Video CD Super VCD WMA/MP3 DivX<br />
1 HOME MENU Display the Home Menu.<br />
ENTER<br />
MENU<br />
Alternatively, for a CD, Video CD, Super VCD or WMA/<br />
MP3/DivX disc, you can press DISC NAVIGATOR, which<br />
takes you straight to the Disc Navigator screen.<br />
3 Select what you want to play.<br />
Depending on the type of disc you have loaded, the Disc<br />
Navigator looks slightly different, but they are all navigated<br />
in the same way.<br />
The screen below shows a WMA/MP3/DivX disc.<br />
Navigate to the folder, or the track/title within a folder<br />
that you want to play.<br />
Playback starts after you press ENTER.<br />
• For discs that contain CD-Audio tracks and WMA/<br />
MP3 tracks or DivX titles, you can switch the<br />
playback area between CD, WMA/MP3 and DivX.<br />
This can only be done while the disc is stopped.<br />
Scanning discs<br />
(except WMA)<br />
You can scan discs at various speeds, forwards or<br />
backwards. 1<br />
A L L<br />
1 During playback, start reverse or forward<br />
scanning.<br />
• The scanning speed is shown on-screen.<br />
2 Press repeatedly to change the scanning<br />
speed.<br />
There are four scanning speeds available when playing<br />
HDD video, a DVD or a DivX title. Reverse playback is also<br />
possible with HDD and DVD video. 2<br />
There are two scanning speeds for other types of disc.<br />
3 <br />
Resume normal playback.<br />
2 Select ‘Disc Navigator’.<br />
Note<br />
1• No subtitles are displayed when scanning DVDs and DivX titles.<br />
• No sound is output when scanning from the HDD, DVDs and DivX, except on forward SCAN 1.<br />
• Depending on the disc, normal playback may automatically resume when a new chapter is reached on a DVD disc.<br />
2 Reverse playback may not be smooth.<br />
ENTER<br />
Disc Navigator<br />
CD<br />
WMA/MP3<br />
Divx<br />
PLAY<br />
Folder (01-03)<br />
01.Rock<br />
02.Pop<br />
03.Dance<br />
Track(001-004)<br />
001.Intro<br />
002.Escape<br />
003.Everything You Say<br />
004.What I Do<br />
95<br />
En
07<br />
96<br />
En<br />
Playback<br />
Playing in slow motion<br />
DVD HDD Video CD Super VCD DivX<br />
You can play video at various slow motion speeds. DVDs<br />
and video on the HDD can be played in slow motion in<br />
either direction, while Video CDs/Super VCDs and DivX<br />
titles can only be played forwards in slow motion.<br />
There is no sound when playing in slow motion.<br />
PAUSE<br />
1 Pause playback.<br />
/<br />
/<br />
2 Press and hold to start slow motion<br />
reverse or forward play.<br />
/<br />
/<br />
3 Press repeatedly to change the slow<br />
motion speed.<br />
The current playback speed is indicated on-screen.<br />
PLAY<br />
4 Resume normal playback.<br />
Frame advance/frame reverse<br />
DVD HDD Video CD Super VCD DivX<br />
You can advance or back up video on a DVD disc 1 or the<br />
HDD frame-by-frame.<br />
With Video CDs/Super VCDs and DivX titles, you can only<br />
use frame advance.<br />
PAUSE<br />
1 Pause playback.<br />
/<br />
/<br />
2 Back up or advance one frame with each<br />
press.<br />
• You can also do this by rotating the Smart Jog.<br />
PLAY<br />
3 Resume normal playback.<br />
The Play Mode menu<br />
The Play Mode menu gives you access to search<br />
functions, repeat and programme play functions.<br />
• HOME MENU Select ‘Play Mode’ from the Home Menu.<br />
Search Mode<br />
The Search Mode feature lets you start playback from a<br />
specified point in a disc by time 2 or by title/chapter/<br />
folder/track number.<br />
1 Select ‘Search Mode’ from the Play<br />
Mode menu, then choose a search option.<br />
The available search options depend on the type of disc.<br />
2<br />
ADVANCED<br />
0 Enter a title/chapter/folder/track number<br />
or a search time.<br />
Time Search (HDD, DVD): For example, for 25 minutes<br />
into the current title, press 2, 5, 0, 0. For 1 hour and 15<br />
minutes and 20 seconds into the title, press 1, 1, 5, 2, 0.<br />
Time Search (Video CD): For example, for 2 minutes and<br />
30 seconds into the current track, press 2, 3, 0.<br />
Title/Chapter/Folder/Track Search: For example, for track 6,<br />
press 6.<br />
ENTER<br />
3 Start playback.<br />
Note<br />
1 Depending on the disc, normal playback may automatically resume when a new chapter is reached.<br />
2 When using time search, playback may occasionally start slightly before or after the time you input.<br />
A L L<br />
A L L<br />
Play Mode<br />
Search Mode<br />
A-B Repeat<br />
Repeat<br />
Programme<br />
ENTER<br />
SETUP /TUNE+<br />
1 2<br />
SR+<br />
3<br />
/ST– /ST+<br />
4<br />
ENTER<br />
5 6<br />
F.S.SURR /TUNE– TEST TONE<br />
7 8 9<br />
Play Mode<br />
Search Mode<br />
A-B Repeat<br />
Repeat<br />
Programme<br />
Time Search<br />
Title Search<br />
Chapter Search<br />
Time Search<br />
Title Search<br />
Chapter Search<br />
Input Time<br />
0.01.00
Playback 07<br />
A-B Repeat<br />
DVD HDD CD Video CD DivX<br />
The A-B Repeat function allows you to specify two points<br />
(A and B) within a track or title that form a loop which is<br />
played over and over. 1<br />
ENTER<br />
1 During playback, select ‘A-B Repeat’<br />
from the Play Mode menu.<br />
ENTER<br />
2 With ‘A (Loop Start)’ highlighted, press at<br />
the point you want the loop to start.<br />
Play Mode<br />
Search Mode<br />
A-B Repeat<br />
Repeat<br />
Programme<br />
A (Loop Start)<br />
B (Loop End)<br />
Off<br />
ENTER 3 With ‘B (Loop End)’ highlighted, press at the<br />
point you want the loop to end.<br />
Playback immediately jumps back to the start point and<br />
plays the loop round and round.<br />
• When playing a DVD-Video, DVD-R/-RW (Video mode),<br />
DVD+R/+RW, or from the HDD, the start and end<br />
points of the loop must be in the same title.<br />
• To resume normal playback, select Off from the A-B<br />
Repeat menu, or press CLEAR if no menu OSD (such<br />
as the Play Mode menu) is displayed.<br />
Repeat play<br />
There are various repeat play options, depending on the<br />
kind of disc loaded, or if you’re using the HDD for<br />
playback. It’s also possible to use repeat play together<br />
with programme play to repeat the tracks/chapters in the<br />
programme list (see Programme play below). 2<br />
• Select ‘Repeat’ from the Play Mode<br />
menu, then choose a repeat play mode.<br />
• To resume normal playback, select Repeat Off from<br />
the Repeat Play menu, or press CLEAR if no menu<br />
OSD (such as the Play Mode menu) is displayed.<br />
Programme play<br />
This feature lets you program the play order of titles/<br />
chapters 3 /folders/tracks on a disc or the HDD.<br />
1 Select ‘Programme’ from the Play Mode<br />
menu, then ‘Input/Edit Programme’.<br />
The Input/Edit Programme screen varies according to the<br />
disc type. Below is the DVD input screen.<br />
Note<br />
1 If you switch camera angles on a DVD during A-B repeat play, A-B repeat is cancelled.<br />
2 If you switch the camera angle during repeat play of a DVD-Video disc, repeat play is cancelled.<br />
3 When playing a programme list of DVD-Video chapters, chapters not included in the programme list may be sometimes be played, depending<br />
on the disc.<br />
A L L<br />
ENTER<br />
Play Mode<br />
Search Mode<br />
A-B Repeat<br />
Repeat<br />
Programme<br />
Repeat Title<br />
Repeat Chapter<br />
Repeat Off<br />
HDD DVD-Video CD Video CD Super VCD WMA/MP3<br />
ENTER<br />
Programme<br />
Step<br />
01.001<br />
02.<br />
03.<br />
04.<br />
05.<br />
06.<br />
07.<br />
08.<br />
Title (01-03)<br />
Title 01<br />
Title 02<br />
Title 03<br />
Chapter(001-015)<br />
Chapter 001<br />
Chapter 002<br />
Chapter 003<br />
Chapter 004<br />
Chapter 005<br />
Chapter 006<br />
Chapter 007<br />
Chapter 008<br />
97<br />
En
07<br />
98<br />
En<br />
Playback<br />
ENTER<br />
2 Select a title, chapter, folder or track for<br />
the current step in the programme list.<br />
After pressing ENTER to add the title/chapter/folder/<br />
track, the step number automatically moves down one.<br />
• To insert a step into the programme list, highlight the<br />
step number where you want to insert another step,<br />
then select a chapter/title/folder/track as usual. After<br />
pressing ENTER, all the subsequent steps move<br />
down one.<br />
• To delete a step from the programme list, highlight<br />
the step you want to delete, then press CLEAR.<br />
3 Repeat step 2 to build up a programme list.<br />
A programme list can contain up to 24 titles/chapters/<br />
folders/tracks.<br />
PLAY<br />
<br />
4 Play the programme list.<br />
Programme play remains active until you cancel<br />
programme play, erase the programme list, eject the disc<br />
or switch off the recorder.<br />
Tip<br />
• To save your programme list and exit the programme<br />
edit screen without starting playback, press<br />
HOME MENU.<br />
• During programme play, press NEXT to skip to<br />
the next programme step.<br />
• To repeat play the programme list, select<br />
Programme Repeat from the Repeat Play Mode<br />
menu (see Repeat play on page 97).<br />
• Press CLEAR during playback to switch off<br />
programme play (if no menu OSD, such as the Disc<br />
Navigator, is displayed). Press while stopped to erase<br />
the programme list.<br />
• From the programme menu you can also:<br />
Start Programme Play – Starts playback of a saved<br />
programme list<br />
Cancel Programme Play – Turns off programme<br />
play, but does not erase the programme list<br />
Erase Programme List – Erases the programme list<br />
and turns off programme play<br />
Displaying and switching subtitles<br />
DVD-Video DivX<br />
Some DVD and DivX discs have subtitles in one or more<br />
languages; the disc box will usually tell you which<br />
subtitle languages are available. You can switch subtitle<br />
language during playback. 1<br />
Check the disc packaging for details of the subtitle<br />
options.<br />
SUBTITLE<br />
+<br />
• MAIN SUB Select/change the subtitle language.<br />
The current subtitle language is shown on-screen and in<br />
the front panel display.<br />
• To switch off subtitles, press SUBTITLE then CLEAR.<br />
Switching DVD and DivX soundtracks<br />
DVD-Video DivX<br />
When playing a DVD disc or DivX title recorded with two<br />
or more soundtracks (often in different languages), you<br />
can switch the soundtrack during playback. 2<br />
Check the disc packaging for details of the soundtrack<br />
options.<br />
AUDIO<br />
+<br />
• MAIN SUB Change the audio soundtrack.<br />
The current audio language is shown on-screen and in<br />
the front panel display.<br />
• The sound may drop out for a few seconds when<br />
switching soundtracks.<br />
• Some discs feature both Dolby Digital and DTS<br />
soundtracks. There is no analog audio output when<br />
DTS is selected. To listen to the DTS soundtrack,<br />
connect this recorder to receiver subwoofer via the<br />
digital output. See Basic connections on page 10 for<br />
connection details.<br />
Note<br />
1• Some discs only allow you to change subtitle language from the disc menu. Press MENU or TOP MENU to access.<br />
• To set subtitle preferences, see Subtitle Language on page 141.<br />
2• Some discs only allow you to change audio language from the disc menu. Press MENU or TOP MENU to access.<br />
• To set audio language preferences, see Audio Language on page 141.
Playback 07<br />
Switching audio channels<br />
DVD (VR) DVD-RAM HDD CD Video CD Super VCD WMA/MP3<br />
For HDD 1 and VR mode content recorded with bilingual<br />
audio, you can switch between left (L) channel, right (R)<br />
channel, or both (L+R). 2<br />
When playing Video CDs and audio CDs you can switch<br />
between stereo, just the left channel or just the right<br />
channel.<br />
Some Super VCDs have two soundtracks. With these<br />
discs you can switch between the two soundtracks as<br />
well as individual channels in each.<br />
AUDIO<br />
+<br />
• MAIN SUB Press repeatedly to display/switch the<br />
audio channel.<br />
The audio channel(s) currently playing are indicated onscreen.<br />
HDD DVD (VR) DVD-RAM<br />
L+R – Both channels (default)<br />
L – Left channel only<br />
R – Right channel only<br />
CD Video CD WMA/MP3<br />
Stereo – Stereo (default)<br />
1/L – Left channel only<br />
2/R – Right channel only<br />
Super VCD<br />
1 Stereo – Soundtrack 1/Stereo (default)<br />
1 L – Soundtrack 1/Left channel<br />
1 R – Soundtrack 1/Right channel<br />
2 Stereo – Soundtrack 2/Stereo<br />
2 L – Soundtrack 2/Left channel<br />
2 R – Soundtrack 2/Right channel<br />
Switching camera angles<br />
DVD-Video<br />
Some DVD-Video discs feature scenes shot from two or<br />
more angles — check the disc box for details: it should<br />
be marked with a icon if it contains multi-angle<br />
scenes. When a multi-angle scene is playing, the same<br />
icon appears on screen to let you know that other angles<br />
are available (this can be switched off if you prefer — see<br />
Angle Indicator on page 143).<br />
• MAIN SUB Switch the camera angle.<br />
• The angle number is displayed on-screen.<br />
• If the disc was paused, playback starts again with the<br />
new angle.<br />
Displaying disc information on-screen<br />
You can display various on-screen information about the<br />
disc loaded or the HDD.<br />
DISPLAY<br />
• Display/change the on-screen information.<br />
• Press once to show the HDD and removable disc<br />
(DVD, etc.) activity together. Press again to show the<br />
status of just the currently selected playback/<br />
recording device (HDD or removable disc).<br />
• To hide the information display, press DISPLAY<br />
repeatedly until it disappears.<br />
HDD and removable disc activity display<br />
Press DISPLAY once to see the HDD and removable disc<br />
(DVD, etc.) activity. Use the HDD/DVD button to switch<br />
between the two kinds of display.<br />
Note<br />
1 Only when HDD Recording Format is set to Video Mode Off (HDD Recording Format on page 143).<br />
2• When playing a Bilingual recording on a VR mode disc, if you are listening to the Dolby Digital soundtrack via the digital output, you cannot<br />
switch the audio channel. Set Dolby Digital Out to Dolby Digital PCM (see Dolby Digital Out on page 141) or listen via the analog outputs<br />
if you need to switch the audio channel.<br />
• When playing a Dolby Digital source, you can also switch channels from the Dual Mono menu of the receiver subwoofer — see Dual mono<br />
setting on page 32.<br />
ANGLE<br />
+<br />
99<br />
En
07<br />
100<br />
En<br />
Playback<br />
The example displays below show high-speed copying<br />
from HDD to DVD, and HDD chase playback.<br />
HDD<br />
Remain 10h35m<br />
Stop<br />
HDD<br />
Remain 10h35m<br />
Chase Play<br />
Rec<br />
Stop<br />
DVD-RW VR<br />
Original<br />
Disc Name : Comedy shows<br />
Play<br />
DVD-R Video<br />
Rec Mode SP(2h00m/DVD)<br />
Hi-Speed Copy<br />
HDD DVD<br />
0h08m left<br />
Rec Mode SP(2h00m/DVD)<br />
Recording time<br />
Relative playback position<br />
Shows recording restrictions for<br />
the current channel programme<br />
DVD-RW Video<br />
Remain –h––m<br />
Stop<br />
DVD-RW Video<br />
Remain 0h52m<br />
Stop<br />
Resume<br />
ABC Pr 1<br />
Stereo<br />
XP (1h00m/DVD)<br />
Finalized<br />
Rem. 0h35m Copy Once<br />
Title Name : 21/11 Football match<br />
Indicates copy-protected material<br />
Indicates a multi-angle scene<br />
DVD Mode<br />
3–2 0. 00. 15 !<br />
Chapter Time 0. 00. 21<br />
Chapter Total 0h01m52s<br />
4.32Mbps<br />
Indicates the data transfer rate<br />
Tip<br />
• See Switching camera angles on page 99 for more on<br />
multi-angle scene switching.<br />
• When using the simultaneous play and record<br />
feature, the display shows information for playback<br />
only.<br />
• During real-time copy, the copy source playback<br />
information is displayed.<br />
• The Video mode DVD-R/-RW displays become the<br />
same as a DVD-Video disc once the disc is finalized.<br />
• The total recording time figure shown in parenthesis<br />
is calculated based on a 12 cm/4.7 GB disc at the<br />
displayed record setting.<br />
• Recording and playback times for TV recordings are<br />
approximately 0.1 % shorter than the actual time.<br />
This is because of the slightly different frame rates of<br />
TV broadcasts versus DVD.<br />
• The frame number is shown next to the elapsed time<br />
display when the disc is paused.<br />
• Copy Once or Can’t Record messages may appear<br />
in the stop or recording displays. These indicate that<br />
the broadcast TV programme contains copy control<br />
information.
Playing and recording from a DV camcorder 08<br />
Chapter 8<br />
Playing and recording from a DV<br />
camcorder<br />
You can play back and record video from a DV camcorder<br />
connected to the DV IN jack on the front panel of this<br />
recorder.<br />
Important<br />
• If you connect a second recorder using a DV cable,<br />
you cannot control the second unit from this one.<br />
• You can’t control this recorder remotely from a<br />
component connected to the DV IN jack.<br />
Playing from a DV camcorder<br />
1 Make sure your DV camcorder is connected to<br />
the front panel DV IN jack.<br />
2 From the Initial Setup menu, check that the DV<br />
audio input is setup as you would like.<br />
See DV Input on page 140 for more on this.<br />
• Check also that the Audio In settings for External<br />
Audio and Bilingual Recording are as you want<br />
them (see Audio In on page 140).<br />
3 HOME MENU Select ‘DV’, then ‘DV Video Playback’<br />
from the Home Menu.<br />
4 Start playback on the camcorder.<br />
Images from the camcorder should appear on your TV.<br />
• To record the incoming video, press HDD/DVD to<br />
select the HDD or a DVD for recording, then press<br />
REC. Press STOP REC to finish recording.<br />
If there is no signal from the device connected to the<br />
DV jack, or the signal is copy-protected, recording<br />
will pause. It will automatically restart once there is a<br />
recordable signal.<br />
• The recorder will only start recording from the DV IN<br />
jack if there is a valid signal. Recording will pause if<br />
the signal is interrupted during recording.<br />
• If your source is copy-protected using Copy Guard,<br />
you will not be able to record it. See Restrictions on<br />
video recording on page 80 for more details.<br />
Recording from a DV camcorder<br />
• The source signal must be DVC-SD format.<br />
• You can’t record date and time information from DV<br />
cassette.<br />
• During DV recording, if a part of the tape is blank, or<br />
has copy-protected material on it, this recorder will<br />
pause recording. Recording will restart automatically<br />
when there is a recordable signal. However, if there is<br />
more than two minutes of blank tape, this recorder<br />
will stop recording and the camcorder should stop<br />
(depending on the camcorder).<br />
Copying from a DV source<br />
Using the recorder’s remote, you can control both the<br />
camcorder and this recorder.<br />
Important<br />
• Some camcorders cannot be controlled using this<br />
recorder’s remote.<br />
• For best results when recording from a DV camcorder<br />
to this recorder, we recommend cueing the<br />
camcorder to the place you want to start recording<br />
from and setting the camcorder to play-pause.<br />
1 Make sure your DV camcorder is connected to<br />
the front panel DV IN jack.<br />
Also, set the camcorder to VTR mode.<br />
REC MODE<br />
2 Set the recording quality.<br />
• See Setting the picture quality/recording time on<br />
page 83 for detailed information.<br />
3 From the Initial Setup menu, check that the DV<br />
audio input is setup as you would like.<br />
See DV Input on page 140 for more on this.<br />
• Check also that the Audio In settings for External<br />
Audio and Bilingual Recording are as you want<br />
them (see Audio In on page 140).<br />
4 HOME MENU<br />
Select ‘DV’, then ‘Copy from a DV<br />
Source’ from the Home Menu.<br />
• DV recording only works when the DV camcorder is<br />
in VTR mode with a tape loaded.<br />
101<br />
En
08<br />
102<br />
En<br />
Playing and recording from a DV camcorder<br />
ENTER<br />
5 Select ‘Record to Hard Disk Drive’ or<br />
‘Record to DVD’.<br />
6 Find the place on the camcorder tape that you<br />
want to start recording from.<br />
For best results, pause playback at the point from which<br />
you want to record.<br />
• Depending on your camcorder, you can use this<br />
recorder’s remote to control the camcorder using the<br />
, , , , , and buttons.<br />
ENTER<br />
7 Select ‘Start Rec’.<br />
Stop<br />
1.02.22<br />
Stop<br />
Control with these<br />
buttons<br />
<br />
Start Rec<br />
Pause Rec<br />
<br />
Stop Rec<br />
HDD<br />
Rem.<br />
SP (2h00m/DVD)<br />
32h45m<br />
• You can pause or stop the recording by selecting<br />
Pause Rec or Stop Rec from the on-screen display.<br />
You cannot control the camcorder from this remote<br />
control during recording.<br />
• If you restart recording after stopping the camcorder,<br />
the first few seconds of the camcorder tape will not be<br />
recorded. Use the pause button on your camcorder<br />
instead and recording will start immediately.<br />
• HDD, DVD (VR Mode) and DVD-RAM only: A chapter<br />
marker is inserted every time there is a break in the<br />
timecode on the DV tape. This happens when the<br />
recording is stopped or paused then restarted, for<br />
example.<br />
• If you don’t want to see the DV recording screen<br />
during recording, press DISPLAY to hide it (press<br />
again to display).<br />
• While recording, you cannot exit the DV recording<br />
screen using the HOME MENU or RETURN/EXIT<br />
button.<br />
DV Auto Copy<br />
DV Auto Copy allows you to make an exact copy of the<br />
contents of a DV source to the HDD or a DVD.<br />
1 Make sure your DV camcorder is connected to<br />
the front panel DV IN jack.<br />
Also, set the camcorder to VTR mode.<br />
REC MODE<br />
2 Set the recording quality.<br />
• See Setting the picture quality/recording time on<br />
page 83 for detailed information.<br />
3 From the Initial Setup menu, check that the DV<br />
audio input is setup as you require.<br />
See DV Input on page 140 for more on this.<br />
• Check also that the Audio In settings for External<br />
Audio and Bilingual Recording are as you want<br />
them (see Audio In on page 140).<br />
4 HOME MENU Select ‘DV’, then ‘DV Auto Copy’ from<br />
the Home Menu.<br />
• DV recording only works when the DV camcorder is<br />
in VTR mode with a tape loaded.<br />
ENTER<br />
5 Select ‘Record to Hard Disk Drive’ or<br />
‘Record to DVD’.<br />
The DV tape is rewound to the beginning. Once it is<br />
rewound, the DV tape is played from the beginning and<br />
copied to either the HDD or a DVD.<br />
• If there is a gap of two minutes or more between<br />
recorded contents, the copying process is<br />
automatically stopped.<br />
• Once copying is finished, the DV tape is automatically<br />
rewound.<br />
• To cancel the copying process, press STOP REC for<br />
more than three seconds.
Playing and recording from a DV camcorder 08<br />
About automatic finalization<br />
If you use a DVD-R/-RW (Video mode) or DVD+R/+RW<br />
disc for copying, it will automatically be finalized after<br />
copying is complete.<br />
• You can’t customize the background for DVD-R/-RW<br />
or DVD+R/+RW disc finalization.<br />
• No title names are assigned.<br />
• If you want to give the disc a name, please do so<br />
before you start the copy (see Input Disc Name on<br />
page 132).<br />
• If a timer recording is scheduled to start, and in some<br />
other instances, the disc will not be finalized.<br />
Frequently Asked Questions<br />
•I can’t get my DV camcorder to work with the recorder!<br />
Check that the DV cable is properly connected. Also<br />
make sure that what you’re trying to record is not<br />
copy-protected.<br />
If it still doesn’t work, try switching off the camcorder<br />
then switch back on.<br />
• There’s a picture, but no sound!<br />
Try switching the DV Input setting (see DV Input on<br />
page 140) between Stereo 1 and Stereo 2. 1<br />
About DV<br />
Using DV, also known as i.LINK or IEEE 1394-1995, you<br />
can connect a DV camcorder to this recorder using a DV<br />
cable for input of audio, video, data and control signals.<br />
“i.LINK” and the “i.LINK” logo are trademarks.<br />
• This recorder is only compatible with DV-format<br />
(DVC-SD) camcorders. Digital satellite receivers and<br />
Digital VHS video recorders are not compatible.<br />
• You cannot connect more than one DV camcorder at<br />
a time to this recorder.<br />
• You cannot control this recorder from external<br />
equipment connected via the DV IN jack.<br />
• It may not always be possible to control the<br />
connected camcorder via the DV IN jack.<br />
• DV camcorders can usually record audio as stereo<br />
16-bit/48 kHz, or twin stereo tracks of 12-bit/32 kHz.<br />
This recorder can only record one stereo audio track.<br />
Set the DV Input setting as required (see DV Input on<br />
page 140).<br />
• Audio input to the DV IN jack should be 32 kHz or 48<br />
kHz (not 44.1 kHz).<br />
• Picture disturbance in the recording may occur if the<br />
source component pauses playback or plays an<br />
unrecorded section of tape, or if the power fails in the<br />
source component, or the DV cable is disconnected.<br />
• The DV IN jack is an input only. There is no output<br />
functionality.<br />
Note<br />
1 If the audio subcode on the DV tape cannot be read correctly, the audio type will not switch automatically. You can switch the audio manually<br />
from the External Audio setting (page 140).<br />
103<br />
En
09<br />
104<br />
En<br />
Editing<br />
Chapter 9<br />
Editing<br />
Editing options<br />
The table below shows which commands you can use with the HDD and different disc types.<br />
*1 DVD-R/-RW only<br />
HDD<br />
DVD-R/-RW<br />
(Video mode),<br />
DVD+R/+RW<br />
DVD-R/-RW, DVD-RAM<br />
(VR mode)<br />
Original Play List<br />
Create (page 106) <br />
Play (page 106) <br />
Erase (page 106) <br />
Edit > Title Name (page 107) <br />
Edit > Set Thumbnail (page 108) <br />
Edit > Erase Section (page 108) <br />
Edit > Divide (page 109) <br />
Edit > Chapter Edit (page 109) <br />
Edit > Set Genre (page 110) <br />
Edit > Lock (page 111) <br />
Edit > Move (page 111) <br />
Edit > Combine (page 112) <br />
Genre Name (page 112) <br />
Multi-Mode (page 113) <br />
Undo (page 113) *1 *1
Editing 09<br />
The Disc Navigator screen<br />
The Disc Navigator screen is where you can edit video<br />
content on unfinalized Video mode and DVD-R/-RW (VR<br />
mode) discs, DVD+R/+RW and DVD-RAM, as well as<br />
video content on the hard disk drive.<br />
Important<br />
• Titles that have been recorded with a Input Line<br />
System setting different to the current setting of the<br />
recorder are shown in the Disc Navigator with a blank<br />
thumbnail image. See also Additional information<br />
about the TV system settings on page 146.<br />
• During recording, if you display the Disc Navigator<br />
for the HDD, some of the titles may appear with a<br />
mark. These titles were recorded with a Input Line<br />
System setting different to the current setting of the<br />
recorder. During recording, these titles cannot be<br />
played.<br />
HDD/DVD<br />
1 Select the HDD or DVD.<br />
DISC<br />
NAVIGATOR 2 Display the Disc Navigator screen.<br />
Playback will automatically stop when you do this.<br />
• The Disc Navigator is also accessible from the Home<br />
Menu.<br />
Available<br />
recording time<br />
View options panel<br />
Title list<br />
Disc Navigator (HDD)<br />
10Titles<br />
101<br />
11/29 23:00 FRI MON 3/12 7:00PM Pr 4 SP<br />
11/29Mon 23:00 Fri 3/12 7:00PM Pr 4 2ch SP SP<br />
4 Titles<br />
2h00m(1.0G)<br />
9<br />
20:00 FRI 3/12 Pr 9 SP<br />
20:00 Fri 3/12 Pr 9 SP<br />
Recent first<br />
2h00m(1.0G) MENU<br />
8<br />
22:00 THU 2/12 Pr 7 SP<br />
22:00 Thu 2/12 Pr 7 SP<br />
All Genres<br />
1h00m(1.0G)<br />
HDD<br />
SP<br />
7<br />
19:00 MON 29/11 Pr 2 SP<br />
19:00 Mon 29/11 Pr 2 SP<br />
Remain<br />
30h30m<br />
1h00m(1.0G)<br />
Title thumbnail Title information Command<br />
menu panel<br />
Selected<br />
title<br />
• Press to display the command menu panel.<br />
Use the / and ENTER buttons to navigate the<br />
menus.<br />
PREV NEXT<br />
• When in the title list, press to display the<br />
previous/next page if there are more titles than can<br />
be displayed.<br />
DISPLAY<br />
• Press to change the title information displayed<br />
in the title list.<br />
HDD/DVD<br />
• Press to switch between the HDD and DVD<br />
Disc Navigator screens.<br />
• If you are editing a DVD-R/-RW (VR mode) or DVD<br />
-RAM disc you can display the Play List by selecting<br />
Play List from the view options panel (press , then<br />
select Play List from the view options, then Play List).<br />
Disc Navigator (DVD)<br />
4 Titles<br />
4 Titles<br />
Original Original<br />
HDD<br />
SP<br />
Remain<br />
0h30m<br />
101<br />
10Titles<br />
11/29 23:00 FRI MON 3/12 7:00PM<br />
11/29Mon 23:00 Fri 3/12 7:00PM Pr 4 2ch SP SP<br />
2h00m(1.0G)<br />
20:00 FRI 3/12<br />
20:00 Fri 3/12 Pr 9 SP<br />
22:00 THU 2/12 Pr 7 SP<br />
22:00 Thu 2/12 Pr 7 SP<br />
19:00 MON 29/11 Pr 2 SP<br />
19:00 Mon 29/11 Pr 2 SP<br />
2h00m(1.0G)<br />
1h00m(1.0G)<br />
1h00m(1.0G)<br />
• Titles on the HDD marked with a icon are<br />
recently recorded titles that haven’t yet been played.<br />
DISC<br />
Style<br />
PlayList<br />
9<br />
8<br />
7<br />
3 NAVIGATOR<br />
Press to exit the Disc Navigator.<br />
Editing accuracy<br />
Some editing commands ask you whether you want to<br />
keep Video mode compatibility or frame accuracy (Video<br />
Mode Compatible Editing or Frame Accurate Editing).<br />
Frame Accurate Editing is very precise. The edit point is<br />
accurate to the exact frame you choose. However, this<br />
accuracy is not preserved in any copy you make if you use<br />
the high-speed copy function to make a DVD-R/-RW<br />
(Video mode) or DVD+R/+RW.<br />
Video Mode Compatible Editing is less precise. The edit<br />
point you choose will only be accurate to within one-half<br />
to one second. On the other hand, these edit points will<br />
be preserved if you use high-speed copy to make a DVD<br />
-R/-RW (Video mode) or DVD+R/+RW.<br />
HDD genres<br />
The large capacity of the HDD means that there may be<br />
many hours of video in the recorder. To help you organize<br />
your HDD video content you can assign different genres<br />
to titles. There are 20 genres in total, including five userdefinable<br />
ones that you can name as you like.<br />
MENU<br />
105<br />
En
09<br />
106<br />
En<br />
Editing<br />
Create<br />
DVD (VR) DVD-RAM Play List only<br />
Use this function to create a Play List and add titles to it.<br />
Before you can use this command, make sure that the<br />
Play List is switched on in the view options panel on the<br />
left.<br />
1 Select ‘Create’ from the command menu<br />
panel.<br />
2 Select an original title to add to the Play<br />
List.<br />
• You can also use the Smart Jog to select titles.<br />
Repeat these two steps to add as many titles as<br />
necessary to the Play List.<br />
Play<br />
ENTER<br />
Disc Navigator (DVD)<br />
4 Titles<br />
Play List<br />
DVD<br />
VR Mode<br />
Remain<br />
0h30m<br />
ENTER<br />
No title<br />
0Titles<br />
2h00m(1.0G)<br />
Erase<br />
2h00m(1.0G)<br />
Create<br />
1h00m(1.0G)<br />
Undo<br />
DVD (Video) DVD (VR) DVD+R DVD+RW DVD-RAM HDD<br />
Use this function to start playback of a title.<br />
1 Highlight the title you want to play.<br />
• You can also use the Smart Jog to select titles.<br />
Play<br />
Edit<br />
2 Select ‘Play’ from the command menu<br />
panel.<br />
Playback of the title you selected starts.<br />
Erase<br />
Use this function to erase unwanted titles.<br />
When you erase titles from the HDD or Original titles<br />
from a VR mode DVD-RW, the available recording space<br />
increases accordingly. Erasing a title from a DVD-RW<br />
(Video mode) or DVD+RW disc increases the available<br />
recording time only if it is the last title on the disc. 1<br />
Erasing Play List titles, or titles from a DVD-R (VR mode<br />
or Video mode) or DVD+R, will not result in any more free<br />
space on the disc.<br />
1 Highlight the title you want to erase.<br />
• You can also use the Smart Jog to select titles.<br />
2 Select ‘Erase’ from the command menu<br />
panel.<br />
3 Select ‘Yes’ to confirm or ‘No’ to cancel.<br />
Tip<br />
• You can erase a title quickly by pressing CLEAR when<br />
the title is highlighted. Confirm the edit by pressing<br />
ENTER.<br />
Note<br />
1 There may be cases where erasing a title from a DVD+R/+RW disc will result in incontiguous title numbers.<br />
ENTER<br />
Disc Navigator (HDD)<br />
4 Titles<br />
Recent first<br />
All Genres<br />
HDD<br />
SP<br />
Remain<br />
30h30m<br />
101<br />
9<br />
8<br />
7<br />
10Titles<br />
11/29 23:00 FRI MON 3/12 7:00PM Pr 4 SP<br />
11/29Mon 23:00 Fri 3/12 7:00PM Pr 4 2ch SP<br />
Play<br />
SP<br />
2h00m(1.0G)<br />
Erase<br />
20:00 FRI 3/12 Pr 9 SPEdit<br />
20:00 Fri 3/12 Pr 9 SP<br />
22:00 THU 2/12 Pr 7 SP<br />
22:00 Thu 2/12 Pr 7 SP<br />
19:00 MON 29/11 Pr 2 SP<br />
19:00 Mon 29/11 Pr 2 SP<br />
2h00m(1.0G)<br />
Genre Name<br />
1h00m(1.0G)<br />
Multi-Mode<br />
1h00m(1.0G)<br />
DVD (Video) DVD (VR) DVD+R DVD+RW DVD-RAM HDD<br />
ENTER<br />
ENTER
Editing 09<br />
Title Name<br />
DVD (Video) DVD (VR) DVD+R DVD+RW DVD-RAM HDD<br />
You can give titles new names of up to 64 characters long<br />
for VR mode, DVD-RAM and HDD recordings, and up to<br />
40 characters for Video mode recordings and DVD+R/<br />
+RW discs.<br />
1 Highlight the title you want to name (or<br />
rename).<br />
• You can also use the Smart Jog to select titles.<br />
ENTER<br />
2 Select ‘Edit’ > ‘Title Name’ from the<br />
command menu panel.<br />
Disc Navigator (HDD)<br />
101<br />
4 Titles<br />
Recent first<br />
All Genres<br />
HDD<br />
SP<br />
Remain<br />
30h30m<br />
ENTER<br />
9<br />
8<br />
7<br />
10Titles<br />
11/29 23:00 FRI MON 3/12 7:00PM Pr 4 SP<br />
11/29Mon 23:00 Fri 3/12 7:00PM Pr 4 2ch SP<br />
Play<br />
Title Name SP<br />
Set 2h00m(1.0G)<br />
Erase<br />
Thumbnail<br />
20:00 FRI 3/12 Pr 9 SP<br />
Erase Edit Section<br />
20:00 Fri 3/12 Pr 9 SP<br />
Divide<br />
Chapter Edit<br />
2h00m(1.0G)<br />
Set<br />
Multi-Mode<br />
Genre<br />
22:00 THU 2/12 Pr 7 Lock SPGenre<br />
Name<br />
22:00 Thu 2/12 Pr 7 SP<br />
Cancel 1h00m(1.0G)<br />
Cancel<br />
19:00 MON 29/11 Pr 2 SP<br />
19:00 Mon 29/11 Pr 2 SP<br />
1h00m(1.0G)<br />
3 Input a name for the selected title.<br />
Input Title Name<br />
CAPS<br />
small<br />
A B C D E F G H I J K L M . , ? !<br />
N O P Q R S T U V W X Y Z ( ) : ;<br />
A A A A A A Æ ç E E E E I I I I #<br />
D N O O O O O ø U U U U Y ß $ %<br />
0 1 2 3 4 5 6 7 8 9 < = > _ &<br />
£ \ § ¨ © ¬ – ®<br />
2 3 1 ´ µ · ¿ `<br />
OK Clear Space<br />
_ + – / @ [ ¥ ] ˆ ÷ x ± { | }<br />
˚<br />
~
09<br />
108<br />
En<br />
Editing<br />
Set Thumbnail<br />
HDD DVD (Video) DVD (VR) DVD+R DVD+RW DVD-RAM<br />
You can change the thumbnail picture that appears in<br />
the Disc Navigator for a title to any frame that appears in<br />
that title.<br />
1 Highlight the title you want to change<br />
the thumbnail picture for.<br />
• You can also use the Smart Jog to select titles.<br />
ENTER<br />
2 Select ‘Edit’ > ‘Set Thumbnail’ from the<br />
command menu panel.<br />
The thumbnail setting screen appears from which you<br />
can find the frame you want.<br />
Disc Navigator (HDD)<br />
4 Titles<br />
Recent first<br />
All Genres<br />
HDD<br />
SP<br />
Remain<br />
30h30m<br />
101<br />
9<br />
8<br />
7<br />
10Titles<br />
11/29 23:00 FRI MON 3/12 7:00PM Pr 4 SP<br />
Play<br />
11/29Mon 23:00 Fri 3/12 7:00PM Pr 4 2ch SPTitle<br />
SP Name<br />
Set 2h00m(1.0G)<br />
Erase<br />
Thumbnail<br />
Erase Edit Section<br />
20:00 FRI 3/12 Pr 9 SP<br />
Divide<br />
20:00 Fri 3/12 Pr 9 SP<br />
Chapter Edit<br />
2h00m(1.0G)<br />
Set<br />
Multi-Mode<br />
Genre<br />
22:00 THU 2/12 Pr 7 Lock SPGenre<br />
Name<br />
22:00 Thu 2/12 Pr 7 SP<br />
Cancel 1h00m(1.0G)<br />
Cancel<br />
19:00 MON 29/11 Pr 2 SP<br />
19:00 Mon 29/11 Pr 2 SP<br />
1h00m(1.0G)<br />
3 Use the playback controls (, , , , etc.) to<br />
find a suitable frame, then press ENTER to set.<br />
Set Thumbnail (HDD)<br />
OK<br />
OK<br />
Exit<br />
Exit<br />
23:00 Fri 3/12 Pr 4 SP<br />
Rec. time 2h00m<br />
10-1 00.00.09.15<br />
Play Pause<br />
You can also use the chapter and time search features<br />
(press the YELLOW button), and the Smart Jog (for<br />
CM SKIP and CM BACK).<br />
4 Select ‘Exit’ to return to the Edit screen.<br />
Erase Section<br />
HDD DVD (VR) DVD-RAM<br />
Using this command you can delete a part of a title, ideal<br />
for cutting out the commercial breaks in a recording<br />
made from the TV.<br />
1 Highlight the title containing the section<br />
you want to erase.<br />
• You can also use the Smart Jog to select titles.<br />
ENTER<br />
2 Select ‘Edit’ > ‘Erase Section’ from the<br />
command menu panel.<br />
ENTER<br />
3 HDD only: Select the type of edit.<br />
!<br />
HDD/DVD RECORDER<br />
Please select the type of editing.<br />
Video Mode Compatible Editing is<br />
recommended for compatibility with<br />
high-speed copying.<br />
Video Mode Compatible Editing<br />
Frame Accurate Editing<br />
• For more information about these options, see<br />
Editing accuracy on page 105.<br />
4 Highlight ‘From’ then use the playback controls<br />
(, , , , etc.) to find the start of the section<br />
to erase, then press ENTER.<br />
The bar at the bottom of the screen indicates the current<br />
play position in the title. After pressing ENTER, a marker<br />
shows the start of the section.<br />
Erase Section (HDD)<br />
From<br />
To<br />
Exit<br />
23:00 Fri 3/12 Pr 4 SP<br />
Rec. time 2h00m<br />
10-1 00.00.09.15<br />
Play Pause
Editing 09<br />
5 Highlight ‘To’ then, in the same way,<br />
find the end of the section to erase, then press<br />
ENTER.<br />
After pressing ENTER, another marker indicates the end<br />
of the section, with the section itself marked in red.<br />
6 Select ‘Yes’ to confirm, or ‘No’ to cancel.<br />
In the thumbnail viewer you can see a few seconds of<br />
video either side of the marked section to see how the<br />
edit will look.<br />
• When editing VR mode Original content, you may not<br />
be able to erase very short sections (less than five<br />
seconds).<br />
Divide<br />
ENTER<br />
ENTER<br />
HDD DVD (VR) DVD-RAM Play List only<br />
Use this command to divide a title into two. Note that<br />
once divided, the two new HDD titles cannot be<br />
recombined into one again.<br />
1 Highlight the title you want to divide.<br />
• You can also use the Smart Jog to select titles.<br />
ENTER<br />
2 Select ‘Edit’ > ‘Divide’ from the<br />
command menu panel.<br />
3 HDD only: Select the type of edit.<br />
!<br />
HDD/DVD RECORDER<br />
Please select the type of editing.<br />
Video Mode Compatible Editing is<br />
recommended for compatibility with<br />
high-speed copying.<br />
Video Mode Compatible Editing<br />
Frame Accurate Editing<br />
• For more information about these options, see<br />
Editing accuracy on page 105.<br />
4 Use the playback controls (, , , , etc.) to<br />
find the place you want to divide the title.<br />
Divide Title (HDD)<br />
Divide<br />
Cancel<br />
ENTER 5 Press to divide the title at the current<br />
playback position.<br />
ENTER<br />
6 Select ‘Yes’ to confirm or ‘No’ to cancel.<br />
Chapter Edit<br />
DVD (VR) DVD-RAM HDD<br />
23:00 Fri 3/12 Pr 4 SP<br />
Rec. time 2h00m<br />
10–1 00.00.09.15<br />
Play Pause<br />
When editing a VR mode DVD or video on the HDD you<br />
can edit individual chapters within a title, with<br />
commands for erasing, combining and dividing.<br />
1 Highlight the title that contains the chapters you<br />
want to edit.<br />
• You can also use the Smart Jog to select titles.<br />
ENTER<br />
Divided titles cannot<br />
be combined.<br />
OK?<br />
Yes No<br />
2 Select ‘Edit’ > ‘Chapter Edit’ from the<br />
command menu panel.<br />
ENTER<br />
!<br />
3 HDD only: Select the type of edit.<br />
!<br />
HDD/DVD RECORDER<br />
Please select the type of editing.<br />
Video Mode Compatible Editing is<br />
recommended for compatibility with<br />
high-speed copying.<br />
Video Mode Compatible Editing<br />
Frame Accurate Editing<br />
• For more information about these options, see<br />
Editing accuracy on page 105.<br />
109<br />
En
09<br />
110<br />
En<br />
Editing<br />
4 Select the command you want:<br />
• Divide – Divide a chapter into two or more parts: Use<br />
the playback controls (, , , , etc.) to find the<br />
point at which you want to divide the chapter, then<br />
press ENTER.<br />
Chapter Edit (DVD VR mode Play List)<br />
1–1 0.00.00<br />
Play<br />
Exit<br />
Divide<br />
Erase/Move<br />
Combine<br />
19:00 Mon 29/11 Pr 2 SP<br />
Rec. time 1h00m<br />
Chapters 5<br />
You can keep dividing the chapter as many times as<br />
you wish (up to 999 chapters per DVD-R/-RW/-RAM<br />
disc or 99 chapters per HDD title).<br />
• Erase 1 /Move 2 – Erase or move chapters: Select the<br />
chapter you want to erase/move and press ENTER.<br />
Select whether you want to erase or move the<br />
chapter.<br />
Move command only: Select the destination for the<br />
chapter, and press ENTER.<br />
001<br />
Chapter Edit (DVD VR mode Play List)<br />
Exit<br />
Divide<br />
Erase/Move<br />
Combine<br />
19:00 Mon 29/11 Pr 2 SP<br />
Erase<br />
Rec. time 1h00m Move<br />
Chapter 0h01m<br />
Cancel<br />
002 003 004<br />
005<br />
• Combine 3 – Combine two adjacent chapters into<br />
one: Highlight the bar divider between two adjacent<br />
chapters and press ENTER.<br />
Chapter Edit (DVD VR mode Play List)<br />
1<br />
Exit<br />
Divide<br />
Erase/Move<br />
Combine<br />
19:00 Mon 29/11 Pr 2 SP<br />
Rec. time 1h00m<br />
2 3 4<br />
5<br />
5 Select ‘Exit’ to get back to the main Disc<br />
Navigator screen.<br />
Set Genre<br />
HDD<br />
Use this command to assign a genre to a title.<br />
1 Highlight the title you want to assign a<br />
genre to.<br />
• You can also use the Smart Jog to select titles.<br />
2 Select ‘Edit’ > ‘Set Genre’ from the<br />
command menu panel.<br />
3 Select a genre for the title.<br />
Note<br />
1 When editing VR mode Original content, it may not be possible to erase chapters less than five seconds long.<br />
2 VR mode Play List only.<br />
3 It may not always be possible to combine two chapters, even though they are adjacent. If a chapter has been divided into three, then the middle<br />
chapter erased, it is not possible to combine the two remaining chapters into one.<br />
ENTER<br />
ENTER<br />
Disc Navigator (HDD)<br />
101<br />
4 Titles<br />
Recent first<br />
All Genres<br />
HDD<br />
SP<br />
Remain<br />
30h30m<br />
ENTER<br />
9<br />
8<br />
7<br />
Disc Navigator (HDD)<br />
4 Titles<br />
Recent first<br />
All Genres<br />
HDD<br />
SP<br />
Remain<br />
30h30m<br />
101<br />
9<br />
8<br />
7<br />
10Titles<br />
11/29 23:00 FRI MON 3/12 7:00PM Pr 4 SP<br />
Play<br />
11/29Mon 23:00 Fri 3/12 7:00PM Pr 4 2ch SP Title SP Name<br />
Set 2h00m(1.0G)<br />
Erase<br />
Thumbnail<br />
Erase Edit Section<br />
20:00 FRI 3/12 Pr 9 SP<br />
Divide<br />
20:00 Fri 3/12 Pr 9 SP<br />
Chapter Edit<br />
2h00m(1.0G)<br />
Set<br />
Multi-Mode<br />
Genre<br />
22:00 THU 2/12 Pr 7 Lock SPGenre<br />
Name<br />
22:00 Thu 2/12 Pr 7 SP<br />
19:00 MON 29/11 Pr 2 SP<br />
19:00 Mon 29/11 Pr 2 SP<br />
Cancel 1h00m(1.0G)<br />
Cancel<br />
1h00m(1.0G)<br />
10Titles<br />
11/29 23:00 FRI MON 3/12 7:00PM Pr 4 SP<br />
Play<br />
11/29Mon 23:00 Fri 3/12 7:00PM Pr 4 2ch SP Title SP name<br />
No<br />
2h00m(1.0G)<br />
Erase Category<br />
Set Thumbnail<br />
Movies<br />
Erase Edit Section<br />
20:00 FRI 3/12 Pr 9 SPDrama<br />
Edit Chapter<br />
20:00 Fri 3/12 Pr 9 SPEntertainmt.<br />
Divide<br />
2h00m(1.0G)<br />
News<br />
Set<br />
Multi-Mode<br />
Genre<br />
Sport<br />
22:00 THU 2/12 Pr 7 Lock SPGenre<br />
Name<br />
Comedy<br />
22:00 Thu 2/12 Pr 7 SP<br />
19:00 MON 29/11 Pr 2 SP<br />
19:00 Mon 29/11 Pr 2 SP<br />
Cancel 1h00m(1.0G)<br />
Cancel<br />
1h00m(1.0G)
Editing 09<br />
Lock<br />
HDD DVD (Video) DVD (VR) DVD+R DVD+RW DVD-RAM<br />
Original only<br />
You can lock a title so that it can’t be edited or erased<br />
accidently. If you do need to edit it, you can always unlock<br />
it later.<br />
Important<br />
• You can’t undo any edits made before changing the<br />
lock status. You also can’t undo a lock/unlock<br />
command using the Undo option from the Disc<br />
Navigator menu.<br />
1 Highlight the title you want to lock (or unlock).<br />
• You can also use the Smart Jog to select titles.<br />
ENTER<br />
2 Select ‘Edit’ > ‘Lock’ from the command<br />
menu panel.<br />
Disc Navigator (HDD)<br />
4 Titles<br />
Recent first<br />
All Genres<br />
HDD<br />
SP<br />
Remain<br />
30h30m<br />
101<br />
9<br />
8<br />
7<br />
10Titles<br />
11/29 23:00 FRI MON 3/12 7:00PM Pr 4 SP<br />
Play<br />
11/29Mon 23:00 Fri 3/12 7:00PM Pr 4 2ch SP Title SP Name<br />
Set 2h00m(1.0G)<br />
Erase<br />
Thumbnail<br />
Erase Edit Section<br />
20:00 FRI 3/12 Pr 9 SP<br />
Divide<br />
20:00 Fri 3/12 Pr 9 SP<br />
Chapter Edit<br />
2h00m(1.0G)<br />
Set<br />
Multi-Mode<br />
Genre<br />
22:00 THU 2/12 Pr 7 Lock SPGenre<br />
Name<br />
22:00 Thu 2/12 Pr 7 SP<br />
19:00 MON 29/11 Pr 2 SP<br />
19:00 Mon 29/11 Pr 2 SP<br />
Cancel 1h00m(1.0G)<br />
Cancel<br />
1h00m(1.0G)<br />
An unlocked title will become locked; a locked title will be<br />
unlocked. Locked titles are shown in the Disc Navigator<br />
with a padlock icon.<br />
Move<br />
DVD (VR) DVD-RAM Play List only<br />
Use this function to re-arrange the playing order of Play<br />
List titles.<br />
1 Highlight the title you want to move.<br />
• You can also use the Smart Jog to select titles.<br />
ENTER<br />
2 Select ‘Edit’ > ‘Move’ from the command<br />
menu panel.<br />
4 Titles<br />
DVD<br />
VR Mode<br />
Remain<br />
0h30m<br />
Disc Navigator (DVD)<br />
Play List<br />
ENTER<br />
1<br />
2<br />
3<br />
4<br />
10Titles<br />
11/29 23:00 FRI MON 3/12 7:00PM<br />
Play<br />
11/29Mon 23:00 Fri 7:00PM 3/12 Pr 7 2ch Title SP Name SP SP<br />
2h00m(1.0G)<br />
Erase<br />
Set 2h00m(1.0G)<br />
Thumbnail<br />
Erase Edit Section<br />
20:00 FRI 3/12 SP<br />
Divide<br />
20:00 Fri 3/12 Pr 7 SP SP<br />
Chapter Edit<br />
2h00m(1.0G)<br />
Multi-Mode<br />
Move<br />
22:00 THU 2/12 7 SP Combine Genre Name<br />
22:00 Thu 2/12 Pr 7 SP 7 SP<br />
Cancel 1h00m(1.0G)<br />
Cancel<br />
19:00 MON 29/11<br />
19:00 Mon 29/11 Pr 2 SP<br />
1h00m(1.0G)<br />
3 Select a new position for the title.<br />
4 Titles<br />
DVD<br />
VR Mode<br />
Remain<br />
0h30m<br />
Disc Navigator (DVD)<br />
Play List<br />
1<br />
2<br />
3<br />
4<br />
Title to move<br />
10Titles<br />
11/29 23:00 FRI MON 3/12 7:00PM<br />
11/29Mon 23:00 Fri 7:00PM 3/12 Pr 4 2ch SP SP<br />
2h00m(1.0G)<br />
20:00 FRI 3/12<br />
20:00 Fri 3/12 Pr 9 SP<br />
22:00 THU 2/12<br />
22:00 Thu 2/12 Pr 7 SP<br />
19:00 MON 29/11<br />
19:00 Mon 29/11 Pr 2 SP<br />
2h00m(1.0G)<br />
1h00m(1.0G)<br />
1h00m(1.0G)<br />
Insert position<br />
MENU<br />
After pressing ENTER, the new, updated Play List is<br />
displayed.<br />
111<br />
En
09<br />
112<br />
En<br />
Editing<br />
Combine<br />
DVD (VR) DVD-RAM Play List only<br />
Use this function to combine two Play List titles into one.<br />
1 Highlight the title you want to combine.<br />
• You can also use the Smart Jog to select titles.<br />
This title will remain in the same place after combining<br />
with another title.<br />
ENTER<br />
2 Select ‘Edit’ > ‘Combine’ from the<br />
command menu panel.<br />
4 Titles<br />
DVD<br />
VR Mode<br />
Remain<br />
0h30m<br />
Disc Navigator (DVD)<br />
Play List<br />
ENTER<br />
1<br />
2<br />
3<br />
4<br />
10Titles<br />
11/29 23:00 FRI MON 3/12 7:00PM<br />
Play<br />
11/29Mon 23:00 Fri 3/12 7:00PM Pr 7 2ch SP Title Name SP<br />
Erase<br />
Set 2h00m(1.0G)<br />
Thumbnail<br />
Erase Edit Section<br />
20:00 FRI 3/12 SP<br />
Divide<br />
20:00 Fri 3/12 Pr 7 SP SP<br />
Chapter Edit<br />
2h00m(1.0G)<br />
Multi-Mode<br />
Move<br />
22:00 THU 2/12 SPCombine<br />
Genre Name<br />
22:00 Thu 2/12 Pr 7 SP SP<br />
Cancel 1h00m(1.0G)<br />
Cancel<br />
19:00 MON 29/11<br />
19:00 Mon 29/11 Pr 2 SP<br />
1h00m(1.0G)<br />
3 Select another title to combine with the<br />
first.<br />
This title will be appended to the first title selected.<br />
The screen below shows title 3 selected to be appended<br />
to title 1.<br />
4 Titles<br />
DVD<br />
VR Mode<br />
Remain<br />
0h30m<br />
Disc Navigator (DVD)<br />
Play List<br />
ENTER<br />
1<br />
2<br />
3<br />
4<br />
10Titles<br />
23:00 FRI 3/12<br />
11/29Mon 23:00 Fri 3/12 7:00PM Pr 4 2ch SP SP<br />
2h00m(1.0G)<br />
20:00 FRI 3/12<br />
20:00 Fri 3/12 Pr 9 SP<br />
22:00 THU 2/12<br />
22:00 Thu 2/12 Pr 7 SP<br />
19:00 MON 29/11<br />
19:00 Mon 29/11 Pr 2 SP<br />
2h00m(1.0G)<br />
1h00m(1.0G)<br />
1h00m(1.0G)<br />
4 Select ‘Yes’ to confirm or ‘No’ to cancel.<br />
!<br />
OK to combine titles<br />
1 and 3 ?<br />
Yes<br />
No<br />
MENU<br />
Genre Name<br />
HDD<br />
Use this command to rename one of the five userdefinable<br />
genres (Free 1 to Free 5).<br />
ENTER<br />
1 Select ‘Genre Name’ from the command<br />
menu panel.<br />
Disc Navigator (HDD)<br />
4 Titles<br />
Recent first<br />
All Genres<br />
HDD<br />
SP<br />
Remain<br />
30h30m<br />
ENTER<br />
101<br />
9<br />
8<br />
7<br />
10Titles<br />
11/29 23:00 FRI MON 3/12 7:00PM Pr 4 SP<br />
Play<br />
11/29Mon 23:00 Fri 3/12 7:00PM Pr 4 2ch SP SP<br />
2h00m(1.0G)<br />
Erase<br />
Edit<br />
20:00 FRI 3/12 Pr 9 SP<br />
20:00 Fri 3/12 Pr 9 SP<br />
2h00m(1.0G)<br />
Genre Name<br />
22:00 THU 2/12 Pr 7 SP<br />
22:00 Thu 2/12 Pr 7 SP<br />
Multi-Mode0G)<br />
Multi-Mode<br />
19:00 MON 29/11 Pr 2 SP<br />
19:00 Mon 29/11 Pr 2 SP<br />
1h00m(1.0G)<br />
2 Select one of the user-definable genre<br />
names.<br />
Disc Navigator (HDD)<br />
4 Titles<br />
Recent first<br />
All Genres<br />
HDD<br />
SP<br />
Remain<br />
30h30m<br />
ENTER<br />
101<br />
9<br />
8<br />
7<br />
10Titles<br />
11/29 23:00 FRI MON 3/12 7:00PM Pr 4 SP<br />
Play<br />
11/29Mon 23:00 Fri 3/12 7:00PM Pr 4 2ch SP Free1 SP<br />
2h00m(1.0G)<br />
Erase Free2<br />
Edit Free3<br />
20:00 FRI 3/12 Pr 9 SP<br />
Free4<br />
20:00 Fri 3/12 Pr 9 SP<br />
Free5<br />
2h00m(1.0G)<br />
Multi-Mode<br />
22:00 THU 2/12 Pr 7 Cancel SPGenre<br />
Name<br />
22:00 Thu 2/12 Pr 7 SP<br />
1h00m(1.0G)<br />
Cancel<br />
19:00 MON 29/11 Pr 2 SP<br />
19:00 Mon 29/11 Pr 2 SP<br />
1h00m(1.0G)<br />
3 Input a name for the genre.<br />
• The name can be up to 12 characters long.<br />
Input Genre Name<br />
Free 1<br />
CAPS<br />
small<br />
A B C D E F G H I J K L M . , ? !<br />
N O P Q R S T U V W X Y Z ( ) : ;<br />
A A A A A A Æ ç E E E E I I I I #<br />
D N O O O O O ø U U U U Y ß $ %<br />
0 1 2 3 4 5 6 7 8 9 < = > _ &<br />
£ \ § ¨ © ¬ – ®<br />
2 3<br />
1<br />
´ µ · ¿ `<br />
OK Clear Space<br />
_ + – / @ [ ¥ ] ˆ ÷ x ± { | }<br />
˚<br />
~
Editing 09<br />
Multi-Mode<br />
HDD<br />
Multi-Mode allows you to select several titles, then select<br />
a command that will be applied to all of them. In this way<br />
you can select multiple titles and then erase them all at<br />
once, for example.<br />
ENTER<br />
1 Select ‘Multi-Mode’ from the command<br />
menu panel.<br />
Disc Navigator (HDD)<br />
4 Titles<br />
Recent first<br />
All Genres<br />
HDD<br />
SP<br />
Remain<br />
30h30m<br />
ENTER<br />
101<br />
9<br />
8<br />
7<br />
10Titles<br />
11/29 23:00 FRI MON 3/12 7:00PM Pr 4 SP<br />
Play<br />
11/29Mon 23:00 Fri 3/12 7:00PM Pr 4 2ch SP SP<br />
2h00m(1.0G)<br />
Erase<br />
Edit<br />
20:00 FRI 3/12 Pr 9 SP<br />
20:00 Fri 3/12 Pr 9 SP<br />
2h00m(1.0G)<br />
Genre Name<br />
22:00 THU 2/12 Pr 7 SP<br />
22:00 Thu 2/12 Pr 7 SP<br />
1h00m(1.0G)<br />
Multi-Mode<br />
19:00 MON 29/11 Pr 2 SP<br />
19:00 Mon 29/11 Pr 2 SP<br />
1h00m(1.0G)<br />
2 Select titles from the title list.<br />
Selected titles are marked with a .<br />
• You can also use the Smart Jog to select titles.<br />
ENTER<br />
3 Select the command that you want<br />
applied to all the marked titles.<br />
For example, select Erase to erase all the marked titles.<br />
Disc Navigator (HDD)<br />
4 Titles<br />
Recent first<br />
All Genres<br />
HDD<br />
SP<br />
Remain<br />
30h30m<br />
101<br />
9<br />
8<br />
7<br />
Multi-Mode<br />
10Titles<br />
23:00 FRI 3/12 Pr 4 SP<br />
Erase<br />
23:00 Fri 3/12 Pr 4 SP<br />
Lock<br />
2h00m(1.0G)<br />
Unlock<br />
20:00 FRI 3/12 Pr 9 SPChange<br />
Genre<br />
20:00 Fri 3/12 Pr 9 SP<br />
2h00m(1.0G)<br />
22:00 THU 2/12 Pr 7 SPSingle<br />
Mode<br />
22:00 Thu 2/12 Pr 7 SP<br />
19:00 MON 29/11 Pr 2 SP<br />
19:00 Mon 29/11 Pr 2 SP<br />
1h00m(1.0G)<br />
1h00m(1.0G)<br />
Once the command is completed, Multi-Mode is<br />
automatically exited.<br />
Undo<br />
DVD (Video) DVD (VR) DVD+R DVD+RW<br />
If you make a mistake while editing, you can generally<br />
undo it. There is one level of undo (in other words, you<br />
can only undo the last edit you made).<br />
ENTER<br />
• Select ‘Undo’ from the command menu<br />
panel.<br />
• You can’t undo anything after exiting the Disc<br />
Navigator screen.<br />
Disc Navigator (DVD)<br />
4 Titles<br />
Play List<br />
DVD<br />
VR Mode<br />
Remain<br />
0h30m<br />
1<br />
0Titles<br />
11/29 MON 7:00PM<br />
Play<br />
11/29Mon No title<br />
7:00PM 2ch SP<br />
2h00m(1.0G)<br />
Erase<br />
2h00m(1.0G)<br />
Create<br />
1h00m(1.0G)<br />
Undo<br />
Frequently asked questions<br />
• Why doesn’t the available recording time increase<br />
when I erase titles from a VR mode DVD-R?<br />
When you erase titles from a DVD-R (or DVD+R), the<br />
titles are no longer displayed, but the content<br />
remains on the disc. DVD-R/+R are write-once<br />
media; they can’t be erased or rewritten.<br />
•I can’t edit my disc!<br />
You may find that as the available recording time is<br />
reduced on a VR mode DVD-R disc, editing is no<br />
longer possible. This is because information about<br />
your edits requires a certain amount of disc space.<br />
As you edit, this information builds up, eventually<br />
preventing you from editing further.<br />
Edit<br />
113<br />
En
10<br />
114<br />
En<br />
Copying and backup<br />
Chapter 10<br />
Copying and backup<br />
Introduction<br />
Use the copying features of this recorder to:<br />
• Back up important recordings stored on the HDD to<br />
a DVD.<br />
• Make a DVD copy of a recording on the HDD to play<br />
in another player.<br />
• Transfer video from a DVD to the HDD for editing.<br />
• Transfer edited video from the HDD to DVD.<br />
The simplest way to copy a title is to use the One Touch<br />
Copy feature. This copies the currently playing HDD title<br />
to DVD, or DVD title to the HDD. See One Touch Copy<br />
below for detailed instructions.<br />
For more sophisticated copying tasks you can build a<br />
Copy List of titles to copy, and edit titles so that you only<br />
copy the bits you want. See Using Copy Lists on page 115<br />
for detailed instructions.<br />
Where possible, the recorder will copy your recordings at<br />
high-speed. Depending on the recording mode, the kind<br />
of disc loaded and various other factors, copying can be<br />
as fast as one minute per hour of video. See Minimum<br />
copying times on page 150 for more on copying times.<br />
If you want to save disc space you can copy video at a<br />
lower recording quality (for example, an XP recording on<br />
the HDD copied to SP on a DVD). Copying in this way is<br />
always done in real-time.<br />
When real-time copying from the HDD to a DVD-R/-RW<br />
(Video mode) or DVD+R/+RW, the chapter markers in<br />
the original material are not copied. Chapter markers are<br />
put into the copy at intervals, according to the Auto<br />
Chapter settings (see also Auto Chapter (Video) and Auto<br />
Chapter (DVD+R/+RW) on page 143).<br />
Restrictions on copying<br />
Commercial DVD-Video discs are protected using Copy<br />
Guard. These discs cannot be copied to the HDD.<br />
Some video material is copy-once protected. This means<br />
that it can be recorded to HDD, but it can’t then be freely<br />
copied again. If you want to transfer copy-once protected<br />
material from HDD to DVD, you’ll need to a CPRM ver. 1.1<br />
or higher VR mode DVD-RW, ver. 2.0 or 2.1 VR mode<br />
DVD-R, or CPRM-compatible DVD-RAM disc (see CPRM<br />
on page 80 for more on this). Only one instance of a copyonce<br />
protected title can be added to the Copy List, and<br />
after it’s been copied, the title is erased from the HDD (it<br />
is therefore not possible to copy a locked title that is copyonce<br />
protected).<br />
You can identify copy-once protected material during<br />
playback by displaying disc information on-screen. If the<br />
current title is copy-once protected, an exclamation mark<br />
( ! ) is shown.<br />
Copyright<br />
Recording equipment should be used only for lawful<br />
copying and you are advised to check carefully what is<br />
lawful copying in the country in which you are making a<br />
copy. Copying of copyright material such as films or<br />
music is unlawful unless permitted by a legal exception<br />
or consented to by the rightowners.<br />
One Touch Copy<br />
* See also Copyright above.<br />
The One Touch Copy feature copies the currently playing<br />
or selected (in the Disc Navigator) HDD title to DVD, or<br />
DVD title to HDD. The whole title is copied, regardless of<br />
where in the title you start the copy.<br />
HDD to DVD copies are made in the same recording<br />
mode. When copying DVD to HDD, the copy is made in<br />
whatever recording mode is currently set.<br />
Make sure that a recordable DVD disc is loaded when<br />
trying to copy from the HDD.<br />
REC MODE<br />
1 If you’re copying from DVD to the HDD,<br />
select a recording mode.<br />
Note that selecting a recording mode higher than the title<br />
playing will not result in a better quality recording.<br />
ONE TOUCH COPY<br />
2 Press during playback to copy the current<br />
title.<br />
The front panel display indicates that the title is being<br />
copied.<br />
• High-speed copying is used when copying from the<br />
HDD to DVD. Playback continues while copying.<br />
• Real-time copying is used when copying from DVD to<br />
the HDD. Playback restarts from the beginning of the<br />
title.
Copying and backup 10<br />
Cancelling One Touch Copy<br />
You can cancel a One Touch Copy once it’s started.<br />
ONE TOUCH COPY<br />
• Press and hold for more than a second.<br />
Copying is cancelled and the video already copied is<br />
erased.<br />
• If you cancel a HDD to DVD-R/+R copy, the space<br />
available for recording does not return to the precopy<br />
figure.<br />
Notes on copying using One Touch Copy<br />
Copying to DVD<br />
• Title name, chapter markers, as well as thumbnail<br />
picture markers for the Disc Navigator, are also<br />
copied. However, if you copy to a DVD-R/-RW (Video<br />
mode) or DVD+R/+RW, only the first 40 characters<br />
of a name are copied.<br />
• The chapter markers in the copy may not be in exactly<br />
the same positions as the original when recording on<br />
to a DVD-R/-RW (Video mode) or DVD+R/+RW.<br />
• You can’t use the One Touch Copy function to copy a<br />
title if any part of the title is copy-once protected.<br />
•A title that contains mixed aspect ratios can’t be<br />
copied to a DVD-R/-RW (Video mode) or DVD+R/<br />
+RW. Use a DVD-R/-RW (VR mode) or DVD-RAM<br />
disc for this type of material.<br />
• Low resolution (SEP through LP modes 1 ) widescreen<br />
material can’t be copied to a DVD-R/-RW (Video mode)<br />
or DVD+R/+RW. Use a DVD-R/-RW (VR mode) or<br />
DVD-RAM disc for this type of material.<br />
• When HDD Recording Format is set to Video Mode<br />
Off, titles recorded in LP/MN9 to MN15 modes<br />
cannot be high-speed copied to a DVD-R/-RW (Video<br />
mode) or DVD+R/+RW. Please use a DVD-R/-RW<br />
(VR mode) or DVD-RAM.<br />
• Recordings of bilingual broadcasts cannot be highspeed<br />
copied to a DVD-R/-RW (Video mode) or<br />
DVD+R/+RW. Please use a DVD-R/-RW (VR mode)<br />
or DVD-RAM.<br />
• XP+ titles cannot be copied to DVD via One Touch<br />
Copy.<br />
• Titles over eight hours cannot be copied to singlelayer<br />
DVD+R/+RW discs using One Touch Copy.<br />
Use DVD+R DL discs for titles over eight hours.<br />
• Titles recorded in MN1 to MN6, SEP, SLP or EP mode<br />
cannot be copied to DVD+R/+RW using One Touch<br />
Copy.<br />
Copying to the HDD<br />
• The maximum title length for copying is 12 hours.<br />
• Title name and chapter markers are also copied,<br />
except when copying from a finalized Video mode<br />
DVD-R/-RW.<br />
• Thumbnail picture markers and chapter markers for<br />
the Disc Navigator are copied, but their position in<br />
the copy may be slightly changed from the original.<br />
• If some part of the title being copied is copy-protected,<br />
copying will start, but the copy-protected portions will<br />
not be copied.<br />
Using Copy Lists<br />
* See also Copyright on page 114.<br />
At its simplest, a Copy List is just a list of HDD or DVD<br />
titles that you want to copy. When copying HDD titles to<br />
DVD, you can, however, edit the titles in your copy list,<br />
erasing chapters you don’t need, or re-naming titles, for<br />
example. Edits you make to titles in the Copy List do not<br />
affect the actual video content; only the ‘virtual’ content<br />
of the Copy List. So you can freely erase and modify<br />
anything in your Copy List safe in the knowledge that the<br />
actual content is not being altered.<br />
Copying from HDD to DVD<br />
Important<br />
• The recorder can only store one Copy List at a time.<br />
• The Copy List is erased if the Input Line System<br />
setting is changed (see Additional information about<br />
the TV system settings on page 146).<br />
• Resetting the recorder to its factory settings (see<br />
Resetting the recorder on page 161) will erase the<br />
Copy List.<br />
1 Load a recordable DVD.<br />
• It is possible to complete the following steps without<br />
having a recordable DVD loaded (or having an<br />
uninitialized DVD loaded); however, the steps are<br />
slightly different.<br />
• If you want to use a DVD-RW (VR mode) disc for the<br />
copy, make sure it is initialized before you start.<br />
2 HOME MENU<br />
Select ‘Copy’ from the Home Menu.<br />
Note<br />
1 In manual recording mode these equate to MN1 to MN15 (Video Mode Off) or MN1 to MN8 (Video Mode On).<br />
115<br />
En
10<br />
116<br />
En<br />
Copying and backup<br />
ENTER<br />
3 Select ‘HDD DVD’.<br />
HDD DVD<br />
DVD/CD HDD<br />
Disc Back-up<br />
• If this is the first time to create a Copy List, skip to<br />
step 5 below.<br />
4 If there is already a Copy List stored in the<br />
recorder, choose whether to ‘Create New Copy List’<br />
or ‘Continue Using Previous Copy List’.<br />
Continue Using Previous Copy List<br />
Create New Copy List<br />
• If you select Continue Using Previous Copy List,<br />
skip to step 10 below.<br />
• Selecting Create New Copy List will erase any Copy<br />
List already stored in the recorder.<br />
ENTER<br />
5 Add titles to the Copy List (highlight a<br />
title and press ENTER to add).<br />
Copy HDD DVD (Video mode)<br />
8 Title<br />
Select Title<br />
1 > 2 > 3<br />
8 WED 29/03 20:00 Wed29/03 Pr 2 SP Pr 2<br />
7<br />
6<br />
MON 27/03 21:00 Mon 27/03 Pr 4 SP<br />
SAT 25/03 23:00 Sat 25/03 Pr 9 SP<br />
Pr 4<br />
Pr 9<br />
Back<br />
Recent first 5 THU 23/03 22:00 Thu 23/03 Pr 6 SP Pr 6<br />
4 WED 22/03 20:00 Wed 22/03 Pr 2 SP Pr 2<br />
All Genres<br />
3<br />
2<br />
1<br />
MON 20/03 13:00 Mon 20/03 Pr 9 SP<br />
FRI 17/03 21:00 Fri 17/03 Pr 4 SP<br />
WED 15/03 20:00 Wed 15/03 Pr 2 SP<br />
20:00 Wed29/03 Pr 2 SP<br />
Pr 9<br />
Pr 4<br />
Pr 2<br />
Next<br />
20:00 1h00m(2.0G) Pr 2<br />
Sports SP<br />
Copy List Total<br />
Current DVD Remain<br />
0.0G<br />
4.3G<br />
Titles you’ve added to the Copy List are highlighted in<br />
pink.<br />
There are some restrictions on titles that can be added to<br />
the Copy List if you are copying to a DVD-R/-RW (Video<br />
mode) or DVD+R/+RW:<br />
• When adding titles that contain copy-once protected<br />
material, the copy-once parts will not be added.<br />
• When adding titles that contain material of more<br />
than one aspect ratio (screen size), each part with a<br />
different aspect ratio will be added as a separate title<br />
if high-speed copying is possible.<br />
Depending on the title 1 , high-speed copying may not be<br />
possible to DVDs.<br />
6 Press to display the command menu panel.<br />
The Command Menu panel<br />
Copy HDD DVD (Video mode)<br />
8 Title<br />
Select Title<br />
1 > 2 > 3<br />
8 WED 29/03 20:00 Wed29/03 Pr 2 SP Pr 2<br />
7<br />
6<br />
MON 27/03 21:00 Mon 27/03 Pr 4 SP<br />
SAT 25/03 23:00 Sat 25/03 Pr 9 SP<br />
Pr 4<br />
Pr 9<br />
Back<br />
Recent first 5 THU 23/03 22:00 Thu 23/03 Pr 6 SP Pr 6<br />
4 WED 22/03 20:00 Wed 22/03 Pr 2 SP Pr 2<br />
All Genres<br />
3<br />
2<br />
1<br />
MON 20/03 13:00 Mon 20/03 Pr 9 SP<br />
FRI 17/03 21:00 Fri 17/03 Pr 4 SP<br />
WED 15/03 20:00 Wed 15/03 Pr 2 SP<br />
Pr 9<br />
Pr 4<br />
Pr 2<br />
Next<br />
20:00 Wed29/03 Pr 2 SP<br />
20:00 1h00m(2.0G) Pr 2<br />
Sports SP<br />
Copy List Total<br />
4.3G<br />
Current DVD Remain 4.3G<br />
7 Select ‘Next’ to move on to the Title Edit screen.<br />
Copy HDD DVD (Video mode)<br />
Title Edit<br />
1 > 2 > 3<br />
1 20:00 Wed 29/03 Pr 2 SP<br />
2 20:00 Wed 22/03 Pr 2 SP<br />
Copy List Total<br />
Current DVD Remain<br />
20:00 Wed29/03 Pr 2 SP<br />
Note<br />
1 The following titles cannot be copied at high-speed for DVD+R/+RW:<br />
• Titles recorded in MN1 to MN6, SEP, SLP or EP mode.<br />
The following titles cannot be copied at high-speed for DVD-R/-RW (Video Mode) and DVD+R/+RW:<br />
• Widescreen titles recorded at low resolution (SEP through LP/MN1 to MN15 (Video Mode Off) or MN1 to MN8 (Video Mode On)).<br />
• LP/MN9 to MN15 recordings when HDD Recording Format is set to Video Mode Off.<br />
• Bilingual recordings.<br />
• Combined titles that were originally recorded using different recording modes.<br />
The following titles cannot be copied at high-speed for any types of DVD:<br />
• XP+ titles.<br />
4.3G<br />
4.3G<br />
1h00m(2.0G)<br />
2 Title<br />
Back<br />
Next
Copying and backup 10<br />
8 To edit a title, highlight it using the / buttons,<br />
then press ENTER.<br />
Copy HDD DVD (Video mode)<br />
Title Edit<br />
1 > 2 > 3<br />
1 20:00 Wed 29/03 Pr 2 SP<br />
Erase<br />
2 20:00 Wed 22/03 Pr 2 SP<br />
Title Name<br />
Erase Section<br />
Move<br />
Preview<br />
Cancel<br />
Copy List Total<br />
Current DVD Remain<br />
20:00 Wed29/03 Pr 2 SP<br />
4.3G<br />
4.3G<br />
A menu of editing commands appears:<br />
1h00m(2.0G)<br />
2 Title<br />
• Erase – Erase individual titles from the Copy List (see<br />
Erase on page 106).<br />
• Title Name – Name or rename a title in the Copy List<br />
(see Title Name on page 107).<br />
• Erase Section – Erase part of a title (see Erase Section<br />
on page 108).<br />
• Move – Change the order of titles in the Copy List<br />
(see Move on page 111).<br />
• Preview – Check the content of a title in the Copy<br />
List.<br />
• Divide – Divide a title in the Copy List into two (see<br />
Divide on page 109).<br />
• Combine – Combine two titles in the Copy List into<br />
one (see Combine on page 112).<br />
• Chapter Edit – Edit chapters within a Copy List title<br />
(see Chapter Edit on page 109):<br />
• Divide – Divide a chapter into two.<br />
• Erase/Move – Erase a chapter/Change the<br />
chapter order.<br />
• Combine – Combine two chapters into one.<br />
• Set Thumbnail – Set the thumbnail frame for a title<br />
(see Set Thumbnail on page 108).<br />
• Recording Mode – Set the picture quality of the copy<br />
(see Recording Mode on page 118).<br />
• Bilingual – Set how bilingual audio should be copied<br />
when copying from HDD to DVD-R/-RW (Video mode)<br />
and DVD+R/+RW (see Bilingual on page 119).<br />
• Cancel – Exit the menu.<br />
Repeat this step for as many titles you have that need<br />
editing.<br />
9 Display the command menu panel.<br />
Note<br />
1 If a timer recording is scheduled to start during copying, the disc will not be finalized.<br />
Back<br />
Next<br />
ENTER<br />
10 Select ‘Next’ to proceed.<br />
Copy HDD DVD (Video mode)<br />
Title Edit<br />
1 > 2 > 3<br />
1 20:00 Wed 29/03 Pr 2 SP<br />
2 20:00 Wed 22/03 Pr 2 SP<br />
Copy List Total<br />
Current DVD Remain<br />
20:00 Wed29/03 Pr 2 SP<br />
4.3G<br />
4.3G<br />
1h00m(2.0G)<br />
2 Title<br />
There are several options available from the next screen:<br />
• Select Recording Mode if you want to change the<br />
recording quality (see Recording Mode on page 118).<br />
• Select Input Disc Name if you want to change the<br />
disc name. Input a name of up to 64 characters for a<br />
VR mode disc or 40 characters for a Video mode disc<br />
or DVD+R/+RW. (The input method is similar to that<br />
of naming titles; see Title Name on page 107.)<br />
• Select Finalize if you want to automatically finalize a<br />
DVD-R/-RW (Video mode) or DVD+R after copying. 1<br />
Select a title menu style from the following screen.<br />
ENTER<br />
11 Select ‘Start Copy’ to start copying.<br />
Copy HDD DVD (Video Mode)<br />
Start Copy<br />
1 > 2 > 3<br />
HDD<br />
DVD-RW<br />
Video Mode<br />
Copy Time 0h 16m<br />
Recording Mode<br />
Disc Name<br />
High-Speed<br />
Finalize<br />
Off<br />
Copy List Total<br />
4.3G<br />
Current DVD Remain 4.3G<br />
• If you’re using a DVD-R DL or DVD+R DL disc and<br />
the copy will span both layers, the Copy List Total<br />
bar will be purple.<br />
• The Current DVD Remain bar will be half-length if<br />
the first layer of a DVD-R DL or DVD+R DL disc is<br />
already full.<br />
Back<br />
Next<br />
Back<br />
Recording Mode<br />
Input Disc Name<br />
Finalize<br />
Start Copy<br />
117<br />
En
10<br />
118<br />
En<br />
Copying and backup<br />
Copying from DVD to HDD<br />
Important<br />
• The DVD to HDD Copy screen isn’t accessible when<br />
a finalized Video mode DVD-R/-RW or a DVD-Video is<br />
loaded. As long as the disc is not Copy Guard<br />
protected, you can still use the One Touch Copy<br />
function, however (See One Touch Copy on<br />
page 114).<br />
• The recorder can only store one Copy List at a time.<br />
• The Copy List will be erased if:<br />
– any of the titles on the DVD disc are erased or<br />
edited.<br />
– the disc tray is opened.<br />
– playback is switched between Play List and<br />
Original.<br />
– the DVD disc is re-initialized or finalized.<br />
– the recorder is reset to its factory settings (see<br />
Resetting the recorder on page 161).<br />
• It may not be possible to copy from a DVD disc that<br />
was recorded on a different DVD recorder or a PC.<br />
1 HOME MENU Select ‘Copy’ from the Home Menu.<br />
ENTER<br />
2 Select ‘DVD/CD HDD’.<br />
ENTER<br />
3 Select a Copy List type.<br />
• Selecting Create New Copy List will erase any Copy<br />
List already stored in the recorder.<br />
ENTER<br />
4 Add titles to the Copy List (highlight a<br />
title and press ENTER to add).<br />
Titles you’ve added to the Copy List are highlighted in<br />
pink.<br />
ENTER<br />
5 Select ‘Next’ from the command menu<br />
panel to proceed to the title edit screen.<br />
6 Select a title to edit.<br />
A menu appears of Copy List editing commands:<br />
• Erase – Erase individual titles from the Copy List (see<br />
Erase on page 106).<br />
• Move – Change the order of titles in the Copy List<br />
(see Move on page 111).<br />
• Preview – Check the content of a title in the Copy<br />
List.<br />
• Cancel – Exit the menu.<br />
Repeat this step for as many titles you have that need<br />
editing.<br />
7 Select ‘Next’ from the command menu<br />
panel to proceed to the copy options screen.<br />
• Select Recording Mode if you want to change the<br />
recording quality (see Recording Mode below).<br />
8 Select ‘Start Copy’ to start copying.<br />
Recording Mode<br />
1 Select ‘Recording Mode’ from the<br />
command menu panel.<br />
2 Select a recording mode for the copy.<br />
• High-Speed Copy 1 – The Copy List is copied at the<br />
same recording quality as the original.<br />
• XP, SP, LP, EP, SLP, SEP, MN 2 – The Copy List is<br />
copied at the specified recording quality in real-time.<br />
(Note that if you copy at a higher quality setting than<br />
the original, the copy will not be better quality than<br />
the original.)<br />
If you select MN above, you can also change the level<br />
setting (MN1 to MN32 3 , LPCM or XP+ 4 ) from the<br />
Recording Quality box that appears.<br />
Note<br />
1 When copying to a DVD-R/-RW (Video mode) or DVD+R/+RW, the chapter markers in the copy may not be in exactly the same position as<br />
the original.<br />
2 When the copy mode is set to something other than High-Speed Copy for copying to a DVD-R/-RW (Video mode) or DVD+R/+RW, the chapter<br />
markers of the original are not copied. Chapter markers are put into the copy at regular intervals, according to the Auto Chapter setting (see<br />
also Auto Chapter (Video) and Auto Chapter (DVD+R/+RW) on page 143).<br />
3 When copying to a DVD+R/+RW, MN1 to MN3 and SEP modes are not available.<br />
4 XP+ mode available only when copying to HDD.<br />
ENTER<br />
ENTER<br />
ENTER<br />
ENTER<br />
ENTER
Copying and backup 10<br />
• Optimized 1,2 – The recording quality is automatically<br />
adjusted so that the Copy List fits on to the space<br />
available on the disc. Copying is carried out in realtime.<br />
When you change the recording mode setting, you can<br />
see how much disc space it will require. If this is more<br />
than is available, it shows up in red and you won’t be able<br />
to start copying. In this case, either change the recording<br />
quality, or press RETURN/EXIT to go back to the Copy List<br />
screen and erase one or more titles from the Copy List.<br />
Bilingual<br />
1 Select the title containing the audio you<br />
want to change.<br />
ENTER<br />
2 Select ‘Bilingual’ from the command<br />
menu panel.<br />
ENTER<br />
3 Select a bilingual audio option.<br />
Using disc backup<br />
* See also Copyright on page 114.<br />
This feature offers a simple way to make a backup copy<br />
of finalized DVD-R/-RW (Video mode) discs or DVD+R/<br />
+RW discs. The data is copied first to the hard disk<br />
drive 3 , then on to another recordable DVD disc.<br />
1 HOME MENU Select ‘Copy’, then ‘Disc backup’ from<br />
the Home Menu.<br />
2 Select a backup option.<br />
There are three backup options:<br />
• Start new disc back-up – Start making a backup of<br />
a disc.<br />
• Resume writing data – Record the backup data<br />
already on the HDD to a recordable DVD.<br />
• Erase back-up data – Erase the backup data on the<br />
HDD.<br />
3 Load the disc you want to make a backup of.<br />
You can only make backup copies of finalized Video mode<br />
DVD-R/-RW discs, finalized DVD+R or DVD+RW discs<br />
(excluding DVD-R DL/DVD+R DL discs).<br />
Note<br />
1 When the copy mode is set to something other than High-Speed Copy for copying to a DVD-R/-RW (Video mode) or DVD+R/+RW, the chapter<br />
markers of the original are not copied. Chapter markers are put into the copy at regular intervals, according to the Auto Chapter setting (see<br />
also Auto Chapter (Video) and Auto Chapter (DVD+R/+RW) on page 143).<br />
2 Optimized mode only available when copying to DVD. Due to remaining space on the disc or the title that you copy, this mode does not always<br />
exactly fill a disc.<br />
3 It is not possible to play this material directly from the HDD.<br />
ENTER<br />
Disc Back-up<br />
Disc Back-up<br />
Start new disc back-up<br />
Resume writing data<br />
Erase back-up data<br />
No disc.<br />
Please load a disc to be backed-up.<br />
Start Cancel<br />
119<br />
En
10<br />
120<br />
En<br />
Copying and backup<br />
ENTER<br />
4 Select ‘Start’.<br />
Disc Back-up<br />
Read from disc and save to HDD.<br />
Start reading?<br />
Start Cancel<br />
• To see the progress of the backup, press DISPLAY.<br />
• You can cancel the backup process by pressing<br />
ONE TOUCH COPY for more than one second.<br />
5 When the data has been copied, take out the disc<br />
and load a blank* recordable DVD.<br />
* If you’re using a DVD-RW or DVD+RW, the disc doesn’t<br />
have to be blank, although the previous contents of the<br />
disc will be erased in the backup process.<br />
Disc Back-up<br />
Disc content saved to Hard Disk Drive.<br />
Please eject the disc and load a<br />
recordable disc<br />
Start Cancel<br />
You can use a DVD-R ver. 2.0, 2.1 or 2.2 disc, or DVD-RW<br />
ver. 1.1 or ver. 1.2 disc for the backup.<br />
• If you backup a DVD-R disc to DVD-RW, you cannot<br />
undo the finalization later.<br />
• Actual recordable capacity of discs vary so there may<br />
be cases where the contents of the disc you’re<br />
backing-up will not fit on to a particular blank disc. If<br />
this happens, please try another brand of disc.<br />
• DVD-R/-RW discs can only be backed up to DVD-R/<br />
-RW discs; DVD+R/+RW discs can only be backed<br />
up to DVD+R/+RW discs.<br />
6 Select ‘Start’ to start writing the backed-up data<br />
to the blank disc.<br />
Disc Back-up<br />
Write back-up data from Hard Disk Drive.<br />
The disc contents will be overwritten.<br />
OK to start?<br />
Start Cancel<br />
• To see the progress of the backup, press DISPLAY.<br />
• You can cancel the backup process by pressing<br />
ONE TOUCH COPY for more than one second.<br />
However, this will make the disc unusable (although<br />
if you are using a DVD-RW or DVD+RW disc you can<br />
re-initialize it in order to make it usable again — see<br />
Initializing recordable DVD discs on page 89.)<br />
7 After the recorder has finished recording the<br />
backup disc, you can select whether to make another<br />
backup of the same data or exit.<br />
Disc Back-up<br />
Disc back-up finished.<br />
To make another back-up copy, please load<br />
a recordable disc.<br />
Start Cancel<br />
• Select Start to make another backup copy or Cancel<br />
to finish. If you want to make another backup copy,<br />
return to step 6 above.<br />
8 If you don’t need to keep the backup data on the<br />
HDD, you can delete it now.<br />
Select Yes to delete the data from the HDD; select No to<br />
keep it (you can delete it later if you want to).<br />
Disc Back-up<br />
The backed-up data is still on the HDD.<br />
Erasing it will increase the free space<br />
available. OK to Erase?<br />
Yes No<br />
• If you decide to leave the backup data on the HDD,<br />
you can make backup copies to recordable DVD<br />
discs anytime from the Disc Back-up menu.
Using the Jukebox 11<br />
Chapter 11<br />
Using the Jukebox<br />
The Jukebox feature allows you to use the recorder’s<br />
HDD to store and playback music from up to 999 of your<br />
CDs. You can also transfer WMA/MP3 files stored on CD<br />
-R/-RW/-ROM, DVD, USB device or PC. Once on the<br />
HDD, you can name albums and tracks, assign them a<br />
genre, and set tracks that you don’t want to play to Jump.<br />
Copying music to the HDD<br />
The first step is to copy some music to the HDD. CD<br />
audio, WMA and MP3 files are copied at high speed. All<br />
tracks are copied from each CD/DVD as an album. 1<br />
WMA/MP3 album and track names are copied along with<br />
the audio. CD album and track names are not copied, but<br />
you can add these later (see Editing Jukebox albums on<br />
page 124).<br />
Usually, the tracks are copied to the HDD in the order<br />
they appear on the CD/DVD.<br />
Note that once copied to the HDD, audio tracks cannot<br />
be copied to a recordable DVD disc.<br />
Important<br />
• While copying, no other recorder operation is<br />
possible.<br />
• When copying, scheduled timer recordings will not<br />
start until copying is complete.<br />
• Copy protected CDs may not copy successfully.<br />
1 Load the CD/DVD you want to copy to the HDD.<br />
2 HOME MENU Select ‘Copy’ from the Home Menu.<br />
ENTER<br />
3 Select ‘DVD/CD to HDD’.<br />
On pressing ENTER all tracks (or files) on the CD or all<br />
WMA/MP3 files on the DVD are copied to the HDD.<br />
• You can also start copying by starting playback of the<br />
CD/DVD and then pressing ONE TOUCH COPY.<br />
• To cancel copying press ENTER.<br />
• If the CD loaded contains both CD audio tracks and<br />
WMA/MP3 files, the part currently selected will play.<br />
Copying files via USB<br />
Connecting a regular USB device<br />
You can copy WMA or MP3 files from a connected USB<br />
device, such as a USB drive, to the HDD.<br />
1 Connect the USB device.<br />
2 HOME MENU Select ‘Jukebox’ from the Home Menu.<br />
3 Select ‘Listen to Music from USB Device’.<br />
4 Select ‘Copy Album’ from the command<br />
menu panel.<br />
5 Select ‘Yes’ to confirm or ‘No’ to cancel.<br />
The selected folder on the USB device will be copied to<br />
the HDD.<br />
• Up to 99 folders/999 files on the USB device can be<br />
copied/displayed.<br />
Connect PC<br />
Using a USB connection, you can copy WMA and MP3<br />
files from a PC to the HDD of this device. Operations<br />
carried out on the PC require Windows Media Player 10.<br />
Important<br />
• If the PC you are using does not currently have<br />
Windows Media Player 10 installed, you must first<br />
install the program and make sure it functions<br />
correctly before connecting the USB cable and<br />
attempting to use the Connect PC function.<br />
• For more information on Connect PC, see Using a PC<br />
on page 55.<br />
• You cannot edit or delete albums from this device<br />
when it is connected to a PC via USB. If you wish to<br />
edit or delete albums via the Jukebox, you must first<br />
disconnect the USB cable.<br />
Note<br />
1• Up to 999 albums can be created in the Jukebox. If you copy via Connect PC, the total number of albums you are able to create may be less<br />
than 999 (for more information, see page 123).<br />
• Sound quality is not worsened when you copy data from another source.<br />
• When playing back an album copied from a source whose original audio track plays continuously (such as a live recording), there will be a<br />
brief pause in sound between tracks.<br />
ENTER<br />
ENTER<br />
ENTER<br />
121<br />
En
11<br />
122<br />
En<br />
Using the Jukebox<br />
1 Connect the PC via USB cable.<br />
The screen below is displayed. Choose ‘Take no action’<br />
and click ‘OK’.<br />
*Depending on the settings for Windows Media Player<br />
10, the screen shown below may not be displayed.<br />
2 HOME MENU Select ‘Jukebox’ from the Home Menu.<br />
ENTER<br />
3 Select ‘Connect PC’.<br />
ENTER<br />
'Take no action'<br />
'OK'<br />
4 Select ‘Yes’ to confirm, or ‘No’ to cancel.<br />
5 Verify that the import screen is displayed on the<br />
device.<br />
If no actions are carried out for 20 minutes, the import<br />
screen is automatically closed. To reopen it, you will have<br />
to repeat steps 2 through 4.<br />
Status<br />
Connect PC<br />
Number of copied<br />
folders<br />
Standby<br />
000 Folders ( 000 error )<br />
000000 Files ( 000 error )<br />
Number of copied files<br />
Number of files<br />
unable to be copied<br />
Exit<br />
6 Open Windows Media Player 10 on the PC.<br />
The device settings screen appears. Click ‘Cancel’.<br />
*Depending on the settings for Windows Media Player<br />
10, the screen shown below may not be displayed.<br />
From the PC, in Windows Media Player 10:<br />
'Cancel'<br />
1. Click ‘Library’.<br />
2. Choose the artist, album or song you would<br />
like to copy, and press the right mouse button.<br />
3. Click ‘Add to Sync list’ (when choosing songs,<br />
click ‘Add to’ then ‘Sync list’).<br />
4. Click ‘Start Sync’.<br />
This begins the synchronization process. When finished,<br />
the message ‘Synchronized to Device’ is displayed in<br />
Windows Media Player 10.<br />
'Start Sync'
Using the Jukebox 11<br />
For more information refer to the Help menu of Windows<br />
Media Player 10.<br />
Progress Bar<br />
Connect PC<br />
Copying<br />
001 Folders ( 000 error )<br />
000003 Files ( 000 error )<br />
• To cancel the synchronization process while it is<br />
underway, press ENTER on the remote control. The<br />
Connect PC screen is closed.<br />
• If synchronization fails, make sure that the Pioneer.<br />
HDD/DVD-Recorder device is selected at the<br />
synchronization screen of Windows Media Player 10,<br />
and try again.<br />
7 When you have finished copying files, close<br />
Windows Media Player 10 on the PC.<br />
ENTER<br />
8 Close the import screen on this device.<br />
• If no actions are carried out for 20 minutes after<br />
copying, the import screen is automatically closed.<br />
Note<br />
• When using the sync function of Windows Media<br />
Player 10, music, artist and album folders are created<br />
as follows:<br />
Root<br />
Music Artist 1 Album 1<br />
Album 2<br />
Artist 2 Album 1<br />
• Folders containing no files are not displayed in the<br />
Jukebox (such as the above ‘Artist1’ and ‘Artist2’<br />
folders), but do count toward the maximum of 999<br />
folders allowed in Jukebox.<br />
• Up to 999 tracks can be included in one album. Note<br />
that when there are many tracks contained in one<br />
album, it may take time to display and transfer these<br />
tracks.<br />
• Albums and tracks with no set name that are<br />
transferred from CD/DVD/USB are displayed as<br />
‘UnknownAlbum’ and ‘UnknownFile’ in Windows<br />
Media Player 10.<br />
Exit<br />
music1.mp3<br />
music2.mp3<br />
music1.wma<br />
music1.mp3<br />
• Album and track names that do not conform to the<br />
ISO8859-1 standard may display differently in<br />
Windows Media Player 10 and the Jukebox.<br />
• When albums are deleted in the Jukebox, their file<br />
hierarchy as displayed in Windows Media Player may<br />
change.<br />
• File whose extensions are not supported by the<br />
Jukebox (i.e. files that are not .mp3 or .wma) cannot<br />
be transferred.<br />
• Files imported to this recorder via Connect PC cannot<br />
be exported from this recorder.<br />
• Note that no recording functions, including timer<br />
recordings, will be carried out when you are using the<br />
Connect PC function.<br />
Playing music from the Jukebox<br />
You can select albums or individual tracks from the<br />
Jukebox to play.<br />
1 HOME MENU Select ‘Jukebox’ from the Home Menu.<br />
ENTER<br />
2 Select a Jukebox option.<br />
• Listen to Music/Edit – Listen to CDs or WMA/MP3<br />
files that have been copied to the HDD.<br />
You can also access this option directly by pressing<br />
JUKEBOX.<br />
• Listen to Music from USB device – Listen to music<br />
from an external USB device.<br />
ENTER<br />
3 Select what you want to play.<br />
The screen below shows albums stored on the HDD:<br />
Jukebox<br />
By number<br />
All Genres<br />
Remain<br />
47.0 G<br />
HDD<br />
Album name<br />
3<br />
4<br />
Album1<br />
Album2<br />
ALL<br />
1<br />
5 Album3<br />
2<br />
6 Album4<br />
3<br />
7 Album5<br />
4<br />
8 Album6<br />
5<br />
9<br />
10<br />
Album7<br />
Album8<br />
6<br />
7<br />
Album1 The Planets/Mars-Venus-Mercury-Jup<br />
iter-Saturn-Uranus-Nep classical<br />
Total 12 70 MB<br />
10Albums<br />
Info for selected album Playback status<br />
Play<br />
Erase<br />
Edit<br />
Play Mode<br />
Genre Name<br />
3-10<br />
0.03.58 <br />
• If you select a whole album to play, all tracks that are<br />
not set to Jump will play.<br />
123<br />
En
11<br />
124<br />
En<br />
Using the Jukebox<br />
• If you want to start playback from a selected track in<br />
an album, or play a track that is set to Jump, press <br />
to enter the track list then select a track to play.<br />
Jukebox<br />
By number<br />
3<br />
4<br />
5<br />
Album1<br />
Album2<br />
Album3<br />
ALL<br />
1 Mars<br />
2 Venus<br />
6 Album4 3 Mercury<br />
All Genres 7 Album5 4 Jupiter<br />
8 Album6 5 Saturn<br />
9<br />
10<br />
Album7<br />
Album8<br />
6 Uranus<br />
7 Neptune<br />
Jupiter<br />
HDD<br />
MP3 8 MB<br />
Remain<br />
47.0 G<br />
• Press SUBTITLE or ANGLE to change the page.<br />
Changing the album view<br />
1 From the album list, display the view<br />
options menu panel.<br />
ENTER<br />
2 Select a view option.<br />
• Sort order<br />
Track name<br />
classical<br />
10Albums<br />
Play<br />
Erase<br />
Edit<br />
Play Mode<br />
Genre Name<br />
3-10<br />
0.03.58 <br />
Jukebox<br />
10Albums<br />
By number<br />
Play<br />
Erase<br />
Edit<br />
Play Mode<br />
All Genres<br />
Genre Name<br />
Album1 The Planets/Mars-Venus-Mercury-Jup<br />
HDD<br />
Remain<br />
47.0 G<br />
iter-Saturn-Uranus-Nep classical<br />
Total 12 70 MB<br />
3-10<br />
0.03.58 <br />
3 Album1<br />
Sort order<br />
By number 4 Album2<br />
By number<br />
By favourite<br />
5 Album3<br />
By album<br />
Genre 6 Album4<br />
ALL<br />
1<br />
2<br />
3<br />
All Genres 7 Album5<br />
4<br />
Cancel<br />
8 Album6<br />
5<br />
9<br />
10<br />
Album7<br />
Album8<br />
6<br />
7<br />
By number – Albums are listed by the album<br />
number.<br />
By favourite – Most often listened to music appears<br />
at the top of the list.<br />
By album – Albums are listed alphabetically.<br />
Note<br />
1 Tracks set to Jump will be skipped during consecutive track playback.<br />
• Genre<br />
Jukebox<br />
10Albums<br />
By number<br />
Play<br />
Erase<br />
Edit<br />
Play Mode<br />
All Genres<br />
Genre Name<br />
Album1 The Planets/Mars-Venus-Mercury-Jup<br />
HDD<br />
Remain<br />
47.0 G<br />
iter-Saturn-Uranus-Nep classical<br />
Total 12 70 MB<br />
3-10<br />
0.03.58 <br />
3 Album1<br />
Sort order<br />
All Genres 4 Album2<br />
By number<br />
No Category<br />
5 Album3<br />
Best<br />
Genre Rock 6 Album4<br />
ALL<br />
1<br />
2<br />
3<br />
All Genres Pop 7 Album5<br />
4<br />
Jazz<br />
8<br />
Classical<br />
9<br />
10<br />
Album6<br />
Album7<br />
Album8<br />
5<br />
6<br />
7<br />
All Genres – All albums are displayed.<br />
Genre – Only albums in the selected genre are<br />
displayed.<br />
Editing Jukebox albums<br />
A number of commands are available for editing and<br />
changing the playback behavior of albums.<br />
JUKEBOX<br />
1 Press to display the Jukebox screen.<br />
ENTER<br />
2 Select what you want to edit.<br />
ENTER<br />
3 Select an edit function from the command<br />
menu panel.<br />
• Erase – Erase the selected track (if all tracks in an<br />
album are selected, the whole album is erased).<br />
• Edit > Album name – Enter a name of up to 64<br />
characters for the album. See Title Name on page 107<br />
for how to enter names.<br />
• Edit > Track name – Enter a name of up to 64<br />
characters for the track. See Title Name on page 107<br />
for how to enter names.<br />
• Edit > Set Genre – Set or change the genre for the<br />
album.<br />
• Edit > Jump Set 1 – Set a track to jump so that it<br />
doesn’t play (choose this command again to cancel<br />
the Jump setting).<br />
• Play Mode – Change the playback order for albums<br />
and tracks.<br />
• Genre Name – Enter a name of up to 12 characters<br />
for a genre. See Title Name on page 107 for how to<br />
enter names.
The PhotoViewer 12<br />
Chapter 12<br />
The PhotoViewer<br />
From the PhotoViewer you can view JPEG photos and<br />
picture files stored on the HDD, recordable DVD or CD-R/<br />
-RW/-ROM, or on a USB-equipped digital camera. 1 You<br />
can also import files and save them to the recorder’s<br />
HDD or a DVD-R/-RW disc.<br />
Locating JPEG picture files<br />
1 HOME MENU Select ‘PhotoViewer’ from the Home<br />
Menu.<br />
ENTER<br />
2 Select the location of the files you want<br />
to view or edit.<br />
View/Edit Photos on the HDD<br />
View Photos on a CD/DVD<br />
View Photos on a USB Device<br />
Copy Files from a Digital Camera<br />
• View/Edit Photos on the HDD – View or edit photos<br />
already stored on the recorder’s HDD.<br />
• View Photos on a CD/DVD – View photos on a<br />
Fujicolor CD, CD-ROM, CD-R/-RW, or DVD-R/-RW.<br />
• View Photos on a USB Device – View photos on a<br />
digital camera (or other USB device) connected to<br />
the USB port.<br />
• Copy Files from a Digital Camera – Copy all DCF<br />
files directly from a connected digital camera to a<br />
recordable DVD-R/-RW.<br />
ENTER<br />
3 Select the folder containing the files you<br />
want to view, copy or edit.<br />
The first image from the selected folder is displayed as<br />
thumbnail at the bottom of the screen. From the Folder<br />
Information column, you can change thumbnails via the<br />
/ buttons.<br />
PhotoViewer HDD<br />
Select Folder<br />
001 Folder1<br />
002 Folder2<br />
Folder 003 Folder3<br />
004 Folder4<br />
005 Folder5<br />
006 Folder6<br />
007 Folder7<br />
008 Folder8<br />
HDD<br />
Remain<br />
100.0 G<br />
Currently selected<br />
folder in folder list<br />
002 Folder2<br />
Files 999<br />
Folder 999 MB<br />
Folder information<br />
4 Select the file you want to view, copy or<br />
edit.<br />
Currently selected<br />
thumbnail<br />
PhotoViewer HDD<br />
Folder2 Folder Size 999 MB<br />
001 PIOR0000<br />
002 PIOR0001<br />
File<br />
003 PIOR0002<br />
004 PIOR0003<br />
005 PIOR0004<br />
12 Files 006 PIOR0005<br />
007 PIOR0006<br />
008 PIOR0007<br />
009 PIOR0008<br />
010 PIOR0009<br />
HDD<br />
011 PIOR0010<br />
Remain 012 PIOR0011<br />
100.0 G<br />
• The larger the file size, the longer it takes the recorder<br />
to load the file.<br />
• You can change folders via the / buttons.<br />
• If you encounter a disc that will not play, check that<br />
the disc and file formats are compatible with this<br />
recorder (see JPEG file compatibility and PC-created<br />
disc compatibility on page 46).<br />
• The thumbnail of files that cannot be played is<br />
displayed as the logo.<br />
Note<br />
1 Up to 999 files or 99 folders are viewable, but if there are more files/folders than this on the disc or connected USB camera it is still possible<br />
to view them all using the Reload function (see Reloading files from a disc or USB device on page 127).<br />
1/3<br />
1/84<br />
FOLDER<br />
MENU<br />
Pages in<br />
folder list<br />
FILE<br />
MENU<br />
Pages in<br />
file list<br />
125<br />
En
12<br />
126<br />
En<br />
The PhotoViewer<br />
Changing the display style of the<br />
PhotoViewer<br />
You can choose to display photos by grouping them by<br />
folder, file, or number of thumbnails.<br />
1 Display the View Options panel.<br />
The View Options panel<br />
PhotoViewer HDD<br />
Folder2 Folder Size 999 MB<br />
Display Mode 001 PIOR0000<br />
File 002 PIOR0001<br />
File<br />
003 PIOR0002<br />
Style<br />
004 PIOR0003<br />
12 Files<br />
005 PIOR0004<br />
12 Files 006 PIOR0005<br />
007 PIOR0006<br />
008 PIOR0007<br />
009 PIOR0008<br />
010 PIOR0009<br />
HDD<br />
011 PIOR0010<br />
Remain 012 PIOR0011<br />
100.0 G<br />
ENTER<br />
2 Choose ‘Display Mode’ or ‘Style’ then<br />
press ENTER to see the available view options.<br />
• Display Mode – Choose between folder and file<br />
display modes.<br />
• Style – Choose between displays of 1, 4 and 12<br />
thumbnails.<br />
ENTER<br />
3 Choose a view option, then press ENTER.<br />
The display mode will change to that which you have<br />
chosen.<br />
1/84<br />
FILE<br />
MENU<br />
Playing a slideshow<br />
ENTER<br />
1 Select a folder from the folder list.<br />
To start the slideshow from the first file in the folder, skip to<br />
step 3 after choosing the desired folder and pressing .<br />
2 Select a thumbnail.<br />
• Use PREV and NEXT to display the<br />
previous/next page of thumbnails.<br />
ENTER<br />
3 Select ‘Start Slideshow’ or ‘Start Audio<br />
Slideshow’ from the menu.<br />
When you select ‘Start Audio Slideshow’, you are<br />
prompted to select the Genre of music you would like to<br />
hear, and when you press ENTER, music of that Genre<br />
stored on the Jukebox will be played during the<br />
slideshow.<br />
For more information on adding music to the HDD, see<br />
Using the Jukebox on page 121.<br />
• You can also select a file or folder then press PLAY<br />
to start playing the slideshow.<br />
• Use PREV/ NEXT to display the previous/<br />
next picture, or PAUSE to pause the slideshow.<br />
• Depending on the aspect ratio, some pictures may be<br />
displayed with black bars top and bottom, or left and<br />
right.<br />
• Large picture files may take a few seconds to display.<br />
This is normal.<br />
STOP<br />
4 Press to return to the thumbnail.<br />
• You can also use the RETURN/EXIT button.<br />
5 HOME MENU<br />
Press to exit the PhotoViewer.
The PhotoViewer 12<br />
Zooming an image<br />
During a slideshow you can zoom in to enlarge a portion<br />
of the picture by a factor of two or four. You can also move<br />
the area of the picture displayed.<br />
ENTER 1 Press during the slideshow to zoom the<br />
picture.<br />
Repeated presses cycle between zoom off, 2x zoom and<br />
4x zoom. The zoom factor is displayed on-screen.<br />
2 Use to move the zoomed area.<br />
Rotating an image<br />
You can rotate the displayed picture during a slideshow<br />
so you can always view pictures the right way up,<br />
whichever way they were taken.<br />
ANGLE<br />
• + Press during the slideshow to rotate<br />
MAIN SUB<br />
the displayed picture clockwise by 90º.<br />
Press repeatedly to continue rotating the picture in<br />
increments of 90º.<br />
Reloading files from a disc or USB<br />
device<br />
If you have a disc with more than 1000 files and/or 100<br />
folders, you can still view all the images using the reload<br />
function.<br />
1 Navigate to the last entry in the folder<br />
list (‘Read next: ...’).<br />
2 Load the next batch of up to 999 files/99<br />
folders from the disc or connected USB device.<br />
It will take a moment (at most a few minutes) to load in<br />
the images. 1<br />
ENTER<br />
Importing files to the HDD<br />
You can import files and save them to the HDD 2 from a<br />
CD, DVD or a connected USB camera. Once on the HDD<br />
you can edit and organize your pictures and print them<br />
out if you’ve connected a PictBridge-compatible printer.<br />
1 Select the location of folders/files you<br />
want to import.<br />
To import a whole folder, select the desired folder, press<br />
, and skip to step 3 below.<br />
• To import multiple folders, use the Multi-Mode; see<br />
Selecting multiple files or folders on page 128.<br />
2 Select a file to import, then press .<br />
• To import multiple files, use the Multi-Mode; see<br />
Selecting multiple files or folders on page 128.<br />
3 Select ‘Copy to HDD’ from the menu.<br />
4 Select ‘Yes’ to confirm and copy the<br />
folder(s)/file(s), or ‘No’ to cancel.<br />
• The files will be copied to the HDD with the same<br />
folder structure as the original.<br />
• Importing to the HDD will not work if there is<br />
insufficient space on the HDD, or if there are already<br />
the maximum number of files and/or folders on the<br />
HDD (999 folders/999 files per folder).<br />
Note<br />
1 You can press HOME MENU to exit the PhotoViewer screen while the recorder is reloading images. (If you enter the PhotoViewer again, it will<br />
resume reloading.)<br />
2 For files you want to keep permanently, we recommend backing up to DVD-R/-RW.<br />
ENTER<br />
ENTER<br />
File<br />
HDD<br />
Remain<br />
100.0 G<br />
ENTER<br />
PhotoViewer CD/DVD<br />
Folder2 Folder Size 999 MB<br />
12 Files<br />
001 PIOR0000<br />
002 PIOR0001<br />
003 PIOR0002<br />
004 PIOR0003<br />
005 PIOR0004<br />
006 PIOR0005<br />
007 PIOR0006<br />
008 PIOR0007<br />
009 PIOR0008<br />
010 PIOR0009<br />
011 PIOR0010<br />
012 PIOR0011<br />
Start Slideshow<br />
Copy all to HDD<br />
Copy to HDD<br />
Print<br />
Detailed InformationFILE<br />
MENU<br />
Multi-Mode<br />
1/84<br />
127<br />
En
12<br />
128<br />
En<br />
The PhotoViewer<br />
Selecting multiple files or folders<br />
The Multi-Mode allows you to select multiple folders/files<br />
at once for importing or editing.<br />
ENTER<br />
1 Select the folder containing the files you<br />
want to import.<br />
2 Display the command menu.<br />
ENTER<br />
3 Select ‘Multi-Mode’ from the menu.<br />
PhotoViewer HDD<br />
Select Folder<br />
001 Folder1<br />
002 Folder2<br />
Folder 003 Folder3<br />
004 Folder4<br />
005 Folder5<br />
006 Folder6<br />
Remain<br />
100.0 G<br />
ENTER<br />
HDD<br />
007 Folder7<br />
008 Folder8<br />
002 Folder2<br />
Files 999<br />
Folder 999 MB<br />
Start Slideshow<br />
Start Audio Slideshow<br />
New Folder<br />
Folder Options<br />
Copy to DVD<br />
Multi-Mode<br />
4 Select files/folders from the list.<br />
An orange check mark box() is shown by the item you<br />
selected. A blue check mark box () appears on the folder<br />
select screen when files from that folder are selected.<br />
Folder<br />
Remain<br />
100.0 G<br />
HDD<br />
Multi-Mode<br />
Select Folder<br />
001 Folder1<br />
002 Folder2<br />
003 Folder3<br />
004 Folder4<br />
005 Folder5<br />
006 Folder6<br />
007 Folder7<br />
008 Folder8<br />
002 Folder2<br />
Files 999<br />
Folder 999 MB<br />
PhotoViewer HDD<br />
5 Display the command menu.<br />
ENTER<br />
6 Select the command you want to apply<br />
to all the selected items.<br />
1/3<br />
1/3<br />
FOLDER<br />
MENU<br />
FOLDER<br />
MENU<br />
Note<br />
1• There is a limit to the number of files/amount of data that you can copy at one time.<br />
• Only DCF format files in DCIM folders can be copied to a recordable DVD-R/-RW.<br />
Copying files to a DVD-R/-RW<br />
Using this feature you can copy all the files 1 (including<br />
audio and movie files) stored on a connected USB<br />
camera to a recordable DVD disc.<br />
A slideshow of the files is also recorded on the disc as a<br />
Video mode title, making it possible to view the photos on<br />
other DVD players/recorders that may not be compatible<br />
with JPEG file playback.<br />
Once the files have been copied, the disc is automatically<br />
finalized.<br />
Important<br />
• Use a blank DVD-R/-RW disc, or one that has already<br />
been initialized for Video mode recording but has<br />
nothing yet recorded on it. Discs that have already<br />
been recorded on (as well as CD-R/-RW discs) cannot<br />
be used.<br />
• After backing up the pictures in your digital camera<br />
to DVD, we recommend verifying that they have been<br />
recorded properly before deleting anything from the<br />
camera.<br />
1 Press HOME MENU and select ‘PhotoViewer’ to<br />
display the PhotoViewer screen.<br />
2 Load a blank (or unrecorded Video mode) DVD-R<br />
or DVD-RW disc.<br />
3 Select ‘Copy Files from a Digital Camera’ from the<br />
menu.<br />
View/Edit Photos on the HDD<br />
View Photos on a CD/DVD<br />
View Photos on a USB Device<br />
Copy Files from a Digital Camera<br />
4 Select ‘Yes’ to confirm, or ‘No’ to cancel.<br />
• Note that during copying, any timer programmes set<br />
to start will not begin, and no other operations are<br />
possible.
The PhotoViewer 12<br />
Copying selected files to a DVD-R/-RW<br />
This feature allows you just to copy some of the files<br />
stored on HDD to a DVD.<br />
A slideshow of the files is also recorded on the disc as a<br />
Video mode title, making it possible to view the photos on<br />
other DVD players/recorders that may not be compatible<br />
with JPEG file playback. Note however that you may need<br />
to finalize the disc before it will play on another DVD<br />
player (copying selected files doesn’t automatically<br />
finalize the disc).<br />
Important<br />
•A maximum of 99 slideshow titles can be recorded.<br />
• One slideshow title can contain up to 99 files. If there<br />
are more files than this in the slideshow, multiple<br />
slideshows are created on the disc.<br />
• If you erase a slideshow title from a DVD the<br />
slideshow will become unplayable but the free space<br />
will not increase.<br />
1 Load a blank (or unfinalized Video mode) DVD-R<br />
or DVD-RW disc.<br />
ENTER<br />
2 Select ‘View/Edit Photos on the HDD’<br />
from the menu.<br />
ENTER<br />
3 Select the file(s) or folder(s) you want to<br />
copy.<br />
• Copying a folder will copy all the files contained in it.<br />
• To copy multiple folders, use the Multi-Mode; see<br />
Selecting multiple files or folders on page 128.<br />
ENTER<br />
4 Select ‘Copy to DVD’ from the menu.<br />
ENTER<br />
5 Select ‘Yes’ to confirm or ‘No’ to cancel.<br />
• Folder names on the disc will be number PIONR. File<br />
names will be PHOT number.<br />
• Note that during copying, any timer programmes set<br />
to start will not begin, and no other operation is<br />
possible.<br />
• While ‘Cancel’ is displayed, you can press ENTER to<br />
cancel.<br />
Editing files on the HDD<br />
There are a number of commands you can use to edit and<br />
organize your pictures stored on the HDD.<br />
Creating a new folder<br />
1 From the folder list, display the menu.<br />
ENTER<br />
2 Select ‘New Folder’.<br />
The folder appears at the bottom of the folder list with the<br />
name F_number.<br />
PhotoViewer HDD<br />
Select Folder<br />
Folder<br />
001 Folder1<br />
002 Folder2<br />
003 Folder3<br />
Start Slideshow<br />
Start Audio Slideshow<br />
New Folder<br />
004 Folder4<br />
Folder Options<br />
005 Folder5<br />
006 Folder6<br />
007 Folder7<br />
008 Folder8<br />
Copy to DVD<br />
Multi-Mode<br />
FOLDER<br />
MENU<br />
HDD<br />
002 Folder2<br />
Files 999<br />
Remain<br />
100.0 G<br />
Folder 999 MB<br />
1/3<br />
• There can be up to 999 folders on the HDD.<br />
Erasing a file or folder<br />
1 Select the file(s) or folder(s) you want to<br />
erase.<br />
• To erase multiple files or folders, use the Multi-Mode;<br />
see Selecting multiple files or folders on page 128.<br />
• Erasing a folder will erase all the files contained in it.<br />
Please be careful!<br />
• You can’t erase files that have been locked.<br />
• Folders containing locked files can’t be erased.<br />
Unlocked files in the folder, however, will be erased.<br />
2 Display the command menu.<br />
129<br />
En
12<br />
130<br />
En<br />
The PhotoViewer<br />
ENTER<br />
3 Select ‘File Options’ or ‘Folder Options’.<br />
File<br />
HDD<br />
Remain<br />
100.0 G<br />
ENTER<br />
4 Select ‘Erase’ or ‘Erase Folder’.<br />
5 Select ‘Yes’ to confirm, or ‘No’ to cancel.<br />
• You can also erase a file or folder by pressing CLEAR<br />
when the file or folder is highlighted. Press ENTER to<br />
confirm.<br />
Copying files<br />
PhotoViewer HDD<br />
Folder2 Folder Size 999 MB<br />
12 Files<br />
001 PIOR0000<br />
002 PIOR0001<br />
003 PIOR0002<br />
004 PIOR0003<br />
005 PIOR0004<br />
006 PIOR0005<br />
007 PIOR0006<br />
008 PIOR0007<br />
009 PIOR0008<br />
010 PIOR0009<br />
011 PIOR0010<br />
012 PIOR0011<br />
Start Slideshow<br />
Start Audio Slideshow<br />
File Options<br />
Print<br />
Copy to DVD FILE<br />
MENU<br />
Detailed Information<br />
Multi-Mode<br />
1 Select the file(s) or folder(s) you want to<br />
copy.<br />
• Copying a folder will copy all the files contained in it.<br />
• To copy multiple files or folders, use the Multi-Mode;<br />
see Selecting multiple files or folders on page 128.<br />
2 Display the command menu.<br />
3 Select ‘File Options’ or ‘Folder Options’.<br />
1/84<br />
PhotoViewer HDD<br />
Folder2 Folder Size 999 MB<br />
File<br />
12 Files<br />
001 PIOR0000<br />
002 PIOR0001<br />
003 PIOR0002<br />
004 PIOR0003<br />
005 PIOR0004<br />
006 PIOR0005<br />
Start Slideshow<br />
Erase<br />
Start Audio Slideshow<br />
Copy<br />
File Options<br />
Rename File<br />
Print<br />
Lock<br />
Copy to DVD FILE<br />
MENU<br />
Detailed Information<br />
007 PIOR0006<br />
008 PIOR0007<br />
009 PIOR0008<br />
Multi-Mode<br />
Cancel<br />
HDD<br />
010 PIOR0009<br />
011 PIOR0010<br />
Remain<br />
100.0 G<br />
012 PIOR0011<br />
1/84<br />
ENTER<br />
ENTER<br />
ENTER<br />
4 Select ‘Copy’ or ‘Copy Folder Contents’.<br />
File<br />
HDD<br />
Remain<br />
100.0 G<br />
ENTER<br />
PhotoViewer HDD<br />
Folder2 Folder Size 999 MB<br />
12 Files<br />
001 PIOR0000<br />
002 PIOR0001<br />
003 PIOR0002<br />
004 PIOR0003<br />
005 PIOR0004<br />
006 PIOR0005<br />
007 PIOR0006<br />
008 PIOR0007<br />
009 PIOR0008<br />
010 PIOR0009<br />
011 PIOR0010<br />
012 PIOR0011<br />
5 Select a folder to copy the folder(s)/<br />
file(s) to.<br />
ENTER<br />
6 Select ‘Yes’ to confirm, or ‘No’ to cancel.<br />
• Copying to the HDD will not work if there is<br />
insufficient space on the HDD; if there are already the<br />
maximum number of files and/or folders on the HDD.<br />
Naming files and folders<br />
Start Slideshow<br />
Erase<br />
Start Audio Slideshow<br />
Copy<br />
File Options<br />
Rename File<br />
Print<br />
Lock<br />
Copy to DVD FILE<br />
MENU<br />
Detailed Information<br />
Multi-Mode<br />
Cancel<br />
1 Select the file or folder you want to rename.<br />
You can’t rename files that have been locked.<br />
2 Select ‘File Options’ or ‘Folder Options’.<br />
3 Select ‘Rename File’ or ‘Rename Folder’.<br />
File<br />
HDD<br />
Remain<br />
100.0 G<br />
PhotoViewer HDD<br />
Folder2 Folder Size 999 MB<br />
12 Files<br />
001 PIOR0000<br />
002 PIOR0001<br />
003 PIOR0002<br />
004 PIOR0003<br />
005 PIOR0004<br />
006 PIOR0005<br />
007 PIOR0006<br />
008 PIOR0007<br />
009 PIOR0008<br />
010 PIOR0009<br />
011 PIOR0010<br />
012 PIOR0011<br />
4 Enter a new name for the file/folder.<br />
File names or Folder names can be up to 64 characters<br />
long.<br />
See Using a USB keyboard to enter a name on page 107<br />
for how to enter a name.<br />
1/84<br />
Start Slideshow<br />
Erase<br />
Start Audio Slideshow<br />
Copy<br />
File Options<br />
Rename File<br />
Print<br />
Lock<br />
Copy to DVD FILE<br />
MENU<br />
Detailed Information<br />
Multi-Mode<br />
Cancel<br />
1/84
The PhotoViewer 12<br />
Locking/Unlocking files<br />
Locking files will protect them from accidental erasure<br />
and prevent them from being renamed.<br />
Use the same process to both lock and unlock files.<br />
Locked files are displayed in the PhotoViewer with a<br />
padlock icon.<br />
1 Select the file(s) you want to lock (or<br />
unlock).<br />
• To lock/unlock multiple files or folders, use the Multi-<br />
Mode; see Selecting multiple files or folders on<br />
page 128.<br />
2 Display the command menu.<br />
ENTER<br />
3 Select ‘File Options’ or ‘Folder Options’.<br />
ENTER<br />
4 Select ‘Lock’ or ‘Lock Folder Contents’.<br />
PhotoViewer HDD<br />
Folder2 Folder Size 999 MB<br />
File<br />
12 Files<br />
001 PIOR0000<br />
002 PIOR0001<br />
003 PIOR0002<br />
004 PIOR0003<br />
005 PIOR0004<br />
006 PIOR0005<br />
Start Slideshow<br />
Erase<br />
Start Audio Slideshow<br />
Copy<br />
File Options<br />
Rename File<br />
Print<br />
Lock<br />
Copy to DVD FILE<br />
MENU<br />
Detailed Information<br />
007 PIOR0006<br />
008 PIOR0007<br />
009 PIOR0008<br />
Multi-Mode<br />
Cancel<br />
HDD<br />
010 PIOR0009<br />
011 PIOR0010<br />
Remain<br />
100.0 G<br />
012 PIOR0011<br />
1/84<br />
Locked files are shown with a padlock icon next to them.<br />
To remove all locks within a given folder, choose ‘Folder<br />
Option’ > ‘Unlock Folder Contents’.<br />
To view detailed information<br />
This feature allows you to check the settings of the<br />
camera from which you imported the photos.<br />
1 Choose the file for which you would like to see<br />
detailed information.<br />
2 Choose ‘Detailed Information’.<br />
When no detailed information is available, nothing is<br />
displayed.<br />
Note<br />
1 Picture files should be standard DCF format. Non-standard files may not print properly.<br />
Printing files<br />
Connecting a PictBridge-compatible printer to the USB<br />
port will enable you to print out picture files 1 stored on<br />
the HDD, a CD/DVD, or directly from a digital camera.<br />
Make sure that the printer (and your digital camera if you<br />
are using that as a source) is connected to the recorder<br />
before starting.<br />
1 Select the file(s) you want to print.<br />
• To print multiple files, use the Multi-Mode; see<br />
Selecting multiple files or folders on page 128.<br />
2 Display the command menu.<br />
ENTER<br />
3 Select ‘Print’ from the menu.<br />
File<br />
HDD<br />
Remain<br />
100.0 G<br />
ENTER<br />
PhotoViewer HDD<br />
Folder2 Folder Size 999 MB<br />
12 Files<br />
001 PIOR0000<br />
002 PIOR0001<br />
003 PIOR0002<br />
004 PIOR0003<br />
005 PIOR0004<br />
006 PIOR0005<br />
007 PIOR0006<br />
008 PIOR0007<br />
009 PIOR0008<br />
010 PIOR0009<br />
011 PIOR0010<br />
012 PIOR0011<br />
Start Slideshow<br />
Start Audio Slideshow<br />
File Options<br />
Print<br />
Copy to DVD FILE<br />
MENU<br />
Detailed Information<br />
Multi-Mode<br />
4 Select ‘Start’ to confirm, or ‘Cancel’ to<br />
cancel.<br />
• Once printing has started, you can cancel by<br />
pressing ENTER.<br />
Tip<br />
• Paper size and layout can be set; the options<br />
available depend on your printer — check the printer<br />
manual for details.<br />
• This recorder may not work correctly with all printers.<br />
1/84<br />
131<br />
En
13<br />
132<br />
En<br />
The Disc Setup menu<br />
Chapter 13<br />
The Disc Setup menu<br />
From the Disc Setup menu you can name discs, lock the<br />
contents to prevent accidental recording and erasure,<br />
initialize and finalize discs. The Disc Setup menu is<br />
accessed from the Home menu.<br />
Basic settings<br />
Input Disc Name<br />
DVD (VR) DVD (Video) DVD+R DVD+RW DVD-RAM<br />
When you initialize a disc for recording, the recorder<br />
automatically assigns a name for the disc ranging from<br />
DISC 1 to DISC 99. You can use the Input Disc Name<br />
function to change the default disc name to something<br />
more descriptive. This name appears when you load the<br />
disc and when you display disc information on-screen.<br />
1 HOME MENU Select ‘Disc Setup’ from the Home Menu.<br />
ENTER<br />
2 Select ‘Basic’ > ‘Input Disc Name’ > ‘Next<br />
Screen’.<br />
ENTER<br />
3 Input a name for the disc.<br />
The disc name can be up to 64 characters long for a VR<br />
mode disc, or 40 for a Video mode discs and DVD+R/+RW.<br />
• See Title Name on page 107 for more on navigating<br />
the input screen.<br />
Lock Disc<br />
DVD (VR) DVD-RAM<br />
Disc Setup<br />
Basic Input Input Disc Disc Name Name<br />
Next Screen<br />
Initialize<br />
Lock Disc<br />
Finalize<br />
Optimize HDD<br />
DVD-RW Auto Init.<br />
• Default setting: Off<br />
Locking the disc will prevent accidental recording,<br />
editing or erasing of the disc.<br />
Important<br />
•A locked disc can still be initialized (which will<br />
completely erase the disc).<br />
1 HOME MENU Select ‘Disc Setup’ from the Home Menu.<br />
2 Select ‘Basic’ > ‘Lock Disc’ then ‘On’ or ‘Off’.<br />
Set to On to prevent accidental recording, editing or<br />
erasing of the disc loaded. If you need to unlock the disc<br />
to make edits, select Off.<br />
DVD-RW Auto Initialize<br />
DVD-RW<br />
• Default setting: VR Mode<br />
Initialization mode is automatically carried out when you<br />
insert a blank DVD-RW. You must set the desired<br />
initialization mode before inserting a disc.<br />
See DVD-RW Auto Initialize on page 90 for detailed<br />
instructions.<br />
Initialize settings<br />
You can initialize a recordable DVD-R/-RW disc for either<br />
VR mode or Video mode recording.<br />
The first time you load a new DVD-RW disc, it will be<br />
automatically initialized for recording according to the<br />
DVD-RW Auto Init. setting in the Disc Setup menu (see<br />
page 90).<br />
New DVD-R discs are ready for Video mode recording<br />
when you load them, but it is also possible to initialize<br />
them for VR mode recording. 1<br />
Note<br />
1 Once initialized for VR mode recording it is not possible to re-initialize the disc for Video mode recording. Also, once recorded in Video mode,<br />
the disc cannot be re-initialized for VR mode recording.<br />
ENTER<br />
Disc Setup<br />
Basic Input Disc Name<br />
On<br />
Initialize<br />
Lock Disc<br />
Off<br />
Finalize<br />
Optimize HDD<br />
DVD-RW Auto Init.<br />
DVD-R DVD-RW DVD+RW DVD-RAM
The Disc Setup menu 13<br />
DVD+RW and DVD-RAM discs can also be initialized as<br />
a way of erasing the entire disc. When initializing a DVD<br />
-RAM disc, select VR mode.<br />
See Initializing recordable DVD discs on page 89 for<br />
detailed instructions.<br />
Finalize settings<br />
Finalize<br />
DVD-R DVD-RW DVD+R DVD+RW<br />
Finalizing ‘fixes’ the recordings in place so that the disc<br />
can be played on a regular DVD player or computer<br />
equipped with a suitable DVD-ROM drive.<br />
It is also possible to finalize DVD+RW discs. This is only<br />
necessary if you want to a player to display a title menu<br />
for the disc.<br />
See Playing your recordings on other DVD players on<br />
page 88 for detailed instructions.<br />
Undo Finalize<br />
DVD-RW<br />
You can undo the finalization on DVD-RW discs recorded<br />
on this recorder in Video mode. You need to do this if you<br />
want to record more material or edit material already on<br />
the disc.<br />
You can also undo the finalization of VR mode discs<br />
which have been finalized on other DVD recorders. If<br />
when you load a disc the message This disc cannot be<br />
recorded. Undo the finalization. is displayed, use this<br />
command to be able to record on the disc using this<br />
recorder.<br />
1 HOME MENU Select ‘Disc Setup’ from the Home Menu.<br />
ENTER<br />
2 Select ‘Finalize’ > ‘Undo Finalize’ then<br />
‘Start’.<br />
Optimize HDD<br />
HDD<br />
As you record, erase and edit recordings, the HDD file<br />
system gradually becomes fragmented. Periodically, the<br />
HDD will need optimizing to ‘clean up’ all the fragmented<br />
files.<br />
When the HDD needs optimizing the recorder will<br />
automatically display a message recommending<br />
optimization.<br />
Important<br />
• Optimizing the HDD can take as long as eight hours.<br />
During optimization, playback and recording are not<br />
possible.<br />
• Cancelling optimization mid-way does not undo the<br />
optimization already done, so the HDD will be partly<br />
optimized.<br />
1 HOME MENU Select ‘Disc Setup’ from the Home Menu.<br />
ENTER<br />
2 Select ‘Optimize HDD’ then ‘Start’.<br />
Disc Setup<br />
Basic<br />
Initialize<br />
Finalize<br />
Optimize HDD<br />
A progress bar indicates how long there is left to go. If no<br />
actions are carried out for more than 20 minutes after the<br />
optimization process is completed, the unit turns itself<br />
off.<br />
Initialize HDD<br />
HDD<br />
Optimize HDD<br />
When your HDD/DVD recorder is working without a<br />
problem this option is not visible in the Disc Setup menu.<br />
However, if the HDD file system becomes corrupted for<br />
some reason, you can initialize the HDD to fix the<br />
problem. Note that initializing the HDD will erase all the<br />
data on it.<br />
1 HOME MENU Select ‘Disc Setup’ from the Home Menu.<br />
ENTER<br />
2 Select ‘Initialize HDD’ then ‘Start’.<br />
Disc Setup<br />
Basic<br />
Initialize<br />
Finalize<br />
Optimize Initialize Optimize HDD<br />
Initialize HDD<br />
Start<br />
Start<br />
133<br />
En
14<br />
134<br />
En<br />
The Video Adjust menu<br />
Chapter 14<br />
The Video Adjust menu<br />
Using the Video Adjust menu you can set up the picture<br />
quality for the built-in tuner and external inputs, for disc<br />
playback, and for recording.<br />
Setting the picture quality for TV and<br />
external inputs<br />
Picture Creation lets you choose a set of picture quality<br />
settings for the built-in TV tuner 1 and for each external<br />
input. There are several preset settings that suit various<br />
sources, or you can create up to three of your own sets.<br />
Choosing a preset<br />
1 HOME MENU With the recorder stopped, press to<br />
display the Home Menu.<br />
ENTER<br />
2 Select ‘Video Adjust’.<br />
ENTER<br />
3 Select a preset.<br />
Tuner<br />
Detailed Settings<br />
• Use the VIDEO IN button to switch between the builtin<br />
TV tuner and the external inputs.<br />
• Use the Smart Jog to change the channel of the<br />
built-in TV tuner.<br />
There are six presets available:<br />
• Tuner – suitable for general TV broadcasts<br />
• VCR – suitable for video cassettes<br />
• DTV/LDP – suitable for digital broadcasts and<br />
Laserdiscs<br />
• Memory1 – user preset 1<br />
• Memory2 – user preset 2<br />
• Memory3 – user preset 3<br />
You can press DISPLAY to see the individual settings for<br />
the current preset (Tuner, VCR or DTV/LDP).<br />
Pr 1<br />
Creating your own set<br />
There are three user presets in which you can save your<br />
own set of picture quality settings.<br />
1 Follow Choosing a preset above and select one of<br />
the user presets (Memory 1, 2 or 3).<br />
2 Select ‘Detailed Settings’.<br />
3 Select the setting you want to adjust.<br />
You can adjust the following settings:<br />
• Prog. Motion – Adjusts the motion and still picture<br />
quality when video output is set to progressive.<br />
• PureCinema – This setting optimizes the picture for<br />
film material when the video output is set to<br />
progressive. Usually set to Auto; but try switching to<br />
Off if the picture appears unnatural.<br />
• 3-D Y/C – Adjusts the brightness/colour separation.<br />
• YNR – Adjusts the amount of noise reduction (NR)<br />
applied to the Y (brightness) component.<br />
• CNR – Adjusts the amount of noise reduction (NR)<br />
applied to the C (colour) component.<br />
• Detail – Adjusts how sharp edges appear.<br />
• White AGC – Turn on for automatic white level<br />
adjustment.<br />
• White Level – Adjusts the intensity of white.<br />
Note<br />
1 When the Component Video Out (see page 139) is set to Interlace, the settings for the digital tuner cannot be changed.<br />
ENTER<br />
ENTER<br />
Memory1<br />
Prog. Motion<br />
PureCinma<br />
3-D Y/C<br />
YNR<br />
CNR<br />
Detail<br />
Memory1<br />
Detailed Settings<br />
Pr 1<br />
Motion Still<br />
Auto<br />
Motion Still<br />
Off<br />
Max<br />
Off<br />
Max<br />
Off<br />
Max<br />
White AGC Off<br />
Pr 1
The Video Adjust menu 14<br />
• Black Level – Adjusts the intensity of black.<br />
• Black Setup – Corrects the standard reference black<br />
level (525 Input Line System only).<br />
• Hue – Adjusts overall balance between red and green.<br />
• Chroma Level – Adjusts how rich the colours appear.<br />
ENTER<br />
4 Adjust the currently selected setting.<br />
5 HOME MENU Press to exit.<br />
You can now use the preset for any other input or the<br />
built-in TV tuner.<br />
Tip<br />
• To see more of the picture as you adjust different<br />
settings, press ENTER after selecting the setting you<br />
want to adjust.<br />
Setting the picture quality for disc<br />
playback<br />
This setting determines how the picture will look when<br />
playing discs.<br />
Choosing a preset<br />
1 HOME MENU With a disc playing (or paused), press to<br />
display the Home Menu.<br />
ENTER<br />
2 Select ‘Video Adjust’.<br />
ENTER<br />
3 Select a setting.<br />
TV<br />
Detailed Settings<br />
There are six presets available:<br />
• TV – suitable for LCD and cathode-ray tube TVs<br />
• PDP – suitable for plasma display screens<br />
• Professional – suitable for professional monitors<br />
• Memory1 – user preset 1<br />
• Memory2 – user preset 2<br />
• Memory3 – user preset 3<br />
You can press DISPLAY to see the individual settings for<br />
the current preset (TV, PDP or Professional).<br />
Creating your own set<br />
There are three user presets in which you can save your<br />
own set of picture quality settings for disc playback.<br />
1 Follow Choosing a preset above and select one of<br />
the user presets (Memory 1, 2 or 3).<br />
2 Move the cursor down and select ‘Detailed<br />
Settings’.<br />
Memory1<br />
Detailed Settings<br />
135<br />
En
14<br />
136<br />
En<br />
The Video Adjust menu<br />
3 Select the picture quality setting you want to<br />
adjust.<br />
Memory1<br />
Prog. Motion<br />
PureCinma<br />
YNR<br />
BNR<br />
MNR<br />
Sharpness<br />
Detail<br />
Motion Still<br />
Auto1<br />
Off Max<br />
Off<br />
Off<br />
Soft<br />
Soft<br />
You can adjust the following settings:<br />
• Prog. Motion – Adjusts the motion and still picture<br />
quality when video output is set to progressive. (Prog.<br />
Motion is ineffective when PureCinema is On.)<br />
• PureCinema – This setting optimizes the picture for<br />
film material when the video output is set to<br />
progressive. Usually set to Auto 1 but try switching<br />
to Auto 2, On or Off if the picture appears unnatural.<br />
• YNR – Adjusts the amount of noise reduction (NR)<br />
applied to the Y (brightness) component.<br />
• BNR – Adjusts the amount of noise reduction (NR)<br />
applied to the block noise (artefacts visible in areas of<br />
flat colour, caused by MPEG compression).<br />
• MNR – Adjusts the amount of noise reduction (NR)<br />
applied to the mosquito noise (artefacts visible<br />
around the edges of an image, caused by MPEG<br />
compression).<br />
• Sharpness – Adjusts the sharpness of the highfrequency<br />
(detailed) elements in the picture.<br />
Sharpness is ineffective for HDMI output.<br />
• Detail – Adjusts how sharp edges appear.<br />
• White Level – Adjusts the intensity of white. White<br />
Level is ineffective for HDMI output.<br />
• Black Level – Adjusts the intensity of black. Black<br />
Level is ineffective for HDMI output.<br />
• Black Setup – Corrects the standard reference black<br />
level. Black Setup is ineffective for HDMI output.<br />
• Gamma Correction – Adjusts the brightness of<br />
darker images. Gamma Correction is ineffective for<br />
HDMI output.<br />
• Hue – Adjusts overall balance between red and<br />
green. Hue is ineffective for HDMI output.<br />
• Chroma Level – Adjusts how rich the colours<br />
appear. Chroma Level is ineffective for HDMI output.<br />
Max<br />
Max<br />
Fine<br />
Fine<br />
4 Use the / buttons to adjust the currently<br />
selected picture quality setting.<br />
5 When you have all the settings as you want<br />
them, press HOME MENU to exit.<br />
Tip<br />
• To see more of the picture as you adjust different<br />
settings, press ENTER after selecting the setting you<br />
want to adjust.
The Initial Setup menu 15<br />
Chapter 15<br />
The Initial Setup menu<br />
Using the Initial Setup menu<br />
The Initial Setup menu is where you can set various recorder options for sound, picture, language and so on.<br />
Some settings can only be changed when the recorder is stopped. During playback and recording these settings are<br />
grayed out in the Initial Setup menu.<br />
Except for the Setup Navigator, menu screens are exited automatically after 20 minutes of inactivity.<br />
• Press HOME MENU and select ‘Initial Setup’.<br />
In the table below, the default option is marked with a •.<br />
Setting<br />
Basic<br />
Options Explanation<br />
Clock Setting Auto Set the channel that broadcasts a clock signal and the clock will be set<br />
automatically.<br />
Manual • If there is no channel that broadcasts a clock signal in your area, you can set<br />
the time and date manually.<br />
• If any digital TV channels are set then the clock will automatically be set.<br />
• The clock must be set in order to use timer recording.<br />
Input Line System 525 System Use for NTSC or PAL-60 recording from an external input.<br />
625 System • Use for standard PAL or SECAM recording.<br />
• This setting is applicable only when recording from an external input.<br />
• See also About the input line system on page 146 for more information on this setting.<br />
Power Save Mode 1 Only signals arriving at the antenna input are passed through to the antenna<br />
output when the recorder is in standby.<br />
Mode 2 No input signals are passed through to the outputs when the recorder is in<br />
standby.<br />
Off • When the recorder is in standby, all signals arriving at the SCART and<br />
antenna inputs are passed along to the outputs.<br />
HELP Setting On • Switches on the automatic Help screens for GUI displays.<br />
Off Switches off the automatic Help screens for GUI displays. (Press HELP on<br />
the remote to manually display the Help screen.)<br />
EPG Type Select GUIDE Plus+ Use the Gemstar GUIDE Plus+ EPG.<br />
Digital EPG Use the EPG based on information provided by D.TV broadcasts.<br />
Setup Navigator Start Select to start the Setup Navigator. See also Switching on and setting up on<br />
page 56.<br />
Digital Tuner<br />
Replace Channels Next Screen Scans for digital channels and replaces all the channel presets with the<br />
results. Before the scan starts you will need to select your country.<br />
After the scan is complete the recorder tells you whether any new channels<br />
were found, and if so, how many.<br />
(You can cancel the scan before it has finished by pressing HOME MENU or<br />
RETURN/EXIT. In this case, no channels are set.)<br />
If you execute a Replace Channels command, any timer recordings set for D.TV channels will be erased.<br />
137<br />
En
15<br />
138<br />
En<br />
The Initial Setup menu<br />
Setting Options Explanation<br />
Add New Channels Next Screen Automatically scans for new digital channels.<br />
After the scan is complete the recorder tells you whether any new channels<br />
were found, and if so, how many.<br />
(You can cancel the scan before it has finished by pressing HOME MENU or<br />
RETURN/EXIT. In this case, no new channels are set.)<br />
Channel Sort Next Screen Use this screen to sort channel presets into your prefered order. Use the<br />
/// buttons to highlight the channel you want to move, press<br />
ENTER. Use the cursor buttons again to highlight the position you want to<br />
move the channel preset to, then press ENTER again.<br />
(If there are more channel presets than will fit on one screen, you can select<br />
the next/previous page by highlighting the small triangular marks and<br />
pressing ENTER.)<br />
Channel Options Next Screen From this screen you can skip or lock channels. Locked channels will require<br />
the correct password to be entered before the channel can be watched. Use<br />
the /// buttons to highlight a preference box and press ENTER to<br />
toggle the preference.<br />
To enter this screen, input the parental lock password when prompted (if one<br />
has not yet been set then the password you enter becomes the parental lock<br />
password).<br />
Auto Skip Off • No channels are automatically skipped.<br />
Radio Radio channels are skipped when selecting channels.<br />
Data Data channels are skipped when selecting channels.<br />
Radio & Data Radio and data channels are skipped when selecting channels.<br />
Signal Check Next Screen Use this screen to check the signal level and quality of digital channels. Use<br />
the / buttons to change the RF channel; select Add New Channels<br />
then press ENTER to scan for new channels; press HOME MENU to exit.<br />
Aerial Power On Power is supplied to the connected aerial (antenna) when this recorder is on<br />
or in standby.<br />
Auto Power is supplied to the connected aerial (antenna) only when this recorder<br />
is on.<br />
Off • This recorder does not supply power to the connected aerial (antenna).<br />
• If the setting keeps reverting to Off when you try to set to On or Auto, the aerial may not be connected properly, or it may be shorted. In either<br />
case, check the connection and try making the setting again.<br />
D.TV Language Next Screen From this screen you can set your Primary and Secondary Audio preference<br />
for multilingual digital broadcasts, your Primary and Secondary Subtitle<br />
preference for programmes that are broadcast with subtitles, and your<br />
Teletext language preference. Use the / buttons to highlight a field then<br />
use the / buttons to change it.
The Initial Setup menu 15<br />
Setting Options Explanation<br />
Analog Tuner<br />
Auto Channel Setting Auto Scan Select your country and then wait for the recorder to auto tune into channels<br />
in your area. After auto scan has finished, the channel mapping screen<br />
appears showing which channels have been assigned to which programme<br />
numbers. You can skip unwanted channels using the Manual CH Setting<br />
option below.<br />
Press HOME MENU to exit the channel mapping screen.<br />
Download from TV If your TV supports this feature you can download all the channels that your<br />
TV is tuned to via the SCART input. Select your country and then wait for the<br />
download to complete. After the download is complete, the channel<br />
mapping screen appears, as above.<br />
See also the operating instructions that came with your TV for more<br />
information.<br />
Manual CH Setting Next Screen Proceed to the next screen if you need to adjust any of the settings made by<br />
auto tuning. Select your country, then proceed to the manual channel<br />
setting screen:<br />
• Change channel presets using the Smart Jog.<br />
• To skip the displayed channel (because there is no station assigned to that<br />
channel), change the Skip setting to On.<br />
• Set the CH SYSTEM setting to match the channel system of your country<br />
or region.<br />
• Set the CHANNEL setting to the channel you want to assign to the current<br />
channel preset.<br />
• To manually fine tune the channel, change the AFT setting to Off then<br />
adjust the Level setting.<br />
• Set the Sound System setting to match the sound system of your region.<br />
• The Name field allows you to input a name of up to five characters for the<br />
current channel preset.<br />
• If the currently selected channel is scrambled requiring a decoder<br />
connected to the AV2 (INPUT 1/DECODER), set the Decoder setting to On.<br />
Channel Swapping Next Screen Proceed to the next screen to swap channel assignments of different presets<br />
so that you can group together presets that naturally go together. Select two<br />
presets to swap then press ENTER.<br />
Video In/Out<br />
Input Colour System Next Screen Proceed to the next screen to set the input colour system for the external<br />
input and the built-in TV tuner. Use the Smart Jog or VIDEO IN buttons to<br />
change the preset or external input. On the default Auto setting the recorder<br />
can generally correctly detect whether the input signal is PAL, SECAM, 3.58<br />
NTSC or PAL-60, but in some cases you may have to set it manually if the<br />
picture is displayed incorrectly.<br />
• Input Colour System cannot be set when the recorder is in D.TV mode.<br />
• See also About the input colour system on page 146 for more information on this setting.<br />
Component Video<br />
Out<br />
Interlace • Select if your monitor/TV is not compatible with progressive-scan video.<br />
Progressive Select if your monitor/TV is progressive-scan compatible. Check the<br />
operating instructions that came with your monitor/TV if you’re not sure.<br />
• For Component Video Out to be effective, the AV1 Out setting (see page 140) must be set to something other than RGB.<br />
• If your TV is incompatible with progressive scan video and you select Progressive, you will not be able to see any picture at all. In this case,<br />
press OPEN/CLOSE while holding down the (Stop) button on the front panel to switch to Interlace (this also switches Screen Resolution on<br />
page 144 to the default setting).<br />
• When the HDMI signal is output, no video is output from the COMPONENT VIDEO OUT.<br />
139<br />
En
15<br />
140<br />
En<br />
The Initial Setup menu<br />
Setting Options Explanation<br />
AV1 Out Video • Sets the AV1 (RGB)-TV SCART output to standard composite video<br />
(compatible with all TVs).<br />
S-Video Sets the AV1 (RGB)-TV SCART output to S-video. Recommended if you are<br />
using a long SCART cable.<br />
RGB Sets the AV1 (RGB)-TV SCART output to RGB. Good quality but check your<br />
TV for compatibility. Note that on this setting signals from the built-in tuner<br />
and from external inputs is not output when the recorder is in TV mode.<br />
• If you choose a setting that is incompatible with your TV you may not be able to see any picture at all. In this case either switch off and reconnect<br />
using the supplied video cable, or reset the recorder (see Resetting the recorder on page 161).<br />
• The Component Video Out setting (see page 139) has no effect when AV1 Out is set to RGB.<br />
• When the HDMI signal is output, the AV1 Out outputs the composite video signal even when it is set to RGB.<br />
AV2/L1 In Video • Sets the AV2 (INPUT 1/DECODER) SCART input to standard composite<br />
video.<br />
S-Video Sets the AV2 (INPUT 1/DECODER) SCART input to S-video.<br />
RGB Sets the AV2 (INPUT 1/DECODER) SCART input to RGB.<br />
Decoder Use this setting if you connected a decoder to the AV2 (INPUT 1/DECODER)<br />
SCART connector. For scrambled channels, make sure that the channel<br />
Decoder setting is set to On. (See Manual CH Setting on page 139.)<br />
NTSC on PAL TV On • NTSC discs will play correctly on PAL-only TVs.<br />
Off Use if your TV is already NTSC-compatible.<br />
Many recent PAL TVs are compatible with NTSC input and so this setting can be switched off. Check the operating instructions that came with<br />
your TV. See also About NTSC on PAL TV on page 146 for related information.<br />
Audio In<br />
NICAM Select NICAM • Record the NICAM audio in a NICAM broadcast.<br />
Regular Audio Record the non-NICAM audio in a NICAM broadcast. (You can still switch<br />
the audio to record using the AUDIO button before recording.)<br />
Analog Tuner Level Normal • Standard setting.<br />
Compression Use if the audio level from the built-in tuner is excessive, causing distortion.<br />
External Audio Stereo • Select if the audio from the currently selected external input is standard<br />
stereo.<br />
Bilingual Select if each channel carries a separate soundtrack.<br />
When the external audio is from the DV input, an audio subcode channel within the DV audio tells the recorder whether the audio is stereo or<br />
bilingual. This has priority over the setting you make here.<br />
Bilingual Recording A/L • Record the left (A) channel of a bilingual source when recording to HDD<br />
with HDD Recording Format set to Video Mode On, to DVD-R/-RW (Video<br />
mode) or DVD+R/+RW or in LPCM mode, from an external source.<br />
B/R As above, but for right (B) channel recording.<br />
When recording bilingual audio to DVD in VR mode (except in LPCM mode), or to HDD with HDD Recording Format set to Video Mode Off (except<br />
in LPCM mode), both audio channels are recorded and you can switch to the one you want on playback.<br />
DV Input Stereo 1 • Select to use the ‘live’ audio track (recorded during the video shoot) from a<br />
camcorder that supports two stereo audio tracks.<br />
Stereo 2 Select to use the overdubbed audio track from a camcorder that supports<br />
two stereo audio tracks.<br />
Mix Select one of the three settings to use a mix of the two stereo audio tracks.
The Initial Setup menu 15<br />
Setting<br />
Audio Out<br />
Options Explanation<br />
Dolby Digital Out Dolby Digital • Output a Dolby Digital signal when a Dolby Digital source is being played.<br />
Dolby Digital Convert Dolby Digital sources to Linear PCM output. Use if your connected<br />
PCM<br />
equipment doesn’t have a Dolby Digital decoder.<br />
DTS Out On • Output a DTS signal when a DTS source is being played.<br />
Off Switch off the digital output when a DTS source is being played. Use when<br />
your connected equipment doesn’t have a DTS decoder. In this case, use the<br />
analog audio outputs.<br />
96 kHz PCM Out 96 kHz 48 kHz • Convert 96 kHz digital audio sources to 48 kHz output. Use if your connected<br />
equipment doesn’t support 96 kHz sampling rate.<br />
96 kHz Output 96 kHz digital audio when a 96 kHz source is being played.<br />
MPEG Out MPEG Output an MPEG audio signal when a source using MPEG audio is being<br />
played.<br />
MPEG PCM • Convert sources with MPEG audio to Linear PCM output. Use if your<br />
connected equipment doesn’t have an MPEG audio decoder.<br />
Audio DRC On Switches on Audio DRC (Dynamic Range Control). Use when listening to<br />
Dolby Digital material at low volume.<br />
Off • Switches off Audio DRC.<br />
Audio DRC is not effective when listening via the digital output when the Dolby Digital Out setting is set to Dolby Digital. In this case adjust the<br />
dynamic range from the receiver subwoofer — see Dynamic Range Control on page 32.<br />
Language<br />
OSD Language English • Sets the language of the on-screen displays to English.<br />
available languages Choose from the languages displayed for the on-screen displays.<br />
On Screen Display and D.TV Language will both reflect this setting.<br />
Audio Language English • Sets the default audio language for DVD-Video playback to English.<br />
available languages Choose from the languages displayed to set the default audio language for<br />
DVD-Video playback.<br />
Other Select to set the default audio language to something other than the ones<br />
listed. See Selecting other languages for language options on page 147.<br />
Discs do not necessarily have audio in your selected language. Also, some discs override the Audio Language preference.<br />
Subtitle Language English • Sets the default subtitle language for DVD-Video playback to English.<br />
available languages Choose from the languages displayed to set the default subtitle language for<br />
DVD-Video playback.<br />
Other Select to set the default subtitle language to something other than the ones<br />
listed. See Selecting other languages for language options on page 147.<br />
Discs do not necessarily have subtitles in your selected menu language. Also, some discs override the Subtitle Language preference.<br />
141<br />
En
15<br />
142<br />
En<br />
The Initial Setup menu<br />
Setting Options Explanation<br />
Auto Language On • On this setting:<br />
• DVD-Video discs whose main audio track is in your default language will<br />
play using that language, without subtitles.<br />
• Discs whose main audio track is not in your default language but that have<br />
a subtitle track in your default language will play the original audio track with<br />
subtitles.<br />
Off Select to play DVD-Video discs according to your audio and subtitle<br />
language preferences.<br />
For Auto Language to be effective, the Audio Language and Subtitle Language options must be set to the same language.<br />
DVD Menu Language w/Subtitle<br />
Language •<br />
Sets the language of DVD-Video menus to the same as that set for the<br />
subtitle language.<br />
English Sets the language of DVD-Video menus to English.<br />
available languages Choose from the displayed languages to set the default language for DVD<br />
-Video menus.<br />
Other Select to set the DVD menu language to something other than the ones<br />
listed. See Selecting other languages for language options on page 147.<br />
Discs do not necessarily have menus in your selected menu language.<br />
Subtitle Display On • Select to have discs display subtitles according to your Subtitle Language<br />
and Auto Language preferences.<br />
Off Select to switch off subtitle display.<br />
Assist Subtitle Select to display special additional assistive subtitles, where available.<br />
Some discs may override these settings.<br />
Recording<br />
Manual Recording On (go to setup) All the standard recording modes, plus MN1 to MN32, LPCM and XP+<br />
modes can be set.<br />
Off • Just the standard recording modes (XP, SP, LP, EP, SLP and SEP) can be set.<br />
See also Manual recording modes on page 151 for detailed information on manual recording levels.<br />
Optimized Rec On The recording quality of timer recordings is automatically adjusted to fit on<br />
to the selected media if it will not fit at the selected quality setting. If the<br />
recording will not fit even at MN1(MN4 for DVD+R/+RW), then the<br />
recording will be made to the HDD in the original quality selected.<br />
Off • When a timer recording is set that won’t fit on to the selected media, the<br />
recording starts but is cut off when no more recording is possible.<br />
Optimized Rec will only compensate for the next scheduled timer recording if more than one is set. It cannot be used together with VPS/PDC.<br />
Subtitle Recording On The selected subtitle language is recorded with the D.TV timer recording.<br />
Off • No subtitles are recorded with D.TV timer recordings.<br />
Set Thumbnail 0 seconds • Sets the default thumbnail picture in the Disc Navigator to the first frame of<br />
the title.<br />
Auto Chapter<br />
(HDD/VR)<br />
30 seconds Sets the default thumbnail picture to 30 seconds into the title.<br />
3 minutes Sets the default thumbnail picture to three minutes into the title.<br />
On • When recording to the HDD or in VR mode to a DVD, chapter marks are<br />
added at the black screen between commercials and main programming.<br />
When recording in DV, chapter marks can be changed by date/time.<br />
Off Automatic chapter marking is switched off.
The Initial Setup menu 15<br />
Setting Options Explanation<br />
Auto Chapter (Video) No Separation Automatic chapter marking is switched off.<br />
10 minutes • When recording in Video mode, chapter markers are inserted every 10<br />
minutes.<br />
15 minutes Chapter markers are inserted every 15 minutes.<br />
This settings applies to recording or real-time copying to Video mode DVD-R/-RW discs.<br />
Auto Chapter No Separation Automatic chapter marking is switched off.<br />
(DVD+R/+RW)<br />
10 minutes • When recording in DVD+R/+RW or in real-time copying, chapter markers are<br />
inserted every 10 minutes.<br />
HDD Recording<br />
Format<br />
15 minutes Chapter markers are inserted every 15 minutes.<br />
Video Mode Off Recordings made to the HDD are made in VR mode. Use this setting if you<br />
don’t need to transfer the recording later to a DVD-R/-RW (Video mode) or<br />
DVD+R/+RW.<br />
Video Mode On • Recordings made to the HDD are compatible with Video mode recordings.<br />
This setting is convenient if you want to transfer the recording to a DVD-R/<br />
-RW (Video mode) or DVD+R/+RW as high-speed copy can be used.<br />
• When Video Mode On is used, you must select the audio channel you want to record when recording a bilingual broadcast. On the Video Mode<br />
Off setting, both channels will be recorded and you can switch between them on playback. See also Bilingual Recording on page 140.<br />
• When the recording mode is set to XP+, you cannot change HDD Recording Format.<br />
Playback<br />
TV Screen Size 4:3 (Letter Box) Select if you have a standard 4:3 TV and prefer the letter box format<br />
presentation for widescreen material.<br />
4:3 (Pan & Scan) Select if you have a standard 4:3 TV and prefer the pan and scan<br />
presentation for widescreen material.<br />
16:9 • Select if you have a widescreen 16:9 TV. Your TV settings determine how 4:3<br />
material will look.<br />
Selecting 4:3 (Letter Box) or 4:3 (Pan & Scan) does not guarantee that all video material will be presented in that format as some discs override<br />
this setting.<br />
Still Picture Field Produces a stable, generally shake-free image.<br />
Frame Produces sharp image, but may be prone to shake.<br />
Auto • Generates a generally less sharp but more stable still image.<br />
Seamless Playback On Playback is smooth, but with a trade-off against the accuracy of the edit<br />
points.<br />
Off • You may notice momentary interruption at edited points during playback of a<br />
VR mode Play List.<br />
This setting applies to HDD, DVD-R/-RW (VR) and DVD-RAM playback.<br />
Angle Indicator On • A camera icon appears on-screen during multi-angle scenes on a DVD-Video<br />
disc.<br />
Parental Lock<br />
Set Password /<br />
Change Password<br />
Off Nothing is indicated on-screen when a multi-angle scene is showing.<br />
Next Screen If no password has yet been set, enter a four digit number to become your<br />
password. If you want to change the password, first enter your old password,<br />
then enter a new one.<br />
DVD Playback Next Screen From this screen, first enter your password and then set a parental lock level<br />
for playback of DVDs with parental level coding.<br />
143<br />
En
15<br />
144<br />
En<br />
The Initial Setup menu<br />
Setting Options Explanation<br />
D.TV Age Limit Next Screen Use this screen to enter an age limit for D.TV programmes. Programmes<br />
that are broadcast with age suitability guidelines that fall above the age set<br />
here will require the correct password to be entered before the channel can<br />
be viewed.<br />
You must also enter your password in order to change the age limit setting.<br />
This setting is only applicable when the country is set to France, Denmark, Finland or Sweden.<br />
HDMI Output (only available when an HDMI device is connected)<br />
Screen Resolution 1920 x 1080p Constant 1920 x 1080p output.<br />
1920 x 1080i Constant 1920 x 1080i output.<br />
1280 x 720p Constant 1280 x 720p output.<br />
720 x 576p<br />
(720 x 480p)<br />
720 x 576i<br />
(720 x 480i)<br />
Constant 720 x 576p output (when setting the Input Line System to<br />
525 System, video is output in 720 x 480p).<br />
Constant 720 x 576i output (when setting the Input Line System to<br />
525 System, video is output in 720 x 480i).<br />
• If you choose a setting that is incompatible with your TV you may not be able to see any picture at all. In this case, press OPEN/CLOSE while<br />
holding down the (Stop) button on the front panel to switch the setting (this also switches Component Video Out on page 139 to the default<br />
setting).<br />
• If you have the Colour set to YCbCr 4:2:2, you cannot select 720 x 576i (720 x 480i).<br />
4:3 Video Output Full Select if your HDMI TV allows you to change the aspect ratio.<br />
Normal Select if your HDMI TV does not allow you to change the aspect ratio. 4:3<br />
video will be shown with bars on each side.<br />
Colour RGB (0–255) Use if colours are weak and black appears to ‘float’ on the RGB (16–235)<br />
setting.<br />
RGB (16–235) Use this setting if colours appear overly rich and the black too deep on the<br />
RGB (0–255) setting.<br />
YCbCr 4:2:2 The video signal is output as a 10-bit YCbCr 4:2:2 component signal. This is<br />
the standard setting for HDMI-compatible devices.<br />
YCbCr 4:4:4 The video signal is output as a 8-bit YCbCr 4:4:4 component signal.<br />
• Depending on the connected device some settings may not be available.<br />
• When a DVI device is connected, the YCbCr 4:2:2 and YCbCr 4:4:4 options are not available.<br />
• You cannot choose YCbCr 4:2:2 when the Screen Resolution is set to 720 x 576i (720 x 480i).<br />
Audio Output Auto • Dolby Digital, MPEG and DTS sources are output as a bitstream signal.<br />
However, depending on the Audio Out setting, number of audio channels,<br />
and the HDMI-connected device, Linear PCM audio may be output.<br />
PCM All audio signals are converted to Linear PCM (except DTS).<br />
Bitstream Priority Select if the connected device is compatible with bitstream audio.<br />
This setting is not available when a DVI device is connected.<br />
Options<br />
On Screen Display On • The recorder displays operation displays (Stop, Play, etc.) on-screen.<br />
Off Switches off the on-screen operation displays.<br />
Front Panel Display On • The time is shown in the front panel display when the recorder is in standby.<br />
Off The front panel display is switched off in standby.
The Initial Setup menu 15<br />
Setting Options Explanation<br />
Remote Control<br />
Mode<br />
Recorder 1–3<br />
(default: Recorder 1)<br />
If you are using more than one recorder in the same room, set them to<br />
different IDs. This setting sets the recorder ID; to change the remote<br />
controller ID, press and hold RETURN/EXIT then press 1, 2 or 3 to set. The<br />
remote will only control a recorder with the same ID.<br />
AV. Link This Recorder Only • Signals received through the AV input when the recorder is in standby are<br />
not passed through to the AV output.<br />
Pass Through Signals received when in standby are passed though to the output for<br />
connected devices. (Note that during EPG data download, the EPG data is<br />
not passed through.)<br />
When set to Pass Through, make sure to set Power Save (page 137) to Off.<br />
DivX VOD Registration Code Use to display the recorder’s DivX registration code. See DivX video<br />
compatibility and DivX® VOD content on page 46.<br />
Set Preview<br />
(HDD only)<br />
Quick Preview • When in the Disc Navigator, the thumbnail video plays short excerpts from<br />
throughout the selected title. (Note that edited titles that will play normally<br />
from the beginning.)<br />
Normal The thumbnail video plays from the beginning of the title.<br />
CI Information Next Screen This option displays a menu of CI card functions. Consult your service<br />
provider for more information on the functions available.<br />
Software Update Next Screen The Software Update function can check for and download updated system<br />
software for the digital tuner. See Using Software Update (Digital tuner) on<br />
page 147.<br />
Options 2<br />
USB Restart USB Device If the connected USB device does not respond to the recorder, try using this<br />
option to restart it. If the device still does not work properly try switching it off<br />
then back on, and/or disconnecting then reconnecting the USB cable.<br />
Confirm Printer Use this option to confirm the make and model of the printer connected to<br />
the recorder (does not work with all printers).<br />
Pause Live TV TV’s Tuner Allows you to use the Pause Live TV feature with an AV Link-compatible TV<br />
connected by SCART cable.<br />
Recorder’s Tuner • Allows you to use Pause Live TV with this recorder’s internal TV tuner.<br />
See also Pause Live TV on page 84 for more information on this setting.<br />
HDD Sleep Mode Proceed Puts the HDD to sleep. Using this feature when playing DVDs or CDs allows<br />
you to reduce noise produced by the unit, resulting in improved sound<br />
quality. When you wake the HDD back up it will take a few seconds to load.<br />
The HDD can be taken out of Sleep Mode by any number of actions,<br />
including:<br />
• Turning the power off and on again.<br />
• Pressing the HDD/DVD button and choosing the HDD.<br />
• When a timer recording begins.<br />
• When you try and make any changes to system settings.<br />
145<br />
En
15<br />
146<br />
En<br />
The Initial Setup menu<br />
Additional information about the TV system<br />
settings<br />
About the input line system<br />
This recorder is compatible with PAL, SECAM, 3.58 NTSC<br />
and PAL-60 TV systems. The Input Line System and Input<br />
Colour System settings determine how the recorder<br />
treats incoming video signals from an external input.<br />
Please note the following points when changing the<br />
input line system:<br />
• When the current input is a built-in tuner channel<br />
preset, changing the input line system will usually<br />
also affect the input line system of the<br />
AV2 (INPUT 1/DECODER) input. However if the<br />
AV2/L1 In setting is set to Decoder, then the L2<br />
input is affected instead.<br />
• If, when the Input Line System setting is changed, the<br />
screen goes blank (due to incompatibility with your<br />
TV), you can switch back by pressing and holding the<br />
front panel (Stop) button then pressing<br />
INPUT SELECT (also front panel) while the recorder is<br />
stopped.<br />
• When you switch the Input Line System setting the<br />
Copy List is erased. If you switch the setting using the<br />
(Stop) button and INPUT SELECT buttons as<br />
described above, there is no confirmation, so please<br />
use with care.<br />
• You can’t mix recordings of different TV line systems<br />
on the same disc.<br />
• When you change this setting, the Input Colour<br />
System setting also changes (see below).<br />
About NTSC on PAL TV<br />
Depending on the Input Line System setting and the<br />
NTSC on PAL TV setting, the signal format output when<br />
the recorder is stopped varies as shown in the table<br />
below.<br />
Output when<br />
Input Line System NTSC on PAL TV<br />
stopped<br />
625 System Off PAL<br />
On PAL<br />
525 System Off NTSC<br />
On PAL–60<br />
About the input colour system<br />
The available options of the Input Colour System setting<br />
depend on the Input Line System setting. The table below<br />
shows the different options available.<br />
Built-in analog<br />
Input Line System External input<br />
tuner<br />
625 System Auto Auto<br />
PAL PAL<br />
SECAM SECAM<br />
525 System n/a Auto<br />
3.58 NTSC<br />
PAL–60<br />
Additional information about component<br />
video output<br />
If you switch the Component Video Out setting to<br />
Progressive when using a TV that is not compatible with<br />
progressive-scan video, you will not be able to see<br />
anything displayed on your TV. If this happens, press and<br />
hold the (Stop) button on the front panel, then press<br />
OPEN/CLOSE. This will set the recorder’s video output<br />
back to Interlace.
The Initial Setup menu 15<br />
Selecting other languages for<br />
language options<br />
ENTER<br />
1 Select ‘Other’ from the language list.<br />
This option appears in the settings for DVD Menu<br />
Language, Audio Language, and Subtitle Language.<br />
ENTER<br />
2 Select the language you want.<br />
Initial Setup<br />
Basic<br />
Digital Tuner<br />
Analogue Tuner<br />
Video In/Out<br />
Audio In<br />
Language<br />
Audio Out<br />
Language<br />
Recording<br />
OSD DVD Menu Language<br />
Audio Language<br />
Language<br />
Subtitle Language<br />
English<br />
Auto Language Number 0 5 1 4<br />
DVD Menu Language<br />
Subtitle Display<br />
• Select by language name: Use the / buttons to<br />
change the language.<br />
• Select by code number: Press then use the number<br />
buttons to enter the four-digit language code.<br />
See Language code list on page 158 for a list of available<br />
languages and corresponding codes.<br />
Using Software Update (Digital tuner)<br />
The Software Update function can keep the built-in<br />
digital tuner up to date with the latest system software.<br />
You can either check for updates manually, or have the<br />
recorder do it automatically at regular intervals.<br />
Access the Software Update screen from the Options<br />
menu.<br />
There are three options available: Manual Update, Auto<br />
Update and Technical Information.<br />
Manual Update<br />
Select Manual Update to check for updated software<br />
immediately. If new software is found then it is<br />
automatically downloaded and installed. The new<br />
software will take effect the next time the recorder is<br />
powered on.<br />
If for some reason the new software could not be<br />
downloaded successfully, a dialog box informs you of the<br />
error. Press HOME MENU to exit or RETURN/EXIT to<br />
return to the previous screen.<br />
Note that channel information may be erased when<br />
software update is used, and that timer recording will not<br />
work during the update.<br />
To cancel manual update before it has completed, press<br />
HOME MENU.<br />
Auto Update<br />
By default, the Auto Update option is On, which means<br />
that periodically the recorder will check for and update<br />
the digital tuner software if it’s available. We recommend<br />
that you leave this option On.<br />
If new software is found and successfully downloaded,<br />
the recorder automatically scans for new digital<br />
channels, informing you if any are found (this is the<br />
equivalent of using the Add New Channel option, found<br />
in the Digital Tuner section of the Initial Setup menu).<br />
Technical Information<br />
This displays the current hardware and software version<br />
numbers of the digital tuner.<br />
147<br />
En
16<br />
148<br />
En<br />
Additional information<br />
Chapter 16<br />
Additional information<br />
Setting up the remote to control your TV<br />
You can use the supplied remote to control your TV. To be<br />
able to use this feature you first have to program the<br />
remote with a maker code from the table on the following<br />
page.<br />
1 Switch on your TV.<br />
2 Press and hold down the CLEAR button, then<br />
enter the maker code for your TV.<br />
See the table on the next page for the list of maker codes.<br />
If there is more than one code given for your make, input<br />
the first one in the list.<br />
• If the maker’s name of your TV doesn’t appear in the<br />
table, you will not be able to use this remote to<br />
control your TV.<br />
3 Point the remote towards your TV and press<br />
TV to check that the remote works with your TV.<br />
If the remote is set up correctly, the TV should switch off.<br />
If it doesn’t and there is another code given for your<br />
maker, repeat step 1 with a new code.<br />
Using the TV remote control buttons<br />
The table below shows how to use this remote control<br />
with your TV.<br />
Button What it does<br />
TV Press to switch the TV on/off (standby)<br />
INPUT Press to change the TV’s video input<br />
VOLUME +/– Use to adjust the TV volume<br />
CHANNEL +/– Use to change TV channels
Additional information 16<br />
TV Preset code list<br />
Please note that there are cases where only certain functions may be controllable after assigning the proper preset code, or the<br />
codes for the manufacturer in the list will not work for the model that you are using.<br />
Manufacturer Code(s) Manufacturer Code(s) Manufacturer Code(s) Manufacturer Code(s)<br />
ACURA 644<br />
ADMIRAL 631<br />
AIWA 660<br />
AKAI 632, 635, 642<br />
AKURA 641<br />
ALBA 607, 639, 641, 644<br />
AMSTRAD 642, 644, 647<br />
ANITECH 644<br />
ASA 645<br />
ASUKA 641<br />
AUDIOGONIC 607, 636<br />
BASIC LINE 641, 644<br />
BAUR 631, 607, 642<br />
BEKO 638<br />
BEON 607<br />
BLAUPUNKT 631<br />
BLUE SKY 641<br />
BLUE STAR 618<br />
BPL 618<br />
BRANDT 636<br />
BTC 641<br />
BUSH 607, 641, 642, 644, 647, 656<br />
CASCADE 644<br />
CATHAY 607<br />
CENTURION 607<br />
CGB 642<br />
CIMLINE 644<br />
CLARIVOX 607<br />
CLATRONIC 638<br />
CONDOR 638<br />
CONTEC 644<br />
CROSLEY 632<br />
CROWN 638, 644<br />
CRYSTAL 642<br />
CYBERTRON 641<br />
DAEWOO 607, 644, 656<br />
DAINICHI 641<br />
DANSAI 607<br />
DAYTON 644<br />
DECCA 607, 648<br />
DIXI 607, 644<br />
DUMONT 653<br />
ELIN 607<br />
ELITE 641<br />
ELTA 644<br />
EMERSON 642<br />
ERRES 607<br />
FERGUSON 607, 636, 651<br />
FINLANDIA 635, 643<br />
FINLUX 632, 607, 645, 648, 653, 654<br />
FIRSTLINE 640, 644<br />
FISHER 632, 635, 638, 645<br />
FORMENTI 632, 607, 642<br />
FRONTECH 631, 642, 646<br />
FRONTECH/PROTECH 632<br />
FUJITSU 648, 629<br />
FUNAI 640, 646, 658<br />
GBC 632, 642<br />
GE 601, 608, 607, 610, 617, 602, 628, 618<br />
GEC 607, 634, 648<br />
GELOSO 632, 644<br />
GENEXXA 631, 641<br />
GOLDSTAR 610, 623, 621, 602, 607, 650<br />
GOODMANS 607, 639, 647, 648, 656<br />
GORENJE 638<br />
GPM 641<br />
GRAETZ 631, 642<br />
GRANADA 607, 635, 642, 643, 648<br />
GRADIENTE 630<br />
GRANDIN 618<br />
GRUNDIG 631, 653<br />
HANSEATIC 607, 642<br />
HCM 618, 644<br />
HINARI 607, 641, 644<br />
HISAWA 618<br />
HITACHI 631, 633, 634, 636, 642, 643,<br />
654, 606, 610, 624, 625, 618<br />
HUANYU 656<br />
HYPSON 607, 618, 646<br />
ICE 646, 647<br />
IMPERIAL 638, 642<br />
INDIANA 607<br />
INGELEN 631<br />
INTERFUNK 631, 632, 607, 642<br />
INTERVISION 646, 649<br />
ISUKAI 641<br />
ITC 642<br />
ITT 631, 632, 642<br />
JEC 605<br />
JVC 613, 623<br />
KAISUI 618, 641, 644<br />
KAPSCH 631<br />
KENDO 642<br />
KENNEDY 632, 642<br />
KORPEL 607<br />
KOYODA 644<br />
LEYCO 607, 640, 646, 648<br />
LIESENK&TTER 607<br />
LOEWE 607<br />
LUXOR 632, 642, 643<br />
M-ELECTRONIC 631, 644, 645, 654,<br />
656, 607, 636, 651<br />
MAGNADYNE 632, 649<br />
MAGNAFON 649<br />
MAGNAVOX 607, 610, 603, 612, 629<br />
MANESTH 639, 646<br />
MARANTZ 607<br />
MARK 607<br />
MATSUI 607, 639, 640, 642, 644,<br />
647, 648<br />
MCMICHAEL 634<br />
MEDIATOR 607<br />
MEMOREX 644<br />
METZ 631<br />
MINERVA 631, 653<br />
MITSUBISHI 609, 610, 602, 621, 631<br />
MULTITECH 644, 649<br />
NEC 659<br />
NECKERMANN 631, 607<br />
NEI 607, 642<br />
NIKKAI 605, 607, 641, 646, 648<br />
NOBLIKO 649<br />
NOKIA 632, 642, 652<br />
NORDMENDE 632, 636, 651, 652<br />
OCEANIC 631, 632, 642<br />
ORION 632, 607, 639, 640<br />
OSAKI 641, 646, 648<br />
OSO 641<br />
OSUME 648<br />
OTTO VERSAND 631, 632, 607, 642<br />
PALLADIUM 638<br />
PANAMA 646<br />
PANASONIC 631, 607, 608,642, 622<br />
PATHO CINEMA 642<br />
PAUSA 644<br />
PHILCO 632, 642<br />
PHILIPS 631, 607, 634, 656, 668<br />
PHOENIX 632<br />
PHONOLA 607<br />
PROFEX 642, 644<br />
PROTECH 607, 642, 644, 646, 649<br />
QUELLE 631, 632, 607, 642, 645, 653<br />
R-LINE 607<br />
RADIOLA 607<br />
RADIOSHACK 610, 623, 621, 602<br />
RBM 653<br />
RCA 601, 610, 615, 616, 617, 618,<br />
661, 662, 609<br />
REDIFFUSION 632, 642<br />
REX 631, 646<br />
ROADSTAR 641, 644, 646<br />
SABA 631, 636, 642, 651<br />
SAISHO 639, 644, 646<br />
SALORA 631, 632, 642, 643<br />
SAMBERS 649<br />
SAMSUNG 607, 638, 644, 646, 669, 670<br />
SANYO 635, 645, 648, 621, 614<br />
SBR 607, 634<br />
SCHAUB LORENZ 642<br />
SCHNEIDER 607, 641, 647<br />
SEG 642, 646<br />
SEI 632, 640, 649<br />
SELECO 631, 642<br />
SHARP 602, 619, 627, 667<br />
SIAREM 632, 649<br />
SIEMENS 631<br />
SINUDYNE 632, 639, 640, 649<br />
SKANTIC 643<br />
SOLAVOX 631<br />
SONOKO 607, 644<br />
SONOLOR 631, 635<br />
SONTEC 607<br />
SONY 604<br />
SOUNDWAVE 607<br />
STANDARD 641, 644<br />
STERN 631<br />
SUSUMU 641<br />
SYSLINE 607<br />
TANDY 631, 641, 648<br />
TASHIKO 634<br />
TATUNG 607, 648<br />
TEC 642<br />
TELEAVIA 636<br />
TELEFUNKEN 636, 637, 652<br />
TELETECH 644<br />
TENSAI 640, 641<br />
THOMSON 636, 651, 652, 663<br />
THORN 631, 607, 642, 645, 648<br />
TOMASHI 618<br />
TOSHIBA 605, 602, 626, 621, 653<br />
TOWADA 642<br />
ULTRAVOX 632, 642, 649<br />
UNIDEN 671<br />
UNIVERSUM 631, 607, 638, 642, 645,<br />
646, 654<br />
VESTEL 607<br />
VICTOR 613<br />
VOXSON 631<br />
WALTHAM 643<br />
WATSON 607<br />
WATT RADIO 632, 642, 649<br />
WHITE WESTINGHOUSE 607<br />
YOKO 607, 642, 646<br />
ZENITH 603, 620<br />
PIONEER 600, 631, 632, 607, 636, 642,<br />
651<br />
149<br />
En
16<br />
150<br />
En<br />
Additional information<br />
Minimum copying times<br />
The table below shows the minimum HDD to DVD copying time for one hour of video.<br />
Please note that not all discs are compatible with high-speed copying. 1 Check with the disc manufacturer for<br />
compatibility.<br />
Rec mode<br />
SEP SLP EP LP SP XP<br />
DVD disc type 10 h 8 h 6 h 4 h 2 h 1 h<br />
DVD-R / 1x<br />
DVD-RW / 1x<br />
DVD-RW / 2x<br />
1x 6 mins. 7.5 mins. 10 mins. 15 mins. 30 mins. 60 mins.<br />
DVD-R DL<br />
DVD-RAM / 2x<br />
DVD+R / 2.4x<br />
2x 3 mins. 4 mins. 5 mins. 7.5 mins. 15 mins. 30 mins.<br />
DVD+RW / 2.4x<br />
DVD+R DL<br />
2.4x *1 *1 *1 6.3 mins. 12.5 mins. 25 mins.<br />
DVD-RAM / 3x<br />
DVD-RAM / 5x 3x 2 mins. 2.5 mins. 3.5 mins. 5 mins. 10 mins. 20 mins.<br />
DVD-R / 4x<br />
DVD-RW / 4x<br />
DVD+R / 4x<br />
DVD+RW / 4x<br />
DVD-R / 8x / 16x<br />
DVD+R / 8x / 16x<br />
DVD-RW / 6x<br />
DVD+RW / 8x<br />
4x 1.5 mins.*1 2 mins.*1 2.5 mins.*1 4 mins. 7.5 mins. 15 mins.<br />
6x 1.25 mins.*1 1.6 mins.*1 2.2 mins.*1 3 mins. 5.5 mins. 11 mins.<br />
Note that all times in the above table are approximate. Also that actual copy speed varies with the part of the disc being recorded.<br />
*1 Titles recorded on DVD+R/+RW in SEP, SLP or EP modes cannot be high-speed copied.<br />
Note<br />
1 Depending on the disc, the copy speed may be reduced (for example, although a 6x disc is used, the copy may be made at 2x speed).
Additional information 16<br />
Manual recording modes<br />
The table below shows the approximate recording times for different DVD types in each manual recording mode, as<br />
well as the standard recording mode equivalents. For recording time on the HDD, see Specifications (DVR-<strong>LX60D</strong>) on<br />
page 162.<br />
Rec. time *1 Resolution *2<br />
Level<br />
Single-Layer<br />
DVD:<br />
DVD-R/-RW<br />
DVD+R/+RW<br />
DVD-RAM<br />
Dual-Layer<br />
DVD:<br />
DVD-R DL<br />
DVD+R DL<br />
Video mode Off (HDD)<br />
VR mode (DVD-R/-RW)<br />
DVD-RAM<br />
VR mode (DVD-R DL)<br />
MN 1 *3,4 802 mins. 1440 mins.<br />
*3,4<br />
MN 2 720 mins. 1292 mins.<br />
MN 3 *3,4 SEP 600 mins. 1077 mins.<br />
352 x 240 /<br />
*4<br />
MN 4 SLP 480 mins. 861 mins. 352 x 288<br />
*4<br />
MN 5 420 mins. 754 mins.<br />
MN 6 *4 EP 360 mins. 646 mins.<br />
MN 7 300 mins. 538 mins. 352 x 480 /<br />
MN 8 270 mins. 484 mins. 352 x 576<br />
MN 9 LP 240 mins. 431 mins.<br />
MN 10 230 mins. 413 mins.<br />
MN 11 220 mins. 395 mins.<br />
MN 12 210 mins. 377 mins.<br />
MN 13 200 mins. 359 mins.<br />
MN 14 190 mins. 341 mins.<br />
MN 15 180 mins. 323 mins.<br />
MN 16 170 mins. 305 mins.<br />
MN 17 160 mins. 287 mins.<br />
MN 18 150 mins. 269 mins.<br />
MN 19 140 mins. 251 mins.<br />
MN 20 130 mins. 233 mins.<br />
MN 21 SP 120 mins. 215 mins.<br />
MN 22 110 mins. 197 mins.<br />
MN 23 105 mins. 188 mins.<br />
MN 24 100 mins. 179 mins.<br />
MN 25 95 mins. 170 mins.<br />
MN 26 90 mins. 161 mins.<br />
MN 27 85 mins. 153 mins.<br />
MN 28 80 mins. 144 mins.<br />
MN 29 75 mins. 135 mins.<br />
MN 30 70 mins. 126 mins.<br />
MN 31 65 mins. 117 mins.<br />
MN 32 XP 61 mins. 111 mins.<br />
LPCM 61 mins. 111 mins.<br />
*5<br />
XP+ --- mins. --- mins.<br />
480 x 480 /<br />
480 x 576<br />
544 x 480 /<br />
544 x 576<br />
720 x 480 /<br />
720 x 576<br />
Video mode On (HDD)<br />
Video mode (DVD-R/-RW)<br />
DVD+R/+RW<br />
Video mode (DVD-R DL)<br />
DVD+R DL<br />
352 x 240 /<br />
352 x 288<br />
352 x 480 /<br />
352 x 576<br />
720 x 480 /<br />
720 x 576<br />
*1 Recording time may be slightly shorter for certain disc types or recording modes.<br />
*2 The first figure refers to when the Input Line System is set to 525 System; the second when set to 625 System.<br />
*3<br />
Modes MN1 to MN3 not available when using DVD+R/+RW.<br />
*4 Titles recorded at MN6 or lower cannot be high-speed copied to DVD+R/+RW.<br />
*5<br />
XP+ mode is available for HDD recordings only. If set for a DVD recording, the DVD will be automatically recorded in MN32 mode.<br />
• Levels separated by a bold line show where there is a noticeable change in picture quality.<br />
• Audio recording in all manual recording modes is in Dolby Digital 2 ch format, except for LPCM mode, which is in Linear PCM format.<br />
• See also Recording on page 79.<br />
151<br />
En
16<br />
152<br />
En<br />
Additional information<br />
Troubleshooting<br />
Incorrect operation is often mistaken for trouble and malfunction. If you think there is something wrong with this<br />
component, please check the points below. Sometimes the trouble may lie in another component. Investigate the<br />
other components and electrical appliances being used. If the trouble cannot be rectified even after checking the<br />
points below, ask your nearest Pioneer authorized service center or your dealer to carry out repair work.<br />
General<br />
Problem Remedy<br />
The disc is automatically<br />
ejected after closing the<br />
disc tray<br />
• Check that the disc is not an incompatible format disc (page 44).<br />
• Check that the disc is loaded properly (aligned in disc tray and label-side up).<br />
• Take out the disc and clean it (page 160).<br />
• Check that the disc has a region code compatible with the recorder.<br />
Can’t eject a disc • Turn off the power to this device and press and hold OPEN/CLOSE on the front of the<br />
recorder for more than three seconds.<br />
Can’t play a disc • Check that the disc is a compatible format disc (page 44).<br />
• Take out the disc and clean it (page 160).<br />
• Check that the disc is loaded properly (aligned in disc tray and label-side up).<br />
• Press HDD/DVD to select the DVD.<br />
• There may be condensation in the recorder. Leave the recorder for an hour or so for the<br />
condensation to evaporate.<br />
• During HDD recording, you can’t play discs that are recorded with a Line System different<br />
to the current recorder setting.<br />
• DVD+R/+RW discs recorded using another recorder with copy-once protected recordings<br />
will not play in this recorder.<br />
Can’t record a disc • Check that the disc is not an incompatible format disc (page 44).<br />
• Some DVD-RAM discs are not recordable until they have been initialized (page 89). This<br />
can take up to an hour.<br />
Remote control does not<br />
work<br />
• If you connected this recorder to the receiver subwoofer using the CONTROL IN jack, point<br />
the remote control at the display unit of the receiver subwoofer to use (page 48).<br />
• Set the remote control to the same ID number as the recorder (page 145). (When the<br />
batteries run down, the remote mode is automatically reset to Recorder1.)<br />
• Use the remote within its operating range (page 20).<br />
• Replace the batteries (page 21).<br />
No picture • Check that everything is connected properly (page 48).<br />
• Check that the connected TV and/or the AV amp/receiver is set to the correct input.<br />
• The recorder may be set to progressive scan with an incompatible TV. Reset to interlace by<br />
pressing and holding the front panel (Stop) button then pressing OPEN/CLOSE.<br />
• If you are using an indoor antenna that requires power, make sure that Aerial Power in the<br />
Initial Setup menu is set to On or Auto (page 138).<br />
• If the aerial/antenna is not connected properly, or if it is shorted, the Aerial Power setting<br />
will revert to Off automatically. Check the aerial connection and try making the setting again.<br />
• When the HDMI signal is output, no video is output from the COMPONENT VIDEO OUT.<br />
All settings are reset • If the recorder is unplugged (or there is a power failure) while the recorder is on, all the<br />
settings will be lost.<br />
• Make sure that you switch the recorder into standby before unplugging the power cord.
Additional information 16<br />
Problem Remedy<br />
No sound or sound is<br />
distorted<br />
Cannot switch a bilingual<br />
programme<br />
The picture from the<br />
external input is distorted<br />
• Make sure that the amp/receiver or TV is set to the correct input and the volume turned up.<br />
• There is no sound when the picture is paused, or during scanning or slow motion play.<br />
Press PLAY to resume regular playback.<br />
• DTS audio can only be played back if the recorder’s digital output is connected to the<br />
receiver subwoofer. If connected to your TV, your TV must have a DTS decoder for you to be<br />
able to enjoy DTS sound.<br />
• Some 96 kHz discs do not output audio through the digital jack.<br />
• Check the audio cable connections (page 48).<br />
• If the sound is distorted, try cleaning the cable plugs.<br />
• During real-time copying it is not possible to switch audio channels. The main and sub<br />
channels are both output.<br />
• If the video signal from the external component is copy-protected, you cannot connect via<br />
this recorder. Connect the component directly to your TV.<br />
The picture is distorted • Change the Input Line System setting (page 146). (You can also change it by pressing the<br />
(Stop) button and INPUT SELECT on the front panel simultaneously with the recorder<br />
stopped.)<br />
Screen is stretched<br />
vertically or horizontally<br />
Audio/subtitle language<br />
cannot be changed<br />
Can’t play a disc recorded<br />
using this recorder on<br />
another player<br />
• Make sure that the TV Screen Size setting (page 143) is correct for the kind of TV you have<br />
(see also page 159).<br />
• If you have a widescreen TV, check its aspect ratio settings.<br />
• This recorder’s input switches into wide mode automatically according to the input signal.<br />
When the unit connected is not compatible with VIDEO ID-1 (widescreen signalling), set the<br />
connected component to output 4:3 aspect ratio (standard) video.<br />
• Note that audio and subtitle languages cannot be changed during the recording of a<br />
digital broadcast.<br />
• You can only use the audio track and subtitles for the language that were selected at the<br />
time of recording a digital broadcast. The audio track and subtitles cannot be changed to<br />
other languages.<br />
• If the disc was recorded in DVD-R/-RW (Video mode) or DVD+R, make sure that it’s<br />
finalized (page 88).<br />
• Some players will not play recordable DVD discs, even when recorded in DVD-R/-RW (Video<br />
mode) or DVD+R and finalized.<br />
• If the disc was recorded in VR mode, the other player must be specifically RW compatible<br />
in order to play it (page 43).<br />
• Discs recorded with copy-once material cannot be played on non-CPRM compatible<br />
players (page 80).<br />
• DVD+RW discs containing only a small amount of recorded material may not play on other<br />
players. Finalize the disc and try again.<br />
During playback the • When a copy-protected disc is played via a VCR, the picture will not display correctly.<br />
picture is dark or distorted Connect the recorder directly to your TV.<br />
Recorded contents are not<br />
clear or artefacts appear in<br />
areas of flat colour (due to<br />
MPEG compression; also<br />
known as block noise)<br />
• Change the recording mode to XP/SP.<br />
153<br />
En
16<br />
154<br />
En<br />
Additional information<br />
Problem Remedy<br />
Can’t record or does not<br />
record successfully<br />
Timer programme doesn’t<br />
record successfully<br />
After briefly unplugging<br />
or after a power failure<br />
the front panel display<br />
shows ‘--:--’<br />
Front panel display shows<br />
‘LOCKED’ when a button is<br />
pressed<br />
Can’t use One Touch Copy<br />
(HDD to DVD)<br />
Can’t use One Touch Copy<br />
(DVD to HDD)<br />
• Check that there is some remaining blank space on the DVD/HDD.<br />
• For a DVD-R/-RW (Video mode) or DVD+R, check that the disc isn’t already finalized.<br />
• Check the limits on the number of titles and chapters on a disc:<br />
– HDD: 999 titles<br />
– VR mode: 99 titles, 999 chapters per disc<br />
– Video mode disc: 99 titles per disc, 99 chapters per title<br />
– DVD+R/+RW: 49 titles per disc, 99 chapters per title (max 254 chapters per disc)<br />
• Check that the source you are trying to record is not copy protected.<br />
• For a VR formatted disc, check that the disc isn’t locked (page 132).<br />
• Check that you are recording with the same TV system (PAL, NTSC, etc.) as the disc has<br />
already been recorded in. All recordings on a disc must be in the same TV system. When<br />
recording to the HDD, it is also necessary to set the Input Line System setting to match what<br />
you want to record (page 146).<br />
• The power may have failed during recording.<br />
• When setting the recording channel, make sure you set the recorder’s built-in TV tuner, not<br />
the TV’s built-in tuner.<br />
• When recording to a DVD-R/-RW (Video mode) or DVD+R/+RW, programmes that are<br />
copy-once protected cannot be recorded. Use a VR mode formatted disc for copy-once<br />
material (page 80).<br />
• Two timer programmes may have overlapped, in which case only the earlier one will record<br />
completely.<br />
• The power may have failed during recording.<br />
• A backup battery inside the recorder keeps the clock and other settings from being reset<br />
when there is no power to the recorder. After unplugging or a power failure, the battery keeps<br />
all settings for a period of several minutes. Reset the clock and other recorder settings to use<br />
the recorder again.<br />
• To have the battery replaced, please ask your nearest Pioneer authorized service center or<br />
your dealer to carry out repairs.<br />
• The Child Lock is on; turn off in order to use the recorder (page 87).<br />
• Make sure that there is a recordable DVD-R/-RW loaded with some free space for recording<br />
and fewer than 99 titles already on the disc. Also make sure that for a DVD-R/-RW (Video<br />
mode) or a DVD+R, the disc isn’t finalized.<br />
• Make sure there is a recordable DVD+R/+RW loaded with some free space for recording<br />
and fewer than 49 titles already on the disc.<br />
• If you delete a title from a DVD+R/+RW disc, the number of remaining recordable titles<br />
may not decrease.<br />
• Further recording is not possible on a finalized DVD+R. Check that there isn’t a disc menu<br />
on the disc you’re trying to use.<br />
• If the title currently playing contains material that is copy-once protected, One Touch Copy<br />
will not work.<br />
• If the currently playing HDD content was recorded in XP+ mode, the One Touch Copy<br />
feature can’t be used.<br />
• One Touch Copy can’t be used for titles over eight hours long when copying to DVD+R/<br />
+RW (though you can use a DVD+R DL).<br />
• One Touch Copy can’t be used for MN1 to MN6, SEP, SLP or EP titles when copying to<br />
DVD+R/+RW.<br />
• One Touch Copy doesn’t work if the recorder is already recording to DVD.<br />
• Make sure that there is space available on the HDD and that there are fewer than 999 titles<br />
on the HDD.<br />
• One Touch Copy doesn’t work if the recorder is already recording to the HDD.
Additional information 16<br />
Problem Remedy<br />
The device connected to<br />
the USB port is not<br />
recognized<br />
File names are not<br />
displayed properly.<br />
HDMI<br />
Problem Remedy<br />
The connected HDMI or<br />
DVI device does not<br />
display any picture (and<br />
the front panel HDMI<br />
indicator does not light)<br />
No video from the HDMI<br />
output<br />
There’s no sound from the<br />
connected HDMI or DVI<br />
device<br />
• Check that the device is compatible with this recorder (page 55).<br />
• Use a USB cable less than 5 m in length.<br />
• Check that the USB cable is inserted fully.<br />
• Check that the USB device is powered on.<br />
• Try switching this recorder into standby mode and then back on.<br />
• Try using the Restart USB Device option from the Initial Setup menu (page 145).<br />
• If several USB devices (camera, USB memory, card reader, etc.) are connected at the same<br />
time, it’s possible that only the first device connected to this recorder will be recognized.<br />
• Files names that do not conform to the ISO8859-1 standard may not display correctly on<br />
this unit.<br />
• Try disconnecting then reconnecting the HDMI cable (while the power of both components<br />
is on).<br />
• Try switching the power of the HDMI/DVI device off then back on.<br />
• Try switching off the HDMI/DVI device and this recorder. Next, switch on the HDMI/DVI<br />
device and leave it for around 30 seconds, then switch on this recorder.<br />
• When you connect an HDMI-compatible device make sure of the following:<br />
– The connected device’s video input is set correctly for this recorder.<br />
– The cable you’re using is fully HDMI-compliant. Using a non-standard cable may result in<br />
no picture being output.<br />
– Don’t use several HDMI cables connected together. Use a single cable to connect devices<br />
together.<br />
• When you connect a DVI-compatible device make sure of the following:<br />
– The connected device’s video input is set correctly for this recorder.<br />
– The DVI terminal on the connected device is HDCP-compatible.<br />
– The connected device is compatible with NTSC (720 x 480i/p, 1280 x 720p, 1920 x 1080i/p)<br />
and PAL (720 x 576i/p, 1280 x 720p, 1920 x 1080i/p) video input.<br />
• If the recorder’s internal HDD is damaged or broken, there will be no HDMI output.<br />
• Not all HDCP-compatible DVI devices will work with this recorder.<br />
• If you choose a setting that is incompatible with your TV you may not be able to see any picture at<br />
all. In this case, press OPEN/CLOSE while holding down the (Stop) button on the front panel to<br />
switch the setting (this also switches Component Video Out on page 139 to the default setting).<br />
• There is no sound when using a DVI terminal.<br />
• Some HDMI-compatible devices do not output sound (check with the manual that came<br />
with the connected device).<br />
If the unit does not operate normally due to external effects such as static electricity, disconnect the power plug from the<br />
outlet and insert again to return to normal operating conditions.<br />
If the picture freezes and the front panel and remote control buttons stop working<br />
• Press (Stop) then try restarting playback.<br />
• Press the front panel STANDBY/ON button to<br />
switch the power off, then switch back on and restart<br />
playback. If the power fails to switch off, press and<br />
hold STANDBY/ON for five seconds until the<br />
power switches off.<br />
STANDBY/ON<br />
HDD/DVD<br />
A.TV D.TV PLTV DivX COPY<br />
STANDBY/ON DV IN<br />
USB<br />
COMMON INTERFACE<br />
CH<br />
OPEN/CLOSE<br />
STOP REC<br />
INPUT<br />
SELECT<br />
155<br />
En
16<br />
156<br />
En<br />
Additional information<br />
On-screen displays<br />
The table below shows a list of error messages that you may encounter when using the recorder and an explanation<br />
of their meaning.<br />
Message Explanation/Action<br />
• Initializing disc. Please wait a moment. When you load a blank DVD-RW or DVD+RW disc, the recorder<br />
automatically initializes it.<br />
• Incompatible region number. The disc loaded has an incompatible region number for the recorder<br />
and so will not play.<br />
• Cannot record any more titles.<br />
• No more space for file management data.<br />
• This disc cannot be recorded. Undo the<br />
finalization.<br />
• Cannot play this disc.<br />
• This disc cannot be recorded.<br />
• Cannot read the CPRM information.<br />
• Could not record the information to the disc.<br />
• Cannot edit.<br />
• Could not initialize disc.<br />
• Could not complete finalization successfully.<br />
• Could not undo finalization successfully.<br />
• Could not successfully unlock the disc.<br />
The disc control data limit has been reached, or the maximum<br />
number of chapters and/or titles has been reached. Erase titles/<br />
chapters or combine chapters.<br />
The disc was finalized on a non-Pioneer DVD recorder. Undo the<br />
finalization in order to recording/editing.<br />
The disc may be dirty or damaged. Take out the disc, clean it and<br />
retry. If the error persists, use a new disc. If the error appears even<br />
with a new disc, please ask your nearest Pioneer-authorized service<br />
center or your dealer to carry out repairs.<br />
• Incompatible or unreadable disc. The disc loaded is a playback-only disc type. This display may also<br />
appear if the disc is dirty or damaged.<br />
• Cannot record to a disc that is not CPRM<br />
compatible.<br />
• Cannot record this content using Video<br />
mode recording.<br />
• This video cannot be recorded to DVD+R/+RW.<br />
The video source is copy-once protected. Use a VR mode DVD-R/-RW<br />
disc with CPRM for recording.<br />
• This content is copy protected. The video source is copy-protected and cannot be recorded.<br />
• Incorrect CPRM information. The recorder could not read the CPRM information. The recorder<br />
may be damaged — please ask your nearest Pioneer-authorized<br />
service center or your dealer to carry out repairs.<br />
• Repairing disc.<br />
• Repairing the HDD.<br />
During recording, the power was cut. This display appears when the<br />
power is restored.<br />
• Could not repair the disc. The recorder was unable to repair the disc after a power cut. The<br />
contents of the recording will be lost.<br />
• Overheating has stopped operation. Press<br />
DISPLAY to clear message.<br />
• HDD optimization is recommended. This can<br />
be done using Disc Setup.<br />
• Please perform HDD optimization. This can<br />
be done using Disc Setup.<br />
The internal temperature of the recorder has exceeded the operating<br />
limit. If this message reappears, please ask your nearest Pioneerauthorized<br />
service center or your dealer to carry out repairs.<br />
The HDD should be optimized (basically, HDD housekeeping) to<br />
maintain playback and recording performance.<br />
The HDD is in more urgent need of optimization in order to maintain<br />
performance.
Additional information 16<br />
Message Explanation/Action<br />
• The HDD has not been sufficiently<br />
optimized. Please optimize again.<br />
• An error occurred. Please consult the service<br />
center. Note that contents on the HDD may be<br />
erased when servicing this unit.<br />
• The Hard Disk Drive info is incorrect. Use the<br />
Disc Setup menu to reinitialize.<br />
• This signal’s TV system is different from the<br />
recorder’s setting.<br />
• Recording failed due to a TV system<br />
mismatch. Press DISPLAY to clear message.<br />
• Playback has stopped because the TV system<br />
is different than the recording.<br />
• You are not allowed to watch this<br />
Conditional Access Programme.<br />
• There is no DV input or the input signal is<br />
unrecordable.<br />
If this message appears repeatedly after optimizing the HDD it is<br />
likely that there is not enough free space on the HDD for<br />
optimization to complete properly. Please erase some titles from the<br />
HDD and optimize again.<br />
This message is displayed when information from the HDD cannot<br />
be read. The HDD may be damaged or broken. Please ask your<br />
nearest Pioneer-authorized service center or your dealer to carry out<br />
repairs.<br />
As the HDD info cannot be properly read, no new recordings can be<br />
made. Reinitializing the HDD (page 133) may result in your being<br />
able to make recording again. Note that reinitializing the HDD will<br />
erase all recorded contents, including protected files.<br />
The TV system (PAL, NTSC, etc.) of the current channel is different<br />
from the TV system settings of this recorder.<br />
The timer recording failed because the TV system of the channel set<br />
for recording was different from the setting of the recorder.<br />
During recording or timer recording standby, the TV System (PAL,<br />
NTSC, etc.) of the playback video changed, causing playback to stop<br />
automatically.<br />
A CA module or smart card (obtained from your service provider) is<br />
required to watch the selected programme. Insert the supplied<br />
module or card into the Common Interface card slot on the front<br />
panel of the recorder (page 17).<br />
No signal was detected at the DV IN jack. This may appear if a blank<br />
section of DV tape is playing in the connected camcorder.<br />
• No DV camcorder connected. The camcorder is not connected properly, or the camcorder is<br />
switched off.<br />
• You cannot connect more than one DV<br />
camcorder at a time.<br />
This recorder’s DV jack supports connection to just one camcorder.<br />
• Cannot operate the DV camcorder. This recorder cannot operate the DV camcorder. Try switching off the<br />
camcorder then turn it back on again.<br />
• Could not operate the DV camcorder. This recorder was not able to operate the DV camcorder.<br />
• The DV camcorder is not set for playback.<br />
Please select playback mode on the DV<br />
camcorder.<br />
• The printer is not ready or is not connected.<br />
Please check the printer.<br />
The camcorder is in camera mode. Switch it to playback mode.<br />
This message is displayed when communication could not be<br />
established with the printer. See the Troubleshooting section if you<br />
do not know the cause.<br />
• Printing has been cancelled because ... This message is displayed when there is a printer error during<br />
printing. After checking the printer for the cause of the error, either<br />
reconnect the printer and start the printing job again, or select “Yes”<br />
to resume printing (select “No” to cancel the print job). See also the<br />
operating instructions that came with your printer for possible<br />
causes of print errors.<br />
157<br />
En
16<br />
158<br />
En<br />
Additional information<br />
Front-panel displays<br />
The table below shows a list of error messages that you may encounter when using the recorder and an explanation<br />
of their meaning.<br />
Message Explanation/Action<br />
• E01 The HDD may be damaged or broken. Please ask your nearest<br />
Pioneer-authorized service center or your dealer to carry out repairs.<br />
• E02 As the HDD info cannot be properly read, no new recordings can be<br />
made. Reinitializing the HDD (page 133) may result in your being<br />
able to make recording again. Note that reinitializing the HDD will<br />
erase all recorded contents, including protected files.<br />
Language code list<br />
Language (Language code letter), Language code<br />
Japanese (ja), 1001<br />
English (en), 0514<br />
French (fr), 0618<br />
German (de), 0405<br />
Italian (it), 0920<br />
Spanish (es), 0519<br />
Chinese (zh), 2608<br />
Dutch (nl), 1412<br />
Portuguese (pt), 1620<br />
Swedish (sv), 1922<br />
Russian (ru), 1821<br />
Greek (el), 0512<br />
Polish (pl), 1612<br />
Czech (cs), 0319<br />
Norwegian (no), 1415<br />
Afar (aa), 0101<br />
Abkhazian (ab), 0102<br />
Afrikaans (af), 0106<br />
Amharic (am), 0113<br />
Arabic (ar), 0118<br />
Assamese (as), 0119<br />
Aymara (ay), 0125<br />
Azerbaijani (az), 0126<br />
Bashkir (ba), 0201<br />
Byelorussian (be), 0205<br />
Bulgarian (bg), 0207<br />
Bihari (bh), 0208<br />
Bislama (bi), 0209<br />
Bengali (bn), 0214<br />
Tibetan (bo), 0215<br />
Breton (br), 0218<br />
Catalan (ca), 0301<br />
Corsican (co), 0315<br />
Welsh (cy), 0325<br />
Danish (da), 0401<br />
Bhutani (dz), 0426<br />
Esperanto (eo), 0515<br />
Estonian (et), 0520<br />
Basque (eu), 0521<br />
Persian (fa), 0601<br />
Finnish (fi), 0609<br />
Fiji (fj), 0610<br />
Faroese (fo), 0615<br />
Frisian (fy), 0625<br />
Irish (ga), 0701<br />
Scots-Gaelic (gd), 0704<br />
Galician (gl), 0712<br />
Guarani (gn), 0714<br />
Gujarati (gu), 0721<br />
Hausa (ha), 0801<br />
Hindi (hi), 0809<br />
Croatian (hr), 0818<br />
Hungarian (hu), 0821<br />
Armenian (hy), 0825<br />
Interlingua (ia), 0901<br />
Interlingue (ie), 0905<br />
Inupiak (ik), 0911<br />
Indonesian (in), 0914<br />
Icelandic (is), 0919<br />
Hebrew (iw), 0923<br />
Yiddish (ji), 1009<br />
Javanese (jw), 1023<br />
Georgian (ka), 1101<br />
Kazakh (kk), 1111<br />
Greenlandic (kl), 1112<br />
Cambodian (km), 1113<br />
Kannada (kn), 1114<br />
Korean (ko), 1115<br />
Kashmiri (ks), 1119<br />
Kurdish (ku), 1121<br />
Kirghiz (ky), 1125<br />
Latin (la), 1201<br />
Lingala (ln), 1214<br />
Laotian (lo), 1215<br />
Lithuanian (lt), 1220<br />
Latvian (lv), 1222<br />
Malagasy (mg), 1307<br />
Maori (mi), 1309<br />
Macedonian (mk), 1311<br />
Malayalam (ml), 1312<br />
Mongolian (mn), 1314<br />
Moldavian (mo), 1315<br />
Marathi (mr), 1318<br />
Malay (ms), 1319<br />
Maltese (mt), 1320<br />
Burmese (my), 1325<br />
Nauru (na), 1401<br />
Nepali (ne), 1405<br />
Occitan (oc), 1503<br />
Oromo (om), 1513<br />
Oriya (or), 1518<br />
Panjabi (pa), 1601<br />
Pashto, Pushto (ps), 1619<br />
Quechua (qu), 1721<br />
Rhaeto-Romance (rm), 1813<br />
Kirundi (rn), 1814<br />
Romanian (ro), 1815<br />
Kinyarwanda (rw), 1823<br />
Sanskrit (sa), 1901<br />
Sindhi (sd), 1904<br />
Sangho (sg), 1907<br />
Serbo-Croatian (sh), 1908<br />
Sinhalese (si), 1909<br />
Slovak (sk), 1911<br />
Slovenian (sl), 1912<br />
Samoan (sm), 1913<br />
Shona (sn), 1914<br />
Somali (so), 1915<br />
Albanian (sq), 1917<br />
Serbian (sr), 1918<br />
Siswati (ss), 1919<br />
Sesotho (st), 1920<br />
Sundanese (su), 1921<br />
Swahili (sw), 1923<br />
Tamil (ta), 2001<br />
Telugu (te), 2005<br />
Tajik (tg), 2007<br />
Thai (th), 2008<br />
Tigrinya (ti), 2009<br />
Turkmen (tk), 2011<br />
Tagalog (tl), 2012<br />
Setswana (tn), 2014<br />
Tonga (to), 2015<br />
Turkish (tr), 2018<br />
Tsonga (ts), 2019<br />
Tatar (tt), 2020<br />
Twi (tw), 2023<br />
Ukrainian (uk), 2111<br />
Urdu (ur), 2118<br />
Uzbek (uz), 2126<br />
Vietnamese (vi), 2209<br />
Volapük (vo), 2215<br />
Wolof (wo), 2315<br />
Xhosa (xh), 2408<br />
Yoruba (yo), 2515<br />
Zulu (zu), 2621
Additional information 16<br />
Country/Area code list<br />
Country/Area, Country/Area code, Code letter<br />
Argentina, 0118, ar<br />
Australia, 0121, au<br />
Austria, 0120, at<br />
Belgium, 0205, be<br />
Brazil, 0218, br<br />
Canada, 0301, ca<br />
Chile, 0312, cl<br />
China, 0314, cn<br />
Denmark, 0411, dk<br />
Finland, 0609, fi<br />
France, 0618, fr<br />
Germany, 0405, de<br />
Hong Kong, 0811, hk<br />
India, 0914, in<br />
Indonesia, 0904, id<br />
Italy, 0920, it<br />
Japan, 1016, jp<br />
Korea, Republic of, 1118, kr<br />
Screen sizes and disc formats<br />
When viewing on a standard TV or monitor<br />
Malaysia, 1325, my<br />
Mexico, 1324, mx<br />
Netherlands, 1412, nl<br />
New Zealand, 1426, nz<br />
Norway, 1415, no<br />
Pakistan, 1611, pk<br />
Philippines, 1608, ph<br />
Portugal, 1620, pt<br />
Russian Federation, 1821, ru<br />
Screen format of disc Setting Appearance<br />
Singapore, 1907, sg<br />
Spain, 0519, es<br />
Sweden, 1905, se<br />
Switzerland, 0308, ch<br />
Taiwan, 2023, tw<br />
Thailand, 2008, th<br />
United Kingdom, 0702, gb<br />
USA, 2119, us<br />
16:9 4:3 (Letter Box) The programme is shown in widescreen with black bars<br />
at the top and bottom of the screen.<br />
4:3 4:3 (Letter Box)<br />
4:3 (Pan & Scan)<br />
When viewing on a widescreen TV or monitor<br />
4:3 (Pan & Scan) The sides of the programme are cropped so that the<br />
picture fills the whole screen.<br />
The programme is presented correctly on either setting.<br />
Screen format of disc Setting Appearance<br />
16:9 16:9 The programme is presented in widescreen.<br />
4:3 16:9 Your TV will determine how the picture is presented —<br />
check the manual that came with the TV for details.<br />
159<br />
En
16<br />
160<br />
En<br />
Additional information<br />
Handling discs<br />
When holding discs of any type, take care not to leave<br />
fingerprints, dirt or scratches on the disc surface. Hold<br />
the disc by its edge or by the center hole and edge.<br />
Damaged or dirty discs can affect playback and<br />
recording performance. Take care also not to scratch the<br />
label side of the disc. Although not as fragile as the<br />
recorded side, scratches can still result in a disc<br />
becoming unusable.<br />
Should a disc become marked with fingerprints, dust,<br />
etc., clean using a soft, dry cloth, wiping the disc lightly<br />
from the center to the outside edge. Do not wipe with a<br />
circular motion.<br />
If necessary, use a cloth soaked in alcohol, or a<br />
commercially available CD/DVD cleaning kit to clean a<br />
disc more thoroughly. Never use benzine, thinner or<br />
other cleaning agents, including products designed for<br />
cleaning vinyl records.<br />
Storing discs<br />
Although CDs and DVD discs are more durable than vinyl<br />
records, you should still take care to handle and store<br />
discs correctly. When you’re not using a disc, return it to<br />
its case and store upright. Avoid leaving discs in<br />
excessively cold, humid, or hot environments (including<br />
under direct sunlight).<br />
Don’t glue paper or put stickers onto the disc, or use a<br />
pencil, ball-point pen or other sharp-tipped writing<br />
instrument. These could all damage the disc.<br />
For more detailed care information see the instructions<br />
that come with discs.<br />
Do not load more than one disc into the recorder.<br />
Damaged discs<br />
Discs spin at high speed inside the recorder. If you can<br />
see that a disc is cracked, chipped, warped, or otherwise<br />
damaged, don’t risk using it; you could end up damaging<br />
the recorder.<br />
This recorder is designed for use with conventional, fully<br />
circular discs only. Use of shaped discs is not<br />
recommended for this product. Pioneer disclaims all<br />
liability arising in connection with the use of shaped discs.<br />
Cleaning the pickup lens<br />
The HDD/DVD recorder’s lens should not become dirty in<br />
normal use, but if for some reason it should malfunction<br />
due to dust or dirt, consult your nearest Pioneerauthorized<br />
service center. Although lens cleaners are<br />
commercially available, we do not recommend using<br />
them since some may damage the lens.<br />
Condensation<br />
Condensation may form inside the recorder if it is<br />
brought into a warm room from outside, or if the<br />
temperature of the room rises quickly. Although the<br />
condensation won’t damage the recorder, it may<br />
temporarily impair its performance. For this reason you<br />
should leave it to adjust to the warmer temperature for<br />
about an hour before switching on and using.
Additional information 16<br />
Hints on installation<br />
We want you to enjoy using this recorder for years to<br />
come, so please bear in mind the following points when<br />
choosing a suitable location for it:<br />
Do...<br />
Use in a well-ventilated room.<br />
Place on a solid, flat, level surface, such as a table,<br />
shelf or stereo rack.<br />
Don’t...<br />
Use in a place exposed to high temperatures or<br />
humidity, including near radiators and other heatgenerating<br />
appliances.<br />
Place on a window sill or other place where the<br />
recorder will be exposed to direct sunlight.<br />
Use in a dusty or damp environment or in a room<br />
where it will be exposed to excessive cigarette smoke.<br />
Place directly on top of an amplifier, or other<br />
component in your stereo system that becomes hot in<br />
use.<br />
Use near a television or monitor as you may<br />
experience interference — especially if the television<br />
uses an indoor antenna.<br />
Use in a kitchen or other room where the recorder<br />
may be exposed to smoke or steam.<br />
Use on a thick rug or carpet, or cover with cloth —<br />
this may prevent proper cooling of the unit.<br />
Place on an unstable surface, or one that is not large<br />
enough to support all four of the unit’s feet.<br />
Moving the recorder<br />
If you need to move the recorder, first remove the disc, if<br />
loaded, and close the disc tray. Next, press STANDBY/<br />
ON to switch the power to standby, checking that the<br />
POWER OFF indication in the display goes off. Wait at<br />
least two minutes. Lastly, disconnect the power cord.<br />
Never lift or move the recorder during playback or<br />
recording — discs rotate at a high speed and may be<br />
damaged.<br />
Resetting the recorder<br />
If you need to, you can reset the recorder to all its factory<br />
settings.<br />
1 Make sure that the recorder is on.<br />
2 Using the front panel controls, press and hold<br />
(Stop) and press STANDBY/ON.<br />
The recorder turns off with all settings reset.<br />
161<br />
En
16<br />
162<br />
En<br />
Additional information<br />
Specifications (DVR-<strong>LX60D</strong>)<br />
General<br />
Power requirements. . . . . . . . . .220 V to 240 V, 50 Hz/60 Hz<br />
Power consumption . . . . . . . . . . . . . . . . . . . . . . . . . . . . 58 W<br />
Power consumption in standby mode . . . . . . . . . . . .0.69 W<br />
(Front panel display: off)<br />
Weight . . . . . . . . . . . . . . . . . . . . . . . . . . . . . . . . . . . . . . 4.8 kg<br />
Dimensions. . . . . . 420 mm (W) x 77 mm (H) x 288 mm (D)<br />
Operating temperature . . . . . . . . . . . . . . . . +5 °C to +35 °C<br />
Operating humidity . . . . . . .5 % to 85 % (no condensation)<br />
TV system . . . . . . . NTSC (external input only)/PAL/SECAM<br />
Readable discs<br />
DVD-Video, DVD-RW, DVD-R, DVD+R, DVD+RW, DVD-RAM,<br />
Video CD, Super VCD, CD, CD-R/-RW (WMA, MP3, JPEG,<br />
CD-DA, DivX)<br />
Recording discs and formats<br />
DVD-R/-RW: VR mode and Video mode<br />
DVD+R/+RW: +VR mode<br />
DVD-RAM: VR mode<br />
DVD-R DL: VR mode and Video mode<br />
DVD+R DL: +VR mode<br />
Video recording format<br />
Sampling frequency . . . . . . . . . . . . . . . . . . . . . . . . .13.5 MHz<br />
Compression format . . . . . . . . . . . . . . . . . . . . . . . . . . MPEG<br />
Audio recording format<br />
Sampling frequency . . . . . . . . . . . . . . . . . . . . . . . . . . . 48 kHz<br />
Compression format . . . . . . . . Dolby Digital or Linear PCM<br />
(uncompressed)<br />
Recording time<br />
HDD (250 GB)<br />
XP+ . . . . . . . . . . . . . . . . . . . . . . . . . . . . . . . . . . . Approx. 36 h<br />
Fine (XP) . . . . . . . . . . . . . . . . . . . . . . . . . . . . . . . Approx. 53 h<br />
Standard Play (SP) . . . . . . . . . . . . . . . . . . . . . . Approx. 106 h<br />
Long Play (LP). . . . . . . . . . . . . . . . . . . . . . . . . . Approx. 212 h<br />
Extended Play (EP) . . . . . . . . . . . . . . . . . . . . . . Approx. 319 h<br />
Super Long Play (SLP) . . . . . . . . . . . . . . . . . . . Approx. 425 h<br />
Super Extended Play (SEP) . . . . . . . . . . . . . . . Approx. 532 h<br />
Manual Mode (MN) . . . . . . . . . . . . . . .Approx. 36 h to 711 h<br />
DVD-R/-RW, DVD+R/+RW, DVD-RAM<br />
Fine (XP) . . . . . . . . . . . . . . . . . . . . . . . . . . . . . . . . Approx. 1 h<br />
Standard Play (SP) . . . . . . . . . . . . . . . . . . . . . . . . Approx. 2 h<br />
Long Play (LP). . . . . . . . . . . . . . . . . . . . . . . . . . . . Approx. 4 h<br />
Extended Play (EP) . . . . . . . . . . . . . . . . . . . . . . . . Approx. 6 h<br />
Super Long Play (SLP) . . . . . . . . . . . . . . . . . . . . . Approx. 8 h<br />
Super Extended Play (SEP) . . . . . . . . . . . . . . . . Approx. 10 h<br />
(DVD-R/-RW, DVD-RAM only)<br />
Manual Mode (MN)<br />
DVD-R/-RW/-RAM . . . . . . . . . . . . . . . . .Approx. 1 h to 13 h<br />
DVD+R/+RW . . . . . . . . . . . . . . . . . . . . .Approx. 1 h to 8 h<br />
DVD-R DL/DVD+R DL<br />
Fine (XP) . . . . . . . . . . . . . . . . . . . . . . . . . . . .Approx. 1 h 51 m<br />
Standard Play (SP) . . . . . . . . . . . . . . . . . . .Approx. 3 h 35 m<br />
Long Play (LP) . . . . . . . . . . . . . . . . . . . . . . .Approx. 7 h 11 m<br />
Extended Play (EP) . . . . . . . . . . . . . . . . . .Approx. 10 h 46 m<br />
Super Long Play (SLP) . . . . . . . . . . . . . . .Approx. 14 h 21 m<br />
Super Extended Play (SEP). . . . . . . . . . . .Approx. 17 h 57 m<br />
(DVD-R DL only)<br />
Manual Mode (MN)<br />
DVD-R DL . . . . . . . . . . . . . . . . . . Approx. 1 h 51 m to 24 h<br />
DVD+R DL . . . . . . . . . . . . .Approx. 1 h 51 m to 14 h 21 m<br />
Timer<br />
Programmes . . . . . . . . . . . . . . . . . 1 month/32 programmes<br />
Clock. . . . . . . . . . . . . . . Quartz lock (24-hour digital display)<br />
Tuner (analog)<br />
Receivable channels<br />
Hyper<br />
UHF<br />
Hyper<br />
UHF<br />
SECAM B/G<br />
PAL B/G<br />
Frequency<br />
47 MHz to 89 MHz<br />
VHF (low)<br />
VHF (high) 104 MHz to 300 MHz<br />
302 MHz to 470 MHz<br />
470 MHz to 862 MHz<br />
SECAM L<br />
Frequency<br />
49 MHz to 65 MHz<br />
VHF (low)<br />
VHF (high) 104 MHz to 300 MHz<br />
300 MHz to 470 MHz<br />
470 MHz to 862 MHz<br />
Channel<br />
E2 to E4<br />
X to Z<br />
E5 to E12<br />
S1 to S20<br />
M1 to M10<br />
U1 to U10<br />
S21 to S41<br />
E21 to E69<br />
Channel<br />
FB, FC1, FC<br />
F1 to F6<br />
B to Q<br />
S21 to S41<br />
21 to 69<br />
PAL I<br />
Frequency<br />
44 MHz to 89 MHz<br />
104 MHz to 300 MHz<br />
302 MHz to 470 MHz<br />
470 MHz to 862 MHz<br />
SECAM D/K<br />
PAL D/K<br />
Frequency<br />
49 MHz to 94 MHz<br />
104 MHz to 300 MHz<br />
302 MHz to 470 MHz<br />
470 MHz to 862 MHz<br />
Channel<br />
A to C<br />
X to Z<br />
D to J<br />
11, 13<br />
S1 to S20<br />
S21 to S41<br />
E21 to E69<br />
Channel<br />
R1 to R5<br />
R6 to R12<br />
S1 to S20<br />
S21 to S41<br />
E21 to E69<br />
STEREO<br />
B/G - A2<br />
I - NICAM<br />
L - NICAM<br />
B/G - NICAM<br />
D/K - NICAM<br />
Tuner (digital)<br />
Receiving system. . . . . . . . . . . . . . .DVB-T (2 K/8 K COFDM)<br />
Tuner VHF/UHF . . . . . . VHF band III (174 MHz to 230 MHz)<br />
UHF band IV, V (470 MHz to 862 MHz)<br />
Auto Channel Preset. . . . . . . . . . . . . . . 999 ch, Auto Preset,<br />
Auto Label, Auto Sort<br />
Audio . . . . . . . . . . . . . . . . . . . . . . . . . Stereo MPEG layer I/II<br />
Audio Decoder<br />
. . . . . . . . .Sampling frequencies: 32 kHz, 44.1 kHz, 48 kHz<br />
This product’s digital tuner has been confirmed for use in the<br />
following countries: Belgium, France, Germany, Italy, Spain,<br />
Denmark, Finland, Netherlands, Sweden, Switzerland, UK.
Additional information 16<br />
Input/Output<br />
Antenna<br />
. . . . . . . . .75 Ω IEC 169-2 connector for VHF/UHF in/out (analog)<br />
. . . . . . . . . 75 Ω IEC 169-2 connector for VHF/UHF in/out (digital)<br />
Video input . . . . . . . . . . . . . . . AV2 (Input 1), Input 2 (front),<br />
Input 3 (rear)<br />
Input level . . . . . . . . . . . . . . . . . . . . . . . . . . . . 1 Vp-p (75 Ω)<br />
Jacks . . . . . . . . . . . . . . . . . . . . . . . .AV connector (Input 1),<br />
RCA jack (Input 2, Input 3)<br />
Video output . . . . . . . . . . . . . . . . . . . . . . . . . . . . AV1, Output<br />
Output level . . . . . . . . . . . . . . . . . . . . . . . . . . . 1 Vp-p (75 Ω)<br />
Jacks . . . . . . . . . . . . . . . . . . . . . . . . . . AV connector (AV1),<br />
RCA jack (Output)<br />
S-Video input . . AV2 (Input 1), Input 2 (front), Input 3 (rear)<br />
Y (luminance) - Input level . . . . . . . . . . . . . . . 1 Vp-p (75 Ω)<br />
C (colour) - Input level . . . . . . . . . . . . . . .300 mVp-p (75 Ω)<br />
Jacks . . . . . . . . . . . . . . . . . . . . . . . .AV connector (Input 1),<br />
4 pin mini DIN (Input 2, Input 3)<br />
S-Video output. . . . . . . . . . . . . . . . . . . . . . . . . . . AV1, Output<br />
Y (luminance) - Output level. . . . . . . . . . . . . . 1 Vp-p (75 Ω)<br />
C (colour) - Output level . . . . . . . . . . . . . .300 mVp-p (75 Ω)<br />
Jacks . . . . . . . . . . . . . . . . . . . . . . . . . . AV connector (AV1),<br />
4 pin mini DIN (Output)<br />
Component video output<br />
Output level . . . . . . . . . . . . . . . . . . . . . . . . Y: 1.0 Vp-p (75 Ω)<br />
P B, P R: 0.7 Vp-p (75 Ω)<br />
Jacks . . . . . . . . . . . . . . . . . . . . . . . . . . . . . . . . . . .RCA jacks<br />
RGB input . . . . . . . . . . . . . . . . . . . . . . . . . . . . . AV2 (Input 1)<br />
Input level . . . . . . . . . . . . . . . . . . . . . . . . . . . 0.7 Vp-p (75 Ω)<br />
Jacks . . . . . . . . . . . . . . . . . . . . . . . . AV connector (Input 1)<br />
RGB output . . . . . . . . . . . . . . . . . . . . . . . . . . . . . . . . . . . . AV1<br />
Output level . . . . . . . . . . . . . . . . . . . . . . . . . . 0.7 Vp-p (75 Ω)<br />
Jacks . . . . . . . . . . . . . . . . . . . . . . . . . . .AV connector (AV1)<br />
Audio input<br />
. . . . . . . . . . AV2 (Input 1), Input 2 (front), Input 3 (rear) L/R<br />
During audio input . . . . . . . . . . . . . . . . . . . . . . . . . . 2 V rms<br />
(Input impedance: more than 22 kΩ)<br />
Jacks . . . . . . . . . . . . . . . . . . . . . . . .AV connector (Input 1),<br />
RCA jacks (Input 2)<br />
Audio output . . . . . . . . . . . . . . . . . . . . . . . . . . . . AV1, Output<br />
During audio output . . . . . . . . . . . . . . . . . . . . . . . . . 2 V rms<br />
(Output impedance: less than 1.5 kΩ)<br />
Jacks . . . . . . . . . . . . . . . . . . . . . . . . . . AV connector (AV1),<br />
RCA jacks (Output)<br />
Control input . . . . . . . . . . . . . . . . . . . . . . . . . . . . . . .Mini jack<br />
Digital audio output . . . . . . . . . . . . . . . . . . . . . . . . . . Coaxial<br />
G-LINK . . . . . . . . . . . . . . . . . . . . . . . . . . . . . . . . . .Mini jack<br />
Common Interface . . . . . . . . . . . . . . . . . . . . . . . . CA module<br />
DV input. . . . . . . . . . . . . . . . . . . . . . . . . . . . . . . . 4 pin (front)<br />
(i.LINK/IEEE 1394 standard)<br />
USB . . . . . . . . . . . . . . . . . . . . . Type A (front), Type B (front)<br />
HDMI . . . . . . . . . . . . . . . . . . . . . . . . . . . . . . . . . . . . . . . 19 pin<br />
AV Connectors (21-pin connector assignment)<br />
AV connector input/output . . . . . . . . . . . . .21-pin connector<br />
This connector provides the video and audio signals for<br />
connection to a compatible colour TV or monitor.<br />
PIN no. AV1 (RGB)-TV / AV2 (INPUT 1/DECODER)<br />
1. . . . . . . . . . . . . . . . . . . . . . . . Audio 2/R out / Audio 2/R out<br />
2. . . . . . . . . . . . . . . . . . . . . . . . . . . . . . . . . . . – / Audio 2/R in<br />
11 . . . . . . . . . . . . . . . . . . . . . . . . . . . . . . . . . . . . . G out / G in<br />
3. . . . . . . . . . . . . . . . . . . . . . . . .Audio 1/L out / Audio 1/L out<br />
6. . . . . . . . . . . . . . . . . . . . . . . . . . . . . . . . . . . – / Audio 1/L in<br />
15 . . . . . . . . . . . . . . . . . . . . . . . . . . . . . R or C out / R or C in<br />
4. . . . . . . . . . . . . . . . . . . . . . . . . . . . . . . . . . . . . . . . . . . . . GND<br />
17. . . . . . . . . . . . . . . . . . . . . . . . . . . . . . . . . . . . . . . . . . . . GND<br />
7 . . . . . . . . . . . . . . . . . . . . . . . . . . . . . . . . . . . . . . B out / B in<br />
19. . . . . . . . . . . . . . . . . . . . . . . Video out or Y out / Video out<br />
20. . . . . . . . . . . . . . . . . . . . . . . . . . . . . . . . .– / Video in or Y in<br />
8. . . . . . . . . . . . . . . . . . . . . . . . . . . . . . . . . . . . . . . . . . . Status<br />
21. . . . . . . . . . . . . . . . . . . . . . . . . . . . . . . . . . . . . . . . . . . . GND<br />
Supplied accessories<br />
Remote control . . . . . . . . . . . . . . . . . . . . . . . . . . . . . . . . . . . 1<br />
AA/R6 dry cell batteries. . . . . . . . . . . . . . . . . . . . . . . . . . . . . 2<br />
Audio/Video cable (red/white/yellow) . . . . . . . . . . . . . . . . . 1<br />
G-LINK cable . . . . . . . . . . . . . . . . . . . . . . . . . . . . . . . . . . . . 1<br />
RF antenna cable. . . . . . . . . . . . . . . . . . . . . . . . . . . . . . . . . . 2<br />
Power cable . . . . . . . . . . . . . . . . . . . . . . . . . . . . . . . . . . . . . . 1<br />
Warranty card . . . . . . . . . . . . . . . . . . . . . . . . . . . . . . . . . . . . 1<br />
Operating instructions . . . . . . . . . . . . . . . . . . . . . . . . . . . . . 1<br />
Note: The specifications and design of this product are subject<br />
to change without notice, due to improvement.<br />
This product includes FontAvenue ® fonts licenced<br />
by NEC Corporation. FontAvenue is a registered<br />
trademark of NEC Corporation.<br />
Microsoft product screen shots reprinted with permission<br />
from Microsoft Corporation.<br />
163<br />
En
http://www.pioneer.co.uk<br />
http://www.pioneer.eu<br />
Published by Pioneer Corporation.<br />
Copyright © 2007 Pioneer Corporation.<br />
All rights reserved.<br />
PIONEER CORPORATION<br />
4-1, Meguro 1-Chome, Meguro-ku, Tokyo 153-8654, Japan<br />
PIONEER ELECTRONICS (USA) INC.<br />
P.O. BOX 1540, Long Beach, California 90801-1540, U.S.A. TEL: (800) 421-1404<br />
PIONEER ELECTRONICS OF CANADA, INC.<br />
300 Allstate Parkway, Markham, Ontario L3R 0P2, Canada TEL: 1-877-283-5901, 905-479-4411<br />
PIONEER EUROPE NV<br />
Haven 1087, Keetberglaan 1, B-9120 Melsele, Belgium TEL: 03/570.05.11<br />
PIONEER ELECTRONICS ASIACENTRE PTE. LTD.<br />
253 Alexandra Road, #04-01, Singapore 159936 TEL: 65-6472-7555<br />
PIONEER ELECTRONICS AUSTRALIA PTY. LTD.<br />
178-184 Boundary Road, Braeside, Victoria 3195, Australia, TEL: (03) 9586-6300<br />
PIONEER ELECTRONICS DE MEXICO S.A. DE C.V.<br />
Blvd.Manuel Avila Camacho 138 10 piso Col.Lomas de Chapultepec, Mexico,D.F. 11000 TEL: 55-9178-4270 K002_B_En<br />