user manual - AWE Europe
user manual - AWE Europe
user manual - AWE Europe

You also want an ePaper? Increase the reach of your titles
YUMPU automatically turns print PDFs into web optimized ePapers that Google loves.
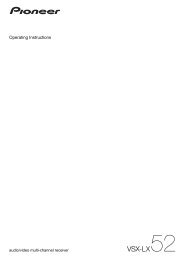
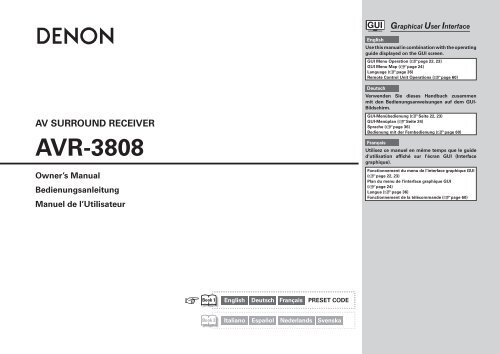
AV SURROUND RECEIVER<br />
AVR-3808<br />
Owner’s Manual<br />
Bedienungsanleitung<br />
Manuel de l’Utilisateur<br />
v Book 1<br />
English Deutsch Français PRESET CODE<br />
Book 2<br />
Italiano Español Nederlands Svenska<br />
English<br />
Graphical User Interface<br />
Use this <strong>manual</strong> in combination with the operating<br />
guide displayed on the GUI screen.<br />
GUI Menu Operation (vpage 22, 23)<br />
GUI Menu Map (vpage 24)<br />
Language (vpage 36)<br />
Remote Control Unit Operations (vpage 60)<br />
Deutsch<br />
Verwenden Sie dieses Handbuch zusammen<br />
mit den Bedienungsanweisungen auf dem GUI-<br />
Bildschirm.<br />
GUI-Menübedienung (vSeite 22, 23)<br />
GUI-Menüplan (vSeite 24)<br />
Sprache (vpage 36)<br />
Bedienung mit der Fernbedienung (vpage 60)<br />
Français<br />
Utilisez ce manuel en même temps que le guide<br />
d’utilisation affiché sur l’écran GUI (Interface<br />
graphique).<br />
Fonctionnement du menu de l’interface graphique GUI<br />
(vpage 22, 23)<br />
Plan du menu de l’interface graphique GUI<br />
(vpage 24)<br />
Langue (vpage 36)<br />
Fonctionnement de la télécommande (vpage 60)
ENGLISH DEUTSCH FRANCAIS<br />
n SAFETY PRECAUTIONS<br />
I<br />
CAUTION<br />
RISK OF ELECTRIC SHOCK<br />
DO NOT OPEN<br />
CAUTION:<br />
TO REDUCETHE RISK OF ELECTRIC SHOCK, DO NOT REMOVE<br />
COVER (OR BACK). NO USER-SERVICEABLE PARTS INSIDE.<br />
REFER SERVICING TO QUALIFIED SERVICE PERSONNEL.<br />
The lightning flash with arrowhead symbol, within an equilateral<br />
triangle, is intended to alert the <strong>user</strong> to the presence of<br />
uninsulated “dangerous voltage” within the product’s enclosure<br />
that may be of sufficient magnitude to constitute a risk of electric<br />
shock to persons.<br />
The exclamation point within an equilateral triangle is intended<br />
to alert the <strong>user</strong> to the presence of important operating<br />
and maintenance (servicing) instructions in the literature<br />
accompanying the appliance.<br />
WARNING:<br />
TO REDUCE THE RISK OF FIRE OR ELECTRIC SHOCK, DO NOT<br />
EXPOSE THIS APPLIANCE TO RAIN OR MOISTURE.<br />
ITALIANO ESPAÑOL NEDERLANDS SVENSKA<br />
• DECLARATION OF CONFORMITY<br />
We declare under our sole responsibility that this product, to which this<br />
declaration relates, is in conformity with the following standards:<br />
EN60065, EN55013, EN55020, EN61000-3-2 and EN61000-3-3.<br />
Following the provisions of 2006/95/EC and 2004/108/EC Directive.<br />
• ÜBEREINSTIMMUNGSERKLÄRUNG<br />
Wir erklären unter unserer Verantwortung, daß dieses Produkt, auf das<br />
sich diese Erklärung bezieht, den folgenden Standards entspricht:<br />
EN60065, EN55013, EN55020, EN61000-3-2 und EN61000-3-3.<br />
Entspricht den Verordnungen der Direktive 2006/95/EC und 2004/108/EC.<br />
• DECLARATION DE CONFORMITE<br />
Nous déclarons sous notre seule responsabilité que l’appareil, auquel se<br />
réfère cette déclaration, est conforme aux standards suivants:<br />
EN60065, EN55013, EN55020, EN61000-3-2 et EN61000-3-3.<br />
D’après les dispositions de la Directive 2006/95/EC et 2004/108/EC.<br />
• DICHIARAZIONE DI CONFORMITÀ<br />
Dichiariamo con piena responsabilità che questo prodotto, al quale la<br />
nostra dichiarazione si riferisce, è conforme alle seguenti normative:<br />
EN60065, EN55013, EN55020, EN61000-3-2 e EN61000-3-3.<br />
In conformità con le condizioni delle direttive 2006/95/EC e 2004/108/EC.<br />
QUESTO PRODOTTO E’ CONFORME<br />
AL D.M. 28/08/95 N. 548<br />
• DECLARACIÓN DE CONFORMIDAD<br />
Declaramos bajo nuestra exclusiva responsabilidad que este producto al<br />
que hace referencia esta declaración, está conforme con los siguientes<br />
estándares:<br />
EN60065, EN55013, EN55020, EN61000-3-2 y EN61000-3-3.<br />
Siguiendo las provisiones de las Directivas 2006/95/EC y 2004/108/EC.<br />
• EENVORMIGHEIDSVERKLARING<br />
Wij verklaren uitsluitend op onze verantwoordelijkheid dat dit produkt,<br />
waarop deze verklaring betrekking heeft, in overeenstemming is met de<br />
volgende normen:<br />
EN60065, EN55013, EN55020, EN61000-3-2 en EN61000-3-3.<br />
Volgens de bepalingen van de Richtlijnen 2006/95/EC en 2004/108/EC.<br />
• ÖVERENSSTÄMMELSESINTYG<br />
Härmed intygas helt på eget ansvar att denna produkt, vilken detta intyg<br />
avser, uppfyller följande standarder:<br />
EN60065, EN55013, EN55020, EN61000-3-2 och EN61000-3-3.<br />
Enligt stadgarna i direktiv 2006/95/EC och 2004/108/EC.<br />
CAUTION:<br />
To completely disconnect this product from the mains, disconnect<br />
the plug from the wall socket outlet.<br />
The mains plug is used to completely interrupt the power supply to<br />
the unit and must be within easy access by the <strong>user</strong>.<br />
VORSICHT:<br />
Um dieses Gerät vollständig von der Stromversorgung abzutrennen,<br />
ziehen Sie bitte den Stecker aus der Wandsteckdose.<br />
Der Netzstecker wird verwendet, um die Stromversorgung zum<br />
Gerät völlig zu unterbrechen; er muss für den Benutzer gut und<br />
einfach zu erreichen sein.<br />
PRECAUTION:<br />
Pour déconnecter complètement ce produit du courant secteur,<br />
débranchez la prise de la prise murale.<br />
La prise secteur est utilisée pour couper complètement<br />
l’alimentation de l’appareil et l’utilisateur doit pouvoir y accéder<br />
facilement.<br />
ATTENZIONE:<br />
Per scollegare completamente questo prodotto dalla rete di<br />
alimentazione elettrica, scollegare la spina dalla relativa presa a muro.<br />
La spina di rete viene utilizzata per interrompere completamente<br />
l’alimentazione all’unità e deve essere facilmente accessibile<br />
all’utente.<br />
PRECAUCIÓN:<br />
Para desconectar completamente este producto de la alimentación<br />
eléctrica, desconecte el enchufe del enchufe de la pared.<br />
El enchufe de la alimentación eléctrica se utiliza para interrumpir por<br />
completo el suministro de alimentación eléctrica a la unidad y debe<br />
de encontrarse en un lugar al que el usuario tenga fácil acceso.<br />
WAARSCHUWING:<br />
Om de voeding van dit product volledig te onderbreken moet de<br />
stekker uit het stopcontact worden getrokken.<br />
De netstekker wordt gebruikt om de stroomtoevoer naar het toestel<br />
volledig te onderbreken en moet voor de gebruiker gemakkelijk<br />
bereikbaar zijn.<br />
FÖRSIKTIHETSMÅTT:<br />
Koppla loss stickproppen från eluttaget för att helt skilja produkten<br />
från nätet.<br />
Stickproppen används för att helt bryta strömförsörjningen till<br />
apparaten, och den måste vara lättillgänglig för användaren.
• Avoid high temperatures.<br />
Allow for sufficient heat dispersion when installed in a rack.<br />
• Vermeiden Sie hohe Temperaturen.<br />
Beachten Sie, dass eine ausreichende Belüftung gewährleistet<br />
wird, wenn das Gerät auf ein Regal gestellt wird.<br />
• Eviter des températures élevées.<br />
Tenir compte d’une dispersion de chaleur suffisante lors de<br />
l’installation sur une étagère.<br />
• Evitate di esporre l’unità a temperature elevate.<br />
Assicuratevi che vi sia un’adeguata dispersione del calore<br />
quando installate l’unità in un mobile per componenti audio.<br />
• Evite altas temperaturas.<br />
Permite la suficiente dispersión del calor cuando está<br />
instalado en la consola.<br />
• Vermijd hoge temperaturen.<br />
Zorg er bij installatie in een audiorack voor, dat de door<br />
het toestel geproduceerde warmte goed kan worden<br />
afgevoerd.<br />
• Undvik höga temperaturer.<br />
Se till att det finns möjlighet till god värmeavledning vid<br />
montering i ett rack.<br />
• Handle the power cord carefully.<br />
Hold the plug when unplugging the cord.<br />
• Gehen Sie vorsichtig mit dem Netzkabel um.<br />
Halten Sie das Kabel am Stecker, wenn Sie den Stecker<br />
herausziehen.<br />
• Manipuler le cordon d’alimentation avec précaution.<br />
Tenir la prise lors du débranchement du cordon.<br />
• Manneggiate il cavo di alimentazione con attenzione.<br />
Tenete ferma la spina quando scollegate il cavo dalla presa.<br />
• Maneje el cordón de energía con cuidado.<br />
Sostenga el enchufe cuando desconecte el cordón de<br />
energía.<br />
• Hanteer het netsnoer voorzichtig.<br />
Houd het snoer bij de stekker vast wanneer deze moet<br />
worden aan- of losgekoppeld.<br />
• Hantera nätkabeln varsamt.<br />
Håll i kabeln när den kopplas från el-uttaget.<br />
• Keep the unit free from moisture, water, and dust.<br />
• Halten Sie das Gerät von Feuchtigkeit, Wasser und Staub<br />
fern.<br />
• Protéger l’appareil contre l’humidité, l’eau et la poussière.<br />
• Tenete l’unità lontana dall’umidità, dall’acqua e dalla<br />
polvere.<br />
• Mantenga el equipo libre de humedad, agua y polvo.<br />
• Laat geen vochtigheid, water of stof in het apparaat<br />
binnendringen.<br />
• Utsätt inte apparaten för fukt, vatten och damm.<br />
• Unplug the power cord when not using the unit for long<br />
periods of time.<br />
• Wenn das Gerät längere Zeit nicht verwendet werden soll,<br />
trennen Sie das Netzkabel vom Netzstecker.<br />
• Débrancher le cordon d’alimentation lorsque l’appareil n’est<br />
pas utilisé pendant de longues périodes.<br />
• Scollegate il cavo di alimentazione quando prevedete di non<br />
utilizzare l’unità per un lungo periodo di tempo.<br />
• Desconecte el cordón de energía cuando no utilice el equipo<br />
por mucho tiempo.<br />
• Neem altijd het netsnoer uit het stopkontakt wanneer het<br />
apparaat gedurende een lange periode niet wordt gebruikt.<br />
• Koppla loss nätkabeln om apparaten inte kommer att<br />
användas i lång tid.<br />
* (For apparatuses with ventilation holes)<br />
• Do not obstruct the ventilation holes.<br />
• Decken Sie den Lüftungsbereich nicht ab.<br />
• Ne pas obstruer les trous d’aération.<br />
• Non coprite i fori di ventilazione.<br />
• No obstruya los orificios de ventilación.<br />
• De ventilatieopeningen mogen niet worden beblokkeerd.<br />
• Täpp inte till ventilationsöppningarna.<br />
SVENSKA<br />
NEDERLANDS<br />
• Do not let foreign objects into the unit.<br />
• Lassen Sie keine fremden Gegenstände in das Gerät kommen.<br />
• Ne pas laisser des objets étrangers dans l’appareil.<br />
• Non inserite corpi estranei all’interno dell’unità.<br />
• No deje objetos extraños dentro del equipo.<br />
• Laat geen vreemde voorwerpen in dit apparaat vallen.<br />
• Se till att främmande föremål inte tränger in i apparaten.<br />
• Do not let insecticides, benzene, and thinner come in<br />
contact with the unit.<br />
• Lassen Sie das Gerät nicht mit Insektiziden, Benzin oder<br />
Verdünnungsmitteln in Berührung kommen.<br />
• Ne pas mettre en contact des insecticides, du benzène et<br />
un diluant avec l’appareil.<br />
• Assicuratevi che l’unità non entri in contatto con insetticidi,<br />
benzolo o solventi.<br />
• No permita el contacto de insecticidas, gasolina y diluyentes<br />
con el equipo.<br />
• Voorkom dat insecticiden, benzeen of verfverdunner met dit<br />
toestel in contact komen.<br />
• Se till att inte insektsmedel på spraybruk, bensen och<br />
thinner kommer i kontakt med apparatens hölje.<br />
• Never disassemble or modify the unit in any way.<br />
• Versuchen Sie niemals das Gerät auseinander zu nehmen<br />
oder zu verändern.<br />
• Ne jamais démonter ou modifier l’appareil d’une manière ou<br />
d’une autre.<br />
• Non smontate né modificate l’unità in alcun modo.<br />
• Nunca desarme o modifique el equipo de ninguna manera.<br />
• Dit toestel mag niet gedemonteerd of aangepast worden.<br />
• Ta inte isär apparaten och försök inte bygga om den.<br />
ESPAÑOL<br />
n NOTE ON USE / HINWEISE ZUM GEBRAUCH / OBSERVATIONS RELATIVES A L’UTILISATION / NOTE SULL’USO /<br />
NOTAS SOBRE EL USO / ALVORENS TE GEBRUIKEN / OBSERVERA ANGÅENDE ANVÄNDNINGEN<br />
ITALIANO<br />
FRANCAIS<br />
DEUTSCH<br />
CAUTION:<br />
• The ventilation should not be impeded by covering the ventilation openings with items,<br />
such as newspapers, tablecloths, curtains, etc.<br />
• No naked flame sources, such as lighted candles, should be placed on the unit.<br />
• Observe and follow local regulations regarding battery disposal.<br />
• Do not expose the unit to dripping or splashing fluids.<br />
• Do not place objects filled with liquids, such as vases, on the unit.<br />
ACHTUNG:<br />
• Die Belüftung sollte auf keinen Fall durch das Abdecken der Belüftungsöffnungen durch<br />
Gegenstände wie beispielsweise Zeitungen, Tischtücher, Vorhänge o. Ä. behindert<br />
werden.<br />
• Auf dem Gerät sollten keinerlei direkte Feuerquellen wie beispielsweise angezündete<br />
Kerzen aufgestellt werden.<br />
• Bitte beachten Sie bei der Entsorgung der Batterien die örtlich geltenden<br />
Umweltbestimmungen.<br />
• Das Gerät sollte keiner tropfenden oder spritzenden Flüssigkeit ausgesetzt werden.<br />
• Auf dem Gerät sollten keine mit Flüssigkeit gefüllten Behälter wie beispielsweise Vasen<br />
aufgestellt werden.<br />
ATTENTION:<br />
• La ventilation ne doit pas être gênée en recouvrant les ouvertures de la ventilation avec des<br />
objets tels que journaux, rideaux, tissus, etc.<br />
• Aucune flamme nue, par exemple une bougie, ne doit être placée sur l’appareil.<br />
• Veillez à respecter les lois en vigueur lorsque vous jetez les piles usagées.<br />
• L’appareil ne doit pas être exposé à l’eau ou à l’humidité.<br />
• Ne pas poser d’objet contenant du liquide, par exemple un vase, sur l’appareil.<br />
ATTENZIONE:<br />
• Le aperture di ventilazione non devono essere ostruite coprendole con oggetti, quali<br />
giornali, tovaglie, tende e così via.<br />
• Non posizionate sull’unità fiamme libere, come ad esempio candele accese.<br />
• Prestate attenzione agli aspetti legati alla tutela dell’ambiente nello smaltimento delle<br />
batterie.<br />
• L’apparecchiatura non deve essere esposta a gocciolii o spruzzi.<br />
• Non posizionate sull’unità alcun oggetto contenente liquidi, come ad esempio i vasi.<br />
PRECAUCIÓN:<br />
• La ventilación no debe quedar obstruida por haberse cubierto las aperturas con objetos<br />
como periódicos, manteles, cortinas, etc.<br />
• No debe colocarse sobre el aparato ninguna fuente inflamable sin protección, como velas<br />
encendidas.<br />
• A la hora de deshacerse de las pilas, respete la normativa para el cuidado del medio<br />
ambiente.<br />
• No exponer el aparato al goteo o salpicaduras cuando se utilice.<br />
• No colocar sobre el aparato objetos llenos de líquido, como jarros.<br />
WAARSCHUWING:<br />
• De ventilatie mag niet worden belemmerd door de ventilatieopeningen af te dekken met<br />
bijvoorbeeld kranten, een tafelkleed, gordijnen, enz.<br />
• Plaats geen open vlammen, bijvoorbeeld een brandende kaars, op het apparaat.<br />
• Houd u steeds aan de milieuvoorschriften wanneer u gebruikte batterijen wegdoet.<br />
• Stel het apparaat niet bloot aan druppels of spatten.<br />
• Plaats geen voorwerpen gevuld met water, bijvoorbeeld een vaas, op het apparaat.<br />
OBSERVERA:<br />
• Ventilationen bör inte förhindras genom att täcka för ventilationsöppningarna med föremål<br />
såsom tidningar, bordsdukar, gardiner osv.<br />
• Inga blottade brandkällor, såsom tända ljus, får placeras på apparaten.<br />
• Tänk på miljöaspekterna när du bortskaffar batterier.<br />
• Apparaten får inte utsättas för vätska.<br />
• Placera inte föremål fyllda med vätska, t.ex. vaser, på apparaten.<br />
ENGLISH<br />
II
ENGLISH DEUTSCH FRANCAIS<br />
A NOTE ABOUT RECYCLING:<br />
This product’s packaging materials are recyclable and can be reused. Please dispose of any materials<br />
in accordance with the local recycling regulations.<br />
When discarding the unit, comply with local rules or regulations.<br />
Batteries should never be thrown away or incinerated but disposed of in accordance with the local<br />
regulations concerning battery disposal.<br />
This product and the supplied accessories, excluding the batteries, constitute the applicable product<br />
according to the WEEE directive.<br />
HINWEIS ZUM RECYCLING:<br />
Das Verpackungsmaterial dieses Produktes ist zum Recyceln geeignet und kann wieder verwendet werden. Bitte<br />
entsorgen Sie alle Materialien entsprechend der örtlichen Recycling-Vorschriften.<br />
Beachten Sie bei der Entsorgung des Gerätes die örtlichen Vorschriften und Bestimmungen.<br />
Die Batterien dürfen nicht in den Hausmüll geworfen oder verbrannt werden; bitte entsorgen Sie die Batterien gemäß<br />
der örtlichen Vorschriften.<br />
Dieses Produkt und das im Lieferumfang enthaltene Zubehör (mit Ausnahme der Batterien!) entsprechen der WEEE-<br />
Direktive.<br />
UNE REMARQUE CONCERNANT LE RECYCLAGE:<br />
Les matériaux d’emballage de ce produit sont recyclables et peuvent être réutilisés. Veuillez disposer des matériaux<br />
conformément aux lois sur le recyclage en vigueur.<br />
Lorsque vous mettez cet appareil au rebut, respectez les lois ou réglementations en vigueur.<br />
Les piles ne doivent jamais être jetées ou incinérées, mais mises au rebut conformément aux lois en vigueur sur la<br />
mise au rebut des piles.<br />
Ce produit et les accessoires inclus, à l’exception des piles, sont des produits conformes à la directive DEEE.<br />
NOTA RELATIVA AL RICICLAGGIO:<br />
I materiali di imballaggio di questo prodotto sono riutilizzabili e riciclabili. Smaltire i materiali conformemente alle<br />
normative locali sul riciclaggio.<br />
Per lo smaltimento dell’unità, osservare le normative o le leggi locali in vigore.<br />
Non gettare le batterie, né incenerirle, ma smaltirle conformemente alla normativa locale sui rifiuti chimici.<br />
Questo prodotto e gli accessori inclusi nell’imballaggio sono applicabili alla direttiva RAEE, ad eccezione delle batterie.<br />
ACERCA DEL RECICLAJE:<br />
Los materiales de embalaje de este producto son reciclables y se pueden volver a utilizar. Disponga de estos materiales<br />
siguiendo los reglamentos de reciclaje de su localidad.<br />
Cuando se deshaga de la unidad, cumpla con las reglas o reglamentos locales.<br />
Las pilas nunca deberán tirarse ni incinerarse. Deberá disponer de ellas siguiendo los reglamentos de su localidad<br />
relacionados con los desperdicios químicos.<br />
Este producto junto con los accesorios empaquetados es el producto aplicable a la directiva RAEE excepto pilas.<br />
EEN AANTEKENING MET BETREKKING TOT DE RECYCLING:<br />
Het inpakmateriaal van dit product is recycleerbaar en kan opnieuw gebruikt worden. Er wordt verzocht om zich van<br />
elk afvalmateriaal te ontdoen volgens de plaatselijke voorschriften.<br />
Volg voor het wegdoen van de speler de voorschriften voor de verwijdering van wit- en bruingoed op.<br />
Batterijen mogen nooit worden weggegooid of verbrand, maar moeten volgens de plaatselijke voorschriften<br />
betreffende chemisch afval worden verwijderd.<br />
Op dit product en de meegeleverde accessoires, m.u.v. de batterijen is de richtlijn voor afgedankte elektrische en<br />
elektronische apparaten (WEEE) van toepassing.<br />
OBSERVERA ANGÅENDE ÅTERVINNING:<br />
Produktens emballage är återvinningsbart och kan återanvändas. Kassera det enligt lokala återvinningsbestämmelser.<br />
När du kasserar enheten ska du göra det i överensstämmelse med lokala regler och bestämmelser.<br />
Batterier får absolut inte kastas i soporna eller brännas. Kassera dem enligt lokala bestämmelser för kemiskt avfall.<br />
Denna apparat och de tillbehör som levereras med den uppfyller gällande WEEE-direktiv, med undantag av<br />
batterierna.<br />
III<br />
ITALIANO ESPAÑOL NEDERLANDS SVENSKA
Contents<br />
Getting Started<br />
Accessories ······················································································2<br />
Cautions on Handling ·····································································3<br />
Cautions on Installation ·································································3<br />
About the Remote Control Unit ····················································3<br />
Inserting the Batteries ····································································3<br />
Operating Range of the Remote Control Unit ································3<br />
Part Names and Functions ·····························································4<br />
Front Panel ·····················································································4<br />
Display ···························································································4<br />
Rear Panel ······················································································5<br />
Remote Control Unit ······································································6<br />
Preparations ····················································································7<br />
Cables Used for Connections ························································7<br />
Video Conversion Function ·····························································8<br />
Speaker Connections ·····································································9<br />
Speaker Installation ········································································9<br />
Speaker Connections ······························································· 9, 10<br />
Connecting Equipment with HDMI connectors ························· 11<br />
Connecting the Monitor ······························································· 12<br />
Connecting the Playback Components ······································ 12<br />
DVD Player ··················································································· 12<br />
Record Player ··············································································· 13<br />
CD Player ····················································································· 13<br />
iPod ® Connections<br />
···························································································· 13<br />
TV/CABLE Tuner ··········································································· 14<br />
Satellite Receiver ········································································· 14<br />
Connecting the Recording Components ···································· 15<br />
Digital Video Recorder ·································································· 15<br />
Video Cassette Recorder ····························································· 15<br />
CD Recorder / MD Recorder / Tape Deck ····································· 16<br />
Connections to Other Devices ····················································· 16<br />
Components Equipped with a DENON LINK connector ·············· 16<br />
Video Camera / Game Console ···················································· 17<br />
Component with Multi-channel Output connectors ····················· 17<br />
External Power Amplifier ······························································ 17<br />
USB Port ······················································································ 18<br />
Antenna terminals ······································································· 19<br />
Network Audio ·············································································20<br />
Multi-Zone ····················································································21<br />
External Controller ·······································································21<br />
Connecting the Power Cord·························································22<br />
Once Connections are Completed ··············································22<br />
GUI Menu Operations<br />
Example of the Display of the GUI Mark at a Title·····················22<br />
Example of Display of Default Values ·········································22<br />
Examples of GUI Screen Displays ···············································23<br />
Example: Browse Menu (Top Menu)············································23<br />
Example: Menus with Illustrations (Auto Setup) ··························23<br />
Cursor Position Display ································································23<br />
Operations ·····················································································23<br />
GUI Menu Map ··············································································24<br />
Auto Setup<br />
Preparations ··················································································25<br />
Auto Setup ····················································································26<br />
a Auto Setup ··············································································26<br />
Error Messages ·······································································27<br />
s Option ·····················································································27<br />
d Parameter Check ·····································································27<br />
Manual Setup<br />
Speaker Setup···············································································28<br />
a Speaker Configuration ·····························································28<br />
s Subwoofer Mode ····································································28<br />
d Distance ··················································································28<br />
f Channel Level··········································································29<br />
g Crossover Frequency ······························································29<br />
h Surround Speaker ···································································29<br />
HDMI Setup ···················································································30<br />
a i/p Scaler ·················································································30<br />
s Resolution ···············································································30<br />
d Progressive Mode ···································································30<br />
f Aspect ·····················································································30<br />
g Color Space ·············································································30<br />
h RGB Range ·············································································30<br />
j Auto Lip Sync ··········································································30<br />
k Audio ·······················································································30<br />
Audio Setup ··················································································30<br />
a EXT. IN Setup ··········································································30<br />
s 2ch Direct/Stereo ····································································31<br />
d Downmix Option ·····································································31<br />
f Auto Surround Mode ······························································31<br />
g Manual EQ ··············································································31<br />
Network Setup ··············································································32<br />
a Network Setup ········································································32<br />
s Other ·······················································································33<br />
d Network Information ·······························································33<br />
Zone Setup ····················································································33<br />
a ZONE2 ····················································································33<br />
s ZONE3 ····················································································33<br />
Option Setup ·················································································34<br />
a Amp Assign ·············································································34<br />
s Volume Control ·······································································34<br />
d Source Delete ·········································································34<br />
f GUI ····················································································34, 35<br />
g Quick Select Name ·································································35<br />
h Trigger Out 1 ···········································································35<br />
j Trigger Out 2 ···········································································35<br />
k Remote ID ···············································································35<br />
l 2Way Remote ·········································································35<br />
A0 Dimmer ···················································································35<br />
A1 Setup Lock ··············································································36<br />
A2 Maintenance Mode ·································································36<br />
A3 Firmware Update ····································································36<br />
Language ·······················································································36<br />
Source Select<br />
Input Source Selection ·································································37<br />
Settings Related to Playing Input Sources ·································37<br />
a Play ·························································································37<br />
s Auto Preset ·············································································37<br />
d Preset Skip ··············································································37<br />
f Preset Name ···········································································38<br />
g Input Mode ·············································································38<br />
h Rename ···················································································38<br />
j Other ·······················································································38<br />
k Playback Mode (iPod) ······························································39<br />
l Assign ·····················································································39<br />
A0 Playback Mode ········································································40<br />
Surround Modes<br />
Standard Playback ········································································40<br />
Surround Playback of 2-channel Sources ·····································40<br />
Playing Multi-channel Sources (Dolby Digital, DTS, etc.) ·············40<br />
DSP Simulation Playback·····························································41<br />
Stereo Playback ············································································41<br />
Direct Playback ·············································································41<br />
Playback in the PURE DIRECT Mode ···········································41<br />
Parameter<br />
Audio······························································································42<br />
a Surround Parameters ························································42, 43<br />
s Tone ························································································43<br />
d Room EQ ················································································44<br />
f RESTORER ··············································································44<br />
g Night Mode ·············································································44<br />
h Audio Delay ·············································································44<br />
Picture Adjust ················································································45<br />
a Contrast ··················································································45<br />
s Brightness ···············································································45<br />
d Chroma Level ··········································································45<br />
f Hue ·························································································45<br />
ENGLISH
ENGLISH<br />
Getting Started<br />
Connections Setup Playback Remote Control Multi-Zone Information Troubleshooting<br />
Information<br />
Status ····························································································45<br />
a MAIN ZONE ············································································45<br />
s ZONE2/3 ·················································································45<br />
Audio Input Signal ········································································45<br />
HDMI Information ·········································································46<br />
a Signal Information ···································································46<br />
s Monitor ···················································································46<br />
Auto Surround ··············································································46<br />
Quick Select ··················································································46<br />
Preset Station ···············································································46<br />
Preparations ··················································································47<br />
Turning the Power On ··································································47<br />
Operations During Playback ·························································47<br />
Playing Video and Audio Equipment ···········································47<br />
Basic Operation ············································································47<br />
Listening to FM/AM Broadcasts ·················································48<br />
Basic Operation ············································································48<br />
Presetting Radio Stations (Preset Memory) ·································48<br />
Listening to Preset Stations ·························································49<br />
RDS (Radio Data System) ····························································49<br />
RDS Search ··················································································49<br />
PTY Search ···················································································50<br />
TP Search ·····················································································50<br />
RT (Radio Text) ··············································································51<br />
iPod ® Playback<br />
Playback ·············································································51<br />
Basic Operation ············································································51<br />
Listening to Music ·······································································52<br />
Viewing Still Pictures or Videos on the iPod ·································52<br />
Playing Network Audio or USB Memory Devices ······················53<br />
Basic Operation ············································································54<br />
Listening to Internet Radio ·····················································54, 55<br />
Presetting Internet Radio Stations ···············································55<br />
Registering Internet Radio Stations as Your Favorites ··················55<br />
Playing Files Stored on a Computer ·············································55<br />
Playing Files Stored on USB Memory Devices ····························56<br />
Operating the AVR-3808 Using a Browser (Web control) ············57<br />
Other Operations and Functions<br />
Other Operations ··········································································57<br />
Playing Super Audio CD ·······························································57<br />
Recording on an External Device (REC OUT mode) ·····················58<br />
Convenient Functions ··································································59<br />
Channel Level ···············································································59<br />
Fader Function ·············································································59<br />
Quick Select Function ··································································59<br />
Personal Memory Plus Function ··················································59<br />
Last Function Memory ·································································59<br />
Backup Memory ···········································································59<br />
Resetting the Microprocessor ······················································59<br />
Remote Control Unit Operations<br />
Main Remote Control Unit···························································60<br />
Operating DENON Audio Components ········································60<br />
Presetting ·····················································································60<br />
Operating Preset Components ············································60 ~ 62<br />
Setting the Remote ID ·································································63<br />
Learning Function ·········································································63<br />
System Call Function ····································································64<br />
Punch Through Function ·······························································64<br />
Setting the Time the Backlight Stays Lit ·······································65<br />
Adjusting the Backlight’s Brightness ············································65<br />
Resetting the Main Remote Control Unit ·····································65<br />
Sub Remote Control Unit Operations ··································66, 67<br />
Switching Zones ···········································································68<br />
Setting the Zone for Which the Sub Remote Control Unit is Used<br />
(ZONE SELECT LOCK mode) ·······················································68<br />
Setting the Remote ID ·································································68<br />
Resetting the Settings ··································································68<br />
Amp Assign / Multi-Zone Connections and Operations<br />
Multi-Zone Settings with the Amp Assign Function ·········69 ~ 71<br />
Multi-Zone Settings and Operations with Zone Pre-out Output ···71<br />
Multi-Zone Operations ·································································72<br />
Turning the Power On and Off······················································72<br />
Selecting the Input Source ···························································72<br />
Adjusting the Volume ···································································72<br />
Turning off the Sound Temporarily ················································72<br />
Other Information ································································73 ~ 82<br />
Troubleshooting ···································································83 ~ 85<br />
Specifications ··············································································· 86<br />
List of preset codes ··········································· End of this <strong>manual</strong><br />
Getting Started<br />
Thank you for purchasing this DENON product. To ensure proper<br />
operation, please read these owner’s <strong>manual</strong> carefully before using<br />
the product.<br />
After reading them, be sure to keep them for future reference.<br />
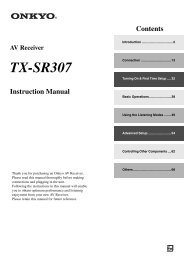
Accessories<br />
Check that the following parts are supplied with the product.<br />
q Owner’s <strong>manual</strong> ...................................................................... 1<br />
w Service station list ................................................................... 1<br />
e Power cord (Cord length: Approx. 1.5 m) ................................. 1<br />
r Main remote control (RC-1068) ............................................... 1<br />
t LR6/AA batteries (for RC-1068) ................................................ 2<br />
y Sub remote control (RC-1070) ................................................. 1<br />
u R03/AAA batteries (for RC-1070) ............................................. 2<br />
i FM indoor antenna .................................................................. 1<br />
o AM loop antenna ..................................................................... 1<br />
Q0 Setup microphone (Cord length: Approx. 7.6 m) ...................... 1<br />
e r y<br />
i o<br />
Q0
Cautions on Handling<br />
• Before turning the power switch on<br />
Check once again that all connections are correct and that there are<br />
no problems with the connection cables.<br />
• Power is supplied to some of the circuitry even when the unit is<br />
set to the standby mode. When traveling or leaving home for long<br />
periods of time, be sure to unplug the power cord from the power<br />
outlet.<br />
• About condensation<br />
If there is a major difference in temperature between the inside of<br />
the unit and the surroundings, condensation (dew) may form on<br />
the operating parts inside the unit, causing the unit not to operate<br />
properly.<br />
If this happens, let the unit sit for an hour or two with the power<br />
turned off and wait until there is little difference in temperature<br />
before using the unit.<br />
• Cautions on using mobile phones<br />
Using a mobile phone near this unit may result in noise. If so, move<br />
the mobile phone away from this unit when it is in use.<br />
• Moving the unit<br />
Turn off the power and unplug the power cord from the power<br />
outlet.<br />
Next, disconnect the connection cables to other system units before<br />
moving the unit.<br />
• Note that the illustrations in these instructions may differ from the<br />
actual unit for explanation purposes.<br />
Cautions on Installation<br />
Note:<br />
For proper heat dispersal, do not install this unit in a confined<br />
space, such as a bookcase or similar enclosure.<br />
b<br />
b Note<br />
b<br />
b<br />
Wall<br />
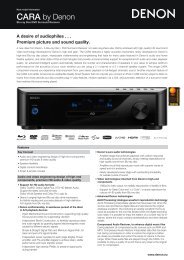
About the Remote Control Unit<br />
In addition to the AVR-3808, the included main remote control unit<br />
(RC-1068) can also be used to operate the equipment listed below.<br />
q DENON system components<br />
w Non-DENON system components<br />
• By setting the preset memory (vpage 60 ~ 62)<br />
• By using the learn function (vpage 63)<br />
Inserting the Batteries<br />
q Lift the clasp and remove the rear lid.<br />
(RC-1068) (RC-1070)<br />
w Load the two batteries properly as indicated by the marks in the<br />
battery compartment.<br />
(RC-1068) (RC-1070)<br />
LR6/AA<br />
e Put the rear cover back on.<br />
R03/AAA<br />
NOTE<br />
Approx. 7 m<br />
30°<br />
30°<br />
or<br />
(RC-1068)<br />
ENGLISH<br />
• Replace the batteries with new ones if the set does not operate even<br />
when the remote control unit is operated close to the unit.<br />
• The supplied batteries are only for verifying operation.<br />
• When inserting the batteries, be sure to do so in the proper direction,<br />
following the “q” and “w” marks in the battery compartment.<br />
• To prevent damage or leakage of battery fluid:<br />
• Do not use a new battery together with an old one.<br />
• Do not use two different types of batteries.<br />
• Do not attempt to charge dry batteries.<br />
• Do not short-circuit, disassemble, heat or dispose of batteries in<br />
flames.<br />
• If the battery fluid should leak, carefully wipe the fluid off the inside<br />
of the battery compartment and insert new batteries.<br />
• Remove the batteries from the remote control unit if it will not be in<br />
use for long periods.<br />
• When replacing the batteries, have the new batteries ready and<br />
insert them as quickly as possible.<br />
Operating Range of the Remote Control<br />
Unit<br />
Point the remote control unit at the remote sensor when operating it.<br />
(RC-1070)<br />
NOTE<br />
The set may function improperly or the remote control unit may not<br />
operate if the remote control sensor is exposed to direct sunlight,<br />
strong artificial light from an inverter type fluorescent lamp or infrared<br />
light.<br />
Getting Started<br />
Connections Setup Playback Remote Control Multi-Zone Information Troubleshooting
ENGLISH<br />
Getting Started<br />
Connections Setup Playback Remote Control Multi-Zone Information Troubleshooting<br />
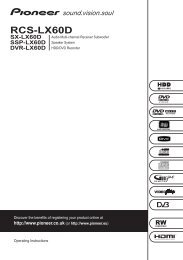
Part Names and Functions<br />
For buttons not explained here, see the page indicated in parentheses ( ).<br />
Front Panel<br />
Q0Q1Q2<br />
o i u y<br />
Q3<br />
q w e<br />
r<br />
GWith the door openH<br />
E3 E2E1E0W9W8<br />
W7 W6<br />
Q4 Q5Q6Q7 Q8Q9 W0W1<br />
W2<br />
W5W4W3<br />
q Power operation button<br />
(ON/STANDBY) ··········································· (47)<br />
w Power indicator ··········································· (47)<br />
e Power switch (hON jOFF) ····················· (47)<br />
r QUICK SELECT buttons / indicators ········· (59)<br />
t MASTER VOLUME control knob ················ (47)<br />
y Master volume indicator<br />
u Display<br />
i Remote control sensor ································· (3)<br />
o SOURCE SELECT knob······························· (37)<br />
Q0 SOURCE button ·········································· (37)<br />
Q1 TUNING PRESET button ···························· (49)<br />
Q2 ZONE2/3 / REC SELECT button ·········· (58, 72)<br />
Q3 VIDEO SELECT button ······························· (38)<br />
Q4 Headphones jack (PHONES) ······················ (47)<br />
Q5 ZONE2 ON/OFF button ······························ (72)<br />
Q6 ZONE3 ON/OFF button ······························ (72)<br />
Q7 INPUT MODE button ·································· (38)<br />
Q8 MENU button ·············································· (23)<br />
Q9 Cursor buttons (uio p) ·························· (23)<br />
W0 CH SEL / ENTER button ······················· (23, 59)<br />
W1 RETURN button ·········································· (23)<br />
W2 V.AUX INPUT connectors ··························· (17)<br />
W3 SETUP MIC jack ·········································· (25)<br />
W4 ROOM EQ button ········································ (44)<br />
W5 DIMMER button ·········································· (35)<br />
W6 USB port ······················································ (18)<br />
W7 STATUS button ··········································· (45)<br />
W8 AUDIO DELAY button ································· (44)<br />
W9 RESTORER button ······································ (44)<br />
t<br />
E0 DIRECT/STEREO button····························· (41)<br />
E1 PURE DIRECT button ·································· (41)<br />
Display<br />
Q7 Q6<br />
o u<br />
i<br />
Q4 Q0<br />
Q5 Q3 Q2 Q1<br />
q w<br />
e r<br />
q Input signal indicators<br />
w Input signal channel indicators<br />
These light when digital signals are input.<br />
e Information display<br />
The input source name, surround mode, setting<br />
values and other information are displayed here.<br />
r Output signal channel indicators<br />
t Surround speaker indicators<br />
These light according to the settings of the<br />
surround A and B speakers.<br />
y Master volume indicator<br />
u AUDYSSEY MULTEQ XT indicator<br />
This lights when the room equalizer is selected.<br />
i Recording output source indicator<br />
This lights when the REC OUT mode is<br />
selected.<br />
o NIGHT indicator<br />
This lights when the night mode is selected.<br />
Q0 Multi-zone indicators<br />
These light when the power for the respective<br />
zone is turned on.<br />
Q1 RESTORER indicator<br />
This lights when the RESTORER mode is<br />
selected.<br />
E2 DSP SIMULATION button ·························· (41)<br />
E3 STANDARD button ····································· (40)<br />
Q2 AL24 indicator<br />
This lights when AL24 Processing Plus is<br />
activated (vpage 75).<br />
Q3 D.LINK indicator<br />
This lights when playing using DENON LINK<br />
connections.<br />
Q4 Input mode indicators<br />
Q5 HDMI indicator<br />
This lights when playing using HDMI<br />
connections.<br />
Q6 Decoder indicators<br />
These light when the respective decoders are<br />
operating.<br />
Q7 Tuner reception mode indicators<br />
These light according to the reception conditions<br />
when the input source is set to “TUNER”.<br />
• AUTO<br />
These light when in the auto tuning mode.<br />
• RDS<br />
This lights when receiving RDS broadcasts.<br />
• STEREO<br />
In the FM mode, these light when receiving<br />
analog stereo broadcasts.<br />
• TUNED<br />
Lights when the broadcast is properly tuned in.<br />
y<br />
t
Rear Panel<br />
Q5 Q4<br />
Q3 Q2 Q1 Q0 o<br />
Q6 Q7 Q8 Q7<br />
Q6 Q9<br />
q w e r t<br />
y<br />
u<br />
i<br />
q RS-232C connector ····································· (21)<br />
w REMOTE CONTROL jacks··························· (21)<br />
e TRIGGER OUT jacks ··································· (21)<br />
r FM/AM antenna terminals<br />
(TUNER ANTENNA) ···································· (19)<br />
t DOCK CONTROL jack ································· (13)<br />
y Speaker terminals (SPEAKERS) ·················· (9)<br />
u AC OUTLET ················································· (22)<br />
i AC inlet (AC IN) ··········································· (22)<br />
o Digital audio connectors<br />
(OPTICAL / COAXIAL) ·························· (12, 14)<br />
Q0 ETHERNET connector ································· (20)<br />
Q1 USB port ······················································ (18)<br />
Q2 DENON LINK connector ····························· (16)<br />
Q3 COMPONENT VIDEO connectors ·············· (12)<br />
Q4 HDMI connectors ·········································(11)<br />
Q5 VIDEO / S-VIDEO connectors ···················· (12)<br />
Q6 Analog audio connectors (AUDIO) ············ (12)<br />
Q7 PRE OUT connectors ····························· (17, 21)<br />
Q8 EXT. IN connectors ····································· (17)<br />
Q9 SIGNAL GND terminal ······························· (13)<br />
ENGLISH<br />
Getting Started<br />
Connections Setup Playback Remote Control Multi-Zone Information Troubleshooting
ENGLISH<br />
Getting Started<br />
Connections Setup Playback Remote Control Multi-Zone Information Troubleshooting<br />
Remote Control Unit<br />
n Main remote control unit (RC-1068) n Sub remote control unit (RC-1070)<br />
q<br />
w<br />
e<br />
r<br />
t<br />
y<br />
u<br />
i<br />
o<br />
Q0<br />
Q1<br />
Q2<br />
Q3<br />
Q4<br />
Q5<br />
Q6<br />
Q7<br />
Q8<br />
Q9<br />
W0<br />
W1<br />
W2<br />
W3<br />
W4<br />
W5<br />
W6<br />
W7<br />
q Signal transmission indicator ··················· (60)<br />
w Mode select buttons ·································· (60)<br />
e Quick select / System call buttons ····· (59, 64)<br />
r Surround mode buttons ······················ (40, 41)<br />
t System buttons ···································· (61, 62)<br />
y Audio delay button (A. DL) ························ (44)<br />
u Tuner system buttons ································ (48)<br />
i Input mode button (INPUT) ······················· (38)<br />
o MENU button ·············································· (23)<br />
Q0 Cursor buttons (uio p) ························· (23)<br />
Q1 Parameter / Search button<br />
(PARA / SRCH) ······································ (42, 49)<br />
Q2 HOME button ·············································· (60)<br />
Q3 Channel buttons (CH) ································· (48)<br />
Q4 Input source select / Number buttons ···(37, 48)<br />
Q5 Remote control signal transmitter ·············· (3)<br />
Q6 Device select indicators (DEV1 / DEV2) ··· (60)<br />
Q7 ZONE3 select indicators (Z3) ····················· (72)<br />
Q8 RESTORER button (RSTR) ·························· (44)<br />
Q9 Night button (NGT) ···································· (44)<br />
W0 Test tone button (TEST) ····························· (29)<br />
W1 Surround speaker select button (SPKR) ··· (29)<br />
W2 POWER buttons ·········································· (47)<br />
W3 Channel select (CH SEL) /<br />
ENTER button ······································· (23, 59)<br />
W4 Return button (RTN) ··································· (23)<br />
W5 Master volume control buttons (VOL) ······ (47)<br />
W6 Muting button (MUTE) ··························(47, 72)<br />
W7 Main remote control unit setup button<br />
(RC SETUP) ················································· (60)<br />
The time for which the backlight stays on can<br />
be changed (vpage 65 “Setting the Time the<br />
Backlight Stays Lit”).<br />
NOTE<br />
• The M. SEL, SAT TU, DTU buttons cannot be<br />
used.<br />
• The ZONE2 mode QUICK SELECT (1 ~ 3), A.DL,<br />
RSTR, NGT, INPUT, SPKR, TEST and surround<br />
mode buttons cannot be used.<br />
• The ZONE4 mode cannot be used.<br />
q<br />
w<br />
e<br />
r<br />
t<br />
y<br />
u<br />
i<br />
o<br />
Q0<br />
Q1<br />
Q2<br />
Q3<br />
Q4<br />
Q5<br />
Q6<br />
Q7<br />
Q8<br />
Q9<br />
W0<br />
q ZONE indicators·········································· (68)<br />
w Advanced setup button ······························ (68)<br />
e Input source select buttons ······················· (37)<br />
r CHANNEL buttons ······································ (48)<br />
t SHIFT button ··············································· (48)<br />
y MENU button ·············································· (23)<br />
u Cursor buttons (uio p) ························· (23)<br />
i SEARCH button ·········································· (49)<br />
o REPEAT button ············································ (52)<br />
Q0 RANDOM button ········································ (52)<br />
Q1 Remote control signal transmitter ·············· (3)<br />
Q2 ZONE SELECT button ································· (68)<br />
Q3 Zone power on/off buttons<br />
(ZONE ON / ZONE OFF) ····························· (72)<br />
Q4 Master volume control buttons<br />
(VOLUME) ············································ (66, 67)<br />
Q5 Muting button (MUTE) ··························(47, 72)<br />
Q6 ENTER button ············································· (23)<br />
Q7 RETURN button ·········································· (23)<br />
Q8 System buttons ······························ (48, 66, 67)<br />
Q9 ALL MUSIC/FAVORITES<br />
(DIRECT PLAY) button ······························· (66)<br />
W0 USB (DIRECT PLAY) button························ (66)<br />
NOTE<br />
The AUX-1, AUX-2, AUX-3, SAT TU, DTU, DVR-2<br />
and OPTION buttons cannot be used.
Connections<br />
Connections for all compatible audio and video signal formats are<br />
described in these operating instructions. Please select the types<br />
of connections suited for the equipment you are connecting.<br />
With some types of connections, certain settings must be made<br />
on the AVR-3808. For details, refer to the instructions for the<br />
respective connection items below.<br />
NOTE<br />
• Do not plug in the power cord until all connections have been<br />
completed.<br />
• When making connections, also refer to the operating instructions of<br />
the other components.<br />
• Be sure to connect the left and right channels properly (left with left,<br />
right with right).<br />
• Do not bundle power cords together with connection cables. Doing<br />
so can result in humming or noise.<br />
Preparations<br />
Cables Used for Connections<br />
Select the cables according to the equipment being connected.<br />
Coaxial digital connections<br />
(Orange)<br />
Audio cables Video cables<br />
Coaxial digital (75 Ω/ohms pin-plug) cable<br />
Optical digital connections<br />
Analog connections (stereo)<br />
(White)<br />
(Red)<br />
L<br />
R<br />
Optical cable<br />
Stereo pin-plug cable<br />
Analog connections (monaural, for subwoofer)<br />
(Black)<br />
DENON LINK connections<br />
Speaker connections<br />
Network connections<br />
Pin-plug cable<br />
DENON LINK cable<br />
Speaker cables<br />
Ethernet cable<br />
L<br />
R<br />
Component video connections<br />
(Green)<br />
(Blue)<br />
(Red)<br />
S-Video connections<br />
Video connections<br />
(Yellow)<br />
HDMI connections<br />
Component video cable<br />
S-Video cable<br />
75 Ω/ohms pin-plug video cable<br />
Audio and video cables<br />
19-pin HDMI cable<br />
Signal direction<br />
Audio signal: Video signal:<br />
Output<br />
Input<br />
Input<br />
Output<br />
Output<br />
Input<br />
(Y)<br />
(PB/CB)<br />
(PR/CR)<br />
Input<br />
Output<br />
ENGLISH<br />
Getting Started Connections<br />
Setup Playback Remote Control Multi-Zone Information Troubleshooting
ENGLISH<br />
Getting Started Connections<br />
Setup Playback Remote Control Multi-Zone Information Troubleshooting<br />
Video Conversion Function<br />
• This function automatically converts various formats of video signals input to the AVR-3808 into the<br />
format used to output the video signals from the AVR-3808 to a monitor.<br />
• The AVR-3808’s video input/output circuitry is compatible with the following four types of video signals:<br />
Digital video signals: HDMI<br />
Analog video signals: Component video, S-Video and Video<br />
Main zone<br />
GFlow of video signals inside the AVR-3808H<br />
High picture<br />
quality playback HDMI connector<br />
ZONE2<br />
Component video<br />
connectors<br />
S-Video connector<br />
Video connector<br />
GFlow of video signals for ZONE2H<br />
HDMI connector<br />
Component video<br />
connectors<br />
S-Video connector<br />
Video connector<br />
Video inputs Video outputs<br />
: When 480i/576i signals are input in the main zone<br />
Monitor<br />
High picture<br />
quality playback<br />
S-Video connector<br />
ZONE2<br />
monitor<br />
Video connector Video connector<br />
Video inputs Video outputs<br />
• When not using this function, connect a monitor output with the same type of connector as the video<br />
input connector.<br />
• The resolution of the HDMI input-compatible monitor connected to the AVR-3808 can be checked at GUI<br />
menu “Information” – “HDMI Information” – “Monitor” (vpage 46).<br />
NOTE<br />
• HDMI signals cannot be converted into analog signals.<br />
• 1080p component input video signals cannot be output to anything other than component video<br />
connectors.<br />
• 480p/576p, 1080i and 720p component video input signals cannot be converted into S-Video or Video<br />
format.<br />
• When a non-standard video signal from a game machine or some other source is input, the video<br />
conversion function might not operate.
Speaker Connections<br />
Speaker Installation<br />
The illustration below shows a basic example of installation of the amplifier combined with 8 speakers and<br />
a monitor.<br />
Subwoofer Center speaker<br />
Front speakers<br />
Place the front speakers to the<br />
sides of the monitor or screen and<br />
as flush with the screen surface as<br />
possible.<br />
The table below shows a typical speaker configuration for the AVR-3808.<br />
Surround speakers<br />
Surround back speakers<br />
FRONT<br />
L R<br />
CENTER<br />
SURROUND SURROUND<br />
A<br />
B<br />
L R L R<br />
SURROUND<br />
BACK<br />
1<br />
L R<br />
only<br />
SUBWOOFER<br />
7.1-channels<br />
(Surround A+B)<br />
S S S S S S S S S – S<br />
7.1-channels S S S S S – – S S – S<br />
6.1-channels S S S S S – – – – S S<br />
5.1-channels S S S S S – – – – – S<br />
3.1-channels S S S – – – – – – – S<br />
2.1-channels S S – – – – – – – – S<br />
2-channels S S – – – – – – – – –<br />
Speaker Connections<br />
Example: 7.1-channels (Surround A+B)<br />
(L)<br />
w q<br />
b L : Left<br />
R : Right<br />
Front speakers Center speaker Subwoofer<br />
(R)<br />
w q<br />
w q<br />
(L) (R) (L) (R)<br />
w q w q w q w q w q w q<br />
Surround speakers<br />
A<br />
Surround speakers<br />
B<br />
When using just one surround back speaker, connect it to the left channel (SBL).<br />
<br />
Subwoofer<br />
with built-in<br />
amplifier<br />
(L) (R)<br />
Surround Back<br />
speakers<br />
ENGLISH<br />
Getting Started Connections<br />
Setup Playback Remote Control Multi-Zone Information Troubleshooting
ENGLISH<br />
Getting Started Connections<br />
Setup Playback Remote Control Multi-Zone Information Troubleshooting<br />
Connecting the Speaker Cables<br />
Carefully check the left (L) and right (R) channels and + (red) and –<br />
(black) polarities on the speakers being connected to the AVR-3808,<br />
and be sure to interconnect the channels and polarities correctly.<br />
1 Peel<br />
2Turn 3Insert 4Turn 0<br />
off about 10 mm of sheathing from<br />
the tip of the speaker cable, then either<br />
twist the core wire tightly or terminate<br />
it.<br />
the speaker terminal<br />
counterclockwise to loosen it.<br />
the speaker cable’s core wire to<br />
the hilt into the speaker terminal.<br />
the speaker terminal clockwise to<br />
tighten it.<br />
NOTE<br />
• Use speakers with an impedance of 6 to 16 Ω/ohms. When using<br />
surround A and B speakers simultaneously, use speakers with an<br />
impedance of 8 to 16 Ω/ohms.<br />
• Connect the speaker cables in such a way that they do not stick out<br />
of the speaker terminals. The protection circuit may be activated if<br />
the core wires touch the rear panel or if the + and – sides touch each<br />
other (v “Protection circuit”).<br />
• Never touch the speaker terminals while the power supply is<br />
connected. Doing so could result in electric shock.<br />
Protection circuit<br />
If speakers with an impedance lower than specified (for example<br />
4 Ω/ohms speakers) are used for an extended period of time with<br />
the volume turned up high, the temperature may rise, activating the<br />
protection circuit.<br />
When the protection circuit is activated, the speaker output is shut<br />
off and the power indicator flashes red. If this happens, unplug<br />
the power cord, then check the speaker cable and input cable<br />
connections. If the set is extremely hot, wait for it to cool off and<br />
improve ventilation around it. Once this is done, plug the power cord<br />
back in and turn the set’s power back on.<br />
If the protection circuit is activated again even though there are no<br />
problems in the ventilation around the set nor in the connections,<br />
the set may be damaged. Turn the power off, then contact a DENON<br />
service center.
Connecting Equipment with HDMI connectors<br />
With HDMI connections, the video and audio signals can be transferred with a single cable.<br />
DVD player Monitor<br />
b The AVR-3808 is equipped for HDMI version 1.3a. This<br />
<br />
<br />
<br />
<br />
version is compatible with other versions, allowing<br />
connection to all components equipped with an HDMI<br />
connector.<br />
b The AVR-3808 is compatible with 30- and 36-bit Deep<br />
Color.<br />
Compatible<br />
audio format<br />
2-channel linear<br />
PCM<br />
Multi-channel<br />
linear PCM<br />
Details<br />
2ch 32-192 kHz<br />
16/20/24 bits<br />
8ch 32-192 kHz<br />
16/20/24 bits<br />
Discs<br />
(examples)<br />
CD, DVD-Video,<br />
DVD-Audio<br />
DVD-Audio<br />
Dolby Digital, DTS Bitstream DVD-Video<br />
DSD<br />
Dolby Digital Plus,<br />
Dolby TrueHD,<br />
DTS-HD<br />
2/5.1ch<br />
2.8224 MHz<br />
1 bit<br />
Bitstream<br />
SACD<br />
HD DVD,<br />
Blu-ray Disc<br />
Copyright protection system (HDCP)<br />
In order to play the digital video and audio signals of a DVD-<br />
Video or DVD-Audio disc using HDMI/DVI connections, both<br />
the connected DVD player and monitor must be equipped<br />
for a copyright protection system called “HDCP” (Highbandwidth<br />
Digital Content Protection).<br />
HDCP is a copy protection technology consisting of data<br />
encoding and mutual identification of the devices.<br />
The AVR-3808 is HDCP-compatible. For details on the<br />
DVD player or monitor you are using, refer to its operating<br />
instructions.<br />
• By default, the HDMI audio signals are output from the speakers connected to the AVR-3808.<br />
• To output the sound from the TV, make the settings at GUI menu “Manual Setup” – “HDMI Setup”<br />
– “Audio” – “TV” (vpage 30).<br />
NOTE<br />
ENGLISH<br />
• Use a CPPM-compatible DVD player to play DVD-Audio discs that are copyright-protected by CPPM.<br />
• The AVR-3808 cannot be controlled from another device via the HDMI cable.<br />
• The audio signals output from the HDMI connector (sampling frequency, bit rate, etc.) may be restricted<br />
by the connected device.<br />
• Video signals are not output properly when using devices that are not HDCP-compatible.<br />
• Video signals are not output if the input video signals do not match the monitor’s resolution. In this case,<br />
switch the DVD player’s resolution to a resolution with which the monitor is compatible.<br />
• If the GUI menu “Manual Setup” – “HDMI Setup” – “Audio” setting (vpage 30) is set to “Amp”, the<br />
sound may be interrupted when the monitor’s power is turned off.<br />
• Use a cable on which the HDMI logo is indicated (a certified HDMI product) for connection to the HDMI<br />
connector. Normal playback may not be possible when using a cable other than one on which the HDMI<br />
logo is indicated (a non-HDMI-certified product).<br />
• If the monitor or DVD player does not support deep color, deep color signal transfer is not possible.<br />
• If the monitor or DVD player does not support xvYCC, xvYCC signal transfer is not possible.<br />
• If the monitor does not support “Auto Lipsync Correction” function, this function will not work.<br />
• When the AVR-3808 and DVD player are connected using an HDMI cable, also connect the AVR-3808 and<br />
monitor using an HDMI cable.<br />
• If the connected monitor or DVD player only has a DVI-D connector, use an HDMI/DVI converter cable.<br />
When using a DVI cable, no audio signals are transmitted.<br />
• Use a Deep Color compatible cable for connection to Deep Color compatible devices.<br />
When connecting with an HDMI/DVI converter cable (adapter)<br />
• HDMI video signals are theoretically compatible with the DVI format.<br />
When connecting to a monitor, etc., equipped with a DVI-D connector, connection is possible using an<br />
HDMI/DVI converter cable, but depending on the combination of components in some cases the video<br />
signals will not be output.<br />
• When connecting using an HDMI/DVI converter adapter, the video signals may not be output properly<br />
due to poor connections with the connected cable, etc.<br />
Getting Started Connections<br />
Setup Playback Remote Control Multi-Zone Information Troubleshooting
ENGLISH<br />
Getting Started Connections<br />
Setup Playback Remote Control Multi-Zone Information Troubleshooting<br />
Connecting the Monitor<br />
• Connect the cables to be used (vpage 8 “Video Conversion Function”).<br />
• With HDMI connections, the video and audio signals can be transferred with a single cable.<br />
• To output the audio signals to the monitor with HDMI connections, set GUI menu “Manual Setup”<br />
– “HDMI Setup” – “Audio” to “TV” (vpage 30).<br />
NOTE<br />
Monitor<br />
<br />
<br />
<br />
<br />
<br />
<br />
<br />
<br />
• The component video connectors may be indicated differently on your monitor. For details, see the<br />
monitor’s operating instructions.<br />
• The audio signals output from the HDMI connectors are only the HDMI input signals.<br />
Connecting the Playback Components<br />
Carefully check the left (L) and right (R) channels and the inputs and outputs, and be sure to interconnect<br />
correctly.<br />
DVD Player<br />
• Connect the cables to be used.<br />
• With HDMI connections, the video and audio signals can be transferred with a single cable.<br />
DVD player<br />
<br />
<br />
<br />
<br />
<br />
<br />
<br />
<br />
<br />
<br />
<br />
<br />
<br />
• Connect an HDP (High-Definition Player) in the same way.<br />
• When using an optical cable for the digital audio connection, make the settings at GUI menu “Source<br />
Select” – “DVD” – “Assign” – “Digital” (vpage 39).<br />
L<br />
L<br />
R<br />
R
Record Player<br />
Turntable (MM cartridge)<br />
<br />
<br />
L<br />
R<br />
<br />
• When connecting a record player with an MC cartridge, use a<br />
commercially available MC head amplifier or a step-up transformer.<br />
• Induction humming (a booming sound) may be produced from the<br />
speakers if the volume is raised with no record player connected.<br />
• With some record players, noise may be generated when the ground<br />
wire is connected. If so, disconnect the ground wire.<br />
NOTE<br />
The AVR-3808’s SIGNAL GND terminal is meant to reduce noise when<br />
a record player is connected. This is not a safety ground terminal.<br />
CD Player<br />
Connect the cables to be used.<br />
CD player<br />
<br />
<br />
<br />
<br />
<br />
L<br />
L<br />
R<br />
R<br />
When using an optical cable for the digital audio connection, make the<br />
settings at GUI menu “Source Select” – “CD” – “Assign” – “Digital”<br />
(vpage 39).<br />
iPod ®<br />
ENGLISH<br />
Use a DENON Control Dock for iPod (ASD-1R, sold separately) to<br />
connect the iPod to the AVR-3808. For instructions on the Control<br />
Dock for iPod settings, refer to the Control Dock for iPod’s operating<br />
instructions.<br />
Example :<br />
iPod<br />
Connections<br />
R L<br />
R L<br />
<br />
• With the default settings, the iPod can be used connected to the VCR<br />
(iPod) connector.<br />
• To assign the iPod to a connector other than VCR (iPod), make the<br />
settings at GUI menu “Source Select” – “(input source to which iPod<br />
dock assigned)” – “Assign” – “iPod dock” (vpage 39).<br />
Getting Started Setup Playback Remote Control Multi-Zone Information Troubleshooting
ENGLISH<br />
Getting Started Connections<br />
Setup Playback Remote Control Multi-Zone Information Troubleshooting<br />
TV/CABLE Tuner<br />
Connect the cables to be used.<br />
TV tuner<br />
<br />
<br />
<br />
<br />
<br />
<br />
<br />
<br />
<br />
L<br />
L<br />
R<br />
R<br />
<br />
<br />
<br />
When using an optical cable for the digital audio connection, make the settings at GUI menu “Source<br />
Select” – “TV/CBL” – “Assign” – “Digital” (vpage 39).<br />
Satellite Receiver<br />
Connect the cables to be used.<br />
DBS / BS tuner<br />
<br />
<br />
<br />
<br />
<br />
<br />
<br />
L<br />
L<br />
R<br />
R<br />
<br />
• When using a coaxial digital cable for the digital audio connection, make the settings at GUI menu “Source<br />
Select” – “SAT” – “Assign” – “Digital” (vpage 39).<br />
• When using a component video cable for the video connection, make the settings at GUI menu “Source<br />
Select” – “SAT” – “Assign” – “Component” (vpage 39).
Connecting the Recording Components<br />
Carefully check the left (L) and right (R) channels and the inputs and outputs, and be sure to interconnect<br />
correctly.<br />
Digital Video Recorder<br />
Connect the cables to be used.<br />
NOTE<br />
Digital video recorder<br />
<br />
<br />
<br />
<br />
<br />
<br />
<br />
<br />
<br />
<br />
or or<br />
L<br />
L<br />
R<br />
R<br />
L<br />
L<br />
R<br />
R<br />
<br />
<br />
• Make analog connections if you wish to record analog audio signals.<br />
• When recording via the AVR-3808, the playback device’s cable must be of the same type as the cable<br />
used to connect the AVR-3808’s DVR OUT connector.<br />
Example: TV IN → S-Video cable : DVR OUT → S-Video cable<br />
TV IN → Video cable : DVR OUT → Video cable<br />
• When using a component video cable for the video connection, make the settings at GUI menu “Source<br />
Select” – “DVR” – “Assign” – “Component” (vpage 39).<br />
Do not connect the output of the component connected to the AVR-3808’s OPTICAL2 output connector to<br />
any input connector other than OPTICAL2.<br />
Video Cassette Recorder<br />
Connect the cables to be used.<br />
Video cassette recorder<br />
<br />
<br />
<br />
or<br />
<br />
<br />
<br />
<br />
<br />
<br />
<br />
L<br />
L<br />
R<br />
R<br />
L<br />
L<br />
R<br />
R<br />
ENGLISH<br />
• When recording via the AVR-3808, the playback device’s cable must be of the same type as the cable<br />
used to connect the AVR-3808’s VCR OUT connector.<br />
Example: TV IN → S-Video cable : VCR OUT → S-Video cable<br />
TV IN → Video cable : VCR OUT → Video cable<br />
• When using a component video cable for the video connection, make the settings at GUI menu “Source<br />
Select” – “VCR” – “Assign” – “Component” (vpage 39).<br />
NOTE<br />
Do not connect the output of the component connected to the AVR-3808’s OPTICAL3 output connector to<br />
any input connector other than OPTICAL3.<br />
or<br />
Getting Started Connections<br />
Setup Playback Remote Control Multi-Zone Information Troubleshooting
ENGLISH<br />
Getting Started Connections<br />
Setup Playback Remote Control Multi-Zone Information Troubleshooting<br />
CD Recorder / MD Recorder / Tape Deck<br />
Make analog connections if you wish to record analog audio signals, or digital connections if you wish to<br />
record digital audio signals, depending on the types of connectors on the components being used.<br />
NOTE<br />
CD recorder /<br />
MD recorder / Tape deck<br />
<br />
<br />
<br />
<br />
<br />
<br />
<br />
L<br />
L<br />
R<br />
R<br />
L<br />
L<br />
R<br />
R<br />
or<br />
Do not connect the output of the component connected to the AVR-3808’s OPTICAL3 output connector to<br />
any input connector other than OPTICAL3.<br />
Connections to Other Devices<br />
Carefully check the left (L) and right (R) channels and the inputs and outputs, and be sure to interconnect<br />
correctly.<br />
Components Equipped with a DENON LINK connector<br />
Multi-channel playback is possible with DVD-Audio discs, Super Audio CD, etc.<br />
DVD player<br />
<br />
<br />
To use with DENON LINK connections, make the settings at GUI menu “Source Select” – “Assign” –<br />
“Digital” – “DENON LINK” (vpage 39).
Video Camera / Game Console<br />
Video camera / Game console<br />
<br />
<br />
<br />
<br />
<br />
<br />
<br />
L<br />
L<br />
R<br />
R<br />
Component with Multi-channel Output<br />
connectors<br />
DVD player /<br />
Super Audio CD player / External decoder<br />
<br />
<br />
<br />
<br />
L<br />
L<br />
<br />
R<br />
R<br />
<br />
<br />
<br />
• To play the analog input signals input to the EXT. IN connectors,<br />
press the INPUT MODE button on the main unit or INPUT button<br />
on the main remote control unit and select “EXT. IN” or make the<br />
settings at GUI menu “Source Select” – “(input source)” – “Input<br />
Mode” – “Input Mode” – “EXT. IN” (vpage 38).<br />
• The video signal can be connected in the same way as a DVD player<br />
(vpage 12).<br />
• To play copyright-protected discs, connect the AVR-3808’s EXT.<br />
IN connector with the DVD player’s analog multi-channel output<br />
connector.<br />
<br />
L<br />
L<br />
<br />
R<br />
R<br />
<br />
L<br />
L<br />
<br />
R<br />
R<br />
External Power Amplifier<br />
Power amplifier<br />
<br />
<br />
<br />
<br />
L<br />
L<br />
<br />
R<br />
R<br />
<br />
<br />
<br />
<br />
L<br />
L<br />
When using just one surround back speaker, connect it to the left<br />
channel (SBL).<br />
<br />
R<br />
R<br />
<br />
L<br />
L<br />
<br />
R<br />
R<br />
ENGLISH<br />
Getting Started Connections<br />
Setup Playback Remote Control Multi-Zone Information Troubleshooting
ENGLISH<br />
Getting Started Connections Setup Playback Remote Control Multi-Zone Information Troubleshooting<br />
USB Port<br />
n Front panel n Rear panel<br />
• In the initial status, USB memory devices can be used by connecting them to the USB port on the front panel.<br />
• To change the port to be used, see “USB Select” on page 40.<br />
• For instructions on playing the files on a USB memory device, see page 56.<br />
NOTE<br />
USB memory device USB memory device<br />
• Set to the USB port you want to use.<br />
• The AVR-3808 is equipped with two USB ports, one each on the front and rear panels. It is not possible to use the set with USB memory<br />
devices connected to both the ports at the same time. Select the USB port you want to use at the GUI menu “Source Select” – “NET/USB” –<br />
“Playback Mode” – “USB Select”.<br />
• Do not use the extension cable for connecting the USB memory device to the AVR-3808’s USB port.<br />
Use of the extension cable may cause harmful interference.
Antenna terminals<br />
An FM antenna cable plug can be connected directly.<br />
Direction of broadcasting station<br />
FM antenna<br />
75 Ω/ohms<br />
Coaxial cable<br />
FM indoor antenna<br />
(supplied)<br />
AM loop antenna assembly<br />
Remove the vinyl tie and take<br />
out the connection line.<br />
Mount<br />
a. With the antenna on top of<br />
any stable surface.<br />
Connect to the AM<br />
antenna terminals.<br />
Ground<br />
Bend in the reverse direction.<br />
b. With the antenna attached<br />
to a wall.<br />
Installation hole Mount on wall, etc.<br />
AM loop antenna<br />
(supplied)<br />
AM outdoor antenna<br />
1. Push the<br />
lever.<br />
NOTE<br />
Connection of AM antennas<br />
2. Insert the<br />
conductor.<br />
3. Return the<br />
lever.<br />
• Do not connect two FM antennas simultaneously.<br />
• Even if an external AM antenna is used, do not<br />
disconnect the AM loop antenna.<br />
• Make sure the AM loop antenna lead terminals do not<br />
touch metal parts of the panel.<br />
ENGLISH<br />
Getting Started Connections<br />
Setup Playback Remote Control Multi-Zone Information Troubleshooting
ENGLISH<br />
Getting Started Connections<br />
Setup Playback Remote Control Multi-Zone Information Troubleshooting<br />
Network Audio<br />
Router<br />
0<br />
Internet<br />
Modem<br />
To WAN side<br />
To LAN port<br />
To LAN port<br />
Computer<br />
LAN port/<br />
Ethernet<br />
connector<br />
Required system<br />
n Broadband Internet connection<br />
A broadband line connection to the Internet is required in order to<br />
use the AVR-3808’s Internet radio function and firmware update.<br />
n Modem<br />
This is a device that is connected to the broadband line to<br />
communicate with the Internet. Some are integrated with the<br />
router.<br />
n Router<br />
When using the AVR-3808, we recommend you use a router<br />
equipped with the following functions:<br />
• Built-in DHCP (Dynamic Host Configuration Protocol) server<br />
This function automatically assigns IP addresses on the LAN.<br />
• Built-in 100BASE-TX switch<br />
When connecting multiple devices, we recommend a switching<br />
hub with a speed of 100 Mbps or greater.<br />
n Ethernet cable (CAT-5 or greater recommended)<br />
• The AVR-3808 does not come with an Ethernet cable.<br />
• Some flat type Ethernet cables are easily affected by noise.<br />
We recommend using a normal type cable.<br />
• For the Ethernet cable, used a shielded twisted pair (STP) cable.<br />
Do not use an unshielded twisted pair (UTP) cable, as it may exceed<br />
noise standard limits.<br />
n Computer<br />
A computer with the following specifications is required to use a<br />
music server:<br />
• OS<br />
Windows ® XP Service Pack2, Windows Vista<br />
• Software (Prepare one of the following.)<br />
· .NET Framework 1.1 and Windows Media Connect (Windows XP)<br />
· Windows Media Player ver.11<br />
· DLNA-compatible server software<br />
• Internet browser<br />
Microsoft Internet Explorer 5.01 or later<br />
• LAN port<br />
• 300 MB or more free disk space<br />
b Free disk space is required to store music files. The following<br />
sizes are approximate.<br />
Format Bit rate Per minute Per hour<br />
128 kbps Approx. 1 MB Approx. 60 MB<br />
MP3 / WMA 192 kbps Approx. 1.5 MB Approx. 90 MB<br />
MPEG-4 AAC 256 kbps Approx. 2 MB Approx. 120 MB<br />
392 kbps Approx. 3 MB Approx. 180 MB<br />
WAV (LPCM) 1400 kbps Approx. 10 MB Approx. 600 MB<br />
FLAC 1080 kbps Approx. 7.7 MB Approx. 464 MB<br />
For connections to the Internet, contact an ISP (Internet Service<br />
Provider) or a computer shop.<br />
NOTE<br />
• A contract with an ISP is required to connect to the Internet.<br />
No additional contract is needed if you already have a broadband<br />
connection to the Internet.<br />
• The types of routers that can be used depend on the ISP. Contact an<br />
ISP or a computer shop for details.<br />
• Depending on the server, video files may be displayed, but they<br />
cannot be played on the AVR-3808.<br />
n Others<br />
• If you have an Internet provider contract for a line on which network<br />
settings are made <strong>manual</strong>ly, make the settings at GUI menu<br />
“Manual Setup” – “Network Setup” (vpage 32, 33).<br />
• With the AVR-3808, it is possible to use the DHCP and Auto IP<br />
functions to make the network settings automatically.<br />
• When using a broadband router (DHCP function), the AVR-3808<br />
sets the IP address, etc., automatically.<br />
When using the AVR-3808 connected to a network with no DHCP<br />
function, make the settings for the IP address, etc., at GUI menu<br />
“Manual Setup” – “Network Setup” (vpage 32, 33).<br />
• The AVR-3808 is not compatible with PPPoE. A PPPoE-compatible<br />
router is required if you have a contract for a line of the type with<br />
which the PPPoE is set.<br />
• Depending on the ISP with which you have your contract, it may<br />
be necessary to make proxy server settings to use the Internet<br />
radio function. If you made proxy server settings on the computer<br />
to connect to the Internet, make the proxy server settings on the<br />
AVR-3808 in the same way.
Multi-Zone<br />
ZONE2 or ZONE3 Pre-out Connections<br />
• If another power amplifier or pre-main (integrated) amplifier is connected, the ZONE2 or ZONE3 pre-out<br />
(variable or fixed level) connectors can be used to play a different program source in ZONE2 or ZONE3<br />
the same time (vpage 69 ~ 72).<br />
• When using an S-Video cable or a video cable for connection between the AVR-3808 and an input device,<br />
connect to the video connectors.<br />
• The ZONE2 video out is only for ZONE2.<br />
Infrared<br />
retransmitter<br />
NOTE<br />
<br />
<br />
Input<br />
Output<br />
Monitor (ZONE2)<br />
<br />
<br />
<br />
Infrared<br />
sensor<br />
Power amplifier<br />
(ZONE2 or ZONE3)<br />
<br />
<br />
<br />
<br />
L<br />
L<br />
Extension jack for future use.<br />
• For the audio output, use high quality pin-plug cords so that no induction humming or noise is produced.<br />
• For instructions on installing and operating separately sold devices, refer to the respective devices’<br />
operating instructions.<br />
• To conduct multi-zone playback, see “Amp Assign / Multi-Zone Connections and Operations” (vpage<br />
69 ~ 72).<br />
R<br />
R<br />
External Controller<br />
RS-232C connector<br />
This connector is used for an external controller.<br />
b If you wish to control the AVR-3808 from an<br />
external controller using the RS-232C connector,<br />
perform the operation below beforehand.<br />
q Turn the AVR-3808’s power.<br />
w Turn off the AVR-3808’s power from the external<br />
controller.<br />
e Check that the AVR-3808 is in the standby mode.<br />
ENGLISH<br />
• When using in combination with an RF Remote Controller (RC-7000CI, sold separately) or RF Remote<br />
Receiver (RC-7001RCI, sold separately) two-way communication with an RF Remote Controller is<br />
possible.<br />
The AVR-3808’s status information as well as iPod and Internet audio music files can be browsed watching<br />
the RF Remote Controller’s display. For details, refer to the operating instructions of the respective<br />
devices.<br />
• When used in combination with an RF Remote Controller or RF Remote Receiver, make the settings at<br />
GUI menu “Manual Setup” – “Option Setup” – “2Way Remote” – “Used” (vpage 35).<br />
Trigger output jacks<br />
The power of an external device equipped with<br />
a trigger input jack can be turned on and off in<br />
association with operations on the AVR-3808. For<br />
details, see GUI menu “Manual Setup” – “Option<br />
Setup” – “Trigger Out 1” or “Trigger Out 2” (vpage<br />
35).<br />
• Output level: 150 mA/12 V<br />
Check the trigger input conditions of the connected<br />
device.<br />
• If the trigger input level of the connected device<br />
is higher than 150 mA/12 V and depending on<br />
the short-circuiting conditions, the AVR-3808’s<br />
protection circuit may be activated, in which case<br />
“TRIGGER PROTECT” appears on the display. If<br />
this happens, turn off the AVR-3808’s power and<br />
disconnect the connected device.<br />
Getting Started Connections<br />
Setup Playback Remote Control Multi-Zone Information Troubleshooting
ENGLISH<br />
Getting Started Connections Setup<br />
Playback Remote Control Multi-Zone Information Troubleshooting<br />
Connecting the Power Cord<br />
Wait until all connections have been completed before connecting the power cord.<br />
NOTE<br />
Power cord<br />
(included)<br />
To household<br />
power outlet<br />
(AC 230 V, 50 Hz)<br />
Connection to the AC outlet<br />
• This outlet supply power to external audio<br />
devices.<br />
• The power supplied from these outlets turns on<br />
and off together with the set’s power switch.<br />
• Audio equipment with a total power consumption<br />
of 100 W (0.43 A) can be connected.<br />
• Insert the AC plugs securely. Incomplete connections could cause noise.<br />
• Only use the AC outlet to plug in audio devices. Do not use them as power supplies for hairdryers or<br />
anything other than audio equipment.<br />
Once Connections are Completed<br />
Turning the Power On (vpage 47)<br />
GUI Menu Operations<br />
With the AVR-3808, settings and operations for most functions can be performed by operating while<br />
looking at the GUI menus displayed on the monitor screen.<br />
The GUI cannot be superimposed when xvYCC signals and component 1080p signal, computer’s resolution<br />
(e.g. VGA) are input.<br />
Example of the Display of the GUI Mark at a Title<br />
Items for which this mark is indicated at the title can be operated from the GUI.<br />
We recommend performing such operations from the GUI.<br />
Auto Setup<br />
Optimize settings for speakers in use.<br />
This is the GUI icon for this setting item or for the menu series to which this<br />
item belongs.<br />
Example of Display of Default Values<br />
In lists of selectable items or adjustable ranges, the item surrounded by a border<br />
is the default value.<br />
[Selectable items] 7.1 (B) 7.1 5.1
Examples of GUI Screen Displays<br />
Some typical examples are described below.<br />
Example: Browse Menu (Top Menu)<br />
SOURCE SELECT<br />
TUNER<br />
PHONO<br />
CD<br />
DVD<br />
HDP<br />
TV/CBL<br />
Select input source and make playback<br />
settings<br />
AUTO SETUP<br />
STEP1 Speaker Detection<br />
Please place the microphone at ear<br />
height at main listening position.<br />
Start<br />
Config 7.1(B)<br />
Amp Assign<br />
Start Auto Setup<br />
Enter RETURN Cancel<br />
Selected item<br />
name<br />
List of subsequent items<br />
Guidance text for item at<br />
cursor position<br />
Example: Menus with Illustrations<br />
(Auto Setup)<br />
Operation guidance text<br />
Guidance text for item at cursor<br />
position<br />
Operation step indicators<br />
1 2 3 4 5<br />
Illustration<br />
Operation<br />
button guidance<br />
Cursor Position Display<br />
n Icon<br />
n List<br />
Assign<br />
Input Mode<br />
Rename<br />
Other<br />
Switch the selected item<br />
Selected item<br />
Switch the selected item<br />
Switch to the next item<br />
Selected item<br />
Switch to the next item<br />
b Switch the selected item using<br />
ui.<br />
Operations<br />
The same operation is possible on the main unit or remote control<br />
unit.<br />
1 Press<br />
the MENU button.<br />
The GUI menu is displayed.<br />
b To operate from the main remote control unit, be sure to set the<br />
remote control unit to the AMP mode.<br />
2 Press<br />
the u i p button to select the menu to be set<br />
or operated.<br />
b To return to the previous item, press the o or RETURN button.<br />
3Press 4Press the ENTER button to enter the setting.<br />
the MENU button to fi nish.<br />
When “Screensaver” is set to “ON”, the screensaver is activated if no<br />
operation is performed for about 3 minutes.<br />
ENGLISH<br />
Getting Started Connections Setup Playback Remote Control Multi-Zone Information Troubleshooting
ENGLISH<br />
Getting Started Connections Setup<br />
Playback Remote Control Multi-Zone Information Troubleshooting<br />
GUI Menu Map<br />
Information<br />
(vpage 45, 46)<br />
n Status<br />
• MAIN ZONE<br />
• ZONE2/3<br />
n Audio Input Signal<br />
n HDMI Information<br />
n Auto Surround Mode<br />
n Quick Select<br />
n Preset Station<br />
Parameter<br />
(vpage 42 ~ 45)<br />
n Audio<br />
• Surround Parameters<br />
· Mode<br />
· Cinema EQ<br />
· DRC<br />
· D.COMP<br />
· LFE<br />
· Center Image<br />
· Panorama<br />
· Dimension<br />
· Center Width<br />
· Delay Time<br />
· Effect<br />
· Effect Level<br />
· Room Size<br />
· AFDM<br />
· SB CH Out<br />
· Subwoofer Att.<br />
· Subwoofer<br />
· Default<br />
• Tone<br />
· Tone Defeat<br />
· Bass<br />
· Treble<br />
• Room EQ<br />
• RESTORER<br />
• Night Mode<br />
• Audio Delay<br />
n Picture Adjust<br />
• Contrast<br />
• Brightness<br />
• Chroma Level<br />
• Hue<br />
Source Select (vpage 37 ~ 40)<br />
n TUNER (FM/AM)<br />
• Play<br />
• Auto Preset<br />
• Preset Skip<br />
• Preset Name<br />
• Input Mode<br />
• Rename<br />
• Other<br />
· Video Select<br />
· Source Level<br />
Surround Mode<br />
(vpage 40, 41)<br />
n STEREO<br />
n DIRECT<br />
n STANDARD<br />
n DOLBY PLIIx, DOLBY PLII or<br />
DOLBY PL<br />
n DTS NEO:6<br />
n 7CH STEREO<br />
n WIDE SCREEN<br />
n SUPER STADIUM<br />
n ROCK ARENA<br />
n JAZZ CLUB<br />
n CLASSIC CONCERT<br />
n MONO MOVIE<br />
n VIDEO GAME<br />
n MATRIX<br />
n VIRTUAL<br />
n PHONO<br />
• Input Mode<br />
• Rename<br />
• Other<br />
· Video Select<br />
· Source Level<br />
Auto Setup (vpage 25 ~ 27)<br />
n Auto Setup<br />
• STEP1: Speaker Detection<br />
• STEP2: Measurement<br />
• STEP3: Calculation<br />
• STEP4: Check<br />
• STEP5: Store<br />
Manual Setup (vpage 28 ~ 36)<br />
n Speaker Setup (vpage 28, 29)<br />
• Speaker Configuration<br />
• Subwoofer Mode<br />
• Distance<br />
• Channel Level<br />
• Crossover Frequency<br />
• Surround Speaker<br />
n HDMI Setup (vpage 30)<br />
• i/p Scaler<br />
• Resolution<br />
• Progressive Mode<br />
• Aspect<br />
• Color Space<br />
• RGB Range<br />
• Auto Lip Sync<br />
• Audio<br />
n Audio Setup (vpage 30, 31)<br />
• EXT. IN Setup<br />
· Surround Speaker<br />
· Subwoofer Level<br />
• 2ch Direct/Stereo<br />
• Downmix Option<br />
• Auto Surround<br />
• Manual EQ<br />
n CD, DVD, HDP,TV/CBL,<br />
SAT, VCR, DVR, V.AUX<br />
• Play (iPod)<br />
• Playback Mode (iPod)<br />
• Assign<br />
• Input Mode<br />
• Rename<br />
• Other<br />
· Video Select<br />
· Video Convert (Excluding CDs)<br />
· Source Level<br />
n Option<br />
• Room EQ<br />
• Direct Mode<br />
• Mic Select<br />
n Network Setup (vpage 32, 33)<br />
• Network Setup<br />
• Other<br />
· Power Saving<br />
· Character<br />
· PC Language<br />
• Network Information<br />
n Zone Setup (vpage 33)<br />
• ZONE2<br />
· Bass<br />
· Treble<br />
· HPF<br />
· Lch Level<br />
· Rch Level<br />
· Channel<br />
· Volume Level<br />
· Volume Limit<br />
· Power On Level<br />
· Mute Level<br />
• ZONE3<br />
· Bass<br />
· Treble<br />
· HPF<br />
· Lch Level<br />
· Rch Level<br />
· Channel<br />
· Volume Level<br />
· Volume Limit<br />
· Power On Level<br />
· Mute Level<br />
n NET/USB<br />
• Play<br />
• Playback Mode<br />
• Input Mode<br />
• Rename<br />
• Other<br />
· Video Select<br />
· Source Level<br />
n Parameter<br />
• Speaker Configuration Check<br />
• Distance Check<br />
• Channel Level Check<br />
• Crossover Check<br />
• EQ Check<br />
• Restore<br />
n Option Setup (vpage 34 ~ 36)<br />
• Amp Assign<br />
• Volume Control<br />
· Volume Limit<br />
· Power On Level<br />
· Mute Level<br />
• Source Delete<br />
• GUI<br />
· Screensaver<br />
· Wall Paper<br />
· Format<br />
· Text<br />
· Master Volume<br />
· NET/USB<br />
· iPod<br />
· Tuner<br />
• Quick Select Name<br />
• Trigger Out 1<br />
• Trigger Out 2<br />
• Remote ID<br />
• 2Way Remote<br />
• Dimmer<br />
• Setup Lock<br />
• Maintenance Mode<br />
• Firmware Update<br />
n Language (vpage 36)
Auto Setup<br />
• Audyssey MultEQ ® XT automatically measures the acoustical<br />
problems in the listening environment to create the best audio<br />
experience for your home theater.<br />
• It optimizes a large listening area where one or more listeners are<br />
seated.<br />
Measurements are performed by placing the calibrated microphone<br />
(DM-A405) successively at multiple positions throughout the<br />
listening area as shown in Example q. For best results, it is<br />
strongly recommended to measure 6 or more positions so that the<br />
measurements have the proper spatial weighting.<br />
Even if the listening environment is small as shown in Example w,<br />
measuring at multiple points throughout the listening environment<br />
results in more effective correction.<br />
Example q Example w<br />
( :Measuring positions)<br />
*M *M<br />
About the main listening position (*M)<br />
The main listening position refers to the most central position where<br />
one would normally sit within the listening environment.<br />
MultEQ XT uses the measurements from this position to calculate<br />
speaker distance, level, polarity, and the optimum crossover value<br />
for the subwoofer.<br />
To make <strong>manual</strong> adjustments to the settings, see page 28, 29.<br />
Preparations<br />
1 Connect<br />
2 Place<br />
the included calibrated setup microphone to<br />
the SETUP MIC jack on the main unit.<br />
The auto setup screen appears automatically.<br />
Sound<br />
receptor<br />
the microphone at ear height on a tripod or stand<br />
with the microphone pointing directly up towards the<br />
ceiling.<br />
Setup<br />
microphone<br />
b It is not recommended to hold it in your hand. Be sure that the<br />
path from microphone to the speakers is not blocked by objects.<br />
Avoid placing the microphone close to a seat back or wall as sound<br />
refl ections may give inaccurate results.<br />
When using a subwoofer, make the following settings before starting<br />
the auto setup procedure:<br />
• Defeat the volume and crossover controls if possible<br />
• If this is not possible then set<br />
• Volume: “12 o’clock” position<br />
• Crossover frequency: “Maximum/Highest Frequency”<br />
• Low pass fi lter: “Off”<br />
• Standby mode: “Off”<br />
NOTE<br />
• Do not disconnect the setup microphone until the auto setup<br />
procedure is completed.<br />
• When using headphones, unplug the headphones before starting<br />
the auto setup procedure.<br />
ENGLISH<br />
Getting Started Connections Setup Playback Remote Control Multi-Zone Information Troubleshooting
ENGLISH<br />
Getting Started Connections Setup Playback Remote Control Multi-Zone Information Troubleshooting<br />
Auto Setup<br />
Optimize settings for speakers in use.<br />
F Menu tree F<br />
Auto Setup<br />
a Auto Setup<br />
s Option<br />
d Parameter<br />
a Auto Setup<br />
The settings are performed automatically.<br />
Start<br />
STEP1: Speaker Detection<br />
GAuto setup flowH<br />
STEP2: Measurement (2 to 8 positions)<br />
STEP3: Calculation<br />
STEP4: Check<br />
STEP5: Store<br />
Start Auto Setup.<br />
The Audyssey MultEQ XT Auto Setup process automatically calculates<br />
the size, level, distance, bass management crossover frequency, and<br />
optimal settings for each speaker and subwoofer. Audyssey MultEQ<br />
XT corrects acoustical distortions within the listening area.<br />
Before starting, connect and position all your speakers.<br />
Once started, MultEQ XT will play a series of test tones through each<br />
speaker.<br />
If an error message appears during the measurements, check “Error<br />
Messages” (vpage 27), take the advised action, then start the<br />
measurements again.<br />
Configuration<br />
The speaker system to be measured can be selected ahead of time<br />
here.<br />
[Selectable items] 7.1 (B) 7.1 5.1<br />
Setting the correct speaker confi guration can reduce the time required<br />
to measure during the auto setup procedure as the system will not<br />
have to look for speakers that are not connected.<br />
Amp Assign<br />
Advanced setting : changes power amplifi er assignment.<br />
NOTE<br />
The items selectable at “Confi guration” differ according to the “Amp<br />
Assign” settings.<br />
STEP1 : Speaker Detection<br />
The speaker connection and polarity are detected at the fi rst<br />
measurement position. The following attributes are also determined<br />
at this time: “Speaker Size”, “Speaker Distance”, “Channel Level”,<br />
“Crossover Frequency”.<br />
Once the measurements are completed, the results are displayed.<br />
NOTE<br />
• Loud test tone may be played during Audyssey MultEQ XT Automatic<br />
Speaker Setup. This is part of normal operation. If there is background<br />
noise in room, these test tones will increase in volume.<br />
• Do not stand between the speakers and setup microphone or allow<br />
obstacles in the path while the measurements are being made. This<br />
will cause inaccurate readings.<br />
• Quiet the listening environment before beginning measurements and<br />
refrain from talking. Turn off air conditioning units or other devices<br />
that emit noise if at all possible as measurements may be affected<br />
by these sounds.<br />
• Operating the MASTER VOLUME knob on the main unit or the VOL<br />
+/– buttons on the remote control unit during the measurements will<br />
cancel the measurements.<br />
• Do not change the speaker connections or subwoofer volume after<br />
“STEP1”.<br />
STEP2: Measurement<br />
After completing a measurement position, move the microphone to<br />
the next position.<br />
Measure at least 6 positions (main listening position and at least 5 other<br />
surrounding positions). For best results it is recommend measuring 6<br />
or more positions (with a maximum of 8 positions).<br />
STEP3: Calculation<br />
When “Calculate” is selected at “STEP2”, the measurements taken<br />
are analyzed automatically to determine how the speaker system<br />
interacts with the room.<br />
The time required for this analysis depends on the number of speakers<br />
connected. The higher the number of speakers, the longer the time<br />
required for analysis.<br />
STEP4: Check<br />
Once the auto setup procedure is complete, a measuring result check<br />
screen appears.<br />
Select any item whose results you want to check to review the<br />
results.<br />
Values that are different from the actual distance may be set for<br />
speakers with built-in fi lters (subwoofers, etc.). This is because fi lters<br />
add electrical delay to the signal that should be compensated.<br />
STEP5: Store<br />
The auto setup measurement results are stored in the AVR-3808.<br />
NOTE<br />
Do not turn the power off while the settings are being stored.
Error Messages<br />
If the auto setup procedure could not be completed due to speaker installation, the measuring environment, etc., an error<br />
message is displayed. If this happens, check the relevant items, be sure to take the necessary measures, then perform the<br />
auto setup procedure over again.<br />
Error messages (examples) Cause Measures<br />
No microphone or speaker • Included setup microphone is not connected.<br />
Ambient noise is too high<br />
or Level is too low<br />
• Not all speakers could be detected.<br />
• Too much noise in the room for accurate<br />
measurements to be made.<br />
• Speaker or subwoofer sound is too low for<br />
accurate measurements to be made.<br />
• Connect the included setup microphone to the SETUP MIC<br />
jack on the main unit.<br />
• Check the speaker connections.<br />
• Either turn off any device generating noise or move it<br />
away.<br />
• Try again when the surroundings are quieter.<br />
• Check the speaker installation and the direction in which<br />
the speakers are facing.<br />
• Adjust the subwoofer’s volume.<br />
None • Displayed speaker could not be detected.<br />
· The front L and front R speakers were not<br />
properly detected.<br />
· Only one channel of the surround (A) and<br />
surround (B) speakers was detected.<br />
· Sound was output from the R channel when only<br />
one surround back speaker was connected.<br />
· The surround back or the surround (B) speaker<br />
was detected, but the surround (A) speaker<br />
was not detected.<br />
• Check the connections of the displayed speaker.<br />
Phase • Displayed speaker connected with the polarities<br />
reversed.<br />
Select “Retry” to make the measurements again.<br />
NOTE Be sure to turn the power off before checking the speaker connections.<br />
• Check the polarities of the displayed speaker.<br />
• For some speakers, this error message may be displayed<br />
even if the speaker is properly connected. If you are sure<br />
that the wiring is correct, select “Skip”.<br />
s Option<br />
Select settings for room EQ, mic, etc.<br />
Room EQ<br />
Select room EQ setting method.<br />
[Selectable items] All Assign<br />
Direct Mode<br />
Select room EQ use for DIRECT or PURE DIRECT mode.<br />
[Selectable items] ON OFF<br />
Mic Select<br />
Select the microphone type if not using supplied mic.<br />
The microphone connected to V.AUX Lch is used.<br />
[Selectable items] Mic V.AUX L<br />
d Parameter Check<br />
Check auto setup measurement results.<br />
This is displayed after the auto setup procedure<br />
is completed.<br />
[Items to be checked]<br />
Spkr Confi g Check Distance Check Ch. Level Check<br />
Crossover Check EQ Check<br />
The auto setup results can be reset to what was originally calculated<br />
by MultEQ XT when “Restore” is selected.<br />
ENGLISH<br />
Only a professionally certifi ed installer should ever connect a<br />
professionally-calibrated microphone to the V.AUX L input on the front<br />
panel.<br />
Getting Started Connections Setup Playback Remote Control Multi-Zone Information Troubleshooting
ENGLISH<br />
Getting Started Connections Setup Playback Remote Control Multi-Zone Information Troubleshooting<br />
Manual Setup<br />
Make detail settings for various parameters.<br />
Speaker Setup<br />
Use this procedure to set the speakers<br />
<strong>manual</strong>ly or if you wish to change the<br />
settings made with the auto setup<br />
procedure.<br />
F Menu tree F<br />
Manual Setup<br />
Front<br />
Speaker Setup<br />
a Speaker Configuration<br />
s Subwoofer Mode<br />
d Distance<br />
Select front speaker size.<br />
f Channel Level<br />
g Crossover Frequency<br />
h Surround Speaker<br />
a Speaker Configuration<br />
Select speaker confi guration and size.<br />
(bass reproduction capability)<br />
[Selectable items] Large Small<br />
Center<br />
Select center speaker use and size.<br />
[Selectable items] Large Small None<br />
Subwoofer<br />
Select subwoofer use.<br />
[Selectable items] Yes No<br />
Surround A<br />
Select surround speakers A use and size.<br />
[Selectable items] Large Small None<br />
Surround B<br />
Select surround speakers B use and size.<br />
[Selectable items] Large Small None<br />
Surround Back<br />
Select surround back speaker use and size.<br />
[Selectable items] Large Small None<br />
2spkrs 1spkr<br />
Large : Select this for a large speaker with strong bass<br />
reproduction.<br />
Small : Select this for a smaller speaker with weaker bass<br />
reproduction.<br />
• Select “Large” or “Small” not according to the physical size of the<br />
speaker but according to the low frequency reproduction capabilities<br />
based on the frequency set at “Crossover Frequency” (vpage<br />
29).<br />
• When “Front” is set to “Small”, “Subwoofer” is automatically set to<br />
“Yes”.<br />
• If “Subwoofer” is set to “No”, “Front” is automatically set to<br />
“Large”.<br />
• If “Surround A” is set to “None”, “Surround B” and “Surround Back”<br />
are automatically set to “None”.<br />
• When using just one surround back speaker, connect it to the left<br />
channel (SBL).<br />
s Subwoofer Mode<br />
Select low range signal to be reproduced by subwoofer.<br />
[Selectable items] LFE LFE+Main<br />
• This can be set when GUI menu “Speaker Confi guration” –<br />
“Subwoofer” is set to “Yes”.<br />
• Play music or a movie source and select the mode offering the<br />
strongest bass.<br />
• Select “LFE+Main” if you want the bass signals to always be<br />
produced from the subwoofer.<br />
d Distance<br />
Set distance from listening position to speakers.<br />
Before making the settings, measure the distance from<br />
the listening position to the different speakers.<br />
Meters / Feet<br />
Select unit for distance.<br />
Step<br />
Select step. (smallest distance)<br />
[Selectable items]<br />
0.1m 0.01m : Can be selected when “Meters” is set.<br />
1ft<br />
Default<br />
Resets the settings to the default values.<br />
Distance measurement<br />
Select the speaker you want to set, then set the distance.<br />
Set the value closest to the measured distance.<br />
[Variable range]<br />
NOTE<br />
0.1ft : Can be selected when “Feet” is set.<br />
0.00m ~ 18.00m : Display when “Meters” is set.<br />
0.0ft ~ 60.0ft : Display when “Feet” is set.<br />
Set the distance between the listening position and the various<br />
speakers to no more than 6.00 meters (20.0 ft).
f Channel Level<br />
Adjust channel levels to obtain equal volume from all<br />
speakers.<br />
Mode<br />
Select test tone playback method.<br />
[Selectable items] Auto Manual<br />
Surround<br />
Select surround speaker from which test tone is output.<br />
[Selectable items] A<br />
Start<br />
Output test tone.<br />
[Variable range]<br />
Default<br />
B<br />
A+B<br />
–12dB ~ 0dB ~ +12dB<br />
Resets the settings to the default values.<br />
Operating from the main remote control unit<br />
Adjusting with the main remote control unit using the test tones is<br />
only possible in the “Auto” mode and only effective in the STANDARD<br />
mode. The adjusted levels for the different modes are automatically<br />
stored in the memory.<br />
GAdjusting using test tonesH<br />
q Press the TEST button.<br />
Test tones are output from the various speakers.<br />
w Use the o p button to adjust so that the volume is equal for all<br />
speakers.<br />
e When the adjustments are completed, press the TEST button<br />
again.<br />
• When the GUI menu “Speaker Configuration” – “Surround Back”<br />
setting (vpage 28) is set to “1spkr”, the surround back speaker<br />
display is set to “Surround Back”.<br />
• Speakers set to “None” in the “Speaker Configuration” settings are<br />
not displayed.<br />
• “Surround” can be set when GUI menu “Speaker Configuration”–<br />
“Surround B” is set to “Large” or “Small” (vpage 28).<br />
• When using surround speakers, be sure to adjust the volume of the<br />
different speakers.<br />
• When “Channel Level” is adjusted, the adjusted values are set for<br />
all the surround modes. To adjust the channel level separately for the<br />
different surround modes, use the operation see page 59.<br />
g Crossover Frequency<br />
Select crossover frequency from which subwoofer handles<br />
low range signal.<br />
[Selectable items]<br />
40Hz 60Hz 80Hz 90Hz 100Hz 110Hz<br />
120Hz 150Hz 200Hz 250Hz<br />
Only the portion of the bass sound of the various speakers output<br />
from the subwoofer that has a frequency below the frequency set<br />
here is output.<br />
Set this according to the low frequency reproduction capabilities of the<br />
speakers you are using.<br />
Advanced :<br />
Set the crossover frequency separately for the different speakers.<br />
• The “Crossover Frequency” can be set when there are speakers that<br />
have been set to “Small” at GUI menu “Speaker Configuration” or<br />
when “Subwoofer” is set to “Yes” (vpage 28).<br />
• If in the “Advanced” settings, “Subwoofer Mode” (vpage 28)<br />
in the GUI menu is set to “LFE”, it is possible to make this setting<br />
for speakers set to “Small” at “Speaker Configuration”. If set to<br />
“LFE+Main”, this setting can be made regardless of the speaker<br />
size.<br />
• For speakers set to “Small”, sound below the crossover frequency<br />
is cut from the sound output. The cut bass sound is output from the<br />
subwoofer or front speakers.<br />
• Always set the crossover frequency to “80Hz”. When using small<br />
speakers, however, we recommend setting the crossover frequency<br />
to a higher frequency.<br />
h Surround Speaker<br />
Select surround speakers to use for each surround mode.<br />
[Selectable items] A<br />
B<br />
A+B<br />
Operating from the main remote control unit<br />
Press the SPKR button.<br />
Surround A Surround B<br />
Surround A+B<br />
ENGLISH<br />
• This can be set when GUI menu “Speaker Configuration” – “Surround<br />
A” and “Surround B” are used (vpage 28).<br />
• When using the pre-out connectors, select and use either “Surround<br />
A” or “Surround B”.<br />
• Make the surround speaker settings when the input mode is set to<br />
“EXT. IN” at GUI menu “Manual Setup” – “Audio Setup” – “EXT. IN<br />
Setup” (vpage 30).<br />
About Speaker Type Setting when Using Both<br />
Surround speakers A and B<br />
If “Small” is set for either surround speakers A or B, the output is the<br />
same as when “Small” is set for both A and B.<br />
Getting Started Connections Setup<br />
Playback Remote Control Multi-Zone Information Troubleshooting
ENGLISH<br />
Getting Started Connections Setup Playback Remote Control Multi-Zone Information Troubleshooting<br />
HDMI Setup<br />
Make settings for HDMI video/audio output.<br />
F Menu tree F<br />
Manual Setup<br />
a i/p Scaler<br />
Make settings for i/p scaler function.<br />
[Selectable items] A to H A to H & H to H OFF<br />
0<br />
HDMI Setup<br />
a i/p Scaler<br />
s Resolution<br />
d Progressive Mode<br />
f Aspect<br />
g Color Space<br />
h RGB Range<br />
j Auto Lip Sync<br />
k Audio<br />
A to H & H to H setting<br />
• Deep color (10 bit/12 bit) signals are converted into 8-bit signals.<br />
• The i/p scaler function does not work if xvYCC or computer’s<br />
resolution signals are input.<br />
s Resolution<br />
Make settings for resolution of HDMI video output signal.<br />
[Selectable items] Auto 480p/576p 1080i 720p 1080p<br />
This can be set when “i/p Scaler” is set to anything other than “OFF”.<br />
NOTE<br />
• It is not possible to convert “1080i” signals into “720p” format.<br />
• It is not possible to convert “720p” signals into “1080i” format.<br />
d Progressive Mode<br />
Select optimum progressive mode for video material.<br />
[Selectable items] Auto Video1<br />
Video2<br />
This can be set when “i/p Scaler” is set to anything other than “OFF”.<br />
f Aspect<br />
This sets the aspect ratio when outputting 480i/576i or<br />
480p/576p input signals from the HDMI output connector.<br />
[Selectable items] Full<br />
Normal<br />
This can be set when “i/p Scaler” is set to anything other than “OFF”.<br />
g Color Space<br />
Make settings for output color space.<br />
[Selectable items] YCbCr RGB<br />
When connected to a monitor with a DVI-D connector (HDCP<br />
compatible) using an HDMI/DVI converter cable, the signals are output<br />
in RGB format, regardless of this setting.<br />
h RGB Range<br />
Make settings for RGB output range.<br />
[Selectable items] Normal<br />
Enhanced<br />
When “YCbCr” is selected under “Color Space”, “RGB Range” will<br />
have no effect.<br />
j Auto Lip Sync<br />
Automatic compensation for timing shift in audio and video<br />
output.<br />
[Selectable items] ON OFF<br />
k Audio<br />
Select HDMI audio output device.<br />
[Selectable items] Amp<br />
a EXT. IN Setup<br />
Make speaker settings for EXT. IN mode playback.<br />
TV<br />
Audio Setup<br />
Make settings for audio playback.<br />
F Menu tree F<br />
Manual Setup<br />
Audio Setup<br />
a EXT.IN Setup<br />
s 2ch Direct/Stereo<br />
d Downmix Option<br />
f Auto Surround Mode<br />
g Manual EQ<br />
Surround Speaker<br />
Select the surround speakers to use.<br />
[Selectable items] A<br />
Subwoofer Level<br />
Set the subwoofer level for playback.<br />
Select according to the player in use.<br />
B<br />
A+B<br />
[Selectable items] 0dB +5dB +10dB +15dB<br />
We recommend setting to “+15 dB”.
s 2ch Direct/Stereo<br />
Make speaker settings for 2-channel mode playback.<br />
Setting<br />
To change the settings, select “Custom”.<br />
[Selectable items] Basic<br />
z Custom<br />
z: Use the same settings as in “Speaker Setup”.<br />
Front<br />
Select front speaker size.<br />
[Selectable items] Large<br />
Subwoofer<br />
Select subwoofer use.<br />
[Selectable items] Yes No<br />
Subwoofer Mode<br />
Small<br />
Select low range signal to be reproduced by subwoofer.<br />
[Selectable items] LFE LFE+Main<br />
Crossover<br />
Select crossover frequency from which subwoofer handles low range<br />
signal.<br />
[Selectable items] 40Hz 60Hz 80Hz 90Hz 100Hz<br />
Distance FL<br />
110Hz 120Hz 150Hz 200Hz 250Hz<br />
Set distance from listening position to front left speaker.<br />
[Variable range] 0.00m ~ 18.00m<br />
Distance FR<br />
Set distance from listening position to front right speaker.<br />
[Variable range] 0.00m ~ 18.00m<br />
d Downmix Option<br />
Set dynamic range for downmix playback of Dolby Digital<br />
sources.<br />
[Selectable items] ON OFF<br />
• Set this to “ON” if the sound from the front speakers seems<br />
distorted.<br />
• When not using the center speaker or surround speakers, the<br />
playback sound is down-mixed and output from the front speakers.<br />
f Auto Surround Mode<br />
Make setting for memorizing surround mode setting for<br />
each input signal type.<br />
[Selectable items] ON OFF<br />
• The auto surround mode function lets you store in the memory the<br />
surround mode last used for playing the four types of input signals<br />
listed below.<br />
q Analog and PCM 2-channel signals<br />
w Dolby Digital and DTS 2-channel signals<br />
e Dolby Digital and DTS multi-channel signals<br />
r Multi-channel signals other than Dolby Digital and DTS (PCM,<br />
DSD, etc.)<br />
• When playing in the PURE DIRECT mode, the surround mode does<br />
not change even if the input signal is changed.<br />
g Manual EQ<br />
Adjust tonal quality for each speaker using graphic<br />
equalizer.<br />
Adjust CH<br />
Select speaker adjustment method.<br />
[Selectable items] Each<br />
Manual EQ<br />
L/R All<br />
Select the speaker and frequency band and adjust the level.<br />
[Selectable items] 63 125 250 500 1k 2k 4k<br />
Curve Copy<br />
8k 16k<br />
[Variable range] –20dB ~ 0dB ~ +6dB<br />
Copy the Room EQ’s “Audyssey Flat” correction curve.<br />
[Selectable items] Yes No<br />
“Curve Copy” is displayed after the auto setup procedure has been<br />
performed.<br />
Default<br />
Resets the settings to the default values.<br />
ENGLISH<br />
Getting Started Connections Setup<br />
Playback Remote Control Multi-Zone Information Troubleshooting
ENGLISH<br />
Getting Started Connections Setup<br />
Playback Remote Control Multi-Zone Information Troubleshooting<br />
Network Setup<br />
Make network settings.<br />
F Menu tree F<br />
Manual Setup<br />
Network Setup<br />
a Network Setup<br />
s Other<br />
d Network Information<br />
a Network Setup<br />
Make settings for LAN.<br />
To acquire the IP address automatically<br />
using the DHCP function<br />
Turn on the AVR-3808’s power.<br />
To enter the IP address <strong>manual</strong>ly<br />
At the GUI menu “Manual Setup” – “Network<br />
Setup” – “Detail” setting, set “DHCP” to “OFF”<br />
and enter the IP address, subnet mask, default<br />
gateway, primary DNS and secondary DNS.<br />
To not pass through the proxy server To connect via proxy server<br />
This completes the setting.<br />
Recheck the connections and settings if you cannot connect to the Internet (vpage 20).<br />
This setting is required when the network<br />
is established via proxy servers.<br />
At the GUI menu “Manual Setup” – “Network<br />
Setup” – “Proxy” setting, set “Proxy” to “ON”<br />
and enter the address or domain name and<br />
port numbers.<br />
NOTE Knowledge about networks is required to make the IP address and proxy settings. For details, consult a network administrator.
s Other<br />
Make setting for amp power save mode and computer<br />
language environment.<br />
Power Saving<br />
Make setting for power saving when not connected to network.<br />
[Selectable items] ON OFF<br />
Character<br />
Set the character code type of the MP3 ID3-Tag played by USB.<br />
[Selectable items] Auto Latin Japanese<br />
If the characters are not properly displayed when set to “Auto”, set to<br />
“Latin” or “Japanese”.<br />
PC Language<br />
Select computer environment language.<br />
[Selectable items] ara chi (smpl) chi (trad) cze dan<br />
d Network Information<br />
Display network information.<br />
dut eng fi n fre ger gre heb<br />
hun ita jpn kor nor pol por<br />
por (BR) rus spa swe tur<br />
[Items to be checked] DHCP= ON or OFF IP Address<br />
MAC Address<br />
Zone Setup<br />
Make settings for audio playback in a multizone<br />
system.<br />
F Menu tree F<br />
Manual Setup<br />
Zone Setup<br />
a ZONE2<br />
s ZONE3<br />
a ZONE2<br />
Make settings for audio playback in a ZONE2 system.<br />
s ZONE3<br />
Make settings for audio playback in a ZONE3 system.<br />
Bass<br />
Adjust low frequency range (bass).<br />
[Variable range] –10dB ~ 0dB ~ +10dB<br />
Treble<br />
Adjust high frequency range (treble).<br />
[Variable range] –10dB ~ 0dB ~ +10dB<br />
HPF<br />
When using speakers that cannot satisfactorily play low frequencies,<br />
distortion of the bass sound can be reduced by setting “HPF” to<br />
“ON”.<br />
[Selectable items] ON OFF<br />
Lch Level<br />
Adjust the left channel output level.<br />
[Variable range] –12dB ~ 0dB ~ +12dB<br />
Rch Level<br />
Adjust the right channel output level.<br />
[Variable range] –12dB ~ 0dB ~ +12dB<br />
Channel<br />
Switch between stereo and mono output.<br />
[Selectable items] Stereo Mono<br />
ENGLISH<br />
When GUI menu “Manual Setup” – “Option Setup” – “Amp Assign”<br />
(vpage 34) is set to “ZONE (MONO)”, the “Channel” setting is<br />
automatically set to “Mono”.<br />
Volume Level<br />
Adjust the main volume level.<br />
[Selectable items] Variable –40dB 0dB<br />
“Variable” is displayed when a power amplifi er is assigned to the<br />
ZONE2 output channel at GUI menu “Manual Setup” – “Option Setup”<br />
– “Amp Assign” (vpage 34).<br />
Volume Limit<br />
Make a setting for maximum volume.<br />
[Selectable items] OFF –20dB –10dB 0dB<br />
Power On Level<br />
Defi ne the volume setting that is active when the power is turned on.<br />
[Selectable items] Last – – – –70dB ~ +18dB<br />
Mute Level<br />
Set the amount of attenuation when muting is on.<br />
[Selectable items] Full –40dB –20dB<br />
Getting Started Connections Setup<br />
Playback Remote Control Multi-Zone Information Troubleshooting
ENGLISH<br />
Getting Started Connections Setup<br />
Playback Remote Control Multi-Zone Information Troubleshooting<br />
Option Setup<br />
Make various other settings.<br />
F Menu tree F<br />
Manual Setup<br />
Option Setup<br />
a Amp Assign<br />
s Volume Control<br />
d Source Delete<br />
f GUI<br />
g Quick Select Name<br />
h Trigger Out 1<br />
j Trigger Out 2<br />
k Remote ID<br />
l 2Way Remote<br />
A0 Dimmer<br />
A1 Setup Lock<br />
a Amp Assign<br />
A2 Maintenance Mode<br />
A3 Firmware Update<br />
Defi ne how the amplifi er for the surround back speaker<br />
channels is used.<br />
The places where the surround back amplifi er are used can be set<br />
freely according to the usage environment. This makes it possible to<br />
output sound to rooms other than the room (the main zone) where<br />
surround playback is performed (multi-zone playback) or play the sound<br />
with high quality using the front speakers (bi-amp connections).<br />
[Selectable items]<br />
7.1CH ZONE2 ZONE3 ZONE(MONO) Bi-Amp 2CH<br />
For details, see “Amp Assign / Multi-Zone Connections and Operations”<br />
(vpage 69 ~ 71).<br />
s Volume Control<br />
Set the main zone volume setting.<br />
Volume Limit<br />
Make a setting for maximum volume.<br />
[Selectable items] OFF –20dB –10dB<br />
Power On Level<br />
0dB<br />
This sets the volume set when the main zone’s power is turned on.<br />
[Selectable items] Last – – – –80dB ~ +18dB<br />
Mute Level<br />
This sets the amount of attenuation of the volume when the mute<br />
mode is set in the main zone.<br />
[Selectable items] Full –40dB –20dB<br />
d Source Delete<br />
Remove input sources that are not used from the display.<br />
[Selectable items] ON Delete<br />
NOTE<br />
• Input sources being used in the various zones cannot be deleted.<br />
• Input sources set to “Delete” cannot be selected from GUI menu<br />
“Source Select” or using the SOURCE SELECT knob on the main unit<br />
or SOURCE SELECT button on the remote control unit.<br />
f GUI<br />
Make GUI related settings.<br />
Screensaver<br />
Make screensaver settings.<br />
Use the screensaver to prevent burn-in on the monitor screen.<br />
When set to “ON”, the screensaver is activated if there is no activity<br />
for about 3 minutes.<br />
[Selectable items] ON OFF<br />
Wall Paper<br />
Change the GUI background.<br />
[Selectable items] Picture Black Gray Blue<br />
Format<br />
Select the video output signal format to match the monitor.<br />
[Selectable items] PAL NTSC<br />
NOTE<br />
When a format other than the video format of the connected monitor<br />
is set, the picture will not be displayed properly. Use the procedure<br />
described below to change the video format.<br />
Operating from the main unit<br />
q Press and hold the STATUS and RETURN buttons for at least 3<br />
seconds.<br />
“Video Format” appears on the display.<br />
w Use the o p button to make the setting.<br />
e Press the ENTER, MENU or RETURN button to complete the setting.
Text<br />
Text information display.<br />
[Selectable items] ON OFF<br />
Master Volume<br />
Master volume display during adjustment.<br />
[Selectable items] ON OFF<br />
NET/USB / iPod / Tuner<br />
This sets the time the on-screen display is displayed when an operation<br />
is performed.<br />
[Selectable items] Always<br />
30s<br />
g Quick Select Name<br />
Change the Quick Select name.<br />
Up to 16 characters can be input.<br />
[Input characters]<br />
A ~ Z a ~ z<br />
0 ~ 9<br />
! “ # % & ’ ( ) * + , - . / : ; < = > ? @ [ \ ] (space)<br />
10s<br />
OFF<br />
h Trigger Out 1<br />
Select the conditions to turn on the trigger out 1 with<br />
respect to the zone, input source, surround mode, HDMI<br />
monitor, etc.<br />
For details about the trigger out function, see page 21.<br />
j Trigger Out 2<br />
This sets the conditions to turn on the trigger out 2, in the<br />
same way as “Trigger Out 1” above.<br />
[Selectable items] ON – – –<br />
Setting with Respect to the Zone<br />
• When the power of the zone turned on/off, the trigger out turns on.<br />
• Associated with the power supply of zones set to “ON”.<br />
Setting with Respect to the Input Source<br />
• When the input source set to on is selected, the trigger out turns<br />
on.<br />
• Associated with respect to the input source for zones set to “ON” at<br />
“Setting with Respect to the Zone”.<br />
Setting with Respect to the Surround Mode<br />
• When the surround mode set to on is selected, the trigger out turns<br />
on.<br />
• Associated with respect to surround modes that are set to “ON”.<br />
• This can be set if the “MAIN ZONE” setting at “Setting with Respect<br />
to the Zone” is set to “ON”.<br />
• Associated when an input source for which “Setting with Respect to<br />
the Input Source” is set to “ON” is selected.<br />
Setting with Respect to the Monitor<br />
• When the HDMI monitor set to on is selected, the trigger out turns<br />
on.<br />
• Associated with respect to HDMI monitor that are set to “ON”.<br />
• This can be set if the “MAIN ZONE” setting at “Setting with Respect<br />
to the Zone” is set to “ON”.<br />
• Associated when an input source for which “Setting with Respect to<br />
the Input Source” is set to “ON” is selected.<br />
k Remote ID<br />
Set remote control ID.<br />
Match the ID setting of the remote control unit and the<br />
receiver.<br />
[Selectable items] 1 2 3 4<br />
ENGLISH<br />
• When changing the remote ID, also change the AMP, iPod, TU and<br />
NET/DTU modes of the main remote control unit at the same time<br />
(vpage 63).<br />
• When changing the remote ID, also change the sub remote control<br />
unit at the same time (vpage 68).<br />
l 2Way Remote<br />
Make setting for 2-way remote control unit.<br />
[Selectable items] Used Not Used<br />
When using a 2-way remote control unit (RC-7000CI and RC-7001RCI,<br />
sold separately), set this to “Used”.<br />
A0 Dimmer<br />
Adjust display brightness of the receiver.<br />
[Selectable items] Bright Dim Dark OFF<br />
Operating from the main unit<br />
Press the DIMMER button.<br />
Bright Dim<br />
OFF<br />
Dark<br />
Getting Started Connections Setup<br />
Playback Remote Control Multi-Zone Information Troubleshooting
ENGLISH<br />
Getting Started Connections Setup<br />
Playback Remote Control Multi-Zone Information Troubleshooting<br />
A1 Setup Lock<br />
Protect settings from inadvertent change.<br />
[Selectable items] ON OFF<br />
• When “Setup Lock” is set to “ON”, the settings listed below can<br />
no longer be changed. Also, “SETUP LOCKED!” is displayed if you<br />
attempt to operate related buttons.<br />
⋅ GUI menu operations<br />
⋅ RESTORER<br />
⋅ Night Mode<br />
⋅ Parameter<br />
⋅ Room EQ<br />
⋅ Channel Level<br />
⋅ Audio Delay<br />
• To cancel the setting, press the MENU button to re-display the “Setup<br />
Lock” screen, then change the setting to “OFF”.<br />
A2 Maintenance Mode<br />
This sets the function for maintenance by a DENON<br />
serviceperson or installer. (For professional use only.)<br />
This function allows a DENON serviceperson or installer to check the<br />
AVR-3808’s status and make settings via the Internet.<br />
NOTE<br />
Only use this function if so instructed by a DENON serviceperson or<br />
installer.<br />
A3 Firmware Update<br />
Update the fi rmware of the receiver.<br />
[Selectable items]<br />
Start :<br />
Execute the update process.<br />
When updating starts, the power indicator lights red. “Updating<br />
zzz” is shown on the display during updating. Once updating is<br />
completed, “Updating complete” is displayed.<br />
“Latest fi rmware” is displayed when the fi rmware is the latest<br />
version.<br />
b If the display reads as shown below, check the settings and network<br />
environment, then update again.<br />
Display Description<br />
Updating failed Updating failed.<br />
Login failed Failure to log into server.<br />
Server is busy Server is busy. Wait a while then try again.<br />
Connection failed Failure connecting to server.<br />
Regist failed Failure registering to server.<br />
NOTE<br />
• Connection to the network and specifi c settings are required to<br />
update the fi rmware. For details, see page 20, 32, 33.<br />
• Do not turn off the power until updating is completed.<br />
• Normally there is no need to use this function, aside from the cases<br />
described below.<br />
⋅ The Firmware Update function is only used for updating the<br />
fi rmware (free or for a charge) via the Internet, for example for the<br />
purpose of adding functions to the AVR-3808 in the future.<br />
⋅ Information regarding the Firmware Update function will be<br />
announced on the DENON web site each time related plans are<br />
defi ned.<br />
⋅ A broadband connection to the Internet is required to use this<br />
function (v page 20).<br />
⋅ Even with a broadband connection to the Internet, approximately 1<br />
hour is required for the updating procedure to be completed. Once<br />
updating starts, normal operations on the AVR-3808 cannot be<br />
performed until updating is completed.<br />
Furthermore, updating the fi rmware may reset the backup data for<br />
the parameters, etc., set for the AVR-3808.<br />
Language<br />
This sets the language used on the display<br />
screens.<br />
F Menu tree F<br />
Manual Setup<br />
Language<br />
[Selectable items]<br />
English<br />
Español<br />
Deutsch<br />
Français<br />
Nederlands Svenska<br />
Operating from the main unit<br />
Italiano<br />
b The GUI menu is not displayed when performing this setting.<br />
q Press and hold the STATUS and RETURN buttons for at least 3<br />
seconds.<br />
“Video Format” appears on the display.<br />
w Use the ui button to set “GUI Language”.<br />
e Use the o p button to make the setting.<br />
r Press the ENTER, MENU or RETURN button to complete the setting.
Source Select<br />
Use this procedure to select the input source and make the settings<br />
related to playing input sources.<br />
Input Source Selection<br />
F Menu tree F<br />
Source Select<br />
TUNER<br />
PHONO<br />
CD<br />
DVD<br />
HDP<br />
TV/CBL<br />
SAT<br />
VCR<br />
DVR<br />
V.AUX<br />
NET/USB<br />
Operating from the main unit or main remote<br />
control unit<br />
GOperation on the main unitH<br />
Turn the SOURCE SELECT knob.<br />
b If “Rec Select” or “Video Select” is selected for the input source,<br />
press the SOURCE button before turning the SOURCE SELECT knob.<br />
GOperation on the main remote control unitH<br />
Press the SOURCE SELECT button.<br />
The desired input source can be selected directly.<br />
(Main unit) (Main remote control unit)<br />
To operate the AVR-3808 using the main remote control unit, set the<br />
remote control unit to the AMP mode (vpage 60 “Remote Control<br />
Unit Operations”).<br />
Settings Related to Playing<br />
Input Sources<br />
F Menu tree F<br />
Source Select<br />
TUNER<br />
PHONO<br />
a Play<br />
s Auto Preset<br />
d Preset Skip<br />
f Preset Name<br />
g Input Mode<br />
h Rename<br />
j Other<br />
g Input Mode<br />
h Rename<br />
j Other<br />
CD, DVD, HDP,TV/CBL, SAT, VCR, DVR, V.AUX<br />
NET/USB<br />
a Playz<br />
k Playback Mode (iPod)z<br />
l Assign<br />
g Input Mode<br />
h Rename<br />
j Other<br />
a Play<br />
A0 Playback Mode<br />
g Input Mode<br />
h Rename<br />
j Other<br />
z : “Play” and “Playback Mode (iPod)” are displayed for input sources<br />
for which “iPod dock” is assigned.<br />
a Play<br />
The playback screen is displayed.<br />
[Input source]<br />
[Selectable items] Start<br />
TUNER NET/USB ( iPod )<br />
s Auto Preset<br />
Use the auto preset function to program radio stations.<br />
[Input source] TUNER<br />
ENGLISH<br />
If an FM station cannot be preset automatically, select the desired<br />
station by tuning it in <strong>manual</strong>ly, then preset it <strong>manual</strong>ly.<br />
d Preset Skip<br />
Set the preset memories that you do not want to display<br />
when tuning.<br />
A ~ G<br />
Select the preset channel(s) you do not want to display.<br />
[Input source] TUNER<br />
[Selectable items] All 1 2 3 4 5 6 7 8<br />
[Selectable items] ON Skip<br />
When set “All” to “Skip”, it is possible to skip entire preset memory<br />
blocks (A to G).<br />
Getting Started Connections Setup<br />
Playback Remote Control Multi-Zone Information Troubleshooting
ENGLISH<br />
Getting Started Connections Setup Playback Remote Control Multi-Zone Information Troubleshooting<br />
f Preset Name<br />
Assign name to a preset memory.<br />
Names containing up to 8 characters can be input.<br />
A1 ~ G8<br />
Select the preset memory number.<br />
[Input source] TUNER<br />
[Characters that can be input]<br />
A ~ Z a ~ z 0 ~ 9 ! “ # % & ’ ( ) * + , - . / : ; < = > ? @ [ \ ] (space)<br />
g Input Mode<br />
Make input mode and decode mode settings for this<br />
source.<br />
The selectable input modes depend on the input source<br />
and “Assign” setting (vpage 39).<br />
Input Mode<br />
Set the input mode for this source.<br />
[Input source] TUNER PHONO ( iPod )<br />
[Selectable items] Analog EXT. IN<br />
[Input source] NET/USB<br />
[Selectable items] Auto EXT. IN<br />
[Input source]<br />
CD DVD HDP TV/CBL SAT VCR DVR V.AUX<br />
[Selectable items]<br />
Auto HDMI Digital Analog EXT. IN<br />
• When a digital signal is properly input, the “ ” indicator lights on<br />
the display. If the “ ” indicator does not light, check the digital<br />
input connector assignment and the connections.<br />
• The surround mode cannot be set if the input mode is set to “EXT.<br />
IN”.<br />
Operating from the main unit or main remote<br />
control unit<br />
Press the INPUT MODE button on the main unit or the INPUT button on<br />
the main remote control unit.<br />
Auto<br />
z1: This can be selected for input sources for which the GUI menu<br />
“Assign” setting is set to “HDMI” (vpage 39). Excluding CD.<br />
z2: This can be selected for input sources for which the GUI menu<br />
“Assign” setting is set to “Digital” (vpage 39).<br />
Decode Mode<br />
EXT. IN<br />
Set the decode mode for this source.<br />
h Rename<br />
Change the display name for this source.<br />
Names containing up to 8 characters can be input.<br />
[Characters that can be input]<br />
HDMI z1 Digital z2<br />
[Input source] CD DVD HDP TV/CBL SAT VCR<br />
DVR V.AUX<br />
[Selectable items] Auto PCM DTS<br />
Analog<br />
• This can be selected for input sources for which the GUI menu<br />
“Assign” setting is set to “HDMI” or “Digital” (vpage 39).<br />
• Only set “PCM” and “DTS” when playing the respective signals.<br />
A ~ Z a ~ z 0 ~ 9 ! “ # % & ’ ( ) * + , - . / : ; < = > ? @ [ \ ] (space)<br />
j Other<br />
Make various other settings.<br />
Video Select<br />
Switch video input source while listening to audio signal.<br />
[Selectable items]<br />
DVD HDP TV/CBL SAT VCR DVR V.AUX SOURCE<br />
Operating from the main unit<br />
Press the VIDEO SELECT button, then turn the SOURCE SELECT knob until<br />
the desired picture appears.<br />
b To cancel, press the main unit’s VIDEO SELECT button, then turn the<br />
main unit’s SOURCE SELECT knob and select “SOURCE”.<br />
NOTE<br />
• It is not possible to select HDMI input signals.<br />
• When playing HDMI video input signals, the analog video signal of<br />
another input source cannot be selected for the HDMI video output.<br />
• Input sources for which “Delete” is selected at “Source Delete”<br />
cannot be selected.<br />
Video Convert<br />
Automatically convert video input signal to monitor output format.<br />
[Input source] DVD HDP TV/CBL SAT VCR DVR<br />
V.AUX<br />
[Selectable items] ON OFF<br />
NOTE<br />
When a non-standard video signal from a game machine or some other<br />
source is input, the video conversion function might not operate. If this<br />
happens, please set the conversion mode to “OFF”.<br />
Source Level<br />
Corrects the playback level of the selected input source’s audio input.<br />
[Variable range]<br />
–12dB ~ 0dB ~ +12dB<br />
For input sources for which “HDMI” and “Digital” are set at the GUI<br />
menu “Assign” setting, the analog input level and digital input level can<br />
be set separately.
k Playback Mode (iPod)<br />
Make settings for “iPod” playback.<br />
Repeat<br />
Make settings for repeat mode.<br />
[Input source]<br />
[Selectable items]<br />
Shuffle<br />
CD DVD HDP TV/CBL SAT VCR<br />
DVR V.AUX<br />
All One OFF<br />
Make settings for shuffle mode.<br />
[Input source]<br />
[Selectable items]<br />
CD DVD HDP TV/CBL SAT VCR<br />
DVR V.AUX<br />
Songs Albums OFF<br />
This can be selected for input sources for which “Assign” is assigned<br />
at the “iPod dock” setting.<br />
l Assign<br />
Assign input sources to input connectors.<br />
HDMI<br />
Select HDMI connector to assign to this source.<br />
[Input source]<br />
[Selectable items]<br />
Input<br />
source<br />
Default<br />
setting<br />
DVD HDP TV/CBL SAT VCR<br />
DVR V.AUX<br />
1 2 3 4 None<br />
DVD HDP TV/CBL SAT VCR DVR V.AUX<br />
HDMI1 HDMI2 HDMI3 None None HDMI4 None<br />
• With HDMI, the video and audio signals are transferred simultaneously.<br />
To play the video signal assigned at “HDMI” combined with the audio<br />
signal assigned at “Digital”, select “Digital” at GUI menu “Source<br />
Select” – “Input Mode” (vpage 38).<br />
• When the AVR-3808 and monitor are connected with an HDMI cable,<br />
if the monitor is not compatible with HDMI audio signal playback,<br />
only the video signals are output to the monitor.<br />
• The audio signals input from the analog, digital and EXT. IN connectors<br />
are not output to the monitor.<br />
NOTE<br />
This cannot be set for input sources for which “iPod dock” is<br />
assigned.<br />
Digital<br />
Select digital input connector to assign to this source.<br />
[Input source]<br />
[Selectable items]<br />
Input<br />
source<br />
Default<br />
setting<br />
Coaxial1 ~ 3 Optical1 ~ 4<br />
DENON LINK z None<br />
z: When a DENON DVD player and the DENON LINK have been<br />
connected, be sure to make a setting to “DENON LINK”.<br />
NOTE<br />
CD DVD HDP TV/CBL SAT VCR DVR V.AUX<br />
Coaxial<br />
3<br />
Coaxial<br />
1<br />
CD DVD HDP TV/CBL SAT<br />
VCR DVR V.AUX<br />
None Coaxial<br />
2<br />
Optical<br />
1<br />
Optical<br />
3<br />
Optical<br />
2<br />
Optical<br />
4<br />
• This cannot be set for input sources for which “iPod dock” is<br />
assigned.<br />
• When “DENON LINK” is assigned at the GUI menu “Assign” setting,<br />
the PCM signals, network audio signals (Internet radio, music server<br />
and USB) input from the digital input connectors cannot be output<br />
from the ZONE2 and ZONE3 audio output connectors and the analog<br />
REC OUT connectors.<br />
Component<br />
Select component video input to assign to this source.<br />
[Input source]<br />
[Selectable items]<br />
Input<br />
source<br />
Default<br />
setting<br />
NOTE<br />
DVD HDP TV/CBL SAT VCR DVR V.AUX<br />
Component<br />
1<br />
Component<br />
2<br />
1 2 3 None<br />
Component<br />
3<br />
None None None None<br />
This cannot be set for input sources for which “iPod dock” is<br />
assigned.<br />
iPod dock<br />
Assign Control Dock for iPod to this source.<br />
[Input source]<br />
[Selectable items]<br />
DVD HDP TV/CBL SAT VCR<br />
DVR V.AUX<br />
CD DVD HDP TV/CBL SAT VCR<br />
DVR V.AUX<br />
Assign None<br />
ENGLISH<br />
• With the default settings, the Control Dock for iPod can be used<br />
connected to the VCR (iPod) connector.<br />
• Even if “iPod dock” is set to “Assign”, if the set is not connected to<br />
a Control dock for iPod, the input source can be used as the normal<br />
input source.<br />
Getting Started Connections Setup Playback Remote Control Multi-Zone Information Troubleshooting
ENGLISH<br />
Getting Started Connections Setup Playback Remote Control Multi-Zone Information Troubleshooting<br />
A0 Playback Mode<br />
Make settings for “NET/USB” playback.<br />
[Input source]<br />
USB Select<br />
Select USB port to use.<br />
[Selectable items]<br />
Repeat<br />
[Selectable items]<br />
[Selectable items]<br />
0<br />
Front Rear<br />
Match the port to be used and the setting.<br />
Make settings for repeat mode.<br />
Random<br />
Make random mode settings.<br />
Direct Play<br />
All One OFF<br />
ON OFF<br />
Set the folder to be played using the DIRECT PLAY button on the sub<br />
remote control unit.<br />
[Selectable items]<br />
NET/USB<br />
Favorites All Music<br />
Surround Modes<br />
Standard Playback<br />
This is the standard mode for enjoying surround sound<br />
according to the program source.<br />
To select these surround modes pressing the STANDARD button on the<br />
main unit or press the STD button on the main remote control unit. The<br />
mode switches each time the button is pressed.<br />
Surround Playback of 2-channel Sources<br />
n When using a surround back speaker<br />
[Selectable items]<br />
DOLBY PLgx DTS NEO:6<br />
n When not using a surround back speaker<br />
[Selectable items]<br />
DOLBY PLgx<br />
or DOLBY PLg<br />
DOLBY PLg DTS NEO:6<br />
: The signals are decoded in DOLBY PLgx or<br />
DOLBY PLg for playback.<br />
Cinema : This mode is suited for movie sources.<br />
Music : This mode is suited for music sources.<br />
Game : This mode is suited for games.<br />
Pro Logic : This is the Pro Logic playback mode. This can<br />
be selected when playing with a DOLBY PLg<br />
decoder. When this mode is selected, “DOLBY<br />
PL” is displayed.<br />
DTS NEO:6<br />
: The signals are decoded in DTS NEO:6 for<br />
playback.<br />
Cinema : This mode is suited for movie sources.<br />
Music : This mode is suited for music sources.<br />
Select the “Cinema”, “Music”, “Game” and “Pro Logic” modes at GUI<br />
menu “Parameter” – “Audio” – “Surround Parameters” – “Mode”<br />
(vpage 42).<br />
Playing Multi-channel Sources<br />
(Dolby Digital, DTS, etc.)<br />
[Selectable items]<br />
STANDARD :<br />
This mode is for decoding the input signals according to their format<br />
and playing surround sound.<br />
The display when the STANDARD mode is selected depends on the<br />
input signal and surround back output playback mode.<br />
Dolby<br />
Digital<br />
Source<br />
DTS<br />
Surround<br />
Source<br />
DVD-<br />
Audio,<br />
SACD<br />
Input signal Display<br />
DOLBY DIGITAL<br />
(other than 2ch) /<br />
DOLBY DIGITAL<br />
EX<br />
DOLBY DIGITAL<br />
Plus<br />
DOLBY DIGITAL<br />
DOLBY DIGITAL EX<br />
DOLBY DIGITAL+PLgx CINEMA<br />
DOLBY DIGITAL+PLgx MUSIC<br />
DOLBY DIGITAL +<br />
DOLBY TrueHD DOLBY TrueHD<br />
DTS (5.1ch) / DTS SURROUND<br />
DTS-ES Discrete DTS+PLgx CINEMA<br />
6.1 /<br />
DTS-ES Matrix<br />
6.1 /<br />
DTS 96/24<br />
DTS+PLgx MUSIC<br />
DTS+NEO:6<br />
DTS ES MTRX6.1 (z1)<br />
DTS ES DSCRT6.1 (z2)<br />
DTS 96/24 (z3)<br />
DTS-HD High<br />
Resolution Audio<br />
DTS-HD HI RES<br />
DTS-HD Master<br />
Audio<br />
DTS-HD MSTR<br />
MULTI CH IN<br />
PCM (multi ch) / MULTI IN+PLgx CINEMA<br />
DSD (multi ch) MULTI IN+PLgx MUSIC<br />
MULTI CH IN 7.1<br />
z1 : This is displayed when the input signal is “DTS-ES Matrix 6.1”<br />
and the AVR-3808’s “AFDM” setting is set to “ON”.<br />
z2 : This is displayed when the input signal is “DTS-ES Discrete<br />
6.1”.<br />
z3 : This is displayed when the input signal is “DTS 96/24”.<br />
For details, see page 78.
DSP Simulation Playback<br />
The desired mode according to the program source and<br />
viewing situation can be selected from among 10 DENON<br />
original surround modes.<br />
The surround parameters can be adjusted (vpage 76, 77)<br />
to achieve an even more realistic, powerful sound field.<br />
[Selectable items]<br />
7CH STEREO<br />
WIDE SCREEN<br />
: This mode is for enjoying stereo sound from<br />
all speakers.<br />
: This mode is for enjoying the atmosphere of<br />
viewing a movie on a large screen.<br />
SUPER STADIUM : This mode is suited for viewing sports<br />
programs.<br />
ROCK ARENA<br />
JAZZ CLUB<br />
: This mode is for enjoying the atmosphere of a<br />
live concert in an arena.<br />
: This mode is for enjoying the atmosphere of a<br />
live concert in a jazz club.<br />
CLASSIC CONCERT : This mode is for appreciating classical concert<br />
programs.<br />
MONO MOVIE z: This mode is for playing monaural movie<br />
sources with surround sound.<br />
VIDEO GAME<br />
MATRIX<br />
VIRTUAL<br />
: This mode is suited for achieving surround<br />
sound with video games.<br />
: This mode lets you add a sense of expansion<br />
to stereo music sources.<br />
: This mode is for enjoying surround effects<br />
using only the front speakers or headphones.<br />
z: When playing sources recorded in monaural in the MONO MOVIE<br />
mode, the sound will be off balance with a single channel (left or<br />
right), so input to both channels.<br />
• To select these surround modes using the buttons on the main<br />
remote control unit, press the SIMU button. The mode switches each<br />
time the button is pressed.<br />
• Depending on the program source being played, it may not be<br />
possible to achieve a satisfactory surround effect. In this case, try<br />
other modes to achieve a sound field suited to your tastes.<br />
Stereo Playback<br />
[Selectable items]<br />
STEREO :<br />
This is the mode for playing in stereo. The tone can be adjusted.<br />
Sound is output from the front left and right speakers and subwoofer.<br />
Direct Playback<br />
[Selectable items]<br />
DIRECT :<br />
In this mode the signals bypass the tone control circuitry for high<br />
quality sound.<br />
The sound is output to the same channels as the input signal.<br />
The display when the DIRECT mode is selected depends on the input<br />
signal.<br />
For multi-channel sources, the display depends on the surround back<br />
output’s play mode.<br />
Input signal Display<br />
Analog signal /<br />
PCM (2ch) /<br />
Dolby Digital source / DIRECT<br />
DTS source /<br />
Other 2-channel digital signals<br />
DSD (2ch) DSD DIRECT (z)<br />
MULTI CH DIRECT<br />
M DIRECT + PLgx CINEMA<br />
PCM (multi ch)<br />
M DIRECT + PLgx MUSIC<br />
M DIRECT 7.1<br />
DSD (multi ch) DSD MULTI DIRECT (z)<br />
z : When DSD signals are converted to PCM signals as set by the<br />
audio parameters and speaker settings, “DIRECT” or “MULTI CH<br />
DIRECT” is displayed.<br />
For details, see page 79.<br />
Playback in the PURE DIRECT Mode<br />
This is the mode that recreates the original sound most<br />
faithfully, providing extremely high quality sound.<br />
Press the PURE DIRECT button on the main unit or the<br />
PURE button on the main remote control unit.<br />
ENGLISH<br />
• When in the PURE DIRECT mode, the GUI screen is not displayed<br />
and the display on the main unit is turned off.<br />
• If the HDMI input connector is selected, video outputs are output in<br />
the PURE DIRECT mode.<br />
• The channel level and surround parameters in the PURE DIRECT<br />
mode are the same as in the DIRECT mode.<br />
Getting Started Connections Setup<br />
Playback Remote Control Multi-Zone Information Troubleshooting
ENGLISH<br />
Getting Started Connections Setup<br />
Playback Remote Control Multi-Zone Information Troubleshooting<br />
Parameter<br />
Parameters can be called out directly by pressing the PARA button on<br />
the main remote control unit.<br />
Audio<br />
Adjust various audio parameters.<br />
F Menu tree F<br />
Parameter<br />
Audio<br />
a Surround Parameters<br />
s Tone<br />
d Room EQ<br />
f RESTORER<br />
g Night Mode<br />
h Audio Delay<br />
a Surround Parameters<br />
Adjust surround sound parameters.<br />
The adjustable parameters differ for the different surround<br />
modes (vpage 76, 77).<br />
Mode<br />
Select the mode according to the playback source.<br />
[Selectable items]<br />
In the PLgx or PLg mode:<br />
In the DTS NEO:6 mode:<br />
Cinema Music Game<br />
Pro Logic z<br />
Cinema Music<br />
z: Can be selected in the PLg mode.<br />
The “Music” mode is also effective for movie sources including a lot<br />
of stereo music.<br />
Cinema EQ<br />
Soften the treble range of movie soundtracks for better<br />
understanding.<br />
[Selectable items]<br />
DRC<br />
D.COMP<br />
Compress dynamic range (difference between loud and soft sounds).<br />
[Selectable items]<br />
LFE<br />
Adjust the low-frequency effects level (LFE).<br />
[Variable range]<br />
ON OFF<br />
Compress dynamic range (difference between loud and soft sounds).<br />
[Selectable items] Auto Low Middle High OFF<br />
This can be set in the Dolby TrueHD mode.<br />
OFF Low Middle High<br />
When playing DTS sources, this is only displayed for compatible<br />
software.<br />
–10dB ~ 0dB<br />
For proper playback of the different program sources, we recommend<br />
setting to the values below.<br />
• Dolby Digital sources: “0 dB”<br />
• DTS movie sources: “0 dB”<br />
• DTS music sources: “–10 dB”<br />
Center Image<br />
Assign center channel signal to front left and right channels for wider<br />
sound.<br />
[Variable range]<br />
Panorama<br />
Dimension<br />
Shift sound image center to front or rear, to adjust playback balance.<br />
[Variable range]<br />
Center Width<br />
Delay Time<br />
0 ~ 3 ~ 6<br />
Assign center channel signal to front left and right channels for wider<br />
sound.<br />
[Variable range]<br />
0 ~ 3 ~ 7<br />
Adjust delay time to control sound stage size.<br />
[Variable range]<br />
Effect<br />
0 ms ~ 30 ms ~ 300 ms<br />
Switch effect signal for multi-surround speakers on and off.<br />
[Selectable items]<br />
0.0 ~ 0.3 ~ 1.0<br />
Assign front L/R signal also to surround channels, for wider sound.<br />
[Selectable items]<br />
ON OFF<br />
ON OFF
Effect Level<br />
Adjust effect signal level.<br />
[Variable range]<br />
AFDM<br />
[Selectable items]<br />
1 ~ 10 ~ 15<br />
Set to a lower level if the positioning and sense of phase of the<br />
surround signals seems unnatural.<br />
Room Size<br />
Determine size of acoustic environment.<br />
[Selectable items]<br />
NOTE<br />
Small<br />
Auto-select surround mode by source.<br />
This function only works for software containing a special identification<br />
signal.<br />
If the software being played is recorded in Dolby Digital EX or DTS-ES,<br />
it is played in 6.1-channels. If not, it is played in 5.1-channels.<br />
ON OFF<br />
Medium small Medium<br />
Medium large Large<br />
“Room Size” does not indicate the size of the room in which sources<br />
are played.<br />
Example : Playing Dolby Digital software (with EX flag)<br />
• When “AFDM” is set to “ON”, the surround mode is automatically<br />
set to the DOLBY D + PLgx C mode.<br />
• To play in the DOLBY DIGITAL EX mode, set “AFDM” to “OFF” and<br />
“SB CH Out” to “MTRX ON”.<br />
Some Dolby Digital EX sources do not include EX flags. If the playback<br />
mode does not switch automatically even when “AFDM” is set to<br />
“ON”, set “SB CH Out” to “MTRX ON” or “PLgx CINEMA”.<br />
SB CH Out (for Multi-channel sources)<br />
Select playback mode for surround back channels.<br />
[Selectable items]<br />
z1 z2<br />
NON MTRX MTRX ON PLIIx CINEMA PLIIx MUSIC<br />
ES MTRX z3 ES DSCRT z4 DSCRT ON OFF<br />
z1: This can be selected when “Surround Back” is set to “2spkrs”<br />
at the GUI menu “Manual Setup” – “Speaker Setup” – “Speaker<br />
Configuration” setting (vpage 28).<br />
z2: This can be selected when “Surround Back” is set to “2spkrs”<br />
or “1spkr” at the GUI menu “Manual Setup” – “Speaker Setup”<br />
–“Speaker Configuration” setting.<br />
z3: This can be selected when playing DTS sources.<br />
z4: This can be selected when playing DTS sources including a<br />
discrete 6.1-channel signal identification signal.<br />
SB CH Out (for 2-channel sources)<br />
Determine whether to use surround back speakers.<br />
[Selectable items]<br />
Subwoofer Att.<br />
ON OFF<br />
Attenuate subwoofer level when using EXT. IN mode.<br />
[Selectable items]<br />
Set this to “ON” if the subwoofer channel level seems too high when<br />
playing Super Audio CD.<br />
Subwoofer<br />
Turn subwoofer output on and off.<br />
[Selectable items]<br />
Default<br />
ON OFF<br />
ON OFF<br />
Resets the settings to the default values.<br />
s Tone<br />
Adjust the tonal quality of the sound.<br />
Tone Defeat<br />
Turn tone adjustments off.<br />
[Selectable items]<br />
The tone cannot be adjusted when in the DIRECT mode.<br />
Bass<br />
Adjust low frequency range (bass).<br />
[Variable range]<br />
Treble<br />
ON OFF<br />
–6dB ~ +6dB<br />
Adjust high frequency range (treble).<br />
[Variable range]<br />
–6dB ~ +6dB<br />
“Bass” and “Treble” can be set when “Tone Defeat” is set to “OFF”.<br />
ENGLISH<br />
Getting Started Connections Setup<br />
Playback Remote Control Multi-Zone Information Troubleshooting
ENGLISH<br />
Getting Started Connections Setup Playback Remote Control Multi-Zone Information Troubleshooting<br />
d Room EQ<br />
Select room equalizer for current environment.<br />
[Selectable items]<br />
Audyssey<br />
Operating from the main unit or main remote<br />
control unit<br />
Press the ROOM EQ button on the main unit or the EQ button on the<br />
main remote control.<br />
OFF<br />
Manual<br />
: Optimize frequency response of all speakers.<br />
Audyssey Byp. L/R : Optimize frequency response of speakers<br />
except front L and R speakers.<br />
Audyssey Flat<br />
Manual<br />
OFF<br />
: Optimize frequency response of all speakers to<br />
flat response.<br />
: Apply frequency response set with “Manual<br />
EQ” (vpage 31).<br />
: Turn equalizer off.<br />
Audyssey Audyssey Byp. L/R<br />
Audyssey Flat<br />
When “Audyssey” is selected, “ ” lights.<br />
When “Audyssey Byp. L/R” or “Audyssey Flat” is selected, or when<br />
the auto setup measuring results have changed, “ ” lights.<br />
• “Audyssey”, “Audyssey Byp. L/R” and “Audyssey Flat” can be<br />
selected after the auto setup procedure has been performed.<br />
• If the settings of the speakers for which “None” has been determined<br />
at “Auto Setup” are changed, “Audyssey”, “Audyssey Byp. L/R” and<br />
“Audyssey Flat” cannot be selected and measurements have to be<br />
taken again to include the newly-added speakers.<br />
• When using headphones, “Room EQ” is always set to “OFF”.<br />
f RESTORER<br />
This function restores compressed audio signals to how<br />
they were before compression and corrects the sense of<br />
volume of the bass and treble to obtain richer playback<br />
sound.<br />
[Selectable items]<br />
OFF<br />
Mode1 (RESTORER 64)<br />
Mode2 (RESTORER 96)<br />
Mode3 (RESTORER HQ)<br />
The default setting for “NET/USB” and “iPod” is “Mode3”. All others<br />
are set to “OFF”.<br />
Operating from the main unit or main remote<br />
control unit<br />
During playback, press the RESTORER button on the main unit or the<br />
RSTR button on the main remote control unit.<br />
When set to something other than “OFF”, “ ” is displayed.<br />
OFF<br />
Mode 1<br />
(RESTORER 64)<br />
Mode 3<br />
(RESTORER HQ)<br />
Mode 2<br />
(RESTORER 96)<br />
About the RESTORER function<br />
• Such compressed audio formats as MP3, WMA (Windows Media<br />
Audio) and MPEG-4 AAC reduce the amount of data by eliminating<br />
signal components that are hard for the human ear to hear. The<br />
RESTORER function generates the signals eliminated upon<br />
compression, restoring the sound to conditions near those of the<br />
original sound before compression. It also corrects the sense of<br />
volume of the bass to obtain richer sound with compressed audio<br />
signals.<br />
• This is displayed on the GUI menu and can be set when the input<br />
source is set to “NET/USB” or when analog signals (including AM/<br />
FM signals) or PCM signals (fs = 44.1/48 kHz) are input.<br />
g Night Mode<br />
Optimized setting for late-night listening.<br />
[Selectable items]<br />
OFF Low Middle High<br />
Operating from the main remote control unit<br />
Press the NGT button.<br />
The “ ” indicator lights when “Low”, “Middle” or “High” is<br />
selected.<br />
OFF<br />
h Audio Delay<br />
Compensate for mismatched timing between video and<br />
audio.<br />
Delay audio.<br />
This sets the delay time for audio signals.<br />
[Variable range]<br />
Low Middle<br />
High<br />
0 ms ~ 200 ms<br />
Operating from the main unit or main remote<br />
control unit<br />
q Press the AUDIO DELAY button on the main unit or the A. DL button<br />
on the main remote control unit.<br />
w Use the o p button to set.<br />
• This cannot be adjusted when playing in the EXT. IN, DIRECT or<br />
STEREO mode (with “Front” set to “Large”, “Tone Defeat” to “ON”<br />
and “Room EQ” to “OFF”.)<br />
• The adjustment range is 0 to 100 ms when the Auto Lipsync<br />
Correction function is activated.
Picture Adjust<br />
Adjust the picture quality.<br />
F Menu tree F<br />
Parameter<br />
Picture Adjust<br />
a Contrast<br />
s Brightness<br />
d Chroma Level<br />
f Hue<br />
a Contrast<br />
Adjust picture contrast.<br />
[Variable range]<br />
s Brightness<br />
Adjust picture brightness.<br />
[Variable range]<br />
–6 ~ 0 ~ +6<br />
0 ~ +12<br />
d Chroma Level<br />
Adjust picture chroma level (saturation).<br />
[Variable range]<br />
f Hue<br />
Adjust color hue.<br />
[Variable range]<br />
–6 ~ 0 ~ +6<br />
–6 ~ 0 ~ +6<br />
• Adjusting the “Contrast”, “Brightness”, “Chroma Level” and “Hue”<br />
settings does not affect the HDMI input signal.<br />
• “Hue” can be adjusted for composite video and S-Video signals.<br />
• The adjustment values are stored for the individual input sources.<br />
Information<br />
Status<br />
Shows information about current settings.<br />
F Menu tree F<br />
Information<br />
Status<br />
a MAIN ZONE<br />
s ZONE2/3<br />
a MAIN ZONE<br />
Shows information about settings for main zone.<br />
The items displayed differ according to the input source.<br />
[Items to be checked]<br />
Select Source Name Surround Mode Input Mode<br />
Assign Room EQ Video Select<br />
Night Mode RESTORER etc.<br />
Src Level Rec Select<br />
s ZONE2/3<br />
Shows information about settings for multi-zone.<br />
[Items to be checked]<br />
Power Select Source Volume Level<br />
Audio Input Signal<br />
Shows information about audio input<br />
signals.<br />
F Menu tree F<br />
Information<br />
Audio Input Signal<br />
[Items to be checked]<br />
Surround Mode : The currently set surround mode is displayed.<br />
Signal<br />
fs<br />
Format<br />
Offset<br />
Flag<br />
: The input signal type is displayed.<br />
ENGLISH<br />
: The input signal’s sampling frequency is<br />
displayed.<br />
: The number of channels in the input signal (front,<br />
surround, LFE) is displayed.<br />
: The dialogue normalization correction value is<br />
displayed.<br />
: “MATRIX” is displayed if the input signal has<br />
undergone matrix processing, “DISCRETE” if the<br />
input signal has undergone discrete processing.<br />
Dialogue normalization function<br />
This is automatically activated when playing Dolby Digital sources.<br />
This function automatically corrects the standard signal level for<br />
individual program sources.<br />
The correction value can be checked using the STATUS button on<br />
the main unit.<br />
The fi gure is the correction value when the standard level is<br />
corrected.<br />
Getting Started Connections Setup<br />
Playback Remote Control Multi-Zone Information Troubleshooting
ENGLISH<br />
Getting Started Connections Setup<br />
Playback Remote Control Multi-Zone Information Troubleshooting<br />
HDMI Information<br />
Shows information about HDMI input/output<br />
signals and monitor.<br />
F Menu tree F<br />
Information<br />
HDMI Information<br />
a Signal Information<br />
s Monitor<br />
a Signal Information<br />
The HDMI input/output signal information is displayed.<br />
[Items to be checked]<br />
Resolution Color Space Pixel Depth<br />
s Monitor<br />
The HDMI monitor information is displayed.<br />
[Items to be checked]<br />
Interface Supported resol.<br />
Auto Surround<br />
Shows information about auto surround<br />
mode settings.<br />
The surround mode for which the last<br />
memory function was used for the different<br />
input signal types is displayed.<br />
F Menu tree F<br />
Information<br />
Auto Surround<br />
[Items to be checked]<br />
Analog/PCM 2ch Digital 2ch Digital 5.1ch Multi ch<br />
Quick Select<br />
Shows information about quick select<br />
settings.<br />
F Menu tree F<br />
Information<br />
Quick Select<br />
[Items to be checked]<br />
1<br />
2<br />
3<br />
Select Source Input Mode Room EQ<br />
Auto Surround Mode setting Volume Level<br />
For instructions on storing settings at Quick Select 1 to 3, see page<br />
59.<br />
Preset Station<br />
Shows information about preset stations.<br />
F Menu tree F<br />
Information<br />
[Input source]<br />
Preset Station<br />
A<br />
B<br />
C<br />
D<br />
E<br />
F<br />
G<br />
[Items to be checked]<br />
TUNER NET/USB<br />
A1 ~ G8<br />
When the STATUS button on the main unit is pressed, the set’s status<br />
can be checked on the display.
SOURCE SELECT MASTER VOLUME Playback<br />
<br />
[ AMP]<br />
[POWER ON]<br />
[MUTE]<br />
[POWER OFF]<br />
MASTER VOLUME<br />
SOURCE SELECT<br />
About the button names in these explanations<br />
< > : Buttons on the main unit<br />
[ ] : Buttons on the remote control unit<br />
Button name only:<br />
Buttons on the main unit and remote control unit<br />
Preparations<br />
1 Press<br />
2 Press<br />
Turning the Power On<br />
.<br />
The power indicator lights red and the power is set to the standby<br />
mode.<br />
or [POWER ON].<br />
The power indicator fl ashes green and the power turns on.<br />
To operate the AVR-3808 using the main remote control unit, set the<br />
remote control unit to the AMP mode (vpage 60 “Remote Control<br />
Unit Operations”).<br />
Turning the Power Off<br />
q Press or [POWER OFF].<br />
The power is set to the standby mode.<br />
w Press .<br />
The power indicator turns off, and so does the power.<br />
NOTE<br />
Power continues to be supplied to some of the circuitry even when<br />
the power is in the standby mode. When leaving home for long periods<br />
of time or when traveling, either press to turn off the power,<br />
or unplug the power cord from the power outlet.<br />
Operations During Playback<br />
Adjusting the Master Volume<br />
Either turn or press [MASTER<br />
VOLUME].<br />
Turning Off the Sound Temporarily (Muting)<br />
Press [MUTE].<br />
Playing Video and Audio Equipment<br />
1 Prepare<br />
the equipment.<br />
q Load the DVD, CD or other software in the player.<br />
(vSee the operating instructions of the respective devices.)<br />
w To play a video device, switch the monitor input.<br />
(vSee the monitor’s operating instructions.)<br />
2 To<br />
operate using the main remote control unit, set the<br />
remote control unit to the AMP mode.<br />
(vpage 60 “Remote Control Unit Operations”)<br />
3Use 3<br />
: “Source Select” (vpage 37)<br />
4 Start<br />
SOURCE SELECT to select the input source.<br />
playback.<br />
(vSee the operating instructions of the respective devices.)<br />
ENGLISH<br />
To cancel, press [MUTE] again. Muting can also be canceled by adjusting<br />
the master volume.<br />
Listening with Headphones<br />
Plug the headphones into .<br />
The sound from the speakers and pre-out connectors is automatically<br />
cut.<br />
NOTE<br />
Be careful not to set the volume too high when using headphones.<br />
Basic Operation<br />
Getting Started Connections Setup Playback<br />
Remote Control Multi-Zone Information Troubleshooting
ENGLISH<br />
Getting Started Connections Setup Playback<br />
Remote Control Multi-Zone Information Troubleshooting<br />
<br />
<br />
[ TU]<br />
( mode)<br />
[A ~ G]<br />
[BAND]<br />
[MODE]<br />
[SEARCH]<br />
[CHANNEL]<br />
[TUNER]<br />
(AMP mode),<br />
[SHIFT]<br />
[df]<br />
[MEMO]<br />
[1 ~ 8]<br />
About the button names in these explanations<br />
< > : Buttons on the main unit<br />
[ ] : Buttons on the remote control unit<br />
Button name only:<br />
Buttons on the main unit and remote control unit<br />
Listening to FM/AM Broadcasts<br />
Basic Operation<br />
1Either turn or press [TUNER]<br />
1 (AMP mode) to select “TUNER”.<br />
: ”Source Select” (vpage 37)<br />
2 To<br />
3Press 4Tune operate using the main remote control unit, set the<br />
remote control unit to the TUNER ( ) mode.<br />
(vpage 60 “Remote Control Unit Operations”)<br />
[BAND] to select “FM” or “AM”.<br />
in the desired broadcast station.<br />
qTo tune in automatically (Auto Tuning)<br />
Press [MODE] to light the “AUTO” indicator on the display, then use<br />
[df] to select the station you want to hear.<br />
wTo tune in <strong>manual</strong>ly (Manual Tuning)<br />
Press [MODE] to turn off the display’s “AUTO” indicator, then use<br />
[df] to select the station you want to hear.<br />
• It is also possible to switch to “FM” or “AM” in step 1 by pressing<br />
[TUNER].<br />
• If the desired station cannot be tuned in with auto tuning, tune it in<br />
<strong>manual</strong>ly.<br />
• When tuning in stations <strong>manual</strong>ly, press and hold [df] to change<br />
frequencies continuously.<br />
• The time for which the GUI menus are displayed can be set at GUI<br />
menu “Manual Setup” – “Option Setup” – “GUI” – “Tuner” (vpage<br />
35).<br />
Presetting Radio Stations<br />
(Preset Memory)<br />
Your favorite broadcast stations can be preset so that you<br />
can tune them in easily. Up to 56 stations can be preset.<br />
1Tune 2Press 3Press in the broadcast station you want to preset.<br />
[MEMO].<br />
[A ~ G] to select the block in which the station is<br />
to be preset, then press [CHANNEL] or [1 ~ 8] to select<br />
the preset number.<br />
b The memory block can also be selected by pressing [SHIFT].<br />
4 Press<br />
[MEMO] again to complete the setting.<br />
• To preset other stations, repeat steps 1 to 4.<br />
• Stations can be preset automatically at GUI menu “Source Select”<br />
– “Tuner” – “Auto Preset” (vpage 37).<br />
NOTE<br />
Preset stations are erased by overwriting them.
Listening to Preset Stations<br />
Operation on the Main Unit<br />
Press , then turn <br />
to select the preset radio station.<br />
Operation on the Main Remote Control Unit<br />
1Press 2Press [A ~ G] to select the memory block.<br />
[CHANNEL] or [1 ~ 8] to select the desired preset<br />
channel.<br />
n Default settings<br />
Auto tuner presets<br />
A1 ~ A8<br />
B1 ~ B8<br />
C1 ~ C8 90.1 MHz<br />
D1 ~ D8 90.1 MHz<br />
E1 ~ E8 90.1 MHz<br />
F1 ~ F8 90.1 MHz<br />
G1 ~ G8 90.1 MHz<br />
87.5 / 89.1 / 98.1 / 108.0 / 90.1 / 90.1 / 90.1 /<br />
90.1 MHz<br />
522 / 603 / 999 / 1404 / 1611 kHz,<br />
90.1 / 90.1 / 90.1 MHz<br />
RDS (Radio Data System)<br />
RDS (works only on the FM band) is a broadcasting service<br />
which allows a station to send additional information along<br />
with the regular radio program signal.<br />
The following three types of RDS information can be<br />
received with this unit:<br />
Program Type (PTY)<br />
PTY identifies the type of RDS program.<br />
The program types and their displays are as follows:<br />
NEWS News<br />
AFFAIRS Current Affairs<br />
INFO Information<br />
SPORT Sports<br />
EDUCATE Education<br />
DRAMA Drama<br />
CULTURE Culture<br />
SCIENCE Science<br />
VARIED Varied<br />
POP M Pop Music<br />
ROCK M Rock Music<br />
EASY M<br />
Easy Listening<br />
Music<br />
LIGHT M Light Classical<br />
CLASSICS Serious Classical<br />
OTHER M Other Music<br />
Traffic Program (TP)<br />
WEATHER Weather<br />
FINANCE Finance<br />
CHILDREN<br />
Children’s<br />
programmes<br />
SOCIAL Social Affairs<br />
RELIGION Religion<br />
PHONE IN Phone In<br />
TRAVEL Travel<br />
LEISURE Leisure<br />
JAZZ Jazz Music<br />
COUNTRY Country Music<br />
NATION M National Music<br />
OLDIES Oldies Music<br />
FOLK M Folk Music<br />
DOCUMENT Documentary<br />
TP identifies programs that carry traffic announcements.<br />
This allows you to easily find out the latest traffic conditions in your<br />
area before leaving home.<br />
Radio Text (RT)<br />
RT allows RDS stations to send text messages that appear on the<br />
display.<br />
NOTE<br />
The operations described below using [SEARCH] will not function in<br />
areas in which there are no RDS broadcasts.<br />
1<br />
2To 3Press 4Press Either turn or press [TUNER]<br />
(AMP mode) to select “TUNER”.<br />
operate using the main remote control unit, set the<br />
remote control unit to the TUNER ( ) mode.<br />
(vpage 60 “Remote Control Unit Operations”)<br />
[SEARCH] to select “RDS”.<br />
[CHANNEL].<br />
The search for RDS stations begins automatically.<br />
b If no RDS stations are found with the above operation, all the<br />
reception bands are searched.<br />
b When a broadcast station is found, that station’s name appears on<br />
the display.<br />
5 To<br />
RDS Search<br />
Use this function to automatically tune to FM stations that<br />
provide the RDS service.<br />
continue searching, repeat steps 2 to 3.<br />
b If no RDS station is found when all the frequencies have been<br />
searched, “NO RDS” is displayed.<br />
ENGLISH<br />
Getting Started Connections Setup Playback<br />
Remote Control Multi-Zone Information Troubleshooting
ENGLISH<br />
Getting Started Connections Setup Playback Remote Control Multi-Zone Information Troubleshooting<br />
0<br />
<br />
uiop<br />
[ TU]<br />
( mode)<br />
uiop<br />
[SEARCH]<br />
[CHANNEL]<br />
About the button names in these explanations<br />
< > : Buttons on the main unit<br />
[ ] : Buttons on the remote control unit<br />
Button name only:<br />
Buttons on the main unit and remote control unit<br />
[ AMP]<br />
[POWER<br />
OFF]<br />
[iPod]<br />
[TUNER]<br />
1Either 2To 3Press 4Watching 5Press turn or press [TUNER]<br />
(AMP mode) to select “TUNER”.<br />
operate using the main remote control unit, set the<br />
remote control unit to the TUNER ( ) mode.<br />
(vpage 60 “Remote Control Unit Operations”)<br />
[SEARCH] to select “PTY”.<br />
the display, press ui to call out the desired<br />
program type.<br />
[CHANNEL].<br />
PTY search begins automatically.<br />
b If there is no station broadcasting the designated program type<br />
with the above operation, all the reception bands are searched.<br />
b The station name is displayed on the display after searching<br />
stops.<br />
6 To<br />
PTY Search<br />
Use this function to find RDS stations broadcasting a<br />
designated program type (PTY).<br />
For a description of each program type, refer to “Program<br />
Type (PTY)”. 1<br />
continue searching, repeat steps 2 to 4.<br />
b If no station broadcasting the designated program type is found<br />
when all the frequencies have been searched, “NO PROGRAMME”<br />
is displayed.<br />
2 To<br />
3Press 4Press Either turn or press [TUNER]<br />
(AMP mode) to select “TUNER”.<br />
operate using the main remote control unit, set the<br />
remote control unit to the TUNER ( ) mode.<br />
(vpage 60 “Remote Control Unit Operations”)<br />
[SEARCH] to select “TP”.<br />
[CHANNEL].<br />
TP search begins automatically.<br />
b If no TP station is found with the above operation, all the reception<br />
bands are searched.<br />
b The station name is displayed on the display after searching<br />
stops.<br />
5 To<br />
TP Search<br />
Use this function to find RDS stations broadcasting traffic<br />
programs (TP stations).<br />
continue searching, repeat steps 2 to 3.<br />
b If no other TP station is found when all the frequencies have been<br />
searched, “NO PROGRAMME” is displayed.
1Either 2To 3 Press<br />
RT (Radio Text)<br />
“RT” appears on the display when radio text data is<br />
received.<br />
turn or press [TUNER]<br />
(AMP mode) to select “TUNER”.<br />
operate using the main remote control unit, set the<br />
remote control unit to the TUNER ( ) mode.<br />
(vpage 60 “Remote Control Unit Operations”)<br />
[SEARCH] to select “RT”.<br />
b While receiving an RDS broadcast station, the text data broadcast<br />
from the station is displayed.<br />
b To turn the display off, press op.<br />
b If no text data is being broadcast, “NO TEXT DATA” is displayed.<br />
iPod® Playback<br />
The music on an iPod can be played by using the Control<br />
Dock for iPod (ASD-1R, sold separately).<br />
The operation can also be performed using the buttons on<br />
the main unit or remote control unit while watching the GUI<br />
menus.<br />
iPod is a trademark of Apple Inc., registered in the U.S.<br />
and other countries.<br />
b The iPod may only be used to copy or play contents that are not<br />
copyrighted or contents for which copying or playback is legally<br />
permitted for your private use as an individual. Be sure to comply<br />
with applicable copyright legislation.<br />
1 Make<br />
the necessary preparations.<br />
qSet the iPod in the DENON Control Dock for iPod.<br />
(vSee the Control Dock for iPod’s operating instructions.)<br />
w Assign the Control Dock for iPod’s input.<br />
2 Either<br />
: ”Source Select” – “(input source)” – “Assign”–<br />
”iPod dock” (vpage 39)<br />
turn or press [iPod] (AMP<br />
mode) to select the input source assigned in step 1-w<br />
above.<br />
(iPod screen)<br />
b If the screens above are not displayed, the iPod may not be<br />
3 To<br />
Basic Operation<br />
OK to disconnect.<br />
properly connected. Try connecting again.<br />
: ”Source Select” – “(input source)” – “Play”<br />
(vpage 37)<br />
operate using the main remote control unit, set the<br />
remote control unit to the iPod mode.<br />
(vpage 60 “Remote Control Unit Operations”)<br />
NOTE<br />
ENGLISH<br />
• With the default settings, the iPod can be used connected to the VCR<br />
(iPod) connector.<br />
• Use the RESTORER mode to expand the low and high frequency<br />
components of compressed audio fi les and achieve a richer sound.<br />
The default setting is “Mode3”.<br />
• Press or [POWER OFF] and set the AVR-3808’s power<br />
to the standby mode before disconnecting the iPod. Also switch<br />
the input source to one to which the GUI menu “iPod dock” is not<br />
assigned before disconnecting the iPod.<br />
• Depending on the type of iPod and the software version, some<br />
functions may not operate.<br />
• DENON will accept no responsibility whatsoever for any loss of iPod<br />
data.<br />
Getting Started Connections Setup Playback<br />
Remote Control Multi-Zone Information Troubleshooting
ENGLISH<br />
Getting Started Connections Setup Playback Remote Control Multi-Zone Information Troubleshooting<br />
ENTER<br />
[SEARCH]<br />
[CHANNEL+/–]<br />
uiop<br />
ENTER<br />
(Main remote control unit)<br />
<br />
[ iPod]<br />
[8], [9],<br />
[6], [7],<br />
[1], [2]<br />
uiop<br />
[2] [1/3]<br />
[8]<br />
[9]<br />
[REPEAT] [RANDOM]<br />
(Sub remote control unit)<br />
About the button names in these explanations<br />
< > : Buttons on the main unit<br />
[ ] : Buttons on the remote control unit<br />
Button name only:<br />
Buttons on the main unit and remote control unit<br />
1Use 2Press Listening to Music<br />
ui to select the menu, then press ENTER or p<br />
to select the music fi le to be played.<br />
ENTER or p.<br />
Playback starts.<br />
Stopping playback temporarily<br />
During playback, press ENTER or [1].<br />
Press again to resume playback.<br />
Fast-forwarding or fast-reversing<br />
During playback, either press and hold u (to fast-reverse) or i (to fastforward),<br />
or press [6] or [7].<br />
To cue to the beginning of a track<br />
During playback, either press u (to cue to the previous track) or i (to<br />
cue to the next track), or press [8] or [9].<br />
To stop<br />
During playback, either press and hold ENTER or press [2].<br />
Playing repeatedly<br />
Press [CHANNEL –] or [REPEAT] on the sub remote control unit.<br />
[Selectable items] All One OFF<br />
: ”Source Select” – “(input source)” –<br />
”Playback Mode (iPod)” – “Repeat” (vpage 39)<br />
Shuffling playback<br />
Press [CHANNEL +] or [RANDOM] on the sub remote control unit.<br />
[Selectable items] Albums Songs OFF<br />
: ”Source Select” – “(input source)” –<br />
”Playback Mode (iPod)” – “Shuffl e” (vpage 39)<br />
Searching up or down pages<br />
Press [SEARCH], then press o (down) or p (up).<br />
To cancel, press ui or [SEARCH].<br />
To switch between the Browse and Remote modes<br />
Either press and hold [SEARCH].<br />
• The title name, artist name and album name can be checked by<br />
pressing during playback.<br />
• On the AVR-3808, folder and fi le names can be displayed as titles. Any<br />
characters that cannot be displayed are replaced with “ . (period)”.<br />
• The time for which the GUI menus are displayed can be set at GUI<br />
menu “Manual Setup” – “Option Setup” – “GUI” – “iPod” (vpage<br />
35).<br />
Viewing Still Pictures or Videos on the<br />
iPod<br />
Photo and video data on the iPod can be viewed on the<br />
monitor. (Only for iPod equipped with slideshow or video<br />
functions.)<br />
1Press 2Watching 3Press and hold [SEARCH] to set the Remote mode.<br />
the iPod’s screen, use ui to select<br />
“Photos” or “Video”.<br />
ENTER until the image you want to view is<br />
displayed.<br />
“TV Out” at the iPod’s “Slideshow Settings” or “Video Settings” must<br />
be set to “On” in order to display the iPod’s photo data or videos on<br />
the monitor. For details, see the iPod’s operating instructions.
Playing Network Audio or USB<br />
Memory Devices<br />
This procedure can be used to play Internet radio stations or<br />
music files stored on a computer or USB memory device.<br />
n About the Internet radio function<br />
• Internet radio refers to radio broadcasts distributed over the<br />
Internet. Internet radio stations from around the world can be<br />
tuned in.<br />
The AVR-3808 is equipped with the following Internet radio<br />
functions:<br />
· Stations can be selected by genre and region.<br />
· Up to 56 Internet radio stations can be preset.<br />
· Internet radio stations in MP3 and WMA (Windows Media Audio)<br />
format can be listened to.<br />
· Your favorite radio stations can be registered by accessing an<br />
exclusive DENON Internet radio URL from a Web browser on a<br />
computer.<br />
b The function is managed for individual <strong>user</strong>s, so you must<br />
provide your MAC or e-mail address.<br />
Exclusive URL: http://www.radiodenon.com<br />
b The radio station database service may be suspended without<br />
notice.<br />
• The AVR-3808’s Internet radio station list is created using a radio<br />
station database service (vTuner). This database service provides a<br />
list edited and created for the AVR-3808.<br />
vTuner services may be discontinued without notice.<br />
n Music server<br />
This function lets you play music files and playlists (m3u, wpl)<br />
stored on a computer (music server) connected to the AVR-3808<br />
via a network.<br />
With the AVR-3808’s network audio playback function, connection<br />
to the server is possible using one of the technologies below.<br />
· Windows Media Player Network Sharing Service<br />
· Windows Media DRM10<br />
Installing Windows Media Player ver. 11<br />
q If Windows XP Service Pack 2 has not yet been installed, either<br />
download it free of charge from Microsoft or install it via a<br />
Windows update installer.<br />
w Download the latest version of Windows Media Player ver.<br />
11, either directly from Microsoft or using a Windows update<br />
installer.<br />
b When using Windows Vista, there is no need to download a new<br />
version of Windows Media Player.<br />
n USB memory devices<br />
A USB memory device can be connected to the AVR-3808’s USB<br />
port to play music files stored on the USB memory device.<br />
· Only USB memory devices conforming to mass storage class and<br />
MTP (Media Transfer Protocol) standards can be played on the<br />
AVR-3808.<br />
· The AVR-3808 is compatible with USB memory devices in<br />
“FAT16” or “FAT32” format.<br />
[Compatible formats]<br />
Internet<br />
radio<br />
Music serverb USBb WMA (Windows<br />
Media Audio)<br />
S S Sz MP3 (MPEG-1<br />
Audio Layer-3)<br />
S S S<br />
WAVz – S S<br />
MPEG-4 AAC – Sz Sz FLAC (Free<br />
Lossless Audio<br />
Codec)<br />
– S S<br />
A server or server software compatible with distribution in the<br />
corresponding formats is required to play music files via a network.<br />
z: Only files that are not protected by copyright can be played on the<br />
AVR-3808.<br />
Contents downloaded from pay sites on the Internet are copyright<br />
protected. Also, files encoded in WMA format when ripped from a<br />
CD, etc., on a computer may be copyright protected, depending on<br />
the computer’s settings.<br />
b Music server and USB<br />
· The AVR-3808 is compatible with MP3 ID3-Tag (Ver. 2) standards.<br />
· The AVR-3808 is compatible with WMA META tags.<br />
ENGLISH<br />
[Playable formats]<br />
Sampling<br />
frequency<br />
Bit rate Extension<br />
WMA (Windows<br />
Media Audio)<br />
32/44.1/48 kHz 48~192 kbps .wma<br />
MP3 (MPEG-1<br />
Audio Layer-3)<br />
32/44.1/48 kHz 32~320 kbps .mp3<br />
WAV 32/44.1/48 kHz – .wav<br />
MPEG-4 AAC<br />
FLAC (Free<br />
32/44.1/48 kHz 16~320 kbps .aac/.m4a/.mp4<br />
Lossless Audio<br />
Codec)<br />
32/44.1/48 kHz – .flac<br />
WAV format Quantization bit rate: 16 bits. Playback<br />
Getting Started Connections Setup Remote Control Multi-Zone Information Troubleshooting
ENGLISH<br />
Getting Started Connections Setup Playback<br />
Remote Control Multi-Zone Information Troubleshooting<br />
uiop<br />
[ NET/DTU]<br />
( mode)<br />
[A ~ G]<br />
ENTER<br />
[SEARCH]<br />
[1 ~ 8]<br />
ENTER<br />
[MEMO]<br />
uiop<br />
[NET/USB]<br />
(AMP mode)<br />
About the button names in these explanations<br />
< > : Buttons on the main unit<br />
[ ] : Buttons on the remote control unit<br />
Button name only:<br />
Buttons on the main unit and remote control unit<br />
1 Make<br />
the necessary preparations.<br />
q Check the network environment, then turn on the AVR-3808’s<br />
power. (vpage 20 “Network Audio”)<br />
w If settings are required, make the network settings.<br />
(vpage 32, 33 “Network Setup”)<br />
e Prepare the computer. (vComputer’s operating instructions)<br />
Install “Windows Media Player ver. 11”.<br />
2Either turn or press [NET/USB]<br />
2 (AMP mode) to select “NET/USB”.<br />
: “Source Select” –“NET/USB” –“Play”<br />
(vpage 37)<br />
3 To<br />
4Use 5Press Basic Operation<br />
operate using the main remote control unit, set the<br />
remote control unit to the NET/DTU ( ) mode.<br />
(vpage 60 “Remote Control Unit Operations”)<br />
ui to select the menu, then press ENTER or p<br />
to select the fi le you want to play.<br />
ENTER or p.<br />
Playback starts.<br />
Stopping playback temporarily<br />
During playback, press ENTER.<br />
Press again to resume playback.<br />
To stop<br />
During the play or pause mode, press and hold ENTER.<br />
Searching up or down pages<br />
Press [SEARCH], then press o (down) or p (up).<br />
To cancel, press ui or [SEARCH].<br />
Searching by first letter (Character search)<br />
This operation is convenient for choosing items from the menu screens<br />
for Internet radio stations or fi les stored on the computer.<br />
q When the menu screen is displayed, press [SEARCH] twice.<br />
w Use o p to select the fi rst letter you want to search for.<br />
If there are multiple items starting with the selected letter, they are<br />
displayed in alphabetical order.<br />
If it is not possible to search the list, “Unsorted list...” is displayed.<br />
• Use the RESTORER mode to expand the low and high frequency<br />
components of compressed audio fi les and achieve a richer sound.<br />
The default setting is “Mode3”.<br />
• The time for which the GUI menus are displayed can be set at GUI<br />
menu “Manual Setup” – “Option Setup” – “GUI” – “NET/USB”<br />
(vpage 35).<br />
• The display can be switched between the artist name, track name,<br />
album name.<br />
1Use 2Use 3 Use<br />
Listening to Internet Radio<br />
ui to select “Internet Radio”, then press ENTER<br />
or p.<br />
ui to select the item you want to play, then<br />
press ENTER or p.<br />
The station list is displayed.<br />
ui to select the station, then press ENTER or<br />
p.<br />
Playback starts once buffering reaches “100%”.<br />
• There are many Internet radio stations on the Internet, and the<br />
quality of the programs they broadcast as well as the bit rate of the<br />
tracks varies widely.<br />
Generally, the higher the bit rate, the higher the sound quality, but<br />
depending on the communication lines and server traffi c, the music<br />
or audio signals being streamed may be interrupted.<br />
Inversely, lower bit rates mean a lower sound quality but less<br />
tendency for the sound to be interrupted.<br />
• “Server Full” or “Connection Down” is displayed if the station is<br />
busy or not broadcasting.<br />
• On the AVR-3808, folder and fi le names can be displayed as titles. Any<br />
characters that cannot be displayed are replaced with “ . (period)”.
Recently Played Internet Radio Stations<br />
Recently played internet radio stations can be selected from “Recently<br />
Played” in top menu.<br />
1Use 2Use 1While 2Use 3Press ui to select “Recently Played”, then press<br />
ENTER or p.<br />
ui to select the item you want to play, then<br />
press ENTER or p.<br />
NOTE<br />
Up to 20 stations stored in “Recently Played”.<br />
Presetting Internet Radio Stations<br />
Preset Internet radio stations can be selected directly.<br />
the Internet radio station you want to preset is<br />
playing, press [MEMO].<br />
ui to select “Preset”, then press ENTER.<br />
[A ~ G], then press [1 ~ 8] to select the desired<br />
preset number.<br />
The Internet radio station is now preset.<br />
NOTE<br />
If registered at a number that has already been preset, the previously<br />
registered setting is cleared.<br />
Listening to Preset Internet Radio Stations<br />
With the input source set to “NET/USB”, press [A ~ G],<br />
then press [1 ~ 8].<br />
The AVR-3808 automatically connects to the Internet and playback<br />
begins.<br />
Registering Internet Radio Stations as<br />
Your Favorites<br />
Favorites are listed at the top of the menu screen, so<br />
when a station is registered as a favorite it can be tuned<br />
in easily.<br />
1Press 2Use 3Press [MEMO] while the Internet radio station you<br />
want to register is playing.<br />
ui to select “Favorites”, then press ENTER.<br />
o to select “Yes”.<br />
The Internet radio station is registered.<br />
If you do not want to register it, press p.<br />
Listening to Internet Radio Stations Registered in<br />
Your Favorites<br />
ui to select “Favorites”, then press ENTER or<br />
p.<br />
1Use 2Use ui to select the Internet radio station, then<br />
press ENTER or p.<br />
The AVR-3808 automatically connects to the Internet and<br />
playback begins.<br />
Clearing Internet Radio Stations from Your Favorites<br />
ui to select “Favorites”, then press ENTER or<br />
p.<br />
1Use 2Use 3Press ui to select the Internet radio station you want<br />
to clear, then press [MEMO].<br />
o to select “Delete”.<br />
The selected Internet radio station is cleared.<br />
To cancel the operation without clearing the station, press p.<br />
Playing Files Stored on a Computer<br />
Use this procedure to play music files or playlists.<br />
1 Use<br />
2Use 3Use ui to select the host name of the computer on<br />
which the music file you want to play is located, then<br />
press ENTER or p.<br />
ui to select the search item or folder, then press<br />
ENTER or p.<br />
ui to select the file, then press ENTER or p.<br />
Playback starts once buffering reaches “100%”.<br />
Selecting tracks<br />
During playback, either press u (previous track) or i (next track).<br />
Playing files that have been Preset or Registered in<br />
Your Favorites<br />
ENGLISH<br />
• Connections to the required system and specific settings must be<br />
made in order to play music files (vpage 20).<br />
• Before starting, you must launch the computer’s server software<br />
and set the files as server contents. For details, see the operating<br />
instructions of your server software.<br />
Files can be preset, registered in your favorites and played using the<br />
same operations as for Internet radio stations.<br />
NOTE<br />
• Presettings are erased by overwriting them.<br />
• When the operation described below is performed, the music<br />
server’s database is updated and it may no longer be possible to play<br />
preset or favorite music files.<br />
• When you quit the music server and then restart it.<br />
• When music files are deleted or added on the music server.<br />
Getting Started Connections Setup Playback<br />
Remote Control Multi-Zone Information Troubleshooting
ENGLISH<br />
Getting Started Connections Setup Playback<br />
Remote Control Multi-Zone Information Troubleshooting<br />
Surround mode<br />
INPUT MODE<br />
ENTER<br />
[RANDOM]<br />
[REPEAT]<br />
INPUT MODE<br />
ENTER<br />
uip<br />
(Main remote control unit)<br />
(Sub remote control unit)<br />
Surround mode<br />
uip<br />
[USB]<br />
About the button names in these explanations<br />
< > : Buttons on the main unit<br />
[ ] : Buttons on the remote control unit<br />
Button name only:<br />
Buttons on the main unit and remote control unit<br />
Playing Files Stored on USB Memory<br />
Devices<br />
Only USB memory devices conforming to mass storage<br />
class and MTP (Media Transfer Protocol) standards can be<br />
played on the AVR-3808.<br />
Basic Operation<br />
1<br />
1Make •<br />
2Use 3Use 4Use the necessary preparations.<br />
• Set the USB port to be used.<br />
: “Source Select” – “NET/USB” –<br />
“Playback Mode” – “USB Select” (vpage 40)<br />
• Connect the USB memory device to the set USB port.<br />
ui to select “USB”, then press ENTER or p.<br />
ui to select the search item or folder, then press<br />
ENTER or p.<br />
ui to select the fi le, then press ENTER or p.<br />
Playback starts once buffering reaches “100%”.<br />
By default, the front panel’s USB port will be used.<br />
Playing repeatedly<br />
Press [REPEAT] on the sub remote control unit.<br />
[Selectable items] All One OFF<br />
: “Source Select” – “NET/USB” –<br />
“Playback Mode” – “Repeat” (vpage 40)<br />
Playing in random order<br />
Press [RANDOM] on the sub remote control unit.<br />
[Selectable items] ON OFF<br />
: “Source Select” – “NET/USB” –<br />
“Playback Mode” – “Random” (vpage 40)<br />
Selecting tracks<br />
During playback, either press u (previous track) or i (next track).<br />
• If the USB memory device is divided into multiple partitions, only the<br />
top partition can be selected.<br />
• The AVR-3808 is compatible with MP3 fi les conforming to “MPEG-1<br />
Audio Layer-3” standards.<br />
• If [USB] on the sub remote control unit is pressed when the USB<br />
memory device or folder is selected, all the tracks on the USB<br />
memory device or in the folder are played.<br />
NOTE<br />
• The AVR-3808 is equipped with two USB ports, one each on the<br />
front and rear panels. It is not possible to use the set with USB<br />
memory devices connected to both the ports at the same time.<br />
Select the USB port you want to use at the “Source Select” – “NET/<br />
USB” – “Playback Mode” – “USB Select” menu.<br />
• DENON will accept no responsibility whatsoever for any loss or<br />
damage to data on USB memory devices when using the USB<br />
memory device connected to the AVR-3808.<br />
• USB memory devices will not work via a USB hub.<br />
• DENON does not guarantee that all USB memory devices will operate<br />
or receive power. When using a USB connection type portable hard<br />
disk of the type for which power can be supplied by connecting an<br />
AC adapter, we recommend using the AC adapter.<br />
• It is not possible to connect and use a computer via the AVR-3808’s<br />
USB port using a USB cable.<br />
• The AVR-3808 is not compatible with the iPod shuffl e.
Operating the AVR-3808 Using a Browser<br />
(Web control)<br />
This function lets you operate the AVR-3808 using Internet<br />
Explorer.<br />
1Check the AVR-3808’s IP address.<br />
1<br />
: “Manual Setup” – “Network Setup” –<br />
2 Input<br />
“Network Information” (vpage 33)<br />
the AVR-3808’s IP address in Internet<br />
Explorer.<br />
The AVR-3808 can be operated in the same way as with regular<br />
Internet browsing.<br />
To use the web control function, set the GUI menu “Manual Setup”–<br />
“Network Setup” – “Other” – “Power Saving” setting to “OFF”<br />
(vpage 33).<br />
Other Operations and<br />
Functions<br />
Other Operations<br />
1Assign 2Either 3 Use<br />
4Select 5Start Playing Super Audio CD<br />
“DENON LINK” or “HDMI” at the “Digital”<br />
or “HDMI” setting (vpage 39).<br />
turn or press [SOURCE<br />
SELECT] to select the input source assigned in step 1.<br />
The “ ” or “ ” indicator lights on the display.<br />
INPUT MODE to select the input mode (vpage<br />
38).<br />
Select the input mode according to the program source to be<br />
played.<br />
the surround mode (vpage 40, 41).<br />
We recommend playing in the DIRECT mode.<br />
playing the Super Audio CD.<br />
The “ ” indicator lights on the display.<br />
For operating instructions, refer to the respective equipment’s<br />
operating instructions.<br />
• When playing DSD signals in the DIRECT or PURE DIRECT mode,<br />
the DSD signals are converted as such into analog signals. When<br />
playing in other surround modes, the DSD signals are fi rst converted<br />
into PCM format, then into analog signals.<br />
• “DSD DIRECT” is shown on the display when playing DSD 2-channel<br />
signals in the DIRECT mode. “DSD MULTI DIRECT” is shown on<br />
the display when playing DSD multi--channel signals in the DIRECT<br />
mode.<br />
ENGLISH<br />
Getting Started Connections Setup Playback Remote Control Multi-Zone Information Troubleshooting
ENGLISH<br />
Getting Started Connections Setup Playback<br />
Remote Control Multi-Zone Information Troubleshooting<br />
<br />
uiop<br />
CH SELECT<br />
<br />
QUICK SELECT<br />
CH SELECT<br />
QUICK SELECT<br />
uiop<br />
About the button names in these explanations<br />
< > : Buttons on the main unit<br />
[ ] : Buttons on the remote control unit<br />
Button name only:<br />
Buttons on the main unit and remote control unit<br />
Recording on an External Device<br />
(REC OUT mode)<br />
You can listen to one program source while recording a<br />
different program source.<br />
1 Press<br />
2 Turn<br />
3Turn 4Play 5 Start<br />
.<br />
“ZONE2 SOURCE” is shown on the display.<br />
ZONE2 SOURCE ZONE2 TUNER ···· ZONE2 NET/USB<br />
RECOUT NET/USB ···· RECOUT TUNER RECOUT SOURCE<br />
until “RECOUT SOURCE”<br />
is displayed.<br />
The “ ” indicator lights.<br />
to choose the input source<br />
to be recorded.<br />
the program source.<br />
For operating instructions, refer to the respective equipment’s<br />
operating instructions.<br />
To record FM or AM broadcasts, select the broadcast (vpage<br />
48).<br />
recording.<br />
For operating instructions, refer to the respective equipment’s<br />
operating instructions.<br />
• To cancel, press , then turn <br />
until “ZONE2 SOURCE” is displayed.<br />
• Make a test recording before starting the actual recording.<br />
• Signals are only output to the analog REC OUT connectors when<br />
the digital signals input to the digital input connectors (OPTICAL/<br />
COAXIAL) are PCM (2-channel) signals.<br />
• Digital audio signals input to the DENON LINK or HDMI connectors<br />
are not output to the REC OUT connectors, so connect using the<br />
OPTICAL or COAXIAL connectors.<br />
• Sources selected with the REC OUT mode are output from ZONE2<br />
as well.<br />
• In the REC OUT mode, the remote control unit’s ZONE2 mode<br />
buttons cannot be operated.<br />
• The network audio signals (Internet radio, music server, USB) are not<br />
output if they are copyright-protected.<br />
NOTE<br />
• Recordings you make are for your personal enjoyment and should<br />
not be used for other purposes without permission of the copyright<br />
holder.<br />
• When “DENON LINK” is assigned at the GUI menu “Assign” setting,<br />
the PCM signals, network audio signals (Internet radio, music server<br />
and USB), input from the digital input connectors cannot be output<br />
from the analog REC OUT connectors.<br />
• Input sources for which “Delete” is selected at “Source Delete”<br />
cannot be selected.
Convenient Functions<br />
Channel Level<br />
You can adjust the channel level either according to the<br />
playback sources or to suit your taste, as described<br />
below.<br />
1Press 2Use 3 Use<br />
1Press 2Press 3Use CH SELECT.<br />
ui or CH SELECT to select the speaker.<br />
The speaker that can be set switches each time one of the<br />
buttons is pressed.<br />
o p to adjust the volume.<br />
b “OFF” can be set by pressing o when the subwoofer’s volume is<br />
set to –12 dB.<br />
Fader Function<br />
This function lets you adjust (fade) the sound from all the<br />
front or rear speakers at once.<br />
CH SELECT.<br />
ui or CH SELECT to select “Fader”.<br />
o p to adjust the volume of the speakers.<br />
(o: front, p: rear)<br />
• The fader function does not affect the subwoofer.<br />
• The fader can be adjusted until the volume of the speaker adjusted<br />
to the lowest value is –12 dB.<br />
Quick Select Function<br />
With this function, the currently playing input source, input<br />
mode, surround mode, room EQ settings and volume can<br />
be stored in the memory.<br />
1 Set<br />
2 Press<br />
the input source, input mode, surround mode,<br />
room EQ settings and volume to the conditions you<br />
want to store.<br />
and hold the desired QUICK SELECT.<br />
Keep pressing the button until the quick select indicator lights.<br />
Input Source Volume<br />
Quick Select 1 DVD –40 dB<br />
Quick Select 2 TV/CBL –40 dB<br />
Quick Select 3 VCR –40 dB<br />
• To call out the settings, press QUICK SELECT at which the desired<br />
settings were stored.<br />
• The Quick Select name can be changed (vpage 35).<br />
NOTE<br />
[Quick Select Defaults]<br />
Input sources stored with the quick select function cannot be selected<br />
if they have been deleted at GUI menu “Manual Setup” – “Option<br />
Setup” – “Source Delete” (vpage 34). In this case, store them<br />
again.<br />
Personal Memory Plus Function<br />
This function sets the settings (input mode, surround<br />
mode, etc.) last selected for the individual input sources.<br />
When you switch to an input source, the settings are<br />
automatically set to the ones that were set the last time<br />
that input source was used.<br />
The surround parameters, tone control, room EQ settings and the<br />
volumes of the different speakers are stored for the individual surround<br />
modes.<br />
Last Function Memory<br />
This stores the settings as they were directly before the<br />
standby mode was set.<br />
When the power is turned back on, the settings are<br />
restored to as they were directly before the standby mode<br />
was set.<br />
Backup Memory<br />
The various settings are backed up for about 1 week,<br />
even if the power is turned off or the power cord is<br />
disconnected.<br />
Resetting the Microprocessor<br />
Perform this procedure if the display is abnormal or if<br />
operations cannot be performed.<br />
When the microprocessor is reset, all the settings are<br />
reset to their default values.<br />
1Turn 2Press 3Once off the power using .<br />
while simultaneously pressing<br />
and .<br />
the display starts flashing at intervals of about 1<br />
second, release the two buttons.<br />
ENGLISH<br />
If in step 3 the display does not flash at intervals of about 1 second,<br />
start over from step 1.<br />
Getting Started Connections Setup Playback<br />
Remote Control Multi-Zone Information Troubleshooting
ENGLISH<br />
Getting Started Connections Setup Playback Remote Control<br />
Multi-Zone Information Troubleshooting<br />
Remote Control Unit Operations<br />
Main Remote Control Unit<br />
• On the main remote control unit, the display switches<br />
according to the device being operated and the mode.<br />
• In modes other than iPod, the mode switches between<br />
“ ” and “ ” each time the [MODE SELECTOR] is<br />
pressed.<br />
• In the AMP, TUNER, NET/DTU and iPod modes, when the<br />
remote ID is set, the AVR-3808 can be used independently<br />
even in an environment containing multiple DENON<br />
amplifiers.<br />
Depending on the model and year of manufacture of your equipment,<br />
some buttons may not operate.<br />
NOTE<br />
The device mode (“ ” or “ ”) cannot be changed while the<br />
setting is being made.<br />
0<br />
[ AMP]<br />
[HOME]<br />
[NUMBER]<br />
Signal transmission<br />
indicator<br />
[MODE SELECTOR]<br />
[RC SETUP]<br />
1 Press<br />
Operating DENON Audio Components<br />
[MODE SELECTOR] for the component to be<br />
operated.<br />
The indicator for the component to be operated flashes.<br />
: AMP / ZONE2 / ZONE3 /<br />
ZONE4 / SYSTEM CALL<br />
: TUNER (FM/AM)<br />
: NETWORK/USB /<br />
DIGITAL TUNER<br />
: Satellite Receiver / Cable TV<br />
: iPod<br />
: DVD player (Recorder) /<br />
CD player (Recorder)<br />
: VCR / TAPE<br />
: TV<br />
b The TUNER ( ) and NET/DTU ( ) mode is not used<br />
on the AVR-3808, so use the learn function to store the signals<br />
(vpage 63).<br />
b The mode switches each time [AMP] is pressed.<br />
2 Operate<br />
GAMP modeH GZONE2 modeH GZONE3 modeH<br />
GSYSTEM CALL modeH GZONE4 modeH<br />
the component.<br />
b For details, refer to the component’s operating instructions.<br />
[HOME] is used to return to the AMP mode (AMP, ZONE2, ZONE3,<br />
ZONE4 or SYSTEM CALL) when in any mode other than AMP.<br />
Presetting<br />
The included main remote control unit can be preset to<br />
operate devices of various brands.<br />
1Press 2Press 3Press [MODE SELECTOR] for the device you want to<br />
preset.<br />
and hold in [RC SETUP] for at least 3 seconds.<br />
The signal transmission indicator flashes twice.<br />
[NUMBER] and input the 5-digit number of the<br />
brand of the component to be preset. The numbers<br />
are shown in the Preset Code Table (v End of this<br />
<strong>manual</strong>).<br />
When the code is registered, the signal transmission indicator<br />
flashes twice.<br />
When the preset code is transmitted, the mode indicator for the<br />
component to which that code belongs flashes.<br />
b The input mode is canceled if no button is operated for 10<br />
seconds.<br />
Some brands have more than one preset code. If the component does<br />
not operate, try inputting a different code.<br />
1 Press<br />
2 Operate<br />
Operating Preset Components<br />
[MODE SELECTOR] for the component to be<br />
operated.<br />
The mode indicator of the device to be operated flashes.<br />
the component.<br />
b For details, refer to the component’s operating instructions.
Functions of Buttons by Component<br />
EL Display<br />
[MODE<br />
SELECTOR]<br />
[MENU]<br />
[SETUP/<br />
SEARCH]<br />
[CH + /<br />
SHUFFLE],<br />
[CH – /<br />
REPEAT]<br />
Buttons<br />
[1],<br />
[8 9],<br />
[6 7], [3],<br />
[2],<br />
[SOURCE ON],<br />
[SOURCE OFF]<br />
[ENTER]<br />
[uiop]<br />
[RETURN]<br />
[0 ~ 9, +10]<br />
EL Display<br />
MODE SELECTOR DVD VCR iPod<br />
Device Mode<br />
Device operated<br />
DVD<br />
(Default setting)<br />
DVD Recorder<br />
CD<br />
(Default setting)<br />
CD Recorder VCR TAPE iPod<br />
1 Playback Playback Playback Playback Playback Playback Playback/Pause<br />
8 9<br />
6 7<br />
Auto search<br />
(cue)<br />
Manual search<br />
(fast-reverse/<br />
fast-forward)<br />
Auto search<br />
(cue)<br />
Manual search<br />
(fast-reverse/<br />
fast-forward)<br />
Auto search<br />
(cue)<br />
Manual search<br />
(fast-reverse/<br />
fast-forward)<br />
Auto search<br />
(cue)<br />
Manual search<br />
(fast-reverse/<br />
fast-forward)<br />
Auto search<br />
(cue)<br />
Manual search<br />
(fast-reverse/<br />
fast-forward)<br />
Auto search<br />
(cue)<br />
Manual search<br />
(fast-reverse/<br />
fast-forward)<br />
Auto search<br />
(cue)<br />
Manual search<br />
(fast-reverse/<br />
fast-forward)<br />
3 Pause Pause Pause Pause Pause Pause –<br />
2 Stop Stop Stop Stop Stop Stop Stop<br />
SOURCE ON Power on Power on – – Power on – –<br />
SOURCE OFF Power off Power off – – Power off – –<br />
Buttons<br />
MENU Menu/guide Menu/guide – – Menu/guide – Menu<br />
u i o p Cursor Cursor – – Cursor – Cursor<br />
ENTER Enter setting Enter setting – – Enter setting – Enter<br />
Page forward<br />
screen / Browse/<br />
SETUP/SEARCH Set up Set up – – Set up –<br />
Remote mode<br />
switching (Press<br />
and hold)<br />
RETURN Return Return – – Cancel – Return<br />
CH + / SHUFFLE – – – – Switch channels –<br />
1-track/album<br />
shuffle play<br />
CH - / REPEAT – – – – Switch channels –<br />
1-track/All-track<br />
repeat play<br />
0 ~ 9, +10 Select track Select track Select track Select track – – –<br />
Special Remarks q, w q q q –<br />
GSpecial RemarksH<br />
q Only one component can be preset for each mode. If a new code is preset, the previous code is automatically cleared.<br />
w The names of the functions for the DVD remote control buttons differ from brand to brand. Check beforehand.<br />
NOTE<br />
• Preset a DVD player or DVD recorder for the “DVD” – “ ” mode. Preset a CD player or CD recorder for the “DVD” – “ ” mode.<br />
• Preset a VCR for the “VCR” – “ ” mode. Preset a tape deck for the “VCR” – “ ” mode.<br />
ENGLISH<br />
Getting Started Connections Setup Playback Remote Control<br />
Multi-Zone Information Troubleshooting
ENGLISH<br />
Getting Started Connections Setup Playback Remote Control<br />
Multi-Zone Information Troubleshooting<br />
EL Display<br />
[MODE<br />
SELECTOR]<br />
Buttons<br />
EL Display<br />
[MENU]<br />
[SETUP]<br />
[CH +/–]<br />
[TV/VCR]<br />
[MODE<br />
SELECTOR]<br />
[SEARCH]<br />
Buttons<br />
[CH +/–]<br />
[SHIFT]<br />
[1],<br />
[8 9],<br />
[6 7], [3],<br />
[2],<br />
[SOURCE ON],<br />
[SOURCE OFF]<br />
[ENTER]<br />
[uiop]<br />
[DISPLAY]<br />
[0 ~ 9, +10]<br />
[A ~ G], [d f],<br />
[BAND],<br />
[MODE],<br />
[MEMO]<br />
[ENTER]<br />
[uiop]<br />
[1 ~ 8]<br />
EL Display<br />
MODE SELECTOR TV Satellite Receiver / Cable TV<br />
Device Mode<br />
Device operated<br />
1<br />
8 9<br />
TV (HITACHI) TV (SONY) SAT SAT<br />
6 7<br />
3<br />
2<br />
Punch through Punch through Punch through Punch through<br />
SOURCE ON Power on Power on Power on Power on<br />
SOURCE OFF Power off Power off<br />
Buttons<br />
Power off Power off<br />
MENU Menu/guide Menu/guide Menu/guide Menu/guide<br />
u i o p Cursor Cursor Cursor Cursor<br />
ENTER Enter setting Enter setting Enter setting Enter setting<br />
SETUP Set up Set up Set up Set up<br />
DISPLAY Display Display Display Display<br />
CH + / – Switch channels Switch channels Switch channels Switch channels<br />
0 ~ 9, +10 Channel selection Channel selection Channel selection Channel selection<br />
TV/VCR Switch inputs Switch inputs – –<br />
Special Remarks q, e q, e q, e q, e<br />
GSpecial RemarksH<br />
q Only one component can be preset for each mode. If a new code is preset, the previous code is automatically cleared.<br />
e The CD, VCR or DVD buttons (one only set) can be assigned to the TV, satellite receiver and cable TV mode (vpage 64 “Punch Through<br />
Function”).<br />
EL Display<br />
MODE SELECTOR TU NET / DTU<br />
Device Mode<br />
Device operated Analog tuner NET / USB<br />
A ~ G Preset memory block selection Preset memory block selection<br />
d f Tuning + / – –<br />
BAND AM/FM switching –<br />
MODE Switch search modes –<br />
MEMO Preset memory registration<br />
Buttons<br />
Favorites /<br />
Preset memory registration<br />
u i o p – Cursor<br />
ENTER – Enter, Playback/Pause<br />
SEARCH RDS search Search<br />
CH + / – Preset channel selection Preset channel selection<br />
1 ~ 8 Preset channel selection Preset channel selection<br />
SHIFT Switch memory block Switch memory block
[ AMP]<br />
[ TU]<br />
[ NET/DTU]<br />
Setting the Remote ID<br />
When using multiple DENON AV receivers in the same<br />
room, make this setting so that only the desired AV receiver<br />
operates.<br />
1Press 2Press 3Refer 4Press 5Repeat [NUMBER]<br />
Signal transmission<br />
indicator<br />
[MODE SELECTOR]<br />
[ iPod]<br />
[RC SETUP]<br />
[AMP] to set the main remote control unit to the<br />
AMP mode.<br />
and hold in [RC SETUP] for at least 3 seconds.<br />
The signal transmission indicator flashes twice.<br />
to the table at the right, and use [NUMBER] to<br />
input the 5-digit number corresponding to the remote<br />
ID to be changed.<br />
The signal transmission indicator flashes twice.<br />
[TU], [iPod] or [NET/DTU] to select the mode to<br />
be set.<br />
steps 2 to 4 to set the remote IDs for all<br />
modes.<br />
MODE SELECTOR<br />
Remote ID<br />
NOTE<br />
1<br />
(Default)<br />
AMP<br />
(MAIN)<br />
TUNER<br />
(Analog<br />
TUNER)<br />
iPod<br />
NET/DTU<br />
(Net Audio /<br />
USB)<br />
81001 52863 72815 62865<br />
2 82001 52795 72816 62837<br />
3 83001 52800 72817 62838<br />
4 84001 52805 72818 62839<br />
• When changing a setting, be sure to set the same remote ID as the<br />
AVR-3808’s (vpage 35).<br />
• When changing the AMP mode’s remote ID, also change the<br />
“TUNER”, “iPod” and “NET/DTU” remote ID at the same time.<br />
• Set the remote ID of an analog tuner for “TUNER” – “ ”.<br />
Learning Function<br />
If your AV devices are of a brand other than DENON or if<br />
they cannot be operated with the preset memory function,<br />
their remote control signals can be transfered to stored in<br />
the AVR-3808’s main remote control unit.<br />
1Press 2Press 3Press 4 Press<br />
[MODE SELECTOR] for the device you want to<br />
set.<br />
and hold in [RC SETUP] for at least 3 seconds.<br />
The signal transmission indicator flashes twice.<br />
[9], [7] and [5], in that order.<br />
The signal transmission indicator flashes twice and the learning<br />
mode is set.<br />
the button to be set.<br />
The main remote control unit’s display turns off.<br />
b If a button that cannot be learned is pressed, the signal transmission<br />
indicator lights but the signal is not learned.<br />
5 Point<br />
the main remote control units directly at each<br />
other and press and hold the button on the other<br />
device’s remote control unit that you want to learn.<br />
Once learning is completed normally, the display lights and the<br />
signal transmission indicator flashes twice.<br />
b If you want to learn other buttons, repeat steps 4 and 5.<br />
b The mode can be switched by pressing [MODE SELECTOR].<br />
b The signal transmission indicator lights once for a long time if<br />
learning was not possible<br />
6 Press<br />
Other device’s<br />
remote control unit<br />
AVR-3808’s main remote<br />
control unit (RC-1068)<br />
and hold in [RC SETUP] for at least 3 seconds.<br />
The signal transmission indicator flashes twice and the setting<br />
is completed.<br />
ENGLISH<br />
• With some remote control units, the signals cannot be learned or the<br />
device will not operate properly even when the signals have been<br />
learned. In this case, use the device’s own remote control unit.<br />
• Learned buttons have priority over the preset memory. If you no<br />
longer need the learned setting, reset the learning function (vpage<br />
65).<br />
NOTE<br />
• [HOME] cannot be learned.<br />
• Do not learn any remote control signals at [RC SETUP].<br />
• The AMP, ZONE2, ZONE3, ZONE4 and SYSTEM CALL modes cannot<br />
be learned.<br />
Getting Started Connections Setup Playback Remote Control<br />
Multi-Zone Information Troubleshooting
ENGLISH<br />
Getting Started Connections Setup Playback Remote Control<br />
Multi-Zone Information Troubleshooting<br />
Signal<br />
transmission<br />
indicator<br />
[ AMP]<br />
[MODE<br />
SELECTOR]<br />
[SYSTEM<br />
CALL]<br />
[POWER<br />
ON]<br />
[CHANNEL<br />
+/–]<br />
[NUMBER]<br />
[RC SETUP]<br />
[8],<br />
[9],<br />
[6],<br />
[7],<br />
[1], [3],<br />
[2]<br />
System Call Function<br />
This function lets you register a series of operations at a<br />
single button.<br />
For example, the amplifier can be turned on, the input<br />
source selected, the monitor’s power turned on, the<br />
source device’s power turned on and the play mode set all<br />
by pressing a single button.<br />
Up to 32 signals each can be registered at [SYSTEM CALL]<br />
(1, 2 or 3).<br />
Registering<br />
1Press 2Press 3Press 4Press 5Press [MODE SELECTOR] for the device you want to<br />
register.<br />
and hold in [RC SETUP] for at least 3 seconds.<br />
The signal transmission indicator flashes twice.<br />
[9], [7] and [8], in that order.<br />
The signal transmission indicator flashes twice and the system<br />
call registration mode is set.<br />
[SYSTEM CALL] (1, 2 or 3) at which you want to<br />
register the signals.<br />
the buttons you want to register in the same<br />
sequence as the operations you want to perform.<br />
The signal transmission indicator lights when a button is<br />
pressed.<br />
Example : Press [POWER ON].<br />
↓<br />
Press [MODE SELECTOR] – [DVD].<br />
↓<br />
Press [1].<br />
b The mode can be switched by pressing [MODE SELECTOR].<br />
b Perform the registration procedure for all the buttons you want to<br />
register.<br />
6 Press<br />
and hold in [RC SETUP] for at least 3 seconds.<br />
The signal transmission indicator flashes twice and the setting<br />
is completed.<br />
Calling out<br />
[AMP], to select “SYSTEM CALL”.<br />
1Press 2Press [SYSTEM CALL] (1, 2 or 3) at which the signals<br />
were registered.<br />
The registered signals are transmitted in the registered<br />
sequence.<br />
Punch Through Function<br />
CD, DVD or VCR mode buttons can be stored at unused TV<br />
or SAT/CBL mode buttons.<br />
For example, when DVD mode buttons are assigned to<br />
the TV mode, the DVD mode operations can be performed<br />
while in the TV mode.<br />
1Press 2Press 3Press 4Press 5Press 6Press [MODE SELECTOR] for the device you want to<br />
punch through (CD, DVD or VCR).<br />
and hold in [RC SETUP] for at least 3 seconds.<br />
The signal transmission indicator flashes twice.<br />
[9], [8] and [4], in that order.<br />
The signal transmission indicator flashes twice and the punch<br />
through setting mode is set.<br />
the button you want to punch through (1, 2,<br />
6, 7, 8, 9 or 3).<br />
[MODE SELECTOR] for the device you want to<br />
punch through (TV or SAT/CBL).<br />
and hold in [RC SETUP] for at least 3 seconds.<br />
The signal transmission indicator flashes twice and the setting<br />
is completed.
1Press 2Press 3 Set<br />
Adjusting the Backlight’s Brightness<br />
The display’s brightness can be adjusted in 5 steps.<br />
(Default: Step 3)<br />
1Press 2Press 3 Press<br />
Setting the Time the Backlight Stays Lit<br />
and hold in [RC SETUP] for at least 3 seconds.<br />
The signal transmission indicator flashes twice.<br />
[9], [7] and [3], in that order.<br />
The signal transmission indicator flashes twice and the backlight<br />
on time setting mode is set.<br />
the light on time.<br />
The signal transmission indicator flashes twice.<br />
[Settable times] : [1] : 5 sec.<br />
[2] : 10 sec. (Default)<br />
[3] : 15 sec.<br />
[4] : 20 sec.<br />
[5] : 25 sec.<br />
and hold in [RC SETUP] for at least 3 seconds.<br />
The signal transmission indicator flashes twice.<br />
[CHANNEL +] or [CHANNEL –].<br />
The display gets one step brighter when [+] is pressed.<br />
The display gets one step darker when [–] is pressed.<br />
[RC SETUP] to complete the setting.<br />
1Press 2Press 3Press 4Press Resetting the Main Remote Control Unit<br />
Learning Function<br />
GResetting button by buttonH<br />
1Press 2Press 3Press 4Press [MODE SELECTOR] for the device you want to<br />
reset.<br />
and hold in [RC SETUP] for at least 3 seconds.<br />
The signal transmission indicator flashes twice.<br />
[9], [7] and [6], in that order.<br />
The signal transmission indicator flashes twice.<br />
the button you want to reset twice.<br />
The signal transmission indicator flashes twice.<br />
GResetting by device modeH<br />
[MODE SELECTOR] for the device you want to<br />
reset.<br />
and hold in [RC SETUP] for at least 3 seconds.<br />
The signal transmission indicator flashes twice.<br />
[9], [7] and [6], in that order.<br />
The signal transmission indicator flashes twice.<br />
[MODE SELECTOR] for the device you want to<br />
reset twice.<br />
The signal transmission indicator flashes twice.<br />
System Call Function<br />
and hold in [RC SETUP] for at least 3 seconds.<br />
The signal transmission indicator flashes twice.<br />
1Press 2Press 3Press 4Press 1Press 2Press 3Press 4Press [9], [7] and [8], in that order.<br />
The signal transmission indicator flashes twice.<br />
[SYSTEM CALL] (1, 2 or 3) you want to reset.<br />
and hold in [RC SETUP] for at least 3 seconds.<br />
The signal transmission indicator flashes twice.<br />
Punch Through Function<br />
[MODE SELECTOR] for the device you want to<br />
reset (TV or SAT/CBL).<br />
1Press 2Press and hold in [RC SETUP] for at least 3 seconds.<br />
The signal transmission indicator flashes twice.<br />
[9], [8] and [4], in that order.<br />
The signal transmission indicator flashes twice.<br />
and hold in [RC SETUP] for at least 3 seconds.<br />
The signal transmission indicator flashes twice.<br />
All Settings<br />
and hold in [RC SETUP] for at least 3 seconds.<br />
The signal transmission indicator flashes twice.<br />
[9], [8] and [1], in that order.<br />
The signal transmission indicator flashes 4 times.<br />
All the settings are restored to their defaults.<br />
ENGLISH<br />
Getting Started Connections Setup Playback Remote Control<br />
Multi-Zone Information Troubleshooting
ENGLISH<br />
Getting Started Connections Setup Playback Remote Control<br />
Multi-Zone Information Troubleshooting<br />
Sub Remote Control Unit Operations<br />
• The sub remote control unit is equipped with frequently used buttons, so it can be used for<br />
simple remote control unit operations.<br />
• The sub remote control unit can also be used for multi-zone, so you can use it to control<br />
the AVR-3808 from other rooms.<br />
• The operations listed below can be performed with the sub remote control unit.<br />
• Switching the input source<br />
• Adjusting the volume<br />
• Tuner (AM/FM) and iPod operations<br />
• NET/USB direct play<br />
• GUI menu and ZONE2 on-screen display operations<br />
• Zone power on/off<br />
• It is not possible to operate devices other than the amplifier.<br />
[ZONE OFF]<br />
[ZONE SELECT]<br />
[ZONE ON]<br />
[SOURCE SELECT]<br />
[CHANNEL +/–] [VOLUME +/–]<br />
[MUTE]<br />
[SHIFT]<br />
[MENU]<br />
[uiop]<br />
[ENTER]<br />
[SEARCH]<br />
[RETURN]<br />
[8 9], [2], [1/3], [TUNING d f]<br />
[REPEAT]<br />
[RANDOM]<br />
[USB]<br />
[ALL MUSIC], [FAVORITES]<br />
Functions of Buttons by Component<br />
Device operated<br />
DVD, HDP, TV / CBL, DVR1, VCR, V.AUX,<br />
SAT, CD, PHONO<br />
TUNER<br />
(AM/FM)<br />
Zone selection M Z2 Z3 M Z2 Z3<br />
ZONE SELECT Zone operation mode selection Zone operation mode selection<br />
ZONE OFF Power turned off (b1) Power turned off (b1)<br />
ZONE ON Power turned on (b1) Power turned on (b1)<br />
SOURCE SELECT Input source selection (b2) Input source selection<br />
CHANNEL + / – – Preset channel selection<br />
SHIFT –<br />
Preset channel memory block<br />
selection<br />
VOLUME + / – Adjustment of volume (b1) Adjustment of volume (b1)<br />
MUTE Muting (b1) Muting (b1)<br />
MENU Selected zone menu Selected zone menu<br />
SEARCH – RDS search<br />
8 9,<br />
TUNING d f<br />
– Tuning<br />
USB b2 b2<br />
ALL MUSIC *<br />
(Music server only)<br />
b3 b3<br />
FAVORITES * b4 b4<br />
b1: Affects the currently selected zone.<br />
b2: The input source switches to “NET/USB” and the files on the USB memory device are played.<br />
b3: The input source switches to “NET/USB” and the files in “All Music” on the music server are played.<br />
b4: The input source switches to “NET/USB” and the files in “Favorites” are played.<br />
*: Whether “All Music” or “Favorites” is selected depends on the “Direct Play” setting (vpage 40).<br />
DIRECT PLAY button<br />
• Playback is possible in the mode selected at GUI menu “Source Select” – “NET/USB” – “Playback<br />
Mode” – “Direct Play”.<br />
FAVORITES: Playback starts from the first track registered in the favorites.<br />
ALL MUSIC: Playback starts from the first track registered in the “All Music” folder.<br />
• When [USB] is pressed, playback starts from the first track on the USB memory device.<br />
NOTE<br />
When the music server is stopped or restarted, it may no longer be possible to play tracks stored in<br />
the favorites.
Device operated NET / USB iPod<br />
Zone selection M Z2 Z3 M Z2 Z3<br />
ZONE SELECT Zone operation mode selection Zone operation mode selection<br />
ZONE OFF Power turned off (b1) Power turned off (b1)<br />
ZONE ON Power turned on (b1) Power turned on (b1)<br />
SOURCE SELECT Input source selection (b2) Input source selection<br />
CHANNEL + / – Preset channel selection –<br />
SHIFT<br />
Preset channel memory block<br />
selection<br />
–<br />
VOLUME + / – Adjustment of volume (b1) Adjustment of volume (b1)<br />
MUTE Muting (b1) Muting (b1)<br />
MENU Selected zone menu Selected zone menu<br />
u i o p File operations File operations<br />
ENTER File operations File operations<br />
SEARCH<br />
Page forward screen /<br />
Character search<br />
Page forward screen /<br />
Browse/Remote mode switching<br />
(press and hold)<br />
RETURN File operations –<br />
8 9,<br />
TUNING d f<br />
Track search Track search<br />
2 Stop Stop<br />
1/3 Play/pause Play/pause<br />
REPEAT 1-track/All-track repeat play (USB) 1-track/All-track repeat play<br />
RANDOM 1-track random play (USB) 1-track/album shuffle play<br />
USB b2 b2<br />
ALL MUSIC *<br />
(Music server only)<br />
b3 b3<br />
FAVORITES * b4 b4<br />
b1: Affects the currently selected zone.<br />
b2: The input source switches to “NET/USB” and the files on the USB memory device are played.<br />
b3: The input source switches to “NET/USB” and the files in “All Music” on the music server are played.<br />
b4: The input source switches to “NET/USB” and the files in “Favorites” are played.<br />
*: Whether “All Music” or “Favorites” is selected depends on the “Direct Play” setting (vpage 40).<br />
ENGLISH<br />
Getting Started Connections Setup Playback Remote Control<br />
Multi-Zone Information Troubleshooting
ENGLISH<br />
Getting Started Connections Setup Playback Remote Control<br />
Multi-Zone Information Troubleshooting<br />
Multi-zone indicator<br />
[ZONE OFF]<br />
[MENU]<br />
[RANDOM]<br />
[REPEAT]<br />
[ZONE SELECT]<br />
[ADVANCED SETUP]<br />
[USB]<br />
[ALL MUSIC/<br />
FAVORITES]<br />
Switching Zones<br />
Use this procedure to select the zone to be operated by<br />
the sub remote control unit.<br />
1Press 2While [ZONE SELECT].<br />
The currently selected multi-zone indicator lights.<br />
the multi-zone indicator is light, press [ZONE<br />
SELECT] to select the zone to be operated.<br />
The currently selected multi-zone indicator lights.<br />
Setting the Zone for Which the Sub<br />
Remote Control Unit is Used (ZONE<br />
SELECT LOCK mode)<br />
We recommend always using the sub remote control unit<br />
for the same room. When this is done, the unit can be<br />
set so that the zone does not switch when buttons are<br />
operated.<br />
1Use 2Select the tip of a pen to press [ADVANCED SETUP].<br />
All the multi-zone indicators light.<br />
the multi-zone to be set.<br />
The selected multi-zone indicator lights.<br />
qTo set to main zone : Press [REPEAT].<br />
wTo set to ZONE2 : Press [RANDOM].<br />
eTo set to ZONE3 : Press [USB].<br />
3 Use<br />
the tip of a pen to press [ADVANCED SETUP].<br />
The multi-zone indicator turns off.<br />
To Cancel<br />
1Use 2Press 3Use the tip of a pen to press [ADVANCED SETUP].<br />
The currently selected multi-zone indicator lights.<br />
[ZONE SELECT].<br />
All the multi-zone indicators light.<br />
the tip of a pen to press [ADVANCED SETUP].<br />
The multi-zone indicator turns off.<br />
Setting the Remote ID<br />
When using multiple DENON AV receivers in the same<br />
room, make this setting so that no AV receiver other than<br />
the desired one operates.<br />
1 While<br />
2 Select<br />
pressing [MENU], press [ADVANCED SETUP]<br />
with the tip of a pen.<br />
The multi-zone indicator corresponding to the currently selected<br />
remote ID flashes.<br />
the remote ID to be set.<br />
qTo set to 1 : Press [REPEAT].<br />
The “M” indicator flashes.<br />
wTo set to 2 : Press [RANDOM].<br />
The “Z2” indicator flashes.<br />
eTo set to 3 : Press [USB].<br />
The “Z3” indicator flashes.<br />
rTo set to 4 : Press [ALL MUSIC/FAVORITES].<br />
The “Z4” indicator flashes.<br />
3 While<br />
pressing [MENU], press [ADVANCED SETUP]<br />
with the tip of a pen.<br />
The multi-zone indicator turns off.<br />
NOTE<br />
When changing a setting, be sure to set the same remote ID as the<br />
AVR-3808’s (vpage 35).<br />
Resetting the Settings<br />
While pressing [ZONE OFF], press [ADVANCED SETUP]<br />
with the tip of a pen.<br />
All the multi-zone indicators flash 4 times, then all the settings are<br />
restored to their defaults.
Amp Assign / Multi-Zone Connections and<br />
Operations<br />
The AVR-3808 is compatible with the following types of playback:<br />
• Multi-zone playback (ZONE2 & ZONE3)<br />
• Bi-amp playback (front speaker)<br />
NOTE<br />
• For bi-amp playback, use speakers compatible with that type of connection.<br />
• When conducting bi-amp playback, remove the short-circuiting boards (or wires) from the speaker<br />
terminals.<br />
Multi-Zone Settings with the Amp Assign Function<br />
The amp assign function lets you assign the amplifiers for the different channels built into the AVR-3808 to<br />
the speaker outputs for the different zones.<br />
Select the desired playback environment from among “Setting 1” to “Setting 4”, then set the corresponding<br />
“Amp Assign” mode at GUI menu “Manual Setup” – “Option Setup” – “Amp Assign” (vpage 34).<br />
Connect the speakers as described at “Amp Assign mode settings and speakers connected to the various<br />
speaker terminals”.<br />
“Setting 3” is possible to switch the Amp Assign mode between the 5.1-channel mode and 2-channel<br />
mode without changing the speaker connections.<br />
Setting 1 :<br />
F7.1-channel playback<br />
FL SW C FR<br />
SL<br />
Main zone<br />
Speaker terminal<br />
Amp Assign mode<br />
A<br />
B<br />
7.1ch<br />
A<br />
B<br />
SBL SBR<br />
SR<br />
Amp Assign mode:<br />
7CH (Default)<br />
Both A and B can be installed for SR and SL.<br />
FRONT<br />
CENTER<br />
SURR-A SURR-B<br />
SURR. BACK /<br />
AMP ASSIGN<br />
R L R L R L R L<br />
7.1CH FR FL C SR-A SL-A SR-B SL-B SBR SBL<br />
ENGLISH<br />
n Amp Assign mode setting and speakers connected to the various speaker<br />
terminals<br />
Getting Started Connections Setup Playback Remote Control Multi-Zone<br />
Information Troubleshooting
ENGLISH<br />
Getting Started Connections Setup Playback Remote Control Multi-Zone<br />
Information Troubleshooting<br />
Setting 2 :<br />
FMulti-zone playback<br />
• 5.1-channel playback + ZONE2 or ZONE3 stereo playback<br />
• 5.1-channel playback + ZONE2 or ZONE3 monaural playback<br />
0<br />
FL SW C FR<br />
SL<br />
Main zone ZONE2<br />
A<br />
B<br />
5.1ch<br />
A<br />
B<br />
SR<br />
Z2L Z2R<br />
Stereo<br />
Z2L Z2R<br />
Z2<br />
Mono<br />
Amp Assign mode:<br />
ZONE2<br />
ZONE (MONO)<br />
• “STEREO” or “MONO” depends on the setting at GUI menu “Manual Setup” – “Zone Setup” – “Channel”<br />
(vpage 33).<br />
• Both A and B can be installed for SR and SL.<br />
Speaker terminal<br />
Amp Assign mode<br />
ZONE2<br />
+<br />
+<br />
+<br />
FRONT<br />
+<br />
+<br />
+<br />
CENTER<br />
ZONE3<br />
Z3L Z3R<br />
Z3L Z3R<br />
Stereo<br />
Z3<br />
Mono<br />
ZONE3<br />
n Amp Assign mode setting and speakers connected to the various speaker<br />
terminals<br />
SURR-A SURR-B<br />
SURR. BACK /<br />
AMP ASSIGN<br />
R L R L R L R L<br />
Z2R Z2L<br />
ZONE3<br />
FR FL C SR-A SL-A SR-B SL-B<br />
Z3R Z3L<br />
ZONE (MONO)<br />
Z3<br />
(MONO)<br />
Z2<br />
(MONO)<br />
Setting 3 : With this setting it is possible to switch between the following two playback modes.<br />
F5.1-channel playback<br />
F2-channel playback<br />
Switching ················Surround Mode switching<br />
FL L C R FR<br />
SW<br />
SL<br />
Main zone<br />
A<br />
B<br />
5.1ch<br />
A<br />
B<br />
SR<br />
Surround Mode<br />
DIRECT / STEREO<br />
Multi Channel /<br />
Surround<br />
FL L C R FR<br />
SW<br />
SL<br />
A<br />
B<br />
Main zone<br />
n Amp Assign mode setting and speakers connected to the various speaker<br />
terminals<br />
Speaker terminal<br />
Amp Assign mode<br />
Both A and B can be<br />
installed for SR and SL.<br />
FRONT<br />
CENTER<br />
2ch<br />
A<br />
B<br />
SR<br />
2CH<br />
SURR-A SURR-B<br />
Amp Assign mode:<br />
SURR. BACK /<br />
AMP ASSIGN<br />
R L R L R L R L<br />
2CH FR FL C SR-A SL-A SR-B SL-B FR FL
Setting 4 :<br />
FMaking bi-amp connections for the FL and FR channels in the main zone<br />
and conducting 5.1-channel playback<br />
(switching with other modes not possible)<br />
Main zone<br />
FL SW C FR<br />
5.1ch<br />
FL/FR<br />
SL<br />
SR<br />
Bi-Amp<br />
A<br />
A<br />
Bi-Amp<br />
Speaker terminal<br />
Amp Assign mode<br />
B<br />
B<br />
Amp Assign mode:<br />
Both A and B can be installed for SR and SL.<br />
n Amp Assign mode setting and speakers connected to the various speaker<br />
terminals<br />
FRONT<br />
CENTER<br />
SURR-A SURR-B<br />
SURR. BACK /<br />
AMP ASSIGN<br />
R L R L R L R L<br />
FR FL<br />
Bi-Amp FR FL C SR-A SL-A SR-B SL-B<br />
FL/FR Bi-Amp<br />
connection<br />
DVD player<br />
Remote<br />
control unit<br />
Multi-Zone Settings and Operations with Zone Pre-out<br />
Output<br />
Prepare power amplifiers for ZONE2 and ZONE3.<br />
Connectors for audio output Audio signals Connectors for video output<br />
ZONE2 ZONE2 PRE OUT Stereo ZONE2 VIDEO OUT<br />
ZONE3 ZONE3 PRE OUT Stereo –<br />
Main zone (7.1-channel system)<br />
Monitor<br />
<br />
Input<br />
<br />
Remote<br />
control unit<br />
<br />
<br />
<br />
AVR-3808<br />
<br />
<br />
ZONE2<br />
video output<br />
ZONE2<br />
audio output<br />
ZONE3 audio output<br />
ZONE2<br />
Monitor<br />
Power amplifier<br />
ZONE3<br />
Power amplifier<br />
: Multi-zone video cable<br />
: Multi-zone audio cable<br />
ENGLISH<br />
• When only using one speaker for ZONE2 or ZONE3, set to “Mono”. In this case, the ZONE2 (ZONE3)<br />
monaural output is output from the ZONE2 (ZONE3) pre-out L and R connectors, so connect as desired.<br />
• Separate power amplifiers are needed for ZONE2 and ZONE3.<br />
Getting Started Connections Setup Playback Remote Control Multi-Zone<br />
Information Troubleshooting
ENGLISH<br />
Getting Started Connections Setup Playback Remote Control Multi-Zone<br />
Information Troubleshooting<br />
SOURCE SELECT VOLUME<br />
<br />
<br />
[ AMP]<br />
[ON]<br />
[OFF]<br />
VOLUME<br />
[MUTE]<br />
SOURCE<br />
SELECT<br />
[OFF]<br />
(Main remote control unit)<br />
(Sub remote control unit)<br />
[ZONE SELECT]<br />
[ON]<br />
[ON]<br />
[OFF]<br />
SOURCE SELECT<br />
About the button names in these explanations<br />
< > : Buttons on the main unit<br />
[ ] : Buttons on the remote control unit<br />
Button name only:<br />
Buttons on the main unit and remote control unit<br />
Multi-Zone Operations<br />
Turning the Power On and Off<br />
GOperation on the main unitH<br />
Press or for the zone to be operated.<br />
When the power turns on, the multi-zone indicator lights on the<br />
display.<br />
GOperation on the remote control unitH<br />
In the zone mode you want to operate, press [ON] or [OFF].<br />
Selecting the Input Source<br />
GOperation on the main unitH<br />
q Press and select the zone to be adjusted.<br />
w Turn .<br />
GOperation on the remote control unitH<br />
In the zone mode you want to operate, press [SOURCE SELECT].<br />
Adjusting the Volume<br />
GOperation on the main unitH<br />
q Press and select the zone to be adjusted.<br />
w Turn to adjust.<br />
GOperation on the remote control unitH<br />
In the zone mode whose volume you want to adjust, press [VOLUME].<br />
[Variable range]<br />
– – – –70dB ~ –40dB ~ +18dB<br />
The volume can be adjusted when GUI menu “Manual Setup” – “Zone<br />
Setup” – “(select the zone)” – “Volume Level” is set to “Variable”. The<br />
volume can be increased up to the value set at GUI menu “Manual<br />
Setup” – “Zone Setup” – “(select the zone)” – “Volume Limit”<br />
(vpage 33).<br />
Turning off the Sound Temporarily<br />
In the zone mode for which you want to mute the sound, press<br />
[MUTE].<br />
The sound is reduced to the level set at GUI menu “Manual Setup”<br />
– “Zone Setup” – “(select the zone)” – “Mute Level” (vpage 33).<br />
To cancel, either adjust the volume or press [MUTE] again.<br />
The setting is canceled when the zone’s power is turned off.<br />
• The source selected for ZONE2 is also output from the recording<br />
output connectors.<br />
• For ZONE2, the “Zone Setup” can be made while watching the onscreen<br />
display. Also, when ZONE3 is operated, the on-screen display<br />
appears on the ZONE2 monitor, so operation can be performed<br />
watching this on-screen display.<br />
ZONE2 MENU<br />
INPUT :DVD<br />
SIGNAL:ANALOG<br />
VOL. :-40dB<br />
>Bass 0dB<br />
Treble 0dB<br />
HPF OFF<br />
Lch Lev. 0dB<br />
Rch Lev. 0dB<br />
ZONE2 MENU<br />
>Channel STEREO<br />
Vol.Lev. VAR<br />
Vol.Limit OFF<br />
P.On Lev. LAST<br />
Mute Lev. FULL<br />
NOTE<br />
• When the input source to which the digital input connectors<br />
(OPTICAL/COAXIAL) are assigned is selected in ZONE2 or ZONE3,<br />
playback is only possible if the digital signal being input is in PCM<br />
(2-channel) format.<br />
• Digital audio signals input from the DENON LINK or HDMI connectors<br />
cannot be played in multi-zone.<br />
• When certain digital signals are being input, noise may be output<br />
from the ZONE2 and ZONE3 audio output connectors.<br />
• When “DENON LINK” is assigned at the GUI menu “Assign” setting,<br />
the PCM signals, network audio signals (Internet radio, music server<br />
and USB) input from the digital input connectors cannot be output<br />
from the ZONE2 and ZONE3 audio output connectors.
Other Information<br />
About Speaker Installation<br />
Surround back speakers<br />
Sound positioning directly to the rear can be achieved easily by adding<br />
a surround back speaker to a 5.1-channel system.<br />
In addition, the acoustic image extending between the sides and the<br />
rear is narrowed, thus greatly improving the expression of the surround<br />
signals for sounds moving from the sides to the back and from the<br />
front to the point directly behind the listening position.<br />
Change of positioning and acoustic image<br />
with 5.1-channel systems<br />
<br />
<br />
<br />
<br />
Movement of acoustic image from SR to SL<br />
Change of positioning and acoustic image<br />
with 6.1-channel systems<br />
<br />
<br />
<br />
<br />
Movement of acoustic image from<br />
SR to SB to SL<br />
In addition to sources recorded in 6.1-channels, the surround effect of<br />
conventional 2- to 5.1-channel sources can also be enhanced.<br />
Number of surround back speakers<br />
We recommend using 2 speakers.<br />
When using dipolar speakers in particular, be sure to use 2 speakers.<br />
Placement of the surround left and right channels<br />
when using surround back speakers<br />
We recommend installing the speakers for the surround “L” and “R”<br />
channels a bit forward.<br />
Examples of speaker layouts<br />
Below we introduce examples of speaker layouts. Refer to these to<br />
arrange your speakers according to their type and how you want to<br />
use them.<br />
G1H Using surround back speaker(s)<br />
q When mainly playing movies<br />
Recommended when your surround speakers are single or 2-way<br />
speakers.<br />
Front speakers<br />
Center speaker<br />
Surround<br />
speakers<br />
Monitor<br />
Subwoofer<br />
60°<br />
60°<br />
Surround back speakers<br />
Surround<br />
speaker<br />
Front speaker<br />
60 to 90 cm<br />
Surround back<br />
speaker<br />
GAs seen from aboveH GAs seen from the sideH<br />
Point slightly<br />
downwards<br />
ENGLISH<br />
w Setting for primarily watching movies using diffusion type<br />
speakers for the surround speakers<br />
For the greatest sense of surround sound envelopment, diffuse<br />
radiation speakers such as bipolar types, or dipolar types, provide<br />
a wider dispersion than is possible to obtain from a direct radiating<br />
speaker (monopolar). Place these speakers at either side of the<br />
prime listening position, mounted above ear level.<br />
Path of the surround sound from the<br />
speakers to the listening position<br />
Surround<br />
speakers<br />
60°<br />
Surround back speakers<br />
Surround<br />
speaker<br />
Front speaker<br />
60 to 90 cm<br />
Surround back<br />
speaker<br />
GAs seen from aboveH GAs seen from the sideH<br />
e When playing movies and music<br />
Surround<br />
speaker A<br />
Front speakers<br />
Center speaker<br />
Monitor<br />
Subwoofer<br />
45° ~ 60°<br />
120°<br />
Surround back<br />
speaker<br />
Surround speaker B<br />
Surround<br />
speaker A<br />
Front speaker<br />
60 to 90 cm<br />
Surround back<br />
speaker<br />
GAs seen from aboveH GAs seen from the sideH<br />
Point slightly<br />
downwards<br />
Point slightly<br />
downwards<br />
Surround<br />
speaker B<br />
Getting Started Connections Setup Playback Remote Control Multi-Zone Information<br />
Troubleshooting
ENGLISH<br />
Getting Started Connections Setup Playback Remote Control Multi-Zone Information<br />
Troubleshooting<br />
G2H When not using surround back speakers<br />
Dolby Digital<br />
Front speakers<br />
Center speaker<br />
Monitor<br />
Subwoofer<br />
60°<br />
120°<br />
Surround speakers<br />
Surround speaker<br />
Front speaker<br />
60 to 90 cm<br />
GAs seen from aboveH GAs seen from the sideH<br />
Surround<br />
The AVR-3808 is equipped with a digital signal processing circuit that<br />
lets you play program sources in the surround mode to achieve the<br />
same sense of presence as in a movie theater.<br />
Dolby Surround<br />
Dolby Digital is a multi-channel digital signal format developed by<br />
Dolby Laboratories.<br />
A total of 5.1-channels are played: 3 front channels (“FL” , “FR” and<br />
“C”), 2 surround channels (“SL” and “SR”) and the “LFE” channel for<br />
low frequencies.<br />
Because of this, there is no crosstalk between channels and a realistic<br />
sound field with a “three-dimensional” feeling (sense of distance,<br />
movement and positioning) is achieved.<br />
A real, overpowering sense of presence is achieved when playing<br />
movie sources in AV rooms as well.<br />
Dolby Digital Plus<br />
Dolby Digital Plus is an improved Dolby Digital signal format that is<br />
compatible with up to 7.1-channels of discrete digital sound and also<br />
improves sound quality thanks to extra data bit rate performance. It<br />
is upwardly compatible with conventional Dolby Digital, so it offers<br />
greater flexibility in response to the source signal and the conditions<br />
of the playback equipment.<br />
Dolby TrueHD<br />
Dolby TrueHD is a high definition audio technology developed by Dolby<br />
Laboratories, using lossless coding technology to faithfully reproduce<br />
the sound of the studio master.<br />
This format is compatible with a maximum sampling frequency of 96<br />
kHz and up to 7.1-channels, so it is used for applications particularly<br />
prioritizing sound quality.<br />
Dolby Pro Logic g<br />
Dolby Pro Logic g is a matrix decoding technology developed by Dolby<br />
Laboratories.<br />
Regular music such as that on CDs is encoded into 5-channels to<br />
achieve an excellent surround effect.<br />
The surround channel signals are converted into stereo and full band<br />
signals (with a frequency response of 20 Hz to 20 kHz or greater)<br />
to create a “three-dimensional” sound image offering a rich sense of<br />
presence for all stereo sources.<br />
Dolby Pro Logic gx<br />
Dolby Pro Logic gx is a further improved version of the Dolby Pro Logic<br />
g matrix decoding technology.<br />
Audio signals recorded in 2-channels are decoded to achieve a natural<br />
sound with up to 7.1-channels.<br />
There are 3 modes: “Music” suited for playing music, “Cinema”<br />
suited for playing movies, and “Game” which is optimized for playing<br />
games.<br />
b Sources recorded in Dolby Surround<br />
Sources recorded in Dolby Surround are indicated with the following<br />
logo marks.<br />
Dolby Surround support mark :<br />
Manufactured under license from Dolby Laboratories.<br />
“Dolby”, “Pro Logic” and the double-D symbol are trademarks of<br />
Dolby Laboratories.<br />
DTS Surround<br />
DTS Digital Surround<br />
DTS Digital Surround is the standard digital surround format of DTS,<br />
Inc., compatible with a sampling frequency of 44.1 or 48 kHz and up<br />
to 5.1-channels of digital discrete surround sound.<br />
DTS-HD High Resolution Audio<br />
DTS-HD High Resolution Audio is an improved version of the<br />
conventional DTS, DTS-ES and DTS 96/24 signals formats, compatible<br />
with sampling frequencies of 96 or 48 kHz and up to 7.1-channels<br />
of discrete digital sound. High data bit rate performance provides<br />
high quality sound. This format is fully compatible with conventional<br />
products, including conventional DTS digital surround 5.1-channel<br />
data.<br />
DTS-HD Master Audio<br />
DTS-HD Master Audio is DTS, Inc’s lossless audio format compatible<br />
with up to 96 kHz/7.1-channels. The lossless audio coding technology<br />
faithfully reproduces the sound of the studio master. It is fully<br />
compatible with conventional products, including conventional DTS<br />
digital surround 5.1-channel data.<br />
DTS-ES Discrete 6.1<br />
DTS-ES Discrete 6.1 is a 6.1-channel discrete digital audio format<br />
adding a surround back (SB) channel to the DTS digital surround sound.<br />
Decoding of conventional 5.1-channel audio signals is also possible<br />
according to the decoder.<br />
DTS-ES Matrix 6.1<br />
DTS-ES Matrix 6.1 is a 6.1-channel discrete digital audio format<br />
inserting a surround back (SB) channel to the DTS digital surround<br />
sound through matrix encoding. Decoding of conventional 5.1-channel<br />
audio signals is also possible according to the decoder.<br />
DTS NEO:6 Surround<br />
DTS NEO:6 is a matrix decoding technology for achieving 6.1channel<br />
surround playback with 2-channel sources. It includes “DTS<br />
NEO:6 CINEMA” suited for playing movies and “DTS NEO:6 MUSIC”<br />
suited for playing music.
DTS 96/24<br />
DTS 96/24 is a digital audio format enabling high sound quality<br />
playback in 5.1-channels with a sampling frequency of 96 kHz and 24<br />
bit quantization on DVD-Video. HDCD ® is an encoding/decoding technology that greatly reduces<br />
Manufactured under license under U.S. Patent #’s: 5,451,942;<br />
5,956,674; 5,974,380; 5,978,762; 6,226,616; 6,487,535 & other<br />
U.S. and worldwide patents issued & pending. DTS is a registered<br />
trademark and the DTS logos, Symbol, DTS-HD and DTS-HD<br />
Master Audio are trademarks of DTS, Inc. © 1996-2007 DTS, Inc.<br />
All Rights Reserved.<br />
Audyssey MultEQ® XT<br />
Audyssey MultEQ ® XT is the first technology to properly measure<br />
sound information throughout a listening area, then combine this<br />
information to accurately represent the acoustical problems in<br />
the room. Based on these measurements, MultEQ XT calculates<br />
an equalization solution that corrects for both time and frequency<br />
response problems in every seat.<br />
Audyssey MultEQ XT not only corrects frequency response problem<br />
in a large listening area, it also performs a fully automated surround<br />
system setup.<br />
For a detailed description, see page 25.<br />
Audyssey MultEQ ® XT is a trademark of Audyssey Laboratories.<br />
It is licensed under U.S. and National Patent Applications<br />
20030235318 and 10/700,220. Additional U.S. and Foreign<br />
Patents pending. MultEQ XT and the Audyssey MultEQ XT logo<br />
are trademarks of Audyssey Laboratories, Inc. All rights reserved.<br />
HDCD®<br />
(High Definition Compatible Digital®)<br />
the distortion that occurs upon digital recording while maintaining<br />
compatibility with the conventional CD format, thus expanding the<br />
dynamic range and achieving a high resolution.<br />
Conventional CDs and HDCD compatible CDs are identified<br />
automatically to select the optimum digital processing.<br />
® , HDCD ® , High Definition Compatible Digital ® and<br />
Microsoft® are either registered trademarks or trademarks of<br />
Microsoft Corporation, Inc. in the United States and/or other<br />
countries. HDCD system manufactured under license from<br />
Microsoft Corporation, Inc. This product is covered by one or more<br />
of the following: In the USA: 5,479,168, 5,638,074, 5,640,161,<br />
5,808,574, 5,838,274, 5,854,600, 5,864,311, 5,872,531, and in<br />
Australia: 669114. Other patents pending.<br />
DENON LINK<br />
DENON LINK is a unique digital, balanced transfer type interface<br />
developed by DENON. It offers high speed, high quality transfer of<br />
digital audio data with low signal loss. It can be used together with<br />
DENON DVD players equipped with a special DENON LINK connector<br />
using a single cable to enable playback with high sound quality.<br />
It allows digital transfer of the 192 kHz/24 bit 2-channel digital signals<br />
of DVD-Audio discs, PCM multi-channel signals, etc. Full-spec digital<br />
transfer of the audio contents of Super Audio CD is possible by<br />
connecting a player equipped for DENON LINK 3rd Edition.<br />
AL24 Processing Plus<br />
ENGLISH<br />
AL24 Processing for All Channels<br />
DENON has further developed its proprietary AL24 Processing, an<br />
analog waveform reproduction technology, to support the 192 kHz<br />
sampling frequency of DVD-Audio. AL24 Processing Plus, thoroughly<br />
suppresses quantization noise associated with D/A conversion of<br />
LPCM signals to reproduce the low-level signals with optimum clarity<br />
that will bring out all the delicate nuances of the music.<br />
Equipped foe not only front left and right channels but also for the<br />
surround left and right, center and subwoofer channels.<br />
Getting Started Connections Setup Playback Remote Control Multi-Zone Information Troubleshooting
ENGLISH<br />
Getting Started Connections Setup Playback Remote Control Multi-Zone Information<br />
Troubleshooting<br />
HDMI<br />
(High-Definition Multimedia Interface)<br />
HDMI is a digital interface standard for next generation TVs based<br />
on DVI (Digital Visual Interface) standards and optimized for use in<br />
consumer equipment.<br />
Non-compressed digital video and multi-channel audio signals are<br />
transmitted with a single connection.<br />
HDMI is also compatible with HDCP (High-bandwidth Digital Contents<br />
Protection), a technology for protecting copyrights that encrypts digital<br />
video signals in the same was as with DVI.<br />
Deep Color<br />
Eliminates on-screen color banding, for smooth tonal transitions and<br />
subtle gradations between colors.<br />
Enables increased contrast ratio.<br />
Can represent many times more shades of gray between black and<br />
white.<br />
At 30-bit pixel depth, a four times improvement would be the minimum,<br />
and the typical improvement would be eight times or more.<br />
xvYCC<br />
Next-generation “xvYCC” color space supports 1.8 times as many<br />
colors as existing HDTV signals.<br />
Lets HDTVs display colors more accurately.<br />
Enables displays with natural, vivid colors.<br />
Lip Sync<br />
Because consumer electronics devices are using increasingly<br />
complex digital signal processing to enhance the clarity and detail of<br />
the content, synchronization of video and audio in <strong>user</strong> devices has<br />
become a greater challenge and could potentially require complex end<strong>user</strong><br />
adjustments. HDMI 1.3 incorporates an automatic video/audio<br />
synching capability that allows devices to perform this synchronization<br />
automatically with total accuracy.<br />
“HDMI”, “HDMI logo” and “High-Definition Multimedia Interface”<br />
are trademarks or registered trademarks of HDMI Licensing<br />
LLC.<br />
Surround Modes and Parameters<br />
Signals and adjustability in the different modes<br />
Surround Mode<br />
Front L/R Center<br />
Channel output<br />
Surround<br />
L/R<br />
Surround<br />
Back L/R<br />
Subwoofer<br />
Parameter (default values are shown in parentheses)<br />
D. COMP LFE AFDM<br />
z1<br />
z2<br />
z1 SB CH Out Cinema EQ.<br />
PURE DIRECT, DIRECT S A A A D S (OFF) S ( 0 dB) A A A<br />
DSD DIRECT S A A A A A A A A A<br />
DSD MULTI DIRECT S D D D D A S ( 0 dB) A S A<br />
MULTI CH DIRECT S D D D D A S ( 0 dB) S (ON) S A<br />
STEREO S A A A D S (OFF) S ( 0 dB) A A A<br />
EXT. IN S D D D D A A A A A<br />
MULTI CH IN S D D D D A S ( 0 dB) S (ON) S A<br />
WIDE SCREEN S D D D D S (OFF) S ( 0 dB) A S S (OFF)<br />
DOLBY PRO LOGIC gx S D D D D S (OFF) A A S S (NOTE1)<br />
DOLBY PRO LOGIC g S D D A D S (OFF) A A S S (NOTE2)<br />
DTS NEO:6 S D D D D S (OFF) A A S S (NOTE1)<br />
DOLBY DIGITAL S D D D D S (OFF) S ( 0 dB) S (ON) S S (OFF)<br />
DTS SURROUND S D D D D S (OFF) S ( 0 dB) S (ON) S S (OFF)<br />
7CH STEREO S D D D D S (OFF) S ( 0 dB) A S A<br />
SUPER STADIUM S D D D D S (OFF) S ( 0 dB) A S A<br />
ROCK ARENA S D D D D S (OFF) S ( 0 dB) A S A<br />
JAZZ CLUB S D D D D S (OFF) S ( 0 dB) A S A<br />
CLASSIC CONCERT S D D D D S (OFF) S ( 0 dB) A S A<br />
MONO MOVIE S D D D D S (OFF) S ( 0 dB) A S A<br />
VIDEO GAME S D D D D S (OFF) S ( 0 dB) A S A<br />
MATRIX S D D D D S (OFF) S ( 0 dB) A S A<br />
VIRTURL S A A A D S (OFF) S ( 0 dB) A A A<br />
S : Signal / Adjustable<br />
A : No signal / Not adjustable<br />
D : Turned on or off by speaker configuration setting<br />
S : Enable<br />
A : Unable<br />
NOTE1 : This parameter is availabe when the GUI menu “Parameter”<br />
– “Audio” – “Surround Parameters” – “Mode” is set to<br />
“Cinema” (vpage 42).<br />
NOTE2 : This parameter is availabe when the GUI menu “Parameter”<br />
– “Audio” – “Surround Parameters” – “Mode” is set to<br />
“Cinema” or “Pro Logic” (vpage 42).<br />
NOTE:<br />
z1 : When playing Dolby Digital and DTS signals.<br />
z2 : When playing Dolby Digital, DTS, DVD-Audio and Super<br />
Audio CD.
Surround Mode<br />
Mode Room Size Effect Level Delay Time Subwoofer<br />
Signals and adjustability in the different modes<br />
Parameter (default values are shown in parentheses)<br />
PRO LOGIC g/gx MUSIC mode only<br />
NEO:6 MUSIC<br />
mode only<br />
EXT. IN only<br />
Panorama Dimension Center Width Center Image Subwoofer Att.<br />
Tone Night Mode Room EQ RESTORER<br />
PURE DIRECT, DIRECT A A A A S A A A A A A S (OFF) S (NOTE5) S<br />
DSD DIRECT A A A A S A A A A A A A A A<br />
DSD MULTI DIRECT A A A A A A A A A A A A A A<br />
MULTI CH DIRECT A A A A A A A A A A A S (OFF) S (NOTE5) A<br />
STEREO A A A A A A A A A A S (0 dB) S (OFF) S (OFF) S<br />
EXT. IN A A A A A A A A A S A A A A<br />
MULTI CH IN A A A A A A A A A A S (0 dB) S (OFF) S (OFF) A<br />
WIDE SCREEN A A S (ON, 10) A A A A A A A S (0 dB) S (OFF) S (OFF) S<br />
DOLBY PRO LOGIC gx S (Cinema) A A A A S (OFF) S (3) S (3) A A S (0 dB) S (OFF) S (OFF) S<br />
DOLBY PRO LOGIC g S (Cinema) A A A A S (OFF) S (3) S (3) A A S (0 dB) S (OFF) S (OFF) S<br />
DTS NEO:6 S (Cinema) A A A A A A A S (0.3) A S (0 dB) S (OFF) S (OFF) S<br />
DOLBY DIGITAL A A A A A A A A A A S (0 dB) S (OFF) S (OFF) A<br />
DTS SURROUND A A A A A A A A A A S (0 dB) S (OFF) S (OFF) A<br />
7CH STEREO A A A A A A A A A A S (0 dB) S (OFF) S (OFF) S<br />
SUPER STADIUM A S (Medium) S (10) A A A A A A A S (NOTE3) S (OFF) S (OFF) S<br />
ROCK ARENA A S (Medium) S (10) A A A A A A A S (NOTE4) S (OFF) S (OFF) S<br />
JAZZ CLUB A S (Medium) S (10) A A A A A A A S (0 dB) S (OFF) S (OFF) S<br />
CLASSIC CONCERT A S (Medium) S (10) A A A A A A A S (0 dB) S (OFF) S (OFF) S<br />
MONO MOVIE A S (Medium) S (10) A A A A A A A S (0 dB) S (OFF) S (OFF) S<br />
VIDEO GAME A S (Medium) S (10) A A A A A A A S (0 dB) S (OFF) S (OFF) S<br />
MATRIX A A A S (30 ms) A A A A A A S (0 dB) S (OFF) S (OFF) S<br />
VIRTURL A A A A A A A A A A S (0 dB) S (OFF) S (OFF) S<br />
S : Signal / Adjustable<br />
A : No signal / Not adjustable<br />
D : Turned on or off by speaker configuration setting<br />
S : Adjustable<br />
A : Not adjustable<br />
NOTE3 : BASS +6 dB, TREBLE 0 dB<br />
NOTE4 : BASS +6 dB, TREBLE +4 dB<br />
NOTE5 : Can be used according to the “Direct Mode” setting.<br />
ENGLISH<br />
Getting Started Connections Setup Playback Remote Control Multi-Zone Information<br />
Troubleshooting
ENGLISH<br />
Getting Started Connections Setup Playback Remote Control Multi-Zone Information<br />
Troubleshooting<br />
Differences in Surround Mode Names Depending on the Input Signals<br />
STANDARD<br />
Button<br />
Surround Mode<br />
DTS SURROUND<br />
Note<br />
ANALOG<br />
LINEAR<br />
PCM /<br />
WAV<br />
WMA<br />
(Windows<br />
Media Audio)<br />
/ MP3 /<br />
MPEG-4<br />
AAC / FLAC<br />
DTS ES<br />
DSCRT<br />
(With Flag)<br />
DTS ES<br />
MTRX<br />
(With Flag)<br />
Input signals<br />
DTS DOLBY DIGITAL DVD-AUDIO Super Audio CD<br />
DTS<br />
(5.1ch)<br />
DTS<br />
96/24<br />
DOLBY<br />
DIGITAL EX<br />
(With Flag)<br />
DOLBY<br />
DIGITAL EX<br />
(With no<br />
Flag)<br />
DOLBY<br />
DIGITAL<br />
(5.1/5/4ch)<br />
DOLBY<br />
DIGITAL<br />
(4/3ch)<br />
DOLBY<br />
DVD-Audio<br />
DIGITAL<br />
(multi ch)<br />
(2ch)<br />
DTS ES DSCRT6.1 z 1 A A A F D A A A A A A A A A A A A<br />
DTS ES MTRX6.1 z 1 A A A A F D A A A A A A A A A A A<br />
DTS SURROUND A A A S S F A A A A A A A A A A<br />
DTS 96/24 A A A A A A F A A A A A A A A A<br />
DTS + PLgx CINEMA z 2 A A A S S S S A A A A A A A A A<br />
DTS + PLgx MUSIC z 1 A A A S S S S A A A A A A A A A<br />
DTS + NEO:6 z 1 A A A A S S S A A A A A A A A A<br />
DTS NEO:6 CINEMA S S S A A A A A A A A S A S A S<br />
DTS NEO:6 MUSIC S S S A A A A A A A A S A S A S<br />
DOLBY SURROUND<br />
DOLBY DIGITAL EX z 1 A A A A A A A S S S S A A A A A<br />
DOLBY DIGITAL A A A A A A A S F F F A A A A A<br />
DOLBY DIGITAL + PLgx CINEMA z 2 A A A A A A A F D S S S A A A A A<br />
DOLBY DIGITAL + PLgx MUSIC z 1 A A A A A A A S S S S A A A A A<br />
DOLBY PRO LOGIC gx CINEMA S S S A A A A A A A A F A S A S<br />
DOLBY PRO LOGIC gx MUSIC S S S A A A A A A A A S A S A S<br />
DOLBY PRO LOGIC gx GAME S S S A A A A A A A A S A S A S<br />
DOLBY PRO LOGIC g CINEMA S S S A A A A A A A A S A S A S<br />
DOLBY PRO LOGIC g MUSIC S S S A A A A A A A A S A S A S<br />
DOLBY PRO LOGIC g GAME S S S A A A A A A A A S A S A S<br />
DOLBY PRO LOGIC S S S A A A A A A A A S A S A S<br />
MULTI CH IN<br />
MULTI CH IN A A A A A A A A A A A A F A F A<br />
MULTI IN + PLgx CINEMA z 2 A A A A A A A A A A A A S A S A<br />
MULTI IN + PLgx MUSIC z 1 A A A A A A A A A A A A S A S A<br />
MULTI CH IN 7.1 A A A A A A A A A A A A F D (7.1) A A A<br />
NOTE:<br />
z 1: This mode is not available when the surround back speaker setup is set to “None”.<br />
z 2: This mode is not available when the surround back speaker setup is set to “1spkr” or “None”.<br />
F : Mode selectable in initial status<br />
D : Mode fixed when “AFDM” is “ON”<br />
S : Selectable mode<br />
A : Non-selectable mode<br />
DVD-<br />
Audio<br />
(2ch)<br />
DSD<br />
(multi ch)<br />
DSD<br />
(2ch)
DIRECT<br />
Button<br />
Surround Mode<br />
Note<br />
ANALOG<br />
LINEAR<br />
PCM /<br />
WAV<br />
WMA<br />
(Windows<br />
Media Audio)<br />
/ MP3 /<br />
MPEG-4<br />
AAC / FLAC<br />
DTS ES<br />
DSCRT<br />
(With Flag)<br />
DTS ES<br />
MTRX<br />
(With Flag)<br />
Input signals<br />
DTS DOLBY DIGITAL DVD-AUDIO Super Audio CD<br />
DTS<br />
(5.1ch)<br />
DTS<br />
96/24<br />
DOLBY<br />
DIGITAL EX<br />
(With Flag)<br />
DOLBY<br />
DIGITAL EX<br />
(With no<br />
Flag)<br />
DOLBY<br />
DIGITAL<br />
(5.1/5/4ch)<br />
DIRECT S S S S S S S S S S S S A S A S<br />
DSD DIRECT A A A A A A A A A A A A A A A S<br />
DSD MULTI DIRECT A A A A A A A A A A A A A A S A<br />
MULTI CH DIRECT A A A A A A A A A A A A S A S A<br />
M DIRECT + PLgx CINEMA z 2 A A A A A A A A A A A A S A S A<br />
M DIRECT + PLgx MUSIC z 1 A A A A A A A A A A A A S A S A<br />
M DIRECT 7.1 A A A A A A A A A A A A S A A A<br />
PURE DIRECT<br />
PURE DIRECT S S S S S S S S S S S S A S A S<br />
DSD PURE DIRECT A A A A A A A A A A A A A A A S<br />
DSD MULTI PURE A A A A A A A A A A A A A A S A<br />
MULTI CH PURE DIRECT A A A A A A A A A A A A S A S A<br />
M PURE D + PLgx CINEMA z 2 A A A A A A A A A A A A S A S A<br />
M PURE D + PLgx MUSIC z 1 A A A A A A A A A A A A S A S A<br />
M CH PURE DIRECT 7.1 A A A A A A A A A A A A S A A A<br />
DSP SIMULATION<br />
STEREO<br />
7CH STEREO z 3 S S S S S S S S S S S S S S S S<br />
WIDE SCREEN S S S S S S S S S S S S S S S S<br />
SUPER STADIUM S S S S S S S S S S S S S S S S<br />
ROCK ARENA S S S S S S S S S S S S S S S S<br />
JAZZ CLUB S S S S S S S S S S S S S S S S<br />
CLASSIC CONCERT S S S S S S S S S S S S S S S S<br />
MONO MOVIE S S S S S S S S S S S S S S S S<br />
VIDEO GAME S S S S S S S S S S S S S S S S<br />
MATRIX S S S S S S S S S S S S S S S S<br />
VIRTUAL S S S S S S S S S S S S S S S S<br />
STEREO F F F S S S S S S S S S S F S F<br />
NOTE :<br />
z 1: This mode is not available when the surround back speaker setup is set to “None”.<br />
z 2: This mode is not available when the surround back speaker setup is set to “1spkr” or “None”.<br />
z 3: If the surround back speaker setup is set to “None”, then “5CH STEREO” is displayed.<br />
F : Mode selectable in initial status<br />
S : Selectable mode<br />
A : Non-selectable mode<br />
DOLBY<br />
DIGITAL<br />
(4/3ch)<br />
DOLBY<br />
DIGITAL<br />
(2ch)<br />
DVD-<br />
Audio<br />
(multi<br />
ch)<br />
DVD-<br />
Audio<br />
(2ch)<br />
DSD<br />
(multi<br />
ch)<br />
ENGLISH<br />
DSD<br />
(2ch)<br />
Getting Started Connections Setup Playback Remote Control Multi-Zone Information<br />
Troubleshooting
ENGLISH<br />
Getting Started Connections Setup Playback Remote Control Multi-Zone Information<br />
Troubleshooting<br />
About Networks<br />
Windows Media Player ver.11<br />
This is a media player distributed free of charge by Microsoft<br />
Corporation.<br />
It can be used to play playlists created with Windows Media Player<br />
ver. 11 as well as files in such formats as WMA, DRM WMA, MP3<br />
and WAV.<br />
vTuner<br />
This is a free online contents server for Internet radio. Note that usage<br />
fees are included in upgrade costs.<br />
For inquiries about this service, visit the vTuner site below.<br />
vTuner website: http://www.radiodenon.com<br />
This product is protected by certain intellectual property rights of<br />
Nothing Else Matters Software and BridgeCo. Use or distribution of<br />
such technology outside of this product is prohibited without a license<br />
from Nothing Else Matters Software and BridgeCo or an authorized<br />
subsidiary.<br />
DLNA<br />
• DLNA and DLNA CERTIFIED are trademarks and/or service marks of<br />
Digital Living Network Alliance.<br />
• Some contents may not be compatible with other DLNA CERTIFIED<br />
products.<br />
0<br />
Windows Media DRM<br />
A copyright-protected technology developed by Microsoft.<br />
• Windows Vista and the Windows logo are trademarks of the<br />
Microsoft group of companies.<br />
• The PlaysForSure logo, Windows Media and the Windows logo are<br />
trademarks or registered trademarks of Microsoft Corporation in the<br />
United States and/or other countries.<br />
• Content providers are using the digital rights management technology<br />
for Windows Media contained in this device (WM-DRM) to protect<br />
the integrity of their content (Secure Content) so that their intellectual<br />
property, including copyright, in such content is not misappropriated.<br />
This device uses WM-DRM software to play Secure Content (WM-<br />
DRM Software). If the security of the WM-DRM Software in this<br />
device has been compromised, owners of Secure Content (Secure<br />
Content Owners) may request that Microsoft revoke the WM-DRM<br />
Software’s right to acquire new licenses to copy, display and/or play<br />
Secure Content. Revocation does not alter the WM-DRM Software’s<br />
ability to play unprotected content. A list of revoked WM-DRM<br />
Software is sent to your device whenever you download a license<br />
for Secure Content from the Internet or from a PC. Microsoft may,<br />
in conjunction with such license, also download revocation list onto<br />
your device on behalf of Secure Content Owners.
Relationship Between Video Signals and Monitor Output<br />
n Main zone<br />
ON<br />
Video Convert<br />
With HDMI<br />
monitor<br />
Without HDMI<br />
monitor<br />
or<br />
with HDMI<br />
monitor off<br />
Input signal Monitor output Monitor output (when GUI menu displayed)<br />
HDMI COMPONENT S-VIDEO VIDEO HDMI COMPONENT S-VIDEO VIDEO HDMI COMPONENT S-VIDEO VIDEO<br />
A A A A b b z3 z3 z3 z3 A A A S b VIDEOz1 VIDEOz1 VIDEOz1 z4 VIDEOz1 z4 b VIDEOz2 VIDEOz2 VIDEOz2 VIDEOz2 A A S A b S-VIDEOz1 S-VIDEOz1 S-VIDEOz1 S-VIDEOz1 b S-VIDEOz2 S-VIDEOz2 S-VIDEOz2 S-VIDEOz2 A A S S b S-VIDEOz1 S-VIDEOz1 S-VIDEOz1 S-VIDEOz1 b S-VIDEOz2 S-VIDEOz2 S-VIDEOz2 S-VIDEOz2 A S (1080p) A A A COMPONENT A A b z3 z3 z3 z3 A S (480p ~ 720p) A A b COMPONENTz1 COMPONENTz1 A A b COMPONENTz2 COMPONENTz2 A A<br />
A S (480i/576i) A A b COMPONENTz1 COMPONENTz1 COMPONENTz1 COMPONENTz1 b COMPONENTz2 COMPONENTz2 COMPONENTz2 COMPONENTz2 A S (1080p) A S b VIDEOz1 COMPONENT VIDEO z1z4 VIDEO z1z4 b VIDEOz2 VIDEOz2 VIDEOz2 VIDEOz2 A S (480p ~ 720p) A S b COMPONENTz1 COMPONENTz1 A VIDEO b COMPONENTz2 COMPONENTz2 A VIDEO<br />
A S (480i/576i) A S b COMPONENTz1 COMPONENTz1 COMPONENTz1 COMPONENTz1 b COMPONENTz2 COMPONENTz2 COMPONENTz2 COMPONENTz2 A S (1080p) S A b S-VIDEOz1 COMPONENT S-VIDEOz1 S-VIDEOz1 b S-VIDEOz2 S-VIDEOz2 S-VIDEOz2 S-VIDEOz2 A S (480p ~ 720p) S A b COMPONENTz1 COMPONENTz1 S-VIDEO S-VIDEO b COMPONENTz2 COMPONENTz2 S-VIDEO S-VIDEO<br />
A S (480i/576i) S A b COMPONENTz1 COMPONENTz1 COMPONENTz1 COMPONENTz1 b COMPONENTz2 COMPONENTz2 COMPONENTz2 COMPONENTz2 A S (1080p) S S b S-VIDEOz1 COMPONENT S-VIDEOz1 S-VIDEOz1 b S-VIDEO*2 S-VIDEOz2 S-VIDEOz2 S-VIDEOz2 A S (480p ~ 720p) S S b COMPONENTz1 COMPONENTz1 S-VIDEO S-VIDEO b COMPONENTz2 COMPONENTz2 S-VIDEO S-VIDEO<br />
A S (480i/576i) S S b COMPONENTz1 COMPONENTz1 COMPONENTz1 COMPONENTz1 b COMPONENTz2 COMPONENTz2 COMPONENTz2 COMPONENTz2 S A A A HDMI A A A HDMIz2 A A A<br />
S A A S HDMI VIDEOz1 VIDEO z1z4 VIDEO z1z4 HDMIz2 VIDEO VIDEO VIDEO<br />
S A S A HDMI S-VIDEOz1 S-VIDEOz1 S-VIDEOz1 HDMIz2 S-VIDEO S-VIDEO S-VIDEO<br />
S A S S HDMI S-VIDEOz1 S-VIDEOz1 S-VIDEOz1 HDMIz2 S-VIDEO S-VIDEO S-VIDEO<br />
S S (1080p) A A HDMI COMPONENT A A HDMIz2 COMPONENT A A<br />
S S (480p ~ 720p) A A HDMI COMPONENTz1 A A HDMIz2 COMPONENT A A<br />
S S (480i/576i) A A HDMI COMPONENTz1 COMPONENTz1 COMPONENTz1 HDMIz2 COMPONENT COMPONENT COMPONENT<br />
S S (1080p) A S HDMI COMPONENT VIDEO z1z4 VIDEO z1z4 HDMIz2 COMPONENT VIDEO VIDEO<br />
S S (480p ~ 720p) A S HDMI COMPONENTz1 A VIDEO HDMIz2 COMPONENT A VIDEO<br />
S S (480i/576i) A S HDMI COMPONENTz1 COMPONENTz1 COMPONENTz1 HDMIz2 COMPONENT COMPONENT COMPONENT<br />
S S (1080p) S A HDMI COMPONENT S-VIDEOz1 S-VIDEOz1 HDMIz2 COMPONENT S-VIDEO S-VIDEO<br />
S S (480p ~ 720p) S A HDMI COMPONENTz1 S-VIDEO S-VIDEO HDMIz2 COMPONENT S-VIDEO S-VIDEO<br />
S S (480i/576i) S A HDMI COMPONENTz1 COMPONENTz1 COMPONENTz1 HDMIz2 COMPONENT COMPONENT COMPONENT<br />
S S (1080p) S S HDMI COMPONENT S-VIDEOz1 S-VIDEOz1 HDMIz2 COMPONENT S-VIDEO S-VIDEO<br />
S S (480p ~ 720p) S S HDMI COMPONENTz1 S-VIDEO S-VIDEO HDMIz2 COMPONENT S-VIDEO S-VIDEO<br />
S S (480i/576i) S S HDMI COMPONENTz1 COMPONENTz1 COMPONENTz1 HDMIz2 COMPONENT COMPONENT COMPONENT<br />
S A A A A A z3 z3 z3 S A A S A VIDEOz1 VIDEOz1 z4 VIDEOz1 z4 A VIDEOz2 VIDEOz2 VIDEOz2 S A S A A S-VIDEOz1 S-VIDEOz1 S-VIDEOz1 A S-VIDEOz2 S-VIDEOz2 S-VIDEOz2 S A S S A S-VIDEOz1 S-VIDEOz1 S-VIDEOz1 A S-VIDEOz2 S-VIDEOz2 S-VIDEOz2 S S (1080p) A A A COMPONENT A A A z3 z3 z3 S S (480p ~ 720p) A A A COMPONENTz1 A A A COMPONENTz2 A A<br />
S S (480i/576i) A A A COMPONENTz1 COMPONENTz1 COMPONENTz1 A COMPONENTz2 COMPONENTz2 COMPONENTz2 S S (1080p) A S A COMPONENT VIDEOz1 z4 VIDEO z1z4 A VIDEOz2 VIDEOz2 VIDEOz2 S S (480p ~ 720p) A S A COMPONENTz1 A VIDEO A COMPONENTz2 A VIDEO<br />
S S (480i/576i) A S A COMPONENTz1 COMPONENTz1 COMPONENTz1 A COMPONENTz2 COMPONENTz2 COMPONENTz2 S S (1080p) S A A COMPONENT S-VIDEOz1 S-VIDEOz1 A S-VIDEOz2 S-VIDEOz2 S-VIDEOz2 S S (480p ~ 720p) S A A COMPONENTz1 S-VIDEO S-VIDEO A COMPONENTz2 S-VIDEO S-VIDEO<br />
S S (480i/576i) S A A COMPONENTz1 COMPONENTz1 COMPONENTz1 A COMPONENTz2 COMPONENTz2 COMPONENTz2 S S (1080p) S S A COMPONENT S-VIDEOz1 S-VIDEOz1 A S-VIDEOz2 S-VIDEOz2 S-VIDEOz2 S S (480p ~ 720p) S S A COMPONENTz1 S-VIDEO S-VIDEO A COMPONENTz2 S-VIDEO S-VIDEO<br />
S S (480i/576i) S S A COMPONENTz1 COMPONENTz1 COMPONENTz1 A COMPONENTz2 COMPONENTz2 COMPONENTz2 S : Signal present<br />
A : No signal<br />
480p ~ 720p : 480p / 576p / 1080i / 720p<br />
A : No output<br />
z1 : The “Picture Adjust” setting can be made.<br />
z2 : Superimposed over video signal<br />
z3 : Only displayed when the MENU button is<br />
pressed<br />
z4 : If the input signal is in SECAM format, it is<br />
converted to PAL for output<br />
• The main zone video conversion function is compatible with the following formats: NTSC, PAL, SECAM, NTSC4,43, PAL -N, PAL -M and PAL -60.<br />
• When SECAM signals of video input are up-converted, the signals are output in PAL format from the S-Video connector.<br />
• If the input signal is a component 1080p signal, up-converting to HDMI is not possible.<br />
• The GUI menu display cannot be superimposed when xvYCC signals and component 1080p signal, computer’s resolution (e.g. VGA) are input.<br />
b : Output according to “Resolution” setting (i/p Scaler : When “A to H” is set) (vpage 30).<br />
: Wallpaper or set background color displayed<br />
: Output according to “Resolution” setting (i/p Scaler : When “H to H” is set) (vpage 30).<br />
: GUI menu not displayed<br />
ENGLISH<br />
Getting Started Connections Setup Playback Remote Control Multi-Zone Information<br />
Troubleshooting
ENGLISH<br />
Getting Started Connections Setup Playback Remote Control Multi-Zone Information<br />
Troubleshooting<br />
Video Convert<br />
OFF<br />
SIGNAL IN MONITOR OUT (Normally) MONITOR OUT (when GUI menu displayed)<br />
HDMI COMPONENT S-VIDEO VIDEO HDMI COMPONENT S-VIDEO VIDEO HDMI COMPONENT S-VIDEO VIDEO<br />
A A A A A A A A S S S S<br />
A A A S A A A S (VIDEO) S S S S<br />
A A S A A A S (S-VIDEO) A S S S S<br />
A A S S A A S (S-VIDEO) S (VIDEO) S S S S<br />
A S A A A S (COMPONENT) A A S S S S<br />
A S A S A S (COMPONENT) A S (VIDEO) S S S S<br />
A S S A A S (COMPONENT) S (S-VIDEO) A S S S S<br />
A S S S A S (COMPONENT) S (S-VIDEO) S (VIDEO) S S S S<br />
S A A A S (HDMI) A A A S (HDMI) z 2 A A A<br />
S A A S S (HDMI) A A S (VIDEO) S (HDMI) z 2 A A A<br />
S A S A S (HDMI) A S (S-VIDEO) A S (HDMI) z 2 A A A<br />
S A S S S (HDMI) A S (S-VIDEO) S (VIDEO) S (HDMI) z 2 A A A<br />
S S A A S (HDMI) S (COMPONENT) A A S (HDMI) z 2 A A A<br />
S S A S S (HDMI) S (COMPONENT) A S (VIDEO) S (HDMI) z 2 A A A<br />
S S S A S (HDMI) S (COMPONENT) S (S-VIDEO) A S (HDMI) z 2 A A A<br />
S S S S S (HDMI) S (COMPONENT) S (S-VIDEO) S (VIDEO) S (HDMI) z 2 A A A<br />
S : Signal present<br />
A : No signal<br />
To display the GUI menu on an HDMI monitor, output with a resolution of 480p/576p.<br />
n ZONE2<br />
Input MONITOR OUT<br />
S-VIDEO VIDEO VIDEO<br />
A A A<br />
A S S (VIDEO)<br />
S A S (S-VIDEO)<br />
S S S (S-VIDEO)<br />
S : Signal present<br />
A : No signal<br />
S : Output present<br />
A : No output<br />
S : Output present<br />
A : No output<br />
z 2 : Superimposed over video signal
Troubleshooting<br />
If a problem should arise, first check the following:<br />
1. Are the connections correct?<br />
2. Is the set being operated as described in the owner’s <strong>manual</strong>?<br />
3. Are the other components operating properly?<br />
If this unit does not operate properly, check the items listed in the table below. Should the problem persist,<br />
there may be a malfunction.<br />
In this case, disconnect the power immediately and contact your store of purchase.<br />
GGeneralH<br />
Symptom Cause Countermeasure Page<br />
Power does not • Connection of the power cord is • Check that the power plugs are 22<br />
turn on, or turns faulty.<br />
securely inserted into the AVRoff<br />
directly after it<br />
3808’s AC inlet and the wall<br />
was turned on.<br />
power outlet.<br />
No sound is • Connection with the input • Check the connections.<br />
9<br />
produced from devices or connection of the<br />
speakers.<br />
speaker cables is faulty.<br />
• Device you want to play and set • Select an appropriate input 37<br />
input source do not match. source.<br />
• Master volume is turned too • Adjust the master volume to an 47<br />
low.<br />
appropriate level.<br />
• Mute mode is set.<br />
• Cancel the mute mode.<br />
47<br />
• Headphones are connected. • Disconnect the headphones. 47<br />
• No digital signals are being • Select an input source for which 39<br />
input.<br />
the digital input setting has been<br />
made.<br />
• The connectors to which the • Set the input mode.<br />
digital inputs are assigned and<br />
the settable input modes do not<br />
match.<br />
39<br />
Display is off. • The “Dimmer” setting is set to • Set to something other than 35<br />
“OFF”.<br />
“OFF”.<br />
• The PURE DIRECT mode is set. • Set a surround mode other than<br />
the PURE DIRECT mode.<br />
40, 41<br />
“DOLBY DIGITAL” • DVD player’s digital audio output • Check the DVD player’s audio –<br />
indicator does not setting is not proper.<br />
output setting. For details, read<br />
appear on display.<br />
the DVD player’s operating<br />
instructions.<br />
Symptom Cause Countermeasure Page<br />
Power turns off • Protection circuit activated due • Turn off the power, wait for the 10<br />
suddenly and to rise of internal temperature. set to fully cool down, then turn<br />
power indicator<br />
the power back on.<br />
flashes red.<br />
• Place the set in a well-ventilated<br />
place.<br />
10<br />
• First unplug the power cord,<br />
then twist the core wires tightly<br />
or terminate the speaker cables,<br />
then reconnect.<br />
10<br />
• Core wires of two speakers are<br />
touching each other or a core<br />
wire is sticking out of the terminal<br />
and touching the set’s rear panel,<br />
activating the protection circuit.<br />
• Speakers with an impedance<br />
other than specified are being<br />
used.<br />
• Set is damaged.<br />
• Use speakers with the specified<br />
impedance.<br />
• Turn off the power and contact a<br />
DENON service center.<br />
GRemote Control UnitH<br />
Symptom Cause Countermeasure Page<br />
Set does not work • Batteries are worn.<br />
• Replace with new batteries.<br />
3<br />
properly when • You are operating outside of the • Operate within the specified 3<br />
remote control specified range.<br />
range.<br />
unit operated. • Obstacle between main unit and • Remove the obstacle.<br />
remote control unit.<br />
3<br />
• The batteries are not inserted in • Insert the batteries in the 3<br />
the proper direction, as indicated proper direction, following the<br />
by the polarity marks in the polarity marks in the battery<br />
battery compartment.<br />
compartment.<br />
• The set’s remote control sensor • Move the set to a place in which 3<br />
is exposed to strong light (direct the remote control sensor will<br />
sunlight, inverter type fluorescent<br />
bulb light, etc.).<br />
not be exposed to strong light.<br />
• The remote ID of the main unit • Set the same remote IDs for the 35, 63<br />
and remote control unit do not main unit and remote control<br />
match.<br />
unit.<br />
ENGLISH<br />
10<br />
–<br />
Getting Started Connections Setup Playback Remote Control Multi-Zone Information<br />
Troubleshooting
ENGLISH<br />
Getting Started Connections Setup Playback Remote Control Multi-Zone Information<br />
Troubleshooting<br />
GAudioH<br />
Symptom Cause Countermeasure Page<br />
No sound is • You are playing a monaural • The mode is set to something 41<br />
produced from source (TV, AM radio broadcast, other than “STANDARD”.<br />
center speaker. etc.) in the STANDARD mode.<br />
No sound • The surround mode is set to • Set to a surround playback 40, 41<br />
is produced “STEREO”, “DIRECT” or “PURE mode.<br />
from surround<br />
speakers.<br />
DIRECT”.<br />
No sound is • The surround back speaker’s • Check the setting and change it 28<br />
produced from power amplifier is assigned to a as necessary.<br />
surround back different channel.<br />
speaker.<br />
• Surround back speaker setting is • Set to something other than 28<br />
set to “None”.<br />
“None”.<br />
• Surround mode not set to a mode • Select a surround playback 40, 41<br />
for 6.1- or 7.1-channel playback. mode.<br />
No sound is • Subwoofer’s power not turned • Turn on the subwoofer’s power. –<br />
produced from on.<br />
subwoofer. • The “Subwoofer” setting at • Set to “Yes”.<br />
28<br />
“Speaker configuration” is set to<br />
“No”.<br />
• The subwoofer is not properly • Check the connections.<br />
connected.<br />
9<br />
• The subwoofer’s volume is • Adjust the subwoofer’s volume 59<br />
turned off.<br />
to an appropriate level.<br />
No test tones are • Surround mode not set to • Set to the STANDARD mode. 40<br />
produced when<br />
main remote<br />
control unit’s TEST<br />
TONE button is<br />
pressed.<br />
“STANDARD”.<br />
DTS sound is not • DVD player’s audio output setting • Set the DVD player. For details, –<br />
output.<br />
is not set to bitstream.<br />
refer to the DVD player’s<br />
operating instructions.<br />
• DVD player is not compatible • Use a DTS-compatible player.<br />
with DTS sound playback.<br />
–<br />
• The AVR-3808’s “Decode Mode” • Set to the “Auto” or DTS mode.<br />
setting is set to “PCM”.<br />
38<br />
HDMI audio • The “Manual Setup” – “HDMI • Set to “Amp”. 30<br />
signals are not Setup” – “Audio” setting is set to<br />
output from<br />
speakers.<br />
“TV”.<br />
Symptom Cause Countermeasure Page<br />
No sound is • The “Manual Setup” – “HDMI • Set to “TV”. 30<br />
output from Setup” – “Audio” setting is set to<br />
the monitor<br />
connected<br />
with HDMI<br />
connections.<br />
“Amp”.<br />
GVideoH<br />
Symptom Cause Countermeasure Page<br />
The on-screen • The format of the GUI and TV • Match the format of the GUI and 34<br />
display does not<br />
appear.<br />
(PAL or NTSC) do not match. TV.<br />
No picture • The connections between the • Check the connections.<br />
11 ~ 22<br />
appears.<br />
AVR-3808<br />
faulty.<br />
and monitor are<br />
• The monitor’s input setting is • Set properly.<br />
wrong.<br />
–<br />
• PURE DIRECT mode is set. • Cancel the PURE DIRECT mode. 40, 41<br />
• The player is connected using the • High definition (1080i/720p) and –<br />
component input connectors, the progressive (480p/576p) video<br />
monitor is connected using the signals are not down-converted.<br />
video (yellow) or S-Video output Set the player to interlace<br />
connectors.<br />
(480i/576i) signals.<br />
No picture<br />
appears<br />
with HDMI<br />
connections.<br />
Picture cannot be<br />
recorded.<br />
DVDs cannot be<br />
copied on a VCR.<br />
• The connections to the HDMI<br />
connectors are faulty.<br />
• HDMI input setting is improper.<br />
• The monitor is not compatible<br />
with copyright protection<br />
(HDCP).<br />
• The HDMI format of the player<br />
and monitor do not match.<br />
• Input source does not match<br />
recorder’s video connection<br />
connector (video or S-Video).<br />
–<br />
• Check the connections.<br />
• Check the HDMI input setting.<br />
• Connect a monitor that is<br />
compatible with copyright<br />
protection (HDCP).<br />
• Match the HDMI format of the<br />
player and monitor.<br />
• The video conversion function<br />
does not work for the REC<br />
OUT connectors. Match the<br />
input source and recorder<br />
connections.<br />
• This is not a malfunction. Most<br />
movie software includes copy<br />
prevention signals and cannot be<br />
copied.<br />
11<br />
39<br />
11<br />
11<br />
15<br />
–
GiPodH Symptom Cause Countermeasure Page<br />
Symptom Cause Countermeasure Page Internet radio • Ethernet cable is not properly • Check the connection status. 20<br />
iPod cannot be<br />
played.<br />
• The input source assigned to • Switch to the input source<br />
“iPod dock” is not selected. assigned at “iPod dock”.<br />
• Cable is not properly connected. • Reconnect.<br />
• Control Dock for iPod’s AC • Plug the Control Dock for iPod’s<br />
adapter is not connected to AC adapter into a power outlet.<br />
power outlet.<br />
39<br />
13<br />
–<br />
cannot be played. connected or network is<br />
disconnected.<br />
• Program is being broadcast in • Only Internet radio programs in<br />
non-compatible format.<br />
MP3 and WMA can be played on<br />
this set.<br />
• The computer’s or router’s • Check the computer’s or router’s<br />
firewall is activated.<br />
firewall settings.<br />
53<br />
–<br />
GNET/USBH<br />
• Radio station is not currently • Choose a radio station that is<br />
broadcasting.<br />
currently broadcasting.<br />
54<br />
Symptom Cause Countermeasure Page<br />
• IP address is wrong.<br />
• Check the set’s IP address.<br />
33<br />
When a USB • The set cannot recognize a USB • Check the connection.<br />
18 Files stored on a • Files are stored in a non- • Record in a compatible format. 53<br />
memory device is memory device.<br />
computer cannot compatible format.<br />
connected, “USB” • A USB memory device not • Connect a USB memory device – be played. • You are attempting to play a file • Files that are copyright protected 53<br />
is not displayed on conforming to mass storage class conforming to mass storage<br />
that is copyright protected. cannot be played on this set.<br />
the GUI menu. or MTP standards is connected. class or MTP standards.<br />
• Set and computer are connected • The set’s USB port cannot –<br />
• The set port and the connected • Connect to the port set at “USB 40<br />
by USB cable.<br />
be used for connection to a<br />
port do not match.<br />
Select”.<br />
computer.<br />
• A USB memory device that • This is not a malfunction. DENON<br />
the set cannot recognize is does not guarantee that all USB<br />
connected.<br />
memory devices will operate or<br />
receive power.<br />
• USB memory device is connected • Connect the USB memory device<br />
via USB hub.<br />
directly to the USB port.<br />
–<br />
–<br />
Server is not<br />
found, or it is<br />
not possible to<br />
connect to the<br />
server.<br />
• The computer’s or router’s • Check the computer’s or router’s<br />
firewall is activated.<br />
firewall settings.<br />
• Computer’s power is not turned • Turn on the power.<br />
on.<br />
• Server is not running.<br />
• Launch the server.<br />
• Set’s IP address is wrong. • Check the set’s IP address.<br />
–<br />
–<br />
–<br />
32, 33<br />
Files on a USB<br />
memory device<br />
cannot be played.<br />
The file names<br />
are not displayed<br />
properly (“...”, etc.).<br />
• USB memory device is in format • Set the format to FAT16 or<br />
other than FAT16 or FAT32. FAT32. For details, refer to the<br />
USB memory device’s operating<br />
instructions.<br />
• USB memory device is divided • When divided into multiple<br />
into multiple partitions.<br />
partitions, only files stored in the<br />
top partition can be played.<br />
• Files are stored in a non- • Record the files in a compatible<br />
compatible format.<br />
format.<br />
• You are attempting to play a file • Files that are copyright protected<br />
that is copyright protected. cannot be played on this set.<br />
• Characters that cannot be • This is not a malfunction. On<br />
displayed are used.<br />
this set, characters that cannot<br />
be displayed are replaced with a<br />
“ . (period)”.<br />
–<br />
–<br />
53<br />
53<br />
–<br />
Cannot connect to • Radio station is not currently • Wait a while before trying again.<br />
preset or favorite broadcasting.<br />
radio stations. • Radio station is not currently in • It is not possible to connect to<br />
service.<br />
radio stations that are no longer<br />
in service.<br />
For some • Station is congested or not • Wait a while before trying again.<br />
radio stations, currently broadcasting.<br />
“Server Full”<br />
or “Connection<br />
Down” is<br />
displayed and<br />
station cannot be<br />
connected to.<br />
Sound is broken • Network’s signal transfer speed • This is not a malfunction. When<br />
during playback. is slow or communications lines playing broadcast data with a<br />
–<br />
–<br />
–<br />
–<br />
or radio station is congested. high bit rate, the sound may<br />
be broken, depending on the<br />
communications conditions.<br />
Sound quality is • File being played has a low bit • This is not a malfunction. –<br />
poor or played<br />
sound is noisy.<br />
rate.<br />
ENGLISH<br />
Getting Started Connections Setup Playback Remote Control Multi-Zone Information<br />
Troubleshooting
ENGLISH<br />
Getting Started Connections Setup Playback Remote Control Multi-Zone Information Troubleshooting<br />
Specifications<br />
n Audio section<br />
• Power amplifier<br />
Rated output: Front:<br />
130 W + 130 W (8 Ω/ohms, 20 Hz ~ 20 kHz with 0.05 % T.H.D.)<br />
160 W + 160 W (6 Ω/ohms, 1 kHz with 0.7 % T.H.D.)<br />
Center:<br />
130 W (8 Ω/ohms, 20 Hz ~ 20 kHz with 0.05 % T.H.D.)<br />
160 W (6 Ω/ohms, 1 kHz with 0.7 % T.H.D.)<br />
Surround (A + B):<br />
130 W + 130 W (8 Ω/ohms, 20 Hz ~ 20 kHz with 0.05 % T.H.D.)<br />
160 W + 160 W (6 Ω/ohms, 1 kHz with 0.7 % T.H.D.)<br />
Surround back:<br />
130 W + 130 W (8 Ω/ohms, 20 Hz ~ 20 kHz with 0.05 % T.H.D.)<br />
160 W + 160 W (6 Ω/ohms, 1 kHz with 0.7 % T.H.D.)<br />
Dynamic power: 140 W x 2ch (8 Ω/ohms)<br />
210 W x 2ch (4 Ω/ohms)<br />
Output connectors: Front, Center, Surround back 6 ~ 16 Ω/ohms<br />
Surround: A or B 6 ~ 16 Ω/ohms<br />
A + B 8 ~ 16 Ω/ohms<br />
• Analog<br />
Input sensitivity / Input impedance: 200 mV / 47 kΩ/kohms<br />
Frequency response: 10 Hz ~ 100 kHz — +1, –3 dB (DIRECT mode)<br />
S/N: 102 dB (DIRECT mode)<br />
Distortion: 0.005 % (20 Hz ~ 20 kHz) (DIRECT mode)<br />
Rated output: 1.2 V<br />
• Digital<br />
D/A output: Rated output — 2 V (at 0 dB playback)<br />
Total harmonic distortion — 0.008 % (1 kHz, at 0 dB)<br />
S/N ratio — 102 dB<br />
Dynamic range — 96 dB<br />
Digital input: Format — Digital audio interface<br />
• Phono equalizer (PHONO input — REC OUT)<br />
Input sensitivity: 2.5 mV<br />
RIAA deviation: ±1 dB (20 Hz to 20 kHz)<br />
S/N: 74 dB (A weighting, with 5 mV input)<br />
Rated output: 150 mV<br />
Distortion factor: 0.03 % (1 kHz, 3 V)<br />
n Video section<br />
• Standard video connectors<br />
Input / output level and impedance: 1 Vp-p, 75 Ω/ohms<br />
Frequency response:<br />
• S-Video connectors<br />
5 Hz ~ 10 MHz — +0, –3 dB (when video convert set to “OFF”)<br />
Input / output level and impedance: Y (brightness) signal — 1 Vp-p, 75 Ω/ohms<br />
C (color) signal — 0.3 (PAL) / 0.286 (NTSC) Vp-p, 75 Ω/ohms<br />
Frequency response:<br />
• Color component video connector<br />
5 Hz ~ 10 MHz — +0, –3 dB (when video convert set to “OFF”)<br />
Input / output level and impedance: Y (brightness) signal — 1 Vp-p, 75 Ω/ohms<br />
PB / CB signal — 0.7 Vp-p, 75 Ω/ohms<br />
PR / CR signal — 0.7 Vp-p, 75 Ω/ohms<br />
Frequency response: 5 Hz ~ 100 MHz — +0, –3 dB (when video convert set to “OFF”)<br />
n Tuner section [FM]<br />
(note: µV at 75 Ω/ohms, 0 dBf = 1 x 10<br />
[AM]<br />
-15 W)<br />
Receiving Range: 87.5 MHz ~ 108.0 MHz 522 kHz ~ 1611 kHz<br />
Usable Sensitivity: 1.0 µV (11.2 dBf) 18 µV<br />
50 dB Quieting Sensitivity: MONO 1.6 µV (15.3 dBf)<br />
STEREO 23 µV (38.5 dBf)<br />
S/N (IHF-A): MONO 77 dB<br />
STEREO 72 dB<br />
Total harmonic Distortion (at 1 kHz): MONO 0.15 %<br />
n General<br />
STEREO 0.3 %<br />
Power supply: AC 230 V, 50 Hz<br />
Power consumption: 550 W<br />
0.3 W (Standby)<br />
Maximum external dimensions: 434 (W) x 171 (H) x 420 (D) mm<br />
Mass: 17.8 kg<br />
n Main remote control unit (RC-1068)<br />
Batteries: LR6/AA Type (two batteries)<br />
Maximum external dimensions: 63 (W) x 238 (H) x 31 (D) mm<br />
Mass: 190 g (including batteries)<br />
n Sub remote control unit (RC-1070)<br />
Batteries: R03/AAA Type (two batteries)<br />
Maximum external dimensions: 49 (W) x 220 (H) x 24.5 (D) mm<br />
Mass: 114 g (including batteries)<br />
b For purposes of improvement, specifications and design are subject to change without notice.
List of preset codes / Liste von voreingestellten Codes / Liste de codes préréglés / Lista dei codici pre-regolati /<br />
Lista de códigos pre-ajustados / Lijst van vooringestelde codes / Förteckning över förinställda koder<br />
Denon Amp<br />
D Denon 81001, 82001, 83001, 84001<br />
Denon Tuner<br />
D Denon (Analog) 52863, 52795, 52800, 52805<br />
Denon Digital Tuner<br />
D Denon (NET/USB) 62865, 62837, 62838, 62839<br />
Denon iPod<br />
D Denon 72815, 72816, 72817, 72818<br />
Cable<br />
A A-Mark 00008, 00144<br />
ABC 00237, 00003, 00008<br />
Accuphase 00003<br />
Acorn 00237<br />
Action 00237<br />
Active 00237<br />
ADB 01230<br />
Aichi Denshi 01512<br />
Americast 00899<br />
Amstrad 01222<br />
Archer 00237<br />
Auna 01230<br />
Austar 00276<br />
B BCC 00276<br />
Bell South 00899<br />
Bestlink 00303<br />
Birmingham Cable<br />
Communications<br />
00276<br />
British Telecom 00003<br />
C Cable & Wireless 01068<br />
Century 00008<br />
Coship 01462<br />
D Daehan 00778<br />
Daeryung 01877, 00877, 00477, 00008<br />
Digeo 01187<br />
Director 00476<br />
DX Antenna 01500<br />
E Emerson 00303<br />
Encon 00008<br />
F Fosgate 00276<br />
Foxtel 01222<br />
France Telecom 00817<br />
Freebox 01482<br />
Fujitsu 01497<br />
G Galaxi 00008<br />
GE 00237, 00144<br />
Gehua 00476<br />
General Instrument 00476, 00810, 00276, 00003<br />
Gibralter 00003<br />
GNI 01466<br />
GoldStar 00144<br />
H Hitachi 00003, 00008<br />
Hongtian Jiangsu 01462<br />
Hwalin 00303<br />
I Insight 00476, 00810<br />
J Jerrold 00476, 00810, 00276, 00003<br />
Jiuzhou 01445<br />
K KNC 00008<br />
L LG 00144<br />
M Macab 00817<br />
Madritel 01230<br />
Maspro 01510<br />
Matav 01082<br />
Memorex 00000<br />
Mitsubishi 00003<br />
Motorola<br />
01376, 00476, 00810, 00276,<br />
01187<br />
MS 00303<br />
N NEC 01496<br />
Noos 00817<br />
Nova Vision 00008<br />
Novaplex 00008<br />
NTL 00276, 00003, 01060, 01068<br />
O Oak 00303<br />
Ono 01068<br />
Optus 00276, 01060<br />
P Pace<br />
01877, 00877, 00237, 00008,<br />
01060, 01068, 01577<br />
Panasonic 00000, 00008, 00144, 01488<br />
Paragon 00000, 00008, 00525<br />
Penney 00000<br />
Philips 01305, 00317, 00817<br />
Pioneer<br />
01877, 00877, 00144, 00533,<br />
01500<br />
Pulsar 00000<br />
PVP Stereo Visual<br />
Matrix<br />
00003<br />
Q Quasar 00000<br />
R RadioShack 00303<br />
Regal 00276<br />
Runco 00000<br />
S Sagem 00817<br />
Salora 00000<br />
Samsung<br />
00003, 00000, 00144, 00778,<br />
Scientific Atlanta<br />
00840, 01060, 01666<br />
01877, 00877, 00477, 00237,<br />
00003, 00000, 00008, 01510<br />
Skyworth 01464<br />
Sony 01006, 01460<br />
Sprucer 00144<br />
Starcom 00003<br />
StarHub 00276<br />
Sumitomo 01500, 01504<br />
Supercable 00276<br />
T Taihan 00778<br />
TCL 01445<br />
Telewest 01068<br />
Time Warner cable 01877<br />
TongKook 00840<br />
Torx 00003<br />
Toshiba 00000, 01509<br />
Trans PX 00276, 00303<br />
TS 00003, 00303<br />
U United Cable 00276, 00003<br />
US Electronics 00276, 00003, 00008<br />
V Videoway 00000<br />
Visiopass 00817<br />
Z Zenith 00000, 00525, 00899<br />
Cable/PVR Combination b1<br />
A Americast 00899<br />
D Digeo 01187<br />
F Freebox 01482<br />
G General Instrument 00810<br />
J Jerrold 00810<br />
M Motorola 01376, 00810, 01187<br />
P Pace 01877, 00237<br />
Pioneer 01877, 00877<br />
S Scientific Atlanta 01877, 00877<br />
Sony 01006<br />
Supercable 00276<br />
T Time Warner cable 01877<br />
Z Zenith 00899<br />
CD Player<br />
A Acoustic Research 40420<br />
Advantage 40032<br />
Aiwa 40157<br />
Arcam 40157<br />
Audio Research 40157<br />
Audiolab 40157<br />
Audiomeca 40157<br />
Audioton 40157<br />
AVI 40157<br />
B<br />
Balanced Audio<br />
Technology<br />
40157<br />
Burmester 40420<br />
Bush 40388<br />
C Cairn 40157<br />
California Audio Labs 40029, 40303<br />
Cambridge 40157<br />
Cambridge Audio 40157<br />
Cambridge<br />
Soundworks<br />
40157<br />
Carver 40157, 40179<br />
CDC 40420<br />
CEC 40420<br />
Copland 40393<br />
Curtis Mathes 40032<br />
Cyrus 40157<br />
D Denon<br />
40873, 40003, 40766,<br />
[42867] z, 42868<br />
DKK 40000<br />
DMX Electronics 40157<br />
Dual 40003<br />
Dynaco 40157<br />
Dynamic Bass 40179<br />
F Fisher 40000, 40179<br />
G Garrard 40393, 40420<br />
Genexxa 40000, 40032, 40037, 40179<br />
Goldmund 40157<br />
Grundig 40157<br />
H Hafler 40173<br />
Harman/Kardon 40100, 40157, 40173<br />
Hitachi 40032<br />
I Inkel 40157<br />
Integra 40101<br />
J Jerrold 40003<br />
JVC 40032, 40072<br />
K Kenwood<br />
40681, 40000, 40029, 40157,<br />
40028, 40037, 40036, 40190<br />
KLH 41318<br />
Krell 40157<br />
L Linn 40157<br />
Loewe 40157<br />
Luxman 40393<br />
LXI 40179<br />
M Magnavox 40157<br />
Marantz 40029, 40157<br />
Matsui 40157<br />
MCS 40029<br />
Memorex<br />
40000, 40032, 40179, 40420,<br />
40468<br />
Meridian 40157<br />
Micromega 40157<br />
Miro 40000<br />
Mission 40157<br />
Modulaire<br />
40000, 40032, 40087, 40179,<br />
40420, 40468<br />
MTC 40420<br />
Musical Fidelity 40393<br />
Myryad 40157<br />
N NAD 40000, 40721<br />
Naim 40157<br />
NSM 40157<br />
O Onkyo 40868, 40101<br />
Optimus<br />
40000, 40032, 40037, 40087,<br />
40179, 40393, 40420, 40468<br />
Orion 40393<br />
P Panasonic 40029, 40303, 40388, 40752<br />
Parasound 40420<br />
Penney 40029<br />
Philips 40157<br />
Pioneer 40032, 40101, 40468<br />
Polk Audio 40157<br />
Proceed 40420<br />
Proton 40157<br />
Q QED 40157<br />
Quad 40157<br />
Quasar 40029<br />
R Radiola 40157<br />
RadioShack<br />
40000, 40032, 40179, 40420,<br />
40468<br />
RCA<br />
40032, 40053, 40179, 40420,<br />
40468<br />
Realistic<br />
40000, 40032, 40087, 40179,<br />
40420, 40468<br />
Restek 40157<br />
Revox 40157<br />
Roksan 40420<br />
Rotel 40157, 40420<br />
Royal 40420<br />
S SAE 40157<br />
Saisho 40000<br />
Sansui 40000, 40157<br />
Sanyo 40000, 40087, 40179<br />
SAST 40157<br />
Sears 40179<br />
Sharp 40037<br />
Siemens 40157<br />
Silsonic 40036<br />
Simaudio 40157<br />
Sonic Frontiers 40157<br />
Sony<br />
40490, 40000, 40100, 41364,<br />
40185<br />
Sugden 40157<br />
Sylvania 40157<br />
T TAG McLaren 40157<br />
Tandy 40032<br />
PRESET CODE
Tascam 40393, 40420<br />
Teac 40490, 40393, 40420<br />
Technics 40029, 40303<br />
Techwood 40303<br />
Thomson 40053<br />
Thorens 40157<br />
Thule Audio 40157<br />
Tokai 40420<br />
U Universum 40157, 40053<br />
V Victor 40072<br />
W Wadia 40393<br />
Wards<br />
40000, 40032, 40157, 40053,<br />
40087, 40179<br />
Y Yamaha 40490, 40868, 40032, 40036<br />
Yorx 40000<br />
CD Recorder<br />
D Denon 40766, 42868<br />
J JVC 40072<br />
R RCA 40053, 40420<br />
S Sony 40000, 40100, 41364<br />
T Teac 40420<br />
Thomson 40053<br />
Tape Deck<br />
A Aiwa 20029, 20197, 20200, 21315<br />
Akai 20283, 20439<br />
Arcam 20076<br />
Audiolab 20029<br />
C Carver 20029<br />
D Denon<br />
20076, 20371, 21311,<br />
[22471] z<br />
F Fisher 20074<br />
G Garrard 20308, 20309, 20375, 20439<br />
Genexxa 20439<br />
GoldStar 20375<br />
Grundig 20029, 20375<br />
H Harman/Kardon 20182, 20029, 21314<br />
I Inkel 20070, 20071, 20337<br />
20244, 20273, 20274, 20303,<br />
J JVC<br />
PRESET CODE<br />
20304, 20310, 21309<br />
K Kenwood<br />
20070, 20071, 20092, 20233,<br />
20234, 21364<br />
L LG 20375<br />
Luxman 20308, 20309<br />
M Magnavox 20029<br />
Marantz 20029, 20009<br />
Memorex 20099<br />
Mitsubishi 20283, 20439<br />
Myryad 20029<br />
O Onkyo 20135, 20136, 20282<br />
Optimus 20027, 20220, 20337, 20439<br />
Orion 20308, 20309<br />
P Palladium 20375<br />
Panasonic 20229<br />
Philips 20029, 20229<br />
Phonotrend 20337<br />
Pioneer<br />
20027, 20220, 20099, 20109,<br />
21306, 21312<br />
Polk Audio 20029<br />
R Radiola 20029<br />
RCA 20027, 20220<br />
Revox 20029<br />
S Sansui 20029, 20009<br />
Sanyo 20074<br />
Sharp 20231, 20371<br />
Sherwood 20337<br />
Sonic 20375<br />
Sony<br />
20243, 20170, 20291, 20234,<br />
21313<br />
T TaeKwang 20439<br />
Tandberg 20109<br />
Teac<br />
20280, 20283, 20289, 20308,<br />
20309<br />
Technics 20229<br />
Technovox 20229<br />
Thorens 20029<br />
U Universum 20375, 20439<br />
V Victor 20244, 20273, 20274<br />
W Wards 20027, 20029<br />
Wharfedale 20439<br />
Y Yamaha 20097, 20094<br />
HDTV Tuner b1<br />
A ABS 01272<br />
Accurian 01653<br />
Alienware 01272<br />
C CyberPower 01272<br />
D D-Link 01554<br />
Dgtec 01363<br />
E Epson 01563<br />
G Gateway 01272<br />
H Hewlett Packard 01272, 01267<br />
Howard Computers 01272<br />
HP 01272, 01267<br />
Hush 01272<br />
I iBUYPOWER 01272<br />
L LG 01415<br />
Linksys 01272, 01365<br />
M Media Center PC 01272<br />
Microsoft 01272, 01805<br />
Mind 01272<br />
Motorola 01363<br />
N Niveus Media 01272<br />
Northgate 01272<br />
P Packard Bell 01272<br />
Panasonic 01120<br />
Pioneer 01010<br />
R Ricavision 01272<br />
S Samsung 01190, 01490<br />
Sensory Science 01126<br />
Sharp 01010<br />
SMC 01456<br />
Sony 01272, 01324, 01364<br />
Stack 9 01272<br />
Sylvania 01563<br />
Systemax 01272<br />
T Tagar Systems 01272<br />
Toshiba 01272<br />
Touch 01272<br />
V Viewsonic 01272, 01329<br />
Vizio 01126<br />
Voodoo 01272<br />
X Xbox 01805<br />
Z ZT Group 01272<br />
Satellite Receiver<br />
A @sat 01300<br />
@Sky 01334<br />
A-Mark 00345<br />
ABsat 00123, 00713<br />
ADB<br />
00642, 01259, 01367, 01418,<br />
01473, 01491<br />
AGS 00710<br />
Aiwa 01514<br />
Akai 00200<br />
Alba<br />
00455, 00713, 01284, 01659,<br />
01811<br />
Allsat 00200, 01043<br />
Alltech 00713<br />
Allvision 01232, 01334, 01412<br />
AlphaStar 00772<br />
Amitronica 00713<br />
00345, 00713, 00795, 00847,<br />
Amstrad<br />
00863, 00882, 01113, 01175,<br />
01693, 01801<br />
Anglo 00713<br />
Ankaro 00713<br />
AntSat 01083<br />
Apollo 00455<br />
Arcon 01043, 01075<br />
Armstrong 00200<br />
Arnion 01300<br />
Asat 00200<br />
ASCI 01334<br />
ASLF 00713<br />
AssCom 00853<br />
Astacom 00710<br />
Aston 00142<br />
Astra 00713<br />
Astratec 01743<br />
Astro<br />
00173, 00658, 01099, 01100,<br />
01113<br />
Atlantic Telephone 01333<br />
Atsat 01300<br />
AtSky 01334<br />
Audioline 01672<br />
Aurora 00642, 00879, 01333, 01433<br />
Austar<br />
00497, 00642, 00863, 00879,<br />
01176, 01259<br />
Axiel 00710<br />
Axil 01457, 01659<br />
Axis 01111<br />
B B@ytronic 01412<br />
Beko 00455<br />
Bell ExpressVu 00775<br />
Big Sat 01457<br />
Black Diamond 01284<br />
Blaupunkt 00173<br />
Blue Sky 00713<br />
Boca 00713, 01232, 01366<br />
Boston 00710, 01251<br />
Brainwave 00658, 01672<br />
British Sky<br />
Broadcasting<br />
00847, 01175, 01662, 01847<br />
Broco 00713<br />
BskyB 00847, 01175, 01662<br />
BT 00710, 01296<br />
Bubu Sat 00713<br />
Bush<br />
01284, 01645, 01672, 01743,<br />
01811<br />
C Canal 00853<br />
Canal Digital 00853, 01622<br />
Canal Satellite 00853, 01339, 01853<br />
Canal+ 00853<br />
Centrex 01457<br />
CGV 01413, 01567<br />
Chaparral 00216<br />
Cherokee 00123, 00710<br />
Chess 00713, 01085, 01334, 01626<br />
Chili 01718<br />
CityCom<br />
00299, 00394, 00818, 01075,<br />
01176, 01232<br />
Classic 01672<br />
Clatronic 01413<br />
CNS 01367<br />
Comag 01232, 01366, 01412, 01413<br />
Condor 01700<br />
Conia 01695<br />
Contec 00394<br />
Continental Edison 01695<br />
Coship 01457<br />
Crossdigital 01109<br />
Crown 01284<br />
Cryptovision 00455, 00795<br />
Cyfra+ 01076<br />
Cyrus 00200<br />
D D-box 00723, 00873, 01114<br />
Daewoo 00713, 01111, 01296, 01743<br />
Delfa 00863<br />
Deltasat 01075<br />
Dgtec 01542, 01631, 01242<br />
Digenius 00299<br />
Digiality 01685<br />
Digifusion 01645, 01743<br />
DigiLogic 01284<br />
DigiQuest 00863, 01300, 01457, 01473<br />
DigiSat 01232<br />
Digisky 01457<br />
DigitAll World 01227<br />
Digiturk 01076<br />
Digiwave 01631<br />
Dijam 01296<br />
DiPro 01367, 01543<br />
01377, 00392, 00566, 00639,<br />
01639, 01142, 00247, 00749,<br />
DirecTV<br />
01749, 00724, 00819, 01856,<br />
01076, 01108, 00099, 01109,<br />
01414, 01442, 01609, 01392,<br />
01640<br />
Discovery 00710<br />
Dish Network System 01505, 01005, 00775, 01775<br />
Dishpro 01505, 01005, 00775, 01775<br />
Distratel 01283, 01704<br />
DMT 01075<br />
DNT 00200<br />
Dream Multimedia 01237<br />
DSE 01375<br />
DSTV 00642, 00879, 01433<br />
Durabrand 01284<br />
DX Antenna 01530<br />
01505, 01005, 00775, 00455,<br />
E Echostar<br />
00610, 00713, 00853, 00871,<br />
01086, 01200, 01323, 01409,<br />
01418, 01473, 01775<br />
Einhell 00713<br />
Elap 00713, 01567<br />
Elsat 00713<br />
Elta 00200, 01659<br />
Emme Esse 00871<br />
Energy Sistem 01631<br />
Engel 00713, 01251<br />
EP Sat 00455<br />
Esat 00879<br />
Eurieult 00882
Eurocrypt 00455<br />
EuroLine 01251<br />
Europa 00863<br />
Europhon 00299<br />
Eurosky 00262, 00299<br />
Eurostar 00818<br />
Eutelsat 00713<br />
Expressvu 00775, 01775<br />
F Fenner 00713<br />
Ferguson 00455, 01291, 01743<br />
Finlandia 00455<br />
Finlux 00455<br />
Flair Mate 00713<br />
FMD 01251, 01413, 01457<br />
Force 01101<br />
Fortec Star 01083<br />
Foxtel<br />
00455, 00497, 00795, 00879,<br />
01162, 01176, 01356<br />
Fracapro Planet 00871<br />
Fracarro 00125, 00871<br />
France Telecom 00871<br />
Freesat 00882<br />
FTE 00863<br />
FTEmaximal 00713, 00863<br />
Fuba<br />
00173, 00262, 00299, 00394,<br />
01214, 01251, 01801<br />
Fugionkyo 00125<br />
Funai 01377<br />
G Galaxis<br />
00853, 00863, 01101, 01111,<br />
01557<br />
Gardiner 00818<br />
Garnet 01075<br />
GbSAT 01214<br />
GE 00392, 00566<br />
Gecco 01412<br />
General Instrument 00869<br />
General Satellite 01176<br />
GF Good Friends 01043<br />
GF Star 01043<br />
Globo<br />
01251, 01334, 01412, 01429,<br />
01626<br />
GOD Digital 00200<br />
GOI 00775, 01775<br />
Gold Box 00853<br />
Gold Vision 01631<br />
Golden Interstar 01283<br />
GoldStar 00394<br />
Goodmans 00455, 01284, 01291<br />
Gradiente 00887<br />
Granada 00455<br />
Grundig<br />
00173, 00345, 00847, 00853,<br />
00879, 01291<br />
H Handan 01622<br />
Hanseatic 01099, 01100<br />
Hauppauge 01672<br />
HB 01214, 01801<br />
HDT 01159<br />
Hills 01232<br />
00125, 00173, 00299, 00710,<br />
Hirschmann 00882, 01085, 01111, 01232,<br />
01412<br />
Hisense 01535<br />
Hitachi<br />
00749, 00819, 00455, 01250,<br />
01284, 01518, 01523, 01525<br />
Homecast 01214, 01680, 01700<br />
Hornet 01300<br />
Houston 00775<br />
HTS 00775, 01775<br />
Hughes Network<br />
Systems<br />
Humax<br />
01142, 00749, 01749, 01442<br />
00863, 01176, 01225, 01406,<br />
01427, 01675, 01743, 01790,<br />
01915<br />
Huth 01075<br />
Hyundai 01075, 01159<br />
I iCan 01367<br />
ID Digital 01176<br />
ILLUSION sat 01557, 01631<br />
iLo 01535<br />
Imperial 01334, 01429, 01672<br />
Indovision 00887<br />
Ingelen 00882<br />
Innova 00099<br />
Interstar 01214<br />
InVideo 00871<br />
ISkyB 00887<br />
Italtel 00871<br />
ITT Nokia 00455, 00723, 00873<br />
J Jadeworld 00642<br />
Jaeger 01334<br />
Jerrold 00869<br />
Jiuzhou 01450<br />
JOK 00710<br />
JVC 00775, 01507, 01531, 01775<br />
K K-SAT 00713<br />
Kamm 00713<br />
Kaon 01300<br />
KaTelco 01111<br />
00123, 00173, 00200, 00249,<br />
Kathrein<br />
00394, 00442, 00480, 00504,<br />
00658, 00713, 00818, 01221,<br />
01416, 01561, 01567<br />
Kennex 00125<br />
Kenwood 00853<br />
Klap 00710<br />
Kocmoc TB 01333<br />
Koscom 01043<br />
Kosmos 00442, 01333<br />
Kreiling 00249, 00658<br />
Kreiselmeyer 00173<br />
Kross 01695<br />
L L&S Electronic 01043, 01334<br />
Labgear 01296<br />
LaSAT 00173, 00299<br />
Lava 01631<br />
Legend 01718<br />
Legrand 01718<br />
Lemon 01334<br />
Lenco 00713<br />
Lenoxx 01611<br />
LG 01075, 01414<br />
Lifesat 00299, 00713, 01043<br />
Lodos 01284<br />
Logik 01284<br />
Logix 01075<br />
Lorenzen 00299<br />
Luxor 00345, 00873<br />
M M Electronic 00818<br />
M vision 01557<br />
Magnavox 00724, 00722<br />
Manata 00710, 00713<br />
Manhattan 00455, 00710, 01083<br />
Marantz 00200<br />
Maspro 00173, 00713, 01530<br />
Master’s 00394<br />
Matsui 00173, 00710, 01284, 01743<br />
Maximum 01075, 01334, 01685<br />
McIntosh 00869<br />
MDS 01225<br />
Mediabox 00853<br />
Mediacom 01206<br />
MediaSa 00853<br />
Medion<br />
00299, 00713, 01043, 01075,<br />
01232, 01334, 01412, 01626<br />
Medison 00713<br />
Mega 00200<br />
Memorex 00724<br />
Metronic<br />
00713, 00818, 01283, 01334,<br />
01375, 01704<br />
Metz 00173<br />
MiCO 01811<br />
Micro 00713<br />
Micro Elektronic 00713<br />
Micro Technology 00713<br />
Micromaxx 00299<br />
Microstar 01075<br />
Microtec 00713<br />
Mitsubishi 00749, 00455<br />
Morgan’s 00200, 00713, 01232, 01412<br />
Motorola 00869, 00856, 01473<br />
MTEC 01214<br />
Muller 01695<br />
Multibroadcast 00642, 00879<br />
Multichoice<br />
00642, 00879, 01333, 01433,<br />
01559, 01560<br />
Mx Onda 01659<br />
Myryad 00200<br />
Mysat 00713<br />
MySky 01693, 01848, 01850<br />
N NEC 01519<br />
NEOTION 01334<br />
Netgem 01322<br />
Netsat 00099, 00887<br />
Neuf TV 01322<br />
Neuhaus 00713<br />
Neuling 01232<br />
Neusat 00713<br />
Nevir 01659<br />
Next Level 00869<br />
Nikko 00200, 00713, 00723<br />
Noda Electronic 01704<br />
Nokia<br />
00455, 00723, 00751, 00853,<br />
00873, 01023, 01223, 01723<br />
Nordmende 00455, 01611<br />
O OctalTV 01505<br />
Okano 00442<br />
Omega 00887<br />
Opentel 01232, 01412<br />
Optex<br />
00394, 00713, 01043, 01283,<br />
01611<br />
Optimus 00724<br />
Optus 00879<br />
Orbis 01232, 01334, 01412<br />
Orbitech 01099, 01100<br />
Origo 00497<br />
OSAT 00345<br />
P P/Sat 01232<br />
00200, 00329, 00455, 00497,<br />
Pace<br />
00795, 00847, 00853, 00887,<br />
01175, 01323, 01356, 01423,<br />
01693, 01717, 01848, 01850<br />
Pacific 01284, 01375<br />
Packard Bell 01111<br />
Packsat 00710<br />
Palcom 00299, 01409<br />
Panarex 01159<br />
Panasat 00615, 00879, 01333, 01433<br />
00247, 00701, 00455, 00847,<br />
Panasonic 01304, 01404, 01508, 01526,<br />
01527<br />
Panda 00173, 00455<br />
Pansat 01159<br />
Patriot 00710<br />
Paysat 00724<br />
peeKTon 01457<br />
Philips<br />
01142, 00749, 01749, 00775,<br />
00724, 00819, 01076, 00722,<br />
00099, 00710, 00455, 00818,<br />
00200, 00847, 00853, 00173,<br />
01114, 00133, 01442, 01543,<br />
01672<br />
Phonotrend 00863, 01200<br />
Pilotime 01339<br />
Pino 01334<br />
Pioneer<br />
01142, 00329, 00853, 01308,<br />
01442<br />
Planet 00871<br />
Plasmatic 00442<br />
PMB 00713, 01611<br />
Polytron 00394<br />
Portland 01296<br />
Preisner 00262, 01101, 01113, 01366<br />
Premier 00723, 00853, 00873, 01429<br />
Prima 00795<br />
Primacom 01111<br />
Primestar 00869<br />
Profile 00710<br />
Promax 00455<br />
Proscan 00392, 00566<br />
Proton 01535<br />
Q QNS 01367, 01402, 01404<br />
Quadral 00710<br />
Quelle 00299<br />
R Radiola 00200<br />
RadioShack 00566, 00775, 00869<br />
Radix 00394, 00882, 01113, 01317<br />
00392, 00566, 01142, 00775,<br />
RCA<br />
00855, 00143, 01291, 01392,<br />
01442<br />
Rebox 01214<br />
Regal 01251<br />
RFT 00200<br />
Roadstar 00713, 00853<br />
Rollmaster 01413<br />
Rover 00713<br />
Rownsonic 01567<br />
S SAB 01251<br />
Saba 00710, 00820<br />
Sabre 00455<br />
Sagem<br />
00820, 01114, 01253, 01307,<br />
01690<br />
Samsung<br />
01377, 01142, 01276, 01108,<br />
01109, 00853, 00863, 01206,<br />
01442, 01458, 01570, 01609,<br />
01700, 01916<br />
Sat Control 01300<br />
Sat Team 00713<br />
SAT+ 01409<br />
Satec 00713<br />
Satelco 01232<br />
Satplus 01100<br />
PRESET CODE
Satstation 01083<br />
Schaub Lorenz 01214<br />
Schneider 00710, 01206, 01251<br />
00394, 00504, 00863, 01075,<br />
Schwaiger 01083, 01111, 01317, 01334,<br />
01412, 01457<br />
SCS 00299<br />
Sedea Electronique 00125, 01206, 01283, 01626<br />
SEG 01075, 01087, 01251, 01626<br />
Seleco 00871<br />
Septimo 01375<br />
Serd 01412<br />
Serino 00610<br />
Servimat 01611<br />
ServiSat 00713, 01251<br />
Sharp 01517<br />
Siemens 00173, 01334, 01429<br />
Silva 00299<br />
Skantin 00713<br />
SKR 00713<br />
00856, 00099, 00847, 00887,<br />
SKY<br />
01014, 01175, 01662, 01693,<br />
01847, 01848, 01850<br />
SKY Italia 00853, 01693, 01847, 01848<br />
Sky Television 01014<br />
Sky XL 01251, 01412<br />
Sky+ 01175<br />
Skymaster<br />
00713, 01075, 01085, 01200,<br />
01334, 01409, 01567, 01611<br />
Skymax 00200<br />
Skyplus 01232, 01334, 01412<br />
SkySat 00713<br />
Skyvision 01334<br />
SL 00299, 01672<br />
SM Electronic 00713, 01200, 01409<br />
Smart<br />
00713, 00882, 01101, 01113,<br />
PRESET CODE<br />
01232, 01404, 01413<br />
Sony<br />
00639, 01639, 00455, 00847,<br />
00853, 01524, 01558, 01640<br />
Star 00887<br />
Star Choice 00869<br />
Star Trak 00772, 00869<br />
Starland 00713<br />
Starlite 00200<br />
Stream 01847, 01848<br />
00125, 00713, 00820, 00853,<br />
Strong<br />
00879, 01159, 01284, 01300,<br />
01409, 01626<br />
Sunkai 00123<br />
Sunny 01300<br />
Sunsat 00713<br />
Sunstar 00642<br />
Supernova 00887<br />
SVA 01455<br />
Systec 01334<br />
T Tantec 00455<br />
Tarbs 01225<br />
Tatung 00455<br />
TBoston 01659<br />
Teac 01225, 01227, 01251, 01322<br />
Tecatel 01200<br />
TechniSat<br />
00262, 00455, 00863, 01099,<br />
01100, 01195, 01197, 01322<br />
Technomate 01283, 01610<br />
Technosonic 01672<br />
Technotrend 01429<br />
Techwood 01284, 01626<br />
Tele System<br />
Electronic<br />
01251, 01409, 01611, 01801<br />
Teleciel 01043<br />
TeleClub 01367<br />
Telefunken 00710<br />
Teleka 00262, 00442<br />
Telestar<br />
01099, 01100, 01251, 01334,<br />
01610, 01626<br />
Telesystem 01801<br />
Televes 00455, 01214, 01300, 01334<br />
Televisa 00887<br />
Telewire 01232<br />
Tevion 00713, 01409, 01622, 01672<br />
00392, 00566, 00455, 00710,<br />
Thomson<br />
00713, 00820, 00847, 00853,<br />
01046, 01175, 01291, 01534,<br />
01543, 01662<br />
Thorn 00455<br />
Tiny 01672<br />
Tioko 00394<br />
Tivo 01142, 01442<br />
Tokai 00200<br />
Tonna 00455, 00713, 01611<br />
Topfield 01206, 01208, 01545, 01783<br />
00749, 01749, 00790, 00819,<br />
Toshiba<br />
00455, 01285, 01501, 01516,<br />
01530<br />
TPS 00820, 01253, 01307<br />
00200, 00713, 00853, 01113,<br />
Triax<br />
01227, 01251, 01291, 01296,<br />
01626<br />
Trio 01075<br />
TT-micro 01429<br />
Turnsat 00713<br />
Twinner 00713, 01611<br />
U UEC 00879, 01162, 01333, 01356<br />
UltimateTV 01392, 01640<br />
Uniden 00724, 00722<br />
Unisat 00200<br />
United 01251<br />
Universum<br />
00173, 00299, 01087, 01099,<br />
01251<br />
US Digital 01535<br />
USDTV 01535<br />
V Variosat 00173<br />
Ventana 00200<br />
Vestel 01251<br />
VH Sat 00299<br />
Viasat 01682<br />
ViewSat 01232<br />
Visionic 00125, 01283<br />
VisionNet 01557<br />
Visiosat<br />
00142, 00710, 00713, 01413,<br />
01457, 01718<br />
Viva 00856<br />
Vivid 01162<br />
Voom 00869<br />
VTech 00818<br />
W Wavelength 01232, 01413<br />
Wewa 00455<br />
Wharfedale 01284<br />
Winbox 01801<br />
Wintel 00299<br />
Wisi 00173, 00299, 00455<br />
Worldsat<br />
00123, 00710, 01214, 01251,<br />
01543<br />
X Xcom 00123<br />
XMS 01075<br />
Xsat<br />
00123, 00713, 00847, 01214,<br />
01323<br />
Xtreme 01300<br />
Y Yakumo 01413<br />
Yamada 01718<br />
Yes 00887<br />
Z Zehnder<br />
00394, 00504, 00818, 01075,<br />
01232, 01251, 01334, 01412,<br />
01413<br />
Zenith 00856, 01856<br />
Zeta Technology 00200<br />
Zodiac 01801<br />
Satellite Receiver/<br />
PVR Combination b1, b3<br />
b1<br />
A @sat 01300<br />
Allvision 01412<br />
Amstrad 01175<br />
Atsat 01300<br />
B B@ytronic 01412<br />
British Sky<br />
Broadcasting<br />
01175<br />
BskyB 01175, 01662<br />
Bush 01645<br />
C Canal Satellite 01339<br />
Comag 01412<br />
D Digifusion 01645<br />
DigiQuest 01300<br />
Digiturk 01076<br />
DirecTV<br />
01377, 00392, 00639, 01142,<br />
01076, 00099, 01392, 01442,<br />
01640<br />
Dish Network System 01505, 00775<br />
Dishpro 01505, 00775<br />
DMT 01075<br />
Dream Multimedia 01237<br />
E Echostar 01505, 00775, 00610<br />
Expressvu 00775<br />
F Foxtel 01356<br />
G GbSAT 01214<br />
Gecco 01412<br />
Globo 01412<br />
H HDT 01159<br />
Hirschmann 01412<br />
Homecast 01680<br />
Hughes Network<br />
Systems<br />
01142, 01442<br />
Humax 01176, 01427, 01675<br />
Huth 01075<br />
Hyundai 01075, 01159<br />
K Kaon 01300<br />
Kathrein 00249, 00658, 01221, 01561<br />
L LG 01075<br />
M Maximum 01334<br />
Mediacom 01206<br />
Medion 01412<br />
Microstar 01075<br />
Morgan’s 01412<br />
Motorola 00869<br />
MTEC 01214<br />
Multichoice 01333, 01559, 01560<br />
MySky 01693, 01848, 01850<br />
N NEOTION 01334<br />
Nokia 01023<br />
O Opentel 01412<br />
Orbis 01412<br />
P Pace 01175, 01356, 01423, 01850<br />
Panasonic 01304<br />
Philips 01142, 00099, 01442<br />
Pilotime 01339<br />
Proscan 00392<br />
R Radix 01317<br />
RCA 01392<br />
Rebox 01214<br />
S Sagem 01253, 01307<br />
Samsung 01206, 01442, 01570, 01609<br />
Sat Control 01300<br />
Schneider 01206<br />
Schwaiger 01075, 01412<br />
Sedea Electronique 01206<br />
Serd 01412<br />
SKY 01175, 01693, 01848, 01850<br />
SKY Italia 01848<br />
Sky XL 01412<br />
Skymaster 01075<br />
Skyplus 01412<br />
Sony 00639, 01640<br />
Star Choice 00869<br />
Strong 01300<br />
Sunny 01300<br />
T TechniSat 01195, 01197<br />
Thomson 01175, 01534, 01662<br />
Topfield 01206, 01545, 01783<br />
TPS 01253, 01307<br />
X Xtreme 01300<br />
Z Zehnder 01075, 01412<br />
b3<br />
H<br />
Hughes Network<br />
Systems<br />
20739<br />
P Philips 20739<br />
S Samsung 20739<br />
Television<br />
1 888 10264<br />
A A-Mark 10047, 10054, 10009<br />
A.R. Systems<br />
10037, 10352, 10374, 10455,<br />
10556<br />
Accent 10009, 10037<br />
Accuscan 10047<br />
Accuscreen 10001<br />
Acoustic Research 11269<br />
Action 10030, 10650<br />
Acura 10009<br />
Addison 10092, 10108, 10653<br />
ADL 11217<br />
10047, 10054, 10017, 10051,<br />
Admiral<br />
10093, 10463, 10180, 10163,<br />
10264, 10418<br />
Advent<br />
10761, 10783, 10815, 10817,<br />
10842, 10876, 11933<br />
Adventuri 10000<br />
Adyson 10217<br />
AEG 11163, 11556<br />
Agashi 10217, 10264<br />
Agna 10150<br />
10092, 10009, 10035, 10037,<br />
Aiko<br />
10217, 10264, 10361, 10371,<br />
10433<br />
Aim 10706, 10037, 10455, 10805<br />
Aiwa 10264, 10701, 11904, 11911<br />
10000, 10060, 10812, 10702,<br />
10178, 10030, 10145, 10602,<br />
10606, 10631, 10648, 10672,<br />
10714, 10715, 11207, 11537,<br />
Akai<br />
11675, 11676, 11903, 10556,<br />
10548, 10480, 10433, 10371,<br />
10361, 10264, 10218, 10217,<br />
10208, 10163, 10037, 10035,<br />
10009
Akashi 10009, 10860<br />
Akiba 10037, 10218, 10455<br />
Akira 10418<br />
Akito 10037<br />
10171, 10009, 10037, 10163,<br />
Akura<br />
10218, 10264, 10668, 10714,<br />
11037, 11498, 11556, 11982<br />
Alaron 10170<br />
10009, 10036, 10037, 10073,<br />
Alba<br />
10163, 10218, 10352, 10370,<br />
10371, 10418, 10443, 10487,<br />
10668, 10714, 11037<br />
Albatron 10700, 10843<br />
Alfide 10672<br />
All-Tel 10865, 11269<br />
Alleron 10030, 10170<br />
Allorgan 10217<br />
Allstar 10037<br />
Ambassador 10150<br />
America Action 10180<br />
American High 10000, 10060<br />
Amplivision 10217, 10370<br />
10000, 10171, 10009, 10011,<br />
Amstrad<br />
10037, 10163, 10218, 10264,<br />
10362, 10371, 10433, 10648,<br />
11037, 11982<br />
Amtron 10000, 10180<br />
Anam<br />
10250, 10180, 10009, 10037,<br />
10700, 10861<br />
Anam National 10250, 10037, 10650<br />
Andersson 11149, 11163<br />
Anglo 10009, 10264<br />
Anhua 10051<br />
Anitech 10009, 10037, 10264<br />
Ansonic<br />
10009, 10037, 10163, 10370,<br />
10374, 10668<br />
AOC<br />
10451, 10093, 10180, 10060,<br />
10178, 10030, 10092, 10009,<br />
10108<br />
Aolinpike 10264<br />
Apex Digital<br />
10156, 10748, 10879, 10765,<br />
10767, 11217, 11943<br />
AR 10352, 10556<br />
Arc En Ciel 10109<br />
Arcam 10217<br />
Ardem 10037, 10714<br />
Aristocrat 10163<br />
Aristona 10037, 10556<br />
ART 11037<br />
Arthur Martin 10163<br />
ASA 10070<br />
Asberg 10037<br />
Asora 10009<br />
Astra 10037<br />
Asuka 10217, 10218, 10264<br />
ATD 10698<br />
Atlantic 10001, 10037<br />
Atori 10009<br />
Auchan 10163<br />
Audinac 10180<br />
10009, 10037, 10109, 10217,<br />
Audiosonic 10218, 10264, 10370, 10374,<br />
10486, 10714, 10715, 10820<br />
Audioton 10217, 10264, 10370, 10486<br />
10451, 10180, 10092, 10623,<br />
Audiovox<br />
10802, 10875, 11937, 11951,<br />
11952<br />
Audioworld 10698<br />
Aumark 10060<br />
Autovox 10217<br />
Aventura 10171<br />
AVP 10000<br />
10451, 10009, 10011, 10036,<br />
Awa<br />
10108, 10217, 10264, 10374,<br />
10606<br />
Axion 11937, 11958<br />
Axxent 10009<br />
B Baier 10876<br />
Baihe 10009, 10264<br />
Baile 10001, 10009, 10374, 10661<br />
Baird<br />
10037, 10073, 10109, 10208,<br />
10217, 10343, 11196<br />
Bang & Olufsen 10565<br />
Baohuashi 10264<br />
Baosheng 10009, 10817<br />
Barco 10163, 10556<br />
10009, 10037, 10163, 10217,<br />
Basic Line 10218, 10374, 10455, 10556,<br />
10668, 11037, 11163<br />
Bastide 10217<br />
Bauer 10805<br />
Baur<br />
10037, 10195, 10361, 10455,<br />
10512<br />
Baysonic 10180<br />
Bazin 10217<br />
Beaumark 10017, 10178, 10030<br />
10812, 10001, 10009, 10208,<br />
Beijing<br />
10226, 10264, 10374, 10661,<br />
10817, 10821<br />
Beko<br />
10037, 10195, 10370, 10418,<br />
10486, 10606, 10714, 10715,<br />
10808, 11037<br />
Belcor 10030<br />
Bell & Howell 10054, 10017, 10154, 10093<br />
Belson 10698, 11191<br />
Belstar 11037<br />
BenQ 11032, 11756<br />
Beon 10037, 10163, 10218, 10418<br />
Berthen 10668<br />
Best 10370<br />
Bestar 10037, 10370, 10374<br />
Bestar-Daewoo 10374<br />
Binatone 10217<br />
Black Diamond<br />
10614, 10820, 10821, 11037,<br />
11163, 11909<br />
Blackway 10218<br />
Blaupunkt<br />
10036, 10170, 10195, 10200,<br />
10327, 10455<br />
10037, 10218, 10455, 10487,<br />
Blue Sky<br />
10499, 10556, 10668, 10714,<br />
10715, 11037, 11191, 11363<br />
Boots 10009, 10217<br />
BPL 10037, 10208<br />
Bradford 10180<br />
Brandt<br />
10109, 10287, 10335, 10560,<br />
10625, 10714<br />
Brinkmann 10037, 10418, 10486, 10668<br />
Brionvega 10037, 10362<br />
Britannia 10217<br />
Brockwood 10178, 10030<br />
Broksonic<br />
10236, 10463, 10180, 11911,<br />
11938<br />
Brother 10264<br />
BSR 10163<br />
BTC 10218<br />
11900, 11556, 11037, 10778,<br />
10714, 10698, 10668, 10661,<br />
Bush<br />
10614, 10556, 10487, 10374,<br />
10371, 10361, 10335, 10264,<br />
10218, 10217, 10208, 10163,<br />
10037, 10036, 10009<br />
C Caihong 10009, 10817<br />
Cailing 10748<br />
Candle 10030<br />
Canton 10218<br />
Capehart<br />
10017, 10178, 10030, 10092,<br />
10036<br />
Capetronic 10030<br />
Capsonic 10264<br />
Carad 10610, 10668, 11037<br />
Carena 10037, 10455<br />
Carnivale 10030<br />
Carrefour 10036, 10037, 10070<br />
Carver 10054, 10170<br />
Cascade 10009, 10037<br />
Casio 10037<br />
Cathay 10037, 10218<br />
CCE 10037, 10217<br />
Celebrity 10000<br />
Celera 10765<br />
Celestial 10767, 10819, 10820, 10821<br />
Centrex 10780<br />
Centrum 11037<br />
Centurion 10037<br />
CGE 10074, 10163, 10370, 10418<br />
Changcheng<br />
10051, 10001, 10009, 10264,<br />
10374, 10661, 10817<br />
Changfei 10009, 10374, 10817<br />
Changfeng 10264, 10817<br />
Changhai 10009, 10817<br />
Changhong<br />
10156, 10765, 10009, 10264,<br />
10508, 10767, 10783, 10817,<br />
10819, 10820, 10821, 11008,<br />
11156<br />
Chengdu 10009, 10817<br />
Ching Tai 10092, 10009<br />
Chun Yun<br />
10000, 10180, 10092, 10009,<br />
10700, 10843<br />
Chunfeng 10009, 10264<br />
Chung Hsin 10180, 10053, 10036, 10108<br />
Chunsun 10009, 10817<br />
Cimline 10009, 10218<br />
Cinema 10672<br />
Cineral 10451, 10092<br />
Cinex 10648, 11556<br />
Citek 10047<br />
10054, 10000, 10451, 10463,<br />
Citizen<br />
10180, 10060, 10030, 10171,<br />
10092, 10001, 10035<br />
City 10009<br />
Clarion 10180<br />
Clarivox 10037, 10070, 10418<br />
Classic 10030, 10092, 10499<br />
Clatronic<br />
10009, 10037, 10217, 10218,<br />
10264, 10370, 10371, 10714<br />
Clayton 11037<br />
CMS Hightec 10217<br />
Colortyme<br />
10047, 10054, 10017, 10060,<br />
10178, 10030<br />
Commercial Solutions 11447, 10047<br />
Concorde 10009<br />
Condor<br />
10009, 10037, 10264, 10370,<br />
10418<br />
Conia 10820, 10821, 11498<br />
Conic 10178<br />
Conrac 10808<br />
Conrowa<br />
10156, 10145, 10009, 10264,<br />
10698, 11156, 11170<br />
Contec 10180, 10009, 10036, 10037<br />
Continental Edison 10109, 10287, 10487<br />
Cosmel 10009, 10037<br />
Craig 10180, 10171<br />
Crosley<br />
10054, 10000, 10180, 10030,<br />
10171, 10074, 10163, 10370<br />
Crown<br />
10093, 10180, 10053, 10009,<br />
10037, 10208, 10370, 10418,<br />
10486, 10487, 10606, 10672,<br />
10712, 10714, 10715, 11037<br />
Crown Mustang 10672<br />
CS Electronics 10218<br />
CTX 11756<br />
10047, 10054, 10154, 10000,<br />
10051, 10451, 10093, 10180,<br />
Curtis Mathes 10060, 10702, 10178, 10030,<br />
10145, 10166, 10037, 10035,<br />
11147, 11347<br />
CXC 10180<br />
Cybertron 10218<br />
Cytronix 11298<br />
D D-Vision 10037, 10556, 11982<br />
Daewoo<br />
10154, 10451, 10180, 10178,<br />
10030, 10092, 11661, 10634,<br />
10661, 10672, 10700, 10860,<br />
10865, 10876, 10880, 11755,<br />
11756, 11909, 10623, 10556,<br />
10499, 10374, 10264, 10218,<br />
10217, 10170, 10109, 10108,<br />
10037, 10036, 10009<br />
Dainichi 10218<br />
Dansai<br />
10009, 10035, 10036, 10037,<br />
10208, 10217<br />
Dantax 10370, 10486, 10714, 10715<br />
Datsura 10208<br />
Dawa 10009, 10037<br />
Daytek 10672, 11207<br />
Dayton 10092, 10009, 11207<br />
Daytron<br />
10180, 10178, 10030, 10092,<br />
10009, 10036, 10037, 10374<br />
Dayu 10374, 10661<br />
De Graaf 10163, 10208, 10548<br />
Decca 10037, 10217<br />
Degraff 10163, 10208<br />
Deitron 10374<br />
Dell 11080, 11178<br />
Denko 10264<br />
Denon 10145, 10511<br />
Denver 10037, 10587<br />
Desmet 10009, 10037<br />
Diamant 10037<br />
Diamond<br />
10706, 10009, 10371, 10672,<br />
10698, 10820, 10860<br />
Digatron 10037<br />
Digiline 10037, 10668<br />
Digital Life 10872<br />
Digitex 10820<br />
Digitor 10037<br />
Digix Media 10880<br />
Dixi 10009, 10037, 10217<br />
DL 10587, 10780, 10872<br />
Domeos 10668<br />
Domland 10394<br />
Dongda 10009<br />
Donghai 10009<br />
Dream Vision 11164, 11704<br />
DSE 10698, 10820, 11556<br />
DTS 10009<br />
Dual<br />
10037, 10217, 10343, 10352,<br />
10394, 11037, 11137<br />
Dual Tec 10217<br />
Dumont<br />
10017, 10180, 10178, 10070,<br />
10217<br />
Durabrand<br />
10463, 10180, 10178, 10171,<br />
11034, 11463<br />
Dux 10037<br />
Dwin 10093<br />
Dynatech 10217<br />
Dynatron 10037<br />
PRESET CODE
E Easy Living 11248<br />
Eaton 10060<br />
Ecco 10773<br />
ECE 10037<br />
Edison-Minerva 10487<br />
Elbe<br />
10037, 10217, 10218, 10362,<br />
10610<br />
Elcit 10163<br />
Electroband 10000<br />
Electrograph 11755<br />
Electrohome<br />
10154, 10000, 10463, 10150,<br />
10178, 10030, 10073<br />
Elekta 10009, 10264<br />
Elfunk 11037, 11208<br />
ELG 10037<br />
Elin 10009, 10037, 10361, 10548<br />
Elite 10037, 10218<br />
Elta 10009, 10264<br />
Emerald 10178<br />
10047, 10017, 10154, 10451,<br />
10236, 10463, 10180, 10150,<br />
10178, 10171, 11944, 11911,<br />
Emerson<br />
11909, 10714, 10668, 10623,<br />
10486, 10036, 10371, 10370,<br />
10361, 10037, 10195, 10170,<br />
10070, 10073<br />
Envision 10030, 10813<br />
Enzer 10860<br />
Erae 11371<br />
Erres 10037<br />
ESA 10812, 10171, 11944<br />
ESC 10037, 10217<br />
Ether 10030, 10009<br />
Etron 10001, 10009, 10163, 10820<br />
Eurofeel 10217, 10264<br />
Euroman 10037, 10217, 10264, 10370<br />
Europa 10037<br />
Europhon 10037, 10109, 10217<br />
Evesham Technology 11248<br />
Evolution 11756<br />
Expert 10163<br />
Exquisit 10037<br />
F Feilang 10009<br />
Feilu 10009, 10817<br />
Feiyan 10264<br />
Feiyue 10009, 10817<br />
Fenner 10009, 10374<br />
Fer0 10335<br />
10053, 10037, 10073, 10109,<br />
Ferguson<br />
10195, 10287, 10335, 10343,<br />
10443, 10548, 10560, 10625,<br />
PRESET CODE<br />
11037<br />
Fidelity<br />
10171, 10037, 10163, 10217,<br />
10264, 10361, 10371, 10512<br />
Filsai 10217<br />
Finlandia<br />
10163, 10208, 10346, 10361,<br />
10548<br />
10037, 10070, 10163, 10217,<br />
Finlux<br />
10346, 10480, 10556, 10631,<br />
10714, 10715, 10808, 11556<br />
Firstar 10236, 10009<br />
10009, 10037, 10208, 10217,<br />
Firstline<br />
10361, 10374, 10556, 10668,<br />
10714, 10808, 11037, 11191,<br />
Fisher<br />
11363, 11371<br />
10047, 10054, 10154, 10000,<br />
10036, 10208, 10217, 10361,<br />
10370<br />
Flint<br />
10037, 10218, 10264, 10455,<br />
10610<br />
Force 11149<br />
Formenti 10037, 10163<br />
Fortress 10093<br />
Fraba 10037, 10370<br />
Friac<br />
10009, 10037, 10370, 10499,<br />
10610<br />
Frontech 10009, 10163, 10217, 10264<br />
Fujimaro 10865, 11498<br />
Fujitsu<br />
10009, 10217, 10352, 10683,<br />
10809, 10853<br />
Fujitsu General 10009, 10217, 10683<br />
Fujitsu Siemens 10808, 10809, 11163, 11298<br />
Funai<br />
10000, 10180, 10171, 10264,<br />
10668, 11271, 11904<br />
Furi 10145, 10264, 10817<br />
Furichi 10860<br />
Futronic 10264, 10860<br />
Futuretech 10180<br />
G Galaxi 10037<br />
Galaxis 10037, 10370<br />
Ganxin 10817<br />
Gateway 11755, 11756<br />
GBC 10009, 10163, 10218, 10374<br />
11447, 10047, 11454, 10000,<br />
10051, 10451, 10093, 10180,<br />
GE<br />
10060, 10178, 10030, 10092,<br />
11922, 11917, 11347, 11147,<br />
10625, 10560, 10335, 10035<br />
GEC 10037, 10163, 10217, 10361<br />
Geloso 10009, 10163, 10374<br />
Gemini 10047<br />
General 10109, 10287<br />
General Technic 10009<br />
Genesis 10009, 10037<br />
Genexxa 10009, 10037, 10163, 10218<br />
Gericom<br />
10808, 10865, 10880, 11217,<br />
11298<br />
Gevalt 11371<br />
Giant 10009, 10217<br />
Gibralter 10017, 10000, 10030<br />
Go Video 10060, 10886<br />
Go Vision 11937<br />
Goldfunk 10668<br />
10047, 10054, 10154, 10178,<br />
10030, 10715, 10714, 10606,<br />
GoldStar<br />
10455, 10361, 10217, 10163,<br />
10109, 10073, 10037, 10036,<br />
10009, 10001<br />
Gooding 10487<br />
10000, 11909, 11900, 11163,<br />
11037, 10880, 10808, 10714,<br />
10668, 10661, 10634, 10625,<br />
Goodmans<br />
10587, 10560, 10556, 10499,<br />
10487, 10480, 10374, 10371,<br />
10343, 10335, 10264, 10218,<br />
10217, 10037, 10036, 10035,<br />
10011, 10009<br />
Gorenje 10370<br />
GPM 10218<br />
Gradiente 10053, 10037, 10170<br />
Graetz<br />
10163, 10361, 10371, 10487,<br />
10714, 11163<br />
Gran Prix 10648<br />
10036, 10037, 10108, 10163,<br />
Granada<br />
10208, 10217, 10226, 10343,<br />
10548, 10560<br />
10009, 10037, 10163, 10218,<br />
Grandin<br />
10374, 10455, 10610, 10668,<br />
10714, 10715, 10865, 10880,<br />
11037, 11191<br />
Gronic 10217<br />
10706, 10009, 10036, 10037,<br />
Grundig<br />
10070, 10163, 10195, 10443,<br />
10487, 10556, 10587, 10672,<br />
10683, 11371<br />
Grundy 10180, 10195<br />
Grunkel 11163<br />
Grunpy 10180<br />
H H & B 10808<br />
Haaz 10706<br />
Haier<br />
11034, 10037, 10508, 10587,<br />
10698, 11017<br />
Haihong 10009<br />
Haiyan 10264, 10817<br />
Halifax 10217, 10264<br />
Hallmark 10236, 10180, 10178<br />
Hampton 10217<br />
Hanimex 10218<br />
Hankook 10180, 10178, 10030<br />
10009, 10037, 10217, 10361,<br />
Hanseatic 10370, 10394, 10499, 10556,<br />
10634, 10661, 10714, 10808<br />
Hantarex 10009, 10037, 10865<br />
Hantor 10037<br />
Harley Davidson<br />
10000, 10180, 10060, 10178,<br />
10030, 11904<br />
Harman/Kardon 10054<br />
Harsper 10865<br />
Harvard 10180<br />
Harwa 10773, 11196, 11269<br />
Harwood 10009, 10037, 10487<br />
Hauppauge 10037<br />
Havermy 10093<br />
HCM<br />
10009, 10037, 10217, 10218,<br />
10264, 10418<br />
Heathkit 10017<br />
Helios 10865<br />
Hello Kitty 10451<br />
Hema 10009, 10217<br />
Hewlett Packard 11494, 11502<br />
Hifivox 10109<br />
Highline 10037, 10264<br />
Hikona 10218<br />
Hikone 10218<br />
10009, 10036, 10037, 10163,<br />
Hinari<br />
10208, 10218, 10264, 10352,<br />
10443<br />
Hisawa 10218, 10455, 10610, 10714<br />
10156, 10748, 10145, 10009,<br />
Hisense<br />
10208, 10508, 10556, 10780,<br />
10821, 10860, 11022, 11156,<br />
11170, 11208, 11363<br />
Hitachi<br />
10047, 10054, 10017, 10000,<br />
11256, 10156, 10051, 10150,<br />
10178, 10030, 11145, 10145,<br />
10092, 10744, 10877, 10634,<br />
11037, 11137, 11149, 11156,<br />
11170, 11225, 11576, 11904,<br />
11960, 10578, 10548, 10508,<br />
10499, 10481, 10480, 10343,<br />
10217, 10163, 10109, 10108,<br />
10037, 10036, 10035, 10009<br />
Hitachi Fujian 10150, 10108, 10860<br />
Hitec 10698<br />
Hitsu 10009, 10218, 10455, 10610<br />
Hoeher 10714, 10865, 11163, 11556<br />
Home Electronics 10606<br />
Hongmei 10093, 10009, 10264, 10817<br />
Hongyan 10264, 10817<br />
Hornyphon 10037<br />
Hoshai 10218, 10455<br />
HP 11494, 11502<br />
Hua Tun 10009<br />
Huafa 10145, 10009<br />
Huanghaimei 10009<br />
Huanghe 10009, 10817<br />
Huanglong 10009<br />
Huangshan 10009, 10264, 10817<br />
Huanyu 10217, 10264, 10374, 10817<br />
Huaqiang 10264<br />
Huari 10145, 10264<br />
Hugoson 11217<br />
Huodateji 10051<br />
Hygashi 10217<br />
Hyper 10009, 10217<br />
Hypersonic 10361<br />
10037, 10217, 10264, 10455,<br />
Hypson<br />
10486, 10556, 10668, 10714,<br />
Hyundai<br />
I Iberia 10037<br />
10715, 11037<br />
10849, 10860, 10865, 10876,<br />
11556<br />
ICE<br />
10037, 10217, 10218, 10264,<br />
10371<br />
ICeS 10218<br />
Iiyama 10877, 11217<br />
Ima 10236, 10180, 10178<br />
Imperial 10037, 10074, 10370, 10418<br />
Imperial Crown<br />
10001, 10009, 10264, 10374,<br />
10661<br />
Indiana 10037<br />
Infinity 10054<br />
InFocus 11164<br />
Ingelen 10163, 10487, 10610, 10714<br />
Ingersol 10009<br />
Inno Hit 10009, 10217, 10218, 11163<br />
Innova 10037<br />
Innowert 10865, 11298<br />
Inotech 10773, 10820<br />
Insignia 10171, 11517<br />
Inteq 10017, 10145<br />
Interbuy 10009, 10037, 10264<br />
Interfunk<br />
10037, 10109, 10163, 10200,<br />
10327, 10361, 10512<br />
Internal 10037, 11909<br />
10009, 10037, 10217, 10218,<br />
Intervision 10264, 10394, 10455, 10486,<br />
10487<br />
Irradio 10009, 10037, 10218, 10371<br />
Isukai 10037, 10218, 10455<br />
ITC 10217<br />
ITS 10037, 10218, 10264, 10371<br />
ITT<br />
10163, 10208, 10346, 10361,<br />
10480, 10548, 10610<br />
10070, 10163, 10195, 10208,<br />
ITT Nokia<br />
10346, 10361, 10480, 10548,<br />
10606, 10610<br />
ITV 10037, 10264, 10374<br />
IX 10877<br />
J JBL 10054<br />
JCB 10000<br />
JDV 11982<br />
Jean<br />
10156, 10051, 10236, 10092,<br />
10009, 10036<br />
JEC 10035<br />
Jensen 10761, 10815, 10817, 11933<br />
Jiahua 10051<br />
JiaLiCai 10009, 10264<br />
JIL 10030<br />
Jinfeng 10051, 10208, 10226, 10817<br />
Jinque 10009, 10264, 10817<br />
Jinta 10009, 10264<br />
10054, 10156, 10145, 10009,<br />
Jinxing<br />
10037, 10264, 10556, 10698,<br />
10817, 10821, 11011<br />
JMB 10443, 10499, 10556, 10634<br />
JNC 10876<br />
Jocel 10712<br />
Johnson 10455<br />
Jubilee 10556<br />
Juhua 10264, 10817<br />
Jutan 10030
JVC<br />
10054, 10093, 10463, 10053,<br />
10030, 10070, 10036, 10218,<br />
10371, 10418, 10508, 10606,<br />
10650, 10653, 10683, 10731,<br />
11253, 11923<br />
K Kaige 10009, 10264, 10817<br />
Kaisui<br />
10009, 10037, 10217, 10218,<br />
10455<br />
Kambrook 10217<br />
Kamp 10017, 10180, 10217<br />
Kangli<br />
10001, 10009, 10264, 10374,<br />
10661, 10817<br />
Kangyi 10009, 10264<br />
Kapsch 10163, 10361<br />
Karcher<br />
10264, 10370, 10606, 10610,<br />
10714, 10778, 11556<br />
Kathrein 10556<br />
Kawa 10371<br />
Kawasho 10030<br />
KB Aristocrat 10163<br />
KDS 11498<br />
KEC 10180, 10060<br />
Kendo<br />
10037, 10362, 10370, 10610,<br />
10648, 11037<br />
Kennedy 10163<br />
Kennex 10668, 11037<br />
Kenwood 10180, 10030<br />
Khind 10706<br />
KIC 10217<br />
Kiota 10001, 10371, 10455<br />
Kioto 10706, 10556<br />
Kiton 10037, 10668<br />
KLH<br />
10156, 10180, 10765, 10767,<br />
11962<br />
KLL 10037<br />
Kloss 10030<br />
Kneissel<br />
10037, 10362, 10370, 10374,<br />
10499, 10556, 10610<br />
Kolin<br />
10180, 10150, 10053, 10036,<br />
10108, 11331<br />
Kolster 10037, 10218<br />
Kongque 10009, 10264, 10817<br />
Konichi 10009<br />
Konig 10037<br />
10180, 10037, 10218, 10371,<br />
Konka<br />
10418, 10587, 10641, 10714,<br />
10817, 11084<br />
Kontakt 10487<br />
Korpel 10037<br />
Korting 10370<br />
Kosmos 10037<br />
Koyoda 10009<br />
Kreisen 10876<br />
KTV 10463, 10180, 10030, 10217<br />
Kuaile 10009, 10264<br />
Kulun 10009<br />
Kunlun<br />
10051, 10208, 10226, 10264,<br />
10374, 10661, 10817<br />
Kyoshu 10418<br />
Kyoto 10163, 10217<br />
L L&S Electronic 10714, 10808, 10865<br />
Lark 10154<br />
LaSAT 10486<br />
Lavis 11037<br />
Leader 10009<br />
Lecson 10037<br />
Legend 10009<br />
Lenco 10037, 10374, 10587<br />
Lenoir 10009<br />
Lexsor 11196<br />
Leyco 10037, 10264<br />
10054, 11265, 10060, 10178,<br />
10030, 11758, 11637, 11191,<br />
LG<br />
11178, 10856, 10715, 10714,<br />
10700, 10698, 10556, 10370,<br />
10361, 10217, 10163, 10109,<br />
10108, 10037, 10009, 10001<br />
Liesenk & Tter 10037<br />
Liesenkotter 10037, 10327<br />
10009, 10037, 10218, 10374,<br />
Lifetec<br />
10668, 10683, 10714, 11037,<br />
11137<br />
Lihua 10817<br />
Lloyd’s<br />
10236, 10180, 10030, 10001,<br />
10009, 11904<br />
Local India TV 10009, 10208, 10602<br />
Local Malaysia TV 10698<br />
Lodos 11037<br />
Loewe<br />
10037, 10370, 10512, 10633,<br />
10790<br />
10236, 10180, 10060, 10001,<br />
Logik<br />
10009, 10011, 10371, 10698,<br />
10773, 10880, 11037, 11217<br />
Logix 10668<br />
Longjiang 10264, 10817<br />
Luker 11982<br />
Luma<br />
10009, 10163, 10362, 10374,<br />
11037<br />
Lumatron<br />
10037, 10073, 10163, 10217,<br />
10264, 10361, 10556<br />
Lux May 10009, 10037<br />
10163, 10208, 10217, 10346,<br />
Luxor<br />
10361, 10480, 10548, 10631,<br />
11037, 11163<br />
10047, 10054, 10017, 10154,<br />
10000, 10156, 10051, 10093,<br />
LXI<br />
10060, 10053, 10178, 10030,<br />
10171, 10166, 10037, 10036,<br />
10035, 10001, 10208<br />
10009, 10037, 10109, 10163,<br />
M M Electronic<br />
10195, 10217, 10287, 10343,<br />
10346, 10374, 10480, 10512,<br />
10634, 10661, 10714<br />
Madison 10037<br />
MAG 11498<br />
Magnadyne 10054, 10163<br />
Magnafon 10073<br />
Magnasonic<br />
10054, 10000, 10156, 10093,<br />
10030, 10092, 10109<br />
Magnavox<br />
10047, 11454, 10054, 10154,<br />
10000, 10250, 10051, 10180,<br />
10060, 10030, 10171, 10092,<br />
10706, 11944, 11904, 11755,<br />
11254, 10802, 10780, 10011,<br />
10035, 10037, 10036<br />
Magnum 10037, 10648, 10714, 10715<br />
Majestic 10017<br />
Mandor 10264<br />
Manesth 10035, 10037, 10217, 10264<br />
Manhattan<br />
10037, 10668, 10778, 10876,<br />
11037, 11267<br />
Marantz<br />
11454, 10054, 10030, 10037,<br />
10556, 10704, 10855<br />
Mark<br />
10009, 10037, 10217, 10374,<br />
10714, 10715<br />
Master’s 10499<br />
Mastro 10053, 10706, 10698, 10780<br />
Masuda<br />
10009, 10037, 10217, 10218,<br />
10264, 10371<br />
Matsui<br />
11037, 10744, 10714, 10556,<br />
10487, 10455, 10443, 10433,<br />
10371, 10352, 10335, 10217,<br />
10208, 10195, 10163, 10037,<br />
10036, 10035, 10011, 10009<br />
Matsushita 10250, 10051, 10650<br />
Maxdorf 10773<br />
Maxent 11755, 11756<br />
Maxim 11556, 11982<br />
MCE 10009<br />
Meck 10698<br />
Mediator 10037, 10556<br />
10037, 10512, 10556, 10668,<br />
Medion<br />
10698, 10714, 10808, 10880,<br />
11037, 11137, 11248, 11900<br />
Megapower 10700<br />
Megas 10610<br />
Megatron 10047, 10178, 10145, 10009<br />
MEI 11037<br />
Meile 10264, 10817<br />
10154, 10250, 10463, 10180,<br />
Memorex<br />
10150, 10060, 10178, 10030,<br />
10009, 10035, 10037, 10195,<br />
10877, 11037, 11911<br />
Memphis 10009<br />
Mercury 10060, 10001, 10009, 10037<br />
Mermaid 10037<br />
Metronic 10625<br />
10037, 10195, 10367, 10388,<br />
Metz<br />
10447, 10587, 10668, 10746,<br />
11163<br />
MGA<br />
10150, 10178, 10030, 10218,<br />
10374<br />
MGN Technology 10178<br />
Micro Genius 10150<br />
Micromaxx<br />
10037, 10668, 10714, 10808,<br />
11037<br />
Microstar 10808<br />
MicroTEK 10820, 10860<br />
Midland 10047, 10017, 10051<br />
Mikomi 11037, 11149<br />
Minato 10037, 10556<br />
Minerva 10070, 10108, 10195, 10487<br />
Minoka 10037<br />
Mirror 11900<br />
10154, 10250, 10093, 10236,<br />
10180, 11250, 10150, 10178,<br />
Mitsubishi 10030, 11917, 11037, 10836,<br />
10817, 10556, 10512, 10195,<br />
10108, 10037, 10036, 10011<br />
Mivar 10217<br />
Monaco 10009<br />
Monivision 10700, 10843<br />
Morgan’s 10037<br />
Motorola 10054, 10051, 10093, 10150<br />
MTC<br />
10180, 10060, 10030, 10092,<br />
10011, 10370, 10512<br />
MTlogic 10714<br />
Mudan<br />
10051, 10009, 10208, 10226,<br />
10264, 10817<br />
Multitec<br />
10037, 10486, 10668, 11037,<br />
11556<br />
Multitech<br />
10180, 10009, 10037, 10217,<br />
10264, 10370, 10486<br />
Murphy 10163<br />
Musikland 10218<br />
Mx Onda 11498<br />
Myryad 10556<br />
10156, 10178, 10166, 10037,<br />
10361, 10866, 11156<br />
Naiko 10037, 10606, 11982<br />
Nakimura 10037, 10374<br />
Nanbao 10009, 10264<br />
Nansheng 10264, 10817<br />
Narita 11982<br />
NAT 10226<br />
National 10051, 10208, 10226, 10508<br />
10047, 10154, 10156, 10051,<br />
10053, 10178, 10030, 11704,<br />
NEC<br />
11270, 11170, 10817, 10704,<br />
10661, 10653, 10508, 10499,<br />
10455, 10374, 10264, 10217,<br />
N NAD<br />
10170, 10036, 10011, 10009<br />
Neckermann<br />
10037, 10200, 10327, 10370,<br />
10418, 10556<br />
NEI 10037, 10163, 10371<br />
Neovia 10865, 10876, 11371<br />
Netsat 10037<br />
NetTV 11755<br />
Neufunk<br />
10009, 10037, 10218, 10556,<br />
10610, 10714<br />
New Tech<br />
10009, 10037, 10217, 10343,<br />
10556<br />
New World 10218<br />
Newave 10093, 10178, 10092, 10009<br />
Nikkai<br />
10009, 10035, 10036, 10037,<br />
10163, 10217, 10218, 10264<br />
Nikkei 10714<br />
Nikko 10178, 10030, 10092<br />
Nikkodo 10178, 10030, 10092<br />
Nishi 10030<br />
Nobliko 10070<br />
Nogamatic 10109<br />
10163, 10208, 10346, 10361,<br />
Nokia<br />
10374, 10480, 10548, 10606,<br />
10610, 10631<br />
Norcent 10748, 10824<br />
Nordic 10217<br />
Nordmende<br />
10037, 10109, 10195, 10287,<br />
10343, 10560, 10714<br />
Normerel 10037<br />
Novatronic 10037, 10374<br />
NTC 10092<br />
Nu-Tec 10455, 10698, 10820<br />
Nyon 10000<br />
O Oceanic 10163, 10208, 10361, 10548<br />
Odeon 10264<br />
Okano 10009, 10037, 10264, 10370<br />
Olevia 11144, 11240, 11331, 11610<br />
Omega 10264<br />
Omni 10748, 10698, 10780, 10872<br />
Onida 10053, 11253<br />
Onimax 10714<br />
Onwa<br />
10180, 10218, 10371, 10433,<br />
10602<br />
Opera 10037<br />
10154, 10250, 10093, 10180,<br />
Optimus<br />
10150, 10178, 10030, 10166,<br />
10650<br />
Optoma 10887<br />
Optonica 10093<br />
Orbit 10037<br />
Orcom 11504<br />
10017, 10236, 10463, 10180,<br />
Orion<br />
10178, 11463, 10011, 10037,<br />
10264, 10443, 10556, 10714,<br />
10880, 11196, 11911<br />
Orline 10037, 10218<br />
Ormond 10668, 11037<br />
Osaki<br />
10037, 10217, 10218, 10264,<br />
10374, 10556<br />
Osio 10037<br />
Oso 10218<br />
Osume 10036, 10037, 10218<br />
Otic 11498<br />
10093, 10036, 10037, 10109,<br />
Otto Versand 10195, 10217, 10226, 10343,<br />
10361, 10512, 10556<br />
P Pace 10092<br />
Pacific<br />
10037, 10443, 10556, 10714,<br />
Palladium<br />
11037, 11137<br />
10037, 10163, 10200, 10217,<br />
10327, 10370, 10418, 10556,<br />
10714, 11137<br />
10001, 10037, 10217, 10218,<br />
Palsonic<br />
10264, 10418, 10698, 10773,<br />
10778, 11196, 11269, 11904<br />
Panama 10009, 10037, 10217, 10264<br />
Panashiba 10001<br />
PRESET CODE
10054, 10000, 10156, 10250,<br />
10051, 10236, 10030, 11947,<br />
11946, 11941, 11480, 11310,<br />
Panasonic 11291, 11271, 10853, 10650,<br />
10548, 10508, 10367, 10361,<br />
10226, 10208, 10163, 10108,<br />
10037, 10035<br />
Panavision 10037<br />
10051, 10706, 10009, 10208,<br />
Panda<br />
10226, 10264, 10508, 10698,<br />
10780, 10817, 10821<br />
Pathe Cinema 10163<br />
Pathe Marconi 10109<br />
Pausa 10009<br />
Paxonic 10060, 10030<br />
PCE 10156, 10060<br />
10047, 10000, 10156, 10250,<br />
Penney<br />
10051, 10060, 10178, 10030,<br />
10035, 10036, 10037, 10070,<br />
10108, 11347<br />
Perdio 10037, 10163<br />
Perfekt 10037<br />
Petters 11523<br />
10054, 10451, 10463, 10180,<br />
Philco<br />
10178, 10030, 10145, 11661,<br />
10037, 10074, 10163, 10370,<br />
10418<br />
Philharmonic 10217<br />
11454, 10054, 10017, 10000,<br />
10051, 10178, 10030, 10171,<br />
Philips<br />
10092, 11961, 11756, 11254,<br />
10690, 10556, 10512, 10374,<br />
10361, 10343, 10200, 10108,<br />
10037, 10009<br />
Phocus 10714<br />
Phoenix 10037, 10163, 10370, 10486<br />
Phonola 10037, 10556<br />
Pilot<br />
10051, 10060, 10178, 10030,<br />
10706, 10011<br />
10166, 10011, 10037, 10109,<br />
Pioneer<br />
10163, 10170, 10287, 10361,<br />
10370, 10486, 10512, 10679,<br />
10760, 10866, 11260<br />
Pionier 10370, 10486, 11556<br />
Plantron 10009, 10037, 10264<br />
Playsonic 10037, 10217, 10714, 10715<br />
Polaroid<br />
10765, 10865, 11276, 11316,<br />
11341, 11498, 11523<br />
Poppy 10009<br />
Portland 10451, 10092, 10374<br />
Powerpoint 10037, 10487, 10698<br />
Prandoni-Prince 10361<br />
Precision 10236, 10180, 10217<br />
Premier 10009, 10264<br />
President 10860<br />
Prima<br />
10761, 10009, 10264, 10783,<br />
10815, 10817, 11269, 11933<br />
Princeton 10700<br />
Prinston 11037<br />
Prinz 10361<br />
Prism 10250, 10051<br />
PRESET CODE<br />
Profex 10009, 10163, 10361<br />
Profi 10009<br />
Profilo 11556<br />
Profitronic 10037<br />
Proline<br />
10037, 10073, 10625, 10634,<br />
11037<br />
Proscan 11447, 10047, 11347, 11922<br />
Prosco 10156<br />
Prosonic<br />
10037, 10217, 10370, 10371,<br />
10374, 10668, 10714<br />
Protec 10009, 10037, 10217, 10264<br />
Protech<br />
10009, 10037, 10217, 10264,<br />
10418, 10486, 10668, 11037<br />
Proton 10178, 10030, 10001, 10009<br />
Proview 11498<br />
ProVision 10037, 10556, 10714, 11037<br />
Pulsar 10017, 10092<br />
Pulser 10178, 10092<br />
Pvision 10876, 11191<br />
Pye 10037, 10374, 10556<br />
Pymi 10009<br />
10051, 10208, 10226, 10264,<br />
10817<br />
Quadral 10051, 10218<br />
Quartz 10150, 10178<br />
Quasar<br />
10250, 10051, 10009, 10035,<br />
Q Qingdao<br />
10650, 10865<br />
Quelle<br />
10011, 10037, 10070, 10074,<br />
10109, 10195, 10200, 10327,<br />
10361, 10512, 10668, 11037<br />
Questa 10036<br />
Questar 10036<br />
R R-Line 10037<br />
Rabbit 10047<br />
Radialva 10163, 10218<br />
Radiola 10037, 10217, 10556<br />
Radiomarelli 10037<br />
RadioShack<br />
10047, 10154, 10180, 10150,<br />
10178, 10030, 10037, 11904<br />
Radiotone<br />
10009, 10037, 10264, 10370,<br />
10418, 10648, 10668, 11037<br />
Rank 10070<br />
Rank Arena 10036, 10602<br />
RBM 10070<br />
11447, 10047, 11454, 10054,<br />
10000, 10051, 10093, 10178,<br />
RCA<br />
10030, 10092, 11958, 11953,<br />
11948, 11922, 11917, 11547,<br />
11347, 11247, 11147, 11047,<br />
10679, 10625, 10560, 10090<br />
Realistic<br />
10047, 10154, 10180, 10150,<br />
10178, 10030<br />
Recor 10037, 10418<br />
Rectiligne 10037<br />
Rediffusion<br />
10036, 10163, 10346, 10361,<br />
10548<br />
Redstar 10037<br />
Reflex 10037, 10668, 11037<br />
Relisys<br />
10865, 10876, 10877, 11207,<br />
11298<br />
Remotec<br />
10250, 10093, 10145, 10171,<br />
10037<br />
Reoc 10714<br />
Revox 10037<br />
Rex 10163, 10264<br />
RFT 10037, 10264<br />
Rinex 10773<br />
10009, 10037, 10218, 10264,<br />
Roadstar<br />
10418, 10668, 10714, 11037,<br />
11900<br />
Rolson 11371<br />
Rover 10036, 10877<br />
Rowa<br />
10748, 10009, 10037, 10264,<br />
10587, 10698, 10712, 10817<br />
Royal Lux 10335, 10370<br />
Runco 10017, 10060, 10030<br />
Ruyi 10817<br />
10250, 10109, 10163, 10287,<br />
10335, 10343, 10361, 10498,<br />
10548, 10560, 10625, 10714<br />
Sagem 10455, 10610, 10618<br />
Saige 10009, 10817<br />
Saisho<br />
10009, 10011, 10163, 10217,<br />
S Saba<br />
10264<br />
Saivod<br />
10037, 10668, 10712, 11037,<br />
11163, 11556, 11982<br />
Sakai 10163<br />
Sakyno 10455<br />
Salora<br />
10163, 10208, 10361, 10480,<br />
10548, 10631<br />
Salsa 10335<br />
10047, 10154, 10093, 10178,<br />
Sampo<br />
10030, 10171, 10092, 10009,<br />
10036, 10650, 10700, 11755,<br />
11756<br />
10047, 10054, 10017, 10154,<br />
10156, 10093, 10060, 10812,<br />
10702, 10178, 10030, 10092,<br />
10814, 10766, 10718, 10618,<br />
Samsung<br />
10587, 10817, 10821, 11060,<br />
11249, 11312, 11903, 11959,<br />
10556, 10371, 10370, 10362,<br />
10264, 10226, 10217, 10208,<br />
10163, 10090, 10037, 10036,<br />
10035, 10009<br />
Sandra 10217<br />
Sanjian 10264<br />
Sanky 10060, 10030<br />
10463, 10060, 10030, 10706,<br />
Sansui<br />
10037, 10371, 10455, 10602,<br />
10714, 10861, 11371, 11537,<br />
11904, 11911<br />
Santon 10009<br />
10047, 10054, 10154, 10000,<br />
10156, 10463, 10180, 10145,<br />
10171, 11755, 11208, 10704,<br />
Sanyo<br />
10508, 10370, 10264, 10217,<br />
10208, 10170, 10163, 10108,<br />
10088, 10037, 10036, 10011,<br />
10009<br />
Sanyong 10037<br />
Sanyuan 10093, 10009, 10817<br />
Saville 10060<br />
SBR 10037, 10556<br />
Sceptre 11217<br />
Schaub Lorenz<br />
10361, 10374, 10486, 10548,<br />
10606, 10714, 11191<br />
11982, 11904, 11137, 11037,<br />
10714, 10668, 10648, 10556,<br />
Schneider 10394, 10371, 10361, 10352,<br />
10343, 10218, 10217, 10163,<br />
10070, 10037<br />
Scotch 10178<br />
Scotland 10163<br />
Scott 10236, 10180, 10178, 10030<br />
10047, 10054, 10017, 10154,<br />
10000, 10156, 10051, 10093,<br />
Sears<br />
10060, 10053, 10178, 10030,<br />
10171, 10166, 10035, 10036,<br />
10037, 10001, 10208, 11904<br />
Seaway 10634<br />
Seelver 11037<br />
10009, 10036, 10037, 10217,<br />
SEG<br />
10218, 10264, 10362, 10487,<br />
10668, 11037, 11163<br />
SEI 10037, 10163<br />
Sei-Sinudyne 10037<br />
Seleco<br />
10163, 10264, 10346, 10362,<br />
10371<br />
Semivox 10180<br />
Semp 10156<br />
Sencora 10009<br />
Sentra 10035<br />
Serino 10093, 10455, 10610<br />
Shancha 10264, 10817<br />
Shanghai<br />
10009, 10208, 10226, 10264,<br />
10817<br />
Shaofeng 10145, 10817<br />
10054, 10093, 10180, 10053,<br />
Sharp<br />
10030, 10009, 10036, 10200,<br />
10650, 10653, 10668, 11193,<br />
11393, 11917<br />
Shen Ying 10092, 10009<br />
Shencai 10145, 10009, 10264<br />
Sheng Chia 10093, 10236, 10009<br />
Shenyang 10009, 10264, 10817<br />
Sherwood 10009<br />
Shintoshi 10037<br />
Shivaki<br />
10178, 10037, 10374, 10443,<br />
10556<br />
Show 10009, 10418<br />
Siarem 10163<br />
Siemens<br />
10145, 10037, 10195, 10200,<br />
10327<br />
Siera 10037, 10556<br />
Siesta 10370<br />
Signature 10047, 10093, 10030<br />
Silva 10037, 10361, 10648<br />
Silva Schneider 10037, 11556<br />
Silvano 10587<br />
Silver 10036, 10361, 10455, 10715<br />
SilverCrest 11037<br />
Simpson 10178, 10030, 10011<br />
Singer<br />
10060, 10092, 10009, 10037,<br />
10335, 10371, 10433, 11537<br />
Sinotec 10773<br />
Sinudyne 10037, 10163, 10361<br />
Skantic 10163<br />
SKY 10037, 10880, 11504<br />
Sky Brazil 10880<br />
Sky-North 10037<br />
Skygiant 10180<br />
Skyworth<br />
10748, 10009, 10037, 10264,<br />
10698, 10805, 10817, 11115<br />
Sliding 10865, 10880<br />
SLX 10668<br />
Smaragd 10487<br />
Soemtron 10865, 11298<br />
Solar Drape 10000<br />
Solavox 10037, 10163, 10361, 10548<br />
Sole 10813<br />
Sonawa 10218<br />
Songba 10009<br />
Soniko 10037<br />
Sonitron 10208, 10217, 10370<br />
Sonneclair 10037<br />
Sonoko 10009, 10037, 10217, 10264<br />
Sonolor 10163, 10208, 10361, 10548<br />
Sontec 10009, 10037, 10370<br />
10017, 10154, 11100, 10000,<br />
Sony<br />
10150, 10053, 10011, 10036,<br />
10037, 10074, 10353, 10650,<br />
11505, 11651, 11751, 11904<br />
Sound & Vision 10218, 10374<br />
Soundesign 10180, 10178<br />
Soundwave 10037, 10418, 10715<br />
Sova 11952<br />
Sowa<br />
10156, 10051, 10060, 10178,<br />
10092, 10036, 10226<br />
Soyea 10773<br />
Spectra 10009<br />
Spectravision 10156, 10178<br />
Spectroniq 11498<br />
Squareview 10171<br />
SR2000 10154, 10171<br />
Ssangyong 10009<br />
SSS 10180<br />
Staksonic 10009<br />
Standard<br />
10009, 10037, 10217, 10218,<br />
10374, 11037<br />
Standard Components 10009, 10218<br />
Starlite<br />
10236, 10180, 10009, 10037,<br />
10163, 10264<br />
Stenway 10218<br />
Stern 10163, 10264<br />
Stevison 11982<br />
Strato 10009, 10037, 10264
Strong 11149, 11163<br />
Studio Experience 10843<br />
Stylandia 10217<br />
Sunkai<br />
10218, 10455, 10487, 10610,<br />
10865<br />
Sunstar 10009, 10037, 10264, 10371<br />
Sunwatt 10455<br />
Sunwood 10037<br />
Superla 10217<br />
Superscan 10093, 10864, 11944<br />
Supersonic 10009, 10208, 10455, 10805<br />
SuperTech 10009, 10037, 10218, 10556<br />
Supra 10178, 10009, 10374<br />
Supreme 10000<br />
Susumu 10218, 10287, 10335<br />
Sutron 10009<br />
SV2000 10054<br />
SVA<br />
10748, 10587, 10865, 10870,<br />
10871, 10872<br />
Svasa 10455<br />
Swisstec 10880, 11504<br />
Sydney 10217<br />
10047, 10054, 10154, 10000,<br />
Sylvania<br />
10051, 10178, 10030, 10171,<br />
10092, 10036, 10037, 10876,<br />
11271, 11904, 11944<br />
Symphonic<br />
10000, 10180, 10178, 10171,<br />
11904, 11944<br />
Synco<br />
10000, 10451, 10093, 10060,<br />
10178, 10092, 10036<br />
Syntax 11144, 11240, 11331<br />
Sysline 10037<br />
T T+A 10447<br />
Tacico 10178, 10092, 10009<br />
Tai Yi 10009<br />
Taishan 10009, 10374, 10817<br />
Tandberg 10109, 10361, 10367<br />
Tandy 10093, 10163, 10217, 10218<br />
Targa 11371<br />
Tashiko<br />
10092, 10036, 10163, 10170,<br />
10217, 10650<br />
10054, 10154, 10000, 10156,<br />
10051, 10060, 10037, 10036,<br />
Tatung<br />
10011, 10009, 10217, 11156,<br />
11191, 11248, 11254, 11371,<br />
11556, 11756<br />
TCL 10706, 10698, 11027, 11537<br />
TCM 10714, 10808<br />
10154, 10178, 10171, 10706,<br />
11755, 11149, 11037, 10714,<br />
Teac<br />
10712, 10698, 10668, 10512,<br />
10455, 10418, 10264, 10217,<br />
10170, 10037, 10009<br />
Tec<br />
10009, 10037, 10163, 10217,<br />
10335<br />
Tech Line 10037, 10668, 11163<br />
Techica 10218<br />
Technica 11982<br />
Technics<br />
10054, 10250, 10051, 10226,<br />
10556, 10650<br />
TechniSat 10556, 11267<br />
Technisson 10714<br />
Technosonic 10499, 10556<br />
Technovox 10030, 10217<br />
Techview 10847<br />
Techwood 10250, 10051, 10060, 11163<br />
Tecnimagen 10556<br />
10051, 10093, 10178, 10092,<br />
Teco<br />
10009, 10036, 10218, 10264,<br />
10653, 11040<br />
Tedelex<br />
10009, 10208, 10217, 10418,<br />
10606, 10698, 11537<br />
Teiron 10009<br />
Tek 10820<br />
Teknika<br />
10054, 10463, 10180, 10150,<br />
10060, 10178, 10092<br />
Tele System<br />
Electronic<br />
10876<br />
Teleavia 10287, 10343<br />
Telecolor 10017<br />
Telecor<br />
10037, 10163, 10217, 10218,<br />
10394<br />
Telefunken<br />
10702, 11504, 10821, 10820,<br />
10819, 10714, 10712, 10698,<br />
10625, 10587, 10560, 10498,<br />
10486, 10346, 10343, 10335,<br />
10287, 10109, 10074, 10073,<br />
10037<br />
Telefusion 10037<br />
Telegazi 10037, 10163, 10218, 10264<br />
Telemeister 10037<br />
Telesonic 10037<br />
Telestar 10009, 10037, 10556<br />
Teletech 10009, 10037, 10668, 11037<br />
Teleton 10036, 10217<br />
Televideon 10163<br />
Teleview 10037<br />
Tempest 10009, 10264, 10455<br />
Tennessee 10037<br />
Tensai<br />
10009, 10037, 10217, 10218,<br />
10371, 10374, 10715, 11037<br />
Tenson 10009<br />
Tera 10030, 10092<br />
10037, 10556, 10648, 10668,<br />
Tevion<br />
10714, 10808, 11037, 11137,<br />
11248, 11298, 11498, 11556<br />
Texet 10009, 10217, 10218, 10374<br />
Texla 10780<br />
ThemeScene 10887<br />
Thomas 10047, 10178, 10001, 11904<br />
11447, 10047, 10037, 10109,<br />
Thomson<br />
10287, 10335, 10343, 10560,<br />
10625<br />
10035, 10036, 10037, 10073,<br />
Thorn<br />
10074, 10109, 10163, 10264,<br />
10335, 10343, 10361, 10499,<br />
10512<br />
Thorn-Ferguson 10073, 10335, 10343, 10499<br />
Tiane 10093, 10817<br />
Tiny 11269<br />
TMK 10236, 10180, 10178<br />
TML 11756<br />
TNCi 10017<br />
Tobishi 10218<br />
Tobo 10748, 10009, 10264<br />
Tocom 10156<br />
Tokai<br />
10009, 10037, 10163, 10217,<br />
10374, 10668, 11037<br />
Tokaido 11037<br />
Tokyo 10035<br />
Tomashi 10218<br />
Tongguang 10264<br />
Tongtel 10587, 10780<br />
Topline 10668, 11037<br />
10154, 11256, 10156, 10150,<br />
11265, 10060, 11145, 10145,<br />
10166, 11037, 11156, 11163,<br />
11164, 11356, 11508, 11556,<br />
Toshiba<br />
11656, 11704, 11945, 11971,<br />
10845, 10821, 10718, 10650,<br />
10618, 10508, 10264, 10217,<br />
10195, 10109, 10070, 10036,<br />
10035, 10011, 10009<br />
Totevision 10051<br />
Towada 10217<br />
Toyoda 10009, 10264, 10371<br />
Toyomenka 10178<br />
Trakton 10217, 10264<br />
Trans Continens 10037, 10217, 10668, 11037<br />
TRANS-continents 10556, 10865<br />
10009, 10037, 10264, 10418,<br />
Transonic<br />
10455, 10512, 10587, 10698,<br />
10712, 10780<br />
Triad 10218, 10556<br />
Trident 10217<br />
Trio 11498<br />
Tristar 10218, 10264<br />
Triumph 10037, 10346, 10556<br />
Truetone 10250, 10051<br />
Tuntex 10030, 10092, 10009<br />
TVS 10463<br />
TVTEXT 95 10556<br />
10037, 10370, 10374, 10418,<br />
10480, 10486<br />
Ultra 10092<br />
Ultravox 10037, 10163, 10374<br />
Unic Line 10037, 10455<br />
United<br />
10037, 10587, 10714, 10715,<br />
11037, 11982<br />
Universal 10047, 10037<br />
11163, 11037, 10668, 10631,<br />
10618, 10512, 10480, 10418,<br />
10370, 10362, 10361, 10346,<br />
Universum 10327, 10264, 10217, 10200,<br />
10195, 10170, 10109, 10074,<br />
10070, 10037, 10036, 10011,<br />
10009<br />
U Uher<br />
Univox 10037, 10163<br />
V V 10864, 10885, 11755, 11756<br />
V2max 10865<br />
V7 Videoseven 10880, 11217, 11755<br />
Vector Research 10030<br />
Vestel<br />
10037, 10217, 10668, 11037,<br />
11163<br />
Vexa 10009, 10037<br />
Victor<br />
10250, 10053, 10036, 10650,<br />
10653<br />
Videocon 10508<br />
Videologic 10218<br />
Videologique 10217, 10218<br />
Videomac 10009<br />
VideoSystem 10037<br />
Videotechnic 10217, 10374<br />
Videoton 10163<br />
Vidikron 10054<br />
Vidtech 10178, 10036<br />
Viewpia 10876<br />
Viewsonic<br />
10857, 10864, 10885, 11330,<br />
11578, 11627, 11755<br />
Viking 10060<br />
Viore 11207<br />
Vision 10037, 10217, 10264<br />
Vizio<br />
10864, 10885, 11755, 11756,<br />
11758<br />
Vortec 10037<br />
Voxson 10178, 10037, 10163, 10418<br />
10037, 10109, 10217, 10418,<br />
W Waltham<br />
10443, 10668, 11037<br />
Wards<br />
10047, 10054, 10017, 10154,<br />
10000, 10156, 10051, 10093,<br />
10236, 10180, 10060, 10178,<br />
10030, 10166, 11347, 11156,<br />
11147, 10866, 10195, 10001,<br />
10037, 10035<br />
Warumaia 10374, 10661<br />
Watson<br />
10009, 10037, 10163, 10218,<br />
10394, 10668, 10714, 11037<br />
Watt Radio 10163<br />
Waycon 10156<br />
Wega 10036, 10037<br />
Wegavox 10009<br />
Weipai 10009<br />
Welltech 10714<br />
Weltblick 10217<br />
Welton 10178<br />
Weltstar 11037<br />
Westinghouse<br />
10000, 10451, 10885, 10889,<br />
11282, 11577<br />
Wharfedale 10037, 10556, 10860, 11556<br />
White<br />
10451, 10236, 10463, 10037,<br />
Westinghouse 10623, 10889, 11909<br />
Windsor 10668, 11037<br />
Windy Sam 10556<br />
Wintel 10714<br />
World 10451, 10236, 10463, 10180<br />
World-of-Vision<br />
10865, 10877, 10880, 11217,<br />
11298<br />
Worldview 10455<br />
X X-View 11191<br />
Xenius 10634, 10661<br />
Xiahua<br />
10009, 10264, 10698, 10773,<br />
10817<br />
Xianghai 10009<br />
Xiangyang 10264<br />
Xiangyu 10009<br />
Xihu 10264, 10817<br />
Xingfu 10009<br />
Xinghai 10264<br />
XLogic 10698, 10860<br />
Xoceco 11064<br />
Xoro 11196, 11217<br />
XR-1000 10154, 10180, 10171<br />
Xrypton 10037<br />
Y Yamaha 10030, 10650, 11576<br />
Yamishi 10037, 10217, 10218, 10455<br />
Yapshe 10250<br />
Yingge 10009<br />
Yokan 10037<br />
Yoko<br />
10009, 10037, 10217, 10218,<br />
10264, 10370<br />
Yonggu 10009<br />
Yorx 10030, 10218<br />
Youlanasi 10817<br />
Yousida 10009<br />
Yuhang 10009<br />
Z Zanussi 10163, 10217, 10264<br />
10047, 10017, 10000, 10093,<br />
10463, 11265, 10812, 10178,<br />
Zenith<br />
10030, 11145, 10145, 10171,<br />
10092, 10037, 11904, 11909,<br />
11911<br />
ZhuHai 10009, 10374<br />
TV/DVD Combination b2, b4<br />
b2<br />
A Advent 11933<br />
Akai 11675<br />
Akura 11982<br />
Alba 11037<br />
Amstrad 11982<br />
Apex Digital 11943<br />
Audiovox 11937, 11951, 11952<br />
Axion 11937, 11958<br />
B Black Diamond 11037<br />
Bush 10698, 11037, 11900<br />
C Centrum 11037<br />
Crown 11037<br />
D D-Vision 11982<br />
Denver 10587<br />
PRESET CODE
E Elfunk 11037<br />
F Ferguson 11037<br />
Finlux 11556<br />
G Goodmans 10587, 11037, 11900<br />
H Hitachi 11960<br />
J JDV 11982<br />
Jensen 11933<br />
K KLH 11962<br />
L Lenco 10587<br />
Logik 11037<br />
Luker 11982<br />
Luxor 11037<br />
M Matsui 11037<br />
Maxim 11982<br />
Medion 11900<br />
Mirror 11900<br />
N Naiko 11982<br />
Narita 11982<br />
P Panasonic 11941<br />
Philips 11454, 10556, 11961<br />
Powerpoint 10698<br />
Prima 11933<br />
R RCA 11948, 11958<br />
Roadstar 11900<br />
S Saivod 11982<br />
Samsung 11903<br />
Schneider 11982<br />
SEG 11037<br />
Sova 11952<br />
Stevison 11982<br />
Sylvania 10171<br />
T Teac 10698<br />
Technica 11982<br />
Telefunken 10698<br />
Thomson 10625<br />
Transonic 10587<br />
U United 10587, 11037, 11982<br />
V Vestel 11037<br />
b4<br />
A Akai 30695<br />
Akura 31367<br />
Alba 30695, 30884<br />
Amstrad 31367<br />
Apex Digital 30830<br />
B Black Diamond 30713, 30884<br />
Broksonic 30695<br />
Bush 30713, 30884<br />
C Centrum 30713<br />
Citizen 30695<br />
Crown 30713<br />
D D-Vision 31367<br />
0<br />
PRESET CODE<br />
DMTech 31271<br />
E Elfunk 30713, 30884<br />
Emerson 30675, 31268<br />
ESA 31268<br />
F Ferguson 30695, 30713, 30884<br />
Funai 31268<br />
G Goodmans 30713<br />
Grandin 30713<br />
Grundig 30539, 30695<br />
H Hitachi 31247<br />
I Insignia 31268<br />
J JDV 31367<br />
JNC 31271<br />
K Konka 31192<br />
L Logik 30713, 30884<br />
Luker 31367<br />
Luxor 30713<br />
M Magnavox 31268<br />
Matsui 30713, 30884<br />
Maxim 31367<br />
N Naiko 31367<br />
Narita 31367<br />
Neovia 31271<br />
O Orion 30695<br />
P Pacific 30695<br />
Panasonic 31490<br />
Philips 30539, 30854, 31260<br />
R RCA 31022<br />
S Saivod 31367<br />
Samsung 30899<br />
Sansui 30695<br />
Schneider 31367<br />
SEG 30713, 30884<br />
Sliding 31115<br />
Stevison 31367<br />
Sylvania 30630, 30675, 31268<br />
T Technica 31367<br />
Thomson 30551<br />
Toshiba 30695<br />
U United 30713, 30884, 31367<br />
Universum 30713<br />
V Vestel 30884<br />
TV/VCR Combination b2, b3, b4<br />
b2<br />
A Aiwa 11904, 11911<br />
America Action 10180<br />
Amstrad 10171<br />
Audiovox 10180<br />
B Beko 10486<br />
Black Diamond 11909<br />
Broksonic 10463, 11911<br />
Bush 11556<br />
C Curtis Mathes 10051<br />
D Daewoo 11909<br />
E Emerson 10236, 10463, 11909, 11911<br />
F Ferguson 10073, 10625<br />
Fidelity 10171<br />
Funai 11904<br />
G GE<br />
10047, 10051, 10093, 11917,<br />
11922<br />
GoldStar 10037<br />
Goodmans 10374, 11909<br />
Grundig 10037, 10195, 10556<br />
H Harley Davidson 11904<br />
Hinari 10036<br />
Hitachi 11904<br />
I Internal 11909<br />
J JVC 11923<br />
L LG 10178<br />
Lloyd’s 11904<br />
M Magnavox 10054, 11904<br />
Memorex 10250<br />
Mitsubishi 10093, 10556, 11917<br />
O Orion 10463, 11911<br />
P Palsonic 11904<br />
Panasonic 10250, 10051<br />
Penney 10051<br />
Philips 10037, 10556<br />
Q Quasar 10250, 10051<br />
R Radiola 10556<br />
RadioShack 11904<br />
RCA<br />
10047, 10051, 10093, 11917,<br />
11922<br />
S Saba 10625<br />
Samsung 11959<br />
Sansui 10463, 11904, 11911<br />
Schneider 10037, 10556, 11904<br />
Sears 11904<br />
Sharp 10093, 11917<br />
Siemens 10037<br />
Sony 10000, 11505, 11904<br />
Sylvania 10054<br />
Symphonic 11904<br />
T Teac 10178, 10171<br />
Technics 10556<br />
Thomas 11904<br />
Thomson 10625<br />
Toshiba 11971<br />
W White<br />
Westinghouse<br />
11909<br />
Z Zenith 11904, 11909, 11911<br />
b3<br />
A Aiwa<br />
20000, 20352, 20479, 20742,<br />
21137<br />
Akai 20352<br />
Alba 20352<br />
America Action 20278<br />
Amstrad 20000<br />
Audiovox 20278<br />
B Beko 20104<br />
Bestar 20278<br />
Blue Sky 20278, 20352, 20742<br />
BPL 20046<br />
Broksonic 20002, 20479, 21479<br />
Bush 20352, 20742<br />
C Citizen 20278, 21278<br />
Curtis Mathes 20035, 21035<br />
D Daewoo 20278, 20637, 21278<br />
Dantax 20352<br />
E Emerson<br />
20002, 20278, 20479, 20637,<br />
21278, 21479<br />
F Ferguson 20000, 20278<br />
Fidelity 20000<br />
Firstline 20278<br />
Funai 20000<br />
G GE<br />
20060, 20035, 20048, 20240,<br />
20807, 21035, 21060<br />
GoldStar 20037, 20480, 21237<br />
Goodmans 20278, 20352, 20637<br />
Grandin 20278, 20742<br />
Grundig 20081, 20347, 20352, 20742<br />
H Hanimex 20352<br />
Harley Davidson 20000<br />
Hinari 20352<br />
Hitachi 20000<br />
Hypson 20037<br />
I Internal 20278, 20637<br />
J JBL 20278<br />
JMB 20352<br />
K Kambrook 20037<br />
Kneissel 20278, 20352<br />
L LG 20037, 20480, 21237<br />
Lloyd’s 20000<br />
Loewe 20037<br />
M Magnasonic 20278, 21278<br />
Magnavox 20081, 20000, 21781<br />
Magnin 20240<br />
Matsui 20352, 20742<br />
Medion 20352<br />
Memorex<br />
20162, 20037, 21162, 21237,<br />
21262<br />
MGA 20240<br />
Mitsubishi 20048, 20081, 20043, 20807<br />
O Optimus 20162, 21162, 21262<br />
Orion<br />
20002, 20352, 20479, 20742,<br />
21479<br />
P Pace 20352<br />
Pacific 20742<br />
Palsonic 20000<br />
Panasonic<br />
20035, 20162, 21035, 21162,<br />
21262<br />
Penney<br />
20035, 20037, 20240, 21035,<br />
21237<br />
Philips 20081<br />
Portland 20637<br />
Q Quasar 20035, 20162, 21035, 21162<br />
R Radiola 20081<br />
RadioShack 20000<br />
RCA<br />
20060, 20035, 20048, 20240,<br />
20807, 21035, 21060<br />
S Saba 20320<br />
Samsung 20240, 20432, 21014<br />
Sansui 20000, 20479, 21479<br />
Sanyo 20240<br />
Saville 20352<br />
Schneider 20081, 20000<br />
Sears 20037, 20000, 21237<br />
SEG 20637<br />
Sharp 20037, 20048, 20807<br />
Shivaki 20037<br />
Siemens 20081<br />
Sinudyne 20352<br />
Sony 20032, 20000, 21232<br />
Supra 20348<br />
Sylvania 20081, 21781<br />
Symphonic 20000<br />
T Tatung 20352<br />
Teac 20037, 20000, 20637, 20642<br />
Technics 20081<br />
Technosonic 20352<br />
Telefunken 20278<br />
Thomas 20000<br />
Thomson 20278<br />
Toshiba 20352, 20432, 20845, 21145<br />
U United 20742<br />
W White<br />
Westinghouse<br />
20278, 20637<br />
Z Zenith 20000, 20479, 20637, 21479<br />
b4<br />
T Thomson 30551<br />
TV/VCR/DVD Combination<br />
b2, b3, b4<br />
b2<br />
A Akai 11903<br />
B Broksonic 11938<br />
E Emerson 11944<br />
ESA 11944<br />
M Magnavox 11944<br />
P Panasonic 11946, 11947<br />
R RCA 11953
S Sharp 11917<br />
Sylvania 11944<br />
Symphonic 11944<br />
T Toshiba 11945<br />
b3<br />
S Sharp 20807<br />
b4<br />
A Akai 30899<br />
E Emerson 30821<br />
ESA 30821<br />
M Magnavox 30821<br />
P Panasonic 31362, 31462<br />
R RCA 31132<br />
S Sharp 30630<br />
Superscan 30821<br />
Sylvania 30821<br />
Symphonic 30821<br />
T Toshiba 31045<br />
VCR<br />
ABS<br />
20037, 20240, 20000, 20278,<br />
20046<br />
21972<br />
Admiral<br />
20060, 20048, 20039, 20047,<br />
20104, 20121, 20209, 20479<br />
Adventura 20037, 20240, 20000<br />
Aiko 20278<br />
Aim 20278, 20348, 20642<br />
20037, 20032, 20000, 20209,<br />
Aiwa<br />
20041, 20348, 20352, 20479,<br />
A A-Mark<br />
20742, 21137<br />
Akai<br />
20037, 20240, 20041, 20106,<br />
20315, 20348, 20352, 20642<br />
Akura 20041<br />
Alba<br />
20081, 20000, 20209, 20278,<br />
20315, 20348, 20352<br />
Alienware 21972<br />
Allegro 20039, 21137<br />
Allorgan 20240<br />
Allstar 20081<br />
America Action 20278<br />
American High 20035, 20081<br />
Amoisonic 20479<br />
Amstrad 20000, 20278<br />
Anam<br />
20162, 20037, 20240, 20278,<br />
20226, 20480<br />
Anam National 20162, 20226, 21162, 21562<br />
Ansonic 20000<br />
Aristona 20081<br />
ASA 20037, 20081<br />
Asha 20240<br />
Astra 20035, 20240<br />
Asuka 20037, 20081, 20000, 20038<br />
Audiolab 20081<br />
Audiosonic 20278<br />
Audiovox 20037, 20278, 20038<br />
Avis 20000<br />
AVP 20000, 20352<br />
Awa 20037, 20043, 20278, 20642<br />
20000, 20104, 20041, 20278,<br />
20046, 20106<br />
Basic Line 20104, 20278, 20046<br />
Beaumark 20240<br />
Beko 20104<br />
Bell & Howell<br />
20035, 20048, 20039, 20000,<br />
20104, 20046, 20479<br />
Bestar 20278<br />
Black Diamond 20642<br />
Black Panther 20278<br />
Blaupunkt 20162, 20081, 20226<br />
20037, 20209, 20278, 20348,<br />
Blue Sky<br />
20352, 20480, 20642, 20742,<br />
21137<br />
BPL 20046<br />
Brandt 20041, 20320<br />
Brandt Electronique 20041<br />
Brinkmann 20209, 20348<br />
Broksonic<br />
20184, 20121, 20209, 20002,<br />
B Baird<br />
20348, 20479, 21479<br />
Bush<br />
20081, 20000, 20209, 20278,<br />
20315, 20348, 20352, 20642,<br />
20742<br />
C Calix 20037<br />
Candle 20037, 20038<br />
Canon 20035<br />
Capehart 20002<br />
Carena 20081, 20209<br />
Carrefour 20045<br />
Carrera 20240<br />
Carver 20035, 20081<br />
Casio 20000<br />
Cathay 20278<br />
CCE 20278<br />
CGE 20000, 20041<br />
Changhong 20048, 20081<br />
Cimline 20209<br />
Cineral 20278<br />
CineVision 21137<br />
Citizen<br />
20035, 20037, 20240, 20000,<br />
20209, 20278, 20479, 21278<br />
Classic 20037<br />
Clatronic 20000, 21593<br />
Colortyme 20060, 20035, 20045, 20278<br />
Colt 20000<br />
Combitech 20352<br />
Condor 20278<br />
Craig 20037, 20047, 20240<br />
Criterion 20000<br />
Crosley 20035, 20081, 20000<br />
Crown 20037, 20278, 20480<br />
20060, 20035, 20162, 20240,<br />
Curtis Mathes 20000, 20041, 20278, 20432,<br />
21035<br />
Cybernex 20240<br />
CyberPower 21972<br />
Cyrus 20081<br />
D Daewoo<br />
20037, 20045, 20104, 20209,<br />
20278, 20046, 20352, 20637,<br />
20642, 21137, 21278<br />
Dansai 20278<br />
Dantax 20352<br />
Daytron 20037, 20278<br />
De Graaf<br />
20048, 20081, 20042, 20104,<br />
20046<br />
Decca<br />
20081, 20000, 20067, 20209,<br />
20041, 20352<br />
Degraff 20048, 20081, 20042, 20104<br />
Deitron 20278<br />
Dell 21972<br />
Denon 20081, 20042<br />
Derwent 20041<br />
Diamant 20037<br />
Diamond 20348<br />
Digitor 20642<br />
DirecTV 20739<br />
Domland 20209<br />
DSE 20642<br />
Dual<br />
20081, 20000, 20041, 20278,<br />
20348<br />
Dumont 20081, 20000, 20104<br />
Durabrand 20039, 20038, 20642<br />
Dynatech 20240, 20000<br />
E Elbe 20278, 20038<br />
Electrohome<br />
20060, 20037, 20240, 20000,<br />
20043, 20209<br />
Electrophonic 20037<br />
Elin 20240<br />
Elta 20278<br />
Emerald 20184, 20121<br />
Emerex 20032<br />
20035, 20037, 20184, 20039,<br />
20240, 20045, 20000, 20121,<br />
Emerson<br />
20043, 20209, 20002, 20278,<br />
20348, 20479, 20637, 21278,<br />
21479, 21593<br />
ESA 21137<br />
ESC 20240, 20278<br />
EuroLine 21593<br />
F Ferguson<br />
20000, 20041, 20278, 20320,<br />
20348<br />
Fidelity 20240, 20000, 20352, 20432<br />
20037, 20048, 20081, 20000,<br />
Finlandia<br />
20042, 20104, 20043, 20046,<br />
20106, 20226<br />
Finlux 20081, 20000, 20042, 20104<br />
Firstline<br />
20037, 20045, 20042, 20043,<br />
20209, 20278, 20348, 20480,<br />
Hughes Network<br />
Systems<br />
20042, 20739<br />
21137<br />
Humax 20739<br />
Hush 21972<br />
Hypson<br />
20037, 20000, 20209, 20278,<br />
20352, 20480<br />
Hytek 20047, 20000<br />
I iBUYPOWER 21972<br />
Imperial 20000<br />
Ingersol 20240, 20209<br />
Interbuy 20037<br />
Interfunk 20081, 20104<br />
Internal 20278, 20637<br />
International 20037, 20278, 20642<br />
Intervision<br />
20037, 20000, 20209, 20278,<br />
20348<br />
Irradio 20037, 20081, 21137<br />
ITT<br />
20240, 20104, 20041, 20046,<br />
20106<br />
ITT Nokia 20240, 20104, 20041, 20106<br />
ITV 20037, 20278<br />
J Janeil 20240<br />
JBL 20278<br />
Jensen 20067, 20041<br />
20226, 20480, 21137, 21237 JMB 20209, 20348, 20352, 20742<br />
Joyce 20000<br />
JVC<br />
20184, 20081, 20045, 20067,<br />
20041, 21162<br />
K Kambrook 20037<br />
Karcher 20081, 20278, 20642<br />
KEC 20037, 20278<br />
Kendo<br />
20037, 20209, 20278, 20106,<br />
20315, 20348, 20642<br />
Kenwood 20067, 20041, 20038, 20046<br />
20742<br />
KIC 20000<br />
Kimari 20047<br />
Kneissel<br />
20037, 20209, 20278, 20348,<br />
20352<br />
Kodak 20035, 20037<br />
Kolin 20043, 20041<br />
Kolster 20209<br />
KTV 20000<br />
Kuba 20047<br />
Kuba Electronic 20047<br />
L Lenco 20278<br />
20037, 20240, 20045, 20000,<br />
LG<br />
20042, 20209, 20278, 20038,<br />
20225, 20480, 21137, 21237<br />
Lifetec 20209, 20348<br />
Linksys 21972<br />
Lloyd’s 20240, 20000, 20038<br />
Loewe<br />
21062, 20162, 20037, 20081,<br />
21262, 21562<br />
Logik 20240, 20000, 20209, 20106<br />
Lumatron 20278, 21137<br />
Lunatron 21137<br />
Fisher<br />
20039, 20047, 20000, 20104,<br />
20046<br />
Flint 20209, 20348<br />
Fuji 20035, 20033<br />
Fujitsu 20037, 20045, 20000<br />
Fujitsu General 20037<br />
Funai 20037, 20000, 20278, 21593<br />
G Galaxi 20000<br />
Galaxis 20278<br />
Garrard 20000<br />
Gateway 21972<br />
20060, 20035, 20048, 20240,<br />
GE<br />
20000, 20226, 20320, 20807,<br />
21035, 21060<br />
GEC 20081<br />
Gemini 20060<br />
General 20045<br />
General Technic 20348<br />
Genexxa 20037, 20000, 20104, 20278<br />
Go Video 20240, 20432, 20614, 21137<br />
20035, 20037, 20039, 20000,<br />
GoldStar<br />
20209, 20278, 20038, 20225,<br />
20037, 20081, 20240, 20000,<br />
Goodmans 20209, 20278, 20348, 20352,<br />
20637, 20642, 20742<br />
GPX 20037<br />
Gradiente 20000<br />
Graetz 20240, 20104, 20041<br />
20035, 20037, 20048, 20081,<br />
Granada<br />
20240, 20000, 20042, 20104,<br />
20046, 20226<br />
Grandin<br />
20037, 20000, 20209, 20278,<br />
Grundig<br />
20081, 20226, 20320, 20347,<br />
20348, 20352, 20742<br />
H Haaz 20348<br />
Hanimex 20352<br />
Hanseatic 20037, 20081, 20209, 20038<br />
Haojie 20240<br />
Harley Davidson 20000<br />
Harman/Kardon 20081, 20038<br />
Headquarter 20046<br />
Hewlett Packard 21972<br />
HI-Q 20035, 20047, 20000<br />
Hinari<br />
20240, 20209, 20041, 20278,<br />
20352<br />
Hisawa 20209, 2035<br />
Hischito 20045<br />
20035, 20037, 20081, 20240,<br />
Hitachi<br />
20045, 20000, 20042, 20041,<br />
20046, 20089<br />
Hoeher 20278, 20642<br />
Hornyphon 20081<br />
Howard Computers 21972<br />
HP 21972<br />
PRESET CODE
Luxor<br />
20048, 20047, 20104, 20043,<br />
20046, 20106, 20315<br />
LXI 20037, 20000, 20042, 20067<br />
M M Electronic 20037, 20240, 20000, 20038<br />
Magnadyne 20081<br />
Magnasonic<br />
20037, 20240, 20000, 20278,<br />
PRESET CODE<br />
21278<br />
Magnavox<br />
20035, 20037, 20048, 20039,<br />
20081, 20240, 20000, 20226,<br />
20618, 20642, 21593, 21781<br />
Magnin 20240<br />
Magnum 20642<br />
Manesth 20081, 20045, 20209<br />
Marantz 20035, 20081, 20209, 20038<br />
Mark 20000, 20278<br />
Marta 20037<br />
Mastec 20642<br />
Master’s 20278<br />
Matsui<br />
20037, 20240, 20209, 20278,<br />
20348, 20352, 20742<br />
Matsushita<br />
20035, 20162, 20081, 20226,<br />
21162<br />
Media Center PC 21972<br />
Mediator 20081<br />
Medion 20209, 20348, 20352, 20642<br />
MEI 20035<br />
20035, 20162, 20037, 20048,<br />
20039, 20047, 20240, 20000,<br />
Memorex<br />
20104, 20209, 20278, 20046,<br />
20348, 20479, 21162, 21237,<br />
21262<br />
Metronic 20081<br />
21062, 20162, 20037, 20081,<br />
Metz<br />
20226, 20347, 20836, 21162,<br />
21262, 21562<br />
MGA 20060, 20240, 20043<br />
MGN Technology 20240<br />
Micormay 20348<br />
Micromaxx 20209<br />
Microsoft 21972<br />
Midland 20240<br />
Migros 20000<br />
Mind 21972<br />
Minolta 20042<br />
20060, 20048, 20047, 20081,<br />
Mitsubishi 20000, 20042, 20067, 20043,<br />
20041, 20480, 20642, 20807<br />
Motorola 20035, 20048<br />
MTC 20240, 20000<br />
MTX 20000<br />
Multitec 20037<br />
Multitech 20039, 20000<br />
Murphy 20000<br />
Myryad 20081<br />
N NAD 20240, 20104<br />
Naiko 20348, 20642<br />
NAP 20039<br />
National 20226<br />
Nebula Electronics 20033<br />
20035, 20037, 20048, 20104,<br />
NEC<br />
20067, 20041, 20278, 20038,<br />
21137<br />
Neckermann 20081, 20041<br />
Nesco 20000<br />
Neufunk 20209<br />
Newave 20037<br />
Nikkai 20278<br />
Nikko 20037, 20278<br />
Nikkodo 20037, 20278<br />
Nishi 20240<br />
Niveus Media 21972<br />
Noblex 20240<br />
20048, 20081, 20240, 20042,<br />
Nokia<br />
20104, 20041, 20278, 20046,<br />
20106, 20315<br />
Nordmende 20067, 20041, 20320<br />
Northgate 21972<br />
Nu-Tec 20209<br />
O Oceanic<br />
20048, 20081, 20000, 20104,<br />
20041, 20046, 20106<br />
Okano 20209, 20278, 20315, 20348<br />
Olympus 20035, 20162, 20104, 20226<br />
Onimax 20642<br />
Onkyo 20222<br />
21062, 20035, 20162, 20037,<br />
Optimus<br />
20048, 20047, 20240, 20000,<br />
20104, 20432, 21162, 21262<br />
20184, 20240, 20000, 20104,<br />
Orion<br />
20121, 20209, 20002, 20278,<br />
20348, 20352, 20479, 20742,<br />
21479<br />
Orson 20000<br />
Osaki 20037, 20000<br />
Otake 20209<br />
Otto Versand 20081<br />
P Pace 20352<br />
Pacific 20000, 20348, 20642, 20742<br />
Packard Bell 21972<br />
Palladium 20037, 20209, 20041, 20348<br />
Palsonic 20000, 20642<br />
Panama 20035<br />
21062, 20035, 20162, 20000,<br />
Panasonic<br />
20225, 20226, 20614, 20616,<br />
20836, 21035, 21162, 21262,<br />
21562<br />
Pathe Cinema 20043<br />
Pathe Marconi 20041<br />
20035, 20162, 20037, 20047,<br />
Penney<br />
20081, 20240, 20000, 20042,<br />
20067, 20038, 21035, 21237<br />
Pentax 20042<br />
Perdio 20000, 20209<br />
Philco<br />
20035, 20081, 20000, 20209,<br />
20038, 20226, 20479<br />
Philips<br />
20035, 20162, 20048, 20081,<br />
20045, 20000, 20209, 20226,<br />
20616, 20618, 20739, 21081,<br />
21181<br />
Phoenix 20278<br />
Phonola 20081<br />
Pilot 20037<br />
Pioneer 20162, 20081, 20042, 20067<br />
Polk Audio 20081<br />
Portland 20278, 20637<br />
Presidian 21593<br />
Prinz 20000<br />
Profitronic 20081, 20240<br />
Proline 20000, 20278, 20320, 20642<br />
Proscan 20060, 21060<br />
Prosco 20278<br />
Prosonic 20209, 20278<br />
Protec 20000<br />
Protech 20081<br />
ProVision 20278<br />
Pulsar 20039, 20240, 20278<br />
Pulser 20240<br />
Pye 20081, 20000<br />
Q Qisheng 20060<br />
Quarter 20046<br />
Quartz 20035, 20047, 20046<br />
Quasar<br />
20035, 20162, 20002, 20278,<br />
20226, 21035, 21162<br />
Quelle 20081<br />
R Radialva 20037, 20048, 20081<br />
Radiola 20081<br />
Radionette 20037, 21137<br />
20035, 20162, 20037, 20048,<br />
RadioShack 20047, 20240, 20000, 20104,<br />
20046, 21162<br />
Radix 20037<br />
Randex 20037<br />
Rank 20041<br />
Rank Arena 20041<br />
20060, 20035, 20048, 20240,<br />
RCA<br />
20045, 20000, 20042, 20106,<br />
20226, 20320, 20807, 20880,<br />
21035, 21060<br />
Realistic<br />
20035, 20162, 20037, 20048,<br />
20047, 20240, 20000, 20104,<br />
20121, 20278, 20046, 21162<br />
Reoc 20348<br />
ReplayTV 20614, 20616<br />
Rex 20041<br />
Ricavision 21972<br />
Rio 21137<br />
Roadstar<br />
20037, 20081, 20240, 20278,<br />
20038, 20742<br />
Runco 20039<br />
S Saba 20041, 20278, 20320<br />
Saisho 20209, 20348<br />
Salora 20104, 20043, 20046, 20106<br />
Sampo 20037, 20048<br />
Samsung<br />
20060, 20240, 20045, 20000,<br />
20038, 20432, 20739, 21014<br />
Samtron 20240<br />
Sanky 20048, 20039<br />
Sansei 20048<br />
20240, 20000, 20067, 20209,<br />
Sansui<br />
20041, 20002, 20106, 20348,<br />
20479, 21479<br />
20048, 20047, 20240, 20000,<br />
Sanyo<br />
20104, 20067, 20209, 20046,<br />
20348, 20479, 21137<br />
Saville 20240, 20278, 20352<br />
SBR 20081<br />
ScanSonic 20240<br />
Schaub Lorenz<br />
20000, 20104, 20041, 20106,<br />
20315, 20348<br />
20037, 20081, 20240, 20000,<br />
Schneider 20042, 20278, 20348, 20352,<br />
20642, 21137<br />
Scott 20184, 20045, 20121, 20043<br />
20060, 20035, 20162, 20037,<br />
20048, 20039, 20047, 20033,<br />
Sears<br />
20045, 20000, 20042, 20104,<br />
20067, 20043, 20209, 20041,<br />
21237, 20046<br />
Seaway 20278<br />
SEG<br />
20081, 20240, 20278, 20637,<br />
20642<br />
SEI 20081<br />
Sei-Sinudyne 20081<br />
Seleco 20037, 20041<br />
Semp 20045<br />
Sentra 20278<br />
Sharp<br />
20037, 20048, 20047, 20032,<br />
20000, 20209, 20807<br />
Shinco 20000<br />
Shintom 20039, 20240, 20000, 20104<br />
Shivaki 20037<br />
Shogun 20240<br />
Siemens<br />
20037, 20081, 20104, 20046,<br />
20320, 20347<br />
Siera 20081<br />
Signature<br />
20060, 20035, 20037, 20048,<br />
20000, 20046, 20479<br />
Silva 20037<br />
Silver 20278<br />
SilverCrest 20642<br />
Singer 20037, 20240, 20045, 20348<br />
Sinudyne 20081, 20209, 20352<br />
Smaragd 20348<br />
Sonic Blue 20614, 20616, 21137<br />
Sonographe 20046<br />
Sonolor 20048, 20046<br />
Sontec 20037, 20278<br />
Sonwa 20642<br />
20035, 20048, 20047, 20032,<br />
Sony<br />
20033, 20000, 20067, 20046,<br />
20106, 20226, 20636, 21232,<br />
21972<br />
Soundmaster 20000<br />
Soundwave 20037, 20209, 20348<br />
Stack 9 21972<br />
Standard 20278<br />
Stern 20278<br />
STS 20042<br />
Sunkai 20209, 20278, 20348<br />
Sunstar 20000<br />
Suntronic 20000<br />
Supra 20037, 20278, 20348<br />
Susumu 20037<br />
SV2000 20000<br />
SVA 20000<br />
Sylvania<br />
20035, 20081, 20000, 20043,<br />
21593, 21781<br />
Symphonic 20240, 20000, 20002, 21593<br />
Systemax 21972<br />
T T+A 20162<br />
Tagar Systems 21972<br />
Taisho 20209<br />
Tandberg 20278<br />
Tandy 20000, 20104<br />
Tashiko<br />
20037, 20048, 20081, 20240,<br />
20000<br />
Tatung<br />
20048, 20081, 20045, 20000,<br />
20067, 20043, 20209, 20041,<br />
20348, 20352<br />
Tchibo 20348<br />
TCM 20348<br />
Teac<br />
20037, 20000, 20067, 20041,<br />
20278, 20637, 20642, 21593<br />
Technics<br />
20035, 20162, 20037, 20081,<br />
20000, 20226, 21162<br />
TechniSat 20348<br />
Technosonic 20352<br />
Teco<br />
20035, 20037, 20048, 20041,<br />
20038<br />
Tedelex 20037, 20209, 20348, 20642<br />
Teknika 20035, 20037, 20000<br />
Teleavia 20041<br />
Telecorder 20240<br />
Telefunken<br />
20209, 20041, 20278, 20320,<br />
20642<br />
Telerent 20226<br />
Telestar 20037<br />
Teletech 20000, 20278<br />
Tensai 20037, 20000, 20278<br />
Tevion 20209, 20348, 20479, 20642<br />
Texet 20278<br />
Thomas 20000, 20002<br />
Thomson<br />
20060, 20067, 20041, 20278,<br />
20320<br />
Thorn 20037, 20104, 20041, 20320<br />
Tisonic 20278<br />
Tivo 20618, 20636, 20739, 21996<br />
TMK 20240, 20000
TNIX 20037<br />
Tocom 20240<br />
Tokai 20037, 20104, 20041<br />
Topline 20348<br />
20081, 20240, 20045, 20000,<br />
20042, 20067, 20043, 20209,<br />
Toshiba<br />
20041, 20352, 20432, 20742,<br />
20845, 21008, 21145, 21972,<br />
21996<br />
Tosonic 20278<br />
Totevision 20037, 20240<br />
Touch 21972<br />
Toyoda 20278<br />
Tradex 20081<br />
Triad 20278<br />
Trix 20037<br />
U Uher 20240<br />
Ultra 20045, 20278<br />
Ultravox 20278<br />
Unitech 20240<br />
United 20348, 20742, 21593<br />
20037, 20081, 20240, 20000,<br />
Universum 20104, 20209, 20106, 20348,<br />
21137<br />
V Vector 20045<br />
Vector Research 20184, 20038<br />
Victor 20067, 20041<br />
Video Concepts 20045<br />
Video Technic 20000<br />
Videomagic 20037<br />
Videosonic 20240, 20000<br />
Viewsonic 21972<br />
Villain 20000<br />
Voodoo 21972<br />
20060, 20035, 20037, 20048,<br />
W Wards<br />
20039, 20047, 20081, 20033,<br />
20240, 20045, 20000, 20042,<br />
20043, 20041, 20038, 20046,<br />
20479<br />
Watson 20081, 20352, 20642<br />
Weltblick 20037<br />
Wharfedale 20642<br />
White<br />
20000, 20209, 20278, 20479,<br />
Westinghouse 20637<br />
World 20209, 20002, 20348, 20479<br />
X XR-1000 20035, 20240, 20000<br />
Y Yamaha 20041, 20038<br />
Yamishi 20278<br />
Yoko 20037, 20240<br />
Z Zenith<br />
20037, 20039, 20033, 20000,<br />
20209, 20041, 20278, 20479,<br />
20637, 21137, 21479<br />
ZT Group 21972<br />
ZX 20209, 20348, 20352<br />
PVR b3<br />
A ABS 21972<br />
Alienware 21972<br />
C CyberPower 21972<br />
D Dell 21972<br />
DirecTV 20739<br />
G Gateway 21972<br />
Go Video 20614<br />
H Hewlett Packard 21972<br />
Howard Computers 21972<br />
HP 21972<br />
Hughes Network<br />
Systems<br />
20739<br />
Humax 20739<br />
Hush 21972<br />
I iBUYPOWER 21972<br />
L Linksys 21972<br />
M Media Center PC 21972<br />
Microsoft 21972<br />
Mind 21972<br />
N Niveus Media 21972<br />
Northgate 21972<br />
P Panasonic 20614, 20616<br />
Philips 20618, 20739<br />
R RCA 20880<br />
ReplayTV 20614, 20616<br />
S Samsung 20739<br />
Sonic Blue 20614, 20616<br />
Sony 20636, 21972<br />
Stack 9 21972<br />
Systemax 21972<br />
T Tagar Systems 21972<br />
Tivo 20618, 20636, 20739<br />
Toshiba 21008, 21972, 21996<br />
Touch 21972<br />
V Viewsonic 21972<br />
Voodoo 21972<br />
Z ZT Group 21972<br />
DVD Player<br />
1 3D LAB 30503, 30539<br />
4Kus 31158<br />
A A-Trend 30714<br />
Acoustic Solutions 30713, 30730, 31228<br />
AEG 30770, 30788, 30790, 31923<br />
AFK 31051, 31152, 31923<br />
Aim 30672, 30699, 30833<br />
Airis<br />
30672, 31005, 31224, 31250,<br />
31321, 31345<br />
Aiwa 30533, 30641<br />
Akai<br />
30690, 30695, 30705, 30770,<br />
30788, 30790, 30884, 30898,<br />
30899, 31115, 31205, 31233,<br />
31695<br />
Akashi 30838<br />
AKI 31005<br />
Akira 30699, 31321<br />
Akura<br />
30898, 31051, 31140, 31233,<br />
31367<br />
Alba<br />
30672, 30539, 30717, 30695,<br />
30699, 30713, 30730, 30783,<br />
30884, 31140, 31530, 31695<br />
Alco 30790<br />
Alize 31151<br />
All-Tel 31451<br />
Allegro 30869<br />
Altacom 31224<br />
Amitech 30784, 30770, 30850<br />
Amoi 30852<br />
Amphion Media<br />
Works<br />
30872<br />
Amstrad 30713, 30770, 31151, 31367<br />
AMW 30872<br />
Anam 31913<br />
Ansonic 30759, 30774, 30831<br />
30533, 30672, 30717, 30755,<br />
Apex Digital 30794, 30796, 30797, 30830,<br />
31004, 31020, 31056, 31061<br />
Aristona 30539, 30646<br />
Arrgo 31023<br />
ASCOMTEC 31923<br />
Asono 31224<br />
Aspire Digital 31168<br />
Atacom 31224<br />
Audiosonic 30690, 31923<br />
Audiovox 30717, 30790<br />
Audioworld 30790<br />
Autovox 30713<br />
Auvio 30843<br />
Awa 30730, 30872<br />
Axion 30730<br />
B Base 31451<br />
Basic Line 30713<br />
Baze 30898<br />
BBK 30862, 31224<br />
Beep 31163<br />
Bellagio 31004<br />
Belson 31086, 31923<br />
Binatone 31923<br />
Black Diamond 30713, 30833, 30884<br />
Blaupunkt 30717<br />
Blu:sens 31233, 31321<br />
Blue Nova<br />
International<br />
31321<br />
Blue Parade 30571<br />
Blue Sky<br />
30672, 30651, 30695, 30699,<br />
30713, 30790, 30843, 31423<br />
Boghe 31004<br />
Boman 30783, 30898, 31005<br />
Bose 32023<br />
Brainwave 30770, 31115<br />
Brandt 30503, 30651, 30551<br />
Broksonic 30695<br />
30672, 30717, 30690, 30699,<br />
Bush<br />
30713, 30723, 30730, 30831,<br />
30833, 30884, 31051, 31140,<br />
31483, 31695, 31832<br />
Byd:sign 30872<br />
C C-Tech 30798, 31152<br />
California Audio Labs 30490<br />
Cambridge Audio 30751, 31109<br />
Cambridge<br />
Soundworks<br />
30690<br />
Campomatic Digital 31051<br />
Cat 30699, 30789, 31421, 31923<br />
CCE 30730<br />
Celestial 31020<br />
cello 31730<br />
Centrex 30672, 31004<br />
Centrum<br />
30713, 30789, 31005, 31227,<br />
31923<br />
CGV 30751, 31115<br />
Changhong 30627, 31061<br />
Cinea 30831, 30841<br />
Cinetec 30713, 30872<br />
cineULTRA 30699<br />
CineVision 30833, 30869, 31483<br />
Citizen 30695<br />
Clairtone 30571<br />
Classic 30730, 31730<br />
Clatronic 30672, 30675, 30788, 31233<br />
Clayton 30713<br />
Coby<br />
30730, 30852, 31086, 31321,<br />
31923<br />
Codex 31233<br />
Commax 31321<br />
Conia 30672, 30852, 31321<br />
Contel 30788<br />
Continental Edison 30831, 30872<br />
Craig 30831<br />
Creative 30503, 30539<br />
Crown 30690, 30713, 30770, 31115<br />
Crypto 31228<br />
Curtis Mathes 31087<br />
Cybercom 30831<br />
CyberHome<br />
30714, 30816, 30874, 31023,<br />
31024, 31117, 31129, 31502<br />
Cytron 30651, 30705, 30774, 31347<br />
D D-Vision 31115, 31367<br />
Daenyx 30872<br />
Daewoo<br />
30490, 30784, 30705, 30714,<br />
30770, 30833, 30869, 30872,<br />
31172, 31483, 31906<br />
Dalton 31036<br />
Dansai 30770, 30783, 31115, 31695<br />
Dantax 30539, 30713, 30723, 30790<br />
Daytek 30872, 31005<br />
Dayton 30872<br />
DCE 30831<br />
Decca 30770, 31115<br />
Denon<br />
30490, 30634, 31634,<br />
[32134] z<br />
Denver<br />
30672, 30699, 30788, 30898,<br />
31056, 31104, 31321, 31923<br />
Denzel 30665<br />
Desay 30843, 31212<br />
Dgtec 30672<br />
Diamond 30651, 30751, 30768, 30790<br />
Digihome 30713<br />
DigiLogic 30713<br />
digiRED 30717<br />
Digitech 31832<br />
Digitor<br />
30651, 30690, 30833, 31005,<br />
31423<br />
Digitrex 30672, 31004, 31056<br />
DiK 30831<br />
Dinamic 30788<br />
Disney 30675, 30831, 31270<br />
DiViDo 30705<br />
DK Digital 30831<br />
DMTech 30783, 31271<br />
Dragon 30831<br />
DreamX 31151<br />
DSE 30833, 31152, 31730<br />
30651, 30665, 30675, 30713,<br />
Dual<br />
30730, 30783, 30790, 30831,<br />
31023<br />
Durabrand 30713, 30831, 31023, 31502<br />
DVD2000 30521<br />
DVX 30768<br />
E E:max 31233, 31321<br />
EagleTec 30714<br />
eBench 31152<br />
ECC 30730<br />
Eclipse 30723, 30751<br />
Elfunk 30713, 30850, 30884<br />
Elin 30770<br />
Elite 31152<br />
Ellion 30850, 31421<br />
30672, 30690, 30770, 30788,<br />
Elta<br />
30850, 31051, 31115, 31151,<br />
31233<br />
Eltax 31233, 31321<br />
Emerson<br />
30591, 30675, 30705, 30821,<br />
31268<br />
Enterprise 30591<br />
PRESET CODE
Entivo 30503, 30539<br />
Enzer 30784, 30770, 31228<br />
ESA 30821, 31268<br />
EuroLine 30675, 30788, 31115, 31233<br />
F Fenner 30651<br />
Ferguson<br />
30651, 30695, 30713, 30884,<br />
30898, 31695, 31730<br />
Finlux<br />
30672, 30591, 30741, 30751,<br />
PRESET CODE<br />
30770, 30783<br />
Firstline<br />
30651, 30713, 30843, 30869,<br />
31530<br />
Fisher 30670<br />
Funai 30675, 30695, 31268<br />
Fusion 30862<br />
G Gateway 31158<br />
GE 30522, 30815, 30717<br />
General Electric 30717<br />
Germatic 31051<br />
Global Link 31224<br />
Global Solutions 30768<br />
Global Sphere 31152<br />
30573, 30744, 30717, 30715,<br />
Go Video<br />
30741, 30783, 30833, 30869,<br />
31044, 31075, 31099, 31158,<br />
31483, 31730<br />
GoldStar 30591, 30741, 30869<br />
30651, 30690, 30713, 30723,<br />
Goodmans<br />
30730, 30783, 30790, 30833,<br />
31004, 31140, 31423, 31530,<br />
31730, 31923<br />
GP Audio 31140<br />
GPX 30699, 30741<br />
Gradiente 30490, 30651<br />
Graetz 30665<br />
Gran Prix 30831, 30898<br />
Grandin 30713, 31233<br />
Greenhill 30717<br />
30539, 30651, 30551, 30670,<br />
Grundig<br />
30686, 30695, 30705, 30713,<br />
30775, 30790, 31004, 31036,<br />
31695, 31730, 31832, 31920<br />
Grunkel 30770, 30790, 30831<br />
H H & B<br />
30713, 30841, 30850, 31233,<br />
31421<br />
Haaz 30751, 31152<br />
Haier 30843<br />
Hanseatic 30741, 30783, 30790<br />
Harman/Kardon 30582, 30702<br />
HCM 30788<br />
HDT 30705<br />
HE 30730, 31163, 31923<br />
Henss 30713<br />
HiMAX 30843<br />
Hitachi<br />
30573, 30664, 30665, 30713,<br />
31247, 31920<br />
Hiteker 30672, 31923<br />
Hoeher<br />
30651, 30713, 30831, 31004,<br />
31224<br />
Home Electronics 30730, 30770<br />
Home Tech Industries 31224<br />
Hoyo 30665<br />
Humax 30646<br />
Hyundai 30783, 30850, 31061, 31228<br />
I iLo 31348<br />
Ingelen 30788<br />
Ingersol 31023<br />
Initial 30839, 30717<br />
Inno Hit 30713<br />
Insignia 31268<br />
Integra 30571, 30627, 31634<br />
Irradio 30869, 31115, 31224, 31233<br />
IRT 30783<br />
ISP 30695<br />
J Jamo 31036<br />
Jaton 30665<br />
JBL 30702<br />
JDB 30730<br />
JDV 31367<br />
Jeken 30699<br />
Jepssen 31250<br />
JMB 30695<br />
JNC 30672, 31271<br />
JSI 31423<br />
JVC<br />
30503, 30539, 30558, 30623,<br />
30867, 31164, 31597, 31860<br />
jWin 31051<br />
K Kansas Technologies 31233, 31530<br />
Karcher 30783<br />
Kawasaki 30790<br />
Kendo 30672, 30699, 30713, 30831<br />
Kennex 30713, 30770, 30898<br />
Kenwood 30490, 30534<br />
Kiiro 30770<br />
Kiss 30665, 30841, 31523<br />
KLH 30815, 30717, 30790, 31020<br />
Kloss 30533<br />
Koda 31230<br />
Konka 31192<br />
Koss 30651, 31061, 31423<br />
Kreisen 31421<br />
KXD 31321, 31923<br />
L Lasonic 30627, 30798, 30789<br />
Lawson 30768<br />
Lecson 31533<br />
Leiker 30872<br />
Lenco<br />
30651, 30699, 30713, 30770,<br />
30774<br />
Lenoir 31228<br />
Lenoxx 30690, 30838<br />
Lexia 30699, 30768<br />
LG<br />
30591, 30741, 30790, 30869,<br />
31906<br />
Lifetec 30651, 30831, 31347<br />
Limit 30768, 31104<br />
LiteOn 31058, 31158<br />
Lodos 30713<br />
Loewe 30539, 30511, 30741, 30885<br />
Logik 30713, 30884<br />
Logix 30705, 30783<br />
Luker 31367<br />
Lumatron<br />
30695, 30705, 30713, 30741,<br />
30833, 31115, 31321, 31832<br />
Lunatron 30741<br />
Luxman 30573<br />
Luxor 30713, 31004, 31695, 31730<br />
M Magnasonic 30651, 30675<br />
Magnat 31923<br />
30503, 30539, 30646, 30675,<br />
Magnavox 30713, 30821, 30885, 31140,<br />
31268<br />
Magnex 30723<br />
Majestic 31345<br />
Manhattan 30705, 30713<br />
Marantz 30503, 30539, 30675<br />
Mark 30713<br />
Marquant 30770<br />
Matsui<br />
30672, 30651, 30695, 30713,<br />
30884, 31004, 31695, 31730<br />
Maxdorf 30788<br />
Maxent 31347<br />
Maxim 30713, 30872, 31367<br />
Maya 31345<br />
MBO 30690, 30730, 31730<br />
McIntosh 31533<br />
MDS 30713<br />
Mecotek 30770<br />
30651, 30630, 30774, 30783,<br />
Medion<br />
30831, 31006, 31270, 31345,<br />
31347, 31423<br />
MEI 30790<br />
Memorex 30690, 30695, 30831, 31270<br />
Metronic 30690<br />
Metz 30525, 30571, 30713<br />
MiCO 30723, 30751, 31223<br />
Micromaxx 31695<br />
Micromedia 30503, 30539<br />
Micromega 30539, 31005<br />
Microsoft 30522, 31708<br />
Microstar 30831<br />
Minato 30752<br />
Minax 30713<br />
Minerva 30705<br />
Minoka 30770, 31115<br />
Mintek 30839, 30717<br />
Mirror 30752<br />
Mitsubishi 31521, 30521, 30713, 31403<br />
Mizuda 30770, 31451<br />
Monyka 30665<br />
MPX 30843<br />
Mustek 30730, 31730<br />
Mx Onda 30651, 30751, 31223<br />
Mystral 30831<br />
N NAD 30741<br />
Naiko 30770, 31004, 31367<br />
Narita 31367<br />
NEC 30741, 30869, 31404<br />
Neovia 31271<br />
Nesa 30717<br />
Neufunk 30665<br />
Nevir 30770, 30831, 31197<br />
NexxTech 31402<br />
Nikkai 31923<br />
Nintaus 31051, 31202<br />
Niro 32024<br />
Norcent 30872, 31923<br />
Nordmende 30774, 30831<br />
Noriko 30752<br />
Nova 31923<br />
Nowa 30843<br />
Nu-Tec 31228<br />
O Okano 30752<br />
Olidata 30672<br />
Omni<br />
30690, 30833, 30838, 30862,<br />
31104, 31832<br />
Onix 30838<br />
Onkyo 30503, 30627<br />
Oopla 31158<br />
Oppo 31224<br />
Optim 30843<br />
Optimus 30525, 30571<br />
Orbit 30872<br />
Orion 30695, 31233, 31695<br />
Oritron 30651<br />
Ormond 30713<br />
P P&B 31451<br />
Pacific<br />
30695, 30713, 30759, 30768,<br />
30790, 30831<br />
Packard Bell 30831<br />
Palladium 30695, 30713, 31906, 31920<br />
Palsonic 30672, 30852, 31056, 31321<br />
30503, 30490, 30571, 30703,<br />
Panasonic 31362, 31462, 31490, 31579,<br />
31762, 31834, 31905, 31908<br />
Panda 30717, 30789, 31203<br />
peeKTon 30898, 31224<br />
Philco 30690, 30862<br />
30503, 30539, 30646, 30675,<br />
Philips<br />
30854, 30885, 31158, 31260,<br />
31267, 31340, 31354<br />
Philo 31345<br />
Phonotrend 30699<br />
PianoDisc 31024<br />
Pioneer<br />
30490, 30525, 30571, 30631,<br />
31965<br />
Plu2 30850<br />
Pointer 30784<br />
Polaroid 31020, 31061, 31086<br />
Polk Audio 30539<br />
Portland 30770<br />
Powerpoint 30872, 31005<br />
Presidian 30675<br />
Prima 31228<br />
Prinz 30831<br />
Prism 30705, 30831<br />
Pro2 31345<br />
ProCaster 31004<br />
Proceed 30672<br />
Proline<br />
30672, 30651, 30686, 30833,<br />
31004, 31483<br />
Proscan 30522<br />
Proson 30713<br />
Prosonic 30699, 30752<br />
ProVision<br />
30699, 30730, 31163, 31321,<br />
31923<br />
Pye 30539, 30646<br />
Q QONIX 31051<br />
Qwestar 30651<br />
R Radionette 30741, 30869, 31906, 32024<br />
RadioShack 30571<br />
Raite 30665<br />
30522, 30571, 30717, 30790,<br />
RCA<br />
30822, 31022, 31132, 31769,<br />
31913, 31965<br />
Realistic 30571<br />
REC 30490<br />
Redstar<br />
30759, 30763, 30770, 30788,<br />
30898, 31345, 31923<br />
Relisys 31347<br />
Reoc 30752, 30768<br />
Revoy 30699, 30841<br />
Rex 30838<br />
Richmond 31233<br />
Rio 30869<br />
30672, 30690, 30699, 30713,<br />
Roadstar<br />
30730, 30833, 30898, 31051,<br />
31227<br />
Rocksonic 30789<br />
Ronin 30872<br />
Rotel 30558, 30623<br />
Rowa 30717, 30759, 30872, 31004<br />
Rownsonic 30789<br />
S Saba 30651, 3055<br />
Sabaki 30798<br />
Saivod 30759, 30831, 31367
Salora 30741<br />
Sampo 30752, 31321, 31347<br />
30490, 30573, 30744, 30199,<br />
Samsung<br />
30820, 30899, 31044, 31075,<br />
31635, 31932<br />
30784, 30695, 30751, 30763,<br />
Sansui<br />
30768, 31051, 31228, 31230,<br />
31695, 31832<br />
Sanyo<br />
30670, 30675, 30695, 30713,<br />
30873, 31228<br />
Scan 30705, 30850<br />
ScanMagic 30730, 31730<br />
ScanSonic 31695<br />
Schaub Lorenz 30770, 30788, 31115, 31151<br />
30539, 30646, 30651, 30705,<br />
Schneider 30713, 30774, 30783, 30788,<br />
30790, 30831, 30869, 31367<br />
Schwaiger 30752<br />
Scientific Labs 30768<br />
Scott<br />
30672, 30651, 31005, 31036,<br />
31233, 31423<br />
Seeltech 31224, 31451<br />
SEG<br />
30798, 30665, 30713, 30763,<br />
30872, 30884, 31483, 31530<br />
Sensory Science 31158<br />
Shanghai 30672<br />
Sharp<br />
30630, 30675, 30713, 30752,<br />
31256, 32015, 32024<br />
Sharper Image 31117<br />
Sherwood 30717, 30741, 30770<br />
Shinco 30717<br />
Shinsonic 30533, 30839<br />
Siemssen 31382<br />
Sigmatek 31005, 31224<br />
Siltex 31224<br />
Silva 30788, 30898<br />
Silva Schneider 30831, 30898<br />
SilverCrest 31152<br />
Simaudio 30885<br />
Singer 30690, 30751, 30768<br />
Sistemas 30672<br />
Skantic 30539, 30713<br />
Skymaster 30730, 30768<br />
Skyworth 30898<br />
Sliding 31115<br />
Slim Art 30784<br />
SM Electronic 30690, 30730, 30768, 31152<br />
Smart 30705, 30713<br />
Sonai 30755<br />
Sonashi 30831<br />
Sonic Blue<br />
30573, 30715, 30783, 30869,<br />
31099<br />
30533, 31533, 30864, 30573,<br />
Sony<br />
30630, 30772, 31033, 31070,<br />
31431, 31433, 31536, 31633,<br />
31769, 31981, 32043<br />
Sound Color 31233<br />
Soundmaster 30768<br />
Soundmax 30768<br />
Soundwave 30783<br />
Spectra 30872<br />
Standard<br />
30651, 30768, 30788, 30831,<br />
30898<br />
Star Clusters 31152, 31227<br />
Starlogic 31005<br />
Starmedia 31005, 31224<br />
Stevison 31367<br />
Strong 30713<br />
Sunkai 30770, 30850<br />
Sunstech 30831<br />
Sunwood 30788, 30898<br />
Superscan 30821<br />
Supervision 30768, 31152<br />
SVA 30672, 30717, 30752, 31105<br />
Sylvania 30630, 30675, 30821, 31268<br />
Symphonic 30675, 30821, 31268<br />
Synn 30768<br />
T Tandberg 30713, 31695<br />
Tangent 31321<br />
Targa 31227<br />
Tatung 30770, 31695<br />
Tchibo 30741<br />
TCL 31180<br />
TCM 30741, 30790<br />
30571, 30717, 30675, 30741,<br />
Teac<br />
30759, 30768, 30790, 30833,<br />
31006, 31197, 31227<br />
Tec 30898<br />
Technica 31367, 31695<br />
Technics 30490, 30703, 31905<br />
Technika 30770, 30831, 31115, 31695<br />
Technisson 31115<br />
Technosonic 30730, 31051, 31115<br />
Techwood 30713, 31530<br />
Tedelex 30690, 30768, 31004, 31228<br />
Telefunken<br />
30789, 30790, 30833, 31483,<br />
31832, 31923<br />
Teletech 30713, 30768<br />
Tensai 30651, 30690, 30770<br />
30651, 30798, 30768, 30833,<br />
Tevion<br />
30898, 31036, 31227, 31347,<br />
31382, 31483, 31730, 31923<br />
Theta Digital 30571<br />
Thomson 30522, 30511, 30551<br />
Tivo 31503<br />
Tokai<br />
30784, 30665, 30788, 30790,<br />
30898<br />
Tom-Tec 30789<br />
Top Suxess 31224<br />
30503, 30573, 30539, 30695,<br />
Toshiba<br />
31045, 31154, 31503, 31510,<br />
31769<br />
TRANS-continents 30831, 30872, 31321, 31327<br />
Transonic 30730<br />
Tredex 30843<br />
TruVision 31451<br />
Tsinghua Tongfang 31205<br />
TSM 31224<br />
U Umax 30690, 31151<br />
Unimax 30770<br />
30675, 30695, 30699, 30713,<br />
United<br />
30730, 30788, 30884, 31115,<br />
31152, 31228, 31367, 31832<br />
Universum<br />
30591, 30713, 30741, 30790,<br />
30869, 31227, 31530, 31913<br />
Uptek 30763<br />
upXus 31345<br />
Urban Concepts 30503, 30539<br />
US Logic 30839<br />
V Venturer 30790<br />
Vestel 30713, 30884, 31530<br />
Victor 31597<br />
Vieta 30705<br />
Viewmaster 30862, 31224<br />
Voxson 30690, 30730, 30774, 30831<br />
Vtrek 31228<br />
W Waitec 31151, 31224, 31233<br />
Walkvision 30717<br />
Waltham 31530<br />
Welkin 30831<br />
Wellington 30713<br />
Weltstar 30713<br />
Wesder 30699<br />
Wharfedale<br />
30686, 30751, 30752, 30790,<br />
31832<br />
Wilson 30831, 31233<br />
Windsor 30713<br />
Windy Sam 30573<br />
WIZE 31115<br />
Woxter 31005, 31151, 31224<br />
X Xbox 30522, 31708<br />
Xenius 30790<br />
XLogic 30768, 31152, 31228<br />
XMS 30770, 30788<br />
Xoro 31183, 31250<br />
Y Yakumo 31004, 31056<br />
Yamada<br />
30872, 31004, 31056, 31151,<br />
31158<br />
Yamaha<br />
30490, 30539, 30646, 30545,<br />
31354<br />
Yamakawa 30665, 30872, 31104<br />
Yukai 30730, 31730<br />
30503, 30591, 30741, 30869,<br />
31906<br />
Zeus 30784<br />
Z Zenith<br />
DVD Recorder<br />
1 4Kus 31158<br />
A Airis 31321<br />
Akira 31321<br />
Alba 31530<br />
Apex Digital 31056<br />
Aristona 30646<br />
Aspire Digital 31168<br />
B Belson 31086<br />
C Cat 31421<br />
cello 31730<br />
Centrum 31227<br />
Classic 31730<br />
Coby 31086<br />
Commax 31321<br />
Conia 31321<br />
CyberHome 31129, 31502<br />
Cytron 31347<br />
D Denon 30490<br />
Denver 31056<br />
Digitrex 31056<br />
DSE 31730<br />
Durabrand 31502<br />
E E:max 31321<br />
Ellion 31421<br />
Eltax 31321<br />
Emerson 30675<br />
F Ferguson 31730<br />
Firstline 31530<br />
Funai 30675<br />
G Gateway 31158<br />
Go Video 30741, 31158, 31730<br />
Goodmans 31530, 31730<br />
GPX 30741<br />
Grundig 31730<br />
H H & B 31421<br />
Humax 30646<br />
I iLo 31348<br />
J JVC 31164, 31597<br />
K Kansas Technologies 31530<br />
Kreisen 31421<br />
KXD 31321<br />
L LG 30741<br />
Lifetec 31347<br />
LiteOn 31158<br />
Loewe 30741<br />
Lumatron 31321<br />
Luxor 31730<br />
M Magnavox 30646, 30675<br />
Matsui 31730<br />
Maxent 31347<br />
MBO 31730<br />
Medion 31347<br />
MiCO 30751<br />
Mitsubishi 31403<br />
Mustek 31730<br />
N NEC 31404<br />
O Oopla 31158<br />
P Palsonic 31056, 31321<br />
Panasonic 30490, 31579<br />
Philips 30646, 31158<br />
Pioneer 30631<br />
Polaroid 31086<br />
ProVision 31321<br />
Pye 30646<br />
R RCA 30522<br />
Relisys 31347<br />
Roadstar 31227<br />
S Sampo 31347<br />
Samsung 30490, 31635<br />
ScanMagic 31730<br />
Schneider 30646<br />
SEG 31530<br />
Sensory Science 31158<br />
Sharp 30630, 30675<br />
Sony<br />
31033, 31070, 31431, 31433,<br />
31536<br />
Star Clusters 31227<br />
Sylvania 30675<br />
T Tangent 31321<br />
Targa 31227<br />
Teac 31227<br />
Techwood 31530<br />
Tevion 31227, 31347, 31730<br />
Thomson 30551<br />
Toshiba 31510<br />
U Universum 31227, 31530<br />
V Vestel 31530<br />
Victor 31597<br />
W Waltham 31530<br />
Y Yakumo 31056<br />
Yamada 31056, 31158<br />
Yamaha 30646<br />
Yukai 31730<br />
Z Zenith 30741<br />
PRESET CODE
DVD preset codes<br />
DVD-Voreinstellungscodes<br />
Codes préréglés DVD<br />
Codici di preselezione DVD<br />
Códigos de preajuste de DVD<br />
DVD-voorkeuzecodes<br />
Förinställda DVD-koder<br />
e<br />
Model No.<br />
Modellnr<br />
Modéle numéro<br />
Modello No<br />
Nº de modelo<br />
Modelnr<br />
Modellnr<br />
PRESET CODE<br />
DVD-550<br />
DVD-700<br />
DVD-900<br />
DVD-1000<br />
DVD-1400<br />
DVD-1500<br />
DVD-1710<br />
DVD-1910<br />
DVD-1930<br />
DVD-2200<br />
DVD-2800<br />
32134 30490<br />
DVD-2800g<br />
DVD-2900<br />
DVD-2910<br />
DVD-2930<br />
DVD-3800<br />
DVD-3910<br />
DVD-3930<br />
DVD-A11<br />
DVD-A1<br />
DVD-A1XV<br />
DVD-800<br />
DVD-1600<br />
DVD-2000<br />
DVD-2500<br />
DVD-3000<br />
DVD-3300<br />
[ ] z: Preset codes set upon shipment from the factory.<br />
[ ] z: Sie Voreinstellungscodes wurden vor der Auslieferung werkseitig eingestellt.<br />
[ ] z: Les codes préréglés diffèrent en fonctiom des livraison de l’usine.<br />
[ ] z: I codici di presettaggio sono impostati in fabbrica prima della consegna.<br />
[ ] z: Los códigos vienen preprogramados de fábrica.<br />
[ ] z: Vooringestelde codes bij hey verlaten van de fabriek.<br />
[ ] z: Förinställda koder har ställts in vid transporten från fabriken.<br />
b1 : These preset codes can be recorded in the SAT/CBL mode.<br />
b1 : Diese voreingestellten Codes können im SAT/CBL-Modus aufgenommen werden.<br />
b1 : Ces codes de présélection peuvent être enregistrés en mode SAT/CBL.<br />
b1 : I codici preimpostati possono essere registrati nel modo SAT/CBL.<br />
b1 : Es posible guardar estos códigos preajustados en el modo SAT/CBL.<br />
b1 : Deze voorkeuzecodes kunnen worden opgenomen in de SAT/CBL-modus.<br />
b1 : Dessa förinställningskoder kan lagras i SAT/CBL-läget.<br />
b2 : These preset codes can be recorded in the TV mode.<br />
b1 : Diese voreingestellten Codes können im TV-Modus aufgenommen werden.<br />
b1 : Ces codes de présélection peuvent être enregistrés en mode TV.<br />
b1 : I codici preimpostati possono essere registrati nel modo TV.<br />
b1 : Es posible guardar estos códigos preajustados en el modo TV.<br />
b1 : Deze voorkeuzecodes kunnen worden opgenomen in de TV-modus.<br />
b1 : Dessa förinställningskoder kan lagras i TV-läget.<br />
b3 : These preset codes can be recorded in the VCR mode.<br />
b1 : Diese voreingestellten Codes können im VCR-Modus aufgenommen werden.<br />
b1 : Ces codes de présélection peuvent être enregistrés en mode VCR.<br />
b1 : I codici preimpostati possono essere registrati nel modo VCR.<br />
b1 : Es posible guardar estos códigos preajustados en el modo VCR.<br />
b1 : Deze voorkeuzecodes kunnen worden opgenomen in de VCR-modus.<br />
b1 : Dessa förinställningskoder kan lagras i VCR-läget.<br />
b4 : These preset codes can be recorded in the DVD mode.<br />
b1 : Diese voreingestellten Codes können im DVD-Modus aufgenommen werden.<br />
b1 : Ces codes de présélection peuvent être enregistrés en mode DVD.<br />
b1 : I codici preimpostati possono essere registrati nel modo DVD.<br />
b1 : Es posible guardar estos códigos preajustados en el modo DVD.<br />
b1 : Deze voorkeuzecodes kunnen worden opgenomen in de DVD-modus.<br />
b1 : Dessa förinställningskoder kan lagras i DVD-läget.
www.denon.com<br />
Denon Brand Company, D&M Holdings Inc.<br />
Printed in China 00D 511 4732 104