MMD6NP Manual - General Tools And Instruments
MMD6NP Manual - General Tools And Instruments
MMD6NP Manual - General Tools And Instruments

You also want an ePaper? Increase the reach of your titles
YUMPU automatically turns print PDFs into web optimized ePapers that Google loves.
TABLE OF CONTENTS<br />
1. FEATURES ................... 1<br />
2. SPECIFICATIONS. ............. 1<br />
3. FRONT PANEL DESCRIPTIONS ... 2<br />
4. MEASURING PROCEDURE.. ....... 3<br />
5. CONSIDERATIONS.. ............ 4<br />
6. BATTERY REPLACEMENT.. ....... 5<br />
7. T BLE OF CORRECTION V LUES . . 6<br />
Operating condition: Temp. 0-50'C, Humidity 40%<br />
Size: 218x76x53rnm<br />
Weight: about 260g ( including batteries<br />
Accessory:<br />
Carryingcase ............. 1 pc.<br />
Operation manual. ......... 1 PC.<br />
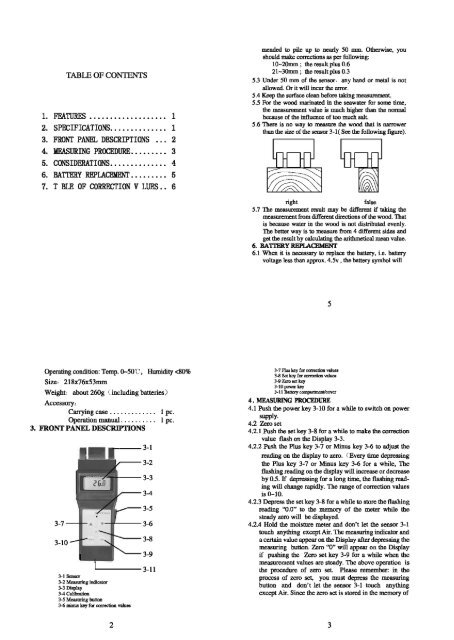
3. FRONT PANEL DESCRIPTIONS<br />
- 3-11<br />
3-1 Sensor<br />
3-2 Measuring indicator<br />
3-3 Display<br />
3-4 Calibration<br />
3-5 Measuring button<br />
3-6 minus key for correction values<br />
mended to pile up to nearly 50 mm. Otherwise, you<br />
should make corrections as per following:<br />
10-2Omm ; the result plus 0.6<br />
21-30mm ; the result plus 0.3<br />
5.3 Under 50 mm of the sensor, any hand or metal is not<br />
allowed. Or it will incur the error.<br />
5.4 Keep the surface clean before taking measurement.<br />
5.5 For the wood marinated in the seawater for some time,<br />
the measurement value is much higher than the normal<br />
because of the influence of too much salt.<br />
5.6 There is no way to measure the wood that is narrower<br />
than the size of the sensor 3-1( See the following figure).<br />
n n<br />
right false<br />
5.7 The measurement result may be different if taking the<br />
measurement from different directions of the wood. That<br />
is because water in the wood is not distributed evenly.<br />
The better way is to measure from 4 different sides and<br />
get the result by calculating the arithmetical mean value.<br />
6. BA'ITERY REPLACEMENT<br />
6.1 When it is necessary to replace the battery, i.e. battery<br />
voltage less than approx. 4.5, the battery symbol will<br />
3-7 Plus key fa correction values<br />
3-8 Set key for correction values<br />
3-9 2ao set key<br />
3-10 power key<br />
3-11 Battery compartment/cover<br />
4. MEASURING PROCEDURE<br />
4.1 Push the power key 3-10 for a while to switch on power<br />
supply.<br />
4.2 Zero set<br />
4.2.1 Push the set key 3-8 for a while to make the correction<br />
value flash on the Display 3-3.<br />
4.2.2 Push the Plus key 3-7 or Minus key 3-6 to adjust the<br />
reading on the display to zero. (Every time depressing<br />
the Plus key 3-7 or Minus key 3-6 for a while, The<br />
flashing reading on the display will increase or decrease<br />
by 0.5. If depressing for a long time, the flashing read-<br />
ing will change rapidly. The range of correction values<br />
is 0-10.<br />
4.2.3 Depress the set key 3-8 for a while to store the flashing<br />
reading "0.0" to the memory of the meter while the<br />
steady zero will be displayed.<br />
4.2.4 Hold the moisture meter and don't let the sensor 3-1<br />
touch anythmg except Air. The measuring indicator and<br />
a certain value appear on the Display after depressing the<br />
measuring button. Zero "0" will appear on the Display<br />
if pushing the Zero set key 3-9 for a while when the<br />
measurement values are steady. The above operation is<br />
the procedure of zero set. Please remember: in the<br />
process of zero set, you must depress the measuring<br />
button and don't let the sensor 3-1 touch anything<br />
except Air. Since the zero set is stored in the memory of