Riga S/Riga Basic kit assembly instructions - Home Depot
Riga S/Riga Basic kit assembly instructions - Home Depot
Riga S/Riga Basic kit assembly instructions - Home Depot

You also want an ePaper? Increase the reach of your titles
YUMPU automatically turns print PDFs into web optimized ePapers that Google loves.
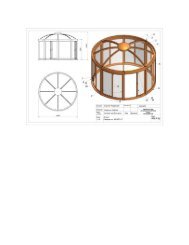
Assembly procedure gable view from inside<br />
ATTENTION! When using a foundation frame assemble in advance on this soil profi le (see page 5, 6)<br />
step 5 to step 5:<br />
rand rung left - curved (pos.1.5.4)<br />
glazing<br />
rand rung to the corner connection peg plugged<br />
Only rear gable!<br />
rand rung right - curved (pos.1.5.6)<br />
The rear gable is assembled in the same way!!!<br />
connecting<br />
plate (V10)<br />
crossbar<br />
(Pos.1.8)<br />
glazing<br />
The square peg of the corner connector<br />
is plugged in the rand rung<br />
(pos.1.5.4/1.5.6).<br />
Small triangular glazing positioned<br />
on the door frame (pos.1.8).<br />
The rand rung by means of<br />
connecting plate (V5) screwed to<br />
the door frame. On the rand rung<br />
you need 2 self-tapping screws pan<br />
head 4,2 x 13 (S9), on the door<br />
frame 2 hexagonal screws M6 x 16<br />
(S5).<br />
- See also step 4! -<br />
step 6: to step 6:<br />
view from outside<br />
step 7:<br />
holes for<br />
door lock<br />
11<br />
The crossbars (pos.1.9) are<br />
mounted sideways with the selftapping<br />
screw pan head 4,8 x 45<br />
(S13).<br />
to step 7:<br />
Slide before mounting the crossbar<br />
required hex screws M6 x 16 (S5)<br />
into the profi le of the crossbar<br />
(pos.1.8 und 1.9).<br />
The crossbar in the rear gable<br />
is used the same height as the<br />
existing crossbar. Attachment is to<br />
the connecting plate (V10).<br />
Now comes the glazing<br />
(787 x 728 mm).<br />
The remaining opening is later<br />
closed by the supplied rear window.