Riga S/Riga Basic kit assembly instructions - Home Depot
Riga S/Riga Basic kit assembly instructions - Home Depot
Riga S/Riga Basic kit assembly instructions - Home Depot

You also want an ePaper? Increase the reach of your titles
YUMPU automatically turns print PDFs into web optimized ePapers that Google loves.
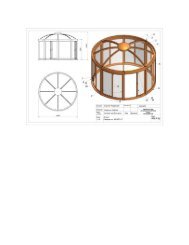
Assembly procedure gable<br />
ATTENTION! When using a foundation frame assemble in advance on this soil profi le (see page S. 5, 6)<br />
step 1<br />
corner soil profi le (V9)<br />
step 2<br />
glazing<br />
door frame left (pos.1.6)<br />
door frame right (pos.1.7)<br />
soil profi le (pos.1.1)<br />
<strong>Riga</strong> S <strong>Riga</strong><br />
730 x 728 1048 x 728<br />
glazing<br />
self-tapping screw pan head 4,2 x 13 (S9)<br />
Note: Only after the screw mounting of the door --><br />
ability to align.<br />
crossbar (pos.1.9) crossbar (pos.1.9)<br />
step 4 self-tapping screw pan head 4,2 x 13 (S9) to step 4:<br />
view from inside<br />
glazing<br />
door frame<br />
above<br />
(pos.1.8)<br />
connecting plate (V5)<br />
glazing<br />
screw M6 x 16 (S5)<br />
with nut M6 (S1)<br />
to step 1:<br />
First, please slide the door frame<br />
left (pos.1.6) and the door frame<br />
(pos.1.7)<br />
(profi le with 8 drill holes, a 30° chamfer and<br />
a black plastic glide)<br />
up to the small holes in the middle<br />
of the soil profi le. The chamfer must<br />
show this to the outside. Then attach<br />
the corner bracket (V9) on the<br />
soil profi le.<br />
to step 2:<br />
step 3 to step 3:<br />
10<br />
view from inside<br />
Even now you need the small side<br />
windows.<br />
Dimensions are listed in the table.<br />
With bar direction - vertical - in the<br />
soil profi le and sideways while in the<br />
door frame.<br />
Now the crossbar (pos. 1.9) is inserted<br />
from the top of the glazing.<br />
Before the connecting plate (V5)<br />
with the door frame above (pos.1.8)<br />
screwed, slide in the vertical door<br />
frames (pos.1.6/1.7) two hex screws<br />
M6 x 16 (S5) and in the horizontal<br />
door frame in M6 x 16 (S5) one.