Kingpin Bushing and Seal Installation Instructions - Spicer
Kingpin Bushing and Seal Installation Instructions - Spicer Kingpin Bushing and Seal Installation Instructions - Spicer
Kingpin Bushing and Seal Installation Instructions Models: E-1000I E-1200I E-1320I E-1460I EFA-12F3, EFA-12F4 EFA-22T2 E-1000W E-1200W E-1320W E-1460W EFA-13F3, EFA-13F5 EFA-22T5 E-1201W E-1462I EFA-18F3, EFA-20F4 EFA-24T2 EFA-24T5 P/N: SHAIS130 Some Dana bushings require reaming after installation. This kit contains “pre-sized” kingpin bushings that do not require reaming. Follow the proper installation instructions provided with the parts. Below are the installation instructions for kingpin bushing and seal replacement only. Refer back to the proper service manual for detailed instructions on the disassembly and assembly of all other steer axle components. Installation Steps: 1. Remove the old grease seals from the knuckle kingpin bores with a suitable tool. 2. Drive bushings out of knuckle with the proper Removal/Installation tool. 3. Remove all foreign material from kingpin areas of the steering knuckle and axle beam. 4. Wire brush machined surfaces taking care not to damage them. Clean kingpin bore. 5. When installing the bushings lightly lubricate the outside diameter to make installation easier. 6. Hand start the bushing in the beam bore. Note: When installing kingpin bushings, position the seam in areas marked “X”. (See Figure 1) Bushing seam locate in either area marked "X" 90 X X Figure 1 Spicer ® Axles & Brakes
<strong>Kingpin</strong> <strong>Bushing</strong> <strong>and</strong> <strong>Seal</strong> <strong>Installation</strong> <strong>Instructions</strong><br />
Models:<br />
E-1000I E-1200I E-1320I E-1460I EFA-12F3, EFA-12F4 EFA-22T2<br />
E-1000W E-1200W E-1320W E-1460W EFA-13F3, EFA-13F5 EFA-22T5<br />
E-1201W E-1462I EFA-18F3, EFA-20F4 EFA-24T2<br />
EFA-24T5<br />
P/N: SHAIS130<br />
Some Dana bushings require reaming after installation. This kit contains “pre-sized” kingpin bushings<br />
that do not require reaming. Follow the proper installation instructions provided with the parts.<br />
Below are the installation instructions for kingpin bushing <strong>and</strong> seal replacement only. Refer back to the<br />
proper service manual for detailed instructions on the disassembly <strong>and</strong> assembly of all other steer axle<br />
components.<br />
<strong>Installation</strong> Steps:<br />
1. Remove the old grease seals from the knuckle kingpin bores with a suitable tool.<br />
2. Drive bushings out of knuckle with the proper Removal/<strong>Installation</strong> tool.<br />
3. Remove all foreign material from kingpin areas of the steering knuckle <strong>and</strong> axle beam.<br />
4. Wire brush machined surfaces taking care not to damage them. Clean kingpin bore.<br />
5. When installing the bushings lightly lubricate the outside diameter to make installation easier.<br />
6. H<strong>and</strong> start the bushing in the beam bore.<br />
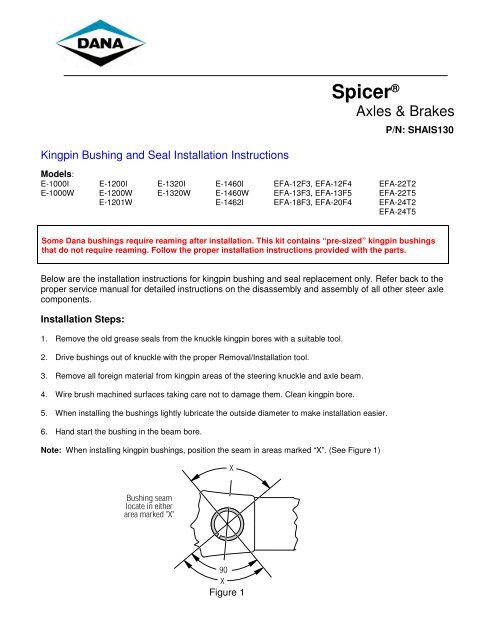
Note: When installing kingpin bushings, position the seam in areas marked “X”. (See Figure 1)<br />
<strong>Bushing</strong> seam<br />
locate in either<br />
area marked "X"<br />
90<br />
X<br />
X<br />
Figure 1<br />
<strong>Spicer</strong> ®<br />
Axles & Brakes
7. Drive bushing until they are located at the depth indicated on figure 2. Use the same method to install both top<br />
<strong>and</strong> bottom bushings.<br />
Model Depth<br />
E-1000I, E1000W, E-1200I, E-1200W 0.55"<br />
E-1201W, E1203I, E-1320I, E-1320W<br />
E-1460I, E-1460W, E1462I 0.40"<br />
EFA-12F3, EFA-12F4 0.25"<br />
EFA-13F3, EFA-13F5, EFA-18F3, 0.10"<br />
EFA-20F4, EFA22T2, EFA22T5<br />
EFA24T2, EFA24T5<br />
Figure 2<br />
Recess bushing from the top<br />
knuckle surface.<br />
Recess bushing from the<br />
bottom knuckle surface.<br />
<strong>Bushing</strong><br />
8. Install new grease seal using the proper installation tool. When installing the seal be sure the lip is pointing<br />
toward the center of the knuckle. See Figure 3 for seal position.<br />
0.060"<br />
0.060"<br />
Figure 3<br />
For spec’ing or service assistance, call 1-800-621-8084 24 hours a day, 7 days a week.<br />
Or visit our web site at: http://www.spicerparts.com<br />
Dana Corporation<br />
SHAIS130A Copyright Dana Corporation, 2001 Commercial Vehicle Axle Division<br />
August 2001 All Rights Reserved. P.O. Box 321<br />
Printed in U.S.A. www.dana.com Toledo, Ohio 43697-0321<br />
Lip<br />
Instal <br />
botom <br />
seal <br />
lip up<br />
Instal <br />
top seal <br />
lip down


