Knuckle Hinge Joint - The Guild of New Hampshire Woodworkers
Knuckle Hinge Joint - The Guild of New Hampshire Woodworkers
Knuckle Hinge Joint - The Guild of New Hampshire Woodworkers

You also want an ePaper? Increase the reach of your titles
YUMPU automatically turns print PDFs into web optimized ePapers that Google loves.
•NEW HAMPSHIRE<br />
Nov 2008<br />
Volume 20 No. 2<br />
THE G U I L D OF<br />
WOODWOR K E R S •<br />
Founded 1990<br />
www.gnhw.org<br />
Nov 8 Period Furniture<br />
Nov 15 <strong>Guild</strong> Meeting<br />
Nov 16 Luthiers<br />
Nov 22 GSWT<br />
Dec 6 BIG<br />
Dec 13 Hand Tools<br />
Jan 10 Period Furniture<br />
Jan 18 Luthiers<br />
Jan 24 GSWT<br />
Feb 7 BIG<br />
Feb 14 Hand Tools<br />
Feb 21 <strong>Guild</strong> Meeting<br />
Mar 14 Period Furniture<br />
Mar 15 Luthiers<br />
Mar 21 <strong>Guild</strong> Small Meetings<br />
Mar 28 GSWT<br />
Apr 4 BIG<br />
Apr 11 Hand Tools<br />
Apr 18 <strong>Guild</strong> Meeting<br />
May 9 Period Furniture<br />
May 17 Luthiers<br />
May 23 Turning Symposium<br />
May 30 GSWT<br />
Jun 6 BIG<br />
Jun 13 Hand Tools<br />
Jun 20 Summer Trip<br />
Jul 25 GSWT<br />
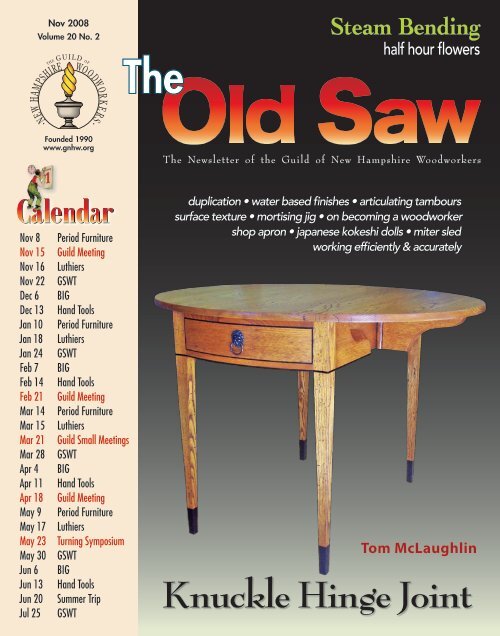
<strong>The</strong><br />
Steam Bending<br />
half hour flowers<br />
<strong>The</strong> <strong>New</strong>sletter <strong>of</strong> the <strong>Guild</strong> <strong>of</strong> <strong>New</strong> <strong>Hampshire</strong> <strong>Woodworkers</strong><br />
duplication • water based finishes • articulating tambours<br />
surface texture • mortising jig • on becoming a woodworker<br />
shop apron • japanese kokeshi dolls • miter sled<br />
working efficiently & accurately<br />
Tom McLaughlin<br />
<strong>Knuckle</strong> <strong>Hinge</strong> <strong>Joint</strong>
president’s message by Dave Frechette<br />
Scholarships and a Safety Lesson<br />
It is a great thrill to be the new President<br />
<strong>of</strong> the <strong>Guild</strong> <strong>of</strong> <strong>New</strong> <strong>Hampshire</strong><br />
<strong>Woodworkers</strong>. I would like to start by<br />
again thanking Dave Anderson for a<br />
great job over the last two years.<br />
Annual Meeting – For those <strong>of</strong> you<br />
who were not at the annual meeting, we<br />
missed you and you missed a fun auction<br />
and an excellent educational session<br />
by Garrett Hack. <strong>The</strong> main business<br />
covered was a vote to raise the dues to<br />
forty dollars annually. As many <strong>of</strong> you<br />
realize, we were getting to the point<br />
where we were actually losing money on<br />
each member. <strong>The</strong> increase should hold<br />
us for a number <strong>of</strong> years.<br />
Scholarships – It is my hope that<br />
over the next two years the <strong>Guild</strong> will<br />
continue to expand it’s educational<br />
activities particularly into the schools<br />
near our membership. I know that my<br />
first experiences where in a junior high<br />
shop class, which was mandatory and<br />
all male back then. I think things have<br />
changed a little over the years. <strong>The</strong><br />
fact that the scholarship requests have<br />
overtaken the income to the scholarship<br />
Steering Committee<br />
President David Frechette 802-633-2561 dfrech@together.net<br />
At Large Mike Noel 603-744-3821 mnlwoods@netzero.net<br />
Secretary Caleb Dietrich 603-556-1629 calebd356@yahoo.com<br />
Treasurer Peter James 603-435-8133 cpjvkj@metrocast.net<br />
At Large Peter Breu 603-647-2327 peterbreu@comcast.net<br />
At Large Jon Siegel 603-768-5882 big@proctornet.com<br />
At Large Bob LaCivita 603-942-1240 rlacivita@comcast.net<br />
At Large John Whiteside 603-679-5443 johninfremont@comcast.net<br />
At Large Ed Orecchio 603-542-0322 ejorecchio@verizon.net<br />
At Large John Faro 603-968-9800 jff960@metrocast.net<br />
At Large Roger Myers 603-773-9634 strathamwood@comcast.net<br />
Old Saw Editor Jim Seroskie 603-673-2123 jseroskie@verizon.net<br />
Past President Dave Anderson 603-887-6267 dsachester@gsinet.net<br />
Programs Alan Saffron 603-424-2023 sasaffron@verizon.net<br />
Scholarship Committee<br />
Chairman Peter Breu 603-647-2327 peterbreu@comcast.net<br />
Member David Frechette 802-633-2561 dfrech@together.net<br />
Member Ed Bartlett 603-364-5242 erbart@metrocast.net<br />
— Please send all applications to Peter Breu, Selection Committee Chair<br />
In addition, Peter Bloch and Bob Jarrett are non-voting members<br />
<strong>The</strong> <strong>Guild</strong> <strong>of</strong> <strong>New</strong> <strong>Hampshire</strong> <strong>Woodworkers</strong> – Bringing together the diverse interests <strong>of</strong> the <strong>New</strong> <strong>Hampshire</strong> woodworking community.<br />
“<strong>The</strong> Old Saw” is published five times per year. To join the <strong>Guild</strong>, go to www.gnhw.org and click on “Membership “ to download an application form.<br />
2 <strong>The</strong> <strong>Guild</strong> <strong>of</strong> <strong>New</strong> <strong>Hampshire</strong> <strong>Woodworkers</strong><br />
fund is a positive change. While there<br />
is still plenty <strong>of</strong> money available, both<br />
members and nonmembers are taking<br />
advantage <strong>of</strong> the funds and we are<br />
beginning to reach out to area schools.<br />
Just as a reminder, scholarships<br />
are not need based, are given for any<br />
woodworking related educational<br />
activity and the applications are available<br />
online from Peter Breu, chairman <strong>of</strong> the<br />
committee. We do ask that recipients<br />
pay the <strong>Guild</strong> back in some form.<br />
This may be writing an article on the<br />
experience for <strong>The</strong> Old Saw, making an<br />
item for the Sunapee Craft Fair Raffle<br />
or volunteering to work at the Fair or<br />
some other event is up to the individual<br />
and the committee.<br />
Shop Safety Lesson – On another<br />
note, I recently had a reminder <strong>of</strong> the<br />
importance <strong>of</strong> shop safety. My lathe is<br />
a large One Way and the extension was<br />
on to turn a spindle from a 31/2 foot 4x4.<br />
This was a sizable piece <strong>of</strong> wood and I<br />
started at a low speed. Everything went<br />
well until the lathe turned itself <strong>of</strong>f. It<br />
turned right back on when I pushed the<br />
button but kept<br />
turning itself <strong>of</strong>f.<br />
I decided it must have a loose wire<br />
or something so I shut the whole thing<br />
<strong>of</strong>f and dismantled the control panel.<br />
Everything seemed intact so I called<br />
One Way and told them my trouble.<br />
Tech support had me check a magnetic<br />
switch inside the lathe but it appeared<br />
to be OK. Tech support then said to<br />
turn on the lathe. I said the front <strong>of</strong> the<br />
control box was <strong>of</strong>f and hanging from<br />
the wires but was told it did not matter.<br />
So I did what I was told. Unfortunately<br />
the speed control dial on the One Way<br />
is on the control box. Part <strong>of</strong> my usual<br />
routine is to check it before turning on<br />
the lathe but in this case it was upside<br />
down and out <strong>of</strong> sight and I did not<br />
follow my usual routine. Even more<br />
unfortunate for me was the fact that it<br />
had shifted when I took <strong>of</strong>f the panel.<br />
When I turned on the lathe, it<br />
was near full speed. I immediately<br />
recognized my dilemma but could not<br />
hit the emergency shut <strong>of</strong>f because it too<br />
continued on Page 3<br />
SubGroups<br />
BIG Bob LaCivita 603-942-1240 rlacivita@metrocast.net<br />
Granite State Woodturners Jon Siegel 603-768-5882 big@proctornet.com<br />
Granite State Woodturners DJ Delorie 603-463-5996 dj@delorie.com<br />
Granite State Woodturners Marcel Durette 603-669-2995 marceldurette@aol.com<br />
Luthier John Whiteside 603-679-5443 johninfremont@comcast.net<br />
Period Furniture Mike Noel 603-744-3821 mnlwoods@netzero.net<br />
Period Furniture John Faro 603-968-9800 jff960@metrocast.net<br />
Hand Tools Dave Anderson 603-887-6267 dsachester@gsinet.net<br />
Volunteer Positions<br />
Books Tony Immorlica 603-673-9629 aaijr@comcast.net<br />
Membership DJ Delorie 603-463-5996 dj@delorie.com<br />
Old Saw Mailing Syd Lorandeau 603-542-5295 slorandeau@verizon. net<br />
Shirts/Hats Peter James 603-435-8133 cpjvkj@metrocast.net<br />
Small Meetings Ed Orecchio 603-542-0322 ejorecchio@verizon.net<br />
Sunapee Co-Coordinator Mike Noel 603-744-3821 mnlwoods@netzero.net<br />
Sunapee Co-Coordinator John Faro 603-968-9800 jff960@metrocast.net<br />
Video Librarian John Pitrone 603-894-5893 jpitrone@verizon.net<br />
Video Recording Peter Bloch 603-526-6152 peterbloch@adelphia.net<br />
Web Master DJ Delorie 603-463-5996 dj@delorie.com
announcements<br />
Nov 15 th , 2008<br />
November Meeting<br />
Homestead hosts November <strong>Guild</strong> meeting in <strong>New</strong>market, NH<br />
An Introduction to Bench Planes – <strong>The</strong> common bench planes should be a part <strong>of</strong> every<br />
woodworking assortment <strong>of</strong> tools even if you do most <strong>of</strong> your work with power tools.<br />
<strong>The</strong>re are just some operations that can be done better, faster and with less effort. For<br />
our November meeting at the Homestead School, Dave Anderson will provide you<br />
with an introduction to these tools, their selection, setup and uses.<br />
For the morning session between 10:00 and 11:00,<br />
members are invited to bring in problem planes which<br />
don’t work properly or those which need setup, and we<br />
will hold a mini-clinic on problem solving for planes.<br />
Please bring chairs and don’t forget your lunch.<br />
Please consider bringing a project to the meeting, either<br />
one you are working on or one you have completed. It<br />
is a great way to see what others are doing and to give<br />
us some inspiration.<br />
<strong>The</strong> main afternoon session will explore how to<br />
get into these planes with your choice <strong>of</strong> new or used,<br />
inexpensive or pricey, and bevel up versus bevel down<br />
styles. Special emphasis will be directed toward picking<br />
a basic kit <strong>of</strong> three to four planes which you will never<br />
outgrow and which will meet most <strong>of</strong> your needs. While<br />
Pr e s i d e n t ’s Me s s a g e – continued<br />
was in the wrong place. <strong>The</strong> 4x4 took <strong>of</strong>f<br />
and hit me in the face scraping me up,<br />
squishing my glasses and cutting my<br />
nose. Some bending, a few stitches and<br />
the passage <strong>of</strong> time have returned me to<br />
my normal self.<br />
<strong>The</strong> take home message is that it is<br />
great to have safe routines for operating<br />
Ta b l e Sa w S …<br />
1.5 hp HP 10 inch General Cabinet Saw - extra<br />
blades etc, 220 volt. Accessories available. Direct<br />
wired. This is David Lambs saw.<br />
Also included is 1.5 hp 10 inch Delta Contractors<br />
Table Saw 30 inch – With Mobility kit installed<br />
– $625 obo.<br />
Richard Brennan: 603-783 9493 or<br />
David Lamb: 603-783-9912<br />
Ch i S e l Mo r T i S e r…<br />
Multico PM 20 Hollow Chisel Mortiser. Good<br />
condition – $750.<br />
Dennis Capodestria: 603-968 3145 or<br />
jhighland@innevi.com<br />
your machinery but when you get out <strong>of</strong><br />
the routine, recognize it and take greater<br />
care. If you are going to do something<br />
and have a gut feeling that it is not a<br />
great idea, do not do it until you figure<br />
out why.<br />
My mistake was listening to someone<br />
on the phone tell me to do something I<br />
was not comfortable doing and going<br />
ra d i a l ar M Sa w & Pl a n e r…<br />
Delta 10-inch Radial Arm Saw, excellent<br />
condition, one owner, light use. Includes 8-foot<br />
extension table. List price $1200. For sale, $350<br />
or BRO.<br />
DeWalt 121/2 inch thickness planer, benchtop<br />
model. Includes extra set <strong>of</strong> new knives.<br />
Excellent condition, one owner, very little use.<br />
List price $450. For sale, $150 or BRO.<br />
Matthew Siranian: 603-526-8029 or<br />
matthewsiranian@tds.net<br />
Mu l T i C o Mo r T i S e r & ST a n l e y<br />
Pl a n e S…<br />
Multico PM16 mortiser with AEG German motor<br />
Directions to<br />
Homestead<br />
Woodworking School<br />
• From Rt 125 north, turn right onto Rt<br />
87 in Epping. After 3 miles turn left<br />
onto Bald Hill Road. <strong>The</strong> school is 1.1<br />
miles on the left.<br />
• From Rt 108 south, turn right onto Rt<br />
152 in <strong>New</strong>market. Go past the high<br />
school and turn left onto Grant Road.<br />
After 3.5 miles turn left onto Bald Hill<br />
Road. <strong>The</strong> school is 0.5 miles on the<br />
right.<br />
a well set up and equipped woodworkers<br />
bench is always desirable, many <strong>of</strong> us<br />
have only a basic bench. Part <strong>of</strong> the<br />
demonstration will give you strategies<br />
and show you ways to work effectively<br />
with only the most basic bench plus a<br />
few inexpensive shop made fixtures<br />
which take up little space can be put<br />
away after every use.<br />
ahead and doing it anyway. If I had<br />
stepped back for a moment I could have<br />
unloaded the lathe and/or checked the<br />
speed control. <strong>The</strong> worst thing was that<br />
it later became clear that there was no<br />
information to be gained from turning<br />
on the lathe and three new switches later,<br />
the problem is still unsolved.<br />
in great shape with<br />
instruction and parts<br />
manual. This is the<br />
machine that all the<br />
others have copied –<br />
$160 firm.<br />
Buy<br />
Neat<br />
Stuff<br />
Plus several clean Stanley user planes.<br />
Bill <strong>New</strong>bold 603-673-1261 before 9 pm<br />
Sh a r P e n i n g Sy S T e M …<br />
Woodcraft Mark ll Sharpening System – $400<br />
plus shipping. I can email photo to anyone who<br />
might be interested.<br />
John McAlevey: 207-273-2535 or<br />
johnmcalevey@gmail.com<br />
<strong>The</strong> <strong>Guild</strong> <strong>of</strong> <strong>New</strong> <strong>Hampshire</strong> <strong>Woodworkers</strong><br />
3
Q<br />
Write to jseroskie@verizon.net with your questions 4<br />
Sizing Par T S – When sizing<br />
the parts for a furniture<br />
project from rough sawn planks, how<br />
do you deal with the movement that<br />
can occur shortly after the plank is<br />
divided? Do you allow the plank to sit<br />
for a period after being planed? Do<br />
you size them slightly over sized and<br />
allow them to find balance before a<br />
final shape is given? Caleb Dietrich<br />
Bob LaCivita replies: To minimize<br />
wood movement when milling rough<br />
lumber into parts for a project, I first cut<br />
the pieces to length leaving them long<br />
by and 1˝ up to 6˝. This way I can cut<br />
away any snipe left by the planer. I then<br />
cut all my parts to width using a band<br />
saw with a fairly wide course blade. I<br />
leave the parts 1/4˝ - 3/8˝ wider than the<br />
finished dimension. If the rough board<br />
has a very bad bow to it, I will remove<br />
the bow by jointing or hand planing.<br />
By sizing to a rough dimension, you<br />
are relieving the tension in the wood<br />
caused by the natural way it has grown<br />
or in the drying process. Most <strong>of</strong> us<br />
have experienced a wide board closing<br />
in around table saw blade. This will<br />
eliminate this for the most part and make<br />
cutting much safer. Once the parts are<br />
cut to rough size, I joint a reference face<br />
and edge and then plan the remaining<br />
face and saw the last edge.<br />
Bill Thomas replies: <strong>The</strong> rule <strong>of</strong><br />
thumb I learned in school for sizing<br />
rough stock was to cut all the parts<br />
1˝ longer than finished dimension, 1/2˝<br />
wider, and round up the thickness to the<br />
next standard quarter, ie. 4/4, 5/4, 6/4,<br />
8/4, etc.<br />
<strong>The</strong> next step is rough milling to an<br />
oversize dimension. It is very important<br />
to allow the wood to equalize to its new<br />
dimensions. Wood can be thought <strong>of</strong> as<br />
a sponge. <strong>The</strong> outside may be dry, but<br />
the inside contains moisture roughly<br />
equidistant from the outside. When the<br />
4 <strong>The</strong> <strong>Guild</strong> <strong>of</strong> <strong>New</strong> <strong>Hampshire</strong> <strong>Woodworkers</strong><br />
wood is cut and milled, some <strong>of</strong> that<br />
moisture is now closer to the surfaces,<br />
especially the ends, which creates an<br />
imbalance <strong>of</strong> stresses. That imbalance<br />
can cause the wood to go out <strong>of</strong> flat,<br />
sometimes dramatically.<br />
It is critical to allow the stock to<br />
settle down to equilibrium before going<br />
further with it. How much extra to leave<br />
is a judgement call. If the pieces are<br />
milled close to their final dimensions,<br />
they will be also close to final equilibrium,<br />
but run the risk <strong>of</strong> moving beyond their<br />
final tolerance.<br />
Conversely, if too much extra is<br />
left, the final milling may need further<br />
equalizing. How long the process takes<br />
depends on the species <strong>of</strong> wood, the<br />
thickness <strong>of</strong> the stock and the moisture<br />
content <strong>of</strong> the wood before cutting.<br />
<strong>The</strong>re is no magic answer, but as much<br />
time as possible should be allowed.<br />
Q<br />
wo o d v S Me T a l SP o k e S h a v e<br />
– What is the benefit <strong>of</strong> the<br />
blade angle in wooden spokeshaves<br />
compared to metal spokeshaves? Joe<br />
Barry<br />
Bill Thomas replies: Without going<br />
too far into cutting geometry, a metal<br />
bodied spokeshave is designed to work<br />
like a miniature bench plane. <strong>The</strong> iron<br />
is held at a 45° angle and the bevel is on<br />
the bottom to give the clearance angle.<br />
<strong>The</strong> typical wood bodied spokeshave,<br />
however, is quite different. <strong>The</strong> iron is<br />
flat on the underside with the bevel up,<br />
like a chisel. When the iron is lowered,<br />
the nose <strong>of</strong> the spokeshave rests on the<br />
work and the cutting edge becomes<br />
angled downwards. This allows it to dig<br />
in and take a cut.<br />
Since the clearance angle changes<br />
depending on how far the iron is lowered,<br />
a wood bodied spokeshave can be set<br />
to take very fine cuts, or if necessary,<br />
lowered more so that heavier cuts can<br />
be made.<br />
Q<br />
wa x in She l l a C – What type<br />
<strong>of</strong> shellac does not have wax<br />
in it? If the shellac has wax, how do<br />
you remove it? What if any problems<br />
does the wax cause? John Watson<br />
Ted Blachley replies: If you have<br />
Bullseye shellac from the hardware store<br />
and want to de-wax it, pour some in a<br />
jar, put the cover on and let it sit on a<br />
window sill for a few days. You will see<br />
the wax settle to the bottom. Without<br />
disturbing the jar, suck the clear liquid<br />
<strong>of</strong>f the top with a turkey baster and<br />
dispense into another jar. You can let<br />
the shellac in the first jar settle again<br />
and repeat the process.<br />
Traditional shellac in flake form is<br />
available in the woodworking catalogs<br />
– follow directions on the package. I’ve<br />
found it to be a harder finish. <strong>The</strong> wax in<br />
Bullseye may cause adhesion problems<br />
if you are using it as a sealer under<br />
varnish.<br />
Q<br />
JoinTing a TableT o P –<br />
Are there any particular<br />
techniques to ensure a flat surface<br />
when jointing boards for a table top?<br />
David Frechette<br />
Ted Blachley replies: When making<br />
a top, use lumber that has been<br />
acclimated to the shop for as long as<br />
possible. Flattening a single board is a<br />
basic woodworking skill but requires<br />
sharp eyes and sharp hand planes. Use<br />
straight edges and winding sticks to<br />
check for twist.<br />
Once a side is flat you can proceed to<br />
the planer to mill the other side parallel.<br />
Re-check for twist as you approach<br />
desired thickness. <strong>Joint</strong> one edge square<br />
to the face and run it against the fence<br />
<strong>of</strong> the table saw to rip the other edge<br />
square. If you can do that, you are<br />
halfway there.<br />
I have a set <strong>of</strong> perfectly straight long<br />
continued on Page 10
About thirty years ago, a small ad in<br />
a trade magazine caught my eye. It<br />
<strong>of</strong>fered ‘Water Based Lacquer’ as a safer<br />
alternative to the common nitrocellulose<br />
lacquers that many <strong>of</strong> us were spraying.<br />
After receiving a sample can that had a<br />
very plain industrial label, I first noticed<br />
that it said, ‘Combustible’. <strong>The</strong> sniff test<br />
confirmed that it had plenty <strong>of</strong> solvent,<br />
maybe alcohol, and I took their word<br />
that it would burn or at least smolder<br />
over a flame. <strong>The</strong> critical test came from<br />
brush and spray application, as I looked<br />
for leveling, hardness, and most <strong>of</strong> all,<br />
appearance. <strong>The</strong> results? Not bad.<br />
I can’t say that I have tried every<br />
water based finish since then, but<br />
new developments repeatedly get my<br />
attention, and my finishing shelf has<br />
been full <strong>of</strong> experiments with various<br />
brands. <strong>The</strong> try outs have mostly led to<br />
frustration because I can never overcome<br />
the blanched color and melted Saran<br />
Wrap look. After all, when you have<br />
carefully chosen woods for a special<br />
project, you want a coating that will<br />
accentuate, not compromise, the beauty<br />
<strong>of</strong> the wood.<br />
In spite <strong>of</strong> its shortcomings, there<br />
is no doubt that water based finish is<br />
here to stay and I have found several<br />
uses for it in my shop. For your own<br />
study, if you do a pros and cons list,<br />
you may be surprised that the positive<br />
qualities <strong>of</strong> water base will at least equal<br />
the negatives. After doing this exercise,<br />
you might look at the use <strong>of</strong> water in<br />
finishing with a new perspective.<br />
Take a typical finish schedule <strong>of</strong><br />
staining, sealing, filling and top coating.<br />
A water based finish can be the most<br />
appropriate choice for some or all <strong>of</strong><br />
these steps. Application <strong>of</strong> water stains,<br />
especially the dyes, provide excellent<br />
depth <strong>of</strong> color and light fastness. Water<br />
based sealer coats easily accept dyes and<br />
pigments to help build color. One note <strong>of</strong><br />
caution is that the first coat <strong>of</strong> water based<br />
sealer is <strong>of</strong>ten the culprit for blanching<br />
the wood, and many pr<strong>of</strong>essionals prefer<br />
a thin coat <strong>of</strong> dewaxed shellac to seal<br />
and retain natural color.<br />
Water based grain fillers can be used<br />
before or after sealer coats with good<br />
adhesion, and they have the advantage<br />
<strong>of</strong> quick and predictable dry time that<br />
solvent based fillers can’t match.<br />
Topcoats in most water based<br />
formulas are designed for ease <strong>of</strong><br />
application and are quite durable. Many<br />
rubbing compounds used to finish <strong>of</strong>f<br />
top coats contain water. <strong>The</strong> traditional<br />
rubbing agent, pumice, works well in a<br />
water slurry. Apart from clear finishing,<br />
it should be noted that solid colors such<br />
as found in acrylic paints can be used<br />
full strength or thinned with water to<br />
make glazes, and genuine milk paint<br />
relies on water for full bodied color or<br />
thin washes.<br />
Here is a list <strong>of</strong> typical uses for water<br />
based finish:<br />
• Exteriors – <strong>The</strong> list is endless from your<br />
outdoor deck to your snowshoes. Be<br />
sure to pick a water based finish that<br />
is specifically labeled for exterior use.<br />
• Cabinet Faces – Use water base when<br />
you want low odor, especially on a job<br />
site.<br />
• Cabinet Interiors – Water based finish<br />
is ideal on interior surfaces when:<br />
1) You want to avoid strong solvent<br />
odors. Caution: water based finishes<br />
need proper ventilation too. <strong>The</strong>y<br />
are not hazard free. 2) A lower sheen<br />
and flatter look is desirable such as<br />
the interior <strong>of</strong> drawers. 3) Speed and<br />
predictable drying time is needed.<br />
• Decorative Pieces – Many projects go<br />
quicker with water versus oil colors.<br />
Consider a reproduction blanket chest<br />
that calls for one or two base colors<br />
and several highlights. You could wait<br />
days for oil paints to dry or just hours<br />
by Gary Wood<br />
Water Based Finishes<br />
“<strong>New</strong> developments repeatedly get my attention”<br />
for water paints.<br />
• Utility Pieces – A production run <strong>of</strong><br />
tool handles or anything similar could<br />
be dipped or sprayed with water base<br />
finish.<br />
Manufacturers have made many<br />
claims about water based finishes,<br />
<strong>of</strong>ten characterizing them as the equal<br />
<strong>of</strong> traditional finishes. I think it is an<br />
unnecessary and unhelpful comparison.<br />
Water based finish is just different and<br />
should be used for its unique qualities<br />
rather than seen as a replacement for<br />
solvent based varnishes and lacquers.<br />
No single finish suits every need.<br />
When you have a variety <strong>of</strong> finishes on<br />
your shelf, and when you take advantage<br />
<strong>of</strong> their versatility as tools to reach a<br />
desired look on specific projects, water<br />
based finish will be one <strong>of</strong> your valued<br />
tools.<br />
If there could be one plea from many<br />
<strong>of</strong> us who are small shop pr<strong>of</strong>essionals<br />
or avid woodworkers, it might be that<br />
manufacturers would keep working to<br />
combine as much appropriate solvent<br />
with water as possible, keeping it under<br />
the threshold <strong>of</strong> required VOC levels.<br />
Some brands already contain some<br />
amount <strong>of</strong> solvent. A second request<br />
would be for the addition <strong>of</strong> more natural<br />
resins and less acrylic and urethane that<br />
are common in water based finishes. It<br />
would create a better appearance that<br />
many <strong>of</strong> us would pay for.<br />
Relying on memory is risky when<br />
it comes to details, but the water based<br />
lacquer that I tried 30 years ago seemed<br />
to have a good portion <strong>of</strong> a natural resin<br />
and it certainly had a solvent to help it<br />
penetrate and flow. Today’s technology<br />
emphasizes user friendly, green and<br />
low odor qualities but the products still<br />
need to provide great, not just good,<br />
appearance. Having said that, I use water<br />
based finish to advantage for specific<br />
purposes and always will in my shop.<br />
<strong>The</strong> <strong>Guild</strong> <strong>of</strong> <strong>New</strong> <strong>Hampshire</strong> <strong>Woodworkers</strong><br />
5
Tambours bring to mind the classic<br />
roll top desk. <strong>The</strong> small slats <strong>of</strong> wood<br />
that are the tambours create a curtain<br />
that can be drawn over the mess <strong>of</strong> a<br />
desk and secure the contents within.<br />
<strong>The</strong>y can also provide a visual consistency<br />
or massing for a piece <strong>of</strong> furniture. Plus,<br />
they appeal to our inherent sense <strong>of</strong> play<br />
(Peek-a-boo!). Admit it. <strong>The</strong>y’re kinda<br />
neat!<br />
<strong>The</strong> most common form <strong>of</strong> tambour<br />
is wooden slats glued to a backing <strong>of</strong> 10<br />
or 12 oz. artist’s canvas. <strong>The</strong>re are also<br />
Lonnie Bird tambours<br />
6 <strong>The</strong> <strong>Guild</strong> <strong>of</strong> <strong>New</strong> <strong>Hampshire</strong> <strong>Woodworkers</strong><br />
reports <strong>of</strong> silk or leather being used. To<br />
help conceal the canvas if it is exposed<br />
between the slats, it is helpful to dye the<br />
canvas black. Hide, white and yellow<br />
glues have been used to secure the<br />
canvas to the underside <strong>of</strong> the tambours.<br />
In one case, the manufacturer made a<br />
sandwich <strong>of</strong> the canvas by placing thin<br />
slats <strong>of</strong> veneer on the inside <strong>of</strong> the canvas.<br />
One <strong>of</strong> the best resources and how to<br />
make a curtain is the <strong>Guild</strong> video <strong>of</strong> Jere<br />
Osgood’s demo. Borrow it and all will be<br />
made clear!<br />
Tambour History – <strong>The</strong> tambour<br />
resolved a design problem inherent in<br />
the cylinder desk <strong>of</strong> Thomas Sheraton.<br />
<strong>The</strong> solid quarter cylinder was<br />
a large awkward shape to<br />
accommodate within a<br />
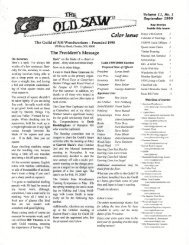
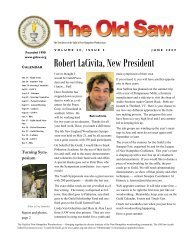
Wire cables provide a more secure approach than canvas backing – Remove material on the<br />
face at each end <strong>of</strong> the slats to create 5/16” x 3/8” long tenons that will be held in the 7/16” groove.<br />
by Joe Barry<br />
piece <strong>of</strong> furniture and took<br />
up a lot <strong>of</strong> interior space.<br />
It limited the size and<br />
depth <strong>of</strong> the pigeonholes<br />
within the desk. By making<br />
the cylinder out <strong>of</strong> slats,<br />
it could be bent around a<br />
gallery <strong>of</strong> pigeonholes to<br />
drop in behind for storage. A<br />
further refinement is to bevel<br />
or shape the outside edges<br />
<strong>of</strong> the slat allowing them<br />
to turn around an exterior<br />
radius. This led to the “S”,<br />
double curve, or “waterfall” curtain<br />
that is associated with the classic roll<br />
top desk. Typically the tambour<br />
is shaped with a bullnose or a 30°<br />
bevel on each outside edge.<br />
Tambours can also be made<br />
in other shapes. <strong>The</strong> Bureau du Roi,<br />
arguably the first roll top desk, was made<br />
for King Louis XV in the 1760s (ordered<br />
in 1760 – delivered in 1769!) had flat<br />
tambours for the marquetry surface<br />
decoration. John and Thomas Seymour<br />
used tambours shaped with a scratch<br />
stock and inlaid with bellflowers for the<br />
galleries <strong>of</strong> their lady’s desks. Hoosier<br />
cabinets had relatively flat tambours.<br />
Danish Modern used a flat square<br />
edged tambour so that the veneered<br />
face <strong>of</strong> the sideboard presented what<br />
appeared to be a solid piece <strong>of</strong> unbroken<br />
teak. Tambours have also been made in<br />
a variety <strong>of</strong> shapes and even been carved<br />
in bas relief. A more ambitious shaping<br />
into a sawn tambour can give the curtain<br />
a swelling belly like a Bombé bureau.<br />
During the reign <strong>of</strong> the roll top desk in<br />
the late 19th century, the major drawback<br />
to a canvas backing became readily<br />
apparent. In an age when every man<br />
carried a pocket knife, it was relatively<br />
easy to insert a knife between the<br />
tambours and slice the canvas bypassing<br />
any locks. <strong>The</strong> 19th century was in many<br />
ways the age <strong>of</strong> the patent gadget. In a<br />
very competitive marketplace, furniture<br />
manufacturers were always ready to<br />
market a newer and better widget. <strong>The</strong><br />
answer to the security problem was to<br />
replace the canvas with a couple <strong>of</strong> wire<br />
cables threading the tambours together.<br />
A different approach was to make the
artwork and images courtesy <strong>of</strong> Eagle America/Amana<br />
tambours interlock so that there was no space for a knife to get<br />
between them.<br />
Making articulating tambours could be a very complicated<br />
process requiring multiple steps to form the tambour.<br />
Fortunately, we now have choices in router bit sets made<br />
especially for this task. If you have ever considered building a<br />
strip canoe, you are familiar with the cove and bead bits used<br />
to make the strips. In early strip canoes, each strip had to be<br />
beveled to match the changing bevel <strong>of</strong> the previous strip. Or<br />
you relied upon the “crap in the gap” technique when applying<br />
the fiberglass coating. <strong>The</strong>n someone had the bright idea to<br />
mill a cove on one edge <strong>of</strong> the strip and a matching radius<br />
along the other edge. This allowed the pieces to mate smoothly<br />
without any gaps as the strips wrapped around the turn <strong>of</strong> the<br />
boat. <strong>The</strong> same idea has been applied to making tambours.<br />
Eagle America Bit Set – Eagle America (www.eagleamerica.com)<br />
makes a set <strong>of</strong> two bits for use in stock either 5/8˝ thick or 3/8˝<br />
thick (180-8015 for 3/8˝ $89.95 & 180-8005 for 5/8˝ stock<br />
$99.95). <strong>The</strong> thinner stock would be used for smaller items<br />
such as an appliance garage and the thicker stock for larger<br />
uses such as a desk.<br />
<strong>The</strong>y also sell a cable kit. <strong>The</strong>re is no need to go overboard<br />
and buy a Nicopress tool to secure the end <strong>of</strong> the cable.<br />
Squeezing on a sleeve with a pair <strong>of</strong> vice grips or driving in<br />
a screw alongside is enough to secure the cable. Rockler<br />
(www.rockler.com) can do all the work if you want to buy the<br />
pre-cut tambours and assemble them yourself.<br />
Amana Bit Set – Amana (www.amanatool.com) has brought<br />
out a bit set in association with Lonnie Bird. This three piece<br />
set (#54314 for $189.95) will make the ball and socket style.<br />
No additional canvas or wire is needed to assemble. <strong>The</strong><br />
tambours interlock.<br />
This style <strong>of</strong> tambour has been like the Loch Ness monster.<br />
It occasionally pops up in the woodworking magazines to<br />
tantalize briefly and disappears only to briefly show up again<br />
later. I first sighted it briefly as a letter in Fine Woodworking #15<br />
(1986) and then later in #79 (1989) it re-appeared in an article<br />
on building a roll top desk. It also briefly surfaced as a how-to<br />
in the British publication <strong>The</strong> Woodworker (Volume 102, issue<br />
8 – 1998). But building this monster required a lot <strong>of</strong> steps and<br />
custom tooling before these bits were made by Amana. Now it<br />
is a relatively straightforward process.<br />
To make the Amana style tambour there is one step that<br />
is not readily apparent on first viewing. You rip your material<br />
wide enough to make two tambours plus 1/8˝ for a saw kerf to<br />
separate them after forming. <strong>The</strong> large bit cuts the face pr<strong>of</strong>ile<br />
and half <strong>of</strong> the ball. After running all four edges across this bit,<br />
you have two tambours almost fully formed and needing only<br />
a rip pass between the two balls to separate them.<br />
Before ripping them apart, a groove is made in the two<br />
outside edges to provide relief for the ball cutter. <strong>The</strong> ball cutter<br />
makes a pass inside the groove to shape the spherical recess.<br />
<strong>The</strong> third bit is a round over bit to relieve the sharp corners<br />
around the groove and provide clearance for articulation. Now<br />
you can rip them apart! <strong>The</strong> ball slides into the spherical socket<br />
and you have the tambour without the canvas or wires. One<br />
Setting Bit Height<br />
Bit A is positioned correctly when the 45˚ removes the<br />
bottom <strong>of</strong> the slat<br />
Bit BB is positioned correctly when the center point <strong>of</strong><br />
Bit "A" is on the same plane as center point <strong>of</strong> Bit "B".<br />
Center Points<br />
45° Removes Bottom<br />
Note: Routing is done with the finished side up.<br />
Eagle America style tambour – Slats can be mounted over canvas or<br />
joined with cable<br />
criticism <strong>of</strong> this style is that the neck below the ball might be<br />
fragile in ring porous woods such as oak. I’ve experimented<br />
with this bit and believe that not to be an issue with good stock<br />
selection.<br />
In this day <strong>of</strong> the internet we now have some great support<br />
materials. Both manufacturers have additional technical<br />
information linked to their catalog pages for these items. You<br />
can even watch Lonnie Bird make tambours live on YouTube!<br />
One Last Point – <strong>The</strong>se bits are made for use in a router table.<br />
<strong>The</strong>y are not designed for freehand use and you shouldn’t be<br />
trying to shape small stick like tambours<br />
freehand.<br />
Also if you really can’t be bothered,<br />
you can buy pre-made tambours from<br />
Rockler or Van Dyke’s Restorers<br />
(www.vandykes.com). Van Dykes also<br />
stocks tambour cloth for the traditional<br />
approach. Enjoy!<br />
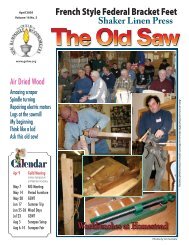
Amana style (Lonnie Bird) tambour router bit set. Designed for<br />
creating tambours without the need for wires, canvas or glue.<br />
<strong>The</strong> <strong>Guild</strong> <strong>of</strong> <strong>New</strong> <strong>Hampshire</strong> <strong>Woodworkers</strong><br />
7
I built myself a house many years ago.<br />
When I finally made the cabinets and<br />
a few pieces <strong>of</strong> furniture, I discovered<br />
that I liked woodworking much better<br />
than carpentry but hesitated to pursue it<br />
seriously because I was not very skilled.<br />
<strong>The</strong> doors on those rustic kitchen<br />
cabinets still won’t close in the summer,<br />
and my first c<strong>of</strong>fee table has fallen apart<br />
and been reglued countless times. <strong>The</strong><br />
only joint I knew was the mortise and<br />
tenon, which I hacked out with chisels<br />
that I took to the hardware store for<br />
sharpening when they were too nicked<br />
to use.<br />
A couple <strong>of</strong> years ago, while<br />
contemplating a jelly cupboard with<br />
an ill-fitting door which I had just<br />
completed, I thought with chagrin, “I<br />
don’t know what the heck I’m doing!”<br />
Suddenly a light bulb went on in<br />
my head – my incompetence as a<br />
furnituremaker was not due to stupidity<br />
or some inherent lack <strong>of</strong> ability. It was<br />
simply due to not knowing how! <strong>The</strong><br />
solution was obvious – education.<br />
I bought Woodworking Basics:<br />
Mastering the Essentials <strong>of</strong> Craftsmanship<br />
8 <strong>The</strong> <strong>Guild</strong> <strong>of</strong> <strong>New</strong> <strong>Hampshire</strong> <strong>Woodworkers</strong><br />
by Peter Korn and read it cover to<br />
cover. I almost laughed out loud upon<br />
discovering the techniques that would<br />
solve my problems – using razor-sharp<br />
tools, starting with perfectly flat and<br />
square stock, and accurately measuring<br />
and marking cuts. It was clear, however,<br />
that learning these skills would take<br />
more than just a good book. With the<br />
blessings <strong>of</strong> my very supportive husband,<br />
I signed up for a two-week Basic<br />
Woodworking class at the Center for<br />
Furniture Craftsmanship in Rockport,<br />
Maine, taught by Peter<br />
Korn.<br />
I arrived in Rockport<br />
on a rainy July day in 2007<br />
and unpacked my bags at<br />
the home <strong>of</strong> a local family<br />
who rents rooms in their<br />
sprawling historic home<br />
near the waterfront. Over<br />
the next two weeks, I<br />
hardly saw my hosts since<br />
virtually all my time was<br />
spent either at the school<br />
or on forays to Lie Nielson<br />
Toolworks or Liberty Tool.<br />
project photos by Lauren E. Sayoc<br />
by Monica Raymond<br />
<strong>The</strong>re were eleven other students from<br />
a wide variety <strong>of</strong> backgrounds in the<br />
class. Two teenage brothers were hoping<br />
to become pr<strong>of</strong>essional woodworkers.<br />
A retired college pr<strong>of</strong>essor was starting<br />
a new hobby. A stained-glass artist<br />
wanted to incorporate wood into his<br />
work. In the next classroom woodcarvers<br />
were expanding their skills. In the other<br />
buildings on campus students in the<br />
nine-month comprehensive course and<br />
fellowships were working on a variety<br />
<strong>of</strong> projects. Each <strong>of</strong> the three workshop
uildings has a machine shop with<br />
state-<strong>of</strong>-the-art equipment, maple<br />
workbenches, and every hand tool a<br />
woodworker needs. <strong>The</strong> only thing I had<br />
to supply was a good set <strong>of</strong> chisels.<br />
Peter Korn is a consummate teacher<br />
and teaches with compassion and<br />
humor. I learned how to flatten and<br />
sharpen my chisels, mill stock flat and<br />
square, hand cut mortise and tenon<br />
joints, hand cut dovetails including<br />
half-blind dovetails, hand plane a board<br />
flat, and glue up a piece. I also attended<br />
lectures about wood movement and<br />
finishing. I had expected to learn all <strong>of</strong><br />
these things and was not disappointed.<br />
What I did not expect was to engage<br />
in discussions about art, creativity, and<br />
even philosophy. Peter talked about the<br />
day he realized that the qualities he<br />
aimed for in his furniture – grace and<br />
simplicity – were actually qualities he<br />
wished to develop in himself. I spoke<br />
about my goal <strong>of</strong> developing patience<br />
and concentration through working<br />
Machines I have in the shop —<br />
• 6˝ Delta jointer<br />
• 15˝ Makita planer (found this<br />
through Brad Purmort)<br />
• 16˝ Walker Turner bandsaw<br />
(found this through <strong>The</strong> Old Saw)<br />
• Delta table saw (contractor saw)<br />
• Delta hollow chisel mortiser<br />
(found this through Brad<br />
Purmort)<br />
• Delta bench top drill press<br />
• Baldor slow speed grinder (found<br />
this through Brad Purmort)<br />
• Several routers<br />
• Dewalt mitre saw<br />
• I hope someday to replace the<br />
table saw, drill press, and jointer<br />
with better quality machines.<br />
— Brad Purmort Woodworking<br />
Company in <strong>New</strong>port, NH<br />
with wood. Laura Mays, our Irish coteacher<br />
and a superior woodworker,<br />
questioned the fairness <strong>of</strong> charging<br />
people money for pursuing one’s own<br />
personal development. <strong>The</strong> conclusion<br />
<strong>of</strong> this very interesting discussion was<br />
the idea that if woodworking is in part<br />
an exercise in personal development,<br />
then it is worthwhile because it makes<br />
the woodworker a better person and<br />
thereby a better citizen <strong>of</strong> the world.<br />
In addition to philosophizing and<br />
attending lectures, every day we worked<br />
on our projects – a variation <strong>of</strong> a simple<br />
bench with dovetails and mortise and<br />
tenon joints. It was a joy to see each<br />
student develop his or her vision and<br />
put it into action. Some people sailed<br />
through their practice dovetails while<br />
others struggled along. Everyone got<br />
close attention from the teachers and<br />
improved their skills immensely, and all<br />
finished with a beautiful bench or stool<br />
to take home.<br />
I am the kind <strong>of</strong> person who is always<br />
rushing and always thinking <strong>of</strong> the next<br />
task or the next adventure. I have trouble<br />
staying in the present moment. But<br />
for those two weeks in woodworking<br />
school, sitting at my workbench with a<br />
razor-sharp chisel in my hand seeing a<br />
cherry footstool take shape, I thought<br />
“there is no place I’d rather be right now.”<br />
Leaving was sad, but arriving home was<br />
very exciting, as the very next week we<br />
broke ground on a new workshop.<br />
When my husband, Todd, and I<br />
bought a house in Alexandria, NH we<br />
decided we needed an outbuilding to<br />
serve as a woodworking shop for me and<br />
someday a boat-building shop for him,<br />
as well as a space for storing bicycles<br />
and skis. After getting an estimate from<br />
a local builder for a 24´ x 36 one and one<br />
half story building that was so expensive<br />
it made our jaws drop, we scaled the<br />
project down to about half that size<br />
and decided to build it ourselves. This<br />
also required us to narrow it down<br />
from an all-purpose building to a<br />
dedicated woodworking shop. Todd was<br />
a bit unhappy about this, but when I<br />
promised he could use the shop to build<br />
a boat and we incorporated an attached<br />
shed for a small boat, he became more<br />
enthusiastic. I feel incredibly lucky to be<br />
able to design and build my own shop<br />
and deeply appreciate my husband’s<br />
support.<br />
<strong>The</strong> problem I faced was that, as a<br />
beginning woodworker, I knew nothing<br />
about how to design and set up a shop.<br />
I read Sandor Nagyszalanczy’s book<br />
Setting Up Shop, which was extremely<br />
helpful. But I still felt unsure about<br />
where to put machines and benches<br />
and where to plan storage for sheet<br />
goods and lumber. I needed to plan<br />
these things in order to determine the<br />
placement <strong>of</strong> doors and windows as well<br />
as wiring. Peter Korn <strong>of</strong> the Center for<br />
Furniture Craftsmanship advised me to<br />
visit some local woodworkers’ shops and<br />
get their advice.<br />
I went online and found the NH<br />
Furniture Masters Association. I was<br />
<strong>The</strong> <strong>Guild</strong> <strong>of</strong> <strong>New</strong> <strong>Hampshire</strong> <strong>Woodworkers</strong><br />
9
pleased to find biographies and addresses<br />
<strong>of</strong> the members. I emailed Terry Moore<br />
and David Lamb, asking if I could visit<br />
them. Both immediately agreed.<br />
When I arrived at Terry Moore’s<br />
shop, his puppy ran out to greet me with<br />
barking and tail-wagging. Inside, Terry<br />
welcomed me just as warmly, albeit<br />
with a bit more reserve. I was impressed<br />
with how much he had in his mediumsized<br />
shop. I furiously took notes as he<br />
showed me around, advised me about<br />
tools, and gave me resources to track<br />
down. Soaking in as much as I could, I<br />
did not feel at all looked down upon as<br />
a beginner. Terry seemed to genuinely<br />
want to help me get started and even<br />
said “you need to get good fast because<br />
we need more women in the Furniture<br />
Masters.” Although I doubt I will ever be<br />
good enough to join this distinguished<br />
group <strong>of</strong> artists, his comment made me<br />
feel welcomed into the community <strong>of</strong><br />
woodworkers. Terry’s most ardent piece<br />
<strong>of</strong> advice was to join the <strong>Guild</strong> <strong>of</strong> NH<br />
<strong>Woodworkers</strong>. He said that it would be<br />
the best $30 I would ever spend. I have<br />
since discovered he was correct. He also<br />
<strong>of</strong>fered to help me get tools from a local<br />
high school that had discontinued its<br />
woodshop program.<br />
While I was at Terry’s shop, Brad<br />
Purmot, another local woodworker,<br />
stopped by, and he invited me to see his<br />
shop which was closer in size to the one<br />
I was building. We went to Brad’s shop,<br />
and there I was impressed by how he fit<br />
all his tools and a small workbench into<br />
a very small space. I began to realize that<br />
the size <strong>of</strong> my shop, though small, was<br />
perfectly acceptable.<br />
A few weeks later I visited David<br />
Lamb in his shop in Canterbury. He and<br />
his wife, Janet, took time out <strong>of</strong> their busy<br />
as k th i s Ol d sa w! – continued<br />
and heavy maple cauls that I use for big<br />
tops. I attach them to my horses and<br />
make sure they are parallel by shimming<br />
the feet <strong>of</strong> the horses – check in the<br />
same way you would use winding sticks.<br />
I wax the edges <strong>of</strong> the cauls to avoid<br />
glue sticking and lay my top boards on<br />
perpendicular to the cauls. Check the<br />
joints. If the edges are square and the set<br />
10 <strong>The</strong> <strong>Guild</strong> <strong>of</strong> <strong>New</strong> <strong>Hampshire</strong> <strong>Woodworkers</strong><br />
day to patiently show me their shop and<br />
answer all <strong>of</strong> my questions. David echoed<br />
Terry’s comments regarding joining the<br />
<strong>Guild</strong>. He gave me excellent advice about<br />
the business aspects <strong>of</strong> making furniture,<br />
such as to record the time it takes me<br />
to make each component <strong>of</strong> a piece in<br />
order to begin estimating prices, and<br />
to have pr<strong>of</strong>essional photographs taken<br />
<strong>of</strong> each completed piece in creating my<br />
portfolio. I also tremendously enjoyed<br />
seeing his shop, in particular the row <strong>of</strong><br />
antique bandsaws powered by a common<br />
driveshaft, which David has lovingly<br />
restored and uses in his work.<br />
Since meeting Terry, Brad, and<br />
David, all three have helped me by<br />
either hooking me up with folks who<br />
were selling used tools or answering<br />
questions that arise from time to time.<br />
And <strong>of</strong> course, I immediately joined the<br />
<strong>Guild</strong>, which has allowed me to meet<br />
many other folks who have been equally<br />
as generous with their time and advice.<br />
Regarding my shop design, I finally<br />
realized that every space and every<br />
woodworker is so different that there is<br />
no cookie-cutter approach. All I could<br />
do was take all the advice and ideas I’d<br />
read and received and do my best to<br />
come up with a plan. Inevitably there will<br />
mistakes and regrets, but that’s part <strong>of</strong><br />
the process <strong>of</strong> becoming a woodworker.<br />
My husband Todd, our good friend<br />
Mike McGraw, my father-in-law Don<br />
Smith, and I spent ten days in August,<br />
2007 framing and ro<strong>of</strong>ing the workshop.<br />
Although the days were long and the<br />
work challenging, the camaraderie<br />
was great and we had a fantastic time.<br />
I spent the year since then installing<br />
the windows, siding, wiring, insulation,<br />
heating, flooring, and inside walls. <strong>The</strong><br />
shop has a 16´ x 20´ main room and 10´<br />
can be drawn up dry with light clamp<br />
pressure, I’m ready to glue.<br />
When placing the clamps, I work<br />
“west to east” alternating one on top and<br />
one on bottom. I try to center the bar<br />
clamp screw in the center <strong>of</strong> the edge<br />
rather than put the bar right on the<br />
boards. Excessive clamp pressure can<br />
cause distortion in the top. If the top is<br />
Shop Features —<br />
• I have two 220 volt circuits - one<br />
for the bandsaw and one for a<br />
dust collector (to be installed in<br />
the future).<br />
• I have quite a few windows - a<br />
few for ventilation and five<br />
horizontal windows are high on<br />
the walls to let light in without<br />
blocking wall space.<br />
• <strong>The</strong> lighting is several rows <strong>of</strong><br />
fluorescents, plus incandescent<br />
task lighting.<br />
• <strong>The</strong>re is a l<strong>of</strong>t for wood storage,<br />
but this is inconvenient for dayto-day<br />
use since I access it via<br />
ladder.<br />
• Doors are two large 4´x8´ doors<br />
(total opening 8´x8´) - like barn<br />
doors.<br />
• <strong>The</strong> floor is plywood on top <strong>of</strong><br />
2x4s over concrete.<br />
• Heating: propane direct vent<br />
heater.<br />
• Jet air filtration unit on the ceiling.<br />
• I built a workbench from a plan<br />
in Fine Woodworking, out <strong>of</strong> 3/4˝<br />
birch plywood (you can see it in<br />
one <strong>of</strong> the photos).<br />
• <strong>The</strong> bandsaw and planer are on<br />
wheels so I can move them out <strong>of</strong><br />
the way.<br />
• Future plans: dust collector,<br />
lumber racks, sheet goods rack.<br />
x 10´ finishing room. It is 90% finished,<br />
but I simply cannot wait any longer to<br />
start making furniture! I am starting to<br />
design the first piece I will build in the<br />
new shop – a cherry blanket chest which<br />
will be a gift for Mike McGraw.<br />
laying flat on the cauls when I’m done<br />
tightening the clamps, then it is flat.<br />
Another thing I do routinely when<br />
building a project that has a substantial<br />
top is after I’m done making the top<br />
(and it is flat) I’ll screw some temporary<br />
heavy cauls to the bottom to maintain<br />
“flat” while I work on other parts <strong>of</strong> the<br />
project.
Steam Bending<br />
Windsor chairs – sound approach makes for a successful project<br />
Most Windsor chairs require bent<br />
wood parts. It is safe to say<br />
that if you want to make these chairs,<br />
you have to master this skill. However,<br />
steam bending is an art, not a science.<br />
No matter how much experience you<br />
have, some bendings are going to break.<br />
Like a military planner, the chairmaker’s<br />
goal is to keep the casualties as low as<br />
possible. That means you need to have<br />
every contingency leaning in your favor,<br />
and you cannot take short cuts. If you<br />
do, you may accomplish some successful<br />
bends, but your failure rate will be<br />
unacceptably high.<br />
Choose Your Log Carefully<br />
Begin with wood selection and use<br />
the woods most suitable for bending.<br />
About ten years ago, it was popular for<br />
woodworkers to make everything out<br />
<strong>of</strong> walnut. Right now, the “in” wood is<br />
cherry. I regularly get calls (as I did then)<br />
from people who are suffering very high<br />
failure rates. When I ask what they are<br />
bending, I am told they are trying to<br />
make an all-cherry chair (just as it used<br />
to be an all-walnut chair). This is folly,<br />
as these woods do not bend well.<br />
Windsor chairmakers traditionally<br />
used locally available oak, ash, or hickory<br />
for bendings. <strong>The</strong>se are all ring porous<br />
woods with long tough fibers. Today, as<br />
in the past, these remain the best woods<br />
for this job.<br />
You need to obtain your wood<br />
directly from the log. Wood that has<br />
been sawn into boards or planks usually<br />
does not have straight enough grain to<br />
result in a high success rate. Do not buy<br />
wood at Home Depot and try to bend it.<br />
Do not try to bend wood that has been<br />
kiln dried, as wood that has been heated<br />
does not bend well. I have had bad luck<br />
bending wood that has been heated<br />
when it was left leaning against a wall<br />
too near a stove.<br />
You have to be finicky and down<br />
right fussy when selecting your logs.<br />
When trying to describe to people<br />
what to look for I say, “Think telephone<br />
poles.” That is just what you want, trees<br />
that look like telephone poles, perfectly<br />
straight. <strong>The</strong> wood inside such a tree<br />
will generally look like the tree did on<br />
the outside. For that reason, the trunk<br />
must be straight, with no curve or twist.<br />
If there is, the wood will be bowed or<br />
twisted.<br />
by Mike Dunbar<br />
<strong>The</strong>re must be no obvious blemishes<br />
on the log’s surface. A blemish in the log<br />
will cause the layers <strong>of</strong> annual growth<br />
to deflect around it, and the stock you<br />
obtain will not be straight. Reject out <strong>of</strong><br />
hand logs with freshly trimmed limbs.<br />
It does not matter whether these limbs<br />
were live or dead.<br />
Refuse any logs with bumps or burls.<br />
Next to the shape <strong>of</strong> the log, the bark<br />
is the best indicator to what is inside.<br />
Oaks, ashes, and hickories have coarse<br />
bark with striations in it. <strong>The</strong>se should<br />
all be straight and parallel.<br />
A knot or defect inside the log is<br />
said to be “encased.” Encased defects<br />
will usually disturb the pattern <strong>of</strong> the<br />
striations in the bark and <strong>of</strong>ten create<br />
“cats faces.” <strong>The</strong>se telltale swirls are a<br />
<strong>The</strong> <strong>Guild</strong> <strong>of</strong> <strong>New</strong> <strong>Hampshire</strong> <strong>Woodworkers</strong><br />
11
sure give away that the log contains a<br />
defect, and should be rejected.<br />
Be on the look out for folds in<br />
the bark. <strong>The</strong>se appear as long (<strong>of</strong>ten<br />
dark) lines, like a scar on human skin.<br />
<strong>The</strong>se folds cover an injury the tree has<br />
sustained. Look out also for dark stains<br />
in the bark. This can indicate an injury<br />
that is still open to water, which can<br />
cause rot in the log.<br />
No matter how choosey you are,<br />
there is no guarantee that even the best<br />
looking logs will not have flaws. You<br />
cannot be sure what the wood looks like<br />
until you split it open.<br />
If you are buying the log at a mill,<br />
you obviously incur all the risk. <strong>The</strong><br />
saw mill owner is not going to let you<br />
return a log that you split open. Avoid<br />
logs that are too big or too small. We<br />
do not like them to be less than 14<br />
inches in diameter, nor greater than<br />
about 24 inches. Small logs have a<br />
greater percentage <strong>of</strong> juvenile wood<br />
– the wood that was once the sapling.<br />
This wood usually has too many small<br />
encased knots to be good for bending.<br />
Logs that are too big cannot be easily<br />
handled. Splitting them requires more<br />
wedges and back breaking work. In a<br />
big log, the splits made by the wedges<br />
frequently miss each other rather than<br />
running together, and a lot <strong>of</strong> wood will<br />
be wasted.<br />
Here at <strong>The</strong> Institute, we use forest<br />
grown trees. We are a big enough<br />
business to be able to buy our logs<br />
wholesale from a concentration yard<br />
that sells veneer logs to buyers from<br />
China and Germany. <strong>The</strong> logs are<br />
delivered here by a big logging truck<br />
and a cherry picker. If you want just one<br />
log, try a local sawmill or a logger. <strong>The</strong>y<br />
also have forest grown trees.<br />
I have successfully used oaks that<br />
grew on someone’s lawn. However,<br />
landscapers and tree services usually<br />
have urban grown trees and I would<br />
recommend avoiding these. We tried<br />
to use an urban tree in a class I taught<br />
in Atlanta many years ago. <strong>The</strong> log was<br />
beautiful, but we had almost 100%<br />
failures. I do not know whether the<br />
problem was environmental, but I never<br />
wanted to take that chance again.<br />
12 <strong>The</strong> <strong>Guild</strong> <strong>of</strong> <strong>New</strong> <strong>Hampshire</strong> <strong>Woodworkers</strong><br />
Freshness<br />
Finally, determine when the tree was<br />
felled. If it has been down too long, it<br />
may have begun to decay. Decayed or<br />
decaying wood will not bend. If you are<br />
buying from a saw mill, the operator<br />
may not know this information, but if<br />
your are buying from the logger who cut<br />
it, he should.<br />
Otherwise, your best bet is to<br />
examine the sapwood. This is the band<br />
<strong>of</strong> annual rings about an inch thick<br />
and closest to the bark. On oaks, the<br />
sapwood is usually a lighter color. <strong>The</strong><br />
sapwood contains nutrients that attract<br />
fungi. <strong>The</strong>se will usually appear as bluish<br />
or blackish spots about the size <strong>of</strong> a<br />
pencil point.<br />
In red oak, you can cut away the<br />
speckled sapwood and still use the<br />
reddish heart wood. I suspect the tannic<br />
acid in red oak protects it. However,<br />
after enough time even heart wood will<br />
be affected by decay.<br />
Trees that are cut in the summer<br />
or late spring are more likely to decay<br />
quickly. At that time <strong>of</strong> the year the<br />
tree is in its growth cycle and the sap is<br />
up. <strong>The</strong> weather is also much warmer. A<br />
tree dropped in July when temperatures<br />
are in the 90s can begin to decay in a<br />
week. A tree dropped in October when<br />
the tree is dormant and the weather cool,<br />
will remain fresh much longer. In fact,<br />
we like to put in a large supply <strong>of</strong> logs in<br />
the late fall, as they remain frozen from<br />
December through March. In the warm<br />
weather we buy small numbers <strong>of</strong> logs,<br />
and more frequently.<br />
<strong>The</strong> problem is that other than in<br />
the sapwood, you cannot always see the<br />
early stages <strong>of</strong> decay, a break down <strong>of</strong> the<br />
wood that makes it brittle and incapable<br />
<strong>of</strong> bending. Although over the phone or<br />
via email, I cannot diagnose why wood<br />
will not bend, I suspect that decay is most<br />
<strong>of</strong>ten the culprit. Your best protection is<br />
to know a tree’s history – when it was<br />
dropped and where it has been in the<br />
meanwhile.<br />
Storing Wood<br />
No matter how fresh your log, it will<br />
not remain that way. This means you<br />
need to get to work on it right away.<br />
<strong>The</strong>re is no difference between wood<br />
taken from a log that has been at the<br />
mill for six months and one that has<br />
been lying in your back yard for the<br />
same amount <strong>of</strong> time.<br />
This is the analogy I use when<br />
describing wood selection during a class.<br />
Think <strong>of</strong> yourself as a farmer putting<br />
down a cow for meat. You will not take<br />
the cow out into the field, drop it, walk<br />
away, and return three months later to<br />
cut <strong>of</strong>f a steak. <strong>The</strong> meat needs to be<br />
processed right away. Once it is cut up<br />
you have two choices – freeze it or dry<br />
it into jerky.<br />
Treat a tree the same. Split it up right<br />
away. <strong>The</strong>n, you have two options, freeze<br />
it or dry it. Here at <strong>The</strong> Institute, we<br />
have a large 6 foot chest freezer which<br />
we fill with riven wood for our classes<br />
and for sale.<br />
Unfortunately, back in the 1970s<br />
working wood that has been split<br />
from the log was been dubbed “green<br />
woodworking”. As a result many people<br />
think the wood needs to be kept wet.<br />
This is wrong, and results in a lot <strong>of</strong><br />
ruined wood. Some people try keeping<br />
the billets submerged in water. This is<br />
unnecessary. Others wrap it in plastic.
Still others wax the ends. <strong>The</strong>se steps<br />
only promote decay.<br />
If you cannot freeze your wood, allow<br />
the billets to air dry. Although successful<br />
steam bending requires the wood to<br />
be wet, the steam box will take care <strong>of</strong><br />
that. Treat the billets like you would any<br />
other wood you buy. Keep it dry and <strong>of</strong>f<br />
the ground.<br />
I remember one fellow who called<br />
because his bends were breaking. It<br />
turned out he had stored his billets on<br />
the ground under his back porch. Of<br />
course, the wood began to rot just as<br />
would a board stored on the ground. <strong>The</strong><br />
best place to store billets is in a garage<br />
or other unheated building. Unless you<br />
live in a desert, it will not air dry much<br />
below 10% - 14%. Wood stored this way<br />
will be good for years. I have successfully<br />
bent air dried wood I split into billets a<br />
decade earlier.<br />
Making Billets<br />
Here at <strong>The</strong> Institute, we split our<br />
logs with a log splitter. Every couple <strong>of</strong><br />
months we have what we call a “spilling<br />
party.” Fred, Don, and I, along with a<br />
farmer who lives down the road, split<br />
enough wood for our upcoming classes<br />
and for sales. <strong>The</strong> farmer Kevin, drives<br />
his tractor down here with a four-foot<br />
splitter mounted on the rear. Splitting<br />
the logs this way saves us a great deal <strong>of</strong><br />
back breaking labor.<br />
If you are a chairmaker working on<br />
a smaller scale, you will most likely split<br />
your logs by hand. Using a maul and<br />
splitting wedges, split the log into halves.<br />
This is called riving. Use a hatchet to<br />
snip any wood that is tearing from the<br />
two halves and holding them together.<br />
Otherwise, these tears may lengthen and<br />
waste good wood. Next, split the halves<br />
into quarters and then, the quarters into<br />
eighths. <strong>The</strong>se eighths – called billets –<br />
have a cross section that looks like a slice<br />
<strong>of</strong> pie.<br />
With a maul and wedge split away<br />
the pointed piece <strong>of</strong> the pie. This is the<br />
tree’s juvenile wood, and it is seldom<br />
useful. Next, use a drawknife to peel<br />
the bark <strong>of</strong>f each billet. Remember,<br />
the tree’s living growth layer is right<br />
under the bark. It is wet and rich with<br />
nutrients. If left this way, boring insects<br />
will quickly make your riven billets their<br />
home. After our splitting parties we take<br />
these billets and carefully following the<br />
grain, cut them on our Hitachi band<br />
resaw into arm and bow blanks. We<br />
use this big saw because we are cutting<br />
enough stock for as many as six classes<br />
at a time. You are not likely to place<br />
these demands on your equipment and<br />
so, can use your shop band saw. To make<br />
the stock more manageable, you might<br />
want to split your billets one more time,<br />
into sixteenths.<br />
Preparing the Stock<br />
Once the oak has been sawn into<br />
bending stock it is ready to be worked.<br />
In our experience, stock that has been<br />
set aside for even a couple <strong>of</strong> days and<br />
has lost a bit <strong>of</strong> water will bend better<br />
than wood that is dead fresh. <strong>The</strong> use<br />
<strong>of</strong> the term “green woodworking” leads<br />
many people to think that wetter is<br />
better. However, as long as wood is not<br />
heated by kiln drying, being placed near<br />
a stove, or stored in a hot attic, moisture<br />
content is largely irrelevant. <strong>The</strong> steam<br />
box will provide the necessary moisture.<br />
<strong>The</strong> type <strong>of</strong> chair you are making<br />
determines the stock’s shape and<br />
dimensions. When sawing, the goal is<br />
to keep the blade in one layer <strong>of</strong> growth<br />
as much as possible, as doing this<br />
perfectly results in stock with no grain<br />
direction. Following one layer <strong>of</strong> growth<br />
may result in stock that is not perfectly<br />
straight and that has a slight bow. This<br />
is not a problem, as the part is going to<br />
be bent anyway.<br />
Like most other human endeavors<br />
sawing bending stock is not always<br />
possible to do perfectly. As a result,<br />
when shaping the wood into chair backs<br />
there will sometimes be places in the<br />
stock where you will be cutting with the<br />
grain and other times, against it.<br />
When a tool begins to dive or choke,<br />
it is necessary to cut in the opposite<br />
direction. <strong>The</strong> greatest risk occurs when<br />
using the draw knife. This tool’s open<br />
blade can dive as it follows the stock’s<br />
grain and ruin the part. A light test cut<br />
is always best.<br />
Do not be concerned by the light<br />
colored sapwood. In our experience it<br />
bends well. However, it does best when<br />
in compression. <strong>The</strong>refore, when it is<br />
present, we plan our work so that it will<br />
be on the inside <strong>of</strong> the bend. In other<br />
words, so it will be placed against the<br />
bending form.<br />
Pin knots are a real hazard, as they<br />
create weak spots. It is best to plan your<br />
work so they are removed while shaping<br />
the part. If this is not possible, we again<br />
prefer to place them on the inside <strong>of</strong> the<br />
bend so they are in compression.<br />
When either sapwood, pin knots, or<br />
some other risk is present, our habit is<br />
to mark the area with large, dark Xs<br />
made with a Sharpie permanent marker.<br />
When the part comes out <strong>of</strong> the steam<br />
box, this reminds us that when making<br />
the Xs we had determined a preferred<br />
placement on the form.<br />
Mark Your Parts<br />
Since Windsor chair parts are bent<br />
from the middle, it is necessary to locate<br />
and mark the center. You have about<br />
45 seconds to bend a part. While, this<br />
is more than enough time, you do not<br />
want to be delayed by problems that<br />
could have been avoided.<br />
We also mark the centers <strong>of</strong> our<br />
bendings with a Sharpie, as it leaves a<br />
dark, easy to find mark. Do not skimp on<br />
this important step by making a faint or<br />
incomplete mark. Make the center mark<br />
all the way around a round part and on<br />
all four sides <strong>of</strong> one that is rectangular.<br />
When you take the hot, wet part out <strong>of</strong><br />
the steam box, you do not want to waste<br />
precious time looking for your mark.<br />
Do not use a mechanical pencil or a<br />
ball point. Steaming gives the wood a<br />
slight gray cast, and the faint mark made<br />
by a mechanical pencil can be hard to<br />
find. Steaming will bleed ink out <strong>of</strong> the<br />
wood and the mark will disappear.<br />
Remember steaming wood is an art,<br />
not a science. Some parts will break,<br />
even when you are doing everything<br />
right. <strong>The</strong> goal is to keep these failures at<br />
an acceptable level. This means you want<br />
to have as much in your favor as possible.<br />
<strong>The</strong> process we use at <strong>The</strong> Institute does<br />
just that. An average <strong>of</strong> 2 parts out <strong>of</strong> 34<br />
will break in a sack back class. In some<br />
classes, there are no breaks at all. In<br />
others, there are more than two.<br />
<strong>The</strong> <strong>Guild</strong> <strong>of</strong> <strong>New</strong> <strong>Hampshire</strong> <strong>Woodworkers</strong><br />
13
When Should I Bend<br />
In our experience, bending goes<br />
better some days than on others. Over<br />
the years I had observed this and began<br />
to look for the cause. <strong>The</strong> following may<br />
seem like folk lore, but it is quite true<br />
and accurate. <strong>The</strong> best bending days are<br />
those that are bone dry and crystal clear.<br />
<strong>The</strong>se are the days that make you feel<br />
like you have boundless energy. Wood<br />
taken from the steam box on these days<br />
feels dry and not very hot.<br />
<strong>The</strong> least favorable bending days are<br />
wet, gloomy, and dreary. <strong>The</strong>se are the<br />
days when there is not enough c<strong>of</strong>fee in<br />
the world to wake you up. Wood out <strong>of</strong><br />
the steam box feels wet, and is so hot we<br />
end up juggling it from hand to hand as<br />
we carry it to the bending form.<br />
This observation runs counter to what<br />
one would assume. Since wood needs to<br />
be hot and wet to bend, it seems a wet<br />
day would be our favor. However, it is<br />
not.<br />
We found an indicator that would<br />
tell us when bending conditions were<br />
good. We found it in a very unlikely<br />
place – a piece <strong>of</strong> wood called a weather<br />
stick. <strong>The</strong>se are specially cut twigs from<br />
Maine that are sold by some <strong>of</strong> the<br />
country living type catalogs for about<br />
$8. Please, Google “weather stick” rather<br />
than calling me for a phone number.<br />
When the weather is dry and<br />
providing a good bending day, the stick<br />
points upward. When the weather turns<br />
dreary and overcast, the stick turns<br />
down. Obviously, the wood in the twig<br />
is responding to the relative humidity <strong>of</strong><br />
the surrounding air, and the particular<br />
way it was cut makes it go up and down.<br />
<strong>The</strong> weather stick further underscores<br />
how much successful steam bending is<br />
art and skill. I would never recommend<br />
becoming a slave to the weather stick.<br />
However, if you are not in a hurry and<br />
have the flexibility to wait for a better<br />
day, I would. At home, you have an<br />
advantage in that you can wait for a<br />
good bending day. We have to bend on<br />
the first day <strong>of</strong> each class so our parts are<br />
dry and ready to use later in the week.<br />
Regardless <strong>of</strong> the weather, we fire up the<br />
boxes and go to work.<br />
14 <strong>The</strong> <strong>Guild</strong> <strong>of</strong> <strong>New</strong> <strong>Hampshire</strong> <strong>Woodworkers</strong><br />
<strong>The</strong> Steam Box<br />
To successfully bend wood it has to<br />
be both hot and wet. <strong>The</strong> temperature<br />
should be at least 185 degrees F with<br />
25% moisture content. With both<br />
these properties, the wood is said to<br />
be plasticized, which means capable <strong>of</strong><br />
being bent.<br />
<strong>The</strong> steam box we use is the one we<br />
developed and perfected here at <strong>The</strong><br />
Institute. We call it <strong>The</strong> Ultimate Steam<br />
Box, because it is so efficient and because<br />
it solves the problems associated with<br />
other ways <strong>of</strong> making these devices.<br />
To make the box we use Schedule 80<br />
PVC pipe – Schedule 40 will not take<br />
the heat and will crinkle up like a pretzel.<br />
Wood steam boxes require a lot <strong>of</strong><br />
steaming time just to become saturated<br />
and tight. Unless insulated, metal boxes<br />
radiate <strong>of</strong>f a lot <strong>of</strong> the heat that should<br />
be plasticizing the wood. If you touch an<br />
exposed part <strong>of</strong> a metal tube you can get<br />
a good burn. PVC is both impervious<br />
and a good insulator. I demonstrate this<br />
to a class by holding my hand on the<br />
PVC tube. Only 1/4˝ away from my skin<br />
is live steam.<br />
We boil water on a 160,000 BTU<br />
burner originally designed for cooking<br />
lobsters and crawdads. This burner<br />
creates a rolling boil and lots <strong>of</strong> steam.<br />
Electric hot plates and the camp stoves<br />
that I used early in my career, make the<br />
water simmer and do not provide the<br />
volume <strong>of</strong> steam created by these new<br />
burners.<br />
We boil our water in five gallon steel<br />
utility cans. Needless to say, we buy<br />
these brand new and never put gasoline<br />
in them. Five gallon capacity is more<br />
water than most chairmakers will need.<br />
However, in a sack back class we bend<br />
34 arms and bows in about 21/2 hours,<br />
and having to continually fill the boilers<br />
is a nuisance. For most chairmakers a<br />
two gallon can is sufficient.<br />
<strong>The</strong> steam box and boiler are<br />
connected by tight fittings. This ensures<br />
that all the steam that is generated in<br />
the boiler is conveyed to the steam<br />
box. Because the PVC is impervious<br />
and a good insulator, the steam goes<br />
right to work doing its intended job <strong>of</strong><br />
plasticizing the chair parts.<br />
You have 45 sec.
If the steam box did not have some<br />
relief, the test caps on either end would<br />
be blown <strong>of</strong>f as pressure developed in<br />
the tube. We make a 1/2˝ relief hole in<br />
the bottom <strong>of</strong> each end <strong>of</strong> the tube. <strong>The</strong><br />
steam enters the tube in the middle<br />
and travels in both directions, escaping<br />
out the vent holes. This ensures an even<br />
distribution in the box. When our boxes<br />
are running at full steam, a plume <strong>of</strong><br />
water vapor blows down from the ends<br />
<strong>of</strong> the tubes to the ground. We can look<br />
out the classroom window and tell how<br />
things are going in the bending area.<br />
Because heat rises, the parts do not<br />
sit on the bottom <strong>of</strong> the box. <strong>The</strong>re, they<br />
would also be bathed in cooler condensed<br />
water. Instead, they rest on a rack made<br />
<strong>of</strong> stainless steel bolts that pierce the<br />
tube. Regular steel bolts would leave<br />
dark purple stains on the parts.<br />
Plasticizing<br />
As little as 15 minutes is all that is<br />
required to plasticize red oak chair parts.<br />
This time can vary somewhat according<br />
to the circumstances. <strong>The</strong> wood we use<br />
is freshly cut before each class. That<br />
means our bendings already have 25%<br />
moisture content and that all we need to<br />
do is heat them. If your wood has been<br />
stored for a while and allowed to air dry,<br />
it may be around 14%. You should steam<br />
a bit longer, perhaps 20-25 minutes.<br />
Chairmakers who live in the Rocky<br />
Mountain states or at other high<br />
elevations have another problem. Water<br />
boils at a lower temperature the higher<br />
you are. I ran into this problem in 1980<br />
and 1981 when I taught chairmaking<br />
classes at BYU in Provo, Utah. We<br />
managed to bend successfully by<br />
steaming our parts even longer than usual.<br />
We left them in the box 40 - 45 minutes.<br />
Because the wood was noticeably cooler<br />
than at lower elevations, we worked even<br />
more quickly.<br />
Adding fabric s<strong>of</strong>tener to the water<br />
in the boiler has been suggested in some<br />
woodworking magazines as a way to<br />
s<strong>of</strong>ten the wood’s fibers and make it<br />
bend more easily. I have tried that trick<br />
and have not found that it makes any<br />
difference.<br />
<strong>The</strong> Moment <strong>of</strong> Truth<br />
Before removing a piece <strong>of</strong> wood<br />
from the steam box, be sure that every<br />
thing else is prepared and ready. You<br />
only have about 45 seconds to complete<br />
the bends before the wood becomes too<br />
cool, and you do not want to waste any<br />
<strong>of</strong> that time fumbling. Always check the<br />
form to make sure it is securely clamped<br />
to the bench. Be sure that the bending<br />
strap is easily accessible. Check that you<br />
have the required number <strong>of</strong> wedges<br />
and pins, as well as a hammer. I always<br />
go through this mental checklist. For<br />
beginners, I recommend refreshing the<br />
bending process in their minds by first<br />
pantomiming it.<br />
Remove the wood from the box<br />
with a pair <strong>of</strong> tongs. We use the ones<br />
sold in a super market for picking ears<br />
<strong>of</strong> corn out <strong>of</strong> boiling water. Before you<br />
open the steam box remember what you<br />
learned in your high school physics class.<br />
Released steam will rise. To avoid a burn,<br />
always open the box and approach it<br />
with the tongs from below.<br />
Remove the part from the box and<br />
moving quickly, place it in the bending<br />
strap and secure it to the bending form.<br />
While you want to move quickly when<br />
setting up the bend, remember that as<br />
you bend, speed is your enemy. You must<br />
give the wood time to compress. If you<br />
move too quickly, you shift the outside<br />
edge <strong>of</strong> the bend from compression into<br />
tension. While wood compresses very<br />
well, it has a very limited ability to stretch.<br />
Tension will cause failures. Avoid it by<br />
bending slowly and deliberately.<br />
“Do you wear gloves?” is a common<br />
question asked by students. I advise<br />
against them. As you gain experience<br />
bending you will discover that you can<br />
sometimes feel problems in time to<br />
correct them. We will sometimes feel a<br />
piece beginning to weaken and turning<br />
the part around, bend it successfully in<br />
the other direction. Roll up too, can be<br />
felt by a pair <strong>of</strong> experienced hands. You<br />
will never develop this “feel” for the<br />
wood if you wear gloves.<br />
While steamed wood is quite hot,<br />
you can juggle it back and forth while<br />
carrying it to the form, and can switch<br />
hands while bending. <strong>The</strong> wood needs<br />
to be this hot and if it is not, you will<br />
experience more failures. I always tell<br />
students, “If you’re not swearing, it’s not<br />
hot enough.<br />
Failures<br />
You cannot tell if the wood has been<br />
sufficiently heated when wearing gloves.<br />
Furthermore, bending requires dexterity.<br />
Gloves make your hands too clumsy.<br />
While we have few bending failures at<br />
<strong>The</strong> Institute, they do occur. Failures are<br />
a fact <strong>of</strong> life that a chairmaker has to<br />
accept, as bending wood is an art, not a<br />
science. Four types <strong>of</strong> failure can occur<br />
when bending. <strong>The</strong>y are: delamination,<br />
tension shear, compression failure, and<br />
roll up.<br />
Delamination is by far the most<br />
common failure. In this case, a layer<br />
<strong>of</strong> wood peels <strong>of</strong>f the outside edge <strong>of</strong><br />
the bending. A tension shear occurs<br />
when the wood fibers rupture, tearing<br />
like cloth across their width. In a<br />
compression failure, the wood on the<br />
inside <strong>of</strong> the bend fails to compress<br />
evenly, and kinks up like ribbon candy.<br />
<strong>The</strong> <strong>Guild</strong> <strong>of</strong> <strong>New</strong> <strong>Hampshire</strong> <strong>Woodworkers</strong><br />
15
Roll up occurs most commonly in pieces<br />
with a rectangular section, such as the<br />
sack back arm rail. In this case, the part<br />
does not remain in a plane as it is bent.<br />
Instead, the rear edge rolls upward.<br />
A failure is not necessarily<br />
catastrophic and can frequently be fixed.<br />
<strong>The</strong> difference between it going into<br />
the scrap pile or into a chair is usually<br />
a matter <strong>of</strong> degree. If it is not too large,<br />
a delamination can be tacked back into<br />
place with glue. It is best to wait a day or<br />
two for the wood to dry a bit.<br />
A small tension shear can be<br />
consolidated with cyanoacrylate glue,<br />
which with a sufficient number <strong>of</strong><br />
applications will actually fill the void.<br />
We saturate small compression failures<br />
with cyanoacrylate and when it is dry,<br />
smooth the crinkled, ribbon candy effect<br />
with a plane or spoke shave. We remove<br />
roll up by clamping the bending flat<br />
between two boards and setting it aside<br />
to dry.<br />
Delamination, tension shear, and<br />
compression failures can frequently be<br />
prevented by bending in a slow, steady<br />
motion. As I said above, speed is the<br />
enemy.<br />
Roll up results from one <strong>of</strong> two<br />
causes. If the part’s edge against the<br />
bending block was not made at a right<br />
angle to the upper and lower surfaces,<br />
the part’s section is a parallelogram<br />
rather than a rectangle. In this case, the<br />
rear edge will lift as the front edge is<br />
pulled tight. Second, when bending, it<br />
<strong>The</strong> kiln<br />
16 <strong>The</strong> <strong>Guild</strong> <strong>of</strong> <strong>New</strong> <strong>Hampshire</strong> <strong>Woodworkers</strong><br />
is common for students pulling a part,<br />
towards themselves to actually twist<br />
the part forward. We suggest students<br />
be conscious <strong>of</strong> this and counter it by<br />
purposefully twisting the part away from<br />
themselves. If in spite <strong>of</strong> these efforts a<br />
roll up begins, we can minimize it by<br />
allowing the bend to ramp up the side<br />
<strong>of</strong> the block. When it is cool we drive it<br />
back flat against the back board.<br />
Drying<br />
Once a part has been bent, it has to<br />
dry before it can be used in a chair. For<br />
single plane bends such as sack back and<br />
bow back side chair, we wait until the<br />
part is cool. We then tie the bending<br />
with a string and remove it from the<br />
form. <strong>The</strong> c-arm is bent in two planes<br />
and has to dry on its form. Crests are<br />
bent in a press and have to stay clamped<br />
in this device until dry.<br />
At <strong>The</strong> Institute we dry bendings in<br />
the furnace room, which we use as a kiln.<br />
During the heating season the furnace<br />
keeps the temperature around 100<br />
degrees. Because humidity is very low<br />
in the winter, the warm room will dry<br />
bendings in several days. In the summer<br />
we maintain the same temperature with<br />
a heat lamp. We lower the summer<br />
humidity with a dehumidifier.<br />
At home, you can allow a part to dry<br />
on its own if you have the time to wait.<br />
In the winter you can speed it up by<br />
placing a bending on a heating duct, or<br />
above a radiator. In the summer, a part<br />
will dry in about a week if left in the sun.<br />
When I taught on the road, we would<br />
dry summer bendings by placing them<br />
in the backs <strong>of</strong> pick up trucks with black<br />
bed liners.<br />
If you want to dry your parts more<br />
quickly, build a small kiln out <strong>of</strong> foam<br />
core board. In a pinch you can also use<br />
the kitchen oven. Set it to its lowest<br />
possible temperature and crack the door<br />
to allow the moisture to escape.<br />
Spring Back?<br />
Anyone who has ever read an article<br />
on steam bending knows that it is<br />
necessary to over bend to allow for spring<br />
back. While everyone knows this, it is flat<br />
wrong. It seems to be one <strong>of</strong> those things<br />
that having made its way into print, just<br />
keeps getting repeated. When wood is<br />
sufficiently dry it compresses further.<br />
We can tell with a glance whether or<br />
not a bending is dry. As it comes <strong>of</strong>f the<br />
form, the string is taut. Once the part<br />
is dry, the string droops. Obviously, the<br />
part did not spring back, but moved in<br />
exactly the opposite direction. When<br />
it dries, a c-arm will compress so that<br />
the wedges that hold it on its form will<br />
loosen and fall away. A fully-dried crest<br />
will fall out <strong>of</strong> its press.<br />
In fact, this extra compression<br />
presents problems for a chairmaker<br />
who bends a long time before being<br />
ready to put the part in the chair. <strong>The</strong><br />
compression set makes the amount <strong>of</strong><br />
curve too extreme for the chair. We<br />
have had good luck correcting over<br />
compression by filling the sink with hot<br />
water and soaking one side <strong>of</strong> the bend.<br />
Once it has become wet, we can force<br />
the bend back open. We then repeat the<br />
process on the other side. Once you have<br />
restored the part to the desired shape,<br />
use it in a chair immediately. Otherwise,<br />
it will compress again as it dries.<br />
Steam Box Lesson<br />
As I said earlier, most <strong>of</strong> the problems<br />
people have bending chair backs is<br />
caused by decay. However, other things<br />
can go wrong and result in repeated<br />
breaks. This is an example <strong>of</strong> a problem<br />
with the equipment. During a class a<br />
couple <strong>of</strong> summers ago, one <strong>of</strong> the other<br />
instructors called me out to the bending<br />
area. On the ground were four or five<br />
broken arm and bows. Over a little<br />
less than half its length, each part was<br />
a strange purple-brown color, and each<br />
had broken within this discolored area.<br />
However, the other end <strong>of</strong> each part had<br />
bent well.<br />
First, we examined the broken parts<br />
then, the steam box. I discovered that<br />
instead <strong>of</strong> being level, one end <strong>of</strong> the<br />
box was significantly lower than the<br />
other. <strong>The</strong> landscapers had recently<br />
replenished the crushed stone in the<br />
bending area, and one end <strong>of</strong> the saw<br />
buck that supports the steam box had<br />
sunk into the fresh stone. <strong>The</strong> steam<br />
boxes have vent holes on both ends.<br />
<strong>The</strong>se are drilled through the lower<br />
surface, just before the end caps. Since
these vents are the only escape, the steam<br />
flows evenly through the tube in both<br />
directions. This two-way flow plasticizes<br />
the entire chair back uniformly.<br />
Because the box was at an angle<br />
with one end lower than the other, the<br />
steam entering the tube in the middle<br />
rose and exited only out the higher end.<br />
None was flowing down through the<br />
lower end. However, the jet <strong>of</strong> steam<br />
entering the middle <strong>of</strong> the tube and<br />
rising did heat the air in the lower part<br />
<strong>of</strong> the tube without wetting it. This hot<br />
dry air not only failed to plasticize the<br />
wood, it began to toast it. That explained<br />
the discoloration we had observed. <strong>The</strong><br />
parts on the ground had all broken in<br />
the end that was lowest in the tube.<br />
As I described earlier, in order to<br />
bend wood it has to be both hot and wet.<br />
This wood was only hot and wet on one<br />
end, and hot and dry on the other. In fact,<br />
it was so dry and so hot, it had begun<br />
to char. We leveled the steam box and<br />
every part after that bent as it should.<br />
We quickly made replacements for<br />
the students whose parts had broken,<br />
and these bent without trouble. I saved<br />
one <strong>of</strong> the discolored parts and hung it<br />
on the shop wall. I tell this story to each<br />
class and use it to illustrate my tale.<br />
Boiler Lesson<br />
During a writing arm class one year<br />
we also experienced a series <strong>of</strong> breaks. I<br />
went out to the bending area to watch<br />
and help. As I assisted a student bending<br />
his arm I commented that the wood<br />
seemed too cool. Sure enough, it broke.<br />
Polling the staff and students, I learned<br />
that all the breaks were coming from<br />
one box. Those from the other box were<br />
bending properly. This ruled out bad<br />
wood. As I studied the box, I observed<br />
that very little steam was coming out<br />
the vent holes. Ordinarily, plumes <strong>of</strong><br />
water vapor blow down to the ground<br />
from each end <strong>of</strong> the tube. Assuming<br />
the boiler was running dry, I took it by<br />
its handle to shake it. I expected it to be<br />
nearly empty and thus, light in weight.<br />
All I remember is a moment <strong>of</strong><br />
surprise at how heavy the boiler was,<br />
because as I began to agitate the boiler<br />
a geyser <strong>of</strong> hot water and steam erupted<br />
from the filler spout. Next, I was<br />
running across the lawn with the skin <strong>of</strong><br />
my face stinging. After lots <strong>of</strong> cold water<br />
and aloe I was sufficiently recovered to<br />
look for the cause <strong>of</strong> the accident. We<br />
use utility cans as our boilers. About<br />
six months earlier the old boiler on the<br />
problem steam box had rusted through<br />
its bottom. Unable to immediately find a<br />
replacement boiler <strong>of</strong> the type we prefer,<br />
we had bought another brand.<br />
This brand <strong>of</strong> utility can had a<br />
fine mesh screen at the base <strong>of</strong><br />
the spout, which was intended to<br />
act as a filter.<br />
Over time, the steel screen<br />
began to rust and the tiny<br />
holes became more and more<br />
constricted. Eventually, this<br />
constriction cut down the flow <strong>of</strong><br />
steam up the spout, creating back<br />
pressure in the boiler.<br />
In the filler spout we have<br />
a wooden plug with a funnel<br />
though its center. This allows us<br />
to maintain the water level in<br />
the boiler without shutting down.<br />
As the water begins to boil the<br />
wooden plug becomes wet and<br />
tightens. When I agitated the<br />
can the plug let go. <strong>The</strong> water<br />
and steam trapped in the boiler<br />
by the constricted mesh filter<br />
erupted out the filler spout.<br />
Fortunately, my face was not directly<br />
over the hole. Most <strong>of</strong> the hot spray<br />
passed by with only some <strong>of</strong> it landing<br />
on my right cheek and neck. For several<br />
days I looked like I had a very oddly<br />
shaped sunburn. However, I healed<br />
quickly.<br />
Like most accidents, this one could<br />
have been avoided if I had exercised<br />
plain old common sense safety. <strong>The</strong><br />
lesson – always shut down a steam box<br />
before working on it.<br />
<strong>The</strong> <strong>Guild</strong> <strong>of</strong> <strong>New</strong> <strong>Hampshire</strong> <strong>Woodworkers</strong><br />
17
y Al Breed<br />
Half Hour Flowers<br />
Most any carving is really an<br />
exploration <strong>of</strong> what you can<br />
convince your tools to do for you.<br />
Carving small flowers is an easy way<br />
to get more familiar with grain and<br />
tool techniques. Given the small scale,<br />
amount <strong>of</strong> material and time spent,<br />
think <strong>of</strong> these as quick sketches that you<br />
need not get too attached to, that way<br />
you can be brave with your cuts and not<br />
worry about the perfection <strong>of</strong> each one.<br />
It’s OK to throw them out until you get<br />
one you like. After gluing down a bunch<br />
<strong>of</strong> basswood or pine blanks about a half<br />
inch thick by two inches in diameter<br />
with very weak hide glue and brown<br />
paper, proceed as follows.<br />
Draw a small circle in the center <strong>of</strong><br />
your blank and cut around it with a 12-6<br />
V-tool (photo 1).<br />
Round the center with a 7-15<br />
(photo 2) and then the outside with a<br />
7-20 (photo 3).<br />
Divide the circle into five petals and<br />
separate them with spiraling cuts using<br />
a 7-20 (photo 4).<br />
With a 12-6 V-tool again, make a<br />
notch in the edge <strong>of</strong> each petal (photo 5)<br />
and then form the overlap <strong>of</strong> the petals<br />
with a 7-20 (photo 6).<br />
18 <strong>The</strong> <strong>Guild</strong> <strong>of</strong> <strong>New</strong> <strong>Hampshire</strong> <strong>Woodworkers</strong><br />
Using a 5-35, hollow the petals<br />
(photo 7). Be brave and try to span the<br />
entire width <strong>of</strong> the petal with your cut.<br />
This will leave a single smooth surface<br />
with fewer tool marks than if you’d<br />
made several cuts. I use a mallet and try<br />
to keep forward pressure on the tool to<br />
keep it from rippling.<br />
Before you round the outside edges<br />
<strong>of</strong> the petals, cut notches with a 22-6<br />
or 12-6 and then connect the notches<br />
with a 7-10 or another appropriate size.<br />
Your notches don’t need to be regular<br />
(photo 8).<br />
Draw in the veins and cut them with<br />
an 11-3, or another small veiner or V-tool<br />
(photo 9). You can clean up around the<br />
center with a 7-20 beforehand. Use<br />
your fingers like a compass to enable<br />
you to make smooth curving veins. One<br />
fingertip will be the center <strong>of</strong> the circle<br />
while the others hold the tool in orbit<br />
around it. Always have your hands on<br />
the inside <strong>of</strong> the arc <strong>of</strong> the cut so that<br />
you’ll naturally describe the curve. Never<br />
try to steer the tool from the outside <strong>of</strong><br />
the arc, its way too hard to get a good<br />
line that way. If you run into oncoming<br />
grain (you’ll hear the telltale snapping<br />
sound) turn around and come from the<br />
other direction and meet the first part<br />
<strong>of</strong> the cut.<br />
This is the basic flower that I start<br />
with – common on Rococo architectural<br />
carving. <strong>The</strong>re are many variations<br />
on this theme that you can play with<br />
once you feel relaxed about carving<br />
the basic form. You can cut notches in<br />
the petals (photo 10), vein the whole<br />
petal (photo 11) or point the flower in<br />
a direction by shaping some petals with<br />
high outside edges and some with low<br />
ones. <strong>The</strong> treatment <strong>of</strong> the centers can<br />
vary also (photo 12).<br />
<strong>The</strong> best thing to do is find examples<br />
to look at when you’re carving. Ince<br />
and Mayhews has a few examples, and<br />
is available from Dover Books. Many<br />
Rococo carved mirrors or mantels<br />
contain flowers that will give you ideas<br />
you can use. Anything by Grinling<br />
Gibbons will either inspire you to<br />
greatness or scare you out <strong>of</strong> carving<br />
altogether. Most importantly, just<br />
be brave and don’t count on keeping<br />
everything you do. Glue down twelve<br />
blanks and plan on getting warmed up<br />
at about number eight! Repetition may<br />
be the devil to cabinetmakers, but it’s<br />
the mother <strong>of</strong> all carvers.
1<br />
4<br />
7<br />
10<br />
2<br />
5<br />
8<br />
11 12<br />
<strong>The</strong> <strong>Guild</strong> <strong>of</strong> <strong>New</strong> <strong>Hampshire</strong> <strong>Woodworkers</strong><br />
3<br />
6<br />
9<br />
19
at the lathe by John Siegel<br />
Duplication<br />
I met Matthew Burak twenty years ago.<br />
He was making custom furniture in<br />
Vermont and was frustrated by the fact<br />
that the turned legs <strong>of</strong>fered in catalogs<br />
were poorly designed.<br />
After we started making legs from his<br />
designs, he got the idea that there was<br />
room in the marketplace for a company<br />
that could supply well designed legs in<br />
small quantities for furniture makers<br />
who did not have the ability to turn their<br />
own. For a few years, I made a variety <strong>of</strong><br />
20 <strong>The</strong> <strong>Guild</strong> <strong>of</strong> <strong>New</strong> <strong>Hampshire</strong> <strong>Woodworkers</strong><br />
legs for Matt, usually in quantities <strong>of</strong> 40<br />
or more. Inevitably, Matt moved on to<br />
more mechanized production, and today<br />
Classic Designs by Matthew Burak has<br />
30 employees and sells millions <strong>of</strong> dollars<br />
<strong>of</strong> legs each year. For me it was a period<br />
when I honed my skills at duplication,<br />
and what I learned has served me well<br />
in my spindle turning career.<br />
In my classes, by far the most<br />
frequently asked question is, “How do<br />
I make four legs that look alike?” And<br />
the short answer is, “Make more than<br />
Centering Jig – Slide the work into the pin four times, making 1/4 turn each time.<br />
1<br />
four, and use the four that look the<br />
most alike.” This is good advice for a<br />
beginner who needs the practice. A set<br />
<strong>of</strong> legs is definitely a milestone in the<br />
beginner’s repertoire, especially anyone<br />
interested in furniture, yet none <strong>of</strong> the<br />
woodturning books in my library have a<br />
section on duplication.<br />
Before the turning can start, there<br />
are some marking jigs you can set up on<br />
your bench that speed things along and<br />
help avoid mistakes. <strong>The</strong>se jigs take time<br />
to set up, but pay <strong>of</strong>f on jobs <strong>of</strong> a dozen<br />
or more pieces.<br />
<strong>The</strong> centering jig is shown in photo 1.<br />
Slide the work along the bench and fence<br />
and into the pin four times, rotating the<br />
work a quarter turn each time. A wedge<br />
under the pin block makes it easy to<br />
adjust for different stock sizes. <strong>The</strong> pin<br />
is actually a wood screw with its head<br />
sawn <strong>of</strong>f and filed or ground to a point.<br />
Mark the location <strong>of</strong> transition<br />
cuts with another bench mounted jig<br />
– photo 2. <strong>The</strong> handscrews themselves<br />
become the marking guide. Use a s<strong>of</strong>t<br />
pencil, but sharpen it regularly to avoid<br />
the error caused by a rounded point.<br />
After the pieces are centered and<br />
marked they are still not ready for the<br />
lathe. Now is the time to put the final<br />
finish on the square parts (pommels),<br />
because it is difficult to plane, scrape,<br />
or sand these surfaces later without<br />
damaging the turning. <strong>The</strong> transition<br />
marks show us where to work. After<br />
this step, the transition marks are all but<br />
gone. No problem, we have our jig to<br />
mark them again. This system may seem<br />
inefficient because it requires marking<br />
twice, but after much experimentation, I<br />
have found it is still the best way.<br />
<strong>The</strong>re are methods you may use for<br />
repetition work that you would not<br />
use for a short run, and mostly this<br />
involves setting up jigs. Perhaps more<br />
importantly, there is a momentum and
2<br />
Transition Points Marking Jig – <strong>The</strong><br />
turning square is slightly thinner than the<br />
fence so it slips easily under the handscrews,<br />
which act as marking guides.<br />
muscle memory that kicks in after about<br />
six or eight pieces, and you may never<br />
experience this if you are only making<br />
four. In any event, success depends on a<br />
combination <strong>of</strong> taking measurements in<br />
a few critical places, then depending on<br />
your powers <strong>of</strong> observation.<br />
Learning how to visualize curves<br />
was covered in a previous article on the<br />
“S-curve”, and if you recall it involves<br />
paying attention to inflection point<br />
locations and end point angles. <strong>The</strong><br />
inflection point is where the curve<br />
changes from convex to concave and the<br />
end point angle is simply the angle <strong>of</strong> a<br />
line tangent to the curve at it’s end point.<br />
Work in Short Steps<br />
If there is one single piece <strong>of</strong> advice<br />
I can give you for successful duplication,<br />
it is to break up the job into many short<br />
operations. Do the first step, remove<br />
the workpiece and replace it with the<br />
next one. Working in this way there are<br />
fewer operations to memorize, fewer<br />
chisels out at one time, fewer calipers to<br />
use (reducing the chance <strong>of</strong> taking the<br />
wrong one and making an error), fewer<br />
changes <strong>of</strong> the tool rest and/or steady<br />
rest (one time for each step) and quicker<br />
development <strong>of</strong> “muscle memory”.<br />
I see many people who hesitate to<br />
remove the workpiece in progress from<br />
the lathe, because they fear that they<br />
will never get it back in the center again.<br />
This causes them to attempt to turn the<br />
entire piece from start to finish in one<br />
step, which is definitely the hard way.<br />
This procedural error is brought about<br />
by faulty lathe centers.<br />
Repeatability<br />
When machinists speak <strong>of</strong><br />
repeatability, they mean the ability to<br />
remove a workpiece or tool from a<br />
chuck, vise, collet, or jig, and replace<br />
it, or an identical part, in exactly the<br />
same location again. This concept is <strong>of</strong><br />
the utmost importance in the machine<br />
shop where making precision multiple<br />
parts is so <strong>of</strong>ten at hand. We can learn<br />
from these principles even for our wood<br />
lathe projects when we embark on the<br />
production <strong>of</strong> multiples. In this case the<br />
workholding jig is simply the pair <strong>of</strong><br />
opposing lathe centers.<br />
While working in short steps, it may<br />
be necessary to remove and replace the<br />
workpiece five or more times in the<br />
process. Of course this requires that<br />
your centers be well tuned. It should<br />
be possible to remove, replace, or turn<br />
end-for-end an infinite number <strong>of</strong><br />
times and have the workpiece return to<br />
the exact center every time without fuss<br />
and without fail. With a spring center<br />
point, it is possible to do this without<br />
stopping the spindle. But whatever<br />
kind <strong>of</strong> centers you have, you must be<br />
able to get “repeatability” or relocation<br />
<strong>of</strong> concentricity every time the work<br />
is removed and replaced. If you do not<br />
have this, then you are operating at a<br />
great disadvantage, and you should fix<br />
your centers.<br />
<strong>The</strong> only exceptions to the “working<br />
in steps” method is with very heavy<br />
workpieces, such as porch posts, or<br />
hollow columns where a single set <strong>of</strong><br />
end plugs are used.<br />
3<br />
Planning Steps to Minimize Vibration<br />
Working in steps does not mean you<br />
should start at one end and work toward<br />
the other. Very <strong>of</strong>ten you need to start<br />
in the middle. In most furniture work,<br />
workpiece vibration is a problem. A<br />
steady rest is frequently necessary, and<br />
this will be covered in the next article.<br />
Regardless <strong>of</strong> the steady rest, if there<br />
are details near the middle, start there,<br />
because this is where the amplitude <strong>of</strong><br />
workpiece vibration will be the greatest.<br />
Leave the foot for last, because you will<br />
not experience much vibration in that<br />
area.<br />
If you only have four legs to make you<br />
can mark out directly from the drawing<br />
as shown in my last article (Drafting for<br />
Woodturning). If you have a dozen or<br />
more, I suggest you use a marking stick.<br />
This has notches in the edge to locate the<br />
pencil for quick and accurate marking <strong>of</strong><br />
the work in motion – photo 3. Make the<br />
notches with a triangular file.<br />
You should decide how many steps the<br />
job requires. Here are some guidelines.<br />
It is practical to make transition cuts,<br />
rough out and marking in a single step.<br />
This step requires two chisels (skew<br />
and spindle roughing gouge), a pencil<br />
and marking stick. Next proceed to the<br />
groups <strong>of</strong> details, and these require two<br />
or three steps on average. During each<br />
<strong>of</strong> these steps you would commonly<br />
have two or three chisels, and one or two<br />
calipers.<br />
As you approach each group <strong>of</strong><br />
details, you will have two or three lines<br />
to make starting cuts. Simply cut in on<br />
Marking after Rough Out – Hold the marking stick against the rotating work, and use a<br />
pencil in each <strong>of</strong> the notches.<br />
<strong>The</strong> <strong>Guild</strong> <strong>of</strong> <strong>New</strong> <strong>Hampshire</strong> <strong>Woodworkers</strong><br />
21
4 5<br />
Calipers – Hold the parting tool in one hand and the calipers in the<br />
other. Be prepared to stop as soon as the calipers fall through.<br />
these lines with a parting tool, or make<br />
a vee cut with a skew chisel, and the<br />
axial measurements are thus established.<br />
Usually these are made with a parting<br />
tool, because you can slide the caliper<br />
in the parting tool slot while the cut is<br />
being made. This is an essential skill to<br />
have. It requires holding the parting tool<br />
in one hand, and the caliper in the other<br />
– photo 4. It is much harder to measure<br />
the diameter <strong>of</strong> a vee cut, and should not<br />
be attempted while the work is rotating,<br />
as the calipers may catch. Calipers for<br />
measuring the diameter <strong>of</strong> a vee have<br />
the tips ground to a narrow edge, but<br />
not quite to a sharp point – photo 5.<br />
Duplication requires the<br />
establishment <strong>of</strong> certain points in the<br />
correct measured location. After that,<br />
you simply “connect the dots”. <strong>The</strong>re are<br />
many variations <strong>of</strong> this method, but in<br />
general I think you will find that you do<br />
22 <strong>The</strong> <strong>Guild</strong> <strong>of</strong> <strong>New</strong> <strong>Hampshire</strong> <strong>Woodworkers</strong><br />
not need very many measured points to<br />
achieve consistency. <strong>The</strong> most important<br />
diameter is at the bottom <strong>of</strong> the coves,<br />
because variations here are noticeable<br />
even at a distance.<br />
Another FAQ is, “Do you use<br />
templates?” I only use templates in two<br />
situations: straight lines (for cylinders<br />
and cones) and circles (for balls). I think<br />
it’s pretty simple to use a straight edge,<br />
usually wood, to assist in making a<br />
straight line. I find this method works<br />
well on every scale, from porch columns<br />
to pool cues. Making and using ball<br />
templates is worthy <strong>of</strong> a separate article.<br />
After the turning is complete,<br />
sanding is the final step. Remove the<br />
tool rest with its base, and the steady<br />
rest completely <strong>of</strong>f the lathe bed, so they<br />
will not interfere with your hands, nor<br />
do you want sanding grit in any <strong>of</strong> that<br />
mechanism.<br />
Vee-Calipers – Special calipers have tips shaped to measure a vee.<br />
Mahogany Ball Finials – 28” high furlong markers for Belmont Park race track<br />
(Belmont Stakes) received gold leaf.
underneath. One <strong>of</strong> the best examples <strong>of</strong><br />
this category is the knuckle hinge joint.<br />
<strong>The</strong> knuckle hinge joint is most <strong>of</strong>ten<br />
used on small to medium sized tables to<br />
hinge a support, or swing leg, under a<br />
drop leaf. It can be made with flat square<br />
intersecting ends, like a moving finger<br />
joint. Or, as in the example we show<br />
here, it can be made more refined with a<br />
rounded barrel.<br />
<strong>The</strong> recent commission <strong>of</strong> a Pembroke<br />
style table presented an opportunity to<br />
revisit this clever mechanical wood joint.<br />
<strong>The</strong> process <strong>of</strong> making one breaks down<br />
into a simplified step by step process.<br />
For a Pembroke table like this one, the<br />
by Tom McLaughlin<br />
and Levi Lucks – demonstrating craftsman<br />
making the<br />
<strong>Knuckle</strong> <strong>Hinge</strong> <strong>Joint</strong><br />
Great joinery can mean the<br />
difference between a piece <strong>of</strong><br />
furniture lasting for hundreds <strong>of</strong> years or<br />
just a few. Some is internal, completely<br />
concealed or “blind”, its integrity<br />
known only to the maker. While other<br />
exposed joinery types, break through<br />
to the surface in some way. At its best,<br />
exposed joinery is the fingerprint <strong>of</strong><br />
fine craftsmanship. It moves beyond its<br />
structural intent, adding a decorative<br />
effect and reassuring beauty.<br />
My favorite kind <strong>of</strong> joinery is not<br />
the showiest, but the type you happen<br />
to discover using a piece <strong>of</strong> furniture, or<br />
when crawling around the floor looking<br />
2 3 4<br />
side rails, usually justified to the outside<br />
surface <strong>of</strong> the leg, are instead set to the<br />
inside <strong>of</strong> the leg. This leaves the necessary<br />
cavity into which the swing support will<br />
1<br />
<strong>The</strong> <strong>Guild</strong> <strong>of</strong> <strong>New</strong> <strong>Hampshire</strong> <strong>Woodworkers</strong><br />
23
5 6<br />
be fit. For a table like this, it is good to<br />
plan for the swing support material to<br />
be approximately 1˝ thick, and not less<br />
than 7/8˝.<br />
<strong>The</strong> first step is to prepare and size<br />
the material to be hinged, leaving the<br />
pieces an inch or two long, to be cut<br />
to fit into the recessed sides after the<br />
hinged joint is made. <strong>The</strong>n you will<br />
need to accurately square both ends to<br />
be joined (1).<br />
<strong>The</strong> next step is to mark on the top<br />
and bottom <strong>of</strong> both pieces intersecting<br />
ends, 45 degree, crossing lines. <strong>The</strong>n<br />
using a compass at the intersection<br />
draw a circle <strong>of</strong> diameter equal to the<br />
material thickness (2). Marking well is<br />
key. Remember, there is no mystery to<br />
executing superb joinery. You can learn<br />
rather quickly how to cut cleanly to a<br />
line. But if your lines are bad, it doesn’t<br />
matter if you are the Samurai master <strong>of</strong><br />
sawing and paring, the joint will never<br />
fit. Great joinery begins with accurate<br />
marking.<br />
24 <strong>The</strong> <strong>Guild</strong> <strong>of</strong> <strong>New</strong> <strong>Hampshire</strong> <strong>Woodworkers</strong><br />
Next, using the table saw tilted to 45<br />
degrees, make a small notch cut precisely<br />
to the diagonal line on the inside <strong>of</strong> the<br />
marked cylindrical barrel. Don’t worry<br />
about getting the depth perfect. It is<br />
best to be a little bit shy, or short. You<br />
can quickly clean it up with hand tools<br />
later (3). This cut defines where the<br />
swing support will stop when extended.<br />
In this way, the two 45 degree cuts will<br />
mate to stop the swing out at 90 degrees<br />
to the drop leaf it supports.<br />
Note, to insure accuracy without<br />
risking screwing up the cut on your<br />
good pieces, always prepare and use an<br />
identically sized and marked scrap piece<br />
to set-up and pre-test your cuts. This is<br />
something you never see Norm Abrams<br />
do, but trust me, when setting up, he and<br />
his assistants are using test pieces.<br />
With the saw still tilted at 45 degrees,<br />
cut the waste on the outer end <strong>of</strong> the<br />
cylinder to create an octagonal form.<br />
Now the rounded barrel can be shaped<br />
using a well-tuned hand plane, taking<br />
7 8 9<br />
care to use the guidelines and planing<br />
in from the ends (4). <strong>The</strong> inside <strong>of</strong> the<br />
barrel can be more easily shaped using<br />
a shoulder plane (5). Once planed to<br />
shape, the cylinder is fine tuned by<br />
sanding, using a coved sanding block<br />
with the matching concave radius (6)<br />
.Dividing the cylinder into five equal<br />
parts, a marking gauge is used to crisply<br />
mark the division points <strong>of</strong> the knuckles<br />
on both ends (7). <strong>The</strong>n using a pencil<br />
or pen, scribble on the sections to be<br />
removed on each <strong>of</strong> the mating end (8).<br />
Note that the hinged end to be fixed to<br />
the table will have three full knuckles,<br />
while the swing support will have the<br />
corresponding three spaces removed.<br />
If you are confident with a dovetail<br />
saw, saw right to the marking gauge<br />
knife line, taking care to saw on the<br />
waste, or scribbled side <strong>of</strong> the line (9).<br />
However if you prefer, you can saw just<br />
shy <strong>of</strong> the line and use a sharp chisel to<br />
pare right to it. Use the actual marking<br />
gauge line to set the chisel to insure the
10 11 12<br />
greatest accuracy. Rough out the rest <strong>of</strong><br />
the material between the knuckles using<br />
the band saw or other means, and then<br />
chisel between the knuckles to allow<br />
the outer radius <strong>of</strong> the corresponding<br />
knuckle to seat fully (10). <strong>The</strong> radius on<br />
the ends will also need to be cleaned out<br />
using a gouge chisel with the conforming<br />
curve or sweep (11).<br />
Once fitted up so that the ends seat<br />
fully and firmly, you are ready to drill for<br />
the hinge pin. Be sure your drill press<br />
is set up accurately to bore a true 90<br />
degree hole centered in the thickness <strong>of</strong><br />
the stock. Here again, a scrap test piece<br />
is your best friend. Test your drill press<br />
by boring, using a spur bit, a little more<br />
than half way in from both ends, and<br />
then try fitting the hinge pin.<br />
A 3/16˝ diameter brass, steel, or<br />
13<br />
welding rod makes a good hinge pin.<br />
An auxiliary fence attached to your drill<br />
press, the same height as the hinge parts,<br />
adds greater stability and precision.<br />
Adjust the drill press as needed until the<br />
hinge pin fits firmly without much force,<br />
indicating the hole is properly aligned.<br />
Now clamp the assembled ends against<br />
the auxiliary fence and drill on your<br />
center marks, a little more than halfway<br />
from each side (12).<br />
After the hinge pin is fit, a little<br />
tweaking may be necessary to get<br />
the joint to operate properly without<br />
binding. Look for the burnished areas<br />
on the knuckles. <strong>The</strong>se indicate where<br />
you may need to adjust by chiseling or<br />
filing. It is a good idea to cut the hinge<br />
pins about an inch longer than necessary<br />
so that it is easy to tap out and remove<br />
during the fitting stage. When ready for<br />
final assembly, you can then cut the pin<br />
to the final length and hammer flare the<br />
top end slightly to keep the pin from<br />
falling through over time.<br />
All that remains is cutting the fixed<br />
pieces to length, fitting and gluing into<br />
the recessed areas on the sides <strong>of</strong> the<br />
table. <strong>The</strong>n comes the creative phase<br />
where you will shape and sculpt the<br />
swing support, and complimentary fixed<br />
piece on the apron. Do as much <strong>of</strong> this<br />
custom shaping before you glue in the<br />
fixed portion. You will want to shape<br />
both parts in such a way that <strong>of</strong>fers a<br />
comfortable and attractive finger pull<br />
recess (13).<br />
<strong>The</strong> last step is to sit back and enjoy,<br />
and wait for someone to discover your<br />
fingerprints.<br />
<strong>The</strong> <strong>Guild</strong> <strong>of</strong> <strong>New</strong> <strong>Hampshire</strong> <strong>Woodworkers</strong><br />
25
Butt <strong>Hinge</strong><br />
Mortising Jig<br />
Here is a question for<br />
you to mull over –<br />
how long does it take you to<br />
route, chisel and install butt<br />
hinges in a cabinet door? If<br />
the answer to this question<br />
or the thought <strong>of</strong> this type <strong>of</strong><br />
operation puts you in a sour<br />
mood, please read on.<br />
I have been using a<br />
very simple system to<br />
make routing mortises for<br />
butt hinges very fast and<br />
incredibly accurate. As with<br />
most woodworking projects,<br />
a jig is the key to my system.<br />
On a kitchen I did last year,<br />
I had to mortise in about<br />
thirty pairs <strong>of</strong> butt hinges.<br />
Just the other week I did<br />
four pairs and it took under<br />
an hour to completely install<br />
26 <strong>The</strong> <strong>Guild</strong> <strong>of</strong> <strong>New</strong> <strong>Hampshire</strong> <strong>Woodworkers</strong><br />
by Chris Kovacs<br />
the hinges in the doors and<br />
cabinet frames.<br />
Once you have your<br />
hinges, you can build your<br />
jig. To start, rip a couple <strong>of</strong> 3˝<br />
wide strips <strong>of</strong> half inch MDF.<br />
I prefer to use Merit brass<br />
hinges (www.meritmetal.com).<br />
<strong>The</strong>y are extremely nice<br />
components with machined<br />
pins and your choice <strong>of</strong> tips<br />
on the ends.<br />
Cross-cut the MDF to fit<br />
exactly into the door opening<br />
<strong>of</strong> your cabinet, not just close,<br />
but a snug fit. At the table<br />
saw, use the miter fence,<br />
dado set and stop blocks to<br />
cut out the slots in the MDF<br />
that match your hinges. In<br />
the case <strong>of</strong> the jig shown, the<br />
hinge leaves were 3/4˝ x 21/2˝.<br />
<strong>The</strong> blade was raised to 3/4˝<br />
and stop blocks were set up<br />
so the hinge would be 3˝<br />
from the top and 3˝ from<br />
the bottom <strong>of</strong> the cabinet<br />
opening.<br />
In this example, the stop<br />
block is set such that the<br />
first cut is 3˝ plus the hinge<br />
length. Flip the board end<br />
for end and make the same<br />
cut on the other end <strong>of</strong> the<br />
MDF. Do this for both<br />
pieces <strong>of</strong> MDF. Once you<br />
have made all four first cuts,<br />
move the stop block away<br />
from the blade and make<br />
cut 2 as shown. I usually aim<br />
for being about 1/32˝ less than<br />
the length <strong>of</strong> my hinge. Now<br />
just nibble away the material<br />
between the cuts. Do this<br />
on both end <strong>of</strong> each piece <strong>of</strong><br />
MDF. Make sure the cut-out<br />
is nice and smooth because a<br />
pattern routing bit is going<br />
to be following your cut.<br />
Before gluing the two<br />
pieces <strong>of</strong> MDF together,<br />
clamp one <strong>of</strong> them to a<br />
scrap piece and set up your<br />
router with a 1/2˝ diameter<br />
top bearing pattern bit. This<br />
same procedure can be done<br />
using your router’s bushing<br />
set with a straight cutting<br />
bit and adjusting the length<br />
and width <strong>of</strong> your cutout to<br />
accommodate the bushing. I<br />
prefer a flush trim router bit.<br />
Set the depth <strong>of</strong> the bit.<br />
In this case it is going to
e about 5/8˝ (1/2˝ for MDF plus<br />
1/8˝ thick hinge leaf ). Make a test<br />
cut and check the depth. Get the<br />
depth right and make another test<br />
cut clearing all <strong>of</strong> the material away.<br />
You should be left with a nice clean<br />
mortise that has rounded corner.<br />
Break out your nicely sharpened<br />
chisel and square these corners.<br />
Check the fit. If anything, it<br />
should be too snug. If it is too loose,<br />
you can add tape or veneer to your<br />
notches to make them slightly<br />
smaller. In the case <strong>of</strong> being a bit<br />
snug, nudge the stop block ever<br />
so slightly and widen the cutout<br />
and go back to the scrap and make<br />
another test mortise. If still too<br />
tight, nudge some more and test<br />
again. If you nudge too much and<br />
make the test mortise too loose, have no fear, remember, we<br />
have two pieces <strong>of</strong> MDF and only one needs to be perfect.<br />
Once you get the perfect fit, make the cuts on the second<br />
piece <strong>of</strong> MDF and label it as the good piece. <strong>The</strong> router is<br />
going to ride on this piece. Glue and staple the two MDF<br />
pieces together at right angles. Once the glue has set, clamp<br />
the MDF template to your cabinet side. It should fit perfectly.<br />
Route the two mortises, remove the jig and chisel them<br />
square. With that operation complete, fit the door to the<br />
opening with whatever gap you choose. Fitting the door now<br />
is critical because once the<br />
mortises are cut in the door,<br />
there is going to be no play<br />
up or down.<br />
To make the matching<br />
mortises in the door, clamp<br />
it into a vise and clamp the<br />
jig to the hinge side <strong>of</strong> the<br />
door. Use your fingers or a<br />
ruler, to center the jig along<br />
the door edge. It should<br />
overhang the door equally<br />
on both ends. Route and<br />
chisel clean the corners <strong>of</strong><br />
the mortises. At this point,<br />
the hinges will fit perfectly<br />
in the door and match<br />
perfectly to the ones in the<br />
cabinet. <strong>The</strong> same jig can be<br />
used for both left and right<br />
doors by simply flipping it<br />
over.<br />
As a last word, when<br />
driving in the screws, use<br />
a self-centering pilot bit.<br />
Skipping this part will lead<br />
to screws being <strong>of</strong>f center and the hinge being pulled out <strong>of</strong><br />
position. Also, if you are using nice solid brass screws, make<br />
sure to drive a similar sized steel screw first to pre-thread the<br />
hole. Drive the brass screw in after dabbing the tip in a little<br />
wax and using a screwdriver and not a drill. This last bit <strong>of</strong><br />
advise will keep you from stripping screws <strong>of</strong> damaging the<br />
coatings the s<strong>of</strong>t brass screws.<br />
Although my methods for building the jig requires a different<br />
jig for different door heights, it can be modified to work on<br />
different door heights. By using short lengths <strong>of</strong> MDF (about<br />
10˝) and making only one notch in each set, pairs <strong>of</strong> MDF jigs<br />
can be attached together with a length <strong>of</strong> scrap wood. This<br />
would allow you to lengthen or shorten the jig depending on<br />
the door opening height.<br />
<strong>The</strong> <strong>Guild</strong> <strong>of</strong> <strong>New</strong> <strong>Hampshire</strong> <strong>Woodworkers</strong><br />
27
Surface Texture<br />
This article is derived from an excellent workshop put on by Graham Priddle.<br />
Sometimes the object speaks for itself<br />
but sometimes a little decoration<br />
is in order. <strong>The</strong>re are several ways to<br />
decorate a bowl or other wooden object.<br />
This article deals with texturing the<br />
surface. Among the many ways to texture<br />
surfaces are carving and branding.<br />
Branding<br />
To brand an object, you need a brand<br />
and a heat source. Let’s start with the<br />
heat source. <strong>The</strong>re are a number <strong>of</strong><br />
commercial products out there and they<br />
do a good job but are fairly light weight.<br />
You can make your own source from a<br />
battery charger but please remember that<br />
you are playing with electricity and do so<br />
at your own risk. If you would like to<br />
proceed, you will need a battery charger<br />
28 <strong>The</strong> <strong>Guild</strong> <strong>of</strong> <strong>New</strong> <strong>Hampshire</strong> <strong>Woodworkers</strong><br />
(inexpensive and without any circuit<br />
boards) or that old one lying around the<br />
garage, a standard single pole dimmer<br />
switch, and a few wire nuts. You will also<br />
need a screwdriver to remove the case,<br />
wire cutters/stripers and something<br />
to alter the case to accept the dimmer<br />
switch. You need the dimmer switch to<br />
reduce the amperage and therefore the<br />
amount <strong>of</strong> heat produced by the charger.<br />
At full power it will melt your brand.<br />
Power Source<br />
First remove the cover and find the<br />
place you are going to put the dimmer.<br />
Either install it now or after you do the<br />
wiring.<br />
Find the power wire (black) coming<br />
in from the plug. Cut it and run the plug<br />
by Dave Frechette<br />
side into the dimmer switch and the<br />
other side out <strong>of</strong> the on/<strong>of</strong>f switch.<br />
<strong>The</strong>re also should be a heat controller<br />
module. This keeps the charger from<br />
overheating and burning down your<br />
house if left unattended. Disable this<br />
as shown in the photos. Obviously if<br />
this is disabled and you leave the unit<br />
unattended, it can now burn down the<br />
house. Take appropriate precautions<br />
when using it. If you have a metal case,<br />
you will need to ground the switch.<br />
Replace the charger cover. Cut <strong>of</strong>f<br />
the charging clips. I would leave a little<br />
wire on them so you can reattach them<br />
in the future if you would like to. Set the<br />
clips aside.<br />
You now have a controllable source<br />
<strong>of</strong> electricity to heat your branding iron<br />
but no iron (or in this case – nickel).<br />
Branding Wand<br />
To make the wand you will need an<br />
8˝ piece <strong>of</strong> PVC pipe (22 mm diameter)<br />
usually used as a conduit for electrical<br />
wire, a piece <strong>of</strong> wood about 3 to 4 inches<br />
long and a half inch square in section,<br />
four electrical connectors (Radio shack<br />
#274-667, barrier strip, European style)<br />
from which two have the plastic removed,<br />
two pieces <strong>of</strong> copper wire (10-12 gauge)<br />
each about an inch and a half long, a bolt<br />
and nut to attach one set <strong>of</strong> connectors<br />
to the wood and a brand made <strong>of</strong> nickle<br />
chromium wire (18 gauge or possibly<br />
20 – MSC 73226342). You will need a<br />
saw to cut the wood and pipe and a wire<br />
cutter/stripper to prepare the copper<br />
wire. Tools required, after the wood and<br />
pipe are cut include needle nose pliers<br />
and a small screw driver.<br />
Drill a hole about 1/4˝ away from the<br />
end <strong>of</strong> the wood. Bolt on the plastic<br />
enclosed connectors. Slide the pipe over<br />
the wires <strong>of</strong> the charger and strip the
Basic battery charger<br />
ends or the wires. Attach the wire to the<br />
connectors on the long side <strong>of</strong> the wood.<br />
Attach a piece <strong>of</strong> copper wire to each<br />
side <strong>of</strong> the connectors. Attach a nonplasticised<br />
piece <strong>of</strong> connector to each<br />
end <strong>of</strong> the wires. Attach the brand to<br />
the connectors. Shove the pipe onto the<br />
wood. You have a completed brander.<br />
Branding wand with nickel chromium wire brand<br />
Make a Brand<br />
To make a brand, cut a piece <strong>of</strong> nickle<br />
chromium wire to length and using your<br />
pliers, shape it. Remember electricity<br />
flows like water and tries to flow back to<br />
the source by the shortest route. If you<br />
have a complicated design and the wires<br />
touch, the electricity will flow through<br />
the touch and not heat the entire brand.<br />
You can fine tune the shape <strong>of</strong> the brand<br />
when it is heated.<br />
Using the Brand<br />
You will not need full power. When<br />
you turn up the dimmer switch, the<br />
brand should get red hot at about 8-12<br />
amps. That is all you need and if you<br />
keep going, you will melt the brand.<br />
Try the brand on scrap wood until you<br />
are comfortable with it. If you brand<br />
everywhere on a surface, you will not<br />
need to sand around it. If you are making<br />
a bowl, you can keep the pattern in a<br />
circular area and then do your sanding<br />
<strong>of</strong> the edges on the lathe.<br />
Disable the<br />
Heat Control Module<br />
Move wire from one post to the other<br />
Painting<br />
When you are done with the<br />
branding, lightly sand <strong>of</strong>f any fuzz you<br />
may have created. Using a black acrylic<br />
paint (available in art stores) and a tooth<br />
brush, work the color into all the crevices.<br />
After the paint is dry, sand anything that<br />
went over the side. Finish the article as<br />
you normally would.<br />
Rotary Carving – Another Approach<br />
Obviously, there are many ways to<br />
carve. This article will deal with rotary<br />
carving. Again, there are a number <strong>of</strong><br />
commercial tools available. I have been<br />
using a pneumatic pencil grinder (Sioux<br />
– $135 from MSC) and have been<br />
pleased with it.<br />
<strong>The</strong> only problem I had was that it<br />
came with a 1/8˝ collet and when I called<br />
<strong>The</strong> <strong>Guild</strong> <strong>of</strong> <strong>New</strong> <strong>Hampshire</strong> <strong>Woodworkers</strong><br />
29
to get a smaller one, I was told that there<br />
were no smaller ones available and that<br />
no other manufacturers would work.<br />
However, I took one from a Dremel and<br />
put it on and it works fine. <strong>The</strong> grinder<br />
has a high number <strong>of</strong> RPM (54,000 in<br />
my case) and is easy to hold and control.<br />
If you do not have air in your shop,<br />
you will need something else. Besides the<br />
rotary tool, you will need cutting tools.<br />
Small burrs are available from jewelry<br />
supply stores. If you are in the city, there<br />
may be a jewelry supply store you can<br />
walk into but if, like me, these are not<br />
readily available, you can order from the<br />
internet. I have used Rio Grande Supply<br />
(www.riogrande.com) with success but<br />
there are a number available.<br />
30 <strong>The</strong> <strong>Guild</strong> <strong>of</strong> <strong>New</strong> <strong>Hampshire</strong> <strong>Woodworkers</strong><br />
Because I seem to like round shapes,<br />
I got some round burrs and some cups.<br />
I use the burrs to make round holes<br />
(valleys) and the cups to leave round<br />
raised centers (hills).<br />
Again the key to success is to use all<br />
the area you have mapped out and then<br />
to paint it and sand the surrounding<br />
wood before applying the final finish.<br />
Hammer Gun<br />
You can also use a hammer gun with<br />
a blunt tool in it to dimple a surface. If<br />
Grinder bits<br />
you are going to do this, apply the finish<br />
first to make it less likely for the hammer<br />
to break the wood fibers.<br />
Pneumatic pencil grinder<br />
back on the lathe for sanding if needed.<br />
<strong>The</strong> bowl is reversed and the tenon<br />
removed. If I am going to decorate the<br />
bottom, this is done next followed by<br />
painting and returning the bowl to the<br />
lathe for any finish sanding. <strong>The</strong> entire<br />
bowl is then finished.<br />
October 11 th , 2008<br />
Hand Tools<br />
O n<br />
Saturday October 11, the new<br />
Hand Tools Group held its first<br />
meeting at Dave Anderson’s shop in<br />
Chester, NH. Thirteen members showed<br />
up for the inaugural meeting. <strong>The</strong> group<br />
has decided to meet five times per year<br />
on the second Saturday <strong>of</strong> the even<br />
numbered months. <strong>The</strong> exception will<br />
be August when the guild is occupied<br />
with the Sunapee Fair.<br />
Members decided that the most<br />
logical way to proceed for the future<br />
was to center each meeting around<br />
a particular tool or category <strong>of</strong> tools.<br />
Meetings will cover such things as the<br />
choice between new and used, how to<br />
Final Steps<br />
When turning and decorating a bowl,<br />
I will turn the outside and, if I am not<br />
going to decorate it, I will sand it. I then<br />
chuck up the bowl and turn the inside. I<br />
<strong>of</strong>ten will put a “V” edge around areas<br />
that I am going<br />
to decorate to<br />
make finish<br />
sanding easier.<br />
<strong>The</strong> bowl is<br />
then removed<br />
from the lathe<br />
and branded or<br />
carved and then<br />
painted. <strong>The</strong><br />
bowl then goes<br />
restore and tune the tool, maintenance,<br />
and sharpening, and techniques for using<br />
the tool. Members will be encouraged to<br />
bring problems, questions, tools which<br />
they need identified, or those which are<br />
giving them problems.<br />
At Saturday’s meeting, John<br />
Whiteside brought a box <strong>of</strong> assorted<br />
hand tools from the mid to latter part<br />
<strong>of</strong> the 19th century for identification.<br />
Included were both factory and user<br />
made tools such as an old woman’s tooth<br />
router, calipers, hollows and rounds, a<br />
side escapement rabbet plane, beading<br />
planes, and some complex molding<br />
planes.<br />
Impact hammer gun<br />
by Dave Anderson<br />
new subgroup holds first meeting<br />
For our December 13 meeting the<br />
topic will be scrapers, scraper planes,<br />
and the accessories and tools needed to<br />
sharpen and maintain them. Included<br />
will be a demonstration <strong>of</strong> several<br />
techniques for sharpening and rolling a<br />
burr and time for members to try their<br />
hand at preparing and testing their own<br />
tools. <strong>The</strong>re will also be a discussion <strong>of</strong><br />
what is available in the marketplace.<br />
<strong>The</strong> time and location <strong>of</strong> the meeting<br />
will be listed on the guild website and<br />
further information will be available<br />
from Dave Anderson.
Miter Sled … Again<br />
Some <strong>of</strong> you may remember this sled<br />
from the picture frame article a<br />
while back. A later issue talked about a<br />
jig on a jig. Well this jig has been evolving<br />
and improving. And now it’s a jig on a<br />
jig on a jig. <strong>The</strong> intent <strong>of</strong> this article is to<br />
entice you to evolve your jigs. If you find<br />
a shortcoming, as I had with this one, fix<br />
it. I used it joyfully for over a year but<br />
each time struggled with the stops for<br />
the pieces to be mitered. Clamping on<br />
other boards, temporary solutions, but<br />
good enough for now.<br />
Well, frustration and belief in a better<br />
life won out. It has morphed into a new<br />
state that, so far, has no need for further<br />
improvement. So a quick explanation <strong>of</strong><br />
the details in case you want to upgrade,<br />
or build your first one, or just see what<br />
evolutionary thoughts can do for you.<br />
<strong>The</strong> first incarnation doesn’t exist any<br />
more. <strong>The</strong>re was a 3/4˝ setback to manually<br />
clamp on a stop bar. That worked but was<br />
consistently inconvenient. By moving<br />
the face out flush and adding a T-track,<br />
the external clamps were eliminated.<br />
Back then, a T-track was clamped on.<br />
It’s permanently mounted in this one.<br />
by Bob Oswald<br />
Second problem was that the<br />
T-tracks stuck way out, four feet into<br />
the room on each side. A real challenge<br />
to store and difficult to keep from<br />
bending something. It was also grossly<br />
inconvenient for short frame pieces. So<br />
the upgrade that finally emerged through<br />
a lot <strong>of</strong> trail and error was an extension<br />
track riding on the track. In hindsight it<br />
seemed so obvious. But it took months<br />
for a solution to evolve. Holes were<br />
drilled in this rigid extension every<br />
three inches for adjustability options.<br />
This extension allows frame lengths over<br />
six feet. And yet it collapses to about a<br />
24˝ x 24˝ jig – much easier to store.<br />
And a final tip. This long extension<br />
would dangle unceremoniously when<br />
the locking knob was<br />
adjusted, tending to<br />
swivel itself to the floor<br />
at the unsupported end.<br />
So the extension slide<br />
was actually made with<br />
a raised center section<br />
that fits in the T-track<br />
groove and holds it<br />
aligned.<br />
Bolt holds T-track for easy change to a longer track<br />
Stops in short & long positions<br />
Track slides in holder T hardware sliding stop<br />
Do I do that<br />
many picture<br />
frames that all<br />
<strong>of</strong> this was necessary? Quite honestly, no.<br />
Although I did a custom eye glass frame<br />
set recently, three large structures that<br />
were basically picture frames. It really<br />
paid <strong>of</strong>f to have the right tools in place.<br />
And the need arises <strong>of</strong>ten enough that<br />
frustration eventually wins out.<br />
Even at a few uses a year, it was such<br />
a hassle to wrestle with the pieces that<br />
the time spent was worth it. Of course<br />
some part <strong>of</strong> this current solution<br />
was simply to make the point that<br />
sometimes it’s worth an evening to “just<br />
do the job right”. And after numerous<br />
continued on Page 38<br />
Shoulder stays aligned in T-track<br />
Extension arm<br />
<strong>The</strong> <strong>Guild</strong> <strong>of</strong> <strong>New</strong> <strong>Hampshire</strong> <strong>Woodworkers</strong><br />
31
Japanese Kokeshi Dolls<br />
September 27 th , 2008<br />
Granite State Woodturners<br />
meeting at Franklin High School in Franklin, NH<br />
<strong>The</strong> Granite State Woodturners met<br />
on September 27, 2008, at Franklin<br />
High School in Franklin, NH. <strong>The</strong>re<br />
were several business related items<br />
discussed, then a presentation on<br />
Japanese Kokeshi dolls.<br />
<strong>The</strong> first item was the upcoming<br />
turning symposium, which will be held<br />
at Pinkerton Academy on Saturday,<br />
May 23, 2009. <strong>The</strong>re will also be youth<br />
turning symposium at Pinkerton the<br />
day before, Friday, May 22, 2009.<br />
Peter Breu led the discussion. This<br />
included issues concerning the number<br />
<strong>of</strong> presenters, rotation coordination,<br />
and the trade show. Peter also raised<br />
several issues concerning the video<br />
taping <strong>of</strong> the different presentations.<br />
<strong>Guild</strong> library records indicate that<br />
these tapes are immensely popular with<br />
the membership, representing onequarter<br />
<strong>of</strong> the tapes borrowed from the<br />
collection each year. Taping this event<br />
is an area where assistance is certainly<br />
needed. Anyone willing to help out with<br />
video taping should contact Peter Breu.<br />
Jon Siegel addressed the idea <strong>of</strong><br />
hands-on workshops that would focus<br />
on various woodturning techniques. This<br />
would give members an opportunity to<br />
practice these techniques first hand. Jon<br />
32 <strong>The</strong> <strong>Guild</strong> <strong>of</strong> <strong>New</strong> <strong>Hampshire</strong> <strong>Woodworkers</strong><br />
is looking for input from members with<br />
regard to topics.<br />
With business matters out <strong>of</strong> the<br />
way, I gave a presentation on Japanese<br />
Kokeshi dolls, which are limbless<br />
wooden dolls turned on the lathe and<br />
then hand-painted. Before I describe<br />
the details <strong>of</strong> the Kokeshi dolls, however,<br />
let me first explain how it was that I<br />
came to be in Japan and discover these<br />
cultural artifacts.<br />
Shortly after World War II, the<br />
United States government established<br />
the Fulbright Foundation, a program<br />
designed to promote educational and<br />
cultural exchange between the United<br />
States and other countries. One country<br />
that has participated enthusiastically in<br />
the Fulbright program is Japan, sending<br />
hundreds <strong>of</strong> its citizens to the United<br />
States to study in our educational system<br />
and learn about our culture.<br />
About twelve years ago the<br />
Government <strong>of</strong> Japan decided to<br />
reciprocate and developed a program<br />
that would allow citizens <strong>of</strong> the United<br />
States to go to Japan and learn about its<br />
educational system, manufacturing and<br />
business sectors, and its culture. This<br />
was linked together with the Fulbright<br />
program here in the US, and thus the<br />
Japan Fulbright Memorial Foundation<br />
by Matt Siranian<br />
photos by<br />
Matt Siranian<br />
Lindsay Freese<br />
Kellina Fantozzie<br />
was created. Although it is linked with,<br />
and coordinated through the Fulbright<br />
Foundation, it is a separate entity and<br />
fully funded by the Government <strong>of</strong><br />
Japan. It is <strong>of</strong>fered to teachers and school<br />
administrators only.<br />
Each spring and fall, 160 teachers<br />
and administrators are selected to travel<br />
to Japan for three weeks. During that<br />
time, participants attend classes, lectures,<br />
and symposiums where they learn about<br />
the Japanese educational system, the<br />
economy, manufacturing, industry, social<br />
issues, history, health care, political<br />
issues, arts, and culture. <strong>The</strong>se sessions<br />
take place over a week in Tokyo.
After this first week, the 160<br />
participants are broken up into 10<br />
groups <strong>of</strong> 16 people each. Each small<br />
group then travels to a different part <strong>of</strong><br />
Japan and for the next 10 days lives in<br />
a smaller Japanese city and visits local<br />
government, universities, public schools,<br />
businesses and industries, local areas <strong>of</strong><br />
interest, and finally, each person spends<br />
2 days living with a Japanese host family.<br />
This is a total-immersion program in the<br />
life and ways <strong>of</strong> the Japanese.<br />
As a high-school industrial arts<br />
teacher, I went to Japan last spring, and<br />
after a week in Tokyo I traveled north<br />
to the Osaki prefecture, a county-type<br />
area located in one <strong>of</strong> the most seismic<br />
areas <strong>of</strong> Japan. <strong>The</strong> Osaki prefecture has<br />
a number <strong>of</strong> volcanic hot springs, where<br />
people go to soak in hot, mineral-rich<br />
baths that are naturally heated by the<br />
earth. It was in this area <strong>of</strong> volcanic hot<br />
springs that I discovered the Kokeshi<br />
doll.<br />
<strong>The</strong> Kokeshi doll was first made<br />
sometime during the Edo period, 1603-<br />
1867. <strong>The</strong>re are several stories about<br />
how it originated. One story says that<br />
it was created as an inexpensive toy for<br />
children, a less-expensive alternative to<br />
porcelain dolls. Another story indicates<br />
that they were made as a means <strong>of</strong><br />
remembering children who died or were<br />
sold away during periods <strong>of</strong> famine. <strong>The</strong><br />
word Kokeshi, as I learned, is made up<br />
<strong>of</strong> two words – ko, meaning child; and<br />
keshi, meaning erasing, or absent. <strong>The</strong><br />
Kokeshi doll served to memorialize the<br />
lost child, and to appease the spirits.<br />
Nevertheless, the dolls were eventually<br />
seen by tourists who had traveled to<br />
the region to bathe in the volcanic hot<br />
springs, and were purchased as souvenirs.<br />
<strong>The</strong>y became very popular and demand<br />
for them increased. Artisans would<br />
make them during the winter months<br />
when other types <strong>of</strong> work were scarce,<br />
stockpiling them for sale to tourists in<br />
the spring and fall, when visiting the hot<br />
springs was most popular.<br />
Whereas this was a regional artifact,<br />
the original dolls were similar in the way<br />
they were turned and decorated, yet there<br />
are some noticeable differences. As I was<br />
told, there were eleven original varieties,<br />
based on the area within the prefecture<br />
where it was made and the artisans who<br />
lived there. I visited a Kokeshi museum<br />
while I was in northern Japan, and<br />
although the antique dolls were similar,<br />
certain turning and painting techniques<br />
became apparent and the dolls definitely<br />
fell into their own sub groups. <strong>The</strong>se<br />
antique dolls are now coveted by<br />
collectors and are quite valuable.<br />
<strong>The</strong> dolls range in size from very<br />
small (less than 1 inch) to quite large<br />
(over 3 feet). <strong>The</strong>y are made from<br />
dogwood, Japanese maple, cherry, and<br />
pear, with the last two being the most<br />
expensive.<br />
<strong>The</strong> dolls are turned on small – or<br />
what we would consider mid-sized –<br />
lathes, with an unusual cone-shaped<br />
jamb chuck that the material is driven on<br />
to. <strong>The</strong> chuck is hollow, and sharpened<br />
to cut in to the material and hold it. It<br />
reminded me <strong>of</strong> the very end <strong>of</strong> an apple<br />
corer. <strong>The</strong>re is no tailstock. <strong>The</strong> entire<br />
piece is turned without any support or<br />
pressure on the tailing end. <strong>The</strong> lathes<br />
do not have a traditional tools rest,<br />
but rather, a sliding wooden rest that<br />
supports the turner’s arm. <strong>The</strong>re does<br />
not appear to be any speed adjustment.<br />
<strong>The</strong> turning tools are hand-made and do<br />
not resemble our turning tools at all.<br />
<strong>The</strong> dolls are usually turned in two<br />
<strong>The</strong> <strong>Guild</strong> <strong>of</strong> <strong>New</strong> <strong>Hampshire</strong> <strong>Woodworkers</strong><br />
33
pieces, with the head being made first.<br />
<strong>The</strong> head is turned with a small tenon, or<br />
ball protruding from the end. Once this<br />
tenon is sized the head is parted <strong>of</strong>f.<br />
<strong>The</strong>n the body <strong>of</strong> the<br />
doll is turned. Most are<br />
rather simplistic, although<br />
there are some modern<br />
variations. Again, the doll<br />
is turned without a tailstock,<br />
and as it is finished, a small<br />
mortise, or socket, is turned<br />
in to the end; this mortise<br />
is ball-shaped, growing<br />
larger as it goes deeper, to<br />
accommodate the tenon,<br />
or ball, protruding from<br />
the head. While the body<br />
is still spinning the turner<br />
tries to fit the ball on the<br />
head into the socket in the<br />
body. If it’s too tight, the<br />
turner opens the mortise<br />
slightly, then fits the head<br />
again. This may take several attempts,<br />
but when all seems right the turner<br />
holds the ball-shaped tip on the head<br />
firmly—and at an angle— against the<br />
socket-shaped mortise on the body until<br />
34 <strong>The</strong> <strong>Guild</strong> <strong>of</strong> <strong>New</strong> <strong>Hampshire</strong> <strong>Woodworkers</strong><br />
it begins to smoke, and in a second or<br />
two it actually pops in to the body with<br />
a remarkably tight fit. <strong>The</strong> head will turn,<br />
but it doesn’t wobble or teeter. It’s almost<br />
as if it were made from one piece.<br />
<strong>The</strong> dolls come <strong>of</strong>f the lathe as<br />
smooth as glass. <strong>The</strong> turner uses a<br />
scraper and therefore there is very little<br />
sanding. <strong>The</strong> dolls are then painted with<br />
Japanese ink. <strong>The</strong>re are several different<br />
styles <strong>of</strong> painting, again, reflecting the<br />
eleven original styles <strong>of</strong> dolls, although<br />
there are more modern approaches that<br />
reflect the anime genre.<br />
We are now making<br />
Kokeshi dolls in my wood<br />
working classes at Franklin<br />
High School, although at<br />
this point we’re making<br />
them in one piece. We are<br />
still trying to perfect the<br />
ball-and-socket joint. It’s<br />
not as easy as the wood<br />
turner in Japan made it<br />
look. We are working with<br />
the art teacher on the<br />
painting end <strong>of</strong> the project;<br />
that’s taking some practice,<br />
too. <strong>The</strong> Kokeshi doll is<br />
beguiling in its simplicity:<br />
<strong>The</strong>re is much more craft,<br />
technique, and history<br />
behind this simplistic little<br />
artifact than seems apparent.<br />
In closing I need to thank the Japanese<br />
Fulbright Memorial Foundation and<br />
the Government <strong>of</strong> Japan for the<br />
opportunity to travel to Japan, learn<br />
about the country,<br />
and meet many<br />
wonderful people. I<br />
need to also thank<br />
the Franklin School<br />
District for its support,<br />
and finally, the <strong>Guild</strong><br />
<strong>of</strong> <strong>New</strong> <strong>Hampshire</strong><br />
<strong>Woodworkers</strong> for<br />
helping me share my<br />
great fortune with<br />
others.
October 4 th , 2008<br />
by Alan Saffron<br />
Beginner & Intermediate Group<br />
meetings held at the Salmon Falls Mill in Rollingsford, NH<br />
<strong>The</strong> Beginner & Intermediate Group<br />
met October 4 at Bob LaCivita’s<br />
shop in Rollinsford. <strong>The</strong> group was<br />
honored to have a GNHW member<br />
from upstate <strong>New</strong> York. Being a local<br />
member <strong>of</strong> the Northeast <strong>Woodworkers</strong><br />
guild, <strong>The</strong> Old Saw impressed him<br />
enough to attend his first BIG meeting.<br />
Hanging the apple cabinet doors and<br />
finally closing the cabinet as the group’s<br />
topic was the only thing on the agenda.<br />
<strong>The</strong> doors curve gently across the<br />
front <strong>of</strong> the cabinet. To match the curve<br />
on the inside <strong>of</strong> the doors, Bob used both<br />
old and new technology. He planed some<br />
<strong>of</strong> the curve out using a 1746 wooden<br />
cove plane. Needing a more aggressive<br />
solution, he used a hand power plane to<br />
plane a shallow flat top to bottom, then<br />
used sanding discs to round the edges<br />
<strong>of</strong> the flat, and finished with a power<br />
sander to refine the curve.<br />
<strong>The</strong> doors were checked for fit, and<br />
uniform space around the edges. <strong>The</strong><br />
group nodded approvingly as only<br />
the edge <strong>of</strong> one door needed a little<br />
work – after all Bob made them. To<br />
accommodate expansion, he planed the<br />
center edges at a complimentary angle<br />
so they overlap and not show a space.<br />
We all watched very closely as Bob<br />
worked on the hinges. For good design,<br />
the hinges were spaced having the top<br />
hinge a bit closer to the top then the<br />
bottom hinge to the bottom, four and<br />
six inches respectively.<br />
Layout was done with a marking<br />
knife followed by penciling for accuracy<br />
and visibility and with two marking<br />
gauges to transfer marks from the doors<br />
to the cabinet.<br />
<strong>The</strong> key measurement was to allow<br />
for one half the thickness <strong>of</strong> the hinge<br />
barrel on the door and cabinet mortises.<br />
<strong>The</strong> mortises were cut using the marking<br />
knife and a sharp chisel, first on the<br />
doors, then the cabinet.<br />
To accurately drill the screw holes,<br />
Shop Apron by Caleb Dietrich<br />
Do you wear an apron around the shop? Why not?<br />
I was thinking I would write a blurb<br />
on my apron since it is my most used<br />
tool. I can’t get on with my work without<br />
it. If I do attempt to work without<br />
it, I’m liable to drop tools on the floor<br />
trying to holster them, or feel around<br />
my chest for a pencil that is not there. I<br />
take a little heat for it on job sites where<br />
framers ask me if I’m gonna bake them<br />
a cake. I either go with it, or send one<br />
back at them. Around the shop, I joke<br />
that I’m Clark Kent until I put it on.<br />
It keeps my clothes clean and keeps<br />
my most used tools at hand. I keep a<br />
12´ tape measure in the right pocket.<br />
You could go with a 16´, but I think the<br />
12´ Stanley is made better. It’s smaller<br />
and a 25´ is never far away. I keep a 6˝<br />
combination square in the left pocket,<br />
and a pencil, a 6˝ rule, and a permanent<br />
marker in the chest pockets. A crayon<br />
could replace the marker, but I use the<br />
marker for plywood edges.<br />
Most <strong>of</strong> the tools are self explanatory,<br />
but you might not have a full grasp<br />
on what you can accomplish with a 6˝<br />
Bob used a Vix bit, which does a nice job<br />
<strong>of</strong> centering the drill in the hinge screw<br />
holes. Final fit was done with a block<br />
plane. Lastly, Bob raised a small dent in<br />
the edge <strong>of</strong> one <strong>of</strong> the doors by wetting<br />
it, and heating it with a household iron.<br />
<strong>The</strong> dent did come out. Having that<br />
household iron in his shop, makes you<br />
wonder just how <strong>of</strong>ten Bob dings and<br />
dents his stock.<br />
At the next meeting on December<br />
6, the group is going to start a cabinet<br />
with multiple drawers, each having a<br />
different design and mounting. Bob<br />
will demonstrate the processes so<br />
that the group can make their own<br />
versions in their shops as we go. Just<br />
like being in school, you can ask the<br />
teacher for help on the problems you<br />
had doing your homework. <strong>The</strong> meeting<br />
will be in Rollinsford. Contact Bob at<br />
rlacivita@metrocast.net or 603-942-1240<br />
before 9:00 PM.<br />
rule. It is a utility<br />
knife for opening<br />
packages, a glue<br />
scraper for clearing<br />
half dried glue, and<br />
useful inside a rag<br />
for wiping stain or glue out <strong>of</strong> corners.<br />
So if you haven’t thought about<br />
the usefulness, I hope this helps. I just<br />
recommend that you get one with Xing<br />
shoulder straps. I’m on my second one.<br />
My first was modified to have Xing<br />
straps before Lee Valley came out with<br />
the second generation. It was sadly<br />
thrown away about a month after the<br />
hole in the pocket became bigger than<br />
my tape measure. I’m warming up to its<br />
replacement.<br />
<strong>The</strong> <strong>Guild</strong> <strong>of</strong> <strong>New</strong> <strong>Hampshire</strong> <strong>Woodworkers</strong><br />
35
Sept 20 th , 2008<br />
Annual <strong>Guild</strong> Meeting<br />
meeting held at Camp Lincoln in Kingston, NH Dave Frechette – Incoming President<br />
Hi to all. This is for all <strong>of</strong> you that<br />
did not make the Annual Meeting.<br />
We had a great place, a great time and<br />
great weather. Well a lot <strong>of</strong> us wished<br />
we had another sweater, but at least the<br />
sun was out.<br />
<strong>The</strong> turnout was a little lacking as we<br />
had 58 bidders vs 60 last year. But the<br />
real action was on the bidding. <strong>The</strong>re are<br />
three people laughing all the way to the<br />
bank as they got items at $1, then we<br />
had a high bid <strong>of</strong> $60 for a morse taper<br />
chuck which he or she is going to the<br />
lathe thinking <strong>of</strong> the money they saved.<br />
We led <strong>of</strong>f with the annual auction.<br />
Jon Siegel did not have to carry the<br />
Jon Siegel (right) conducts the annual auction<br />
36 <strong>The</strong> <strong>Guild</strong> <strong>of</strong> <strong>New</strong> <strong>Hampshire</strong> <strong>Woodworkers</strong><br />
by Syd Lorandeau<br />
whole load this year as Gary Bashian<br />
stepped it to finish up part we through.<br />
After the accountants totaled the<br />
auction, we made $889 which is a huge<br />
help to the scholarship fund. I do not<br />
want to be a beggar but just think how<br />
much good that stuff you do not use can<br />
help those that can not afford. All in all,<br />
the auction was another success.<br />
Next came the business meeting<br />
with more than a full agenda <strong>of</strong> items to<br />
discuss. <strong>The</strong> topic that took most <strong>of</strong> the<br />
time was discussion concerning raising<br />
the dues to $40 next membership year.<br />
<strong>The</strong>re were many points <strong>of</strong> view about<br />
<strong>The</strong> Old Saw and other expenses but in<br />
the end it came down to a vote and next<br />
year the dues will be $40 – not this year<br />
but the 2008/2009 membership year<br />
beginning next September.<br />
Election <strong>of</strong> <strong>of</strong>ficers took place.<br />
Incoming <strong>of</strong>ficers are Dave Frechette<br />
(President), Mike Noel (Vice President),<br />
Peter James (returning Treasurer) and<br />
Caleb Dietrich (returning Secretary).<br />
Our outgoing president Dave<br />
Anderson was presented with a Lie-<br />
Nielson plane very nicely engraved with<br />
the symbol <strong>of</strong> the <strong>Guild</strong>. One more<br />
“Thank you” Dave Anderson for a job well<br />
done.<br />
We broke for lunch right on schedule<br />
and was served a super meal that was<br />
photos by Jim Seroskie<br />
quite outstanding, as a matter <strong>of</strong> fact<br />
I am trying to find out when Camp<br />
Lincoln is serving again as I plan to go<br />
back.<br />
Garrett Hack gave his presentation<br />
in the afternoon. You can read about on<br />
the back cover.<br />
We received a number <strong>of</strong> dues as they<br />
are now due, if you have forgotten please<br />
send them in.<br />
Dave Frechette congratulates Dave Anderson<br />
for his two years <strong>of</strong> service as <strong>Guild</strong> President
ulletin board<br />
Discounted Woodworking Books<br />
– Last Chance<br />
<strong>The</strong> November <strong>Guild</strong> meeting will be<br />
the last opportunity to order discounted<br />
woodworking books until next Fall. If<br />
you would like to take advantage <strong>of</strong> a<br />
40% or higher discount through group<br />
sales, email your order to me or take a<br />
look at the catalogs from Taunton Press<br />
and Fox Chapel that I will bring to the<br />
November meeting.<br />
I will have catalogs and take<br />
orders at <strong>Guild</strong> meetings, or you<br />
can view titles on the publishers’<br />
web sites (www.taunton.com &<br />
www.foxchapelpublishing.com) and email<br />
your order to me.<br />
If you email your order, you must<br />
include the following in addition to your<br />
name and telephone number:<br />
• For Taunton: <strong>The</strong> exact title, author,<br />
type <strong>of</strong> item (hard or s<strong>of</strong>t cover book,<br />
video or DVD), the list price and the<br />
Taunton Product Code (NOT the<br />
ISBN #).<br />
• For Fox Chapel: <strong>The</strong> exact title, author,<br />
type <strong>of</strong> item (hard or s<strong>of</strong>t cover book,<br />
video or DVD), list price and the<br />
ISBN #.<br />
Books should be available in early<br />
December for pick up at my home in<br />
Mont Vernon, NH, or at a future guild<br />
meeting. Note that we do not mail books<br />
to member homes.<br />
All email orders will be acknowledged<br />
within one week. So if you do not get a<br />
response, please call me – I have vigorous<br />
anti-spam s<strong>of</strong>tware.<br />
I’ll email you with the net cost<br />
when the books arrive. Payment is due<br />
immediately and the books are not<br />
returnable. This gives us a premium<br />
discount. Happy hunting for some really<br />
good woodworking books.<br />
Discounted magazine subscriptions,<br />
also an annual event, takes place in the<br />
February time frame – watch for the<br />
next Old Saw for details.<br />
Tony Immorlica - Book Coordinator<br />
603-6763-9629 (evenings) or<br />
aaijr@comcast.net<br />
Beginner & Intermediate Group<br />
<strong>The</strong> next two BIG meetings will be held<br />
December 6, 2008 and February 7, 2009<br />
at 9:30 in my shop. <strong>The</strong> shop is located<br />
at <strong>The</strong> Salmon Falls Mill in Rollingsford,<br />
NH, studios 215 & 217. For directions<br />
go to www.millartists.com. Please let me<br />
know if you plan to attend.<br />
Robert LaCivita: rlacivita@metrocast.net or<br />
603-942-1240 please call before 9:00 pm<br />
Granite State Woodturners<br />
<strong>The</strong> Granite State Woodturners is<br />
both a subgroup <strong>of</strong> the <strong>Guild</strong>, and a<br />
chapter <strong>of</strong> the American Association<br />
<strong>of</strong> Woodturners. <strong>The</strong> group covers all<br />
aspects <strong>of</strong> turning, from the conventional<br />
spindle and bowl turning to segmented,<br />
ornamental, and other types <strong>of</strong> turning.<br />
Meetings typically include a<br />
presentation or demonstration, and a<br />
short business meeting. Once a year there<br />
is a design critique, and occasionally<br />
other meeting formats are used, like field<br />
trips or open shops. GSWT also puts on<br />
the <strong>New</strong> England Turning Symposium<br />
every three years.<br />
Meetings are the fourth Saturday <strong>of</strong><br />
odd numbered months, typically from<br />
9:00am to 1:00pm, and are open to the<br />
guild membership, AAW membership<br />
and the general public. Contact DJ<br />
Delorie to be added to the e-mail<br />
notification list.<br />
DJ Delorie: dj@delorie.com<br />
Granite State Woodcarvers<br />
This small group <strong>of</strong> dedicated<br />
woodcarvers meets Thursday nights at<br />
Rundlett Middle School in Concord,<br />
NH. Meetings are 6:00pm-9:00pm<br />
during the school year. For info or<br />
directions contact:<br />
Lou Barchey: 603-753-2708 or<br />
barchey@comcast.net<br />
Period Furniture<br />
<strong>The</strong> next Period Furniture Group<br />
meeting will be at Dave MacRae’s shop<br />
in Weare NH. <strong>The</strong> special guest speaker<br />
demonstrator will be NH Furniture<br />
Master Jere Osgood. Jere will be doing<br />
a presentation on furniture design,<br />
presenting a slide show that he has put<br />
together and also do a dry run demo<br />
on one <strong>of</strong> the joints he has used in his<br />
furnituremaking.<br />
After Jere is done with his<br />
presentation we would like to see what<br />
you the members are working on. If you<br />
are currently working on a project or<br />
have a finished item, bring it with you<br />
for a show and tell.<br />
We have to limit attendance to<br />
25. If you would like to attend you<br />
need to email me and I will send you<br />
a confirmation email. I will also send<br />
you the directions in that email. We also<br />
need a person to bring a slide projector<br />
as Jere’s is broken. Let me know if you<br />
have one to bring. If you would like to<br />
attend the meetings, please contact John<br />
Faro or Mike Noel to be added to the<br />
list.<br />
John Faro: 603-968-9800 or<br />
Jff960@metrocast.net<br />
Mike Noel: 603-744-3821 or<br />
mnlwoods@netzero.net<br />
Luthiers<br />
<strong>The</strong> <strong>Guild</strong> Luthiers is a special<br />
interest group focused on the making<br />
<strong>of</strong> stringed instruments. People <strong>of</strong> all<br />
levels <strong>of</strong> expertise are welcome to join.<br />
Ordinarily we meet on the 3rd Sunday <strong>of</strong><br />
September, November, January, March,<br />
and June.<br />
We also have started an annual table<br />
at the Sunapee Craftsman’s Fair, which<br />
has been very successful. In addition, we<br />
are affiliated with the <strong>New</strong> England<br />
Luthiers, a sister organization based in<br />
Massachusetts. Several times a year our<br />
meetings are held jointly with them.<br />
To receive meeting notifications,<br />
contact John Whiteside.<br />
John Whiteside: 603-679-5443 or<br />
johninfremont@comcast.net<br />
Hand Tools<br />
<strong>The</strong> <strong>Guild</strong> Hand Tools subgroup will<br />
meet five times per year on the second<br />
Saturday <strong>of</strong> the even numbered months.<br />
<strong>The</strong> exception will be August. Meetings<br />
are held at Dave Anderson’s shop in<br />
Chester, NH.<br />
Contact Dave for more information.<br />
Dave Anderson: 603-887-6267 or<br />
dsachester@gsinet.net<br />
<strong>The</strong> <strong>Guild</strong> <strong>of</strong> <strong>New</strong> <strong>Hampshire</strong> <strong>Woodworkers</strong><br />
37
Mi t e r e d sl e d – continued<br />
days trying to visualize the solution, the<br />
actual construction time for a complete<br />
new jig was about an hour. Hopefully this<br />
will give you some ideas for that jig you<br />
Tru-Cut LLC<br />
“Trust us with your good stuff”<br />
CNC Carbide Blade Sharpening<br />
Planers/Routers/Shapers/Drills<br />
Satisfaction Guaranteed<br />
10% Off to GNHW Members<br />
603-826-4131<br />
213 River Rd • Charlestown • NH<br />
Rich Burnett – Owner<br />
mtoolrepair@comcast.net<br />
603-622-0207 • www.tool-repair.com<br />
Complete Repair Service<br />
MANCHESTER TOOL REPAIR<br />
722 East Industrial Park Dr Unit 3 • Manchester, NH<br />
10% Discount When You Present Your Card<br />
MAINE COAST LUMBER, INC<br />
17 WHITE BIRCH LANE<br />
YORK, ME 03909<br />
(207) 363-7426 • (800) 899-1664<br />
HARDWOOD PLYWOODS - HARDWOOD LUMBER<br />
SOFTWOOD LUMBER - MELAMINE<br />
MARINE PLYWOODS<br />
EDGE BANDING - VENEER - MDO - MDF<br />
PARTICLE BOARD - CUSTOM MOULDINGS<br />
DOVETAILED DRAWERS - TARGET COATINGS<br />
www.mainecoastlumber.com<br />
All guild members receive a 10% discount<br />
Gary R. Wood & Co.<br />
Select Finishing Supplies<br />
Shellacs, waxes, stains,<br />
varnishes & tools for an elegant finish.<br />
Your questions are always welcome!<br />
24 Gristmill Hill Rd • Canaan, NH<br />
www.garyrwood.com 603-523-4337<br />
10% discount to <strong>Guild</strong> members<br />
CTW<br />
38 <strong>The</strong> <strong>Guild</strong> <strong>of</strong> <strong>New</strong> <strong>Hampshire</strong> <strong>Woodworkers</strong><br />
have been struggling with or haven’t even<br />
made yet.<br />
<strong>The</strong> latest and final incarceration is not<br />
show. It adds slots where the miter bars<br />
MINUTEMAN<br />
PRESS ®<br />
Printing by MinuteMan Press • 88 Main St, Nashua, NH • 603-883-4890<br />
Serving NH for Over 30 years<br />
Highest Level <strong>of</strong> Customer Service<br />
Quality Stationary & Powered Hand Tools<br />
10% Discount to <strong>Guild</strong> Members<br />
Except machinery, power tools & already discounted items<br />
<br />
<br />
10% Discount to <strong>Guild</strong> Members<br />
Dave Anderson<br />
dave@chestertoolworks.com<br />
C HESTER T OOL W ORKS LLC<br />
www.chestertoolworks.com<br />
<br />
<br />
603-887-6267<br />
146 Jennifer Drive • Chester, NH 03036<br />
Introductory level to advanced courses<br />
Specialty classes<br />
Three to one teacher ratio<br />
Choose from 3 hr/wk for 4 wk,<br />
2-day workshops or 5-day workshops<br />
10% Discount to <strong>Guild</strong> Members<br />
<br />
are attached. <strong>The</strong>y are then secured with<br />
bolts from the top so they can be easily<br />
adjusted, especially to fit different table<br />
saws.<br />
Discount to <strong>Guild</strong> Members<br />
1-888-TURNING<br />
<br />
Big Tree Tools, Inc.<br />
<strong>The</strong> Belt and Buff Sharpening System<br />
from Big Tree Tools, Inc. is not just for<br />
woodturners. <strong>The</strong> NEW MODEL includes the Versa-Jig for<br />
sharpening carving and cabinet chisels, as well as plane<br />
irons. Price to <strong>Guild</strong> members for complete system: $355.<br />
<br />
Hand-Made Guitars &<br />
Guitar-Making Lessons<br />
10% discount for GNHW Members<br />
email: johninfremont@comcast.net<br />
<strong>The</strong> Millwork Shop<br />
at Trumbull-Nelson Construction Co., Inc.<br />
Rt. 120 - Hanover, <strong>New</strong> <strong>Hampshire</strong><br />
Milling Services, Hardwoods & Plywoods<br />
Contact Mitch Ross – 603/643-3658<br />
Fax 603-643-2924 • nrcarey@t-n.com • www.t-n.com<br />
10% discount to GNHW Members<br />
®<br />
NAVIS<br />
PACK&SHIP CENTERS<br />
North Road Guitars<br />
234 North Road<br />
Fremont, NH 03044<br />
(603) 679-5443<br />
10% Discount to<br />
<strong>Guild</strong> Members<br />
Reliable No-Hassle Shipping Partner for Your<br />
Fine Furniture, Arts & Antiques<br />
One-Stop White Glove Packaging & Shipping<br />
In-State, Out-<strong>of</strong>-State & International Delivery<br />
Local Pickup & Warehousing<br />
25 yrs Experience Specializing in FLAV<br />
www.gonavis.com/nh1063 • 603-424-1035<br />
180 Locations in US – 5 Miles from Manchester Airport
Read Mike Dunbar’s Weekly Blog<br />
www.thewindsorinstitute.com<br />
e<br />
Windsor<br />
Institute<br />
10% Discount for Sack Back Class &<br />
Supplies Purchased During that Class<br />
44 Timber Swamp Rd • Hampton, NH 03842 • 603-929-9801<br />
ROCKLER ®<br />
WOODWORKING AND HARDWARE<br />
373 S Broadway (Rt 28)<br />
Salem, NH 03079<br />
603-898-5941<br />
2154 Massachusetts Ave<br />
Cambridge, MA 02140<br />
617-497-1136<br />
MILL OUTLET STORE • 10% DISCOUNT FOR GUILD MEMBERS<br />
Northern and Appalachian Hardwoods<br />
Ash • Basswood • Birch • Cherry • Maple • Mahogany • Oak • Poplar • Walnut<br />
4/4 - 16/4 Rough or Surfaced Kiln Dried Lumber<br />
Fixed and Special widths • FSC-certified wood from well-managed forests<br />
visit www.northlandforest.com for stocking info<br />
36 Depot Road,Kingston,NH • 603.642.8275<br />
45 Goslin Rd<br />
<strong>New</strong>ington, NH 03801<br />
800-234-3818<br />
10% Discount<br />
to <strong>Guild</strong> Members<br />
29 Andover St<br />
Danvers, MA 01923<br />
978-774-0241<br />
Class schedules on rockler.com • Instructor inquires welcome www.westerntool.com • 603-627-4957<br />
Sawmill & Lumber<br />
10% discount to members!<br />
603-798-5135<br />
www.goosebaylumber.com<br />
83 Dover Rd (US Route 4)<br />
Chichester, <strong>New</strong> <strong>Hampshire</strong><br />
(10 Minutes from I-93 Concord • Take exit 15 east)<br />
Specializing in Bird’s Eye & Curly Maple<br />
Green & Kiln Dried Bowl Blanks & Turning Squares<br />
Rare & Hard to Find Domestic & Imported Hardwoods<br />
10% discount for <strong>Guild</strong> members<br />
313 Montvale Ave<br />
Woburn, MA 01801<br />
781-935-6414<br />
Except machinery, power tools & already discounted items<br />
10% Discount on Stock Items to <strong>Guild</strong> Members<br />
– HARDWOOD DISTRIBUTION CENTER –<br />
Route 125 • Brentwood, NH<br />
P.O. BOX 426, KINGSTON, NH 03848<br />
TEL 1-800-442-1812 • 603-679-1230 • FAX 603-679-1960<br />
e<br />
Contractor’s<br />
Choice! <br />
<strong>The</strong> Wood Finishing School<br />
978-363-2638<br />
www.patinarestoration.net<br />
Learn wood finishing<br />
individually or as part <strong>of</strong> a group<br />
Twenty-seven years experience<br />
10% Discount for <strong>Guild</strong> Members<br />
Teaching & Class Instruction Only<br />
Bruce Hamilton Antique Restoration<br />
Williams & Hussey Machine Co., Inc.<br />
Straight, Round, and Elliptical<br />
Molding<br />
Simple, Easy, Safe<br />
Quality Construction<br />
Seven Year Warranty<br />
MADE IN THE USA<br />
10% Discount to GNHW Members<br />
Tim Corcoran<br />
Store Manager<br />
10% Discount<br />
to <strong>Guild</strong> Members<br />
on Non-Powered Tools<br />
Manchester, NH store only<br />
Low Prices – Guaranteed<br />
100 Cahill Ave • Manchester, NH<br />
Off South Willow St. in front <strong>of</strong> Home Depot<br />
<strong>The</strong> Breed School<br />
American 18th Century Furniture<br />
By Hand<br />
13 Liberty Street, South Berwick, ME 03908<br />
15% Discount to GNHW Members!<br />
www.allanbreed.com • 603-749-6231<br />
email: breeds@comcast.net<br />
OFFER EXCLUDES CUSTOM KNIVES AND OTHER PROMOTIONS<br />
800.258.1380 • www.williamsnhussey.com<br />
CLASSIC DESIGNS<br />
by MATTHEW BURAK<br />
SOLUTIONS FOR THE PROFESSIONAL WOODWORKER<br />
Table Legs, Columns, Cabinet Feet<br />
Windsor Chair Kits & Parts<br />
Wolfgang’s Wood<br />
Specialty Native Woods<br />
Furniture Making Classes<br />
336 Baptist Road<br />
Canterbury, NH<br />
603-783-9700<br />
Strafford, NH<br />
603-664-7691<br />
10% Off to GNHW Members<br />
Come into the woods...<br />
10% annual discount for GNHW<br />
Enjoy a mini<br />
apprenticeship<br />
with some <strong>of</strong><br />
America’s best<br />
woodworkers!<br />
www.experiencewoodworking.com<br />
PHONE: 603-659-2345<br />
TOLL FREE: 1-888-659-2345<br />
52 BALD HILL ROAD<br />
NEWMARKET, NH 03857<br />
HOMESTEAD<br />
WOODWORKING SCHOOL<br />
Alan S. Mitchell<br />
Director<br />
10% Discount to<br />
GNHW Members<br />
1.800.843.7405<br />
www.tablelegs.com<br />
10% Discount to GNHW Members<br />
Email: woodschool@comcast.net<br />
Web: www.woodschoolnh.com<br />
We Care!<br />
www.ghevarts.com<br />
TEL (603) 763-4525<br />
10% Discount<br />
to <strong>Guild</strong> Members<br />
Non-Sale Lumber Items Only<br />
GH Evarts & Co., Inc.<br />
Kiln Dried Hardwood Lumber<br />
From Our Sawmill Near Lebanon, NH<br />
Route 4A • West Springfield, NH<br />
<strong>The</strong> <strong>Guild</strong> <strong>of</strong> <strong>New</strong> <strong>Hampshire</strong> <strong>Woodworkers</strong><br />
39
“Wo r k i n g EfficiEntly a n d ac c u r a t E l y ”<br />
Those who attended <strong>The</strong> <strong>Guild</strong>’s Annual<br />
Meeting were privileged to see a lecture<br />
and demonstration given by a very<br />
prolific and well regarded member <strong>of</strong> the<br />
woodworking community. Garrett Hack,<br />
whose credentials are too many to be listed,<br />
may be best known by his furniture and<br />
articles which are <strong>of</strong>ten published in Fine<br />
Woodworking. He divides his pr<strong>of</strong>essional<br />
life as an author, teacher and woodworker.<br />
On that afternoon he gave a talk on the<br />
importance <strong>of</strong> working efficiently and<br />
accurately in the shop, an ability that helps<br />
allow time for his other ventures.<br />
Garrett began his talk by warning about<br />
the high cost <strong>of</strong> mental mistakes. Errors that<br />
create extra shop time, wasted materials,<br />
and/or an inferior final product can generally<br />
be avoided. He emphasized the importance<br />
<strong>of</strong> careful planning, and taking steps that<br />
might initially seem to extend the length <strong>of</strong><br />
the process.<br />
Develop a Full-sized Drawing: Craft or<br />
even butcher paper were recommended as<br />
options for sheets large enough to handle the<br />
task. A top, front and side view will help you<br />
visualize the project and carefully consider<br />
the proportion and grain direction <strong>of</strong> its<br />
parts. Garrett also makes detailed drawings<br />
<strong>of</strong> the joinery, and uses this phase to create<br />
curves and dimensions he can refer to and<br />
work from throughout the building process.<br />
While in the design and drawing phase,<br />
Garrett will also make critical design decisions<br />
that affect the time and effort that will be put<br />
into the piece. He gave the example <strong>of</strong> using<br />
a “country cock bead” on the top and bottom<br />
<strong>of</strong> a drawer rather that extending it up and<br />
down the sides where the end grain can be<br />
difficult to deal with.<br />
As he talked about designing a piece <strong>of</strong><br />
furniture, I could relate it to a poet working<br />
until each word has been individually chosen.<br />
Though he did admit that he is open to the<br />
design evolving later in the process, it is clear<br />
that he is very thorough and meticulous as<br />
he goes through the revisions.<br />
Create a Pattern: Although I have made<br />
this into a separate step, it is more <strong>of</strong> a natural<br />
progression when Garrett talks about it. I can<br />
imagine him drawing with pencil and paper<br />
then jumping up to quickly shape something<br />
out <strong>of</strong> a wood scrap to help him visualize.<br />
He talked about the usefulness <strong>of</strong> wooden<br />
patterns for finalizing the design. He then<br />
focused on their purpose in shaping the<br />
parts <strong>of</strong> the project. Garrett uses the patterns<br />
to lay out tapers, joinery, curves and other<br />
aspects <strong>of</strong> a piece.<br />
He demonstrated the usefulness <strong>of</strong> a 1/4˝<br />
template <strong>of</strong> a tapered leg. He first used it to<br />
visually decide if he would like to splay the<br />
legs. He then set it on rough stock to choose<br />
grain direction. Afterwards, he used it as a<br />
tapering jig to pass the stock through the<br />
band saw. Finally, he used it as a story pole to<br />
layout the joinery.<br />
Work Efficiently and Accurately in the<br />
Shop: Beginning where most projects<br />
do, Garrett talked about surfacing stock,<br />
developing a marking system that labels<br />
grain direction, reference faces for joinery,<br />
and orientation <strong>of</strong> the parts. Specifically, he<br />
talked about orientating the pattern on the<br />
photos by Jim Seroskie<br />
stock to choose the grain direction <strong>of</strong> your<br />
piece rather than simply jointing an edge<br />
and working <strong>of</strong>f it. He also addressed the<br />
luxury <strong>of</strong> having extra parts.<br />
From the machines, Garrett moves on to<br />
do much <strong>of</strong> his work with hand tools. And no<br />
one attending thought Garrett would make<br />
it through a presentation without talking<br />
about the importance <strong>of</strong> hand planes. He<br />
demonstrated the accuracy and efficiency<br />
<strong>of</strong> edge jointing, surfacing, and shaping<br />
with hand planes, all together eliminating<br />
the step <strong>of</strong> sanding while creating an<br />
unmatched surface.<br />
Throughout the talk he emphasized<br />
knowing what is <strong>of</strong> critical importance,<br />
and not getting carried away with some<br />
trivial aspect being perfect. As an example<br />
he asked , “Who has ever noticed that the<br />
underside <strong>of</strong> a table apron was slightly<br />
out <strong>of</strong> square?” His point being that, in<br />
woodworking, “square” and “flat” <strong>of</strong>ten only<br />
need to be visually acceptable.<br />
In fact, as he performed many specific<br />
demonstrations <strong>of</strong> working efficiently and<br />
accurately, it seemed clear he was also<br />
hinting toward a woodworking mind-set<br />
or consciousness that would have to be<br />
adopted in order to cover the expansive<br />
topic <strong>of</strong> his lecture. It is what I enjoyed most<br />
about the talk. I walked away feeling I could<br />
better understand how Garrett approaches<br />
his work. – Caleb Dietrich<br />
Garrett Hack